1
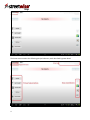
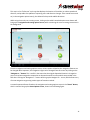
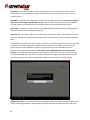
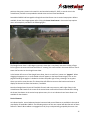
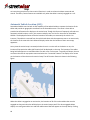
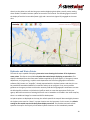
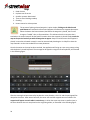
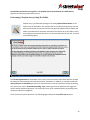
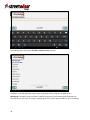
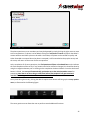
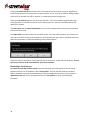
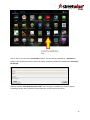
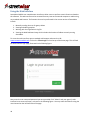
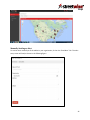
Table of Contents Tablet System Settings .................................................................................................................................. 3 Starting StreetWise CADlink ......................................................................................................................... 3 Home Screen ................................................................................................................................................. 3 Server Connectivity ....................................................................................................................................... 6 Home Screen Options Menu ......................................................................................................................... 7 Receiving and Reviewing Alerts .................................................................................................................... 7 Engaging and Disengaging on Alerts ............................................................................................................. 9 Navigation and Routing................................................................................................................................. 9 Interactive Tactical Map ............................................................................................................................. 14 Automatic Vehicle Location (AVL)............................................................................................................... 18 Hydrants and Water Points ......................................................................................................................... 19 Group Messaging ........................................................................................................................................ 22 “Sticky” Hazard Waypoints ......................................................................................................................... 23 Tactical Hazard Waypoints.......................................................................................................................... 26 Tactical Information Waypoints .................................................................................................................. 28 Status Timestamp Recording ...................................................................................................................... 31 Preplan Surveys and Survey Management ................................................................................................. 32 Performing A Preplan Survey Using The Tablet ...................................................................................... 33 Restarting A Saved Survey ...................................................................................................................... 36 Preplan Retrieval ..................................................................................................................................... 39 Photo Sharing .............................................................................................................................................. 41 Using the Web Interface ............................................................................................................................. 44 Manually Sending an Alert ...................................................................................................................... 45 Editing Preplans ...................................................................................................................................... 46 Adding Attachments to the Preplans ...................................................................................................... 47 Working With The Organization Log ....................................................................................................... 48 Troubleshooting .......................................................................................................................................... 51 1 StreetWise CADlink Response Information Software by Hangar 14 Solutions, LLC 2 Tablet System Settings After installing StreetWise CADlink, the settings of the tablet should be adjusted for maximum efficiency and effectiveness of this software. It may be necessary, when installing other software to the device, to periodically verify that the settings have remained properly set. Because the process of changing settings varies from device to device, as well with different versions of the Android operating system, only the general description of the setting is supplied here. For details on changing system settings for your particular device, refer to the device operating manual or supplier. Note that some of these system settings will reduce battery life, but will achieve maximum efficiency of the software. It is recommended, of course, that power be supplied to the device whenever it is not in a mobile condition out of the vehicle. The wireless connectivity used by this device should be set for maximum availability. This may require access to the advanced wireless settings, changing the setting to have device maintain connectivity even when in sleep mode. For cellular broadband devices, data must be enabled over the mobile networks In the location settings, the device should be set to use wireless networks and GPS satellites for maximum location efficiency. The camera settings should be set to default to a modest resolution; normal quality and 1 megapixel or less are desirable settings. Starting StreetWise CADlink To start the software, click the StreetWise icon on the tablet screen or in the tablet’s application menu. The software will take only a few moments to start up, validate internal licensing, and then contact the StreetWise servers. During the following 20 or 30 seconds, the tablet will download any “Sticky Hazard” waypoints and hydrant location information from the server. Once this completes, all features should be functional. If mapping features are activated prior to completion of the download of waypoint or hydrant information, display of these features may be delayed or unavailable. In the unlikely event that the software prompts for a StreetWise or Sygic Navigation license activation, this may be an indication that the tablet’s software licensing files have become corrupted. Contact your agency’s system administrator for assistance. Home Screen The figure below shows the StreetWise CADlink home screen when the software is in contact with the server and no alerts have been pushed to the device by the server. 3 The home screen contains the following principal elements, each described in greater detail. 4 The primary feature buttons activate the main features of StreetWise, which are detailed in their own sections of this manual. The engagement status indicates whether this tablet is currently engaged on an active alert or call. If the tablet is engaged, the StreetWise alert identification number will be displayed here to verify which alert the tablet has engaged on. Just above the engagement status, to the right of the StreetWise logo, is the small navigation toggle button. When the navigation and routing feature has been activated, this button is used to toggle between the navigation services and the StreetWise home screen. This is described in greater detail in the Navigation and Routing section of this manual. The server log is a small scrolling text box that continually updates the most recent significant activities between this tablet and the StreetWise servers. Information here may be useful in reviewing what the tablet is doing or in troubleshooting any software difficulties. The small status icons/buttons indicate the state of certain software preferences and the availability of certain features. Each of these is described in the following paragraphs: This icon indicates the status of this tablet’s preference setting (see “Home Screen Options” menu) relative to the audible alert notification sound. If the option is set to “Insistent On”, this icon will be active and bold. If the option is set to “Insistent Off”, the icon will be greyed out. This icon indicates the availability of pre-incident plan information (see “Pre-Incident Plans Feature”. If pre-incident plan data is available, the icon will be active and bold. If no pre-incident plan data is available, the icon will be greyed out. When the icon is not greyed out, clicking on it will bring up a list of available pre-incident plans. This icon indicates the preplan wizard. Selecting this icon will start the preplan wizarrd, allowing you to create a preplan from scratch using 109 pre determined questions. Once completed this survey will upload and be avalible on every device in your department. (See Preforming A Preplan Survey Usint the Tablet Page 33) This icon indicates the availability of photos that have been shared by units engaged on the same alert as this tablet (see “Photo Share Feature”). If photos have been shared for this incident, the icon will be active and bold. If no photos have been shared, the icon will be greyed out. In addition, this icon acts as an activation button to retrieve the thumbnail list of available shared photos for this engaged alert. When the icon is not greyed out, clicking on it will access the shared photos. 5 Server Connectivity In the event the tablet loses network connectivity due to loss of broadband service or other networking malfunction, the background screen of StreetWise CADlink will turn yellow, as indicated in the figure below. Any such out-of-network condition may be temporary, such as when driving through a tunnel, and will typically self –correct within a few seconds. Any alerts or other communications destined for this tablet will be held by the server until connection is restored and will then push to the tablet automatically, in the sequence received. Should the condition fail to correct, follow these procedures: 1. Verify that all networking and broadband settings on the tablet are active and the tablet is not in “airplane mode” 2. Check your connectivity using another application, such as the Browser or YouTube, in order to determine whether the device’s network connectivity is functioning. If not, technical support from the device manufacturer or broadband carrier may be necessary. 3. If all other networking is functional and the problem is limited to StreetWise, contact your agency system administrator or StreetWise technical support. 6 Home Screen Options Menu While on the home screen of StreetWise CADlink, clicking the tablets normal application options menu button will bring up the StreetWise home screen options, as shown in the following figure. The function of each option is described below. Shut Down: This button is used to completely shut down the StreetWise application. Set Insistent ON or OFF: This button is a toggle button, which switches the software’s audible notification for new alerts to either a single sound or a continuous, repeating sound. If set to “Insistent ON”, the audible alert will sound continuously until the alert screen is acknowledged by a tap in the alert text area of the home screen. A home screen icon indicates the status of the setting. Delete Current: This button will cause the tablet to delete only the alert that is active on the home screen and showing in the alert text area. Delete All: This button will cause the tablet to delete any alerts that are present on the tablet. Re-send Recent: This button will cause the server to send any alerts it has received in the last two hours back to the tablet. This action will not affect other tablets and only this tablet will receive the re-sent alerts. This button is important to be aware of, since a user might inadvertently delete an alert that he or she needs to engage on. Likewise, a user might accidentally close Streetwise or a hardware conflict or memory issue may, on rare occasions, cause a tablet to “force close” the StreetWise application. When this occurs, all alerts on the tablet are automatically deleted. The “Re-send Recent” button can be used to retrieve any recent alerts. Receiving and Reviewing Alerts When the StreetWise servers receive a call from a client’s dispatch center, the server determines the appropriate tablets to notify and sends the alert information to them. In additional to the audible alert notification (see “Set Insistent ON or OFF”), the home screen of StreetWise will turn red to indicate that a new active alert has been received, as shown in the following figure. 7 Tapping the screen anywhere in the alert text area will acknowledge the alert, thus silencing any insistent audible notification and will return the screen to white. The basic alert information, as received from the dispatch center, will appear in the center of the screen. In addition, the StreetWise server automatically assigns an alert identification number, which appears in the top center of the screen. This number is not related to your agency’s CAD number or NFIRS incident number. Instead, this number is used by StreetWise to identify this incident and its sequencing in all alerts coming into the StreetWise server center from all agencies. If multiple alerts are received without being deleted, the alerts “stack” in the order they were received, from left to right, on the home screen. You can see how many alerts are on the tablet by looking at the alert scroll buttons near the top of the home screen, shown in the following figure. Button scrolling through alerts: The button on the left indicates the number of alerts that were received by the tablet prior to the current alert being viewed in the main alert text area. The button on the right indicates the number of alerts that were received by the tablet after the current alert being viewed in the main alert text area. Pressing either of these buttons will scroll through the alerts either forward or backward sequentially, with the numbers updating accordingly. 8 Finger scrolling through alerts: You can also scroll through multiple alerts, either forward or backward in sequence, by dragging a finger across the alert text area of the home screen. Drag left to right to move backward in time, and right to left to move forward in time. Engaging and Disengaging on Alerts When an active alert is on the home screen with the information displayed in the alert text area, pressing on the Engage Button will send a request to the StreetWise server to engage your tablet on that particular alert. The server will acknowledge this request and will then dynamically group the tablet with any other tablets that have engaged on this alert, allowing these tablets to tactically interface with each other through StreetWise tactical features. The process of engaging on the alert may take several seconds after the engage button has been activated. Once the tablet has been engaged on the alert, the engagement status on the home screen will indicate that the tablet is engaged and will provide the alert number to which the tablet is assigned. This is important because it is still possible to scroll to other alerts on the home screen while engaged on an alert. The display of the alert number in the engagement status can be referred to by the user to confirm which alert the tablet has been engaged on. When the tablet is engaged on an incident, the engage button will now toggle to become the disengage button. The disengage button can be pressed at any time to disengage the tablet from the alert. Again, the process of disengagement must be confirmed by the server and may take several seconds. When a tablet is engaged or disengaged from an alert, the status timestamp for that action is automatically logged in the agency log file and can be retrieved later from the web interface. See the Agency Log section of this manual for more information. Navigation and Routing When an active alert is on the home screen with the information displayed in the alert text area, pressing on the Nav to Alert Button will activate the navigation and routing feature and the location of the incident will automatically be entered in as the navigation target. The Nav to Alert Button will also toggle to become a Nav Cancel Button. The tablet will switch screens to the navigation feature and, within a few seconds, a navigation route will be calculated and will appear on the screen, as shown in the following figure. 9 The initial view of the navigation and routing feature is an overview map of the entire route. This also displays the distance to the location, the estimated time of arrival and the time remaining (calculated at legal speed limits). After several seconds, this screen will switch to the turn-by-turn routing feature screen. Clicking on the “Done” button will also switch to the routing screen. The Turn-By-Turn Routing Feature screen is shown in the following figure. 10 This map is a live “follow me” style map that displays the location of the tablet, its relative speed and direction, and provides live updates of upcoming turns and direction changes. If the sounds are turned on (in the navigation options menu), the tablet will also provide audible directions. While using the turn-by-turn routing screen, clicking on the tablet’s standard option menu button will bring up the navigation and routing options screen, while continuing the current routing instructions in the background. From the navigation and routing options screen, various options related to the navigation features can be changed. Most important, the navigation target can be changed from this screen by clicking on the “Navigate to…” Button. This is useful in the event that the original dispatched location is changed or your unit has been assigned to respond to an alternate location from that which was provided in the CAD alert. Clicking the “Navigate to…” button will bring up the Navigate To… screen, which allows entry of a new navigation target using various types of location methods. A second important feature found on the navigation and routing options screen is the “Route” Button, which is used to bring up the Route Options screen, shown in the following figure. 11 This Route Options screen allows the user to view the route in various formats. “Show on Map” displays the overall route from start to finish, “Show Route Instructions” displays a list of route directions, and “Show Route As Images” displays the route as a scrollable collection of static images. An important feature of the Route Options screen is the Alternative Route feature. Clicking the “Alternative Route” Button will present the user with various options for altering the existing route to the navigation target, as shown in the following figure. 12 “Compute Alternative” will ask the navigation system to self-calculate the next fastest route to the location. “Avoid Next” will present the user with the option of telling the navigation router to avoid a portion of the upcoming route, and can be specified for 500 yards, 1 mile, 5 miles, 10 miles, 15 miles, or 20 miles. The router will then self-calculate a new route that does not utilize the designated section of the original route. “Travel via…” allows the user to specify that the router calculate a route that uses a specific location, address or point on the map, as specified by the user in this menu. It is important to note that whenever the navigation and routing feature is being used on the device, the software can be toggled back and forth between the StreetWise home screen and the navigation screens WITHOUT deactivating any navigation that is underway to a designated navigation target. To toggle back and forth, click the small navigation toggle button located in the upper left-hand portion of the screen next to the StreetWise logo, shown in the following detailed figure. On the navigation screens, this toggle button reads “Alert” to indicate that clicking it will move to the StreetWise home alert screen. On the home alert screen, the button reads “Nav” to indicate that clicking it will move the navigation and routing screens. To end navigation to a target, return StreetWise to the home alert screen using the navigation toggle button, then click on the Nav Cancel Button. Once initiated, the navigation and routing to a target will continue until canceled. Even if the alert is deleted from StreetWise, navigation to that alert will continue until canceled. Navigation must be canceled by manual order of the user. In rare circumstance, a software failure or force close may result in a situation where navigation continues despite the StreetWise application being closed. To force cancel navigation, follow these procedures” 1. 2. 3. 4. reopen the StreetWise application use the home screen options to re-send recent alerts select any alert and click the Nav to Alert Button toggle back to the alert screen and then click the Nav Cancel Button 13 Interactive Tactical Map Most of the critical activities related to advance situational awareness will take place on StreetWise CADlink’s tactical map. This is also where the tactical feature activation buttons are located. When an active alert is on the home screen with the information displayed in the alert text area, pressing on the Tactical Map Button will open the tactical map page and the map will automatically center on the location of the incident, which will be designated by a star marker icon. The type of initial map display, street map or satellite map, will depend on the preference that was set in the home screen options menu. The following figure illustrates the features of the initial tactical map display of an incident in street map view. The tactical feature buttons are located in the upper portion of the screen. If the tablet is not currently engage in an alert, some of the tactical features will be unavailable and their icons will be greyed out. The tablet status information is provided in the upper right corner of the screen. The map is finger interactive. Sliding a finger on the screen from left to right or up and down will move the map in the same direction. The map also uses what is known as a “pinch-zoom” interface. Placing the thumb and forefinger on the screen simultaneously and squeezing them together will result in the map zooming out. Spreading the thumb and forefinger apart will result in the map zooming in. Most icons appearing on the map are interactive as well. For instance, clicking a finger on the incident’s star marker icon will cause a text box to appear that contains the incident alert text received from the CAD system. To make any text box disappear, click anywhere on the map outside of the text box. 14 As indicated earlier, the initial tactical view will appear in either street map view or satellite view, based on the preference settings. A different view can be selected at any time the tactical map is active by using the device option menu button. The following figure illustrates the initial tactical map display in satellite map view. In either tactical map view, the tactical map options menu can be activated by using the device’s options menu button. The options menu appears, as illustrated in the following figure. The tactical map options include the following selections: Delete Point- this button is used to delete waypoints and will be explained in the section of this user manual on Waypoints. Locate Me- this button will quickly center the map on the map location of this tablet, based on the GPS coordinates of the tablet. The tablet’s icon will be shown on the map. 15 Locate Alert - this button will quickly center the map back on the incident location marker. This is a useful tool when you have been moving the map around and need to quickly return the map to the incident location. Map Mode – this direct menu allows you to select from four different map views, Streets Only (default map), Streets and Satellite, Satellite Only, Terrain. Once you have selected, you may switch between the other features of StreetWise and the map will hold the view and last position of the map. Street View - this button is used to switch to the Google Street View feature, which will be explained in the section of this manual on Google Street View. Hydrant View - this button is a direct menu that allows you to set the radius in which hydrants or water points are displayed. This will be further explained in the section of this manual on Hydrants and Water Points. The StreetWise server uses a customized parser to extract the incident location out of the alert message it receives from a client’s CAD system. Occasionally, the location of an incident as sent by the CAD system does not contain adequate or specific enough information for the StreetWise server to determine the location of the incident. If the server cannot reliably determine the location of the incident, the automatic location feature of the map will not function. In such a case, the tactical map can still be displayed, but it will center to a default location in the agency’s jurisdiction and a text box will indicate the alert could not be mapped. This condition is illustrated in the following figure. Google Street View is an interactive photo feature produced and maintained by Google. Google Street View is a technology featured in Google Maps and Google Earth that provides panoramic views from 16 positions along many streets in the world. It was launched on May 25, 2007, in several cities in the United States, and has since expanded to include cities and rural areas worldwide. StreetWise CADlink had leveraged the Google Street View feature into its tactical map options. Where available, Street View images appear after clicking the Street View button in the tactical map options menu. An example is provided in the following figure. The Google Street View is a 360 degree panoramic view that is completely interactive. Sliding a finger left or right on the screen will have the effect of “rotating” the camera view in the same direction. Pinchzoom also functions on the Google Street View. In the bottom left corner of the Google Street View, there is a small icon, known as a “pegman”. When dragging the pegman icon, a small shaded circle will appear on the Street View imagery. Click on the pegman and drag the pegman’s shaded circle down the public right of way, releasing it at any point where you wish to reset the view. The Street View will effective move to that location and reset to display the Street View from that location, if available. Note that Google Street View is NOT available for each and every street or public right of way in the United States and Canada. If the screen of the tactical view remains black several seconds after clicking the Street View button in the tactical map options menu, this is an indication that a Street View is not available for that location. Tactical Features As indicated earlier, several advanced tactical command and control features are available in the tactical map display of StreetWise CADlink. The following sections of this user manual will describe each of these features in detail. When tablets are engaged on a call, they are dynamically grouped by the server into 17 an interactive group that can share tactical functions in order to enhance incident command and control. Therefore, certain features are available only when the tablet is actively engaged on a call. Automatic Vehicle Location (AVL) StreetWise CADlink uses the built-in GPS capability of the Android tablet to capture the location of the tablet and provide its geographic coordinates to the StreetWise server. The server is then able to provide that information for display on the tactical map. Though this feature is frequently referred to as automatic vehicle location, or AVL, this common industry term is a bit of a misnomer for StreetWise CADlink. The displayed location will be the location of the tablet, not necessarily the vehicle. For instance, if the tablet is removed from the vehicle and taken with the apparatus crew on an area search, the location of the crew with their tablet will display rather than the location of their now-empty apparatus. At any time the tactical map is accessed, whether there is an active call on the device or not, the location of that particular tablet (self-location) will be displayed on the map. The location of the tablet being held will appear as a small blue tablet icon with a star in the center. To quickly self-locate, the user can access the tactical map options menu and select the “Locate Me” button. The display will re-center on the location of that device on the tactical map. The self-location feature is shown in the following figure. When the tablet is engaged on an active alert, the locations of all of the other tablets that are also engaged on that particular alert will display on the tactical map as well. The other engaged tablets display as a small green tablet icon and their tablet name label will appear on the map nearby. Clicking 18 directly on the tablet icon will also bring up a text box displaying their tablet name for easier reading, when needed. The tablet locations update at intervals of five seconds. The following figure illustrates the display of both the home tablet (lower right) and a second unit (upper left) engaged on the same alert. Hydrants and Water Points The tactical map is capable of displaying interactive icons showing the locations of fire hydrants or water points. This feature is available only when the tactical map is displaying an active alert. This display is developed from the information and data supplied by the client agency. If the agency’s water department, city engineering, or public works department has a file from geographic information software (GIS), known as a “shapefile”, already prepared with the hydrant locations and data, this can be provided to StreetWise CADlink for conversion and use in our program. If not, we can provide guidance to the agency on how to collect the necessary field data and geographic coordinates to create the GIS shapefile, and then our GIS technical staff can work to create the appropriate file for your agency. While the conversion of existing GIS files for use in StreetWise is included in the initial setup fee, there is an additional charge for customized GIS file development. As hydrant points are displayed on the map, the refresh speed of the map will decrease slightly because the hydrant points must be “drawn” in proper location over the base map. For this reason, the default setting for the tactical map is with the hydrant display turned off. This provides maximum refresh speed to the map for the majority of calls where hydrant locations are not immediately needed. 19 To activate the display of hydrants, click on the device’s options menu while displaying any view of the tactical map. Click on the button labeled “Hydrant View”. This will cause the tactical map to display a table with options on how you would like to view the hydrants. The table offers the view selections illustrated in the image below: The distances are references to radius around the incident location as it was mapped from the CAD alert. The exception is the 1,000 ft Radius of My Position option, which displays hydrants in a 1,000 foot radius of your AVL location and will change as you move. Hydrant display is illustrated in the following figure. 20 Once the hydrant locations are mapped on the tablet, they become interactive. StreetWise is capable of displaying up to four fields of information for each hydrant or water point. The data in these fields is determined and supplied by your agency at the time of the setup. Your agency can also determine the order in which the information is to display. Clicking directly on any hydrant or water point icon brings up the data stored for that location in a text box, as illustrated in the following figure. 21 In the example above, this department chose to display the results of the latest flow test performed on the hydrant, followed by the date of that test, the size of the hydrant valve and its actual street address. Hydrant information is not field editable. Updates or changes need to be made through the originating agency that provided the data files at the time of setup. Revised hydrant data files can be provided to StreetWise technical support for conversion and replacement in the StreetWise server. Group Messaging The tablet can be used to send a broadcast text message to other tablets that are engaged on the same call. The Group Message Button is located in the row of tactical feature buttons at the top of the tactical map screen. It is only active when this tablet is engaged on an alert. Clicking on the Group Messaging Button will bring up a text entry prompt, along with the device’s virtual keyboard. The message can be typed in using the virtual keyboard, as illustrated in the following figure. As an alternative, Android tablet devices typically are equipped with speech-to-text capability. Depending upon the type of hardware, the user may be able to activate this feature from the keyboard and dictate the message directly into the device without typing. For specific information on the availability and use of this feature, refer to the user manual for your tablet device or contact the manufacturer or service provider. 22 After the message has been entered by keyboard or voice dictation, click O.K. and the message will be relayed to the server. After several seconds, the server will send the message out to all tablets that are engaged on the same call. The alert text will automatically appear over the tactical map view of the engaged tablets, as shown in the following figure. Clicking OK will clear the text box off of the tactical map view. If an engaged tablet is not currently using the tactical map view (for instance, checking the navigation or routing), the group message will be held by the server and will display on the device as soon as the user returns to any tactical map view. When a tablet sends a group message, a timestamp for that action is automatically logged in the agency log file and can be retrieved later from the web interface. See the Agency Log section of this manual for more information. “Sticky” Hazard Waypoints This tactical map feature is available whether the tablet is engaged on an active alert or not. Hazard waypoints, also known as “sticky waypoints”, are used to identify a particular hazard or warning condition that is not necessarily related to any specific incident. This feature is used to drop a waypoint onto the map that will appear in the exact location where it was placed and will be visible to all tablets in the agency at any time they are using the tactical map in either street map or satellite view. Some examples of “sticky waypoint” uses are: 23 1. 2. 3. 4. 5. 6. Road closures Hydrants out of service Sprinkler systems deactivated Trees or wires blocking roadway Flooding Known mental or violent patient The process of placing a hazard waypoint is quite simple. Clicking on the blue hazard point button will activate the feature and prepare the software for waypoint placement. When the button has been activated, but before the waypoint is placed, the icon will change to “loaded” color, as illustrated here. This indicates that the next spot that is touched on the tactical map will be the specific location where the waypoint is placed. Simply touch the map at the precise location you wish the waypoint to appear. Keep in mind that once the waypoint is placed, it cannot be relocated. Instead, it must be removed and placed again. It is helpful to have the map zoomed in to the view needed for accurate placement. Once the location on the map has been touched, the application will bring up a text entry prompt, along with the device’s virtual keyboard. The message can be typed in using the virtual keyboard, as illustrated in the following figure. After the message has been entered by keyboard or voice dictation, click O.K. and the message will be relayed to the server. After several seconds, the server will send the waypoint out to all tablets. The waypoint will appear on each tablet’s tactical map, in either the street map view or satellite view, in the exact location where it was placed on the originating tablet, as illustrated in the following figure. 24 The waypoint icons are interactive. Clicking on any waypoint icon on the map will cause a text box to appear containing the hazard text that was entered by the originating tablet, along with the date and time the waypoint was created and by whom. This is illustrated in the following figure. The process of deleting a waypoint is an equally simple two-step process. First, click the button for “Delete Point” on the tactical map options menu. After clicking that button, touch the screen precisely on the waypoint that is to be removed. A warning prompt will appear to ensure the action is intended. Once acknowledged, the waypoint will be removed from this tablet and all other tablets. Note that waypoint deletion is permission protected. Depending on your agency’s system permission settings, you may not be able to remove waypoints that were not placed by your tablet. 25 When a tablet drops a “sticky waypoint”, a timestamp for that action is automatically logged in the agency log file and can be retrieved later from the web interface. See the Agency Log section of this manual for more information. Tactical Hazard Waypoints This tactical map feature is available only when the tablet is engaged on an active alert. Tactical hazard waypoints are used to identify a hazard or warning conditions that are related to the specific incident on which the tablet is engaged. This feature is used to drop a waypoint onto the map that will appear in the exact location where it was placed and will be visible to all other tablets that are engaged on the same alert. Tactical hazard waypoints are visible in either street map or satellite view. Some examples of tactical hazard waypoint uses are: 1. 2. 3. 4. 5. Chemical spills Fire location and possible spread Exposure identification Wires down Possible assailant location The process of placing a tactical hazard waypoint is similar to the “sticky waypoint”. Clicking on the yellow tactical hazard point button will activate the feature and prepare the software for waypoint placement. When the button has been activated, but before the waypoint is placed, the icon will change to “loaded” color, as illustrated here. This indicates that the next spot that is touched on the tactical map will be the specific location where the waypoint is placed. Simply touch the map at the precise location you wish the waypoint to appear. Keep in mind that once the waypoint is placed, it cannot be relocated. Instead, it must be removed and placed again. It is helpful to have the map zoomed in to the view needed for accurate placement. Once the location on the map has been touched, the application will bring up a text entry prompt, along with the device’s virtual keyboard. After the message has been entered by keyboard or voice dictation, click O.K. and the message will be relayed to the server. After several seconds, the server will send the waypoint out to all other engaged tablets. The waypoint will appear on each tablet’s tactical map, in either the street map view or satellite view, in the exact location where it was placed on the originating tablet, as illustrated in the following example, where the hazard waypoint has been placed in a lot used for school bus parking to identify a hazardous spill area.. 26 Again, the waypoint icons are interactive. Clicking on the waypoint icon on the map will cause a text box to appear containing the hazard text that was entered by the originating tablet, along with the date and time the waypoint was created and by whom. This is illustrated in the following figure. The process of deleting a waypoint is the same. First, click the button for “Delete Point” on the tactical map options menu. After clicking that button, touch the screen precisely on the waypoint that is to be 27 removed. A warning prompt will appear to ensure the action is intended. Once acknowledged, the waypoint will be removed from this tablet and all other tablets. Note that waypoint deletion is permission protected. Depending on your agency’s system permission settings, you may not be able to remove waypoints that were not placed by your tablet. When a tablet drops a tactical hazard waypoint, a timestamp for that action is automatically logged in the agency log file and can be retrieved later from the web interface. See the Agency Log section of this manual for more information. Tactical Information Waypoints This tactical map feature is available only when the tablet is engaged on an active alert. Tactical information waypoints are used to identify geographic points that are related to the specific incident on which the tablet is engaged. What differentiates these waypoints from the others is that they are programmed with a self-numbering icon. As each information waypoint is dropped onto the map, the number in the center of its icon will sequentially increase by one digit from the previous information waypoint. This allows the waypoints to be easily referred to in radio transmissions or group messages sent on the tablets. Once again, these waypoints will be visible to all other tablets that are engaged on the same alert. Tactical information waypoints are visible in either street map or satellite view. Some examples of tactical hazard waypoint uses are: 1. 2. 3. 4. 5. 6. 7. Identification of staging areas Identification of helicopter landing zones (LZ) Identification of triage, treatment or transport staging in mass casualty Disaster damage assessment reporting Witness location identification Evidence location identification Search area completion progress The process of placing a tactical information waypoint is similar to the other waypoints. Clicking on the red numbered point button will activate the feature and prepare the software for waypoint placement. When the button has been activated, but before the waypoint is placed, the icon will change to “loaded” color, as illustrated here. This indicates that the next spot that is touched on the tactical map will be the specific location where the waypoint is placed. Simply touch the map at the precise location you wish the waypoint to appear. Keep in mind that once the waypoint is placed, it cannot be relocated. Instead, it must be removed and placed again. It is helpful to have the map zoomed in to the view needed for accurate placement. 28 Once the location on the map has been touched, the application will bring up a text entry prompt, along with the device’s virtual keyboard. After the message has been entered by keyboard or voice dictation, click O.K. and the message will be relayed to the server. After several seconds, the server will send the waypoint out to all other engaged tablets. The waypoint will appear on each tablet’s tactical map, in either the street map view or satellite view, in the exact location where it was placed on the originating tablet, as illustrated in the following figure. Once again, these waypoint icons are interactive. Clicking on any waypoint icon on the map will cause a text box to appear containing the information text that was entered by the originating tablet, along with the date and time the waypoint was created and by whom. This is illustrated in the following figure. 29 When multiple information waypoints are dropped for the same incident, the icons will number sequentially. The following illustration shows this feature in use where a fire company has been requested to perform damage assessment in a specific neighborhood area. The company has placed information waypoints on each structure as they move from house to house. The assessment is being monitored by the command post in real time and damage conditions can be retrieved for each structure by simply clicking on the desired waypoint. 30 The process of deleting a tactical information waypoint is the same as the removal of all other waypoints. First, click the button for “Delete Point” on the tactical map options menu. After clicking that button, touch the screen precisely on the waypoint that is to be removed. A warning prompt will appear to ensure the action is intended. Once acknowledged, the waypoint will be removed from this tablet and all other tablets. Note that waypoint deletion is permission protected. Depending on your agency’s system permission settings, you may not be able to remove waypoints that were not placed by your tablet. When a tablet drops a tactical information waypoint, a timestamp for that action is automatically logged in the agency log file and can be retrieved later from the web interface. See the Agency Log section of this manual for more information. Status Timestamp Recording As has already been described in this user manual, many actions conducted by a tablet that is engaged in a call are automatically logged with a timestamp in the agency log file. In addition to the automatic timestamps, the tablet has the ability to transmit manually triggered status timestamps that are recorded in the agency log file. These tablet-specific timestamps can then be retrieved later using the web interface (see the Agency Log section of this manual) when preparing the incident report or for other agency records and investigation files. To send a status timestamp to be logged on the server, click on the timestamp button in the tactical feature bar at the top of any tactical map view. A drop down list of available status conditions is displayed, as shown in the following figure. 31 Select the status condition that you wish to record a timestamp for and the textbox will clear from the screen. The timestamp request will be sent to the server for recording in the agency log. Note that the status condition will not be transmitted back to your agency’s computer aided dispatch system (CAD) for automatic radio-free status tracking unless that option has been purchased by your agency and installed by your CAD vendor. Preplan Surveys and Survey Management StreetWise CADlink is capable of managing your agency’s pre-incident planning program. The basic components of a preplan program are: 1. 2. 3. 4. Obtaining the preplan data in the field Storing the preplan data in a secure setting Distributing the preplan data to response apparatus Retrieval of the preplan data during a response StreetWise CADlink has the capability to manage each of these components with minimal effort by the agency. Preplan data is collected by personnel in the field using the tablet computer and then effortlessly transmitted back to the main StreetWise servers, where it is stored in a high security system. The information is available to each tablet as a synchronized and continuously updated preplan list, making distribution to all response units automatic. At any time, a tablet user can request the preplan data for a specific facility and it is quickly transmitted to the tablet where it can be viewed. Storage and 32 transmission processes are encrypted and no preplan data is stored directly on a tablet device, significantly enhancing preplan data security. Performing A Preplan Survey Using The Tablet Preplan entry is performed by clicking on the main preplan feature button on the home screen of StreetWise. This activates the pre-incident planning survey and may take several seconds to load. The initial survey question (question #1) is hidden and used by the software for automatic collection of the device I.D. for the tablet, so the survey will open to question #2, which is an instructional panel for the user, as shown in the following figure. The left and right buttons at the bottom of the survey screen are used to move back and forth through the questions. Some questions will self-advance upon completion. In addition, it should be noted that many questions are mandatory and the user cannot advance to the next questions without answering. Also, the survey is of an “automatic branching” style, meaning that certain questions will trigger the need to answer additional questions. This allows the survey to be conducted quickly by avoiding many unnecessary questions altogether. There are several styles of questions. The following figure illustrates a text fill-in style question. 33 The following figure illustrates a checkbox, multiple-choice question. In addition to standard question styles, there are questions that prompt for the addition of a photograph. The tablet’s built in camera is used for this purpose. The following figure illustrates one such question. In this case, the survey is prompting the user to add a photo of side “A” of the occupancy. 34 The photo questions are not mandatory and may be bypassed by simply clicking the right arrow to move to the next question. If a photo is to be added, clicking the “add picture” button will launch the tablet’s camera software and allow a photo to be taken. Once taken, the photo can be verified for quality and either discarded or accepted. Once the photo is accepted, it will be attached to the preplan survey and the survey will return to the screen for the next question. At the completion of all survey questions, the final question will have a checkmark box used to indicate the final completion of the survey. If any answers need to be verified or changed, this should be done by using the navigation buttons prior to clicking on the completion checkmark button. Once the checkmark button is clicked, the survey will automatically synchronize up to the main StreetWise server for processing. Note that it can be as long as a half hour before that preplan is fully processed and available for viewing on either the tablets or the web interface. At any time during the survey, clicking the device’s option menu button will bring up the survey options menu, as illustrated in the following figure. The survey options menu allows the user to perform several additional functions. 35 Clicking the camera button will allow the user to add a photo to the survey at any point, regardless of whether that particular survey question is a photo question or not. This can be useful for adding a photo of the utility or sprinkler shut off, for instance, or a hazardous material storage area. Clicking the save button will save the survey, but not end it. This can be used during particularly long survey processes to save work in mid-survey as a safety measure in the event the tablet battery was deleted, for instance. The note button and the attachment button are not currently supported in the survey synchronization and should not be used. The stop button would permit the user to end the survey. This is particularly useful if, for instance, the user had to leave the occupancy to respond to a call and planned to return later to complete the survey. When the stop button is clicked, the following screen prompt appears. If the user wishes to discard the survey and start over at a later time, simply click the no button. To save the survey so that it can be continued later, press the yes button. Restarting A Saved Survey To restart a survey that has been saved, the user will need to access it directly from the surveying application that is part of StreetWise, called “SurveyToGo”. A survey that was saved to the device before completion cannot be accessed directly from the StreetWise home screen. Go to the device’s application menu and scroll to the application icon for SurveyToGo, as shown in the following illustration. 36 Click on the icon to launch the SurveyToGo interface. The user will be prompted for a password, as shown in the following illustration. Other information should be prefilled by StreetWise and should not be changed. Where prompted, enter the password as “4321” and click Login. The following screen will appear indicating that login was successful and the application is linked back to the server. 37 This screen will also indicate how many incomplete surveys have been saved on this device without synchronization to the StreetWise server. Click on the Pre-Incident Planning Survey bar to bring up a list of these surveys, as shown in the following figure. The list includes the date and time the survey was saved, allowing the user to determine which survey he/she wishes to retrieve. Tap and hold on any survey in this list to bring up the menu of choices shown in the following figure. 38 That survey can be viewed, continued or even deleted (clear) by clicking the appropriate choice. Once a survey has been completed and submitted for synchronization, it can be viewed on the device or the web interface. While the Preplan Wizard is a fast and easy way to create a new preplan from scratch, editing an existing preplan may be better performed from the preplan itself. If a tablet has been assigned permissions for preplan editing by the agency administrator, the preplans are fully editable from the tablet. Preplans may also be edited through the web interface. Additional information on this process will be found in this user manual in the section on web interface features. Preplan Retrieval Preplans that have been synchronized to the StreetWise server and processed can be retrieved and viewed on the tablet device. Clicking on the Preplan list icon on the left hand side of the StreetWise home screen will bring up a list of available preplans for your agency. Note that when there are no preplans available in the system for your agency, the icon will be greyed out. The preplan list will display differently, depending on whether or not there is an active alert on the screen. When there is an active alert on the screen, regardless of whether the tablet has engaged on that alert, the list will sort by geographic proximity to the location of the alert. The distance from the alert (in miles) will be shown next to the preplan. This will permit the user to quickly find the closest matching preplan to the location to which they are responding. In addition, the preplans of any nearby exposures will also naturally be at the top of the list. When there is no active alert on the screen, the preplans simply display as a basic list, as illustrated in the following figure, and “n/a” will appear in the distance field. The sort order can be changed to view the preplans on the list by selecting Name to order them in alphabetical order, Address to view them in order of the numerical value in the address, or Distance to view them in closest proximity to the location of the alert (this is how they default when first viewed). 39 The preplan system in StreetWise CADlink consists primarily of basic textual data collected in the field by the survey tablets, along with any photos or sketches made on the device or any attachments uploaded through the client web interface. The goal is the rapid collection, indexing and storage of basic information needed for situational awareness during the response. Preplans display in a tabbed layout that is grouped to provide you with quick access to necessary information needed quickly while responding on a call. The First Due information comes up on the first tab by default and contains critical pieces of information typically needed prior to arrival at the incident. The First Due tab is followed by 7 additional tabs of information: 40 Water Supply Construction & Features Fire Systems & Security Life Safety Building Systems & Utilities Special Hazards Attachments & Photos There will be times when the size or nature of an occupancy requires more detailed information than is provided for in the basic preplan survey instrument performed on the tablet. In some cases, the use of third-party preplanning software for creation of detailed floor plan drawings and site layouts may be desirable. If you have these types of drawings you may convert them into a JPEG to directly attach them to the preplan using the web interface. You may also change them into a PDF and attach them to the preplan using the web interface, though when selected they will open in another program, not in the preplan itself. Additional permitted attachments types of Word documents and Excel spreadsheets. Attachment uploading is described in the section of this manual on Using The Web Interface Photo Sharing The use of highly mobile tablet computers provides a wide range of opportunities to enhance mobile response software. In the case of the photo sharing feature, StreetWise CADlink leverages the capabilities of the device’s built in camera. Photos may be instantly shared among tablets that are engaged on the same call. This feature can be useful in many ways, with the following list providing some examples: 1. 2. 3. 4. Current conditions photo to provide enhanced arrival size-up to incoming units Remote access to show conditions at a distant portion of an incident Disaster damage assessments Display of hazardous conditions to other units to enhance safety 41 This feature is available only when the tablet is engaged on an active alert. To activate the feature, click on the Photo Share button on the StreetWise home screen. The device’s camera software will launch and the user can point the device and click the shutter command to capture the photo, as shown in the following figure. Note that the screen appearance may vary from what is shown here, since different devices have slightly differing layouts for their camera software. After verifying that the photo is acceptable, click the O.K. button and the photo will be uploaded to the StreetWise server, where it will be made available to all other units engaged on that same alert. This process may take up to twenty seconds. When any photos have been uploaded and shared by any unit on a call, the Photo Available icon located on the right hand side of the StreetWise home screen will go from greyed out to full color, as shown here. This will indicate the presence of a shared photo. Clicking directly on this icon when it is active will launch the photo viewing screen. This screen, which may take several seconds to load, will display a small thumbnail of any shared photos for the incident, as shown in the following figure. 42 Clicking on a thumbnail will display a larger version of the photo in the lower portion of the screen, as illustrated in the following figure. 43 Using the Web Interface StreetWise CADlink uses a web browser interface to allow a user to perform certain functions related to the software. This web interface can be accessed from any internet-connected computer or tablet using any standard web browser. The functions that can be performed in the current version of StreetWise include: 1. 2. 3. 4. Manually sending alerts to all agency tablets Viewing and editing preplans Working with the organization’s log file Viewing the Web Dashboard map, which includes the location of tablets currently running StreetWise To access the web interface, open a standard web browser and enter the URL www.streetwisecadlink.com. Click on the “Client Login” link at the top of the home page. This will load the web interface login page, illustrated in the following figure. Next, enter the user name and password you were provided. Click “Submit” and your agency’s web interface home screen will open, as shown in the following figure. You may select the features using the menu located on the left hand side of the page. 44 Manually Sending an Alert To send an alert manually to all the tablets in your organization, click on the “Send Alert” link. The alert entry screen will load, as shown in the following figure. 45 Enter a properly formatted address into the “Address” text box and enter any details or text message you wish to appear in the alert text area of the tablet application into the “Details” text box. (Please note that additional entry information may be required for departments whose tablets are activated only for calls assigned by specific unit. Contact your agency administrator for more information if required for your agency.) Click on the “Submit” button. The alert will be formatted and sent to the StreetWise server for processing. The alert will then be sent to all tablets within about ten seconds. Editing Preplans To work with the agency’s preplans, click the “Preplans” link on the left hand side. A scrollable list of all of the agency’s preplans will appear, as shown in the following figure. To open and work with any individual preplan, click the link on the right hand side under view for that preplan in the list. The preplan will load on the screen, as shown in the following figure. 46 The preplan display is scrollable. As with the tablet preplan display, the preplan is formatted in a tabbed display. The first tab of the preplan screen contains the First Due section, which is a collection of the most critical items needed during a response. This section automatically builds off of the answers to questions in the body of the survey and it not editable. The rest of the tabs lay out in the same order as the tablet display. Using the web interface, the preplan can be edited. Click directly on the text in any particular survey answer to bring up the edit form for that answer. In the following example illustration, the user clicked on the “Type” answer in this preplan. The text of this preplan entry may now be changed. After editing the text, click on “Save”. This will complete the edit process for that preplan survey question and the corrected text will now appear in the preplan, as well as on all the tablets in your department. Adding Attachments to the Preplans Certain third-party attachments can be added to the preplan from the web interface. Attachments cannot currently be added from the tablet preplan display. 47 With a preplan open in the web interface, select the Attachments & Photos Tab. Click the small upload icon located in the lower right-hand corner of the main tabs section at the top of the preplan display. A file selection window will appear, as illustrated in the next figure. Click on the “Browse” button and use the standard Windows explorer windows to navigate to the desired file. Acceptable file types are JPEG picture files, PDF files, and Microsoft Word and Excel files. Select the file and click “Open”. The filename will appear in the attachment window. Click “Save” and the file will be uploaded to the StreetWise server and attached to the preplan. The document will appear as an icon. The name of the document can be edited using the previously described edit method. Working With The Organization Log When your agency’s tablets are active and engaged on alerts, the StreetWise server logs certain processes and records any status timestamps that are submitted by the tablets (see section on Status Timestamp Feature). This effectively creates a running log of the activities associated with each incident 48 to which an agency responds, so long as the responding units are equipped with tablets and use their “Engage Button” to engage and disengage on the calls. To work with the organization log file, click on the “Log” link on the left hand side of the web interface. This organization’s running server log will appear, as shown in the following figure. The log entries are automatically sorted by Alert ID first (the second column appearing in the log), from oldest alert to latest alert. The list is then sorted again by Event ID (the first column appearing in the log), which is a server-assigned sequencing number assigned to each and every log entry. This essentially provides a log that is sorted by both the sequence of alerts and then the sequence of events within that alert. To print any specific section of the log file, simply use the computer mouse to highlight all entries associated with that section or alert while holding down on the mouse button. In the following example, the user is preparing to print the log entries associated with Alert #8835. Once the desired alert entries are highlighted, use the web browser’s “Print Selection” command to print only the highlighted items in the log. This is shown in the following figure. 49 This method can also be used to copy the selected items so that they can be pasted into another program. Simply highlight the desired log entries, then right-click for the copy command. 50 Troubleshooting NOTE: This agency’s StreetWise Administrator is:____________________________________________ StreetWise Technical Support line: 800-718-8027 The StreetWise Alert Home Screen is yellow and the application does not seem to be functioning. The main alert screen turns yellow to indicate that communication with the StreetWise server has been lost. It is normal for this to occur for a few seconds from time to time as the cellular system adjusts to changes in the tower assignments or when traveling through areas of low cell coverage. The software should automatically reconnect and any missed messages or functions will then be pushed to the tablet by the server. If, however, the screen remains yellow for an extended period of time, this is an indication of a more serious connectivity issue. Try the following steps: 1. Check to be certain the device has not been inadvertently switched into “airplane” mode and that the wireless connection option being used (3G/4G or WiFi) is still turned on. 2. Shut down and restart the StreetWise application. 3. Verify whether the connectivity issue is unique to the StreetWise application by using another application that accesses broadband, such as the Browser or YouTube. If other programs also have no connectivity, try manually shutting down the tablet and restarting. If connectivity is not restored, the problem is likely a hardware issue. Contact your agency StreetWise administrator or the hardware provider’s technical support. 4. If other programs are functioning correctly with connectivity and restarting the StreetWise program does not clear the issue, notify your agency StreetWise administrator and/or contact StreetWise Technical Support. When the StreetWise application is opened, a dialogue box opens and requests a “device I.D.” or Sygic Navigation licensing information. This rare condition is an indication that the StreetWise licensing files in the tablet’s internal memory have been erased or corrupted. The device will need to be reactivated by your agency’s StreetWise administrator using the following procedure. 1. Manually shut down and restart the tablet. If this does not clear the problem, proceed to step 2. 2. Open the device settings menu and navigate to “Manage Applications”. Scroll to the StreetWise application icon and select. 3. Click of “Force Close”, then click on “Clear Data”. 4. Return to the normal application menu and reopen StreetWise CADlink. Re-enter the proper device I.D. number and license provided to you by StreetWise at the time of initial installation on this device. For assistance, contact StreetWise Technical Support. 51 The tablet is providing continuous audible navigation directions to an unknown location and will not stop, even though StreetWise has been shut down. In rare circumstance, a software failure or force close may result in a situation where navigation continues despite the StreetWise application being closed. To force cancel navigation, follow these procedures” 1. Reopen the StreetWise application 2. Use the home screen options to re-send recent alerts to the tablet so that an alert is present in the home screen alert text area. If no recent alerts are in the system, use the StreetWise web interface to manually send a test alert. 3. When an alert is appearing in the alert text area, click the Nav to Alert Button. The application should override the existing navigation commands that have been “stuck” in the device and begin navigation to the new alert. The usual navigation screens should now open. 4. Toggle back to the alert screen and then click the Nav Cancel Button, as normal. Navigation should now be canceled. Fire Hydrants or Water Points are not appearing on the map, even though the user has selected a visible radius for Hydrant Display When the StreetWise application is first opened, the server sends the latest hydrant files to the device for use in the map display. Depending on the number of hydrants in the agency’s system, this can take several seconds. If the process is interrupted by other device commands to the server, such requesting a tactical map or resending recent alerts, the server will reattempt to send the hydrants every 60 seconds until the file is successfully loaded to the tablet. Until the file is successfully loaded, the hydrants will not display on the tactical map. 1. Restart the StreetWise application and watch the small server log file being written in the upper right corner of the home screen. After several seconds, the log will verify whether the hydrant points were loaded properly. If not, the log will indicate the server will reattempt after 60 seconds. 2. If the log indicates the hydrant points were loaded properly, attempt a tactical map display with an alert active in the alert text area and click on the option for hydrant display. The hydrants should now display correctly. 3. If the log continuously indicates that the hydrant points failed to load after numerous attempts, notify your agency StreetWise administrator and contact StreetWise Technical Support. A pre-plan was conducted using the survey on the tablet device, but it does not subsequently appear in the list of available preplans, either on the tablet or on the web interface preplan menu. Preplan synchronization and processing can take up to a half hour. If, after that time, the preplan has still not synchronized through the system, use the following procedures. 1. Go to the device’s application menu and scroll to the application icon for “SurveyToGo”. Click on the icon to launch the SurveyToGo interface. 52 2. The user will be prompted for a password. Other information should be prefilled by StreetWise and should not be changed. Where prompted, enter the password as “4321” and click Login. 3. SurveyToGo will open and the opening screen will indicate whether there are any incomplete surveys on this device that have not been synchronized to the StreetWise server. If the number is greater than “0”. click on the Pre-Incident Planning Survey bar to bring up a list of these surveys. The list includes the date and time the survey was saved, allowing the user to determine which survey he/she wishes to retrieve. If the missing survey is among this list, it is an indication that the survey was no fully completed. It is possible that a question was missed or the completion checkmark at the end of the survey was not selected to begin the synchronization process. 4. Tap and hold on any survey in this list to bring up the menu of choices shown in the following figure. That survey can be viewed, continued or even deleted (clear) by clicking the appropriate choice. 5. If this process fails to result in synchronization from the device, contact your agency StreetWise administrator and/or StreetWise Technical Support. 53