1
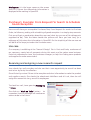
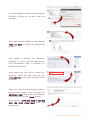
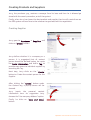
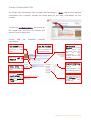
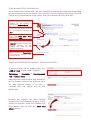
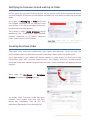
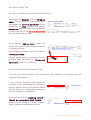
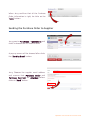
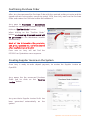
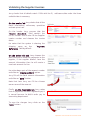
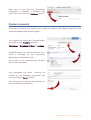
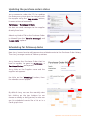
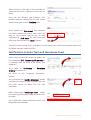
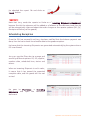
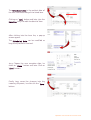
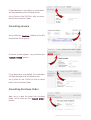
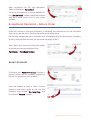
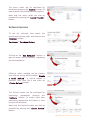
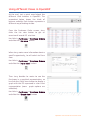
OpenERP Purchase User's Manual
About OpenERP......................................................................................................................2
Accessing to OpenERP..........................................................................................................2
Working in OpenERP.............................................................................................................3
Purchase's Example: From Request for Search to Schedule Goods Reception...........4
Use case......................................................................................................................................... 4
Receiving and assigning a new research request....................................................................4
Creating Products and Suppliers............................................................................................... 6
Creating Supplier................................................................................................................ 6
Creating Product................................................................................................................. 7
Product Information Tab................................................................................................... 8
Procurement Tab. Information......................................................................................... 9
Suppliers Related Information - Procurement Tab........................................................9
Notifying to Commercial and waiting to Order.....................................................................10
Creating Purchase Order.......................................................................................................... 10
Purchase Order Tab.......................................................................................................... 11
Incoming Shipment & Invoices Tab................................................................................11
Sending the Purchase Order to Supplier................................................................................12
Confirming Purchase Order..................................................................................................... 13
Creating Supplier Invoice on the System................................................................................13
Validating the Supplier Invoices............................................................................................... 14
Payment requests...................................................................................................................... 15
Updating the purchase orders status..................................................................................... 16
Scheduling for follow-up tasks................................................................................................ 16
Notifications to Sales Team and Warehouse Team...............................................................17
Scheduling Reception............................................................................................................... 18
Exceptional Operation – Cancel Purchase Order...........................................................20
Cancelling Incoming Shipment................................................................................................ 20
Cancelling Invoice...................................................................................................................... 21
Cancelling Purchase Order....................................................................................................... 21
Exceptional Operation – Return Order............................................................................22
Return Products......................................................................................................................... 22
Refound Invoices........................................................................................................................ 23
Using different Views in OpenERP....................................................................................24
OpenERP User Manual for Purchase Teams
OpenERP Purchase User's Manual
Goal
Guide the management of the information related to purchases using the Enterprice
Resource Planing tool available for the company (OpenERP), to create accurate and
correct purchases orders before giving rise to other operations.
Scope
This document will help the user from its First Steps, access to the ERP platform, products
and suppliers management, creation and confirmation of Purchase Orders and the
concerned incoming schedule procedure of the goods and ending with exceptionals
operations execution as orders cancellation .
About OpenERP
OpenERP is an amazing software system that is easy to use and provides great benefits to
help you organize your daily work.
Users no need to install special software (a web browser is enough), and offers unrivaled
functionality, all you require is a device with internet access.
Accessing to OpenERP
To access OpenERP you must enter the following
address
in
your
web
browser:
http://erp.nexxogroup.com/
Enter the username and password that were
supplied by the system administrator
Ensure to select the right database on the top
corner of the screen.
OpenERP User Manual for Purchase Teams
Working in OpenERP
We will explain the different components of the work area in OpenERP:
Main Menu: It Indicates the modules which your
user can access, in this case the user can access to
sales functionalities, messaging, and sales reports
modules.
User Menu: The menu at the top right allows:
Modify user preferences, such as name,
language, email, signature for outgoing mails, and
others.
To check the documentation and Help
Log off to exit of the system.
Compose a new message: This is a quick access
icon that is always available while you work, will
allow you to send an email at any time.
Vertical Menu: contains the options related to
the main menu that is active.
Search Bar: this tool allows searches related to
the area where you are working, it has different
filter options.
OpenERP User Manual for Purchase Teams
Workspace: It is the larger space on the screen
and this is where the documents information is
displayed while working in OpenERP.
Purchase's Example: From Request for Search to Schedule
Goods Reception
Here we will show you a complete Purchases flow, from Request for search to Purchase
Order, to follow-up, ending with scheduling of goods reception in a step-by-step scenario.
First you will get an explanation about the use case (what Jerry or one of his colleagues is
supposed to do). Then the Notes beside the pictures will learn you how Jerry (or a
colleague of his) enters the information in OpenERP. For the simplicity of the use case we
will do all of the steps just under the Purchases users.
Use case
Our company is exhibiting at the “House & Design” Fair in Paris and Paulo, a salesman of
our company, meets lots of prospects during this event and he makes some business.
Paulo has requested to Jane, the purchases manager, to help him finding some products
and suppliers to make some orders.
Receiving and assigning a new research request
Jane checks her mail everyday and she saw that a new opportunity to search has been
sent to her by Paulo, the salesman.
She will start by review if there is the complete and clear information to make the product
and suppliers search, She checks the attachment Multiform and all is ok, then she will
assign the research to Jerry, one of his employees.
To check her mail, Jane goes to Messaging
→ Inbox
She clicks on “Mark as ToDo” button
to
remember that this message will need some
actions to do in the future.
OpenERP User Manual for Purchase Teams
Jane downloads and checks the attachment
Multiform clicking on the Icon under the
message.
Jane clicks the the Subject of the message
(Title on bold) to open the opportunity
details.
Jane sends a message like "Research
Assigned" to Jerry from the opportunity
and automatically adds a purchaser to
follow the document.
Jane knows that she has to unmark the
customer check box and clicks on the
rectangle icon to send the message to the
purchaser.
When she clicks on the rectangle button a
pop-up screen appear. then Jane type the
purchaser email and writes the message.
Finally Jane clicks on the "Send" button.
From now on, Jerry will keep in contact
with the Sales department using the
opportunity.
OpenERP User Manual for Purchase Teams
Creating Products and Suppliers
Jerry, the purchaser guy, receives a message from his boss and then he is allowed go
ahead with the search procedure, out of the system!
Finally, when Jerry has chosen the best product and supplier then he will create them on
the ERP system and confirms to the salesman to go ahead with his negotiation.
Creating Supplier
Jerry goes to Purchases → Suppliers and
clicks on “Create” button.
Jerry defines whether it is a company or a
person. It is suggested that all contact
person should be defined below, he Inputs
the basic information and Add a Tag to
provide easy access to individual supplier by
searching the Tag.
Next step, Jerry clicks on the "Create"
button to Create the contact person for the
Supplier
After clicking the “Create” button under
the Contact tag, a pop-up screen will be
showed.
Jerry Inputs the personal contact
information here. As suggestion Jerry
chooses the "Use company Address" option.
Finally, he clicks on “Save and Close”
button
OpenERP User Manual for Purchase Teams
Now the supplier related contact is showed
under the supplier information.
The internal Notes is for internal reference,
which will not be showed on any of the
documents.
Usually the sales and purchases Tab and the
accounting setting take the default settings.
If there is no special need, the default
setting will serve.
On the Accounting tab, Jerry clicks the
“Add an Item” button to add a Bank
Account to make the payments to the
supplier, a supplier can have more than one
bank account related.
He writes down the account number and
clicks on "Create and Edit" option.
Jerry fills all the Bank account Information,
chooses the bank from the list, here Jerry
can fill the chinese owner name of the
account.
At the end he clicks on "Save" button.
Finally Jerry clicks on the “Save” button to save the changes on the supplier form.
Creating Product
To create a new product on OpenERP, Jerry
goes to Purchases → Products and he clicks
in "Create" button.
Jerry notes that the product formulary has
four different tabs, and he knows that all is
important because the information will be
used in most of the operation, but he will be
only responsible of Information Tab. and
Procurement Tab., so he starts in an
ordered way.
OpenERP User Manual for Purchase Teams
Product Information Tab.
Jerry Start from Information tab, he knows that the Boxes in “Blue” color are the required
information for a product, anyway he writes down all the basic information for the
product.
To Add the product picture, Jerry clcks on
the Image icon and then he chooses the
picture from his computer.
Ensure add
information:
the
Can be Sold, Allow
the product to be
selected in Sales
Order
Edit the unit of
Measure for the
product
complete
product
Can be Purchase,
Allow the product
to be selected in
Purchases Order.
Consumable
Product, the system
won’t check the
inventory level and
user
can
keep
consuming
this
product even it is out
of stock
Sales price and
have to be FOB and
USD
Internal Reference:
it is usable For
internal
communication and
printable documents.
Complete Product
specifications on
english,
Include
MOQ and SAMPLE
PRICE here.
The specifications for
the Packages will be
usable from sales
quotations.
OpenERP User Manual for Purchase Teams
Procurement Tab. Information
Jerry clicks on the Procurement Tab, then OpenERP automatically completed some fields
on the blue boxes in this formulary, Jerry just has to be sure about some things. The FOB
Cost price is a critical data to input in here, then he is specialy carefully with that .
Ensure that the Procurement
Method for the product is
selected on Make to Stock.
Ensure that the Supply Method
for the product is selected on
Buy.
Enter the FOB Cost
(Every time in USD)
Price
Here Jerry puts the related
supplier, can be more than one
assigned supplier to one
product. The next pic will
explain how to do it.
Here To edit the Description
which will be showed on the
Purchase Order
Suppliers Related Information - Procurement Tab.
A pop-up screen will be showed after the
“Add an item” button under “Supplier”.
Purchases → Products → Procurement
Tab → Add an Item
Note that the Product Name and Reference
on the Supplier side can be different from
the one entered before. If no text is
inputted here, the system will use the
default one.
Because the supplier has been created
already, then Jerry chooses it directly. He just
writes the supplier name and chooses the
Right option, then he clicks on “Save and
Close” button.
OpenERP User Manual for Purchase Teams
Notifying to Commercial and waiting to Order
At This point Jerry almost finish its Search, he just has to notify to the commercial about
the new product refference on the system and await for his answer to make the purchase
order.
Jerry goes to Messaging → ToDo and finds
the related message that he received from
Jane before, if it's many messages there then
he could use the filter options.
Jerry sends a short reply message saying
something like: "Product has been created,
Internal reference is: [TC-A002] Laminate
Floor" and clicks on "Send" button.
Important: Ensure that the check button is
unmarked to don't add the customer as recipient .
Creating Purchase Order
Days later Jerry received a notification from Paulo, the salesman, Paulo has sent the
confirmation about the business successful including a Sales Order like attachment.
Jerry downloads it and reviews all details contain in sales order, he confirms all the
information with “ABC Laminate Floors Factory” ,the supplier, then Jerry creates a draft
Purchase Order and redacts the purchases contract, finally he sends it all together to the
supplier.
Jerry goes to Purchases → Purchase
Orders and clicks on “Create” button
An empty Draft Purchase Order has been
created, Jerry knows that only the blue
boxes are mandatory, but he fills the
complete information from the begining.
OpenERP User Manual for Purchase Teams
Purchase Order Tab
Jerry fills the header of the Purchase Order Tab First
He chooses the Supplier, Fills the Shipping
name, The same that the Sales Order, then
he chooses the currency (pricelist) for the
transaction on USD, chooses the correct
warehouse that the Order will be shipped
to and finally he fills the Source Document
with the Sales Order number.
Jerry clicks on “Add an Item” button, he
selects the product and changes whatever
he needs to change.
Here different products can have different
“Scheduled Dates”.
General special terms or conditions for this
purchase must be content in "Terms and
Conditions" field if it is necessary.
Incoming Shipment & Invoices Tab
from the Incoming Shipments and Invoices tab Jerry controls the invoicing and the
reception of the goods.
If it's a directly shipment from supplier to
customer Jerry must choose the customer's
delivery address, but on this case the goods
will be send to our Guangzhou warehouse
then Jerry keeps this field empty.
Jerry confirms that the Invoicing control is
"Based on generated draft invoice", it
allows him to create a Preform Supplier
Invoice, before the goods are received.
OpenERP User Manual for Purchase Teams
When Jerry confirms that all the Purchase
Order Information is right, he clicks on the
"Save" button.
Sending the Purchase Order to Supplier
Jerry goes to Purchases → Quotations and
clicks to chooses the PO Draft to send.
A pop-up screen will be showed after clicks
the “Send by Email” button.
Jerry Chooses the supplier email address
and ensures that Purchase Order and
Purchase Contract are attached before
clicks on "Send" button.
OpenERP User Manual for Purchase Teams
Confirming Purchase Order
After Jerry has compared the Purchase Order with the received proforma Invoice and the
signed contract from supplier, everything match 100%, then Jerry confirms the Purchase
Order and creates the Purchase Invoice and validates it.
Jerry goes to Purchases → Quotations
chooses the concerned Purchase Order and
clicks on “Confirm Order” button.
When clicking on the “Confirm Order”
button, an incoming shipment record will
be generated in the Warehouse module
automatically.
Most of the information like products,
unit price, quantity etc. can't be altered
after confirmation of the PO.
From now on Jerry will not find the
PO00010 on Quotations menu anymore.
Creating Supplier Invoice on the System
Once Jerry is ready to order deposit payment, he creates the Supplier Invoice on
OpenERP.
Jerry opens the the concerned Purchase
Order and he clicks on the "Receive
Invoice" button.
Jerry saw that a Supplier Invoice Draft has
been generated automatically on the
system.
OpenERP User Manual for Purchase Teams
Validating the Supplier Invoices
Jerry checks that all details match 100% with the PI, add some data under the three
available tabs is necessary.
On the Invoice Tab Jerry checks that all the
Items information, references, quantities
and cost price is ok.
On the header Jerry ensures that the
“Source document” field contain the
PO:SO number and he also fill the Supplier
Invoice number and chooses the Invoice
dates.
He notes that the system is showing the
shipping name on the
"Payment
Reference" field by default.
On the Other Info tab, Jerry chooses the
Bank Account to make the payments to the
supplier, if the supplier doesn't have the
account information then he will create a
new bank account for him.
He writes down part of the account number
and clicks on "Create and Edit" option.
Jerry fills all the Bank account Information
and clicks on "Save" button.
Note that here Jerry can fill the chinese
owner name of the account.
Finally, on the Payments tab Jerry notes
that no payments has been registered yet, It
is normal because he didn't order pay to
accounting department.
To save the changes Jerry clicks on the
“Save” button.
OpenERP User Manual for Purchase Teams
Now Jerry is sure that the information
registered on OpenERP is complete and
right, then he can click on "Validate" button.
Payment requests
Once Jerry confirms the Invoice, he is ready to request the deposit payment from
accounting department to the supplier.
Jerry opens the concerned Purchase order
and clicks on the “Invoices” button
Purchases → Purchase Orders → Invoices
OpenERP opens the Invoice and then Jerry
sends a message to the accounting
department responsible to pay.
Jerry clicks on the rectangle Icon to open
the full mail composer.
Jerry composes the email ensuring to
include all the necessary information and
then he clicks on “Send” button.
Jerry waits for the payment confirmation to
start the follow-up procedure.
OpenERP User Manual for Purchase Teams
Updating the purchase orders status
Jerry comments under the PO, he updates
the status every time when he contacts with
the supplier using the "Log a note" button,
it means a Internal comment.
Purchases → Purchase Orders
He also can send messages to the supplier
directly from here.
Attach any kind of file to the Purchase Order
is allowed from the “Send a message” and
“Log a note” options.
Scheduling for follow-up tasks
Now Jerry knows how to add comments and attachments to the Purchase Order history.
Then Jerry arrange a series of follow up actions.
Jerry chooses the Purchase Order that he
have to update, he goes to Purchases →
Purchase Orders and opens it.
Jerry clicks on the Supplier name and the
supplier tab appears.
He clicks on the “Meetings” button, then
the calendar screen appear.
By default Jerry can see the monthly view
but clicking on the top buttons he can
choose a weekly or daily period, he also can
see his scheduled events like a list or in a
Gantt graph view.
OpenERP User Manual for Purchase Teams
After clicking on the day of the calendar to
schedule the event, a pop-up screen will be
show.
Jerry set the Subject, the Duration, the
location and the description for this event
and then he goes to the "Options" tab.
Jerry checks the "Recurrent" box because
he wants repeat this event every four (4)
days as his function manual say, he also
indicates the "End date" for this event and
after that he clicks on the "Save" button.
To the DPI performing Jerry arranges it on the same way, so he has complete control of
his follow up tasks under the ERP.
Notifications to Sales Team and Warehouse Team
When Jerry has the DPI report he adds it to
the concerned PO - Incoming Shipment as
a message and he send it to Paulo, the
salesman.
Jerry goes to Purchases → Purchase
Orders and opens it.
He clicks on the “Incoming Shipments”
button.
Jerry clicks on the “Send a Message” option
and then he clicks on the rectangle Icon on
the right corner to open the full mail
composer.
After clicking the “Rectangle Icon” under
the Incoming Shipment, a pop-up screen will
be show.
Jerry adds the related salesman email and
composes the message.
OpenERP User Manual for Purchase Teams
He attached the report file and clicks on
“Send” button.
Important:
Note that Jerry sends the reports to Paulo as a “Incoming Shipment attachment”
because like this the salesman will be added as a follower of the document and then he
will be automatically informed about the order changes or the reports updates (DPI, QC,
Receipt and Delivery of the goods).
Scheduling Reception
Once the DPI has successful and Jerry has been notified that the balance payment was
done, then he has to check the schedule date to the goods reception.
He knows that the Incoming Shipments are generated automatically by the system when a
PO is confirmed.
Jerry can use the filters bar to arrange and
search by different options: PO, SO, supplier,
creation date, scheduled time, status and
others.
When an Incoming Shipment is red in color,
it means that it has passed the expected
reception date, and the goods still has not
arrived.
He goes to Purchases → Incoming
Shipments and open the concerned
document.
OpenERP User Manual for Purchase Teams
The Scheduled date is the earliest date of
the item received among all the listed item.
Clicking on “Edit” button and later into the
item line, Jerry can edit the detail of item
After clicking into the Item line, a pop-up
screen appear.
The Scheduled Date can be modified as
long as no product is received.
Jerry Choose the new reception date, he
clicks on “Done” button and later Click on
“Save” button.
Finally Jerry saves the changes into the
Incoming Shipment, he clicks on the “Save”
button.
OpenERP User Manual for Purchase Teams
Exceptional Operation – Cancel Purchase Order
If an issue appear and purchase department need cancel the operation, Jerry knows that a
confirmed Purchase Order can’t be cancelled directly, as invoice or incoming shipment is
auto-created in most cases, they have to be cancelled in advance in order to cancel the
Purchase Order.
When Jerry goes to Purchases → Purchase
Order, he opens the related Purchase Order
and clicks in the “Cancel Order” button, this
pop-up screen appear.
Note that once the invoice/incoming shipment is validated (not in draft status),
the Purchase Order can’t be cancelled any more , so this procedure only apply to
cancel orders with Invoice/Incoming shipment no validated.
Cancelling Incoming Shipment
Jerry chicks on “Incoming Shipments”
button at the left hand of the PO to open it.
Once the Incoming Shipment appear, Jerry
clicks on the “Cancel Transfer” button.
OpenERP User Manual for Purchase Teams
If the document is cancelled, no red button
will be showed on the left-hand corner.
Jerry clicks on the PO00016 title to come
back to the Purchase Order.
Cancelling Invoice
Jerry chicks on “Invoices” button at the left
hand of the PO to open it.
Once the Invoice appear, Jerry clicks on the
“Cancel Invoice” button.
If the document is cancelled, no red button
will be showed on the left-hand corner.
Jerry clicks on the PO00016 title to come
back to the Purchase Order
Cancelling Purchase Order
Now Jerry is able to cancel the Purchase
Order, so he clicks on the “Cancel Order”
button
OpenERP User Manual for Purchase Teams
After cancelling the PO, the document
status will become “Cancelled”.
To re-use the content of the cancelled PO,
the “Set to Draft” button should be pressed
and Jerry could re-use the PO with same
content.
Exceptional Operation – Return Order
Once the invoice or incoming shipment is validated, the document can’t be cancelled.
User has to use the return function to perform the adjustment.
For security reasons the return functions will be available only for department managers,
so Jerry need ask help to Jane, the purchase manager, to do it.
Jane opens the concerned Purchace order
and clicks on Incoming shipment first.
Purchases → Purchase Orders
Return Products
Clicking on the “Return Products” button a
pop-up screen will be showed, requesting
the return quantity of each product.
User can choose to issue a return invoice
based on the return order or not. For the
example Jerry choose "No Invoicing" and
he clicks on “Return” button.
OpenERP User Manual for Purchase Teams
The return order will be confirmed by
warehouse pressing the “Deliver” button. (It
means deliver the product back to supplier)
Note that the return order can also be
cancelled by pressing the “Cancel Transfer”
button.
Refound Invoices
To ask for refounds Jane opens the
concerned Purchace order and clicks on the
“Invoices” button.
Purchases → Purchase Orders
Clicking on the “Ask Refounds” button a
pop-up screen will be showed, requesting
the refound details.
Different return method can be chosen,
Jane will use the by default option "Create
a Draft Refund". A refund reason is
required, then Jane fills it and clicks on
“Create Refund” button.
The refund Invoice will be confirmed by
accounting
responsible
pressing
the
“Validate” button. (It means from here
accounting department will follow it, Jane
has just informs them.)
Note that the Refund Invoice can also be
cancelled by pressing the “Cancel Invoice”
button.
OpenERP User Manual for Purchase Teams
Using different Views in OpenERP
At the end, just a quick word about the
different View buttons in OpenERP. The
screenshot below shows the kinds of
buttons available. Each button represents a
different way of looking at data.
From the Purchases Order screen, Jerry
clicks the List view button to get an
overview of several PO at a time.
He clicks in Purchases → Purchase Orders
and clicks the “list view” button
When Jerry wants more information about a
specific opportunity, he will switch to Form
view.
He clicks in Purchases → Purchase Orders
and clicks the “Form view” button
Then Jerry decides he wants to see the
Purchases in a graphical representation, so
he clicks the Graph view button to display a
graph with the PO expressed in a bar chart
representation (more graph options are
availables).
He clicks in Purchases → Purchase Orders
and clicks the “Graph view” button
OpenERP User Manual for Purchase Teams
He could also choose to display the
Purchases in Calendar view.
He clicks in Purchases → Purchase Orders
and clicks the “Calendar View” button
OpenERP User Manual for Purchase Teams