1
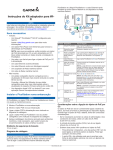
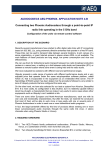
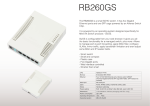
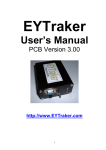
User Manual !
!
!
!
!
!
!
Revision 7
Quick Start
Product Info
!
WiFiRanger Home
!
WiFiRanger Go
!
WiFiRanger Sky
!
WiFiRanger Mobile
!
WiFiRanger Marine
Control Panel
!
Main Tab
!
WiFi Tab
!
Setup Tab
!
Fusion Tab
!
Advanced Tab
!
Status Tab
General Use
!
Firmware!
!
Tokens
!
WiFi
!
WFRBoost
!
WFRControl!
!
Fusion Networking™
!
Auto Connect
Terms Glossary
Warranty
Revision 7 was written when firmware version 5.6.1 was current
Intelligent WiFi Routers™!
1
Quick Start
Quick Start
The five connection methods that you can use to receive internet through the WiFiRanger
Ethernet WAN
Internal WiFi
Cellular*
WFRBoost
WFRControl
*WiFiRanger Home and WiFiRanger Go only
Setup
Installing your WiFiRanger router
1 Plug the WiFiRanger into power or follow the Installation guide for a Sky, Mobile, or Marine
2 Wait two or three minutes
3 Wirelessly connect your computer to the WiFiRangerʼs SSID using the WPA2 Key
!
4 Using a web browser, go to mywifiranger.com for the Control Panel
✦
An alternate Control Panel address is made by transposing the last two pairs of the unique
WiFiRanger ID into the two underlined spaces of the below address, for example, WiFiRanger
772250 would have the unique address of 10.122.50.1:8080
5 Get the WiFiRanger online
✦
To use Ethernet WAN, plug an ethernet cable into the WiFiRangerʼs WAN port from your modem
✦
To use Internal WiFi, Join which WiFi broadcast to connect with from the Main tab
✦
To use Cellular, connect your Aircard to the WiFiRanger using the included USB extension cable
✦
To use WFRBoost, go to the Setup tab and configure the WFRBoost following Installation guide
✦
To use WFRControl, go to the Setup tab and Pair with the desired client WiFiRanger
•
•
•
Enter the WiFiRanger ID of the client which is to be remotely controlled (Sky, Mobile, or Marine typically)
Select Wireless or Wired and the correct Ethernet Port if Wired (LAN 5 typically)
Click Save and then Pair and you will now be able to Scan and Join using
Intelligent WiFi Routers™!
2
WiFiRanger Home
WiFiRanger Home
Band
2.4GHz
LAN
4x (10/100)
Antenna
Integrated 2x2 MIMO
WAN
1x (10/100)
Throughput
Up to 150Mbps
USB
1x
Radio
19dBm / 79mW
Dimensions
162x132x29mm
Standards
802.11 b / g / n
Temperatures
-20C ~ +60C
Broadcasts
1x Private / 1x Public
Power Input
5VDC
Encryption
WPA2 Personal 256bit
Reception
Up to 100m
1
Status lights
1 LAN
2 WAN
3 Internet
4 Wireless
5 Power
Back of WiFiRanger Home
1 WAN
2 LAN
3 Reset
4 USB
5 Power
Intelligent WiFi Routers™!
1
2
3
2
3
4
5
4
5
3
WiFiRanger Go
WiFiRanger Go
Band
2.4GHz
LAN
4x (10/100)
Antenna
Integrated 2x2 MIMO
WAN
1x (10/100)
Throughput
Up to 300Mbps
USB
1x
Radio
27dBm / 500mW
Dimensions
113x138x29mm
Standards
802.11 b / g / n
Temperatures
-20C ~ +50C
Broadcasts
1x Private / 1x Public
Power Input
8-30VDC (Power Port)
Encryption
WPA2 Personal 256bit
Reception
Up to 250m
POE Output
Intelligent WiFi Routers™!
8-30VDC (LAN Port 5)
1
2
Status lights
1 Wireless
2 WAN
3 LAN
Front of WiFiRanger Go
1 Power
2 Reset
3 Power LED
4 Activity LED
5 WAN 1 (POE Input)
6 LAN 2-4
7 LAN 5 (POE Output)
8-30VDC (WAN Port 1)
3
1
2 3
4
5
6
7
4
WiFiRanger Sky
WiFiRanger Sky
Band
2.4GHz
LAN
1x (POE Model)
Antenna
Integrated 2x2 MIMO
Dimensions
113x138x29mm
Throughput
Up to 300Mbps
Temperatures
-20C ~ +50C
Radio
26dBm / 400mW
Waterproof
Yes
Standards
802.11 b / g / n
UV-Rated
Yes
Broadcasts
1x Private / 1x Public
Vibration-Rated
Yes
Encryption
WPA2 Personal 256bit
Power Input
12VDC
Reception
Up to 750m
Power Use
4W Max Consumption
Intelligent WiFi Routers™!
5
WiFiRanger Mobile
WiFiRanger Mobile
Band
2.4GHz
Bracket
All-aluminum
Antenna
Omni 3dBi Mobile-rated
Mounting
Ladder or Pole
Throughput
Up to 300Mbps
Ethernet
Outdoor Rated
Radio
28dBm / 600mW
Temperatures
-20C ~ +70C
Standards
802.11 b / g / n
Power
Power Over Ethernet
Broadcasts
1x Private / 1x Public
Power Input
12VDC +/- Wires
Encryption
WPA2 Personal 256bit
Power Output
12VDC
Reception
Up to 2mi
Power Use
7W Max Consumption
Intelligent WiFi Routers™!
6
WiFiRanger Marine
WiFiRanger Marine
Band
2.4GHz
Bracket
All-aluminum
Antenna
Omni 8.5dBi Marine-rated
Mounting
Ladder or Pole
Throughput
Up to 300Mbps
Ethernet
Outdoor Rated
Radio
28dBm / 600mW
Temperatures
-20C ~ +70C
Standards
802.11 b / g / n
Power
Power Over Ethernet
Broadcasts
1x Private / 1x Public
Power Input
12VDC +/- Wires
Encryption
WPA2 Personal 256bit
Power Output
12VDC
Reception
Up to 7mi
Power Use
7W Max Consumption
Intelligent WiFi Routers™!
7
Main Tab
Main Tab
6
1
7
2
3
8
4
9
5
Key
Features
Installation
1 Toggle the WiFi method between available options such as Internal, WFRBoost, and WFRControl
2 Perform a Range after dropping down the Range Options by clicking the button to the right of WiFi
3 Manually join a WiFi network
4 Have the WiFiRanger populate the list of available WiFi networks
5 Bookmark the unique Control Panel address of this WiFiRanger
6 See firmware version or find updates, view length of time turned on, and see the unique ID number
7 Perform an Auto Connect which is customized on the Setup tab
8 Add a new network token or toggle preferred / ignored on existing tokens
9 Connect / Disconnect this WiFiRanger from Ethernet WAN
Control Panel appearance and functionality varies slightly by product
Intelligent WiFi Routers™!
8
WiFi Tab
WiFi Tab
1
2
3
4
5
6
Key Features
1 Manually add a network name and key for an encrypted WiFi Network
2 Manually add a network token and toggle it between preferred / ignored or make it Last Resort
3 Configure the Private Broadcast as desired by turning it on / off, renaming, or changing the key
4 Configure the Public Broadcast as desired by turning it on / off, renaming, and changing the password
5 Set preferred WiFi broadcast channel (does not apply when online using Internal WiFi)
6 Adjust the power of the WiFiRangerʼs broadcast(s)
Intelligent WiFi Routers™!
9
Setup Tab
Setup Tab
1
2
3
4
5
6
7
8
9
10
Key Features
11 12
13
1 Adjust the order, specify Swapback, toggle standby and active, or change settings for Ethernet WAN
2 Adjust the order, specify Swapback, toggle standby and active, or change settings for Internal WiFi
3 Adjust the order, specify Swapback, toggle standby and active, or change settings for Cellular
4 Adjust the order, specify Swapback, toggle standby and active, or change settings for WFRBoost
5 Adjust the order, specify Swapback, toggle standby and active, or change settings for WFRControl
6 Set the interval for Connection Automation, determining how often Failover or Swapback may initiate
7 Turn on / off Failover which initiates an Auto Connect when an internet failure occurs
8 Turn on / off Control Panel Redirect which sends web browser to the Control Panel when offline
9 Turn on / off Initial Auto Connect which attempts to get online when first booting up
10 Turn on / off Show Notifications which displays messages from the manufacturer
11 Download a diagnostic log which can help WiFiRanger support technicians when troubleshooting
12 Immediately reboot the WiFiRanger
13 Revert the WiFiRangerʼs configuration to defaults, wiping out any customization
Intelligent WiFi Routers™!
10
Fusion Tab
Fusion Tab
1
2
3
4
5
Key Features
1 See the status of Fusion Networking™
2 Add the WiFiRanger ID of other devices in the fuse
3 Enter the nickname of this WiFiRanger, which will be displayed in the Fused Device field
4 Enter the desired key of the fuse that this WiFiRanger is connected with
5 Turn Fusion Surf™ on / off for this WiFiRanger
Intelligent WiFi Routers™!
11
Advanced Tab
Advanced Tab
1
2
3
4
Key Features
1 Add a port forward for services that require one
2 Set DNS to the desired configuration
3 Enter a DMZ IP Address of a publicly accessible server
4 Enter an IP Alias to be recognized by the WiFiRanger, connecting devices on another IP subnet
Intelligent WiFi Routers™!
12
Status Tab
Status Tab
1
2
3
Key Features
1 See what this WiFiRangerʼs current client IP address and default gateway is
2 See all active connection methods of this WiFiRanger
3 See all devices that are currently connected to this WiFiRanger
Intelligent WiFi Routers™!
13
Firmware
Updating Firmware
To update firmware
1 Click the Check for Updates button which is at the top righthand corner of the Control Panel
2 If available, click the Firmware Update button then wait several minutes for the update to complete
3 Watch the status lights of the WiFiRanger, waiting for them to turn off then on again, indicating a reboot
4 From the Control Panel, verify that the firmware version changed to the latest release
Tokens
Using Tokens
Adding new tokens
On the Main tab, click the Token checkbox and select whether the token should be Complete or Partial.
Complete tokens recognize an entire SSID while a partial token may recognize part of multiple SSIDs.
Tokens can also be added manually on the WiFi tab under Network Token. All networks will be preferred
that contain a case sensitive partial token within their broadcast name. For example, adding WiFi as a
partial token will have the WiFiRanger prefer all WiFi networks that contain WiFi in their name, such as
Pvt.WiFiRanger.1272, FreeWiFi, or WiFiNetwork1000.
Prefer or ignore tokens
On either the Main tab or WiFi tab, toggle tokens between preferred and ignored. The token icon will be
green and connected when a token is preferred, but will be red and disconnected when ignored.
Preferred WiFi networks are prioritized higher while ignored WiFi networks are skipped when the
WiFiRanger is performing a Range or an Auto Connect.
Using Last Resort
Advanced
Make a Network Token the Last Resort to have that WiFi network connected to for internet as the very
last option, ensuring that the WiFiRanger tries all other WiFi networks to get online before using the Last
Resort. The Last Resort feature is effective for saving data plans on MiFi devices or Smartphone
Hotspots.
Intelligent WiFi Routers™!
14
WiFi
Using WiFi
Connecting to a wireless broadcast
On the Main tab, click Join
✦
If the network type is WEP or WPA, the correct key must be entered in the prompt window
✦
If the network type is OPEN, the WiFiRanger will immediately begin connecting
✦
If the network type is FILTERED, the WiFiRanger will connect wirelessly, but further login steps
are required, likely involving entering a username and password through the web browser.
Filtered networks are often at locations which provide WiFi for a fee
Using the Public Broadcast
By default, the WiFiRanger has the optional Public Broadcast turned off. To have the unencrypted
(OPEN) Public Broadcast available, simply turn it on from the WiFi tab and enter the desired Broadcast
SSID. The Access Password can also be customized as desired, which should be given out privately, so
that even nearby WiFi devices will be unable to get online through the Public Broadcast without knowing
and entering the custom Access Password. The Access Password is not an encryption key, but rather is
the password required to browse the web when connected to the Public Broadcast. The Public Broadcast
is by definition a FILTERED network. Devices connected to the Public Broadcast are segregated from the
Private network of the WiFiRanger, making it safe to have friends or neighbors on the Public network.
Adjusting Radio Power
The topic of Radio Power is an important one, as the principle of less is more can apply. Oftentimes the
biggest problem faced with WiFi performance is caused by Wireless Noise. The concept is that if there
are multiple people talking in the same room, it can get more difficult to hear the desired conversation
when either more people are talking, or they are talking louder. Understanding this principle can help to
improve WiFi performance and reliability.
When surrounded by many nearby WiFi networks, it is often best to have the Radio Power of the
WiFiRanger set on Low to reduce Wireless Noise and the problems caused by it. However, when needing
to broadcast longer distances, it is recommended to use the High setting to increase power and range. It
is also recommended to only have one WiFiRanger within a close proximity of another to have Radio
Power set to High, such as those using a WiFiRanger Go and WiFiRanger Sky, Mobile, or Marine. In such
cases where WFRControl is being used, it is recommended to have the WiFiRanger Go set to Low and
the WiFiRanger Sky, Mobile, or Marine set to High so that they can reach out to weak WiFi networks.
Setting a WiFi Channel
When manually setting the WiFiRanger to a certain wireless channel, it is important to understand that
this channel will not always be used as the WiFiRanger must match the channel of a WiFi network that it
is connected to using Internal WiFi. However, this set channel will be used if the WiFiRanger is online
through other connection methods such as Ethernet WAN, Cellular, WFRBoost, or wired WFRControl.
Intelligent WiFi Routers™!
15
WFRBoost
Using WFRBoost
Initiating WFRBoost
On the Setup tab, check WFRBoost as Active then click the Settings icon of the WFRBoost, expanding
the setup fields. Select the appropriate Model and which Ethernet Port the WFRBoost is plugged into on
the WiFiRanger. Click Save at the bottom of the Setup tab.
Connection Prohibited message
When connecting to some WiFi Hotspots using the WFRBoost, the message Connection Prohibited will
display. This problem is caused by an IP Address conflict. The WFRBoost is on 192.168.1.20 by default,
which is the same IP address used by many common WiFi routers. When a WiFi Hotspot has a wireless
router that is using 192.168.1.xxx for its IP pool, the WFRBoost cannot connect, saying Connection
Prohibited, which may also cause the WFRBoost to become un-configured. Changing the IP address of
the WFRBoost fixes this problem.
1 Initiate WFRBoost then click the WFRBoost hyperlink seen top left in the above screenshot
2 When prompted, enter ubnt / ubnt for the username and password to access the AirOS control panel
3 Go to the Network tab of the AirOS control panel
4 Under Network Settings, enter the desired unique IP Address, such as 192.168.44.20
5 Enter the corresponding Gateway IP which would be 192.168.44.1 for this example then click Save
6 Close the AirOS control panel and get back onto the WiFiRanger Control Panel
7 Go to the Setup tab and expand the WFRBoost setup fields
8 Replace 192.168.1.20 with the unique IP address that was used in step 4 (192.168.44.20)
9 Reboot WiFiRanger and WFRBoost then reinitiate WFRBoost
10 Connect to the WiFi Hotspot
Intelligent WiFi Routers™!
16
WFRControl
Using WFRControl
Initiating WFRControl
WFRControl is used to pair two WiFiRangers together to seamlessly connect through other WiFi networks
from the master Control Panel and for uniting the Private network so that devices connected to either
WiFiRanger can communicate on the same Local Area Network. This feature is commonly used to pair an
indoor WiFiRanger Go with an outdoor WiFiRanger Sky, Mobile, or Marine as the client.
On the Setup tab, check WFRControl as Active then click the Settings icon of WFRControl, expanding the
setup fields. Enter the WiFiRanger ID of the client WiFiRanger which is to be locally controlled by this
WiFiRanger. Select whether this WiFiRanger and the client WiFiRanger are to be interlinked wirelessly or
wired. If wired, select which Ethernet Port is being used. Click Pair which will begin interlinking both
devices. If Wireless was the method selected, reboot the client WiFiRanger and wait a few minutes, as
they automatically interlink. Once paired, WFRControl can be selected on the Main tab and then the client
WiFiRanger will be used to Scan and Join rather than Internal WiFi.
Fusion
Using Fusion Networking™
Initiating Fusion Networking™
On the Fusion tab, enter the desired nickname of this WiFiRanger along with the key. The key is
customizable, and should be as unique as possible, being shared only with those trusted to be on the
fused network. Click the Save button to initiate.
Fusion Networking™ simply fuses all of the WiFiRanger devices together that share the same custom
key. This creates an interconnected private network that can span the world, allowing for easy remote
desktop access, quick file sharing, global NAS hosting, and so much more. Fusion Networking™ is the
most simple internet cloud Local Area Network.
Intelligent WiFi Routers™!
17
Auto Connect
Using Auto Connect
Customizing Auto Connect
Auto Connect is designed to be customizable according to many scenarios and desired operations. It can
be quite the in-depth topic, but understanding it properly will provide the groundwork to configure it for
best results.
The WiFiRanger has five distinct connection methods, Ethernet WAN, Internal WiFi, Cellular, WFRBoost,
and WFRControl. Each of these methods may be checked Active on the Setup tab, or made inactive if a
method is not desired to be used during an Auto Connect. For instance, those who do not have a Cellular
aircard for using with the WiFiRanger may wish to make Cellular inactive, skipping Cellular during an Auto
Connect.
Swap Connection is also a very useful feature of Auto Connect. Swap Connection determines which
connection to switch to when internet becomes available through the swap-to selection. For instance, to
have the WiFiRanger swap from Internal WiFi to Ethernet WAN when internet is restored through
Ethernet WAN, select to Ethernet WAN on Internal WiFiʼs drop-down for Swap Connection. The Swap
Connection feature essentially runs in the background to ensure that this WiFiRanger is using the most
desirable way to keep online. A common configuration for Swap Connection is to point all Active
connection methods to the one at the top (Order 1) which is Ethernet WAN in this example.
Having Standby checked for a connection method makes it so that the method will attempt to be ready in
case internet fails on another connection method. For instance, with the above configuration, this
WiFiRanger may be online through Ethernet WAN. If the Cable or DSL modem fails, and your WiFiRanger
was connected to a nearby WiFi Hotspot through Internal WiFi, the WiFiRanger would stay online through
Internal WiFi despite Ethernet WAN failing. The Standby feature works in the background ensure that this
WiFiRanger stays online, even when the current connection method fails. It basically queues available
connection methods to standby in case the current internet connection fails.
Connection Automation determines how often the WiFiRanger will ensure that it is online. Having the
interval set for higher frequency ensures that the WiFiRanger cannot lose an internet connection without
sensing it quickly, initiating an Auto Connect or Swap Connection. In some cases, such as being online
through spotty WiFi or poor Cellular coverage, setting the Connection Automation interval to be less often
will help to keep the WiFiRanger online. When internet is slow or there is a high amount of packet loss,
the Connection Automation check may fail, initiating an Auto Connect. When the poor internet connection
is the only option, an Auto Connect is not helpful in restoring connectivity.
Intelligent WiFi Routers™!
18
Terms
Terms Glossary
General Networking Terms
Using Tokens
LAN
Local Area Networks are local only and limited to directly interlinked devices
WAN
Wide Area Network commonly refers to internet networking
SSID
Name of a wireless broadcast which is seen when scanning for signals
WiFiRanger Terms
Ranging
WiFiRangerʼs process of analyzing available wireless broadcasts
First
Analyzes all wireless broadcasts in range, connecting to the best
Best
Connects WiFiRanger to the first available wireless broadcast
Manual
Analyzes all wireless broadcasts in range but remains unconnected
Swap Connection
Connection method to change with following a connection failure
Standby
Being ready for an immediate swap after the current connection fails
IP Alias
Recognizes static devices on a separate IP subnet from the DHCP subnet
Uptime
Length of time that a WiFiRanger has been operating since last boot
WiFiRanger ID
Unique six digit identification number for WiFiRangers
Using WFRBoost
WiFi Network Types
Filtered
Networks that require user authentication, often done through a web browser
Open
An unencrypted network that anyone in range can connect with
Using Fusion Control
WEP
An encrypted network which requires a HEX key or passphrase
WPA
An encrypted network which requires a key that is much stronger than WEP
Intelligent WiFi Routers™!
19
Warranty
Warranty
We back our product(s) in three ways, our 30-day Satisfaction Guarantee, 1-year Warranty, and 1-year
As-advertised Functionality Guarantee.
The 30-day Satisfaction Guarantee allows you to return the product(s) in as-delivered condition within 30
days of purchase for a no-questions-asked, purchase-price refund.
The 1-year Warranty protects our product(s) against failure under normal/recommended use for a full year
after purchase. Should our product(s) fail within a year after purchase, we will replace the failed hardware
through our RMA process. To request an RMA, please correspond with our support team at
[email protected]
The 1-year As-advertised Functionality Guarantee allows you to have peace of mind, knowing that we
back our product(s) as advertised. Should you experience a problem with the functionality of our product
(s) that we have advertised to be working, we will have our support team troubleshoot until it is evident
that a solution is not available, at which point, you may opt to return the product(s) for a purchase-price
refund.
The WiFiRanger Mobile Titanium is backed by a 5-year Warranty that protects against failure under
normal/recommended use for a full five years after purchase. Should the product fail within a year after
purchase, we will replace the failed hardware through our RMA process. To request an RMA, please
correspond with our support team at [email protected]
Intelligent WiFi Routers™!
20