Transcript
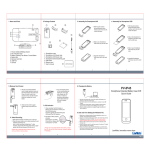
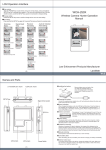
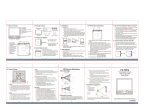
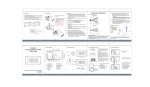
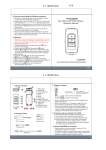
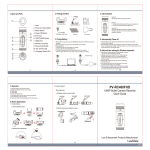
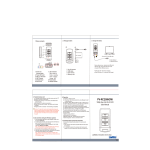
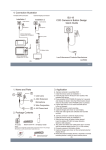
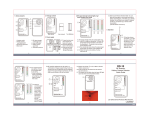
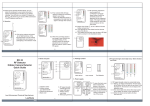
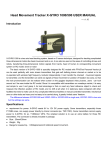
3. Charging the battery
2. Package content
1.
2. Mode button
3. °C/°F switch & Set button
4. PIR sensor
5. Max/Min switch & Up button
6. Down button
7. Lens
2
3
4
5
6
5. Installation
Manual
Lock
1
4. Format memory card
Adapter
4GB
1. Name and parts
Memory card
1. Insert the memory card
as shown in the illustration.
1. Connect the device to PC
via USB cable.
2. When the battery is fully
charged the green
indicator will turn off.
User manual
A.Wall stand
1. Slide on the wall stand cover.
2. Clean the backside surface of the device before applying
the double-side adhesive tape.
3. Clean the area of the wall you intend to install the device,
peel the film from double-side adhesive tape tape on the
device then pasting the device onto the wall.
4. Under standby status the battery can last about 5-6 days.
USB cable
7
8
9 10
11
12
13
Main device
14
8. Power switch
9. Format button
10. Memory card slot
11. USB port
12. Rec/Photo switch
13. HD/VGA switch
14. Overwrite switch
15. Microphone switch
16. Power LED
17. Rec/Photo LED
18. Charge LED
19. Buzzer
20. Reset button
15
16
Stand
2. Press and hold the 9
then power on the device.
The red indicator will
flash when the memory
card is being formatted.
The red light will turn off
when the memory card
format completed.
Double-side tape
17
18
Cleaning
19
20
Cleaning accessary
(2)
7. Download videos and photos from DVR
1. Select operation mode by sliding Photo/Rec switch to place.
2. Video: Whenever the PIR sensor is triggered, the DVR
automatically starts recording. Please note the length of
video varies from 5 seconds to 2 minutes depending on
the movement detection.
3. Photo: The device takes 3 photos whenever the PIR
sensor is triggered.
(6)
(4)
(3)
c. TIME
9. Display Setting
1. Video and photo files are stored in the memory card.
2. There are two ways to download video/photo files.
3. Using the memory card reader to download video/photo
files.
4. With the device powered on and memory card inserted,
connect the device to PC by USB connection. It will be
recognized by PC as an external drive for user to
download the video recordings and photo files.
4. Resolution setting by sliding VGA/HD switch to place.
5. Video resolution: VGA(640X480@30fps)
HD(1280X720@30fps)
6. Photo resolution: 2MP(1600X1200 .JPG)
7. LED indicator
8. Blue(Power): Blue indicator lights on when the device is
powered on.
9. Red(Rec): Red indicator lights on when recording video or
taking photo.
10.Green(Charge): Green indicator lights
on when charging and turn off when
battery is fully charged.
1.Slide the device downwards
into the table stand until
properly assembled.
Wall stand
(1)
6. Setting
B. Table Stand
MONTH
DATE
1.Long press set button 2 to access the time setting
2.Select 24-hour or 12-hour clock by pressing Up and Down 3 4
3.Press set to modify the time,using up and Up and Down 3 4
to change the time.
4.Press Mode button 1 to retreat from time setting
DAY
sun
Forecast
2:23
d. Temperature and humidity
TEMP
Humidity
1
3
2
4
a. Alarm
8. LCD setting
Time
1. Press Mode button to change the clock to show normal
time show mode.
2. Long press Set button to access the time setting.
3. Press Up/Down button to select 12H/24H.
4. Press Set button again into hour and minute selection.
5. Press Up/Down button to set the hour and minute.
6. Press Mode button to retreat from the time setting.
(7)
1. Press Mode button 1 to select the alarm disply on LCD.
2. Long press Set button 2 to access the alarm setting.
2.1 Press Up/Down button 3 4 to set the hour and minute.
3. Press Mode button 1 to retreat from the time setting.
4. Back to disply mode press Up button 3 to switch on
the alarm setting.
b. Date
1. Press Mode button 1 to select the year display on LCD.
2. Long press Set button 2 to access the date setting.
3. Press Up/Down button 3 4 to set up year.
4. Press Set button 2 again into moth and date selection.
5. Press Up/Down button 3 4 to set up month and date.
6. Press Mode button 1 to retreat from the date setting.
(8)
1. Every 20 seconds the system detects automatically
the temperature and humidity.
2. Temperature detecting from -49℃~69℃(-56°F~156°F).
3. In normal mode press ℃/°F button 2 to switch to
Centigrade or Fahrenheit.
4. The humidity detecting from 20%~89%.
5. If the system cannot detect the temperature and
humidity LCD will disply “_ _℃” and “_ _%”.
(5)
PV-TM10
Thermometer & Clock
720P Covert DVR
Quick Guide
e. MAX/MIN
1. The system memorizes the recent maximum and
minimum temperature and humidity.
2. In normal mode press once MAX/MIN button 3 to
disply the maximum temperature and humidity.
3. In normal mode press twice MAX/MIN button 3 to
disply the minimum temperature and humidity.
4. In normal mode press three times MAX/MIN button
3 to disply the current temperature and humidity.
5. In normal mode long press MAX/MIN button 3 for
two seconds to eliminate the MAX/MIN data and the
system will rememorize the newest temperature and
humidity.
(9)
LawMate
Law Enforcement Products Manufacturer