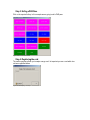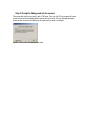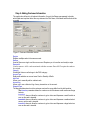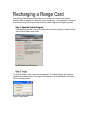
1
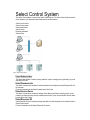
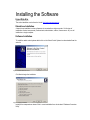
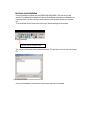
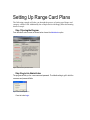
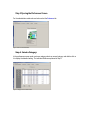
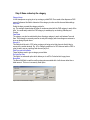
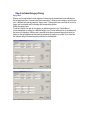
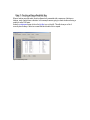
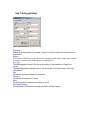
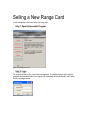
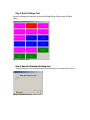
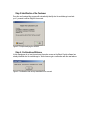
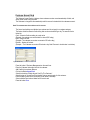
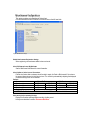
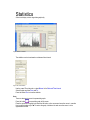
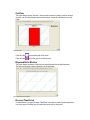
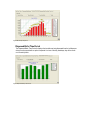
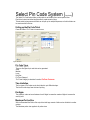
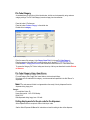
ENGLISH http://www.rangeservant.com User Guide Select Administrator Revisions RReevviissiioonn NNuum mbbeerr 1 2 Part number 2004-06-20 2006-01-1 Initial Release 2.5 Release Disclaimer and Limitation of Liability Range Servant assumes no responsibility for any damage or loss resulting from the use of this manual. Range Servant assumes no responsibility for any damages, loss or claims by a third parties, which may arise through the use of this system. Range Servant assumes no responsibility for any damages or loss caused by deletion of data as a result of malfunction. Be sure to make backup copies of all data on other media to protect against data loss. Range Servant reserve the right to change or update any information contained in this manual; to change, without notice, the design, construction, materials, processing, or specification of any product; and to discontinue or limit production, or distribution of any product. No part of this publication may be reproduced without the written authorization from Range Servant. Using this manual TTeexxtt SSttyylleess Some text in this manual is styled typographically to help you interpret the information it contains. For example, keyboard keys are styled like this: shift key. ext BButton. utton. Buttons that display on the screen are styled like this: NNext The following table identifies and explains the text styles used in this manual. Style Keys Explanation Identifies a key such as enter, on the keyboard . A plus sign (+) between 2 or more keys indicates they are a key combination. To use most key combinations: Briefly press the first key, then press the succeeding key. or Press and hold the first key, press and hold each succeeding key, then release all keys simultaneously. Unless instructed to do so, do not press the keys simultaneously. Commands “Initial Capital Letters” Identifies characters that you are asked to type. For example, to visit the Range Servant Website , you would type www.rangeservant.com Identifies words that appear on screen. For example, in a procedure for setting a happy hour, you might be asked to select an “Enable Happy Hour Period” checkbox. Welcome Range Servant Select system is an online management system for Range Servant Ball Dispensers. It is a complete and user-friendly front end for managing and controlling a golf driving range. With Range Servant Select you can run a local online payment system, manage your customers and view detailed “range” reports. GGeettttiinngg HHeellpp aanndd PPrroodduucctt SSuuppppoorrtt Range Servant Offers many resources to help to use your product. You can search the product help on the Range Servant Website www.rangeservant.com AAsskk RRaannggee SSeerrvvaanntt SSuuppppoorrtt TTeeaam m If you can’t find an answer to your question on our online resources, Range Servant offers flexible payment options to meet your support needs. You can obtain support by phone or from [email protected] . For further details about our support services, see www.rangeservant.com or call 1800-878-8050 Before you contact for technical support make sure you have the following: Hardware lock number and product version, which you will find on the tag of the hardware lock and by selecting About… from the Help Menu. Operating system version and service pack if applicable. A description of what you do before the problem occurs. Your name, Club name, and how to contact you. Contract number or payment information, if applicable. CCoonnttaacctt RRaannggee SSeerrvvaanntt SSaalleess Contact Range Servant Sales department to purchase additional products, upgrades, support services, or consulting. U.S.: Toll Free: Web Site: (800) 878 8050 http://rangeservant.com GGeettttiinngg uuppddaatteess oovveerr tthhee wweebb The check for updates command on the help menu provides an easy way to get the latest version of the Range Servant Select products using your active internet connection. Minor point releases (x.01, x.02 and so on) are generally free, while major number releases generally incur an upgrade fee. Point releases generally contain maintenance updates such bug fixes and minor feature additions. To check for updates Connect to the Internet. In the Select Client/Communicator, select “Check For Updates” from the Help menu. The select product will automatically download if an update is available. Follow the instructions, which will be displayed. Select Control System The Select Client software is a part of the Select Control System. The Select Control System consists of the hardware in the dispenser Select Dispenser Kit and the software. Select License Server Select Communicator Select Administrator Select Cashier Dispenser Hardware Select Utilities Figure 1 Select Control System SSeelleecctt AAddm miinniissttrraattoorr The Select Administrator is used for viewing statistics, reports, managing user rights setting up prices and happy hours etc. SSeelleecctt CCoom mm muunniiccaattoorr The Select Communicator handles the interface between the ball dispenser Select Dispenser Kit and the computer. For more information see the Select Communicator User Guide. SSeelleecctt LLiicceennssee SSeerrvveerr The Select License Server handles the storage of the data and the Select Licensing system. It also prevents your data from being used by unauthorized sources For the more information see the Select License Server User Guide. SSeelleecctt DDiissppeennsseerr KKiitt Select Dispenser Kit is the hardware package mounted in the ball dispenser and is interfaced with the Select Communicator. For more information see the Select Dispenser Kit manual. SSeelleecctt BBaacckkuupp aanndd RReessttoorree There are various Select utilities supplied in addition to the backup and restore functions Backup & Restore Utility Database conversion - Update to Select version 2 to databases. Select License Server IP Configuration Utility Installing the Software SSeelleecctt W Weebb SSiittee The entire installation can be found on line at http://select.rangeservant.se SSttaannddaalloonnee IInnssttaalllaattiioonn A stand alone installation is when a dispenser is connected to a single computer. On this type of installation all select components (Communicator, administrator, cashier, license server etc.) are all installed on a single computer. SSooffttwwaarree IInnssttaalllaattiioonn To install the select control system double click on the Select Control System icon downloaded from the web site Figure 3: Installation Welcome Screen Click Next to begin the installation Figure 3: Component Installation Install all the components as shown if this is a new installation then do not select “Database Conversion Utility” HHaarrddwwaarree LLoocckk IInnssttaalllaattiioonn Once the installation is finished insert the GREEN USB HARDWARE LOCK sent with your ball machine. The hardware lock manages the licensing of the software and protects your database from unwarranted use. Once this is done you need to load the license file which matches your hardware lock. To do this double click the license server icon found in the task manager as shown below. FFiigigguuurrreee333:::TTTaaassskkkMMMaaannnaaagggeeerrr License Server Process Icon This will open up the license server window shown below. The next step is to click on the “Load License File” Figure 4: License Server Screen Once you have loaded the license file the License server may have to be restarted. Setting Up Range Card Plans The following example will take you through the process of setting up a Range card category called a PAR. Additionally the example deals with Happy Hour discounting shown in step 6. SStteepp 11 OOppeenniinngg tthhee PPrrooggrraam m dminniisstrator trator option From the select control screen as shown below choose the AAdmi Figure 1: Select Control System Home Screen SStteepp 22 LLooggiinn iinnttoo AAddm miinniissttrraattoorr The program will ask you for a user name and password. The default setting is golf in both the username and password fields Figure 2: Select Control Login Screen oginn. Press the button LLogi SStteepp 33 OOppeenniinngg tthhee PPrreeffeerreenncceess SSccrreeeenn reference tab For the administrator window shown below select the PPreference Figure 3: Select Control Administrator SStteepp 44:: SSeelleecctt aa CCaatteeggoorryy:: In the preferences screen under customer category select an unused category and double click on it to display the detailed setting. The individual fields are explained in Step 5. Figure 4: Category Screen in Select Control SStteepp 55:: NNaam mee aanndd sseett uupp tthhee ccaatteeggoorryy CCaatteeggoorryy NNaammee In this example we are going to set up a category called PAR. Once used at the dispenser a PAR pass will reference this field to determine if the category is active and the time and date settings. DDaayy FFiieeldldss Select the days you want this category active for. e.g. The example shown below will allow all cards associated with the PAR category to work all the time. You could easily restrict the PAR category to weekdays by un-checking Saturday and Sunday. TTim imee FFieieldldss The category can also be restricted by time, allowing a category to work only between 7am and 9am. This example is commonly used as an early bird category which encourages a customer to show up during off peak times. DDisisccoouunntt % % This field should be set to 100% when a category is being set up that does not directly take in money at the cashier terminal. E.g. A Pro Category would have a 100% discount when a PRO is given a card to use as a privilege and does not pay for it, VVaalildid FFrroomm aanndd VVaalildid ttoo DDaatteess These fields are used to give a category an end date. PPinin CCooddee EExxpp.. DDaattee This field is an advanced option which allows you to sell Pin Codes tied into happy hours. BBoonnuuss BBaallsls The Bonus Ball field is used then selling categories associated with a ball volume rather than a dollar amount. This is not a commonly used option. Figure 5: Select Control Administrator Category SStteepp 66:: IInnddiivviidduuaall CCaatteeggoorryy PPrriicciinngg HHaappppyy HHoouurrss When a card is inserted into the ball dispenser it references the standard ball prices indicated on the ball dispenser (See “Communicator Setup Instructions”). However each category can also have up to 4 different time and day sensitive “Happy Hours”. During which time a card checks to see if a happy hour is activated and if so displays the corresponding options Setting Up Happy Hours To set up a Happy Hour pull up the category in question and click on the “Details Button” In this example we are setting up 2 different happy hours. The first will be active on weekdays and the second on Saturdays. When a card is inserted during the programmed happy hour times,the display on the ball dispenser will automatically reference the happy hour options. At all other time the customer will get the standard pricing reflected on the dispenser. Figure 6: Detailed Category with Happy Hour 1 Figure 7: Detailed Category with Happy Hour 2 SStteepp 77:: CCrreeaattiinngg aa RRaannggee CCaarrdd HHoott KKeeyy When a cashier uses the select control software he is presented with a sequence of buttons or hotkeys, each of which have a function. In this example we are going to create a button allowing a cashier to sell a PAR pass. ot KKey references screen click on the HHot ey icon on the left. This will show you a list of Under the ppreferences currently used hotkeys. Select an unused field and double click to expand. Figure 8: Detailed Hotkey Screen SStteepp 77:: SSeettttiinngg uupp HHoottkkeeyyss Figure 9: Detail of Individual Hotkey KKeeyy NNuummbbeerr References the sequential hot key number. There is no limit to the number of hotkeys that can be programmed CCaatteeggoorryy.. The category field allows us to reference the category for the hotkey being created. In this example we reference the PAR category created in Step 5 Key Type This field designates the type of Hot Key we are creating. In this example it’s a Range Card. HHoott KKeeyy This field designated the keyboard shortcut. You can use any of the function keys or alt and ctrl combinations. PPrricicee This denotes the amount charged to the customer TToo AAccccoouunntt This denotes the amount put on a card AAccttivivee The active check box is used to turn a hotkey on and off DDoonn’t’t CChhaannggee CCaatteeggoorryy Used to prevent a customer from recharging the card to a higher category. Selling a New Range Card In this example we learn how to sell a new range card. SStteepp 11:: OOppeenn UUpp tthhee ccaasshhiieerr PPrrooggrraam m Figure 1: Select Control Startup Screen SStteepp 22:: LLooggiinn The program will ask you for a user name and password. The default setting is golf in both the username and password fields. Once logged in all transactions will be referenced to the Cashier Golf for reporting purposes Figure 2: Cashier Login SStteepp 33:: SSeellliinngg aa PPAARR PPaassss Click on the required hotkey. In this example we are going to sell a PAR pass. Figure 3: Select Control Cashier Screen SStteepp 44:: RReeggiisstteerriinngg tthhee ccaarrdd The cashier program will ask you to swipe a range card. Its important you use a card which has not been registered before Figure 4: Screen Prompting a card swipe SStteepp 55:: PPrroom mpptt ffoorr AAddddiinngg ccaasshh iinnttoo tthhee aaccccoouunntt This screen will verify that you want to sell a PAR pass. Once you click OK the program will create a new account and automatically add the amount into the account. If the card already belongs to someone else the screen will identify the card and ask if you want to recharge it. Figure 6: Screen after the card has been read SStteepp 66:: AAddddiinngg CCuussttoom meerr IInnffoorrm maattiioonn The cashier should input in all relevant information. Its up to the Range management to decide which fields are important but at the very minimum the First Name, Last Name and Email should be recorded. Figure 7: Customer Information screen RReeggisistteerr Register multiple cards to the same account RReemmoovvee Used to Remove a single card from an account. Requires you to have the card ready to swipe RReemmoovvee AAlll Used to remove ALL cards associated with the account. Does NOT require the cards to be swiped CCaatteeggoorryy Shows that this account belongs to the PAR category AAccccoouunntt TTyyppee References whether an account uses Cash or Quantity of Balls. AAdddd CCaasshh Allows you to manually add or subtract cash AAccccoouunntt LLoogg Allows you to see a historical log of every transaction on the account. DDisisppeennssee TTyyppee The dispense determines how the customer receives the range balls from the ball machine. nteracttivive e parameter allows the customer a choice between small medium and large The IInterac buckets. IImmedi mmediaate1 te1 does not allow the customer to get a choice and dispenses a small bucket as soon as the card is inserted. IImmedi mmediaate2 te2 does not allow the customer to get a choice and dispenses a medium bucket as soon as the card is inserted. IImmedi mmediaate3 te3 does not allow the customer to get a choice and dispenses a large bucket as soon as the card is inserted. Recharging a Range Card Once a Range Card has been sold its likely that the customer will come back and want to purchase either the same level or better still a higher priced option. In this example we will cover a customer who has a PAR range card but wants to purchase a higher priced Eagle range card SStteepp 11:: OOppeenn tthhee CCaasshhiieerr PPrrooggrraam m If the cashier program isn’t running you would need to open it by clicking on Cashier from the Select Control System home screen Figure 1: Select Control Main Screen SStteepp 22:: LLooggiinn The program will ask you for a user name and password. The default setting is golf in both the username and password fields. Once logged in all transactions will be referenced to the Cashier Golf for reporting purposes Figure 2: Login Screen SStteepp 33:: SSeelleecctt tthhee RRaannggee CCaarrdd As we are recharging the customers account with an Eagle Range Card we press the Eagle hotkey. Figure 3: Cashier Screen SStteepp 44:: SSwwiippee tthhee CCuussttoom meerrss EExxiissttiinngg CCaarrdd As we are recharging a card its important swipe the card belonging to the customer and not new one. Figure 4: Card Swipe Prompt SStteepp 55:: IIddeennttiiffiiccaattiioonn ooff tthhee CCuussttoom meerr Once the card is swiped the program will automatically identify who the card belongs to and ask you if you want to add an Eagle to the account Figure 5: Prompt identifying the account SStteepp 66:: CCoonnffiirrm maattiioonn ooff BBaallaannccee In this example we do not see the customer information screen as the Select Control software has already identified who the card belongs to. We do however get a confirmation with the new balance Figure 6: Confirmation that money was added to the account Processing Common Transactions TThe he ccustomer ustomer hhas as llost ost ttheir heir ccard ard There are two ways to handle this type of situation. The first is to block the card; the other is to erase it from the system. Block ID-Cards If the customer has misplaced his card his card but haven’t lost it you can use the Block ID option. The “Block ID-card” option blocks all card cards, but the card is not deleted from the system. d CCustomer ustomer Button. From the Cashier Screen Press the FFiinnd And locate the customer using the First Name Last Name or Customer Number fields In the customer account screen Select the Check Box “Block ID Card”. ave button. Press the SSave If the customer has lost his card then you can un-register his card and replace it with another card. Remove ID-Card There are two ways to remove ID-Cards. Remove Find the customer. emove button and swipe the card, click YYes es on the In the Customer Information form click the RRemove confirmation message that will be displayed. Remove All This will remove all customer cards that are registered to this customer. Find the Customer. emove AAllllll.. Click Yes on the confirmation message In the customer information form click the button RRemove that is displayed. Message is displayed that the cards are removed and the amount of card. CCuussttoom meerr AAnnnnuuaall CCaarrdd The Customer Annual Card is a feature, where customers receive annual membership of balls, and where abuse wants to be prevented. The Customer is charged for the membership and this amount is inserted into the customers account. Note! The customer must have a balance on his account. The Annual card settings are individual per customer and do not apply to a customer category. The feature limits the amount of balls during that can be received during a day. The amount can be limited by: Cash – Amount of balls according to a cash value. (Example: the customer can receive balls for value of $25 a day). Balls – Amount of balls (Example: The customer can receive an amount of 25 balls a day) Buckets – Number of buckets (Example – The Customer can receive 25 buckets a day. Note! Concern to bucket sizes is not taken). Figure 2 Annual Card Press the button 2 Customer Management on the main form. Enter the Customer Information form for the customer. Add Credit to the customer Balance. nnuaall CCard a rd . Click on the Button AAnnual Select the checkbox “Enable Annual Card For This Customer”. Select the type of “Annual Card Functionality” that you want to apply for this customer. Enter the limiting value for the functionality (Cash, Balls or Buckets). Select validation start and end dates for this annual card. ave . Press the button SSave M Miisscceelllaanneeoouuss CCoonnffiigguurraattiioonnss This section contains various settings of Select client. Click the button Ball Account Price list in the Outlook bar on the left hand side. Figure 3 Miscellaneous Settings Default New Customer Registration Settings When registering new customers default values can be set. Allow POS Remote Control By Mainframe See the Mainframe User Manual for more information. Allow ProRata on Online Account Transactions ProRata is a feature that a customer should be able to empty his Cash or Ball account if the value on the account does not reach to the first price level. This is done by automatically adjusting the displayed pricelist according to the current balance. Example: Without ProRata With Prorata Price Level 1 15 36 balls 15 36 balls Price Level 2 25 65 balls 19 19 balls Price Level 2 35 101 balls NOT DISPLAYED Customer Balance 19 19 NOTE!! The ProRata feature can ONLY be used in full ULTIMA ball dispenser installations. Show warning before executing Hot keys Displays confirmation message before executing a hotkey event. Hot keys are described in section SETTING UP HOTKEYS. Statistics Select can display various range data graphically. Figure 4 Statistics / Cashflow The statistics can be view based on a data and time interval. Figure 5 Set a time limitation anual in the DDate ate aand nd TTiimme e IInterval nterval Use the preset Time Intervals or select MManual F r o m T o Select the date and time From and To. un to view the statistics. Press the Button RRun Zoom There are two ways to zoom the presented graphs. to expand the graph to full screen. Press the button Place the mouse on the graph hold down the left button on the mouse and move the cursor in a motion from top left to buttom right. Ô. To restore the graph, hold down the and move the cursor in a the opposite direction Ñ . CCaasshhFFllooww This graph displays the total “real cash” that have been received in by adding credits to customer accounts, cash from the dispenser, tokens and the amount received by customers from pin code tickets. Figure 6 Cash Flow Press the button to expand the graph to full screen. Press the button to print the graph to the default printer. DDiissppeennsseedd BBaalllss // M Maacchhiinnee This graph displays the amount of balls that have been dispensed from the ball dispenser(s). The graph can be set for a specific dispenser or for all dispensers. Figure 7 Dispensed Balls per Dispenser RReevveennuuee // TTiim mee PPeerriioodd eriood evenue // TTiimme e PPeri d is the option to display the data separated on An added feature in the graph RRevenue hour of day, days of the week, day of the month and month during a time period. Figure 8 Revenue per time period DDiissppeennsseedd BBaalllss // TTiim mee PPeerriioodd The Dispensed Balls / Time Period is displays the how balls are being dispensed from the ball dispense during the a time period with an option to separate it on hour of the day, weekdays, days of the month or on a monthly basis. Figure 9 Dispensed Balls per Time Period Top List Top list displays various of data about the who and how customer are using your range. TToopp CCuussttoom meerr bbyy bbaallaannccee ((CCaasshh AAccccoouunntt)) umber ooff hhitits s , who Generates a graph displaying the amount of customers, entered in the edit box NNumber have the most credit stored on their account. TToopp CCuussttoom meerr bbyy BBaalll BBaallaannccee ((BBaalll AAccccoouunntt)) Same as above but regarding ball accounts TToopp CCuussttoom meerr bbyy AAccccoouunntt UUssaaggee ((TTiim mee PPeerriioodd)) Generates a graph displaying which customer(s) have received balls most times from the dispensers. NNote! ote! No concern to bucket sizes is not taken. TToopp CCuussttoom mee PPeerriioodd)) meerr bbyy DDiissppeennsseedd BBaalllss ((TTiim Displays the customer(s) who have received the most balls from the dispenser. TToopp OOppeerraattoorr bbyy SSaalleess ((TTiim mee PPeerriioodd)) Generates a graph displaying, which operator have highest accumulated value of sales from Pin code and card system. TToopp BBuucckkeett SSiizzeess DDiissppeennsseedd ((TTiim mee PPeerriioodd)) Diplays a graph on the most used dispensed ball sizes. TToopp CCaatteeggoorryy bbyy M Meem mbbeerrss Displays which customer category (Range plan) has the most members. Number Of Hits Enter the number of range that you want to receive (Top 5, Top 10 and so on). Reports Select has a variety of reports, which can be printed, Figure 10 Reports TTrraannssaaccttiioonn SSuum mm maarryy The transactions summary is report that displays an income summary from the online card system, pin code ticket sales and a summary of the income received from the ball dispensers. DDiissppeennsseerr TTaakkiinnggss This Dispenser Takings Report displays the total amount of cash and tokens received in at the ball dispenser and the total value per cash type ($1, $5, RS-A, RS-B and so on). CCaasshhffllooww CCaasshhiieerr AAuuddiitt TTrraaiill The cashier Audit Trail report displays the transactions that an operator has done during a specified time period. Needs to be updated with range summary report Select Pin Code System ( ) if applicable The Select Pin Code feature offers you the option to sell tickets of four various portion sizes. Each ticket is also time-limited to expire after a preset amount of days. Tickets containing large amount of balls can be split up into multiple dispenses, so that the tickets can be used more than one time. SSeettttiinngg uupp tthhee PPiinn CCooddee TTiicckkeett Press the button 6. Pin Ticket in the main menu. Figure 1 Pin Ticket PPiinn CCooddee TTyyppeess There are five types of pin code that can be generated. Small, Medium, Large King Size Pin Ticket Category* *Pin Ticket Category is described in section PIN CODE CATEGORY TTiim mee LLiim miittaattiioonn The four types of Pin Codes can be time limited in up to 999 whole days. The ticket is valid x days from the time of printing. PPiinn DDiiggiittss The printed pin code can be set between 4 and 8 digits. Increase the number of digits to increase the security level. M Maaxxiim muum m PPoorrttiioonn SSiizzee With the Parameter Max Portion Size a pin ticket with large amount of balls can be divided in to smaller portions. The Maximum portion size applies to all portion sizes Example: Pin Code Ticket with a 100 balls and Max portion size = 25 will initiate 4 dispenses of 25 balls. DDeeffaauulltt TTiicckkeett HHeeaaddeerr A free text can also be printed together with the pin code for advertising purposes. This text is set in the DDefau efaultlt TTiiccket ket HHeader eader . PPrriinntt LLaarrggee CCooddee oonn ttoopp ooff ttiicckkeett Check the checkbox to print the pin code in a large font at the top of the ticket. GGeenneerraattee PPiinn CCooddeess ttoo ffiillee enerate PPiinn CCode ode tto o ffiiillele enables for generating pin codes in advance for advertising. The Feature GGenerate CodeLisst.Txt t.Txt . The Pin codes are saved to the file PPiinnCodeLi The pin codes are separated by a Carriage Return CR; Import the file in your favorite spreadsheet for further processing.. See also Pin Code Category for further information. Enter the number of balls in the edit box for how many balls each ticket should contain. Enter expiration time Enter the amount of pin codes that should be generated. enerate . Press the button GGenerate PPiinn CCooddee CCaatteeggoorryy As standard there are only four pin ticket bucket sizes, but this can be increased by using customer category settings. The Pin Code Category has also a happy hour bonus feature. Press the button 3. Preferences ustomer CCategory ategory in the outlook bar. Press the button CCustomer ategory . Double click at a ccategory Figure 11 Pin Code Category ategory NName ame FFiieelldd (In this case Pin CCode ode CCategory ategory ). Enter the name of the category in the CCategory i P n C o d e E x p ays (10 10 ). Enter the amount of days that the Pin code should be valid in the field Pin Code Exp DDays l l i B a s 1 H a p p y H o u r P e r o d 4 ll In the field Balls 1 in Happy Hour Period 4 enter the amount of balls that the Pin Ticket should hold. To access the Category Pin Ticket a hotkey must be set up. Hot keys are described in section SETTING UP HOTKEYS PPiinn CCooddee CCaatteeggoorryy HHaappppyy HHoouurr BBoonnuuss Pin code Category has a happy hour bonus feature, which works as follows: If the happy hour is enabled for this category, an extra amount balls specified in the field “Bonus” is dispensed. NNote ote !! The extra amount of balls is not generated on the receipt, it is only dispensed from the dispenser during happy hour. Example: Pin code ticket Value: 50 Happy Hour period: 14.00-15.00 Monday Bonus: 20 % Balls dispensed during happy hour = 60 balls. SSeettttiinngg ddiissppllaayy m mooddee ffoorr tthhee ppiinn ccooddee ffoorr tthhee ddiissppeennsseerr.. At the dispenser there is an option to show or hide the pin code. See the Select Dispenser Kit Manual for instructions on how this setting is done at the dispenser. See the Select Communicator manual on how this is done using the Select Communicator.