1
aMember Guide
© 2002-2006, CGI-Central
What is aMember Pro?
Introduction
by Alex Scott
aMember is a flexible membership and subscription
management PHP script. It has support for PayPal,
BeanStream, 2Checkout, NoChex, VeriSign PayFlow,
Authorize.Net, PaySystems, Probilling, Multicards, E-Gold
and Clickbank payment systems (complete list can be found
here) and allows you to setup paid-membership areas on
your site. It can also be used without any payment system you can manage users manually. aMember Pro also
supports integration plugins to link with third-party scripts
databases (like vBulletin, Invision Board, you can see
complete list here). aMember is a perfect solution for selling
digital membership and downloads, and it can be used for
another applications as well.
aMember Pro
© 2002-2006, CGI-Central
All rights reserved. No parts of this work may be reproduced in any form or by any means - graphic, electronic, or
mechanical, including photocopying, recording, taping, or information storage and retrieval systems - without the
written permission of the publisher.
Products that are referred to in this document may be either trademarks and/or registered trademarks of the
respective owners. The publisher and the author make no claim to these trademarks.
While every precaution has been taken in the preparation of this document, the publisher and the author assume no
responsibility for errors or omissions, or for damages resulting from the use of information contained in this document
or from the use of programs and source code that may accompany it. In no event shall the publisher and the author be
liable for any loss of profit or any other commercial damage caused or alleged to have been caused directly or
indirectly by this document.
I
aMember Pro
Table of Contents
Part I Introduction
3
1 aMember Pro ...................................................................................................................................
Licence Agreement
3
2 Support
................................................................................................................................... 4
Part II How it works
6
1 Signup
................................................................................................................................... 6
2 Payment
................................................................................................................................... 6
3 Expiration and...................................................................................................................................
subscription renewal
7
4 Protection
................................................................................................................................... 7
5 Third-party scripts
...................................................................................................................................
integration
7
Part III Installation
10
1 Requirements
................................................................................................................................... 10
2 Quick Start ................................................................................................................................... 10
3 Step-by-Step................................................................................................................................... 10
4 Initial Setup ................................................................................................................................... 11
5 How to set cron
...................................................................................................................................
job
12
6 First steps ................................................................................................................................... 14
7 Setting-up protection
................................................................................................................................... 15
8 Affiliate program
................................................................................................................................... 17
9 Upgrade from
...................................................................................................................................
Free to Pro
18
10 Upgrade Pro...................................................................................................................................
to newer version
18
Part IV Payment Plugins
1 PayPal
21
................................................................................................................................... 21
2 PayPal Pro ................................................................................................................................... 22
3 2Checkout ................................................................................................................................... 23
4 ClickBank
................................................................................................................................... 25
5 VeriSign PayFlow
...................................................................................................................................
Link
26
6 WorldPay
................................................................................................................................... 28
7 Free
................................................................................................................................... 28
8 Other plugins
................................................................................................................................... 29
Part V Protection Plugins
31
1 Using new_rewrite
................................................................................................................................... 31
2 Using mod_rewrite
...................................................................................................................................
with php_include
32
© 2002-2006, CGI-Central
Contents
II
3 Using php_include
................................................................................................................................... 33
4 Using auto_prepend
...................................................................................................................................
with php_include
35
5 Using htpasswd
................................................................................................................................... 36
Part VI Third-party Plugins
39
1 Bulletin Board
...................................................................................................................................
Plugins
39
Part VII aMember Admin CP Guide
42
1 Setup/Configuration
................................................................................................................................... 42
2 Configuring ...................................................................................................................................
Plugins
43
3 Managing Products
................................................................................................................................... 44
4 Products Renewal
...................................................................................................................................
Groups
46
5 Managing Users
................................................................................................................................... 47
6 Managing Payments
................................................................................................................................... 49
7 Coupons
................................................................................................................................... 50
8 Error and Access
...................................................................................................................................
Logs
51
9 IP-based access
...................................................................................................................................
control
52
Part VIII Customization
55
1 Templates Customization
................................................................................................................................... 55
Creating header
..........................................................................................................................................................
and footer files
55
2 Adding login-form
...................................................................................................................................
anywhere on your site
56
3 Include member's
...................................................................................................................................
data into pages
57
4 Adding new fields
................................................................................................................................... 57
5 Creating new...................................................................................................................................
integration plugins
59
How to start ..........................................................................................................................................................
Understanding
..........................................................................................................................................................
user record
How to setup ..........................................................................................................................................................
a plugin hook
Plugin hooks ..........................................................................................................................................................
- member status
Plugin hooks ..........................................................................................................................................................
- login helpers
Plugin hooks ..........................................................................................................................................................
- signup helpers
59
60
60
61
62
63
6 Extending aMember
...................................................................................................................................
with PHP
63
Hooks - validation
..........................................................................................................................................................
functions
Hooks - payments
..........................................................................................................................................................
update
aMember database
..........................................................................................................................................................
functions
Index
© 2002-2006, CGI-Central
64
64
65
67
1
Foreword
© 2002-2006, CGI-Central
Part
I
3
1
aMember Pro
Introduction
aMember Pro is a PHP script for creating protected areas on websites with payment
processing options. This document covers aMember Pro installation, configuration and
customization.
This document is a setup/customization guide for aMember Pro script users. It describes the
process new users should follow to install the script on their web site and customize it to their
needs.
Much of this guide assumes that the user is familiar with FTP and HTML. Certain parts also
require basic knowledge of PHP, but all these parts are optional and may be skipped.
Less experienced users will find it easier to follow the longer step-by-step installation guide
and will find links to additional information at various points in the Guide.
aMember Pro website: http://www.cgi-central.net/scripts/amember/
1.1
aMember Pro Licence Agreement
aMember Pro ('the Software') is a copyrighted work of authorship and is also protected under
applicable database laws. CGI-CENTRAL retains ownership of the Software and any copies of it,
regardless of the form in which the copies may exist.
By installing and using aMember on your server, you agree to the following terms and conditions. Such
agreement is either on your own behalf or on behalf of any corporate entity which employs you or
which you represent ('Corporate Licensee'). In this Agreement, 'you' includes both the reader and any
Corporate Licensee
* aMember licence grants you the right to run one instance (a single installation) of the Software on
one web server and one web site for each licence purchased. Each licence may power one instance of
the Software on one domain. For each installed instance of the Software, a separate licence is
required.
* Transfer Policy: CGI-CENTRAL may, in its discretion, allow you to transfer your license to another
domain, providing the license:
- has not already been transferred; and
- was purchased less than 3 months in the past.
* If you have a valid licence, you may set up an additional test installation on test host, providing it
never will be accessed by the general public;
* The licence is effective until terminated. You may terminate it at any time by uninstalling the
Software and destroying any copies in any form.
* You undertake to;
- ensure that, prior to use of the Software by your employees or agents, all such parties are notified
of the terms of this Agreement; and
- hold all data (including object and source codes), software listings and all other information
relating to the Software confidential and not at any time, during the period of the licence or after its
expiry, disclose the same whether directly or indirectly to any third party without CGI-CENTRAL's
consent.
* The Software source code may be altered (at your risk)
* The Software may not be used for anything that would represent or is associated with an
Intellectual Property violation, including, but not limited to, engaging in any activity that infringes or
misappropriates the intellectual property rights of others, including copyrights, trademarks, service
marks, trade secrets, software piracy, and patents held by individuals, corporations, or other entities.
© 2002-2006, CGI-Central
Introduction
4
* If any of the terms of this Agreement are violated, CGI-CENTRAL reserves the right to revoke the
licence at any time.
Disclaimer of Warranty
The software and the accompanying files are sold "As Is" and without warranties as to performance of
merchantability or any other warrantied whether expressed or implied.
CGI-CENTRAL is not liable for the content of any site powered by the Software.
You must assume the entire risk of using the program. ANY LIABILITY OF CGI-CENTRAL WILL BE
LIMITED EXCLUSIVELY TO PRODUCT REPLACEMENT OR REFUND OF PURCHASE PRICE.
Except in respect of personal injury or death caused directly by the negligence of CGI-CENTRAL, in no
event will CGI-CENTRAL be liable to you for any damages, including any lost profits, lost savings, loss
of data or any indirect, special, incidental or consequential damages arising out of the use of or inability
to use such Software, even if CGI-CENTRAL has been advised of the possibility of such damages.
Nothing in this Agreement limits liability for fraudulent misrepresentation.
This licence gives you specific legal rights and the you may have other rights that vary from country to
country. Some jurisdictions do not allow the exclusion of implied warranties, or certain kinds of
limitations or exclusions of liability, so the above limitations and exclusions may not apply to you. Other
jurisdictions allow limitations and exclusions subject to certain conditions. In such a case the above
limitations and exclusions shall apply to the fullest extent permitted by the laws of such applicable
jurisdictions. If any part of the above limitations or exclusions is held to be void of unenforceable, such
part shall be deemed to be deleted from this agreement and the remainder of the limitation or
exclusion shall continue in full force and effect. Any rights that you may have as a consumer (i.e. a
purchaser for private as opposed to business, academic or government use) are not affected.
General
This Agreement constitutes the complete statement of the agreement between you and
CGI-CENTRAL, and supercedes all representations, understandings or prior agreements between you
and CGI-CENTRAL.
CGI-CENTRAL reserves the right to modify these terms at any time.
1.2
Support
CGI-Central offers fast priority email and web-based support to all customers of aMember Pro version.
Guaranteed response time is 24 hours for any question.
Priority Support
Web Support: https://cgi-central.net/support/
E-Mail Support: [email protected]
Forum (no priority support)
http://www.cgi-central.net/forum/
FAQ (Frequently asked questions)
https://www.cgi-central.net/support/faq.php
© 2002-2006, CGI-Central
Part
II
How it works
2
6
How it works
This is an overview of how the aMember script works to sign up users to your protected area or areas.
If you are unfamiliar with aMember or have not used a script to protect content in the past, it is highly
recommended that you read this section before installing aMember.
2.1
Signup
The procedure for signing up a new customer/member is as follows:
1. A user comes to the signup page (http://www.yoursite.com/amember/signup.php) and
completes a signup form. User is asked to enter their first and last name and email
address. They may also be asked to create a username and password. You can
optionally enable username and/or password generation in the aMember Pro settings,
in which case the user will be issued with an automatically generated username and/or
password.
2. You may add more fields to signup form if you wish.
3. After completing the form, the user presses the "Signup" button. aMember now
creates two new database records:
· a pending user record
· a pending payment record.
This does NOT give the user rights to enter. The pending payment record contains
amount to be paid, subscription start and expiry dates, subscription type ordered
and other related information. However this payment record is not marked as
"paid".
Read about payment process
2.2
6
Payment
·
The user is redirected to payment system payment page where he will be asked for
credit card info (or for other necessary payment information, depending on the
payment method selected). The payment gateway (eg PayPal, 2Checkout or
Authorize.Net) checks the information entered and makes the transaction.
· Once the transaction is completed successfully, the user will be redirected to the
"thanks" page of aMember (http://www.yoursite.com/amember/thanks.php). If the
transaction failed, user may be redirected to failed payment page (only if the payment
system supports it : http://www.yoursite.com/amember/cancel.php ).
· In background, the payment system sends confirmation to aMember script that the
payment process has been completed. The aMember script then marks the payment as
"Paid" and sends a signup (welcome) email to the customer.
Read about subscription expiration
7
Full list of supported payment plugins can be found here:
http://www.cgi-central.net/scripts/amember/features.php#paysys
© 2002-2006, CGI-Central
7
2.3
aMember Pro
Expiration and subscription renewal
All members (even those who did not pay or whose payment has been failed) can access
the aMember members page (http://www.yoursite.com/amember/member.php).
On this page they will see:
· Links to membership areas which they are allowed to access (is to which subscriptions
are completed and not-expired)
· Logout link
· Link to update profile info/change password
· List of completed payments (if subscription is recurring, a subscription cancel link will
be displayed near every active recurring subscription record)
· Controls to renew subscription or order another subscription type(product)
To add/renew a subscription, users must select a membership type, a payment method and
press a button, then they are redirected to a payment system page and payment will be
exactly the same as for initial signup. If a user already has a subscription to the same
subscription type (product), the new subscription start and expiry dates will be calculated
from the day when the existing subscription expires.
Read about protection abilities
2.4
7
Protection
aMember can generate an authorization database for any number of protected
destinations. For example, it can generate .htpasswd and .htgroup files, which are suitable
for authorization on Unix platforms.
aMember handles subscription expirations and expired members will not get access to
protected areas. aMember can also act as an authorization source itself, checking
authorization in the database, when someone tries to access a protected area protected
with the php_include method.
All protection methods are fully described in separate chapter: "Protection Plugins"
Read about third-party scripts integration
2.5
31
.
7
Third-party scripts integration
aMember can be integrated with third-party scripts, such as bulletin boards, Content
Management Systems, trouble tickets systems and so on.
For example, it can maintain a vBulletin Board database, so that only active (paid and
not-expired) members are able to access the board. Thus a user can have a single login for
both aMember and vBulletin and (in case of vBulletin board) will need to login only once
in to access protected areas with HTML content and the vBulletin board.
Full list of available integration plugins can be found here:
© 2002-2006, CGI-Central
How it works
http://www.cgi-central.net/scripts/amember/features.php#protect
© 2002-2006, CGI-Central
8
Part
III
Installation
3
Installation
3.1
Requirements
10
· PHP version 4.1.0+
· MySQL version 3.23+
· Apache (generally Unix-based) hosting (only if protection is required )
If you are unsure whether your hosting meets these requirements, please contact your host
company for confirmation.
3.2
Quick Start
Installation is easy and aMember includes an automated set up for your database.
If you are experienced in installing scripts, this Quick Guide will have you up and running in
minutes. If you are less experienced you may prefer to follow the more detailed Step-by-Step
Instructions 10 .
Installation Quick Guide
Unpack the distribution of the script.
FTP the entire aMember folder to your public HTML directory in binary mode.
To use the Web Based Setup browse to:
http://www.yoursite.com/amember/setup.php
If setup script requires, make the following folders writeable for the script (chmod 707 or
777 depending on server configuration):
·
·
amember/data/
amember/data/new_rewrite/
Follow setup script instructions
3.3
11
Step-by-Step
Installation is quite easy.
If you are experienced in installing PHP scripts, the Quick Guide 10 will have you up and
running in minutes. Otherwise please follow these detailed step-by-step instructions.
Installation Step-by-Step Instructions
1. Unzip the distribution of the script. To do this you will need an unzipping utility with
support for long filenames. WinZip is suitable.
2. You now need to FTP the script files to your server, using an FTP client such as
WS_FTP. It is important that aMember files are copied to the correct place in your
directory structure. The aMember folder should be copied to your public HTML
directory - this is the directory where your home page is located, often called '
html_docs', 'public_html' or something similar. FTP the entire aMember folder to
this directory making sure that you transfer the files in binary mode. There is no need
to set up the folders on the server side, you can copy the whole directory over in a
© 2002-2006, CGI-Central
11
aMember Pro
single step.
3. To use the Web Based Setup browse to
http://www.yoursite.com/amember/setup.php,
then follow the instructions at
each step in the web-based 11
4. If the setup script requires, the following folders must be made writeable for the
script:
·
·
amember/data/
amember/data/new_rewrite/
5. This usually means CHMOD permissions 707 or 777. Which one will depend on your
server configuration. Try 707, if you get an error in the installation procedure you can
change it to 777. If you are unsure about how to CHMOD your files, please see here.
3.4
Initial Setup
Setup Guide
Each screen of the setup procedure has instructions about the information required. Please
read these instructions carefully!
Configuration Parameters
Note: You will be able to edit these later in the aMember Admin Control Panel.
· Root URL of script
This will be http://www.yoursite.com/amember where yoursite.com is your
domain. NO trailing slash!!
· Secure (HTTPS) Root URL of script
Only required if you are using a secure connection. If not leave it blank. This will
start with https://
· Admin Email
Your email address - the address to which alerts generated by the script will be
sent.
· Admin Login
Chose a login name for accessing the aMember Admin Control Panel
· Admin Password
Chose a password for accessing the aMember Admin Control Panel
· Template Cache Level
This can be altered later in the Admin section - leave it at '0' during installation.
· License
Paste the full license key here.
If you do not have a license key, log on to
https://www.cgi-central.net/amember/member.php using the username and
password supplied when you purchased the script.
Database Connection
© 2002-2006, CGI-Central
Installation
12
To create the aMember database some information is required about your MySQL
database. If you do not know this information please consult your hosting
documentation or contact your host.
· MySQL Host
Very often 'localhost' - if you are unsure, try that.
· MySQL Database
If you created a database for aMember, enter its name. If you are using the
default database created by your host it may be called something like '
yoursite_com' or 'yoursite_host_com' - if you are unsure please consult
your hosting documentation or contact your host.
· MySQL Username
Will have been supplied to you by your host.
MySQL
Password
·
Will have been supplied to you by your host.
MySQL
Tables Prefix
·
This is important if you are running several applications in the same database. If
you are unsure about this enter 'amember_' , including the underscore.
Setting-up cron job
aMember has ability to execute periodical jobs (update membership status, rebill
customers, etc) without additional setup. However, it is more reliable to setup an external
cron job. If your hosting / control panel supports setting-up cron jobs, please do the
following:
· Go to aMember CP -> Setup -> Advanced and enable "Use External Cron"
setting;
· Go to your webhosting control panel and setup a cron job that will run URL
http://www.yoursite.com/amember/cron.php at 00:00 everyday.
Please read the following topic for more details
12
.
Congratulations! You have successfully installed aMember!
3.5
How to set cron job
What is a cron job?
The cron job is a sheduled task on the hosting server. You may choose to run specific
program in specific time, periodically. In case of aMember Pro, we have to call aMember Pro
page (yes, just regular page: http://yoursite.com/amember/cron.php) with browser.
However, your hosting is using Linux/Unix, so there is no usual browsers like IE or
Netscape.
We will use command-line text mode browser, named Lynx. You may run it on Unix with the
following command: /usr/bin/lynx -source
Line /usr/bin/lynx -source http://yoursite.com/amember/cron.php will access specified
URL and display HTML source of page. In our case, we don't need any output, we just need
© 2002-2006, CGI-Central
13
aMember Pro
our page to be accessed, so we will ignore output.
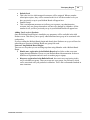
Setting it up
We will provide here instructions for CPanel-based control panel. I hope you will be able to
find equivalent controls if your hosting uses different panel software.
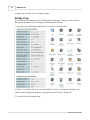
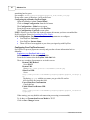
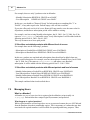
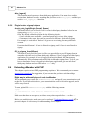
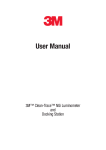
1. Login into your webhosting control panel. You will see screen like that:
2. Click to "Cron Jobs" link. It may be also hidden in "Tools" or "Advanced" submenu. You
will see screen offering you to choose your expirience level. Choose "Advanced".
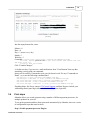
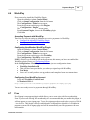
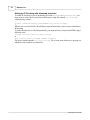
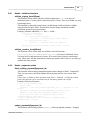
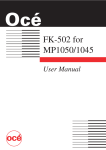
3. You will see the following screen:
© 2002-2006, CGI-Central
Installation
14
Into the empty bottom line, enter:
Minute = 0
Hour = 0
Day = * (means every day)
Month = *
Weekday = *
Command = /usr/bin/lynx
-source http://yoursite.com/amember/cron.php
Of course, replace yoursite.com to your actual domain name. Ensure that this
URL works, first try
to open it from your browser.
Click "Commit Changes"
4. On the next day, if you receive e-mail notifications from "Cron Daemon" that says that
something is wrong with your command,
please read it carefully. It means that your cron job doesn't work. If it says "Command not
found" , try to use the following command lines:
/usr/bin/curl -s http://yoursite.com/amember/cron.php
/usr/bin/wget -o/dev/null -O- http://yoursite.com/amember/cron.php
/usr/local/bin/lynx -source http://yoursite.com/amember/cron.php
/usr/local/bin/curl -s http://yoursite.com/amember/cron.php
/usr/local/bin/wget -o/dev/null -O- http://yoursite.com/amember/cron.php
If nothing helps, feel free to contact CGI-Central Support, and dont' forget to include your
webhosting control panel login info and aMember CP (admin) login info.
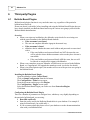
3.6
First steps
aMember allows you to take payment using a number of different payment processors, for
multiple products on your site.
To set up the payments and have them processed automatically by aMember, there are a series
of configuration steps that must be taken.
Step 1: Enable payment processor Plugins
© 2002-2006, CGI-Central
15
aMember Pro
aMember has pre-existing plugins which allow you to easily take payment from a number of
payment processors.
You can choose just one processor or multiple processors, in which case users will be able to
choose how they prefer to make payments. Of course you must have an account with a
payment processor before you can use the plugin for that processor.
To enable payment plugin, visit aMember CP -> Setup -> Plugins and enable necessary
payment plugins.
Step 2: Configure Payment Plugins
Consult and follow the specific configuration information for each plugin you have enabled.
You can find plugin configuration page at aMember CP -> Setup -> PLUGIN_NAME. Take an
advice to gray box below the plugin configuration screen - it displays content of readme.txt
file from plugin folder, make sure you read it.
Step 3: Set up Products
It is necessary that you set up some products (membership types). See Managing Your
Products for details.
Step 4: Conduct test purchases
Be sure to leave test thoroughly, before allowing users to subscribe and pay, to ensure that
your systems are working.
Visit page http://www.yoursite.com/amember/signup.php and try to signup. If your payment
processor supports test mode, then enable this mode and use test credit card numbers. If it
doesn't support, run a real payment, then visit your Payment system control panel and refund
payment (it cannot be done from aMember yet).
3.7
Setting-up protection
Protection Basics
Essentially protection allows you to make one or more areas on your site available only for
registered and not-expired customers. If you have protection set up correctly, only ACTIVE,
that is paid and non-expired, customers will be able to access the protected area or areas.
You already know that aMember allows you to have several membership types ("products")
each of which broadly equates to a protected area. aMember allows considerable flexibility in
setting up protection for these areas.
For example, suppose you have 2 folders on your site:
/membersA/
/membersB/
and you have 3 products:
Product #1 - gives access to folder A
Product #2 - gives access to folder B
Product #3 - gives access to both folder A and folder B
Please note: Products are always numbered. The id number is visible on the "aMember
Admin Control Panel > Edit Products" page. First id is not always equal to 1, and second id
is not always equal to first id increased by 1.
© 2002-2006, CGI-Central
Installation
You can allow access as follows:
/membersA/
16
access allowed for members subscribed to
products #1 OR #3
access allowed for members subscribed to
products #2 OR #3
/membersB/
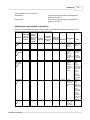
Choosing the right method of protection
There are several methods of protection available with aMember. The one you chose will
depend on both your hosting features and your needs.
METHOD
new_rewrite
.... 31
Username/p
assword
HTML login
invisible in
form, no
URL and not
ugly login
stored in
window
browser
history
Logout is
possible
Tracks IP to
Limitation to
prevent
number of
Requirement
password
Performance
user records
s
sharing
+
+
+
no limits
no limits
+
mod_rewrite
with
php_include
.... 32
+
+
+
+
no limits
no limits
auto_prepen
d_file with
php_include
..... 35
+
+
+
+
no limits
no limits
php_include
..... 33
+
+
+
+
no limits
no limits
htpasswd
..... 36
-
-
-
-
limited
no limits
© 2002-2006, CGI-Central
mod_rewrite
available
from
.htaccess
files
mod_rewrite
available
from
.htaccess
files, PHP
compiled as
Apache
module
mod_rewrite
available
from
.htaccess
files, PHP
compiled as
Apache
module
Notes
most
preffered
method
this method
may cause
problems
with
third-party
PHP scripts
in protected
area
cannot be
used to
protect
images or
downloadable
content, this
method may
cause
problems
with
third-party
PHP scripts
in protected
area
all your
cannot be
PROTECTE used to
D content
protect
must be PHP images or
files
downloadable
content. You
have to
change your
existing files.
All your
protected
content must
reside in files
with .php
extension.
no special
requirements,
will work on
any hosting
17
aMember Pro
As you can see from the table above, php_include with mod_rewrite is the preferred and most
useful method of protection. If hosting limitations don't allow you to use this method, we
recommend using htpasswd_secure protection.
php_include plugin uses the MySQL database directly to authenticate members.
htpasswd plugin builds .htpasswd and .htgroup files in amember/data/ folder. These files are
completely updated every time anything is changed in the members database.
The .htpasswd file contains a list of ACTIVE user accounts in the following form:
username1:crypted_password1
username1:crypted_password2
.htgroup file contains a list of products, each followed by a list of members who own
subscription for the product:
PRODUCT_1: username1 username2 username5 ...
PRODUCT_2: username3 username4 username5 ...
NOTE. Most effective way to setup protection is to use aMember CP -> Protect Folders
function instead of manual procedures described in the manual. It will also show you list of
protection methods available on your website.
Enabling Protection Plugins
Step 1. Enable protection plugin
To enable plugin, visit aMember CP
plugins.
-> Setup -> Plugins
and enable necessary protection
Step 2. Configure protection plugin
Visit aMember CP -> Setup -> PLUGIN_NAME and setup necessary parameters if plugin requires
it.
Step 3. Follow plugin readme to actually enable protection
When you are on the page aMember CP -> Setup -> PLUGIN_NAME, have a look to readme text
on this page.
It will give you neccessary instructions to actually enable protection. This readme is specially
useful, because it contains .htacess files which can be used on your site without any changes.
Step 4. Test your protection
If you followed payment process testing, as described above, you should already have
working username and password to access protected area. Try to access protected area directly
- it will ask you for username and password. Enter values and make sure that protection works
as expected.
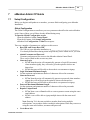
3.8
Affiliate program
Starting from version 2.3.0, aMember includes affiliate program. To enable and use it, you
have to make the following steps:
© 2002-2006, CGI-Central
Installation
18
1. Enable affiliate program usage, set aMember CP -> Setup -> Advanced : Enable
affiliate program = YES
2. Go to aMember CP -> Setup -> Affiliates and configure your affiliate program. Most
important is to enter commissions. Commissions can be set as absolute value, for
example if you set it as 10.25 will result to $10.25 commission. Or you can set it to be a
percentage from amount paid, for example: 1.5%. Also, don't forget to choose payout
methods that you will use to pay out your affiliates.
3. Go to aMember CP -> Setup Affiliate Banners (you will need to re-login into your
aMember CP to start seeing this link. You have to setup some banners and text links that
your affiliates will use to advertise your website. Add at least one text link, if you don't
have banners yet.
4. Last, but not least, you have to make affiliate cookies working. Recent version of IE and
other browsers have the following "feature" - it don't store permanent cookies from
websites that don't have P3P policy. Please read this website http://www.p3ptoolbox.org,
then build and install your own P3P policy.
5. Now, every member of your website (even those who never paid) can go to
yoursite.com/amember/member.php and click link named "Advertise our website to your
friends and earn money". Once he clicks this link, he will see pages with text links and
banners that you set on step (3).
6. When new customer comes by affiliate link and places order, affiliate will be credited
corresponding commission. aMember Pro tracks all clicks and commisions, this
information is available for both admin and affiliate.
7. After some time, you have to go aMember Cp -> Affiliate Commissions, choose payout
method (only affiliates choosed this method will be displayed), and period. We
recommend to use default payout period, else you will be at risk of fraud. For example,
we suggest to pay commisions for July in September, or even later. Usually it takes 2-3
months for chargeback to come.
3.9
Upgrade from Free to Pro
If you are upgrading aMember Free to aMember Pro, follow these instructions:
1. Backup everything (both aMember Free files and database)
2. Overwrite aMember free files with aMember Pro files.
3. Delete amember/config.inc.php and amember/config_plugins.inc.php
4. Run http://yoursite.com/amember/setup.php.
IMPORTANT: enter exactly the same database settings. aMember Pro setup will not
delete any tables or data, it just upgrades database structure to work with latest aMember
Pro version.
Read more about Initial setup process 11
3.10
Upgrade Pro to newer version
1. Backup database and aMember files - it is IMPORTANT
Use aMember CP -> Backup Db to get a copy of MySQL database
© 2002-2006, CGI-Central
19
aMember Pro
and use FTP client to get copy of entire aMember folder.
2. Rewrite aMember files with new version. Usually you may keep your customized
USER-SIDE templates (folder amember/templates/),
however you MUST upgrade ADMIN-SIDE template files (folder amember/templates/admin/
) and don't forget to upload new user-side template files, which have been not present in the
installed version.
3. Run http://www.yoursite.com/amember/admin/upgrade_db.php
It will upgrade database structure without losing of any data.
4. Check everything, we recommend you to run a test payment.
© 2002-2006, CGI-Central
Part
IV
21
aMember Pro
4
Payment Plugins
4.1
PayPal
This plugin uses traditional PayPal integration interface and supports both recurring and
non-recurring payments.
First you need to install the PayPal Plugin
Open the aMember Admin Control Panel
Click on Setup/Configuration from the left menu
The Configuration : Global screen opens
From the top menu on this page click Plugins
The Configuration : Plugins screen opens
Keeping Ctrl key pressed, click to paypal_r plugin in the payment plugins list
Press Save
Accepting Payment with PayPal
There are two stages in setting up aMember to receive payments via PayPal
· Configure the aMember PayPal Plugin
· Configure your PayPal Account
Configuring the aMember PayPal Plugin
Open the aMember Admin Control Panel
Click on Setup/Configuration from the left menu
The Configuration : Global screen opens
From the top menu on this page click PayPal
The Configuration : PayPal screen opens
NOTE: If there is no PayPal link in the top menu, this means you have not enabled the
PayPal plugin. Please see Configuring Plugins.
In the Configuration : Paypal screen there is just one piece of information to enter, the email
address used by the PayPal account you want to use to receive payments.
Configuring Your PayPal Account
For PayPal to process payments correctly and pass the relevant information back to aMember,
you need to set the PayPal IPN (Instant Payment Notification) URL
To do this you must Login to your PayPal Account. The next step will depend on whether you
are using a Personal or a Business/Premium account.
· PayPal Business Account
Log in to your Business or Premier PayPal account
Go to the Profile subtab
Click on Instant Payment Notification Preferences link in the Selling
Preferences column
Click Edit
Check the box and enter the URL to the file ipn.php in your installation:
http://www.yoursite.com/amember/plugins/payment/paypal_r/ipn.ph
p
© 2002-2006, CGI-Central
Payment Plugins
22
(please read note below regarding this URL)
·
Click Save
PayPal Personal Account
Log in to your Personal PayPal account
Go to the Sell tab
Click on Technical Overview link in left-hand menu
On the Technical Overview page, click on the Start using IPN link
Click Edit
Check the box and enter the URL to the file ipn.php in your installation:
http://www.yoursite.com/amember/plugins/payment/paypal_r/ipn.ph
p
(please read note below regarding this URL)
Click Save
Important Notes
Before you start, there are a couple of things to note.
Firstly, for payments through PayPal to be processed automatically by aMember you MUST
have a business or premium account. If you use a personal account you will have to approve
the payment in PayPal and then mark it complete in the aMember Admin Control Panel
before the user will have access.
Secondly, the PayPal Recurring plugin behavior may appear strange, but it is correct. It sets
the expiry date for any active subscription to a future date in the year 2012. When the
subscription is cancelled, the expiry date is automatically set to yesterday's date - it disables
subscription access automatically.
Third, it is not required to change IPN URL in your account if you have it already entered
(from another script, for example). It does not matter which IPN URL is entered, it is only
required that IPN is enabled in PayPal account. aMember will anyway pass IPN URL with
each payment request, and PayPal will use given URL (it overrides setting in PayPal account).
MOST IMPORTANT - Email address entered into aMember settings MUST match your
PayPal account primary email address, else automatic payment confirmation will not work.
4.2
PayPal Pro
This plugin uses new WebPayments Pro PayPal interface. It offers nice features like
processing credit cards directly on your website, but it does not support recurring billing.
STEP I. CREATE AND CONFIGURE TEST OR LIVE PAYPAL ACCOUNT
*** Sandbox (for tests) ***
1. Visit http://developer.paypal.com and create a developer's account.
2. Click on the "Sandbox" tab, then click on "Create Account".
4. Create a Sandbox account just as you would a normal Paypal account.
© 2002-2006, CGI-Central
23
aMember Pro
None of the information entered needs to be your actual information.
5. To verify the account return to the Developer Central web page and
select the email tab. All emails sent to your sandbox account will
appear here. Find the verification email and follow the steps to
verify the account.
6. On the "Overview" menu click on "Add Bank Account" in the left column.
7. Enter anything into "Bank Name" and click "Add Bank".
8. Return to the "Overview" menu, and click on "Confirm Bank Account" in
the left column, then click on "Submit" to confirm the account
10. Return to the "Overview" menu, and click the "Add Credit Card"
link in the left hand column of the page.
11. Write down the Card Number Expiration Date and Card Verification Number,
you will use this card to test your Direct Payment installation.
12. Click the "Add Card" button to complete this process.
*** Live Account configuration ***
1. Follow all the instructions to set up your normal business PayPal account
to use Web Payments Pro, including account verification, back account
verification and signing up for Web Payments Pro (This last step may
take 24-48 hours for approval)
*** The following steps are necessary for both Sandbox and Live accounts ***
0. Download Certificate (Sandbox users will do this in their Sandbox account).
1. Goto My Account > Profile.
2. Click the API Access link and allow access to all API functions.
3. Click the API Certificate Request link.
4. Follow the on-screen instructions to complete your certificate request.
5. Click on download and save the file, give it unique filename and upload
to your server. If you upload it to amember/plugins/payment/paypal_pro/
folder, it will simplify following configuration.
STEP II. ENABLE AND CONFIGURE THE PLUGIN
1. Go to aMember CP -> Setup -> Plugins,
disable "paypal_r" plugin if you have it enabled.
On the same page, enable "paypal_pro" (this) plugin.
2. Configure plugin at aMember CP -> Setup -> Paypal Pro
If you have uploaded the certificate to "paypal_pro" plugin folder,
you may enter just filename. Else you will have to enter full Unix
path to file.
4.3
2Checkout
First you need to install the 2Checkout Plugin
Open the aMember Admin Control Panel
Click on Setup/Configuration from the left menu
© 2002-2006, CGI-Central
Payment Plugins
24
The Configuration : Global screen opens
From the top menu on this page click Plugins
The Configuration : Plugins screen opens
Keeping Ctrl key pressed, click to twocheckout_r plugin in the payment plugins list
Press Save
Accepting Payment with 2Checkout
There are two stages in setting up aMember to receive payments via 2Checkout
· Configure the aMember 2Checkout Plugin
· Configure your 2Checkout Account
Configuring the aMember 2Checkout Plugin
Open the aMember Admin Control Panel
Click on Setup/Configuration from the left menu
The Configuration : Global screen opens
From the top menu on this page click 2Checkout Rec.
The Configuration : 2Checkout screen opens
NOTE: If there is no 2Checkout link in the top menu, this means you have not enabled the
2Checkout plugin. Please see Configuring Plugins.
In the Configuration : 2checkout screen there are three parameters to configure:
· Your 2Checkout Account ID
· Enter your 2Checkout Account ID, a number that will have been supplied to you when
you signed up with 2Checkout.
· Your 2checkout Secret Phrase
· You MUST enter the identical phrase when configuring your 2checkout account - see
below. Enter a single word.
Configuring Your 2Checkout Account
For 2Checkout to process payments correctly and pass the relevant information back to
aMember. This procedure varies according to which 2Checout Plugin you are using
· Login into your 2Checkout account: https://www2.2checkout.com/2co/login
· Click to "Look&Feel Setttings" link. Set
Approved URL:
http://www.yoursite.com/amember/plugins/payment/twocheckout_r/thanks.php
Pending URL: http://www.yoursite.com/amember/
· Your Secret Word:
set to any value you like. Enter the same secret word as you entered when configuring the
2Checkout Plugin in aMember.
Important Notes
Before you start, there are a couple of things to note.
For aMember to process payment for products through 2Checkout you must first define
products in your 2Checkout member area as described in the 2Checkout user manual. It is
very important that the price, period and other parameters are the same as in aMember. Write
down the 2checkout product numbers of any products you create in 2Checkout - you will need
them when adding products in aMember.
© 2002-2006, CGI-Central
25
aMember Pro
2Checkout doesn't return any information if a recurring payment fails or if it is cancelled.
Instead, you will receive notification by email from 2Checkout. Once you receive this
notification, login into your aMember Admin Control Panel and set the expiry date for this
user to yesterday's date. This automatically disables the subscription but allows you to keep
the history of your charges and customers. It is preferable to use this method instead of
deleting anything.
4.4
ClickBank
First you need to install the ClickBank Plugin
Open the aMember Admin Control Panel
Click on Setup/Configuration from the left menu
The Configuration : Global screen opens
From the top menu on this page click Plugins
The Configuration : Plugins screen opens
Select the ClickBank Plugin from Payment Plugins
Click Save
Accepting Payment with ClickBank
Before you can use aMember to take payments via ClickBank, you must products in your
ClickBank account. These products represent your future subscription types in aMember.
The ClickBank account is also useful for testing aMember. To start testing, enter 0 for the
price into ClickBank product settings. Then you may signup as real user, but without entering
real credit card information.
There are two stages in setting up aMember to receive payments via PayFlow
· Configure the aMember ClickBank Plugin
· Configure your ClickBank Account
Configuring the aMember ClickBank Plugin
Open the aMember Admin Control Panel
Click on Setup/Configuration from the left menu
The Configuration : Global screen opens
From the top menu on this page click ClickBank
The Configuration : ClickBank screen opens
NOTE: If there is no ClickBank link in the top menu, this means you have not enabled the
ClickBank plugin. Please see Installing ClickBank Plugin
In the Configuration : ClickBank screen there are two parameters to configure:
Your ClickBank Account Name
This will have been supplied to you when you signed up with ClcikBank.
Your ClickBank Secret Phrase
Enter a word or series of characters. Make a note of this - you will need it later.
Configuring Your ClickBank Account
For ClickBank to process payments correctly and pass the relevant information back to
aMember.
© 2002-2006, CGI-Central
Payment Plugins
26
Login into your ClickBank account
On the top of the page click on the Click HERE to modify your account link
On the next page click again on the Click HERE to modify your account link.
At the bottom of this page you will find the THANK-YOU page fields.
For each of your products (subscription types) you have to enter a number of parameters:
Thank you page
http://www.yoursite.com/amember/plugins/payment/clickbank/thanks.p
hp
Price
Must be the same as in aMember. Changing the price in the aMember script will
not affect ClickBank!
You should enter 0 for price to test the script first. It will allow you to check the
script without making a real payment. Make sure to enter the real price after
testing.
Write down the numbers of the products you create. You will need them later.
Secret Key
At the bottom of the page enter your SECRET KEY, the same word or string of
characters you entered in the ClickBank : Configuration screen in aMember.
If you forget this key, you can find it, or edit it, in the aMember file
config_plugins.inc.php.
Click on the Save Changes button.
Your ClickBank account is now ready to receive payments using aMember. You will be asked
for the ClickBank product number of each product (subscription type) you add in the
aMember Add Products screen.
4.5
VeriSign PayFlow Link
First you need to install the PayFlow Plugin
Open the aMember Admin Control Panel
Click on Setup/Configuration from the left menu
The Configuration : Global screen opens
From the top menu on this page click Plugins
The Configuration : Plugins screen opens
Select the PayFlow Plugin from Payment Plugins
Click Save
Accepting Payment with PayFlow
There are three stages in setting up aMember to receive payments via PayFlow
· Rename the ipn.php file
· Configure the aMember PayFlow Plugin
· Configure your PayFlow Account
Rename the ipn.php File
This is very important.
You MUST rename the file: amember/plugins/payment/payflow_link/ipn.php to
© 2002-2006, CGI-Central
27
aMember Pro
something hard to guess.
For example: amember/plugins/payment/payflow_link/ix33kn_115.php
Please make a note of this name, you'll need it later.
Configuring the aMember Payflow Plugin
Open the aMember Admin Control Panel
Click on Setup/Configuration from the left menu
The Configuration : Global screen opens
From the top menu on this page click PayFlow
The Configuration : PayFlow screen opens
NOTE: If there is no PayFlow link in the top menu, this means you have not enabled the
PayFlow plugin. Please see Installing PayFlow Plugin
In the Configuration : PayFlow screen there are two parameters to configure:
· Your PayFlow Username
· Your PayFlow Partner Name
· These will have been supplied to you when you signed up with PayFlow.
Configuring Your PayFlow Account
For PayFlow to process payments correctly and pass the relevant information back to
aMember.
Login into your Payflow Link account
On the menu click on the Account Info link
From the left menu select the Payflow Link Info link
There are a number of parameter to set in this screen:
Return URL Method
Set to POST
Return URL
Set to http://www.yoursite.com/amember/thanks.php
Silent Post URL
Set to
http://www.yoursite.com/amember/plugins/payment/payflow_link/ipn.p
hp
Replacing ipn.php with the new name you gave this file earlier.
Also check the box near this field.
Force Silent Post Confirmation
Check this box
Failed Silent Post Return URL
Set to
http://www.yoursite.com/amember/plugins/payment/payflow_link/faile
d_ipn.php
When testing, you may disable real transaction processing (recommended).
To do that, set Transaction Process Model to TEST
Click on Save Changes button.
© 2002-2006, CGI-Central
Payment Plugins
4.6
28
WorldPay
First you need to install the WorldPay Plugin
Open the aMember Admin Control Panel
Click on Setup/Configuration from the left menu
The Configuration : Global screen opens
From the top menu on this page click Plugins
The Configuration : Plugins screen opens
From Payment Plugins, choose the WorldPay plugin.
Click Save
Accepting Payment with WorldPay
There are two steps in setting up aMember to receive payments via WorldPay
· Configure the aMember WorldPay Plugin
· Configure your WorldPay Account
Configuring the aMember WorldPay Plugin
Open the aMember Admin Control Panel
Click on Setup/Configuration from the left menu
The Configuration : Global screen opens
From the top menu on this page click WorldPay
The Configuration : WorldPay screen opens
NOTE: If there is no WorldPay link in the top menu, this means you have not enabled the
WorldPay plugin. Please see Configuring Plugins.
In the Configuration : WorldPay screen there are just two configuration items:
· WorldPay Installation ID
· This will have been provided to you when you signed up with WorldPay
· Test Mode
· Leave at Yes until you have set up products and completed some test transactions.
Configuring Your WorldPay Account
Login into WorldPay Control Panel
Set Postback URL to:
http://www.yoursite.com/amember/plugins/payment/worldpay/ipn.php
You are now ready to receive payments through WorldPay.
4.7
Free
Free Signup is an payment plugin which allows you to create sites with free membership.
Even if you are not offering free membership it is recommended that you enable this plugin, it
will not appear on your signup page. To use free signup products need to have a price of $0.00
- ie to be free. This plugin is always enabled and it is impossible to disable it. It is hidden in
payment systems list on signup page and will be automatically used for payments with zero
total amount.
© 2002-2006, CGI-Central
29
aMember Pro
Configuring the Free Signup Plugin
Open the aMember Admin Control Panel
Click on Setup/Configuration from the left menu
The Configuration : Global screen opens
From the top menu on this page click Free
The Configuration : Free screen opens
NOTE: If there is no Free link in the top menu, this means you have not enabled the free
signup plugin. Please see Configuring Plugins.
In the Configuration : Free screen there are two parameters to configure:
· Require admin approval for new payments
· If Yes: New signups will NOT be able to access the member area until their
membership has been approved by the administrator.
· If No: New signups will have immediate access to the member area following
signup.
· Send E-Mail to admin about new subscription
· If Yes: the administrator will receive an email each time a new member signs
up
· If No: Emails will NOT be sent to administrator when a new member signs up
HINT: If you decide to require admin approval for new subscriptions, then it is recommended
that you enter 'Yes' to receive emails about new signups. This will alert you to go to the
control panel and approve new members.
4.8
Other plugins
If you are going to use another payment plugin, do the following:
Open the aMember Admin Control Panel
Click on Setup/Configuration from the left menu
The Configuration : Global screen opens
From the top menu on this page click Plugins
The Configuration : Plugins screen opens
From Payment Plugins, choose the necessary plugin.
Click Save
Then go to aMember Admin Control Panel : Setup/Configuration: PLUGIN_NAME
You will see configuration instructions in gray box in bottom - follow these instructions. It is
also valid
for plugins described in this manual - plugin readme may contain more recent information
and
actual URLs to setup.
© 2002-2006, CGI-Central
Part
V
31
5
aMember Pro
Protection Plugins
aMember allows you to protect your content in a number of different ways. For the
comparsion, advantages and disadvantages of each method, please read this topic 15 .
Consider using aMember CP -> Protect Folders function instead of manual procedure
described here. Described below is a manual procedure, and should be used only if aMember
CP -> Protect Foldes doesn't work for you by some reason.
For detailed instructions about using each method, please see the pages below.
· Using new_rewrite 31
· Using mod_rewrite with php_include 32 protection
· Using htpasswd 36 protection
· Using auto_prepend with php_include 35 protection
· Using php_include 33
Important Note
If you are unfamiliar with creating and using .htaccess files, please read this page before you
begin.
5.1
Using new_rewrite
This plugin allow you add cookie-based login for ANY protected content. It can protect both
HTML files, downloadable content, and even complex PHP scripts. Currently, it is better and
most recommended protection technique.
Useful if:
· You wish to protect CGI/PHP scripts, HTML content, images or downloads;
Not useful if:
· Your server does not support mod_rewrite.
· You/your scripts already uses PHP rewrite. In this case, this method may not work.
Requirements
mod_rewrite available from .htaccess files (see below)
See your hosting server information if you are unsure.
Setting Up Protection
Please use aMember CP
method.
-> Protect Folders
function and choose "new_rewrite" protection
Adding a Logout Link
To add a Log out link anywhere in your protected area you can can use the link
http://www.yoursite.com/amember/logout.php
You can set where user will be redirected after logout at the aMember CP -> Setup
php_include. By default, the user will be redirected to http://www.yoursite.com
->
© 2002-2006, CGI-Central
Protection Plugins
5.2
32
Using mod_rewrite with php_include
This plugin allow you add cookie-based login for protected content. Any kind of files
(HTML, images, downloads, CGI scripts) can be protected, except complex PHP scripts. To
protect complex PHP scripts use other method of protection.
Please note, it is always better to use new_rewrite 31 protection method if possible.
Useful if:
· You wish to protect images, PDFs or other file.
Not useful if:
· Your server does not support mod_rewrite.
· You protect complex PHP scripts - this method will not work. You may use plain
php_inlcude protection in this case.
Requirements
mod_rewrite available from .htaccess files (see below)
PHP compiled as Apache module
See your hosting server information if you are unsure. Usually, any Cpanel-based hosting
or dedicated server will work.
Setting Up Protection
Note: use aMember CP -> Protect Folders function instead. Described below is a manual
procedure, and should be used only if aMember CP -> Protect Foldes doesn't work for you by
some reason.
Step 1: Add a .htaccess file to the protected directory
For this plugin to work a .htaccess file must be added to the directory you wish to
protect. The following is the content you need for the .htaccess file:
========================================
RewriteEngine On
RewriteRule ^(.*)$ /amember/plugins/protect/php_include/rewrite.php
=========================================
Note: Please use correct links inside the protected area. If you link to a directory, write
"/directory/" instead of "/directory" (use trailing slash). Also remember that protecting a
directory with .htaccess also protects any sub-directories within that directory.
Unfortunately, the 404 File Not Found error page will never be displayed in this area.
How it Works in Practice
Apache's mod_rewrite process access to all pages/images/anything loading through
aMember's file rewrite.php. This file checks the user's authorization in the database.
· If the user has an active subscription to the product or products then the protected
content will be displayed.
· If the user is not authorized yet, or has an expired subscription, then the login form is
© 2002-2006, CGI-Central
33
aMember Pro
displayed again with an error message.
The login form is template based and can be customized, you will find it at
/templates/login.html
Protecting Multiple Areas (versions 1.9.4 and later)
By default rewrite.php allows access to users with a subscription to products 1-21. To
change this, please change your .htaccess as follows:
========================================
RewriteEngine On
RewriteRule ^(.*)$ /amember/plugins/protect/php_include/rewrite.php
[E=PRODUCT_ID:"1;2;3"]
=========================================
In this example, customers of products #1 and/or #2 and/or #3 will get access to protected
folder where this file located.
Protecting Multiple Areas (versions before 1.9.4)
By default rewrite.php allows access to users with a subscription to products 1-9. To
specify the ditectory to which you wish to give access you must edit this file.
To set up different protection status for different directories follow these steps:
· Make a copy of the file rewrite.php.
· Rename it rewrite_1.php
· Open the file rewrite_1.php and edit it to specify the product number which gives
access to the directory you are protecting.
· Edit the .htaccess file so that your new rewrite file is used for authorizing access:
========================================
RewriteEngine On
RewriteRule ^(.*)$ /amember/plugins/protect/php_include/rewrite_1.php
=========================================
· This can be repeated for as many directories as you wish - ie you can create r
ewrite_2.php, rewrite_3.php etc.
Adding a Logout Link
To add a Log out link anywhere in your protected area you can can use the link
http://www.yoursite.com/amember/logout.php
You can set where user will be redirected after logout at the aMember CP -> Setup
php_include. By default, the user will be redirected to http://www.yoursite.com
5.3
->
Using php_include
This plugin allow you add cookie-based login for protected-pages. It is particularly useful for
adding paid membership support to an existing PHP-based application.
If your existing content is in standard .html files rather than .php files, see php_include with
auto_prepend 35
Useful if:
· All your protected content, including images, is stored in PHP files.
Not useful if:
· Images, downloadable content or other non-PHP files are included in your protected
content.
© 2002-2006, CGI-Central
Protection Plugins
34
Requirements
mod_rewrite available from .htaccess files (see below)
PHP compiled as Apache module
See your hosting server information if you are unsure. If you able to execute .php files,
then you are probably ok.
Setting Up Protection
Note: use aMember CP -> Protect Folders function instead. Described below is a manual
procedure, and should be used only if aMember CP -> Protect Foldes doesn't work for you by
some reason.
Step 1: Include check.inc.php in your pages
For this plugin to work the file /ammember/plugins/php_include/check.inc.php
must be included at the very top (before the opening <html> tag) of the PHP pages you
wish to protect as follows:
========================================
<?
$_product_id = array(1,3);
include("aMember_Root_Dir/plugins/php_include/check.inc.php");
.. any existing PHP code goes here ..
?>
========================================
Note: You must edit the $_product_id array to reflect the aMember product which gives
access to the page. For example, if access is confined to those with products 1 and 3 it will be
as above. If it is confined to those with products 2 and 5 you would use
$_product_id = array(2,5);
How it Works in Practice
When a user enters a URL to the protected page the aMember login form is displayed and the
user enters a username/password. This information is compared to entries in the member
database to determine whether a user has the right credentials
· If the user has an active subscription to the product or products as defined in
$_product_id then the protected page will be displayed.
· If the user is not authorized yet, or has an expired subscription, then the login form is
displayed again with an error message.
The login form is template based and can be customized, you will find it at
/templates/login.html
If you are not using subscriptions or wish to allow any member to have access to a page,
regardless of the subscriptions they hold, then you can define $_product_id as below:
$_product_id = array('ONLY_LOGIN');
This simply checks that the username and password exist in the database. Be careful - it will
allow access for non paying or expired members!
Adding a Logout Link
To add a Log out link anywhere in your protected area you can can use the link
© 2002-2006, CGI-Central
35
aMember Pro
http://www.yoursite.com/amember/logout.php
You can set where user will be redirected after logout at the aMember CP -> Setup
php_include. By default, the user will be redirected to http://www.yoursite.com
5.4
->
Using auto_prepend with php_include
This method of protection convert all your HTML files to PHP and allows you to authenticate
users using the database. You don't need to change file extensions nor do you need to change
the content of files.
It is particularly useful for adding paid membership support to an existing site.
Useful if:
· You wish to protect html files.
Not useful if:
· SSI tags will not be handled in converted files, so if you use .shtml files this method is
not suitable for you
· Images, downloadable content or other non-html files are included in your protected
content.
Requirements
PHP compiled as Apache module
See your hosting server information if you are unsure. If you able to execute .php files,
then you are probably ok.
Setting Up Protection
Note: use aMember CP -> Protect Folders function instead. Described below is a manual
procedure, and should be used only if aMember CP -> Protect Foldes doesn't work for you by
some reason.
Step 1: Add a .htaccess file to the protected directory
For this plugin to work a .htaccess file must be added to the directory you wish to protect.
The following is the content you need for the .htaccess file:
========================================
AddType application/x-httpd-php .html
AddType application/x-httpd-php .htm
php_value auto_prepend_file "/home/yoursite/public_html/
path_to_protected_folder/protect.inc.php"
=========================================
Be sure to replace /home/yoursite/public_html/path_to_protected_folder/ to
the actual path to the folder where .htaccess and protect.inc.ph files located.
Step 2: Create and add protect.inc.php file
Open a text file and add the following to it:
========================================
<?
$_product_id = array(1,3);
require_once '/home/yoursite/public_html
/amember/plugins/protect/php_include/check.inc.php';
?>
© 2002-2006, CGI-Central
Protection Plugins
36
========================================
Be sure to replace /home/yoursite/public_html/amember/ to the actual path to your
aMember folder. It can be found at aMember CP -> Info.
Note: You must edit the $_product_id array to reflect the aMember product which gives
access to the pages in the directory. For example, if access is confined to those with products
1 and 3 it will be as above. If it is confined to those with products 2 and 5 you would use
$_product_id = array(2,5);
How it Works in Practice
The server will now treat all .html files in the directory as .php files and will include the PHP
file protect.inc.php at the top of all these files.
When a user enters a URL to a protected page the aMember login form is displayed and the
user enters a username/password. This information is compared to entries in the member
database to determine whether a user has the right credentials
· If the user has an active subscription to the product or products as defined in
$_product_id then the protected page will be displayed.
· If the user is not authorized yet, or has an expired subscription, then the login form is
displayed again with an error message.
The login form is template based and can be customized, you will find it at
/templates/login.html
Adding a Logout Link
To add a Log out link anywhere in your protected area you can can use the link
http://www.yoursite.com/amember/logout.php
You can set where user will be redirected after logout at the aMember CP -> Setup
php_include. By default, the user will be redirected to http://www.yoursite.com
5.5
->
Using htpasswd
This plugin will work to provide protection on any Unix based hosting plan. It will protect all
content in any protected directory. However there are some disadvantages compared to using
php_include plugin - for details see here 15 . If it is possible for you to do so we recommend
that you use a php_include method.
Useful if:
· You require strong protection but are not able to use php_include.
Not useful if:
· You expect to have a very large database of members. There are some limits to
database size with this method.
Requirements
No special requirements
Setting Up Protection
Note: use aMember CP -> Protect Folders function instead. Described below is a manual
procedure, and should be used only if aMember CP -> Protect Foldes doesn't work for you by
some reason.
© 2002-2006, CGI-Central
37
aMember Pro
Step 1: Enable htpasswd plugin.
Open the aMember Admin Control Panel
Click on Setup/Configuration from the left menu
The Configuration : Global screen opens
From the top menu on this page click Plugins
The Configuration : Plugins screen opens
Select Protection Plugins
A list of the options available for protection appears, select htpasswd.
Step 2: Place .htaccess files in Protected Directories
If you are unfamiliar with .htaccess files and how they work please read this page before you
begin.
Each directory that will be protected must contain a .htaccess file which specifies the product
which gives access to that directory.
Creating Your .htaccess Files
· For sample .htaccess files, specifically configured to work on your server, click
Setup/Configuration in the left menu of the aMember Admin Control Panel and
choose htpasswd from the top menu.
· The file will look something like this:
AuthType Basic
AuthName "My Protected Directory"
AuthUserFile
/home/virtual/site91/fst/var/www/html/amember/data/.htpasswd
AuthGroupFile
/home/virtual/site91/fst/var/www/html/amember/data/.htgroup
Require group PRODUCT_2
·
For each directory you wish to protect, create a .htaccess file by copying the code from
your aMember Admin Control Panel into a plain text file and editing the line:
Require group PRODUCT_2
to reflect the product number or numbers which give access to the directory. If
multiple products give access to the same directory, edit that line as follows:
Require group PRODUCT_2 PRODUCT_5 PRODUCT_9
listing all the products that allow access. Save the file as .htaccess and upload to the
relevant directory.
How it Works in Practice
Normally when an user enters a URL to a page protected with .htaccess an ugly gray login
screen will pop up. After latest Internet Explorer fixes, it is impossible to avoid this login box.
You can use advanced protection methods (php_include in different combinations) to avoid it.
© 2002-2006, CGI-Central
Part
VI
39
aMember Pro
6
Third-party Plugins
6.1
Bulletin Board Plugins
Bulletin board plugins function in very much the same way, regardless of the particular
bulletin board involved.
Please note that it is advisable, before installing and using the Bulletin Board Plugin, that you
have already installed your Bulletin Board and set up the various user groups you need in the
Bulletin Board administration.
Overview
· When a user signs up in aMember, the aMember script checks for an existing user
with the same username in the Bulletin Board database.
· If the username is not found
· The user can complete aMember signup in the normal way.
· If the username is found
· aMember checks whether the same email address and password are associated
with it
· If the email address and password details are NOT the same the user
will be asked to chose another username as the one they have chosen is
unavailable
· If the email address and password details ARE the same, the user will
be allowed to complete their signup with aMember
· When a user completes payment, aMember will add a new user record in the Bulletin
Board, or, if appropriate, will upgrade the members record. (see below for details)
· When a user subscription expires, the member will revert to the previous user group in
the Bulletin Board.
Installing the Bulletin Board Plugin
Open the aMember Admin Control Panel
Click on Setup/Configuration from the left menu
The Configuration : Global screen opens
From the top menu on this page click Plugins
The Configuration : Plugins screen opens
Select the Bulletin Board Plugin you wish to use from Protection Plugins
Click Save
Configuring the Bulletin Board Plugin
There are a number of parameters to configure here, which may vary slightly depending on
the particular bulletin board you are using.
· Board Db and Prefix
· Enter the prefix used by the Bulleting Board tables in your database. For example if
using Invision Board, you would enter ib_
· If you are unsure about this please refer to your database or to the documentation that
came with your Bulletin Board.
© 2002-2006, CGI-Central
Third-party Plugins
·
·
·
·
40
Default Level
This is the level to which non-paid customers will be assigned. When a member
subscription expires, they will be returned to this level. All the member levels you
have previously set up in your Bulletin Board will appear here.
Denied Groups
This is an important parameter as it allows you to protect your administration
accounts. Any user groups chosen here will never be changed by aMember. All the
member levels you have previously set up in your Bulletin Board will appear here.
Adding User Levels to Products
Once the Bulletin Board Plugin is installed a new parameter will be available in the Add
Product screen. This allows you to specify a Bulletin Board user group to be associated with
each product.
If you are adding the Bulletin Board plugin and already have Products set up you will need to
amend them to associate a Bulletin Board user group with each.
Notes on Using Bulletin Board Plugins
There are two ways that you can set things up when using aMember with a Bulletin Board
Plugin.
· Disable user registration in the Bulletin Board and set links so that users must
signup through aMember. Please see your Bulletin Board documentation for how to
disable user registration and refer users to another page to signup.
· Keep user registration in the Bulletin Board, but restrict users registering in this
way to a default user group. Then you create new user groups, for paid users, which
can be associated with your products in aMember. This is the recommended method in
most situations.
© 2002-2006, CGI-Central
Part
VII
aMember Admin CP Guide
7
aMember Admin CP Guide
7.1
Setup/Configuration
42
Before you begin to add products or members, you must finish configuring your aMember
Installation.
Global Configuration
The Global Configuration screen allows you to set parameters that affect the entire aMember
script. Some of these you will have already defined during setup.
To open the Global Configuration screen:
Open the aMember Admin Control Panel
From the left menu, click Setup/Configuration
aMember Pro Configuration : Global screen opens
There are a number of parameters to configure on this screen:
· Root URL and Secure Root URL
The URLs to your aMember installation, eg http://www.yoursite.com/amember
You already defined these during initial setup but they can be edited here if you wish.
· Admin Username and Password
Username and password for access to the aMember Admin Control Panel.
These can be edited in this screen at any time.
· Generate Login
· If 'Yes' then the script will automatically generate a Login ID (username)
when members signup, they will not be given the option to choose one
themselves.
· If 'No' then users will be able to choose their own username at signup
· Login Maximum/Minimum Length
Set the maximum and minimum number of characters allowed in usernames.
· Generate Password
· If 'Yes' then the script will automatically generate a password when members
signup, they will not be given the option to choose one themselves.
· If 'No' then users will be able to choose their own password at signup
· Password Maximum/Minimum Length
Set the maximum and minimum number of characters allowed in passwords
· Require Unique Email
· If 'Yes' then a user will not be able to create separate accounts using the same
email address.
· If 'No' a user will be able to signup multiple times with the same email
address.
·
Note: Entering 'Yes' does not preclude a member from having multiple
subscriptions - any member can have multiple subscriptions which they can access
using the same email address, username and password.
Use Address info
© 2002-2006, CGI-Central
43
aMember Pro
·
·
If 'Yes' then users will be asked to enter their full postal address when they
sign up
If 'No' no fields for address information will appear in signup forms and this
information will not be requested.
Advanced Configuration
To open the Advanced Configuration screen:
Open the aMember Admin Control Panel
From the left menu, click Setup/Configuration
aMember Pro Configuration : Global screen opens
From the top menu on this page select the Advanced link
7.2
Configuring Plugins
A number of the functions of aMember are provided by using plug-ins, a system which
enables individual administrators to choose precisely the functionality they require.
After basic configuration is complete the next step is to enable the plug-ins that you will be
using.
How to Install Plug-ins
Open the aMember Admin Control Panel
Click on Setup/Configuration from the left menu
The Configuration : Global screen opens
From the top menu on this page click Plugins
The Configuration : Plugins screen opens
There are two categories of Plugin on this page:
· Payment Plugins
A list of the payment options currently available, that is the different payment processors
and payment methods supported by aMember. It is recommended to always have the 'free'
plugin enabled. It will not be displayed in payment methods list, but is useful for testing
and allows the Administrator to add members free of charge in the aMember Admin
Control Panel.
You can enable multiple plugins by holding down the Ctrl key while making your
selection.
· Protection Plugins
A list of the options currently available for protecting your pages/directories.
You can enable multiple plugins by holding down the Ctrl key while making your
selection.
Configuring Plugins
Once you have added Plugins, a new menu item relating to each installed plugin will appear
© 2002-2006, CGI-Central
aMember Admin CP Guide
44
on the top of the Configuration : Plugins screen. Click on the link to each plugin you
installed to complete configuration. Instructions for each plugin are available elsewhere in this
Guide, please consult the section relating to the plugin you are configuring.
7.3
Managing Products
What is a Product?
Understanding the concept of a 'product' or subscription type is central to understanding how
the aMember script works.
Many membership management scripts limit you to having just one subscription type,
protecting a single directory. This is not the case with aMember. You can have any number of
subscription types, each relating to a protected directory or a set of files. Each subscription
type is referred to as a 'Product'.
A product can have a number of predefined criteria. The easiest way to understand these is to
add a test product to aMember now, you will be able to delete this product later.
Add a Product
To add a product
Open the aMember Admin Control Panel
From the left menu, click Add Products
The Add Product screen opens
The Add Product screen allows you to define a number of parameters for each product.
Although you may not need to use all of them it is important to understand what each of them
means.
· Product Title
The name of your product. This will be displayed to users on the main signup page
and will also appear in the list of products that an existing member can add or renew.
It is also used in various member and admin reports.
·
·
·
It is best to keep the title short.
Description
A brief description of the product, usually a description of the content to which the
product gives access. This will be displayed alongside the product title on the main
signup page. You can use HTML in this field.
Price
The cost of the subscription for the given period. Enter only a number here, without
any currency symbols. Example: 12.25
Duration
The length of time for which a subscriber will be able to access the protected content,
also referred to as the period of subscription or the subscription cycle.
Duration can be defined in days, calendar months or years. Calendar month means
that if the subscription starts on January 3rd, it must be renewed, or will expire,
exactly on February 3rd. The duration is entered as a number followed by 'y' for years,
'm' for months and 'd' for days - eg 4m is 4 calendar months.
© 2002-2006, CGI-Central
45
aMember Pro
·
Note: It is not a good idea to use 30d - ie 30 days - or similar entries to model a
month, months, indeed years, can have different numbers of days!
Product URL
This is the URL to the content to which you wish this product to give access.
The purpose of this field is simply to create a link to the content in the list of their
subscriptions which a member will see. If you leave this field blank the Title will
appear as plain text rather than a link in the Member Page (member.php)
Please Note: Entering a URL here does NOT protect content. For information
about protecting your content please see the section "Setting up protection" 15
·
·
Scope
This determines where on your site information about this product will be displayed.
You have 4 options:
· Visible to All: The product will be displayed on the main signup page AND
will be available to existing members in the Add/Renew subscriptions list.
· Only Signup: The product be displayed on the signup page only, it will NOT
be available to existing members.
· Only Members having paid subscriptions: The product will NOT be
displayed on the main signup page, it will only be available to existing
members.
· Disabled: The product will not appear for any users. It will still be available in
the Admin Control Panel for manual signups.
Sorting Order
This is a very useful field for those who have many products. It determines the order
in which products will be listed on the signup page and in the list of products shown
to members.
Products are normally sorted alphabetically. By entering a number in this field you
can override this alphabetical sorting. It also allows you to group products for display
by entering the same number for each of them.
·
·
Products will be sorted first by the number entered here, then alphabetically.
Price Group ID
Again, a useful field for those with many products. Its primary use is to create
different signup pages for different groups of products.
If you enter a negative value - for example '-1' - the product will NOT be displayed on
the default signup page. You can instead use the link
http://www.yoursite.com/amember/signup.php?price_group=-1 for a signup page
which displays products in this price group only.
Display Agreement
Tick this box if you wish users to indicate their agreement with your terms and
conditions before their signup is completed. An individual user will see this
© 2002-2006, CGI-Central
aMember Admin CP Guide
·
·
46
agreement only once. You can add your terms and conditions by editing the file
agreement.html in the templates/ folder.
Payment Information
Depending on what payment plugins you have configured there will also be fields
about payment information. Please refer to the notes beside each field before
completing them.
Renewal Group
This field explained in the next topic 46 .
Edit a Product
To edit an existing product:
Open the aMember Admin Control Panel
From the left menu, click Edit Your Products
The Products (Subscription Types) List opens
Click the Edit link in the Actions column of the product you wish to edit.
Changing the details of a product will NOT affect existing customers.
Delete a Product
To delete a product:
Open the aMember Admin Control Panel
From the left menu, click Edit Your Products
The Products (Subscription Types) List opens
Click the Delete link in the Actions column of the product you wish to delete
NOTE: You cannot delete a product to which there have already been subscribers. If you
wish to delete a product to which there are already subscribers, you must first delete all
subscriptions to the product.
See Managing Payments 49 for details.
7.4
Products Renewal Groups
Renewal Group setting
Value in this field in product settings defines how aMember will calculate subscription start
date when user renews his membership or adds a new subscription via amember/member.php
page. If user already has a subscription to a product WITH THE SAME renewal group,
aMember will use expiration date of previous subscription as start date for new subscription.
If user has no such subscriptions, aMember will use current date as start date. Basically,
products which grants the same level of access must have the same Renewal Group value. If
this field has negative numeric value, it will always set subscription start date to current date,
allowing member to have several subscriptions to the same product.
Examples
1. Site offers one level of access
© 2002-2006, CGI-Central
47
aMember Pro
For example, there are only 2 products exists in aMember:
- Monthly Subscription RENEWAL GROUP set to BASIC
- Year Subscription RENEWAL GROUP set to BASIC
In this case, you should set "Renewal Group" for both products to something like "1" or
"BASIC", or any other equal value. Default empty value will also work fine.
If your site offers only one level of access, Renewal Group must be set to the same value for
all products, and then new subscription period will be added to existing.
For example, user has existing Monthly subscription: Jan 01, 2006 - Jan 31, 2006. Jan 15 he
comes to amember/member.php and orders a new Yearly Subscription. It will be added with the
following period: Feb 01, 2006 - Feb 01, 2007
This way customer never loose paid period.
2. Site offers not-related products with different level of access
For example there are the following 2 products:
- Subscription to Football News RENEWAL GROUP set to FOOTBALL
- Subscription to Baseball News RENEWAL GROUP set to BASEBALL
In this case, products are unrelated and subscription dates should not be added when user
orders second subscription. For example, user has subscription to Football News: Jan 01 2006
- Jan 31 2006. Jan 15 he comes to amember/member.php and orders a new Baseball
subscription. It will be added with the following period: Jan 15 - Feb 15 2006.
3. Site offers not-related products with different periods and level of access
- Monthly Subscription to Football News RENEWAL GROUP set to FOOTBALL
- Year Subscription to Football News RENEWAL GROUP set to FOOTBALL
- Monthly Subscription to Baseball News RENEWAL GROUP set to BASEBALL
- Year Subscription to Baseball News RENEWAL GROUP set to BASEBALL
This sample combines behaviour described above.
7.5
Managing Users
What is a Member?
A Member is a user of your site who is registered in the aMember script (usually via
signup.php). Each member has a unique login ID (username) and password.
What happens to expired members?
While expired members will no longer have access to protected content, they are NOT deleted
from the database when their membership expires. This is important, as it means that any data
associated with expired members is still available for reporting and history purposes. There
© 2002-2006, CGI-Central
aMember Admin CP Guide
48
are other advantages, for example it means that expired members can login to renew
subscriptions and can also, optionally, be included in emails sent by the administrator.
Adding Users/Members
Before adding members you must have at least one product to subscribe them to. If you have
not already done so return to the Managing Products 44 of this guide and set up a test product
now.
To add a member, or user:
Open the aMember Admin Control Panel.
Click Add User in the left menu.
The Add User Screen opens
The add a user form is pretty self explanatory. Fill in the details for a test user (you can
delete this user later).
Click Save and you will see a message: Information has Been Saved.
·
Click the Continue link, then you will be redirected to User Payments page
·
Using Quick Add form, add a subscription to customer. By default, both start and
·
expiration dates are set to today, but it can be easily changed.
Managing Users
You can edit both the user information and any member payments at any time from the
Admin Control Panel. In addition to 'User Information' and 'User Payments/Subscriptions' on
the top of the member record page there are two other links
· Actions
Delete a member, resend the signup email to a member or merge member records.
· Access Log
Lists recent access by the member to aMember and to other member areas that use PHP
protection
Finding Members
aMember makes it very easy to find your members, either individually or by a number of
different criteria.
· Click Browse users on the left Menu to browse through your members, listed by
username.
· Click Search Users on the left menu to search through the user database using any of
the various criteria listed there.
· Enter part of username, name or email into the input box in left menu and press Enter
key
Note: Once a user has been added as a member, they will be able to access their member page
at http://www.yoursite.com/amember/member.php, using the username and password in
their member record. However adding a user as a member does not give access to any content,
you must subscribe user (add a payment).
© 2002-2006, CGI-Central
49
7.6
aMember Pro
Managing Payments
What is a Subscription?
A subscription is a permission for the user to use a defined product (that is, to access some set
of pages/directories) for a specified period of time.
A subscription is set up when a person makes a payment for a product, so subscriptions are
also referred to as "Payments". This payment can be a real payment, or a 'not-real' payment in
the case of free signups.
Adding a Subscription
While in practice most members will probably subscribe themselves by using the public parts
of the aMember script, as administrator you can manually subscribe members to any of your
products.
To add a subscription for a member, first open the Member Record:
Open the aMember Admin Control Panel
Click on Browse Users from the left menu to find the test user you created earlier
Click on the User Payments/Subscriptions link on the top of the page
The User Subscriptions screen opens
There are a number of parameters here to set for each subscription:
· Select a product from the drop down Products List to subscribe this member to
· Set the period (start and end dates) of the subscription
· Select the payment method
By default, when subscribing a member through the Control Panel, Manual Payment
is selected, but you can choose any payment method that you have configured
· Enter the amount paid - this will be displayed to the user in their payment history
· Tick the checkbox to mark the subscription paid
· Click 'Add' - you will see a message: Information has Been Saved
Return to the payments screen for this user by clicking the 'User Payments/Subscriptions' link
on the top of the page. You will see that the information you just added now appears in the
member's list of subscriptions.
Complete and Incomplete Subscriptions
A subscription does not necessarily give a user immediate access to protected content.
If payment was not completed, if you have configured the script to require admin approval of
new subscriptions or if you have not ticked the 'Paid' box when adding a manual subscription,
then the subscription will initially be incomplete.
An incomplete subscription does not give the user access to any content. The administrator
can manually change a subscription from incomplete to complete by ticking the 'paid' box in
the 'User Subscriptions/Payments' screen.
Edit a Payments/Subscription
To edit an existing subscription:
Open the aMember Admin Control Panel
Click on Browse Users from the left menu to find the test user you created earlier
Click on the User Payments/Subscriptions link on the top of the page
The User Subscriptions screen opens
© 2002-2006, CGI-Central
aMember Admin CP Guide
50
Click the Edit link to the right of the payment record you wish to edit
You can edit any of the payment criteria.
Suspend a Payment/Subscription
When in the Edit screen for any payment, changing the status of the subscription from
'Complete' to 'Incomplete' will deny the user access to the subscribed content related to that
payment, effectively suspending the subscription.
Delete a Payment/Subscription
To delete an existing subscription:
Open the aMember Admin Control Panel
Click on Browse Users from the left menu to find the test user you created earlier
Click on the User Payments/Subscriptions link on the top of the page
The User Subscriptions screen opens
Click the Delete link to the right of the payment record you wish to delete
7.7
Coupons
What is a Coupon?
When you create a coupon a coupon number is generated. A user entering this number during
signup will receive a discount on their subscription.
You can define several criteria for any given batch of coupons.
Adding a Coupon Batch
To add a new coupon batch:
Open the aMember Admin Control Panel.
Click Coupons in the left menu.
In the coupons screen click the Generate Coupons link.
The following criteria can be defined for a batch of coupons:
· Coupon Count
The number of coupons you wish to add to this batch. This will determine how many
different coupon numbers are generated. It will often be just one. However if you are
running advertising campaigns you might wish to use a different coupon number for
each ad to determine which returned the better results.
· Coupon Usage Count
This determines the number of times that the coupons in this batch can be used.
Entering 100 would mean that only the first 100 people entering a coupon code would
be able to avail of the discount. To allow unlimited use enter a very large number.
· Member Coupons Usage Count
Determines how often an individual user can use a coupon. If you enter '1' then any
individual user will only be able to use the coupon on a single occasion.
Code
Length
·
Determines the number of characters in the coupon code.
· Discount
© 2002-2006, CGI-Central
51
aMember Pro
·
·
·
You can apply the discount either as a percentage or as an absolute value - eg a
specified number of dollars.
Date
You can specify the start and end dates during which the coupon can be used.
Alternately by ticking the 'Don't limit date of usage' the coupon code will be valid
indefinitely.
Locked
Tick this box if you wish to disable the coupons. they will be retained in the database
and can be reactivated later.
Products
Select the products or product to which the coupon can be applied. If you do not make
a selection here the coupon will be useable for subscription to any of your products.
WARNING: If you do not define the products to which the coupon can be applied, then it
is in most cases advisable to ensure that the discount is defined as an absolute value. If
you apply the discount to all products, and it is a percentage discount, it would be possible
for a user to order multiple products and receive the percentage discount on their total
value.
Editing Coupons
To edit a coupon:
Open the aMember Admin Control Panel.
Click Coupons in the left menu.
Click on the Edit link next to the coupon batch you wish to edit
The following parameters can be edited:
· Discount: The amount of discount allowed by the coupons in a batch
· Date: The date range during which a batch of coupons can be used
· Products: The products for which the discount can be applied
· Locked: Tick the check box to temporarily disable the coupon batch
Coupon Usage Statistics
aMember keeps a record of the number of times each coupon is used. You can view the
record of all coupons in a batch by clicking on the Batch number in the coupons screen.
7.8
Error and Access Logs
There are a number of log files available in the aMember
Admin Control Panel.
Error Logs
Contains a list of error/debug messages for periodical review by site owners. The error log can
be cleared by using the Delete Old Records function.
Access Logs
A log of access to site by authenticated users, ie members. The log files may or may not show
all queries, depending on the protection scheme used:
© 2002-2006, CGI-Central
aMember Admin CP Guide
·
·
Using php_include means that all access to any protected areas will be logged.
Using htpasswd or htapasswd_secure protection means that only access to aMember
files, such as the Member Profile page (member.php) will be logged. Access to the
actual protected areas is not logged. However if you enable IP-Checking with
.htpasswd you can log access to these protected areas. Please read this topic for details
53 .
The access log can be cleared by using the aMember
7.9
52
CP -> Delete Old Records
function.
IP-based access control
aMember allows you to control the access that members have based on their IP address. This
access can be controlled both on a site wide level and on an individual user level.
To Set General Access Controls
· Open the aMember Admin Control Panel
· From the left menu chose Setup/Configuration
· From the top menu chose Advanced
· The Advanced Configuration window opens
· There are two options here for access control:
· Maximum count of different IP
· Set this to the maximum number of different IP addresses a single user may
connect from in a given period.
· Count IP for ... hours
· The period in hours for which IP addresses should be counted
IP-Checking works automatically if you are using php_include protect plugin. But it is
possible and recommended to setup IP-protection for your static pages protected with
.htpasswd too. See here for details.
Controlling Access on a User by User Basis
There also options for IP locking that can be used on a user by user basis. These allows you to
control the access of individual members. This may be useful for example if you wish to ban a
user, or to allow a user more liberal access than would be permissible under the IP access
control settings as set above.
To see these options open any user record.
· Open the aMember Admin Control Panel
· From the left menu chose Browse users
· Open any user record
· In the record you will see a field: "Locked: auto-locking by IP"
· There are three options here:
· No (default): means not-locked, user has normal access
· Yes: means locked - user's access is suspended
· Disable Autolock for this User: User will be able to connect using as many
different IP addresses as they wish.
© 2002-2006, CGI-Central
53
aMember Pro
Setting up IP-Checking with .htpasswd protection
To enable IP checking if you are protecting files with htpasswd or htpasswd_secure, you
must create in each your of your protected directories a php file, named log_access.php
with following content:
<?
include "/home/user/public_html/amember/log_access.inc.php";
?>
When a user accesses this file, the aMember script automatically writes a log record and does
IP checking.
To ensure that this file is called automatically, you must insert in your protected HTML pages
following code:
<script src="log_access.inc.php"></script>
or
<img src="log_access.inc.php" width=1 height=1>
The above assumes that the log.access.inc.php file is in the same directory as the pages to
which the code is added, as it should be.
© 2002-2006, CGI-Central
Part
VIII
55
aMember Pro
8
Customization
8.1
Templates Customization
The appearance of aMember is totally template based, which means it is easy to customize it
to match the rest of your site.
Finding the templates
Customizing Header and Footer Files
Customizing the CSS
Customizing Other Script Pages
Finding the Templates
The templates which determine the appearance of the front end (that is the parts visible to
users) are located in the folder /templates/
Templates which determine the appearance of the Admin Control Panel are located in
/templates/admin/
Customizing Header and Footer Files
For many people customizing the header and footer files will be all that is required, since this
can make the pages immediately look like the rest of your site. You may use any HTML you
wish in these files, but be careful to ensure that you URLS and paths are all valid from the
aMember directory.
If you are inexperienced at creating header and footer files please see here for a detailed
description of how to create custom headers and footers.
Customizing the CSS
The CSS in the head of the default /templates/header.html page determines the font style
and size of the text on script pages and the background colors of tables and table cells. It can
be edited to make the styles match your own site.
The CSS information in the header template can be removed to your existing external
stylesheet, just make sure the link to that stylesheet is correct in the header template.
Customizing Other Script Pages
Each page in the aMember user interface has a corresponding template page which you can
edit. For example the file /aMember/signup.php has the corresponding template
/amember/templates/signup.html
Editing these pages is straightforward but as they each contain PHP and/or Smarty code
essential for the functioning of the script it is important to be careful when you make your
changes.
8.1.1
Creating header and footer files
The easiest way to create custom header and footer files is to start with an existing page on
your site. Follow these steps:
· Open an existing page on your site and save it in a new name - say amtemplate.html
© 2002-2006, CGI-Central
Customization
·
·
56
Remove all the content you do not wish to include in the aMember pages.
You need to change all the urls in the HTML from relative to absolute. Links, image
paths and so on must all be changed.
For example if you have a link to your home page that reads
<a href=index.html>
this must be changed to
<a href=http://www.yoursite.com/index.html>
Similarly if you have an image called using
<img src=../images/image.gif> it needs to be amended to
<img src=http://www.yoursite.com/images/image.gif>
·
·
·
·
·
8.2
(Alternatively you can edit all URLs to be relative from the root. This means all will
begin with a forward slash - eg "/images/image.gif")
From the aMember template file /templates/header.html, copy the CSS
information into the head area of your page.
Now write the word "HERE" in the part of the page where you want the script pages to
appear, this is usually the main part of the page.
The content of the page which appears above the word "HERE" is your header - copy
it into a new file and save as header.html
The content of the page which appears below the word "HERE" is your footer - copy it
into a new file and save as footer.html
Replace the aMember files /templates/header.html and
/templates/footer.html with your new ones - don't forget to back up the originals
first!
Adding login-form anywhere on your site
Use the following to add a login form anywhere you wish on your site:
<form action="/amember/login.php" method=post>
Username: <input type=text name=amember_login size=10><br>
Password: <input type=password name=amember_pass size=10><br>
<input type=submit value=Login>
</form>
If your page is PHP, you may display "smart" login form like that:
<?php
session_start();
if ($au=$_SESSION['_amember_user']){ // user is logged-in
print "Hello $au[name_f] $au[name_l]!<br>";
print "<a href='/amember/logout.php'>Logout</a>";
} else { // user is not logged-in
print "<form method=post action='/amember/login.php'>
Username: <input type=text name=amember_login size=10><br>
Password: <input type=password name=amember_pass size=10><br>
<input type=submit value='Login'>
</form>";
}
?>
© 2002-2006, CGI-Central
57
aMember Pro
Make sure you also add <?php session_start(); ?> into the FIRST line in your script, no output before, else you
will get errors like that:
Warning: session_start(): Cannot send session cookie - headers already sent by (output started
at
8.3
Include member's data into pages
1. Adding Member data to the Member profile Page
It is possible to include data from the members table in the database in your Member Profile
page. For example, you may wish to include a "Welcome John Doe" message at the top of the
Member Profile page.
To do this edit the file templates/member.html, adding the following:
Welcome, {$smarty.session._amember_user.name_f}
{$smarty.session._amember_user.name_l} !
You can also add additional information. For example the following would add the member's
phone number:
{$smarty.session._amember_user.data.phone}
2. Adding Member Information to PHP Pages
If you are using PHP pages on your site, you can also add member information to additional
pages. In this case you are using session information to add the data, it will only appear when
a member is logged in.
To add a welcome message use the following code:
<?
session_start();
print "Welcome, " . $_SESSION['_amember_user']['name_f'] . " " .
$_SESSION['_amember_user']['name_l'];
?>
Again, added fields must be used as
$_SESSION['_amember_user']['data']['phone']
8.4
Adding new fields
There are two set of additional fields that can be added to the aMember signup page and thus
to the Member database.
1. To add fields already in the database
By default the following fields are not included in the sign up form:
· street (text)
· city (text)
· state (text or select, your choice)
· zip (text)
· country (text or select, your choice)
You can activate these fields from the aMember Admin Control Panel as follows:
© 2002-2006, CGI-Central
Customization
58
Open the aMember Admin Control Panel
From the left menu, click Setup/Configuration
aMember Pro Configuration : Global screen opens
Find the field: Use Address info
· If 'Yes' then users will be asked to enter their full postal address when they
sign up
· If 'No' no fields for address information will appear in signup forms and this
information will not be requested.
2. Add Custom Fields from aMember Control Panel
You can add fields from Control Panel. Go to aMember
fields. You can also change order of added fields.
CP -> Add Fields,
and define new
3. Define and Add Custom Fields from PHP code
This requires some editing of script files but is easy to do. Please remember to keep a backup
of the original file in case of errors.
Also, consider using method (2) - this method is depricated.
To add another text field
For the purposes of this example, lets suppose you want to add a text field to collect a
Company Name.
Open the file config.inc.php
Add the information for the new field at the bottom of the config.inc.php file,
just before "?>"
Add the following at that location:
add_member_field('company', 'Company Name',
'text', 'company of member');
Save config.inc.php
The new field will now appear in Admin Control Panel for each customer.
If you want to add it to signup page, you have to edit the template
templates/signup.html and add text input field named 'company'.
To Add Select Fileds
This is a similar procedure to that described above. For the purposes of this example let's
assume you want to ask where people heard about your site.
Open the file config.inc.php
Add the information for the select or radio button at the bottom of the
config.inc.php file, just before "?>"
Add the following at that location:
add_member_field('where_heard', 'Where did you hear about
© 2002-2006, CGI-Central
59
aMember Pro
us',
'select', 'select where you heard about our site',
'',
array('options' => $items = array(
'link' => 'Link from another site',
'friend' => 'Referred by a Friend',
'press' => 'Newspaper or Magazine',
'other' => 'None of the above'
))
);
$config['where_heard_items'] = $items;
The select box will now appear in the Admin Control Panel in the member profile
To add the field to your sign up page edit the file templates/signup.html, using
the following:
<tr>
<th><b>Where did you hear about us?</b><br>
<small>please stell us how you heard about out
site.</small></th>
<td nowrap><select name=where_heard size=1>
{html_options options=$config.where_heard_items
selected=$smarty.request.where_heard}
</select>
</td>
</tr>
Add Field to Payments Table
The examples above add fields to the member table in the database. It is also possible to
add custom fields to the payments table in a similar way. In that case your entry in
config.inc.php will in each case begin with add_payment_field instead of
add_member_field
8.5
Creating new integration plugins
This chapter requies serious PHP programming expirience. We recommend you to contact
[email protected] for suggestion, if you not sure that you have such knowledge.
What is integration plugin?
Integration plugin is an add-on for aMember which allows you to maintain third-party
members database or solve other tasks. It consists from several PHP files. This guide will
show you how to create such a plugin and test it.
8.5.1
How to start
You will need text editor and FTP client to create a plugin.
Creating plugin template:
1. Copy folder amember/plugins/protect/plugin_template/ to some other folder, lets say
© 2002-2006, CGI-Central
Customization
60
"some_your_plugin_name";
2. Rename "plugin_template.inc.php" to "some_your_plugin_name.inc.php";
3. In the plugin files, replace all occurrences of "plugin_template" to
"some_your_plugin_name" (of course, without quotes);
4. Now please open "some_your_plugin_name.inc.php" with your favorite text editor and lets
write some code.
Usually you have to define code at least for user status changes
8.5.2
60
.
Understanding user record
First, let us explain: member record is an array, usually we name it $member in the code. It
contains the following fields, for example:
$member['login']
$member['pass']
$member['name_f']
$member['name_l']
$member['email']
Also, there is a special "field" called "data" ($member['data']). It contains all additional
fields
(fields which you've added with using of add_member_field() function. So, if you added field
phone, there will be define a varaible :
$member['data']['phone']
What is user status?
aMember always hold and maintain user status in several fields. Because member can have
several subscriptions
for different products in the same time, we maintain 2 status fields:
$member['data']['status']
This field is an associative array. Keys are product IDs, and values are status value for this
product. 0 means that subscription for this product is not active (never paid or expired), and 1
means that subscription is active (paid and not-expired). This field should be used for most
calculations in plugins.
$member['status']
This field is mostly for usage in aMember code, but you can use it as well. It is status of entire
member record and it can have the following values: 0 - never paid (user never had completed
subscriptions), 1 - paid and active (user have at least one completed and active subscription),
2 - expired (all user subscriptions have been expired)
8.5.3
How to setup a plugin hook
A plugin hook can be set with this line of code:
setup_plugin_hook('subscription_added',
'plugin_template_added');
It means that for even subscription_added, aMember will run function
plugin_template_added. There can be several hooks called for the same event.
© 2002-2006, CGI-Central
61
8.5.4
aMember Pro
Plugin hooks - member status
These hooks called when changes made to aMember database and you need to update your
third-party members database.
subscription_added($member_id, $product_id, $member)
This hook will be called when user subscription status $member['data']['status']
changed to active (1) for product with ID = $product_id. In this case, you have to add (or
update) member record in your database, or execute some other actions regarding this
event.
Please note - because user may have subscriptions for several products, your database
may already hold this customer record. Then you should update it with new password, for
example and you should unlock customer record if necessary.
It is important to understand this hook is not necessary called for every payment. It is
called only when user status for product changes. So, when user already have active
subscription for product, and he orders this product again, this hook will not be called. If
you need to call a function for every member payment, have a look to
"finish_waiting_payment" plugin hook.
subscription_updated($member_id, $oldmember,$newmember)
This hook will be called when user (or admin) updates profile. You should update
customer profile in your database accordingly, if such profile exists in your database.
New info will be stored in $newmember variable, and old info will be in $oldmember
variable. $oldmember will also
help you to find user record in your database. Don't forget - login can be changed too! (by
admin)
Also, if you need to use member status fields in this function, use it from $oldmember
variable - these fields are
empty in $newmember variable.
subscription_deleted($member_id, $product_id, $member)
This function will be called when user subscriptions status for $product_id becomes
NOT-ACTIVE. It may happen
if user payment expired, marked as "not-paid" or deleted by admin. This function is an
opposite for subscription_added.
Be careful here - user may have active subscriptions for another products and he may be
should still in your database - check $member['data']['status'] variable to be sure that user
has no other subscriptions allowing his to access your application.
subscription_removed($member_id, $member)
This function will be called when admin (or aMember) completely deletes member
© 2002-2006, CGI-Central
Customization
62
profile from aMember database with all related payments and other info.
Your plugin should delete user profile from database (if your application allows it!), or it
should just disable member access if your application if application doesn't allow profiles
deletion.
subscription_rebuild(&$members)
This function will be called when admin clicks on aMember CP -> Rebuild Db link. This
function allows admin to ensure that third-party members databases are synchronised with
aMember members Db. aMember sends a short list of members. Each key is a member
login, each record is an assotiative array with the following fields:
array(
'pass' => 'MEMBER PASSWORD',
'product_id' => array('LIST','OF',
'ID OF PRODUCTS','WHICH MEMBER IS SUBSCRIBED FOR')
)
It is not necessary to implement this hook.
8.5.5
Plugin hooks - login helpers
aMember Pro allows you to implement an unqiue feature - "single-login". It means that when
user is logged-in to third-party application, he automatically become logged-in in aMember
and vice-versa.
Please note - there is one potenial problem - when user clicks Logout in aMember, it is
possible to implement that member will be logged-out automatically from third-party
application. However, it is impossible to implement that when user logs out from third-party
application, he automatically logs-out from aMember. It can be resolved by replacing logout
link in third-party application - it must point to aMember logout page :
http://www.yoursite.com/amember/logout.php
check_logged_in()
This function must check if user is logged-in in third party application. Function can use
cookies, sessions and database info to determine this. Function must return:
array('username', 'password') if user logged-in
and
array('', '') if user is not logged-in
after_login($member)
This function must login user into third-party application. It can use $member to get
member info from aMember database.
If this function has incorrect code, it is a potential hole - please be careful. This function
must check third-party members
database and ensure that enabled user with exactly the same username and password is
exists in third-party
© 2002-2006, CGI-Central
63
aMember Pro
after_logout()
This function must logout user from third-party application. You must clear cookies,
session data, database records - anything that you have set in after_login() and that you
used in check_logged_in() functions.
8.5.6
Plugin hooks - signup helpers
check_uniq_login($login, $email, $pass)
This hooks allows you to check if user is exists in third-party database before he can
signup using amember/signup.php
form. By default, aMember plugins do the following checks :
- if user with the same username , email and password is exists, allow signup
- if username is the same, but email or password is different - don't allow signup
For example, it won't allow "hackers" to get access to existing, but not-paid forum
account.
Function shoulld return 1 if user is allowed to signup, and 0 if user is not allowed to
signup.
fill_in_signup_form(&$vars)
This hook is rarely used, hovewer it offers you great ability to pre-fill signup form in
amember with info received from third-party database, if user is logged-in in third-party
application. For example, if user is logged-in in Invision Board, this function may
automatically fill-in username and email fields in aMember signup form. To do it, you
have to determine if user is logged-in in third-party application, get user info from
third-party database and save this info to $vars array.
8.6
Extending aMember with PHP
This chapter requies serious PHP programming expirience. We recommend you to contact
[email protected] for suggestion, if you not sure that you have such knowledge.
Right way to add small piece of code to aMember
We recommend you to create file amember/site.inc.php and put all your customization code
to this file. If you follow this advice, your customizations won't be lost after upgrade, and it
will be easy to track.
To start, upload file amember/site.inc.php with the following content:
<?php
// customization code must be added below this line
?>
Make sure that there are no spaces, newlines or any other output before <? or after
?>.
Before you read this topic, make sure you've read topic "Understanding user record
previous chapter. It is necessary for understanding of this chapter.
60
" in
© 2002-2006, CGI-Central
Customization
8.6.1
64
Hooks - validation functions
validate_signup_form(&$vars)
This function will be called when user submits signup form. $vars is an array of
submitted values. You may check it and return array of errors. If no errors found, you may
return empty array.
This function is extremelly useful, when you added some fields and need to validate
entered values for these fields. This function can also change submitted variables
(validation goes before any processing).
Example (validates additional phone and fax fields ):
function vsf(&$vars){
$errors = array();
if (!strlen($vars['phone'])
$errors[] = "Please enter phone number;
if (!strlen($vars['fax'])
$errors[] = "Please enter fax number;
}
setup_plugin_hook('validate_signup_form', 'vsf');
validate_member_form(&$vars)
This function will be called when user submits renewal form from
http://www.yoursite.com/amember/member.php. $vars is an array of submitted values.
You may check it and return array of errors. If no errors found, you may return empty
array. Please note, that this form doesn't contain any member info. However, you may get
member info from session.
8.6.2
Hooks - payments update
finish_waiting_payment($payment_id)
This function called when payment(subscription) status changes to Paid ("Completed").
Then you can retreive info from database about payment and use it to execute some
actions.
Please note - if admin switches payment status Paid -> NotPaid -> Paid from control
panel, this function can be executed twice for the same payment. Be careful.
Example of this hook function:
function fwp($payment_id){
global $db;
$payment = $db->get_payment($payment_id); // $payment is now
array
$product = $db->get_product($payment['product_id']);
$member = $db->get_user($payment['member_id']);
print "For this period: $payment[begin_date] $payment[expire_date]<br>";
print "$product[title] ordered by $member[name_f]
$member[name_l]<br>";
}
update_payments($payment_id)
This function called when payment $payment_id has been updated somehow - changed,
© 2002-2006, CGI-Central
65
aMember Pro
marked as paid, added, deleted.
You can use the same code as for finish_waiting_payment function.
8.6.3
aMember database functions
Often, in plugin hooks, you need to access database records. It is possible in numerous ways.
Usually, it is right way to access aMember database with special access functions. You will
find description of these functions in this topic.
Note: you have to define global
$db;
in your function to get access to database object.
$q = $db->query($sql)
It is not recommended, but if you want to execute a MySQL query to aMember database, you
should use this function. This function will access right database and it will handle errors
automatically.
To substitute aMember tables prefix into query, use {$db->config[prefix]} in your string,
like
$db->query($sql = "SELECT member_id
FROM {$db->config[prefix]}members
WHERE login = 'someone'");
$u = $db->get_user($user_id)
This function will return you a user record for given user_id
$db->update_user($user, $u)
This function will update user with new user record $u. You should load record with get_user
, change some fields, then pass changed record to this function.
$db->delete_user($user_id)
This function will delete user with given user_id
$p = $db->get_payment($payment_id)
This function will return you a payment record with given payment_id
$db->update_payment($payment_id, $p)
This function will update payment
$db->delete_payment($payment_id)
This function will delete payment
$db->get_user_payments($member_id, $completed)
This function will return you array of member payments, each record in this array is the same
as returned from get_payment function. $completed parameter may be 1 - then only Paid
("completed") payments will be returned, or 0 - then all member payments (include pending)
will be returned. This code snippet will show you how to select only active payments from
this list:
$pl = array();
$dat = date('Y-m-d');
© 2002-2006, CGI-Central
Customization
foreach ($db->get_user_payments($member_id, 1) as $p){
if (($p['begin_date']<=$dat) && ($p['expire_date']>=$dat)){
$pl[] = $p;
}
}
// now $pl contains only completed payments
© 2002-2006, CGI-Central
66
67
aMember Pro
Index
-MMember 47
mod_rewrite with php_include
-Aafter_login 62
after_logout 62
auto_prepend with php_include
-BBulletin Board Plugins
39
-P35
payment 49
php_include 33
Plugins 43
Product 44
Protection Plugins
31
-Q-
-Ccheck_logged_in
check_uniq_login
CSS 55
62
63
delete_payment 65
delete_user 65
-Eexpired members
47
-Ffill_in_signup_form 63
finish_waiting_payment 64
-Gget_payment 65
get_user 65
get_user_payments
-H36
query(
65
-S-
-D-
htpasswd
32
Setting up IP-Checking with .htpasswd
setup_plugin_hook 60
Signup 6
site.inc.php 63
Subscription 49
subscription_added 61
subscription_deleted 61
subscription_rebuild 61
subscription_removed 61
subscription_updated 61
52
-TThird-party scripts integration 7
This is the URL to the content to which you wish this
product to give access. 44
-U65
update_payment 65
update_payments 64
update_user 65
-Vvalidate_member_form
64
© 2002-2006, CGI-Central
Index
validate_signup_form
© 2002-2006, CGI-Central
64
68
69
aMember Pro
Endnotes 2... (after index)
© 2002-2006, CGI-Central