1
Using Python for Interactive Data Analysis
Perry Greenfield
Robert Jedrzejewski
Vicki Laidler
Space Telescope Science Institute
18th April 2005
1
Tutorial 2: Reading and plotting spectral data
In this tutorial I will cover some simple plotting commands using Matplotlib, a Python plotting package developed
by John Hunter of the University of Chicago. I will also talk about reading FITS tables, delve a little deeper
into some of Python’s data structures, and use a few more of Python’s features that make coding in Python so
straightforward. To emphasize the platform independence, all of this will be done on a laptop running Windows
2000.
1.1
Example session to read spectrum and plot it
The sequence of commands below represent reading a spectrum from a FITS table and using matplotlib to plot it.
Each step will be explained in more detail in following subsections.
>>>
>>>
>>>
>>>
>>>
>>>
>>>
>>>
>>>
>>>
import pyfits
from pylab import *
# import plotting module
pyfits.info(’fuse.fits’)
tab = pyfits.getdata(’fuse.fits’) # read table
tab.names
# names of columns
tab.formats
# formats of columns
flux = tab.field(’flux’)
# reference flux column
wave = tab.field(’wave’)
flux.shape
# show shape of flux column array
plot(wave, flux)
# plot flux vs wavelength
# add xlabel using symbols for lambda/angstrom
> > > xlabel(r’$\lambda (\angstrom)$’, size=13)
> > > ylabel(’Flux’)
# Overplot smoothed spectrum as dashed line
> > > from numarray.convolve import boxcar
> > > sflux = boxcar(flux.flat, (100,)) # smooth flux array
> > > plot(wave, sflux, ’--r’, hold=True) # overplot red dashed line
> > > subwave = wave.flat[::100]
# sample every 100 wavelengths
> > > subflux = flix.flat[::100]
1
>>>
>>>
>>>
>>>
plot(subwave,subflat,’og’)
# overplot points as green circles
errorbar(subwave, subflux, yerr=0.05*subflux, fmt=’.k’)
legend((’unsmoothed’, ’smoothed’, ’every 100’))
text(1007, 0.5, ’Hi There’)
# save to png and postscript files
> > > savefig(’fuse.png’)
> > > savefig(’fuse.ps’)
1.2
Using Python tools on Windows
Most of the basic tools we are developing and using for data analysis will work perfectly well on a Windows machine.
The exception is PyRAF, since it is an interface to IRAF and IRAF only works on Unix-like platforms. There is
no port of IRAF to Windows, nor is there likely to be in the near future. But numarray, PyFITS, Matplotlib and
of course Python all work on Windows and are relatively straightforward to install.
1.3
Reading FITS table data (and other asides...)
As well as reading regular FITS images, PyFITS also reads tables as arrays of records (recarrays in numarray
parlance). These record arrays may be indexed just like numeric arrays though numeric operations cannot be
performed on the record arrays themselves. All the columns in a table may be accessed as arrays as well.
> > > import pyfits
When you import a module, how does Python know where to look for it? When you start up Python, there is a
search path defined that you can access using the path attribute of the sys module. So:
> > > import sys
> > > sys.path
[”, ’C:\\WINNT\\system32\\python23.zip’,
’C:\\Documents and Settings\\rij\\SSB\\demo’,
’C:\\Python23\\DLLs’, ’C:\\Python23\\lib’,
’C:\\Python23\\lib\\plat-win’,
’C:\\Python23\\lib\\lib-tk’,
’C:\\Python23’,
’C:\\Python23\\lib\\site-packages ’,
’C:\\Python23\\lib\\site-packages\\Numeric’,
’C:\\Python23\\lib\\site-package s\\gtk-2.0’,
’C:\\Python23\\lib\\site-packages\\win32’,
’C:\\Python23\\lib\\site -packages\\win32\\lib’,
’C:\\Python23\\lib\\site-packages\\Pythonwin’]
This is a list of the directories that Python will search when you import a module. If you want to find out where
Python actually found your imported module, the __file__ attribute shows the location:
> > > pyfits.__file__
’C:\\Python23\\lib\\site-packages\\pyfits.pyc’
2
Note the double ’\’ characters in the file specifications; Python uses \ as its escape character (which means that
the following character is interpreted in a special way. For example, \n means “newline”, \t means “tab” and \a
means “ring the terminal bell”). So if you really _want_ a backslash, you have to escape it with another backslash.
Also note that the extension of the pyfits module is .pyc instead of .py; the .pyc file is the bytecode compiled
version of the .py file that is automatically generated whenever a new version of the module is executed.
I have a FITS table of FUSE data in my current directory, with the imaginative name of ’fuse.fits’
> > > pyfits.info(’fuse.fits’)
Filename: fuse.fits
No.
Name
Type
Cards
Dimensions
Format
0
PRIMARY
PrimaryHDU
365 ()
Int16
1
SPECTRUM
BinTableHDU
35 1R x 7C
[10001E,
10001E, 10001E, 10001J, 10001E, 10001E, 10001I]
> > > tab = pyfits.getdata(’fuse.fits’) # returns table as record array
PyFITS record arrays have a names attribute that contains the names of the different columns of the array (there
is also a format attribute that describes the type and contents of each column).
> > > tab.names
[’WAVE’, ’FLUX’, ’ERROR’, ’COUNTS’, ’WEIGHTS’, ’BKGD’, ’QUALITY’]
> > > tab.formats
[’10001Float32’, ’10001Float32’, ’10001Float32’, ’10001Float32’,
’10001Float32’, ’10001Float32’, ’10001Int16’]
The latter indicates that each column element contains a 10001 element array of the types indicated.
> > > tab.shape
(1,)
The table only has one row. Each of the columns may be accessed as it own array by using the field method. Note
that the shape of these column arrays is the combination of the number of rows and the size of the columns. Since
in this case the colums contain arrays, the result will be two dimensional (albeit with one of the dimensions only
having length one).
> > > wave = tab.field(’wave’)
> > > flux = tab.field(’flux’)
> > > flux.shape
(1, 10001)
The arrays obtained by the field method are not copies of the table data, but instead are views into the record
array. If one modifies the contents of the array, then the table itself has changed. Likewise, if a record (i.e., row)
of the record array is modified, the corresponding column array will change. This is best shown with a different
table:
> > > tab2 = getdata(’table2.fits’)
> > > tab2.shape # how many rows?
(3,)
> > > tab2
3
array(
[(’M51’, 13.5, 2),
(’NGC4151’, 5.7999999999999998, 5),
(’Crab Nebula’, 11.119999999999999, 3)],
formats=[’1a13’, ’1Float64’, ’1Int16’],
shape=3,
names=[’targname’, ’flux’, ’nobs’])
> > > col3 = tab2.field(’nobs’)
> > > col3
array([2, 5, 3], type=Int16)
> > > col1[2] = 99
> > > tab2
array(
[(’M51’, 13.5, 2),
(’NGC4151’, 5.7999999999999998, 5),
(’Crab Nebula’, 11.119999999999999, 99)],
formats=[’1a13’, ’1Float64’, ’1Int16’],
shape=3,
names=[’targname’, ’flux’, ’nobs’])
Numeric column arrays may be treated just like any other numarray array. Columns that contain character fields
are returned as character arrays (with their own methods, described in the PyFITS User Manual)
Updated or modified tables can be written to FITS files using the same functions as for image or array data.
1.4
Quick introduction to plotting
The package matplotlib is used to plot arrays and display image data. This section gives a few examples of how
to make quick plots. More examples will appear later in the tutorial (these plots assume that the .matplotlibrc
file has been properly configured; the default version at STScI has been set up that way. There will be more
information about the .matplotlibrc file later in the tutorial).
First, we must import the functional interface to matplotlib
> > > from pylab import *
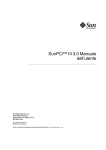
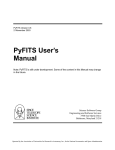
To plot flux vs wavelength:
> > > plot(wave, flux)
[<matplotlib.lines.Line2D instance at 0x02A07440>]
4
Note that the resulting plot is interactive. The toolbar at the bottom is used for a number of actions. The
button with arrows arranged in a cross pattern is used for panning or zooming the plot. In this mode the zooming
is accomplished by using the middle mouse button; dragging it in the x direction affects the zoom in that direction
and likewise for the y direction. The button with a magnifying glass and rectangle is used for the familiar zoom to
rectangle (use the left mouse button to drag define a rectangle that will be the new view region for the plot. The
left and right arrow buttons can be used to restore different views of the plot (a history is kept of every zoom and
pan). The button with a house will return it the the original view. The button with a diskette allows one to save
the plot to a .png or postscript file. You can resize the window and the plot will re-adjust to the new window size.
Also note that this and many of the other pylab commands result in a cryptic printout. That’s because these
function calls return a value. In Python when you are in an interactive mode, the act of entering a value at the
command line, whether it is a literal value, evaluated expression, or return value of a function, Python attempts
to print out some information on it. Sometimes that shows you the value of the object (if it is simple enough) like
for numeric values or strings, or sometimes it just shows the type of the object, which is what is being shown here.
The functions return a value so that you can assign it to a variable to manipulate the plot later (it’s not necessary
to do that though). We are likely to change the behavior of the object so that nothing is printed (even though it
is still returned) so your session screen will not be cluttered with these messages.
5
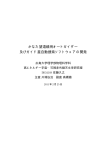
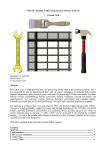
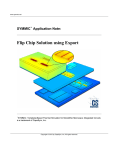
It is possible to customize plots in many ways. This section will just illustrate a few possibilities
> > > xlabel(r’$\lambda (\angstrom)$’, size=13)
<matplotlib.text.Text instance at 0x029A9F30>
> > > ylabel(’Flux’)
<matplotlib.text.Text instance at 0x02A07BC0>
6
e
5
4
e
e
1
2
1
1
2
2
x
3
l
e
1
2
u
F
2
e
1
e
1
2
1
2
0
9
8
0
1
0
0
0
1
0
2
0
1
0
4
0
1
0
6
0
1
0
8
0
1
1
0
0
◦
λ(A)
One can add standard axis labels. This example shows that it is possible to use special symbols using TEX
notation.
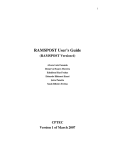
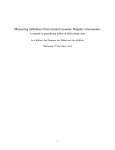
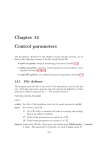
Overplots are possible. First we make a smoothed spectrum to overplot.
> > > from numarray.convolve import boxcar # yet another way to import functions
> > > sflux = boxcar(flux.flat, (100,)) # smooth flux array using size 100 box
> > > plot(wave, sflux, ’--r’, hold=True) # overplot red dashed line
[<matplotlib.lines.Line2D instance at 0x0461FC60>]
This example shows that one can use the hold keyword to overplot, and how to use different colors and linestyles.
This case uses a terse representation (– for dashed and r for red) to set the values, but there are more verbose ways
6
to set these attibutes. As an aside, the function that matplotlib uses are closely patterned after matlab. Next we
subsample the array to overplot circles and error bars for just those points.
> > > subwave = wave.flat[::100] # sample every 100 wavelengths
> > > subflux = flux.flat[::100]
> > > plot(subwave,subflat,’og’, hold=True) # overplot points as green circles
[<matplotlib.lines.Line2D instance at 0x046EBE40>]
> > > error = tab.field(’error’)
> > > suberror = error.flat[::100]
> > > errorbar(subwave, subflux, suberror, fmt=’.k’, hold=True)
(<matplotlib.lines.Line2D instance at 0x046EBEE0>, <a list of 204 Line2D errorbar objects>)
Adding legends is simple:
> > > legend((’unsmoothed’, ’smoothed’, ’every 100’))
<matplotlib.legend.Legend instance at 0x04978D28>
As is adding arbitrary text.
> > > text(1007., 0.5e-12, ’Hi There’)
<matplotlib.text.Text instance at 0x04B27328>
7
1
e
1
2
e
u
n
s
m
o
o
t
e
s
m
e
8
e
1
3
6
e
1
3
o
v
o
e
r
t
y
d
h
d
h
1
0
0
x
H
l
i
T
h
e
r
e
u
F
4
e
2
e
1
3
1
3
1
0
0
6
1
0
0
8
1
0
1
0
1
0
1
2
1
0
1
4
1
0
1
6
1
0
1
8
1
0
2
0
◦
λ(A)
Matplotlib uses a very different style from IDL regarding how different devices are handled. Underneath the
hood, matplotlib saves all the information to make the plot; as a result, it is simple to regenerate the plot for
other devices without having to regenerate the plotting commands themselves (it’s also why the figures can be
interactive). The following saves the figure to a .png and postscript file.
> > > savefig(’fuse.png’)
> > > savefig(’fuse.ps’)
1.5
A little background on Python sequences
Python has a few, powerful built-in “sequence” data types that are widely used. You have already encountered 3
of them.
1.5.1
Strings
Strings are so ubiquitous, that it may seem strange treating them as a special data structure. That they share
much with the other two (and arrays) will be come clearer soon. First we’ll note here that there are several ways
8
to define literal strings. One can define them in the ordinary sense using either single quotes (’) or double quotes
(“). Furthermore, one can define multiline strings using triple single or double quotes to start and end the string.
For example:
> > > s = ”’This is an example
of a multi-line string that
goes on and on and on.”’
>>> s
’This is an example\nof a string that\ngoes on and on\nand on’
> > > print s
This is an example
of a string that
goes on and on
and on
As with C, one uses the backslash character in combination with others to denote special characters. The most
common is \n for new line (which means one uses \\ to indicate a single \ is desired). See the Python documentation
for the full set. For certain cases (like regular expressions or MS Windows path names), it is more desirable to
avoid special intepretation of backslashes. This is accomplished by prefacing the string with an r (for ’raw’ mode):
> > > print “two lines \n in this example”
two lines
in this example
> > > print r”but not \n this one”
but not \n this one
Strings are full fledged Python objects with many useful methods for manipulating them. The following is a brief
list of all those available with a few examples illustrating their use. Details on their use can be found in the Python
library documentation, the references in Appendix A or any introductory Python book.
capitalize()
center(width ,[fillchar])
count(sub [,start[,end]])
decode([encoding[,errors]])
encode([encoding[,errors]])
endswith(suffix[,start[,end]]))
expandtabs([tabsize])
find(substring[,start[,end]])
index(substring[,start[,end]])
isalnum()
isdigit()
islower()
isspace()
istitle()
isupper()
join(seq)
# capitalize first character
# return string centered in string of
width specified with optional fill char
# return number of occurences of substring
# see documentation
# see documentation
# True if string ends with suffix
# defaults to 8 spaces
# returns position of substring found
# like find but raises exception on failure
# true if all characters are alphanumeric
# true if all characters are digits
# true if all characters are lowercase
# true if all characters are whitespace
# true if titlecased
# true if all characters are uppercase
# use string to join strings in the seq
9
ljust(width[,fillchar])
lower()
lstrip([chars])
replace(old, new [,count])
rfind(substring[,start[,edn]])
rindex(substring[,start[,end]])
rjust(width[,fillchar])
rsplit([sep[maxsplit]])
split([sep[,maxsplit])
splitlines([keepends])
startswith(prefix[.start[,end]])
strip([chars])
swapcase()
title()
translate(table[,deletechars])
upper()
zfill(width)
# return string left justified
within string of specified width
# convert to lower case
# strip leading whitespace (and optional
characters specified)
# substitute “old” substring
with “new” string
# return position of rightmost match of substring
# like rfind but raises exception on failure
# like ljust but right justified instead
# similar to split, see documentation
# return list of words delimited by
whitespace (or optional sep string)
# returns list of lines within string
# true if string begins with prefix
# strip leading and trailing whitespace
# switch lower to upper case and visa versa
# return title cased version
# maps characters using table
# convert to upper case
# left fill string with zeros to given width
> > > “hello world”.upper()
“HELLO WORLD”
> > > s = “hello world”
> > > s.find(“world”)
6
> > > s.endwith(“ld”)
True
> > > s.split()
[’hello’, ’world]
1.5.2
Lists
Think of lists as one dimensional arrays that can contain anything for its elements. Unlike arrays, the elements of
a list can be different kinds of objects (including other lists) and the list can change in size. Lists are created using
simple brackets, e.g.:
> > > mylist = [1, “hello”, [2,3]]
This particular list contains 3 objects, the integer value 1, the string “hello” and the list [2, 3].
Empty lists are permitted:
> > > mylist = []
Lists also have several methods:
10
append(x)
extend(x)
count(x)
index(x [,i[,j]])
insert(i, x)
pop([i])
remove(x)
reverse()
sort([cmp[,key[,reverse]]])
1.5.3
#
#
#
#
#
#
adds x to the end of the list
concatenate the list x to the list
return number of elements equal to x
return location of first item equal to x
insert x at ith position
return last item [or ith item] and remove
it from the list
# remove first occurence of x from list
# reverse elements in place
# sort the list in place (how sorts on
disparate types are handled are
described in the documentation)
Tuples
One can view tuples as just like lists in some respects. They are created from lists of items within a pair of
parentheses. For example:
> > > mytuple = (1, “hello”, [2,3])
Because parentheses are also used in expressions, there is the odd case of creating a tuple with only one element:
> > > mytuple = (2) # not a tuple!
doesn’t work since (2) is evaluated as the integer 2 instead of a tuple. For single element tuples it is necessary to
follow the element with a comma:
> > > mytuple = (2,) # this is a tuple
Likewise, empty tuples are permitted:
> > > mytuple = ()
If tuples are a lot like lists why are they needed? They differ in one important characteristic (why this is needed
won’t be explained here, just take our word for it). They cannot be changed once created; they are called immutable.
Once that “list” of items is identified, that list remains unchanged (if the list contains mutable things like lists, it
is possible to change the contents of mutable things within a tuple, but you can’t remove that mutable item from
the tuple). Tuples have no standard methods.
1.5.4
Standard operations on sequences
Sequences may be indexed and sliced just like arrays:
> > > s[0]
’h’
> > > mylist2 = mylist[1:]
> > > mylist2
[“hello”, [2, 3]]
11
Note that unlike arrays, slices produce a new copy.
Likewise, index and slice asignment are permitted for lists (but not for tuples or strings, which are also immutable)
> > > mylist[0] = 99
> > > mylist
[99, “hello”, [2, 3]]
> > > mylist2
[1, “hello”, [2,3]] # note change doesn’t appear on copy
> > > mylist[1:2] = [2,3,4]
> > > mylist
[1, 2, 3, 4, [2, 3]]
Note that unlike arrays, slices may be assigned a different sized element. The list is suitably resized.
There are many built-in functions that work with sequences. An important one is len() which returns the length
of the sequence. E.g,
> > > len(s)
11
This function works on arrays as well (arrays are also sequences), but it will only return the length of the next
dimension, not the total size:
> > > x = array([[1,2],[3,4]])
> > > print x
[[1 2]
[3 4]]
> > > len(x)
2
For strings, lists and tuples, adding them concatenates them, multiplying them by an integer is equivalent to adding
them that many times. All these operations result in new strings, lists, and tuples.
> > > “hello “+”world”
“hello world”
> > > [1,2,3]+[4,5]
[1,2,3,4,5]
> > > 5*”hello “
“hello hello hello hello hello “
1.5.5
Dictionaries
Lists, strings and tuples are probably somewhat familiar to most of you. They look a bit like arrays, in that they
have a certain number of elements in a sequence, and you can refer to each element of the sequence by using
its index. Lists and tuples behave very much like arrays of pointers, where the pointers can point to integers,
floating point values, strings, lists, etc. The methods allow one to do the kinds of things you need to do to arrays;
insert/delete elements, replace elements of one type with another, count them, iterate over them, access them
sequentially or directly, etc.
12
Dictionaries are different. Dictionaries define a mapping between a key and a value. The key can be either a
string, an integer, a floating point number or a tuple (technically, it must be immutable, or unchangable), but not
a list, dictionary, array or other user-created object, while the value has no limitations. So, here’s a dictionary:
> > > thisdict = {’a’:26.7, 1:[’random string’, 66.4], -6.3:”}
As dictionaries go, this one is pretty useless. There’s a key whose name is the string ’a’, with the floating point
value of 26.7. The second key is the integer 1, and its value is the list containing a string and a floating point value.
The third key is the floating point number -6.3, with the empty string as its value. Dictionaries are examples of
a mapping data type, or associative array. The order of the key/value pairs in the dictionary is not related to the
order in which the entries were accumulated; the only thing that matters is the association between the key and
the value. So dictionaries are great for, for example, holding IRAF parameter/value sets, associating numbers with
filter names, and passing keyword/value pairs to functions. Like lists, they have a decent set of built-in methods,
so for a dictionary D:
D.copy()
D.has_key(k)
D.items()
D.keys()
D.values()
D.iteritems()
D.iterkeys()
D.itervalues()
D.get(k[,x])
D.clear()
D.update(D2)
D.setdefault(k[,x])
D.popitem()
#
#
#
#
#
#
#
#
#
#
#
#
Returns a shallow copy of the dictionary
Returns True if key k is in D, otherwise False
Returns a list of all the key/value pairs
Returns a list of all the keys
Returns a list of all the values
Returns an iterator on all items
Returns an iterator an all keys
Returns an iterator on all keys
Returns D[k] if k is in D, otherwise x
Removes all items
For each k in D2, sets D[k] = D2[k]
Returns D[k] if k is in D, otherwise sets
D[k] = x and returns x
# Removes and returns an arbitrary item
So, for example, we could store the ACS photometric zeropoints in a dictionary where the key is the name of the
filter:
> > > zeropoints = {’F435W’:25.779, ’F475W’:26.168, ’F502N’:22.352, ’F550M’:24.867,
’F555W’:25.724, ’F606W’:26.398, ’F625W’:25.731, ’F658N’:22.365, ’F660N’:21.389,
’F775W’:25.256, ’F814W’:25.501, ’F850LP’:24.326, ’F892N’:21.865}
> > > filter = hdr[’filter1’]
> > > if filter.find(’CLEAR’) != -1: filter = hdr[’filter2’]
> > > zp = zeropoints[filter]
Sweet, huh?
You will be seeing a lot more dictionaries over the next weeks, so you should learn to love them. The power
afforded by dictionaries, lists, tuples and strings and their built-in methods is one of the great strengths of Python.
1.5.6
A section about nothing
Python uses a special value to represent a null value called None. Functions that don’t return a value actually
return None. At the interactive prompt, a None value is not printed (but a print None will show its presence).
13
1.6
More on plotting
It is impossible in a short tutorial to cover all the aspects of plotting. The following will attempt to give a broad
brush outline of matplotlib terminology, what functionality is available, and show a few examples.
1.6.1
matplotlib lingo, configuration and modes of usage
The “whole” area that matplotlib uses for plotting is called a figure. Matplotlib supports multiple figures at the
same time. Interactively, a figure corresponds to a window. A plot (a box area with axes and data points, ticks,
title, and labels...) is called an axes object. There may be many of these in a figure. Underneath, matplotlib has
a very object-oriented framework. It’s possible to do quite a bit without knowing the details of it, but the most
intricate or elaborate plots most likely will require some direct manipulation of these objects. For the most part
this tutorial will avoid these but a few examples will be shown of this usage.
While there may be many figures and many axes on a figure, the matplotlib functional interface (i.e, pylab)
has the concept of current figures, axes and images. It is to these that commands that operate on figures, axes, or
images apply to. Typically most plots generate each in turn and so it usually isn’t necessary to change the current
figure, axes, or image except by the usual method of creating a new one. There are ways to change the current
figure, axes, or image to a previous one. These will be covered in a later tutorial.
Matplotlib works with many “backends” which is another term for windowing systems or plotting formats. We
recommend (for now anyway) using the standard, if not quite as snazzy, Tkinter windows. These are compatible
with PyRAF graphics so that matplotlib can be used in the same session as PyRAF if you use the TkAgg backend.
Matplotlib has a very large number of configuration options. Some of these deal with backend defaults, some
with display conventions, and default plotting styles (linewidth, color, background, etc.). The configuration file,
.matplotlibrc, is a simple ascii file and for the most part, most of the settings are obvious in how they are
to be set. Note that usage for interactive plotting requires a few changes to the standard .matplotlibrc file as
downloaded (we have changed the defaults for our standard installation at STScI). A copy of this modified file may
be obtained from http://stsdas.stsci.edu/python/.matplotlibrc. Matplotlib looks for this file in a number
of locations including the current directory. There is an environmental variable that may be set to indicate where
the file may be found if yours is not in a standard location.
Some of the complexity of matplotlib reflects the many kinds of usages it can be applied to. Plots generated
in script mode generally have interactive mode disabled to prevent needless regenerations of plots. In such usage,
one must explicitly ask for a plot to be rendered with the show() command. In interactive mode, one must avoid
the show command otherwise it starts up a GUI window that will prevent input from being typed at the interactive
command line. Using the standard Python interpreter, the only backend that supports interactive mode is TkAgg.
This is due to the fact most windowing systems require an event loop to be running that conflicts with the Python
interpreter input loop (Tkinter is special in that the Python interpreter makes special provisions for checking Tk
events thus no event loop must be run). IPython has been developed to support running all the backends while
accepting commands. Do not expect to be able to use a matplotlib backend while using a different windowing
system within Python. Generally speaking, different windowing frameworks cannot coexist within the same process.
Since matplotlib takes its heritage from matlab, it tends toward using more functions to build a plot rather
than many keyword arguments. Nevertheless, there are many plot parameters that may be set through keyword
arguments.
The axes command allows arbitrary placement of plots within a figure (even allowing plots to be inset within
others). For cases where one has a regular grid of plots (say 2x2) the subplot command is used to place these
within the figure in a convenient way. See one of the examples later for its use.
Generally, matplotlib doesn’t try to be too clever about layout. It has general rules for how much spaces is
needed for tick labels and other plot titles and labels. If you have text that requires more space than that, It’s up
14
to you to replot with suitable adjustments to the parameters.
Because of the way that matplotlib renders interactive graphics (by drawing to internal memory and then
moving to a display window), it is slow to display over networks (impossible over dial-ups, slow over broadband;
gigabit networks are quite usable however)
1.6.2
matplot functions
The following lists most of the functions available within pylab for quick perusal followed by several examples.
• basic plot types (with associated modifying functions)
– bar: bar charts
– barh: horizontal bar charts
– boxplot: box and whisker plots
– contour:
– contourf: filled contours
– errorbar: errorbar plot
– hist: histogram plot
– implot: display image within axes boundaries (resamples image)
– loglog: log log plot
– plot: x, y plots
– pie
– polar
– quiver: vector field plot
– scatter
– semilogx: log x, linear y, x y plot
– semilogy: linear x, log y, x y plot
– stem
– spy: plot sparsity pattern using markers
– spy2: plot sparsity pattern using image
• plot decorators and modifiers
– axhline: plot horizontal line across axes
– axvline: plot vetical line across axes
– axhspan: plot horizontal bar across axes
– axvspan: plot vertical bar across axes
– clabel: label contour lines
– clim: adjust color limits of current image
– grid: set whether grids are visible
15
–
–
–
–
–
–
–
–
–
–
–
–
legend: add legend to current axes
rgrids: customize the radial grids and labels for polar plots
table: add table to axes
text: add text to axes
thetagrids: for polar plots
title: add title to axes
xlabel: add x axes label
ylabel: add y axes label
xlim: set/get x axes limits
ylim: set/get y axes limits
xticks: set/get x ticks
yticks: set/get y ticsk
• figure functions
–
–
–
–
colorbar: add colorbar to current figure
figimage: display unresampled image in figure
figlegend: display legend for figure
figtext: add text to figure
• object creation/modification/mode/info functions
–
–
–
–
–
–
–
–
–
–
–
–
–
–
–
–
axes: create axes object on current figure
cla: clear current axes
clf: clear current figure
close: close a figure window
delaxes: delete axes object from the current figure
draw: force a redraw of the current figure
gca: get the current axes object
gcf: get the current figure
gci: get the current image
hold: set the hold state (overdraw or clear?)
ioff: set interactive mode off
ion: set interactive mode on
isinteractive: test for interactive mode
ishold: test for hold mode
rc: control the default parameters
subplot: create an axes within a grid of axes
• color table functions
– autumn, bone, cool, copper, flag, gray, hot, hsv, pink, prism, spring, summer, winter
16
1.7
1.7.1
Plotting mini-Cookbook
customizing standard plots
The two tables below list the properties of data and text properties and information about what values they can
take. The variants shown in parentheses indicate acceptable abbreviations when used as keywords.
17
Data properties
Property
alpha
antialiased (aa)
color (c)
data_clipping
label
linestyle (ls)
linewidth (lw)
marker
markeredgewidth (mew)
markeredgecolor (mec)
markerfacecolor (mef)
markersize (ms)
Value
Alpha transparency (between 0. and 1., inclusive)
Use antialiased rendering (True or False)
Style 1:
’b’ -> blue
’g’ -> breen
’r’ -> red
’c’ -> cyan
’m’ -> magenta
’y’ -> yellow
’k’ -> black
’w’ -> white
Style 2: standard color string, eg. ’yellow’, ’wheat’
Style 3: grayscale intensity (between 0. and 1., inclusive)
Style 4: RGB hex color triple, eg. #2F4F4F
Style 5: RGB tuple, e.g., (0.18, 0.31, 0.31), all values between 0. and 1.)
Clip data before plotting (if the great majority of points
will fall outside the plot window this may be much faster);
True or False
A string optionally used for legend
One of ’–’ (dashed), ’:’ (dotted), ’-.’ (dashed dot), ’-’ solid
width of line in points (nonzero float value)
symbol:
’o’ -> circle
’^’,’v’,’<’,’>’ triangles: up, down, left, right respectively
’s’ -> square
’+’ -> plus
’x’ -> cross
’D’ -> diamond
’d’ -> thin diamond
’1’,’2’,’3’,’4’ tripods: down, up, left, right
’h’ -> hexagon
’p’ -> pentagon
’|’ -> vertical line
’_’ -> horizontal line
’steps’ (keyword arg only)
width in points (nonzero float value)
color value
color value
size in points (nonzero float value)
18
The following describes text attributes (those shared with lines are not detailed)
Property
alpha, color
family
fontangle
horizontalalignment
verticalalignment
multialignment
name
position
variant
rotation
size
style
text
weight
Value
As with Lines
font family, eg ’sans-serif’,’cursive’,’fantasy’
the font slant, ’normal’, ’italic’, ’oblique’
’left’, ’right’, ’center’
’top’, ’bottom’, ’center’
’left’, ’right’, ’center’ (only for multiline strings)
font name, eg. ’Sans’, ’Courier’, ’Helvetica’
x, y position
font variant, eg. ’normal’, ’small-caps’
angle in degrees for text orientation
size in points
’normal’, ’italic’, or ’oblique’
the text string itself
e.g ’normal’, ’bold’, ’heavy’, ’light’
These two sets of properties are the most ubiquitous. Others tend to be specialized to a specific task or function.
The following illustrates with some examples (plots are not shown) starting with the ways of specifying red for a
plotline
>>>
>>>
>>>
>>>
>>>
>>>
x = arange(100.)
y = (x/100.)**2
plot(x,y,’r’)
plot(x,y, c=’red’)
plot(x,y, color=’#ff0000’)
lines = plot(x,y)
# lines is a list of objects, each has set methods
for each property
> > > set(lines, ’color’, (1.,0,0)) # or
> > > lines[0].set_color(’red’) ; draw() # object manipulation example
> > > plot(y[::10], ’g>:’,markersize=20’) # every 10 points with large green triangles and
dotted line
And more examples specifying text:
> > > textobj = xlabel(’hello’, color=’red’,ha=’right’)
> > > set(textobj, ’color’, ’wheat’) # change color
> > > set(textobj, ’size’, 5) # change size
1.7.2
“implot” example
You can duplicate simple use of the IRAF task implot like this:
> > > pixdata = pyfits.getdata(’pix.fits’)
> > > plot(pixdata[100], hold=False)
> > > plot(pixdata[:,200],hold=True)
# plots row 101
#overplots col 201
19
5
4
0
0
0
0
3
0
2
0
0
1
0
0
0
0
0
1.7.3
1
0
0
2
0
0
3
0
0
4
0
0
5
0
0
6
0
0
imshow example
Images can be displayed both using numdisplay, which was introduced in the last tutorial and works perfectly well
on Windows with DS9, and the matplotlib imshow command:
>>>
>>>
>>>
>>>
>>>
>>>
import numdisplay
numdisplay.open()
numdisplay.display(pixdata,z1=0,z2=1000)
clf()
imshow(pixdata,vmin=0,vmax=1000)
gray()
20
# clears the current figure
# loads a greyscale color table
5
4
0
0
0
0
3
0
2
0
0
1
0
0
0
0
0
1
0
0
2
0
0
3
0
0
4
0
0
5
0
0
The default type of display in Matplotlib “out of the box” has the Y coordinate increasing from top to bottom.
This behavior can be overriden by changing a line in the .matplotlibrc file:
image.origin : lower
The .matplotlibrc that is the default on STScI unix systems (Solaris, Linux and Mac) has this already set up.If
you are using Windows, you will need to get the STScI default .matplotlibrc from one of the Unix systems, or from
the web.
imshow will resample the data to fit into the figure using a defined interpolation scheme. The default is set
by the image.interpolation parameter in the .matplotlibrc file (bilinear on STScI systems), but this can be set to
one of bicubic, bilinear, blackman100, blackman256, blackman64, nearest, sinc144, sinc256, sinc64, spline16 and
spline36. Most astronomers are used to blocky pixels that come from using the nearest pixel; so we can get this at
run-time by doing
> > > imshow(pixdata, vmin=0, vmax=1000, interpolation=’nearest’)
21
1.7.4
figimage
figimage is like imshow, except no spatial resampling is performed. It also allows displaying RGB or RGB-alpha
images. This function behaves more like the IDL TVSCL command. See the manual for more details.
1.7.5
Histogram example
Histograms can be plotted using the hist command.
> > > pixdata[pixdata>256] = 256
> > > hist(pixdata,bins=256)
Duplicating the functionality of, for example, the IRAF imhistogram task will take a bit more work.
8
0
0
0
7
0
0
0
6
0
0
0
5
4
0
0
0
0
3
0
0
2
0
0
1
0
0
0
0
0
0
0
0
5
1.7.6
0
0
5
0
1
0
0
1
5
0
2
0
0
2
5
0
3
0
0
contour example
Contour plotting was added by Nadia Dencheva. So, to overplot green contours at levels of 100,200,400 and 800,
we can do:
22
> > > levels = [100,200,400,800]
> > > imshow(pixdata,vmin=0,vmax=1000,origin=’lower’)
> > > contour(pixdata,levels,colors=[1., 1., 1., 0.])
5
4
0
0
0
0
3
0
2
0
0
1
0
0
0
0
0
1.7.7
1
0
0
2
0
0
3
0
0
4
0
0
5
0
0
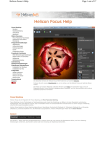
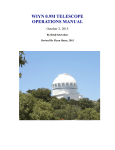
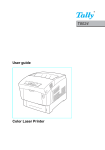
subplot example
You aren’t limited to having one plot per page. The subplot command will divide the page into a user-specified
number of plots:
> > > err = err*1.0e12
> > > flux = flux*1.0e12
There’s a bug in the axes code of Matplotlib that causes an exception when the upper and lower limits of the plot
are too close to each other, so we multiply the data by 1.0e12 to guard against this.
> > > subplot(211)
# Divide area into 2 vertically, 1
horizontally and select the first plot
> > > plot(wavelength,flux)
23
> > > subplot(212)
> > > plot(wavelength,error)
# Select second plot
6
5
4
3
2
1
0
1
9
0
.
0
.
0
.
0
1
0
0
0
1
0
2
0
1
0
4
0
1
0
6
0
1
0
8
0
1
1
0
0
8
0
1
0
0
0
1
0
2
0
1
0
4
0
1
0
6
0
1
0
8
0
1
1
0
0
2
1
0
8
5
.
1
0
5
0
9
1.7.8
readcursor example
Finally, it is possible to set up functions to interact with a plot using the event handling capabilities of Matplotlib.
Like many other GUIs, Matplotlib provides an interface to the underlying GUI event handling mechanism. This is
achieved using a callback function that is activated when a certain prescribed action is performed. The prescribed
action could be a mouse button click, key press or mouse movement.You can set up a handler function to handle
the event by registering the event you want to detect, and connecting your callback function with the required
event. This is getting a little bit ahead of ourselves here, since we weren’t going to explain functions until the next
lesson, but it’s impossible to explain event handling without it....
This is best explained using an example. Say you want to print the X and Y coordinates when you click the
mouse in an image. Start by displaying the image in an imshow() window:
> > > imshow(pixdata, vmin=0, vmax=200)
24
Then set up a handler to print out the X and Y coordinates. This will be run every time the mouse button is
clicked, until the “listener” function is killed.
> > > def clicker(event):
...
if event.inaxes:
...
print event.xdata, event.ydata
...
>>>
This is a very simple handler: it just checks whether the cursor is inside the figure (if event.inaxes), and if it
it, it prints out the X and Y coordinates in data coordinates (i.e. in the coordinates as specified by the axes). If
the cursor is outside the figure, nothing is done.
Now we set up a “listener” by connecting the event we are looking for (’button_press_event’) with the function
we will call (clicker).
> > > cid = connect(’button_press_event’, clicker)
The connect function returns a “connect id”, which we will use when we want to kill the listener.
Now, when we press the mouse button when we are in the figure, we get the coordinates printed out on our
screen. This works even if we zoom the image, since we have requested the coordinates in data space, so Matplotlib
takes care of determining the X and Y coordinates correctly for us. When we’re done, we can just do the following:
> > > disconnect(cid)
and we are no longer listening for button presses.
There are more details in the Matplotlib manual.
1.8
Exercises
1. Using only Python tools, open the fits file fuse.fits, extract the flux and error columns from the table, and
plot these against each other using plot(). Scale the flux and error by 1.0e12 before plotting.
2. Smooth pix.fits with a 31x31 boxcar filter (see first tutorial) and make a contour plot at 90, 70, 50, and 30,
and 10% of the peak value of the smoothed image.
3. Repeat 2, except before generating a contour plot display the unsmoothed image underneath.
4. Change the colortable to gray and label your favorite feature with a mathematical expression
5. Save the result as a jpeg file and view it in your favorite jpeg viewer
6. Extra credit: parroting the readcursor example, write a short callback function to display a cross cut plot of
a displayed image on a left mouse button click, and a vertical cut plot on a right button click (overplotting
the image).
25
Appendix D: IDL plotting compared with matplotlib
MATPLOTLIB for IDL Users
March 2005, Vicki Laidler
About this document:
This is not a complete discussion of the power of matplotlib
(the OO machinery) or pylab (the functional interface). This
document only provides a translation from common IDL plotting
functionality, and mentions a few of the additional capabilities
provided by pylab. For a more complete discussion, you will
eventually want to see the tutorial and the documentation for the
pylab interface:
http://matplotlib.sourceforge.net/tutorial.html
http://matplotlib.sourceforge.net/matplotlib.pylab.html
This document also makes use of the PyFITS and numarray packages
in its examples. Separate documentation packages exist for these
as well:
http://www.stsci.edu/resources/software_hardware/pyfits
http://www.stsci.edu/resources/software_hardware/numarray
Setting up and customizing your Python environment:
==================================================
Whether you use PyRAF, ipython, or the default python
interpreter, there are ways to automatically import your favorite
modules at startup using a configuration file. See the
documentation for those packages for details. The examples in
this document will explicitly import all packages used.
Setting up and customizing matplotlib:
=====================================
You will want to modify your .matplotlibrc plot to use the
correct backend for plotting, and to set some default behaviors.
(The STScI versions of the default .matplotlibrc have already
been modified to incorporate many of these changes.) If there is
a .matplotlibrc file in your current directory, it will be used
instead of the file in your home directory. This permits setting
up different default environments for different purposes. You may
also want to change the default behavior for image display to
avoid interpolating, and set the image so that pixel (0,0)
appears in the lower left of the window.
image.interpolation : nearest
# see help(imshow) for options
image.origin : lower
# lower | upper
I also wanted to change the default colors and symbols.
lines.marker
: None
# like !psym=0; plots are line plots
by default
lines.color
: k
# black
lines.markerfacecolor : k # black
lines.markeredgecolor : k # black
26
text.color
: k
# black
Symbols will be solid colored, not hollow, unless you change
markerfacecolor to match the color of the background.
About overplotting behavior:
~~~~~~~~~~~~~~~~~~~~~~~~~~~
The default behavior for matplotlib is that every plot is a "smart"
overplot, stretching the axes if necessary; and one must explicitly
clear the axes, or clear the figure, to start a new plot. It’s
possible to change this behavior in the setup file, to get new
plots by default
axes.hold
: False
# whether to clear the axes by
default on
and override it by specifying the "hold" keyword in the plotting
call. However I DO NOT recommend this; it takes a bit of getting
used to, but I found it easier to completely change paradigms to
"build up the plot piece by piece" than it is to remember which
commands will decorate an existing plot and which won’t.
Some philosophical differences:
==============================
Matplotlib tends towards atomic commands to control each plot
element independently, rather than keywords on a plot command. This
takes getting used to, but adds versatility. Thus, it may take more
commands to accomplish something in matplotlib than it does in IDL,
but the advantage is that these commands can be done in any order,
or repeatedly tweaked until it’s just right.
This is particularly apparent when making hardcopy plots: the mode
of operation is to tweak the plot until it looks the way you want,
then press a button to save it to disk.
Since the pylab interface is essentially a set of convenience
functions layered on top of the OO machinery, sometimes by
different developers, there is occasionally a little bit of
inconsistency in how things work between different functions. For
instance the errorbar function violates the principle in the
previous paragraph: it’s not an atomic function that can be added
to an existing plot; and the scatter function is more restrictive
in its argument set than the plot function, but offers a couple of
different keywords that add power.
Some syntactic differences:
===========================
You can NOT abbreviate a keyword argument in matplotlib. Some
keywords have had some shorthand versions programmed in as
alternates - for instance lw=2 instead of linewidth=2 - but you
need to know the shorthand. Python uses indentation for loop
control; leading spaces will cause an error if you are at the
interactive command line. To issue 2 commands on the same line, use
a semicolon instead of an ampersand.
27
The Rosetta Stone:
==================
Setup
Some data sets:
Basic plotting:
IDL
(none needed if your paths
are correct)
foo = indgen(20)
bar = foo*2
plot, foo
plot, foo, bar
plot, foo, bar, line=1,
thick=2
plot, foo, bar, ticklen=1
plot, foo, bar
oplot, foo, bar2
plot(foo, bar)
grid()
plot(foo, bar, ’x’)
OR
scatter(foo, bar)
plot(foo, bar, ’-x’, ms=5)
***or spell out markersize=5
plot(foo, bar)
xlim(2,10)
ylim(2,10)
err = arange(20)/10.
errorbar(foo, bar, err,
fmt=’o’)
errorbar(foo, bar, err, 2*err,
’o’)
(error bars in x and y)
plot(foo, bar)
plot(foo, bar2, hold=True)
xyouts, 2, 25, ’hello’
text(2, 25, ’hello’)
plot, foo, bar, psym=1
plot, foo, bar, psym=-1,
symsize=3
plot, foo, bar,
xran=[2,10], yran=[2,10]
err=indgen(20)/10.
plot, foo, bar, psym=2
errplot, foo,
bar-err,bar+err
Overplotting with
default behaviour
changed (Not
recommended or
used in any other
examples
Text, titles and
legends:
Matplotlib
from numarray import *
from pylab import *
import pyfits
(Or, none needed if you set
up your favorite modules in
the configuration file for
the Python environment you’re
using.)
foo = arange(20)
bar = foo*2
plot(foo)
plot(foo, bar)
plot(foo, bar, ’–’, lw=2)
***or spell out linewidth=2
28
plot, foo, bar,
title=’Demo’, xtitle=’foo’,
ytitle=’bar’
plot, foo, bar*2, psym=1
oplot, foo, bar, psym=2
legend,[’twicebar’,’bar’],
psym=[1,2],/upper,/right
plot, foo, bar,
title=systime()
Window Manipulation
Log plotting
Postscript output
erase
window, 2
wset, 1
wdelete, 2
wshow
plot_oo, foo, bar
plot_io, foo, bar
plot_oi, foo, bar
set_plot, ’ps’
device,
file=’myplot.ps’,/land
plot, foo, bar
device,/close
29
plot(foo, bar)
title(’Demo’)
xlabel(’foo’)
ylabel(’bar’)
plot(foo, bar*2, ’x’,
label=’double’)
plot(foo, bar, ’o’,
label=’single’)
legend(loc=’upper right’)
***legend will default to
upper right if no location
is specified.
Note the *space* in the
location specification string
import time
plot(foo, bar)
label(time.asctime())
clf() OR cla()
figure(2)
figure(1)
close(2)
[no equivalent]
loglog(foo+1, bar+1)
semilogy (foo, bar)
semilogx (foo, bar)
***Warning: numbers that
are invalid for logarithms
(<=) will not be plotted, but
will silently fail; no warning
message is generated.
***Warning: you can’t
alternate between linear plots
containing zero or negative
points, and log plots of valid
data, without clearing the
figure first - it will generate
an exception.
plot(foo, bar)
savefig(’myplot.ps’,
orientation=’landscape’)
Viewing image data:
Histograms
Multiple plots on a
page
Erasing and
redrawing a subplot:
plotting x, y, color
and size:
Adding a colorbar
im = mrdfits(’myfile.fits’,
1)
f = pyfits.open(’myfile.fits’)
im = f[1].data
imshow(im)
jet()
gray()
contour(im)
[no equivalent]
tv, im
loadct, 5
loadct, 0
contour, im
xloadct
mu=100 & sigma=15 &
mu, sigma = 10, 15
x=fltarr(10000)
x = mu + sigma*randn(10000)
seed=123132
n, bins, patches = hist(x, 50)
for i = 0, 9999 do x[i] =
mu + sigma*randomn(seed)
plothist, x
*** Note that histograms are specified a bit
differently and also look a bit different: bar chart
instead of skyline style
!p.multi=[4,2,2]
plot, foo, bar
subplot(221) ; plot(foo, bar)
plot, bar, foo
subplot(222) ; plot(bar, foo)
plot, foo, 20*foo
subplot(223) ; plot(foo,
plot, foo, bar*foo
20*foo)
subplot(224) ; plot(foo,
bar*foo)
[no equivalent]
subplot(222)
cla()
scatter(bar, foo)
[no obvious equivalent]
scatter(foo, bar, c=foo+bar,
s=10*foo)
[no obvious equivalent]
colorbar()
Some comparisons:
=================
Some additional functionality:
- modify axes without replotting
- add labels, generate hardcopy, without replotting
- colored lines and points, many more point styles
- smarter legends
- TeX-style math symbols supported
- interactive pan/zoom
Some functionality that is not yet conveniently wrapped:
(These are items that are available through the OO machinery, but
are not yet wrapped into convenient functions for the interactive
user. We welcome feedback on which of these would be most important
30
or useful!)
- subtitles
- loadct - to dynamically modify or flick through colortables
- tvrdc,x,y - to read the xy position of the cursor
- histogram specification by bin interval rather than number of bins
Some still-missing functionality:
(These are items for which the machinery has not yet been
developed.)
- surface plots
- save - to save everything in an environment
- journal - to capture commands & responses. (ipython can capture
commands.)
Symbols, line styles, and colors:
=================================
!psym equivalences:
0
line
1
plus
+
2
asterisk
unsupported; overplotting + with x is close
3
dot
.
4
diamond
d
5
triangle
^
6
square
s
7
cross
x
10
histogram
ls=’steps’
!linestyle equivalences:
1
solid
2
dotted
:
3
dashed
-4
dash-dot -.
The following line styles are supported:
: solid line
-: dashed line
-.
: dash-dot line
:
: dotted line
.
: points
,
: pixels
o
: circle symbols
^
: triangle up symbols
v
: triangle down symbols
<
: triangle left symbols
>
: triangle right symbols
s
: square symbols
+
: plus symbols
x
: cross symbols
D
: diamond symbols
d
: thin diamond symbols
31
1
: tripod down symbols
2
: tripod up symbols
3
: tripod left symbols
4
: tripod right symbols
h
: hexagon symbols
H
: rotated hexagon symbols
p
: pentagon symbols
|
: vertical line symbols
_
: horizontal line symbols
steps : use gnuplot style ’steps’ # kwarg only
The following color strings are supported
b : blue
g : green
r : red
c : cyan
m : magenta
y : yellow
k : black
w : white
Matplotlib also accepts rgb and colorname specifications (eg hex
rgb, or "white").
Approximate color table equivalences:
loadct,0
gray()
loadct,1
almost bone()
loadct,3
almost copper()
loadct,13
almost jet()
Color tables for images:
autumn
bone
cool
copper
flag
gray
hot
hsv
jet
pink
prism
spring
summer
winter
The generic matplotlib tutorial:
===============================
http://matplotlib.sourceforge.net/tutorial.html
32