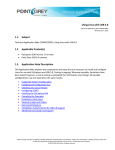
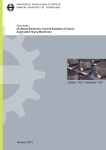
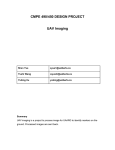
1
Coriander User Manual
Damien Douxchamps
December 30, 2003
1
Contents
1 What is Coriander?
1.1 About this manual . . . . . . . . . . . . . . . . . . . . . . . . . .
1.2 IIDC vs. DV . . . . . . . . . . . . . . . . . . . . . . . . . . . . .
1.3 History . . . . . . . . . . . . . . . . . . . . . . . . . . . . . . .
4
4
4
5
2 Installation
2.1 Hardware requirements . . . . . .
2.2 Software requirements . . . . . .
2.2.1 Linux Kernel and devices
2.2.2 Gnome dependencies . . .
2.2.3 Misc building libraries . .
2.2.4 libraw1394 . . . . . . . .
2.2.5 libdc1394 . . . . . . . . .
2.2.6 libftp . . . . . . . . . . .
2.2.7 SDL . . . . . . . . . . . .
2.2.8 Vloopback . . . . . . . .
2.3 Installation . . . . . . . . . . . .
2.4 Testing . . . . . . . . . . . . . . .
.
.
.
.
.
.
.
.
.
.
.
.
6
6
6
6
7
7
7
7
7
8
8
8
8
3 The IIDC standard
3.1 Features . . . . . . . . . . . . . . . . . . . . . . . . . . . . . . .
3.2 Image formats . . . . . . . . . . . . . . . . . . . . . . . . . . . .
3.3 Other commands . . . . . . . . . . . . . . . . . . . . . . . . . .
9
9
10
10
.
.
.
.
.
.
.
.
.
.
.
.
.
.
.
.
.
.
.
.
.
.
.
.
.
.
.
.
.
.
.
.
.
.
.
.
.
.
.
.
.
.
.
.
.
.
.
.
4 The Graphical User Interface
4.1 Main Menu . . . . . . . . . . . . . . . .
4.2 The Camera Tab . . . . . . . . . . . . . .
4.3 The Services Tab . . . . . . . . . . . . .
4.3.1 Introduction to the service system
4.3.2 The Receive Service . . . . . . .
4.3.3 The Display Service . . . . . . .
4.3.4 The Save Service . . . . . . . . .
4.3.5 The V4L Service . . . . . . . . .
4.3.6 The FTP Service . . . . . . . . .
4.4 The Format 7 Tab . . . . . . . . . . . . .
4.5 The Status Tab . . . . . . . . . . . . . .
.
.
.
.
.
.
.
.
.
.
.
.
.
.
.
.
.
.
.
.
.
.
.
.
.
.
.
.
.
.
.
.
.
.
.
.
.
.
.
.
.
.
.
.
.
.
.
.
.
.
.
.
.
.
.
.
.
.
.
.
.
.
.
.
.
.
.
.
.
.
.
.
.
.
.
.
.
.
.
.
.
.
.
.
.
.
.
.
.
.
.
.
.
.
.
.
.
.
.
.
.
.
.
.
.
.
.
.
.
.
.
.
.
.
.
.
.
.
.
.
.
.
.
.
.
.
.
.
.
.
.
.
.
.
.
.
.
.
.
.
.
.
.
.
.
.
.
.
.
.
.
.
.
.
.
.
.
.
.
.
.
.
.
.
.
.
.
.
.
.
.
.
.
.
.
.
.
.
.
.
.
.
.
.
.
.
.
.
.
.
.
.
.
.
.
.
.
.
.
.
.
.
.
.
.
.
.
.
.
.
.
.
.
.
.
.
.
.
.
.
.
.
.
.
.
.
.
.
.
.
.
.
.
.
.
.
.
.
.
.
.
.
.
.
.
.
.
.
.
.
.
.
.
.
11
. . . 11
. . . 12
. . . 13
. . . 13
. . . 14
. . . 16
. . . 17
. . . 18
. . . 18
. . . 18
. . . 19
5 Epilogue
19
1 What is Coriander?
Coriander is a Graphical User Interface (GUI) for controlling an IEEE1394 camera. This camera should be compliant with the Industrial and Instrumentation
Digital Camera (IIDC) specifications, as issued by the 1394 Trade Association
[2]. These specifications are aimed at industrial and scientific cameras, as their
name would suggest. IIDC is not for commercial grade camcorders, and Coriander will thus not work with any camera in which you can insert a tape. Note that
IEEE1394 webcams are most of the time compliant with the IIDC specs.
1.1 About this manual
This manual is just a draft written in one rainy afternoon to help you go through the
controls of Coriander. It is incomplete, very drafty, full of typos and mistakes, and
last but no least is probably full of technical errors. You’re welcome to contribute
to it if you want to make it any better. Besides this manual you might also want to
read the IIDC specs, which is probably the best thing to do to learn how to control
your camera.
1.2 IIDC vs. DV
You should keep in mind that DV camcorders compress the video before sending
it so that you must decompress the video in the host computer before you can use
it. This compression occurs because the video files would be otherwise much too
large for a computer to deal with. Even with today’s big harddrives the problem
remains as one hour of video would take as much as a whole 100GB hard drive
(720x576x3x25x3600).
IIDC cameras, on the other hand, do not compress video. This results in a
much higher bandwidth: DV is typically less than 20Mb/s while a typical VGA
webcam will need around 100Mb/s on the bus. This could be seen as a drawback
for IIDC cams, but it is also their advantage: since no compression occur in the
camera, no decompression is required in the host computer which can be fully
used for other tasks. This is the reason while most real-time applications, common
in the industrial and scientific world, will use IIDC cameras.
1.3 History
The usual solution for digital imaging is to use LVDS or CameraLink cameras.
Both standards use one or more high speed parallel channel to transmit video
at very high speed (several GB/sec). These systems have three problems: they
are expensive, the control interface (and card) change from camera to camera (or
brand to brand) and your can almost forget about Linux drivers. The IEEE1394
bus provides an alternative solution which is more flexible (no complicated interface), plug and play, much cheaper, and last but not least more standardized. This
standard is the IIDC specifications, which regulate the video formats, camera controls,... Since IIDC came later than IEEE1394, some manufacturers did not wait
for it and sold (and still sell) cameras that are not compliant with IIDC. However,
the current tendency is towards IIDC compliance.
Having such a great bus at had, one could dream of a real-time video system
at a reasonable price. Another advantage was the availability of IEEE1394 on laptops (Cardbus or integrated). Our image processing group [3] was very interested
in this feature for it allowed to make remote demonstrations without having to
bring a whole computer in the airplane. In a word, the introduction of IEEE1394
brought a great deal of flexibility for these kind of applications.
After the first squetch of the low-level kernel drivers were developed the next
thing to do was to write an IIDC API: libdc1394 [7]. Gord Peters started just that
and together with Sebastien Rougeaux, Chris Urmson, Dan Dennedy and myself
we finally builded everything that was required to use the cameras under Linux. A
last piece was still missing, for we could not easily set the camera in an interactive
way, which is mandatory whenever you want to get a good picture. So we needed
a GUI.
That was in December 2000. At that time it was not yet so clear we should
make a GUI so that it was difficult to justify hour of work at the office just for
that. I thus started to work on Coriander during our annual on-week break around
Christmas and New Year. It took me two days trying to figure out how Glade [4]
was working (!), more days to find a way to add a response to control scales and
at the beginning of January I could post a first pre-alpha release on a brand new
SourceForge project page.
The project was obviously a good idea: about 80 downloads were registered
on the first week. The real dawn of Coriander would happen later, though, for
it still lacked an essential feature: a video display! This is where Dan Dennedy
came in, and I think his work really made Coriander what Coriander should be.
After three years, Coriander is now reaching a 1.0 release and has become a
full-featured program. It is distributed as beta software in the Debian distribution,
it was downloaded about 15,000 times and the SourceForge webpage received
more than 100,000 hits (I suspect most of these are from would-be cooks, but it
satisfies my ego ;-).
2 Installation
2.1 Hardware requirements
The hardware requirements a very simple: you need a Linux box, an IIDC compliant IEEE1394 camera and an interface card. I strongly advise you choose an
OHCI interface, for their support is better under Linux. Moreover, capturing images with DMA is only available for this class of interfaces.
The compliance of the camera with IIDC is not always marked on the datasheets,
and it is sometimes difficult to tell before actually buying the camera. There’s a
webpage describing all the 1394 cameras, I suggest you have a look at it [5].
2.2 Software requirements
This is where the serious fun begins... Although the only required thing is a 1394enabled Linux kernel, I will spend some lines describing the problems you might
have. If you have weird things happening with your kernel you should visit the
linux1394 project pages: there’s a howto there [6].
2.2.1 Linux Kernel and devices
It is strongly advised to use a recent kernel like 2.4.23 or later. There has been
recent changes in the DMA kernel API so that coriander and libdc1394 will only
2.4.23. You should enable 1394 support and
compile with a kernel version
select raw1394, ohci1394 (or pcilynx, depending on your card) and video1394
modules (for DMA, only works with OHCI cards). Do not enable ’excessive
debugging output’ as this will result in printing a debug line for each command
sent on the bus. This obviously slows things down quite a bit.
After compiling and installing the modules, you should create the proper 1394
devices. There are two devices to create: raw1394 and video1394. raw1394 has
major 171 and minor 0, while video1394 had major 171 and minor 16. If you
use several interface cards you need one video1394 device per card. The standard
way to do this is to create a video1394 directory (instead of a device), and create
the first device (171,16), second device (171,17),... in that directory. The names
for these devices is usually simply 0,1,2,...
2.2.2 Gnome dependencies
As Coriander is a Gnome application [8], I expect you to have some Gnome libraries installed. Besides the main Gnome library, you should also install the
Gnome development packages and libraries. If the development libraries are not
installed the configure script will fail with some message related to gnome-config.
2.2.3 Misc building libraries
Autoconf [15] and Automake [16] are required if you are building Coriander from
CVS or for older versions of Coriander (before 0.99.4). This is usually part of
your favorite distibution but you might need an update.
2.2.4 libraw1394
You should download libraw1394 and install it [9]. There is nothing really special
0.9.0) for there might be some comfor this library. Just use a recent version (
patibility problems. This library is probed in the configure script so that if you
don’t have a recent version you will be prompted for a download.
2.2.5 libdc1394
libdc1394 [7] is the IIDC API so it’s really mandatory... Use the latest version; it
is even recommended to use the CVS since Coriander sticks to libdc1394 and is
updated very regularly. If you don’t have a sufficiently recent version the configure
script will fail and ask you for an update.
2.2.6 libftp
If you wish to use the FTP capabilities of Coriander you need libftp [11]. This
library is thus not necessary; it’s an option. Download and install the library in
the usual way as described in the library README file. It might be available as a
package for your distribution.
2.2.7 SDL
One of the major feature of Coriadner is its live display. This function requires the
SDL library [10]. You should simply install the library on your computer, using
your distribution packages. I can’t think of a distribution without SDL so you
won’t have problems to find it.
2.2.8 Vloopback
The vloopback interface [12] is a kernel module which can be used to export
video through a V4L device. It elegantly changes Coriander into a V4L source
that can be further used by applications like Effectv [13] or Gnomemeeting [14].
This module is easily found but requires patches in order to be installed properly.
Various patches can be found, and as this module is not really maintained anymore
you’ll have to find one that works for you.
2.3 Installation
The installation is fairly easy: just run ’./configure’ (or ’sh autogen.sh’ if you use
the CVS version) and type ’make’ to build the program. If you want a systemwide installation you can ’make install’, which requires root privileges.
If you encounter compilation problems you can post a bug report on the SourceForge website.
2.4 Testing
In order to launch Coriander, you should first install the kernel modules. You can
insert this in the /etc/rc.local file (RedHat systems) or in the /etc/rc.boot directory
(Debian) to launch the modules at every boot. Other file modifications might be
required on other distributions.
First ’modprobe ieee1394 raw1394 ohci1394 video1394’. Once the modules
have been loaded, plug a camera in the 1394 port of you computer. Check that the
bus is powered and launch Coriander. Two things can happen now.
One possibility is that everything goes well and you have the Coriander main
control window on the screen. This is good. You can now play with the camera
controls described in the next section.
Some things could go wrong, in which case Coriander will give you a message
with a guess about the problem and how to fix it. Check that every item proposed
is OK, correct your setup and retry. Send a bug-report if you still have problems.
If you want to see what’s on the IEEE1394 bus for low-level debuggin purposes
you can have a look at gscanbus [?].
3 The IIDC standard
This is just a short presentation of the standard, you can obtain a copy of it on
the 1394 Trade Association website [2]. Unfortunately, the 1394-TA now asks
money simply to send you a PDF, so you might as well send me an email to get a
free copy. If copyright allows, I will put a version of this document on Coriander
homepage too. The current version of IIDC is 1.30. It is the one described here.
The IIDC standard can be split in several sections:
Features control
Image formats
Misc controls
Some image formats like Format7 and Format6 have a specific set of commands
that are also described.
Coriander almost fully implements the controls of the IIDC specifications. The
IIDC specs do not say that your camera should provide every possible control,
but merely that it should implement some of them. Coriander can read what is
supported by your camera and allows you to control what can be controlled. For
example, if the Iris feature is not available in your camera, it won’t be shown.
If the format/mode you have select does not support 30fps, you won’t be able to
choose that. If you’re camera can’t be powered off, the power control will be
inactive.
3.1 Features
Features are actually image controls provided by the camera. The full list of feature is: Brightness, Auto Exposure, Sharpness, White Balance, Hue, Saturation,
Gamma, Shutter, Gain, Iris, Focus, Temperature, Trigger, Zoom, Pan, Tilt, Optical
Filter, Capture Size and Capture Quality.
You will find a detailed explanation about each one in the IIDC specifications,
but I guess you already have an idea about what is their respective purpose.
Features have several controls available:
Value: obviously the most interesting one: the value of the feature. The
value can be changed within boundaries specified by the camera. The value
itself has usually no physical meaning: 123 for the exposure does not mean
123ms.
Absolute value: this optional control mode let you control the feature using
a real physical value, like 0.002314 seconds for the exposure. Since the
camera can’t set the exposure to just any float value Coriander will display
the real value used by the camera after you entered the value you wished to
have.
Auto mode: the camera can support manual or automatic control of a feature. The single shot mode is a single automatic adjustment of the feature.
Two features have two values associated to them: the temperature feature (current temperature, target temperature) and the white balance (the two colour channels). At last, the trigger feature is completely different and you will find details
about it in the IIDC specifications.
3.2 Image formats
Image formats are defined by two parameters: the Format and the Mode, each
Format containing several modes. Five modes are defined in IIDC:
Format 0 contains low resolution modes up to 640x480
Format 1 contains medium resolution modes: 800x600 and 1024x768
Format 2 contains megapixel modes: 1280x960 and 1600x1200
Format 6 is the still image format, and is not implemented in any camera
that I know of. It is not supported by Coriander.
Format 7 is the scalable image format. With it you change the image size,
position, color coding, and other parameters.
3.3 Other commands
Memory channels: some cameras can store setups in their memory. This
is the save/recall control for that feature. The setup 0 is always available. It
represent the factory settings and is read-only.
Reset/ON/OFF: control over the camera power.
Framerate: for formats 0, 1 and 2, this control changes the video framerate.
Trigger: although it is a feature like brightness..., it is placed separately
because it’s control method is so different. The trigger feature has several
controls: external trigger input, mode, polarity and a parameter, dubbed
count, whose signification depends on the selected mode.
The IIDC specifications provide many more controls. Instead of providing a
pale copy of the standard here, the next section will review the GUI controls one
by one. This will show you the particularities of the GUI and how to use it. If
you plan to make your own programs using libdc1394, you should read the IIDC
specs (but you did that anyway, didn’t you?).
4 The Graphical User Interface
4.1 Main Menu
The main menu contains only two pop-down menus: the File and Help menus.
The File menu leads to the preferences window and the exit. The Help menu
leads to the classic About window and to a description of the keyboard shortcuts
for the display. These shortcuts will be explained in the display section, so that
only the preferences window need to be addressed here.
The preferences window contains two controls:
Timeout for One-push auto. The one-push auto control of features can be
used to make a quick auto adjustment of a feature. The drawback is that you
can’t use the camera when it’s operating. The GUI therefor waits for the
auto adjustment to be finished before you can use Coriander again. Sometimes the camera can take too much time or behave strangely during this
auto adjustment. It is thus necessary to provide a timeout in case the camera has such a trouble. The value is not critical, just leave it like that (10sec)
unless you know what you’re doing.
Update rate. This is a futur feature that will be used when the IIDC controls
will be probed regularly to check for changes.
These two controls, as well as several other user options like text inputs, camera
nicknames,... are saved into a preference file in /.gnome/coriander.
That’s all for the main window controls. The other controls are located in tabs
and are described below.
4.2 The Camera Tab
This tab contains the general camera controls, as well as a camera selector.
Camera Select. Obviously used to select between cameras when more than
one is connected. The name that appears in the menu can be changed in the
Status Tab. The default name is the camera brand and model. The custom
name you enter here will be remembered and stored in the coriander config
file.
Power. Used to switch on/off or reset the camera. Few cameras support the
on/off feature, so that it will most of the time appeared grayed-out.
Memory Channels. You can use this to save camera setups in a memory
space in the camera. Up to 16 channels are available. The first channel
contains the factory defaults and can’t be overwritten.
Global Iso Control. If more than one camera is on the bus you can use this
control box to start/stop the image flow for all the cameras at the same time.
Note that it will not happen exactly at the same time for all cameras: there
is a hardcoded delay of 50ms between ISO commands (otherwise strange
things happen...). It is thus not a good idea to use this a synchronisation
technique, unless you have a very low framerate.
The camera information box is a summary of the low-level ROM:
Vendor: the name of the manufacturer.
Model: the name of the camera model.
GUID: the unique identifier of the camera. Every IEEE1394 device has a
unique number, like a network card MAC address.
Name: this field can be changed so that you can name your cameras. The
name is associated to the camera GUID, which means that even cameras
from the same manufacturer/model can have a different name. Useful when
you have a setup of 10 cameras and want to know who’s who. This information is kept in coriander config file.
handle: the RAW1394 handle for this camera.
node/port: the IEEE1394 node number and the port number. Ports refer
to physical adapters (and thus physical bus), while nodes refer to physical
devices on a port.
PHY Speed: the speed used by the camera. Most of the time this will be
400Mbps. Coriander is not yet compatible with 800Mbps adapters (IEEE1394b)
for the simple reason that it is no yet in IIDC specs.
IIDC specs: the revision of the specs that the camera supports. Unknown
specs revisions are shown as “?? 0x...”, as they appear in the ROM. This
usually means that the manufacturer did a poor job designing the camera.
Sometimes this is done on purpose so that the camera will not be recognised
wy the windoze drivers, letting the manufacturer design its own drivers (this
is the case of Point Grey, which uses 0x114 as specs revision although it is
v1.30 compliant).
ISO Channel: the ID of the isochronous channel used by this camera.
PHY delay: some strange info that was in the ROM...
Power class: the typical power required by the device or provided by it.
4.3 The Services Tab
Services are processes that can be launched and cancelled using the buttons in the
Switch/FPS box. This box also provides an estimate of the image rate for each
service, in frames per second.
4.3.1 Introduction to the service system
Coriander provides a number of image ’services’. This smart (hey! I designed
that! ;-) ) system is a kind of pipeline for images: these travel from left to right
(receive display save V4L FTP) and are used successively by different
processes, implemented as threads. If you’re really interested in this kind of thing
you should pay a visit to the code, but I would like to stress some things that will
be useful for everybody to know.
First, as stated above, the images travel from left to right (look at the ’Switch’
box). Services have been ordered on this queue with respect to their expected
speed: fast services before slow ones. This is because the pipe structure can
create frame dropping. As images are sent to the next service after being used by
the current service, the output framerate of a service is equal to the framerate of
the service or its input framerate, whichever is smaller. This results in the fact that
the service framerates will be decreasing from left to right. You can easily check
that by looking at the framerate displays under each service button.
Technically, each service contains at least two image buffers: an input buffer
and an output buffer. When a service finished working on an image, the image is
put on its output buffer and a flag is set. The following service, seeing the ’new
frame flag’, exchanges the pointer of its input buffer with the pointer of the output
buffer of the previous service. Images propagate that way from left to right, while
used buffers propagate the other way back to the first service. Each service being
a separate thread, this process is completely asynchronous.
If you change the image size (e.g. by changing mode or format), used buffers
will be re-allocated when they return to the receive service, which is the only one
to allocate image buffers. At last, buffers contain all the information about the
image: size, colour coding,... so that each service checks the buffer for changes
and adapt itself automatically if necessary. That also means that if no frames have
been received yet, the service is not activated (it does not know the image size,...).
Example: no display window show up until you actually received one frame.
A quick but important note here: in order to get an image from the camera you
have to push three buttons: start the receive service, start the display service and
start the ISO transmission. The order does not matter but you have to push the
three buttons.
4.3.2 The Receive Service
The receive service tab not only contains specific Linux/Coriander controls but
also IIDC controls like image format. It seemed just right to put the latter there,
so there they are.
Format. Selects image format. If you choose a Format 7 format you may
change its properties in the Format 7 tab or interactively within the display
window.
Iso Control. Start/stop/restart ISO flow. The images are sent as an isochronous
flow, hence the ISO name. Basically, ISO control means image transmission
control. The box is thus used to start/stop/restart the image transmission.
Trigger. You can select internal/external trigger, external trigger polarity,
external trigger mode (and the pulse count for modes 2 and 4) as well as the
framerate for formats 0, 1 and 2.
Options. This is not an IIDC box, it’s pure extras. The first extra is the bayer
decoding, for decoding raw Bayer-tiling images. The image elementary tile
must be specified in the menu below (BGGR,GRBG,...). Three Bayer decoding schemes are available: Nearest neighbour is the faster (low quality),
Edge sensing is much better (but slower) and downsample is of good quality,
excellent speed, but reduces the resulotion by a factor 2. Stereo decoding
is also provided for stereo cameras (like the Bumblebee from Point Grey).
Depending on the stereo coding scheme you can use either interlaced or
field decoding. At last, you can set the bit-per-pixel in 16bit mode to render
the image correctly on the display. (Hint: for stereo cameras working in interlace mode, you can use the bpp box to switch from one view to the other
(8 and 16 bits values) if you don’t want to use the stereo decoding).
Method. Two methods are proposed by the ieee1394 Linux drivers to receive isochronous flows: raw1394 or video1394. The first one is a fail-safe
mode, but is rather slow. The second one uses DMA and is thus much faster,
but does not work with PciLynx and is sometimes more difficult to have
working. The video1394 modes have some options: the device filename
(see the coriander installation above for explanation about 1394 devices),
the DMA ring buffer size (minimum value is 3, lower at your own risk,
adised 4 to 10), and at last a frame dropping button. Frame dropping will
cause the capture functions to always send the latest frame received, discarding older frames. If no frame dropping is selected, the system can still
drop frames when the ring buffer is full.
Note that some images include padding, particularly with Format 7. This
padding is conserved during the whole process if there is no other image processing required (RAW save, no bayer or stereo conversion,...) It is important to
know the padding value when you save in RAW mode so that I advise you write
down the padding value displayed in the camera tab.
4.3.3 The Display Service
The display service tab has not many features, but more capabilities are directly
handled by SDL.
Frame drop. All services except the Receive service have a frame drop
control. It allows the service to operate at a lower framerate than its input
framerate while still allowing further services to get all the frames. For
example, if you receive at 30fps, the display will be around 30fps and a
save service around, say, 10fps. Switching to a frame drop of ’Every 2
frames’, the display will be now around 15fps but the save service will keep
running at 10fps, not 5. This is because the discarded frames are still sent
to the service output, they are simply not processed by the service.
SDL options. You can choose to keep the image aspect ratio when resizing
the image, and also set a minimum display refresh update. The latter option
is nice when you want to move the display window and that no frames are
received. Try with and without and you’ll see what I mean...
When the display window is the active window you can use mouse and keyboard controls to change some display parameters, as well as Format 7 parameters. Functions are (see the Help/Key bindings menu):
and
. Display parameter to Zoom/shrink the image by a factor 2.
n. Display parameter to set the image size back to the normal size. It cancels
the effects of and .
f. Toggle Full-screen mode. If you don’t see the image in full screen but
rather a small image surrounded by a black border it means that you should
add the image resolution (e.g. 640x480) to the resolutions supported by the
X server. Have a look at /etc/X11/XF86Config-4.
m. Set Format 7 image size to the maximum available for the current mode.
mouse button 1. Selects the Window of Interest (WOI). Hold the button
while moving the mouse. If the camera does not support Format 7, the
WOI is close to useless (it is a simple highlight). For cameras supporting
Format 7, the way you can select the WOI will depend on the capabilities
of your camera, i.e. the acceptable stepping for position and size. Simple Format 7 cameras that support only one stepping do not require special comments. For cameras supporting both size and position stepping, the
feedback you will get during the selection of the WOI will be a little strange
at the beginning. Just keep one thing in mind: select the region you want
accurately and the area displayed (representing the actual region chosen in
the camera according to its limitations) will include your selection and be
centered on it (except on image borders where some rounding occurs).
c. Set the WOI (Format 7 image size an position) to the interest area defined
by the mouse.
mouse button 2. Shows the current pixel information (position, values) in
the status window.
Note that you really should have an accelerated display card to show images
efficiently. Try ’xvinfo’ to see if your video card supports overlay. If you have
a huge output, it’s OK. If just get 3-4 lines, you should install better drivers. For
nVidia cards, have a look at the nVidia website [17], for ATI users check Gatos
project website [18] or the ATI website [19].
4.3.4 The Save Service
The save service is for saving image (or image sequences) to a local disk.
Filename. Obviously the filename or filename base. The extension defines
the image format if you want to convert to a still image format like jpeg,
png,...
Frame drop: same as display service.
Scratch. Options for overwriting files,... Three modes are available: (1)
sequentially numbering files, with either a date or number added to the base
filename; (2) always overwrite the same file or (3) append all frames in a
single file (video sequence). The latter option does not write an AVI, MPG
or similar video file: it simply append frames in one file. No conversion
is performed, so that the file size will always be a multiple of the byte size
of the image buffer (width x height x bytes per pixel). For fast cameras,
a RAM buffering option is available. This will fill a RAM buffer with the
frames until either the service is stopped or the buffer is filled. The content
of the RAM buffer is then saved to disk.
Conversions. You can either dump raw data to the disk or convert images
using Imlib. Conversion can take a lot of time, especially PNG conversion.
RAM buffering options. You can select the size of the RAM buffer and test
memory allocation. Test results are reported in the status tab. Beware that
memory allocation test will return success even if the allocation uses SWAP
space. RAM buffering is usefull when you want to save an image sequence
with a framerate higher than what your harddrive can support.
4.3.5 The V4L Service
This service sends frame to the selected video4linux device. The vloopback kernel
module will then forward the frames to the next V4L device. Other apps may use
the latter device to get images from Coriander. Important note: there is always
a +1 difference between the V4L device you mention in the ’output device’ box
and the device that will be used by other apps. Example: if Coriander videodev is
/dev/video0, gnomemeeting will use /dev/video1.
4.3.6 The FTP Service
This service send images to a remote computer using the FTP protocol.
Server. This collection of text inputs configures the FTP link. There should
not be any problem with that. Passwords are not saved into the configuration
file.
Frame drop: same as display service.
Scratch. These options are described for the save service. Note that Imlib
conversion is always performed in the FTP service.
4.4 The Format 7 Tab
The Format 7 tab is only available with cameras that support Format 7. With this
tab you select all Format 7 parameters for every mode. You can change Format 7
parameters of a mode which is not the selected (i.e. streaming) one. The mode you
are editing is automatically set to the current mode when this mode is changed.
Current mode. Selects the edit mode and the colour mode. Colour mode
availability might depend on the mode you have selected.
Packet size. This parameter is important to reach the maximum frame rate
when several cameras are streaming on the bus. Have a look at the bus usage
bar in the status tab and compare with the services framerates to optimize
this value.
Horizontal and vertical settings. This is obviously where the real thing happens. Note that the controls adapt dynamically due to their inter-dependence.
For example, if you set the position of a sub-image to 100, the maximal size
will be lowered of the same amount. It is also why you can’t change the
image position when the size is maximal.
Frame info contains a collection of sizes (in bytes) for the current edited
mode. Image pixels = width height, image bytes = width height
bytes per pixel, total bytes = packets per frame bytes per packet. Padding
is te difference between the total number of bytes and the image bytes. Remember that padded bytes are saved on the disk (Save Service) if no transformation occurs, that is no Bayer decoding and no stereo decoding.
4.5 The Status Tab
The Cursor box contains info about the location and the colour content of the pixel
under the mouse pointer (see display service).
At last, a message window shows error and warning messages during the use
of Coriander. This is great for debug, but I don’t think you’ll need it.
5 Epilogue
I hope you will enjoy using this program. All suggestions and comments are welcome. If you use it for a nice project please let me know about your application:
it’s very rewarding for me to know that Coriander is useful for you! ;-)
References
[1] http://www.tele.ucl.ac.be/PEOPLE/DOUXCHAMPS/ieee1394/coriander/
[2] http://www.1394ta.com
[3] http://www.tele.ucl.ac.be
[4] http://glade.gnome.org
[5] http://www.tele.ucl.ac.be/PEOPLE/DOUXCHAMPS/ieee1394/cameras/
[6] http://www.linux1394.org
[7] http://www.sourceforge.net/projects/libdc1394
[8] http://www.gnome.org
[9] http://www.linux1394.org/
[10] http://www.libsdl.org
[11] http://nbpfaus.net/ pfau/ftplib/
[12] http://motion.sourceforge.net/vloopback/
[13] http://effectv.sourceforge.net/
[14] http://www.gnomemeeting.org/
[15] http://www.gnu.org/software/autoconf/
[16] http://www.gnu.org/software/automake/
[17] http://www.nvidia.com
[18] http://gatos.sourceforge.net
[19] http://www.ati.com