1
User Manual
User Manual
ST-2221 Series
Model No.:
ST-2221SUSRI (SATA to USB2.0 + SATA)
ST-2221SUSRE (SATA to USB2.0 + SATA)
ST-2221SATA (SATA to SATA)
Note: ST-2221SUSRI is with internal use packaging and
ST-2221SUSRE is with external use packaging)
Description and specs:
The ST-2221SUSR is a complete RAID solution through the use of two
2.5" SATA hard disks mounted on one mini 3.5" form factor drive cage.
It is used as a standard 2.5" HDD with mirroring capability(Raid 1).
By mirroring technique, ST-2221SUSR maintains data in two disk
drives simultaneously and securely. If one drive fails, the
ST-2221SUSR automatically switches operations to the functional
drive and after changed a new hard drive the data is mirroring back.
Data is totally secured by ST-2221SUSR.
-1-
User Manual
Description:
*Two ways Raid mode for Internal & External purposes. Support Raid
modes including JBOD(Single), Big(Span), Fast(Strip), Safe(Mirror),
Safe33, Safe50 and GUI only
* The dimensions match exactly as a standard 3.5" bay
* Simultaneously support two 2.5" SATA I or II hard drives in a 3.5"
form factor(Raid 1)
* Maximum transfer rate up to 480Mbps for USB2.0 & 3.0Gbps for
SATA Interface
* Complies with SATA-I, SATA-II interface, transfer rate up to 1.5Gbps
& 3.0Gbps.
* Compatible with SiliconImage SiI3132(*Suggest use “base driver”
and avoid using “Raid driver”) or SiI-3531 PCI-E to SATA Card,
SiI-3124 PCI-X to SATA Card or another early SiliconImage SATA
interface (But the early products of SiliconImage don’t support port
multiplier technology, so you can not configure more than 1 volume
mode like safe33 or safe50 on this case.)
* Hardware Raid engine inside. Easy raid configuration without any
software (It supports software raid configure for power user). And
-2-
User Manual
support external RAID modes including JBOD(Single), Big(Span),
Fast(Strip), Safe(Mirror), Safe33, Safe50 or GUI only.
* Hardware DIP Switch Raid Setting
* HDD Auto Eject when you open the cover
* With hot-plug function, no driver needed
* Aluminum material, best heat sink.
* Dimension: 101.7x 25.8 x 146mm
* Weight: 0.23 kg
NOTE:
This 2.5” dual HDD Raid box is featuring that it can start & recognize
TWO hard disks through USB connection..
[*Very important: When you use it as an external enclosure, we
strongly suggest DO NOT USE THE PC CASE FRONT USB PORTS
FOR CONNECTION ON THIS DEVICE. Many PC Cases’ front USB
ports may use weak wiring connection and caused the front USB ports
can not support enough power to start the device with hard drives].
-3-
User Manual
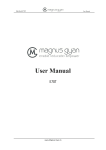
Front Panel
Picture A
A1) HDD 0 Access & Failure LED (Green: HDD-0 working. Red:
HDD-0 failed)
A2) OTB Switch & System ready/Backup LED
A3) HDD 1 Access & Failure LED (Green: HDD-1 working. Red:
HDD-1 failed)
A4) Upper cover & HDD extractor
A5) Lower cover & HDD extractor
A6) Upper HDD Safety Lock (Push right to open & push left to lock)
A7) Lower HDD Safety Lock (Push right to open & push left to lock)
-4-
User Manual
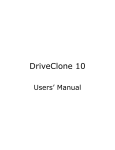
Picture B
B1) SATA 15pin power connector
B2) SATA 7pin data connector
B3) Mini USB Port
B4) RAID mode configuration DIP switch ( see page 9 for details )
B5) Change mode button
B6) SATA 7pin data connector
-5-
User Manual
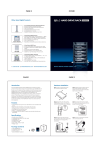
Safety Lock
Upper HDD Safety Lock & Lower HDD Safety Lock. (Push right to
open & push left to lock). See Picture C.
Picture C
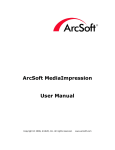
Install HDD:
Open the upper & lower cover and put the HDD inside the cage.
Picture D
-6-
User Manual
Hardware Installation Procedures
Please follow the following procedures to complete the hardware
installation:
1) Open the package and take out the product and make sure the
product is brand new and all the necessary parts are included. If
damage or shortage occurred, please contact your distributor or where
you bought.
2) Unlock the upper and lower covers (see picture C, push the lock
rightward ) and open the two covers and then, put the two 2.5"SATA
HDD inside the box(See Picture D).
3) After both HDD installed, push both covers back like picture C and
then, push the lock button leftward to lock both covers to secure the
HDD inside properly.
4) Then, mount the ST-2221 on the device and use the included
screws to mount it on the device and make all the cable connections
and it is ready for use.
5) There are two ways to mount the ST-2221 on the device (see
pictures E-1(on the 3.5” bay & E-2 mounted it inside the case):
-- Picture E-1) Mount ST-2221 on the floppy drive bay
-7-
User Manual
-- Picture E-2) Mount ST-2221 inside the case
Picture E-1
Picture E-2
6) See the drawing of the two ways to mount ST-2221 on the device
(See Picture F)
-8-
User Manual
Set the RAID mode on the DIP SW:
RAID Config
Display RAID Status
4
2
1
0
BIG (span)
OFF
OFF
OFF
1
JBOD (single)
OFF
OFF
ON
2
FAST (strip)
OFF
ON
OFF
3
SAFE (mirror)
OFF
ON
ON
4
SAFE33
ON
OFF
OFF
5
SAFE50
ON
OFF
ON
6
RESERVED
ON
ON
OFF
7
GUI ONLY
ON
ON
ON
DIP Switch Table 1
-9-
User Manual
When you want to set any Raid mode from the table1, follow the
following steps:
1) Connect USB or SATA data and power cable to your system, then,
turn on the power and wait both hard disks are recognized.
2) After you set the Raid mode you need, then, press the RAID
Change Mode Switch one time (Picture B, B5) to finish the RAID
Mode setting.
Note:
A) When you replaced HDDs, you MUST press the RAID Change
Switch button once( See Picture B, B5).
B)Or even you use the default mode, .you still HAVE TO press the
RAID Change Switch button once( See Picture B, B5).
(3) After selected Raid is built ready, then, to partition/format the
Raid-built HDDs. After HDDs being formatted, they are ready to
use.
- 10 -
User Manual
RAID Mode DIP Switch Setting:
1. BIG(Span) Mode ( Set DIP SW-1: OFF, SW-2: OFF, SW-4: OFF )
RAID Mode is BIG (Span), the HDD capacity is HDD1 + HDD2, It
has big capacity feature but without safety consideration.
2. JBOD(Single) Mode ( Set DIP SW-1: ON, SW-2: OFF, SW-4: OFF)
RAID Mode is JBOD (Single), the system recognizes two separate
HDD of their own capacity but without safety consideration.
3. FAST(Strip) Mode ( Set DIP SW-1: OFF, SW-2: ON, SW-4: OFF)
RAID Mode is FAST (Strip), the HDD capacity is double from the
smaller one, and with faster speed ( Ex: HDD-1 : 50Gb, HDD-2: 80G,
then, it is 100Gb in this mode).
4. SAFE(Mirror) Mode ( Set DIP SW-1: ON, SW-2: ON, SW-4: OFF)
RAID Mode is SAFE(Mirror), the system recognize 1 physical drive
only and capacity is with the smaller capacity of the two. But it is
with the highest safety. ( Ex: HDD-1 : 150Gb, HDD-2: 200G, then, it
is 150Gb in this mode).
5. SAFE33 Mode (Set DIP SW-1: OFF, SW-2: OFF, SW-4: ON)
The RAID Mode is SAFE33. It will have 30% of each HDD to build a
SAFE(mirror) Raid and also use the rest of the capacity to build a
- 11 -
User Manual
second BIG(Span) HDD. In this mode, System will recognize two
physical drives, one is SAFE(mirror) and the other is BIG(Span).
6. SAFE50 Mode (Set DIP SW-1: ON, SW-2: OFF, SW-4: ON)
The RAID Mode is SAFE50. It will take 50% of both HDD to build a
SAFE(mirror) Raid and the rest of the HDD capacity to build a
BIG(span) Raid. The system recognizes two physical drives, one is
SAFE(mirror) and the other, BIG(span). This Raid mode is
featuring with bigger SAFE(mirror) HDD capacity.
7. Reserved Mode ( Set DIP SW-1: OFF, SW-2: ON, SW-4: ON)
There is no Raid function of this setting. It is reserved.
8. GUI ONLY Mode ( Set DIP SW-1: ON, SW-2: ON, SW-4: ON )
The RAID Mode is GUI ONLY Mode. In this Raid mode, it can
configure the Raid mode through the GUI(Graphical Utility Interface).
Using this mode, you can configure different combination settings.
It is suggested for professional & advanced users.
- 12 -
User Manual
How to use the OTB( One button backup)
There is an OTB software together with this product.
The following
pictures are the samples of the procedure reference.
Please refer to
the enclosing software for all the installation details.
admin
- 13 -
User Manual
Press “Apply” first, then ‘OK”
- 14 -
User Manual
Appendix A
File System Expansion for Windows
Overview
This appendix describes the procedures needed with Microsoft
Windows for expanding file systems that have been created on
volumes that have increased in size, while preserving all of your
existing data. After you have added more hard disk drives to increase
the storage capacity of a BIG volume, you must use the supplemental
procedure described below to allow the expanded capacity to be
recognized by the Windows file system.
A command-line utility named "Diskpart.exe" ("Disk Partition") enables
you to manage hard disk partitions and volumes. This utility is
included as part of Windows XP Professional Edition, Windows 2003
Server and Windows Vista. For Windows 2000 or Windows XP Home
Edition, you must download the "diskpart" utility from Microsoft's
website.
Additional third-party products (such as Acronis Disk Director Suite
10.0) are available to perform similar volume management activities,
- 15 -
User Manual
but those products are very sophisticated and are not included in this
manual.
Procedure
Before you can use DiskPart.exe commands on a hard drive disk
partition/volume, you must first list and then select the partition/volume
to extend their capacity to match the virtual hard drives created in the
DIP SW.
1. Open a command prompt window by clicking Start Run, then
entering "cmd"
2.
At a command prompt, type diskpart
- 16 -
User Manual
3. Type list volumeto display the existing volumes on the computer.
4.
e select volume <volume_number>where “<volume_number>” is
number of the volume that you want to extend. In this case that
will be “2”.
5. Type extend
6. Type exitto quit Diskpart.exe
The volume size will be updated to reflect the expanded physical
storage capacity while maintaining all of the existing data that is stored
on the volume.
- 17 -
User Manual
The result of extending the hard disk partition/volume is illustrated
below.
Before extend:
After extend:
Note: Before the hard drive partition/volume has been extended the
“152.67GB Unallocated” was not accessible for data usage.
After
using the diskpart utility to extend the hard drive partition/volume
capacity, the Windows host side matches the virtual hard drive
partition/volume created in the DIP SW.
For more information about the diskpart utility, please see the
documentation on Microsoft's
website at:
http://www.microsoft.com/resources/documentation/windows/xp/all/pr
oddocs/en-us/diskpart.mspx?mfr=true
- 18 -
User Manual
Appendix B
File System Expansion for Macintosh
Overview
This appendix describes the procedures needed with Apple Mac OS X
for expanding file systems that have been created on volumes that
have increased in size, while preserving all of your existing data.
After you have added more hard disk drives to increase the storage
capacity of a BIG volume, you must use the supplemental procedure
described below to allow the expanded capacity to be recognized by
Mac OS X.
The following example illustrates a hard disk growing from a JBOD to a
BIG Storage Policy.
A software tool named VolumeWorks from SubrosaSoft (available from
http://www.subrosasoft.com/OSXSoftware/index.php?main_page=pro
duct_info&products_id=6) can be used to grow the partition that was
created in JBOD Storage Policy to a BIG Storage Policy disk.
SubrosaSoft VolumeWorks easily organizes your hard drive by
creating, resizing, copying your partitions on a Mac OS X (10.3 or
higher) system.
- 19 -
User Manual
There are other third-party products are available to perform similar
volume management activities, but those products are very
sophisticated and are not described in this manual.
Procedure
Growing partition/volume with VolumeWorks:
Limitations of Resize/Move
VolumeWorks can only resize HFS+ partitions
The second drive when growing from JBOD to BIG must not have
any partition information on it. It must be a raw disk with no data of
any kind.
- 20 -
User Manual
To extend a volume, follow these steps:
1. Start Volume Works
2. Click on the volume that you want to extend, then click on
Repartitionbutton on the bottom.
- 21 -
User Manual
3. Now click on the Resizebutton on the bottom
4. Now move the slider all the way to the right within the Resize
dialog box.(Maximum resize)
Once you click on Start, it will execute the volume resize request.
- 22 -
User Manual
The new storage capacity will be added to the existing drive while
maintaining the data on the volume.
Appendix C
File System Expansion for Linux
Overview
This appendix describes the procedures needed with Linux for
expanding file systems that have been created on volumes that have
increased in size, while preserving all of your existing data. After you
have added more hard disk drives to increase the storage capacity of a
BIG volume, you must use the supplemental procedure described
below to allow the expanded capacity to be recognized by Linux.
The following example illustrates a hard disk growing from a JBOD to a
BIG Storage Policy.
A software tool named GNU Parted (available from
http://www.gnu.org/software/parted/parted.html) can be used to grow
the partition that was created in JBOD Storage Policy to a BIG Storage
Policy disk.
GNU Parted easily organizes your hard drive by creating, resizing,
- 23 -
User Manual
copying your partitions on a Linux system.
There are other third-party products are available to perform similar
volume management activities, but those products are very
sophisticated and are not included in this manual.
Procedure
Growing partition/volume with GNU Parted:
To extend a volume, follow these steps:
1. Start parted by typing parted /dev/hdc. (where /dev/hdc is the
device path of the hard disk for the system) This will bring up the
parted console indicated by the partedprompt.
# parted / dev / hdc
(parted)
2. Type print with in the parted console to bring up the volume and
disk information.
(parted) print
Disk geometry for /dev/hdc: 0.000-800000.000 megabytes
Disk label type: msdos
Minor
Start
- 24 -
User Manual
End
Type
Filesystem
Flags
1
0.063
400000.000
primary
ext2
3. Use the resize command extend the size of volume 1 listed above.
(parted) resize 1 0.063 400000
4. Type print to verify the resize of volume 1.
(parted) print
Disk geometry for /dev/hdc: 0.000-800000.000 megabytes
Disk label type: msdos
Minor
Start
End
Type
- 25 -
User Manual
Filesystem
Flags
1
0.063
800000.000
primary
ext2
The new space should be added to the existing drive while
maintaining the data on the volume. Before resize:
(parted) print
Disk geometry for /dev/hdc: 0.000-800000.000 megabytes
Disk label type: msdos
Minor
Start
End
Type
Filesystem
Flags
1
- 26 -
User Manual
0.063
400000.000
primary
ext2
After resize:
(parted) print
Disk geometry for /dev/hdc: 0.000-800000.000 megabytes
Disk label type: msdos
Minor
Start
End
Type
Filesystem
Flags
1
0.063
800000.000
primary
ext2
- 27 -
User Manual
DriveClone 3 Personal
OTB
User’s Guide
®
for Windows 2000, XP &Vista
- 28 -
User Manual
Copyright Notice
No part of this publication may be copied, transmitted, stored in a
retrieval system or translated into any language in any form or by any
means without the expressed written permission of FarStone
Technology, Inc.
FarStone grants you the right to use one copy of the enclosed software
program (“SOFTWARE”) on a single computer. If the SOFTWARE is
installed on a network, or more than one user can run the SOFTWARE
at the same time, you must purchase an additional license for each
additional user or computer.
Trademark
®
FarStone and DriveClone™ are trademarks of FarStone Technology,
®
®
®
Inc. Microsoft , Windows and MS-DOS are registered trademarks of
Microsoft Corporation. Other product names mentioned in this User’s
Guide may be trademarks or registered trademarks of their respective
companies.
FarStone Technology, Inc.
- 29 -
User Manual
U.S. Headquarters:
6 Morgan, Suite 160
Irvine, CA 92618 Phone: (949) 458-3666
Fax: (949) 458-3633
Asia-Pacific Offices
10F-1B, No. 207, DunHua North Rd., Taipei, 105, Taiwan
Phone: 886-2-2546-9898
Fax: 886-2-2546-3838
Technical Support
Answers to frequently asked questions are posted on our website at
www.farstone.com/support/faqs . For other support issues, please
contact FarStone Technical Support at www.farstone.com/support .
©
Copyright 2000-2007 FarStone Technology, Inc. All rights reserved.
- 30 -
User Manual
Software License Agreement
FARSTONE TECHNOLOGY, INC. (FARSTONE) END USER
LICENSE AGREEMENT FOR DRIVECLONE, HEREAFTER
REFERRED TO AS THE “SOFTWARE”
PLEASE READ CAREFULLY: THE USE OF THIS “SOFTWARE” IS
SUBJECT TO THE “SOFTWARE” LICENSE TERMS OF FARSTONE
AND OTHER LICENSORS WHO’S SOFTWARE MAY BE BUNDLED
WITH THIS PRODUCT.
BY YOUR USE OF THE “SOFTWARE” INCLUDED WITH THIS
PRODUCT YOU AGREE TO THE LICENSE TERMS REQUIRED BY
THE LICENSOR OF THE “SOFTWARE”, AS SET FORTH BELOW. IF
YOU DO NOT AGREE TO THE LICENSE TERMS APPLICABLE TO
THE “SOFTWARE”, YOU MAY RETURN THE ENTIRE UNUSED
PRODUCT FOR A FULL REFUND.
LICENSE AND WARRANTY:
The software that accompanies this license (the “Software”) is the
property of FARSTONE or its licensors and is protected by copyright
law. While FARSTONE continues to own the Software, you will have
- 31 -
User Manual
certain rights to use the Software after your acceptance of this license.
Except as may be modified by a license addendum which
accompanies this license, your rights and obligations with respect to
the use of this Software are as follows:
A. Single User License: (a) Use the “Software” on a single computer
system or network, and only by a single user at a time. If you wish to
use the “Software” for more users, you will need an additional License
for each user.
(b) Make one copy of the “Software” in machine-readable form solely
for back-up purposes provided you reproduce FarStone’s copyright
proprietary legends. Notwithstanding the foregoing, the “Software” may
be used on the home, laptop or other secondary computer of the
principal user of the “Software”, and an additional copy of the
“Software” may be made to support such use. As used in this License,
the “Software” is “in use” when it is either loaded into RAM or installed
on a hard disk or other permanent memory device. The “Software” may
be “in use” on only one computer at any given time. (Different License
terms and fees are applicable for networked or multiple user
- 32 -
User Manual
applications.) As a specific condition of this License, you agree to use
the “Software” in compliance with all applicable laws, including
copyright laws, and that you will not copy, transmit, perform or
distribute any audio or other content using the “Software” without
obtaining all necessary Licenses or permissions from the owner of the
content.
B. Multiple User License: Make one copy of the “Software” in
machine-readable form solely for back-up purposes, provided you
reproduce FarStone’s copyright proprietary legends. You must acquire
and dedicate a License for each separate computer on which any part
or portion of the “Software” is installed or run as used in this License,
the “Software” or any part or portion of the “Software” is “in use” when it
is either loaded into RAM or installed on a hard disk or other
permanent memory device including any networked or shared
environment where either direct or indirect connections are made
through software or hardware which pools or aggregates connections.
As a specific condition of this License, you agree to use the “Software”
in compliance with all applicable laws, including copyright laws, and
- 33 -
User Manual
that you will not copy, transmit, perform or distribute any audio or other
content using the “Software” without obtaining all necessary Licenses
or permissions from the owner of the content.
C. Restrictions: You may not distribute copies of the “Software” to
others or electronically transfer the “Software” from one computer to
another over a network. You may not post or otherwise make available
the “Software”, or any portion thereof, in any form, on the Internet. You
may not use the “Software” in a computer service business, including
in time-sharing applications. The “Software” contains trade secrets and,
in order to protect them, you may not decompile, reverse engineer,
disassemble, or otherwise reduce the “Software” to a
human-perceivable form. YOU MAY NOT MODIFY, ADAPT,
TRANSLATE, RENT, LEASE, LOAN, RESELL FOR PROFIT,
DISTRIBUTE, NETWORK OR CREATE DERIVATIVE WORKS
BASED UPON THE “SOFTWARE” OR ANY PART THEREOF.
D. Limited Warranty: FarStone warrants that the media on which the
Software is distributed will be free from defects for a period of fifteen
- 34 -
User Manual
(15) days from the date of delivery of the Software to you. Your sole
remedy in the event of a breach of this warranty will be that FarStone
will, at its option, replace any defective media returned to FarStone
within the warranty period or refund the money you paid for the
Software. FarStone does not warrant that the Software will meet your
requirements or that operation of the Software will be uninterrupted or
that the Software will be error-free.
THE ABOVE WARRANTY IS EXCLUSIVE AND IN LIEU OF ALL
OTHER WARRANTIES, WHETHER EXPRESS OR IMPLIED,
INCLUDING THE IMPLIED WARRANTIES OF MERCHANTABILITY,
FITNESS FOR A PARTICULAR PURPOSE AND
NONINFRINGEMENT. THIS WARRANTY GIVES YOU SPECIFIC
LEGAL RIGHTS. YOU MAY HAVE OTHER RIGHTS, WHICH VARY
FROM STATE TO STATE.
E. Limitation of Liability: IN NO EVENT WILL FARSTONE OR ITS
LICENSORS BE LIABLE TO YOU FOR ANY INCIDENTAL,
CONSEQUENTIAL OR INDIRECT DAMAGES, INCLUDING ANY
LOST PROFITS, LOST SAVINGS, OR LOSS OF DATA, EVEN IF
- 35 -
User Manual
FARSTONE OR A LICENSOR HAS BEEN ADVISED OF THE
POSSIBILITY OF SUCH DAMAGES, OR FOR ANY CLAIM BY ANY
OTHER PARTY. Some states do not allow the exclusion or limitation of
special, incidental, or consequential damages, so the above limitation
or exclusion may not apply to you.
F. General: You acknowledge that you have read this Agreement,
understand it, and that by using the “Software” you agree to be bound
by its terms and conditions. You further agree that it is the complete
and exclusive statement of the agreement between FarStone and you,
and supersedes any proposal or prior agreement, oral or written, and
any other communication between FarStone and you relating to the
subject matter of this Agreement. No additional or any different terms
will be enforceable against FarStone unless FarStone gives its express
consent, including an express waiver of the terms of this Agreement, in
writing signed by an officer of FarStone. You assume full responsibility
for the use of the “Software” and agree to use the “Software” legally
and responsibly.
Should any provision of this Agreement be declared unenforceable in
- 36 -
User Manual
any jurisdiction, and then such provision shall be deemed severable
from this Agreement and shall not affect the remainder hereof.
FarStone reserves all rights in the “Software” not specifically granted in
this Agreement.
Should you have any questions concerning this Agreement, you may
contact FarStone by writing to:
FarStone Technology, Inc.
Legal Department
6 Morgan, Suite 160
Irvine, CA 92618
- 37 -
User Manual
Chapter1:Product
Overview·············································································40
1.1FeaturesandBenefits......................................................41
Chapter2:Installing and Uninstalling DriveClone
2.1System
Requirements.....................................................................42
2.2InstallingDriveClone.......................................................43
2.3UninstallingDriveClone...................................................44
Chapter3: Getting Started inDriveClone
3.1DriveCloneMainConsole................................................45
3.2Backup
Console...............................................................................49
Disc·····················································································47
3.3Restore
Console...............................................................................64
3.4Clone Console...............................................................68
3.5 Recovery
CD/DVD.............................................................................. 71
3.6 Image Integrity
- 38 -
User Manual
Check............................................................... ....................75
Chapter 4
Glossary···································································· 76
Chapter 5
Appendix··························································· 77
5.1 FAQ............................................................................... 77
- 39 -
User Manual
Chapter 1: Product Overview
DriveClone creates a complete disk image of a hard drive or a single
hard drive partition. The image can be used for backup and recovery,
to quickly transfer all information from a computer’s hard drive to a new
hard drive. The image file can also be distributed across multiple hard
drives or partitions
DriveClone’s compressible image file contains all of the hard drive data
files, partition information and security settings, by copying only the
used data sectors to keep the size of the image to a minimum. The
complete disk image can now be updated quickly with incremental
backups; the incremental backup contains only the hard drive changes
that have occurred since the complete backup was created, or since
the last incremental backup. This offers the user an easy and reliable
way to keep system backup data current, by storing the images on an
external USB hard drive, CD or DVD set, or on a network share. The
user would then be able to quickly recover from any type of data
disaster, including data corruption or hard drive failure. System
administrators will appreciate DriveClone’s ability to dramatically
reduce the time they spend configuring multiple systems, installing
- 40 -
User Manual
software, or restoring multiple systems to an original image.
1.1 Features and Benefits
Hard Drive Imaging: Quickly back up or restore a system, or transfer
a system image to a new hard drive.
Complete External Backup: Store a complete system image on a
USB hard drive, network share, or use
the built-in CD/DVD burner to create
an exact copy of your hard drive on
disc
Easy Disk Image Updates: Incremental Backup lets you quickly
update your saved disk image without
ever leaving Windows.
Flexible Backup: Back up your hard drive to a protected local partition,
a network drive, a USB device, or to CD or DVD.
Clone hard drives that are different in size, format,
or brand.
Ease of Use: One-click recovery restores your system in seconds
Rapid, Controlled Recovery: Support UDMA1-5 and can restore
data in sectors.
- 41 -
User Manual
Partition Support: Support FAT32, NTFS, Linux EXT2/3 and other
unknown partitions.
Hardware Support: Support IDE, EIDE, SATA, and SCSI hard drives
and hardware RAID 0/1 .
100% protection: Restore an operating system damaged by corrupt
software, human error, a virus attack, or a software
bug.
Password Protection: Restrict user access to DriveClone; lock
your computer at the DOS level
Chapter 2: Installing and Uninstalling DriveClone
2.1 System Requirements
Windows 2000/XP/Vista
Intel 486 (or compatible) processor or higher
VBE2.0 Display Card or higher
512 MB of RAM
130 MB free hard drive space for installing DriveClone
IE6.0 or higher
- 42 -
User Manual
2.2 Installing DriveClone
Step 1 Insert the DriveClone setup CD into your CD drive. The Setup
program should start automatically. If it does not, run the file called
Setup.EXE directly from the CD. And user can also download the
program to set up.
Step 2 Select your language preference, and when the installation
screen appears, click Next.
Step 3 Carefully read the software license agreement. If you accept
the terms of the software license agreement, select I accept to
continue.
Step 4 Enter your personal information and serial number. If you have
not purchased a serial number, click Continue will install a time-limited
evaluation of DriveClone.
Step 5 DriveClone will be installed in the path displayed. You will have
the option to select another location to install DriveClone.
Step 6 Click Continue and DriveClone will be installed to the
destination folder.
Step 7 Select Restart to complete the installation. DriveClone will
- 43 -
User Manual
restart the computer.
Note
You cannot launch DriveClone until your computer has restarted
2.3 Uninstalling DriveClone
®
Step 1 From the Windows taskbar, select Programs
DriveClone
Uninstall DriveClone.
Step 2 Click OK to begin uninstalling DriveClone.
Note
All of the backup files you created will not be deleted after you uninstall
DriveClone.
You can still use those backup files to restore your
system
if you installed DriveClone again.
Chapter 3: Getting Started in DriveClone
To launch DriveClone, double click the DriveClone icon on your
desktop, or select Start
All Programs
DriveClone
DriveClone.
- 44 -
User Manual
3.1 DriveClone Main Console
3.1.1 Quick Start
Files Backup - Start automatically or manually save copies of select
files or folders on your hard drive.
Back Up My Computer - Back up your entire system.
Clone Drive - Create a 1:1 copy of your hard drive. More than one
hard drive will need to exist in the system for this functionality to work.
View File Versions - View the file versions you have created and
select a backup file to restore from.
Update My Disk Image - Modify the pre-set backup schedule setting.
- 45 -
User Manual
Close Preview Drives – Close all the previewed drives with Complete
Backup image.
3.1.2Schedule
Schedule of Back Up My Computer - You must first create a
complete backup of your system prior to see the following
functionalities.
Detail - View detailed information about the backup jobs you have
created, including its description, source, destination and schedule
setting.
Edit Schedule - Specify the frequency to back up additional changes
since the last back up. You can choose to run the backup every n(1-7)
day(s). If you wish to automatically run the scheduled backup job
when the system starts up after you miss the scheduled time of backup,
check the Execute Schedule Job while starting system after miss
schedule box.
Back Up Now - Start to back up the incremental changes immediately.
Delete - Delete the selected jobs.
Schedule Definition of Back Up My Computer
1 Back up files will be created according to the pre-set backup
- 46 -
User Manual
schedule.
2 If the system is busy, DriveClone will not able to run the scheduled
backup job. DriveClone will try it again automatically.
3 If you turn off your computer before reaching the scheduled backup
time and you have selected Execute Schedule Job while starting
system after miss schedule, DriveClone will start the backup
process as soon as you turn on your computer. If you have not
selected Execute Schedule Job while starting system after miss
schedule, DriveClone will start the backup process at the next
scheduled backup time.
4 If you changed the time of your operating system and the time you
changed is later than the scheduled backup time, DriveClone will start
the back up process. If the time you changed is earlier than the
scheduled backup time, DriveClone will start the back up process
according to the pre-set schedule.
Schedule of File Backup
Detail - View the detailed information about the backup jobs you have
created, including its description, source, destination and schedule
setting.
- 47 -
User Manual
Edit Schedule - Specify your preferred Schedule Settings of the
backup job you have created.
Add Files - Add files, folders or file types to your file backup list. Refer
to File Backup for more details.
Back Up Now - Backup the selected job immediately
Delete - Delete the selected job.
Schedule Definition of Back Up Files
1 If you changed the time of your operating system and the time you
changed is later than the scheduled backup time, DriveClone will start
the backup process 10 minutes from the current time. If the time you
changed is earlier than the scheduled backup time, DriveClone will
start the backup process according to the pre-set schedule set.
2 If your system is turned off during your scheduled backup time,
DriveClone will start the backup process immediately after you start the
system.
3 If your system is busy, DriveClone will not able to start the backup
process. DriveClone will start the backup process again automatically
5 minutes later.
4 Following files will not be backed up.
- 48 -
User Manual
a. Files in Recycle Bin
b. Files in System Volume Information directory, pagefile.sys and
files in _$temp directory
c. Hiberfil.sys
d. Files with the extension named with rit and tmp
e. Temporary files of Word
f. Files in DriveClone 3 Pro’s Setup folder
g. Files in Backup Destination directory of the current running
backup job
h. Files in the Temp directory
3.1.3 View Logs
This feature records all events of DriveClone, including warnings,
errors and operations.
Delete - Delete the selected events.
Delete All - Delete all the saved events.
Save - Save the event record.
3.2 Backup Console
3.2.1 File Backup
Step 1 Start the DriveClone Program. Select Back Up and then click
- 49 -
User Manual
Files Backup.
Step 2 You can create a new full file backup and you can also select
Incremental File Backup box to select a former job and create
incremental file backup.
If you have selected Incremental File Backup, you can choose to
examine the detail information of all created backup jobs, modify the
time and date to run scheduled Incremental File Backup, click Back
Up Now to run Incremental File Backup immediately, or delete the job
that is no longer required (Refer to Schedule of File Backup for
details).
Step 3 Enter a name for your new job.
Step 4 Select the file(s) you want to back up. You can also click Add
Files/Folders or Add File Types to add file type, folder or individual
file to back up according to your needs. Click Next to continue. You
can set the maximum number of backup versions you want to back up
in this step. DriveClone will always store a fixed number of the most
recent backup versions you set.
Add Files/Folders: Click this to select the files or folders you want to
®
add from Windows Explorer.
- 50 -
User Manual
Add File Types: Click this to enter Select File Types interface, shown
as below.
a. Add New File Type: Click this to add new file type(s) into the file
type group you select. You will also need to enter the File Type
Extension and File type description. Click Browse to add file type
icon. Click Add Group to create a new file type group.
- 51 -
User Manual
b. Remove File Type: Click this to delete the file type you don’t want
to back up.
Step 5 Select a location on a hard drive, USB storage medium, or a
network location to store the backup file. Click Next to continue.
Calculate Space: Click Calculate Space to calculate the space
required to store the backup file in the destination location.
Step 6 You can now review the information and settings that have
been specified. After reviewing your selections, click Start Backup to
start backing up the file(s).You can also click Previous to modify your
selections.
Some files may not be able to be copied because they are in use by
other applications. It is recommended that you close all applications
and files you want to back up prior to start the backup job.
Step 7 File backup:You can use this OTB(One button backup) function
but it is necessary to install GUI(57xx SteelVine Manager). After
installed, then ‘double click’ the icon(Pic-1), and Pic.2 will show up.
Follow the Pic-2 to Pic-6 to set the OTB route & job. After these
procedures are done, the file backup setting is finished. After this
setting, each time you click the OTB icon, the default OTB schedule
- 52 -
User Manual
backup process is in operation(*see Pic-7) as you have set.
1
2
3
- 53 -
User Manual
4
5
6
- 54 -
User Manual
7
Step 8 Click Schedule Incremental Backup to specify your preferred
Schedule Settings. By doing so, you can choose to repeat the
backup operation at a certain time of the day. The shortest time interval
is 1 day. The longest time interval is 7 days. You can also view
details of your backup, run System Snapshot, or delete a backup
(Refer to Schedule of File Backup for details).
3.2.2 Back Up My Computer
Step 1 Start the DriveClone Program. Select Back Up and then click
Back Up My Computer.
Step 2 You can create a new complete backup or update the existing
backup by selecting Incremental Backup. If you selected
Incremental Backup, you can choose to view the detail of the backup
file, modify the schedule to create an Incremental Backup, start the
- 55 -
User Manual
incremental back up immediately, or delete the selected job. (Refer to
Schedule of Back Up My Computer for details).
Step 3 Enter a name (1-50 characters) for your new Complete backup
file. Click
Get Started> to continue.
Step 4 Select the hard drive and partition(s) you want to
Note
If there is only one hard drive installed in a computer, you can skip
selecting the partition(s) you would like to protect.
If there is more than one hard drive, you can choose to back up any
partition(s) of any hard drive(s).
You can select to image one or more partitions from a hard drive
simultaneously. If you prefer to back up the entire hard drive, select a
source hard drive instead of partitions.
Step 5 Select a destination location on a hard drive, USB storage
medium, or a network location to store the image file.
Note
If you want to store the image on a network location, you can select the
location through Windows® and My Network Places directly.
If you have a CD/DVD writer (USB recorders are supported), you can
- 56 -
User Manual
burn the image onto a blank CD/DVD. The CD/DVD burned by
DriveClone can be used as a Recovery CD/DVD.
If you select a location on the network, you may be prompted to
provide a username and password. If your system does not respond
when you try to save disk image to a network location, please contact
your network administrator to check your connection status or access
privileges.
If you choose to store the Complete backup on a location of the hard
drive where the operating system is installed, System Snapshot will be
disabled. You can enable System Snapshot after you finish Complete
backup.
Step 6 Click Next to select a compression method between None,
Medium and High. Compressed images will save disk space, however
will take more time during image creation and data recovery.
(Optional) You can select Enable password protection to password
protect your image files. Once a password is set, it will be required
when you attempt to use the image file.
In the Image Splitting option, select a file size for a single volume of the
split image. If you select automatic, DriveClone will automatically split
- 57 -
User Manual
the image according to the file system type of the destination partition.
(Optional) If you want to verify whether the backup file is usable, you
can select the box “Check the data integrity of the image file when
backup is complete”.
Step 7 You can add description of the backup file in the Image File
Description box.
Step 8 You can now review the information and settings that have
been specified. After reviewing your selections, click Start Backup to
begin copying data into an image. You can also click Previous to
modify your selections. Click Start Backup to start the backup process.
If the system is busy, and DriveClone can not start the backup process
successfully, DriveClone will try to back up again automatically.
Step 9 Click Schedule Incremental Backup to specify Schedule
Settings. By doing so, you can choose to repeat the update the image
at a certain time of the day based on pre-set time interval. The shortest
time interval is 1 day. The longest time interval is 7 days. You can also
view detail of your backup, run Incremental Backup or delete the
backup. (Refer to Schedule of Back Up My Computer for details)
3.2.3 Create Start-up Disc
- 58 -
User Manual
Step 1 Click Start-up Disc to start creating the start-up disc
Step 2 Insert a blank CD into your CD/DVD Drive and click Get
Started to continue
Step 3 Click Finish to return to Main Console
3.2.6 Use Start-up Disc
Step 1 Insert the Start-up Disc and restart your computer, and then
enter BIOS to set the CD/DVD ROM as the first boot device.
Step 2 If you are using the Evaluation Version of DriveClone, you have
to enter your serial number and click OK to continue.
Note
Only the licensed user can use this function.
Step 3 After entering DriveClone Pre-OS Console, you can then
modify your network settings, check image integrity and restore drives.
Restore My Computer in Pre-OS
You can select a complete backup point stored on CD/DVD, local hard
drive or local area network to restore your computer.
Step 1 Click Restore My Computer icon on Pre-OS Main Console.
Step 2 Click Browse
to select the complete backup points you want
to restore. Click OK to continue.
- 59 -
User Manual
DriveClone can restore from a network location. To use this feature,
you should first configure your network settings.
Modify Network Settings
Network Settings
There are two tabs in the Network Settings window:
General:
You can setup your network adaptor, IP address, Subnet mask and
Default gateway from here.
If you have more than one network adaptor on your system, select the
adaptor to be used from the dropdown menu.
- 60 -
User Manual
IP Settings:
Obtain an IP address automatically: If your network supports DHCP
(Dynamic Host Configuration Protocol), choose this option to obtain an
IP address automatically from a DHCP server or a Point-to-Point
Protocol (PPP) dial-up network access server. DriveClone uses
DHCP as the default option and will obtain the IP address of your
computer automatically. IP address: Choose this option to manually
specify IP address for your network. This option can be used when
automatically obtaining IP address fails or the there is an IP address
conflict.
Advanced:
- 61 -
User Manual
If your computer is on a Local Area Network (LAN), you can set the
LAN settings so that you can back up images to or restore from a
network location.
DNS settings:
Obtaining DNS server address automatically: DNS (Domain Name
System) is an internet service that translates domain names into IP
addresses. It is a system for name resolution suitable for network
computers with fixed IP addresses. By default, DriveClone uses this
option to obtain the DNS sever address automatically from the
network.
- 62 -
User Manual
Use the following DNS server addresses: Choose this to manually
specify the DNS server addresses if needed.
WINS: Specify an IP address for a WINS server. Windows Internet
Naming Service (WINS) is a system that determines the IP address
associated with a particular network computer. It supports network
client and server computers running Windows and can provide name
resolution for other computers with special arrangements. It uses a
distributed database that is automatically updated with the names of
computers currently available and the IP address assigned to each
one.
Gateway: Specify an IP address for a default gateway. A default
gateway is a local IP router that is used to forward packets to
destinations beyond the local network.
Step 3 Click Next and select the complete backup point or any
incremental backup point to restore.
Step 4 Click Next to select Source partition/hard drive and Destination
partition/hard drive.
Step 5 Click Next to continue.
Step 6 Click Previous to modify your selections and click Start to begin
- 63 -
User Manual
restoration.
Image Integrity Check
In this section, you can check if the backup data in your Complete
backup image file is valid.
Step 1 Click Image Integrity Check icon on Pre-OS Main Console.
Step 2 Click Browse to select the image file you want to check. Click
OK.
Step 3 Click Next to begin checking process.
Step 4 Click Continue to select another image to check, or click
Cancel to return to Pre-OS Main Console.
DriveClone can also check the image file stored on a network location.
To use this feature, you should first configure your network settings.
Refer to Network Settings for details.
3.3 Restore Console
3.3.1 Restore My Computer
To restore a partition or the entire hard drive, please do the following:
Note
There must be enough free disk space on the destination partition to
hold the data that will be restored from the image file.
- 64 -
User Manual
Step 1 Start DriveClone and select Restore and then click Restore
My Computer.
Step 2 Select a Complete backup job from the list or click Browse to
select a Complete backup job that is not listed in the dropdown choice.
Click Next to continue.
Note
If you want to select an image file which is stored on the network, you
may be prompted to provide username and password to access the
network stored image file.
Step 3 You can restore from the complete backup point plus any
incremental back up files. Click Next to continue.
Step 4 Select a partition or an entire hard drive to restore. Click Next
to continue.
Step 5 Select a destination partition or unallocated space to restore
the image file. Click Start Restore to continue.
Note
An image file may contain backup data of more than one partition. You
can select and restore only one partition at a time.
If you want to restore the entire hard drive, click the drive entry only.
- 65 -
User Manual
Step 6 Click OK to begin the restoration process. If you don’t want to
start the restoration process, click Cancel to return to Main Console.
Step 7 Click Finish to complete the restoration process.
3.3.2Restore Files
To restore file(s), please do the following:
Step 1 Select Restore and then click Restore Files.
Step 2 Select a backup image file you want from the drop down list.
You can also click Browse to select it from another location on your
computer. Click Get Started to continue.
Step 3 Select the file you want to restore. In the selection area, all of
the backed up files with all available versions are listed in a standard
®
Windows folder structure. Check the file(s) you want to restore. If
backup data is stored on CD/DVDs, please have all of the necessary
discs before the restoration. If backup data is stored on multiple discs,
insert the last volume discs first. Please then follow the on-screen
instructions.
Under Restore files to option, select a location to save the restored
files:
◊ If New folder on my desktop is selected, the restored files will be
- 66 -
User Manual
saved in a new folder on your desktop, with the original folder hierarchy
preserved as it was backed up previously.
◊ If Original location is selected, the restored files will be saved in
their original locations. The files in this location will be replaced by
the back up files. It is recommended that you back up this location
prior to restore.
Note: If several versions of a file are selected, the files will be
restored to the same place with the version number appended to the
file name.
◊ If Another folder is selected, click Choose a folder to specify a
folder on your local hard drive to contain the restored files. The
restored files will be kept in their original folder hierarchy.
Step 4 Click Start Restore to continue.
Step 5 Click OK to begin the restoration process. If you don’t want to
start the restoration process, click Cancel to return to exit.
Step 6 Click Return to Main Console to complete the process.
3.3.3 Preview Backup Image
To restore an individual file or folder:
Step 1 Click Preview Backup Image directly on the main interface of
- 67 -
User Manual
Restore.
Step 2 Select an image you want to preview and click Next or click
Browse to select an image that is not listed in the dropdown choice.
Click Next to continue.
Step 3 Select a complete backup point or an incremental backup point
and click Next.
Step 4 Select the partition you want to preview and click Mount to
begin previewing the image.
Step 5 You can now browse and copy data on the preview drive in
Windows® Explorer.
After you have finished restoring an individual file or folder, you can
un-mount the preview partition.
Step 1 Click Tools and then select Close Preview Drives or click
Close Preview Drives on the interface of Quick Start.
Step 2 Click OK to begin the process.
This operation will unmount all of the preview partitions.
3.4 Clone Console
With DriveClone, you can clone (duplicate) a partition or hard drive to
another one without any lost or altered data.
- 68 -
User Manual
3.4.1 Clone Drive
Clone Drive duplicates one hard drive to another. It eliminates the
need to re-install the operating system, drivers and applications, and
enables you to upgrade a new hard drive with only a few mouse clicks.
Note
To use this function, you will need to have at least two hard drives on
your computer The target hard drive should have enough space to
store the data of the source hard drive
Step 1 Select Clone and then click Clone Drive.
Step 2 Select the Source Disk (top pane) and then the Destination
Disk (bottom pane). You can choose to modify the Destination Partition
Size automatically or manually by selecting Modify the destination
partition size.
You can also choose not to modify the Destination
Partition Size by selecting Keep the partition size of the destination
drive the same as the source drive. Click Next to continue.
Note
If you select Keep the partition size of Destination Hard Drive the
same as the Source Hard Drive, please skip to step 4.
If the Hard Drive you want to clone is going to boot your system, for
- 69 -
User Manual
best result, please select Keep the partition size of Destination
Hard Drive the same as the Source Hard Drive.
Step 3 You can alter the Destination Partition size by double-clicking
the entry of Destination Partition and change the size in a popup dialog
box. Click Next to continue.
Step 4 After confirming your selections, click Start Clone to begin the
cloning process or you can click Previous to change your settings.
You can start the clone process by clicking Start Clone. If the system
is busy, DriveClone will try to clone again automatically.
Step 5 Click Finish to complete the process.
3.4.2 Clone Partition
With DriveClone, you can copy data from the source partition into the
destination partition.
Step 1 Select Clone and then click Clone Partition.
Step 2 Select the Source Hard Drive, and then select a Source
Partition (top pane).
Note
If there is only one hard drive installed in a computer, you can skip the
drive selection step and proceed to selecting a partition.
- 70 -
User Manual
You can only choose one partition at a time.
The Source Partition and the Destination Partition cannot be the same.
Step 3 Select the Destination Hard Drive, and then select Destination
Partition (bottom pane). Click Next to continue.
Note
The selected destination partition must have enough space to hold the
data of the source partition.
Step 4 After confirming your selections, click Start Clone to start the
duplicating process or you can click Previous to change your
selections. You can start the cloning process by clicking Start Clone. If
the system is busy, DriveClone will try to clone again automatically.
Step 5 Click Finish to complete the process.
3.5 Recovery CD/DVD
A Recovery CD/DVD is a disc containing backup data. It allows end
users to restore backed up partition(s) or entire drives from these
CD/DVDs
3.5.1 Create a Recovery CD/DVD
Step 1 Start DriveClone. Select Back Up and then click Back Up My
Computer.
- 71 -
User Manual
Step 2 Enter a name (1-50 characters) for your Backup file. Click Get
Started to continue.
Step 3 Select the Source Hard Drive, and then select the Source
Partition(s) to be backed up. Click Next to continue.
Note
If there is only one hard drive installed in a computer, you can skip
selecting the partition(s) you would like to protect.
If there is more than one hard drive, you can choose to back up any
partition(s) of any hard drive(s).
You can select to image one or more partitions from a hard drive
simultaneously. If
you prefer to back up the entire hard drive, select a source hard drive
instead of partitions.
Step 4 Click on My Computer and select your CD/DVD Drive. Click
Next to continue.
Step 5 Click Next to select a compression method between None,
Medium and High. Compressed images will save disk space, however
will take more time during image creation and data recovery.
(Optional) You can select Enable password protection to set a
- 72 -
User Manual
password to access your image files. Once a password is set, you will
be prompt for password when you attempt to use the image file.
In the Image Splitting option, select a file size for a single volume of the
split image. If you select automatic, DriveClone will automatically split
the image according to the file system type of the destination partition.
(Optional) If you want to verify whether the backup file is valid, you
can select the box Check the data integrity of the image file when
backup is complete.
Step 6 Add description of the backup file in the Image File Description
box.
Step 7 Review the information and settings that have been specified.
Click Start Backup to begin copying data into an image or click
Previous to modify your selections. You can complete the backup by
clicking Start Backup. If the system is busy, DriveClone will try to back
up again automatically.
Note
If the size of the backup data exceeds the writable disc capacity,
DriveClone will automatically split the image into several volumes and
burn onto different discs. It will prompt you to insert another disc when
- 73 -
User Manual
needed.
If there are some data on the disc, you will be asked whether you wish
to erase the disc. If you want to continue, click Erase. Click Change to
insert another blank CD/DVD, or click Cancel to stop burning.
3.5.2 Restoring from a Recovery CD/DVD
Step 1 Insert the Recovery CD/DVD and select Restore and then click
Restore My Computer.
Step 2 Click Browse to select the restore point from the CD/DVD.
Step 3 Select a partition or an entire hard drive to restore.
Step 4 Select a destination partition or unallocated space to restore
the image file. Click Next to begin the process.
Note
An image file may contain backup data of more than one partition. You
can select and restore one or more partitions at a time.
If you want to restore the entire hard drive, click the drive entry only.
Step 5 Click OK to begin restoration process. If you don’t want to
restore, click Cancel to return to Main Console.
You can also restore the partition or hard drive directly through
CD/DVD Rom.
- 74 -
User Manual
Step 1 Restart your computer and enter BIOS. Set CD/DVD ROM to
be the first bootable device.
Step 2 Insert the Recovery CD/DVD and start up the computer. The
system will enter the Pre-OS mode.
Step 3 Click OK to continue. Click Cancel to exit and restart your
computer.
Step 4 Enter your serial number and click OK to begin restoration.
Step 5 Click OK to complete the process and restart your computer.
3.6 Image Integrity Check
Use this function to check if an image file created by DriveClone can
be used.
Step 1 Select Tools
Image Integrity Check
Step 2 Select an image from either hard drive, CD/DVD disc, network
location or other movable storage medium, and then click OK to check
the image. Click Finish to complete the Image Check.
- 75 -
User Manual
Chapter 4 Glossary
DriveClone Image
A DriveClone image is the file that contains the contents of a
computer’s hard drive or partition(s). Using this image, you can copy
the contents of a hard drive to a portable medium such as a recordable
CD/DVD, USB drive or to another hard drive.
Recovery CD/DVD
The Recovery CD/DVD allows users to restore their system by
inserting this disc into their CD/DVD-ROM drive. Once the system is
booted up, the Recovery CD/DVD will restore the system automatically
based on the content contained on the Recovery CD/DVD.
Clone (Copy) Partition/Drive
The term "cloning" refers to the physical reading of all sectors of a
source partition or disk and the subsequent writing of this raw sector
information to the corresponding sectors of a destination partition or
disk. The size, file system formats, brand of the source partition/disk
and target partition/disk can be different.
- 76 -
User Manual
Chapter 5 Appendix
5.1 FAQ
Q1. How long does it take to backup/restore a system using
DriveClone?
A: The time to backup/restore the system depends on the amount of
data on your system. However, DriveClone’s unique technology
minimizes the amount of time it takes to backup/restore the system.
Q2. I launched DriveClone in Windows, but a message indicates
that I must restart my computer in order to run DriveClone?
A: You have to restart your computer after the installation of
DriveClone.
Q3. When I restored a partition from an image file, it prompted me
“There is not enough space on the Destination Partition.”
However, I’m sure the free space on the Destination Partition is
larger than the used space in the Source Partition.
A: If the data on the end of the Source Partition cannot be moved,
DriveClone will prompt you with this notice. Even if the free space on
Destination Partition is larger than the used space in the Source
Partition.
- 77 -
User Manual
Q4. If the source partition is a bootable partition (e.g. C:\) but the
target partition is not, can the target partition be used to boot the
system after restoration?
A: Yes, however please follow the instruction shown below.
1. Modify your boot.ini file.
a. If you are in DOS, enter the boot partition (C:\) and type “edit
boot.ini” to modify this file.
b. If you are in Windows, the file boot.ini may be hidden. Select Show
hidden files and folder from tools->folder options from the menu bar
to show boot.ini, then open it.
2. Add the following entry to boot.ini:
multi(0)disk(0)rdisk(X)partition(Y)\Folder=" Description "
X: is the HDD (hard drive) number, generally defined as 0 – 3. Number
0 is the primary master, 1 is the primary slave, 2 is the secondary
primary and 3 is the secondary slave;
Y: is the partition ID, generally defined as 0-25, 0 is for the first
partition.
Folder: is the place storing the boot file (this is not the boot.ini file).
If your system is Windows® NT/2000, it should be defined as WINNT.
- 78 -
User Manual
If your system is Windows® XP, it should be Windows.
Description is for adding comments for the options listed on the
splash screen at system
startup.
Q5. I installed DriveClone on two different operating systems
®
(Windows 2000 and XP) on my computer.
After I removed
®
DriveClone from Windows 2000, why is the program on
®
Windows XP unusable?
A: Uninstalling DriveClone from one operating system will result in
the removal of the program in the other operating systems as well.
Q6. I cloned a hard drive using the Clone Disk function. Why
can’t I boot from the cloned drive?
A: This may happen if Norton GoBack is installed on your computer.
Please uninstall Norton GoBack before cloning the drive.
Q7. I have connected a USB hard drive or a USB CD/DVD
recorder to the system, why can’t
the device be recognized by
DriveClone?
A: Please try the following methods
(1) If you plugged in the USB hard drive after launching DriveClone,
- 79 -
User Manual
please insert your USB drive and then restart your computer and try
again.
(2) Disable the USB 2.0 Controller in BIOS or set USB to “Hi Speed” in
the BIOS USB settings.
Q8. I created an image for Drive C: on two CD-R discs. Why can’t
the disc be mounted as a temporary partition?
A: Mounting a partition requires all the backup data of the drive. If you
use one of two discs, it cannot provide the complete information. To
solve this problem, copy the image files from the two discs to the
hard drive and then mount it as a temporary partition. This problem
cannot be overcome by using multiple CD/DVD drives.
Q9. When I created a Recovery CD/DVD, an error message “Move
Data Error” appears.
A: This error may occur if the quality of the recordable CD/DVD
media is not good, or the disc is incompatible with the recorder. To
solve this problem, please try a different brand of CD/DVD media or
upgrade your CD/DVD recorder.
Q10. Are there any limitations when I restore from an image over
the network?
- 80 -
User Manual
A: DriveClone can restore an image file size below 2GB when
restoring from a network location. When backing up an image to a
network location, DriveClone can automatically split the file into several
volumes with a maximum size of 2GB each. You can select the first
volume of the image to be restored. If you have an image that is over
2GB on the network share, you cannot restore over the network. The
file must be copied back to the local computer prior to restoration.
Q11. Why can’t I find all backup files in the Backup files List?
A: There are two possible scenarios.
Case 1: The core files of your System Partition were lost or
re-initialized after restoring the System Partition.
Case 2: The partition which was backed up in your backup files has
been resized. In both scenarios, the backup files which contain the old
partition information of this hard drive are no longer valid and therefore
removed from the backup file list.
Q12.
Do I need to do anything before installing DriveClone?
®
A: We strongly recommend that you run the Windows Checkdisk
program to check for hard drive errors prior to install DriveClone. The
Checkdisk utility can be started by running Chkdsk.exe from a
- 81 -
User Manual
command prompt or by using the DriveClone, Pre-Installation Checklist
tool. Note: Running Checkdisk from either location will require a
system restart for the operation to be completed.
Q13.
Can DriveClone fix the system after my hard drive has
been mistakenly formatted or repartitioned?
A: DriveClone can fix the system only if it was installed prior to the
data lost.
Q14.
Can I use disk tools such as F-disk, PartitionMagic and
Norton Speed Disk after DriveClone is installed on my computer?
A:
Even though DriveClone is compatible with those software,
certain functions within those utilities may cause DriveClone to stop
function Properly.
Q15.
What should I do if I see error message “0xe2f” while
installing DriveClone?
A: Please contact our technical support staff to obtain a tool to
repair the logic error on your hard drive.
Q16.
I have multiple operating systems, including Linux.
Can
DriveClone protect all three systems?
®
A: DriveClone is designed for Windows users only, and it protects
- 82 -
User Manual
®
Windows® only. DriveClone can protect multiple Windows operating
systems but it cannot protect a Linux system.
®
Q17.
Does DriveClone work in Windows Safe Mode?
®
A: No. DriveClone does not work in Windows Safe Mode.
Q18.
Can I use Norton Ghost to copy a hard drive on which
DriveClone is installed?
A: Yes. DriveClone version 3.01 or later is compatible with all
versions of Ghost except Ghost 2003.
If you are using Ghost 2003, in order to copy the hard drive properly
you need to modify the Ghost
Properties by typing in “parameter –ib” behind the Target command.
Q19.
Why do I see a “0xe2” error when trying to install
DriveClone on a system with four operating systems?
A: A maximum of four operating system entries can reside on a
computer. If all four entries are filled, then DriveClone cannot be
installed.
Q20.
Can DriveClone really protect my PC from being
destroyed by a virus?
A: Yes. When a virus attacks your PC, common system files,
- 83 -
User Manual
applications, MS Word documents, you can use DriveClone to revert
your system back to the day before the virus infection. All of the files on
your hard drive will be free of viruses after restoration.
®
Q21.
Does DriveClone Provide support for Windows advanced
power management?
®
A: DriveClone supports all Windows advanced power management
features (Standby, Sleep, Hibernate).
Q22.
Why did my computer crash while DriveClone was loading
the hard drive driver?
A: This problem will only occur on a computer whose hard drive
does not support UDMA3. Please
disable UDMA in CMOS setup.
Q23.
Why can’t I find some of the Complete backup Files that
have been stored on the hard drive in Pre-OS?
A:
If you stored the backup file in the compressed NTFS partition,
the backup file can not be recognized and selected in Pre-OS mode.
To avoid this issue, please move the backup files to a non-compressed
NTFS partition.
Q24.
I try to back up the data to network computer. Why can’t I
- 84 -
User Manual
access the network computer’s share folder after I have entered
the correct user name and password?
A:
If you can’t back up the data to a network location, you may
need to modify the Local Security Settings of the network computer.
®
Shown below are steps to update the Local Security in Windows XP
and Vista.
1. Select Start
Control Panel
Administrative Tools
2. Double click on Local Security Policy.
3. Select Security Settings
Local Policies
Security
Options from the directory in the left pane.
4. Double click on Network access: sharing and security model for
local accounts.
5. Select Classic-local users authenticate as themselves, and click
Apply.
- 85 -