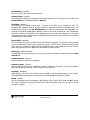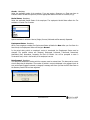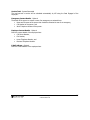
1
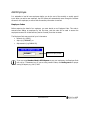
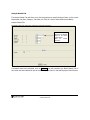
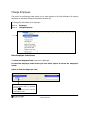
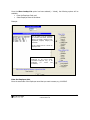
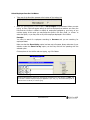
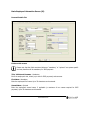
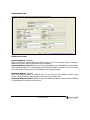
Addendum to Premier Payroll User Manual Basic Employee Information Screen i Copyright Notice © Copyright 2009 by Softline VIP, hereinafter referred to as "VIP Payroll", under the Copyright Law of the Republic of South Africa. No part of this publication may be reproduced, transmitted, transcribed, stored in a retrieval system, or translated into a human or computer language, in any form or by any means, electronic, mechanical, magnetic, optical, chemical, manual or otherwise without the express permission in writing of Softline VIP. Disclaimer Softline VIP makes no representation or warranties with respect to the contents hereof. Further, Softline VIP reserves the right to revise this publication and to make changes in the content hereof, from time to time, without obligation to notify any person or organisation of such revision or change. The sole purpose of this document is to provide the users of the Premier Payroll System with adequate information about the Basic Employee Information Screen. The use of this document for any other use is prohibited. Addendum to Premier Payroll User Manual 2009: Basic Employee Information Screen Published by: Softline VIP PO Box 38017 Garsfontein East Pretoria 0060 Trademarks Notice Windows is a trademark of Microsoft Corporation. ii Softline VIP Addendum to Premier Payroll User Manual: Basic Employee Information Screen Contents Chapter 1 Basic Employee Information Screen .................................................................................... 3 Add Employee ......................................................................................................................... 4 Employee Codes ................................................................................................................... 4 The Add New Employee Cycle ................................................................................................ 5 Adding a New Employee ........................................................................................................... 6 Basic Employee Information Screen (IS) ................................................................................. 7 Personal Details Tab .......................................................................................................... 7 Address Details Tab ........................................................................................................... 8 Statutory Details Tab ......................................................................................................... 9 Payment Details Tab ........................................................................................................ 10 Analysis Details Tab ......................................................................................................... 11 Leave Days screen (LD)....................................................................................................... 13 Employee Linking Screen (MC) ............................................................................................. 14 Increase Screen (INC)...................................................................................................... 16 Payslip Screen (PS) .......................................................................................................... 17 Change Employee .................................................................................................................. 19 Enter Employee Code Screen ............................................................................................... 19 Enter the Employee Code ................................................................................................. 21 Select Employee from the List Below ................................................................................. 22 Basic Employee Information Screen (IS) ............................................................................... 24 Personal Details Tab ........................................................................................................ 24 Address Details Tab ......................................................................................................... 28 Statutory Details Tab ....................................................................................................... 30 Payment Details Tab ........................................................................................................ 37 Analysis Details Tab ......................................................................................................... 39 Benefit Details Tab .......................................................................................................... 41 Foreign Income Employees .................................................................................................. 44 iii Chapter 1 In this Chapter: Basic Employee Information Screen o Add New Employee o Change Employee Addendum to Premier Payroll Manual © 2009 Softline VIP 1 2 Addendum to Premier Payroll Manual © 2009 Softline VIP Basic Employee Information Screen It has been necessary to amend the Basic Employee Information Screen (IS) to cater for a number of new fields required by SARS for IRP5/IT3a Certificates. These changes have been incorporated in the Update to 2.8a, in May 2009. The Basic Employee Information Screen has been expanded to consist of the following tabs: • Personal Details, • Address Details, • Statutory Details, • Payment Details, • Analysis Details, and • Benefit Details. All the information previously contained on the Basic Employee Information Screen, the Employee Additional Information Screen and the Employee Miscellaneous Screen has been moved to one of these tabs. This also means that the Employee Miscellaneous Screen (MIS) has fallen away. The Basic Employee Information Screen (IS) is of importance when: • Adding a New Employee onto the system, and • Changing an Employee’s details on the system. This document specifically addresses all information on all tabs of the Basic Employee Information Screen (IS) when adding or changing employees and should be seen as an addendum to the current Premier Payroll User Manual. Addendum to Premier Payroll Manual © 2009 Softline VIP 3 Add Employee It is advisable to load all new employees before you do the rest of the monthly or weekly payroll input. When you add a new employee, the VIP System will automatically move through the relevant screens for the employee, to ensure that all necessary information is entered. Employee Codes Before capturing the detail of an employee, you must decide on an Employee Code. This code is entered when adding an employee for the first time, and this code will be used to access the employee’s screens for all data entries (fixed or financial) from then onwards. The Employee Code may consist of up to 8 characters: • Numeric (e.g. 00012), • Alpha (e.g. BARNARD), or • Alphanumeric (e.g. BAR00012). Enter the required Employee Code in the space provided. If you are using Standard Bank’s EFTS System to pay your employees, the Employee Code can only be 7 characters long. If you are using numeric codes, use leading zeros for proper sorting of Reports, e.g. 0001, 0002. 4 Addendum to Premier Payroll Manual © 2009 Softline VIP The Add New Employee Cycle The full cycle of adding an employee must be completed. The default cycle consists of the following screens: 1. The Basic Employee Information Screen (IS): a. Address Details Tab, b. Statutory Details Tab, c. Payment Details Tab, d. Employee Analysis Tab, e. Employee Benefits Tab, 2. The Employee Leave Days Screen (LD), 3. The Employee Linking Screen (MC), 4. The Employee Increase Screen (INC), and 5. The Employee Payslip Screen (PS). The Employee Analysis Tab, Employee Benefits Tab, Employee Leave Days Screen (LD) and/or Employee Linking Screen (MC) may be omitted from the above cycle, if required. Additional screens may also be added to this cycle. See “Add Employee Control” in your Premier Payroll User Manual for more information. If you are affiliated to an Industrial Council, it is imperative to access the Employee’s Industrial Council Screen and link the employee to the relevant fields. See “Employee Industrial Council Screen” in your Premier Payroll User Manual for more information. Addendum to Premier Payroll Manual © 2009 Softline VIP 5 Adding a New Employee To add a new Employee: Click on Employee Click on Add New Employee Enter the required Employee Code, e.g. 00012345. 6 Addendum to Premier Payroll Manual © 2009 Softline VIP Basic Employee Information Screen (IS) The Basic Employee Information Screen (IS) is a mandatory screen in the Add New Employee Cycle. The Basic Employee Information Screen (IS) contains the employee’s fixed information, and consists of the following tabs: Personal Details Tab This screen includes fixed information such as the Surname, First Name, ID Number, Date of Birth, Gender, Marital Status, Date Engaged and important Contact Numbers. All the mandatory fields are indicated in cyan and you will not be able to exit this screen if these fields have not been completed. Personal Details Tab: Use the <Tab> key to move between fields, except for fields with Combo Boxes. Once a mandatory field has been completed, it will change from cyan to white. Addendum to Premier Payroll Manual © 2009 Softline VIP 7 If all details have been completed, click on Continue . You will proceed to the Address Details Tab as the next step to complete on the Basic Employee Information Screen. Address Details Tab The Address Details Tab includes the Reporting Address, Residential Address and Postal Address of the employee. Only the Reporting Address is mandatory and coloured in cyan. This Address is required to be completed for IRP5 reporting. Address Details Tab: It is recommended to default the Reporting Address to the Residential or Postal Address of the employee. If all details have been completed, click on Continue . You will proceed to the Statutory Details Tab as the next step to complete on the Basic Employee Information Screen. 8 Addendum to Premier Payroll Manual © 2009 Softline VIP Statutory Details Tab The Statutory Details Tab includes important information about Tax, IRP5’s, OID, UIF, SDL and RFI. It is imperative that the information on this screen should be entered correctly as it will have a direct influence on the calculation of Tax, UIF and SDL for the employee. The only mandatory field indicated in cyan is the Tax Status of the employee. Statutory Details Tab: If all details have been completed, click on Continue . You will proceed to the Payment Details Tab as the next step to complete on the Basic Employee Information Screen. Addendum to Premier Payroll Manual © 2009 Softline VIP 9 Payment Details Tab The Payment Details Tab is used to specify how the employee will be paid, e.g. by Cheque, Cash, ACB or Bank List and includes the employee’s banking details. The only mandatory field indicated in cyan is the Pay Method field. Payment Details Tab: Click on the magnifying glass for Bank Codes available or click on the 01 in the block to see the options available. If all details have been completed, click on Continue . You will proceed to the Analysis Details Tab, if this screen has been selected as part of the Add Employee Cycle on the Add Employee Control Screen. 10 Addendum to Premier Payroll Manual © 2009 Softline VIP Analysis Details Tab The Analysis Details Tab will allow you to link the employee to specific Analysis Codes, e.g the correct Department, Pay Point, Category, Job Grade, Job Title, etc. None of these fields are mandatory. Analysis Details Tab: Click on the magnifying glasses for the available codes for the various Analysis Fields. Make the relevant selections. If all details have been completed, click on Continue . You will proceed to the Benefit Details Tab, if this screen has been selected as part of the Add Employee Cycle on the Add Employee Control Screen. Addendum to Premier Payroll Manual © 2009 Softline VIP 11 Benefit Details Tab The details of all the Benefit Funds that the employee can be a member of will be entered on the Benefit Details Tab. None of the fields on this screen is mandatory, but it is imperative that the Start Dates for Pension, Provident Fund and Medical Aid is entered if the employee is a beneficiary to these funds. Benefit Details Tab: If all details have been completed, click on Continue . The Basic Employee Information Screen has been completed. You will now proceed to the Employee’s Leave Days Screen (LD). All fields on all tabs of the Basic Employee Information Screen (IS) are explained in the “Change Employee” section from page 19 onwards. 12 Addendum to Premier Payroll Manual © 2009 Softline VIP Leave Days Screen (LD) The Leave Days Screen (LD) contains the employee’s Leave Cycle and Leave Accrual information. For new employees, these are set to the values defined on the Leave Control Screen. You may alter these fields, if necessary. Employee Leave Days Screen (LD): If you are not licenced for the Premier Leave Module, only six lines will be available on this screen. If you are licenced for the Premier Leave Module, this screen will have up to 30 lines and fields. For more information about all the fields on this screen, see your Premier Payroll User Manual. If all details have been completed, click on Close . You will proceed to the Employee Linking Screen (MC), if this screen has been selected as part of the Add Employee Cycle on the Add Employee Control Screen. Addendum to Premier Payroll Manual © 2009 Softline VIP 13 Employee Linking Screen (MC) On the Employee Linking Screen (MC), you have to link the employee to the Methods of Calculation column, next to the Earning, Deduction or Calculation that are required for him/her. Click in the Field where the method exists that the employee has to be linked to. The methods on file will be displayed to enable you to select the required option. Click on the applicable method number next to the Earning, Deduction or Calculation Field. A zero (0) means that the employee is not linked to any method for that Earning, Deduction or Calculation Field. Employee Linking Screen (MC): If Payslip Display Codes are not used in your company, you have to specify which Methods of Calculation are to be used for this employee, by linking the employee to the required methods. If Payslip Display Codes are in use, the Payslip Display Code to which the employee must be linked can be selected on this screen. When linking the new employee to a particular Payslip Display Code, only the applicable Earnings, Deductions or Calculation Fields, according to the Payslip Display Code, will appear on the employee’s Payslip. The employee will also be automatically linked to the Methods of Calculation as specified for that Payslip Display Code. 14 Addendum to Premier Payroll Manual © 2009 Softline VIP When the column is set to Y=Yes, the line will display on the employee’s Payslip Screen and when the column is set to N=No, the line will not display on the employee’s Payslip Screen. The column serves therefore as an indication of whether the line will display on the employee’s Payslip or not and will only display those Earnings and Deductions that have been set to Y=Yes. The column indicates the Method number to which the employee is linked for this particular Payslip Display Code. For a detailed explanation of all fields on this screen, see “Employee Linking Screen (MC)” in your Premier Payroll User Manual. If all details have been completed, click on Continue . You will proceed to the Increase Screen (INC). Addendum to Premier Payroll Manual © 2009 Softline VIP 15 Increase Screen (INC) The Increase Screen (INC) is a mandatory screen in the Add New Employee Cycle. Increase Screen (INC): The employee's Annual Basic, Fixed Salary, Rate per Hour or Rate per Day can be entered here. Any one of these four amounts can be entered or changed and the others will automatically be recalculated. The standard Working Hours per Period and the Working Hours per Day, both of which are mandatory fields, are displayed here. Enter the default number of shifts on this screen if you are going to accumulate the shifts worked for an employee. The Charge out Rate/Hour can be used if an employee gets paid at more than one Rate per Hour. For an explanation of all fields on this screen, see “Employee Increase Screen (INC)” in your Premier Payroll User Manual. If all details have been completed, click on Continue . You will proceed to the Payslip Screen (PS), if this screen has been selected as part of the Add Employee Cycle on the Add Employee Control Screen. 16 Addendum to Premier Payroll Manual © 2009 Softline VIP Payslip Screen (PS) This screen displays the employee’s current payslip information. It shows the result of all the information that was entered on the default screens when the new employee’s details were entered. This screen displays exactly what will be printed on the employee’s payslip. The Tax, Gross and Nett Salary are immediately calculated as input is done on the Payslip Screen. Payslip Screen: For an explanation of all fields on this screen, see “Payslip Screen (PS)” in your Premier Payroll User Manual. Addendum to Premier Payroll Manual © 2009 Softline VIP 17 The default Add Employee Cycle has now been completed. If any additional screens have been selected on the Add Employee Control Screen, these screens will display in order of selection. If you are licenced for the Deloitte Interface the Deloitte Interface Screen (DI) will also form part of your default Add Employee Cycle. If you are licenced for the Job Management Module, the Job Screen (JOB) will also form part of your default Add Employee Cycle. Once you have completed all screens in the default cycle and have clicked Close on the Payslip Screen, you will be returned to the Enter the Employee Code Screen where you may enter the code of the next new employee. Enter the code of the next new employee, otherwise click Close and you will be returned to the Main Menu. 18 Addendum to Premier Payroll Manual © 2009 Softline VIP Change Employee This option on the Employee Menu allows you to make changes to the fixed information for existing employees on their Basic Employee Information Screens (IS). To change the Information of an Employee: Click on Employee Click on Change Employee Enter Employee Code Screen The Enter the Employee Code Screen will be displayed. On the Enter Employee Code Screen you have three options to access the employee’s record: Option 1: Enter the Employee Code In the Enter the Employee Code field, type the Employee Code, e.g. 00012345 and click OK . Please note that you have to enter the exact Employee Code. Addendum to Premier Payroll Manual © 2009 Softline VIP 19 Option 2: Enter Employee Name In the Enter Employee Name field, type the Employee Surname, e.g. Smith. Option 3: Show Lookup List Select (b tick) the Show Lookup List Tick box. 20 Addendum to Premier Payroll Manual © 2009 Softline VIP Once the Show Lookup List option has been selected (b ticked), the following options will be available: • Enter the Employee Code, and • Select Employee from the list below. Example: You can select to list the employees by: Surname, First Names, Known As Names, ID Number, Employee Code, Department, Paypoint, Category and Job Grade. In this example the list is shown by Employee Code. You can select to list all Active Employees for the current period, Terminated Employees only, or All Employees (i.e. current and terminated). Enter the Employee Code Enter the exact code of the Employee record that you want to access, e.g. 00012345. Addendum to Premier Payroll Manual © 2009 Softline VIP 21 Select Employee from the List Below • Take note of the blue help message at the bottom of the Lookup List: • When you click anywhere in the List Box, a search engine will be activated. When you start typing, an Entry Field will appear calling up the first employee that matches your entry the best and the List Box is shifted to display all employees applicable to your entry as you continue typing. At this point you may accept the option in the Entry Field, i.e. <Enter> to select the option, or you may click on any other employee displayed in the List Box. Example: You want to search for employees according to Surname and you are searching for employee Bester. Make sure that the Show List by: option has been set to Surname. Always take note of your selection under the Show List by: option, as the Entry field will be operating with the selected option. Click anywhere in the List Box and start typing, e.g. B for Bester: The Entry Field will appear, calling up the first employee that matches your entry the best, e.g. Baker, and the List Box is shifted to display all employees applicable to your entry, e.g. all Surnames starting with B, and will continue to shift as you continue typing. 22 Addendum to Premier Payroll Manual © 2009 Softline VIP • Up and Down Arrow Buttons If you click on this arrow, the screen will move up one line. If you click on this arrow, the screen will move up a full page. If you click on this arrow, the screen will move down a full page. If you click on this arrow, the screen will move down one line. Addendum to Premier Payroll Manual © 2009 Softline VIP 23 Basic Employee Information Screen (IS) Personal Details Tab Fields on this screen: Please note that the fields mentioned below as “mandatory” or “optional” are system specific and may therefore still be mandatory for IRP5 purposes. Title, Initials and Surname - Mandatory Enter the employee’s title, initials (up to two for IRP5 purposes) and surname. First Name - Mandatory Enter the employee’s first name. Up to 35 characters can be entered. Second Name - Optional Enter the employee’s second name, if applicable (a maximum of two names required for IRP5 purposes). Up to 35 characters can be entered. 24 Addendum to Premier Payroll Manual © 2009 Softline VIP Also Known As - Optional Enter the name by which the employee is known. Spouse’s Name - Optional If the employee is married, the spouse’s name may be entered here. If a spouse’s name is entered, the Marital Status will automatically default to Married. ID Number - Optional The employee’s ID Number entered here, is printed on the IRP5 and is required for UIF. The Unemployment Insurance Fund will only pay benefits to employees who have contributed to UIF, and benefits will be based on the UIF Remuneration on which the contributions were calculated. The employee’s 13 digit bar-coded Identity Number is used to record the contributions in the UIF database and also to access the information on the database when the benefits are calculated. It is therefore essential that you have a valid 13 digit bar-coded Identity Numbers for all your South African employees to enable them to claim benefits. Date of Birth - Mandatory If an ID Number is entered, the Date of Birth will default automatically. The format in which the date must be entered will be shown at the bottom of the screen. You will not be allowed to leave this field blank, since it is necessary for determining the employee’s age for tax calculations, etc. Date of Birth should correspond to the first 6 digits of the ID Number, for IRP5 purposes. Actual Age - System Generated The employee’s actual age as at the end of the current period is displayed in brackets next to the Date of Birth field. Passport Number - Optional Enter the Passport number of the employee. Passport Country - Optional Enter the Passport Country of the employee. A code is entered for the country, e.g. AUS for Australia. After the code has been entered, it can be viewed in the Lookup List. Language - Mandatory Select English or Alternate. This is used to print the English or the Alternate descriptions on the Payslip. The English/Alternate descriptions are entered on the Earning/Deduction Definition Screens. Group - Optional Enter the applicable race of the employee - A for African, C for Coloured, I for Indian and W for White. This field is required for Employment Equity and Skills Development and may be used for sorting purposes for reports. Addendum to Premier Payroll Manual © 2009 Softline VIP 25 Gender - Mandatory Select the applicable gender of the employee. If you are paying a Company or a Trust, you have to indicate it here to enable the system to print the appropriate Nature of Person on the IRP5/IT3 (a). Marital Status - Mandatory Select the applicable Marital Status of the employee. The employee’s Marital Status affects the Tax calculation in certain Tax Countries. Options available for selection: Married, Single, Divorced, Widowed and Permanently Separated. Employment Status - Mandatory When a new employee is added, the Employment Status will default to New. After your first Start of a New Period, the Employment Status will change to Normal. In the period during which an employee’s service is terminated, the Employment Status must be changed. The possible choices are: Resigned, Discharged, Pensioned, Transferred, Retrenched, Absconded, Died, Misconduct, Incapacity and End of Contract. You will be prompted to enter a Termination Date, which is the last day of the employee’s service. Date Engaged - Mandatory The date of the employee’s first day with the company must be entered here. This date must be correct since it affects the tax calculation. The number of periods in service is displayed in the adjacent block. As soon as the Date Engaged is entered or changed, a message will inform you that the IRP5 Start Date on the Statutory Details Tab has been adjusted: 26 Addendum to Premier Payroll Manual © 2009 Softline VIP Service Total - System Generated The total periods in service will be calculated automatically by VIP using the Date Engaged of the employee. Emergency Contact Details - Optional The details of the person to contact in case of an emergency are entered here: • Name and Surname of the person that should be contacted in case of an emergency, • Cell Number of the person, and • Work Telephone Number of the person. Employee Contact Details - Optional Enter the contact details of the employee here: • Cell Phone Number, • Fax Number, • Home Telephone Number, and • Business Telephone Number. E-Mail Address - Optional Enter the e-mail address of the employee here. Addendum to Premier Payroll Manual © 2009 Softline VIP 27 Address Details Tab Fields on this screen: Reporting Address - Mandatory Enter the employee’s reporting address for IRP5 purposes. This is the employee’s place of residence. Address lines 1 and 2 and the Postal Code field are mandatory. Reporting Address Linked To allows you to link the Residential, the Postal Address or Work Address to the Reporting Address. It is recommended that the Reporting Address is linked to one of the options as this will minimize input and errors if the address of the employee changes. Residential Address - Optional Enter the employee’s address of residence here. You can enter the Unit Number, Complex, Street Number, Street Name/Farm, Suburb/District, City/Town and the Postal Code. Residential Address Linked To allows you to link the Residential Address to either the Work Address or Postal Address to minimize errors and input. 28 Addendum to Premier Payroll Manual © 2009 Softline VIP Postal Address - Optional Enter the employee’s postal address here. You can specify the Type of Service, the Postal Number, the Street Number, the Street Name/Farm, the Suburb/District, the City/Town, and the Postal Code. Postal Address Linked To allows you to link the Postal Address to either the Work Address or the Residential Address to minimize error and input. Work Address - Optional A Work Address can be entered for the employee. This is useful when a company has more than one branch and you can specify the address where the employee works. The details for the Work Address can be entered, or the employee can be linked to an existing Work Address Code. Enter the code in the block or select a code from the options available. Addendum to Premier Payroll Manual © 2009 Softline VIP 29 Statutory Details Tab Tax Information Tax Office - Optional Enter the employee’s registered Tax Office, e.g. Johannesburg, Pretoria, etc. This is printed on the employee’s IRP5. Tax Number - Optional The employee’s Tax Number, which is entered here, is printed on the IRP5. The number will be validated by your VIP System. As this is an optional field, leave this field blank if you don’t have the employee’s Tax Number. 30 Addendum to Premier Payroll Manual © 2009 Softline VIP Tax Status - Mandatory Select a Tax Status for the employee from the options provided. The employee’s Tax Status directly affects the Tax calculation. The available options for R.S.A. are: Statutory Tables Tax is calculated according to the latest Statutory Rates. Directive % This allows you to enter the percentage according to the Directive from SARS. The system will prompt you for a Directive Number, as soon as you enter the percentage. The Directive is only applicable for one Tax Year. The Directive Number is a mandatory field. Temporary/Part Time The employee will be taxed at a fixed rate of 25%. The IRP5 will indicate that the employee is taxed at a fixed rate. The tax will print as PAYE and not SITE. PAYE only The employee’s tax is calculated according to the latest Statutory Rates, but no SITE split calculation is done on the employee’s IRP5. Independent Contractor No tax is calculated for the employee and the words Independent Contractor are printed on the IT3(a). No Tax This option is only allowed in prescribed cases, and should not generally be used. PSP Company This is a Personal Service Provider registered as a Company and will be taxed at a rate of 33%. The tax will print as PAYE and not SITE. PSP Trust This is a Personal Service Provider registered as a Trust and will be taxed at a rate of 40%. The tax will print as PAYE and not SITE. PAYE (Director) Directors pay tax on remuneration received. There will be no SITE split calculation on the Director’s IRP5. The employee’s tax is calculated according to the latest Statutory Rates. Temporary (Director) A director that is not in Standard Employment with a company will pay tax at a rate of 25%. Directive (Director) A director issued with a Directive will pay tax that is calculated using the percentage stated on the Directive. No Tax (Director) This option is no longer in use. Addendum to Premier Payroll Manual © 2009 Softline VIP 31 Labour Broker - IRP30 No tax will be calculated and at Tax Year-end an IT3(a) with the Code 07 – Labour Broker with IRP30 will be printed. Labour Broker no IRP30 This option is no longer in use. Legally Retired for Tax purposes - Optional You may select whether an employee is retired due to superannuation, ill health or infirmity for tax benefit purposes. Superannuation is an age related event that provides the right to retirement. Ill-health or infirmity means that an employee is retired due to illness, sickness or some sort of medical condition. Unlike employees over the age of 65, where the full Medical Aid Deduction may be regarded as a Tax benefit, the Deduction that may be regarded as a Tax benefit is limited to the Medical Aid Capped Amount. Legally Retired employees will never have a Medical Aid Fringe Benefit even if the company contributes an amount greater than the Capped Amount. If a Legally Retired employee has a Medical Aid Deduction, the Tax benefit that arises is limited to the Medical Aid Capped Amount. When a Legally Retired employee actually turns 65, the full Medical Aid Deduction may be regarded as a Tax benefit, as is the case for all employees over the age of 65. If you select (b tick) this option, the following message will be displayed: It is very important that you only click on Yes to continue if you are very sure that this option should be applied for the employee. Once you have selected this option, the employee’s tax will be calculated using VIP’s Average Tax method and even if you untick this option, it will remain like this indefinitely. We recommend that you phone the VIP Call Centre for assistance when you want to apply this option for any of your employees. Directive % - System Generated If Directive % has been selected as the employee’s Tax Status, the percentage will be displayed here automatically. The value cannot be adjusted in this field. It can only be adjusted in the Tax Status field. Directive Number - *Mandatory If and employee’s Tax Status is Directive %, the Directive Number is a mandatory field. 32 Addendum to Premier Payroll Manual © 2009 Softline VIP No of Tax Dependants - Optional This field is not used in the tax calculation and is therefore not mandatory. IRP5 Start Date - Mandatory When a new employee is added in the Current Tax Year, the IRP5 Start Date will default to the employee’s Date Engaged. If the employee was already in service at the beginning of the Tax Year, the IRP5 Start Date will default to the Start Date of the Current Tax Year. The IRP5 Start Date directly influences the employee’s Tax calculation. The number of periods in service, since the IRP5 Start Date, is indicated in the adjacent block. Age (Tax Year) - System Generated This is the age of the employee at the end of the Tax Year. It is important to know the age of the employee at the end of the Tax Year as it may influence the tax calculation. If an employee is turning 65 in this Tax Year (in other words he/she will be 65 by the end of the Tax Year), the employee is entitled to the further rebate in the tax calculation. If the employee belongs to the Medical Aid, the Capped Amount is ignored and if the employee pays his or her own Medical Aid contributions it will be treated as a tax deductible deduction. IRP5 Information Interim Issued - System Generated If an employee is deceased or immigrates during a Tax Year, an IRP5 can be issued to the employee during the Tax Year. The employee will be issued with an Interim IRP5 Number. Live Issued - System Generated This number will be generated automatically when a Live IRP5 run is done. Prev Tax Year- System Generated This number has been issued automatically when the previous IRP5 run has been done in VIP. If a Duplicate IRP5 should be issued to an employee, this number will be used. Manual/E@syFile issued - Optional If an IRP5 was issued manually or using the the e@syFile system without generating the IRP5 through VIP, this option should be selected (b ticked). It is important to indicate if an IRP5 has not been generated by VIP as the IRP5 numbers generated will be influenced. Include for IRP5 Resubmission - Optional If an IRP5 Resubmission run should be done, b tick the employees to be included for the run. Addendum to Premier Payroll Manual © 2009 Softline VIP 33 Assessment Year - Optional This field must be populated if an employee receives any payment in the Current Tax Year which relates to a prior Tax Year, for example where a Directive is issued in the current year, but relates to a prior year. OID Information Periods in Service for OID year (excl current) - Optional This field will be calculated automatically by VIP, but is accessible if adjustments need to be made. The OID Year runs from March to February and coincides with the Tax Year. Remember that the number of periods excludes the current period. If you have done a take-on from a previous system, you will have to manually adjust the OID periods, as this field is used for the OID Report that must be printed at the end of the Tax Year. UIF and SDL UIF Status - Mandatory Select the employee’s UIF Status for R.S.A. companies. UIF contributions must be paid for ALL employees in R.S.A., except those to whom one of the following UIF Exclusion Reasons applies: Government Employees in the National and Provincial Government spheres. Learner Unemployed Learners (under the Skills Development Levy Act) who receive Remuneration. Repatriated Foreign employees who must be repatriated at the end of their Contract of Service. Temporary Employees Temporary employees who work less than 24 hours per month. (Note that this is not the same as the definition of Part-time for Tax purposes which is less than 22 hours per week). Independent Contractor For employees who are NOT Independent Contractors for Tax purposes but could be Independent Contractors in terms of Labour Law. Legal Entity For employees who are NOT Legal Entities for Tax purposes but could be Legal Entities in terms of Labour Law. 34 Addendum to Premier Payroll Manual © 2009 Softline VIP The following UIF Status Indicators are set programmatically, and are shown in the EMP201 Report: Commission Only When the employee has ONLY Commission Earnings indicated by IRP5 code 3606. Pension Only When the employee has ONLY Pension Earnings indicated by IRP5 code 3603. Independent Contractor When the employee’s Tax Status is Independent Contractor. Legal Entity When the employee’s Tax Status is PSP Company or PSP Trust or if Gender is Trust or Company/CC. No Income No Income, if the employee has no income for this period. Seasonal Worker – Optional Select (b tick) this field if the employee is regarded as a Seasonal Worker. Learner/Excluded for Skills Levy - Optional Select (b tick) this field to exclude the employee from the calculation of the Skills Development Levy. Retirement Funding Income (RFI) There are two ways of accumulating RFI in VIP: • Using the Earning Definition Screen (ED), or • Using a Method of Calculation. RFI fields: Link to Method If a Method is used, the employee must be linked to the correct Method in the Linked to Method Combo Box. RFI Adjustment This field is available for entering RFI adjustments and can be accessed at any time to make the necessary adjustments. This field would be used to adjust the RFI amounts to ensure that you have no negative Non-RFI amounts at the end of February. RFI Current The Current Period’s RFI amount will automatically be displayed here. The amount calculated here will depend on whether you have used the RFI indicators on the Earning Definition Screen (ED), or whether you have selected a Method of Calculation for the calculation of RFI. Addendum to Premier Payroll Manual © 2009 Softline VIP 35 RFI Year-to-Date This is the Year-to-Date accumulated total for RFI, excluding the Current Period. This field cannot be accessed. The Year-to-Date RFI field is updated automatically during each roll-over according to the amounts in the Current Period field. RFI Total (YTD+) This is the Year-to-Date accumulated total for RFI, including the Current Period. This field also includes the total from the adjustment line and will therefore be the actual amount printed on the IRP5/IT3(a) certificate. This field cannot be accessed. The YTD+ RFI amount includes the following: Year-to-Date RFI, current RFI and any RFI adjustments. Non-RFI The Non-RFI amount is the difference between the total taxable Remuneration of the employee and the RFI amount. This field is not accessible and the calculation is done automatically. 36 Addendum to Premier Payroll Manual © 2009 Softline VIP Payment Details Tab Fields on this screen: Pay Method (ACB) - Optional Specify how the employee’s Salary/Wage will be paid. Available options are: Cheque If this option is selected, the Cheque printing option on the Reports menu may be used to print cheques directly from VIP or employees may be issued with manual cheques. Cash Payments The user can print a Coinage Analysis for the company from the Reports Screen. Addendum to Premier Payroll Manual © 2009 Softline VIP 37 ACB Transfers Details for ACB payments are written to a file which is sent or transmitted to the Bank ensuring that the employee’s salary is paid directly into his/her account. If this pay method is selected, the employee’s Account Type, the Branch Code of the employee’s Bank, and his/her Account Number must be entered. 10 to ZZZZ- Bank Codes Bank Codes must be used if you want to send a Bank Deposit List to your Bank which then pays the employees’ Salaries directly into their accounts. Each Bank branch must be defined by a Code. Any alpha-numeric code between 10 and ZZZZ may be used, e.g. ABSA. The employee’s Account Type and Number must be entered, but the Branch Code is obtained from the Bank/Financial Institution screen. Type of Account, Branch Code, Bank Name, Bank Branch Name and Account Number These fields are used only if the Pay Method has been specified as ACB or Bank Codes. The Type of Account, Branch Code, Bank Name, Bank Branch Name and Account Number fields must be completed. • Type of Account: Select: Cheque, Savings, Transmission or Loan account. • Branch Code: Enter the 6 digit Branch Code which indicates at which bank branch the employee’s account is held, e.g. 012345 for Standard Bank. Bank Name: Enter the name of the bank where the employee’s account is held, e.g. Standard Bank. If this field has been pre-defined under System Description Codes for Branch Code, it will default automatically. Bank Branch Name: Enter the branch name of the bank where the employee’s account is held, e.g. Westville. If this field has been pre-defined under System Description Codes for Branch Code, it will default automatically. • Account Number: Enter the employee’s bank account (or credit line) number. Account Holder Name - Optional The name of the Account Holder is entered here. If you <tab> through the fields, the Account Holder Name will default to the Employee Name. This can be changed if the account is not in the employee’s name. Account Holder Relationship - Optional Specify the relationship to the Account Holder. The options available are: Own, Joint, 3rd Party or None. 38 Addendum to Premier Payroll Manual © 2009 Softline VIP Analysis Details Tab Fields on this screen: Job Grade - Optional to get a list of options to Enter the Job Grade Code, e.g. 1 for Top Management, or click on the choose from. The Job Grades are user-defined and can be alphanumeric up to a maximum of 8 characters. This field may be used for classification purposes and for sorting reports. Employees of companies affiliated to councils such as SEIFSA, NIC and NBCRFI must be linked to a Job Grade, as the Job Grade affects the Bonus and Leave Pay calculations. Job Title - Optional to get a list of Enter the relevant Job Title Code, e.g. FINM for Financial Manager, or click on the options to choose from. When you enter a new Job Title, the system will prompt you to enter a description. The Job Titles are user-defined. Addendum to Premier Payroll Manual © 2009 Softline VIP 39 Category - Optional This field may be used for classification purposes and for sorting reports. Enter the relevant Category Code or click on the to get a list of options to choose from. The codes are user-defined. RSC Code - Optional Regional Services Council Codes are no longer applicable but you may customise this field, if required. Department - Optional This field may be used for classification purposes and for sorting reports. Enter the Department Code manually or click on the to get a list of options to choose from. The codes are user-defined. Pay Point - Optional This field may be used for classification purposes and for sorting reports. Enter the Pay Point Code manually or click on the to get a list of options to choose from. The codes are user-defined. Zone code - Optional This will only be displayed if your company is using Advanced Access Control with Zones. Enter the to list existing Codes that have already Zone Code, e.g. MAN for Management, or click on the been defined. For a new Code, you will be prompted to enter the Report and Screen descriptions. If you are using Zone Codes and you do not enter a Zone Code for an employee, all operators will have access to the employee’s information. Infoslips – Manager - Optional The Manager Codes are used mainly for Infoslips, a separate module. Here you can create Manager Codes that can be up to eight alpha-numeric characters long. You can allocate an employee, who exists in any Company within that Directory, to the Manager Code. This screen will pick up the selected employee’s contact details, as found on the Employee Additional Information Screen, on the Employee Information Screen, including the e-mail address. If you are licenced for the VIP InfoSlips Module, extra options for Infoslips will be displayed. You can choose that the employee will have No Infoslip, a Standard Infoslip or a Consolidated Infoslip. There is also an option available to enter a Unique Infoslip ID. 40 Addendum to Premier Payroll Manual © 2009 Softline VIP Benefit Details Tab Fields on this screen: Pension Start Date - Optional The Pension Start Date must be entered if Pension Deductions are to be made for the employee. If a future Start Date is entered, Pension Deductions will only start on the specified date. Methods of Calculation may be set up for Pension contributions. Employee % - Optional If the Pension is to be calculated only on the Fixed Salary/Wage (Line 01, Column 1 on the Payslip Screen) of the employee, the percentages for the Employee Deduction may be entered here. If a Method of Calculation is used, this field should be left blank. Addendum to Premier Payroll Manual © 2009 Softline VIP 41 Company % - Optional If the Pension is to be calculated only on the Fixed Salary/Wage (Line 01, Column 1 on the Payslip Screen) of the employee, the percentages for the Company Contribution may be entered here. If a Method of Calculation is used, this field should be left blank. Annual Salary % - Optional This field is used in conjunction with a Pension Month on the Basic Company Information Screen. The system will update this field with the new Annual Salary when rolling into the pension month. The Annual Basic Salary from the Increase Screen is stored here. This field can be used in Methods of Calculation. Total Employee (Current Period not included) This field displays the Total Contribution of the employee towards Pension since the employee joined the Pension Fund. This amount will automatically be updated with every roll-over. The Current Period is not included. If you have done a take-on from a previous system, these fields will only display the amount since you have started using VIP. You can update this field with the history information. The system will only update the Pension information if the Type of Deduction is Pension. Total Company (Current Period not included) This field displays the Total Contribution of the company towards Pension since the employee joined the Pension Fund. This amount will automatically be updated with every roll-over. The Current Period is not included. If you have done a take-on from a previous system, these fields will only display the amount since you have started using VIP. You can update this field with the history information. The system will only update the Pension information if the Type of Deduction is Pension. Medical Aid Start Date - Optional The Medical Aid Start Date must be entered if Medical Aid is to be deducted. The date may fall in the Current Processing Period or in the future. If a future date is entered, Medical Aid Deductions will only start on the specified date. Base Month - Optional This is the calendar month for the Salary on which the Medical Aid calculation must be based when using a Table Method type. Dependants - Optional The Medical Aid dependants must be entered here to ensure the correct Medical Aid Deduction is calculated. No distinction is made between adult and child dependants on this field. 42 Addendum to Premier Payroll Manual © 2009 Softline VIP Provident Fund Start Date - Optional The Provident Fund Start Date must be entered if Provident Fund Deductions are to be made for the employee. If a future Start Date is entered, Provident Fund Deductions will only start on the specified date. Methods of Calculation may be set up for Provident Fund contributions. Employee % - Optional If the Provident Fund is to be calculated only on the Fixed Salary/Wage (Line 01, Column 1 on the Payslip Screen) of the employee, the percentages for the Employee Deduction may be entered here. If a Method of Calculation is used, this field should be left blank. Company % - Optional If the Provident Fund is to be calculated only on the Fixed Salary/Wage (Line 01, Column 1 on the Payslip Screen) of the employee, the percentages for the Company Contribution may be entered here. If a Method of Calculation is used, this field should be left blank. Total Employee (Current Period not included) This field displays the Total Contribution of the employee towards Provident Fund since the employee joined the Fund. This amount will automatically be updated with every roll-over. The Current Period is not included. If you have done a take-on from a previous system, these fields will only display the amount since you have started using VIP. You can update this field with the history information. The system will only update the Provident Fund information if the Type of Deduction is Provident Fund. Total Company (Current Period not included) This field displays the Total Contribution of the company towards Provident Fund since the employee joined the Fund. This amount will automatically be updated with every roll-over. The Current Period is not included. If you have done a take-on from a previous system, these fields will only display the amount since you have started using VIP. You can update this field with the history information. The system will only update the Provident Fund information if the Type of Deduction is Provident Fund. Addendum to Premier Payroll Manual © 2009 Softline VIP 43 Bonus Information Annual Bonus Calc in Period - Optional The Bonus Period must be specified if you want the VIP System to automatically calculate an Annual Bonus for this employee. In monthly companies, a month number between 01 (January) and 12 (December) must be entered. In weekly/bi-weekly companies, the Processing Period Number in the Tax Year must be entered, i.e. the Processing Periods from the first period in the Tax Year must be counted to establish which period is the Bonus Period. Salary for Bonus % - Optional The Fixed Basic Salary from the Increase screen is accumulated in this field if the % of Annual Salary for Bonus field has been completed on the Basic Company Information screen. The Salary will accumulate according to the specifications on the Basic Company Information Screen and will automatically clear when rolling into the month following the Bonus month. After this it will start accumulating again for the next financial year. The Current Period is not included. Foreign Income Employees R.S.A. taxation is resident-based. “The remuneration derived by a person in respect of rendering services outside the Republic for an employer is exempt from tax if such a person was outside the Republic for periods exceeding 183 full days in aggregate during any 12 month period and for a continuous period exceeding 60 full days during that period and those services were rendered during that period or periods”. Refer to the EMP10 Guidelines for Employers for the Current Tax Year for more information. Separate certificates must be issued to an employee if the employee’s Remuneration consists of Local and Foreign Remuneration for specified periods during a Tax Year. This means that an employee must have separate VIP records for the time during which he is considered a Non-Resident and for the time during which he is considered a Resident for the specific Tax Year. 44 Addendum to Premier Payroll Manual © 2009 Softline VIP Setting the Tax Status to Foreign Income On the Statutory Details Tab of the Basic Employee Information screen (IS), type FI for Foreign Income in the Routing Box at the bottom of the screen: The following message will be displayed: If you select Yes , the FI indicator will appear on the Statutory Details Tab, next to the Tax Status field. Any of the Tax Statuses (Statutory, Directive % etc.) can be used with the Foreign Income indicator. Remove the FI indicator by typing FI in the Routing Box at the bottom of the screen. Addendum to Premier Payroll Manual © 2009 Softline VIP 45