1
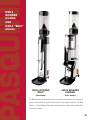
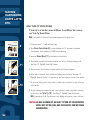
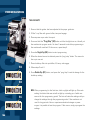
1501 WEST OLYMPIC BOULEVARD
LOS
LOS ANGELES
ANGELES
CALIFORNIA
CALIFORNIA 90015
90015
W
WW
WW
W.
.P
PA
AS
SQ
QU
UI
IN
NI
I.
.C
CO
OM
M
TABLE OF
CONTENTS
LIVIA ESPRESSO MACHINES ................................................................01
LIVIA S / LIVIA AUTO ......................................................................02
MOKA GRINDER ..............................................................................03
HEAVY DUTY BASES ........................................................................04
PORCELAIN CUPS / ACCESSORIES ........................................................05
SAFETY SHEET................................................................................06
CALL OUT, USE
AND
MAINTENANCE, LIVIA ACCESSORIES SUPPLIED ................07
BEFORE INSTALLATION / INSTALLATION
AND
PREPARATION
FOR
DAILY USE ....08,09
MAKING ESPRESSO - FILLING PORTA-FILTER / ENGAGING PORTA-FILTER ..........10
BREWING ESPRESSO ........................................................................11
MAKING CAPPUCCINO, CAFFE LATTE,
DIAGRAMS
FOR
THE
..............................................12
USING “TURBO TIP” STEAM DIFFUSER ................................13
MAKING CAPPUCCINO
CLEANING
ETC
WITH
TRADITIONAL DIFFUSER ..................................13
MACHINE ..............................................................14,15
PROGRAMMING - LIVIA AUTO ..............................................................16
TROUBLESHOOTING ..........................................................................17
MOKA GRINDER - USE / MAINTENANCE ..........................................18,19
MOKA GRINDER ADJUSTMENTS ......................................................20,21
LIVIA
ESPRESSO
MACHINES
LIVIA TECHNICAL SPECIFICATIONS:
ETL listed for home
& commercial usage.
• Pow er 120v. 60hz
• Resistance 1200 w.
• Pum p pressure
15 bar m ax.
• Reservoir 3. 5 liter
• Boiler 1. 3 Liter
• W idth 11. 5"
• D epth 15"
• H eight m in. 12. 5"
• H eight m ax. 16. 5"
(Lid open)
• Add 4” for base
• Weight 36 lbs.
LIVIA S
LIVIA AUTO
• Ship w eight 46 lbs.
1
LIVIA S:
The Livia S is a Sem i-Autom atic espresso m achine. It has been designed and built like a
com m ercial m achine so it can steam m ilk and brew espresso at the sam e tim e! Just
pour w ater in the large . 9 gallon rem ovable reservoir, and sw itch on the m achine.
LIVIA AUTO:
The Livia Auto is a fully program m able autom atic espresso m achine.
It features a volum etric coffee dosing system that guaranties the exact am ount of
espresso according to your taste. The Livia Auto also includes an on-off brew cycle
feature that bypasses the program m able buttons.
Livia's are built to last:
•
H igh polished stainless steel coachw ork
•
Anti-rust pow der coated steel fram e
•
All copper boiler and “N aval” brass (lead free) com ponents
•
Livia pum p capable of producing 15 - 16 bar pressure
•
Pow erful steam jet
•
H ot w ater for tea
•
Only 7 m inute heat up tim e
•
Rem ovable reservoir
All Livia's feature an on-board m icroprocessor that m anages all the low w ater safety
needs. This prevents the pum p and boiler from burning out.
2
MOKA
GRINDER
(WITH DOSER)
AND
MOKA “SELF”
(DOSERLESS)
MOKA GRINDER
“SELF”
(doserless)
MOKA GRINDER
CHROME
(with doser)
The M oka Grinder is built using the sam e com ponents and precision of a com m ercial
grinder, and m eets all the requirem ents needed for any espresso m achine. The M oka
features, a fully adjustable coffee doser, high tem perature carbon steel grinding m ills,
and a built in tam per.
3
H E AV Y
DUTY
BASES
Pasquini bases are intended to keep the espresso area clean and efficient.
All bases (3 sizes available) are m ade of stainless steel, and are equipped w ith
a steel reinforced rubber knock out bar w hich is used to dislodge the spent
coffee. The draw ers are rem ovable for easy cleaning.
MOKA GRINDER BASE: 8”
Specifically designed for the M oka Grinder.
Size: 4"(H ) x 8"(W ) x 16"(D )
LIVIA BASE: 14”
Specifically designed for the Livia m achine.
Size: 4"(H ) x 14"(W ) x 16"(D )
DOUBLE BASE: 19”
Perfect for m ounting the Livia and the M oka Grinder. The double base
includes tw o pull out draw ers: One knock out draw er, and a second draw er for
accessories.
Size: 4"(H ) x 19"(W ) x 16"(D )
4
PORCELAIN
CUPS
IMPORTED
FROM ITALY
8 oz.
6 oz.
3 oz.
"PASQUINI" LOGO CUPS AND SAUCERS.
These are authentic Italian cups that one w ould find in any Italian caffe.
M anufactured by the prem ier porcelain com pany in Italy. These cups are m ade of
thick, top quality porcelain.
Available in 3 sizes: 8 oz. Caffe Latte cups, 6 oz. Cappuccino cups, 3 oz. Espresso cups.
ACCESSORIES
B
A
A. Steam ing pitchers are m ade in Italy
of high-grade polish stainless steel
(500 m l. ).
G. Steam tip, traditional 4 hole style
or turbo tip style. *
B. 7 gram m easuring spoon. *
I. Standard single cup filter, 7 - 8 gram s. *
C. Porta-filter w ith pod filter inser t.
(pod filter, also sold separately)
J. Large single cup filter, 8 - 10 gram s.
D. Group head cleaning kit.
K. Standard double cup filter, 14 - 16 gram s. *
L. Large double cup filter, 16 - 21 gram s.
E. Rubber back flush disc.
F. Stainless steel back flush disc. *
C
H. Plastic tam per. *
M.Chrom e draw.
* Included w ith m achine
D
E
F
G
H
I
J
K
L
M
** Pod adaptor available.
5
SAFETY SHEET
Very Important Instructions:
READ FIRST: WARNING: HOT SURFACES.
The Livia espresso m achine heats up to very high tem peratures, and creates
steam that can cause severe burns. D o not allow inexperience people or
children to use the m achine w ithout proper guidance.
• Please observe normal safety practices.
• Due to hot splashing liquids, do not operate machine barefoot or without
proper clothing.
• Do not modify electrical plug. Electrical plug must be grounded.
• High voltage, unplug machine before servicing.
• Do not use electrical extensions or similar devices.
• Only qualified service persons should remove any panels.
• Keep original shipping box.
The Livia is intended to dispense espresso, hot w ater, and steam for heating
liquids only.
All other usages are to be considered unfit and therefore strictly forbidden.
M anufacture shall not be held responsible for dam ages due to m isuse or
uses unsuitable for espresso m achines.
6
USE & MAINTENANCE
5A
4
LIVIA
AUTO
1
5B
5C
5D
The U se & M aintenance m anual is a guide on how to operate the Livia
m achine only. You m ust have experience in using espresso m achines in order
to obtain perfect espresso beverages, and fully enjoy the Livia. For first tim e
users, please refer to the "Tips" Guide at www.pasquini.com. This w ill help
guide you in the right direction.
USE & MAINTENANCE:
3
4
5
6
2
7
9
8
11
14
13
12
15
10
LIVIA S
1. On-Off Sw itch
2. Steam Control Knob
3. H eating Indicator Light
4. Safety Light
5. Brew Sw itch (sem i-auto)
5A. Cup Selection Pad
(autom atic m achine only)
5B. One-Cup Selection
5C. Tw o-Cup Selection
5D . Program / Sem i-auto
Selection
6. Water Reservoir Lid
7. H ot Water Knob
8. Group
9. Por ta-Filter
10. Pow er Cord
11. Steam Wand
- Full Sw ing Level
12. H ot Water Spout
13. D efuser/ Steam Tip
14. M anom eter Gauge
(boiler pressure)
15. Back Flush Tube
The Livia is supplied with
the following Accessories:
• M easuring Spoon
(7 gram s)
• Single Cup Filter
(7 - 8 gram s)
• D ouble Cup Filter
(14 - 16 gram s)
• Plastic Tam per
• Stainless Steel
Back Flush D isc
7
BEFORE
INSTALLING,
LETS TALK ABOUT
WATER FOR YOUR
ESPRESSO MACHINE
PASQUINI ESPRESSO COMPANY RECOMMENDS:
•
Bottled drinking w ater
•
Softened w ater
•
RO (Reverse Osm osis) - D epending on the RO system , you m ay need to add a cup of
tap w ater in order to have the m achine function.
DO NOT USE DISTILLED, OR DE-IONIZED WATER.
INSTALLATION
AND
PREPARATION
FOR DAILY
USE
8
6
10
1
3
4
1.
Rem ove LIVIA Espresso M achine from shipping box.
2.
Lift lid of Water Reservoir (6) and fill w ith w ater.
3.
Plug Power Cord (10) into socket.
4.
Push Power Switch (1) to “ON”. Yellow Heating Element Indicator (3) w ill light.
Water w ill begin to fill boiler autom atically. Green Safety Light (4) w ill turn on. If the
green light does not stay on, press pow er sw itch off and on again. The green safety
light should alw ays rem ain lit as long as the pow er is on.
INSTALLATION
AND
PREPARATION
FOR DAILY
USE (CONT.)
5.
14
W hen operating pressure is reached (approx. 7 m inutes) the Manometer Gauge (14)
w ill read in the green area, and the yellow light w ill turn off. The Livia is factory set to
1. 1 - 1. 2 bar.
5a. A good w ay of m aking sure to have a fully heated m achine is to release som e steam
until the yellow light turns on again, and w ait a few seconds for it to turn off.
6.
9
Preheating Porta-Filter (9). A Por ta-filter should be the sam e tem perature as the group
head in order to achieve the best espresso. This can be done a couple of w ays:
•
H old the Por ta-filter under the group head and sw itch on the group allow ing the hot
w ater to flow over the entire body of the Por ta-filter.
•
After m aking the first espresso, the porta-filter should be at the proper tem perature
due to the heat transferring from the Group (8) to the por ta-filter.
8
MOVING
THE LIVIA
NOTE: If m achine is m oved, it m ay be necessary to prim e the pum p.
•
After m oving, be sure to add w ater to the reservoir.
•
Turn on m achine, and turn on the brew sw itch until w ater com es out of the head
for 5 seconds.
9
"MAKING
ESPRESSO"
FILLING FILTER:
A
B
C
Filling the Porta-Filter (A). The Livia can brew one or tw o cups of espresso at the sam e
tim e by choosing the single-cup filter or the double-cup filter. The Single-Cup Filter (B) is
m ade to hold half the am ount of coffee as the Double-Cup Filter (C). W hen using the
double-cup filter, be sure to put the recom m ended tw o doses of coffee (approx. 14 gram s).
Standard filters for the Livia:
Single-Cup Filter (B) holds 7 - 8 gram s.
Double-Cup Filter (C) holds 14 - 16 gram s.
After coffee is placed in filter, tam p the coffee using the supplied Tamper (D). The Livia
does not require a lot of tam p pressure. Tam ping evenly is im por tant. Try not to tam p at
an angle. The little coffee that rem ains around the sides w ill not have a negative effect.
D o not over fill the filters. A good rule to rem em ber is a 1/ 4” from the rim of the filter is
the recom m ended level after tam p, Larger filters are available from Pasquini Espresso
Com pany, see page 5.
D
NOTE: A single dose of coffee into the double-cup filter w ill not w ork!
ENGAGING PORTA-FILTER:
Engaging the Porta-Filter (9) is aw kw ard at first. After a w hile, this m ovem ent w ill
becom e faster and faster.
9
We w ill take you through a slow m otion m ovem ent.
• Lift porta-filter straight up and place under Group (8). The handle should be pointing
straight back, and the filter body itself should be centered up against the group head.
8
• M ove handle to left until the por ta-filter lips fit into the slotted groves, w hich are under
the group head. W hen both lips are into the head then tighten by turning back to the
right until the handle stops snug into the group head.
NOTE: The porta-filter should not be at an angle w hen engage properly, if so, rem ove and
try again.
10
BREWING
ESPRESSO:
5
BE SURE OF WHICH MODEL YOUR HAVE!!
TH E LIVIA IS AVAILABLE IN TW O M OD ELS
5A
1. Livia S - Sem i-autom atic w ith an on-off brew sw itch. (Figure 5)
2. Livia Auto - Autom atic w ith a touch pad. (Figure 5A)
FOR LIVIA S:
5B
• Turn on Brew Switch (5) until the desired am ount is reached about 1. 5 oz. of coffee.
(See "Tips for m aking good espresso", to help achieve the best results on the Pasquini
w eb site “www.pasquini.com”.)
5C
FOR LIVIA AUTO:
1. Touch the "One-Cup" (5B) pad for a single dose.
2. Touch the "Two-Cup" (5C) pad for a double dose.
5D
3. Touch the "Prog/Stop" (5D) pad to override dosing and brew espresso in a Semi-Auto
Mode (5D). You need to touch the "prog/ stop" again to stop the brew cycle once
the level is reached.
See Programming page 16 for instructions on how to program dose settings to your ow n
taste. (Livia Auto only)
11
MAKING
CAPPUCCINO,
CAFFE LATTE,
ETC.
USING “TURBO TIP” STEAM DIFFUSER
If “turbo tip” is not installed, remove old Diffuser Tip and Diffuser Seal; screw on
new “Turbo Tip” Steam Diffuser.
NOTE: It is possible to steam m ilk and brew espresso at the sam e tim e.
2
1. Fill pitcher about 1/ 3 w ith m ilk (any type).
2. Tw ist Steam Control Knob (2) counter-clockw ise for 1-2 seconds to elim inate
condensation, then clockw ise to CLOSE before steam ing.
3. Im m erse Steam Wand (11) to the bottom of the pitcher.
11
4. Tw ist steam control Knob counter-clockw ise one full turn to begin steam ing m ilk.
See Page 13, Figure B: H eat Only Position.
5. W ith free hand, touch bottom of steam pitcher until it feels lukew arm .
6. W hen m ilk is lukew arm , low er pitcher until jetting sound is heard. See page 13,
Figure A: Foam ing Position. You w ill star t to see foam rising to the top of the pitcher.
13
7. As you hear jetting sound, low er pitcher to allow foam to continue to rise to the top
of the pitcher.
8. To stop foam ing and continue to heat, return pitcher to heat only position, covering
up the hole of the Turbo Tip (13). See Page13, Figure B: H eat Only Position.
NOTE: Exposing the Turbo Tip side holes, even slightly, w ill produce a thick m ilk foam .
CAUTION: AS MILK BECOMES HOT, BE READY TO TURN OFF STEAM CONTROL
KNOB. VERY HOT MILK WILL BOIL OVER QUICKLY AND MAY CAUSE
SEVERE BURNS.
12
DIAGRAMS
FOR USING
“TURBO TIP”
STEAM
DIFFUSER
MAKING
CAPPUCCINO,
CAFFE LATTE,
ETC.
USING
TRADITIONAL
DIFFUSER
2
Figure A:
Foam ing Position
Partially exposing the holes
of the turbo tip.
Figure B:
H eat Only Position
Turbo tip is com pletely
subm erged.
Figure C:
Incorrect Position
This m ay cause
splashing or burning!
1. Fill pitcher about 1/ 3 w ith m ilk (any type) to taste.
2. Tw ist Steam Control Knob (2) counter-clockw ise for 1-2 seconds to expel.
condensation then clockw ise to CLOSE, before steam ing.
3. Im m erse Steam Wand (11) just below surface of m ilk.
4. Tw ist steam control knob counter-clockw ise one full turn to begin steam ing m ilk. As m ilk
steam s, foam w ill rise to surface.
5. W hen sufficient foam is reached, tw ist steam control knob clockw ise to CLOSE.
11
6. Layer steam ed m ilk on top of espresso. Shake pitcher side to side to reduce friction
and ease pouring.
13
CLEANING
THE MACHINE
Your Livia m ay be cleaned using it's ow n hot w ater, and by using a special soap m ade
for coffee.
NORMAL DAILY CLEANING (w ithout soap) everyday after usage.
GROUP CLEANING:
8
Before turning your machine “OFF” do the following:
1. Porta-filter cleaning: dum p coffee out of the Porta-Filter (“A” see page 15).
2. Insert the Stainless Steel Back Flush Disc (“F” see page 15) in the porta-filter.
3. Engage porta-filter into Group (8) and back flush the group by turning on Brew Switch
5
(5) for 5 seconds and repeat 3 tim es.
4. Insert Brush (“D ” see Page 5) into group head and brush aw ay any rem aining coffee
deposits.
NOTE: The rubber disc m ay be use only w ith the single cup filter in place of the stainless
steel disc.
SOAP CLEANING: (once a w eek)
Using "Puly Caff" (“D ” see page 15).
5D
1. Insert the Stainless Steel Back Flush (“F” see page 15) into porta-filter.
2. Fill 1 teaspoon of "Puly Caff" in the porta-filter and engage into group.
3. Turn on Brewing Cycle (5D) for 7 seconds, and repeat until the w ater from the back
flush tube turns into foam . Let sit for 5 m inutes.
14
CLEANING
THE MACHINE
(CONT.)
4. After 5 m inutes turn on brew ing cycle again for 7 seconds, about 4 tim es: you w ill see
the foam turn to a dark color. This is norm al.
5. Rem ove cleaning discs, and again turn on brew ing cycle for 4 seconds, until all the
soap is gone, it m ay be necessary to rinse the Por ta-filter using the w ater from the
group head. Be sure all the soap is com pletely rinsed out.
STEAM JET
2
1. Tw ist Steamer Control Knob (2) counter-clockw ise to turn “ON ”. M ake sure the holes
at the end of the steam jet are “Open”.
2. W ipe excess m ilk off of Steam Wand (11) w ith dam p cloth.
3. For stubborn m ilk deposits, soak steam w and overnight in pitcher of w ater. Rem ove
loosened m ilk w ith w et cloth.
11
CAUTION: DO NOT TOUCH STEAM WAND WITH BARE HANDS.
BOTTOM DRIP PAN
Lift up and pull out to release tray.
Wash w ith soap and w arm w ater.
A
B
C
E
D
F
* “Puly Caff” is available from your local distributor or “www.pasquini.com”.
15
PROGRAMMING
THE LIVIA AUTO
1. Be sure that the grinder has been adjusted to the proper grind size.
2. Fill the 1-cup filter w ith ground coffee, tam p and engage.
3. Place espresso cups under the spout.
4. Press and hold the "Prog/Stop" (5D) button until the the light turns on, this w ill put
the m achine into program m ode. You have 5 seconds to star t the program m ing or
the m achine w ill reset itself. If this occurs, repeat step 4.
5. Press the Single-Cup (5B) button to star t program m ing.
6. W hen the desired am ount is obtained press the "prog/ stop" button. The am ount in
the cup is now set.
7. Place double-cup filter into porta-filter, fill, tam p, and engage.
5D
8. Follow steps 3 and 4.
9. Press Double-Cup (5C) button, and press the "prog/ stop" to set the dosage for the
double-cup setting.
5B
5C
16
NOTE: W hen program m ing for the first tim e, both cup lights w ill light up. After each
setting, the button that w as set w ill not light up rem inding you of w hich one
w as set for this program m ing period. The Livia w ill retain the settings until you
change the settings through the program m ing m ode. If the m achine is not
used for long periods of tim e or experiences electrical outages or pow er
surges, it is possible to lose the program . If this occurs, sim ply re-program the
settings.
TROUBLESHOOTING
TROUBLE
SYMPTOM
REMEDY
Not heating
Switch #1 light “ON”
#4 Green light “OFF”
Check water in reservoir & fill.
Not making coffee
#5 switch not responding
Check water in reservoir & fill.
Or check wire of reservoir.
Not heating. No coffee.
Green light “OFF” & reservoir fill
Turn machine “OFF for 3 seconds, then
turn “ON” to reset safety.
No steam, or very little steam
Coffee hot & tea water O. K.
Clogged steam tip -- unscrew & clean.
Coffee dripping, not coming out
or cold coffee.
Green light “ON” pump sounds normal.
Coffee is too fine -- Adjust grinder to
coarser setting.
Wet grounds
M achine sounds normal.
Coffee is too fine -- Adjust grinder to
coarser setting.
Bitter coffee -- too hot, no cream on
espresso.
Loud pump
Coffee is too coarse -- Adjust grinder to
finer setting.
Coffee not fresh.
Not enough coffee in filter.
M achine not hot enough.
17