1
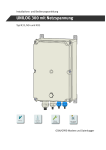
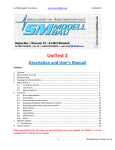
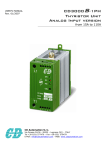
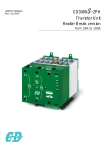
Installation- and user handbook
Pulse-out module
Installation, user and maintenance manual
Pulse-out module
All rights reserved.
Copyright © 2015 Wigersma & Sikkema B.V., NL-6980 AC Doesburg
All the figures and descriptions in this installation, operating and maintenance manual have been compiled
only after careful checking. Despite this, however, the possibility of errors cannot be completely eliminated.
Therefore, no guarantee can be given for completeness or for the content. Also, the manual cannot be taken
as giving assurance with regard to product characteristics. Furthermore, characteristics are also described that
are only available as options.
The right is reserved to make changes in the course of technical development. We would be very grateful for
suggestions for improvement and notification of any errors, etc.
With regard to extended product liability the data and material characteristics given should only be
taken as guide values and must always be individually checked and corrected where applicable. This
particularly applies where safety aspects must be taken into account.
Further support can be obtained from the branch or representative responsible for your area. The address is
printed on the back of this manual or simply enquire at Wigersma & Sikkema B.V.
Passing this manual to third parties and its duplication, in full or in part, are only allowed with written permission
from Wigersma & Sikkema B.V.
The guarantee becomes invalid if the product described here is not handled properly, repaired or modified by
unauthorized persons or if replacement parts are used which are not genuine parts from Wigersma & Sikkema
B.V.
Preface
■
This handbook provides important information. Read this handbook carefully.
■
In this handbook various notes and warnings are marked with symbols. Read them carefully and
take any measures necessary.
The symbols used have the following meanings:
NOTE
Suggestions and advice to make it easier to complete tasks.
ATTENTION
A note that draws the user’s attention to possible problems.
WARNING
If the action is not correctly completed, data or settings can be lost.
ESD
A note that draws the user’s attention to measures that must be taken
e.g. for electrostatic discharge.
DDNN102GHGB /07-2015/Rev. 3
1
Installation, user and maintenance manual
Pulse-out module
Table of Contents
Preface ..................................................................................................................................1
1
Introduction ....................................................................................................................2
2
Installation ......................................................................................................................3
2.1
Placing the module ............................................................................................................................ 3
2.2
Connection with external devices ...................................................................................................... 3
3
Settings and indicators .................................................................................................4
4
Maintenance ...................................................................................................................6
5
Technical specification .................................................................................................6
1 Introduction
The pulse-out module is constructed with 4 configurable and galvanically isolated pulse outputs constructed
with a solid state relay. A solid state relay does not experience contact bounce and has in principle an unlimited
operational lifetime. The pulse outputs can switch both direct current and alternating current. All 4 outputs are
also galvanically isolated from each other.
With jumper settings the pulse outputs can be coupled to two external pulse contacts or the two internal pulse
outputs of UNILOG 300. It is also possible to arrange several pulse outputs parallel so that the same pulse
can be sent galvanically isolated to multiple systems.
All signals are provided with indicators so that the function and configuration can be easily and rapidly
checked.
Order number NN2671.
<125 V AC or DC
<100 mA
Jumper field
Pulse output
1
Jumper set
OUT 1 to INT 1
OUT 1
INT 1
Pulse output
2
OUT 2
EXT 1
Jumper set
OUT 3 to OUT 2
Pulse output
3
OUT 3
INT 2
Jumper set
OUT 2 to off
Pulse output
4
OUT 4
EXT 2
Figure 1. Schematic representation of functions for the pulse-out module.
DDNN102GHGB /07-2015/Rev. 3
2
Installation, user and maintenance manual
Pulse-out module
2 Installation
2.1 Placing the module
ESD
WARNING
Electrostatic discharges (ESD) can cause damage to internal electrical
components if you do not take preventative measures. ESD is caused
by static electricity and the damage caused is usually permanent.
Inside the device in which the pulse-out module is to be placed there are
parts that are connected with the main power supply. Disconnect the
mains power supply temporarily during any work. See the user handbook
for the device in which the pulse-out module is to be placed.
Depending on the device in which the pulse-out module shall be place, the pulse-out module must be installed
as follows:
•
All models UNILOG 300 with mains supply of type N33, N34 or N35 (see type plate left exterior): there
are 1 or 2 open connections on the first PCB. Place the pulse-out module on an open connection.
•
ISC230B (see type plate left exterior): there are 3 connections. Other modules may be present. Place
the pulse-out module on an open connection.
2.2 Connection with external devices
The wiring for connecting with external devices is fed through a free cable gland from the UNILOG 300 or
ISC230B and connected to one or more screw connectors to the outputs OUT 1 to OUT 4 of the pulse-out
module. There are no specific demands for the wiring except that it is suitable for a watertight led trough by
the cable gland.
The possible polarity of the connection with the external devices does not need to be taken into account.
Maximum values of the signal of the external devices:
-
125 V direct or alternating current
-
100 mA.
DDNN102GHGB /07-2015/Rev. 3
3
Installation, user and maintenance manual
Pulse-out module
3 Settings and indicators
Figure 2. Jumpers and led indicators
1.
Screw terminals of the 4 pulse outputs OUT 1 to and including OUT 4
2.
Led indicators for the function of the 4 pulse outputs OUT 1 to and including OUT 4
3.
Jumper field for coupling a pulse output to an internal or external pulse signal
4.
Led indicators for the function of an internal or external pulse signal
Calibrating the jumpers
The pulse outputs on the pulse-out module are coupled by means of jumper settings to an internal or
external pulse signal:
-
When the pulse-out module is placed in an ISC230B:
o The two external pulse signals that are connected to the pulse inputs IN1 and IN2 of the ISC230B
(screw terminals 3 to 6). A pulse signal at input IN1 shall emit an EXT1 pulse signal and a pulse signal
at input IN2 shall emit an EXT2 pulse signal. This is easy to follow through, for example, shorting the
IN1 screw terminal of the ISC230B with a wire will light up the led indicator EXT1. The same applies
for the IN2 input and the EXT2 led indicator.
-
When the pulse-out module is placed in a UNILOG 300:
o The two external pulse signals that are connected to the pulse inputs IN1 and IN2 of the UNILOG 300
(screw terminals 3 to 6). A pulse signal at input IN1 shall emit an EXT1 pulse signal and a pulse signal
at input IN2 shall emit an EXT2 pulse signal. This is easy to follow through, for example, shorting the
IN1 screw terminal of the UNILOG 300 with a wire will light up the led indicator EXT1. The same
applies for the IN2 input and the EXT2 led indicator.
o The two internal pulse outputs of the UNILOG 300. A pulse signal from pulse output 1 of UNILOG 300
shall emit an INT1 pulse signal and a pulse signal from pulse output 2 of UNILOG 300 shall emit an
INT2. This is clearly visible by means of the led indicators INT1 and INT2.
DDNN102GHGB /07-2015/Rev. 3
4
Installation, user and maintenance manual
Pulse-out module
Consequently the pulse signals INT1, EXT1, INT2 and EXT2 can be coupled with a jumper to the
corresponding pulse outputs OUT1, OUT2, OUT3 and OUT4:
-
With a jumper in top position no coupling is present, the pulse output is disabled; see below for example
in which all pulse outputs are disabled. This is the standard factory setting.
-
With a jumper in in the lowest position the pulse output is coupled and active, see for example the
illustration below whereby the pulse output OUT2 is enabled and with the pulse signal EXT1 and the
pulse output OUT4 is enabled with the pulse signal EXT2. The functioning of the jumper setting is easy
to check; when indicator EXT1 lights up also led indicator OUT2 lights up.
-
If multiple pulse outputs are needed for the same pulse signal, then a horizontally placed jumper in the
top position can forward the pulse signal through to a second pulse output. See for example below
whereby an extra connection is made for the pulse signal EXT1 also using the pulse output OUT1
DDNN102GHGB /07-2015/Rev. 3
5
Installation, user and maintenance manual
Pulse-out module
4 Maintenance
The pulse-out module does not need maintenance. For maintenance of the devices in which the module is
placed refer to the user manual of the devices in question.
5 Technical specification
•
Pulse outputs
•
•
•
•
•
Max contact signal
On resistance
EMC Protection
Max. output frequency
Operating temperature
4, optical solid state output, independent
galvanically isolated
125 V AC and 100 mAeff
< 30 Ω
400 W transient suppression
100 Hz DC 50 %
- 25 °C to + 55 °C
DDNN102GHGB /07-2015/Rev. 3
6
DDNN102GHGB/07-2015/Rev. 3
Wigersma & Sikkema B.V.
Postbox 109
6980 AC Doesburg
Leigraafseweg 4
6983 BP Doesburg
TEL: +31 (0) 313 – 47 19 98
FAX: +31 (0) 313 – 47 32 90
[email protected]
www.wigersma-sikkema.com