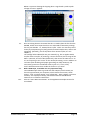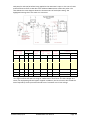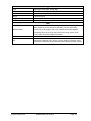
1
Hantek 6022BE Oscilloscope Unofficial Open6022BE User Manual Software written by Richard Krupski Manual compiled by André le Roux V1.0b19 2014/12/21 OPEN6022BE User Manual Page: 1 Contents 1. This Manual: .................................................................................................... 7 2. General Safety: ................................................................................................ 7 3. Overview: ........................................................................................................ 8 4. PC System Requirements: ................................................................................ 8 5. General Features ............................................................................................. 9 6. General Check: ................................................................................................ 9 7. Accessories: ..................................................................................................... 9 8. Connections and Indications: ......................................................................... 10 9. Installing Hantek6022BE Software: ................................................................ 11 10. Driver Installation: ......................................................................................... 12 11. Installing OPEN6022BE Software: ................................................................... 15 12. Probe Compensation Adjustment: ................................................................. 15 13. Functional Check: .......................................................................................... 16 14. Self-Calibration: ............................................................................................. 17 15. Limitations and things to be aware of: ........................................................... 17 16. Demo Mode .................................................................................................. 21 17. GPS Function (used presently for lack of a better name) ................................. 22 18. Waveform Context Area ................................................................................ 22 19. Toolbar menu items ....................................................................................... 23 1) File .................................................................................................................................. 23 a) Import......................................................................................................................... 23 b) Export ......................................................................................................................... 23 c) Print ............................................................................................................................ 23 d) Exit .............................................................................................................................. 23 2) View................................................................................................................................ 23 a) Toolbar ....................................................................................................................... 23 b) Controls ...................................................................................................................... 23 c) Measure ..................................................................................................................... 23 d) Measure output ......................................................................................................... 23 e) Debug Information ..................................................................................................... 23 f) Full Screen .................................................................................................................. 23 3) Channel .......................................................................................................................... 23 a) CH1 ............................................................................................................................. 23 b) CH2 ............................................................................................................................. 24 c) Math ........................................................................................................................... 24 d) Reference ................................................................................................................... 25 4) Trigger ............................................................................................................................ 26 a) Mode .......................................................................................................................... 26 V1.0b19 2014/12/21 OPEN6022BE User Manual Page: 2 b) Sweep ......................................................................................................................... 26 c) Source......................................................................................................................... 26 d) Slope ........................................................................................................................... 26 5) Horizontal ....................................................................................................................... 26 a) Time/Div ..................................................................................................................... 26 b) Format ........................................................................................................................ 27 6) Cursor ............................................................................................................................. 27 a) None ........................................................................................................................... 27 b) Interactive .................................................................................................................. 27 c) Lines ........................................................................................................................... 27 7) Display ............................................................................................................................ 28 a) Waveform................................................................................................................... 28 b) Grid ............................................................................................................................. 28 8) Acquire ........................................................................................................................... 29 a) Start ............................................................................................................................ 29 b) Stop ............................................................................................................................ 29 c) Zoom in ...................................................................................................................... 29 d) Zoom out .................................................................................................................... 29 e) Zoom reset ................................................................................................................. 29 f) Interpolation .............................................................................................................. 29 g) Demo mode................................................................................................................ 29 9) Utility .............................................................................................................................. 29 a) Zero offset Calibration ............................................................................................... 30 b) Auto Setup.................................................................................................................. 30 c) Default Settings .......................................................................................................... 30 10) Help ............................................................................................................................ 30 a) Contents ..................................................................................................................... 30 b) About .......................................................................................................................... 30 20. Toolbar shortcut menu Icons ......................................................................... 30 1) Import from file .............................................................................................................. 30 2) Output to file .................................................................................................................. 30 3) Print ................................................................................................................................ 30 4) Math Functions .............................................................................................................. 31 5) Reference Waveform ..................................................................................................... 31 6) Fast Fourier Transform ................................................................................................... 31 7) Waveforms ..................................................................................................................... 31 a) Line ............................................................................................................................. 32 b) Dot .............................................................................................................................. 32 c) Render Normal ........................................................................................................... 32 d) Render phosphor........................................................................................................ 32 e) Colors ......................................................................................................................... 32 V1.0b19 2014/12/21 OPEN6022BE User Manual Page: 3 f) Intensity...................................................................................................................... 32 g) Phosphor Persistence ................................................................................................. 32 8) Grid ................................................................................................................................. 32 a) Turn Off/On ................................................................................................................ 32 b) Scale ........................................................................................................................... 32 c) Intensity...................................................................................................................... 32 9) Cursor ............................................................................................................................. 32 a) None ........................................................................................................................... 32 b) Interactive .................................................................................................................. 32 c) Lines ........................................................................................................................... 32 10) Start acquiring ............................................................................................................ 33 11) Stop acquiring ............................................................................................................ 33 12) Zoom in ...................................................................................................................... 33 13) Zoom out .................................................................................................................... 33 14) Reset Zoom ................................................................................................................ 33 15) Auto Setup.................................................................................................................. 33 16) Default Settings .......................................................................................................... 33 17) Full Screen .................................................................................................................. 33 18) Hide Toolbar ............................................................................................................... 34 19) Toggle Measure .......................................................................................................... 34 20) Toggle Controls .......................................................................................................... 34 21) About .......................................................................................................................... 34 21. Control Panel functions.................................................................................. 34 1) Horizontal Time base controls ....................................................................................... 34 a) Rotary Knob blue. ....................................................................................................... 34 b) Time/Div dropdown box. ........................................................................................... 34 c) Format. ....................................................................................................................... 34 2) Vertical (First Channel). .................................................................................................. 35 a) Enabled box. ............................................................................................................... 35 b) Dropdown box............................................................................................................ 35 c) Rotary Knob yellow. ................................................................................................... 35 d) Volt/Div dropdown box .............................................................................................. 35 e) Probe .......................................................................................................................... 35 f) AC Couple ................................................................................................................... 35 g) Invert .......................................................................................................................... 35 3) Vertical (Second Channel). ............................................................................................. 35 a) Enabled box. ............................................................................................................... 35 b) Dropdown box............................................................................................................ 35 c) Rotary knob green. ..................................................................................................... 36 d) Volt/Div dropdown box. ............................................................................................. 36 e) Probe. ......................................................................................................................... 36 V1.0b19 2014/12/21 OPEN6022BE User Manual Page: 4 f) AC Couple. .................................................................................................................. 36 g) Invert. ......................................................................................................................... 36 4) Trigger Dropdown boxes. ............................................................................................... 36 a) Trigger level. ............................................................................................................... 36 b) Trigger mode. ............................................................................................................. 36 c) Trigger Sweep............................................................................................................. 36 d) Trigger Source. ........................................................................................................... 37 e) Trigger Slope. ............................................................................................................. 37 22. Common Terms Explained ............................................................................. 38 1) Bandwidth ...................................................................................................................... 38 2) Sample Rate ................................................................................................................... 38 3) Frequency and Period .................................................................................................... 38 4) Voltage ........................................................................................................................... 38 5) Phase .............................................................................................................................. 38 6) Rise Time ........................................................................................................................ 38 7) Vertical Sensitivity .......................................................................................................... 38 8) Sweep Speed .................................................................................................................. 39 9) Gain Accuracy ................................................................................................................. 39 10) Time Base or Horizontal Accuracy.............................................................................. 39 11) Triggering ................................................................................................................... 39 12) ADC Resolution (Or Vertical Resolution) .................................................................... 39 13) FFT .............................................................................................................................. 39 14) Record Length ............................................................................................................ 39 15) Probes ........................................................................................................................ 40 23. Application Examples:.................................................................................... 42 1) Basic Measurement Technique: ..................................................................................... 42 2) Simple Measurement: .................................................................................................... 42 3) Capturing a Single-Shot Signal: ...................................................................................... 43 4) X-Y Application: .............................................................................................................. 44 5) Taking Cursor Measurements: ....................................................................................... 46 6) Automotive Tests and Measurements: .......................................................................... 47 7) Some 6022 Peculiarities: ................................................................................................ 47 24. Appendix: ...................................................................................................... 54 Appendix A: Specifications for Hardware Hantek 6022BE Oscilloscope ................................ 54 Appendix B: Specifications for Software OPEN6022BE Application ...................................... 54 Appendix C: General Maintenance ........................................................................................ 56 Notes: ..................................................................................................................................... 57 V1.0b19 2014/12/21 OPEN6022BE User Manual Page: 5 V1.0b19 2014/12/21 OPEN6022BE User Manual Page: 6 1. This Manual: This manual has been compiled to support the free OPEN6022BE software for the Hantek 6022BE Digital Storage Oscilloscope. Some contents are extracts from the original Hantek manual as well as input from forum members on the www.eeblog.com website and other general Internet sources. Here you can find a thread dedicated to the Hantek 6022BE DSO; http://www.eevblog.com/forum/testgear/hantek-6022be-20mhz-usb-dso/. Quite a substantial number of additional features and enhancements have been added, that makes this oscilloscope a much more user friendly tool, thanks to Richard Krupskis’ initiative and his hard work. This is a live document which can be updated and changed as the software is improved. 2. General Safety: Read the following safety precautions carefully before operating the DSO to avoid any personal injuries or damage to the device itself or any other devices connected to it. To avoid potential hazards use the DSO only as specified by the supplier. The information below is to make the user aware of the hazards and danger and is not considered a complete and accurate guide for use in dangerous situations. The user should consult other sources for more detailed and complete information or should be trained in the correct usage thereof. Avoiding Fire or Personal Injury Do not use this device where the equipment will form a common ground to the mains power when connected for testing! Meaning the ground on the mains power plug is grounded to the device under test; The PC used to run this DSO also has the mains power grounded to its ground and the USB port ground; The DSO powered by a separate power supply with its own ground now connected in common to the PC via the USB connection. Ensure that your mains supply is safe and has a recently tested good ground and that the approved ground leakage units are fitted that have also been tested recently. Also note that the AC mains power neutral is actually connected to ground on the supply side, but a potential difference could exist between your mains ground and the neutral. * Some AC to DC adapters which do not test any continuity between the AC input and the DC output, used to power the DSO may cause the DSO PC drivers to fail immediately when connecting the ground clip of the probe to another device powered also powered by an “isolated” AC adaptor with the DSO connected to a Desktop PC instead of a laptop running on batteries. Note: Removing the oscilloscope grounding connections, either by using a two-pronged plug or using an isolation transformer to power the scope is dangerous practice. The whole metal enclosure of the oscilloscope can be at line voltage when one connects the probe to AC circuitry under test. The safest method is to connect the circuit one wants to test, i.e." a switching power supply" via a 1:1 isolation transformer and use the oscilloscope as normal, with its earth lead connection intact. This does not really reduce the danger as the device under test now has a floating ground and that metal part can be dangerous if touched! Better is to run the device under test from batteries if possible in any way. When working with high voltages there is always a high level of danger involved, either electrocution or blowing up equipment if the proper steps are not followed. The following are listed as the various methods that can be used with caution and prior knowledge, some are safer than other: o A mains isolating transformer to power the device under test or o Powering the device under test by batteries or V1.0b19 2014/12/21 OPEN6022BE User Manual Page: 7 o o A laptop running on batteries. (Not connected to AC adapter) or A laptop and AC adapter with isolated ground (*Ground lead not connected to secondary ground*) or o A USB isolator (it has opto-isolators for data and an isolated DC-DC for power) Connect and disconnect properly. Do not connect or disconnect probes or test leads while they are connected to a voltage source. Connect the probe to the oscilloscope before connecting the probe to the circuit under test. Disconnect the probe input and the probe reference lead from the circuit under test before disconnecting the probe from the oscilloscope. Observe all maximum ratings. To avoid fire, shock hazard, or damage to equipment, observe all ratings and markings on the product. Consult the oscilloscope manual for further rating information before making connections to the oscilloscope. Use proper probes. To avoid shock hazard, use the correctly rated probe for your measurement. Avoid exposure to circuit or wires. Do not touch exposed connections and components when power is on. Do not operate with suspected failures. If suspected damage occurs to the device, have it inspected by qualified service personnel before further use. Provide proper ventilation. Refer to the installation instructions for proper ventilation of the oscilloscope. Do not operate in wet/damp Conditions. Do not operate in an explosive/inflammable area. Keep device surfaces clean and dry. 3. Overview: This oscilloscope is small, lightweight, portable, requires no external power and uses a PC for displaying the test results. It is ideal for production testing, R&D, education, training, applications involving analog circuit testing and troubleshooting. This is a basic, affordable device, focused on low end use. Typical DSO: Replace this with a better picture if someone else can help. 4. PC System Requirements: Minimum PC System Requirements Laptop or Desktop PC with USB port Operating System - Windows XP/Vista/7/8 V1.0b19 2014/12/21 OPEN6022BE User Manual Page: 8 Processor – 1 GHz Memory – 128 MB Disk Space – 500 MB disk free space Screen resolution - 800 x 600 5. General Features Dual channel; Maximum real-time sample rate: 48MSa/s; Memory depth: 1Mbyte/channel (PC memory); Built-in Fast Fourier Transform function (FFT); 20 Selectable Automatic measurements; Automatic cursor tracking measurements; Waveform storage on PC; User selectable fast offset calibration; Mathematical functions, Add, Subtract, Multiply and Division; Adjustable waveform intensity & colors, more effective waveform view; User interface in several user-selectable languages; 6. General Check: Please inspect the instrument after unpacking for the first time: Check the shipping container for damage: Keep the damaged shipping container or padding material until the contents of the shipment have been checked for completeness and the instrument has been checked mechanically and electrically. Check the accessories: Accessories supplied with the instrument are listed in "Accessories" in this guide. If the contents are incomplete or damaged, please contact the seller. Check the instrument: In case there is any mechanical damage or defect, or the instrument does not operate properly or fails performance tests, please notify the seller. 7. Accessories: Two Passive Probes 10:1 (Included). USB Cable (Included). CD with Software, drivers and user manual (Included). Probes 100:1 (Optional). Laptop or Notebook (Not Included). Current Clamp (Optional). Variable DDS or Waveform Generator (Optional). V1.0b19 2014/12/21 OPEN6022BE User Manual Page: 9 8. Connections and Indications: On the rear panel there are 2 connectors: 1. The USB port for connection to a PC (for standard male type B USB cable) 2. The USBXI ™ port for connection to other Hantek devices This port is described by Hantek as a “Standard USBXI™ interface, easily inserts into USBXI™ housing to make up a combination instrument”. Hantek has not implemented the use of this connector it seems, and has not made any additional information available. It is thus assumed that this is a proprietary Hantek connector port that will allow a Hantek device (i.e. Hantek 1025G Waveform Generator and others) to be connected to another Hantek device (i.e. Hantek 6022BE DSO) with a special Hantek interface cable. On the front panel you will see a red/green bi-color led, two BNC connectors and two hook lugs: 1. The bi-color led between the Ch1 BNC connector and the edge of the enclosure only has 3 states, off, flashing red or flashing green. No Indication: If no drivers are installed on PC, the led stays unlit when connected to the USB port. Red flashing: (DSO and PC not communicating) a. If drivers are already installed on the PC and DSO is connected to the USB port, but program is not running or b. when the program fails, due to timebase settings out of limit or c. when program shows red STOP in left top corner Green flashing: (DSO & PC is communicating) a. When the DSO is connected to the USB port and program is running or b. when program shows green WAIT in top left corner or c. when program shows green AUTO in top left corner or d. when program shows green Trig’D in top left corner 2. The two BNC connectors are for the Channel 1 & 2 probes. 3. The hook lug marked 1 KHz 2VP-P provides a fixed reference square wave for adjusting probe compensation. 4. The hook lug marked with the ground symbol is the common ground of the DSO, used to connect the ground clips to when adjusting probe compensation, as well as for calibration of the DSO. V1.0b19 2014/12/21 OPEN6022BE User Manual Page: 10 9. Installing Hantek6022BE Software: The latest Hantek6022be v1.0.4 software is available as of January 2014 and can be downloaded from www.hantek.com . You will need to register on the website to download the software, manual and drivers. This software is normally provided on a CD when purchasing the oscilloscope. When using the free OPEN6022BE software you will also need to install these Hantek drivers for it to work. While in Windows, insert the installation CD into the CD-ROM drive. 1. The installation should start up automatically. Otherwise in Windows Explorer, switch to the CD-ROM drive and run Setup.exe or run Setup.exe from your installation folder on your PC. 2. The software Installation will start. Click 'Next' to continue. 3. Choose a destination directory. Click 'Next' to continue. V1.0b19 2014/12/21 OPEN6022BE User Manual Page: 11 4. Check the setup information. Click Next to start the copying of files. 5. This Status dialog is displayed during the copying of files. 6. Updating Your System Configuration. 7. The installation is complete. 10. Driver Installation: 1. Connect the A-Type Black USB Plug of the USB cable to your PC’S USB port. If your USB port cannot provide enough current then the Red USB plug can be plugged to another USB port on the same PC. The red plug is only for additional power. 2. Connect the B-Type Plug of USB cable to USB port on the oscilloscope. 3. New hardware is found. 4. New hardware search wizard starts. V1.0b19 2014/12/21 OPEN6022BE User Manual Page: 12 5. New hardware search wizard starts to search for the driver. 6. New hardware wizard installs the “DRIVER”. 7. The wizard has finished installing the “DRIVER” V1.0b19 2014/12/21 OPEN6022BE User Manual Page: 13 8. New hardware is found. 9. Found new hardware Wizard. Select “Install the software automatically”. 10. New hardware wizard installs software and finishes new hardware search wizard. 11. Your new hardware is installed and ready to use. V1.0b19 2014/12/21 OPEN6022BE User Manual Page: 14 In Device Manager -> View –> Show Hidden Devices you will see both driver 1 and 2 installed, only driver 2 shows as connected to PC. Driver 1 silently installs the firmware to the device on boot and Driver 2 is for communication with the PC: 11. Installing OPEN6022BE Software: This method may change as the OPEN6022BE software is developed further. 1. Additionally you need to install the latest Hantek6022BE drivers for your Windows version as per previous point 9. If you already have the latest factory software working then the latest drivers are already installed. 2. Optionally create a new folder called “Open6022be” in your Program Files folder on the C drive. 3. Copy the compressed file Open6022BE_1_0_Binary.rar (or latest version) to this folder and extract the compressed files. Right click on Open6022BE.exe and select “Send to”. Click on “Desktop (create shortcut)” and a shortcut will be placed on your Desktop. 4. Run OPEN6022BE by clicking on this shortcut. 5. To uninstall just delete the folder and shortcut created above. 12. Probe Compensation Adjustment: Probe compensation adjustment should be performed whenever attaching a probe to any input channel for the first time, to match the characteristics of the probe to the channel input. From the “Probe” menu, select attenuation 1:10 for both channels. Set the switch to “X10” on both probes and connect them to CH1 and CH2 of the oscilloscope. Attach the probe tip to the Reference signal output lug on the front face of the Oscilloscope and the reference ground lug to the probe crocodile clip, select CH1 and CH2, and then press the “AUTO SET“ button in the menu of the toolbar to give the best display of the reference signal or set manually as required. V1.0b19 2014/12/21 OPEN6022BE User Manual Page: 15 Now check the shape of the displayed waveforms. Adjust each probe to give the best square wave as per the picture below. Correct Over compensated Under Compensated If necessary, use a non-metallic tool (usually supplied with the probe) to adjust the trimmer capacitor on the rear of the probe for the flattest square wave being displayed on the oscilloscope. Repeat if necessary. WARNING: To avoid electric shock while using the probe, ensure that the insulated cable is in good condition and does not touch the metallic portions of the probe while it is connected to a voltage source. 13. Functional Check: Perform this basic functional check to verify that your oscilloscope is operating correctly. The USB patch cord supplied with the oscilloscope has two connections on one end, one black and one red. The black one is a full USB cable, meaning it provides the connection to the PC as well as the 5V DC power for the oscilloscope to run on. The red USB plug is only wired for power and is used in a second USB port on your PC if the first (black) connection cannot provide enough current to run the oscilloscope. Usually this not needed on newer PC’s. Connect the oscilloscope Connect the A-Type connector on the USB cable to your PC’s USB port and the B-Type connector on the USB cable to the oscilloscope USB port. V1.0b19 2014/12/21 OPEN6022BE User Manual Page: 16 Input a signal to a channel on the oscilloscope: The oscilloscope is equipped with dual channels and has a built in signal generator that puts out a 2V P-P square wave at 1 KHz on an output lug on the front panel.. Input a signal in the following steps: Set the attenuation switch on the probe to 10X and connect the probe to the oscilloscope CH1 BNC signal input. Align the slot in the probe connector to the pins on the BNC connector of CH1 and insert, turn right to lock the probe connector in place. Set the CH1 probe attenuation of the oscilloscope to X10 on the PC. (The default is X1). Finally, attach the tip of probe to the 1 KHz output and the black crocodile clip to the Ground connector. (See photo above). A square wave will be displayed. (Approximately 1 kHz, 2V, peak- to- peak). Test CH2 in the same way by repeating steps 2 and 3. 14. Self-Calibration: The self-calibration routine lets you optimize the oscilloscope signal path for maximum measurement accuracy, with reference to the zero setting. You can run the routine at any time, but should also do so if the ambient temperature changes by 5°C or more. For accuracy, power on the oscilloscope and wait about twenty minutes to ensure it is warmed up before calibrating. Then access the Toolbar “Utility -> Calibrate” option and follow the directions on the screen. The software will remind you to connect both probes to the ground reference lug. The selfcalibration routine takes several minutes to complete, but does not give a completed message on the OEM software. The OPEN6022BE software will give you a task completed message immediately. 15. Limitations and things to be aware of: You need to recognize that this is actually a budget, low end, oscilloscope, which cannot be compared to high end devices or even be expected to deliver the same results. Here are some known shortcomings or limitations: V1.0b19 2014/12/21 OPEN6022BE User Manual Page: 17 a) The Hantek 6022BE does not have the Logic Analyzer built in and the PCB has spare positions without the components. The Hantek 6022BL has the Logic Analyzer installed, but only one of the two devices can be used at a time. b) The firmware is not situated on the PCB, but is loaded from the driver every time the oscilloscope is connected to the PC. c) The PCB does not have proper metal screening over the components although the board has been designed for screening cans to be fitted. These can be retrofitted to reduce noise. Base line noise is about 5mV in this state. d) Some users have inspected the device and have provided the following observations, which may be of interest to some. The key components are as follows: i. Microcontroller CY7C68013A-100AXC Cypress EZ-USB FX2LP USB 8/16 bit 16KB memory ii. EEPROM 24LC02 2048 bits (2K) iii. ADC (Analog to Digital Converter) AD9288BSTZ-40 Dual Channel with glued on heat-sink. iv. HRA Amplifiers 2 Analogue input channels. Each channel containing 2 cascaded 74HC4051, 5 pin 'HRA' amplifiers and a 3 pin fast switching dual rectifier A7 device. v. Regulator AMS1117 3V3. vi. There are positions on the PCB for a 16 channel Logic Analyzer, using another CY7C68013A-100AXC, 24LC02 and a SMSC USB2512A USB Hub. The complete unit can be purchased as the Hantek 6022BL which has the logic analyzer installed. vii. There is also a position for a 5V supply. Interestingly, the only components needed are a socket and a diode. There is no polyfuse in the external supply rail unlike the USB feed. The unpopulated components opposite the front end are for an alternate isolated supply for the front end. They are using an LTC3440 Buck regulator for the +5V and a classic 7660 Charge Pump for the -5V supply. The question remains, why is it there if they already have an isolated DC-DC supply (specifically a Mornsun A0505S-2W)? viii. The screening cans have not been fitted over the input amplifiers but the PCB has positions for such. This may explain some of the noise issues that are reported but it could be other factors as well. V1.0b19 2014/12/21 OPEN6022BE User Manual Page: 18 ix. x. xi. xii. xiii. xiv. xv. Noise level with no input checked on 20mV div range only 5-10mV noise and impulses could be seen. No physical AC coupling, but at least the user can add a capacitor himself to do this. At 50ms (1Mhz) it starts acquiring at full 1M samples (1,047,552 for each channel total 2x1047552) At 20ms (1Mhz) it is at 523264 samples each Channel At 10ms (1Mhz)= 523264 At 5ms (1Mhz)= 523264 At 1ms (1MHz) = 130048 At 100us (1Mhz) = 130048 At 20us (4Mhz) = 130048 At 10us (8Mhz) = 130048 At 5us (16Mhz) = 130048 At 2us (48Mhz) = 1016 Anything faster than 2us, it is still at 48MHz at 1016 samples each channel (2032 total). The A7 device is just two fast switching diodes, which breaks down at 100V and is used to protect the HRA input amplifier. Also take note that instead of your usual 1M ohm resistor and trimmer capacitor in parallel connected from input signal to ground we have the input signal going through a 909K resistor with the trimmer capacitor in parallel with it, then shunted to ground through a 100K resistor and an SMD capacitor in parallel. To the input, it looks like a 1M resistor to ground, but the signal is being tapped between 909K and 100K, then going to the first Op Amp. A 5V input signal in 1x mode is going to give a 500mV signal at the node between the 909K and 100K and at the ADC input. Anything more than 500mV will be clipped by the ADC. This would mean with the probe in 1x mode is going to be safe from overloading the input up to 35V. (As per specifications maximum input should not exceed +35V and -35V in 1x which is +350V and -350V in 10x mode). The actual input voltage is limited to a +- 5.0V signal. That means with a 1x probe, signals from -5V to +5V can be displayed; with a 10x probe -50V to +50V, with a 100X probe -500V to +500V and so forth. Clipping will occur if the voltage at the input exceeds 5V. With the proper probe you can thus measure higher voltages than 5V. V1.0b19 2014/12/21 OPEN6022BE User Manual Page: 19 Below is a picture showing the clipping when a signal with a peak to peak voltage of 11.5V is applied: xvi. xvii. xviii. Once nice thing about a schematic like this is it makes plain the fact that the 6022BE, unlike most scopes that have 3 or 4 decades of Sensitivity settings, has only one decade. I.e., 100mV/div to 1V/div. That's one area they saved money by compromising on (along with the limited sample rates, and no real triggering). [Normally, you see anywhere from 10 mV-5V/div, to 1 mV10V/div.] The settings below 100mV/div are just zoomed (e.g., like an Agilent with 4 mV/div claims 1 mV/div, by zooming). Since at that level, the FS range of the ADC is 1,024 mV, and it is 8-bits (256 levels), that means the LSB is 4 mV. So it's not surprising to see "noise" on the 20 mV/div setting, since in addition to real noise (that shielding and proper grounding can help minimize), the uncertainty present in the LSB will result in jitter of +/-4 mV, all by itself. Which becomes more visible the further in you zoom. With a USB scope, remember one very important thing: Your 6022BE scope shares a ground with the USB port, which means you share the ground with your computer, which means the monitor, which means... well, your dish washer, your refrigerator... May I suggest: To ensure isolation, use a laptop on battery, NO external monitor and NO wired network. Or an isolation transformer. Also see “Some 6022 Peculiarities” in the Application Examples section for more detail. V1.0b19 2014/12/21 OPEN6022BE User Manual Page: 20 Hantek OPEN6022BE User Interface, Menu & Control functions OPEN6022BE User Interface 1) 2) 3) 4) 5) 6) 7) 8) 9) 10) 11) 12) 13) 14) 15) 16) 17) 18) Icon to restore full screen to normal window. Main Menu Toolbar icons Zoom level (A better position for displaying zoom level could be an improvement) Scrolling waveforms Active trigger source name and position (voltage) of trigger. Hide Controls Horizontal Control voltage settings Vertical Control Ch1 timebase settings Vertical Control Ch2 timebase settings Trigger settings Trigger markers Displays Sample rate Measure output for each channel Ch1, CH2, Math and Reference. Displays the main time base setting Displays the CH1 and 2 trigger information of turned on channels. Displays the CH1 & CH2 information of turned on channels. The markers show the reference points of the displayed waveforms. If there is no marker, the channel is not displayed. 19) Measure results type select for each channel, Ch1, Ch2, Math and Reference. 20) Select Entire Capture or only Visible Capture of waveforms. 21) Select channel to set measure details 22) Hide the measure panel. Insert new picture here of final GUI with labels when software is complete 16. Demo Mode There are two ways to run Demo Mode: 1. If you run the software without any oscilloscope connected to the USB port, or the drivers are not installed, it will not detect the device and will offer to run in Demo Mode or, 2. you can also change from normal working mode to Demo Mode under the menu item Acquire at any time. To go back to normal working mode, open menu item Acquire, click Demo Mode and select “Exit Demo Mode”. In Demo Mode, inputs from the probes are ignored and you can select your own virtual inputs. You will be presented with a window in which you can select the type of waveforms and parameters. Once in Demo Mode most of the controls and menus can be used as normal to change and read the display. Demo Mode is an excellent tool to test any functions of the oscilloscope or even train someone to become familiar with its use. V1.0b19 2014/12/21 OPEN6022BE User Manual Page: 21 Up to 5 waveforms can be displayed at the same time. The picture above shows the 5 waveforms being displayed in Demo Mode. Yellow = Channel 1 waveform Green = Channel 2 waveform Grey = Reference waveform Violet = Math waveform Red = FFT waveform 17. GPS Function (used presently for lack of a better name) The “GPS” function shows a small popup box with two voltage levels when the cursor is first moved onto the graticule area and halted at any position, sort of giving the vertical coordinates of the cursor in volts. After the first automatic popup you need to left click anywhere on the screen to get a similar voltage reading which is then related to the new pointer position. These voltage readings again are related to the zero line of the two waveforms, which initially was a bit confusing to me. This only works for Ch1 & Ch2, not for Reference or Math sources. It can be quite handy as a quick measurement, but it could also be a bit annoying if you do not need it. There is no way to enable/disable this function as yet. We need to ask RichardK and other members what they think. A name for this function is also needed. 18. Waveform Context Area The “T” is the location of the trigger in the "Waveform Context" area above the waveform. To examine the waveform, you can drag or scroll the waveform in three different ways to view it, by using the mouse cursor. 1. Drag the T above the little triangular wave (fastest way to drag, very coarse) or 2. click and drag the Waveform itself (slower, less coarse) or 3. use Left and Right arrow keys (slowest, fine control). V1.0b19 2014/12/21 OPEN6022BE User Manual Page: 22 19. Toolbar menu items 1) File a) Import Load data from a saved file type *.bewf. b) Export Save data to a file on your PC, for CH1, CH2, Math, Reference and FFT as selected. You can export to the following formats: *.bewf (6022be Waveform data) *.txt (Text Waveform data) *.bmp (Bitmap Waveform Image) *.jpg/jpeg (JPEG Waveform Image) *.xls (Excel Waveform data) not available yet Currently exporting more than one channel (or source) is only supported for image exports. Richard will modify the data formats for exporting more than one source. Right now you have to export them separately. c) Print Click to print the waveform. You are presented with a clear preview, where you can select which waveforms, add a header name to the printout and add notes. You can change the waveform colors before clicking on Print. d) Exit Close the program. 2) View a) Toolbar Click to enable or disable the display of toolbar. b) Controls Click to enable or disable the display of right controls panel. c) Measure Click to enable or disable the display of left measure selection panel. d) Measure output Click to enable or disable the display of bottom measure results panel. e) Debug Information Click to enable or disable the display of debug information in left top corner. f) Full Screen Click to enable Full Screen display without any toolbars, controls, measure display or measure output. There are 3 ways to go back to the normal display: 1. Push the ESC key on your keyboard or 2. right click on the display and select Window Mode or 3. click the small top left hand icon and select Restore. The display becomes smaller, but no toolbars or controls are shown, you have to right click on the display and select Windows Mode to get your toolbar and controls back. 3) Channel a) CH1 i. Turn off Turns off the displayed waveform of Channel 1 as well as the CH1 voltage display in bottom left corner. ii. Volt/Div Select the voltage/division range for the displayed waveform. V1.0b19 2014/12/21 OPEN6022BE User Manual Page: 23 Voltage ranges available: 20mV, 50mV, 100mV, 200mV, 500mV, 1.00V, 2.00V, 5.00V, 10.00V iii. Probe Select the probe attenuation setting to match the setting on your probe. Probe settings available: 1X, 10X, 100X, 1000X, 10000X. iv. Reset Reset the displayed waveform to the Zero line position v. Invert Invert the displayed waveform of Channel 1. vi. Clear Clear the channel of any display that is not removed when the channel is turned off. b) CH2 i. Turn off Turns off the displayed waveform of Channel 2 as well as the CH2 voltage display in the bottom left corner. ii. Volt/Div Select the voltage/division range for the displayed waveform. Voltage ranges available: 20mV, 50mV, 100mV, 200mV, 500mV, 1.00V, 2.00V, 5.00V, 10.00V iii. Probe Select the probe attenuation setting to match the setting on your probe. Probe settings available: 1X, 10X, 100X, 1000X, 10000X. iv. Reset Reset the displayed waveform to the Zero line position. v. Invert Invert the displayed waveform of Channel 2. vi. Clear Clear the channel of any display that is not removed when the channel is turned off. c) Math Two waveforms are used to calculate and display a third waveform, by adding, subtracting, multiplying or dividing. i. Turn on Turns on and display the Math channel waveform. ii. Source A Select the first waveform A to be used in the calculation, either CH1, CH2 or Reference. iii. Source B Select the second waveform B to be used in the calculation, either CH1, CH2 or Reference. iv. Operate Select the Math function to be performed with the two waveforms A and B. Select one of; A + B, A – B, A x B, or A / B. v. Volt/Div Select the voltage/division range for the displayed waveform. Voltage ranges available: 20mV, 50mV, 100mV, 200mV, 500mV, 1.00V, 2.00V, 5.00V, 10.00V vi. Probe V1.0b19 2014/12/21 OPEN6022BE User Manual Page: 24 Select the probe attenuation setting to match the setting on your probe. Probe settings available: 1X, 10X, 100X, 1000X, 10000X. vii. Reset Reset the displayed waveform to the Zero position viii. Invert Invert the displayed waveform of the Math channel. ix. Clear Clear the channel of any display that is not removed when the channel is turned off. d) Reference i. Turn on Turn on the reference waveform display. ii. Volt/Div Select the voltage/division range for the displayed waveform. Voltage ranges available: 20mV, 50mV, 100mV, 200mV, 500mV, 1.00V, 2.00V, 5.00V, 10.00V. iii. Reset Reset the displayed waveform to the Zero position iv. Clear Clear the channel of any display that is not removed when the channel is turned off. v. Import To load a Reference Waveform go to Channels > Reference >Turn On. A new straight line signal (only if settings are None) in the Light Blue default color of the Reference Channel will be displayed. You need to set it up to your requirements: Go to Channel > Reference > Import. The Load Reference window opens and the tab From File gives you 3 choices: 1) The option to select Import From Waveform File which is a data file *.bewf from a saved location on your PC or media or 2) select From Function Generator (Static) or 3) select From Function Generator (Dynamic). i. Export Nothing happening. Not working yet. Example: If you want to display a reference waveform to compare to another waveform being measured. Under Import, Select e.g. From Function Generator (Static) Load Reference window opens the tab Function Generator which allows you to preselect the settings of your Reference Waveform. Function; dropdown box to select the waveform you want: None, Random, Square wave (Artificial), Square Wave (Pure), Sine Wave, Sawtooth, Ram or Triangle. Trigger off; dropdown box to select the trigger source: Channel 1, Channel 2, Math or Reference. Start Freq (kHz) Stop Freq (kHz) Max Voltage (V) Min Voltage (V) Duty Cycle (%) Vert Noise (mV) Horiz Noise (mV) Phase Offset (°) V1.0b19 2014/12/21 OPEN6022BE User Manual Page: 25 Now select Load and the reference waveform will be displayed. 4) Trigger You can drag the trigger marker to adjust the trigger level. The active trigger level will be displayed in the top right corner. a) Mode Select trigger mode. i. Edge Sets the trigger mode to Edge trigger b) Sweep Select sweep mode. i. Auto Auto mode causes the oscilloscope to sweep, even without a trigger. If no signal is present, a timer in the oscilloscope triggers the sweep. This ensures that the display will not disappear if the signal drops to small voltages. It is also the best mode to use if you are looking at many signals and do not want to bother setting the trigger each time. ii. Normal In normal mode the oscilloscope only sweeps if the input signal reaches the set trigger point. Otherwise on a digital oscilloscope it is frozen on the last acquired waveform. Normal mode can be disorienting since you may not see the signal at first if the level control is not adjusted correctly. Hence in normal mode, when trigger events are missing there is no new trace drawn or redrawn. iii. Single In one shot mode, the scan starts only once at first trigger event. After that, it must be manually restarted by using Acquire Start for another start event. So in single mode a trace is drawn just once at first trigger event and the length of scan time depends on time base setting. c) Source Select the trigger source, CH1, CH2, Math or Reference. d) Slope Select on which part of waveform to trigger, leading edge or trailing edge, aka Rise or Fall. 5) Horizontal Select Time/Division to display the waveform. The time base ranges of the oscilloscope are listed further on. The horizontal scan speed is from 4ns/div to 1 hour/div. The horizontal scale of the oscilloscope is used to take time measurements. These time measurements include measuring the period, pulse width, and timing of pulses. Once you know the period, and as frequency is the reciprocal of the period, the frequency is one divided by this period (f=1/Sec). Like voltage measurements, time measurements are more accurate when you adjust the portion of the signal to be measured to cover a large area of the screen. Taking time measurements along the center horizontal graticule line, which has smaller divisions, makes for more accurate time measurements or by using the cursors. a) Time/Div Time/Division ranges. i. nS ii. uS V1.0b19 2014/12/21 OPEN6022BE User Manual Page: 26 iii. iv. v. mS Min S b) Format Select format for display. i. YT Normal use for displaying waveforms. ii. XY (All) Displaying Lissajous patterns. You will see the complete display without the need for scrolling. iii. XY (Visible) Displaying Lissajous patterns. You may have to scroll to see any parts outside the display area. 6) Cursor The on-screen cursors let you take waveform measurements automatically on-screen, without having to count graticule marks. Basically, cursors are two horizontal lines for voltage measurements and two vertical lines for time measurements that you can move around the screen. A readout shows the voltage or time at their positions. a) None Click to remove all cursors. b) Interactive Click to activate and drag cursors to required points on the waveform and read, Time, Frequency and Voltage for each waveform on the left bottom part of screen. Click “None” as above to remove. c) Lines i. Enabled Click to enable the line cursor mode. ii. Source The cursor measurement results are displayed in the left bottom corner. You can measure any of the waveforms, but the color the results are displayed in will correspond with the color of the selected source in this menu for CH1, or CH2, or Math, or Reference. Not sure if this function has other features not working yet, if not, it should rather be renamed to “Source Color” or something better. iii. Cross Select Cross and on the waveform display, click on the first test point, hold in mouse button, a solid line will be placed vertically and horizontally at the first test point and a broken line will move as you drag the mouse pointer until you release it at the second test point. Time, Frequency and Voltage readings will be shown on the lower left of the screen. Click “None” as above to remove. iv. Vertical Select Vertical and on the waveform display, click on the first test point, hold in mouse button, a solid line will be placed vertically at the first test point and a broken line will move as you drag the mouse pointer until you release it at the second test point. Time and Frequency readings will be shown on the lower left of the screen. Click “None” as above to remove. v. Horizontal V1.0b19 2014/12/21 OPEN6022BE User Manual Page: 27 Select Horizontal and on the waveform display, click on the first test point, hold in mouse button, a solid line will be placed horizontally at the first test point and a broken line will move as you drag the mouse pointer until you release it at the second test point. Voltage readings will be shown on the lower left of the screen. Click “None” as above to remove. 7) Display a) Waveform i. Render a. Normal Select to switch off Render Phosphor. The way this is in the menu is causing confusion and members want the “Phosphor” to be changed to “Phosphor persistence”. b. Phosphor Select to enable Phosphor Persistence display. Suggestion: A simpler method would be to remove “Render” from the Display menu and rather couple On/Off to the existing “Phosphor Persistence” which is otherwise greyed out, thus also removing the greyed out function or step. ii. Type a. Line If selected the waveform will be displayed as solid lines. b. Dots If selected the waveform will be displayed as broken lines. iii. Colors Click this and select different colors for the waveforms on CH1, CH2, Math, Reference and XY channels. iv. Intensity Click and drag slider to adjust waveform brightness. v. Phosphor Persistence Click and adjust slider for required intensity and to blank out “shadows” or “ghost” lines in this mode. May need renaming to Phosphor Persistence Intensity? Phosphor persistence is the duration the phosphor on the inside of a CRT remains glowing, thus diffusing the edges of pictures and lines for a short period. Older TV sets and oscilloscopes using CRT’s suffered from this. A specific type of CRT was available with longer or shorter persistence periods. A digital phosphor persistence affect function is included that allows you to adjust this to get sharper and clearer waveform lines. The result may be slightly dimmer, but appear more stable and sharper. Quite useful when zooming a waveform. b) Grid i. Turn off/on Click to toggle display of main grid zero volt axis and center vertical axis. ii. Scale Click to toggle grid sub divisions on or off. Requires rename as scale may be confused with scaling or sizing. “Scale Toggle” or “Scale Off/On” or something better. iii. Intensity Click and adjust slider for required intensity. V1.0b19 2014/12/21 OPEN6022BE User Manual Page: 28 iv. Clear Clear option to clear the screen (good for Phosphor mode). 8) Acquire A digital oscilloscope has the ability to store waveforms for later viewing. There are two buttons in the toolbar that allow you to manually stop and start the acquisition process which allows you to analyze waveforms in your own time. If you want the oscilloscope to automatically stop acquiring after a complete acquisition or after one set of records has been turned into an envelope or average waveform, use the Single Shot feature which can be found in the dropdown box of Trigger Sweep in the Trigger controls. a) Start Manually start acquiring and displaying the signal, according to the trigger conditions previously set. b) Stop Manually stop acquiring. This is useful for “freezing” the most recently displayed signal on the screen. c) Zoom in Click to zoom in on the waveform. The zoom level is incremented with each click and displays the level next to the program name in the area above the toolbar. d) Zoom out Click to zoom out of the waveform. The zoom level is decremented with each click and displays the level next to the program name in the area above the toolbar. e) Zoom reset Click to reset the display to zero zoom. f) Interpolation Digital oscilloscopes use interpolation to display signals that are so fast that the oscilloscope can only collect a few sample points. Interpolation then "connects the dots." i. Step. Sample points are connected by drawing a horizontal line from the 1st sample point until the 2nd sample point occurs then a vertical line to this 2nd sample point forming a step and repeats this for all the sample points. ii. Linear interpolation. This simply connects sample points with straight lines. iii. Sin(x)/x. Or just called Sine interpolation which connects sample points with curves. Sin x over x interpolation is a mathematical process where points are calculated to fill in the time between the real samples. Using this process, a signal that is sampled only a few times in each cycle can be accurately displayed. g) Demo mode From here you can run the Demo Mode directly. Inputs from the probes are then ignored. If you select Demo Mode, you will be presented with a window in which you can select the type of waveforms and parameters. Once in Demo Mode most of the controls and menus can be used as normal to change the display. To go back to normal working mode, open menu item Acquire, click Demo Mode and select “Exit Demo Mode”. 9) Utility V1.0b19 2014/12/21 OPEN6022BE User Manual Page: 29 a) Zero offset Calibration You can calibrate the oscilloscope after it has been on for at least 20 minutes, to insure it has obtained it operating temperature. Both channels need to have probes set to X1 and connected to the ground lug on the front face panel. i. Import Calibration Data You can import saved calibration data by loading the saved file cal_data.becl. ii. Export Calibration Data You can export your calibration data by saving it in a file cal_data.becl. iii. Calibrate You can click Calibrate and the calibration function will run and give you a successful completion notice when completed. b) Auto Setup Once the probes are connected to an input signal and the Auto Setup button is clicked, the inputs are scanned and the proper Volt/Div and Time/Div settings for the best display are selected automatically for that input signal. c) Default Settings Click this button to go back to the factory settings. When you click the Default Settings in the Utility menu, the oscilloscope displays only CH1 and CH2 waveforms and removes all other waveforms. The oscilloscope is set up for normal operation when it is shipped from the factory and can be recalled at any time by the user. The Default Settings function does not reset the following settings: Language option or Date and Time. 10) Help a) Contents Contents and Index of help file not available yet b) About Software version and writer information. 20. Toolbar shortcut menu Icons 1) Import from file Load data from a saved file type *.bewf 2) Output to file Save data to a file on your PC, for CH1, CH2, Math, Reference and FFT as selected. You can export to the following formats: *.bewf (6022be Waveform data) *.txt (Text Waveform data) *.bmp (Bitmap Waveform Image) *.jpg/jpeg (JPEG Waveform Image) *.xls (Excel Waveform data) not available yet Currently exporting more than one channel (or source) is only supported for Image exports. Richard will modify the data formats for exporting more than one source Right now you have to export them separately. 3) Print Print the file. You get a clear preview and can select which waveforms, add a header name to the printout and add notes. You can change the waveform colors before clicking on Print. V1.0b19 2014/12/21 OPEN6022BE User Manual Page: 30 4) Math Functions Click the button to open the window to enable the Math function you want to use, add, subtract, multiply or divide, Source A & B can be CH1, CH2 or reference. 5) Reference Waveform Click the R menu button and the Load Reference window will be displayed with 2 tabs; From File and Function Generator. The tab From File gives you 3 choices: 1) The option to select Import From Waveform File which is a data file *.bewf from a saved location on your PC or media or 2) select From Function Generator (Static) or 3) select From Function Generator (Dynamic). Example: You want to display a reference waveform to compare to another waveform being measured. Select e.g. From Function Generator (Static) The Load Reference window opens the tab Function Generator which allows you to preselect the settings of your Reference Waveform. Function dropdown box to select the waveform you want: None, Random, Square wave (Artificial), Square Wave (Pure), Sine Wave, Sawtooth, Ram or Triangle. Trigger off dropdown box to select the trigger source: Channel 1, Channel 2, Math or Reference. Start Freq (kHz) Stop Freq (kHz) Max Voltage (V) Min Voltage (V) Duty Cycle (%) Vert Noise (mV) Horiz Noise (mV) Phase Offset (°) Now select Load and the reference waveform is displayed. 6) Fast Fourier Transform The Fast Fourier Transform (FFT) can be used to display the component frequencies in a signal. Consult the Internet for more information on this subject. Click the FFT menu button and the Fast Fourier Transform window will open. You can now select the settings for your FFT waveform. Source Select either Ch1, CH2, Math or Reference as the source. Volt/Div Select the Volt/Div scale 20mV, 50mV, 100mV, 200mV, 500mV, 1.00V, 2.00V or 5.00V. Render waveform as Native, Lines, Polyline or Polygon. Window Select window type; Rectangular, Hamming, Hann, Cosine, Lanczos, Bartlett, Triangular, Gauss, Bartlett Hann, Blackman Harris, Blackman Nuttal or Flattop. Frequency Bins Select amount of Bins to be used 256, 512, 1024, 2048, 4096, 8192 or 16384. Show Fundamentals Check this box to display the fundamentals. Begin Peak Threshold Click and hold up or down button for required setting. End Peak Threshold Click and hold up or down button for required setting. Position Drag slider to position the resulting waveform where you want it. Color Change the color from the default red of the resulting waveform. Scale in dB Check this box if the scale is to be displayed in dB. Now click the start button to compute and display the FFT waveform. 7) Waveforms V1.0b19 2014/12/21 OPEN6022BE User Manual Page: 31 a) Line If selected the waveform will be displayed as solid lines. b) Dot If selected the waveform will be displayed as broken lines. c) Render Normal Select to switch off Render Phosphor. d) Render phosphor Select to activate Phosphor Persistence. e) Colors Select colors of your choice for the different waveforms f) Intensity Click and adjust the slider as required for brightness of the waveform. g) Phosphor Persistence Click and adjust slider for required intensity and to blank out “shadows” or “ghost” lines in this mode. May need renaming to Phosphor Persistence Intensity? Phosphor persistence is the duration the phosphor on the inside of a CRT remains glowing, thus diffusing the edges of pictures and lines. Older TV sets and oscilloscopes using CRT’s suffered from this. A digital phosphor persistence affect function is included that allows you to adjust this to get sharper and clearer waveform lines, but it will be slightly dimmer as a result. Quite useful when zooming a waveform. 8) Grid a) Turn Off/On Click to toggle display of Grid. b) Scale Click to toggle grid sub divisions on or off. Requires rename as scale is confused with scaling or sizing. “Scale Toggle” or “Scale Off/On” or something better. c) Intensity Click and adjust slider for required intensity 9) Cursor The on-screen cursors let you take waveform measurements automatically on-screen, without having to count graticule marks. Basically, cursors are two horizontal lines for voltage measurements and two vertical lines for time measurements that you can move around the screen. A readout shows the voltage or time at their positions. a) None Click to remove all cursors. b) Interactive Click to activate and drag cursors to required points on waveform and read, Time, Frequency and Voltage on bottom part of screen. Click “None” as above to remove. c) Lines i. Enabled Click to enable the line cursor mode. ii. Source Select CH1, CH2, Math or Reference iii. Cross Select Cross and on the waveform display, click on the first test point, hold in mouse button, a solid line will be placed vertically and horizontally at the first test point and a broken line will move as you drag the mouse pointer until you release it at the second test point. V1.0b19 2014/12/21 OPEN6022BE User Manual Page: 32 Time, frequency and voltage readings will be shown on the lower left of the screen. Click “None” as above to remove. iv. Vertical Select Vertical and on the waveform display, click on the first test point, hold in mouse button, a solid line will be placed vertically at the first test point and a broken line will move as you drag the mouse pointer until you release it at the second test point. Time and frequency readings will be shown on the lower left of the screen. Click “None” as above to remove. v. Horizontal Select Cross and on the waveform display, click on the first test point, hold in mouse button, a solid line will be placed horizontally at the first test point and a broken line will move as you drag the mouse pointer until you release it at the second test point. Voltage readings will be shown on the lower left of the screen. Click “None” as above to remove. 10) Start acquiring Start acquiring and displaying the signal, according to the trigger conditions previously set. Restart Single Shot trigger event 11) Stop acquiring Stop acquiring. This is useful for “freezing” the most recently displayed signal on the screen. 12) Zoom in Click to zoom in. The zoom level is incremented with each click and displays the level next to the program name in the area above the toolbar. 13) Zoom out Click to zoom out. The zoom level is decremented with each click and displays level next to the program name in the area above the toolbar. 14) Reset Zoom Click to reset the display to zero zoom. 15) Auto Setup Once the probes are connected to an input signal and the Auto Setup button is clicked, the inputs are scanned and the proper Volt/Div and Time/Div settings for the best display are selected automatically for that input signal. This is a very useful feature and used by many. This feature should also be able to “reset” the DSO if it has failed and the red led is flashing – not sure if it is possible on the 6022BE. (RichardK is still implementing this) 16) Default Settings Click to go back to the factory settings. When you click the Default Settings, the oscilloscope displays the CH1 and CH2 waveforms and removes all other waveforms. The oscilloscope is set up for normal operation when it is shipped from the factory and can be recalled at any time by the user. The Default Settings function does not reset the Language option or Date and Time setting. 17) Full Screen Click to enable Full Screen display without any toolbars, controls, measure display or measure output. There are 3 ways to go back to the normal display: 1. Push the ESC key on your keyboard or V1.0b19 2014/12/21 OPEN6022BE User Manual Page: 33 2. right click on the display and select Window Mode or 3. click the small top left hand icon and select Restore. The display becomes smaller, but no toolbars or controls are shown, you have to right click on the display and select Windows Mode to get your toolbar and controls back. 18) Hide Toolbar Click to hide only the toolbar. Click View and select Toolbar if you want it back. 19) Toggle Measure Click this button to toggle the Measure selection panel open or closed. 20) Toggle Controls Click this button to toggle the Controls panel open or closed. 21) About Software version and writer information. 21. Control Panel functions The right hand panel contains all the control buttons, switches, rotary knobs and drop down boxes which emulate the older analogue oscilloscopes and also add extra functions. The three large rotary knobs are for setting the time base and voltage base ranges on two channels for the signals you want to display. There are six possible ways to select the range you need to display your input signal properly. Any one method as per your preference is good: 1. Click Autoset and the oscilloscope will automatically select the best setting for the best display of your waveform or 2. you can click the large rotary knob and then use the mouse scroll wheel to scroll through the ranges or 3. you can click the position the knob should turn to or 4. you can drag the knob around with the mouse pointer or 5. you can click the dropdown box and select the range you want to use or 6. you can select the Menu items, Channel or Horizontal and go to Time/Div or Volt/Div, then just select the range you want. X in right hand corner above controls. Click to close the right hand control panel. By going to toolbar menu View > Controls you can display the Control Panel again. 1) Horizontal Time base controls The horizontal time base has a range of 1.00nS per division to 5000 seconds per division. a) Rotary Knob blue. Turn, click, drag, scroll to correct range settings. b) Time/Div dropdown box. Ranges from 1.00nS to 5000 Seconds to select correct range setting. c) Format. The format dropdown box allows you to select. c. YT Normal use for displaying waveforms. d. XY (All) Displaying Lissajous patterns. You will see the complete display without the need for scrolling. e. XY (Visible) V1.0b19 2014/12/21 OPEN6022BE User Manual Page: 34 Displaying Lissajous patterns. You may have to scroll to see any parts outside the display area. 2) Vertical (First Channel). Top controls for first channel of oscilloscope a) Enabled box. Check to enable this Channel. b) Dropdown box. Select which waveform to display on the first Channel, either CH1, CH2, Math or Reference. c) Rotary Knob yellow. Turn, click, drag, scroll to correct settings. d) Volt/Div dropdown box Ranges from 20mV/Div to 10V /Div. e) Probe Select the probe attenuation setting to match the setting on your probe. Probe settings available: 1X, 10X, 100X, 1000X, 10000X. f) AC Couple If not checked = DC coupling in service. Displays both AC and DC voltage components. If checked = AC coupling in service. Displays only AC voltage component. The AC coupling on the OPEN6022BE is only software controlled. The Hantek 6022be device does not have a physical capacitor switched in/out in series with the input to block the DC voltage. For true AC coupling, with the added safety factor this brings about, it is advisable to use a separate physical capacitor. The value of this capacitor must be calculated w.r.t the frequency of the signal and have a voltage limit which is much higher than the signal being measured. Normally you will always use the scope with the input coupling set to DC. This will allow you to measure true DC voltages and also see any AC components that are present. DC coupling allows you to observe both DC and AC components. Usually you will only select AC coupling for a specific reason. If you have an AC component present on the DC signal, say a ripple, you will not be able to measure or see this ripple voltage separately. By selecting AC coupling you will now block and remove the DC voltage which allows you to properly view the AC component of the signal. AC coupling allows you to observe AC components only. g) Invert Check this box to invert the waveform display on the first channel. 3) Vertical (Second Channel). Top controls for second channel of oscilloscope. a) Enabled box. Check to enable this Channel. b) Dropdown box. Select which waveform to display on the second Channel either CH1, CH2, Math or Reference. V1.0b19 2014/12/21 OPEN6022BE User Manual Page: 35 c) Rotary knob green. Turn, click, drag, scroll to correct setting. d) Volt/Div dropdown box. Ranges from 20mV/Div division to 10V/Div. e) Probe. Select the probe attenuation setting to match the setting on your probe. Probe settings available: 1X, 10X, 100X, 1000X, 10000X. f) AC Couple. If small box not checked = DC coupling is in service. Displays both AC and DC voltage components. If small box checked = AC coupling is in service. Displays only AC voltage component. The user selectable AC coupling on the OPEN6022BE is only software controlled. The Hantek 6022be device does not have a physical capacitor switched in/out in series with the input to block the DC voltage. For true AC coupling, with the added safety factor this brings about, it is advisable to use a separate physical capacitor. The value of this capacitor must be calculated w.r.t the frequency of the signal and have a voltage limit which is much higher than the signal being measured. Normally you will always use the scope with the input coupling set to DC. This will allow you to measure true DC voltages and also see any AC voltage components that are present. DC coupling allows you to observe both DC and AC voltage components. Usually you will only select AC coupling for a specific reason. If you have an AC component present on the DC signal, say a ripple, you will not be able to measure or see this ripple voltage separately. By selecting AC coupling you will now block and remove the DC voltage which allows you to properly view the AC component of the signal. AC coupling allows you to observe AC voltage components only. g) Invert. Check this box to invert the waveform display on the second channel. 4) Trigger Dropdown boxes. a) Trigger level. The trigger level is set by using the right hand trigger markers on the screen display. Drag the marker to set a specific trigger position/ level of the rising or falling part of the waveform. The trigger levels will be shown in the left bottom corner as TR1 and TR2. The dropdown box for Trigger Slope is then used to select either rising or falling part of waveform to trigger. Use the dropdown boxes to set the different trigger settings for displaying the waveform. b) Trigger mode. Can only select Slope. c) Trigger Sweep. Select sweep mode. i. Auto Auto mode causes the oscilloscope to sweep, even without a trigger. If no signal is present, a timer in the oscilloscope triggers the sweep. This ensures that the display will not disappear if the signal drops to small voltages. It is also the best mode to use if you are looking at many signals and do not want to bother setting the trigger each time. ii. Normal V1.0b19 2014/12/21 OPEN6022BE User Manual Page: 36 In normal mode the oscilloscope only sweeps if the input signal reaches the set trigger point. Otherwise on a digital oscilloscope it is frozen on the last acquired waveform. Normal mode can be disorienting since you may not see the signal at first if the level control is not adjusted correctly. Hence in normal mode, when trigger events are missing there is no new redrawn trace. iii. Single In one shot mode, the scan starts only once at first trigger event. After that, it must be manually restarted by using Acquire Start for another start event. So in single mode a trace is drawn just once at first trigger event and the length of scan time depends on time base setting. d) Trigger Source. Select the specific trigger source you want to use CH1, CH2, Math or Reference. This selected source will then be the active trigger and will be displayed in the right hand top corner, together with the trigger level. e) Trigger Slope. Select the trigger slope you want to trigger at, Rising or Falling. V1.0b19 2014/12/21 OPEN6022BE User Manual Page: 37 22. Common Terms Explained 1) Bandwidth The bandwidth specification gives you the frequency range in which the oscilloscope accurately measures. As signal frequency increases, the capability of the oscilloscope to accurately respond decreases. By convention, the bandwidth tells you the frequency at which the displayed signal reduces to 70.7% of the applied sine wave signal. (This 70.7% point is referred to as the "-3 dB point," a term based on a logarithmic scale.) 2) Sample Rate On digital oscilloscopes, the sampling rate indicates how many samples per second the ADC or Vertical Resolution (and therefore the oscilloscope) can acquire. Maximum sample rates are usually given in megasamples per second (MS/s). The faster the oscilloscope can sample, the more accurately it can represent the fine details in a fast signal. The minimum sample rate may also be important if you need to look at slow changing signals over long periods of time. Typically, the sample rate changes when changes are made to the Time/div control to maintain a constant number of waveform points in the waveform record. 3) Frequency and Period A repeating signal repeats has a frequency. This frequency is measured in Hertz (Hz) and equals the number of times the signal repeats itself in one second (i.e. cycles per second). This repeating signal also has a period - this is the amount of time it takes the signal to complete one cycle. Period and frequency are reciprocals of each other, so that 1/period equals the frequency and 1/frequency equals the period. 4) Voltage Voltage is the amount of electric potential between two points in a circuit. One of these points is usually ground (zero volts) but is not always the case. You may want to measure the voltage from the maximum peak to the minimum peak of a waveform, referred to as the peak-to-peak voltage. The word amplitude commonly refers to the maximum voltage of a signal measured from ground or zero volts. Thus for example a waveform can have an amplitude of one volt and a peak-to-peak voltage of two volts. 5) Phase Phase is best described by looking at a sine wave. Sine waves are based on circular motion and a circle has 360 degrees. One cycle of a sine wave has 360 degrees in a straight line. Using degrees, you can refer to the phase angle of a sine wave when you want to describe how much of the period has elapsed. Phase shift describes the difference in timing between two otherwise similar signals. In following figure, the waveform labelled "A" is said to be 90° out of phase with the waveform labelled "B" since the waves reach similar points in their cycles exactly 1/4 of a cycle apart (360 degrees/4 = 90 degrees). Phase shifts are common in electronics. 6) Rise Time Rise time is another way of describing the useful frequency range of an oscilloscope. Rise time may be a more appropriate performance consideration when you expect to measure pulses and steps. An oscilloscope cannot accurately display pulses with rise times faster than the specified rise time of the oscilloscope. 7) Vertical Sensitivity The vertical sensitivity indicates how much the vertical amplifier can amplify a weak signal. Vertical sensitivity is usually given in millivolts (mV) per division. The smallest V1.0b19 2014/12/21 OPEN6022BE User Manual Page: 38 voltage a general purpose oscilloscope can detect is typically about 2 mV per vertical screen division. 8) Sweep Speed For analog oscilloscopes, this specification indicates how fast the trace can sweep across the screen, allowing you to see fine details. The fastest sweep speed of an oscilloscope is usually given in nanoseconds/div. 9) Gain Accuracy The gain accuracy indicates how accurately the vertical system attenuates or amplifies a signal. This is usually listed as a percentage error. 10) Time Base or Horizontal Accuracy The time base or horizontal accuracy indicates how accurately the horizontal system displays the timing of a signal. This is usually listed as a percentage error. 11) Triggering The trigger function is to stabilize the displayed waveform by synchronizing the horizontal sweep of the oscilloscope to the selected point of the trigger signal. Very similar to measuring the timing of a combustion engine with a strobe light. When displaying a waveform and no trigger is set or trigger level is outside the upper and lower peaks of the trigger source waveform, the displayed waveform will not be stable or stationary on the screen. On older analog CRT oscilloscopes it will roll in much the same way as an older analog TV with the horizontal hold not set correctly. By setting the trigger to a level (use trigger markers on right side of waveform)which is anywhere between the upper and lower peaks of the waveform and specifying the source where that trigger is being used in the trigger source dropdown box, the waveform will become stable thus stationary and easy to read. Trigger action will also stop the trace from starting, until a determined part of the waveform occurs. This will make each "sweep" of the display occur in exactly the same place and the display will appear to be stationary. The trigger level control is used to select that point of the waveform. 12) ADC Resolution (Or Vertical Resolution) The resolution, in bits, of the ADC (Analog to Digital Controller) and therefore the digital oscilloscope, indicates how precisely it can turn input analog voltages into digital values. Calculation techniques can improve the effective resolution. 13) FFT The Fast Fourier Transform (FFT) is simply a fast (computationally efficient) way to calculate the Discrete Fourier Transform (DFT). By making use of periodicities in the sines that are multiplied to do the transforms, the FFT greatly reduces the amount of calculation required. Functionally, the FFT decomposes the set of data to be transformed into a series of smaller data sets to be transformed. Then, it decomposes those smaller sets into even smaller sets. At each stage of processing, the results of the previous stage are combined in special way. Finally, it calculates the DFT of each small data set. For example: A FFT of size 32 is broken into 2 FFTs of size 16, which are broken into 4 FFTs of size 8, which are broken into 8 FFTs of size 4, which are broken into 16 FFTs of size 2. Calculating a DFT of size 2 is trivial. As you can see, to understand and use the FFT function it will be necessary to consult other sources for a proper insight and understanding. 14) Record Length V1.0b19 2014/12/21 OPEN6022BE User Manual Page: 39 The record length of a digital oscilloscope indicates how many waveform points the oscilloscope is able to acquire for one waveform record. Some digital oscilloscopes let you adjust the record length. The maximum record length depends on the amount of memory in your oscilloscope. Since the oscilloscope can only store a finite number of waveform points, there is a trade-off between record detail and record length. You can acquire either a detailed picture of a signal for a short period of time (the oscilloscope "fills up" on waveform points quickly) or a less detailed picture for a longer period of time. Some oscilloscopes let you add more memory to increase the record length for special applications. 15) Probes 1. 2. 3. 4. 5. 6. 7. 8. 9. 10. 11. Adjustment Tool Compensation Trimmer BNC Connector Ground Clip (Removable) Ground spring Probe tip IC insulating cap Insulating cap Retractable hook Attenuation switch Identification color rings Standard oscilloscope probes have a BNC connection to the oscilloscope and a probe with interchangeable testing tips and a ground strap with a crocodile clip. These probes could have a switch to change the attenuation to X1 or X10. Some probes have only a single attenuation i.e. X100 and can go up to X10000 for extra high voltage testing. However the 6022be Hantek should not be used for measuring extra high voltages, as it is not designed to do that from a point of safety. Theoretically it may work, but is not recommended. When setting the CH1 probe attenuation switch say to X10, then the same setting, X10, must be selected in the attenuation drop down box or menu. This is necessary as the 6022be Hantek oscilloscope cannot determine whether it is reading an attenuated signal or a straight signal. The probe may also have a compensation adjustment close to the BNC connector which is a trimmer to be adjusted with the supplied insulated tool. Ground spring: Here is an example for using the ground spring that is included with the probes V1.0b19 2014/12/21 OPEN6022BE User Manual Page: 40 There are various types of probes: Passive probes are used for general purpose work. They are fitted with resistor capacitor components to provide a specific testing function and can allow for distortion of the signal at certain frequencies. They usually have compensation adjustment, consisting of a small variable capacitor for the user to match the probe to the signal. Active probes consists of an amplifier built into the tip to amplify the signal. Active probes thus require a power source for their operation. They can be a FET probe or non FET probe and have very high impedance which does not “load” the device you are testing. Some active probes have a built in differential amplifier with two probe tips. Current probes enable you to directly observe and measure current waveforms. They are available for measuring both AC and DC current. They use clamps that clip around the wire carrying the current and could contain a transformer or a Hall Effect device which senses the magnetic field in the wire. This makes them unique since they are not connected in series with the circuit, thus causing little or no interference to the circuit. Auto ignition probes are a 10000:1 passive probes with an inductive capacitance sensor. These can be used to test combustion engine spark ignition secondary (HT) wave parameters for diagnosis of the engine ignition system. This allows comparison of the trigger pulse with the HT pulse to the spark plug. The probe clip does not connect directly to the spark plug, but is clipped around the high tension wire and picks up the induced signals. V1.0b19 2014/12/21 OPEN6022BE User Manual Page: 41 Differential Probes have a significant difference in that the probe tip has two inputs, a positive (or non-inverting) and a negative (or inverting) input and are like two probes in one. Instead of measuring a test point in relation to a ground point (like single-ended active probes), differential probes measure the difference in voltage of a test point in relation to another test point. The tradeoffs are that the probe is more bulky, is more expensive than two passive probes, less dynamic range and requires the use of an external power and control module. 23. Application Examples: 1) Basic Measurement Technique: Period (T) = 4 divisions x1 us/div = 4 us, Frequency =1/T = 250 kHz. V p-p = 6 divisions x 1 V/div = 6V p-p V max = +3 divisions x 1 V/div = +3 V V min = -3 divisions x 1 V/div = -3 V This picture will be updated once V Min works properly in demo mode. The frequency of a wave is the number of times per second that a waveform repeats its shape. We cannot directly measure the frequency on the oscilloscope, but we can measure a closely related parameter called “period”. The period of a wave is the amount of time it takes to complete one full cycle. As indicated in the image above, one cycle is completed in 4 horizontal grid divisions. As indicated in the bottom right of the screen, the time/div is set to 1us, so 4 divisions equals 4us (0.000004 seconds). Using the relationship frequency = 1/period, calculate the period of the signal to be 250000 cycles/second (or 250 kHz). 2) Simple Measurement: To acquire and display a signal, please do the steps as follows: Connect signal to CH1 by using probe The oscilloscope sets the vertical, horizontal, and triggers controls at the best status automatically if you click on Autoset. You can also adjust the controls to meet your measurements to optimize the waveform display. V1.0b19 2014/12/21 OPEN6022BE User Manual Page: 42 Click on View > Measure > Measure Output To measure the Frequency and Peak to Peak Voltage, you can do these steps as follows: See picture above. Check the Frequency box and, the frequency of the signal will be shown on the bottom of the waveform interface. Check the Peak to Peak button, the Peak to Peak Voltage of the signal will also display on the bottom of the waveform interface. To clear the measurement on the waveform interface, uncheck the related button in left panel. The results of measure display CH1, CH2, Math and Reference shows in Information output. 3) Capturing a Single-Shot Signal: In single-shot mode, the scope acquires and displays a single acquisition of consecutive samples determined by the memory depth and sample rate set on the oscilloscope. The user V1.0b19 2014/12/21 OPEN6022BE User Manual Page: 43 can scroll and zoom in to any event of interest in the scope acquisition after the scope captures a single trace. To capture a single event, it needs to gather some pre-test knowledge of the signal in order to set up the trigger level and slope correctly. For example, if the event is derived from 3.3V COMS logic, a trigger level of 1.2 or higher Volts should work on a rising edge. Do these steps as follows: Set the probe and the channel attenuations to X 10. Set up the trigger in the Trigger Menu, or in the Trigger Setting window. Adjust the Trigger Mode to Edge. Set the Trigger Sweep to Single. Set the Trigger Source to CH1. Set the Trigger Slope to “Rising” to select the rising edge. Adjust the Volts/Div and the time base in a proper range for the signal. Drag the trigger level sign on the waveform display screen to proper position. It’s usually a little higher above the normal level. When the trigger conditions are met, data appears on the display representing the data points that the oscilloscope obtained with one acquisition. 4) X-Y Application: The XY display format can be used to measure the phase relationship between two or more synchronous signals. This measurement technique involves inputting one signal into the vertical system as usual and then another signal into the horizontal system. This is called an XY measurement because both the X and Y axis are then tracing voltages. The waveform that results from this arrangement is called a Lissajous pattern pronounced LEE–sa–zhoo. The shape of the Lissajous pattern can tell you the phase difference and frequency ratio between the two signals. When looking at the patterns below, the first pattern top left, shows that the two waveforms are exactly in phase (0°) and the frequencies are exactly the same (1:1). The Lissajous patterns below give you an idea of the XY frequency ratio and the degrees phase shift between the two channels. This method is commonly used to compare the input signal of a device or circuit to the output of the same device or circuit and the pattern will show if any frequency or phase shift is taking place. Display a Lissajous pattern in Demo Mode Run OPEN6022BE in Demo Mode. It will automatically open the Demo Mode Options window where you can setup the CH1 and CH2 waveforms. V1.0b19 2014/12/21 OPEN6022BE User Manual Page: 44 Under Function select Sine Wave for both CH1 & CH2. Only a sine wave will produce these patterns. Leave Phase Offset at 0.0° on both channels. Close Demo Mode Options. In Controls on the right hand side open Format dropdown and select XY. A straight line slanting towards the right (Lissajous pattern) will show, which indicates both frequencies are the same thus 1:1 on CH1 & CH2 as there is no phase difference (0°). Open Demo Mode again. Now change any one channel to Phase Offset 90° and leave the other channel at 0°. The straight line will now take on the shape of a circle (Lissajous pattern). This shape indicates that the frequencies are the same for both CH1 & CH2, but the channels are 90° out of phase. If the Phase Offset is 90° and the frequencies of both channels are the same, the Lissajous pattern will be a full circle. Changing the Phase offset will allow you to display various patterns. Changing the frequencies and even the amplitude of the waveforms will change the pattern displayed. Replace this picture when vertical marker is in place by RichardK Do these steps as follows: You may have a device or circuit that may incorrectly or correctly receive a signal and output it with zero phase shift or a specified phase shift. Set the probe attenuation to “x10”. Set the switch to “x10” on the probes. Connect the CH1 probe to the input of the circuit, and connect the CH2 probe to the output of the circuit. Adjust the vertical scale and offset to display approximately the same amplitude signals on each channel. Select X-Y format at Horizontal window. The oscilloscope will display a Lissajous pattern representing the input and the output characteristics of the circuit. Adjust the scale and offset of the horizontal and vertical to a desirable waveform display. The following picture shows a typical example. Apply the Ellipse Method to observe the phase difference between the two channels. Signal in X-Y Format: Instruction of the Ellipse Method V1.0b19 2014/12/21 OPEN6022BE User Manual Page: 45 Sin6 = A/B or C/D, where 6 = phase shift (in degrees) between the two signals. From the formula above: 6 = ±arcsine (A/B) or ±arcsine (C/D) 6 must be in the range of (0-rr/2) or (3rr/2-2rr) if the main axis of the ellipse is between I and III quadrant. If the main axis is at II and IV quadrant, 6 must be in the range of (rr/2-rr) or (rr3rr/2). 5) Taking Cursor Measurements: Use the cursors to make time and amplitude measurements on a waveform quickly and accurately. Measure the Peak Frequency and the Amplitude/Voltage of a Sine Waveform Do these steps: Click “Cursor > Source”, select CH1, or CH2, or Math or Reference, which is the channel you want to measure. The cursor color will change to whatever color the chosen source is. If all or some of the channels are displayed you can close the other channels by selecting Channel > CH1 > Turn Off. This reduces clutter and is useful if you require the largest waveform on the full screen for precise measurement. You can now click Zoom to enlarge the waveform display if required Click Cursor > Lines > Enabled. Click Cursor > Lines > Cross Place the cursor on the starting point you want to start measuring from. Hold in the left mouse button, and the horizontal and vertical lines will appear. Drag the mouse button to the point you want to stop measuring. Release the left mouse button, the time period, frequency and voltage will be shown in the status bar. Below the Reference was selected, thus the curser lines and measuring results will be shown in the color of the Reference waveform, light blue, which stands out more. The cursor cross is placed at the start of the rise from the zero line and at the fall ending on the zero line for the vertical cursor lines and the horizontal cursor lines on the upper and lower peaks. Period = 998uS (theoretically this should be exactly 1000uS) Frequency = 1.002KHz (theoretically this should be exactly 1.000Khz) Voltage (P-P) = 4V (this is exactly correct) To get a very precise measurement may be hard due to the visual issue with the width of the displayed lines, but you can also open and use the Measure tool on the left side panel for more precise measurements. V1.0b19 2014/12/21 OPEN6022BE User Manual Page: 46 The cross curser allows you to measure both amplitude and frequency of a wave form. The vertical line cursor measures only period and frequency. The horizontal line cursor measures only amplitude. 6) Automotive Tests and Measurements: eevblog mrphyll is providing this chapter info. 7) Some 6022 Peculiarities: The following screenshots and explanation was put together by TomC who is a member and contributor on the http://www.eevblog.com forum This should provide some deeper insight into how the Hantek 6022BE actually functions. Do not forget that this is a budget device and it will be unfair to expect it to provide similar performance to the more expensive devices. TomC says: For the last few days I've been exploring some 6022 peculiarities related to the way that it displays signals that should span the full height of the graticule. The results depend on the V/Div setting and the baseline setting. What happens, in my opinion, is not always intuitive. So I decided to write down my explanation of this effects and to take screenshots of some of my experiments. This is my attempt at explaining what happens and why. This isn't all new material and many of you may already be familiar with it, but I found it helpful to have it all together. The 10 attached screenshots are experimental results obtained by scoping the output of my Function Generator. They are intended to help support the write-up. Note that the "Measurement Output" provided by the 6022 is incorrect in some of these screenshots, specifically #1, #2, #8, #9, #10. So pay attention to the file names, the actual scope settings, and read the displayed signal values yourself. V1.0b19 2014/12/21 OPEN6022BE User Manual Page: 47 #1 50mV-Div, 400mVpp, baseline inside 6 div off ctr #2 50mV-Div, 400mVpp, baseline outside 6 div off ctr #3 100mV-Div, 800mVpp, baseline inside 2ctr div V1.0b19 2014/12/21 OPEN6022BE User Manual Page: 48 #4 100mV-Div, 800mVpp, baseline outside 2ctr div #5 200mV-Div, 1.6Vpp, baseline inside 2ctr div #6 200mV-Div, 1.6Vpp, baseline outside 2ctr div V1.0b19 2014/12/21 OPEN6022BE User Manual Page: 49 #7 1V-Div, 8Vpp, baseline outside 2ctr div #8 2V-Div, 8Vpp, same setup as 1Vpp screenshot #9 5V-Div, 8Vpp, same setup as 1Vpp screenshot V1.0b19 2014/12/21 OPEN6022BE User Manual Page: 50 #10 10V-Div, 8Vpp, same setup as 1Vpp screenshot AD9288 Analog Input The analog input (AIN) range is approximately 1Vpp centered at AIN's bias voltage. This is called the FS range, which means “full scale” or “full span” range. The exact value of the FS range is 1024mVpp. The ADC's encoder will ignore the portion of input signals above +512mV or below -512mV relative to AIN's bias voltage. As a result, anything above or below these levels is absent (clipped off) at the encoder's output. AIN's bias voltage is set by a voltage divider that consists of a 28kΩ resistor connected to VD and a 12kΩ resistor connected to ground. The junction of these two resistors is connected to AIN. With VD = +3V, as it is in the 6022, the voltage at the junction is 0.9V. The input FET is protected from overdrive by the diodes connected across the resistors. The diode across the 28kΩ resistor is forward biased when the voltage at AIN is +3V plus the diode's voltage drop, the diode across the 12kΩ resistor is forward biased when the voltage at AIN is negative relative to ground an amount equivalent to the diode's voltage drop. Assuming a 0.6V voltage drop, the input signal's maximum swing would be limited to -0.6V through +3.6V. Keep in mind, however, that the ADC's encoder ignores any portion of the signal that is above +1.412V (0.9V + 0.512V), or below +0.388V (0.9V – 0.512V). AD9288 Resolution The AD9288 version used in the 6022 is 8 bits. With eight bits, the signal present at AIN can be encoded into one of 256 different values. Since only signal values of -512mV to +512mV relative to AIN's bias voltage are encoded, the minimum change in voltage at AIN required to change the encoded value is 1024 / 256 = 4mV. When a voltage change of this magnitude is detected at the ADC's input it causes the encoded value to increase/decrease by 1. This means that bit 1 of the 8 bit code will change V1.0b19 2014/12/21 OPEN6022BE User Manual Page: 51 state since it represents the least significant bit of the encoded value. To help identify its significance, this voltage value, which in this case is 4mV, is called the LSB voltage. The LSB voltage tells us the voltage resolution of an ADC. When the LSB voltage and the bit resolution are known the full scale (FS) range can be easily deduced if it's not known. For example, since the 6022's ADC has an 8 bit resolution (256 values) and a 4mV LSB, we can deduce the FS range as follows: FS range = 256 × 4mV = 1024mV ADC and Display Screen Interaction Depending on the scope's setup it's not always possible to utilize the entire graticule area (8 graticule divisions) to display the signal at AIN. With the baseline set at the center graticule line a signal swing at AIN from -400mV to +400mV (800mVpp) relative to the bias voltage would do the trick. If we set the baseline down to the next graticule line the swing required at AIN would be from -300mV to +500mV relative to the bias voltage. Moving the baseline any further down would require a swing exceeding +500mV in the positive direction causing the ADC's input range to be exceeded. As we know, signal levels above +512mV or below -512mV relative to the bias voltage are ignored by the ADC's encoder. For this reason, except for V/Div settings that zoom-in, full screen displays are only possible with baseline settings within the two center divisions of the graticule. Signals that require a baseline setting outside this range to fit in the screen will appear clipped, this is normal since part of the signal is ignored by the ADC's encoder. There are also some V/Div settings that zoom-out. In this case it isn't possible to obtain full screen displays even with the baseline set at the center of the screen. The reason is that although the ADC's FS range is 1024mV as usual, fewer than 8 graticule divisions are needed to display a signal of this amplitude. As a result, signals below the full screen range (8 graticule divisions) but above the FS range will appear clipped, this is normal since part of the signal is ignored by the ADC's encoder. The illustration below shows an example of this behavior. Here the signal amplitude is 11.5Vpp. However, at the ADC's input, the 2V/Div setting is electrically identical to a 1V/Div setting. In both cases the signal at the tip of the probe is divided by 10 before being applied to the ADC's input. As a result, a 10Vpp signal appears as a 1Vpp signal at the ADC's input. As we know, a signal above 1024mVpp will exceed the FS range, so an 11.5Vpp signal at the tip of the probe (1150mVpp at the ADC's input) will appear clipped. Although this is normal, it may be confusing to the user, since, in general, it would be reasonable to expect an 11.5Vpp signal to display properly within a 16Vpp full screen range. 6022 Attenuator The attenuator circuit (illustrated below) consists of an operational amplifier (U11/7) with switchable gain resistors. There are 4 possible gain levels which combined with zoom-in or zoom-out provide 9 different V/Div settings. The signal at the tip of a X1 probe is divided by V1.0b19 2014/12/21 OPEN6022BE User Manual Page: 52 10 by R27/17 and R31/21 before being applied to the attenuator's input. In the case of a X10 probe the division factor is 100 due to the additional 9MΩ resistor within the probe. The chart below the circuit diagram shows the characteristics of each V/Div setting. The highlighted settings don't use zoom-in or zoom-out. V/Div Setting X1 X10 Zoom Factor Ratio Attenuator Ratio Voltage Resolution X1 X10 Full Screen Screen Resolution Baseline Range AIN Vpp1 20mV 200mV 500% 5:1 x1 4mV 40mV .2div 21 div off center 0.16 50mV 500mV 200% 2:1 x1 4mV 40mV .08div 6 div off center 0.4 100mV 1V 100% 1:1 x1 4mV 40mV .04div 2 center div 0.8 200mV 2V 100% 1:1 x2 8mV 80mV .04div 2 center div 0.8 500mV 5V 100% 1:1 x5 20mV 200mV .04div 2 center div 0.8 1V 10V 100% 1:1 x10 40mV 400mV .04div 2 center div 0.8 2V 20V 50% 1:2 x10 40mV 400mV .02div full screen n/a 1.6* 5V 50V 20% 1:5 x10 40mV 400mV .008div full screen n/a 4* 10V 100V 10% 1:10 x10 40mV 400mV .004div full screen n/a 8* 1 The signal may or may not be centered at AIN's bias voltage depending on the baseline setting. *The signal exceeds the ADC's FS range of 1.024V even if centered at AIN's bias voltage. As a result, the displayed signals will appear clipped. In addition, the last 2 entries also exceed the limits imposed by the FET protection diodes even if centered at AIN's bias voltage. V1.0b19 2014/12/21 OPEN6022BE User Manual Page: 53 24. Appendix: Appendix A: Specifications for Hardware Hantek 6022BE Oscilloscope Hantek 6022be device Channels 2 Channels Bandwidth 20 MHz (-3dB) Cypress EZ-USB FX2LP USB Microcontroller (CY7C68013A-100AXC) Processor Memory Max. sample rate real-time Max. sample rate burst mode Max. sample rate continuous Max. Input Input protection Coupling Vertical resolution Interface Input Impedance Power Enclosure Dimensions 2048 bits 48 MSa/s 48 Msa/s 16 Msa/s +/- 5 V (Without external attenuation) 35 Vpk (DC + peak AC < 10kHz) DC and AC (AC coupling in software only) 8 bits/channel Universal Serial Bus (USB 2.0) 1 M ohm Powered from USB, no external power source required Anodized aluminum case with rubber protection ends. 200 x 120 x 35 (mm) Appendix B: Specifications for Software OPEN6022BE Application Gain range (Volt/Div) Range Offset level Offset increments DC accuracy Display mode Timebase range (Time/Div) Range Buffer Size V1.0b19 2014/12/21 Open6022be Software 1X Probe 20mV, 50mV, 100mV, 200mV, 500mV, 1.00V, 2.00V, 5.00V, 10.0V. 10X Probe 200mV, 500mV, 1.00V, 2.00V, 5.00V, 10.0V, 20V, 50V, 100.0V. 100X Probe 2.00V, 5.00V, 10.0V, 50.0V, 100V, 200V, 500V, 1000V. 1000X Probe 20.0V, 50.0V, 100V, 200V, 500V, 1.00kV, 2.00kV, 5.00kV, 10.0kV. 10000X Probe 200V, 500V, 1.00kV, 2.00kV, 5.00kV, 10.00kV, 20.0kV, 50.0kV, 100kV. 8 divisions on grid +/-4 divisions 0.02 div +/- 3% Y-T, X-Y Timebase 1ns, 2ns, 5ns, 10ns, 20ns, 50ns, 100ns, 200ns, 500ns, 1us, 2us, 5us, 10us, 20us, 50us, 100us, 200us, 500us, 1ms, 2ms, 5ms,10ms, 20ms, 50ms, 100ms, 200ms, 500ms, 1s, 2s, 5s, 10s, 20s, 50s, 100s, 200s, 500s, 1000s, 2000s, 5000s. 10 divisions on grid Maximum 1M samples (on PC memory) OPEN6022BE User Manual Page: 54 Type Mode Autoset Range Trigger level Settabillity Measurements Trigger Edge trigger: Rising edge, Falling edge Auto, Normal and Single shot Yes 8 divisions on grid +/-4 divisions 0.02 div increments Math 20 Selectable measurements: Vbase, Frequency, Period, Rise time (10%~90%), Fall time (10%~90%), Positive duty cycle, Negative duty cycle, Positive pulse width, Negative pulse width, Vmin, Vmax, Vp-p, Vtop, Vmid, Vrms, Vamp, Vmean, Cycle mean, Positive overshoot, Negative overshoot. Math Addition, Subtraction, Multiplication, Division FFT Rectangular, Hamming, Hann, Cosine, Lanczos, Bartlett, Triangular, Gauss, Bartlett Hann, Blackman, Nuttal, Blackman Harris, Blackman Nuttal, Flattop. V1.0b19 2014/12/21 OPEN6022BE User Manual Page: 55 Appendix C: General Maintenance General Care Do not store or leave the oscilloscope where the device will be exposed to direct sunlight or moisture for long periods of time. Caution To avoid damage to the device or probes, do not expose them to sprays, liquids or solvents. To avoid damage to the surface of the device or probes do not use any abrasive or chemical cleaning agents. Inspection Inspect the device and probes as often as operating conditions require, for damage. Make sure the device is disconnected from all power sources. Cleaning To clean the exterior surface, perform the following steps: Remove loose dust on the outside of the oscilloscope and probes with a lint-free cloth. Use a soft cloth dampened with water to clean the device, while taking care that water does not enter the enclosure cooling openings. V1.0b19 2014/12/21 OPEN6022BE User Manual Page: 56 Notes: ………………………………………………………………………………………………………………………………………………… ………………………………………………………………………………………………………………………………………………… ………………………………………………………………………………………………………………………………………………… ………………………………………………………………………………………………………………………………………………… ………………………………………………………………………………………………………………………………………………… ………………………………………………………………………………………………………………………………………………… ………………………………………………………………………………………………………………………………………………… ………………………………………………………………………………………………………………………………………………… ………………………………………………………………………………………………………………………………………………… ………………………………………………………………………………………………………………………………………………… ………………………………………………………………………………………………………………………………………………… ………………………………………………………………………………………………………………………………………………… ………………………………………………………………………………………………………………………………………………… ………………………………………………………………………………………………………………………………………………… ………………………………………………………………………………………………………………………………………………… ………………………………………………………………………………………………………………………………………………… ………………………………………………………………………………………………………………………………………………… ………………………………………………………………………………………………………………………………………………… ………………………………………………………………………………………………………………………………………………… ………………………………………………………………………………………………………………………………………………… ………………………………………………………………………………………………………………………………………………… ………………………………………………………………………………………………………………………………………………… ………………………………………………………………………………………………………………………………………………… ………………………………………………………………………………………………………………………………………………… ………………………………………………………………………………………………………………………………………………… ………………………………………………………………………………………………………………………………………………… V1.0b19 2014/12/21 OPEN6022BE User Manual Page: 57