1
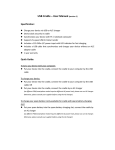
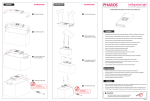
iGPS-BT User Manual
FCC Notices
This device complies with Part 15(b and c) of the FCC Rules. Operation is subject to
the following conditions:
•
•
This device may not cause harmful interference.
This device must accept any interference received, including interference that
may cause undesired operation.
CAUTION: Change or modification not expressly approved by the party responsible
for compliance could void the user’s authority to operate this equipment.
Class B
This equipment has been tested and found to comply with the limits for a Class B
digital device pursuant to Part 15 of the FCC Rules. These limits are designed to
provide reasonable protection against harmful interference in a residential installation.
This equipment generates, uses, and can radiate radio frequency energy and, if not
installed and used in accordance with the manufacturer’s instruction manual, may
cause interference with radio communications. However, there is no guarantee that
interference will not occur in a particular installation. If this equipment does cause
harmful interference to radio or television reception, which can be determined by
turning the equipment off and on, you are encouraged to try to correct the
interference by one or more of the following measures:
•
•
•
•
Reorient or relocate the receiving antenna.
Increase the separation between the equipment and the receiver.
Connect the equipment into an outlet on a circuit different from that to which
the receiver is connected.
Consult the dealer or an experienced radio/television technician for help.
FCC ID# Q7M-IGPS-BT
CE Notices
This device has been tested and found to comply with CE marking according to the
R&TTE Directive, 99/5/EEC. The test standards are listed below:
CE/LVD
CE/EMC
Radio Spectrum
EN60950: 1992+A1+A2+A3+A4+A11
EN301 489-17 V 1.1.1: 09-2000
EN301 489-1 V 1.3.1: 09-2001
EN300 328-1 V 1.3.1: 12-2001
EN300 328-2 V 1.2.1: 12-2001
1
I.
iGPS-360 Receiver and Bluetooth Dock
iGPS-BT
Dock
iGPS-360
Receiver
Power
Jack
On/Off
Switch
Bluetooth Status
Indicator
(Internal Blue LED)
Power Jack
-
Plug either the AC battery charger (optional, in PXT02) or the DC
charging adapter (included) into the Power Jack to charge the battery.
Refer to III. Battery charging instructions.
iGPS-BT will need to be charged for approximately 2-3 hours before
initial use.
On/Off Switch
-
Turns the iGPS-BT on or off. Blue LED’s will light up when powered.
Bluetooth Status Indicator (Internal Blue LED)
-
Blinking: Searching for Bluetooth signal
Steady: Bluetooth communication established, ready to use.
2
II. iGPS-BT Setup
1. The iGPS-BT will need to be charged for two to three hours before initial
use.
2. Turn on the iGPS-BT. The status indicator will blink as it searches for a
Bluetooth connection.
3. Launch the Bluetooth configuration software on your mobile device. (This
should be provided by the manufacturer of your Bluetooth device)
4. Have the Bluetooth configuration software search for any Bluetooth
devices present. It should detect the iGPS-BT and list it as an available
device (a “Pharos iGPS-BT” icon should be displayed).
5. Select the “Pharos iGPS-BT” device. Depending on your Bluetooth
software, this should bring up a screen that will ask for a PIN Code or
Security PIN. Enter the following PIN code:
IMPORTANT
PIN Code: 12345678
(Please memorize this code for future use)
6. After the PIN number is entered, a connection between your mobile device
and the iGPS-BT should be established. The blue LED on the iGPS-BT
dock will change from blinking to a steady glow.
7. Once a connection is established, check the properties of the iGPS-BT in
the Bluetooth configuration software and make a note as to what number
COM port is assigned to it. The navigation software that will be used will
require this COM port number.
For more information regarding the iGPS-BT setup, please visit our
Support Æ Product Support Æ Bluetooth Setup page at
www.pharosgps.com.
Hints & Tips
•
•
•
GPS receiver must have a direct view to the sky. GPS receiver does
not work indoors.
If possible, make sure the GPS is stationary when getting the initial
satellite position lock. Allow 1-2 minutes at initial start-up for the GPS
receiver to acquire a satellite lock for tracking.
Make sure that the communication (COM) port is configured correctly
in the navigation software being used to ensure proper functioning of
the GPS system.
3
III. Battery charging instructions
The Pharos Bluetooth Dock (BT Dock) for the GPS receiver includes a
rechargeable and replaceable Li-Polymer battery. The optional Power
Accessory Kit (PXT02), which contains a spare battery, battery charging
holder, and an AC battery charger can be purchased from Pharos. Below are
four possible ways to charge the battery.
A. Charging the battery at home with AC battery charger:
1. Charging the battery in the BT Dock with or without GPS receiver
Plug the DC plug of the AC
charger (optional) into the DC
jack on the BT Dock then plug
the AC charger into the AC
outlet. When the LED indicator
turns green, the battery is fully
charged.
2. Charging a spare battery in the battery charging holder (in PXT02)
Plug the DC plug of the AC
charger into the DC jack on the
battery charging holder (make
sure the battery is properly
placed in the holder) then plug
the AC charger into the AC
outlet. When the LED indicator
turns green, the battery is fully
charged.
4
B. Charging the battery in the car (or at home) with DC charging
adapter:
3. Charging battery while using the BT GPS in the car
Plug the DC plug from the DC
charging adapter into the DC
jack on the BT Dock then make
sure the car charge is on and is
connected to the DC charging
adapter. When the LED
indicator turns green, the
battery is fully charged.
Note: You can charge both PDA and iGPS-BT at home by plugging the
PDA AC charger (comes with your PDA) instead of the car charger into
the DC charging adapter.
4. Charging a spare battery in the battery charging holder (in PXT02)
in the car (or at home)
Plug the DC plug from the DC
charging adapter into the DC
jack on the battery charging
holder (make sure the battery is
properly placed in the holder)
then make sure the car charge
is on and is connected to the
DC charging adapter. When
the LED indicator turns green,
the battery is fully charged.
Note: You can charge both PDA and the spare battery at home by
plugging the PDA AC charger (comes with your PDA) instead of the
car charger into the DC charging adapter.
5
Battery Precautions (w: WARNING!)
1.w
2.
3.w
4.w
5.w
6.
7.w
8.w
Reverse charging is not acceptable.
Charge before use. The cells/batteries are delivered in an
uncharged state.
Do not charge/discharge with more than our specified current
(400mA).
Do not short circuit the cell/battery, permanent damage to the
cell/battery may result.
Do not incinerate or mutilate the cell/battery.
Do not solder directly to the cell/battery.
The life expectancy may be reduced if the cell/battery is subjected
to adverse conditions like: extreme temperature, deep cycling,
excessive overcharge, or over-discharge.
Store the cell/battery uncharged in a cool dry place. Always
discharge batteries before bulk storage or shipment.
Note: Please follow the instructions whenever you use or dispose of your
battery pack.
a.
b.
c.
d.
e.
f.
g.
Use provided charger only.
Do not incinerate the battery.
Do not disassemble or modify the battery.
Do not allow metal objects to contact or short circuit the battery
terminal.
Avoid exposure to excessive heat (> 60oC or 140℉), moist, or
caustic environments.
Stop using the battery whenever there are unusual conditions (for
example: deformed, discolor, peculiar smell, leakage, etc.)
Must be recycled or disposed of according to the local waste
disposal agency.
6
IV. iGPS-BT GPS Receiver Specifications
Performance
Chipset
Antenna
Frequency
Sensitivity
Channels
Acquisition time
Reacquisition
Position update
Accuracy
Electrical Power
Battery
Battery charger
Operation time
Interface
Connection
Protocol
Data rate
NMEA message
WAAS/EGNOS
Trickle power
Bluetooth spec
Physical
Dimension
Weight
Environmental
Operation temperature
Dynamics
SiRF StarIIe/LP
Integrated patch antenna
L1, 1575.42 MHz
-140 dBm (typical)
12 Channel all-in-view tracking
Cold Start: 60 sec
Warm Start: 40 sec
Hot Start: 5 sec
0.1 sec
1 Hz
Position: 10 meters 2D-RMS, SA off
Velocity: 0.1 meter/second, SA off
Time: 1 microsecond synchronized to GPS time
Datum: WGS-84
720mAh Li-Polymer rechargable/replaceable battery
AC battery charger optional, DC charging adapter
(works with car charger – in car or PDA AC
charger – at home) included. Constant current
charging circuit included in both AC and DC battery
charger.
6 hours minimum continuous use with full charge
> 6 hours in trickle power mode
Communicate with Host Platform via
Bluetooth(Class2) Serial Profile
NMEA-0183 (V2.3) standard
4800 bps
GGA, GSA, GSV, and RMC
Programmable
Programmable
Frequency band: 2400-2483.5 MHz
Data rate: up to 721 Kbps
Security: data encryption up to 128-bits
Typical range: up to 32 feet (10 meters)
60 mm x 85 mm x 25 mm
85 grams
-20°C to 60°C (-4°F to 140°F)
Altitude < 20 km
Velocity < 900 km/h
Acceleration < 3g
Specifications are subject to change without prior notice.
7
V. Precautions
•
•
•
•
•
•
•
•
Position fixing may not be available when this receiver is used near highvoltage wire, electronics equipment that generates electrical noise, or
mobile phones in operation at 1.5 GHz. The noise from PDA or PC may
deteriorate the GPS receiver performance.
Note that some glass material containing metal, such as heat-ray
protection glass, screen out signals from GPS satellites.
GPS satellites are under the control of the U.S. Department of Defense.
Therefore, services provided for general consumers are subject to change
without prior notice. Pharos shall not be liable for any losses caused by
such changes.
Do not touch the connectors of the Bluetooth Dock with fingers or insert
foreign substances; otherwise, a failure may be caused.
Do not put this receiver at a place exposed to direct sunlight for a long
period of time; near heating equipment; a place that can become hot, or a
humid place, such as a bathroom.
Do not wet this receiver; otherwise a failure may be caused. If you use it
in the rain, fog, or snow, be careful not to wet it.
Do not drop this receiver, apply strong impact to it, or put it on a surface
that vibrates; otherwise a failure may be caused.
Use a soft cloth to wipe dirt off this receiver. If dirt is severe, dampen a
soft cloth with diluted neutral detergent, securely wring it out, and wipe off
the dirt. Do not use a spray-type detergent; highly volatile solvent, such
thinner and benzene; or a chemical cloth. Otherwise, deformation or
discoloration may be caused.
VI. Package contents
PT200:
Bluetooth Pocket iGPS NavigatorTM
iGPS-360 receiver
iGPS-BT Dock with Li-Polymer battery
DC charging adapter
Car charger for PDA
Vent mounted PDA Holder
Ostia Software and street level maps
Travel carrying case
Belt case
PT100:
Bluetooth iGPS Receiver
iGPS-360 receiver
iGPS-BT Dock with Li-Polymer battery
AC battery charger
Belt case
Note: Contents may vary- see the box cover or contents list.
Note: New products may not be listed here.
8
VII. Quick Start Guide for Ostia Navigation Software(included in PT200)
1. Install the Pharos Ostia & MapFinder Software
•
•
•
Insert the CD-ROM. If Auto-Run is enabled for your CD-ROM, the Setup
program will run automatically. If not, run the Setup program on the CD-ROM.
Select “Install Ostia” to install the navigation software to your Pocket PC and
follow the on-screen instructions.
Select “Install MapFinder” to install the map loading utility to your
Desktop/Laptop PC and follow the on-screen instructions.
SYNCHRONIZATION
CABLE
2. Install Map Data
•
•
•
•
•
•
•
Insert map CD, MapFinder will appear.
Type a city name or zip code in the search field, then click "Search“.
Double click on the appropriate result (to the right).
-OR- Double click sections directly on the map to select multiple maps.
Right click on the map to bring up the command menu and choose where you
want the maps to be transferred to.
You will have the option to copy the maps directly to your Pocket PC or to
your PC hard drive for later use.
If you choose to extract maps to your PC hard drive, you can use MapFinder
later to transfer the maps to your Pocket PC or Memory Card.
Installing Map
Data to Internal
Storage
Map
Data
Docking
Station
Installing Map
Data to
Memory Card
Memory
Card
Map
Data
PLEASE NOTE: IN EITHER CASE MAPS SHOULD RESIDE IN THE “\My
Documents” DIRECTORY OF THE POCKET PC OR MEMORY CARD.
MAPFINDER WILL AUTOMATICALLY CREATE THE “\My Documents”
FOLDER.
9
Create a Route Using the Pharos Pocket GPS Navigator
Start your vehicle in a safe area where as much of the open sky is in view (GPS
does not work indoors), then proceed with the following steps:
• On the PDA start running the Pharos Ostia program.
• Click “File” then “Open” and select the map(s) you want to use.
• In the “Find” menu, select your destination using “Recent Destination,”
“Contacts,” “Favorites,” “Address,” “Intersection,” or “Point of Interest.”
• Click the “Happy Face” icon then click “Yes” to Enable GPS.
• Wait approximately 60 seconds for a red arrow to appear indicating your
current position on the map.
• In the “Find” menu click “New Route” to calculate a route from your current
position to the selected destination. The calculated route will be highlighted
on the map in light blue.
• Start driving along the blue route with the advisory of the voice/sound
prompts and on-screen graphics.
• A “Favorite” can be used to find a specific Latitude and Longitude point on the
map which can then be used to find the nearest street that can be selected as
the Origin or Destination.
Additional Tips
•
•
•
•
If you should miss a turn or make a wrong turn, the voice prompt will inform
you that “You are off route.” Simply press the Pocket PC’s “Action Button”
(Refer to your PDA manual to identify the “Action Button”) to have a new
route calculated from your current position to the selected destination. To
have the program automatically generate a new route when you go off route,
access the “Tools”/”Options…” menu, and then check “Auto Re-route.”
Under “Tools"/”Options…,” check "Heading Up" to choose the vehicle’s
forward direction as the orientation of the map on the PDA display. This
option will display a compass in the bottom, right-hand corner of the map.
North up is the default map orientation.
In the “View” menu, click “GPS Info” to view Compass Information (Lat., Lon.,
Alt., Time, Speed, and Distance) about the current position of the iGPS
receiver.
In the “View” menu, click “Text Directions” to view turn-by-turn text directions
for your route with street names and distances between each.
Please refer to the Ostia User’s Manual for detailed instructions.
VIII. Troubleshooting
For any troubleshooting assistance, please check the Frequently Asked
Questions section at www.pharosgps.com.
10
IX. Warranty
The iGPS-BT Receiver is warranted by Pharos to the original purchaser to be free
from defects in material workmanship under normal use for a period of one year from
the date of purchase. During the warranty period, and upon proof of purchase, the
product will be repaired or replaced (with the same or a similar model) at Pharos'
option without charge for parts or labor. This warranty will not apply if the product
has been misused, abused, or altered.
To obtain warranty service, you must take or send the product, postage paid, with a
copy of your sales receipt or other proof of purchase and the date of purchase to
Pharos at 411 Amapola Avenue, Torrance, CA 90501, USA. Prior approval and
RMA number must be included for your warranty return to be accepted.
X. Return Policy
• Our goal is for every customer to be satisfied with each purchase, and we will
make every effort to resolve any issues you may have.
• All non-defective returns must be shipped with the original packaging with all
original components within the first 30 days from purchase. There is a 15%
restocking fee on all non-defective returns. Shipping charges are not refundable.
The customer is responsible for returning items to Pharos at their own expense.
• All defective returns for either repair or replacement will be processed and returned
to the customer within 3 business days of receipt. For items beyond the 1year
warranty, a repair charge of $35 to $50 or a replacement charge of $95 to $150 will
be due. For items sent to us after 90 days from purchase, an $8.50 shipping and
handling fee will be due upon completion of repair or replacement.
Every return, defective or not, MUST have prior written approval from Pharos. The
RMA number MUST be marked on the outside of the package otherwise it will be
rejected. The RMA form must also be included in the box with the customer's
information and reason for return. Proof of purchase must also be attached.
411 Amapola Avenue
Torrance, CA 90501
www.pharosgps.com
361-1010-01 rev. B
11