1
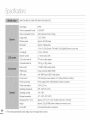
HMX-FgO/HMX-F91
HMX-F9OO/HMX-F910
HMX-F920
ImDO nt ¢ feCyincVuotion¢
DO NOT OPEN
CAUTION:
TO REDU©E THE RISK QF ELECTRIC SHQ©K,
DQ NOT REMQVE ©QVER (QR BA©K).
NQ USER-SERVI©EABLE
PARTS INSIDE
REFER SERVICING TQ QUALIFIED SERVICE PERSQNNEL
This symbol indicates that dangerous voltage consisting
electric shock is present within this unit.
a risk of
This symbol indicates that there are important operating and
maintenance instructions in the literature accompanying this unit.
To Reduce The Risk Of Fire Or Electric Shock, Do Not Expose This
Apparatus To Rain Or Moisture,
Apparatus shall not be exposed to dripping or splashing
objects filled with liquids, such as vases, shall be placed
apparatus. fo disconnect the apparatus from the mains,
must be pulled out from the mains socket, therefore the
shall be readily operable.
1
Read these instructions.
2
Keep these instructions.
3
Heed all warnings.
4
Follow all instructions.
and no
on the
the plug
mains plug
5
Do not use this apparatus
6
Clean only with dry cloth,
7
Do not block any ventilation openings, Install in accordance with
the manufacturer's instructions,
near water,
Do not install near any heat soumes such as radiators, heat
registers, stoves, or other apparatus (including amplifiers) that
produce heat.
Do not defeat the saf_ty purpose of the polarized or groundingtype plug. A polarized plug has two blades with one wider than
the other, A grounding type plug has two blades and a third
grounding prong. The wide blade or the third prong are provided
for your safety, if the provided plug does not fit into your outlet,
consult an electrician for replacement of the obsolete outlet,
10 Protect the power cord from being walked on or pinched
particularly at plugs, convenience receptacles, and the point
where they exit from the apparatus,
11 Only use attachment/accessories
specified by the manufacturer,
12 Use only with the cart, stand, tripod, bracket, or
table specified by the manufacturer, or sold with
the apparatus, When a cart is used, use caution
when moving the cart/apparatus combination to
avoid injury fromtip-over.
13 Unplug this apparatus during lightning storms or when unused
for long periods of time.
Impo_¢ant safety instR,sctions
14 Refer all servicing to qualified service personnel, Servicing is
required when the apparatus has been damaged in any way,
such as power--supply cord or plug is damaged, liquid has been
spilled or objects have falbn into the apparatus, the apparatus
has been exposed to rain or moisture, does not operate
normally, or has been dropped,
15 Apparatus shall not be exposed to dripping or splashing and no
objects filled with liquids, such as vases, shall be placed on the
apparatus,
16 VENTILAIION:
Slots and openings in the cabinet are provided for ventilation to
ensure reliabb operation of the CAMCORDER and to protect
it from overheating. These openings must not be blocked or
covered, Never place your CAMCORDER on a bed, sefa, rug, or
other similar surface: ors or near a radiator or heat register, This
CAMCORDER should not be placed in a bulk-in installation such
as a bookcase or rack urless proper ventilation is provided or
the manufacturer's instructions have been adhered to,
17 POWER SOURCES:
The CAMCORDER should be operated only from the type of
power source indicated ors the label, II you are not sure of the
type of power supply at your home, consult your appliance
dealer or local power corrlpany. A CAMCORDER is intended to
be operated from battery power, or other sources, ref_)r to the
operating instructions.
18 GROUNDING OR POLARIZATION:
This CAMCORDER may be equipped with either a polarized
2--wire AC line plug (a plug having one blade wider than the
other) or a 3--wire grounding type plug, a plug having a third
(grounding) pin, If you are unable to insert the plug Iully into the
outlet, try reversing the plug, If the plug still fails to fit, contact
your electrician to replace your outlet. Do not defeat the saf_)ty
purpose of the polarized plug,
19 POWER-CORD PROTECTION:
Power--supply cords should be routed so that they are not likely
to be walked ors or pinched by items placed upors or against
them, paying particular attention to cords or plugs, convenient
receptacles, and the point where they exit from the unit.
2O OUTDOOR ANTENNA GROUNDING:
CAMCORDER, be sure the antenna or cable system is grounded
to provide some protection against voltage surges and builtup static charges, Section 810 of the National Electrical Code,
AN SI/NFF_A,No, 70--1984, provides information with respect
to proper grounding of the mast and supporting structure,
grounding of the lead in wire and supporting structure,
grounding of the mast and supporting structure, grounding of
the lead-in wire to an antenna discharge unit, size of grounding
to conductors, location of arstenna-discharge unit, connection
to grounding electrodes and requirements for the grounding
ebctrode, See figure below,
Impo_¢ant safety instR,sctions
21 LIGHTNING:
For added protection of this CAMCORDER during a lightrling
storm or when it is left unattended and unused for long periods
of time, unplug it from the wall outlet and disconnect the antenna
or cable system. This will prevent damage to the CAMCORDER
due to lightning and powerline surges.
a.
When the power-supply
b.
If any liquid has been spilled onto, or objects
CAMCORDER.
c.
If the CAMCORDER
has been exposed
d.
If the CAMCORDER
does
operating
22 POWER LINES:
An outside antenna system should not be located in the vicinky
of overhead power lines or other ebctric light or power circuits
where it can fall into such power lines or circuits. When installing
an outside antenna system, exlreme care should be taken to
keep from touching such power lines or circuits as contact with
them might be fatal.
by the operating
controls
work
normal
e.
24 OBJECTS AND LIQUIDS:
Newer push objects of any kind into this CAMCORDER through
openings as they may touch dangerous voltage points or short
out a part that could result in a fire or electric shock. Never
spill liquids of any kind onto the CAMCORDER. Should spillage
occur, unplug unit and have it checked by a technician before
use,
25 SERVICING:
Do not attempt to service this CAMCORDER yourself. Opening
or removing covers may expose you to dangerous voltage or
other hazards. Ref_r all servicing to qualified service personnel.
26 DAMAGE REQUIRING SERVICE:
Unplug this CAMCORDER from the wall outlet and refer servicing
to qualified service personnel under the following conditions:
not operate
adjust
instructions,
improper
technician
into the
to rain or water.
normally
by following
only those controls
may result in damage
by a qualified
have fallen
the
that are covered
adjustment
of other
and will often require extensive
to restore
the CAMCORDER
to ks
operation.
If the CAMCORDER
has been dropped
or the cabinet
has been
damaged.
f.
23 OVERLOADING:
Do not overload wall outlets and extension cords as this cars
result in a risk of fire or electric shock.
instructions,
cord or plug is damaged.
When the CAMCORDER
performance,
this indicates
exhibits
a distinct
change
in
a need for service.
27 REPLACEMENT PARTS:
When replacement parts are required, be sure the service
technician has used replacement parts specified by the
manufacturer and having the same characteristics as the original
part. Unauthorized substitutions may result in fire, electric shock
or other hazards.
28 SAFELY/CHECK:
Upon compbtion of any service or repairs to this CAMCORDER,
ask the service tecl'wsician to perform safety checks to determine
that the CAMCORDER is in safe) operating order.
29 To prevent damage which may result in fire or shock h_ard,
not expose this appliance to rain or moisture.
do
30 If this power supply is used at 240V ac, a suitable plug adaptor
should be used.
Impo_¢ant safety instR,sctions
USER
INSTALLER
CAUTION:
Your authority to operate this FCC certified equipment could be voided if
you make changes or modifications not expressly approved by this party
responsible for compliance to part 15 FCC rules.
NOTE:
LAMP(S) INSIDE THIS PRODUCT CONTAIN MERCURY AND MUST BE
RFCYCLED OR DISPOSED OF ACCORDING TO LOCAL, STATE OR
FEDERAL LAWS. For details see lamprecycb.org,
Samsung
(7267864)
CALIFORNIA
eiae.org, or call 1-800-
USA ONLY
This Perchlorate warning applies only to primary CR (Manganese
Dioxide) Lithium coin cells in the product sold or distributed
ONLY in
California USA "Perchlorate
Material - special handling may apply, See
www.dtsc.ca.gov/hazardouswaste/perchlorate".
NOb:
This equipment has been tested and found to comply with the
limits for a Class B digkal device, pursuant to part 15 of the FCC
Rules.
These Iir_lits are designed to provide reasonable protection
against harmful interf_)rence in a residential installation.
This equipment generates, uses and can radiate radio
frequency energy and, if not installed and used in accordance
with the instructions, may cause harmful interference to
radio communications. However, there is no guarantee that
interference will not occur in a particular installation. If this
equipment does cause harmful interference to radio or television
reception, which carl be determined by turning the equipment
off and ors, the user is encouraged to try to correct the
interference by one or more of the following measures:
Reorientor relocate the receiving antenna.
Increasethe separation between the equipment and receiver.
Connect the equipment into an outlet on a circuit differentfrom that to
which the receiver is connected.
Consult the dealeror an experiencedradio/TV technicianfor help and for
additional suggestions.The usermay find the following booklet prepared
by the Federal CommunicationsCommission helpful: "How to Identify and
ResolveRadio-TV InterferenceProblems." This Booklet is availablefrom
the U.S. Government Printing Office, Washington, D.C. 20402, Stock No.
004@00-00345-4.
PCC W_;sr 9
The user is cautioned that changes or modifications not
expressly approved by the manufacturer could void the user's
authority to operate the equipment.
This device complies with Part 15 of FCC Rules.
Operation is subject to the following two conditions;
(1)This device may not cause harmful interference,and
(2)This device must accept any interferencereceived,including
interferencethat may cause undesiredoperation.
Before reading this user manual
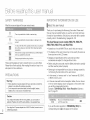
SAFETY WARNINGS
IMPORTANT INFORMATION ON USE
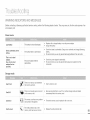
What the icons and signs in this user manual mean:
I About
this user
manual
Thank you for purchasing this Samsung Camcorder.
_-_
wi\ _!}/(:;:
LW_
Thereis a potentialrisk of deathor seriousinjury,
There
i\U :N
is a potential
risk of personal
injury or damage
to the
product.
To
reduce
the risk of fire, explosion,
electric
shock,
or personal
injury when using your camcorder, follow these basic safety
precautions.
_]
Here are hints or page number references you will find helpful
when you operate the camcorder.
warning
Please
follow
safe
place
signs
them
for future
are here to prevent
explicitly.
After
reading
injury
this
correctly, refer to Trou bleshooting. _ pages 93-102
This User Manual covers models HMX-F90,
HMX-F91,
HMX-F900, HMX-F910, and HMX-F920.
o Illustrations of model HMX-F90 are used in this user manual.
o The displays in this user manual may not be exactly the same as
those you see on the LCD screen.
o Designs and specifications of the camcorder and other
accessories are subject to change without notice.
Settings required before using a function.
These
Please read
this user manual carefully before you use the camcorder and keep
it handy for future reference. Should your camcorder fail to operate
to you and others.
section,
keep
it in a
reference.
o Before using the camcorder, read the Safety information carefully
and then use the product properly.
o Samsung is not responsible for any injury or damage caused by
not following the instructions in the user manual.
PRECAUTIONS
o In this manual, a 'memory card' or 'card' means an SD, SDHC,
or SDXC memory card.
I
Warning!
i
® When using the AC power adaptor
,
I
I
*
wen your camoorder
connect tne
adaetor to an outlet wltn protecuve grounding.
Do not exoose tne camcorder battery to olreoi sunllgnt, neaters.
radiators, fire, or an_ source OTexcessive neat.
o In this user manual's function description tables, the icon shown
in the on-screen display column will appear on the screen when
you set the corresponding function.
Example: 720X480/60p
(16:9) - Video Resolution Submenu
item _ page 53
Caution
If you replace the battery with the wrong battery, you can cause an
exeloalon. Replace only with the same battery or an equivalent type.
f you plug the AC powe r adaptor
SUltBE}Ieplug adaptor
into a 240V AC outlet
De sure to use a
720X48O/6Op
(16:9)
Records in 720x480 (60p) resolution
_ with 16:9 aspect ratio.
_D
If you set the video resolution to 720X48O/60p (16:9}, the
corresponding icon ( _D ) will appear on the screen.
Befo_'e reading this use_ manual
U
The following terms are used in this manual:
• 'Scene' refers to the point where you press the [Recording
start/stop]
butten to start recording until you press it again to
stop recording.
• The terms 'photo' and 'still image' are used interchangeably with
the same meaning.
I Before using this camcorder
• This camcorder records video in H.264 (MPEG4/AVC) format.
• You can play back and edit the video recorded by the
camcorder on a personal computer using the internal
software of this camcorder.
•
•
•
•
•
Please note that this camcorder is not compatible with other
digital video formats.
Before recording important video, make a trial recording.
Play back your trial recording to make sure the video and audio
have been recorded properly.
Recorded contents may be lost due to a mistake when handling
this camcorder or memory card, etc. Samsung will not provide
compensation for damages due to the loss of recorded contents.
Make a backup of important recorded data.
Protect your important recorded data by copying the files to
a PC. We also recommend you copy it from your PC to other
recording media Ior storage. Refer to the software installation and
USB connection guide.
Copyrights:
Please note that this camcorder is intended for
individual use only.
Data recorded ors the storage media in this camcerder using
other digitaVanalog media or devices is protected by the
Copyright Act and cannot be used without permission of the
owner of the copyright, except for personal enjoyment. Even if
you record an event such as a show, performance, or exhibition
for personal enjoyment, we strongly recommend that you obtain
permission beforehand.
|m
Notes regarding trademarks
• All the trade names and registered trademarks mentioned in this
manual or other documentation provided with your Samsung
product are trademarks or registered trademarks of their
respective holders. Furthermore, ,TM,and '®' are not mentioned in
each case in this manual.
• SD, SDHC and SDXC loges are trademarks of SD-3C, LL.C.
• Microsoft ®, Windows ®, Windows Vista _, Windows ®7, and
Direc'uXc_are either registered trademarks or trademarks of the
Microsoft Corporation in the United States and/or other countries.
• Intel® Core M, Core 2 Duo ®, and Pentium ®are the registered
trademarks or trademarks of the Intel Corporation in the United
States and other countries.
• AMD and AINon M are either registered trademarks or
trademarks of AMD in the United States and other countries.
• Macintosh, Mac OS are either registered trademarks or trademarks
of Apple Inc. in the United States and/or other countries.
• YeuTube is a trademark of Googb Inc.
• Flickr is a trademark of Yahoo.
• Facebook is a trademark of Facebook Inc.
• Twitter is a trademark of [_/vitter Inc.
• Picasa is a trademark of Googb Inc.
• Adobe, the Adobe logo, and Adobe Acrobat are either registered
trademarks or trademarks of Adobe Systems Incorporated in the
United Stales and/or other countrbs.
•
HDMI, the HDMI logo and the term
"High Definition Multimedia Interface"
are trademarks or registered
trademarks of HDMI Licensing LLC.
H
_r_
'"_"°_'"'_'°" _°'_'_°'_"_°_
I
TM
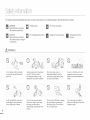
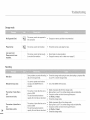
S fety infon's ion
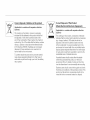
The safety precautions illustrated below are to prew_nt personal injury or material damages. Heed all instructions carefully,
WARNING
Means that there is a potential
risk of serious personal injury.
D
Prohibited action.
_
Do not touch the product.
CAUTION
Means that there is a potental
risk of personal injury or damage
to the product.
_
Do not disassemble the product.
_
Unplug from the power supply.
U
This precaution must be
folowed.
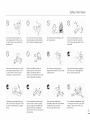
,/_ WARNING
@
@
Do not overload
x_ras as tnls
leat or tirc
No ot! Ot entering
power
shock,
outlets
or extension
may resuL_ in aonorma
the camcorder
adaptor
could cause electric
malfunctions
or defects.
or
@
Js_ng _ne camcoraer
a_ _emoera_ures
over 60%
140°F) may esu_ ir
Do not atow
water
netal,
nfiammable
material
to enter
fire. Keeping
temperature
samcoraer
or power adaptor.
so may pose a tire nazara
the oattery
may cause
Do not aim the camcorder
at a nlgn
an explosion
directly
into the sun. Doing so could cause
eye injuries, as well as lead to
malfunctioning
of internal parts of the
product.
Do not bend
the USB cable
o
_o sand
the
Doing
or damage
the power
adaptor
by pressing on it
with a heavy object.
There is a risk of
fire or an electric
shock.
or dust_ Fine sand
or ausl
3nterlng tne camcoraer
or sower
_aa[ tot could cause malfunctions
Jetects
Do not disconnect
the adaptor
pultng
on its USB cable,
damage
the cable.
ol
by
as this could
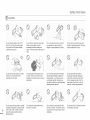
Safety information
o
@
Do not use the Dower
aaabtor
1as aamagea,
s[ [ or broken
r wires. Doing so ma_ cause
elecmc snocK
if it
Do not connect
core8
fire or
the Dower
aaaD_o
nless _ne slug can be fully nseRee
_w_n no ,)art of the blades e_ }osea
Do not dis )ose
as it Nlay
of the oatter,
q a fire
_Aploae
lever use cleanlr
_ fluid or simila_
snemlcals
to clean _ne camcoraer
Do not spray
samcoraer
cleaners
directly
on me
®
eeD _ne camcoraer
aw%
from
wa_er
wnen using i_ near _ne peach or oo
r when it rains. There b a risk ol a
_salfunction
or an electric
shocl<
\eel
tne
nemoG
children.
usea
iltnlum
oatte
y
card
out of the reach ol
If the lithium battery
or
-nemor_ cara
is swallowed
oy
sonsuJt a pnysLcJan immealat6
Do not plug or unplug tne r swel
aaaotor
wltn wet nanas. There is a riSK
Df electric shock
,eep the power
adaptor
unplugged
wnen not in use or (]urln ] ilgntnlng
_torms. There is a risk of fire.
a cnlla
®
Unplug
the power
adaptor
before
you
If the
camcorder
emits
an abnormal
If the camcorder
malfunctions,
clean it. If you leave it plugged
in, there
is a risk of a malfunction
or an electric
sound
or smell, or smokes,
unplug
the power adaptor
immediately
and
immediately
detach the power
or battery from the camcorder.
shock.
request
service
There
personal
service from a Samsung
center. There is a risk of fire or
injury.
is a risk of fire or injury.
Do not attempt
adaptor
to disassemble,
repair,
or modify the camcorder
or the power
adaptor.
There is a risk of fire or an
electric shock.
Safety information
(]) CAUTION
@
®
®
_A_,
_
.@
Do not Dress
the surface
of the LCD
with force
)r n_ i_w_tn a snarD
If you push
the LCD surface
unevenness
ma,
ODleot
alsplay
occur
Do not drop
_'i
or exE )se the camcoraer
Datte y, Dower aaautor
or o[ner
accessories
[o severe vlDra[ions
impact.
ljury.
This
may cause
Do not use the camcorder
on a tr 9oa
qot SUDDlle@ In a place
or
suDjecl
a malfunction
lo severe
wnere
wDrallons
it is
or irr 3acl
@
Do not leave [ne camcoraer in a aosea
Do not exE 3se [ne camcoraer
to soo;
Do not use the camcorder
vehicle for a long time wnere tne
temperature _svery nlgn.
or steam.
coula
exnaust
(9
soot
aamage [ne camcoraer
malfunction
or steam
case or cause
a
]as generatea
near dense
Dy gasoline
or
normal
oDerat_or
®
Do not expose
the camcorder
to sudden
shock when using
lightning
storms.
outdoors
during
Do not place
the
open
LCD
the camcorder
screen.
down
on
near direcl
equipment.
or injury
This may
@
alesel enc nes. or corroswe
gas SUCh
as nyarogen
sulpnlae.
Doing so may
corroae
[ne external or interna lermmas
alsaDmg
changes
in temperature
or high humidity,
There is also a risk of defect
or electric
use the camcorder
sur jht or heating
cause a malfunction
or
@
Thick
Do not
Do not wipe
Do not exoose
_nsect_aae.
camcoraer
[ne camcoraer
to
msect_clae en[enng
tne
cou_a cause [ne oroaucl
to fail to operate
normally
camcorder
off and cover
Turn the
it with vir,
snee[
lsectlclae
e[c
before
usir ]
®
the camcorder
body
with
benzene
or thinner. The exterior coating
could peel off or the case surface could
deteriorate.
Do not
leave the LCD
not using
screen
the camcorder.
open
when
Safety information
®
@
@
f
Do not hold
screen
when
x_uFa ae_acn
fal
the camcorder
liftir _ it. The
ana
b
the LCD
LOD screen
_ne camcoraer
ma_
Do not use the camcorder
near a TV o_
radio
qterference
from the camcorde
Do not use the camcorder
couFu cause
-nagnefic
raolo
noise
on the TV or in the
oroaacast
sources
fields
_ radio
such
nea
waves
Jse Samsun
or
as s_eaKers
and
Jrge motors.
Noise from these
sources
COUld alstorI _ne video or
aualo
you are recoraLng
]_approvea
accessones
Dn_y. Jsmg E Dauc_s Trom omel
T_anufacturers
ma
cause overnea_lng,
Tire. e> 9_o8_or e_ecmc SHOCK O_
personal
Doerauon
_urles
caused
Dy aDnorma
@
/::b....
Place the camcorder
on a stable
surface that is well ventilated.
of stror
Keep important
data separately.
Samsung
is not responsibb
for data
loss.
Only plug the power adaptor
plug into
a socket that is easily accessible.
If any
Other manufacturers
of optional
accessories
compatible
with this
problem
occurs
with the product,
you
must pull the plug out of the socket
camcorder
are responsible
for their
own products.
Use the optional
to disconnect
the power completely.
Turning off the power button on
accessories
instructions.
according
Samsung
the product
camcorder
responsible
fire, electric
for any malfunction,
shock,
or damages
does not turn
completely.
off the
caused
by using
accessories.
to the safety
is not
unauthorized
risk of
Contents
Before reading this user manual ....................... 2
SAFE [Y WARNINGS .....................................................................
PRECAUTIONS .............................................................................
IMPORTANT INFORMATION ON USE ...........................................
2
2
2
Safety inl:orrnatior_............................................
4
Qubk star/guide ...........................................
10
_,(]
'
(:;_ttlng
1:oknow the camcorder ...................... 18
unpacking ...................................................................................
LOCATION OF CONTROLS .........................................................
IDENTIFIYING THE SCREEN DISPLAYS ......................................
13
14
16
(_£_tting stsr/ed ..............................................
1©
INSERTING/EJECTING THE BATTERY ........................................
CHARGING THE BAf-fERY .........................................................
CHECKING THE BATTERY S IXTE ...............................................
19
20
21
Basic operation of the carncorder ................... 24
TURNING YOUR CAMCORDER ON/OFF ....................................
SWITCHING TO THE POWER SAVING MODE ............................
SETTING THE DATUTIME FOR THE FIRST TIME ........................
SEIT]NG THE OPERAfION MODES ...........................................
SWITCHING THE INFORMA]ION DISPLAY MODE ......................
24
24
25
26
26
USING THE SHORTCUT MENU (OK GUIDE) ...............................
SELECTING THE lANGUAGES ...................................................
27
29
Gel:tir_gready 1:ostar/recording ...................... 80
INSERTING AND EJECTING A MEMORY CARD
(NOT SUPPLIED) .........................................................................
30
SELECTING A SUITABLE MEMORY CARD (NOT SUPPLIED) ...... 31
RECORDABLE TIME AND CAPACHY .........................................
ATqACHING THE STRAP .............................................................
ADJUSTING THE LCD SCREEN ..................................................
33
34
34
Basic recording .............................................
35
RECORDING VIDEOS ..................................................................
35
RecordiNG pause/RESUME
.......................................................
TAGGING AND CAPTURING GREAf MOMENTS WHILE
RECORDING (MY CLIP FUNCTION) ..........................................
RECORDING PHOTOS ................................................................
36
37
38
RECORDING WITH EASE FOR BEGINNERS (SMART AUTO) ...... 39
Zooming in/out ............................................................................
40
USING THE BACK LIGHT BUTTON .............................................
41
Basic playback ..............................................
42
CHANGING THE PbA,YBACK MODE ...........................................
PLAYING BACK VIDEOS .............................................................
PLAYING BACK MY CLIP ............................................................
USING THE SMART BGM FUNCTION .........................................
42
43
45
45
TAGGING and capturing great moments while playing back
video ...........................................................................................
VIEWING PHOTOS ......................................................................
ZOOMING DURING PHOTO PLAYBACK .....................................
46
47
48
Using the rnenu items ....................................
49
HANDLING MENUS ....................................................................
MENU ITEMS ..............................................................................
Advanced recording
......................................
iSCENE .......................................................................................
Video Resolution ..........................................................................
Photo Resolution .........................................................................
49
50
O_
':'
52
53
54
Contents
Auto Power OFF............................................................................
PC Seflware ................................................................................
Format .........................................................................................
Default Set ...................................................................................
79
79
80
80
Language ....................................................................................
Open source licenses ..................................................................
80
80
Cor_r_ecti%jto a TV........................................
Connecting to a high definition lV with HDMI ..............................
CONNECTING TO A REGULAR /"V .............................................
VIFWING ON A TV SCREEN ........................................................
Dubbing videos .............................................
DUBBING TO VCR OR DVD/HDD RECORDERS .........................
Using with a wir_dows computer .....................
81
81
82
83
34
84
85
WHAI YOU CAN DO WITH A WINDOWS COMPUTER ............... 85
USING THE Intelli-studio PROGRAM ...........................................
86
Upload your videos directly to YoufiJbe! .......................................
USING AS A REMOVABLE SI°ORAGE DEVICE ............................
]?oubleshootir_<j.............................................
WARNING
INDICATORS AND MESSAGES .................................
90
91
9_
93
Other settir_gs ................................................
75
Symptoms and solutions .............................................................
Storage Info .................................................................................
File No .........................................................................................
Date/Time Set .............................................................................
75
75
76
Mainter_ance & additional ir_lormatior_............ 108
Date/Time Display .......................................................................
LCD Brightness ...........................................................................
Auto LCD OFF...............................................................................
76
77
77
Beep Sound ................................................................................
Shutter Seund .............................................................................
78
78
MAINTENANCE .........................................................................
USING YOUR CAMCORDER ABROAD .....................................
GLOSSARY ...............................................................................
S_:>eoil:iot¢l:iot_s
..............................................
96
103
104
105
10(_
iiiiiiiiiiiiiii
iiiiiiiiiiiiiiiiiiiiiiiiiiiiiiiiiiii_
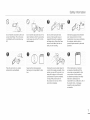
sTEF_
1:Get
re_,dy
iiiiiiiiiiiiiiiiiiiiiiiiiiiiiiiiiiiii
H
iiiiiiiiiiiiiiiiiiiiiiiiiiiiiiiiiiiii
iiiiiiiiiiiiiiiiiiiiiiiiiiiiiiiiiiiii
iiiiiiiiiiiiiiiiiiiiiiiiiiiiiiiiiiiii
iiiiiiiiiiiiiiiiiiiiiiiiiiiiiiiiiiiii
iiiiiiiiiiiiiiiiiiiiiiiiiiiiiiiiiiiii
iiiiiiiiiiiiiiiiiiiiiiiiiiiiiiiiiiiii
iiiiiiiiiiiiiiiiiiiiiiiiiiiiiiiiiiiii
iiiiiiiiiiiiiiiiiiiiiiiiiiiiiiiiiiiii
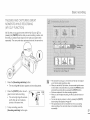
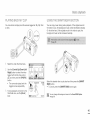
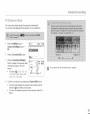
insert
the
battery
into
the
STEP 2: Record videos and photos
battery
slot.
_page
19
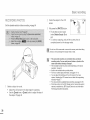
Open
screen
and
press
the
[Power
(_)]
button
to
turn
......
_"
.....'
iiiiiiiiiiiiiiiiiiiiiiiiiiiiiiiiiiiii
2 Charge the battery fully, "-,page 20
iiiiiiiiiiiiiiiiiiiiiiiiiiiiiiiiiiiii
iiiiiiiiiiiiiiiiiiiiiiiiiiiiiiiiiiiii
3 Insert a memory card, '-*page
iiiiiiiiiiiiiiiiiiiiiiiiiiiiiiiii[ii
./[@_? i
_,/,
;_
iiiiiiiiiiiiiiiiiiiiiiiiii
iiiii
iiiiiiiiiii
iiii
iiiiiiiii
iiiii
::::::::::::::::::::::3
[b record videos, press the [Recording start/stop]
button or,
to record photos, press the [PHOTO] button, "-,pages 35, 38
iiiiiiiiiiiiiiiiiiiiiiiiiiiiiiiiiiiii
30
S,s,,,,,_,_,
'_"
' ) -/
))
w_
__
LCD
_ntsL_i_i;i_irli5rnderc°ver°pen/cl°se]switcht°open(_[)"
iiiiiiiiiiiiiiiiiiiiiiiiiiiiiiiiiiiii
_/.
the
,_
"i?
start/stop]
button
start/stop]
[Recording
button
iiiiiiiiiiiiiiiiiiiiiiiiiiiiiiiiiiiiiiiiiiiiiiiiiiiiiiiiiiiiiiiiiiiiiiiiiiiiiiiiiiiiiiiiiiiiiiiiiiiiiiiiiiiiiiiiiiiiiiiiiiiiiiiiiiiiiiiiiiiiiiiiiiiiiiiiiiiiiiiiiiiiiiiiiiiiiiiiiiiiiiiiiiiiiiiiiiiiiiiiiiiiiiiiiiiiiiiiiiiiiiiiiiiiiiiiiiiiiiiiiiiiiiiiiiiiiiiiiiiiiiiiiiiiiiiiiiiiiiiiiiiiiiiiiiiiiiiiiiiiiiiiiiiiiiiiiiiiiiiiiiiiiiiiiiiiiiiiiiiiiiiiiiiiiiiiiiiiiiiiiiiiiiiiiiiiiiiiiiiiiiiiiiiiiiiiiiiiiiiiiiiiiiiiiiiiiiiiiiiiiiiiiiiiiiiiiiiiiiiiiiiiiiiiiiiiiiiiiiiiiiiiiiiiiiiiiiiiiiiiiiiiiiiiiiiiiiiii
____________
iiiiiiiiiiiiiiiiiiiiiiiiiiiiiiiiiiii_
iiiiiiiiiiiiiiiiiiiiiiiiiiiiiiiiiiiiiS°ll'i°F 3:: l Ybackvid ° ° Ph°
iiiiiiiiiiiiiiiiiiiiiiiiiiiiiiiiiiiii
iiiiiiiiiiiiiiiiiiiiiiiiiiiiiiiiiiiii
iiiiiiiiiiiiiiiiiiiiiiiiiiiiiiiiiiiil
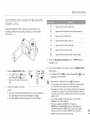
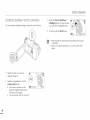
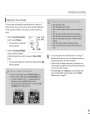
You can find recordings quickly by using the thumbnail view,
iiiiiiiiiiiiiiiiiiiiiiiiiiiiiiiiiiiii
iiiiiiiiiiiiiiiiiiiiiiiiiiiiiiiiiiiii
iiiiiiiiiiiiiiiiiiiiiiiiiiiiiiiiiiiii
iiiiiiiiiiiiiiiiiiiiiiiiiiiiiiiiiiiii
iiiiiiiiiiiiiiiiiiiiiiiiiiiiiiiiiiiii
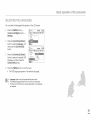
Press the [MODE] button to select the playback (_)
mode.
Select the video or photo thumbnail view by using the [Zoom]
lever.
Use the [Control (UpfDown/Left/Right)]
button to select a
desired video or photo, and then press the [Control (OK)]
button.
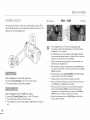
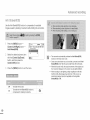
h_ p(:_l n{i ard vewng
t_e camco_xSeF
2
v deos/photos
to you_ PC/_om
on Web stes
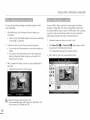
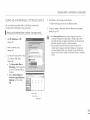
Share your contents with the world by uploading photos and
videos directly to a web site with a single click.
Click the Share (_)
_ Upload tab on the IntellPetudio browser.
page 89
Start the Intelli-etudio program by connecting the camcorder to
your PC with a USB cable.
* A new file saving screen appears with the Intelli-studio main
window. Click Yes, and the uploading procedure starts.
_@l
Any new files are saved to your PC and registered to
Contents Manager in the IntellPetudio program.
* You can arrange the files by different criteria such as Face,
Date, Location, etc.
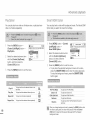
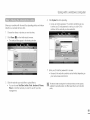
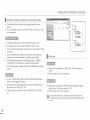
STEP 5:: Delete video{: or t botch:
Contents Manager
Saved files in your PC
Foldersdirectory on your PC
}[
Sha_"r g v deos/p_otos
Double-click
the file you would like to play back.
IntellPetudio rune automatically when you connect the
camcorder to a Windows computer (if you have set PC
Software: On). _ page 79
If the camcorder'e storage media is full, you cannot record new
videos or photos. Delete videos or photos you have saved to your
computer from the camcorder'e storage media. Then you can
record new videos or photos on newly freed up space,
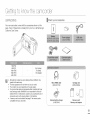
Getting to know the camcorder
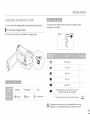
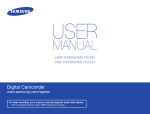
UNPACKING
Your
new camcorder
I Check your accessories
comes
page. If any of these items
Customer
Care Center.
with
the accessories
is missing
from
your
shown
box,
on this
call Samsung's
HMX-F90
HMX-F91
HMX-F900
HMX-F910
HMX-F920
•
52x (Optical),
70x (Intelli),
130x (Digital)
Although the models have some features that are different, they
operate in the same way.
The exact appearance of each item may vary by model.
The contents may vary depending on the sales region.
You can purchase parts and accessories after consulting with your
local Samsung dealer. SAMSUNG is not responsible for reduced
battery life time or malfunctions caused by any unauthorized use of
accessories such as the power adaptor or the batteries.
A memory card is not included. See page 31 for memory cards
compatible with your camcorder.
Micro HDMI cable
(AD39-00179A)
External
battery charger
(IA-BC9UA4)
Carrying case
(AD69-00929A)
Memory card/
Memory card adaptor
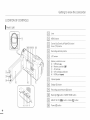
Gettin 9 to know the camcorde_
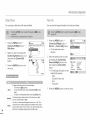
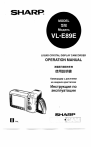
LOCA£1ON OF CONTROLS
I Front & Left
(]J
Lens
{2}
MENU button
Control (Up/Down/Left/Right/OK)
Zoom (T/W) button
J
Recording start/stop
butten /
button
_..CD
screen
J
Memory card/Jack cower
{a}, USB jack (,_€*)
{b:,
(_}
,{d
,:e}:,
[
Memory card slot (_)
AV jack (AV)
CHG (charging) indicator
HDMI jack (_ml)
Internal speaker
Display (@}) butters
Recording pause/resume
10]__
(_!_)button
Back light (@) button/SMART
SMAF_T AUTO (_)
Power (¢) button
BGM button
button / Share (_t)
button
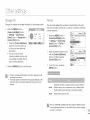
Gettin 9 to know the cameo[tier
I Right/Top
& Bottom
I Rear
ii!i!i!i!/1)!ii!i!iiii
MODEbutton
Mode indicator
a _: Recording
mode
_VideoJPhoto/
r_] : Playback mode
PHOTO/MyC
i
pbutton
Recording start/stop
Strap
button
Batteryslot
Be careful not to cover the internal microphone
recording.
Lens cover open (G:)/c!ose
/nterna!
(@) sw!tch
microphone
Battery re!ease switch (BATT.)
Tripod receptacle
and lens during
Getting to know the camco[de_"
IDEN-IIFIYING THE SCREEN DISPLAYS
The
available
functions
vary
depending
I Video and Photo recording
SSlB?
O:O0:OQ :
on
the
selected
operation
NDi
@i
......
.o.3
Wt
r_
tT
/ [_]
o
g:oo:o0
o
[220Min]
o
o
9999
on
the
setting
values.
Lapse
_q%_
1/60
+0.3
w_
w_'r
i Storage
I_
_'
_)
media
level)
Photo
Video
Resolution,
@
Anti-Shake
(HDIS)
_P_
Back
Continuous
Photo mage counter
(tota! number of recordabb
F_=I
_
_ _ _,
_-r-r-r-r-r-r-r-r-r_ Pace Lxe.ec. on
Manual
@o!os)
Balance _
focus +_
C.Nite
EV (Fxposure
Value) _
Zoom
zoom
(optical
zoom)
Date/Time
Effect
Display
/ inteli zoom
(memory
Battery info.
(remaining
battery
_
i/digital
12:00AM
Auto
REC _
Digital Special
JANt01/20t3
recording
dable time)
I
[_]
My Clip
White
r_
(Video/Photo)
Time counter (video
ti ..........
ining .....
iSCENE _ / Smart
marked with a +_are
turns off.
For enha_sced pedormance,
the display
indications and their order are subject to change
without prior notice.
The total number of recordabb photos is based
on the available space on the storage media.
The maximum number the photo counter can
display is 9,999.
mode
Operating
status (standby/
recording/pause/photo
capturing)
_8+f/O/[][]/_
This camcorder
combined
video
and photo provides
recording one
mode.
You can
easily record videos or photos in the same
mode without
having to change it.
The on screen indicators are based on a 16GB
SDHC memory card.
The settings of functions
lost when the camcorder
depending
IIilI!
¸ /! I
i Recording
Time
o
appear
Right of the LCD screen
IIIIIIi i Iiii!!I
_/_£_
*
indicators
Left of the LCD screen
[220Mini
1_
[]
Different
mode
©
1_ _8o
mode.
light
shot
card)
Resolution
Getting to know the cameo[tier
I Video playback
mode: Thumbnail
view
Center of the LCD screen
Top of the LCD screen
_]
Video playback
0:00:55
Recorded time
_]
Storage media (memory card)
1/10
Current video / total number
recorded videos
Battery info
(remaining battery level)
I_
@:_
Protect
mode
[]
of
Share Mark
Bottom of the LCD screen
My Clip
Error
f,e
_
I Video playback
_
Button guide
Scroll bar
mode: Single view
Top of the LCD screen
ND
_]
Video playback
mode
,_
i My Clip
Protect
Time code (elapsed time /
0 O0 0010 O0 55 recorded time)
:_Th
u_b_a_V_e
w.................................................................... I_
I_
Storage media (memory card)
Q})
Bottom of the LCD screen
Battery info
(remaining battery level)
PlayOption
_D
Shortcut menu
Video Resolution
Button guide
1oo-oooi
File name (file number)
17
Getting to know the camco[de_"
I Photo playback
mode: Thumbnail
view
Center of the LCD screen
Top of the LCD screen
1110
Photo playback
mode
1/10
Current photo / total number of
recorded photos
@:us
Protect
Storage media (memory card)
Battery info
(remaining battery level)
I_
Error file
Bottom of the LCD screen
't
_
I Photo playback
_
Scroll bar
Button guide
mode: Single view
Top of the LCD screen
Photo playback
@::us
mode
Protect
Slide Show
Shortcut
1/10
Current photo / total number
recorded photos
_]
Storage media (memory card)
Battery
I_
menu
of
Bottom of the LCD screen
info
(remaining battery level)
Photo Resolution
_
100-0001
Button guide
File name (file number)
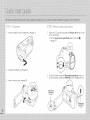
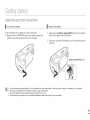
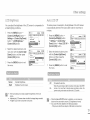
etting started
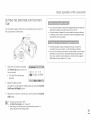
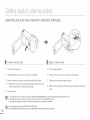
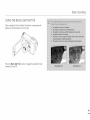
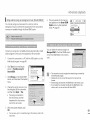
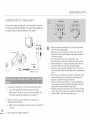
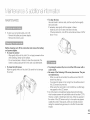
INSEFtTING/EJEC]]NG
I To insert
THE BAT/_LEFtY
the battery
Insert the battery into the battery slot until it softly clicks.
Make sure that the SAMSUNG logo on the battery is facing you
when the camcorder is placed as shown in the figure.
I To eject the battery
"N Gently push the [Battery release (BATT.)] switch in the direction
shown in the figure to eject the battery.
2
Push down, and then lift the battery out in the direction shown in
the figure.
[Battery
_i
•
Use only Samsung-approved
batteries. Do not use batteries from other manufacturers. Otherwise, there is a danger of overheating,
Samsung is not responsible for the problems caused by unapproved batteries.
Remove the battery from the camcorder when the camcorder is not in use.
We recommend you purchase one or more additional batteries to allow continuous use of your camcorder.
release (BAT[)]
switch
fire, or explosion.
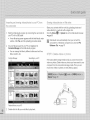
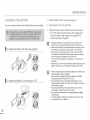
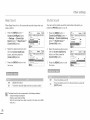
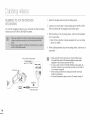
Gettin 9 started
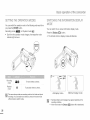
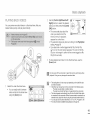
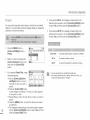
CHARGING THE BAT rEFtY
"N Insert the battery into the camcorder. _page
You can charge
2
Open the jack cover of the camcorder.
3
Charge the battery using the USB cable and power adaptor.
o The CHG (charge) indicator lights up and charging starts.
When the battery is fully charged, the charging (CHG)
indicator turns green. _page 21
the
battery
with
the
USB
cable
and power
adaptor.
*
I To charge the battery with the power adaptor
[ii_ ] •
I To charge the battery by connecting to a PC
o
19
Charging the battery at low temperature may take longer or the
battery may not charge fully (The green indicator will not turn on).
Make sure that there are no foreign substances on the plug or in the
socket when you connect the power adaptor to the camcorder.
When using the power adaptor, place it close to the wall outlet. If
you experience a malfunction while using the camcorder, separate
the power adaptor immediately from the wall outlet.
Do not use the power adaptor in a tight space, such as between
furnishings.
Make sure to turn off the camcorder before disconnecting the power
adaptor. Otherwise, you can damage the storage media or data.
When recording indoors with a wall outlet available, it is convenient to use
the power adaptor instead of the batter_
We recommend you charge the battery in a place with an ambient
temperature between 50°F and 86°F (10°C-30°C).
If the cemcorder is turned on, the battery will still charge, but more
charging time will be needed. We recommend you keep the cemcorder
turned off while it charges.
You cannot operate the camcorder using USB power onl_ Use the
power adaptor or battery to power the cemcorder.
If you use the cemcorder while you are charging the batte_ charging
may take longer
An AC plug adaptor is required in some foreign countries. Ifyou need
one, purchase it from your distributor.
Gettin 9 started
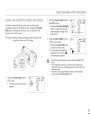
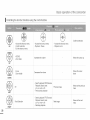
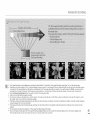
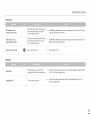
CHECKING THE BATFEFtY S_B_TE
You can check
the
charging
I To check the charging
The color
of the CHG
lamp
state
and remaining
battery
capacity.
The battery level display shows the amount of battery power
remaining in the battery.
state
indicates
the
charging
state.
Fully charged
75%-50%
50%-25%
25%-5%
less than
Charging
Fully charged
__, ,
Q
(Orange)
(Green)
5%
Error
_
Exhausted
The as
device
soon turn
Charge (flickers):
the battery
soon will
as possibb.
The device
will be forced
to turn
off.
off after 3 seconds.
Low
battery
[i!_ 1 The figures above are based on a fully charged battery at normal
temperature. Low ambient temperature may affect the use time.
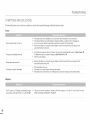
Gettin 9 started
approx.
160 min.
approx. 300 min.
approx.
160 min.
approx. 300 min.
approx. 400 min.
• Charging time: Approximate time in minutes required to fully charge a compbtely exhausted battery.
• Recording/Playback time: Approximate time available when you have fully charged the battery.
• The time is only for reference. Times shown above are measured under Samsung's test conditions. Your times may diff_r, depending on
your usage and conditiorls.
,, The recording and playback times will be shorter when you use your camcorder in low temperatures.
,, We recommend using the power adaptor when using the Time Lapse REC function.
The continuous recording time shows the available recording time
when you record without using any other function after recording
starts.
The battery may discharge 1.5 times faster than this reference if you
use the record start/stop, the zoom, and the playback functions.
Prepare additional batteries with the expectation that the actual
recording time is about 60% of the times listed above.
We recommend that you use the power adaptor to power the
camcorder from a household AC outlet when recording and playing
back the camcorder indoors. The connection is the same as that for
battery charging. '-,page 20
/_
_
The charging time will vary depending
the battery.
Depending on your PC specifications,
prolonged.
on the amount
of charge left in
the charging time can be
Gettin 9 started
•
•
-
Battery properties
A lithium--ion battery is smalPsized and has a high capacity, Low
arnbbnt temperature (below 50°F (10°C)) may shorten ks usage
time and affect its function, Before recording in low temperatures,
put the battery into your pocket to warm it, then install it in the
camcorder.
Make sure to store the battery separately after use,
- A small amount of battery power is consumed when the
battery is stored in the camcorder even if the camcorder
power is off,
- The battery may be completely discharged, if it has beers
instalbd and left in the camcorder Iora long period of time.
If this occurs, the battery may not fully operate even if you
charge it.
- II the battery is not used Ior a long time, fully charge the
battery and then, using your camcorder, drain the charge
corrlpletely. Do this once every 3 months to keep the battery
functioning properly. fo store the battery, remove it from your
camcorder and put it in a cool, dry place,
Charge an extra battery before using the camcorder
outdoors in cold temperatures.
- The cold temperature may shorten the length of time you carl
use the battery before needing to recharge it,
- Carry the supplied USB cable and power adaptor to charge
the battery while travelling,
• Check whether the battery terminal is damaged if the battery
falls or is dropped.
If you install a battery with the damaged terminal into the
camcorder, you carl damage the camcorder,
•
Remove the battery and the memory card from the
camcorder and disconnect
the power adaptor after use.
Store the battery in a stable, cool, and dry place.
(Recommended temperature : 59°F-_77°F (15°C-_25°C),
recommended humidity: 40%~60%)
Temperatures that are too high or too low shorten the battery
lifetime,
The battery terminals can become rusty or malfunction if the
battery is stored in a smoky or dusty location,
•
Recycle or dispose
of your dead batteries
properly.
• The battery lifetime is limited.
Battery capacity decreases over time and through repeated
use, If decreased usage time between charges becomes
significant, it is probably time to replace the battery with a new
one,
Each battery's life is _£fected by storage, and operating and
environmental conditions,
E asic operation of the camcorder
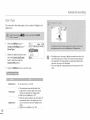
=FURNINGYOUR CAMCORDEFt ON/OFF
"N Open
the
LCD
screen
and press
the
[Power
(_)]
button
oWITCHING TO THE POWEFt SfOdING MODE
to turn
If you need to use camcorder
for the extended
time,
functions
enable you to prevent unnecessary
energy
the following
consumption.
on the camcorder.
o
2
Set the
To turn
[Lens
off the
cover
camcorder,
open/close]
press
switch
the
[Power
to open
I Sleep mode
(_).
The camcorder
switches
to the sleep mode when the LCD screen
is closed,
and then, if idle for more than 20 minutes,
the camcorder
((_)] button.
turns
off.
turns
off in 5 minutes.
However,
If you open
ends
and
the
LCD
if Auto
screen
the camcorder
LCD
screen
Power(_O)
during
returns
screen
<Sleep
LCD
Power
is closed
mode>
Off:
sleep
to the
5 Min is set, the
mode,
camcorder
the sleep
last operation
After
mode
mode
used.
20 minutes
<Power
off>
button
_]
.'
The camcorder operates the self-diagnosis function when powered
If a warning message appears, refer to 'warning indicators and
messages' ("*pages 93-95) and take corrective action.
on.
•
The power saving mode does not work in the following situations:
- While recording, playing back, or displaying a slide show.
- When the LCD screen is opened.
The camcorder consumes less battery power in the power saving
mode. However, if you plan to use the camcorder for an extended
time, we recommend you turn off the camcorder by pressing the
[Power ((_))] button when not using it.
Basic operation
of the camcorde_
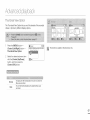
SEWING THE DA£E/%IME FOR THE FIRST
TIME
You carl set tile date and time of your
this camcorder
for the first time.
local area when
you turn
on
Your camcorder includes a internal rechargeable battery that retains the
date and time settings even after the power is turned off.
Once this battery is depleted, the current date/time values are all reset
to defaults, and you need to recharge the internal rechargeabb battery.
The date/time must be set again.
The internal battery is always recharged while your camcorder is
connected to the power adaptor or while the battery is attached.
If you do not connect the camcorder to power adaptor or do not attach
the battery for about 48 hours, the internal battery fully discharges. If
this occurs, charge the internal battery by connecting to the supplied
USB cable and power adaptor for 12 hours.
Open the LCD screen and press
the [Power (¢_)] button to turn on
the camcorder.
The Date/lime
appears.
2
Set screen
Sebct the date and time
information, and change the setting values by using the [Control
(Up/Down/Left/Right)]
button.
[_ Make sure the dock is correctly set, and then press the ]Control
(OK)] button.
_}
o
o
The year can be set up to 2037.
Set Date/Time
Display to On. _page 76
After setting, the date and time are automatically
special data area of the storage media.
recorded
on a
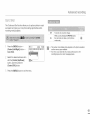
Basic ope_'ation of the camco[de_"
SETTING THE OPEFtAT!ON MODES
You can switch the operation mode in the following order each time
you press the [MODE] button.
Recording mode ( _
I_J ) e Playback mode ([_])
Each time the operation mode changes, the respective mode
indicator light turns on.
Recording
mode
Playback
mode
_
_
_
SWITCHING THE INFORMATION DISPLAY
MODE
You
can switch
Press
o
the
the
[Display
on-screen
(Ir"ll)]
The full and minimum
information
display
mode.
button.
display
modes
will alternate.
To record videos or photos.
[220Mini
To play back videos or photos.
<Full
display
mode>
_/
<Minimum
display mode>
This camcorder provides one recording mode for both video and photo
recordings. You can easily record videos or photos in the same mode
without having to switch modes.
[i_l
=
Warning indicators and messages may appear depending on the
recording conditions.
In the menu screen, the [Display (_r"l_)] button will be deactivated.
Basic ope_'ation of the camco[de_"
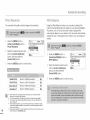
USING THE oHOR FCU F MENU (OK GUIDE)
Press the [Control (Left)] button to
select EV function.
The shortcut menu (OK guide) contains the most frequently
accessed functions for the selected mode. Pressing the [Control
(OK)] button will display the shortcut menu of frequently used
functions on the LCD screen.
o Press the [Control (Left/Right)]
button to adjust the exposure
while viewing the image on the
LCD screen.
An example: Setting EV (Exposure Value) in the recording mode
using the shortcut menu (OK guide).
Press the [Control (OK)] button to
confirm your selection,
o Press the [Control (OK)] button
to exit the shortcut menu.
o The exposure value setting is
applied and the indicator
and setting value appear.
*
The
shortcut
mode.
/_
/
÷
--_
_F
menu (OK guide) cannot be used in the SMART AUTO
The example above shows how to set EV in the recording mode
using the shortcut menu. The setting procedure could be different for
other menu items.
The shortcut menu appears briefly. The shortcut
when you press the [Control (OK)] button.
Press the [Control (OK)] button in
STBY mode.
o The shortcut menu (OK guide)
appears.
menu reappears
Basic
ope_'ation
of the camco[de_"
I ©ontrolling the shortcut functions using the control buttons
Confirms
- Access
OK
the shortcut
menu
- Confirm selection
- Exit the shortcut menu
- Access
- Playback
the shortcut
menu
/ Pause
- Access
the shortcut
- Playback
selection
menu
zoom
- iSCENE
Zoom
(tele)
Increases
the volume
Moves
the cursor
up
UP
Moves the cursor
down
DOWN
- Search
EV
- Search
Face Detection
RIGHT
RPS (Reverse
x2_>x4_>xS_>xlPlayback
Search)6rate:
- Previous
LEFT
playback
Previous
image
menuM°Ves
to the previous
skip playback
playback
FPS (Forward
Playback Search) rate:
x2_>x4_>x8_>xl
6
- Next skip playback
Next image
Moves
menu
to the next
Basic ope_ation of the camco_de_ _
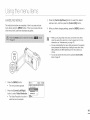
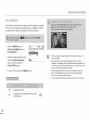
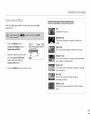
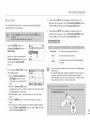
SELECTING THE LANGUAGES
You can select
"N
the language
Pressthe
[MENU]
[Control
(Left/Right)]
that
appears
on the
LCD screen.
button
button
Settings.
Press the [Control (Up/Down)]
button to select Language, and
then press the [Control (OK)]
button.
Press the [Control (Up/Down)]
button to select the desired OSD
language, and then press the
[Control (OK)] button.
Press the [MENU] button to exit the menu.
o The OSD language appears in the selected language.
•
•
Language options may be changed without prior notice.
The selected language remains even if you remove the battery.
The date and time format may change depending on the language
you selected.
ettin
Ire dy to strict Ireoolrdin
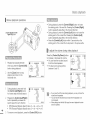
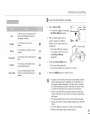
INSERTING AND EJECTING A MEMORY CARD (NOT SUPPLIED)
I To insert a memory card
I To eject a memory card
"
[ism the camcorder off.
"
[ism the
2
Open the memory card cower as shown in the figure,
2
Open
3
Gently
LI
Pull the memory
:S Insert the memory card into the card slot until it softly clicks,
• Make sure that the camcorder is placed as shown abow_ and
the terminal portion of the card is facing up.
camcorder
the
memory
push
the
off.
card
cover
memory
card
card
out
as shown
to eject
of the
memory
cover
zI
Close the cover,
o
o
_]
To avoid data loss, turn offthe camcorder by pressing the [Power (_)] button before inserting
Be careful not to push the memory card too hard. The memory card may suddenly pop out.
If you eject the memory card from the camcorder while it is on, the camcorder turns off.
Your
SD, SDHC,
cards. on the card manufacturer
Card camcorder
compatibility supports
with thisonly
camcorder
may and
varySDXC
depending
and type.
or ejecting the memory card.
in the
figure.
card
slot and
it.
close
the
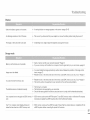
Getting ready to start reco_din9
SELECTING A SUFABLE MEMORY CARD
(NOT SUPPLIED)
I Compatible
memory cards
• You can use SD, SDHC, and SDXC cards with thb camcorder.
We recommend you use an SDHC card. This camcorder
supports SD cards up to 2GB. We cannot guarantee normal
operation with SD cards bigger than 2GB.
•
MMC (Multi Media Card) and MMC Plus are not supported.
•
CorrlpaIibb memory card capacity:
- SD: 1GB~2GB
- SDHC: 4GB~32GB
- SDXC: ~up to 64GB
• When you use unauthonzed memory cards, the camcorder can
not record videos correctly and your recordings may be lost.
• The memory cards released after thb camcorder was rebased
may not be compatible with the camcorder.
-
lo ensure stable recording and playback, use 6MB/s (Class 6) or
higher memory cards.
-
SD/SDHC/SDXC memory cards have a mechanical writeprotection switch. Setting the switch prevents accidental erasure
of files recorded on the card. To enabb writing, move the switch
up in the direction of the terminals, lo set write protection, mow_
the switch down.
-
SDHC/SDXC cards are a higher version of SD memory cards and
support higher capacities than SD memory cards.
-
SD cards can be used with current SD enabled host devices.
SD
(1GB-2GB)
SDHC
(4GB-32GB)
SDXC
(Up to 64GB)
Getting ready to start reco_'din9
| Handling
o
a memory
card
Damaged data may not be recoverable. We recommend you
make a back-up of important data separately on the hard disk of
your PC.
The data storage speed of cards may differ, depending ors the
manulacturer and production system.
,, SLC (singb level cell) system: faster write speed enabbd.
,, MLC (multi level cell) system: only lower wdte speed is
supported.
For best resuks, we recommend using a memory card that
supports a Iaster write speed.
Using a lower write speed memory card for recording video may
cause difficulties when storing.
You may even lose your video data during the recording. In an
attempt to preserve every bit of the recorded video ors a low
speed card, the camcorder forcibly stores the vide() ors the
memory card and displays a warning:
Low speed card. Please record at a lower resolution.
II you are unavoidably using a low speed memory card, the
resolution and quality of the recording may be lower than the
value you set. '-,page 53
The higher the video resolution and quality, the more memory the
• fiJmirlg the power off or removing a memory card dunng an
operation such as formatting, debting, recording, and playback
may cause data loss.
• If you modify the name of a file or folder stored in the memory
card wkh your PC, your camcorder may not recognize the
modified file.
• The memory card does not support any data recovery mode.
Therefore, care should be takers to prew_nt the memory card from
being damaged while recording.
-
Make sure to format the memory card on this camcorder. If the
memory card had beers formatted by a PC or other device, using
it on this camcorder without re-formatting may cause trouble
with recording and/or playback. Samsung is not responsible for
damage to recorded contents caused by improper formatting.
-
You have to format newly--purchased memory cards, memory
cards with data that your camcorder cannot recognize, or cards
with data saved by other devices. Note that formatting erases all
data ors the memory card. Erased data cannot be recovered.
-
A memory card has a certain life spars. If you cannot record new
data, you have to purchase a new memory card.
-
Do not bend, drop, or subject the card to strong impacts.
-
Do not place foreign substances ors the memory card terminals.
Use a soft dry cloth to clean the terminab if required.
-
Do not paste anything other than the label provided with the card
on the label pasting area of the card.
-
Do not use a damaged memory card.
-
Be careful to keep the memory card out of the reach of children,
who might swallow it.
camcorder
/_]
•
uses.
Samsung is not responsible for data loss due to misuse, including
loss caused by any PC virus.
We recommend using a memory card case to avoid data loss that
can be caused by moving the card or by static electricity.
After a period of use, the memory card may get warm. This is normal
and is not a malfunction.
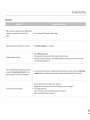
GetSn9 ready to start reco_din9
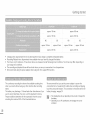
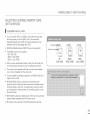
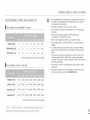
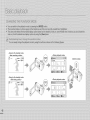
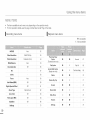
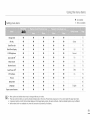
RECORDABLE TIME AND CAPACITY
I Recordable
l@
•
Your recordabb time and capacity and recordable
may differ from the figures in the tables depending
and actual recording conditions.
number of photos
on your subject
The higher the resolution, the more memory is used.
time available for video
Lower resolution
may suffer.
increases the recording time, but the image quality
The bit rate automatically adjusts to the recording
Accordingly, the recording time may vary.
image.
Memory cards bigger than 64GB may not operate normally.
1280X720/30p
720X480/60p
13
(16:9)
13
(4:3)
13
720X480/60p
27
55
27
27
(Unit:
110
55
110
55
110
Approximate
220
440
220
220
minutes
890
440
890
440
890
of recording)
The recording
setlings.
on
The maximum continuous recording time is under 20 minutes. The
maximum video fib size is 1.8GB. When a video recording time is
more than 20 minutes or a video file exceeds 1.8GB, a new video file
is created automatically.
The maximum
respectively.
I Recordable number of photos
length of a Time Lapse REC may vary depending
A memory card that is used to store a video can have umwritable
areas, which may result in reduced recording time and free memory
space.
number of recordable
photo and video files is 9,999,
Resolutions marked with _ are the resolutions of photos you record
when you set video resolution to 720X480/60p
(4:3).
1696x954
(16:9)
1280x720(16:9)
1,650
3,290
6,630
9,999
9,999
9,999
9,999
2,270
4,550
9,160
9,999
9,999
9,999
9,999
9,999
9,999
9,999
9,999
9,999
9,999
9,999
9,999
i
1600x1200(4:3)
_
1,520
3,030
6,110
[
800x600
(4:3) _
2,990
5,970
(Unit:
1Gl:::} _: 1 O00 OO0,0OO byles
Jess as he
internal
l}m'/ware
9,999
Approximate
: Aclual
uses
Iorma
a portion
number
ed capacity
ol he
memory
of images)
may be
Gettin 9 ready to start recordin 9
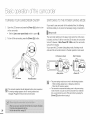
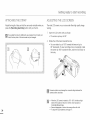
£r[ACHI NG TH E STFtAP
Adjust the length of strap so that
press the [Recording
start/stop]
the camcorder
is stable when
button with your thumb.
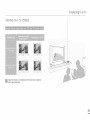
ADJUSTING THE LCD SCFtEEN
you
The wide
viewing.
LOD
"N
the
If you adjust the strap too tightly and use excessive force to insert your
hand, the strap hook of the camcorder may be damaged.
Open
o
2
The
screen
LCD
screen
screen
opens
Rotate
the
o
can rotate
You
LCD
90 ° backwards.
the
screen
the
body.
on your
with
camcorder
your
offers
quality
image
finger.
up to 90 °.
screen
towards
the
lens.
it up to 180 ° towards
To view
recordings
by 180 ° towards
the
the
lens and
more
up to
conveniently,
lens, and then
Excessive
may damage the connective
screen
androtation
the camcorder.
*
high
rotate
fold it back
hinge between
the
When the LCD screen is rotated by 150°-180 °, the left and right
sides of the subject are shown in reverse, which produces a
horizontally flipped image.
Remove fingerprints or dust on the screen with a soft cloth.
To adjust the LCD brightness, see page 77.
to
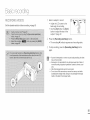
Basic recording
RECORDING VIDEOS
Select a subject to record.
,
Set the
desired
resolution
before
recording.
_page
Adjust the LCD screen to the
best angle for recording.
° Use the [Zoom] lever or [Zoom]
button to adjust the size of the
subject. "page 40
53
2
Press the [Recording
,
3
start/stop]
button.
The recording (o) indicator appears and recording starts.
To stop recording, press the [Recording
again.
*
start/stop]
button
If power is interrupted or an error occurs during recording, the video
may not be recorded.
Samsung
is not responsible for any damage caused by a failure of
normal recording or playback operations caused by memory card
error.
Note that damaged data cannot be recovered.
Do not turn off the camcorder or remove the memory card while
accessing
the storage media. Doing so may damage the storage
media or the data in the storage media.
Basic recording
o
For on-screen
For approximate
information
recording
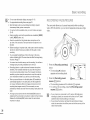
RECORDING PAUSE/RESUME
display, see pages 16-18.
times, see page 33.
Eject the battery when you have finished recording to prevent
unnecessary battery power consumption.
For various functions available when you record videos, see pages
52-66.
During recording, some button operations
button, [MENU] button, etc.)
are unavailable.
The camcorder allows you to pause temporarily while recording a
video, With this function, you can record separate scenes as a single
video.
([MODE]
Sound is recorded from the internal stereo microphone on the
top-front of the camcorder. Take care that this microphone is not
blocked.
*
Before recording an important video, make sure to test the recording
function to check if there is any problem with the audio or video
recording.
You can adjust the brightness of the LCD screen in the menu
options. Adjusting the LCD screen does not affect the image being
recorded. _page 77
You cannot use a locked memory card for recording. You will see a
message saying recording is disabled due to the lock.
Press the [Recording
button.
Recording videos in a quiet environment increases microphone
sensitivity. This increased sensitivity may cause the microphone
to record surrounding ambient noise. The increased microphone
sensitivity may also cause the camcorder to record the noise the
zoom mechanism makes if you use the zoom while recording.
o The recording (o) indicator
appears and recording starts.
Press the [Recording
resume (Q)] button.
When you record indoors or in the dark places, ISO sensitivity is
automatically adjusted. In very dark places, the ISO adjustment
can cause interference effects on images and prevent you from
recording these images correctly. We recommend you use a
professional, infrared camcorder when recording in dark places or at
night.
An image can be blurred when the AntPShake(HDIS) function is
enabled and the camcorder is mounted on a tripod or fixed in place.
Release the AntbShake(HDIS) function when the camcorder is
mounted on a tripod.
start/stop]
pause/
o The recording pauses and the indicator (_) appears.
• To continue the recording, press the [Recording pause/
resume (G)] button.
[i(_J
*
If you connect your camcorder to a PC using a USB cable when
recording is paused, the camcorder will connect to the PC after it
saves the video it has recorded up to the pause.
If you remove the memory card when the camcorder is in Pause
mode, the camcorder turns off the power and will not save any of the
video it has recorded.
Basic recordin 9
TAGGING AND CAPTURING GF/EAT
MOMENTS WHILE RECORDING
(MY CLIP FUNCTION)
My Clip lets you tag good scenes with the My Clip icon (_5) by
pressing the [PHOTO] button while you are recording a video, and
then lets you extract those clips from the video and watch them
separately. The camcorder also captures photos at the same time.
Press the [Recording
start/stop]
button.
o The recording (o) indicator appears and recording starts.
Press the [PHOTO] button at each
great moment while recording.
o The camcorder tags the scenes
as My Olip (_s) and captures
photos at the same time.
To stop recording, press the
[Recording start/stop] button again.
[ii_ ] •
The camcorder can tag up to 5 moments as 'My Clip' and capture
up to 5 photos while recording a video.
When you use the My Clip function, the camcorder tags the scene
so that it starts 3 seconds before you pressed the [PHOTO] button
and ends five seconds after you pressed the [PHOTO] button.
Photos are captured in the video recording resolution.
When you use time lapse recording, the My Clip function does not
operate.
You can also tag any scenes in a video by pressing the [PHOTO]
button during video playback. _page 46
The captured photos are not recorded if an error occurs during
video recording or the camcorder does not complete recording
successfully.
Basic recordin 9
RECORDING PHOTOS
Set the
desired
reeolution
before
recording.
2
_page
Center the subject in the LCD
screen.
54
B Fully press the [PHOTO] button.
o The shutter sound is heard
(when Shutter Sound: On is
set).
o To continue capturing, wait until the current photo is
completely saved on the storage media.
Do not turn off the camcorder or remove the memory card when taking
photos as it may damage the storage media or data.
•
o
o
Select a subject to record.
o Adjust the LCD screen to the best angle for capturing.
o Use the [Zoom] lever or [Zoom] button to adjust the size of
the subject. _page 40
This eamcorder
provides one combined video and photo
recording mode, You ean easily record videos or photos in the
same mode without having to change it,
The recordable number of photos varies depending on the photo
resolution. _page 33
Audio is not recorded when you take photos.
For the on-ecreen display information, see pages 16-18.
You can adjust the brightness of the LCD ecreen in the menu
options. Adjusting the LCD screen does not affect the image being
recorded. _page 77
For various functions available during recording, see pages 52-66.
Photo files conform to the DCF (Design rule for Camera File system)
standard, established by JEITA (Japan Electronics and Information
Technology Industries Association).
Basic recordin 9
RECORDING WITH EASE FOR BEGINNEFtS
(SMART AUTO}
0_)
User-friendly SMART AUTO optimizes your camcorder for the
recording conditions automatically, providing you with the best
performance.
_%
3
Press
the
_pages
Press the [SMART
*
The SMART
AUTO
AntPShake(HDIS)
appear
time.
Center
the
AUTO]
(_)
(@)
on the screen
subject
in the
button.
and
icons
I_
_
_,w
Ir
at the same
LCD
screen.
o The camcorder automatically detects the scene (Landscape,
etc.) and adjusts the camcorder settings accordingly.
o The appropriate scene icon appears on the LCD screen.
Appears when recording
a night scene.
Appears when recording
with a very bright background.
Appears when recording
indoors.
Appears when recording
a close-up.
Appears when recording
a landscape.
Appears when recording
a portrait.
Appears when recording
a portrait outdoors
[Recording
start/stop]
button
at night.
or [PHOTO]
button.
35, 38
To cancel the SMART AUTO mode, press the [SMART AUTO]
button again.
• The SMART AUTO (_)
and AntPShake(HDIS) (@)
disappear from the screen.
When there is no detected scene, the (_J)
icons
icon appears.
The camcorder may not detect the Portrait mode when recording
face, depending on the position of the face or brightness.
a
Depending on conditions such as lighting, shaking of the camcorder,
or distance to the subject, the camcorder may detect the image you
see on the LCD screen as a different scene type each time you apply
SMART AUTO.
The Portrait and Night Portrait modes work only when Face
Detection is set to On. _page 56
Buttons unavailable during SMART AUTO operation:
[MENU] button, [Control (OK)] button, etc. Most settings are
automatically adjusted in SMART AUTO mode. To set or adjust
functions on your own, release the SMART AUTO mode first.
SMART AUTO must be set before recording.
Basic recording
ZOOMING IN/OUT
W: Wide-angle
_
_ 0i_ll[llnlnnnnnnl_llt,,
T: Telephoto
Use the zoom function for close-up or wide-angle recording, This
camcorder allows you to record using 52x optical power zoom, 70x
IntellPzoom and 130x digital zoom.
•
Zoom magnification over 70x is done through digital image
processing, and is therefore called digital zoom. Digital zooming
possible up to 130x. _page 62
is
To maintain sharp focus, the minimum possible distance between
the camcorder and subject is about lcm (about 0.39 inch) for wideangle and 1m (about 39.4 inches) for telephoto.
Optical zoom preserves image quality, but the image quality may
suffer when you use digital zoom.
Fast zooming or zooming in a subject that is a good distance away
may cause the camcorder to focus slowly. If this occurs, use Focus:
Manual. _page 58
We recommend you use Anti-Shake(HDIS)
for handheld recording
when the subject is zoomed in and enlarged.
Slide the [Zoom] lever towards [T] (telephoto).
(Or press the [Control (Up)] button on the LCD screen.)
The distant subject is gradually magnified.
Slide the [Zoom] lever towards [W] (wide-angle).
(Or press the [Control (Down)] button on the LCD screen.)
The subject gets smaller and further away.
The smallest zoom ratio is the subject's original size in the zoomout.
Frequent use of the zoom function
consumes
more power.
If you zoom when recording, the camcorder may record the sound
of the [Zoom] lever or [Zoom] button operating.
When you use the zoom function, you can decrease its speed by
slowly moving the [Zoom (T/W)] lever. Moving the lever quickly
increases the zoom speed. However, you cannot use the [Zoom
(T/W)] button on the display to adjust the zoom speed.
When Video Resolution is set to 1280x720/30p,
function does not operate.
the Intelli Zoom
Basic reco_'ding
USING THE BACK LIGHT BU_ON
When a subject is lit from behind, this function compensates
lighting se that the subject is not too dark,
for
_zS ..........
Press the [Back light ( _
between On and Off.
)] button to toggle the back light mode
<Going to the standby mode
after recording a video>
r_,..........
[...... I
......
<Video
playback
mode>
_C]_]
<Switch
........
_-
<Photo
playback
modes>
mode>
<Going
mOdeafter
totaking
the standby
a photo>
iiiiiiiiiiiiiiiiiiiiiiiiiiiiiiiiiiiii````````````````````````````````````_``````````````````````````````````
8,,,........
......
,......
0_00'
_"_°°°_
,_ __
........
i:
i ,iiiii,iiii,
iiiiiii_'_:'_
_':_,
iiiiiiiiiiiiiiiiiiiiiiiiiiiiiiiiiiiii
Basic playback
PLAYING BACK VIDEOS
Use the [Control (Up/Down/Left/
Right)] button to select the desired
videos, and then press the [Control
(OK)] button.
o The camcorder plays back the
video you selected and the
shortcut menu for playback
appears for a short time.
o The selected videos play back according to the PlayOption
setting. '._page 68
o If you play back a video tagged as My Clip, the My Clip
(_) icon on the LCD screen appears. The color of the My
Clip icon is changed to yellow at the scenes tagged as My
Clip (for 8 seconds).
You can preview recorded videos in a thumbnail view, find your
desired video quickly, and play back directly.
To stop playback and return to the thumbnail view, use the
[Zoom] lever.
Do not power off the camcorder or eject the memory card during video
playback. Doing so may damage the recorded data.
*
Select the video thumbnail view.
o You can easily switch between
video and photo thumbnail view
using the [Zoom] lever.
o,,,_,,...o.,J
L_.,__,J
_i=!£1@iiiiiiiiiiiii!i
_ IiiI!iii_!!i
i!!il!ii@
o
The
loadingresolution.
time of a video may vary debanding on the video file's size
and video
Video files may not play back on the camcorder in the following eases:
The video was recorded on another device.
The video has a file format that is not supported by the camcorder.
The internal speaker automatically turns off when the AudioNideo cable
is connected to the camcorder. (When the camcorder is connected to an
external device, adjust the volume using the connected external device.)
You can play back recorded video files on a %/or a PC. _pages 81, 86
For various functions available during playback, see page 44.
Basic playback
I Various playback
operations
o During playback, press the [Control (Right)] button to locate
the starting point of the next file. Pressing the [Control (Right)]
button repeatedly skips files in the forward direction.
o During playback, press the [Control (Left)] button to locate the
starting point of the current file. Pressing the [Control (Left)]
button repeatedly skips files in the reverse direction.
o Press the [Control (Left)] button within 3 seconds from the
starting point of the current file to skip back to the previous file.
[Control
(Up/Down/Left/
Right/OK)]
button
I To adjust the volume during video playback
'1
Playback and pause alternate
when you press the [Control (OK)]
button during playback.
2
Use the [Zoom] lever to stop
playback and return to the
thumbnail view.
Press the [Control (Up/Down)] button
to increase or decrease the volume.
o You can hear the recorded sound
from the internal speaker.
o The level can be set anywhere
between 0 and 10.
[E3_
...................
iii
ii i
oo-ooo
'1
During playback, press and hold
for reverse search/forward
2
[-_1 _#_ ..............
search.
the
EControl
Left/Right
button
l
Pressing the [Control (Left/Right)]
button repeatedly increases the
search speed for each direction.
/
,c..;;;;@/
..........
f/
_00-0001j
o RPS (Reverse Playback Search) rate: x2 _ x4 _ x8 _ x16
o FPS (Forward Playback Search) rate: x2 _ x4 _ x8 _ x16
1"3 To resume normal playback, press the [Control (OK)] button.
_]
*
If you close the LCD screen during playback, you may not hear the
sound from the speaker.
You can hear the recorded sound only when the playback is at
normal speed.
When playing back the My Clip tags, the search playback function
does not operate.
Basic playback
PLAYING BACK MY CLIP
USING THE SMAF/T BGM FUNC1°!ON
You can extract and play back the scenes tagged as 'My Clip' from
a video.
You can enjoy music during video playback, If the original sound in
the video is loud, the background music will be decreased naturally.
On the other hand, if the original sound in the video is quiet, the
background music will be increased naturally.
1
Select the video thumbnail view.
2
Use the [Control (lip/Down/Left/
Right)] button to select the video
tagged with the My Clip symbol
(_), and then press the [PI--IOTO]
button.
Select the desired video to play back and then press the [SMART
BGM] button.
To cancel, press the [SMART BGM] button again.
o The camcorder plays back the
tagged scenes sequentially.
To stop playback and return to the
thumbnail view, use the [Zoom]
lever.
1oo-ooe5
[_}
ou can change the background
"_ page 68
music in the Smart BGM Option.
Basic playback
[XGGING AND CAPTURING GRE!IF
MOMENTS WHILE PLAYING BACK VDEO
You carl tag
function
(_)
good
scenes
and capture
during
playback
photos
from
those
using
the
scenes,
My Clip
]:_ When you see a scene you want to
tag, press the [PHOTO] button.
The camcorder tags the scenes
as My Clip (_) and captures
photos at the same time.
4
[_]
[o stop playback and return to the
thumbnail view, use the [Zoom] lew_r.
•
During video playback, the camcorder can tag up to 20 scenes
with 'My Clip' from a video and capture photos until the available
remaining capacity of the storage media is full.
Photos are captured in the same resolution as the video recording.
If you press the [PHOTO] button while extracting and playing back
scenes tagged as My Clip, the camcorder switches to STBY mode.
1
Select the video thumbnail view,
2
Use the [Control (Up/Down/Left/
Right)] button to select the desired
videos, and then press the [Control
(OK)] button,
The camcorder plays back the
video you selected and the
shortcut menu for playback
appears for a short time.
Basic playback
VIEWING PHOTOS
Uee
the[Control
Left/Right)]
button(Up/Down/
to select the
_-_,_
:ii
.....
desired photos, and then press the
[Control (OK)] button.
o The camcorder displays the
photo you selected in full screen (_Thumbno*_wow
view and the shortcut menu for
playback appears for a short time.
o To view the previous/next photo, press the [Control (Left/
Right)] button.
You can view recorded photos by using various playback functions.
:'_ To return to the thumbnail view, use the [Zoom] lever.
Do not power off the camcorder or eject the memory card during photo
playback. Doing so may damage the recorded data.
I_]
*
Loadingtimemayvarydependingonthesizeandqualityofthe
selected photo file.
Your camcorder may not play back the following photo files normally:
Photos that were recorded on another device.
Photos recorded in a file format not supported by this camcorder
(a format that does not conform to DCF standards).
Select the photo thumbnail view.
o You can easily switch between
the video and photo thumbnail
view using the [Zoom] lever.
...............
Basic playback
ZOC)MING DURING PHOTO P_ AYBACK
You carl magnify
a playback
image
by using
the zoom
Press the [Control (Up/Down/
Left/Right)] button to view the area
you want on the magnified photo,
function,
4
!_
To cancel,
•
use the
[Zoom]
lever.
Photos recorded on other devices or those edited on a PC cannot
be magnified.
WhiLe you are using the playback
images.
1
Select the photo you want to
magnify. _page 47
2
Adjust the magnification with the
[Control (OK)] button,
lhe screen b framed and tile
image is magnified starting from
the center of the image.
* You can zoom in from xl.3 to x2,0.
_Thoo, bno"VE°w
zoom, you cannot select other
Using the menu items
HANDLING MENUS
S Press the [Control (Up/Down)]
The instructions below are examples of how to access and use
menu items using the [MENU] button. When you access and use
other menu items, use these examples as guides.
4
button to select the desired
submenu item, and then press the [Control (OK)] button.
When you finish changing settings, press the [MENU] button to
exit.
•
While you are using certain menu items, some other menu items
cannot be used at the same time or may be grayed out. For more
information, see 'Troubleshooting' on page 102.
For easy understanding,
the menu setting procedure in the example
above presented the simplest way of setting the menu item. Menu
setting methods can differ depending on the menu options you
choose.
You can also access the shortcut
button. _page 27
1
Pressthe
[MENU] button.
o The menu screen appears.
2
Pressthe [Control (Left/Right)]
button to select Video Resolution.
o The Video Resolution function is
used here as an example.
menu using the [Control
(OK)]
Usin 9 the menu items
MENU ITEMS
•
•
The items available
For item operation
I Recording
in each menu vary depending
details, see the page number
on tile operation
listed under Page
menu items
mode.
in the table,
I Playback menu items
@ : Accessible
X : Not accessibb
iSCENE
Video
Auto
Resolution
Photo Resolution
White
52
1280X720/30p
1696x954
(16:9)
53
54
Balance
Auto
54
Face Detection
Off
56
EV
C,Nite
-
Focus
Thumbnail
View
Option
(Thumbnail view only)
Digital Special
67
@
X
Play All
68
57
@
X
The Flea Waltz
68
58
Delete
@
@
70
@
X
71
Auto
58
Off
60
Off
61
Type
Optical Zoom
62
Cont.
Shot
Off
63
Off
64
Guideline
Off
66
Settings
_
75
REC
Normal
PlayOption
Zoom
Time Lapse
Effect
@
Smart BGM Option
(Single view only)
Delete
Anti-Shake(HDJS)
@
My Clip
Protect
@
@
72
Share Mark
@
X
73
Slide Show
X
@
74
File Info
@
@
74
Settings
@
@
75
Usin 9 the menu items
@ : Accessibb
X
I Setting menu items
Storage
Info
accessible
@
@
@
@
@
@
@
@
@
@
@
@
@
@
@
@
@
@
@
@
Off
76
LCD Brightness
@
@
@
@
@
Normal
77
Auto LCD Off _'
@
@
@
@
@
On
77
@
@
@
@
@
On
78
@
@
@
@
@
On
78
@
@
@
@
@
5 Min
79
PC Software
@
@
@
@
@
On
79
Format
@
@
@
@
@
@
@
@
X
X
@
@
@
@
@
@
@
@
@
@
File No.
Date/Time
Date/Time
Set
Display
Beep Sound
Shutter
Sound
Auto Power Off _
Default
Set
Language
Open source
[_i
: Not
o
o
o
licenses
75
Series
75
76
80
80
English
Menu options and default values may be changed without prior notice.
There are some functions you cannot activate simultaneously in the menu. These items are grayed out. You cannot select the gray menu items.
In general, functions in both the thumbnail display and full image display employ the same methods, while their detaibd options may be different.
Items marked with ® are availabb only when the camcorder is powered by the battery.
80
80
Advanced recording
iSCENE
This camcorder automatically can set the shutter speed and
aperture according to the subject and brightness for optimum
recording.
Use this setting for regular recording
Auto
conditions. The camcorder automatically
adjusts the aperture value and shutter
speed for optimum
Sports
Press the [MENU] button
[Control (Left/Right)] button
iSOENE.
Select the desired submenu item
with the [Control (Up/Down)]
button, and then press the
[Control (OK)] button.
3
Press the [MENU] button to exit the menu.
Portra t
Spotlight
Beach & Snow
Food
Waterfall
recording.
For recording rapidly moving subjects.
Example: When recording sports.
sethng to capture
natural skin tones.
For recording subjects under strong light.
For example, under stage spotlights in
theaters.
@
Use where sunlight or the reflection of light
is intense. Example: a beach or snow field.
For recording objects close-up
color saturation.
For recording
in high
%IY
a waterfall or fountain.
You can also set iSCENE with the shortcut
menu. _page
27
Advanced
Video Resolution
You can select
the resolution
[_j
of a video
to be recorded,
*
recording
60p indicates the camcorder
60 frames per second.
will record in progressive
scan mode at
30p indicates the camcorder
30 frames per second.
will record in progressive
scan mode at
Recorded files are encoded using Variable Bit Rate (VBR). VBR is an
encoding system that automatically adjusts the bit rate according to
the image being recorded.
High resolution images occupy more memory space than low
resolution images. If you select the higher resolution, there is less
space to record videos in the memoe4
Press the [MENU] button
[Control (Left/Right)] button
Video Resolution.
The recording times depend
recorded. _page 33
Select the desired submenu item
with the [Control (Up/Down)]
button, and then )tess the
[Control (OK)] button.
3
Press the [MENU] button to exit the menu.
1280x720/30p
Records in 1280x720
(30p) resolution.
Iq[D
720x480/60p
(16:9)
Records in 720x480 (60p) resolution
with 16:9 aspect ratio.
8_
720x480/60p(4:3)
Records in 720x480 (60p) resolution
with 4:3 aspect ratio.
8©
on the resolution of a video to be
Advanced
recording
Photo Resolution
White Balance
You can select the quality of photo images to be recorded.
Using the White Balance function, you can select a setting that
matches the light illuminating the subject you are shooting (Daylight,
Fluorescent, etc.) or let the camcorder make all adjustments
automatically. Based on your selection, the camcorder automatically
adjusts the color of the subject so the colors in your recording look
natural.
Press the [MENU] button
[Control (Left/Right)] button
Photo Resolution.
2
Select the desired submenu item
with the [Control (Up/Down)]
button, and then press the
[Control (OK)] button.
Press the [MENU] button
[Control (Left/Right)] button
White Balance.
i"3 Press the [MENU] button to exit the menu.
Select the desired submenu item
with the [Control (Up/Down)]
button, and then press the
[Control (OK}] button.
1696x954(16:9)
Record in 1696x954
resolution.
1280x720(16:9)
Record in 1280x720
resolution.
1600xl 200(4:3) _
Record in 1600xl 200 resolution.
800x600(4:3) _
•
•
•
•
•
3
_qJ
Record in 800x600 resolution.
Other devices
not display
photos recorded by your carncorder if those
devices
do not may
support
high resoJution.
For photo development,
the higher the resolution, the finer the image qualEty.
The number of recordabb images differs according to the photo resoJution you
sebot. _page 33
High resolution images occupy more memory space than low resolution images.
If you select a higher resoJution for your photos, you will have less space to store
photos in the memory.
Resolutions marked with _ are the resolutions of photos your record when you set
video resolution to 720X480/60p
(4:3).
Press the [MENU] button to exit the menu.
Advanced
I To set the white balance
i
!
Select Custom
i!i!!!ili
Daylight
lighting.
For recording
in clear, outdoor
Cloudy
weather.
For recording
in the shade or cloudy
Fluorescent
lights.
For recording
under white fluorescent
manually
WB.
o The indicator (_::::_)and message
Set White Balance appear.
To let the camcorder adjust the white
balance automatically according to
the lighting conditions.
Auto
recording
Frame a white object such as
a piece of paper so it fills the
screen. Use an object that is not
transparent.
o If the object filling the screen is
not focused, correct the focus
using Focus: Manual.
'_ page 58
Press the [Control (OK)] button.
Tungsten
For recording
underlights.
halogen lamps
and
incandescent
_,
o The camcorder applies the
stored white balance the next time you record.
Lets you manually adjust the white
Custom
WB
balance to match the light source or
situation.
4
/_]
Press the [MENU] button to exit the menu.
*
A subject can be recorded under various types of lighting conditions
indoors (natural, fluorescent, candlelight, etc.). Because the color
temperature is different depending on the light source, the subject's
tint will differ, affecting the subject's white balance. Use this function
to correct the white balance and provide a more natural result.
When you set white balance manually, the object you frame must
be white. Otherwise your camcorder may not detect an appropriate
setting value.
The adjusted
o
setting remains until you set the white balance again.
During normal outdoor
results.
recording, setting to Auto
may provide better
Cancel the digital zoom function for a clear and precise setting.
Reset the white balance if light conditions
change.
Advanced
recording
Face Detection
Face Detection detects and recognizes faceqike shapes and adjusts
focus, color, and exposure automatically. Also, it adjusts recording
conditions so that they are optimized for the face detected.
Press the [MENU] button
[Control (Left/Right)] button
Face Detection.
Select the desired submenu item
*
with the [Control (Up/Down)]
button, and then press the
[Control (OK)] button.
3
he not
Face
Detection
are
recorded.
indicator (_)
and Face Detection frame (
The Face Detection frame will not work on the side of a person's
face or if the illumination is too low. You must be facing subjects
'head-on' and have enough illumination.
To exit the menu, press the [MENU] button.
You can also set Face Detection with the shortcut
Off
To disable the function.
On
TOrecordingdetect
values.faces
automatically
)
Face Detection may not operate depending on the recording
conditions. For example, the Face Detection frame may appear on a
'faceqike' shape, even when the subject is not a person's face. If this
occurs, turn off the Face Detection function.
and set the optimal
_(_
menu. _page
27
Advanced
EV (Exposun'_eValue}
The camcorder usually adjusts the exposure automatically,
You can also manually adjust the exposure to your preference.
Press the [MENU] button
[Control (Left/Right)]
EV.
button
2
Press the [Control (OK)] button.
3
Press the [Control (Left/Right)]
button to adjust the exposure while
viewing the image on the LCD
screen.
o EV values (1_--I):-2.0, -1.6, -1,3,
-1.0, -0.6, -0.3, 0, +0.3, +0.6,
+1.0, +1.3, +1.6, +2.0
Confirm your selection by pressing the [Control (OK)] button.
o The camcorder applies the exposure value setting and the
indicator (_) and setting value appear.
o To cancel the adjusted exposure value manually, select 0 in
Step 3.
You can also set EV with the shortcut
menu. _page
27
recording
Advanced
CNite
Focus
You can adjust the shutter speed when recording a slow moving
object or a brighter image in dark places without compromising
colors.
When
you turn the cameorder
on, focus isalways
You can also set the focus manually.
recording
set to automatic.
Press the [MENU] button
Press the [MENU] button
[Control (Left/Right)] button
C.Nite.
[Control
Focus.
(Left/Right)]
button
Select the desired submenu item
Select the desired submenu item
with the [Control (Up/Down)]
button, and then press the
[Control (OK}] button.
with the [Control (Up/Down)]
button, and then press the
[Control (OK)] button.
3
3
Press the [MENU] button to exit the menu.
Press the [MENU] button to exit the menu.
!!!!!!
ili!!!lii! i !!!lii
i!i il
Off
To disable the function.
On
To record a brighter image by extending the
low shutter speed range to 1/60 or 1/30.
In most situations,
Auto
Manual
•
When you use C.Nite, the image takes on a slow motion like effect.
In addition, the focus adjusts slowly and white dots may appear on
the screen. This is not a defect.
•
When Video Resolution
does not operate.
is set to 1280x720/30p,
the C.Nite function
it is better to use the automatic
focus feature, as it enables you to concentrate
the creative side of your recording.
To focus manually4 Manual focusing may be
necessary under certain conditions that make
automatic focusing difficult or unreliable.
on
Advanced
I Adjusting
the focus
recording
manually
This camcorder automatically focuses subjects from close-up to
infinity. However, the correct focus may not be obtained depending
on the recording conditions. If this occurs, use the manual focus
mode.
Press the [Control (Up/Down)]
button to select Manual.
o The manual focus adjustment
indicator appears.
Press the [Control (Left/Right)]
button to select the desired
indicator to adjust focus, and then press the [Control (OK)]
button.
* The camcorder applies the manual focus setting and the (_])
indicator appears.
*
You can also adjust the focus with the shortcut menu. "*page 27
Manual focusing focuses on a point in the framed scene while auto
focusing focuses on the center area automatically,
o
The Auto Focus (AF) setting is useful when you operate the zoom
function because you might not be able to keep accurate focus after
the zoom ratio has been changed.
*
When Zoom Type is set to Digital Zoom, manual focusing will not
focus accurately, Before focusing manually, check if the Digital
Zoom is turned off. _page 62
Advanced
recording
Use the Anti-Shake(HDIS) function to compensate for unstable
images caused by shaking movements while holding the camcorder.
1
Pressthe
[MENU] button
[Control (Left/Right)]
Anti-Shake(HDIS).
button
Select the desired submenu item
with the [Control (Up/Down)]
button, and then press the
[Control (OK)] button.
3
/_]
*
Gross camcorder shake may not be entirely corrected even if AntiShake(HDIS) is On. Hold the camcorder firmly with both hands.
When this function is On, the actual movement of the subject and
the movement displayed on the screen may be slightly different.
Press the [MENU] button to exit the menu.
o
Off
On
To disable the function.
To enable ihe Anii Shake(HDiS i funciion io
compensate
for shaking movements.
The
camcorder
automatically
activates the Anti-Shake(HDIS)
function
in the Smart
Auto mode.
When recording in dark lighting at high magnification while this
function is On, afterimages may stand out. If this occurs, we
recommend using a tripod (not supplied) and turning AntiShake(HDIS) to Off.
Advanced
recording
Digital Special Effect
Using the digital special effect function gives your recording a
creative look.
Press the [MENU] button
BlkaWht (@)
This mode changes the image into black and
white.
[Control (Left/Right)] button
Digital Special Effect.
Sepia (@)
This mode gives images a reddish brown cast.
Select the desired submenu item
with the [Control (Up/Down)]
button, and then press the
[Control (OK)] button.
3
off
Disables the function.
Press the [MENU] button to exit the menu.
Negative (@)
This mode reverses the colors and the brightness
and creates a negative effect.
Dazzle (@)
This mode creates a brighter image by increasing
color saturation.
Noir (_)
This mode creates a stronger image by
increasing contrast.
Western (@)
This mode creates a faded and old film vintage
look,
Advanced
recording
Zoom °Fype
The camcorder
digital zoom.
offers
three
types
of zoom:
optical,
intelligent,
and
Press the [MENU] button
[Control (Left/Right)]
Zoom Type.
button
Select the desired submenu item
with the [Control (Up/Down)]
button, and then )tess the
[Control (OK)] button.
3
_1
Press the [MENU] button to exit the menu.
Optical
Zoom
To use optical zoom, up to 52X.
o
Inteiii Zoom
Zoom
zooms the fuii width of ihe
image sensor to obtain a larger zoom range
without any deterioration in image quality.
Intelli zoom is available up to 70X.
o
Digital
The camcorder
When this option is selected, the camcorder
will
automatically switch to the digital zoom if you
zoom in beyond the optical or intelligent zoom
range.
Digital zoom is available up to 130X.
*
With digital zoom, the image is digitally processed more than it is in
the intelli or optical zoom modes. As a result, the image resolution
may deteriorate. The image quality may deteriorate depending on
how much you zoom in on the subject.
The zoom range will change depending on the aspect ratio of the
video.
Advanced
recording
Cont Shot
The Continuous Shot function allows you to capture photos in rapid
succession and gives you more photo-taking opportunities when
recording moving subjects.
Press the [MENU] button
[Control (Left/Right)] button
Cont. Shot.
Select the desired submenu item
with the [Control (Up/Down)]
button, and then press the
[Control (OK)] button.
3
Press the [MENU] button to exit the menu.
/_
Off
To record only one photo image.
On
While you are pressing the [PHOTO] button,
the camcorder can take up to 30 photos
continuously.
*
The number of recordable photos depends on the photo's
and the memory space available.
o
If an error occurs (Card full, etc.) during continuous
recording stops and an error message appears.
resolution
shot, the
Advanced
Time Lapse REC
Using the Time Lapse feature, you can program your camcorder to
create a time lapse video by recording a series of frames over a set
period of time with a set time interval between each frame. The Time
Lapse feature lets you create time lapse videos of blooming flowers
and similar subjects.
Move to the next setting (Fir) by pressing the [Control (Left/
Right)] button, and then set the desired total recording time in
the same way.
5
Press the [Control (OK)] button to finish the setting, and then
press the [MENU] button to exit the menu.
6
After setting the Time Lapse REC mode, press the [Recording
start/stop] button.
o The Time Lapse REC starts.
Press the [MENU] button
[Control (Left/Right)] button
Time Lapse REC.
Off
To disable the function.
;
Press the [Control (Up/Down)]
button to select On, then press the
[Control (OK)] button.
o The recording interval and total
recording time items appear.
Set the desired recording interval
(Sec) with [Control (Up/Down)]
button.
recording
On
o
inie_ai iSecii To set ihe iime inie_ai beiween
image captures.
1_3_5_
10_ 15 _ 30 (Seconds)
REC Limit (Hr): To set the total time of
recording.
24 _ 48 _ 72 _ co (Hours)
/_
During Time Lapse recording, the C.Nite function
does not work.
Advanced
[_1
°
•
•
•
•
•
•
•
reco_din9
Time Lapse on
Recording
is released
recording images
has been
finbhed.a video
To start
repeatlength
stepsof 1a to
6 onthat
the your
preqous
page. can save
Depending
the video mode
resolution,
60 or once
30 captured
compose
of 1another
second Time
length.Lapse
SinceRecording,
the minimum
video
camcorder
is one second,
the interval defines the total minimum
recording
time for the Time Lapse Recording.
For example,
if you set the interval to 30 Sec, you need to set the
recording
time to at least 30 minutes for a 60 frames per second
resolution
or 15 minutes for a 30 frames per second
resolution
to record a video 1 second
long.
Press the [Recording
start/stop]
button if you want to stop the Time Lapse Recording.
Audio is not recorded
during time lapse recording.
The maximum
continuous
recording
time is under 20 minutes. The maximum
video file s_ze is 1.8GB. When a video recording
time is more than 20 minutes or a video
file exceeds
1.8GB,
a new video file is created automatically.
If the battery charge is exhausted
during time lapse recording,
the camcorder
saves recording
up to that point and switches
to standby
mode. After a while, it displays
a
warning message,
then turns off automatically.
If the storage media
becomes
full during time lapse recording,
the camcorder
switches
to the standby mode after saving the recording
up to the maximum
memory
available.
VVe recommend
using the power
adaptor for a Time Lapse Recording
instead of the battery.
When a time lapse recording
starts, the Time Lapse Recording
message
will blink even if you switch
This is normal operation.
Do not remove the power source or memory
card from the camcorder.
the
information
display
mode
to the minimum
display
mode.
Advanced
recording
Guideline
This camcorder
provides
3 types of guidelines
a balanced
image composition
on the screen.
to help you to set up
!i
!
Off
Cross
Use when focusing
a subject
in the center.
[]
Grid
Use when recording a subject in a
horizontal or vertical composition or
shooting with the tele macro function.
[]
Safety Zone
Positioning subjects within the Safety
Zone rectangle ensures they will be
recorded.
[]
Press the [MENU] button
[Control (Left/Right)]
Guideline.
To cancel the guideline function.
button
Select the desired submenu item
with the [Control (Up/Down)]
button, and then press the
[Control (OK)] button.
3
Press the [MENU] button to exit the menu.
/_
*
Positioning a subject at the cross point of a guideline provides a
balanced composition.
Guidelines are not recorded.
Advanced playback
Thumbnail View Option
The Thumbnail View Option lets you sort thumbnails of the recorded
videos or photos by different display options.
Press the [MENU] button
[Control (Left/Right)] button
Thumbnail View Option.
This function
Select the desired submenu item
with the [Control (Up/Down)]
button, and then press the
[Control (OK)] button.
Normal
Date
To display the file thumbnails
files were recorded.
To sort the file thumbnails
recorded.
in the order in which the
by the date the files were
is available in thumbnail
view only4
Adva__ced playback
Sma,'_tBGM Option
You can play back one video or all videos once, or play back one
video or all videos repeatedly.
Press the [MENU] button
[Control (Left/Right)] button
PlayOption.
You can play back a video with background music. The Smart BGM
Option lets you select the music that will play.
1
Press [MENU] button _ [Control
(Left/Right)] button
Smart BGM Option.
2
Select the desired submenu item
Select the desired submenu item
with the [Control (Up/Down)]
button, and then press the
[Control (OK)] button.
with the [Control (Up/Down)]
button, and then press the
[Control (OK)] button.
1"3 Press the [MENU] button to exit the menu.
o To play back the selected background music with a video,
press the [SMART BGM] button when the video plays back.
To stop the background music, press the [SMART BGM]
button again.
i"3 Press the [MENU] button to exit the menu.
!
!!! !lili! iilii!i!
!i!iiJi
!lii!!!iiiiiii! !i
Play
Play
Repeat
Repeat
All
One
TOlastPlaYvideo.back
from
the selected
To play back
the selected
All
To play back
all videos
One
To play back
the selected
video
video
to the
only once.
_,
The Flea Waltz
Canon in D
Cello Suite No.1
Nocturne
=_
repeatedly.
video
repeatedly.
Random
_]
To playbackThe FleaWaltz.
To playbackCanoninD.
To playbackCelloSuiteNo.1.
To playbackNocturne.
To play back
randomly.
from
The
Flea Waltz
to Nocturne
When you change background music by pressing the [MENU] button while
the video is playing back, the video will be paused. Press the [Control
(OK)] button to play back the paused video again with the changed
background music.
Advanced
I Using external
songs
as background
music
(Smart
BGM [][)
The song saved into the memory
card appears on the Smart BGM
Option menu in video playback
mode. _ page 68
You can play songs you have saved to a memory card as
background music as well as the songs stored in the camcorder's
memory and available through the Smart BMG option.
Convert your songs to a compatible format using the built-in Intellistudio program so they can be recognized by the camcorder.
'1
Connect the camcorder
to a PC with the USB cable to run the
playback
You can delete the external songs from
Manage BGM in the Smart BGM screen
or from the BGM folder in the memory
card.
Intelli=studio program. _ page 86
2
Click Tool on the Intelli-studio
screen _ Sending song for
Smart BGM.
_l
1"3 Click Browse on the Smart BGM
screen, and then select the desired
song.
Change the song's name so it can
be recognized by the camcorder,
and then click Send _ Yes.
o The song is converted to
the m4a format, and then
transferred into the memory
card in the camcorder.
When the transfer finishes, click
OK.
o You can save up to 5 converted songs in the memory card in the
camcorder.
_
The camcorder can only recognize the external songs converted
the Intelli-studio program.
Intelli-studio can only convert files saved in the mp3 and m4a
formats.
by
External songs are saved into the BGM folder in the memory card.
If you transfer the converted m4a files into the BGM folder in the
memory card, you can use them with Smart BGM.
Advanced
D@ete
You can erase
If you selected
your
recordings
one
by one or all at once.
option
to select
Yes,
Select
Press the [MENU] button
[Control (Left/Right)] button
Delete.
Files
All Files
Select an option by pressing the
[Control (Up/Down)] button, and
then press the [Control (OK)] button.
If you selected Select Files, image
thumbnails appear.
® Use the [Control (Up/Down/
Left/Right)] button to move to
the photo or video you want to
delete.
@ Press the [Control (OK)] button
to mark images for deletion. The garbage can icon (}ll_)
appears on the photo or video.
© Repeat Steps ® and @ for each photo or video you want to
delete.
@ Press the [MENU] button to delete the photos and videos you
selected.
@ The message corresponding to the selected option appears.
Use the [Control (Left/Right)] button to select Yes, and then
press the [Control (OK)] button.
selected
_j
All
Files,
appears.
and then
the
message
playback
corresponding
Use the
[Control
(Left/Right)]
press the
[Control
(OK)I
to the
button
button.
To delete selected videos or photos.
To delete all videos or photos,
protected files.
except for the
*
Deleted images cannot be recovered.
Do not remove the power adaptor or memory card while deleting
files, otherwise the storage media may be damaged.
•
You can also delete your recordings in single view.
To protect important images from accidental deletion, activate image
protection. _page 72
Protected images cannot be deleted. To delete a protected image,
cancel the protect function first. _page 72
If the write protection tab on a memory card is set to lock, you
cannot delete.
You can also format the storage media to delete all the images at
once. Be aware that all files and data including protected files will be
erased. _page 80
The Delete function does not operate if the battery charge is
insufficient. We recommend you use the power adaptor to avoid
powerqoss while deleting.
Advanced
Delete My Clip
You can delete the My Clip tag from a video tagged as 'My Clip'.
Press the [MENU] button
[Control (Left/Right)] button
Delete My Clip.
Select an option by pressing the
[Control (Up/Down)] button, and
then press the [Control (OK)] button.
If you selected Select Files, image
thumbnails appear.
® Use the [Control (Up/Down/
Left/Right)] button to move to a
video tagged as My Clip (_).
@ Press the [Control (OK)] button.
The garbage can icon (_}_)
appears on the video.
© Repeat Steps ® and @ for each video tagged as My Clip
@ Press the [MENU] button to delete all tags from the videos
you selected.
@ The message corresponding to the selected option appears.
Use the [Control (Left/Right)] button to select Yes, and then
press the [Control (OK)] button.
4
playback
If you selected All Files, the message corresponding
to the
selected option appears. Use the [Control (Left/Right)] button
to select Yes, and then press the [Control (OK)] button.
Select Files
All Files
To delete the My Clip tags from selected videos.
To delete the My Clip tags from all videos.
Deleted My Clip tags cannot be recovered.
You can also delete the My Clip tags from videos in single view.
Advanced
Protect
If you selected All On, the message corresponding to the
selected option appears. Use the [Control (Left/Right)] button
to select Yes, and then press the [Control (OK)] button.
You can protect important saved videos or photos from accidental
deletion. You cannot delete protected images unless you release the
protection or format the memory.
If you selected All Off, the message corresponding to the
selected option appears. Use the [Control (Left/Right)] button
to select Yes, and then press the [Control (OK)] button.
Press the [MENU] button
[Control (Left/Right)] button
Protect.
Select Files
Select an option by pressing the
[Control (Up/Down)] button, and
then press the [Control (OK)]
button.
If you selected Select Files, image
thumbnails appear.
® Use the [Control (Up/Down/
Left/Right)] button to move to
the photo or video you want to
protect.
@ Press the [Control (OK)] button
to mark images for protection. The key icon (@=ss)appears
on the photo or video.
© Repeat Steps ® and @ for each photo or video you want to
protect.
@ Press the [MENU] button to protect the photos and videos
you selected.
@ The message corresponding to the selected option appears.
Use the [Control (Left/Right)] button to select Yes, and then
press the [Control (OK)] button.
playback
[_
*
To protect selected videos or photos from deletion.
All On
To protect all videos or photos.
All Off
To cancel the protection for all videos or photos.
You can also protect you recordings in single view.
If the write protection tab on a memory card is set to lock, you
cannot set image protection. _page 31
Advanced
Share Mark
playback
If you selected All On, the message corresponding to the
selected option appears. Use the [Control (Left/Right)] button
to select Yes, and then press the [Control (OK)] button.
You can set the share mark on a video and directly upload the
marked file to the YouTube site,
If you selected All Off, the message corresponding to the
selected option appears. Use the [Control (Left/Right)] button
to select Yes, and then press the [Control (OK)] button.
Press the [MENU] button
[Control (Left/Right)] button
Share Mark.
Select
Select an option by pressing the
[Control (Up/Down)] button, and
then press the [Control (OK}]
button.
If you selected Select Files, image
thumbnails appear.
® Use the [Control (Up/Down/
Left/Right)] button to move
to the video you want to share
mark.
@ Press the [Control (OK)] button
to select each video you want to share mark. The share mark
icon ((_]) appears on the video.
© Repeat Steps ® and @ for each video you want to share
mark.
@ Press the [MENU[ button to mark the videos you want to
share.
@ The message corresponding to the selected option appears.
Use the [Control (Left/Right)] button to select Yes, and then
press the [Control (OK)] button.
Files
All On
All Off
I_j
o
o
To set the share mark selected videos.
To set the share mark all videos.
To remove the share mark from all marked videos
all at once,
You can also set the share mark on your videos in the single image
display mode,
By using the IntellPstudio software embedded in the camcorder, you
can easily upload videos marked with share marks, _page 90
When uploading a video file to a web site such as YouTube, the onetime upload maximum is 14 minutes 59 seconds,
Advanced
Slide Show
You can enjoy
a slide show
File Info
with
various
effects.
You
can see the
image
information
for
photos
Press the [MENU] button
[Control (Left/Right)] button
File Info _ [Control (OK)] button.
o The fib sebction screen
Press the [MENU] button
[Control (Left/Right)] button
Slide Show.
appears.
Select an option by pressing the
[Control (Up/Down)] button, and
then press the [Control (OK)]
button.
Select the desired video or photo
by pressing the [Control (Up/
Down/Left/Right)]
button, and
then press the [Control (OK)]
button.
Press the [MENU] button to exit
the menu.
o The following information forthe
selected file appears:
Date
Ioo-oooi
Duration (Video only)
Size
Resolution
To start a slide show from the current image.
- The indicator (_)
appears.
Start
-
Interval
To stop the slide show, press the [Control (OK)] button
again.
To return to the thumbnail view, move the [Zoom] lever.
Continuously plays back photos at the interval you select.
You can choose lsec or 3see.
You can turn the internal background
Music
playback
music on or off. This
camcorder has 4 default background melodies stored in the
boot-up flash memoe4 If the music is on when the slide show
starts, the 4 melodies will play back in shuffle mode.
3
Press the [MENU] button to exit the menu.
and
videos.
Other settings
Storage Info
File No
Storage Info displays the storage information for the storage media.
The camcorder assigns file numbers to recorded files in the order
they were recorded. Use File No. to continue or reset the current file
number sequence.
Press the [MENU] button
[Control (Left/Right)] button
Settings _ [Control (Up/
Down)] button _ Storage Info
[Control (OK)] button.
Press the [MENU] button
[Control (Left/Right)] button
Settings _ [Control (Up/
Down)] button _ File No.
[Control (OK)] button.
° Press the [Control (Up/Down)]
button to move the screen up
or down and view additional
information.
° You can check the used
Select the desired submenu item
with the [Control (Up/Down)]
button, and then press the
[Control (OK)] button.
memory, available memory, and
the available recordabb time for
each recording resolution.
2
Press the [MENU] button to exit the menu.
•
If
is no on
storage
media inserted, it cannot be selected and will
bethere
dimmed
the menu.
•
The actual capacity may be less than the capacity displayed on the
LCD screen as the camcorder's system files occupy a part of the
capacity.
1"3 To exit the menu, press the
[MENU] button.
Assigns file numbers
Series
The file number
Reset
[_]
in sequence
different memory card, formatted
even if you have inserted
a
the card, or deleted all files.
is reset only when a new folder is created.
Resets the file number to 0001.
When you set File No. to Series, each file is assigned a different number
to avoid duplicating file names. It is convenient when you want to manage
your files on a computer.
75
Other settings
Date/qqme Set
Date/Time Display
By setting the date and time, you can display the date and time of a
recording during playback.
You can set whether or not the date and/or time appear on the LCD
screen.
Press the [MENU] button
[Control (Left/Right)] button
Settings _ [Control (Up/Down)]
button _ Date/Time Set
[Control (OK)] button.
Press the [MENU] button
[Control (Left/Right)] button
Settings _ [Control (Up/Down)]
button _ Date/Time Display
[Control (OK)] button.
Select the date or time information,
and change the setting values by
pressing the [Control (Up/Down/
Left/Right)] button.
Select the desired submenu and
menu item with the [Control (Up/
Down)] button, and then press
[Control (OK)] button.
Press the [MENU] button to exit
the menu.
1"3 Make sure the clock is correctly set,
and then press the [Control (OK)]
button.
[_
o The date/time appears on the
LCD screen according to the selected option.
The year can be set up to 2037.
Off
Date
Time
Daie & Time
_]
To not displaythe current date/
time.
To displaythe current date.
To displaythe current time.
JAN/01/2013
12:00AM
To disp'ayihe curieni daie and
time.
JAN/01/2013
12:00AM
hen the internal battery is depleted,
JAN/01/2013
12:00AM.
the date/time
will read
Othe__settings
Auto LCD Off
LCD Brightness
You can adjust the brightness
ambient
lighting
conditions.
of the
LCD
screen
to compensate
for
To reduce
power
is automatically
minutes.
Press the [MENU] button
[Control (Left/Right)] button
Settings _ [Control (Up/Down)]
button _ LCD Brightness
[Control (OK)] button.
consumption,
dimmed
if the
the
brightness
camcorder
of the
LOD screen
is idle for more
than
2
Press the [MENU] button
[Control (Left/Right)] button
Settings _ [Control (Up/
Down)] button _ Auto LCD Off
[Control (OK)] button.
Select the desired submenu and
Select the desired submenu item
menu item with the [Control (Up/
Down)] button, and then press
[Control (OK)] button.
3
Press the [MENU] button to exit
the menu.
Normal
Bright
with the [Control (Up/Down)]
button, and then press the
[Control (OK)] button.
3
Standard brightness.
Press the [MENU] button to exit
the menu.
Off
Brightens the LCD screen.
When the camcorder
On
_i
_
If the surrounding
screen.
*
Adjusting the LCD screen does not affect the image being recorded.
A brighter LCD screen consumes more power.
To disable the function.
is idle for more than 2 minutes in the STBY
mode, or for more than 5 minutes when recording a video, the
power saving mode starts and dims the LCD screen.
is too bright, adjust the brightness of the LCD
[_
*
When the Auto LCD Off function is enabled, you can press any
button on the camcorder to return LCD brightness to normal.
Auto LCD Off will be disabled in the following situation:
- If the power cable (Power adaptor, USB cable) is connected.
Othe__settings
Beep Sound
Shutter Sound
When Beep Sound is on, the camcorder sounds a beep when you
press a button,
You can turn the shutter sound the camcorder
press the [PHOTO] button on or off.
Press the [MENU] button
[Control (Left/Right)] button
Settings _ [Control (Up/
Down)] button _ Beep Sound
[Control (OK)] button.
Press the [MENU] button
[Control (Left/Right)] button
Settings _ [Control (Up/Down)]
button _ Shutter Sound
[Control (OK)] button.
Select the desired submenu item
Select the desired submenu item
with the [Control (Up/Down)]
button, and then press the
[Control (OK)] button.
with the [Control (Up/Down)]
button, and then press the
[Control (OK)] button.
3
Press the [MENU] button to exit
the menu.
Off
Disablesthe function.
On
To have the camcorder beep everytime you press a button.
iThe Beep Sound function is suspended in the following situations:
- During recording and playback
During a pause while recording
When the camcorder has a cable connection. (AV cable, micro HDMI
cable, etc.)
3
emits when you
Press the [MENU] button to exit
the menu.
Off
To turn the shutter sound off.
on
Toiuiniheshuite_
;ound
onliiwillsound
whenyoupiessthe
[PHOTO] button.
Othe__settings
Auto Power Off
PC Software
You can set your camcorder to turn off automatically if it is idle for 5
minutes without an operation. This function will prevent unnecessary
power consumption.
If you set PC Software to On, you can use the built-in PC software
easily by connecting a USB cable between the camcorder and your
PC. Using the software, you can download stored video and photo
images on the camcorder to your PC's hard disk. You can also edit
video and photo files using the PC software.
Press the [MENU] button
[Control (Left/Right)] button
Settings _ [Control (Up/Down)]
button _ Auto Power Off
[Control (OK)] button.
Press the [MENU] button
[Control (Left/Right)] button
Settings _ [Control (Up/
Down)] button _ PC Software
[Control (OK)] button.
Select the desired submenu item
with the [Control (Up/Down)]
button, and then press the
[Control (OK)] button.
3
Select the desired submenu item
with the [Control (Up/Down)]
button, and then press the
[Control (OK)] button.
Press the [MENU] button to exit
the menu.
3
Off
5 Min
To disable the function.
The camcorder
performing
[_
•
•
Press the [MENU] button to exit
the menu.
turns off if idle for 5 minutes without
an operation.
Auto Power Off does not work in the following situations:
- If the power cable (Power adaptor, USB cable) is connected.
- While the following functions are in operation: Delete: All Files,
Protect: All On.
While recording, playing back (except when paused), or playing
back a photo slide show.
To operate the camcorder again, press the [Power (I(_)] button.
Off
To disable the function.
On
To launch the built-in editing software when you connect the
camcorderto a PC witha USB cable.
The PC Software
is compatible
with Windows
operating systems
only.
Other settings
FofliT_st
Default Set
Use the Format function if you want to delete all files completely or
to correct problems on the storage media.
You
]
can restore
Press
the
[Control
all menu
[MENU]
Press the [MENU] button
[Control (Left/Right)] button
Settings _ [Control (Up/Down)]
button _ Format _ [Control (OK)]
button.
button
[Control
2
_
(OK)]
defaults,
button
[Control
_
to their
button
(Left/Right)]
Settings
Down)]
settings
(Up/
Default
Set
button.
Select Yes if you want all the
settings returned to the defaults.
*
Select Yes by pressing the
[Control(Left/Right)]
button, and
then press the [Control (OK)] button.
Do not turn off the power while using this function.
After resetting the camcorder, reset the Date/Time Set. _page 25
The Default Set function does not affect the files recorded on the
storage media.
Do not remove the memory card or perform any other operation
(such as turning off the power) during formatting. Also, be sure to
use the provided power adaptor, as the recording media may be
corrupted if the battery becomes exhausted during formatting.
Q If the storage media becomes corrupted, format it again.
@/"
Do not format the storage media on a PC or other device.
Make sure to format the storage media on this camcorder.
Format the memory card in the following situations:
Before using a new memory card
If the memory card was formatted on other devices
If the memory card was used to record on other devices
If the camcorder cannot read the memory card
A memory card with the protection tab set to lock can not be
formatted.
If there is no storage media inserted, it cannot be selected and will
be dimmed in the menu.
You cannot format when the battery power is insufficient. We
recommend you use the power adaptor to avoid loss of power while
formatting.
You can select a desired language to display the menu and
messages in, "_page 29
Open
Show
SOUrCe liCeNSeS
the Open
source
licenses
information,
Connecting to a 12/
CONNECTING TO A HIGH DEFINITION FV
WITH HDMI
lisrn
You carl view High Definition (HD) quality videos recorded in HD
resolution on an HDTV using an HDMI connection, This camcorder
supports HDMI output to deliver high-definition video transfer.
*
on the camcorder.
If you do not turn
fail to recognize
2
Connect
on the
the
the camcorder
camcorder
connected
to the
first, the
camcorder
may
TV.
TV with
a micro
HDMI
cable.
B Set the 12/'s input or source selector to the HDMI input you've
attached the camcorder to,
HDTV
Refer to the TV's instruction
TV's input or source,
4
manual to see how to select the
Start to play back images, "-page 42
Camcorder
•
You can use only a D to A type micro HDMI cable with this
camcorder.
The HDMI jack on the camcorder is for output only.
Use only HDMI 1.3 cable when connecting to the HDMI jack of this
camcorder. If the camcorder is connected with HDMI cables that are
not version 1.3, the screen display may not work.
Connectin 9 to a l°V
"
G
C"C
_)NNECTIN
_-_
TO A REGULAR FV
You carl view irrlages recorded with your camcorder on a regular
lV that supports standard definition. This camcorder supports the
composite output for standard definition video transfer.
TV
•
Audio/Video
cable
Connect the camcorder to a TV with an Audio/Video cable.
* Turn on the camcorder, and then connect an Audio/
Video cable, If you do not turn on the camcorder first, the
camcorder may fail to recognize the connected FV,
Set the lV'e input or source selector to the input you've
attached the camcorder to,
Refer to the TV's instruction manual to see how to select the
lV input.
i:_
Start
to play back
images.
_,page
42
When you connect the camcorder to a TV, the LCD screen of the
camcorder turns off automatically.
Make sure you've connected the camcorder to the correct input
jacks. The TV screen may not display the right image information if
connected incorrectly.
Do not use excessive force when connecting the cables.
We recommend you use the power adaptor as the power source.
When connecting to a TV using the Audio/Video cable, match the
color of the cables to the color of the corresponding jacks.
Videe input may appear green depending on the T_ If this occurs,
connect the yellow plug of the Audio/Video cable to the green jack of
the TV.
If your TV has one audio jack (mono input), connect the yellow plug
of the Audio/Video cable to the video jack, the white plug to the
audio jack, and leave the red plug unconnected.
When you connect the camcorder to a TV using the Audio/Video
cable, images recorded in high definition image quality (1280x720/
30p) play back in standard definition image quality.
When the camcorder is connected to a TV with more than one kind
of cable, the camcorder outputs video signals in the following order
of priority: HDMI _ Audio/Video (composite) output
Connecting
VIEWING ON A TV SCF/EEN
[_
djust the volume to a moderate level. If the volume is too high, the
video may include noise.
/
/
to a TV
Dubbing videos
DUBBING TO VCF/OF/DVD/HDD
RECORDERS
You can dub images recorded on your camcorder
devices, such as VCRs or DVD/HDD recorders.
'1
Insert the storage media into the recording device.
2
Connect your camcorder to the recording device (VCR or DVD/
HDD recorders) with the supplied Audio/Video cable.
to other recording
c_ Start recording on the recording device, and then start playback
on the camcorder.
o Refer to the instruction manuals supplied with your recording
device for details.
4
VCRs
or DVD/HDD
recorders
When dubbing finishes, stop the recording device, and then your
camcorder.
*
VIDEO
Carnoorder
AUDIO
o
Videos recorded on this camcorder can only be dubbed using
the Audio/Video cable in SD (standard definition) image quality,
regardless of the recording resolution (HD/SD).
To copy a video recorded in HD (high definition) image quality, use
the built-in software of your camcorder, and then copy the video to
your computer. _page 86
Since dubbing is performed via analog data transfer, the image
quality may deteriorate.
To record the date/time,
L J
......
............
Audio/Video
cable
display it on the LCD screen. _page
76
Using with a windows computer
WHAT YOU CAN DO WITH A WINDOWS
COMPUTER
You can perform
the functions
listed below by connecting
camcorder
to your Windows
computer
with a USB cable
the
IntellPstudio
editing
software
built into your
I System
your
and using
camcorder.
OS
higher
I Main Functions
Intelli-studio
editing
Playing
back
Editing
recorded
software's
recorded
main
videos
videos
You
the
can transfer
storage
media
or copy
the files
into your
Intel ®Core 2 Duo ®1.66 GHz or higher i............
AMD AthlonTM X2 DuaPCore 2.2 GHz or higher is
functions
or photos.
CRU
or photos.
Uploading
the recorded
videos
Flickr or Facebook,
etc.
and
photos
(videos
and
computer.
Requirements
Your computer must meet the following requirements to run Intellistudio:
to YouTube,
photos)
saved
RAM
on
recommended
(Notebook: Intel Core2 Duo 2.2GHz or AMD Athlon X2 DuaP
Core 2.6GH _ b)_ber is recommended)
1GBorhigheri
.....
.
V!deo Card
NVIDIA GeForce 85_ Gz[or higher,
ATI Radeon HD 2600 series or higher
Direct
DirectX
9.0c
6MB/s
(Class
X
ded
or higher
Recommended
Memory
(Instalbd
Card
in
6) or above
Camcorder)
•
System requirements mentioned above are recommendations.
Even
on a system that satisfies the requirements, Intelli-studio may not
operate optimally.
On a slower than recommended computer, video playback may skip
frames or operate in an unexpected manner.
If the version of DirectX on your computer is lower than 9.0c, install
DirectX 9.0c or higher.
We recommended you transfer recorded videos to a PC before
playing back or editing the videos.
To run IntellPstudio, a laptop computer requires faster and better
components than a desktop PC.
Intelli-studio is not Mac OS compliant.
On 64-bit environment of Windows XP, Windows Vista, and Windows
7, Intelli-studio may be installed and work as 32-bit program.
Usin 9 with a windows
o Q
UoIN
_ THE InteHi .studio PROGRAM
Inte,i studio is a built in program that allows you to play back and
edk files. You carl upload files to web sites, such as YoufiJbe or
Flickr.
1
Set PC Software
computer
]:_ Click Yes in the new fib saving window. The uploading
procedure starts. Click Yes to confirm.
* If you do not want to save any new files, select No.
to On,
* This is the default setting.
2
Connect the camcorder
to a PC with the USB cable.
* A new file saving window appears along with the Intelli-studio
main window. If your camcorder has no new fibs, the pop-up
window for saving new files will not appear.
* Depending on your version of Windows, the Windows
removable disk window may also appear.
[_]
•
Use
provided
USBthecable.
Make thesure
you insert
USB (Supplied
plug into by
the Samsung)
USB jack
in the correct direction.
•
When
cause
•
If you disconnect
the USB cable from the PC or the camcorder
while
transferring
files, data transmission
will stop and the data may be damaged.
If you connect the camcorder
to a PC via a USB HUB or simukaneously
connect
the camcorder
along with other USB devices,
the camcorder
may
not work properly.
If this occurs,
remove all USB devices from the PC, and
then reconnect
the camcorder.
•
•
the USB cable is connected,
the PC to malfunction.
turning
with the plug
the camcorder
Intelli_studio
may not automatically
run. If this occurs,
or Windows
Explorer, open the drive that corresponds
find Intelli_studio,
and then run iStudio.exe.
oriented
on or off may
access
My Computer
to your camcorder,
Usin 9 with a windows
compute_
When the IntelB studio starts up, video and photo thumbnails appear
in the main window.
@
[_]
o
o
o
If you install Intelli-studio on your PC, the program will launch more
quickly. To install the program, select Tool _ install Intelli-studio
on PC.
You can update the latest version of IntellPstudio software by clicking
onWeb Support
-_ Update Intelli-studio
-_ Start Update.
The camcorder's builtqn Intelli-studio software is intended for
home use. It is not for precision or industrial productions. For these
applications, we recommend an editing software designed for
professional use.
@
Menu items
_
Display files in the selected folder.
@
Switch to Photo edit mode.
@
Switch to Video edit mode.
@
Switch to Share mode.
@
Enlarge or reduce the thumbnails
@
Select a file type.
@
View videos and photos of the selected folder on your computer.
@
Show or hide videos and photos of the connected
@
Vbw videos and photos of the selected folder on the device.
@
View files as thumbnails
@)
Browse
folders in the connected
@}
Browse
folders stored on your computer.
@
Move to the previous or next folder.
0
Print files, view flies on a map, store flies in Contents
register faces.
in the list.
device.
or on a map.
device.
Manager, or
Usin 9 with a windows
You carl play back the recordings conveniently using the Intelli-studio application,
With Intelli--studio, click the desired felder to display your
recordings,
You can edit the videos or photos in various ways with various
functions. (Change Size, Fine--TiJrsing, Image Effect, Insert Frame,
etc,) Before editing a video or pholo in Intelli-studio, make a backup
copy of the video or photo file and store it on your computer for
safe-keeping using My Computer or Windows Explorer,
* Video or photo thumbnails appear on the screen, depending
on the felder you selected,
1
Choose the video or photo that you want to play back.
You can view the file information by moving the mouse over
the file,
If you click a video thumbnail once, the video plays back
inside the thumbnail frame, allowing you to search for a
desired scene with ease,
1:5 After you select the video or photo you want, double--click to
play back.
Playback starts and the controls appear.
_1
computer
Intelli-studio supports the following file formats:
Video formats: MP4 (Video: H.264, Audio: AAC), WMV (WMV 7/8/9)
Photo formats: JPG, GIF, BMP, PNG, TIFF
Choose the videos or photos you want to edit,
Click Movie Edit (_) or Photo Edit (_)
you selected in the Intelli--studio browser.
depending ors the file
* The selected file appears in the editing window,
1:5 Edit a video or photo with various edit functions,
Usin 9 with a windows
compute_
Click Upload to start uploading.
*
Share your contents with the world by uploading photos and videos
directly to a web site with one click,
1
Choose the videos or photos you want to share.
2
Click Share (_)
A pop-up window appears. The window will either ask you
to enter your ID and password or ask you to click OK to
continue to the web site you have selected,
on the Intelli-studio browser,
The selected files appear in the sharing window,
Enter
your
Access
your
Click the web site you would like to upload files to,
You can choose YouTube, twitter, flickr, facebook, Picasa,
Email, or another web site you want to use for your site
management,
[_1
ID and the
password
to the
site contents
web
web
access
to access,
can be limited
depending
environment,
The allowed total recording time for individual videos and the capacity
available for uploading videos can differ, depending on each web site's
policy.
ors
TEP
1
On the product, select a video you want to upload in the video
thumbnail index view using the [Share ( I_ )] button. Repeat for
each video you want to upload. "_page 73
The Share mark (_ ) appearson each video.
S1EP 2
Connect
the product to a PC with the USB cable.
If you have set PC Software: On, Intelli-studio runs automatically
Windows computer after you've connected the product.
on a
iiiiiiiiiiiiiiiiiiiiiiiiii
iiiiiiiiiiiiiiiiiiiiiiiiii
_j
_
•
•
•
Aspartoftheupbadingprocess,
thevldeosyoumarkedarecorlve/tedintoaformatplayableby
YouTtbe
beforeactually
uploading,
Timespentt_plo_ding
mayvdy dependii_g
onsuchr_ndltions
as
f_s_ze,
computer
pe_o_n_,
_d,_e_ork
_pe_d.
ThereisnoOmlazant
eetheuploadhg
o_rationwillworkinallenvkonments,
YouTube
server-s_e
changesinthefuturemaydisable
thist,nction.
Formoreinfo_/ationonYouTube,
visR
theYouTube
website:http:/hfdw,yout
ube,com/
Thisproduct's
YouTube
uploading
functionality
isproededu_dertheI_cense
fromYouTube
LLC,
Thepresence
oftheYouTube
uploading
functione_Ry
inthisproductisr_ot
anendorserllent
ofor
reeommeT_dation
fortheproductbyVouTube
LLC,
Usin 9 with a windows
UoIN c_AS A REMOVABLE STORAGE DEVICE
zI
compute_
The folders in the storage media appear,
Different file types are stored in diff_rent folders.
You carl transfer
recorded
data to a Windows
connecting
the USB cabJe to the camcorder.
computer
by
Copy and paste or drag and drop the files from the storage
media to your PC,
I Viewing and transferring the contents of storage media
1
Set PC Software
_page
[_]
to Off.
79
2
insert a memory card,
page 30
3
Connect the camcorder
to the
PC with the USB cable,
_page 86
The Removable Disk or
Samsung window appears
on the PC's screen after a
moment.
Sebct Open folders to
view files using Windows
Explorer and then click
OK,
Photos
System
Videos
telder
Setting
folder
•
If the Removable
Disk window does not appear, confirm the
connection (_page 86) or repeat steps 1 through 3 again. If the
removable disk does not appear automatically, open the removable
disk folder using My Computer or Windows Explorer.
If the connected camcorder's disk drive does not open or the
context menu that appears when righbdicking your mouse (open
or browse) appears broken, your computer may be infected by an
Autorun virus. Be sure to update your antivirus software to the latest
version.
Usin 9 with a windows
I Structure
of folders
and files on the storage
compute_
media
• The folder and file structure for the storage media is shown
below.
• Do not arbitrarily change or remove the folder or file name. It may
not be playable.
HDV 000_.MP4
iii_vloEo
}
L
•
•
SDVO008.MP4
SOY0007.MP4
i_i_i
r_'_
100PHOTO
HD-quality videos have an HDV ####.MP4 name format.
SD-quality videos have an SDV ####.MP4 name fermat.
• The fib number automatically increases when a new video clip file
is created.
•
Up to 9,999 fibs carl be stored in one folder. A new folder is
created when the number files in a folder exceeds 9,999.
I File format
• The folder names are given in the following order: 100VIDEO.
101VIDEO, etc. The maximum number of folders is 999.
• The camcorder carl create a maximum of 9,999 files in a storage
media.
• As with video clip flies, the Iile number automatically increases
when a new image file is created.
• Photo files have a SAM ####.JPG format. A new folder stores
files starting with SAM 0001 .JPG.
• Folder names increase in this order: 100PHOTO_ 101PHOTO
etc.
• Videos are compressed in H.264 format. The file extension is
'.MP4'.
• Refer to page 53 for video resolution.
•
Photos are compressed in JPEG (Joint Photographic
Group) format. The Iile extension is '.JPG'.
• Refer to page 54 for photo reselution.
_]
Experts
Do not modify the name of a movie file recorded by the camcorder.
For proper playback, the camcorder
requires the original folder and file
name.
oublechootin$
WAF/NING IN©!©ATORS AN© M E,,>_"¢o
A Qa
E,,>_
....
Before contacting
unnecessary
call,
Power
a Samsung
authorized
service
center,
perform
the
following
simple
checks,
They
may saw_ you the time
and expense
of an
source
Low Battery
Check authenticity
battery.
The battery is almost discharged.
of the
_
Replace with a charged battery or use the power adaptor.
Charge the battery.
•
Check the battery's authenticity. Change to an authentic and charged Samsung
battery.
We recommend you use only genuine Samsung batteries in this camcorder,
•
Check the power adaptor's authenticity.
We recommend you use only genuine Samsung
The battery failed to authenticate,
This is not a rated
adaptor.
Use only the rated
adaptor that we
provided.
Storage
The power adaptor
authenticate,
failed to
power adaptors
for this
camcorder.
media
insert Card
[_
There
is no memory
the memory
card slot,card inserted in
_
Insert a memory card.
Card Full
[_
There
not enough
on
the ismemory
card. space to record
•
Back-up important
to your PC
or another
unnecessary
files in files
the memory
card.
The cannot
memory be
card
has some problem
and
recognized,
•
Format the memory card or replace it with a new one.
The write protection tab on the
memory card has been set to lock,
•
Release the write protection
Card Error
Card Locked
_}_1
tab.
storage media and delete
93
Storage
media
Not Supported
The camcorder.
memory card is not supported
this
Card
in
_
Change to a memory card that we recommended.
The memory card is not formatted.
•
Format the memory card using the menu.
The memory card is not fast enough
to record at this resolution.
•
*
Record video at a lower resolution.
Change the memory card to a faster one. _page
Write Error
Some problems occurred while writing
data to the storage media,
*
Format the storage media using the menu after backing-up
to your PC or another storage media.
Release the Smart Auto
You cannot operate some functions
manually when SMART AUTO is
activated.
*
Turn off the SMART AUTO function.
-
.
The number of video files that can be
,
stored is 9 999.
'
.
The card has reached max mum
capacity. No more files can be stored.
*
*
*
*
De ete unnecessary f es from the storage med a
Back up fi es to your PC or another storage reed a and de ete fies
Change to another card which has enough free space.
Set F e No to Reset
•
Format the storage media.
•
De ete unnecessary
--
The number of photo f es that can be
stored is 9 999
'
'
.
The card has reached maximum
capacity. No more files can be stored•
*
*
*
Back up files to your PC or another storage media and delete files.
Change to another card which has enough free space.
Set File No. to Reset.
.......
formal tne storage media.
Please format
_
Low speed card.
Please record a lower
resolution•
32
Recording
The number of video files is
full
•
Cannot record video •
The number
fu
Cannot
of
P
hoto files is
take a p hoto •
o
important
f es on the storage med a
flies
Recording
File number is full.
Cannot record video,
Folder and file number have reached
the maximum number. You cannot
record additional videos,
File number
Folder and file number have reached
the maximum number. You cannot
Cannot
is full.
take a photo,
Check the lens cover.
record additional
_
*
Set File No. to Reset and format the storage media. Remember
important files before formatting.
to back up
*
Set File No. to Reset and format the storage media. Remember
to back up
photos,
important
files before formatting.
Lens cover is closed.
°
Open the lens cover.
Some problems occurred when
reading data from the storage media,
*
Format the storage media using the menu after backing up important
to PC or another storage device.
•
Format the storage media after backing up important
Playback
Read Error
Corrupted
file
This file cannot be read.
another storage device.
files to a PC or
files
C
.... C' C....
oYMPT./Mo
AND
SOLUTIONS
If these
solve
instructions
do not
your
probbm,
contact
the
nearest
Samsung
authorized
service
center.
Power
The camcorder
does not turn on.
The power automatically
p
•
The battery is quickly discharged.
camcorder. Insert a battery into the camcorder.
Charge the battery or replace it with a charged one.
is properly connected to the wall outlet.
adaptor, and then reconnect the power supply to the
If no button is pressed for about 5 minutes, the camcorder is automatically
To disable this option, change the setting of Auto Power Qff to Off.
Use the power adaptor.
turns off.
......
ower canno_ be _urnea el.
The battery may not be installed on your
The inserted battery may be discharged.
If you use a power adaptor, make sure it
Remove the battery or unplug the power
camcorder before turning it on.
•
•
Remove the battery or unplug the power adaptor
camcorder before turning it on.
and then reconnect
turned off (Auto Power Off).
the power supply to the
The temperature is too low.
The battery is not fully charged. Recharge the battery.
The battery has reached the end of its lifespan and cannot be recharged.
Use another
battery.
Displays
The TV screen or LCD display has distorted images
or has stripes at the top/bottom
or on the left/right,
o
This can occur when recording or viewing a 16:9-ratio
details, see display specifications.
"*page 83
image on a 4:3-ratio T_, or vice versa. For more
Displays
Unknown
appears on the screen.
•
A warning
An afterimage remains on the LCD screen.
*
This occurs
The image on the LCD screen looks dark.
*
Ambient light is too bright. Adjust the brightness and angle of the LCD.
*
Insert a memory card into your camcorder properly. _page 30
If you use a memory card formatted on a computer, format it again directly on your camcorder. _page
Storage
indicator
indicator
or message appears on the screen. _pages
if you disconnect
93-95
the power adaptor or remove the battery before turning the power off.
media
Memory card functions are not operable.
*
*
You cannot delete the images protected by another device. Release the protection of the image on the
device. _page 72
Release the lock on the write-protect tab of the memory card (SDHC memory card, etc.), if any. "page 31
°
Release the lock on the write-protect tab of the memory card (SDHC memory card, etc.), if any. _page
The memory card is not supported on your camcorder or the card has some problems.
*
*
*
The file may be corrupted.
The file format is not supported by your camcorder.
Only the file name appears if the directory structure does not comply with the international
*
SDXC memory cards use the exFAT file system. TouseSDXCmemorycardsonaWindowsXPcomputer,
download and update the exFAT file system driver from the Microsoft website.
*
SDXC memory cards use the exFAT file system. Ensure that the external
exFAT file system before connecting the product to the device.
Image cannot be deleted,
You cannot format the memory card.
The data file name is not indicated correctly.
Your computer
card.
does not recognize an SDXC memory
Your TV or computer cannot display photos and
videos that are stored on an SDXC memory card.
80
31
standard.
device is compatible
with the
Recording
* There
isnot
enough
free
space
torecord
onthe
storage
media.
* Make
sure
the
memory
card
isinserted
and
write-protect
tabisset
tounlock.
Pressing
the
[Recording
start/stop]
button
does * The
internal
temperature
ofyour
camcorder
isunusually
high.
not
start
recording.
Turn
offyour
camcorder
and
leave
itforawhile
inacool
place.
* Your
camcorder
isdamp
and
moist
inside
Turn
offyour
camcorder
and
leave
itfor
a(condensation).
bout
1hour
inacool
place.
The
actual
recording
time
isless
than
the
estimated
** The
estimated
recording
time
may
vary
depending
onthe
cconsequently
ontents
and
the
features
you
sed.
time.
Recording
afast-moving
subject
increases
the
bitrate
and
the
amount
ofsutorage
space
required
for
the
recording,
which
can
lead
to
ashorter
available
recording
time.
The
recording
stops
automatically.
* There
isnomore
free
space
forrecording
onthe
storage
media.
Back
upimportant
files
toyour
PC,
and
then
format
the
storage
media
ordelete
the
unnecessary
files.
* Ifyou
frequently
record
ordelete
flies,
the
performance
ofthe
storage
media
will
deteriorate.
Inthis
case,
reformat
the
storage
media.
* Ifyou
use
amemory
card
with
alow
writing
speed,
the
camcorder
automatically
stops
recording
the
videos
and
the
corresponding
message
appears
onthe
LCD
screen.
When
recording
asubject
illuminated
bybright
light,. The
camcorder
isunable
torecord
these
levels
ofbrightness.
vertical
lines
appear.
Recording
When
the
screen
isexposed
todirect
sunlight
during
recording,
the
screen
turns
red
orblack
foran * Donot
expose
the
LCD
screen
todirect
sunlight.
instant.
During
recording,
the
date/time
does
not
appear.* Set
Date/Time
Display
toon.
_page
76
The
beep
sound
isnot
heard.
* Set
the
Beep
Sound
toOn.
* The
beep
sound
istemporally
offwhile
the
camcorder
records
videos.
* When
the
Audio/Video
cable
jack
ormicro
HDMI
caUe
jack
isconnected
tothe
camcorder,
the
beep
sound
will
automatically
turn
off.
There
isatime
between
the
point
where
you
press
the
[difference
Recording
start/stop]
button
and * On
your
camcorder,
there
may
beaslight
time
delay
between
the
point
where
you
press
the
[Recording
the
point
where
therecorded
video
starts/stops,
start/stop]
button
and
the
actual
point
where
the
recorded
video
starts/stops.
This
isnot
anerror.
You
cannot
record
aphoto
image.
* Set
your
camcorder
tothe
recording
mode.
_page
26
* Release
the
lock
onthe
write-protection
tab
otfhe
memory
card
ifset.
'=_page
31
* The
storage
media
isfull.
Use
anew
memory
card
orformat
the
storage
media.
_page
80
Remove
unnecessary
images.
'=_page
70
Adjusting
the image during
recording
*
*
Set Focus to Auto. _page 58
The recording conditions are not suitable for auto focus.
Adjust the focus manually. _page 58
*
*
The lens is dusty on the surface. Clean the lens and check the focus.
You are recording in a dark place. Increase the brightness.
.
TNs occurs when recording images under a fluorescent
iSCENE to minimize these phenomena. "*page 52
*
*
*
Press the [MODE] button to set the video playback mode.
Image files recorded on another camcorder may not play back on your camcorder.
Check out memory card compatibility. "*page 31
*
If the temperature inside the camcorder is too high, it cannot function properly.
Turn the camcorder off, wait for a few moments, and then turn it on again.
*
Check if the power adaptor or battery is properly connected
*
The Time Lapse REC function does not record sound.
Focus does not adjust automatically.
The image appears too bright or flickering, or
changes in color,
Playback
on your camcorder
The video does not play back.
The Skip or Search function does not work properly.
Playback is interrupted
unexpectedly.
You cannot hear sound when playing back a Time
Lapse recording.
Photos stored on a storage media do not appear in
the actual size..
Playback
on other devices
Photos recorded
on other devices
and stable.
may not appear at their actual size. This is not an error.
(TV, etc.)
*
100
lamp, sodium lamp, or mercury lamp. Cancel
You cannot view the image or hear the sound on the
connected device.
°
You cannot dub correctly using the HDMI cable.
*
Connect the audio line of the Audio/Video cable jack to your camcorder and the connected device (T_,
DVD recorder, ere). (Red color- right, White color- left)
The Audio/Video cable jack or micro HDMI cable jack is not connected properly. Make sure that the
Audio/Video cable jack or micro HDMI cable jack is connected to the proper jack. _page 82
You cannot dub images using the HDMI cable.
Connecting
toacomputer
When
accessing
videos,
acomputer
does
not
recognize
your
camcorder.
o Disconnect
the
USB
cable
from
the
computer
and
camcorder,
restart
the
computer,
then
reconnect
it
correctly.
o You
need
toinstall
avideo
codec
onthe
PC
toplay
back
the
files
recorded
byyour
camcorder.
Install
or
run
the
internal
edit
software
(Intelli-studio).
o Make
sure
you
insert
the
connector
inthe
correct
direction,
and
connect
the
USB
cable
totheUSB
Cannot
play
back
avideo
file
properly
onaPC. jack
onyour
camcorder
firmly.
Dbconnect
the
cable
from
the
computer
and
camcorder,
restart
the
computer.
Reconnect
itproperly.
o Your
computer
may
not
have
the
necessary
performance
specifications
toplay
back
avideo
file.
Check
the
recommended
computer
specifications.
Intelli-studio
does
not
function
properly.
o Exit
the
Intelli-studio
application,
and
restart
the
Windows
computer.
o Intelli-studio
isnotMac
OS
compliant.
o Set
PC
Software
toOn
inthe
Settings
menu.
o The
image
orsound
ofthe
video
fibmay
stop
playing
back
temporarily
depending
onthe
data
transfer
The
image
orsound
ofthe
video
file
recorded
by
speed
ofPC.
Copy
the
video
file
toyour
PC
and
then
play
itback
onthe
PC.
your
camcorder
does
not
play
back
correctly
on o Ifyou
connect
the
camcorder
toyour
PC
that
the
PC
does
not
support
Hi-Speed
USB
(USB2.0),
your
PC.
the
image
orsound
ofthe
video
file
may
not
play
back
correctly.
Video
files
copied
tothe
PC
are
not
affected
byit.
o Check
the
system
requirements
toplay
back
avideo.
_page
85
Fxit
allother
applications
running
onthe
computer.
The
playback
screen
ispaused
ordistorted. o
o Ifyou
play
back
the
recorded
file
byconnecting
the
camcorder
toyour
PC,
the
file
may
not
play
back
smoothly
depending
onthe
data
transfer
speed
ofPC.
Dubbing
withother
devices
You
cannot
dub
correctly
using
the
Audio/Video
o The
cable
not
connected
Make
sure
that
the
A
udio/Video
cable
iscamcorder.
connected
to
cable,
the
pAudio/Video
roper
i.e.
tois
the
input
jacks
ofproperly.
the
device
used
for
dubUng
an
image
from
your
_page
84jacks,
General
operations
! [_
t:
The date and time are incorrect.
*
Pressing a button will not turn on or operate the
camcorder,
Menu
items
that
cannot
be used
at the
o
same
i:
i "
",!'
Has the camcorder been left unused for a long period of time?
The backup internal rechargeaUe battery may be discharged. _page
Remove the battery or unplug the power adaptor, and then reconnect
camcorder before turning it on.
25
the power supply to the
time
o
Menu items are grayed out.
} i:
You cannot select grayed items in the menu. If you have not inserted a memory card into the camcorder,
all functions that require, a memory card (Storage Info, Format, etc.) are grayed in the menu and you
cannot select them. Insert a memory card to select and use these functions.
Anti-Shake(HDIS)
Face Detection
Back light
Digital Special
C,Nite,
Video
Intelli
Zoom
Effect
Resolution
: 1280x720/30p
Maintenance & additional infolrm ion
MAINTENANCE
• fo store your camcorder safely, turn k off.
- Remove the battery and power adaptor.
- Remove the memory card.
• To clean the lens
Use a air brush to remove dust, and then wipe the lens gently
with a soft cloth.
If necessary, wipe gently with lens paper or tissue.
Mold may form ors the bns if the bns is left dirty.
If the bns looks dim, turn off the camcorder and leave it off for
about 1 hour.
Before cleaning, turn off the camcorder and remove the battery
and power adaptor.
• To clean the exterior
- Wipe gently with a soft dry cloIh. Do not apply excessive force
when cleaning. Gently rub the surface.
- Do not use benzene or thinner to cban the camcorder. The
extedor coating could peel off or the case could deteriorate.
• To clean the LCD screen
Wipe very gently with a soft dry cloth. Be careful not to damage
the screen.
• To prolong its service life, do not rub the LCD screen with a
coarse cloth.
• Be aware of the following LCD screen phenomena. They are
not malfunctions.
When you use the camcorder, the surface around the LCD
screen may heat up.
If you leave the power on for a long time, the surface around
the LCD screen becomes hot.
When using the camcorder in cold conditions, an afterimage
may appear on the LCD screen.
• An LCD screen is manulactured using advanced technology
which creates screens with pixel failure rates of less than 0.01%.
However, a black or bright spot (red, blue, white) may appear in
the center of the LCD screen and up to two spots may appear
outside the center. These spots, which are normally incurred
during the manufacturing process, do not affect the recorded
images.
Maintenance
& additiona_ information
USING YOUR CAMCORDER ABROAD
a Each country or region has ks own electric and color systems.
• Before using your camcorder abroad, check the following items,
The power adaptor provided lets you power, recharge, and use your
carncorder in any country/region that has the power in the 100 V to
240 V, 50/60 Hz range. You may need a commercially available AC
plug adaptor depending ors the design of local wall outlets.
Your camcorder is an NTSC based camcorder, II you want to view
your recordings ors a IV or copy them to an external device, it must
be an NTSC based TV or external device and have the appropriate
Audio/Video jacks. Otherwise, you may need to use a separate
video format transcoder (For example, an NTSC to PAL format
converter).
i_a] The format transcoder is not provided by Samsung.
*
°
Use the camcorder only after dew condensation has completely
disappeared.
Be sure to use the recommended accessories supplied with the
camcorder. For service, contact your nearest Samsung authorized
service center.
Bahamas, Canada, Central Amenca, Japan, Korea, Mexico,
Philippines, Taiwan, United States of America, etc.
Australia, Austria, Belgium, Bulgaria, China, CIS, Czech
Republic, Denmark, Egypt, Finland, France, Germany, Greece,
Great Britain, Holland, Hong Kong, Hungary, India, Iran,
Iraq, Kuwait, Libya, Malaysia, Mauritius, Norway, Romania,
Saudi Arabia, Singapore, Slovak Republic, Spain, Sweden,
Switzerland, Syria, Thailand, 'runisia, etc.
[}i_l
ou can make recordings with your camcorder and view pictures
on the LCD screen anywhere inthe world.
Maintenance
3LOSoARY
AF (Auto
F:ocal b_gth
Focus}
Apedu_
The aperture controls the easount of light that reaches the camearder's sensor
shake
Compositk:>r
Composition in photography means arranging objects in a photo. Usually, abiding by
the rule of thirds leads to a good composition.
Metal
C)xide
Semicor
ductor
(CMOS}
A CMOS is at1 image sensor that produces images approaching the quality of COD
(charge coupled device) sensors It consumes less power, meaning the battery on
your camcorder lasts longer before it needs recharging.
Digital
F:::No (F Numbe
0
The F-number defines the ratio of the focal length to the size of the lens aperture
(focal length/diameter of lens aperture) Tne smaller the F-number, the larger the lens
aperture and the greater the amount of light that reaches the cea]corder's sensor
General_ smaller F-numbers provide brighter images.
(Blu o
If the eealocrder is moved while the shutter is open, the entire, image may appear
blurred. This occurs more often when the shutter speed is slow. Prevetlt camocrder
shake by raising the sensitivity or using a faster shuller speed. Alternately, use a
tripod or the DIS or OIS fueetion to stabilize the camcorde_
Compleme//tary
(O
The distanea from the middle of the lens to its focal point (in millimeters). Longer focal
lengths result in narrower angles of view and the subject is magnified. Shorter focal
lengths result in wider angles of view.
A system that automatically focuses the camocrber lens on the subject. Your
camcorder uses contrast to focus automaticall4
Camcorde_"
& additiona_ information
zoom
MPEO4/\VC
/ 1264
MPFG-4 AVC/H.264 defines the latest video ocding format standardized by the
ISOIFC and the ITU-T, in 2003. Compared with the converltional MPFG-2 format,
MPFG-4 AVC/H.264 has more than lwiea the efficiency. Your camearder employs
MPEG-4 AVC/H.264 to encode high definition videos.
Optical
zoom
This is a general zoom which can enlarge images with the lens alone and does not
degrade the quality of images.
Quality
An expression of the rate of compression used in a digital image. Higber quality
images have a lower rate of compression, which usually results in a larger file size.
/_@sc>l(/ i(::>_
/
A feature that artificially increases the amount of zoom available with the zoom lens
(Optical zoom) When using the Digital zoom, the image quality will deteriorate as the
magnification increases.
The number of pixeb present in a digital image. High resolution images contain more
pixels and typically show more detail than low resolution images.
Efl;ective
S_ utter
Pxel
Cou//t
Unlike the total pixel count, this is the actual number of pixels used to capture an
image.
/V
(Exposu_
V_lue)
All the combinations of the camcorder's shutter speed and lens aperture that result
in the same exposure.
White
Exposu_
The amount of light allowed to reach the cea]corder's sensor Exposure is controlled
by a combination of the shutter speed, the aperture value, and ISO sensitivity.
speed
Shcrlter speed refers to the amount of time ittakes to open and close the shutt_
and it is an important factor in the brightness of a photo, as it controls the amount
of light which pass through the aperture before it reaches the image sensor A fast
shutter speed provides less time for light to enter The photo becomes darker, but
more easi_/freezes subjects in motion.
k>alance
(co[o_ balan(:: e}
An adjustment of the intensities of colors (typically the primary colors red, green, and
blue) in an image. The goal of adjusting the white balance, or color balance, is to
correctly render the colors in an image.
Speoifio tioi
NTSC
Video signal
Picture compression format
H.264/AVC
Audio compression
AAC (Advanced Audio Coding)
fermat
image device
1/3.2" CMOS
Effective pixels
Approx. 920,000 pixels
Tbtal pixels
Approx. 5 Mega pixels
Lens
1.8 to 4.9, 52x (Optical), 70x (Intelli), 130x (Digital) Electronic zoom lens
Focal length
2.1 mm-_ 109.2mm
Size/dot number
2.7 inches wide, 230k
LCD screen method
TFT active matrix system
Composite video out
1.0V (pp), 75_.), analog
Audio output
-7.5dBm 47K__), analog, stereo
HDMI output
D type connector (Micro HDMI)
USB output
mini USB--B type (USB2.0 High Speed)
Power source
5.0V (Using the power adaptor), 3.7V (Using Lithium Ion battery)
Power source type
Power supply (100V-_240V) 50/60Hz, Lithium Ion battery
Power consumption
2.4W ( LCD on)
Operating temperature
32°F~ 104°F (0°C~40°C)
Operating humidity
10% ~80%
Storage temperature
-4°F~ 140°F (--20°0-_60°0)
Dimensions (VVx H x D)
Approx. 2.05" x2.3" x 4.43"
Weight
Internal MIC
Approx. 222g (0.4891b) (without battery and memory card)
The technical specifications
Omni-directional
(53.9mm x56.4mm x 119.0mm)
stereo microphone
and design may be changed without notice.
SAMSUNG
LiMiTED WARRANTY
SAMSUNG Electronics America Inc, (SEA), warrants that this product is free from ddective material and workmanship.
SEA further warrants that if product fails to operate properly within the specified warranty period and the failure is due to improper
workmanship or defective material, SEA will repair or replace the product at it's option,
All warranty repairs must be performed by a SEA authorized service center, The name and address of the location nearest you carl be
obtained by calling toll free: 1-800 SAMSUNG (1-800--726--7864),
Labor
1 year carry-in
Parts
1 year
On carry--in models, transportation to and from the service center is the customer's responsibility,
The original dated sales receipt must be retained by the customer and is the only acceptable proof of pumhase.
It must be presented to the authorized service center,
EXCLUSIONS (WHAT iS NOT COVERED)
This warranty does not cover damage due to accident, fire, flood and/or other acts of God; misuse, incorrect line voltage, improper
installation, improper or unauthorized repairs, commercial use, or damage that occurs in shipping,
Exlerior and interior finish, lamps, and glass are not covered under this warranty.
Customer adjustments which are explained in the instruction manual are not covered under the terms of this warranty.
This warranty will automatically be voided for any unit found with a missing or altered serial number. This warranty is valid only on products
purchased in the United States and Puerto Rico,
Some States de not allow the exclusions or limitations of incidental or consequential damages, or allow limitations on hew long an implied
warranty lasts, so the above limitations or exclusions may not apply to you,
This warranty gives you specific legal nghts, and you may also have other nghts which vary from State to State.
Correct
disposal
ofbatteries
in this
(Applicable
systems)
in countries
with
separate
product
collection
This marking on the battery, manual or packaging
indicates that the batteries in this product should not
be disposed
of with other household waste at the
end of their working life. Where marked, the chemical
symbols Hg, Cd or Pb indicate that the battery contains
mercury, cadmium
or lead above the reference levels
in EC Directive 2006/66.
If batteries are not properly
disposed of, these substances
can cause harm to
human health or the environment.
To protect natural resources and to promote
material
reuse, please separate
batteries from other types of
waste and recycle them through your local, free battery
return system.
Correct Disposal of This Product
(Waste Electrical & Electronic Equipment)
(Applicable
systems)
in
countries
with
separate
collection
This marking on the product, accessories
or literature
indicates that the product and ks electronic
accessories
(e.g. charger, headset, USB cable) should not be
disposed of with other household waste at the end
of their working
life. To prevent possible harm to the
environment
or human heakh from uncontrolled
waste
disposal, please separate these items from other types
of waste and recycle them responsibly
to promote the
sustainable
reuse of material resources.
Household
users should
contact
either the retailer
where they purchased
this product,
or their local
government
office, for details of where and how they
can take these items for environmentally
safe recycling.
Business users should contact their supplier and check
the terms and condkions
of the purchase contract. This
product and ks electronic
accessories
should not be
mixed wkh other commercial
wastes for disposal.
QUESTIONS OR COMMENTS?
COUNTRY
•
CALL
IN THE US
RollS
OR VISIT US ONLINE AT I
WRITE
Samsung Electronics America, Inc.
85 Challenger Read Ridgsfisld Park, NJ 07660
www.samsung.com
compliant
Our product
complies
with
do not use the 6 hazardous
(PBBs),
I
1-800-SAMSUNG
(726-7864)
Poly Brominated
"The Restriction
materials-
Diphenyl
Of the use of certain
Cadmium
Ethers
Hazardous
(Cd), Lead (Pb), Mercury
(PBDEs)-
in our products.
Substances
(Hg), Hexavalent
in electrical
Chromium
and electronic
equipment",
(Cr +6), Poly Brominated
and we
Biphenyls