1
CCD-FX420/F
RMT-509
i
SERVICE
MANUAL
US
Model
CCD-FX420/FX425
Canadian
Model
CCD-FX420
Video8
Handgcam
Remote commander is available as a unit. But as
individual parts the battery case lid of commander
is only avaiable.
IA MECHANISM
I
For MECHANISM ADJUSTMENTS, refer to the
"8 mm Video MECHANICAL
ADJUSTMENT
CCD-FX420/FX425
is based on model CCD-FX300/FX310/FX311.
MANUAL
]Y" (9-973-199-11 ).
In this service manual, only the differences from CCD-FX300/FX310/FX311
are mentioned.
When servicing, see the CCD-FX300/FX310/FX311
service manual(9-973-275-11 ) with this.
SPECl FICATIONS
Color temperature
Minimum illumination
Video camera recorder
AUTO
2 Ix
System
Illumination
Video recording system
Rotary two heads, Helical scanning
FM system
Audio recording system
Rotary head, FM system
Video signal
NTSC color, EIA standards
Usable cassette
8 mm video format cassette
Tape speed
SP mode: Approx.
(_9/32inch)/sec.
LP mode: Approx.
(5/,6 inch)/sec.
(playback only)
Recording time
SP mode: 2 hours
Playback time
SP mode: 2 hours
LP mode: 4 hours
Fast forward/rewind time
Image device
Viewfinder
Lens
IMICROFILM
1.43 cm
0.72 cm
(P6-120)
(P6-120)
(P6-120)
Approx. 6 min. 30 sec. (P6-120)
CCD (Charge Coupled Device)
Electronic viewfinder
(black and white)
Combined 10 × power zoom lens
f=6.1 to 61 mm (V4 to 2V2 inches)
Approx. 441o 440 mm (13/4to
173/Binches) converted into the
focal length of a 35-mm still
camera.
F 1.6 to 2.4 with macro
Filter diameter: 37 mm (1 '/2 inches)
TTL autofocus system inner focus
wide macro system
range
2 Ix to 100,000 Ix
(0.2 to 9294 footcandles)
Recommended illumination
More than 100 Ix
(9 footcandles)
Aperture correction
Automatic
With backlight adjustment
Input and output connector
Video output
Phono jacK, 1 Vp-p, 75 ohms
unbalanced sync negative
Phono jack
Output: -7.5 riBs, (at output
impedance 47 kilohms)
impedance less than
1 kilohms
Audio output
RFU DC OUT
Earphone jack
Remote _ jack
MIC jack
Microphone
Special minijack, 5 V DC
Minijack, 8-ohm impedance
Stereo mini-minijack
Minijack, --66 dBs, low impedance
with 2.5 to 3 V DC output, impedance
6.8 kilohms
power output jack
Special minijack, 5 V DC
Continued
on next
page
--
VIDEO
CAMI RA
RECORDE
S 01 'Y
SECTION 1
GENERAL
Before you can use this camcorder,
Tinstruction
his sectionmanual.
is extracted
from
(CCD-FX425)
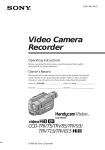
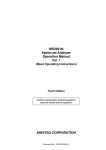
1 Align the flat side of the battery pack with the white line on the camcorder.
2 Make sure that the arrow on the battery pack is close to the top of the camcorder.
you need to charge and install the battery pack.
3
Notes
Removing
Push down and slide the battery pack in the direction of the arrow.
• Make sure the battery is securely installed so that it does not fall off. If the battery is not
installed properly, the camcorder will not record accurately.
• You can use the AC power adaptor as e power source when recording indoors.
the battery
J
pack
Slide the BATT switch in the direction of the arrow, and at the same time, slide out the
Q
battery pack to the left.
1
2
3
Plug the AC power adaptor into a wall outlet.
Align the flat side of the battery pack with the lines on the AC power
battery back.
Push down and slide the battery pack in the direction of the arrow.
4
Set the VTR (DC OUT)/CHARGE
adaptor
and the
selector to CHARGE.
Required charging time:
NP-55
NP-77H
NP-77
(supplied)
70
NP-77HD
160
140
I
I Type of battery pack
Required charging time
I
When charging is finished, the charge indicator will go out.
NP-66H
NP-55H
120
80
(approx._nutes u=ng AC-V25)
BATI"
Battery life and remaining capacity
A fully charged batterypack _astsfor:
Important!
Use the battery
completely
NP-77HD
NP-77H/
150
before recharglngl
TO check the remaining
STANDBY
To use up the battery, remove the video cassette and set the POWER switch to
CAMERA with the battery attached, and leave the camcorder until the __\'_ indicator
appears blinking and a red lamp blinks in the viewfinder.
Video equipment
cannot be operated
whikD charging the battery back.
The POWER
lamp will remain lit for a while even if the battery pack is removed
NP-77
120
and the power
is unplugged after charging the battery pack. This is normal.
It the POWER
lamp does not light, set the VTR (C)C OUT)/CHARGE
selector to OFF and
disconnect
the power cord. After about one minute, reconnect
the power cord and set the VTR
OUT)ICHARGE
selector to CHARGE
again.
ACoS10 AC power adaptor:
This adaptor has a lunction which allows you to confirm that the battery is completely
discharged
battery capacity, set the POWER
switch up and press TAPE/BATT
ready
switch to CAMERA,
to be recharged
!:fi'Ji('-,]MJ
irldo_)
set the
[
cord
(DC
Battery life
indicator
TAPFJBA'I-r CHECK
and
to its full capacity.
The decreasing black bar indicates
i_l_"llhn[!lli_
NP-55H
75
CHECK.
•
OpUon
NP-66H
110
(ap_ox. minutes.¢(:_tirxJous
_cocding when_
Before yOU recharge the battery, make sure the battery has been used (discharged)
completely. Excessive charging may reduce the charging capacity of the battery,
Notes
(supplied)
NP-55
60
Type of battery pack
Battery life
I,_l_.[ol;g
When you have finished-charging
decreasing
battery power, After the black bar disappears the
_\_ indicator will appear and blink and a red
lamp will also blink in the viewfinder. When they
the battery, install the battery pack as follows:
blink rapidly, replace the battery pack.
J
\l/
Notes
• The battery life indicator of the camcordar
the NP-77HD
battery pack.
• Charge
(3
Getting Started
the battery
pack
when
may indicate
the black bar of the
a different
battery
remaining
life indicator
capacity
decreases
from that of
quickty.
Getting Started
7
i IiI[,."[:J
itIIel_*I_.11!.:.Ij[;.l
Make sure that the battery pack or another power source is attached.
Press
the small
on the EJECT
simultaneously
In the direction
Before using your camcorder for the first time or after another person used it, adjust the
viewfinder lens to best fit your eyesight. Make sure that a battery pack or another power
source is attached to the camcorder.
blue button
switch
and
slide EJECT
of the arrow.
The cassette compartment
automatically lifts up and opens
toward you.
4
3
Insert a tape with the
Press
window facing outside.
set the POWER
Insert
the small
green
switch
button
on POWER
and
to CAMERA.
a tape.
(See page 8.)
Set the STANDBY
I
,_
adjustment ring around the
vlewflnder lens until the
"STBY" Indicator displayed in
the vlewflnder screen comes
Into sharp focus.
i_iil.I
II-'l_
up.
Turn the vlewflnder
I
i lil[l'l=iliilll*
switch
_Amh_
Close the cassette holder by
pressing the area on the
cassette compartment
marked "PUSH".
ilillvl
_ HTI l I ;it;.I.lil|-JI
Slide the red tab closing the window to prevent accidental recording. To re-record on the
tape, slide the tab opening the window.
If you try to record with the red mark exposed, the _
and i indicators flash in the
viewfinder and beeps sound for about 5 seconds.
l:lTi
il"iTil_hl'il.ll-lil.]ill_
I i1"iii [I
Your camcorder is equip!_:l with a Sports Finder.
You can use the viewfinder as the sports finder by
turning the viewfinder adjustment ring.
What
Is a sports finder?
Since this finder has a long focal length, you can
monitor the picture while your eye is at a distance
from the eyecup, The sports finder is convenient
when moving around to shoot scenes,
Setting
Notes
on handling
the vlewflnder
to the sports finder position
Turn the viewfinder adjustment ring clockwise
completely,
tapes
Don't
insert anything
in the small holes
on the
rear of the cassette.
type and thickness of tape, or if the red mark is exposed
and keep them in an upright position
to prevent intrusion
These
holes are used to sense
Or covered, etc. Store tapes in their cases
of dust and uneven winding.
the
Returning
vlewflnder
from the sports
position
finder
position
to the normal
Adjustment ring
Turn the adjustment ring counterclockwise until the
word "STBY" that appears in the viewfinder comes
into sharp focus.
When
Getting Started
storing
your camcorder
Turn the viewfinder
barrel to the front.
Gettin_l Started
9
To keep birth dates in the camcorder's
battery must be Installed.
You need to set your camcorder's
memory and to activate the clock, the lithium
date and time to be able to superimpose
time onto your video.
Make sure that the power source and lithium battery
the date and
;.;-
are attached.
,i=
Remove the lithium battery holder
located st the bottom of the
camcorder.
I=@i
Press
Install the supplied CR2025
lithium battery with the + side
facing down.
the small
green
button
POWER switch and slide
switch to CAMERA.
Set the STANDBY
up.
Press
DATE
on the
[llH_,f_llJ
the POWER
CAMEn oF
_/<_E_
switch
(+) and
TIME
J
AVE
:_
._
(NEXT)
simultaneously
for a few
seconds
until the date indicator
l
appears
in the vlewflnder.
The DATE button now functions as +
(to advance numbers) and the TIME
t
Put the lithium
Lithium
battery
battery
holder
into the camcorder.
button functions as NEXT (to set).
4
life
The battery will last for approximately
1 year in normal operation.
When the lithium battery becomes weak, the _ indicator will blink in the viewfinder
for about 5 seconds when you set the POWER
the battery with a Sony CR2025 or Duracell
present a risk of fire or explosion.
the lithium
WARNING
Cautions
battery holder from the camcorder,
The battery may explode if mistreated,
DO not recharge, disassemble,
or dispose
month,
hour by using
screen
by pressing
switch to CAMERA. In this case, replace
DL-2025. Use of any other battery may
digits
of
day, and
DATE
TIME
(+), and
(NEXT).
Notes
• When you keep DATE (+)
pressed, the digits advance
faster.
• The year starts at 1993 and
proceeds as follows:
1993--_1999-,2000---_2020
battery
Remove the lithium
insert a new one.
the blinking
the year,
When replacing the lithium battery, keep the battery pack or other power source attached.
Otherwise, resetting the date, time and birth dates will be necessary.
Changing
Adjust
and pull out the lithium battery and
o%j.%
of it in fire.
• Keep the lithium battery
out of the leach of children,
Should the battery be swallowed,
immediately
consult a doctor',
• Do not hold the battery with metallic tweezers, otherwise
a short-circuit
s byor...,no
.0,o,,,...,
O.TO
n.,°O
0,0
t.om,nut,
,
may occur,
Press
TIME
(NEXT)
to set the second
to "00".
The clock Starts operating.
Correcting
the date and
time settings
Repeat steps 3 to 6.
I 0
Getting Sta,"ted
Getting Started
11
When you preset your child's birth date in your camcorder, you can put your child's age in
years and months on your tape. You can also preset the date of an event. Once you enter
the birth date of your child, the clock inside your camcorder will automatically update age
of your child. You can superimpose the age anytime on your recording.You
can preset up
to three birth dates or events.
Before
you
connected,
the birth date.
First adjust the blinking digits by
pressing DATE (+). and then press
TIME (NEXT).
The age (year and month) appears
when all the items are adjusted.
begin
Before you store a birth date in your camcorder,
How to store
Enter
make sure that power source is
.... -->
that the lithium battery is installed and that the date is correctly set.
1
birth date
To store a birth date in your camcorder, see the following example and procedure.
Example: Store "Aug. 3, 1987" in memory 2.
I
if you
missed
the correct
number
with
DATE
(+)
Keep pressing DATE (+),
The indicator changes as follows:
Press
POWER
I
switch
the small
switch
green
button
and slide
Year:
on the
the POWER
1900 ---) 1901
Month: JAN. _
Set the STANDBY
switch
FEB. - - - -* DEC.
T
up.
Day:
1 -_2------)
A
='1'
- e=ntxoA_
A._ .. tJ==
I
(+) to select
the year before
r_.
Each time you press DATE (+), the display in the
viewfinder changes as follows:
_L_BIRTHDAY _ []
[] EVENT*_
,,, 1
BIRTHpAY
- ,_l_nT.O=
i1 .... 1tel)
* Alfhough "EVENT" is displayed on [_, you can
use it for age as well.
[] and [] can also be used to record event
dates in memory.
Press TIME (NEXT).
The "1900"indicatorblinks.
r
Advancing the digits faster
Keep DATE (+) pressed.
Presetting
DATE
---
Correcting/changing the setting
Followthe proceduresfrom step 1 again,
Press TIME (NEXT) and AGE/EVENT
simultaneously for a few seconds until the
"_ BIRTHDAY---1900"
Indicator appears
In the vlewflnder.
Press
_
31
1"
3
year
to CAMERA.
€O
I
- - - _ Current
Current year - (minus) 99
When
1900
1
2
After step 5 on page 12, keep pressing DATE (+) until the current year is displayed.
Press DATE (+) again.
The year goes back 99 years.
(example: 1993--_ 1894)
3
Go to step 6 above.
In 2000
"--- -1901" is displayed in step 3 on page 12. After that, it advances every year as "1902,
1903 ...... ".
%
= mJn'f'_kI
Now It's ready for recording!
/t,,'_ntln,
........
ue_**I\I
12
Getting Started
GettinQ Started
13
Before you record one-time events, make a trial recording to make sure that your
camcorder is working properly,
Keep the lens clean, or the focus cannot be adjusted properly.
Automatic
With the PROGRAM AE switch set to the green position, all the camera functions are on
automatic (i,e. auto iris, auto white balance, auto focus) and the shutter speed is set at
normal (1/60 second).
It is very easy to start recording scenes,
Note
about
To stop
covertng
the camcorder
Do not use marine packs, sports pecks, or rain jackets to cover the carncorder.
fOCUS on the front glass of the packs or transparent
plate of the jacket
recording
Ejecting
the
switch
switch
green
button
end slide
beeps twice
tape
1
Press the small blue button on the EJECT switch, and at the same time push EJECT in
the direction of the arrow.
2
3
Take out the tape.
Close the cassette
holder by pressing the area marked PUSH on the cassette
compartment.
Cautlonl
Please remember that you can only use 8-ram format v_leo tapes with this semcorder.
You will be able to record tapes in SP (standard play) mode only and play back tapes in beth SP
end LP (long play) modes.
on the
[llll ll
the POWER
to CAMERA.
This puts the camcorder
appears in the viewfinder. The camcorder
Make sure that you have attached the battery pack or other power source tO the
camcorder.
By pressing the release on the lens
cap, remove and attach It to the grip
belt.
the small
will
When you have finished recording
Turn the STANDBY switchdownand slide the POWER switchto OFF.
Hold the cemcorder by putting your
hand through the grip belt so that
your thumb can easily press the red
START/STOP button.
POWER
The camcorder
momentarily
Press START/STOP
again. "STBY"
when you have BEEP turned on.
Press
I;
recording
I
Checking the time remaining on the tape
Press TAPE/BATT CHECK.
in the camera
recording mode.
Set the PROGRAM AE (Auto Exposure)
switch to the green position.
Tape length indicator
TAPE/BATr
5
"STBY" appears in the viewfinder. Now.
Set can
the see
STANDBY
up,
you
through switch
the viewfinder,
6
Press
once,
START/STOP
The camera
(red
'_
l
button)
|E ..........
S [IiIiII-IE
..........
Omin
ITMIT/3TOP
In the viewfinder you can see a black and white picture of what you are recording and
information that indicates what the camcorder is now doing.
Basic Camera Operation
.....
when the word
"REC" appears on the viewfinder screen
and the red lamp lights in the viewfinder.
YOU can also confirm the start of recording
with beep sound when you have the BEEP
switch turned on.
14
After pressing TAPE/BAIT
CHECK, the time remaining may not be indicated for about 20
seconds. When the time remaining is tess than about 5 minutes, the indicator displays the
minutes remaining.
STBV]
S[
is recording
CHECK
When "5 min" lights, the _
Note
on the
tape
length
indicator
e
S r"I'--'Iil
E -------_
- Ondn•" I\
-4- ...........
5 ml n it
4rain
/
_iJ
appears in the viewfinder and blinks.
Indicator
• The camcorder
must be in the recording
or playback mode when the TAPE/BATT
CHECK is
pressed to find Out the time remaining.
In the playback mode. however, the indicator does not
indicate the minutes remaining.
• The tape length indicator
does not change while using EDITSEARCH
Basic
Camera
Operation
1
5
n -JhvAiaLom-'P.[_:!_.! r.1f,i=a
You can create a professional-looking
close-up, fade-in and fade-out.
home video using these sepcial effects; zoom,
You can use this camcorder as a VCR by connecting it directly to your TV for playback.
After you connect'this camcorder to your "IV, use the Remote Commander for convenient
control of the camcorder.
| Ik'd[e] ei in IkVA i_ I_'_Sj
Zooming is a recording technique that lets you change the size of the subject in the scene.
Use "Zoom-in (telephoto)" for dramatic close-ups, and "zoom-out (wide-angle)" for
panoramic long shots. You can also use zooming to focus manually or to decide on a
shooting angle. For more professional-looking recordings, use zooming sparingly.
W(Wide-angle)
i1 I,Vd[.=l l l__i
(:-] il iKII
r| I e) i t d
Use the supplied RFU adaptor to connect your camcorder to your TV. Before connecting,
make sure that the TV is turned off to prevent speaker damage, If your TV has audio/
video Inputs,
see page 33.
T(Telephoto)
=
I
t
RFU DC OUT
AUDIO OUT
RFu-9ouC_
_
!
To zoom
9suc
/
'
RFU-90UC
l
3CH_4cH
Channel selector
RFU DC OUT
r
d
0
t_l
Telephoto
*
3_'_
*
€_ __'_
!
RFU-95UC
_'_-_
_
AUDIO
"',
OU_
J
L
Channel selector
: Signal flow
ilv;lel
[._vL;.] ] _'1 e_'_:Ze ir_eIel
i i I I a[el
To connect your camoorder
antenna, you need to:
The camcorder's power zoom button offers two-level speed zooming. Press it firmly for
high speed zooming and softly, for relatively slow zooming.
Press the T side of the power zoom button for telephoto (subject appears closer) and the
W side for wide-angle (subject appears farther away).
Even small subjects such as flowers, insects, and images in photographs, can literally fill
the screen using focus in macro.
1 Bring the camcorder
as close as necessary
to obtain the desired subject size.
2
Note
16
Press the W side of the power
stops at the W end,
You can shoot
position.
a subject
Basic Camera Operation
that is at least
zoom button
until the Indicator
393/0 iches)
away
from
Unplug the antenna cable from your "IV first.
Plug in the tail end of the RFU adaptor marked OUT to the antenna input of your TV.
Re-wire the antenna cable you unplugged to the RFU adaptor jack marked ANT. This
way, you can switch between TV broadcasting and your home video playback without
re-wiring.
2
3
4
Connect the RFU adaptor to the camcorder.
Connect the AC power adaptor to a wall outlet.
Set the channel selector on the RFU adaptor (and your TV channel) to 3 CH or 4 CH of
the VHF channel, whichever is not active (vacant) in your area.
5
6
Attach the connecting
plate of the AC power adaptor to the camcorder.
Make sure the CHARGFJVTR
selector on the AC power adaptor is set to VTR position.
In the vlewfinder
Note
1 m (about
to a "IV that is already connected to a regular TV (VHF)
1
lens surface
in the
tarephoto
Notaa
When you want to switch to a raguler
the power on the carncorder.
on the AC power adaptor
• Video equipment
= Keep the sdaptor
TV program,
set the CHARGEJVTR
selector
cannot be operated
unless the selector is changed to VTR
away from video equipment
if video operation is disturbed.
to OFF
(DO OUT)
or turn
off
position.
Basic Camera Operation
17
c'O
=S'
5''<
=,5"
By using the Remote Commander. you can be in the picture with your friends and family.
or conveniently control the playback of your tape from a distance.
4
2
3
1
the
+ and
ends
Insert
two -size
AAproperly
(R6) batteries with
positioned.
2
Set the I! REMOTE
._2/./
_-_'_
3
switch
COMMANDER
on the battery
mounting
surface
of the camcorder.
If the battery is attached, remove it.
Reattach the battery after setting the
REMOTE COMMANDER
ON/OFF switch.
3
: signal flow
Set the POWER
--
Press the small green button on the
POWER switch and set the POWER
switch to PLAYER.
--
4
on the camcorder
I
__
I c="_"=_,lL
_
_"--'--'P_-F"_
/1TIr_._\_
_
_1 '1/(_
'_ ..[ \'_/^
as follows:
,
Aim the Commander
at the remote
on the camcorder
press the appropriate
the Commander.
end
bu.on
FRemote
_2
_
switch
sensor
m (6.6 ft)
2 m (6.6 ft_6.4
on
..j
_%_
When camerarecording,
1) press the small green button on the POWER
and slide it to CAMERA, 2) set the STANDBY switch up.
When playing back, slide the POWER switch to PLAYER.
sensor
Insert a tape. (See page 8.)
I
switch
i
II;13311_
__:-_
fl_ /"]
____
30 °
ib
(Approximate maximum distance and angles for remote control)
I
Note
Turn on the TV and
you adjusted
select
the channel
the RFU adaptor
on
to which
(3 CH or 4 CH).
If you are connecting with audio/video
TV's TV/VIDEO selector to VIDEO.
the Remote
Commander
• Keep the remote sensor away from strong light sources such as direct sunlight or illumination,
Remote control with the Commander
may not function properly under such circumstances.
• The command
mode of the Commander
is VTR2. Avoid using the Sony VCRs with the same
command mode at the same time.
inputs, set your
Getting
familiar with some buttons
HOLD switch
When you slide the switch in the direction of the
arrow, all the buttons will become inoperable to
prevent any misoperation
should you
accidentally
press the buttons.
I,,- SLOW and DATA SCREEN buttons
YOU can use the functions of these buttons only
with the Commander.
PLAY
4
PressC>
(PLAY).
[_
To stop playback, press _ (STOP).
To rewind the tape, press _
(REW).
To advance the tape rapidly, press _
When
you
have finished
HOLD
--
I"
SLOW
--
DATA SCREEN
(FF).
playback
1
2
Eject the tape, see page 15.
Slide the POWER switch to OFF.
3
Set the VTR (DC OUT)/CHARGE
selector on the AC power adaptor to OFF.
Battery
life
To avoid
When
you
In normal operation,
batteries last up to six months. If the camcorder does not
operate properly, the batteries might be exhausted. Replace both batteries with new ones.
damage
from possible
battery leakage
Remove the batteries when you will not use the Commander
Basic Camera Operation
for a long time.
connect
the receiver
of a remote control kit
When you connect the receiver of a remote control kit (not supplied) to the REMOTE U
control connector, be sure to set the I1 REMOTE COMMANDER
switch on the battery
mounting surface of the camcorder to OFF.
8
r.=l
Basic Camera Operation
1 9
i
r-"[,l','i
Have
(;in _il:.] ,_ l L:]I i ;'_J ; F-J_Ji l':-I L, r:.P:I a] F_II:y:"l| (.:.]avl ;.P-'I_ :e
sufficient
recording
battery
than
you
pack
have
power
to do
2 or
3 times
as much
planned,
i L_['-I:_
,It| IT:if [:1, ,, t i, P.ti_l[q 1_I Ii
If the terminals
the battery
temperature
Battery
life
is shorter
using a fully-charged
in cold
Battery
efficiency
up more quickly.
and the battery
battery pack has not been used for a long time,
install and remove the battery pack from time to
time. This will improve the contact condition. Also,
wipe the + and - terminals with a soft cloth or
paper.
wilt b_ u_,ed
i_.r;1 (_1,],
Why
Set
the
STANDBY
switch
to
battery
recording
save
of the
camcorder
down
when
n iiF41=r4"4,_.1|, t_l ,] FJI:_'i, (=]e-, b[,_ :i
the battery
not
transition
recording
is stopped
between
scenes
and started
can be made
up?
. :': :
:":... ,..
f ._
"l '_"':
generated and chemical change has occurred
inside the battery pack, and this is not
dangerous.
even if
again.
While positioning the subject or selecting an angle,
looking through the viewfinder
lens. the lens moves
pack heats
During charging or recording,
the battery pack
heats up. This means energy has been
power.
A smooth
parts on the back) are not clean,
will be shortened.
When the terminals are not clean or when the
battery.
climates.
is decreased
(metal
duration
"Battery
life" indicated in this mamjal
is measured
by the
continuous
recording time of the camcorder,
placed at room
or
automatically
inside the camcorder
and the battery is used.
The battery is also used when a tape is inserted or removed.
How to care for the battery
pack
• Remove the battery pack from the camcorder after using it, and keep it in a cool place.
When the battery pack is in the camcorder, a small amount of current flows to the
I
I
When the _.-\-_indicator and red lamp in the view'finder change from
slow blinking to rapid blinking while you are recording.
Turn off the power switch of the camcorder and replace the
battery pack.
camcorder even if it's turned off. This gradual discharge shortens battery life,
• The battery pack is always discharging even when it is not in use after charging.
Thus, it is recommended you charge the battery right before using.
How to use the switch
on the battery
pack
A
This switch is provided so that you can remember
,_
the charging condition. Set the switch to the "no
mark" position when charging is completed.
Set
the switch to the "red mark" position when the
battery is used up.
How many
I _,r_J (:.],.lO]
i I11] ii_. i I[oLL_
times can the battery
i
pack
be recharged?
The battery pack can be fully charged and discharged
temperatures.
Before using the battery pack, charge it sufficiently.
about 500 times under normal
If the _\-3 indicator blinks rapidly just after turning on the camcorder with a fully charged
battery pack, the battery pack should be replaced with a new fully charged one.
A brand-new battery pack is not charged.
Make sure you usa up the battery before recharging.
• If recording is completed before the f..\'_ indicator appears in
the viewfinder it is recommended ha you remove the tape,
set the POWER switchto CAMERA, turnthe STANDBY
switch up, and leave the camcorder on until the r..-\'-3indicator
blinks rapidly.
• When you use the AC-SlO AC power adaptor, the DC-StO
car battery charger or BC-SIO portable battery charger, you
can discharge the battery with their discharging function.
• Repeated chsrglng without using up the battery may
cause lowering of batte.jrycapacity. However, the original
battery capacity can be recovered if you fully discharge
(use up) and charge the battery again.
Recharge the battery pack after long storage.
Recommended
temperatures
Charging
during
Lower temperatures
Be sure to observe
charging
under temperatures
ranging from 10°C to 30°C (50°F to 85°F) is recommended.
require a longer charging time,
the following
• To prevent an accident caused by a short circuit, do not allow metal objects such
as a necklace to touch the battery terminals. Carry the battery pack attaching to
the terminal cover.
•
•
•
•
Keep the battery pack away from fire,
Keep the battery pack dry,
Do not open nor convert the battery pack,
Do not expose the battery pack to any mechanical
shock.
If the battery pack is fully charged but not used for a long time (about 1 year), it becomes discharged.
Charge it again but in this case the battery life will be shorter than normal. Afterseveral charging and
dischargingcycles, the battery life will recover its original capacity,
20
Basic Camera Operation
Basic Camera Operation
21
You can choose any of the following power sources for your camcorder: battery pack (see
page 6), house current, and 12/24 V car battery.
The appropriate power source for you to choose depends on the place where you want to
use your camcorder.
Note
on power
Place
Power som;ce
Accessory
Outdoors
Battery pack
Battery pack NP-55 (supplied), NP-77H/77HD,
NP-77, NP-66H or NP-55H
Indoors
House current
AC power adaptor AC-V25
AC-S10
In the car
12 V or 24 V car
battery
OC pack DCP-77
The DCP.77
DC pack (not supplied) is required.
to be used
(supplied), AC-V30
aogrces
Disconnecting
the power source or removing the battery pack during recording
damage the inserted tape. In this case, supply the power again immediately.
or playback
or
may
Align the flat side of the DC pack with the white line on the camcorder, and
push down and slide it In the direction of the arrow.
The supplied AC-V25
AC power adaptor is required.
O
o
Connect the cord of the OC pack to the cigarette lighter socket of a car
(12 V or 24 V).
I
To remove
the DC pack
Remove
Options
I
• DC-S10
You
the flat side of the AC Power
camcorder,
Connect
and
push
the AC power
down
Adaptor
end elide
adaptor
Set the VTR (DC OUT)/CHARGE
with
the white
it in the direction
Q
i
it the same way as you do with the battery pack. See page 7.
• BC-77,
BC-St0
portable
battery charger:
You can charge a battery pack on 100 - 240 V AC.
charge
Align
5"
in
e battery
pack whether
car battery
can charge
charger
a battery
BC-SI0
has a discharging
function,
so you can
with
discharging
pack through
Q
function:
the cigarette
lighter socket.
line on the
of the arrow.
to a wall outlet.
selector
of the AC power
adaptor
to VTR
(DCOUT).
To remove
the AC power
adaptor
Remove it in the same way as you do with the battery pack. See page 7.
Notes
on the
AC power
adaptor
• Before attaching
the AC power
AC power
adaptor.
• Video
VTR
equipment
cannot
adaptor
be operated
to the video equipment,
unless
the VTR
remove
the battery
(DC OUT)/CHARGE
selector
pack from the
is changed
to
(DC OUT).
• The POWER
lamp will remain
lit for a while even
if the unit is unplugged
after use. This is normal
• If the POWER
lamp does not light, set the VTR (DC OUT)/CHARGE
selector to OFF and disconnect
the power
cord. After about one minute, reconnect the power cbrd and set the VTR (DC OUT)/
CHARGE
22
selector
to VTR
Advanced Camera Operation
(DC OUT)
'1=
or not it is used up.
again.
Advanced Camera Operation
23
In the previous chapter "Basic Camera Operation", you learnsd the basic recording
operations. This section shows you how to record the date or time, record an age,
re-record s picture and more.
Note
You cannot
To stop
recording
add the
age later
KmtilTeR
|1"_
JDY-i (:-]1.]
playing
back or editing.
the age
Press AGE/EVENT
_t:_e_*]
during
until the indicator
goes out.
dl / I I I [_1
To change
Date or time can be superimposed
on your recording.
the display
while
recording
Press AGE/EVENT
until the indicator you want to record is displayed.
indicator you select starts when ITI, I"_, or [] goes out.
To cancel
the stored
1
birth
The date or time displayed in the viewfinder
mode,
press
DATE
for date
About
memory
a Birth Date in Your Camcorder"
I
r-1.[:] :e] Iiil*]"
When
you
connect
the camcorder
to a TV during
recording
If you do not use the data-screen function by the Remote Commander, the age indicatior
will appear on the TV screen when the [], I-_, or [] indicator goes out in the viewfinder
I I i I_-I
. oT:-Ii
"
and recording starts.
i;Zel • II[elvA'J lIJ}-'J
f
I ! [el I • _=f=-I_[o ] de I I lie
You can also record from low position to get an interesting
During
point
recording,
person
recording
angle.
3
where
press
you want
or the elapsed
START/STOP
to insert
at the
the age of a
time.
This puts the camcorder
in the standby mode.
STARTI STOP
2
Press AGE/EVENT
record.
to select
the indicator
Each time you press AGE/EVENT,
follows:
you want
to
the indicator changes as
AGE/EVENT
Set the viewfinder to the sports finder position (page 9) and turn it for the low position
No indicator _
[]
[]
The fi;st age
The third age *--- []
3
Press
recording. (It can be turned 180 degrees.)
The second age
An item with no presetting
The [_, []_, or [] indicator
is skipped.
goes out after one second.
START/STOP.
Recording starts again.
The indicator in the viewfinder
is recorded with the
picture.
START
24 Advanc_
Camera
Operation
o
a
G
Here's how to put the age of your children in your video while recording.
2
='2
l
1 year.
date or time
Press DATE or TiME again.
The picture recording continues.
".llr]|lllIoFt.t
you press AGE/
battery on the bottom to keep the birth date in memory.
The lithium battery life is approximately
To stop recording
when
on page 12, to select
back-up
The camcorder uses the lithium
is recorded with the picture.
of the
date
Perform steps 1 to 4 in "Storing
the memory number to be canceled
2 Press TIME (NEXT) twice. The month indicator blinks.
3 Press DATE (+) until "--- --" appears.
4 Press TIME (NEXT).
The birth date is deleted from the memory and is not displayed
EVENT.
During camera recording
or when in standby
indication
or TIME for time indication.
Recording
I STOP
Advanced
Camera
Operation
25
_JaT:.]o.]_ii[e-
iln"_J li_4i_'_]|[O]ll
loll _7_,,"_,.Z:.]
a[:.]i*i[o]l F111_i
I ;(-.I,{,1 ale_._ • [;{_J
I;t_]_
I-'f:_l[;lq[e]l[*lliT_el[Hll_-11_l_:4'J[e)ll.lpl
You can check the last portion of a scene you just recorded without changing the setting of
the POWER switch using EDITSEARCH.
I;(:_'_']_'F_I
J_J'i_l[e] |E I_ B]lq_._]::(F_'_
:[_ -"
You can reshoot a scene over the last recorded portion
previously recorded portion will be erased.
using EDITSEARCH.
The
Set the STANDBY switch up.
pressing
the START/STOP
button. mode
Put the camcorder
in the Standby
Press
the - @ side of EDITSEARCH
by
._
2
momentarily.
Look
The last few seconds of the recorded portion will be
played back in the viewfinder, After a few seconds of
playback, the camcorder goes back to the standby
mode, ready for the next recording.
Note
on using
where
and use EDITSEARCH,
At the desired
with your thumb to prevent
LUfli[ol III1 tli'_
k+l[_,,,l _t'_l]
You can check the recorded
be monitored.
Press
the small
the POWER
picture in the viewfinder
using EDITSEARCH.
green
switch
button,
and slide
_!ll_t,e_lll
j
to CAMERA.
release
EDITSEARCH.
START/STOP.
J
D
START
:o
_D
/ STOP
To pause recording
Press START/STOP again.
To stop recording
Set the STANDBY switchdown,
I; F.Jr;'Ji111: ilii 131 _'4
If the tape
Keep pressing the + or- side of EDITSEARCH to
view the playback picture:
+ side for the playbackpicture
- side for the playbackpicturein reverse
reaches
near
The _
:l[d,{,]-L+ I1-1
the end
indicator
during
recording
and the red lamp in the viewfinder and the camera recording/battery
lamp on the camcorder blink slowly. When the tape reaches its end, blinking becomes
rapid and beeps sound for about five seconds (if BEEP is set to ON).
4, EDITSEARCH- (_
Notes
on recording
• To record from the beginning of the tape, run the beginning of the tape for about 15 seconds
before recording. This will avoid missing the starting point when the tape is played back.
• When moving from indoors to outdoors, or vice versa, turn STANDBY up and point the
To stop playback
Release
the sound
1
2
3
4
point,
pre-reoorded portion even if STANDBY is turned down and
turned up, or even if the power is turned off and on again,
provided that the tape is not removed.
Sound cannot
Set the STANDBY switch up.
To monitor
from
by:
Recording begins from the point you released EDITSEARCH.
A smooth transition between scenes can be made after the
11;I l]lil[,,-"_=Ftl :{I']I
I
Press
recording
continuously to advance the picture at a normal
playback speed, or the - side to reverse the picture.
4
I
and find the point
to begin
EDWSEARCH
hold the viewfinder
movement.
ill.
you want
Keep pressing the _- side of EDITSE:ARCH
4. EDITSEARCH-_
EDITSEARCH
When you raise the viewfinder
[q a'F'_ _qin[oi ;f:;o(,]
In the vlewflnder
camcorder
adjusted.
EDITSEARCH.
while
viewing
the playback
picture
in the viewflnder
Connect an earphone to the • (earphone) jack.
Press the small green button and slide the POWER switch to PLAYER.
Press ,4<1 to rewind the tape and press _ where you want to stop,
Press D to start playback.
Note on standby
at a white object for about 10 seconds so that the white balance is properly
mode
If you leave the camcorder in the standby mode for 5 minutes or more, the camcorder will
be automatically turned off. To resume the standby mode, turn STANDBY clown and turn it
up again. To start recording, press START/STOP
directly.
Note on light sources
If you are shooting a subject in bright conditions just after shooting in a dark place, the picture
may not appear in the viewfinder. In this case, point the camcorder in the other direction.
26
Advanced Camera Operation
Advanced Camera Operation
27
[__
i;('_o]
You can insert a scene in the m_ddle of a recorded tape by seKing the starting
ending point. A previously recorded portion will be erased.
[* II l[*I?lll
point and
Ir-t
II
_
_N d IP-litVlJ
1_ +o| l) llO]I[_l
You can connect an external microphone
(not supplied} to the MIC jack. This jack also
accepts a "plug-in-power" microphone.
Attach the microphone to the accessory shoe of the camcorder.
It the microphone
camcorder.
has two plugs, connect
the DC IN plug to the RFU DC OUT jack on the
Accessory shoe
MIC jack
Press the small green button and slide
the POWER switch to CAMERA.
Set the STANDBY
switch
L_oO
FF_-._._
WER
RFU DC OUT jack
up.
Note
When
recording
with an external
micropilone,
wind noise is not muted,
3
START!STOP
While looking In the vlewfinder, keep
pressing the + or - side of EDITSEARCH
and release the button where you want to
end the insertion.
I
_nb
I
iS[o]lllt_lO]llaT*
KI
|flr_'_|
;f:]inTl|[_-l[O_J'iil-d_]i[IJ'_]!
When you connect a wired remote control unit or editing controller (not supplied) to the
REMOTE control connector, you can operate your camcorder from a distance.
+ sorrsf.*acH-_)
The camccrder enters the standbymode again.
REMOTE control
connector
Press COUNTER RESET,
The counter is reset to zero.
About
While looking in the vlewfinder, keep
pressing the - side of EDITSEARCH and
release the button at the point where you
want to start the Insertion°
@ (LANC)
@ stands for Local Application Control Bus System. The @ connector is used for
controlling the tape transport of video equipment and peripherals connected to it. This
connector has the same function as the connectors indicated as CONTROL L or
REMOTE.
+ EDITSEARCH-(_
Press ZERO MEM.
The insert endingpointis stored in memory.
Press START/STOP.
Insert recording begins. The insert recording
stops automatically at the counter zero point.
-
[ROUe_
D
STAKt"
/ STOP
To cancel
the ZERO
MEM
Press ZERO
Note
28
MEM.
The picture may be distorted at the ending point when played back.
Advanced Camera Operation
Advanced Camera Operation
29
o
When you usa the PROGRAM AE (Auto Exposure) function, you can give a "portrait"
effect (the object is in focus and the background is out of focus) or capture high-speed
action with "sports* mode or "high speed shutter" mode. Select from three types of mode
The camcorder's automatic functions offer you worry-free operation under most shooting
conditions. But in some cimumstancas, manual adjustment is better for effective recording.
You can manually maintain focus and compensate for backlighting
with this camcordor.
Some shooting situations may call for using some items manually, while others may call
for using them automatically.
The previous manual settings are retained, as long as you do not remove the battery,
even if you set the POWER switch to OFF.
hl] _11"_ _11 il i l[i i _[t]l,]l
referring to the following
To choose
best programmed
When shooting:
A still subject such as person or a flower
•
•
Zooming in a subject in the telephoto mode
A subject behind such obstacle as a net
Hold down the PUSH
FOCUS
orgo.
• A landecape
In this camcorder,
.r!l_ll l_i l I[I
iI_,._'_.l
_
(Sports mode)
PUSH
FOCUS
- A golf swing or a tennis match with the tennis
ball captured clearly
HOLD
Playing back certain scenes with high speed
movements in a clear, sharp picture
I
the exposure is automatically
controlled.
"Z
m m
5"=
ID €
•I= m_
(High speed
shutter mode)
However, when shooting a
subject that is becklit, that is, if the light source is coming in from the back of the subject,
use the BACK LIGHT button to get natural exposure.
d
_,
in a moving car
HOLU
•
I:_T_
I I_
• Outdoor sports scene such as football, tennis
button.
The focus is maintained
and the q_
indicator is displayed while you hold
down this button.
l{'_
I_
(Portrait mode)
HOLD button to keep the desired subject
in focus.
I
Select:
•
i_
Your camcorder may automatically
refocus on a subject other than the
desired subject.
In such cases, use the PUSH FOCUS
SfI]iiII]NII-'_,iiII[Jl
table.
AE mode
_-_![z_j ITiT_ h-T_lU ={oZel ;it_,1=vJF_,q
=l tvJ
I_T,r
i
Press BACK LIGHT.
The r_ indicator appears. If it does
not appear, press the button again.
Subject is too dark
because of backlight,
E
1'3
1
With backlight
compensation.
Set the STANDBY
switch
up.
._
m_lrme
Set the PROGRAM
After
shooting
Be sure to release this adjustment condition by pressing BACK LIGHT
to the desired
again.
t,
(The [] indicator goes out.)
Otherwise, the picture will be too bright under normal lighting condition.
AE switch
to _, _,, or "_'
setting.
_,_, or "_ appears in the viewfinder.
Press
0
START/STOP.
Recording with the portrait, sports, or high-speed
shutter mode starts.
To resume
the automatic
mode
Set the PROGAM
Notes
0
Advanced Careers Operation
AE switch to the green position.
• When recording under fluorescent, sodium, or mercury Jamp, the brightnessof the recorded picture
may vary. or the color 0t the recorded picture may become unnaturat.
• The shutter speed in each PROGRAM AE mode is as follows:
Portrait mode - between 1/60 and 1/2000
Sports mode - between 1/60 and 1/500
High speed shutter mode - 1/4000
Advanced Camera Oberafion
31
In the earlier section (page
You can fade-in or fade-out to give your recording a professional appearance.
When fading-in, the picture will gradually appear from black or mosaic.
The sound will also gradually increase.
When fading-out, the picture will gradually fade to black or mosaic. The sound will also
decrease.
FADE
17) we explained the basic connection to your TV with the RFU
adaptor. In this section we discuss
lib=
_[l{i]
i I i[;1_ Ill [, !;. I
llVll;In
i iI__11rr; I_Mj(i
[:;lli
several other ways of connecting to your TV.
i i tj i i (..-!1
There are several ways to connect your camcerder
IN
to your TV. If your rv
has audio/video
inputs, use an AN cable. Before connecting, make sure that your TV is turned off to
prevent speaker damage. If your "IV has only an antenna input, see page 17.
FADER
VHF/UHF
FADE
I_
II
OUT
1
Note on the FADER
VIDEO tN
VIDEO OU
button
Each time you press FADER,
the fade indicator changes as follow:
VMC-910MS,<J20MS
No indicator ---* FADER (black fade)
T
When
--> M. FADER
(mosaic fade)
.,_
(not supptied)
fading-In
1
Press
FADER
after
setting
the STANDBY
up to put the camcorder
into standby
The fade indicator starts blinking.
2
When
_:
: Signal flow
Press START/STOP.
The fade indicator stops blinking
switch
mode.
and the recording
(_
FADER
2
3
4
starts fading in.
Use an AN cable to connect your TM and camcorder:
[a} If your TV is a stereo type, use the VMC-910MS/920MS
(not supplied),
[b} If your TV is a monoaural type, use the VMC..710M/720M
A/V connecting cable
A/V connecting
cable
(not supplied),
Connect the AC power adaptor to a wall outlet.
Attach the AC power adaptor to the camcorder.
Set the VTR (DC OUT)/CHARGE
selector on the AC power adaptor to VTR (DC OUT).
._
fading-out
Press
FADER
while
recording.
The fade indicator starts blinking.
2
Press
START/STOP.
The the
and
faderecording
indicator stops.
stops blinking
To cancel
the fade-in/out
and the picture fades out
_u.,=_,o_
function
Before pressing START/STOP,
press FADER again.
Advanced Camera ODeration
33
If your
TV has no AUDIO/VIDEO
input jacks
Disconnect the antenna connection between the TV and the VCR,
adaptor to the VHF/UHF
input of the TV and VHF/UHI;
The supplied wireless Remote Commander is useful to control the camcorder from a
distance. When using if, be sure to set the [] REMOTE COMMANDER
ON/OFF switch to
ON.
and connect the RFU
output of the VCR.
VHF/UHF
To make the aame indications In the viewfinder on the TV (only on the Commander)
Press DATA SCREEN,
To turn the indicationsoff, pressit again.
This DATASCREEN on "IVwilltell you whichplaybackmode you are using.
D PLAY_
<11"11REW
-- IHI,. FF
: Signal flow
95UC
STOP_
The RFU adaptor used in the illustration is RFU-9OUC.
If your
TV has AUDiO/VIDEO
input jacks
Connect Audio and Video from the camcorder
--|_"
tt PAUSE_
SLOW
DATA
SCREEN
to the VCR instead of to the TV. Set the
input selector of the VCR to LINE, if available.
VHF/UHF
AN cable
=___
To view
the still picture
(playback
pause)
Press II during playback.
U appears in the viewfinder.
To resume normal playback, press t> or II.
: Signal flow
Note
When the still picture mode lasts for 5 minutes or more, the camcorder
enters the stop mode.
To view the picture
at 1/5 speed
(slow
playback)
(only
automatically
on the Commander)
Press I=,- during.playback.
I=,- appears in the viewfinder.
Note
To resume normal playback, press [::>.
"Whenslow playback tests 1or1 minute or more. the _btayback at the normal speed s_ad.sa_omatically.
TO locate
the desired
scene
(picture
search)
Keep pressing .<1<1or _
the viewfinder.
during playback or in the still picture mode. _ or _
To resume normal playback,
TO locate
the desired
scene
quickly
release the button.
(skip
Press 4<1 during rewinding or _
the viewfinder.
To resume normal playback,
About
the playback
appears in
scan)
during advancing the tape rapidly. _
or _
appears in
press _>.
picture
During the various playback modes, streaks appear on the screen.
4
Advanced Camera O_eration
Advanced Ca,_e_a Operation
35
I_ef';111"m_
During recording or playback, the digits on the counter indicate
playback time.
To count
the whole
the actual recording or
You can edit a tape with an additional P..]8ram, I_ Betamax
tape
to a preset
VHS format VCR.
This portion is not edited.
Original tape
Press COUNTER RESET at the beginning of the tape so that the counter shows "0:00:00%
Write down the counter reading at a particular point so that you can easily find that point
later by referring to the tape counter.
To return
or _
point
3
Edited tape
1
4
t
Pause
2
How to connect
Make connections using the appropriate A/V cable (such as Sony VMC-710M/720M
monaural VCR or VMC-910MS/920MS
for stereo VCR) and set the CHARGF_./VTR
During playback,
press COUNTER
RESET
at the point you later want to locate.
The counter shows "0;00:00".
c_N_.er,_r
_..
for
[
selector on the AC power adaptor to VTR. Set the input selector of the VCR to LINE, if
available.
L
J
STOP
Press
_ when
Press
ZERO
the playback
has finished,
as usual.
MEM.
ZERO
MEM
The "ZERO MEM" indicator blinks in the
viewfindar.
AUDIO
OUT
Be sure to press ZERO MEM after you
stop the tape. It does not function during
recording or playback.
Raw _
I_ FF
Press .,4<1or I_1_.
VMC_710M/720M
: Signal
The tape rewinds or advances and stops automatically
when the counter reaches approximately zero.
Notes
on
the tape counter
and the ZERO MEM button
• Something
must be recorded on the tape ir_ order for the tape counter
The tape counter,_ll
not work on blank tape,
OUT
[]
flow
(not supplied)
to fur_ction.
• The counter reading and the point of the tape may not correspond exactly, Use the counter as a
guide,
There will be a time lag of several seconds especially when you repeat fast-forward
running/
rewinding
and play back the tape recorded in LP and SP modes mixed.
• The ZERO MEM mode is cancelled
automatically
once the tape is rewound
or sent forward to the
point where you pre-registered,
36
Advanced Camera Operation
Advanced Camera Operation
37
How to edlt
_rll'_"_
I I j i._]ll_e|
i [ I [ _ I I.'_. I | [o]
Insert a tape to be recorded Into recording VCR.
If the camcorder is brought directly from a cold place to a warm place, moisture may
condense inside the camcorder, on the surface of the tape or on the lens. In this condition,
Slide
the tape may stick to the head drum and be damaged or the unit may not operate
correctly. To prevent possible damage under these circumstances, the camcorder is
furnished with moisture sensors.
EDIT
on the camcorder
to the direction
of the arrow.
However,
If moisture
Set the POWER
recorded
switch
of the camcorder
to PLAYER,
then insert
take the following precautions.
condenses
Inside
the unit
the
tape.
Moisture is present inside the camcorder when:
• The gn indicator in the viewfinder blinks.
Play back a tape on the camcorder until you locate the point where
you want to start editing, then press II PAUSE to set the camcorder to
the playback pause mode.
When the tape is inserted, the -_ indicator also blinks.
• Several beeps sound continuously for five seconds when the BEEP switch is set to ON
and the tape is inserted.
In such cases, no functions except for tape ejection work.
Eject the tape, turn off the camcorder and leave it with the cassette
holder open for
at least 1 hour.
The camcorder can be used again if the nn indicator does not appear when the power is
On the recording VCR, locate the recording starting point and set the
VCR to the recording pause mode.
turned on again.
Press II PAUSE on the camcorder and VCR simultaneously to start
If moisture
editing.
Editing
more
scenes
in such cases, no functions except for tape ejection work.
If moisture
function
The indicators displayed on the "IV screen will also be recorded. If you don't want to
record these indicators, press DATA SCREEN on the Commander.
,,,
-_-_."
Eject the tape and let the camcorder
and the tape sit for at least I hour.
The tape can be used again if the _.e indicator does not appear when the tape is inserted
and a tape transport button is pressed.
To stop editing
Press _ STOP on bothVCRs.
SCREEN
of the tape
tape is inserted and a tape transport button ({>, -<1<1,
etc.) is pressed.
• Several beeps sound continuously for about five seconds
when the BEEP switch is set to ON.
TO stop editing momentarily
Press II PAUSE on the recordingVCR.
use the DATA
on the surface
Moisture is present on the surface of the tape when:
Repeat steps 4 to 6.
if you
condenses
condenses
No caution
on the lens
indicators will appear,
Turn off the power
How to prevent
moisture
but the picture becomes
end don't use the cemcorder
dim.
E
for at least 1 hour.
condensation
When bringing the camcorder from a cold place to a warm place, put the camcorder in a plastic
Using
of the EDIT switch
When you set EDiT to the direction of the arrow (EDIT ON), you can keep picture and
sound deteriorations resulting from editing to the minimum. Avoid using the edited tape for
multiple generations of editing. After editing, be sure to set this switch in the opposite
bag and allow it Io adapt to room conditions over a period of time.
1 Be sure to tightly seal the plastic bag containing the camcorder.
2 Remove the bag when the air temperature inside it has reached the temperature
surrounding
it (after about one hour).
direction of the arrow (EDIT OFF).
38
Advanced Camera Operation
m
Additional Information
39
!
D
rill BT'_
{'.,ll_ I l[l_'J
I_i(I)
IIIi_
| i[t]
i I
To reattach the eyecup
_TJTI [*..Jill
:-['._..[i
I[I)J [;_. I I I I i 1! I
Align the groove' on the eyecup with the •
mark on the barrel.
Mark
Slight contamination
Turn the eyecup in the reverse direction
To ensure
a clear
picture,
clean
the video
Groove
| Cdticat contamination
heads
of
the arrow.
periodically
When playback pictures become noisy or hardly visible, the video heads may be contaminated.
In such cases,
1 Clean the video heads with the Sony V8-25CLH cleaning cassette (not supplied),
2
3
referring to its instructions.
After cleaning, check if the picture is clear by recording or playing back with an ordinary
tape.
If the picture is still noisy, repeat cleaning. (Do not repeat cleaning more than 5 times.)
Caution
Do not use a commerciallyavailable wet-type cleaning cassette. It may damage the video heads.
Note
If the V8-25CLH cleaning cassette is not available in your area, consult your Sony service facility.
To clean
the vlewflnder
; [lilvjvl
I?I',_"_
_ l ;.IvLtl
=J'_ I i'EJrla_,
i i i [:.]ip=.l;
1_i.[I]
i{i l i i 111
1%7
I
Pull the switch on the viewfinder
Take a good
barrel down.
posture
for shooting
For hand-held
shots, it is important to hold the
camcorder properly.
- Hold the camcorder firmly and secure it with the
grip belt so that you can easily manipulate the
can]corder with your thumb.
• Place your right elbow firmly against your side.
•
Place your left hand under the camcorder to
support it. When adjusting the focus manually,
make sure the camcorder does not move.
• Stand opposite to the subject and take a
comfortable stance.
Turn the eyecup in the direction of the arrow
and detach the eyecup.
+ Place your eye firmly against the viewfinder
eyecup.
• You can easily determine the horizontal plane by
using the viewfinder frame as a reference.
Less than 6.5 mm
(7/= inches)
Use s tripod
Remove
Clean the sudace of t_e screen with a
commercially
available blower
etc.
Blower
il
If you have a tripod for a still camera, you can also
use it with the camcorder.
If a tripod is not available,
try placing the camcorder on a tabletop or any other
flat surface of suitable height.
Cllutton
When
attaching
length
of the camera
a tripod
6.5 ram. Otherwise
the camera.
40
Additional Information
not manufactured
mounting
the screw
screw must
may damage
by Sony,
0.
:3
qo
the
be tess than
the
inner part of
Additional Information
4 1
Plan ahead
If you are going to edit the tape after recording, shoot the scene a little longer to make the
editing easier.
Camcorder
Lighting
When the light source is behind the subject, or in the following situations, the subject will be
recorded too dark and the background too light.
• The subject is indoors and there is a window behind the subject.
• Bright sources such as fluorescent or incandescent lamps are included in the scene.
• You are shooting a person wearing white or shiny clothes in front of a white background.
In this case, the face will be recorded toodark.
Usa video light In the dark
To get the best colors, you must maintain a sufficient light level.
Photography lamps or halogen lamps are recommended. For best results, use of Sony video
lights, since their weight and low heat output levels aUow safe and direct connection to the
camcorder.
Do not point the light at the camcorder. The high heat from the light may warp the casing of the
camcorder.
Camcorder
Ia_l'£*]
! I dl_l
n [_0]
_e _11
el IOY" [a
Each country has its own electricity system and "IV color system. Before using your camcorder
abroad, check the following points.
I
AC power
Power Sources
You can use your camcorder in any country with the supplied AC power adaptor within
1t0 V to 240 V AC, 50/60 Hz.
f
Use a commercially available AC plug adaptor, if necessary, depending on the design of the
waU outlet.
Wall outlet
Difference
This camcorder is an NTSC system based camcorder. If you want to view the playback picture
on a TV, it must be an NTSC system based "IV. When you want to use a PAL-M system based
TV. you will need NTSC/PAL-M transcoder. Check the following alphabetical list.
NTSC system countries
Bahama islands, Bolivia, Canada, Central America, Chile, Colombia, Ecuador. Jamaica, Japan.
Korea, Mexico, Peru, Surinam, Taiwan, The Philippines, U.S.A., Venezuela, etc.
PAL system countries
Australia, Austria, Belgium, China, Denmark, Finland, Germany (former West Germany), Great
Britain, Holland, Hong Kong, Italy. Kuwait, Malaysia, New Zealand, Norway, Portugal,
Singapore, Spain, Sweden, Switzerland, Thailand, etc.
PAL M system country
Brazil
PAL N system countries
Argentina, Paraguay. Uruguay
countries
Bulgaria, France. Guiana, Hungary. Iran, Iraq, Monaco, Poland. former Soviet Union, etc.
42
Additional
Information
adaptor
Charging
• Repeated charging while some capacity remains causes a lowering of battery capacity.
However, the ordinal battery capacity can be recovered if you use the battery
completely end charge it fully again.
• Charge the battery on a flat place without vibration.
• The battery will get hot during charging. But it is normal.
Do not continuously recharge • charged battery pack as that will cause the battery pack
efficiency to deteriorate.
Charging temperature
The temperature range for charging is 5_C to 35°C (41°F to 95"F). However, to prevent
maximum battery efficiency, the recommended temperature range when charging is 10°C to
30°C (50°F to 86°F).
In Color System
SECAM system
care
• When the unit will not be used for a long time, disconnect the power source and remove the
tape. Periodically turn on the power, operate the camera section and player section and play
back a tape for about 3 minutes.
• Clean the lens with a soft brush to remove dust. If there are fingerprints on it, remove them
with a soft cloth. Clean the camcorder body with a dry, soft cloth, or a soft cloth lightly
moistened with a mild detergent solution. Do not use any type of solvent which may damage
the finish.
For detailed instructions on proper use of the light, read its instruction manual.
Li_
operation
• Operate the camcorder on 6.0 V (battery pack) or 7.5 V (AC power adaptor).
• For DC or AC operation, use the accessories recommended in this manual.
• Should any solid object or liquid fall into the casing, unplug the camcorder and have it
checked by qualified personnel before operating it any further.
• Do not hold the camcorder by the viewfinder or the microphone.
• Avoid rough handling or mechanical shock. Be particularly careful of the lens.
• Keep the lens cap on the lens when not using the camera.
• Do not wrap up the camcorder and operate it since heat may build up internally,
• Keep the camcorder away from strong magnetic fields or mechanical vibration,
• Do not let sand get into the cemcorder.
When you use the camcorder on a sandy beach or dusty place, protect it from the sand or
dust. Sand or dust may cause the camcorder to malfunction and sometimes the malfunction
cannot be repaired.
• Do not let the camcorder get wet.
Keep the cemcorder from rain or sea water, It may cause malfunction and sometimes the
malfunction cannot be repaired.
Shoot with the sun behind you.
Others
• The model for USA or Canada: One blade of the plug is wider than the other for the purpose
of safety and will fit into the power outlet only one way. If you are unable to insert the plug
fully into the outlet, contact your dealer.
• Unplug the unit from the wall outlet when not in use for a long time. To disconnect the cord
(mains lead), pull it out by the plug. Never pull the cord itself.
• Do not operate the unit with a damaged cord or if it has been dropped or damaged.
• Do not bend the AC power cord forcibly, or put a heavy object on it. This will damage the cord
and may cause a fire or an electrical sho_k.
• Be sure that nothing metallic comes into contact with the metal parts of the connecting plate.
If it does, a short may occur and the unit may be damaged.
• Always keep the metal contacts clean.
• Do not disassemble the unit.
• Do not apply mechanical shock or drop the unit.
• While the unit is in use, particularly during charging, keep it away from AM receivers and
video equipment because it will disturb AM reception and video operation.
• While the unit is in use, it gets hot. But this is normal.
• Do not place the unit in locations where it is;
--Extremely hot or cold
--Dusty or dirty
--Very humid
--Vibrating
If any difficulty should arise, unplug the unit and contact your nearest Sony dealer.
Additional Information
43
m
!
J
,,n
o
For
details
onthe
use
ofeach
part,
refer
tothepages
indicated
inthe
circle.
[]
[]
[]
[]
[]
[]
%
[]
[]
[]
[]
[]
[]
[]
[]
44
[]
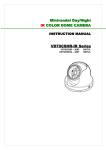
Tape
transport
buttons
E:> PLAY (playback)
FF (fast-forward)
REW (rewind)
O STOP (stop)
POWER switch
CAMERA: for camera recording
PLAYER: for playingback or editingtapes
OFF: poweroff
II PAUSE
•
l_]Lens
(pause)
cap
[]
@ REMOTE control connector (stereo mlnl.mlnljsck)
[]
Q (earphone) Jack (mlnijeck)
[]
VIDEO output Jack (phono Jack)
[]
START/STOP button
[]
RFU DC OUT (RFU adaptor DC output) jack (special mlnljack)
STANDBY switch
[]
AUDIO output jack (phono jack) •
[]
MIC jack (PLUG IN POWER) (mono mini-jack)
..
In
[]
EDITSEARCH (and @ recording review) button O •
[]
Power zoom (MACRO) button
[]
Remote control sensor
[]
Built-In microphone
[]
EDIT switch
[]
EJECT (cassette eject) knob
[]
Hook for shoulder strap
[]
Cassette holder
[]
Lithium battery holder
[]
Grip belt G)
Additional Information
_)
m
'13
Additional Information
45
[]
[]
[]
[]
[]
[]
[]
[]
[]
[]
[]
[]
[]
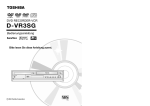
Accessory
[]
Remote
shoe
[]
PUSH
[]
Tripod
[]
FADER
[]
BACK
[]
DATE
(+) button
[]
TIME
(NEXT)
[]
AGE/EVENT
[]
PROGRAM
[]
BA'I'T (battery
[]
Hook
control
sensor
FOCUS
HOLD
receptacle
•
button
•
(bottom)
button
LIGHT
button
•
•
•
button
®
O
button
_
AE selector
eject)
for shoulder
[]
Vlewflnder
[]
Camera
[]
COUNTER
[]
ZERO
[]
TAPE/BATT
CHECK
[]
Viewfinder
adjustment
[]
Eyecup
_
[]
BEEP
_)
[]
[]
Q
[]
Battery
knob
recording/battery
MEM
RESET
button
ON/OFF
REMOTE
lamp
button
_
O
button
_
ring O
switch
COMMANDER
mounting
ON/OFF
switch
surface
O
strap
Q
46
Additional Information
A_ditional Information
47
_IAIJ_'J_
[:_"_1
= (:.]
I I [t|
_
iO_t]
I it
i II¢. I I [o [:-] li
n.=
[]
t IlL
_
_111_
t_
t.oJ
r ii
[]
[]
[:> PLAY (play back) button
[]
<1<1 REW (rewind) button
[]
[:] STOP button
[]
II PAUSE button •
[]
DATA SCREEN button*
[]
HOLD switch*
[]
START/STOP button
[]
FF _
[]
Power zoom button
[]
I1_- SLOW (slow playback) button*
(fast forward) button _)
0
Note
The * indicates
operable
r_
i]---;j_-_l(a| j.t
jl_
[; 1_!11 i [..ll_j
[..;v,v| i'r_'l
the functions
which
are
only with the commander.
[..]/i
[a]
[I]
[cl--------H_
_q
[]
o
I"]
[g)
J
_'-_
[,l
[hi
[a]
[b]
[c]
[d]
[e]
[f]
[g]
[h]
[I]
8
Focus is maintained (_)
BACK LIGHT Is pressed ([_)
PROGRAM AE setting (_, _, "_)
Power zoom Indicator
FADER mode
"Exchange battery" (_.-_)
Moisture has condensed ([]])
Lights up during recording
When flashing: "Exchange
battery or tape"
Playback mode (LP)
Additional Information
[j]
[k]
[I]
Ira]
[n]
[0]
[p]
[q]
[r]
[s]
Tape transport mode
Tape counter
Remaining time of tape
ZERO MEM Is pressed
"Exchange tape or no tape
inside" (_R_)
"Trouble has occurred" (_-)
"Clean vldoc heads" (@)
Remaining capacity of a battery
Age
Date or Time
"Replace lithium battery" (_)