1
0993-8155
PERKIN-ELMER
ROBOTLANGUAGE
(PERL)TNSTRUCTTONS
uilil
August1986
PERKIN-ELMER
NORWALK,
CONNECTICUT.
U.S.A,
Copyrighto1986The Perkin-ElmerCorporation.All rights reserved.
R e p r o d u c t i oonr p u b l i c a t i o n
i n a n y f o r m o r f o r m a tp r o h i b i t e d
without
writtenpermissionof The Perkin-ElmerCorporationor any of
i t ss u b s i d i a r i e s .
PEF|KIN_ELMEF|
CUSTOMER
LICENSE
AGREEMENT
T H E P R O G R A MF U R N I S H E DH E R E W I T Ht S L I C E N S E DB Y P E R K I N - E L M E R
T O C U S T O M E R SF O R
T H E I RU S E O N L YO N T H E T E R M SA N D C O N D I T I O N SS E T F O R T HB E L O W .O P E N I N GT H E D T S K E T T E
P A C K A G EI N D I C A T E SY O U RA C C E P T A N C EO F T H E S ET E R M SA N D C O N D I T I O N S .
1 . 0o E F r N r T r o N s
't.1 LicensedProgram"shall meanany Object Code supplied
bv LICENSORunder this License.
'1.2"DesignaledEquipment shall mean a computer system
manulacturedby PERKIN-ELMEFI.
1.3 'Use" shall mean the copying of any portronof Licensed
Programfrom a slorageunit or mediainto the Designated
Equapment
and executingany ponion ol LicensedProgram
on the Design6tedEquipment
2.0 LICENSEGRANT
2.1 LICENSEE is granled a non-transferable,non-exclusive
right to Usethe LjcensedProgramsuppliedby LICENSOR
on the Desjgnated Equipment. LICENSEE may make
copresot the LicensedProgramas necessarylor archtve,
testing,or backup purposesonly.
3.0 T E R M
3.1 This LICENSEshallbe eflectivelrom lhe dateof recerptoJ
t h e L I C E N S E DP R O G R A Ml n t i l i l i s i e r m i n a t e dr n a c c o r '
dance with Article7 0.
4 . 0 P R O P R I E T A RFYI G H T SA N O P R O T € C T I O N
4 . 1 L I C E N S E Ea c k n o w l e d g easn d u n d e r s t a n dlsh a t n o t h i n g
containedin this Licenseshall be conslruedas convey ng
title in LicensedProgramto the LICENSEE.
5 . 0 N O T I C E SA N D L E G E ND S
5.1 LICENSEE
a g r e e st o r e p r o d u c a
e n d i n c t u d ea n yc o p y r i g h t
nolrces,lrademarks,or otherlegendsor creditsjncludedin
the LrcensedProgram. or requestedIn writing by
L I C E N S O F i,n a n d o n e v e r yc o p y m a d eb y L T C E N S EoEf
LicensedProgram,or part thereot The ex stence ol any
c o p y f i g h ln o t r c es h a l ln o t b e c o n s t r u e a
d s a n a d m r s s t oonr
p r e s u m p l r oonl p u b l r c a t l oonl t h e L i c e n s e dP r o g r a m .
6 O WARRANTY
6 1 LlCENSORwarrantsthaliornrnely(90)dayslromihedate
the LrcensedProgramrs recervedlhe LlcensedProgram
s u p p l r e db y L I C E N S O Rs h a l lp e r i o r mI n a c c o r d a n c w
e rlh
the standardssel forth rn the Lrsermanual relaledto the
L i c e n s e d9 r o g r a m .r f a n y p r o v r d e dl h a l l h e a t t a c h e d
S o l t w a r eR e g r s t r a l r o n
F c r m n a s b e e n r e t u r n e dt o
L I CE N S OR
6.2 The abovewarrantydoes not exlend and shallnot apply to
LicensedProgramto the gxtentthat any breachot warranty
is causedby the LicensedProgrambeing: (a) not Used in
6ccordancewtth the user manualsupptredhereunder;(b)
UsedIn combrnationwiih any programmateriainot lrcensed
herein; (c) moditied by LTCENSEE;or (d) Used with
equrpmenlother than the DesignatedEqUipment.
6 , 3 L i C € N S O RM A K E S N O W A F R A N T I E ST H A T E R R O R S
H A V E B E E N C C M F L E T E L YE L I M I N A T E DF R O M T H E
LICENSED
PROGRAM
O R T H A TU S EO F A N YL I C E N S E D
P R O G B A MW I L L N O T I N F R I N G EL . j P O N
A I J YP A T E N T
C O P Y R I G H TO. N T R A D E M A B KL I C E N S O FM A K E SN O
O T i I E R W A R B A N T I E S E X P R E S SO R I I . 4 P L I E D ,
I N C L U D I N GB U T N O T I . I M I T E DT O F I T N E S SF O R A
PARTICULAR
P U R P O S EO R M E R C H A N T A B I L I TW
YI T H
R E S P E C -TIO T H EI -I C E N S E DP R O G R A MT H I SL I M I T E D
WARFANTY
G I V € SL I C E N S E S
EP E C I F I C
L E G A LR I G H T S .
A N DL I C E N S E M
E A YA L S OH A V EO T H E RR I G H T SW H I C H
VARYFRCI",ISTATETC STATE
4.2 LICENSEEagreeslo hold lhe LicensedProgramin confF
denceand shallnot disclosethe LicensedProgram,or part
thereot,withoUl lhe prior writtenapprovalof LICENSOR,
except to its employeeslo whom drsclosureis necessary 7 . 0 T E R M I N A T I O N
lor Use.Licenseeagreesnot to disassemble,
decompile,or
7 . 1 l f L I C E N S E €l a r l sl o c o m p y w r t na n y l e r m o r c o n d r t r o n
ol
cross-compileLicensedProgram.
t h i s L r c e n s eL, I C E N S O Rm a y n o t i t yL T C E N S E iEn w r i t i n g
4.3 Whereany of LICENSOR'Srightsto the LicensedProgram,
o t s u c h l a r l u r el f L l C E N S E E l a r t s t o c u r e s L r c h f a r l ! r enw r i h
or part thereot,afise underan agreementwith a third party
thirty (30)days of such w.rttenno|ce, thrst.rcensemay be
5 u p p l i e . ,s u c h s u p p l i e r s h a l l h a v e t h e b e n e f i t o l
lermrnaled
LICENSOR'Srights hereunder.
7 . 2 L I C E N S E Em a yt e r m r n a tten r sL r c e n s e
a l w i l lo n r h r t y ( 3 0 )
4.4 LICENSEEacknowledgesthat the LicensedProgrammay
d a y s p n o r w e n n o t r c et o L T C E N S O RW r t h r nt e n { 1 0 )
contaancertain encryptions,or other deviceswhich may
d a y s a l l e r l e r m r n a t r oLni C E N S E E s h a l l c el ryti n w r r t r n g t o
preventor detect unaulhorizedUse of the LicensedProL I C E N S O Rt h a ta c o p r e sr n w h o l ec r i n p a r t .I n a n yt o r m .
gram. TemporaryUse on backup equipmenlmay require
ol the LrcensedProgramhavebeendestroyedor relurned
assistancetrom Licensor.
t o L I C EN S O R
CONTiNTIfD O.\ OTHEB SIDI
SOFTWARE
CHANGEREQUEST
GeneralInformation
Name
PERL version no. -
Address
Phone
Check one:
bug -
enhancement
SystemConfiguration
Circle one:
IBM PC
IBM XT
IBM AT
Clone
K
System memory size:
Memory allocation:
K
stack
program
directory
Communication ports installed (circle):
7
2
3
4
5
6
7
Problemor Suggestion
Error messagereceived(if any):
Description of problem or suggestedimprovement:
Documentation
included(pleasecheck)
Listings (required):Program -
PERL.SCF -
Disk copy (required for reporting a directory problem; otherwise, optional):
-PERL.DIR
PERL.SCF
Procedures(PleaseList)
M a i lt o :
Laboratory Robotics Division
The Perkin-Elmer Corporation
761 Main Avenue
Norwalk, CT 06859-0927
8
9
10
CONTENTS
Section
1
Page
'I -1
INTRODOCTION .. ...
DESCRIPTION
OF PERL
Characteristics
1-1
The PERL ProgrammingEnvironment
l-J
Tools UsedDirectly by the Programmer ...
ToolsInvisibleto the Programmer ,,.
The Structure of PERL Applications Programs
Creatinga PERL Procedure
r-o
USINGT}1ISX{ANUAL
Organization
Conventions
SEND US YOUR IDEAS
-t -at
SOFTWARELICENSINGAGREEIVIENT
1-8
SYSTEM COMMANDS
,-1
SETTINGUP YOUR PERL DISKS
2-I
Backingup DOSand PERL Disks(OneTime Only) .,...
2-f
Loading the PERL/DOS Work Disk
2-2
Creating a Data Disk
2-3
CREATINGTHE SYSTEMCONFIGURATIONFILE
,-^
Infnnrlnafian
vu,r1rts.
I /86
CONTENlS
PaEe
Section
Adding a Module .
2'5
Changinga Module
2-I1
Deleting a Module
2-72
DisplayingModuleInformation ...
2-13
LOADINGPERL .
2-I4
Defauit Conditionsat Start-up
2-15
THE DIRECT CO1IiMANDPROCESSOR
2-76
PRE-DEI'INED CON]MANDS
2-76
THE DCP SCREENEDITOR
2-79
FUNCTIONKEYS AVAILABLEON THE PERL
MAIN SCREEN
THE PERL DIRECTORY
LEAVINGPERL .
3
2.79
.
2-20
2-22
TEE TEACH PROGRAMS
INTRODUCTION
.....
3-1
3-1
Before the Teach Programs:The System Configuration
File . .
J-l
The Interactive TeachingProcess
USINGTHE TEACH PROGRAMS
THE ROBOTTEACH PROCRAI\/I
The Robot Teach Program Options Menu .,
3-4
3-4
Moving the Robot ,
Naming a Position
Moving to a Position
8/86
3-8
CONTENTS
Paae
Section
Positioning the Gripper
Defining a Rack .
THE SYRINGETEACH PROGRAI\I
3-8
3-I2
3-27
Accessingthe Syringe Teach Program
3-22
Setting Up SyringeParameters .. .
3-23
Naming a Syringe Command
3-24
Executing a Syringe Command
3-24
N a m i n ga V a l v eC o m m a n d . , . .
3-25
Naming a SyringeVariable
3-26
THE DEVICEINTERFACETEACH PROGRAIII
3-27
Accessingthe Deviee Interface Teach Program
3-28
Using the Switch Outputs Program
3-29
Using the Inputs Program
3-31
Using the AC Outlets Program
3-33
Using the Alarm Program
3-35
Using the Differences Program
3-37
Using the input Controlled Actions Program
3-40
THE BALANCE TEACH PROGRANT
3-42
Accessingthe BalanceTeach Program
3-43
Displayingthe Current Weight
3-43
Naminga lveigh Command
3-44
Executinga WeighCommand
Naming a Tare Command(SartoriusBalance)
8/86
3-44
CONTENTS
Section
4
Page
THE PERL LANGUAGE ...
4-L
ELEMENTSOF PERL
4-1
PERL Statements
ArgumentsUsedin PERL Statements
4-2
Constantsand Variables
Array Variables
ExDressions
Iunctions
4-3
4-3
4-4
PERL STATEX{ENTS.
HousekeepingStatements
4-11
quct6m
4-13
f-^hlF^l
D e v i c eC o m m a n d s, . .
4-77
Robot Control
4-18
Timer Statements ..,
4-20
Parallel,Until, While
Co-ordinatedProcedu-res:
.,..,..4-18
Input/Output to the l\ionitor and Keyboard
4-24
Printing
4-30
Making Decisionswithin Programs
4-31
RepeatedActions: Loops .
4-34
Input/Outputvia RS232Ports .
4-39
Using Files on Disk .
D a t e a n dT i m e S t a t e m e n t s. . . . .
THE PERLEDITOR
.
4-47
4-44
5-1
I N T R O D U C T I O N. . . . .
5-1
EDITOR COI\IMANDS
5-1
Commandson the Editor l[enu .
CommandsControlled by Keyboard Keys .,
I /86
CONTENTS
Seetion
Page
P R O G R A M N I I NPGR O C E D U R E S. . . . .
Entering the Editor
5-4
5-4
Editing a Procedure
6
Editing a Text F ile
5-7
Leaving the Editor
5-8
CBEATING AN APPLICATTONSPROCRAM
P L A N N I N GT H E P R O C E D U R E. . . .
b-l
6-2
Def ining the Task
6-2
Identifyingthe ProceduresNeeded .
6-2
P l a n n i n gN e w P r o c e d u r e s. . . . .
6-3
CREATING
T H E P R O C E D U R E. . . .
6-6
T e a c h i nN
g e w C o m m a n d .s, . . . ,
6-6
Writing Procedures ..
6-6
l\'iritingthe Final Procedure.,...
6-7
THE LIBRARY FACILITY
SOI!18SAMPLEPROCEDURES
6-9
6-10
G e t t i n gT u b e sf r o m a R a c ka n d R e t u r n i n gT h e m . . . . . .
o-11
Using the Mastersyringe
6-72
Performing a Dilution
DispensingLiquids .
Using a Syringe Variabie
!t \r 1r i^, ri n, -1 6 .
6-72
6-12
o-lJ
o-14
o-rc
, , \ , t 6 , , r ,' t s
o-lo
8/86
CONTENTS
Section
Page
APPENDIXI ERBOB MESSAGES
APPENDIX 2 USEFTJLDOS COMMANDS
L2-7
LEAVINGPERL, ACCESSINGDOS
L2-1
DOSCOIVIMANDS
ttz-l
APPENDIX3 CONTROL CHARACTERS AND
THEIB PERL ABBREVIATIONS
A3-1
APPENDIX4 SAMPLE PERL APPIJCATION
A4-1
APPENDIX5 PERL BESERVED WORI}S
AC -l
REFERENCE GUIDE IlO PERL
8/86
ILLUSTRATIONS
Figure
1-1
Page
Interaction among Modulesof the Masterlab Automated
SamplePreparation System
l-2
l-2
The PERL ProgrammingEnvironment
1-3
2-l
PERL Main Screen .
3-1
Teaeh Program Selection Menu ,.
3-3
3-2
Robot Teach Program Options
3-4
3-3
The Teach Pendant
3-6
3-4
Robot Motion in the X. Y. and Z Planes
.t-o
3-5
Gripperson Robot Hand Closedand Open
3-10
3-6
Some UnusualRacks .
3-13
3-7
ThertDefine a Rack" Initial Sereen
J-IA
3-8
SyringeValve Positions,Front View
3-22
3-9
Syringe Parameter Screen
3-23
3-10
Name Valve CommandSereen ,
3-25
3-11
Switch Output Menu .
3-29
3-12
Inputs Menu
.t-.t r
3-13
AC Outlets Menu ,.
3-14
Alarm Menu
3-36
3-15
Difference Menu .
?-27
3-16
Input Controlled Aetions Menu .
3-40
,
8/86
2-14
ILLUSTRATIONS
Page
Figure
5-1
PERL Editor, Initial Screen
5-2
5-2
Edit CommandsMenu Screen
5-3
6-1
Valve PositionsDuring Syringe Operation
6-4
6-2
Getting a Tube from a Rack .
6-11
6-3
Mixing .
6-14
6-4
Weighing
6-16
8/86
TABLES
Table No.
Page
2-l
Flags Which Modify PERL Start-up Conditions
2-t5
3-1
Typical User-CreatedCommands ...
3-2
3-2
Typieal Device Interfaee Commands
3-28
4-l
Data Types in PERL
4-2
ArithmeticOperators
4-3
Relational and Logicat Operators
4-4
4-4
Numeric Functions
4-5
A-q
q+Fihd
4-6
The IBM PC Characters and Their Oetal Codes
4-3
F,,h^+i^n-
8/86
4-27
INTRODUCTION
Page
Section
1
INTRODUCTTON.....
1-1
DESCRIPTIONOF PERL
1-1
Characteristies
1-1
The PERL ProgrammingEnvironment
1-3
Tools UsedDireetly by the Prog?ammer ..
t-4
Tools Invisible to the Programmer . ..
1-4
The Structure of PERI ApplicationsPrograms
1-5
Creating a PERL Procedure
1-6
USINGTHISMANUAL
t-7
Organization
t-7
Conventions
t-7
SENDUSYOURIDEAS
1-8
SOFTWARE
LICENSING
AGRBEMENT
1-8
INTRODUCTION
DESCRIPTION
OF PERL
Characteristics
PERL (Perkin-Elmer Robot Language)is a new software languagedevised
for usein the Model 9000llasterlab AutomatedSamplePreparation
System. It is specifically intended to facilitate communication in a robotics
system.
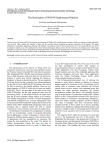
The Masterlab System consistsof a number of modules. Some of the
modulesin the system, such as the robot, the syringe station, the device
interface, and the balance,are able to communieatevia RS232ports with
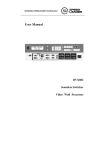
the System Controller (IBNIPC), as shown in Figure 1-1. A unique facility,
the Teach Program, is available in PERL for each of these modules. The
Teach Programsa1lowyou to create new commands,such as I'go_to_mixer'r,
in the laboratory, and store them for use in applicationsprograms (called
I'procedures'r).The robot learns, through a simple interactive procedure, the
Iocation speeified by "go_to_mixerr', It goes to that location wheneverit
encountersthe commandin a PERL procedure.In the same way, the
syringe, the balance,and other devices can be taught the commands
necessaryin order for them to aceomplishtheir tasks,
Otlrer modules(the mixer and the crimping station, for example)are shown
in Figure 1-1 conneetedto the device interface. The device interface can
monitor logic inputs from the crimping station and ean turn the mixer or the
erimping jaws on and off. Thus it is the device interface Teach Program
which is used to create the commandswhich integrate such modulesinto the
system.
Finally, there are moduleswhich are simply locations to whieh the robot
hand must reach. These are shownat the bottom of the diagram in
t-2
Figure 1-1. Racks,dispensingprobes,and also the mixer and crimping
station are examplesof such locations. The robot Teach Prog?am
is usedto teach the robot the neeessaryinteractions with these modules.
It is the PERL Teach Programswhich are in fact responsiblefor the flexibility of the Masterlab System. You can easily add modu.lesto the system
to meet your needs,becauseyou can ereate commandswhich will integrate
these modulesinto the system. In addition' you can program new applieations for your existing system, ereating new commandsas needed.
The Automated SamplePreparationSystem ean earry out many different
sample preparation proceduresin your laboratory. The programming
languageprovidedfor your use is simple to use, so that you can program the
proceduresas readily as you devise them. For this reason' PERL appears
similar to BASIC, a languagewhich is easy to learn and with which you may
already be familiar. Not only are many of the sta.tementsthe same as
@ F
ro@ @&
L€lid
g-vlc.d
bt f,.bot
Figure 1-i - Int..:ii)tion Among Modulesof
The MasterLab Automated SamplePreparation System
BASIC statements, the architecture of the programs is also similar.
You will accumu.Iatea certain amount of data (weights, volumes,numbers
of samples)during sample preparations. PERL is capable of processingthis
data. In fact, PERL ean be usedfor any usual programming needs;the
difference from other languageslies mainly in its additionBlability to
eommunicatewith robots and other devices easily, It was created especially
for performing physical tasks usinglaboratory robotics.
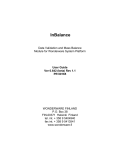
The PERLProgrammingEnvironment
The PERL programming environment (seeFigure 1-2) eonsistsof a set of
programming tools to help you develop PERL proeedures. Some of these
tools you will never use directly. Those with which you do interact are
menu-drivenfor ease of use.
As can be seenin Figure 1-2, you will use the System Configuration Utility
to store the configuration of the system in the system configuration file,
Ext€rnal
D€vices
System
Conngur!Ud
UtIIrty
T€.cI ry
Ploal.m!
hterFeter
+
9e.id
Commraicalio
+
ffi@'
flffi
qL,
|-_
frciUty
\__---l
&^
W
&Ita
l_
Figure 1-2 -The PERL ProgrammingEnvironment
and the Teach Programsto create new stored commandsfor controlling the
systemmodules. You wiil also use the Editor to create PERL procedures,
which are compiledby the Conpiler and stored.
Whenthe storedprocedureis run, the Interpreterusesboth the stored
commandsand the system configuration file to interpret the procedure
statements. Communicationduring procedureexecution is handled through
the Serial CommunicationFaeility.
The following paragraphsdescribe more fully the individual componentsof
the PERL environment.
Tools Used Directly by the Programmer
The SystemConfigurationUtility is an interactiveprogramwhich
allows you to describe the configuration of your system. It creates a
systemconfigurationfile (PERL.SCF)which indicateswhat devicesare
at what ports, the initializationparametersfor the ports and devices,
communicationprotocols,and the spellingof systemcommands.The
computerreadsthis file each time PERL is loadedinto memory,and it
sendsthe appropriateinitiaiizationcommands.
Onceyour systemhasbeen installed,you neednot use the System
ConfigurationUtility againunlessyou add, delete,or move a device. In
that case,changethe systemconfigurationfile. Your programsdo not
need to be changed,sinceall devicecommunicationis basedon the
system conf iguration f ile.
-
TeachProgramsare interactiveprogramsthat al1owyou to give names
to variouspositions,actions,and quantitieswhich wiil be neededin your
laboratory. In teaching the robot, for example,you use the Teach
Pendant,providedwith the robot, to move it to the desiredposition.
You then use the TeachProgramto name the position. Both the name
and the correspondingposition are stored on disk, ready to be used as
commandsin PERL procedures.Note that you do not have to calculate
the position;the positionparametersare determinedby the system. If
you changea location Later,you can use the Teach Program to change
the storedparameters. You need makeno changesin PEF.Lprocedures.
-
The PERL Editor is usedto create and edit PERL procedures.It is a
mEEd;Altor
which takes advantageof the function keys and other
special keyboardkeys available on the System Controller (IBNIPC), As
a result, it is both powerfuland easyto use. The completedprocedure
is automaticallycompiledwhenyou save it.
Tools Invisible to the Programmer
The Serial CommunicationFacilitv allowscommunicationwith external
devicesvia RS232ports. It is the basisof aU communieationbetween
the l\{asterLabsoftware and external devices.
1-5
-
The Compileris embeddedin the Editor, After you create a procedure,
it is automaticailycompiledinto an intermediateform before it is
storedon disk. This decreasesrun-time when the procedureis
executed.
-
The Interpreter interpretsthe statementsof the compiledprocedurein
sequencewhenyou run it. As eachstatementis interpreted,the
appropriateaction occurs.
The Structureof PERLApplicationsPrograms
A PERL procedure,like any other, consistsof a seriesof statements, As an
example,considerthe procedurebelow, (PERL doesnot use line numbers,
and they are includedhere only for reference.)
ft er.
No.
ProgramLiles
Comments
1
proceduredemoprog
2
dim weight(40
)
J
IOrr=1tO;r5
Procedurestatementbeginsthe
procedure.
Dimensionsarray variable i.
Line 3 beginsan action repeated
25 times. The end of this is at line
,1
4
5
6
7
8
9
10
11
L2
13
74
15
16
77
18
19
20
27
22
test_tubes i
parallel
go_to_syringe
fill_syr_5 ml
end parallel
dispense_sml
go_to_mixer
mixer_on
Removesa tubc from location i in
the rack named"test tubes",
Lines 5-8 allow two d-evicesto
act simultaneously.
Lines 9-11 (also4,6,7,14,15,77,20)
are commandscreatedwitlr the
Teach Programsand stored on
d isk.
set timer l for 15 seconds Lines 12 and 13 suspendoperation
wait for timer 1
for 15 seconds.
mixer off
weigh-(i) = weigh_sample
if wt(i) <0.8 then
Lines 16-20containa conditionat
discd tb
statementand an alternative action
else
if the conditionis true.
proc_smp
Calls a subroutineto be executed.
end if
next i
End of repeatedaction begun
at line 3.
end procedure
Last line of procedure.
1-6
As you can see from the example, a PERL procedurecan look quite
different from programs in other languages. This is beeauseof the unique
user-createdeommands,such as'rweigh sample". There are also some
Iogicel constructs (suchas the "parallil[ for-example)which are provided to
meet the unique needsof robotics. lVruchof the logic of the procedure,
however, is similar to BASIC,so that the overall architecture will be
familiar.
Note: Commandnames may contain up to 16 characters, the first of
fr-hich must be alphabetie. Spacesare not permitted in the usercreated commands. This is the reason for the presenceof the
underline charaeter (rr 'r) in most such commands. You must not use
in commandnameseitler decimal points or symbols which the system
could interpret as arithmetic operators (+, -, /, *).
PERL applicationsproceduresare usually constructed from shorter
procedures. Both the proceduresand the subproceduresbegin with
rrprocedurerr
statements. Section 6 of this manual will take you through the
steps in developingan applieationsprocedurefrom subroutines.
Creatinga PERLProcedure
Whenthe Masterlab System is installed, or wheneveryou add or changea
module, you must use the System Configuration Utility, rrconfigrr.See
I'Creating the System Configuration Filerrin Section 2. Assumingthat this
has been done and the system configuration file is complete, you can create
PERL proceduresas follows:
1)
Use the it€ach Programsto create the uniquestatements which will be
neededin the procedure. Examplesnright be "fill_syr_2m|' or
xmove_to_crimper'r. [Jseof the Teach Programsis describedin Section
2)
Access the PLftL Editor as describedin Section 5.
3)
Using the BASIC-like PERL statements in Section 4 to provide the
overall procedurestrueture, and your created statements from step I to
give commandsfor specific actions, enter your procedureand edit it.
4)
Save the procedure.
Ng!e, ff your software contains the optional Debugprogram, press
the F5 (Debug)function key to use it.
The following section expLainshow you can use the various seetionsof thjs
manualas aids to PERL programming.
USINGTHISMANUAL
Organization
The sectionsof this manualare arrangedin the order in which you would
logicallyneed them in order to write a PERL procedure:
Section2, SystemCommands,describeshow to load PERL, how to use the
function keys availablefrom the main PERL sereen,and what commands
can be issuedfrom the keyboard,
Section3, Teach Programs,containsinstructionsfor usingthe Teaeh
Pendantand the interactiveTeaehProgramsto create the commands
neededfor your new applications.
Section4, The PERL Languag6,containsdescriptionsof the statements
which are termanerrtJe-tffi6-of pER L.
Section5, The Editor, explainshow to aceessand use the Editor for writing
and editing proceduresand files. It includesa tutorial section.
Section6. Creatingand Runningan rApplicationprogram, takes vou throurh
the stepsi
p.og.ar. tt
includessamplesubroutinesfor common operations.
Conventions
PERL statementsor portionsof statements(suchas "if a = b then"
"x = abs(y)"which are referred to within the text of the manualareand
in lower
case,enelosedin quotationmarks. This is not meant to imply that quotes
are neededaroundstatementswhen programming.No quotesare usedin the
caseof proceduresegmentswhieh are indentedtb set them off from the
surroundingtext:
ifa=bthen
get_tube
eISe
process_sample
end if
Responses
which you must type in after a prompt are printed in bold type:
name: newrobot
1-8
S E N DU S Y O U RI D E A S
We at Perkin-Elmer are continuing to work to improve the features of
PERL, and to ensurethat the software performs as well as possible. We
welcome your suggestionsfor enhancementsto PERL, as well as your
reports of problems with it.
Pleaseuse the Software ChangeRequest form, found at the beginningof
this manuai, to communicate with us.
L I C E N S I N GA G R E E M E N T
SOFTWARE
Whenyou unpackyour system,you will see that the PERL disks are sealed,
The seal eonstitutes a self-executing Iicense for the software containedon
the disk. Breaking the seal indicates acceptanceof the terms of the
Software License Agreement loeated in the front of this manual. A notice
on the outside of the disks reads as follows:
NOTICE
Program License Agreement
The ProgramsHerein Are LicensedTo You For Use On A Single Computer
Under The Terms And ConditionsStated In The License Found In The Front
Of Your Operator's Manual. OpeningThis PackageIndicates Your
Acceptance Of ThoseTerms And Conditions. If You Do Not Agree To Those
Terms And Conditions,You May Return This Package UnopenedFor A Full
RefundOf The LieenseFee.
8/86
SYSTEMCOMMANDS
Page
Section
2
SYSTBUCOMUANDS
.
2-I
2-I
UP YOURPERLDISKS
SET'TING
Baekingup DOSand PERL Disks(OneTime Only) . . . . .
Loaclingthe PBRL/DOSwork Disk
Creating a Data Disk
?-\
2-2
2-3
.
2'4
FILE
CREATINGTHE SYSTEMCONFIGURATION
Introduction
LoadingConfig ...
Addinga Module .
Changinga Module
Deleting a Module .
DisplayingModuleInformation ..
LOADINGpERL ...
Default Conditionsat Start-up
2-4
2-4
2-5
z-lf
z-tz
2-I3
2-L4
z-Li
THE DIRECTCOMMANDPROCESSOR
2-16
PRE-DEFINEDCOMMANDS
2-16
THE DCP SCREENEDITOR
2-L9
FUNCTIONKEYS AVAILABLEON THE PERL
MAIN SCREBN
2-19
THE PERL DIRECTORY
2-20
LEAVTNGpBRL .
2-22
UPDAITNGYOUB PERL DIBEC"TOBY
TO VER.SION1.60
If you have a PERL Directory (PERL.DIR file) containing commandsereated
with a version of PERL earlier than 1.60, you will need to convert it before
using it with PERL 1.60. To do this, run the program XLATE, which is
included with your new PERL disks.
Important: If you try to use your existing directory with the
new software before translating it, your directory of commands
may be corrupted and lost.
Use the following procedure:
1)
In drive B of the System Controller, place your work disk containing the
files PERL.DIR and ROBOT.999. (Theseare the files to be Uanslated
from an earlier version to PERL 1.60,)
2)
In drive A place the disk containing the XLA?E program.
3)
To make drive B the default drive, type
b:
and pressEnter. The prompt will become B>.
4)
To run the XLATE program, type
a:rlate
and press Enter.
The screen will prompt you to enter the name of your robot.
5)
Type the name your robot was given in your system configuration file,
and pressEnter.
6)
If you have not inserted the disk with the ROBOT.999file, the screen
will prompt you to do so. Whenthe disk is in place, press Enter.
The screen will ask you to identify the version of PERL you used to
make your directory,
-2-
!'PERL Directory 1'58r'' Press
Highlight either I'PERL Directory 1.50rror
Enter.
The screen will ask3
Do you have sYringecommands(Y/n)?
8)
if you do
TYpey if you have syringe commandsin your directory; type n
not.
of
If you answeredyes' the screen will prompt you to enter the name
the syringe.
e)
Type the name given to the syringe in your system configuration file'
PressEnter.
ImDortants If vou have more than one syringe' you will lose
some commandswnen tne qirectory is translated' To minimize
the number lost' give the name of the syringe for which you
have the most commands.
The screen will list the model numbersof the available syringes'
10)
Press
Highlight the model number of the syringe you named in step 9'
Enter.
screen
1 1 ) If vou have not inserted the disk with the PERL'DIR file, the
press
Enter'
place,
in
is
you to do so. when the disk
*iiipt"tpt
The system will now execute the conversionto PERL version 1'60 as
follows:
*
It creates a new PERL.DIR file whieh containsyour commands
in a form compatible with PERL version 1'60'
*
It places your old directory (version 1'50 or 1'58) in a back-up
file called PERLlSX'DIR.
*
It converts the ROBOT.999file to a file called ROBOT'HOI\I'
ImDortant: The structure of the systemconfiguration file is
Eiftifit in PERL1.60. Beforeusingyour newsoftware'
CONFIGprogramthat
reconfigureyour systemby runningthe
"Creating
p-nnl
the System
versioni.oo. See
camer;ith
Instructions'
PERL
your
ConfigurationFile" in Section2 of
SYSTEMCOMMANDS
S E T T I N GU P Y O U RP E R LD I S K S
Backingup DOSand PERLDisks(OneTimeOnly)
You should make a back-up copies of your PERL disks for everyday use, so
that your master copy can be stored. You wili find it a convenienceto have
a copy of the most frequently used DOS commandson the sante diskette
that contains PERL. The following proeedurecopiesboth DOSand PERL
onto a single disk. After you have made this disk, use it with the procedure
under 'rloading the PERL Work Disk'rwheneveryou wish to load PERL.
1)
With power to the System Controller (IBlt PC) turned off, insert the
DOS diskette into drive A. Turn the Controller on. (If your System
Controller is already on, insert the DOSdiskette and then reset the
Controller by pressingCTRL, ALT, and DEL simultaneously.)
2)
Whenthe date is displayed,press Enter. l{hen the time is displayed,
press Enter again. (You shouldset the date and time, but you will do so
whenyou boot your new DOS/PERLdiskettein the next section,)
3)
Whenthe DOSprompt (A>)appears,put a new, unformatteddiskette in
drive B.
4)
Type the following comnand:
format b:/s
PressEnter, and wait for the DOSprompt to reappear.
I /86
5)
Whenthe system asksyou I'format another'r,insert a secondblank disk
in drive B, and type y.
This will give you two formatted disks,on which you can copy your
PERL program disk and your System Configuration Utility (CONFIG)
dlsk.
6)
Remove the DOS diskette from drive A, and insert your PERL program
disk. Type
copy a: perl *.exe b:
and press Enter. The entire PERL diskette will be copied onto the
diskette in drive B.
6)
Removethe PERL diskette from drive A. Removethe diskette from
drive B, and label it I'DOS/PERLwork diskr'.
7)
Insert your CONFIG disk in drive A and your other formatted blank disk
in drive B. Type
c o p ya : + ,t b :
and press Enter. The CONFIG disk will be copied onto the disk in drive
B.
8)
work disk."
Remove the disk from drive B and label it TTCONFIG
9)
Remove the CONFIG disk from drive A. Store the original PERL and
CONFIG disks where they will be safe from heat, magnetic fields, dirt,
or mechaniealinjury.
Loadingthe PERL/DOS
WorkDisk
For this procedure,use the DOS/PERLwork disk which you ereated in the
precedingsection.
1)
First load DOS, To do this, with power to the System Controller turned
off, insert your DOS/PERLdiskette into drive A. Turn on all external
devices connectedto your Systern Controller, then turn the Controller
on, (If your System Controiler is already on, insert the diskette and
then reset the Controller by pressingCTRL, ALT, and DEL simultaneously.)
2)
After a pause,the date will be displayed. If it is not comect, enter the
correct date in either of these formats:
d -l-bD
8/7 /85
PressEnter.
8/86
3)
The present time will then be displayed(hours,minutes, seconds,
hundredthsof a second). If it is not correct, enter the correct hours
and minutes in the format
o.n(
PressEnter. The DOSprompt (A>) wiII appear.
Creatinga DataDisk
In general,you will load the PERL/DOS work disk into drive A, and use a
data disk in drive B for saving your created procedures,directory of
commands.and data files.
To ereate vour first data disk. use the following procedureto place the
necessaryfiles on a disk in drive B:
a)
With the PERL/DOS work disk in drive A. place a formatted disk in
drive B.
b)
Type
copy *.HOM b:
and pressEnter. The system will copy the initialization procedure(s)
for your robot(s)onto the disk in drive B.
c)
To make drive B the default drive, type b:, and press Enter. The
prompt w ill becomeB>.
d)
Place your CONFIG work disk in drive A. Create your system
configuration file (PERL.SCF)as follows. Type
a:config
and pressEnter. Follow the proceduregiven in I'Creating the System
Configuration File'r, below. The system will place the file PERL.SCF
on the disk in drive B.
e)
Load PERL as describedin rrloading PERL", below. Commandsyou
create with PERL will be filed on disk B in PERL.DIR.
To create additional data disks (after you have a System Configuration File
and a Directory of commands),proceed as follows:
a)
With the DOSprompt (A>) displayed,place a previousdata disk in drive
A and a new. formatted disk in drive B.
8 /86
o)
Copy the files you will need onto the new data disk by typing the
following series of commands. PressEnter after each command.
eoDv..HOM b:
CObi PERLSCF b:
eoif nnnr,.mnu:
Load PERL as describedin 'rl,oadingPERL'', below.
T H ES Y S T E MC O N F I G U R A T I OFNI L E
CREATING
Introduction
Before you can operate the Masterlab System,you must configure the
software for the particular modulesyou have in your system. i'CONFIG is
an interactive program which allows you to create a file (PDRL.SCF)that
identifies the communicationrequirementsof the modulesincluded in your
system. You can identify the following:
*
*
*
*
Accessorymodulesin the system
Port location of each module
Initialization parameters for each module
Communicationprotocol for each module
The system reads the system configuration file eaeh time you load PERL
into memory. This results in the initialization of the eommunieationports on
the IBNIPC and of the moduleson the system.
Once the l\Iasterlab System has been installed, you need not use CONFIG
again unlessyou add, delete, or changea module. In that case, you would
changethe system eonfiguration file to reflect the changesto the system.
For example, if you addeda bar code station to the system, you would run
CONFIG in order to make the necessaryaddition to the system configuration file.
LoadingConfig
r)
Load DOS as describedin I'Loadingthe PERL/DOS Work Diskrr,above.
Place the CONFIG disk in drive A and a data disk in drive B. With the
DOSprompt (A>) displayed,type b: and pressreturn. This will make
the data disk in B the destination on which the system will save your
configuration f ite (PERL.SCF).
I /86
2-5
3)
To load the Config program from disk A into memory, type
a:config
and press Enter,
The display showsthe main menu of Config. Four options are available:
-
Add a Module
Changea Module
Delete a l{odule
Display ModuleInformation
The bottom of the display identifies the tasks assignedto each of the five
function keys which are active in Config. The key assignmentsare:
I(ev
Label
Function
F6
Help
Displaysinformation on the
operationof variousparts of
the program.
Note: The HELP functionhasnot yet been implemented.
F7
ciuit
Stops the program and returns
to the DOSenvironment.
F8
Bkup
Returns to the menu displayed
prior to the selectionof the
current menu.
F9
l,-p
Highlights the menu item
the line above the item
currently highlighted.
Fl0
Dn
Ilighlights the menu item
the line below the item
currently highlighted.
A d d i n ga M o d u l e
Every module that is installed with your Masterlab System,or is added to
the system later, must be identified in the system configuration file. This
enablesthe System Controller to communicate with the module. Using
Config to add a module (for example, a printer or a syringe) to the
Masterlab System sets the communieationsparameters associatedwith the
new module. Either the system sets the parametersby default, or you
select them.
8/86
2-6
The following is a general procedure for adding a module to the system. The
procedure for adding a robot to your Nlasterlab System is deseribedin
Section 3 of the Masterlab System Instructions. You wiil find the procedure
for adding each accessorymodule in the manualprovided with the module.
To add a module to the system, proceed as follows:
1)
Use the Up (F9) and Dn (F10) function keys (or the up and down arrow
keys) to highlight the option labeled:
Add a Module
and press the Enter key.
The display now lists categories of moduleswhich can be added to the
system. The choicesare:
Robot
Printer
Syringe
Balanee
Bar Code Reader
Device Interface
CappingStation
AiI Other Modules
2)
Highlight the type of moduleyou wish to add, and press the Enter key.
Note: If the module is a syringe, the system wiil list the
avail-ablemodels: 9030,1040,9050,1060. Highlight the model
number of the syringe you are adding, and press the Enter key.
If the module is a balance, the system will ask you to indicate
whether it is a Mettler or a Sartorius.
The system now asksyou to enter the communicationsrequirements for
the new module.
3)
If you selected Printer as the module to be added,the system prompts:
Port Tlpe
and two options, RS-232and Centronics,are available,
I{ightight the option which correspondsto the interface on the printer
you are adding,and press Enter.
Nqte: For devices other than printers, the system assumesan
RS-232serial interface.
I /86
4)
a) For RS-232devices:
When the display prompts:
Port Mnemonic
highlight the name of the communicationsport on the System
Controller to which you connectedthe module, and press the Enter
key. For example,highlighting
COM3:
and pressingEnter identifies eommunicationsport 3 on the System
Controller as the port to which vou have connected the module.
Note: COIVI3:through COI\16:are available on the standard
SystemController, CONI1:,COM2:and CONI7:throughCOM10:
are optional ports.
b)
For Centronicsinterfaceprintersonlv:
Whenthe displayprompts:
Port Nlnemonic
highlight the name of the Centronicsprinter port to which the
printer is connected, For example, if the printer is connected
to the primary parallel interface port, highlight:
LPTl:
and press the Enter key.
Note: LPTL: is usually used when the System Controller
contains a Herculesgraphics card,
Impoftank Steps 5 through 10 establishparameters which are
defaulted for standard Masterlab System modules, If the type
of moduleyou are adding was listed on the Config "Add a
Modulet'menu, proceed to step 11. If you entered "AlI Other
I\lodules"at step 1, refer to the manualprovided with the
module to determine its communicationsrequirements.
The next prompt displayedis:
Handshaking
and two options, Yes and No, are available,
Ilighlight YES if the module supportshardware handshakingthrough the
Clear to Send(CTS),Data Terminal Ready(DTR),Data Set Ready
(DSR),and Requestto Send(RTS)lines.
I /86
2-8
Highlight NO if the handshakeis not supported.
PressEnter to complete this seleetion.
6)
The system next requestsyou to select the baud rate at whieh the
modulereceives and transmits data. The choicesrange from 50 to 9600
baud. Highlight the value at which the modulereceives and transmits
data, and press Enter.
The system prompts for a parity selection. The three options are:
No Parity
Odd Parity
Even Parity
Highlight the option usedby the module, and press the Enter key.
8)
The system prompts for the number of stop bits; that is, the number of
bits terminating each character sent. The options are:
One Stop Bit
Two Stop Bits
Highlight the option required by the module, and press the Enter key.
ol
The system prompts for the number of data bits transmitted by the
module. The options available are:
Five Data Bits
Six Data Bits
Seven Data Bits
Eight Data Bits
Highlight the option required by the module,and press the Enter key.
1 0 ) The system next prompts for the timeout value; that is, the time (in
seeonds)that the computer waits for the module to respondto a
command. If no responsehas been received when the time has elapsed,
the computer displaysan appropriate emor message.
Whenthe system prompts3
Timeout
enter a value up to 99 seconds,and press Enter.
Note: The timeout function has not yet been implemented,so
the system will make no use of your responseto this prompt.
11)
The system then prompts:
ModuleName
8/86
2-9
Enter a name, and press the Enter key. Names must begin with an
alphabetic character, may include up to sixteen characters,and may
not include spaces. Spacescan be indicated using the underscore
character. The system will use the name to identify the module in the
PERL environment,
Notes:
Il-TEe following characters shouldnot be usedas names in SCU
OTPERL.
oa
+
I
;
2. If you are enteringthe nameof a syringe,the systemwill
continue to prompt you for more names. If you have syringes
trdaisychained",with more than one connectedto one port, enter
the name of each syringe at the port, pressingEnter after each
one. Whenall are entered, press Enter again without typing a
name. Proceedto steD12.
ImDortant Steps 12 through 14 establishparameters which are
defaulted for standard Masterlab System modules. If the type of
moduleyou are adding was listed on the Config "Add a Module"
menu, proceed to step 15. If you entered I'Ali Other Nlodulesnat
step 1, refer to the manualprovided with the module to determine
its communicationsreouirements.
L2)
The system prompts for the Initiaiization Sequence. The initialization
sequenceis the aetion or seriesof actions that sets the module to its
starting position. It can also request a responsefrom the module before
initialization proeeeds. if a responseis required from the module, the
following commandis ineluded:
,?xxx, (wherexxx is the requiredresponse)
You may enter any ASCII character as part of an initialization
sequence,For example,if the initializationwere for the System
Controllerto query'rHello,how are you?",and the nroduleto return'rI
am finer',the initializationsequencewouldbe:
Hello<,>how are you<?>r?I
am fine
The angle brackets around the first eomma and question mark indicate
that they are included in the query, not part of a eommand, it would be
equally correct to use
<Hello,how are you?>,?Iam fine
Angle brackets are also )sed with an ASCII commandsuch as <CR>
(caniage return). See the table of ASCII and PERL abbreviationsfor
control characters, found in Appendix 3 of this manual.
I /86
2-70
\pical Initialization Sequencesfor two modulesare shownbelow.
(Sincethese are standard modules,their initialization sequencewould
be defaulted for you,)
Module
Initialization Sequence
Explanation
Printer
<FF> <CR>
Form feed foLlowedby a
carriagere turn.
Device Interface
C,?*
Clear module and wait
for asterisk to be
returned.
Enter the combination of ASCII and module commandsthat defines the
sequencefor your module,and press Enter.
13)
The system prompts for the Input Terminator, the ASCII character or
sequenceof characters usedto terminate the responsecoming fron the
module to the System Controller (IBM PC). For example, a typical
input terminator is a carriage return, <CR>, or a carriage return, line
feed, <CR> <LF>.
Enter the ASCII character or sequenceof characters for the desired
input terminator in angle brackets < >, and press the Enter key.
14) The system prompts for the Output Terminator, the ASCII charaeter, or
the sequenceof characters used to terminate a commandsent to the
module from the System Controller (IBM PC). For example, a typical
output terminator for a printer is a carriage return followed by a
linefeed;that is, <CR> <LF>.
Enter the ASCII character for the desired terminator in angle brackets
< >, and press the Enter key.
15) To store the information just entered for the module on the PERL
diskette and return to the DOS environment,press the Quit function
key (F 7).
The system queries:
Save the current modifications?(y/n)
Press:
y - to sBvethe communieationsoptions for the module
n - to abort the storage operation
U you type y, the communicationsparameters selected for the module
will be stored on your data disk in the system cohfiguration file named
PERL.SCF.
8/86
2-r7
Changinga Module
With Config you can changethe communicationsparameters assignedto any
module on the system.
To changea module,proceed as follows:
1)
Use the Up and Dn keys (F9 and F10) to highlight the option on the main
menu of Config labeled:
Changea Module
and pressthe Enter key.
A Iist of aII the modulespresently in the system configuration file is
displayedon the screen.
2)
I{ighlight the name of the module whosecommunicationsparameters
you wish to change,and press the Enter key.
The present parameter settings for the deviee are displayedon the
sereen(seeexample below).
Port Type
Port Mnemonic
Handshaking
BaudRate
Parity
Stop Bits
Data Bits
Port Timeout
RS-232
COM7:
Yes
9600
Even
1
7
10 seconds
Module Name
ModuleType
Initialized
Init. Sequence
Input Terminator
Output Terminator
Instrument
Other Device
On Start-up
<CR> <LF>
<CR>
3)
Use the Dn function key (F10) to move the cursor to the first parameter
that you wish to change.
4)
Press the Enter key to delete the current entry for the parameter.
5)
a) If the parameter requires e typed entry, type the desiredentry and
press the Enter key.
b) If the parameter requires a selection from items in a menu, use the
Up and Dn keys (F9 and Fl0) to highlight the desired item, and press
the Enter key to complete the selection.
8/86
2-72
6)
Whenthe parameters for the module are modified as you wish, press the
Dn function key (F10) until you reach the bottom of the parameter list.
You will see the following messages
PleasePressthe ENTER Key to Continue
7)
To continue operation in Config, press the Enter key.
8)
To store the information just entered in the system configuration file
and return to the DOS environment,press the Quit function key (F7).
The system queries:
Save the current modifications?(y/n):
Press:
y - to sBve the modified communieationsparameters for the
module(s)
n - to retain the previousset of communicationsparameters for the
module(s)
Deletinga Module
Config enablesyou to delete any module from the Masterlab System,
Proceed as follows:
1)
Use the Up and Dn keys (P9 and F10) to highlight the option on the
main menu of Config labeled:
Delete a Module
and pressthe Enter key.
A list of the modulespresently in the system configuration file is
displayedon the screen.
2)
Highlight the module that you wish to delete, and press the Enter
key. The module is deleted from the system configuration file,
PERL.SCF.
Important: Deletion is instantaneous. Be certain that you wish to
delete the module from the file before you press the Enter key. If
you make a mistake, use the Add a lVloduleoption to return the
module to the file.
8/86
2-73
3)
To store the modified system eonfiguration file on your data disk and
return to the DOS environment,press the Quit function key (FZ).
The system queries3
Save the current modifications? (y/n):
Press:
y - to save the modified file
n - lo retain the nreviousset of modules
Displaying
ModuleInformation
To display the communicationsparameters for any module that is already
present on the system, proceedas follows:
1)
Highlight the option labeled:
Display ModuleInformation
and press the Enter key,
A list of the moduleswhich are configured for use with the Masterlab
System appearson the screen.
2)
To display information for any of the moduleslisted, highlight the
module name and press the Enter key. A display similar to that shown
below appearson the screen.
Module Information
PERL Configuration Utility V1.0
Port Type
Port Mnemonic
Ilandshaking
BaudRate
Parity
Stop Bits
Data Bits
Port Timeout
RS-232
COMI:
Yes
9600
Even
1
7
10 seconds
hloduleName
Moduie Type
Initialized
Init. Sequence
ROBOT1
Robot
On Start-up
T n n r r tT p r m i n n t n r
<CR>
Output Teminator
<CR> <LF>
Refer to "Adding a l\Ioduletr,above, for information about the individual
items in this list.
8/86
2-t4
3)
To display information for the other moduieson the system:
a) Press t}le Enter key to redisplay the Iist of modulespresently in the
system,
b) Highlight the name of the desired module,and press the Enter key.
4)
If you need to make changesin any parameters, use the 'rChangea
Module" option.
L OADI NGP E RL
1)
Load the PERL/DOS work disk as describedearlier.
2)
With the DOSprompt displayed,place your data disk in drive B. Type
b: and press Enter to make drive B the default destination for the files
you create with PERL.
3)
Type perl (or the name of the batch file you have created; see next
page),and press Enter. The Nlasterlab devices which initialize at
Start-up will initialize, as requestedby the system configuration file.
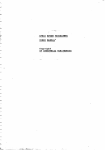
The PERL main screen (see Figure 2-1) wiil appear. lvhen this screen is
displayed,the PERL direct commandprocessoris in con8oli that is,
any PERL commandtyped in will be executed. In addition,the 10
function keys describedunder 'rFunctionKeys Availabie on the PERL
Main Screenrr
are active.
Coprrtrht (c) 1986
P.rhiD-EIDGT Corporltion
PERL>
11:Run f2:Idtt
tr3=Tclch Fa:Dlr
PERL syltGD
trs:HGID F7:Qult
Figure 2-1 - PzRL Main Screen
8/86
v1.60
2-1,5
DelaultGonditionsat Start-up
The PERL default conditionsare set in the file PERL.BAT, which runs
automatically when you load PERL. A listing of this file appearssimilar to
the following:
echo off
verify on
perl =10000-d3000?6000 -rtest
,.r.
., .
,
,.,
J .,i
.,
iii,/
,.rr.
,
{ \
L . ' r , \ , r ' . ", -
The third line of the file allocates the computer memory to be used for
stack space,directory, and program. In the example above, the stack space
is 10,000bytes, the directory size 3000,and the programsize 6000. You can
allocate all the available memory in your computer, if you want, except for
approximately310K for PERL itself (version1.60).
In addition to the -d and ? fiags for setting directory and program space,
you can set several other flags in PERL.BAT to modify start-up conditions.
In the example above, the -r flag indicates that a procedurecalled'rtestrris
to run immediately after start-up. Table 2-1 lists the available flags.
If you want to changethe default conditions,load PERL,BATinto the PERL
Editor (seeSection 5). Use the Editor to changethe flags in the third line of
the file.
TABLE2.1
FLAGSWHICHMODIFYPERLSTART-UP
CONDITIONS
FIag
Explanation
Example
c
Execute a commandimmediately.
-cdisplay devices
d
Set directory size.
-d16
i
Set standard input deviee.
Defaults to console(con:).
-ioldfile
I
Set device in which Iog is kept.
Defaults to console(con:).
-lthursfile.log
o
Set standardoutput deviee.
Defaults to console(con:).
-oprinter
p
Set programsize.
-p6000
r
Run a proeedureimmediately,
-rrobt_tst
oerl =1000
None Set staek size.
8/86
2-r6
THE DIRECTCOMMANDPROCESSOR
The direct eommandprocessor(DCP) is in eontrol whenever the PERL>
prompt is displayed. It allows you to execute any commandsthat you have
defined or that are a part of PERL. Simply type in a commandor a
procedurename and press Enter.
The following features are available to you from the DCP:
Section in
which Described
Feature
pre-defined commands
screen editing commands(not part of
the PERL Editor)
commandscontrolled by function keys
PERL Directory
Teach Programs
PERL Editor
execution of user-definedcommands
2
2
2
2
3
5
2
PRE.DEFINEC
DOMMANDS
The commandsdescribedin this section may be issuedfrom the keyboard as
describedabove, or they may be used in PERL applicationsprograms where
appropriate.
Command
Function
Example
DEVICECOI\lMANDS:
init
Initializes specifie devicesby
the name entered in "CONFIG''.
init robot 1
use
Specifiesby name the device to be
usedwhen there are multiple
devices of the same tvoe in the
system.
use robot_2
display
devices
Displaysthe configurationsfor
all devices in the System
Configuration File. From this
display, press F8(Backup)to
return to the main PERL sereen.
display devices
8/86
DIRECTORYCOIViMANDS:
Ioad
Read Directory from disk. This
causesany new Directory
entries in memory to be lost.
The Directory which is loaded is
automatieally backed up in the file
PERL DIR,BAK.
load
save
Write Directory to disk. This
savesany additions to the
Directory which are in memorY,
placingthem in the file PERL.DIR.
save
I/O COMMANDS:
Changesthe standardinput or
output deviee. (Default
input deviceis the keyboard.
Default output device is the
monitor screen.) Available from
DCP only,
redirect output
to coml:
Iog
Creates a file on disk which
will contain everything sent to
the screen.
log monday.log
clear
Clears the PERL screen.
clear
redirect
redirect input
from newfile
ROBOTCONIIvIANDS:
open
Opengrippers.
open
close
Close grippers.
elose
speed
Set speedof robot. (0 - 9
possible;0 slowest,9 fastest)
speed7
up
Nlovesthe robot up a specified distance (in mm) from its present
position.
up 5
down
Nlovesthe robot down a specified
distance (in mm) frorn its present
Position.
down 4
8/86
2-18
relative
Nlovesthe robot relative to its present relative 2,4,6,5,5
position. The argumentsspecify mm
relativ e 2r2r4
in the x, y, and z directions and
degreesof wrist pitch and roll.
relative 0,0,0,20
reS-pectivety.(Seie"Robot Corirmands[ in Section 4 for details.)
TIMER COMMANDS:
set timer
Sets one of ten software timers for
specified number of minutes
or seconds.
set timer 1 for
10 seconds
wait for
timer
Tells system to do nothing until
previously-settimer has elapsed.
wait for timer 1
SYSTEIVI
CONTROLCOMNIANDS:
dos
Returns to operating system.
PERL remainsin memory. (See
'tsystem Control Commandstrin Section 4 for other usesof 'rdos'r.)
dos
system
Returns to operating system.
PERL is aborted.
system
link
Links all the subproceduresused in a
main procedure. Generatesan executable disk file with the extension
II,LNKrrappendedto the f ilename.
Iink proc_mix
DATE AND TIME COMMANDS:
date
Displaysdate.
date
day
Displays the day of the week.
day
month
Displays the month.
month
time
Displaystime.
time
8/86
2-L9
THE DCPSCREENEDITOR
The screen editor embeddedin the DCP makesuse of the editing keys of the
System Controller (IBM PC), It a[ows you to edit commandlines and to
move the cursor anywhereon the screen. You may also return
to a previously-issuedeommandand execute it again; simply move the
cursor to the end of the commandline and DressEnter. The functions of the
editing keys are as follows:
Key
lunction
Up arrow
Down arrow
Right arrow
Left arrow
Home
End
PgUp
PgDn
Ins
l\'lovesthe cursor up one iine.
Nlovesthe cursor down one line.
Nlovesthe cursor one character to the right.
Nlovesthe cursor one character to the left.
Nlovesthe cursor to the beginningof its present line.
Iviovesthe eursor to the end of its present line.
Nlovesthe cursor to the top of the screen.
llloves the cursor to the bottom of the screen,
Inserts all characters typed subsequentlyinto the
position to the left of the cursor. PressIns again to
return to normal operation.
Deletes the character which is at the present cursor
Position.
Overwrites the character which is at the current
cursorposition,
Nlovesthe cursor to the next tab position.
DeI
any character key
Tab
FUNCTIONKEYSAVAILABLE
ON TH E P E RLM A I N S C R EE N
The PERL main screen assignsfunctions to several of the function keys on
the left side of the keyboard. This section will explain the use of each one.
Kev
Functionof Command
Fl=Run
Runsa PERL applieationsprocedure. Whenyou press Fl,
you will receive the messagetrPleaseenter procedure
name'r. Type in the name and pressEnter.
F2=Edit
Accessesthe PERL ScreenEditor, which is usedto write
and edit proceduresand information files. The use of the
Screen Editor is describedin Section 5 of this manual.
8/86
2-20
F3=Teach
Accessesthe Teach programs for the robot and other
modulesof the Masterlab System which are capable of
RS232communication. Theseprograms are used to
create the eommandsnecessarvto the oDerationof these
modules. The use of the Teach-programs is explainedin
Section 3 of this manual.
F4=Dir
Accessesthe PERL Directory, which contains a list of all
PERL files and procedures,as well as all commandswhich
you have taught to the system by using the Teach
programs. Use of the Directory is explainedin Seetion
the precedingsection.
F6=Help
Displaysappropriate available help screens.
Note: The HELP function has not yet been implemented.
p 7=euit
Aborts PERL and returns you to DOS. This is the same as
the "systemrrcommanddescribedunder irl,eavingPERL'r.
Note: During exeeutionof a PERL procedure, FZ changesand
F8 becomesavailable, as follows:
F 7=Halt
Stopsprocedureexecution at the end of the
Dresentline.
F8=Continue Resumespreviously halted procedure,beginning
at the next line.
THE PERLDIRECTORY
PERL will store in the PERL Directory (the file PERL.DIR)all the
commandsthat you create with the TeachPrograms. Whenyou load PERL,
the System Controller reads this file into memory, so that all the commands
you have created are available,
The computer memory space allocated to the Directory is set in the batch
file PERL.BAT. If your Directory becomeslarger than the allocated
memory, you will receive a screen message. You can then increase the
Directory spaee,as describedinrrDefault Conditionsat Start-up", earlier in
this section.
Each time you attempt to save you.rDirectory on disk, PERL will verify that
the disk contains enoughfree space. If you receive a messagethat there is
insufficient space, insert another disk into the drive, and save the Directory
agBin.
8/86
2-2L
The Directory functions not only as the repository for the commandsyou
create. You can also make use of it directly, in two waysr
*
as a reference tool, in which you can check on the namesyou have
given to commandsl
*
as a meansby which you can execute commandswithout having to
type them.
1)
To see the PERL Directory, pressF4 (Dir) from the PERL main screen
(DCP). The Module CommandDirectory main screen wi appear, It
Iists the types of modulesyou have connectedto your system.
2)
Use the arrow keys or F9 and F10 to highlight the module whose
commandsyou wish to see. PressEnter.
If the moduleyou selected has several types of possiblecommands,then
a menu of commandtypes will appear.
3)
If necessary,highlight the desired type of command,and press ENTER.
The options menu for the moduleyou selected will appear. In all cases,
it lists the following options:
Display/Executel\{oduleCommand
ChangeModuleCommand
Delete ModuleCommand
4)
The Display/Executeoption is highlighted. PressEnter to select it.
A display of commandsyou have created for the chosenmodule will
appear (e.9. robot commandsor syringe commands,dependingon what
module and commandtype you chose in steps 2 and 3),
5)
Use the arrow keys to move the cursor to the commandyou wish to
execute, If you have more than one screen of commands,use the PgUp
and PgDn keys to move from screen to screen. PressEnter. (If you do
not wish to execute a command,proceed to step 7.)
6)
The system will execute the eommandand return you to the options
menu for the moduleyou selected.
7)
PressF8 (Bkup)repeatedly to return to earlier screens,or press F7
(Quit) to return directly to PERL.
8/86
LEAVINGPERL
Whenyou wish to use DOS commandsor load other software, you must leeve
the PERL environment. There are two ways to accomplish this3
-
To return to the DOS Operating System while keeping PERL in mernory'
type dos and press Enter. You can then issueDOS eommands. (For
some commands,you may need to insert the DOS disk in drive A.) I{hen
you are ready to return to PERL, type perl and press Enter. The PERL
screen reappearswithout the moduleshaving to be re-initialized.
Note: Your system must have sufficient memory in order to be
able to use the DOS mode within PERL, and you must have
onto your PERL/DOS
copiedthe DOSfile COMIIIAND.CON{
work disk.
-
To abort PERL and return to DOS, type system and press Enter, or use
F7 (Quit). You will then be able to issue DOS commandsor to load other
software.
8/86
THETEACHPROGRAMS
Page
Section
THE TBACH PBOGRATS
INTRODUCTION . .. . ..
Before the Teach Programs:The SystemConfiguration
File
The Interaetive TeachingProcess
3-1
3-1
3-1
3-2
USINGTHE TEACH PROGRAMS
3-3
THB ROBOTTEACHPROGRAM
3-4
The Robot Teach ProgramOptionsMenu ..
Movingthe Robot .
Naminga Position
Movingto a Position
Positioningthe Gripper
Defining a Rack .
THE SYRINGETEACH PROGRAM
3-4
3-5
3-?
3-8
3-8
s-tz
3-21
Accessingthe SyringeTeach Program
SettingUp SyringeParameters...
Naminga SyringeCommand
Executinga SyringeCommand
Naminga Valve Command
Naminga SyringeVariable
3'22
3-23
3-24
3-24
3-25
3-26
THE DEVICEINTERFACE
TEACHPROGRAM
3-27
Accessingthe Device Interface TeachProgram
Usingthe Switch OutputsProgram
Usingthe lnputs Program
Usingthe AC Outlets Program
Usingthe Alarm Program
Usingthe Differences Prog?am
Usingthe Input Controlled Actions Program
THE BALANCE TEACTIPROGRAM
Accessingthe BalanceTeach Program
Displayingthe Current Weight ...
Naminga WeighCommand
Executinga WeighCommand
Naminga Tare Command(SartoriusBalance)
3-28
3-29
3-31
3-33
3-35
3-3?
3-40
3-42
3-43
3-43
3-44
3-44
3-44
THE TEACHPROGRAMS
INTRODUCTION
The feature which distinguishesPERL from other software languagesis its
ability to acquire new commands. Using the PERL Teach Programs,you can
create commandsfor later use in applieationsprograms, You can tailor
these commandsto the particular sample preparation tasks being carried out
in your laboratory, PERLTsability to direct external devices to perform a
variety of tasks is one res.sonwhy it is Ln advanced language,
Teach Programsexist for each of the programmablemodulesof the
Masterlab System: the robot, the device interface, the slninge, the bar code
reader, and the balanee. The remainder of this introduetory section
explainswhat must be done before you ean use the Teach Programs, and
describesin general the interaetive teaching processthey employ. The
major portion of Section 3 contains specific instruetions for using four of
the Teach Programspresently available. You will also find in the manual
for each accessorymodule the Teach Program information relevant to that
module.
Beforethe TeachPrograms:The SystemConfigurationFile
Before the Masterlab System can be used,the System Configuration Utility
must be used to create a system configuration file. (SeeSection 2.) The
system configuration file contains the basic information the system must
have in order for there to be communicationamong the various modules,
In the system configuration file, eech module has been given a name by
which it can be cBlled in commands, If there is more than one module of a
given kind (two syringes,for example),each one is assigneda separate
name. The system configuration file contains information on how to
initialize each module, its port, and relevant communicationsparameters.
If you have addeda module to or deleted one from the systemr be sure that
you have changedthe system configuration file aceordinglybefore you
attempt to use the Teach Programs. For example, if you add a balance to
your system, the balaneeTeach ProgTamwill not be available to you until
you have usedthe "Add a Nlodule"program of the System Configuration
Utility to inform the software about the new module.
The InteractiveTeachingProcess
A PERL applicationsprogram is, in large part, a series of communications
to the various modules,telling them to changea present condition to a new
condition. Table 3-1 gives examplesof ehangeswhich some modulesmight
undergo,and commandnameswhich you could use to initiate the cfianges.
TABLE3-1
TYPICALUSER.CREATE
D COMMANDS
Module
Initial Condition
Final Condition
Created Command
robot
grlppers over
test tube rack
grippers under
dispensingstand
go_to_syringe
device
interface
AC outlet 1 OFF
AC outlet 1 ON
turn on mixer
balance
weight not being
communicated
weight being communieated
weigh_sample
syringe
plunger at 0.0 ml
plunger at 5.0 ml
fili_syr_Sml
The Teech Programsare interactive. They allow you to put the module in
each successivecondition neededfor your application, and then to assigna
commandname to that condition. The commandsyou create are stored in
the PERL directory. From then on, when the go_to_slringe eommandfrom
Table 3-1, for example, is entered from the keyboardor encounteredin a
running program, the robot wiII place its hand under the dispensingstand.
(The underline character is present in manv commandnames becauseno
spacesare permitted,)
3-3
USINGTHETEACHPROGRAMS
The Teach Programsare accessedfrom the PERL main menu screen by
meansof function key F3 (Teach).
Each Teach Program consistsof a series of screenswhich present you with
menusof avBilable options or ask you to input information from the
keyboard. To make choices on the menus,highlight the desired option, using
the up and down arrow keys or the Fg (Up) and F10 (Dn) keys, Then press
Enter.
The F8 (Bkup) function key, which is always available, allows you to return
to previous screens,
Whenyou press F3 to aecessthe Teach Programs,a Teach Program selection menu similar to Figure 3-1 appears, It lists the kinds of modulesfor
which your system is configured, for which Teach Programsare available to
you. Highlight the kind of module you want to teach, and press Enter.
Copyrtaht (c) 1985
Portln-ElD.r
Corporltion
PERL T6!ch
lrodulc!
Robot
Prtntar
Syrlna€
Bar codc Rc!d.!
D6vtc. Int€lflca
f6:H€lp
r?:Qutt
F8=BkuDrg:Up Plo:Drlr
Figure 3-1 - T each Program Selection Menu
8 /86
3-4
THE ROBOTTEACHPROGRAM
If you have only one robot in your system, the robot Teach Program options
menu (seeFigure 3-2) will be the first screen to appear when you choosethe
rrRobot'rTeach Program.
If you have more than one robot installed in your system, the first screen
which appearswhen you select the "Robot" Teach Program will list your
robots by name. The names come from the system configuration file, where
you have assignedeach module a name (e.g., robot_l, robot_artful,
robot3c). Choosethe desiredrobot by highlighting its name and pressing
Enter. The robot Teaeh Program options menu will then appear.
Coprrlaht (c) 1985
Co4'olrtton
P.rLln-lln.r
Robot ?G.ch Hodulc
D.fln!
| Rlct
Itovc thc Robot
llovc l,o r Po3ltlon
NaDc . Polltlon
Polltlon
th. Orlpp.r
F6:B.I.D l?:Qult
r8:BLup Fg:!p F10:Dn
Figure 3-2 - Robot Teach Program Options
The RobotTeachProgramOptionsMenu
Each of the procedureswhieh the robot performs can be reduced to a series
of commands. Each commandspecifies one of three kinds of conditions:
hand locations
gripper positions
locations in a test tube or vial rack with which the robot is to interact,
8/86
J.D
The options menu allows you to choosewhieh of these conditions is to be
specified in your new command. It lists five choices:
move the robot
use the Teach Pendant to move the robot
along the X, Y, and Z axes to the desired
position.
name a position
assigna name to the robot's present position.
You may changethe robotrsposition from
within this option,before assigninga name.
move to a position
move the robot to a previouslynamedposition
by typing in the position name.
position the gripper
open or close the grippers, name their
position, and adjust the force with which they
grip an object,
define a raek
describea test tube, pipette tip, or other rack
so that the robot will be able to interact with
ouonrr
lnao
finn
in
it
The pageswhich follow describe each of these options in detail.
Movingthe Robot
The "l\lovethe Robottroptionallowsyou to use the TeachPendantto move
the robot to a desiredposition. You ean then name the position if you wish,
option. (However,if namingis your intention,
usingthe "Name a Positiontr
it is more efficient to move the robot from within the "Name a Position
option.)
1)
Highlight "Move the Robotfion the robot Teach Program options menu.
PressEnter. The following messageswill appear on the screen:
Position the Robot with the TeachingPendant
Press the ENTER Key to Compute X, Y, Z Coordinates
2)
Turn on the Teach Pendant,using the ON/OFF switch on the top. (See
Figure 3-3.)
3)
Use the six X, Y, and Z touch pad keys in the top three rows of the
right column to move the robot into the desiredposition, Figure 3-4
indicates the direction of motion initiated by X, Y, and Z keys. Turn
off the Teach Pendant.
8/86
a-a
Oi/OFF
Sritcb
t0vt t^srtr rH-501
lt ctiti6 tox
t
ttc
l
0Ic
t.a
tar
0le
r|I
tot
ITI
oFr
GriPPers
Figtre 3-3 - The Teach P endant
I
-z
+x
Figure 3-4 - Robot Motion in X, Y, and Z Directions
8/86
4)
t)
PressEnter. The X, Y, and Z coordinatesof the position will appear in
the upper right side of the screen.
Whenyou have completed steps 1 - 3, you may repeat them to move to
a different position. Otherwise, press F8 (Bkup) to return to the robot
Teach Program options menu. If you wish to give the present position a
name, choosethe "Name a Position"option.
Naminga Position
The "Name a Position"option,assignsa name to the presentpositionof the
robot. Whenyou then use that name in a PERL proeedure,the robot wiil
move to that position.
1)
Highlight'rNamea Positionrrinthe robot TeaehProgramoptionsmenu.
The screenwill oromot:
PositionName
2)
Type in a name containing up to 16 characters (noneof which are
spaces).The first charaetermust be alphabetic. Do not pressENTER
unlessyou wish to assignthis name to the present position of the robot.
o.,
If you wish to move the robot, assigningthe name to a new position,
turn on the Teach Pendant (seeFigure 3-3). N{ovethe robot as in the
seetiononrrNlovingthe Robot",above.
4)
When the robot is in the position you wish to name, turn off the Teach
Pendant. (The system will not transfer the position data with the
pendant on.) PressEnter.
The system will store the name in the PERL directory. The "Position
Nametrprompt will reappear.
J)
6)
Repeat steps 2 through 4 for each position you want to teach.
PressF8 (Bkup)when you are ready to return to the robot Teach
Programoptionsmenu,
Note: If you are teaching the robot to place a test tube in a test
tube holder or the mixer, you must teaeh it several (at least two)
intermediate positionsbetween "over_holder"and'rin_holder",
Otherwise, the robot hand will describean arc between these two
extreme positions,and the test tube may break against the side of
the holder. Since the I'Define a Rackrroptionautomatieally
teachesaII the necessaryintermediate positions,you can save
teaching time by defining a holder or mixer as a rack with 1
column and 1 row.
8/86
3-8
Movingto a Position
If you have already assigneda name to a position, you can move the robot to
it in any one of three waysr
*
by typing in the position name from the PERL main menu and
pressingEnter;
*
by highlighting the name in the PERL Directory and pressingEnter;
*
by selecting the rMove to a Position'roption in the robot Teach
Program.
To use the Teach Program to go to a namedposition, proceed as follows:
1)
Highlight rrMoveto a Positiontrin the robot Teach Program options
menu. The screenwill prompt you:
PositionName
2)
Type in the name and pressEnter. The robot wiII move to the named
position.
3)
You may enter another position name, or use F8 (Bkup) to return to the
robot Teach Program options menu,
Positioningthe Gripper
IVhenyou assigna name to a robot position, the stored position includes all
parameters except the position of the grippers. You must enter this in a
separatestep.
The gripper position has two components,the grip pressureand the width of
the gripper opening, Whenyou first highlight the rrPositionthe Gripperfi
option and press Enter, a menu appearswhich offers the following choices:
Move the Gripper
-
open or close the grippers to the
appropriate width.
Name a GripperPosition
-
assigna name to the present position
of the grippers.
Name a Gripper Position/Read-
8/86
Retrieve the.value of the present
grlpper openlng.
a-o
Set the Grio Pressure
-
set the pressureparameters (see
below) if they have not previously
been set appropriately for the
presentcontainerbeinggripped(e.g.,
a 12 mm test tube). The default
pressureis fuil open and full close.
Name the Grio Pressure
-
assigna name to the present grip
Dressure.
You will usually set the grip pressurefirst, if necessary,and name it. Then
move the grippers to the openingwidth you need and name their position.
Finally, you can name a commandto read the present gripper openingvalue.
Set the Grip Pressure
1)
Highlight "Set the Grip Pressure'r,and pressEnter. You will be
promptedto enter three parameters:
Force to Close (0 - ?)
Force to l{old (0 - ?)
Force Duration(0 - 99)
The Force Duration is in hundredthsof a second. The Force to Close
speeifiesan initial target current. The grippers close until that cuffent
is reachedor until the duration time has elapsed;then the current
changesto the holding current. The longer the time and the higher the
closing current, the greater the closing force. The default settings are
4,4,99.
Initially, you may need to experiment with various settings, until you
find the ones which grip and hold your containers firmly, but without
excessiveforce.
2)
\lpe a value for each pressureparameter, pressingEnter after each
one. Whenyou have entered all three values, the gripper menu will
r eturn.
Once the grip pressureis set for your containers,you will not need to
changeit again unlessyou changeto a different size or type of
container.
Name the Grip Pressure
1)
Highlight !'Name the Grip Pressure",and pressEnter. The screen will
prompt
Grip PressureName:
8 /86
3-10
2)
Type a suitable name (up to 16 characters,none of which may be
spaces),for example
Iight_touch
and pressEnter, The system will store the name, and you will be
returned to the gripper menu.
o)
Chooseanother gripper option, or pressF8 (Bkup)to return to the robot
Teach Program options menu.
Move the Gripper
1)
Highlight I'l\love the Gripper", and pressEnter. The screen will prompt
you:
Use Left Arrow Key to Open Grippers
Use Right Arrow Key to Close Grippers
2)
The "hand sensetrfacility in your robot allows you to open and close the
grippers to whatever width you need for your containers. Open or close
the grippers as necessary. (SeeFigure 3-5.)
3)
PressF8 (Bkup). You will be returned to the gripper menu.
Figure 3-5 - Grippers on Robot Hand Closed and Open
8/86
J-.11
Name a Gripper Position
1)
Highlight rrNamea Gripper Position", and pressEnter. The screen will
prompt you:
GripperPositionName
2)
Type in the desiredname (up to 16 characters,none of which may be
spaces). PressEnter, The name will be stored, and you will be returned
to the gripper menu.
3)
Chooseanother gripper option, or press F8 (Bkup) to return to the robot
Teach Program options menu,
After you have set up and named a gripper position appropriate for certain
containers (for example, "soft_touch"), use that command to set the grippers
at the beginningof every appiicationsprogram which involves those
containers.
Name a Gripper Position - Read
The I'handsense'rfacility assignsa value to the gripper openingsize. The
'rNamea GripperPosition- Read"option allowsyou to name a command
which will retrieve this value. In a PERL procedure, the value is assignedto
a variable, which can be real, integer, or string. Whatever the variable
type, the variable will be in a decimal representation,with values from 0 to
255.
The procedurebelow uses the eommand"hand*opn"to read the gripper
position. The value of the opening is assignedto the variable x. If x is less
than 10, there is no test tube in the grippers, In that case, procedure
get_tube calls itself to get the next tube.
procedureget_tube
lget tube from rack named sample
samplesamno%
leommandto read gripper opening
x = hand_opn
if x <= 10 then
samnoTo=samnoTo+1
get_tube
lrepeats procedurewith next tube
end if
end procedure
It is relatively unlikely that the comparisonwill give an exact equality, so
you should use (r (=r ), )=, of ranges in such comparisons.
To name a Gripper Position Read command,proceed as follows:
1)
Highlight'rName a cripper Position - Read" on the gripper options
menu.
8/86
3-12
2)
PressEnter. You will be prompted to enter a commandname.
3 ) Type in the name of the commandyou wish to create. The name must
contain no more than 16 characters,none of which may be spaces. The
first character must be alphabetic. For example,
com mand name: gripJtosl
4)
PressEnter.
The commandname will be stored in the PERL Directory. The gripper
options menu will return,
a)
Proceed to chooseanother gripper option, or press F8 (Bkup) to return
to the robot options menu.
Defininga Rack
The'rDefine a Rack" Teach Program teaches the robot to remove and
replace objects which are stored in evenly spacedrows and columns.
The most obvioususe for defining racks is with the Nlasterlab System test
tube and vial racks; after the Teach Program showsthe robot three of the
corner locations, the robot can interact with each of the loeations in the
rack. However, there are many other instancesin which you can use this
Teach Program:
*
You can use it with other kinds of racks; tiited racks and pipette
tip racks, for example. Racks may be tilted at any angle, as long
as the Z componentof the piek-up direction is greater than zero.
The wrist pitch and roil angles will be the same as when the rack
was taught.
*
You can treat stacked items, such as 96-well plates, as if they
were a vertical rack with only one row,
*
Inserting a test tube in a test tube holder (on the mixer or balance,
for example)is like putting it in a rack with l column and 1 row.
*
Finally, there are racks which do not consist of orderly rows and
columns. Some possibilitiesfor handling these are describedbelow
and illustrated in Figure 3-6.
lubdflilg4 Rqcks: If you have two or more different kinds of test
Tu6esffifiElfrii-be pliced in the same rack (tubes of standards and
tubes of samples,for example),you may subdividethe rack. For
example. if the first row containedstandardsand the rest of the
8/86
3-13
o
o
o
o
o
o
o
o
o
o
o
o
o
o
o
o
o
o
o
o
o
o
o
o
o
o
o
o
o
o
o
o
o o I sr""a-a"
o o
o o
o o
o - Srlbdtvided Rack
t)6)
."-€)
t---l---:-l
lR"u,t1 Gg- >
o o o o o o o o o o
t
I
I
znd Posfioo
b - Single-row Rack
A o o o o o o o @ o @ c-<- I
eoooooo@ooc'
o @ o o o @ o @ o @-<-2
B ' O @ O O O O @ O O
.<-B
6 0 0 0 0 0 @ o @ o @
-<-3
c - Rdck With Off set Rows
Figure 3-6 - Some Urlu'su.alRocks
8/86
3-14
rack containedsamples,you could use tJletrDefinea Rack'option
twice, as if there were two racks. (SeeFigure 3-6a.) The first row
and the
could be separately defined as a rack called rrstandardsrr,
"samples".
(To
a
define
one-row
next three rows could be called
rack, see the following paragraph.)
Racks Consistingof a SinEleRow: If you wish to define a one-row
rack, you must still teach the robot three positions. Teach the
first position twicei it is the first location in the first row and also
the first location in the last row. The third position to be taught is
the last location in the row. (SeeFigure 3-6b.)
Racks with Offset Rows: If successiverows in a raek are offset
Eil;EilTEer,
affiTigure 3-6c, the rack must be defined as if
there were two racks, The first rack eonsistsof the numbered
rowsl when it is defined, location 1 in row 1 and locations 1 and 10
in row 5 are taught. The secondrack consistsof the lettered rows;
Iocation A in row A and locations A and I in row B are taught. The
applieationsprogram will, of course,have to deal with the two
racks in such a way that the samplesare processedin an orderly
fashion.
The foliowing pagescontain three sets of instructions for teaehingracks:
*
test tube racks (applicableto most other racks as well)
*
pipette tip racks
*
stacks of items
Test nrbe Raeks
1)
Before you select !'Define a Rack" on the options menu, you must first
set the grip pressureto a Iow value, as follows:
a)
Highlight "Position the Gripperrronthe options menu. PressEnter,
The gripper menu will appear.
b)
Highlight I'Set the Grip Pressure"on the gripper menu. Press
Enter.
You will be prompted to enter three parameters:
Force to Close (0 - 7)
Force to Hoid (0 - 7)
Force Duration(0 - 99)
8/ 8 6
c)
*' ,,'"'''
Note: Robot handsvary in the Force Duration needed,so
you may need to try several values to find the correct one
for your robot. In general, a larger value makes the hand
movementscoarser; a smaller value makes movements
finer, but may not make the gripper open or close at all.
c'\'"'' { ''
1,1,.:C
' riaui.
i'i :i'
V'.\,'l
;
,
,
.
.\,', iri
--.,i
a.{i }.
Type a value for each parameter, pressingEnter after each one.
HoId
Close 3,
0. . .
The recommendedvalues are Force to plose
3. Force to H-oId
' 0,
Force Duration 15. 'J&<- r"-< -,i^"^r{ce'r' h 'rnI r'<Ot;'rcI S"}"'\
lVhenyou have entered all three values, the gripper menu will
return.
! iL', '
l)
2)
PressF8 (Bkup)to return to the robot options menu.
Highlight "Define a Rack" on the robot Teach Program options menu,
PressEnter.
A prompt will ask you whether the rack to be taught is a pipette rack.
Type n to indicate this is not a pipette rack.
The screen shownin Figure 3-7 will appear, indieating the three
locations (A, B, and C) you must teach the robot, and asking you for the
name of the rack.
D€fiD€
|
R.ck
Rbbot T.rch
Hodul€
iA
i o
I F
colo{Ns
RrcL I.r.:
a6:lt.1p F?:Qu1t F8=Blup Fg.gp Fl0=Dn
Figure 3-7 - The t'Define a Racktt htitial Screen
8/86
^t
o
i
t'\,ct'{ J.
3-16
4)
\pe
in a name; for example,
Rack Name: b{_tubes
PressEnter.
The next sereencontains the folowing instructions:
Position the Robot to Tube Position A
Press the ENTER Key to Compute X, Y, Z Coordinates
To accomplish this,
a)
Turn on the Teach Pendant,using the ON/OFF switch on the top.
(SeeFigure 3-3,)
b)
Use the six X, Y, and Z touch pad keys in the top three rows of the
right column to move the robot into position above the first test
tube (A in Figure 3-7). Place the hand in position so that the
grippers are at the right height to grasp a test tube from the rack,
near the top of the tube. (Figure 3-4 showsthe direction of motion
initiated by the X, Y, and Z keys.)
Important Teach positionsA, B, and C exactly as
indicated in Figure 3-7, Changingthe order will eausethe
robot to behaveunDredictablv,
e)
Use the O(pen)and C(lose)touch pad keys at the bottom of the
right column to adjust the grippers so that they are openedwide
enoughto clear the test tube, but closed enoughto clear the, , . I
a d j a e e n t e s t t u b e . F r . , , , 1r , i . ; ' , 1 n i l i . , . . t r t , . . , ) L iu. t l 1 i r L t
d)
When the position of the robot and the position of the grippers are
both correct. turn off the TeBchPendant.
e)
PressEnter. The X, Y, and Z eoordinatesof the position will
appear in the upper right side of the screen.
il?..- aii:,;
The screen messagechangesto request the seeondtube position.
Important: Do not change the Z (height) coordinate from
this Doint on. unlessthis is a slanted rack.
o,
Repeat steps a through e, above, positioning the robot above the first
tube in the last row. (B in Figure 3-7.)
The screen messagethen changesto request the third tube position.
Repeat steps I through e, positioning the robot above the last tube in
the first row. (C in Figure 3-7.)
8/86
o-r I
8)
You will then be asked for three pieces of information, as shown in the
table below. PressEnter after each response.
Prompt
Sample Response Nleaning(see Figure 3-7)
Numberof rows:
4
ENTER
Numberof locationsfrom A
toB
Numberof columns:
10 ENTER
Numberof locationsfrom A
toC
Lengthof tube (mm): 150 ENTER
Lengthof containersin rack
The information about the rack named I'big_tubes"w ill be stored in the
PERL Directory. The robot Teach Program options menu returns.
9)
10)
Highlight t'Positionthe Gripper'ron the options menu. PressEnter.
Repeat step 1, entering the following values:
Forceto Close:4
;;;;;;;e;:
t^50
ForceDuration:
11)
I
[ \,J".
"u tq(,"ii a\61,"4r
J
Pressthe F8 (Bkup)key repeatedly,or pressF7 (Quit) to return to the
PERL main screen,
Pipette Tip Raeks
You do not need to changethe grip pressureor to adjust the gripper opening
in order to teach a pipette rack.
1)
Highlight "Define a Raek" on the robot Teach Program options menu.
A prompt will ask you whether the rack to be taught is a pipette rack.
2)
Tlpe y (yes).
The screen shown in Figure 3-7 will appear, indicating the tlrree
locat;ons (A, B, and C) you must teach the robot, and Bskingyou for the
name of the rack.
3)
Type in a namel for example,
Raek Name: tips
PressEnter.
8/86
3-18
4)
The next screen contains the following instructions:
Position the Robot to Tube Position A
Press the ENTER Key to Compute X, Y, Z Coordinates
To aecomplishthis,
a)
Turn on the Teach Pendant,using the ON/OFF switch on the top.
(SeeFigure 3-3.)
b)
Use the R(oll) keys on the Teaeh Pendantto rotate the wrist 90
degrees,so that the pipette tip adapter is facing downwards.
c)
Use the six X, Y, and Z touch pad keys in the top three rows of the
right column to move the robot into position above the first pipette
tip (A in Figure 3-7). Plaee the hand in position so that the adapter
is inserted into the tip. (Figure 3-4 showsthe direction of motion
initiated by the X, Y, and Z keys.)
Important: Teach positions A, B, and C exactly as
indicated in Figure 3-7. Changingthe order will cause
unpredictablebehavior from the robot.
d)
When the position of the robot is correct, turn off the Teach
Pendant,
e)
PressEnter. The X, Y, and Z coordinatesof the position will
appear in the upper right side of the screen.
The screen messagechangesto request the secondtube position.
c)
Repeat steps a through e, above, positioning the robot above the first
tube in the last row. (B in Iigure 3-?.) I(eep the wrist in the proper
position to piek up a pipette tip.
The screen messagethen changesto request the third tube position.
0)
Repeat steps a through e, positioning the robot above the last tube in
the first row, (C in Figure 3-7.)
You will then be askedfor three pieces of information, as shown in the
table below. PressEnter after each response.
Prompt
Sample Response Nleaning(seeFigure 3-?)
Numberof rows:
4
ENTER
Numberof loeationsfrom A
toB
Numberof columns:
10 ENTER
Number of locations from A
toC
Length of tube (mm): 150 ENTER
8 /86
Length of pipette tips
a-1 0
The information about the rack named "tips" will be stored in the PERL
Directory. The robot Teach Program options menu returns.
8)
Press the F8 (Bkup)key repeatedly, or press F7 (Quit) to return to the
PERL main screen.
Teachirg Stacks of ltems
A stack of items which the robot must piek up individually may be taught as
a vertical rack. The "rack" has only one row, and as many columns as there
are items in the stack. 96-wellplates,for example,eonstitutesueha stack.
1)
Before you selectrtDefinea Rackrronthe optionsmenu,you must first
set the grip pressureto a low value, as follows:
a)
Highlight "Position the Gripper" on the options menu. PressEnter.
The gripper nrenuwill appear.
b)
Highlight'tset the Grip Pressure't
on the gripper menu. Press
Enter.
You wiII be prompted to enter three parameters:
Force to Close (0 - 7)
Force to Hold (0 - 7)
Force Duration(0 - 99)
c)
Type a value for each parameter, pressingEnter after eaeh one.
The recommendedvaluesare Force to Close3. Force to Hold 0.
Force Duration 15,
Note: Robot handsvary in the Force Duration needed,so
you may need to try severalvaluesto find the correct one
for your robot. In general, a larger value makes the hand
movementscoarser;a smallervalue makesthe
movementsfiner, but may not make the gripper openor
close at all.
Whenyou have entered all three vaiues, the gripper menu will
return,
d)
2)
Press18 (Bkup) to return to the robot options merru.
Highlight "Define a Rack'ron the robot Teach Program options menu.
PressEnter.
A prompt will ask you whether the rack to be taught is a pipette rack.
8/86
3-20
Typen to indieatethis is not a pipette rack.
The screen shownin Figure 3-7 wiII appear, indicating the three
locations (A, B, and C) you must teach the robot, and askingyou for the
name of the rack,
4)
Type in a namel for example,
Rack Name: staek2
PressEnter.
a)
The next screen eontainsthe following instructions:
Position the Robot to Tube Position A
Press the ENTER Key to Compute X, Y, Z Coordinates
To accomplishthis,
a)
Turn on the Teach Pendant,using the ON/OI'F switch on the top.
(SeeFigure 3-3.)
b)
Use the six X, Y, and Z touch pad keys in the top three rows of the
right column to rnove the robot into position so the grippers can
grasp the top item in the stack. (Figure 3-4 showsthe direction of
motion initiated by the X, Y, and Z keys.)
c)
Use the O(pen)and C(lose)touch pad keys at the bottom of the
right column to adjust the grippers so that they are openedwide
enoughto clear the item, but closed enoughto clear the next item
below it.
d)
Whenthe position of the robot and the position of the grippers are
both correct, turn off the Teach Pendant.
e)
PressEnter. The X, Y, and Z coordinatesof the position will
appear in the upper right side of the screen.
The screen messagechangesto request the secondposition.
o)
Repeat steps a through e, above,positioning the robot at the bottom
item in the stack.
The screen messagethen changesto request the third position.
Repeat steps a through e again, without movinEthe robot from the
bottom item in the stack.
8/86
3-27
8)
You will then be asked for three pieces of information, as shown in tlre
table below. PressEnter after each resoonse.
Prompt
SampleResponse l\leaning
Numberof rows:
1 ENTER
Numberof columns:
8
ENTER
Lengthof tube (mm): 50 ENTER
Stack consistsof 1 vertical
row
Numberof items in the stack
Height to which items are to
be picked up
The informationabout the rack namedrrstackz'r
will be stored in the
PERL Directory. The robot Teach Program options menu returns.
o)
10)
Highlight I'Positionthe Gripper'ron the options menu. PressEnter,
Repeat step 1, entering the..,following
values:
F o r c et o C l o s e4:
Force to Hold: 4
Force Duration: 50
11)
I."
|i &t
l
r,. vi*\r v
'
"
( . , r ' -'\,c\r'-r.''
""rt
t
i
Pressthe F8 (Bkup)key repeatedly,or pressFZ (Quit) to return to the
PERL main screen.
T H E S Y R I N G ET E A C HP R O G R A M
The syringe module has four conditions whieh can vary:
total syringe volume
The availablesyringesare of volumes50,
1 0 0 , 2 5 0a, n d5 0 0u L , a n d 1 , 5 , a n d 1 0 m L .
plunger position
the volume marking at which the plunger
rests.
speed
Nlaybe set from 1 to 15. A setting of 1 is
1.7 secondsper full plunger stroke.
Settingsof from 2 to 15 are that number
of secondsper full stroke.
valve position
set for either input or output. (SeeFigure
3-8.)
If your unit is the dual syringe model, the conditions can vary on each of the
two syringes,except that the valves in both will always be in the same
position. The two possiblevalve positionsare illustrated in Figure 3-8.
8/86
3-22
The Teach Program for the syringe allows you to set all four parameters as
you wish, then assigna name to that situation, e.g. syr_filled_smi. Or you
can use the t'NameValve Command"option to set only the valve position,
without movingthe plunger. You mav also Eive
-as a name to a svrinEe
referring to a slrinfe plunger
variable, which PERL will always interpret
position. You can then allow the value of that variable to increaseor
decreasein a program as sample is drawn in or dispensedby the syringe.
A commandor variable you teach to a syringe is associatedin the Directory
with the modulename of that syringe. This is true even if the syringesare
'rdaisychainedrr,with more than one eonnectedto a single port. Thus you do
not need to use the rruseficommandwith syringes. However, if you change
the modulename of your syringe, the contmandsmay not function properly.
hput Position
PillinC
Port
oltFut Fosition
Dispensing
Port
Filling
Port
Dispensing
Port
Figure 3-8 - Syringeyolve Positions,Front View
Accessingthe SyringeTeachProgram
1)
From the PERL main menu, press the F3 (Teach)function key. The
Teach Program selection menu shownin Figure 3-1 will appear. It lists
the kinds of modulesfor which Teaeh Programsare available,
2)
Use the up and down arrow keys or the F9 (Up) and F10 (Dn) keys to
highlight "Syringe'r,and press Enter. The next screen which appears
will list, by name, the syringeswhich are installed in your system. This
information comes from the system configuration file, where you have
assignedeach syringe a name (e.g., syringe_l, syringe_gc).
a\
Choosethe desiredsyringe by highlighting its name and pressingEnter.
The next menu which appearslists five options:
ExeeuteSyringe Command
Name SyringeCommand
Name Syringe Variable
Name Valve Command
Setup Syringe Parameters
I /86
? -9.1
The sections which follow will describe eaeh of these options, in the order in
which they would usuallybe used.
SettingUp SyringeParameters
Before you can name or executea syringecommand,you must establishthe
parametersthe commandis to specify.
1)
Highiight rrSetupSyringe Parametersrronthe options menu, and press
Enter.
A screen similar to the one in Figure 3-9 will appear, It lists the four
syringe parametersand indicates the present value of each parameter
for each of the two syringesin the module' The Position setting of 0.00
ml indicates that the syringe plunger is completely depressed.
There is an active cursor available at the first position on the screen
(Volume of Syringe One).
Sctup
6yrln8.
syrlnac
PalrD.t.ra
6zrtDac On€
Poa!t I on
spc.d
V!Iv.
(1 -
15)
T.!ch
Itodul.
Syrtnac
Tvo
1.00 bl
10.00 Dl
O.75 !I
0.00 !I
?. o0
t.o0
Input
IDput
tr6:H.lD f7:Qutt F8:Brup !g:Up fl0:Dn
Figure 3-9 - Syringe Parameter Screen
Use the amow keys to move the cursor to the parameter you wish to
change. PressEnter.
The allowed values for each parameter are as follows:
volume - 0.05 to 10.00mI
position - 0.00 to the volume of the syringe
speed- 1 to 15 seconds(1 is not recommended)
valve - input or output
8 /86
3-24
Tlrpe in the appropriate value, such as 4,00, or o for output or i for
input. Again press Enter.
4)
Repeat steps 2 and 3 to make any othef necessarychanges.
Note: The Valve parameters for the two syringesmust be the
same, either both input or both output. The system will change
them both if either one is changed. (SeeFigure 3-8.) Speed
settings of 2 to 15 indicate the number of secondsfor a complete
plunger cycle, The default value is 4,
5)
Whenall parametersare set as you wish your new command to make
them, press F8 (Bkup).
The syringe Teach Program options menu will return. You can now
proceed to name your new commandl it ean then be executed, to
establish in the syringe module the parameter settings you have
indicated.
Naminga SyringeCommand
1)
Highlight'rNameSyringeCommandrron
the syringeTeachProgram
menu.
Press
Enter.
options
2)
Whenthe prompt "CommandName" appears,type the name you wish to
give to the arrangementof syringe parametersyou establishedin the
previous section. The name must contain no more than 16 characters,
none of which may be spaces, The first character must be alphabetic.
For example,you eould type
CommandName: fi'll slrr 4ml
PressEnter. Your eommandname will be stored in the PERL
Directory, and the syringe Teach Program options will return to the
screen,
Executing
a SyringeCommand
If you wish to see whether the commandyou constructed functions as you
intended,you can use the Teach Program to have the syringe carry out the
command.
1)
Highlight "Execute Syringe Commandnon the options menu, and press
Enter. The screenwill DromDtrrcommand
Name".
8/86
3-25
2)
Type the name of the commandyou wish to execute, and press Enter.
The syringe will execute the command. For example, if your command
was "fill_syr_4m1",the plunger on the syringe should move from the
0,00 ml mark to the 4 mI mark, and 4 ml of liquid will be drawn in.
3)
Proceed to enter another command,or press F8 (Bkup) to return to the
syringe options menu or F7 (Quit) to return to the PERL main screen.
Naminga ValveCommand
A syringe valve commandchangesthe valve position from input to output,
or the reverse, without ehangingany other syringe parameters, (For an
illustration of the input and output positions,see Figure 3-8.)
1)
HighlightrrNameValve Command"on the grringe Teach Program
options menu. PressEnter.
A screen similar to Figure 3-10 will appear. Highlighting will indicate
whether the valve is presently set for input or output.
2)
Use the up and down amow keys or the 19 (Up) and F10 (Dn) keys to
highlight the valve position your commandis to specify.
Nahl
v.l
ve
l-onDdnd
Val ve Poritionr
5yr | "qe
Ie..h
t€:ntrrp
F9.Ur, FIOGDh
nodL'l
e
lnp,,l
OIt put
F6-Helo
F7-O|rt
Figure 3-10 - Name Val\)eCommandScreen
I /86
3-26
Press the Enter key.
The screen will prompt you for a commandname.
4)
Type a name which contains no more than 16 characters,none of which
may be spaces. The first character must be alphabetic, For example,
you could type
Commandname: valve_in
o)
PressEnter. Your commandname wiII be stored in the PERL
Directory, and the syringe Teach Program options will return to the
screen.
Naminga SyringeVariable
A syringe variable is a variable name which you store in the PERL directory
by meansof the syringe Teach Program. It becomesa reservedword, whose
only permitted use in programs is to stand for a syringe plunger position
parameter(i.e., a volume).
Suppose,for example, that you had named and stored a syringe variable
called 'rsyr_1_vol'r.In an applicationsprogram, you wish to fill syringe
1 with 5 ml of liquid, then dispense0.2 ml of that liquid to each of 25 test
tubes. If the sample numbers(1 to 25) are representedby i, then
you must define a variable ("a", for example)such that
a = 5 , 00 - 0 . 2 * i
Then your syringe variable, syr_l_vol, would be equal to a. The PERL
syntax for this is
syr_1_voI a
Those two lines would be used in a program segmentsimilar to the
following:
fitl_syr_s ml
switch_to_output
fori=1to25
a = 5 . 0 0- 0 . 2 * i
syr_l_vol a
process_sample
next i
I /86
3-27
Important: The system must always exeeute a syringe
commandbefore it encountersa syringe variable, so that it can
establish valve position, syringe volume, and syringe speed. The
value of syr_l_vol could be defined by other expressionsin
other programs,but it will always be interpreted as referring to
a syringe plunger position.
To name a syringe variable, proceed as follows:
1)
HighlightrrNameSyringe Variable" on the syringe Teaeh Program
options menu. PressEnter.
2)
If you have a dual syringe, the next screen will ask you whether the
variable is to apply to Syringe One or Syringe Two. Highlight the one
the variable is to control, and pressEnter.
3)
The system then prompts"VariableName". Type in the name you wish
to have reserved for use as a syringe variable.
3)
PressEnter. The variable name will be stored in the PERL Directory,
and the system will return you to the syringe options menu.
4)
Pressfunction key F8 (Bkup)repeatedly to return to the Teach Program
selection menu and then to PERL, or press FZ (Quit) to return directly
to PERL.
THE DEVICEINTERFACE
TEACHPROGRAM
The device interface is used to eontrol or interact with other deviees. It
can do this by turning an AC outlet on or off, by monitoring logic inputs, or
by meansof an output signal to the external deviee which turns it on or off.
Thus the conditionswhieh are given commandnamesin the device interface
Teach Program always consist of the on/off status of a partieular switch or
input. Some examplesare shown in Table 3-2.
The namesyou give to the eommandsshouldbe descriptive of the condition
the device interface is controlling or monitoring" There could be up to
twelve input lines being monitored. it is more helpful to find
trinstrument ready'r in the directory of available commandsthan to be
confrontedwith "inout 7 on",
I /86
3-28
TABLE3-2
TYPICALDEVICEINTERFACE
COMMANDS
Condition
PossibleCommandName
input from instrument ON
instrument ready
AC outlet ON
turn_mixer_on
switch output to instrument ON
take_reading
alarm ON
sound_alarm
changehas occurred in input 1
diff_at_l
changeat input 2 causesAC outlet
to turn ON
inpt2_turnon_mxr
Accessingthe DeviceInterfaceTeachProgram
1)
From the PERL main menu, press the F3 (Teach)function key. The
Teach Program selection menu shown in Figure 3-1 will appear, It lists
the types of modulesfor which Teach Programsare available.
2)
Use the up and down arrow keys or the F9 (Up) and F10 (Dn) keys to
highlight rrDeviceInterfaeerr,and press Enter. If you have more than
one device interfaee installed in your system, the next screen which
appearswill list them by name. This information comes from the
system configuration file, where you have assignedeach module a name
(e.g., dev_int, DI*1). (If you have only one device interface, this screen
is omitted.)
3)
Choosethe desireddevice interface by highlighting its name and pressing Enter.
The next menu which appearslists the four types of functions which are
controlled by the device interface:
Alarm
Inpu ts
A. C. Outlets
Switch Outputs
Differences
Input Controlled Actions
The sections which follow will describe the use of each of these ootions.
8/86
a-to
Usingthe SwitchOutputsProgram
The switch outputs on the device interface allow the interface to output a
signal which turns an external device on or off. Suchan output is used to
turn on the vacuum in the crimper, for example; another is used to close the
crimping jaws.
The Switeh Outputs portion of the device interface Teach Program is used
to create the commandswhich control the switch outputs' and thus in turn
control the external devices to which they are connected.
Whenyou highlight "Switeh Outputs" on the device interface options menu
and press Enter, the menu shown in Figure 3-11 will Bppear.
D.vlc.
81.1!ch Ouiput!
lnlc rf rca
T.rch
Xodtrlc
ll.-b. Snll.ch ColDAnd
h.cut.
Sxttch CoDhrnd
l'arru!I CoDtrot of Arltchc!
l6:H.lp
r?:Qult lE:BLup F9:UDrlo:Dn
Figure 3-11- su,itch output Meta
Manual Control of Switehes
The Manual Control option is used to turn switches on and off without the
useof namedcommands.
1)
Highlight Manual Control of Switches on the Switch Outputs menu' and
press Enter, A list of the twelve switches will appear. The cursor will
be at switch 1.
2)
Use the up and down arrow keys or the F9 (Up) and F10 (Dn) function
keys to move the cursor to the name of the switch whosesetting you
wish to change. PressEnter.
8 /86
3-30
3)
Use the up and down arrow keys, or Fg and F10, to move the ON/OFF
indieator to the setting you need.
4)
PressEnter, The switch wiII be set as you have indicated. You may
proceed to set another switch, or use the F8 (Bkup)function key to
return to the Switch Outputs menu.
Name Switch Command
This option allows you to name a commandwhich sets a switch. Every time
the commandis executed, the switch wiII go to the desiredsetting.
1)
Highlight "Name Switch Command"on the Switch Outputs menu. Press
Enter. A list of the twelve switches will appearat the Ieft of the
screen. The cursor is positionedat switch 1.
2)
Use the up and down arrow keys or the F9 (Up) and F10 (Dn) function
keys to move the cursor to the name of the switch which is to be used
in the command. PressEnter.
Check that the ON/OFF state of the switch, as reported at the bottom
of the screen, is as you wish:
3)
oN = elosing the switch
OFf' = openingthe switch
Otherwise, changeit by using the up and down arrow keys or F9 and
F10. PressEnter.
4)
You will be prompted to type in a commandname. Tlpe in a name
having up to 16 characters,none of which may be spaces. The first
character must be alphabetie. For example,
CommandName: crimper_on
5)
PressEnter. Your commandwill be stored in the PERL directory. You
may proceed to move the cursor to another switch and name another
command,or use the F8 (Bkup) function key to return to the Switch
Outputs menu,
Execute Switeh Command
After you have created a command,you can use the Execute Command
option to see if the command functions as you intended.
1)
HighlightrrExecuteCommandrron
the Switch Outputsmenu. Press
Enter. You will be prompted to enter the name of a command.
8/86
J-JT
2)
Type the name of the commandyou wish to execute, for example,
CommandNamer erimper_off
3)
PressEnter. The commandwill be executed. You may proceed to
enter another command to be executed,or you may use the F8 (Bkup)
function key to return to the Switch Outputs menu'
Usingthe InputsProgram
The inputs on the device interface monitor logic inputs from external
devices. One of these inputs, for example, may be connected to the vaeuum
device on the crimper. When the input reports that the switch to which it is
eonnectedis on. the vaeuum is on. The device interface receives
the input that the switch is on, but cannot changeits setting. Thus there is
norrManualControl" option in the Input portion of the Teach Program.
Whenyou highlight trlnputsrronthe device interface options menu and press
Enter, the menu shownin Figure 3-12 will appear.
lnput!
DGvlcc
I n't..rflcc
T.!ch
tlodul.
Cooband
Nrn. Ihput
Er.cut€
Input CoDDlnd
ol th. lDput!
6t!tu!
P 6 : t s . 1 p F ? : Q u l r F 8 : B t u p F 9 = U pF 1 0 : D b
Figure 3-12 - hrputs Menu
Name Input Command
An input commandcausesthe system to check the status of one of the
twelve inputs. You will want to have such a command for eaeh input to
which a module is connected.
8/86
A-QD
1)
Highlight'rName Input Command on the Inputs menu. PressEnter. A
Iist of the twelve switches will appear. The cursor is positionedat
switch 1.
2)
Use the up and down arrow keys or the F9 (Up) and F10 (Dn) function
keys to move the cursor to the name of the switch which is to be used
in the command. PressEnter.
3)
You will be prompted to type in a commandname. \lpe in a name
having up to 16 characters,none of which may be spaces. The first
eharacter must be alphabetic. For example,
CommandName: crirnper_vac
4)
PressEnter. Your commandwill be stored in the PERL directory. You
may proceed to move the cursor to another switch and name another
command,or use the F8 (Bkup) function key to return to the Inputs
menu.
Note: The device interface Input commandsare usedin
applicationsprograms to monitor conditions. For example, the
robot shouldnot attempt to fill a vial whosecap was not left
behind at the erimper station vacuum device. The following
program segmentchecks that the vacuum was on:
x = crimper_vac
rem Variable x receives value of crimper vac
go_to_vac
ifx = 0 then
sound_alarm
err rtn
eno lr
go_to_syringe
Execute Input Command
After you have created a command,you can use the Execute Input
Commandoption to see if it functions as you intended.
1)
HighlighttrExeeuteInput Command'ron the Inputs menu. PressEnter,
You will be prompted to enter the name of a command.
2)
\pe
the name of the commandyou wish to execute, for example,
CommandName: erimper_vae
3)
PressEnter, The status of the input switch usedin the commandwill
be reported, The message
PleasePress the ENTER Kev to Continue
8/86
a-e2
will appear. PressEnter to enter anothereommandto be executedror
use the Fg (Bkup) function key to return to the Inputs menu, or F7
(Quit) to return to PERL.
Status of the Inputs
This option allows you to see the present ON/OFF status of each of the
twelve inputs.
1)
Highlight "Status of the Inputs'ron the Inputs menu. PressEnter. A list
of the twelve input switches wiII appear, Besideeach the word ON
appearsif the input is on.
At the bottom of the screen is the message
PleasePressthe ENTER Key to Continue
2)
Whenyou are ready to return to the Input options ntenu,press ENTER,
Usingthe AC OutletsProgram
The device interface has two AC outlets to which external devices can be
connected. Thesedevices are turned on and off by device interface
commandscreated with the AC Outlets portion of the Teach Program. The
mixer, for example, is such a device.
Whenyou highlight "A. C. Outlets'on the device interface options menu and
pressEnter, the menushownin Figure 3-13 wiII appear.
Manual Control of A.C. Outlets
You ean uselthe Manual Control option to turn an outlet on or off without
usinga namedcommand.
1)
Highlight 'rManualControl of A.C. Outlets'ron the A.C. Outlets menu,
and press Enter. A list of the outlets wiII appear. The cursor will be at
outlet 1.
2)
Use the up and down arrow keys or the F9 (Up)and F10 (Dn) function
keys to move the cursor to the name of the outlet whosesetting you
wish to change. PressEnter,
3)
Use the up and down arrow keys or F9 and F10 to move the ON/OIF
indicator to the setting you need for your eommand.
I /86
3-34
A. C. OutI.t!
DavlcG tDt.rtrcc
Tcrch
Hodulc
Nr.!! A. C. Outlct
CoiE.nd
k.cut.
A. C. Outl.t
Codland
}tanual Control
ol A.C. Outlctr
16:g.lp
f?:Qult
F6=BLup Fg:Ue F10:Dn
Figure 3-13 - AC Outlets Menu
4)
PressEnter. The outlet will be set as you have indicated. You may
proceed to set the other outlet, or use the F8 (Bkup) function key to
return to the A.C. Outlets menu,
Name A.C. Outlet Command
This option allows you to name a commandwhich correspondsto a specified
ON/OFF setting. Every time the commandis executed,the switch wiII go
to the desiredsetting.
1)
Highlight I'NameOutlet Command"on the A.C, Outlets menu. Press
Enter. A list of the outlets will appearat the right of the screen. The
cursor is positionedat A.C. outlet 1.
2)
Use the up and down arrow keys or the F9 (Up) and F10 (Dn) function
keys to move the cursor to the name of the outlet which is to be used in
the command. PressEnter.
Cheek that the ON/OFF state of the switch. as reDortedat the bottom
of the sereen,is as you wish. Otherwise, changeit by using the up and
down arrow keys or Fg and F10. PressEnter,
3)
You will be prompted to type in a commandname. Type in a name
having up to 16 characters,none of which may be a space, The first
character must be alphabetic. For example,
CommandName: mixer on
8/86
4)
PressEnter. Your commandwill be stored in the PERL directory' You
may proceed to move the cursor to the other outlet and name another
command,or use the F8 (Bkup) function key to return to the A.C.
Outlets menu,
Execute A.C. Ouflet Command
After you have createda command,you can use the ExeeuteCommand
option to see if the commandfunctions as you intended,
1)
Highlight rrExeeuteCommand"on the A.C, Outlets menu. PressEnter.
You will be promptedto enter the name of a command.
2)
Type the name of the commandyou wish to execute, for example,
CommandName: mixer_off
3)
PressEnter, The commandwill be executed, You may proceed to
enter another command to be executed, or you may use the F8 (Bkup)
function key to return to the A.C. Outlets menu.
Usingthe AlarmProgram
There is an alarm permanently installed in the device interface.
Applications programs ean command that alarm to soundwhen a certain
condition occurs:
x = inst not ready
if x = 1 then
sound alarm
eno lr
Whenyou highlight "Alarm" on the device interface options menu and press
Enter, the menu shown in Figure 3-14 will appear,
Manual Control of Alarm
The Manual Control option can be used to set an alarm without using a
namedcommand.
1)
Highlight I'ManualControl of Alarm'on the Alarm menu, and press
Enter. The present ON/OFF status of the alarm will be given,
8/86
3-36
Dcvlcc
lntcrf.c.
?crch
Hodu]c
N!'!. Alalll
CoEr|And
ft€cut.
Alrrlj
CoDDrnal
ttrnull
Control
of Alrl.l|
F6:gclp F?:Qult lS.Btup F9:0p F10:Dn
Firyre 3-14 - Alarm Merut
Use the up and down arrow keys or the Fg (Up) and F10 (Dn) function
keys to move the ON/OFF indicator to the setting you need for your
command.
3)
PressEnter. The alarm wiII be set as you have indicated. Use the F8
(Bkup) function key to return to the Alarm menu.
Name Alarm Command
This option allows you to name a commandwhich correspondsto a specified
ON/OFF alarm setting. Every time the commandis executed, the alarm
will be turned on or off as specified.
1)
Highlight I'NameAlarm Commandrronthe Alarm menu. PressEnter.
2)
Use the up and down arrow keys or the Fg (Up) and F10 (Dn) function
keys to move the cursor to the desiredsetting. PressEnter.
3)
You will be prompted to type in a commandname. Type in a name
having up to 16 characters,none of which may be a space. The first
character must be alphabetic, For example,
Command Name: sound_alarm
4)
PressEnter. Your commandwiII be stored in the PERL directory. Use
the F8 (Bkup) function key to return to the Alarm menu.
8/86
3-3?
Execute Alarm Command
After you have created a command,you can use the Execute Command
option to see if the command functions as you intended.
1)
Highlight rrExeeuteCommand" on the Alarm menu. PressEnter. You
will be prompted to enter the name of a command.
2)
Type the name of the commandyou wish to execute' for example,
CommandName: alarm_off
3)
PressEnter. The eommandwill be executed, You may proceed to
enter another commandto be executed,or you may use the F8 (Bkup)
function key to return to the Alarm menu.
Program
Usingthe Differences
A difference commanddeteets a transient changein one of the inputs to the
device interface. It returns a value of 0 if no changehas occurred; a value
oflindicatesachange.
A PERL proceduremust executethe differencecommandonce to arm it,
before actually Iooking for a change, Once the commandis armed, it can be
used for as Iong as the device interface continuesto be powered.
Whenyou highlight rrDifferencesrron the device interface options menu and
press Enter, the menu shownin Figure 3-15 will appear.
D.v I c.
N.iF
I
Exrcut..
5t.t.
Int..r.<.
l..ch
ldult
F"-llp
FrO-Dh
Dl I l...nr.
Coi..n.l
Di I f.r.n.r
Con6.hd
Di { {er en(F
ot
F6-H!lF
F7!Orii
fS-Fl.(p
Figure 3-15 - bifference Menu
8/86
Name Difference Command
An difference commandcausesthe system to check the status of one of the
twelve inputs. You could have such a commandfor each input to which a
module is conneeted.
1)
HighlighttrName Difference Commandrronthe Differences menu. Press
Enter. A list of the twelve inputs will appear. The cursor is positioned
at input 1.
2)
Use the up and down arrow keys or the F9 (Up) anOFl0 (Dn) function
keys to move the cursor to the name of the switch which is to be used
in the command. PressEnter.
3)
You will be prompted to type in a commandname. Type in a name
having up to 16 charBcters,none of which may be spaces. The first
character must be alphabetie. For example,
CommandName: diff_1
4)
PressEnter. Your commandwill be stored in the PERL directory. You
may proeeedto move tlre eursor to another switch Bnd name another
command,or use the F8 (Bkup) function key to return to the
Differences menu.
Note: The device interface Difference commandsare usedin
applicationsproceduresto monitor conditions. For example, the
following proceduresegmentarms the udiff_lu command,
assigningits value (0, when first armed) to the variable x. Later,
the proeedureuses the commandagain. If a changehas occurred,
so that the value is 1, an error routine will be executed.
x= diff 1
rem Vailable x receives value of diff 1
while x = 0
x = diff_l
get_samp
process
end while
ifx=1then
sound_alarm
err rtn
eno lI
8/86
3-3I
Execute Difference Command
After you have created a command,you can use the Execute Difference
Commandoption to see if it functions as you intended.
1)
Highlight 'rExecuteDifference Command"on the Differences menu.
PressEnter. You will be prompted to enter the name of a command.
2)
Tlpe the name of the commandyou wish to execute, for exantple,
CommandName: diff 4
3)
PressEnter. The state of the input used in the commandwill be
reported. It will be either 0 (if no changehas occurred) or 1 (if there
has been a change). The message
PleasePressthe ENTER Kev to Continue
will appear.
4)
PressEnter to enter another commandto be executed,or use the F8
(Bkup) function key to return to the Differences menu, or F7 (Quit) to
return to PERL.
State of the Differences
This option allows you to see the present ON/OFF status of each of the
twelve inputs.
1)
Highlight "Status of the Differences'on the Differences menu. Press
Enter.
A list of the twelve input switches wiII appear. Besideeach will appear
either a 0 (if no changehas occurred) or a 1 (if there has been a
change).
At the bottom of the screen is the message
PleasePressthe ENTER Key to Continue
2)
Whenyou are ready to return to the Difference options menu, press
ENTER.
8/86
3-40
Usingthe InputControlledActionsProgram
Input controlled action commandsallow the device interface to
autonomouslycontrol an output, in responseto a ehangein an input. This is
useful wheneverthe responseto a changedinput needsto be immediate.
You could, for example, have the device interface turn on the output to an
instrument (t'take_reading")as soon as the input from that instrument
indicates the instrument is ready.
Whenyou highlight rrlnputControlled Actions" on the device interface
options menu and press Enter, the menu shownin Figure 3-16 will appear.
lnput
C6t.ol
l.d
Act r onr
Devr c.
I^t.rt.c.
l..ch
no<lql.
N.r.
lnpL't Cor'trol l.d Acti6
co.r'.nd
Ex.cute
Inpur controlled
Action Corn.nd
llrnu.l
Cont r ol o{ lhprt
Control r pd Act r o.
F6-ft.lp
Ft-Ourt
F:8-Bkup F94p
FIOlIkl
Figure 3-16 - Input Controlled Actions Metu
Manual Control of Input Controlled Action
The Manual Control option is usedto turn switches on and off without the
useof namedcommands.
1)
Highlight Manual Control of Input Controlled Action on the Input
Controlled Actions menu, and press Enter. A list of the two AC
outlets, the alarm, and the twelve switch outputs will appear. The
cursor will be at AC outlet 1.
2)
Use the up and down arrow keys or the F9 (Up) anCP10 (Dn) function
keys to move the cursor to the name of the switch whosesetting you
wish to change. PressEnter.
8/86
3-41
Use the up and down arrow keys,or F9 and F10, to move the ON/OFF
indicator (for AC outlets and alarm) or the OPEN/CLOSEindieator (for
switch outputs) to the setting you need.
4l
PressEnter, The switch wiII be set as you have indicated. You may
proceed to set another switch, or use the F8 (Bkup) funetion key to
return to the Inout Controlled Actions menu.
Name Input Controlled Action Command
This option allows you to name a commandwhich sets a switch in response
to a specified condition of an input. You must select five conditions before
vou can name the command;
1,
,
the particular input whosecondition will control the aetion;
the input state which will trigger the action (whether the vaiue is
f^
A
h6
h;dh
ar
ln'-
\.
the switch which is to be acted upon(an AC outlet, the alarm, or
an output switch)i
whether the switch is to be turned ON or OFF,
whetherPERL is to wait for the aetion to be completedbefore
eontinuingwith the rest of the procedure.Ior example,after
loading a sample into an LC injector, the robot can go on to
preparethe next sample,without waiting; when the instrumentis
ready, the sample is injected. On the other hand, if the action
commandis to turn off a shakertable, the robot will have to wait
until the table has been turned off before it can accessthe table.
Important: If the system executesany other device interface
command while waiting for the input which triggers the input
controlled action command, the latter will be overwritten and
will neverbe executed.
1)
Highlight'rNameInput ControlledAction Commandrronthe Switch
Outputsmenu. PressEnter. A list of the twelve inputswill appearat
the left of the screen. The cursor is positionedat the first,
2)
Use the up and down arrow keys or the F9 (Up)and F10 (Dn) function
keys to move the cursor to the name of the input which is to be used in
the command, PressEnter.
At the bottom left of the screen,highlight the state of the input which
wiil trigger the action to occur, HIGH or LOW. PressEnter.
A list of the available outputs will appear at the right of the screen.
4)
Highlight the output (either AC outlet, alarm, or switch output) that
you want the commandto affeet. PressEnter.
o)
Changethe highlighting on the ON/OFF indieator (for AC outlets and
alarm) or the OPEN/CLOSEindicator (for switch outputs) to the setting
you want the command to establish.
8/86
3-42
6)
The wordsrrWairand I'No Wait'rappearat the bottom of the screen.
Use the right and left arrow keys to changethe highlighting to indicate
whether you want PERL to pauseand wait for the action to be carried
out.
7)
You will be promptedto type in a commandname. Type in a name
having up to 16 characters,none of which may be spaces. The first
character must be alphabetic. For example,
CommandName: inst_on
8)
PressEnter. Your commandwill be stored in the PERL direetory. You
may proceed to name another eommand,or use the F8 (Bkup) function
key to return to the Input Controlled Actions menu.
Execute Input Contpolled Action Command
After you have createda command,you can use the ExecuteCommand
option to see if the commandfunctions as you intended.
1)
Ilightight rrExecuteInput Controlled Aetion" on the Input Controlled
Actions menu. PressEnter.
You will be promptedto enter the name of a command.
2)
\pe
the name of the commandyou wish to execute,for example,
CommandName: inst_off
3)
PressEnter. The commandwill be executed.
You may proceed to enter another commandto be executed, or you may
use the F8 (Bkup)function key to return to the Input Controlled Actions
menu.
THE BALANCETEACHPROGRAM
The output of a balance is always a measuredweight. A "weigh command"
is a commandto the System Controller to accept this reading, so it can be
usedas data. The commands
get_sample_wt
weigh_test_tube
reeord_vial_wt
all eausethis same action to be performed, but they have been given different namesfor increasedprogramclarity,
8/86
3-43
Before a procedure can use the measuredmass,it must assignthe mass to a
variable, For example, the following procedureweighs a sample, transfers
the measuredmass to a variable cal1ed"massrr,then appendsmass to a file
on disk.
procedurestore_wt
mass= get_weight
append mass to "mass_file"
close |tmassfilerr
end oroceduJe
Accessingthe BalanceTeachProgram
1)
From the PERL main menu,pressthe F3 (Teach)function key. T'he
Teach Program selection menu shown in Figure 3-1 will appear. It lists
the types of modulesfor whieh Teach Programsafe available.
2)
Use the up and down arrow keys or the F9 (Up)and F10 (Dn)keys to
hightight "Balance and pressEnter. If you have rnore than one balance
installed in your systern, the next screen which appearswill iist them by
name. This informationcomesfrom the systemconfigurationfile,
whereyou have assignedeach modulea name (e.g.,weigh_station,
balance_1).(If you have only one balance,this screenis omitted.)
3)
Choosethe desiredbalance by highlighting its name and pressingEnter.
The next menuwhich appearslists three options:
DisplayCurrent h eight
Name WeighCommand
ExecuteWeighCommand
The sections which follow will describe each of these options.
Note: If you have a Sartorius balance, the menu wili also
include"Name Tare Command'r.
Displaying
the CurrentWeight
1)
Highlight'rDisplayCurrent Weight"on the balanceoptionsmenu.
2)
PressEnter. The current weight being output by the balance is displayed on the screen. You may select another option, or press F8
(Bkup) to return to the Teach Program selection menu.
8/86
Naminga WeighCommand
1)
HighlightrrNameWeighCommand"on the balanceoptionsmenu.
2)
PressEnter. You will be prompted to enter a commandname.
3)
Type in the name of the commandyou wish to create. The name must
contain no more than 16 characters,none of which may be spaces. The
first character must be alphabetic. For example,
commandname: get_weiht
4)
PressEnter. The commandname will be stored in the PERL Directory.
5)
Proceed to name another command,or pressF8 (Bkup)to return to the
balance ootions menu.
Executinga WeighCommand
After you have created a command,you can use the Execute Weigh
Commandoption to see if the command functions as you intended,
1)
Highlight 'rExecuteWeigh Commandrronthe balance options menu.
2)
PressEnter. You will be prompted to enter a commandname.
3)
Type in the name of the commandyou wish to have executed.
4)
PressEnter. The commandwill be executed,and the present weight
will be displayed.
5)
Proceed to type in the name of another commandto be exeeuted,or
press F8 (Bkup)to return to the balance options menu.
Naminga TareCommand(SartoriusBalances)
Becausethe Sartorius NIP-8is a bidirectional interface, you can use a
command from PERL to tare the balance. Whenyou use a tare command in
a procedure,follow it with a weigh command,to ensurethat the tare
commandwas properly executed.
1)
HighlighttrNameTare Commandt'onthe balanceoptionsmenu.
8/86
3-4 5
2)
PressEnter. You will be promptedto enter a commandname.
3)
Type in the name of the commandyou wish to create. The name must
contain no more than 16 characters,none of which may be spaees. The
first charaeter must be alphabetie. For example,
commandname: tare_it
4)
PressEnter. The commandname will be stored in the PERL Directory,
5)
Proceed to name another eommand,or press F8 (Bkup) to return to the
balance oDtionsmenu.
8/86
THEPERLLANGUAGE
Section
4
Page
THBPBRLLANGUAGB...
ELEMENTS
OF PERL
4-l
4-1
PERLStatements....
4-1
ArgumentsUsedin PERLStatements
4-2
Constantsand Variables
Array Variables
Expressions
Funetions
PERLSTATEMENTS
...
4-2
4-3
4-3
4-4
4-7
Housekeeping
Statements
4-tl
Crra+6m
4-13
a^htr^l
Device Commands ... .
4-r7
Robot Control
4-18
Timer Statements ...
4-20
Co-ordinated Procedures:Parallel, Until, While
.......4-18
Input/Output to the Monitor and Keyboard
4-24
Printing
4-30
MakingDecisionswithin Programs
4-31
RepeatedActionssLoops ..
4-34
Input/Output via RS232Ports .
4-39
Using Files on Disk .
+4r
Date andTime Statements
4-44
THEPERLLANGUAGE
ELEMENTS
OF PERL
PERLStatements
A program in PERL, ealled a trprocedure',eonsistsof a series of one-Iine
stetements. As with any program, the statements constitute a set of commandswhich the system follows in order. The following are typicBl PERL
statements:
use robot 2
set timerl for 10 seconds
get samDletube
display'hIft amples complete."
The statements are of four general types:
-
Statements with syntax similar to the BASIC languagewhich control
the flow of the program. Such statements as "if.,.then", "input", or
"for...next'r will be familiar if you know BASIC. If you do not, you will
find that the simple English words used will make the meaning easy to
grasp, although you may wish to consult a BASIC textbook. (A good
introduetory text is BASIC, a Self-TeachingGuide, by Robert Albrecht,
Leroy Finkel, and Jerald Brown, publishedby John Wiley and Sons.)
-
Statements usedfor input and output of information to various devices
(e.g., monitor, printer, or disk drive). These statements are also English
words, and in many e&sesare similar to commandsyou may have encountered in using other systems. Examplesare "display'r,'rteadrr,and
'tprint".
4-2
-
Statements unique to PERL which are neededto control a robot
carrying out laboratory procedures. Suchstatements as'rset timerrt and
"user are typical.
-
Statements which have been created through the use of the Teaeh
or
ProgTems.Typieal exampleswould be trget_sample_tuberr,
ttmove_to_s]ningerr.
Thesestatements may have up to 16 eharacters,
none of which may be spaees. (The latter restrietion aecountsfor the
frequent preseneeof the underline character.)
This section will be coneernedprimarily with the first three types of statement. The creation of operator-definedstatements is deseribedin Section
3, The Teach Programs.
ArgumenlsUsedin PERLStatements
With the exception of the operator-definedstatements created with the
Teach Programsand unique to each laboratory (lrover_the_mixert',for example), most statements in PERL require some additional inf ormation, ea.lled
arguments, after the word which begirs the statement. In the statement
form ats
use (device name)
for (variable) = (expression1) to (expression2) [step (expression3)]
print (desiredoutput)
the parenthesesspecify argumentsrequired in the rruser','rfor", &nd "print"
statements. The argumentsmay be either constants,variables, expressions,
or functions of any of these.
Constants and Variables
PERL useseither numeric or character eonstants. The numeric constants
may be either real, having a decimal point and possiblya decimal part, or
they may be integer, having no deeimal point.
Variebles, to which the system assigns values during procedure execution,
are of the same types as constants. Variableshave names which may
contain up to 16 characters,none of which may be spaees. Character variable names end with a dollar sign; integer variable names end with a per
cent sign. If you do not speeify character or integer data type, PERL
assumes that the variable is of real data type. Table 4-1 gives examples of
the types of variables and eonstants PERL supports.
4-3
TABLE4-1
DATATYPESIN PERL
Examples
of Constants
Examples
of Variables
Real
2.4,40., L0.0
ml_of_standard
Integer
3,74
nunr_of_samples'b
rrnewstuffrr
prodname$
Type
Numeric
Character
Array Variables
Variablesof the same type may be groupeotogether and assigneothe same
variable name. Such a grouping rs carleo an array. the variables in the
affay are distinguishedfrom each other by a subscript in parenthesesfollowing the name. For example, the weights of 10 samplescoulo be placed in an
array calleo sampwt. the inoivioual weights woulo be sampwt(l),
sampwt(2),etc. A I'oimr'(oimension)statement must always preceoe the
first use of an array variable in a proceoure. See the description of the
rrfor,..nextrrstatement lor PEkL statements which involve arravs.
E4)ressions
Constantsand variables may be joined by arithmetic operators (see Table 42) or relational operators (seeT'able4-3) to form expressions.Sueh
expressionsmay be usedin PERL statements in the same way that constants
or variables are used. The following statements use expressions&s
arguments:
for i = 1 to (num_of_samples/2)
result = absorbanee/sample_weight
TABLE4-2
ARITHMETIC
OPERATORS
Operation
Addition
SubUaction
IViultiplication
Division
lviodulus
|regation
Operator
+
'r
/
@
Expression
a + D
a - b
a*b
a/b
a @ b
-a
4-4
TABLE4-3
RELATIONAL
AND LOGICALOPERATORS
Operator
Operation
=
equal to
<
<=
>
>=
AND
OR
NOT
Iess than
Iess than or equal to
greater than
greater than or equal to
logical AND
logical OR
IogicalNOT
WhenPERL evaluatesan expression
suchas 2+4x3rit operatesundera hierarchy that determineswhich operationshouldcome first. Withoutsueha
hierarchy,the expressioncould be evaluatedas either 14 or 18. (It is 14.)
The following list showsthe order of precedence. The system performs the
operationsat the top of the list first, from left to right in the expression,
followed in order by the items lower on the list.
1.
2,
3.
4.
5,
6.
7,
8.
Functions.
Unary subtraction; NOT,
Multiplication; division; modulus
Addition and subtrac tion.
< = i > = ;< i >
=; <>
Exponentiation.
AND;OR
Functions
Certain numericand characterfunctionsare preprogrammedin PERL. You
can use them simply by naming the function and the variable on which it is
to be used, For example, the absolutevalue funetion is named'rabsrr.The
following statement would cause the absolutevalue of the expression
(l *a-5) to be disptayedon the monitor:
display abs(3*a-5)
If a were equal to -4, the result displayedwouldbe 17.
The functions supportedby PERL are listed in Tables 4-4 and 4-5, with their
formats and an example of each.
4-5
TABLE4-4
FUNCTIONS
NUMERIC
Important
All angles are expressed in radiB.ns.
F unction
Format
Lxample
Absolute Value
abs(x)
display abs(25-73)
48
Arccosrne
arccos(x)
display arccos(U.9
659262)
0.267798
Arcsine
arcsin(x)
oisplay arcsin(0.2588177
)
0 . 26 1 79 8
Arctangent
aretan(x)
display arctan(3)
1.249046
Cosine
cos(x)
displaycos(0.26179
80)
0.965928
Cosecant
csc(x)
Exponent(returns e
to the xth power)
cot(x)
displaycot(1.04?192)
0 . 5 ??3 5 8
exp(x)
display exp(1)
2.7L8282
Exponentto base 10 exp10(x)
(returns 10 to the
xth power)
display expl0(2)
100
Integer (Note that
int(x)
the number is truncateq. To round,
use int(x + 0.5).
oisplayint(123.56?)
123
Log (to basee)
log(x)
oisplay iog(2)
u.693147
Log (to base 10)
logl{l(x)
oisplay logl t)(1.0
00)
3
Sine
sin(x)
displaysin(0.2617980)
0.258818
SquareRoot
sqrt(x)
display sqrt(2)
r.414214
Tangent
tan(x)
displaytan(1.04719
2)
1.732029
4-6
TABLE4-5
STRINGFUNCTIONS
Function
Format
Example
Concatenation
Joins character
strings together
+
a$ = ttlVlastertr
b$ = "Lab Systemrl
dispiay a$ + b$
IVrasterLab
System
ASCII String
Function (returns
the ASCII code of
the character)
asc(x$)
Character function chr$(x)
(returns the
character whose
decimal ASCII code
is given)
Inkey (pausesuntil
a eharacter is
input from the
keyboaro, then
accepts it)
x$ = inkey$
ciisplayasc(rrarr)
65
display chr$(65)
A
display 'rcontinue?- y or n'l
x$ = inkey$
if x$ = "ytr then
process
else
"notltPt"'
Instring (returns
instr(x$,y$)
instr(n,x$,y$)
the position of
the lst oeeurrence
of y$ in x$. May
begin searchingat
the nth position.)
x$ ='rabcdebfi
y$ =rrbn
name$ = instr(x$,y$)
newname$= instr(4,x$,y$)
display name$
display newname$
2
6
Left characters
(returns the
left n characters)
left$(x$,n)
x$ = I'Thanksgiving"
display leftg(x9,6)
Thanks
Length (returns the
no, of characters,
ineluding spaces,
in x$)
len(x$)
x$ = "Greenville, lVrE"
display len(x$)
14
Vriddlecharacters
(returns the
characters from i
to the end)
mld$(x$,i)
midg(xg,i,n)
x$ = "smiles"
display mici$(x$,2)
miles
4-7
Function
Format
Example
Readkey$ (accepts a x$ = readkey$
disptay I'Pre&sany key to stop"
if readkey$ then for i = 1 to 100
character input
x$ = readkey$
from keyboard, but
if x$ <> rr" then
does not pause if
none is input)
break
else
process
end if
next i
Right characters
(returns t}Ie
right n characters
right$(x$,n)
x$ = 'brink"
display right$(x$,3)
ink
String (returns
a character
constant which
eorresponds to
a numeric one)
str$(x)
dispray str$(365)
365
Value (Gives tlre
numeric value of
a character
string)
val(x$)
temp$ = "25 C"
display val(temp$)
25.000
8/86
4-8
PERLSTATEMENTS
This section describes the statements available in PERL' grouped according
to function. The following alphabetical listing gives tlle page number of
each description.
You will find a brief summary of the format of each statement and a
definition of its use in ttre Reference Guide to PERL at the back of this
manual.
append (var) to (filename)
(page 4-40)
as
(page4-39)
break
(page 4-3 7)
case (var) or case (expr)
(page4-32)
clear
(page 4-24)
close
(page4-18)
close (filename)
(page 4-40)
continuous
(page4-19)
cursor (h line no.),(v column no.)
(page4-24)
date$
(page 4-43)
d"Y$
(page 4-43)
default
(page4-32)
define (var) as (port name)
(page4-39)
devices
(page 4-1 7)
dim (var(i))
(page4-36)
display (desired output)
@age 4-24)
display devices
(page 4-1 7)
dos
(page4-13)
down (distanc e)
(page4-18)
8/86
4-9
else
(Page4-3r)
end procedure
(page4-11)
eof
(Page4-42)
for (var) = (expression)to (expression)[step (expression3)]
(page4-34)
from
(page4-28 and 4-40)
if (expression)then
(page4-31)
init (device)
(page4-17)
inkey$
(page4-28)
input [promptl (variable)
(page4-25)
is
(Page4-32)
library
(page4-15)
load
(page4_14)
log (destination)
(page4-16)
monthg
(page4_43)
next (var)
(page4-34)
open
(page4-18)
output
(page4-28)
perl
(page4-13)
print
(page4-30)
print sereen
(page4-30)
procedure(name)
(page4-11)
read (var) from (filename)
(page4-40)
readkey$
(page4-29)
receive(var)
(page4-39)
redirect input from (device),or redirect output to (device)
(page4-28)
8/86
4-10
relative (x,yrz,p,r)
(page4-18)
rem (comment)
(page4-11)
rewind(filename)
(page4-40)
save
(page4-14)
screen
(page4-30)
send(var)
(page4-39)
set timer (no.)for (quantityof time) (type of time)
(page4-20)
speed (integer)
(page4-19)
step
(page4-34)
stop
(page4-14)
suspend
(page4-14)
system
(page4-14)
then
(page4-31)
time$
(page4-43)
timer
(page4-20)
to
(page4-34)
until (condition)
(page4-22)
up (distance)
(page4-18)
use (device name)
(page4-77)
wait for timer (no.)
(page4-20)
while (condition)
(page 4-22)
write (var) to (filename)
(page4-40)
I
(page4-12)
(page4-26)
8/86
Housekeeping
Statements
Every PERL applicationsprogram, and every subroutinewithin it, is a prccedure which the system is to follow. Each sueh proeedurebegins with a
rrprocedure'r
statement which names it:
procedureuv
procedureweigh
oroceduremix
You can use the procedurename as a line in other procedures,teUing the
system to temporarily braneh to the named proeedure,follow it as a subroutine, then return to the original proeedure. For exarnple,the line
weigh
would eausethe system to execute the procedure which begins itprocedure
weightr.
The|tend proeedure'rstatement signalsthe last line in a procedure or subroutine. No procedurename need be given; the system assumesthat the
statement refers to the last previousrrprocedurerr
statement.
t€m
It is good programming practiee to insert in the procedureeomment lines
which indicate what the procedureis supposedto be doing at that point.
These are ealled remarks or I'remrtstatements. For examDle.
rem subroutinepositionssample tube above mixer
rem if error detected, prints message
rem v3 is the coneentrationof HCI
The system doesnot attempt to take any action on a line which begins with
the word rrtemrr,However, the line remains with the procedureand is
printed for the programmertsinformation wheneverthe procedure is listed.
8/86
4-L2
You ean userrrem" only at the beginningof a statement. If you wish to
appenda remark to the end of e statement liner begin it with an
exelamation mark (!):
a = 5.00 - 0.2*i ! volume remaining in syringe
You can also use the exelamation mark at the beginningof a statementr in
Dlaceof ttrem!t.
8/86
4-13
SystemControl
dos lccxrnand]
dos If i lenanBl
per I
The I'dosrrcommand,
without an argument,halts executionof a running
procedureand returns controi to the operating system (DOS). You can then
issue DOS commandsfrom the keyboard. PERL remains in memory; when
you type I'perl'r,the procedureresumesexecution.
However, you will usualiy want to use either a valid DOS eommandor the
name of a batch file as the argument to "dos", The system will execute the
commandor the tasks listed in the batch file, then automatically resume
executionof the PERL procedure.
For example, the following procedureusesthe "dos" command to execute a
BASIC program called "aequire":
Drocedurecommand
deliver
dos basic acquire
eleanup
end procedure
deliver sample
call basic program acquire.bas
to acquire data from instrument
prepare for the next sample
The procedurelisted below executesthe tasks in a batch file called
ttdata.battt:
nrl.lnadr
rra ho t^h
deliver
dos data
! call data.bat to acquire data, reduce
! data, eopy data to new directory
cleanup
enrl
nnnaarlr
rno
listing of data.bat:
basic acquire
reduce
copy newdata \data\uly15.dat
8/86
4-r4
systsn
The "dos" and I'system'rcommandsboth return control to the operating
system (DOS). They differ in that I'system"aborts PERL, while "dos" leaves
PERL in memory,
stop
suspend
If you put "suspend"in your procedure,execution will halt at that point as if
you had pressedF7 (Halt). You can then continue execution by pressingF8
(continue),or you can abort the program by pressingF7.
A I'stoptrstatement in the procedureaborts execution and returns you to the
PERL Direct CommandProcessor, It is eouivalent to oressinEF7 twiee in
succession.
load
save
The PERL Direetory stores in the file PERL.DIR aII commandsyou create
with the Teach Programs. The rrloadrr
command tells the system to read
PERL.DIR into memory. Any new Directory entfies presently in memory
will be lost. The system automatically makesa backup file (PERLDIR.BAK)
of the Directory being loaded.
To write the Directory presently in memory to disk, use "save". The system
will write the Directory to PERL,DIR.
8/ 8 6
4-l)
The "library" commandgives you a way to shorten the run-time devoted to
waiting for subproceduresto load as they are needed. Use it as described
below.
1)
Use the Editor to create a fiie which contains all the proceduresyou
will need in your overall procedure, Do this bt-loading them into the
Editor in sequence, The system will use the name of the first procedure
you load as the library name,
procedure f ill_syr
anal nrnaradr rra
procedure disp_Iiq
end procedure
procedure mix_samp
etc.
Create a procedure for loading the file created in (1), above. Give it a
name (for example, "gc_Iibr"). It will use the I'library" commandand be
similar to the following:
procedure gc_libr
library fill_syr
end procedure
In your main PERL procedure, insert a line near the beginningwhich
executesthe procedurefrom (2), above, loading aII the procedures
needed!
gc_libr
I /86
.l-ro
If you want to have a record of everything which appearson the screen (as a
debuggingtool, for example),use the 'rlogrrcommand.It creates a file on
disk which contains all screen output, For example, to create a file called
monday.log,type:
log monday.log
and pressEnter. Whenyou want to turn off the log function, type:
log con:
and DressEnter.
8/ 8 6
DeviceCommands
Whenthe system eontains more than one device of a given type, procedures
must specify which one is to be used. The rruserr
statement names the device
which the system is to use by default until it encountersanother userrstatement. If there were two robots which had been named robot_mannyand
robot_moe in the System Configuration Utility, a procedure might contain
the line
use robot_moe
near the beginning. All subsequentcommandsfor a robot would go to
robot_moe. If a later subroutinewere to use the other robot, the statement
use robot_manny
would signal the changeto the system.
Note: Syringe commandsare associatedby the system with the
name of the particular syringe to which they were taught. Thus
you do not need to use the'ruserr
eommandfor syringes.
However,if you changethe modulename, the commandmay
not function properly.
ini t (device nsne)
The I'initrrcommandcausesthe device named in the commandto be initialized, following the initialization sequenceestablishedfor that device in the
system eonfiguration file; for example,
init robot ramon
This commandgeneratesa screen display of the configurations of all the
devices listed in the system configuration file.
8/86
4-18
RobotControl
These two commandsopen and close the robot grippers.
Impoatant: There is also a t'close(filename)t'command in
PERL. Be sure to always include the filename when you want
to close a file, becausertclose"alone will elose the grippers. On
the other hand, if you try to use "close grippers" as a robot
control command, the system will search for a file named
ttgripperstt.
up (d i s tance)
.
do$rr'(distance)
rel&tive'(x,!,?rp,r)
..
The "up", "down", and rrrelativeficommandsall move the robot a specified
amount reLative to its Dresentoosition.
Important Be sure that the destinationyou specify with "up",
"downrr,or 'rrelativerris within the work envelopeof the robot.
If you attempt to move the robot to a destination it cannot
reach, it will reset; the grippers will open, releasing any
container being grasped,
rrUprrandrrdownrr
move the robot in the Z direction only, retaining the
cunent X and Y eoordinatesand the pitch and roll. The distance is in
millimeters, and can be either a constant or a variable. For example,
up5
moves the robot up 5 millimeters from its present position.
down b
moves the robot down b millimeters. The distance argument can be either
positive or negative; I'down-4rrhas the same meaning-as"up 4".
8/86
4-79
If you want the x and y eoordinatesor the pitch and roli to change,use the
"relative" statement. The syntax rules for this commandare as follows:
{'
The relative changesin x, y, and z are in millimeters; changesin
wrist pitch and roll are in degrees.
*
Either constantsor variables are allowed.
'r'
If you do not want to changeall the coordinates,use zeros for the
fields which will not chBnge;for example,
relative 0,5,0,0,10
*
You must include all the coordinatesto the left of the one(s)you
want to change, You ean drop the ones to the right. For example'
relative 0,6
would move the robot 6 millimeters in the +y direction.
*
The commasseparatingthe fields are required.
eontinuous
positionl
pos.ition2
position3
..' -. .
end.coirtii,litous
The "continuous commandmoves the robot through a series of positions
without ramping speedsand stoppingat each one. Only robot conimandscan
appear in the "continuous"block, and they must all be positions; that is' you
ean not use a rack or grip pressurecommandin the block. You may'
however, use any number of position commands.
Warning: Do not use "continuousl with commandswhich would
reverse the robot arm motors at high speed, This could damage
the robot. You may need to perform preventive maintenance
more frequently if you use "continuousrrstatements.
speed ( integer or var iable)
You can control the relative speedof the robot by entering an integer or
variable from 0 to 9. The slowest speedis 0, the fastest is 9.
8/86
4-20
TimerStatements
$et t rer (no.) for (quanti ty. of tinp). (r.ui t of tire)
. wai t fof t iner. (lro. )
The PERL software supports20 internal timers for use in camying out
robotics procedures. You may set these timers individually, by number, for
the desiredIength of time in either minutes or seconds. For example,
set timer 1 for 5 minutes
set timer 2 for 60 seconds
There is, in effect, no limit on the amount of time you can set, expressedin
minutes or seconds. You can also use variables for the timer numbersand
times, provided the valuesof the variablesare within the range of valid
numbers:
set timer n for x seconds
If the system is to do nothing else until the time has elapsed,the "set timerrl
statement would be followed by
wait for timer 1
or
wait for timer n
On other occasions,eertain actions may be performed until the time
elapses. In that case, you could use the "while" or the "until" statement (see
the next section).
set timer l for 30 seconds
mix samo
whiG tinier(l) = 1
cursor 10r10
display "Still mixing'l
end while
get_sample
Whenthere is unexpiredtime remaining, the timer is equal to 1. Whenthe
time has elapsed,the timer equals0. The 'rwhile'r,..trend
while" statements
in the aboveproeedureare equivalent to'rwait for timer 1'r.
8/86
The following timer statements both begin loops which dependon the timer
being unequalto zero:
if timer(3)
while timer(3)
while timer(3) = 1
Thesestatements mean if or while timer 3 has not expired (is unequatto
zero\.
8/86
Co-ordinatedProcedures:
Until and While
unt i.1 (condi t ion)
end until
w h i l e ( c o n d it i o n )
erd whi le
Sometimesdifferent actions are dependenton each otherl one action is to
be carried out while a certain condition is true, or until another action is
completed. In these situations, use the I'untilrror I'while" statements, The
following series of statements could be usedto have the robot weigh and
processsamplesfor as long as there were any samplesin the rack:
until (samples> 0) and (samples< 41)
input rrenterthe number of samplesto process:"rsamples
end until
until samples= 0
ge!_samp
weigh
process
samples=samples-1
end until
The proceduresegment which follows usesthe I'whilerrstatement. A nlajor
difference between rruntilrrand rrwhilerris that the system terminates execution of the body of the "while" as soon as the eondition is no longer met; the
body of an rruntil'rwill be carried out at least once before it is terminated.
until (samples> 0) and (samples< 41)
input "enter the number of samplesto process3tr,
samples
end until
while samples> 0
get_samp
welgn
process
samples=samples-1
end while
8/86
You can use numeric and string functions from Tables 4-4 and 4-5 as
conditions in "until" and 'rwhilerrstatementsi for example,
while sqrt(x) < 100
AII rrwhilerrandI'until" blocks must be terminated by an appropriate "end"
statement, as seen in the examplesabove.
8/86
Input/Outputto the Monitorand Keyboard
As a PERL procedureis running, it may use the monitor to give the operator
information suehas the number of the samplebeing prepared. It may also
prompt the operator when human action is needed. Such monitor displays
are initiated by t'display"statements within the procedure. (This is similar
to the PRINT statementin BASIC.)
The argument of a "display" statement may be a constant, as in
display "End of UV samplepreparation.'r
or a variable, such as
display sample_number
In the latter ease, the monitor would display the actual number presently
assignedto the variable sample_number.
The statement may contain a combinationof constants,variables, and
expressions,separatedby semicolons. At execution, the semicolonsprevent
the cursor from advancingbetween each element of the display. The next
constant, variable, or expressionimmediately follows the one which precedesit. This statement
display 'rSamplenumber , sample_number;" of rri total_samples
would give the following result if the robot were at the twenty-eighth of
forty samples:
Samplenumber28 of 40
Note that quotation marks are necessaryaround the string constants.
8/86
4-25
You may tab between items on a displayedline, if you wish' The monitor
screen is divided into vertical zonesby tabs set every 14 spaces(at columns
14, 28, 42, etc,). If you separate the variables and constantsin a I'displayrr
statement by commas,rather than semieolons,each item will begin at the
beginningof the next zone. This feature is useful for printing columns of
data, The lines
ttvol"
display 'tsampleno.t', ttmasstt,
display sample_num,samp_wt, samp_vol
could be usedas part of a procedureto generate a table of data:
sampleno.
MASS
vol
1
2
0,025
0.023
2.48
Displayswill begin by default at the present cursor location. However, you
ean place the display wherever you wish by meansof the "cursor" statement.
The monitor screen is 80 vertical columns wide and 23 horizontal rows high.
The upper left corner of the screen is cursor position 1,1; the lower right is
position23,80. The statement
cursor 5,1
will place the eursor on the first spaceof the fifth line. You may use an
expressionin plaee of a line numberl the system will evaluate the expression
and place the eursor aceordingly:
eursor ((2*x)-3),2*y
As a procedureproceeds,messageswill accumulate on the screen. The
"clear'r statement, which requires no arguments,allows you to remove all
the accumulateddisplaysfrom the screen.
The rrinputl statement allows the operator to type in information from the
keyboard as a proeedureis running. When the system encountersan "input"
statement, it waits for an entry. The value of the typed entry (nurneric or
character) is assignedto the variable in the "input" statement,
input num_samples
would result in the question mark prompt. The typed entry 25, followed by a
carriage return to signal the end of the response,assignsthe value 25.0000
to the variable num samDles.
8/86
4-26
It is usually helpful to display a prompt which tells the operator what sort of
responsethe system expects. The previous example could have used the
statement
input 'rTotal number of samplesrrlnum_samples
Only one prompt and one variable responseare allowed in each "inputfi
statement.
Note that the statement in the precedingparagraphis similar in format to a
"display" statement which has a character constant in quotation marks,
followed by a semicolon,then a variable name. rrlnputrrstatements, Iike
rrdisplayfstatements, can also use a comma instead of a semieolon.
As
shown,the statement wiII cause the system to query
Total numberof samples?
and wait for a response. If you use a comma instead of a semicolon,you
suppressthe question mark.
input "Total number of samples:rr,num_samples
w ill produce
Total number of samples:
display "\(octal)"
d i s p t a y ( v a ri a b t e )
The entire IBM PC character set is available to you from PERL, you ean
display Greek letters, double lines, arrows, and many other non-keyboard
characters.
Each charaeter in the set is identified by an octal number, as shown in Table
4-6.
To accessa character, use the \ symbol followed by the octal identifier, all
surroundedby quotation marks. For example,
display '\101"
will display the character rtArr.
8/86
4-27
TABLE4-6
T H EI B MP C CHARACTERS
AND THEIROCTALCODES
41
4 2
4 3
44
4 5
46
4'l
5 0
51
5 2
53
54
55
56
5 7
6 0
61
6 2
63
6 4
6 5
88
8 7
7 0
71
|
"
{
$
X
&
'
(
)
*
+
,
-
116 N
117 0
120 P
125
126
t27
130
131
132
U
V
\t
X
Y
Z
/
0
1
2
3
4
5
I
7
4
I
134
136
\
^
74
<
140
141
142
143
144
145
145
74'l
150
15t
a
b
c
d
e
f
e
h
i.
76
77
100
101
102
103
104
105
106
107
110
111
112
113
114
>
?
e
A
B
C
D
E
F
G
g
I
J
K
L
153
154
155
156
157
160
k
r
m
n
o
p
162
183
164
165
166
18?
1?0
171
t
s
r
u
v
r.
x
y
122 R
123 S
r37 _
'
250 "25r
252
253 ;
254 \
255
256
25'l
260 i i i
261
262
263
264
265
266
267
270
271
272
273
274
275
278
277
300
301
302
303
304
305
306
30?
310
311
3t2
173
174
175
176
,77
200
20r
202
203
204
205
206
20'l
2LO
2tr
2r3
2L4
2r5
2ra
2t7
220
221
222
223
224
225
226
227
230
231
232
233
234
235
236
237
240
241
242
2t3
244
245
246
i
I
l
I
I
I
314
315
316
3t7
320
321 T
322
323
I
fl
I
325
.
327 +
330 +
I
331
::: rr
:::
ii: t
ii; I
340 q
341 6
342 r
343 r
345
345
347
350
351
352
s
,l
r
E
€
A
354
355
356
357
360
.
et
€
n
I
362
363
364
365
366
35?
370
:
l
f
i
+
g
0
372 373 .l
374 .'
3?5 r
376 .
377
400
You can embedan octal code in a string eonstant:
display rrProposed
\341 Test Sitesrl
will display
ProposedF Test Sites
You can also assignthe octal code to a string variablei for example,
char_b$='\341r
display char b$
The two above statements will display the charaeter "p".
8/86
4-28
redirect input IfrcrnJ (<bvice)
r e d ir e c t o u t p u t [ t o ] ( d e v i e e )
The standard input device for the Masterlab System is the keyboardof the
System Controller. The standardoutput device is the sereen, If you wish to
have the System Controller aceept input from a device connectedat port
coml:, and you had named the portrrlims" in the System Configuration File,
you could issue the command
redirect input from Iims
Input can also come from a file.
redirect input from "datafile"
Similarly, output could be redirected to the printer, a port name, or to a
f ile.
redireet output to "newfile"
Whenyou want the input or output to again eome from or to the standard
deviee, you must use another "redirect'r command, In the following
examples,"con:" refers to the eonsole(screenand keyboard):
redirect input from con:
redirect outDut to con:
Whenthe system encountersa statement containing "inkey$", there is a
pausein procedureexecutionl the pauselasts until the operator signalsby
hitting a key. The following two lines accomplishthis:
display rrPressany key to continue.rl
x$ = inkey$
The string value of the key hit will be assignedto x$. (Note that inkey$
itself is never assigneda value.)
8/86
4-29
The pausemay provide an opportunity for the operator to make a decision:
display t'Do you wish to changesoiutions?Type y or n.r'
x$ = inkey$
if x$ = "y'r then
input I'Enter concentration of new solution"l eonc_soln
eno lr
prep_sam
The above proceduresegmentprovides a pausein which the operator can
changesolutions, if desired. If the value of x$ indicates that this has been
done, input of information is requestedbefore the procedure continueswith
the sub-procedure"prepare_samples". (See the deseriptionof the I'if'statement.)
readkey$
The rrreadkeytr
keyboard function provides a related faciiity for operator
It
control.
allows the procedure to continue without pauseunlessa key has
been pressedsince the last time the keyboardbuffer was read, If no key has
been pressed,the value of the readkey function is the null string, "".
The following procedurewill continue to processsamplesuntil the operator
pressesa key. The system will not save the value of the key pressed.
procedu.re.dk{_d"T
....
wnlle reaoKev!=
';Press
display
any key to stopt'
proeess
end while
end procedure
If the value of the key pressedis important, use readkey$ as in the
following:
procedurerdky_sav
until x$ <) tttt
display 'rPressa key to stop'r
process
xg = readkey$
end until
display rrThekey pressedwas "1 x$
end orocedure
8/86
4-3 0
Printing
The I'printi'statement functions exactly like the rrdisplaynstatement, except
that its output goes to the printer rather than the monitor screen, See the
discussionof "display!'for a description of the varieties of syntax available.
The "print screentrstatement causesthe entire eontents of the screen to be
output to the printer. Whenyou are in the Direct CommandProcessor,you
ean accomplishthe same thing by pressingthe shift key and the PRint
SCReenkey simultaneously. (The printer must be turned on.)
8/86
/ -to
The pausemay provide an opportunity for the operator to make a decision:
display I'Do you wish to changesolutions?\pe y or n."
x$ = inkey$
if x$ = "yt' then
input I'Enter concentration of new solution"l eonc_soln
end if
prep_sam
The above proceduresegmentprovides a pausein which the operator ean
changesolutions, if desired. If the value of x$ indicates that this has been
done, input of information is requestedbefore the procedurecontinues with
the sub?rocedure "prepare_samplesrr,(Seethe description of the 'rifrrstatement.)
readkey$
The 'rreadkeyrkeyboard funetion providesa related facility for operator
control. It allows the procedure to continue without pauseunlessa key has
been pressedsince the last time the keyboardbuffer was read. If no key has
been pressed,the value of the readkey function is the null string, I'r'.
The following procedurewill continue to proeesssamplesuntil the operator
pressesa key, The system will not save the value of the key pressed.
procedu.rerdky_dem
....
wnlle reacKevb= "
display';Pressany key to stopfi
process
end while
end procedure
If the value of the key pressedis important, use readkey$ as in the
following:
procedurerdky_sav
until x$ <> tttt
display "Pressa key to stoprl
process
x$ = readkey$
end until
display rrThekey pressedwas "; x$
end orocedure
8/86
4-30
Printing
The rrprintrrstatement functions exactly like the'rdisplayrrstatement,except
that its output goes to the printer rather than the monitor screen. See the
discussionof "display" for a description of the varieties of syntax available.
The "print screenrrstatementcausesthe entire contents of the screen to be
output to the printer, Whenyou are in the Direct CommandProcessor,you
can accomplishthe same thing by pressingthe shift key and the PRint
SCReenkey simultaneously. (The printer must be turned on.)
8/86
4-31
MakingDecisionswithin Programs
Whenthe system encountersa statement beginningwith "if" and an expression, it evaluates the expressionto see if it is true or false. If the expression is true, the statements following I'thenlrwill be executed. If it is not
true, the statements following "else", if any, will be executed. The following examplesof "if" statements have a variety of expressionsto be evaluated:
if timer (1) = 0 then
if instrument_ready= 0 then
ifinstr(a$,b$)=0then
if sample_wt <= 0.5 then
The first examplerefers to whether the time set on timer t has elapsed.The
secondrefers to a condition which would have been previously defined in
terms of a switeh being on or off. The third tests the condition of a string
function from Table 4-5, The last involvesrelational operators. The
operators allowed in PERL are:
=
equal to
<
<=
>
>=
AND
OR
NOT
less than
less than or equal to
greater than
greater than or equal to
logicai AND
logical OR
logical NOT
For example,
ifb<aorb>cthen
ifa=bANDa=cthen
8/86
4-32
Note that logical operators can be usedonly with numeric variables,not
with strings, Compare the following legal and illegal usesof logical
oDerators3
Lesal
Illegal
ifn=aandt=bthen
if n$ = uauand t$ = "b" then
ifn=aandt=1then
ifn$=ttsnandt=lthen
Use the I'else"portion of the if block only if aetion is to be taken when the
expressionis false that would not be taken if it were true. For example,
if sample_wt <= 1,0 then
add solv
mix-samp
else
dscd sam
end if
The rrcaserr
statement providesanother way of specifying alternative courses
of action. Use it when several different alternatives are possible,depending
on the value of a variable or expression. As an example,supposethat three
different proeedurescould be called, dependingon the volume of the sampie. The following rrcasefconstruction specifies the alternatives:
case vol_sample
is 10:
prp_l0 ml
is 5:
prep_sml
ls _t:
prep_lml
end case
If the value of vol_samplewere 10, the procedureprep_l0m1would be executed. Otherwise, the appropriate other procedurewould be used.
8/86
4-33
The lines which follow therrcase statementmust consistof:
the keyword "is" with either a variable or a constant (not an expression)
before a colon;
a statement (or statements)on the line(s) following the "is".
In the following example, there are two statement Iines after eaeh I'is" line:
total_vol = w eigh_empty_tube
get_samp
vol_sample= weigh_sample
easevol_sample
is 10:
prp_l0 mI
total vol = total vol + 10
ls 5:
prep_5ml
total_vol = total_vol +5
end case
If the rrcasefi
block contains two or more "is!' lines in succession,PERL interprets them as if they were connectedby a logical "or". For example,
casename$
is "Fred'r:
is rrSamrr:
proc_men
isrrHarrietr':
proc_wmn
end case
In the above procedure,the system would execute rrproc menrrif name$
were either Fred or Sam.
The optional 'rdefault'rstatement is equivalent to an "else," If all the other
conditions faii, the system wili execute the default. For example,
case i
is 1:
is 2:
is 3:
default:
display I'I is 1rl
display "I is 2 or 3r'
display rrl is not 1, 2, or 3"
end ease
In the example, the default display I'I is not 1, 2, or 3" would appear if i were
anything other than L, 2, or 3,
8/86
4-34
RepeatedActions:Loops
:
:,
,:.
,:,
Whenthe same steps are to be carried out several times in successionin a
procedure, it is wasteful of programmer time and computer memory to repeat the program lines involved. Instead, the repeated lines are enclosedin
a "program looprr. The loop begins with a I'forfi statement which indicates
how many times the action is to be repeated. It endswith a rrnextrrstatement. In the following example, the variable i is usedsimply as a counter;
its value is increasedby 1 each time the Ioop is executed,until i equals5,
Then the statement following the loop is executed.
fori=1to5
display "Happy"
next i
display trBirthdayrl
The output generatedby this program would be
Happy
Happy
Happy
Happy
liappy
Birthday
The value of the counter variable can also be usedwithin the body of the
loop. The following procedurewould display the numbers from L to 100:
procedurea_loop
fora=1to100
display a
next a
end
nnnoorlr rro
If you want to increment the counter variable by more than one, or to use
negative increments,use the optional 'rstep'rargument:
8/86
4-35
procedurecountdn
display "Countdown:"
for i% = 10 to 0 step -1
display i%
next i%
display TIBLASTOFFn
ahd
^F^.a.tr
rra
The above procedurewould produce the following display:
Countdown:
10
9
I
7
6
5
,
3
2
I
BLAST OFF
You may nest one "for...next" loop inside another. The following program
wiII display the multiplication tables up to the twelfth. The I'displaytrstatement causesthe program to skip a line between successivetables:
proceduremult
fori=1to12
for .1'=1 1o t'
disPlaYi; rr*'r'j' rr= tr;i*j
next j
display
next i
anrl nr^^ad'
rra
Note that the "for j" statement comes after the "for i", and the "next j"
comesbefore therrnext irr,so that the j Ioop is completely enclosedwithin
the i loop. Up to 16 loops may be nested in this manner.
trForrrloopsallow easy aecessto the individual elements of an array. If the
array subscript variable is the same as the counter variable of the loop, the
value of the subscript changeseach time the Ioop is executed.
procedureget_mBss
dim weight(l0)
fori=1to10
read weight(i) from I'weights.dat'r
display i; t' = "; weight(i); rrg
next i
close I'weights.dat'r
onrl
nrnnarfi,no
8/86
4-36
As it reads weights.dat in the above example, the computer generatesa
display similar to the following:
1 = 0.543g
2 = 0,6019
3 = 0.522g
4 = 0.5769
5=
etc.
Be aware that every time you use arrays, vou must use the t'dim'statement
describedbelow. The system doesnot assignany default subscripts,
Whenyou use array variables,you must allocate computer memory for storing them. This is accomplishedby the "dim" statement, whieh is usually
placed near the beginningof the proeedure,and must always come before
the first use of the array variable. In the procedureabove which read 10
weights from weights.dat, for example, the statement
dim weight(10)
would have to occur before the first use of the array variable. I'dim" stands
for dimension. The statement not only allocates memory for the weight(i)
array, it tells the system that the largest subscript will be 10, and it
initializes all the array variables to 0. (String variables are initialized to "",
the null string.)
You may dimensionmore than 1amay in a singlestatement, The statement
dim weight(l0),month%(12),
name$(6)
dimensionstwo numeric arrays and one character amay, alloeating space to
store ten weights, twelve months, and six names,
Arrays may have multiple dimensions,up to three. Such arrays are called
two-dimensionalor three-dimensional. A two-dimensionalarrav
dimensioned
dim array(2,3)
would contain the variables
array(1,1)
array(2,1)
array(1,2)
array(2,2)
array(1,3)
array(2,3)
8/86
4-37
The following nested t'for...nextr'loops use such an amayl
oldfile$(l) = "oldfilel"
oldf ile$(2) = "oldf ile2"
fori=1to2
forj=11o'
read info$(i,j) from oldfile$(i)
next j
next i
The above procedufe would read the first three pieces of information from
each of two files, called oldfilel and oldfile2.
Warnine: The software wili allow you to dimensionan array for up to
three dimensionsof 256 elementseach (subscripts0 to 255). Be
aware, however, that you may not be able to store large auays in the
computer, becauseof memory limitations. Arrange your program so
that you store the array on disk, and retrieve elements as you need
them.
Therbreak'r statement transfers control out of a Ioop and gives control to
the next statement following the loop. Ior example,
num_of_samples= 40
while num_of_samples> 0
get_samp
way_samp
weight = get_weight
ifweight=0then
break
end if
process
num_of_samples= num_of_samples- I
end while
datajrs
In the above example, if the sample weight is 0, then the procedure does not
continue with the "proeess_sample"
statement, Instead, it exits from the
'rwhile'rloop and continueswith rrdatajrs!'.
If you use a fbreak" statement within nested loops, the break applies only to
the innermost of the Ioopspresently executing. Control will continue at the
first statement outside that loop. ln the example which follows, two loops
are executing. rrBreakrr
removes control from the rrfor...next"(innermost)
t'whilerr
loop, but not the
loop.
8/86
4-38
num_of_samples= 40
while num_of_samples> 0
get_samp
way_samp
weight = get_weight
fori=1to5
move_to_syr
f ill_lml
way_samp
weight = get_weight
if weight = 1.1 then
break
end if
pr_nusam
next i
num_of_samples= num_of_samples- 1
end while
datajrs
In the preeedingexample, successive1 ml aliquots are removed from the
sample tube within the "for...next" loop. The "if" statement tests to be sure
there is 1 mI remaining in the tube for the next aliquot. If not, control is
transferred out of the "for.,.next" Ioop, to the statement following the rrnext
irr. However, control is still within the I'whiler loop.
8/86
4-39
lnput/OutputVia RS232Ports
PERL permits serial communicationwith external devices connectedto the
RS232ports.
Defintug a buffer
lvhether the communicationis to be input or output, the port must first be
openedby meansof the I'definefistatement. The port name argument of the
statement must be a port which has been defined in the System Configuration File, The rrdefinefistatement sets aside a buffer whosename is a string
variable. This buffer will eontain the input or output data; it may contain
up to 255 characters.
In the example which follows, LAI\iIBDA3is the name assignedto the port in
the System Configuration Fiie; the buffer is to be named a$:
define a$ as LAMBDA3
OuQutting Data
After the procedurehas defined the buffer, the desiredoutput is assignedto
it ; for example,
a$ = "cET ABSORBANCEI
Then the output can be sentl
senda$
Inputting Data
The statement I'receive a$" wili allow the buffer to receive communication
from the device at LAMBDA3. Thus the entire sequenceof statements for
obtaining an absorbancefrom the Lambda-3 instrument would be as shown
on the following page.
8/86
4-40
procedureget_abs
definea$ as LAMBDA3
a$ = "GET ABSORBANCEn
send a$
receive a$
display a$
end procedure
Receivirg Input without Terminators
Usually a serial input endswith a terminator that signalsthe end of the
transmission. The input$ function allows a specified number of characters
to be transmitted without a terminator.
The syntax for using the input$ function is as follows:
a$ = input$ (devieename, number of charaeters)
The device name is the name assignedto the device in the system
configuration file. The comma and the parenthesesare required.
As an example, supposeyou wanted to input three characters from a
Lambda 4C spectrophotometerwhich was named nL4Cxin CONFIG. The
string which is input is to be assignedto the variable d$. The procedure
would contain the line
d$ = input$ (L4C, 3)
The number of characters must be more than zero, and less than or equal to
8/86
UsingFileson Disk
PERL usessequentialdata files to store data, such as sample weights
acquired during automated sample preparation procedures,on disk.
You may write data to a new file or appendit to an existing one. The stored
data can Iater be read from the file and processedby PERL proceduresor by
other software available for the IBM PC.
The rules for using file names in PERL are as follows:
*
The filename must have no more than 8 characters.
*
Whenusedas an argument in a command,the filename must be in
quotes.
*
The filename argument in a eommand may be a string constant,
such as datafile$.
''
PERL supportsuse of DOS path names for multiple directories on a
single disk. For example, to write data to B file called "july" on a
directory calledrrdata'r
which is immediatelyoff the root, use
write a$ to '\data\uly"
See Chapter 5 in your DOS manual for an explanationof directories
and path names.
*
You can use extensions(for example ".dat") on filenames if the file
is not to be compiled,
8/86
There is norropen(filename)'rstatementin PERL; the softwarewill open the
file automatically when necessary. You must close the file with a "close
(filename)"statement,however.
Importanh The rropentr
and rrcloserr
commands(without a
filename) open and close the robot grippers. Do not use these
words by themselvesunlessthat is what you intend.
The following proceduresegment would store sample weights in a new file
called mysampls:
fori=ltonum_samples
way_samp
write sampwt(i) to "mysampls"
prep_sam
next i
elose ttmysamplstt
(It is assumedthat way_sampand prep_samare existing procedures,and
sampwt0 is dimensioned.) Becausethis is a sequentialfile, the sample
weights are written into the file in order, separatedby carriage returnsi
that is, the first record in the file would correspondto the first sample
weighed,etc. If you later wanted to file the weights of another batch of
samplesinto the existing file mysamples,the statement
appendsampwt(i) to "mysamplest'
would be needed. This would add the additional weishts to the end of the
I TIC.
After the system reads from a file, it must "rewindt' the file (figuratively) to
its beginningbefore it can read the contents again, The following procedure
reads yourfile, rewinds the file, then reads the data again for a different
purpose.
dim data(50)
fori=1to10
read data(i) from 'ryourfile'r
next i
rewind "yourfilen
Drcss da
ior ii 1 to so
read data(i) from "yourfile"
next i
elose ttyourfilett
Note that, becausePERL files are sequential,you can not read just the one
record in which you may be interested. To read the twenty-fifth record, for
example,you must read records 1 through 25.
I /86
4-43
On many oecasions,you as programmer will not know how many records a
file contains. You therefore will not be able to specify how many records
are to be read. The End of File function, eof, is provided to deal with that
situation. In the following procedure,a very trargenumber of records is
specified. After each is read, the procedure ehecksto see if it is the last in
the file. Whenthe last record is reached. a 'break" statement transfers
control out of the loop.
dim data(200)
fori=1to200
read data(i) from I'datafilet'
if eof("datafile") = 1 then
num data = i
display rrFilecontains 'r1i1 " recordsrl
break
end if
next i
fori=ltonum_data
prcss_da
next i
The function eof is equal to 0 when there are records remaining to be
processedleof equals I at the end. Thus you could also processrecords in a
"while" or rbntilr block:
until eof(a$)= 1
or
while eof("myfile'r)= g
8/ 8 6
4-44
Dateand Time Statements
The rrdate$'r,"day$", "month$", and "time$'r statements causethe present
date, day, month, or time to be output to the screen. The following
procedures,fun at noon on December 20, 1985,demonstrate the formats in
whieh the time statementsoutput data:
a$ = date$
display a$
t2 /20/7985
b$ = day$
display b$
f'riday
c$ = time$
display c$
12:00:00
d$ = month$
display d$
December
Thesestatements are useful for dating files created with PERL procedures.
For example, after creating a file called I'newdatarr,use the statements
a$ = date$
b$ = time$
appenda$ to rrnewdatafi
appendb$ to rrnewdatarl
to add the date and time of creation to the file on disk.
8/86
THEPERLEDITOR
Page
Section
5
THBPERLBDITOR
5-1
INTRODUCTION. .. ..
5-1
EDITORCOMMANDS
5-1
Commandson the Editor Menu .
5-2
CommandsControlledby KeyboardKeys .
5-3
P R O G R A M M I NPGR O C E D U R E .S. . . . .
5-4
Entering the Editor
5-4
Editing a Proeedure
t-J
Editing a Text File
5-7
Leavingthe Editor
5-8
THEPERLEDITOR
INTRODUCTION
You will write your PERL applicationsprograms (called procedures)using
the PERL Editor, a.fuII screeneditor whichyou can accessfrom PERL by
meansof the F2 funetion key of the System Controller.
You can use the Editor to create and edit either proeeduresor text files.
Text files are sequentialfiles created for use in a PERL procedure. Sucha
file may, in faet, have actually been created during execution of a PERL
procedure;you would then use the Editor for editing only.
The Editor functions differently if you are editing a procedure,rather than a
text file. The systemcompilesa procedureinto an intermediateform,
ready to be interpretedwhen it is run. This permits more rapid execution.
The PERL Editor usesthe System Controller keyboardkeys for cursor
movementand suchediting funetionsas insertingcharacters. A menu,
accessedby a function key, is available for choosingamong major tasks such
as creating a procedure or savinga procedure on disk,
E D I T O RC O M M A N D S
The PERL Editor is accessedby the f'2 function key. Onceyou have entered
the Editor (see "Entering the Editor" for detailed information on doing this)
the sereenwill be similar to the following, with a cursor positionedat the
upperleft corner,and promptsvisible for the five function keys F6 to F10.
5-2
Co"yrlaht (c) lg85
PcrLln-1I..!
Co4ro!!tlon
CoDpl,lcr
on
F6:HcIp
PERI Edltor
F?:Crd
F8:Bkup
F9:Ins
F10:D.I
Figure 5-1 - PERL Editor, Initial Screen
You may seleet Editor eommandseither from the menu obtained by pressing
F7, or by using eertain typewriter keys, The remainder of this section
describesboth types of commands.
Commandson the EditorMenu
Whenyou press F7 (Edit Commands)while in the Editor, the menu shown in
Figure 5-2 appearsat the right of the screen. To seleet a command from
the menu, use the up and down arrow keys to highlight the desired command,
then pressthe Enter key. After the commandhas been executed, the menu
will be erased,and the text will return to the screen.
The following commandsare available3
Save on Disk
Stores the file in memory on disk under the name
provided. Proeedureswill be stored in both ASCII
and compiled form, text f iles in ASCII.
Load from Disk
A prompt will request the name of the file to be
loaded. The new file will replace any file already in
memory. A backup copy of the file being loaded
will be placed on disk, with the name
IIFILENAME.BAK'I.
Print
Sendsthe entire file in memory to the printer.
8/86
c-J
Copyrltht (c) 1985
P.sLln-lIa.!
CorDolrtton
g.vc
Lold
Prlnt
Turn
Tu!!
Cobpll.r
on
PIEL Xdltor
on dlrl
tror
dlll
coDpllcr
coipll.!
!8:8.1.p
F8:Sttt
ON
Otr'F
l8:BLuD
Fg:In!
Fro:DcI
Figure 5-2 - Edit C ommandsMerur Screen
Turn Compiler On
Causesthe system to automaticaUy compile
proceduresto an executableform when you save
them to disk.
Turn Compiler Off
Turns off automatic syntax checking.
CommandsControlledby KeyboardKeys
Kev
Com mand
F6
Help
Note: The HELP funetion has not yet been implemented.
E7
Edit Commands: Brings up the CommandsMenu described
previously. Whenthe CommandsMenu is up, this function
key becomes
Quit: Leave Edit CommandsNlenu.
F8
Bkup: Method for leaving the Editor.
P9
Insert Line: Creates a blank line in the text above the
present cursor location, in which additional text can be
written.
r10
Delete Line: Deletes the iine of text in which the cursor is
residing.
8/86
c-+
Left Amow
Moves cursor to the left.
Right Arrow
Moves cursor to the right.
Up Arrow
Moves cursor up.
Down Arrow
Moves cursor down.
Home
Moves eursor to the beginningof the line of text.
End
Moves cursor one space to the right of the last character on
the line,
PgUp
Brings up the previouspage of text.
PgDn
Brings up the next page of text.
Del
Deletes the character at the present cursor position. AII
characters to the right of the cursor move one place to the
left.
Ins
Allows characters to be inserted aheadof the cursor. Press
the key again to return to normal operation.
Tab
Moves eursor to the next tab stop. Tabs are set every 8
spaces. Spaces,rather than tab eharacters,will be used in
the text.
Back Arrow
Backspacekey. Moves eursor to the previous character.
PROGRAMMING
A PROCEDURE
Accessingthe Editor
There are four possiblereasonsfor using the Editor; it is used either to
ereate a new file or to edit an existing one, and the file may be either a
procedure or a text file. Your intendedpurposeaffects the way in which
you enter the Editor.
-
To create a new file, either I procedureor a text file:
PressF2.
Check the display at the bottom of the sereen to see whether the
compiler is ON or OFF. PressFZ and use the commandsmenu to
change the ON/OFF status, if necessary.
PressEnter.
8/86
-
To edit an existing text filel
PressF2.
PressF 7.
Highlight Load from Disk; when prompted, give the filename.
PressEnter.
If the compiler is on, use the commandsmenu to turn it off'
-
To edit an existing procedurefile:
PressF2.
PressF 7.
Highlight Load from Disk; when prompted, give the filename.
PressEnter.
If the compiler is off, turn it on,
Editinga Procedure
The section which follows directs you to accessthe PERL Editor, type in a
sampleprocedure,and then modify it using the Editor commands. Doing so
wili allow you to experiencethe editing processfor yourself.
1)
Using the proceduregiven above for entering the Editor to create a new
proeedure,accessthe PERL Editor.
2)
TVpe the following procedure,one line at a time' pressingEnter after
each line. You can type in upper case, lower case, or mixed cases.
If you make an error before pressingEnter, you can baekspaceto
correct it. If you press Enter before correcting the error, use the
procedurein (3), on the next page, to correct it.
Note: Line numbers are included for convenieneein the following
tilE-ussion. They are not usedin PERL procedures.
1
2
3
4
5
6
7
8
I
10
11
12
procedure mix_samp
above_mixer
turn_on_mixer
down_Scm
openjripper
up_3cm
set timer 1 for 30 seeonds
turn_off_mixer
down_3cm
close3ripper
above-_mixer
end procedure
8/86
5-6
3)
To changethe 3cm distancein lines 6 and 9 to 2cm:
a)
Use the arrow keys to move the cursor to the 3 in iine 6.
b)
Pressthe DeI key. The 3 will be deleted.
c)
Pressthe Ins key and type 2. A 2 will be inserted. PressIns again
to turn off the insert function.
d)
Repeat steps a-c for line 9.
4)
Use the same procedureas in step 3 to changethe 30 in line 7 to 15.
5)
To insert a I'wait for timerrrstatementafter Iine 7:
a)
Place the cursor in line 8.
b)
Pressthe F9 (Insert Line) function key. A blank line will appear
above line 8.
c)
Nlovethe cursor to the blank line and type
wait for timer 1 Enter
6)
To changethe i'above_mixerficommandsin lines 2 and 11 to
ttover_mixertt:
a)
Pressthe FZ (Edit Commands)function key to bring up the Edit
Commandsmenu,
b)
Highlight "ChangeStringr',and press Enter.
c)
In responseto the prompts whieh will appear, type
String to Change: above_mker
Replace with: over mixer
Note: It is a good idea to give the longest possiblestring to be
changed. If, in the example above, you had typed only "above" to
be changed,commandssuch as I'above rack" or "above tubet'
would aiso have been changedthrough6utyour proceduie.
7)
To move lines 4-6 so that tbey follow line 2:
a)
Place the cursor at the beginningof line 4. PressF7 to bring up
the Edit Commands.Highlight"NlarkBloek'r,and pressEnter.
b)
Repeatstep a, placingthe cursorat the end of line 6. Lines 4-6
will be marked.
5-7
c)
Niovethe cursor to the beginningof line 3. PressF7 and highlight
'tPasteBlockr'. PressEnter. The marked lines will be inserted
ahead of the cursor,
d)
PressF? and highlight'rCutBlockrr.The markedlines will be
deletedfrom their original location.
The procedureshouldnow appear similar to the following:
procedure mix_samp
over mixer
down-5cm
open_grlpper
up_2cm
turn on m ixer
set tJme-r1 for 15 seconds
wait for timer 1
turn_off_mixer
down zcm
elose-gripper
over mixer
end proce:dure
You could save the procedureby highlighting "Save on Disk" on the Edit
Commandsmenu. (If you saveit, be sure to delete it afterward. To use the
DOScommandERASE,see Appendix2.)
Note: Procedurenames,which you assignin the first line of
IEElrocedure, ean contain no more than 8 characters. If more
than 8 characters are present,you will receive the message
Procedurename exceeds8 characters
whenyou attempt to save the procedure.
Editinga Text File
The editing processis exactly the same for a text file as for a procedure,
except that there is no automaticcompilation.
Whenyou create a new text file, each record in the file shouldbe typed on a
separate line. You might, for example, type a list of identifying
alphanumericinformationto be printed with eachsamplenumberas the
samDlesare orocessed.
5-8
A text file generatedby a running procedurecould contain sample weights
and other quantitative information. You could call the file into the editor
to make annotations,then print it using the "print" commandon the Edit
Commandsmenu.
Text files are savedby selecting "Save on Disk'and entering a file name
when prompted. The compiler shouldbe off.
Leavingthe Editor
Use the F8 (Bkup) function key to leave the Editor and return to the PERL
Main Menu Screen.
Whenyou press F8, the screen will ask if you want to save your file. If you
have already saved it, press Enter. If you have not, pressy; the file wiII be
saved(and compiled, if the compiier is on),
8/86
CREATING
AN APPLICATIONS
PROGRAM
Section
6
Page
CBBATING AN APPLICATIONS PROGRAT
P L A N N I N GT H E P R O C E D U R E. . . .
6-1
6-2
Defining the Task
6-2
Identifying the Procedures Needed .
6-2
PlanningNew Procedures.....
6-3
C R B A T I N GT H E P R O C E D U R E. . . .
6-6
T e a c h i n gN e w C o m m a n d s. . . . . . .
6-6
Writing Procedures ..
6-6
Writing the Final Procedure .....
6-7
THE LIBRARY FACILITY
SOMESAMPLEPROCEDURES
6-9
6-10
Getting Tubes from a Rack and Returning Them ......
6-11
Using the Mastersyringe
6-t2
Performing a Dilution
Dispensing Liquids ..
Using a Syringe Variable
6-12
6-L2
6-13
Mixing .
6-14
Crimping
6-15
Weighing
6-16
CREATING
AN APPLICATIONS
PROGRAM
The first two parts of this section will take you through the processof
planningand writing a PERL applicationsprogram(calleda procedure).The
planning is as important as the writing. Nianyof the statements in the
proceduresyou write will be commandsyou create with the Teach
Programs. This teachingis the most time-consuming
part of robotics
programming, and you will greatly improve your efficiency if you first
invest time in earefully analyzingyour proceduresto determine the
commandsyou needto teach.
Two placesin this manualeontainsamplePERL procedureswhiehyou may
be able to adapt to your own application:
*
At the end of Section 6 are proceduresfor carrying out the tasks of
eachof the major modulesof the Masterlab System.
+
In Appendix4 is an extensiveprocedurewhich integratesmany
featuresof PERL and makesuseof severalsubprocedures.
The examplesgiven in this manualare concernedwith applicationswhich
specificaliyinvolverobotics. If you wish to create PERL programswhieh
manageyour data files, processyour data, or are concernedwith
input/output,the PERL statementsin Section4 are availableto you. These
statementsare similar to BASIC,and a BASIC textbookwill providehelp
shouldyou need it,
The data files which you may accumulate on disk while using the Niasterlab
System can also be processedby third-party software of your choice. You
can not accesssuchsoftware from PERL. however, To leave PERL and
return to DOS, type system while the PERL prompt is displayed. From DOS,
load and use third?arty software as directed in the manual for that
software.
6-2
THE PROCEDURE
PLANNING
Definingthe Task
In general, the planningstage of PERL programmingconsistsof analyzing
the task the Masterlab System is to perform, and determining the individual
steps in the task. You need to consider:
-
What is the overall task to be performed?
What are the smaller tasks involved in the overall task? These will
each be directed by a procedurewithin the final procedure.
Important: A PERL procedure may be run from within another
PEIRLproceduresimply by using its name as a statement line.
Thus a given procedure may function either as an independent
program or as a subroutine. The term 'rprocedure"will be used to
cover both instances.
-
What are the individual steps in the tasks, and whieh module
carries out each step? These are the commandswhich you will
need to create with the Teach Programsand use in vour
procedures.
As an example, the rest of this "Planning the Procedure"section will take
you through the steps in planningthe procedurefor a gas chromatography
sample preparation. The overall tssk is to dilute 0,2 ml of each sample with
1.8 mI of solvent, place 1 mI 8-liquotsof the diluted samplesin vials, seal the
via-ls,and place them in an autosampler. Your first planningstep is to
identify the smaller tasks in this operation.
Needed
ldentifyingthe Procedures
In order to carry out the overall task defined in the last section, the system
wiII have to perform the following tasks for each sample vial:
1.
2,
3.
4,
5,
6.
7.
8.
The robot gets a test tube of sample and brings it to the syringe.
The syringe draws in 1.8 mI solvent and 0.2 ml sample.
The robot returns the sampletube to the rack.
The robot picks up an empty test tube from another rack.
The robot takes the test tube to the syringe dispensingstand.
The syringe adds 0.2 ml of sample and 1.8 ml of solvent to the
tube.
The robot takes the test tube to the mixer.
The mixer mixes the test tube contents.
6-3
9.
10.
11.
72,
13.
14.
15.
16.
77.
The robot retrieves the tube from the mixer.
The robot takes the tube to the dispensingstand,where 1 mi of
diluted sampleis w ithdrawn.
The robot returns the test tube to its rack.
The robot picks up a samplevial and cap from the vial rack.
The robot takes the vial to the crimper, where the cap is Ieft at
the vacuum station,
The robot takes the vial to the dispensingstand, where the 1 ml
aliquot is dispensed.
The robot takes the vial to the vacuumstation and retrievesthe
cap.
The crimper sealsthe vial.
The robot places the vial in the autosampler.
It is wise at this point to eompareyour Iist of taskswith the Iist of existing
proceduresin your PERL Directory. (Use the F4 funetion key to display the
Directory.) In the caseof the exampleabove,assumethat your Directory
aheady lists proceduresfor such standard tasks as:
ta sk
task #
procedurename
mixing
leavingvial cap at
vacuumstation
7 , 8 , a n d9
mix_samp
12 and 13
15 and 16
crmp_vil
placing vials in
autosampler
dispensingliquids
(syringeplunger
to 0.0 ml)
77
5 and 6;
also 14
autosam
disp_Iiq
You would be able to use these procedureswithin your final procedure
without change, Your planning can now focus on programming for tasks 1
through4, 10, and 11.
PlanningNew Procedures
We assumedthat there were six tasksin the aboveexamplewhich were not
programmedin existing proeedures. You couid combine these into two
procedures,one for tasks 1 through 4, one for tasks 10 and 11. Since both
proceduresare concernedwith filling the syringe, after you write one of
them, you can modify it to form the other.
tasks 1 through 4 - fill syringe: This procedurewill load the syringe with the
recuiredamountsof samoleand solventfor one viai. You could name it
"f ill_syr "
6-4
The steps involved in loading the syringe are:
1.
2.
3.
4.
5.
6.
The robot picks up a test tube of sample from the rack.
The robot brings the sample tube to the dispensingstand.
The syringe draws in 1.8 ml of solvent and 0.1 ml of air.
The test tube of sample is raised around the dispensing probe.
The syringe draws in 0.2 mI of sample,
The robot returns the test tube of sample to the rack.
In procedures involving the syringe, it is advisable to keep the syringe itself
and its valves filled with solvent. Other fluids should be drawn into the
dispensing tube, and then dispensedfrom that seme tube, without having
them pass through the valve or into the syringe, Different fluids should be
separatedin the tubing by drawing in a bubble of air between them. (See
Figure 6-1.)
DiA.,|3trE
ruftE
fvbe
Solv€rt
Alr
Fible
SomDl€
F igure 6-1 - V al\)e positions during Syringe Operation
In programming steps 1 and 6, assumethat the robot Teach Program module
called I'Define a Rack" would have been used when the test tube rack was
first installed in the system. (See Section 3 of this manual.) If the rack was
named 'rsample'r,the robot can be directed to get a tube from the rack by
using the command
sample i
where i is the number of the location of a partieular tube in the rack.
Similarly, returning the tube to the rack is aecomplishedby the command
sample i back
6-5
To program the rest of "fill-syr", you will need the following eommands:
to take the test tube to the
dispensingstand -
under-disP
to draw solventand air into the syringewith valve in input position,move
plunger to 1.8 mI
wittivalve in output position, move
plunger to 1.9 ml
to raise the tube of sample -
fill 1.8 solvnt
fill-0'l_air
a!-dispenser
to draw sampleinto the syringewith valve in output position,move
plungerfrom 1.9 to 2.1 ml
to lower the sample test tube -
fill_0.2_sample
under_disp
Note: In aetual praetice,you shouldteach the robot several(at
and
least 2) intermediatepositionsbetween"under_disp"
"at disp". Otherwise,the robot hand will describean arc
betweenthesetwo extremepositions,and the test tube may
knock against and bend the dispensingprobe,
tasks 10 and 11 - take an aliquot of sample: This procedure (called
t tfrat
it wiII not need to begin with picking up a tube
no solvent will be drawn in, although an air bubble will be
there will be 1.0 mi of sampledrawn in, not 0.2
the rack to which the tube is returned will be called rrempties'l
To program aiiquot you will need to create the following additional
commands:
to draw air and sample into the syringe with the valve in output position,
move the plungerfrom 0.0 to 0.1 ml
make bubble
with the valve in output position,
move the plungerfrom 0.1 to 1.1 mI
fill_l_ml
The planningprocessis complete, You havea list of existingprocedures
which you can use,and a list of commandsyou must create before you can
program the new proeeduresyou need.
6-6
THE PROCEDURE
CREATING
TeachingNew Gommands
Use the robot Teach Program and the syringe Teach Program to create the
new commandsyou have listed whichyou will need in your procedure.
Detailed instructions for using the Teach Programsare in Section 3 of this
manual.
WritingProcedures
You will write each PERL procedureas an independent
programby meansof
the PERL Editor. Be sureyou familiarizeyourself with the use of the
Editor by carrying out the procedure in Section 5 of this manual.
Onceyou have usedthe TeachProgramsto create all the commandsyou will
need for your overall procedure, write your new proceduresas follows:
1)
From the PERL main menu,pressthe F2 (Edit) functionkey to enter
the Editor. If the Edit Commandsmenu is not displayed,pressF7.
2)
If the compiler is not on, highlight "compiler on" in the menu, and press
Enter.
3)
Type the first line of the procedure,which shouldbe a "procedure"
statement:
procedure fill_syr
Note that the name given to the proceduredoesnot exceed8
characters.
4)
Type the commandsneededin your procedure,as you planned. Put one
commandon each line, pressingEnter after eaeh,
5)
The last line of the "fill_syr" procedureshouldbe "end procedure". The
procedureshouldnow be similar to the following:
o-t
procedure f ill_syr
sample i
fill 1.8 solvnt
f ill-0,1-air
undtr_d-isp
at_dispenser
fill_0.2_sample
under_disp
samplei back
anrl
7)
nrnaorlr
rr e
Look over the program for places where statements from Section 4 are
needed. For example, it would save time in executing the program if
the syringe filled with solvent while the robot gets the test tube,
I'Parallel' could be inserted before line 2, and "end parallel'r after line
?
8)
Insert appropriate rrremfistatements to identify the function of the
program and to explain any ambiguousstatements. The final procedure
will be similar to the following:
procedure fill_syr
rem Procedurefills dispenserwith 1.8 ml solvent,0.2 ml sample,
rem separatedby 0.1 ml air.
rem
Parallel
sample i
fill 1.8 solvnt
end para-IleIfill 0.1 air
under-dlsp
at dispenser
filT 0.2 sampte
undGr_d-isp
sample i back
end procedure
9)
10)
Saveyour procedureby hightighting i'Saveon Diskrron the Edit
Commandsmenuand pressingEnter.
Repeatsteps1 - 9 for all other procedures,suehas "aliquot", which you
have to create for your program.
Writingthe FinalProcedure
Writing the final procedure is similar to writing the shorter proceduresit
will use,except that most of the statementsin the overall procedurewiII be
namesof other proceduresto be executed.
6-8
It is advisable,where possible,to run the proceduresindividually before
incorporating them into the overall procedure, to be sure that they work as
you intended.
Whenyou have written and tested aII your procedures,write the main
procedureas follows:
1)
From the PERL main menu,pressthe F2 (Edit) functionkey to enter
the Editor. If the Edit Commandsmenuis not displayed,pressF7,
2)
If the compiler is not on, highlight'rcompileronrrinthe menu,and press
Enter.
3)
Type the first line of the procedure, which shouldbe a 'rprocedure'l
statement!
proceduregc_prep
4)
Type the commandsand procedurenamesneededin your procedure,as
you planned. Put one commandon eaeh line, pressingEnter after each.
5)
The last line of "gc_prep"shouldbe "end procedure". The procedure at
this stage shouldbe similar to the following:
^r^.6d
I rFA
6'
v'"v
{iu_sy.r
clsD r10
mrx samD
aliquot
park_cap
disp_liq
crmp_vil
autosam
end procedure
6)
Look over the procedure for plaees where BASIC-like statements from
Section 4 are needed. The procedureabove, as it stands,would only
perform the procedureonce. You must insert a "for...next" loop to
repeat the procedure for the number of samplesyou have, 40 for
example.
7)
Insert appropriate "rem" statements to identify the function of the
proeedureand to expiain any ambiguousstatements. The final
procedure will be similar to the following:
6-9
proceouregejrep
rem Dilutes 0.2 mI samplewith 1.8 ml solvent
rem Takes 1 ml aliquot to autosampler
rem
fori=1to40
f ill_syr
disP-liq
mix_samp
aliquot
Park-caP
disp_Iiq
crmp_vi1
autosam
next i
end procedure
8)
Save your procedureby highlighting 'rsaveon Diskrron the Edit
Commandsmenuand pressingEnter.
9)
Use the F8 (Bkup)key to leave the Editor.
10)
Test your procedureby running it. To do this, from the PERL main
sereentype its name and press Enter, or press F1 (Run) and enter the
name.
11)
Whenyour procedure is running correctly, link the neededsubprocedufes to the main procedureby using thetrlink[ eommand;for example:
link gcgep
This will create a file (in this case, "gcjrep.lnk") whieh has priority of
execution over the correspondingcompiled file ("gc1>rep.cmp),and
which will execute more rapidly becausethe linking is already done.
However, if you want to changea procedureafter it has been linked,
you must either delete the lnk file from disk, or execute the r'link"
commandagain to overwrite the existing lnk file.
THE LIBRARYFACILITY
A major PERL procedureusesa number of other proceduresas it runs. If
the system loads each of these proceduresfrom disk as it is needed,
considerablerun-time is devoted to waiting for proceduresto load. You can
avoid this problem by using the rrlibrary'rfacility, as follows.
1)
Use the Editor to create a file which contains aII the proceduresyou
will need in your overall procedure. Do this by loading them into the
Editor in sequence. The system will use the name of the first procedure
you load as the library name.
8/86
6-10
procedure fill_syr
end procedure
proceduredisp_liq
anrl
nrnnari
rr t ' o
proeeduremix_samp
e tc.
2)
Create a procedurefor loadingthe fiie created in (1), above. Give it a
name (for example,"gc_libr"). It will use the rrlibraryrrcommand
and be
similar to the following:
nnnaazlr
rra
ra
I ihr
iibrary fill_syr
anrl
3)
nnnaaz
rra
In your final PERL procedure,similar to "gcjrep", insert a line near
the beginningwhich executesthe procedure from (2), above, loading ali
the proceduresneeded:
ge_libr
SOMESAMPLEPROCEDURES
This section contains examplesof procedureswhich perform some of the
commonprocedurescarried out by modulesof the NlasterlabSystem.
Although you will have to modify them for your particul,arpurposes,they
may saveyou someprogrammingtime.
Important: Except for a rare coincidence,the Directory in your
system will not contain the user-createdcommandsin these
procedures. Be sure you use the Teach Programs to ereate such
commandsbefore you attempt to use them.
O-T T
GettingTubesfrom a Rackand ReturningThem
TherrDefine a R&ckrtoptionof the robot Teach Program shouldbe used to
name and describeeach rack in your system, The sampie procedureswhich
follow in this section wiII assumea system which contains a 40-tube rack
called rrsamplerr,
a 40-tube rack called rremptiesrr,
and a 40-tube vial rack
ealled'rvia|r.
The format of the commandto eet a tube from a rack is
rackname i
where i is the number of the location of the tube in the rack. (SeeSection 3
on defining a rack.) To return the tube, the format is
rackname i baek
Thus, to take the third tube from 'rempties and then replace it, the
eommandswould be
empties 3
empties 3 back
Figure
6-2 - Getting
a Tube from a Rdck
6-72
To position the robot hand above a location in the rack (for example,
location 5 ). the command would be
emDties5 over
Usingthe MasterSyringe
Performing Dilutions
The following proceduredraws in 1 ml of soivent and 0.5 ml of sample,
separatedby a 0.1 mI air bubble. (Refer to the discussionof the "fill_syr"
procedureunder "PlanningNew Procedures,or to the MasterSyringemanual,
for an explanationof the dilution procedure.) The entire 1.6 mI couid then
procedure,below.
be dispensedby the trdispense_liqrr
proceduredil samp
fori=1to40
sample i
f iil 1mI solvnt
fil 0.1 ;ir
und?r_d-isp
rem intermediatepositionsas tube is raised
mid disoenser1
mid disoenser 2
at dispenser
fiil_0.5 sample
rem intermediatepositionsas tube is lowered
mid_dispenser_2
m id_dispenser_1
under disD
samplEi back
next i
end procedure
Dipensing Liquids
This procedureassumesthat liquid has been drawn into the syringe (i.e. the
plunger is not at zero). The robot gets a test tube, brings it to the
dispensingstand, and raises it (in 3 steps)around the dispensingprobe. The
syringe plunger returns to zero, the test tube is lowered, and the tube is
returned to its rack. Notice that the procedure must give the syringe about
5 secondsof time wheneverit has to fill or emotv,
o-lJ
proceduredispense
fori=1to40
emptiesi
under_disp
mid dispenserI
mid-dis-pense-2
at dispenser
zerojlunger
set timer 1 for 5 seconds
wait for timer 1
m id_dispenser_2
mirl
riicnancor
1
under_disp
6mntiac
i hr.k
next i
end procedure
Using a Syringe Variable
A syringe variable is a variable name which you store in the PERL directory
by meansof the syringe Teach Program. It becomesa reserved word, whose
only permitted use in programs is to stand for a syringe plunger position
parameter(i.e,, a volume).
The procedurewhich follows assumesthat you have named and stored a
syringe variable called "syr_l_vol', The procedure fiils syringe_l with 5 ml
0,2 ml of that liquid to eachof 25 test tubes. If the
of liquid, then dispenses
tube numbers(1 to 25) are representedby i, then you must define a variable
("a", for example)such that
a=5.00-0.2*i
Then your syringe variable, syr_l_vol, would be equal to a. The PERL
syntax for this is
syr_l_vol a
Those two lines would be used in a proceduresimilar to the one below. They
cause the syringe plunger to be depressed0.2 ml farther each time the loop
in the procedure is executed, thus dispensingthe reagent.
procedureuse_var
valve_input
fill_syr_5 ml
valve_output
fori=1to25
samplei
under_disp
mid_dispenser_1
rl r\l_u rJPv||Jsr
at dispenser
z
6-14
a=5.00-0.2*i
syr_l_vol a
set timer 1 for 5 seconds
wait for timer 1
mid dispenser 2
under_disp
sample i back
next i
and
hr^^a.r'
".a
Note that you can define the value of syr_l_vol by other expressionsin
other procedures,but the system will always interpret it as referring to a
syringe plunger position.
Mixing
Commandstaught by the device interface Teach Program turn the mixer on
and off. One of the PERL softwaretimers (seeSeetion48,2) times the
duration of mixing.
The subroutinebelow also assumesthat you usedtherrDefinea Rackrroption
of the robot Teach Program to teach the robot that the mixer is a rack
(named"mixer'r) having 1 column and 1 row. This allows you to use the raek
lrrand I'mixer1 back",
commandsrrmixer
Figure 6-3 - Mixing
6-15
procedure mix_samp
mixer 1 back
turn on mixer
set t-ime-i1 for 15 seconds
wait for timer 1
turn off - mixer
m ixe-r 1
end procedure
Crimping
When the robot is to use the crimper, it first gets a loosely cappedvial from
the vial rack and takes it to the vacuumdeviceon the crimper. The vacuum
removes the cap and retains it while the robot dispensesa sample into the
vial. The robot then retrieves the cap from the vacuum and places the vial
and the cap in the crimpingjaws for crimping.
An input to the device interface from the crimper lets the device interface
test whetherthe vacuumis on. If the vacuumdoesnot turn on, you can
program an alarm to sound.
In the following procedure, "pros_samt'stands for other procedureswhich
would be carried out after the cap is left at the vacuum.
procedure ermp_vil
fori=1to40
vial i
under vac
rem i-aisevial to vacuum
up_to_vac
turn on vac
rem-vaEuum is a variable to test whether vacuum rurns on
untii vacuum= 0
vacuum = vacon
if vacuum = 0 then
soundalarm
end if
end until
alarm_off
pros_sam
under vac
up_to-vac
turn off vac
o- L0
until vacuum= 1
vacuum = vacon
ifvacuum=1then
soundalar m
end if
end until
alarm off
underlaws
up_to jaws
crlmp
under_jaws
vial i back
next i
onri nrnned
rr r p
Weighing
Balanceshave one-waycommunieation;they output measuredmassesto the
SystemController. The only kind of balancecommandwhich can be issued
is a commandto the SystemControllerto accept this reading,
F igure 6-4 - l0eighing
o-1 I
A balance command, suehas "w eigh_sampler',causesthe measuredmass to
be output to the System Controller. The following procedure weighsa
sample, transfers the measuredmass to a variable called "mass", then
appendsmassto a file on disk.
procedurestor_wt
mass= get_weight
append massto mass_fiI$
elose mass_fi1$
end Drocedure
APPENDICES
Section
Pase
APPENDIX1 BRROBUEXIAGBS
At-l
APPENDIX2 USBPTIL
TX)SCOUMANDS ...
A?-L
LEAVING PERL, ACCESSINGDOS
a?-l
D O SC O M M A N D S. . . . .
Az-L
APPENDIX 3 CONTBOL CIIARACTBRS AI{D
TTIEIE PBRL ABBBBVIATIONS .....
A3-1
APPENDIX 4 SAIIIPLBPBRL APPLICATION ...
A4-1
APPENDIX 5 PERL BESBRVBDIYORDS
A5-1
NBTBRBNCB GI'IDB TO PBRL
APPENDIX
1
ERRORMESSAGES
Invalid comn)and
Cornmandcannot be sent to the appropriate device
Invalid device name
Cannot resolve:
Insufficient memory lor this program
Syntax error has occurred
internal staek overflow has occurred
FOR stack overflow
WHILE stack overflow
UNTIL stack overflow
NEXT without a eorrespondingFOR
END !thILE without a WHILE
END UNTIL without an UNTIL
Invalid expression
luissingTHEN
0rissingEND IF
ELSE without a corresponaingI!
END IF without a correspondingIF
IOk without a corresponaingNEXT
lliissing ENir !! HILE
Missing ENIr IJNTIL
T'oomany liles open
Oannot open file
oannot close file
F ile not lound
Emor occurreo while reaoing fronr
Error occurred while writrng to
Subscriptout of range
Duplicete definition found
Mathematical error
A parameter quentity effor has occurree
APPENDIX
2
USEFULDOSCOMMANDS
L EAV I NGP E RL,A CC ES SIN GD O S
!!hen you wish to use IJOSconimands,you must leave the PERL
environment. There are two ways to oo this:
-
1o return to the DOS Operating System while keeping PERL in memory,
type dos ano press Enter. lou can then issue DOS commanos. hhen
you are ready to return to PERL, type perl ano press Enter. The PERL
screen reappearswithout the moduleshaving to be re-initializeo.
Note: Your system must have sufficient memory in order to be
able to use the DOS mode within PERL.
To abort PERL and return to DOS, type sJ6tem and press Enter, You
will then be able to issueDOS commandsand to loao other software.
DOSCOMMANDS
The commandsdiscussedbelow are DOS commanoswhich perlorm essential
housekeepingfunctions such as formatting end copying disks. lf you will be
doing any savingof programsand/or files on disk, you wil-l need these
comfirands. Be aware, however, that much more information is available to
you, about these and many other IJOScommands,in the ljisk Operating
Systernmanual.
A2-2
In the command formats which follow, parametersshown in square brackets
are optional. The parameter syrnbolizedby'rd:'r is the disk drive, and may
be entered in the commandline as either "A:" (the left drive) or "B:r' (the
right drive). You may have eopied one or more of these commandsonto
your PERL/DOS work disk. The others are on your DOS disk.
coPl
Oopiesa file to another (or the same) diskette. The new file
may be given a diflerent name.
Copy with the same filename:
UOPI Io:] filename Io:]
I1 the disk drives are not specifieo, the lile wili be copieo to
the current oirectory of the oefault orive. the source orive
and the target orive must be oitferent, since the new ano
olo fileng.mesare the same.
Example: COPI B:lvtlPHoG A:
Copy with a oifferent filename:
OOPY Id:] filename Io:j fiiename
If no drives are specified, the default drive is used. The
drives do not have to be different.
Example: COPI B:lVlYPRoGB:NEl!PROG
Copy and combine:
COPY Id:] filename+ [d:] filename Id:] [filename]
If no target filename is given, aU the specified files will be
placed in the first file named. Otherwise, the files are
concatenateciano plaeed in the target file.
Example: UOPI F'ILA + FILB + FILO BIGf ILE
DIShOOPI-
Oopresthe entire contents of the diskette in the source
qrrve
onto the oiskette in the target orive. The target oisk will be
tormattec, if necessary.
DISKoOPY Io:] [o:i [ /1j
A2-3
'Ihe first parameter is the souree <irive,the secondis the
target. If the /1 pararreter is useo,oniy the first side of the
diskette will be copied. If the two orives are the same' or il
none are specifieo, a single-arive copy rs perlorlned; you
will be prompted to insert appropriete olskettes &s needeo.
Af ter eopying is complete' ITIShUUPI asks
Oopy another (Y/N )?
If you answer Y, the next copy will be perlormeo using the
same drives as were speeified in the original command.
ERASE
-
Deletes a file from a diskette, DEL is an alternative torm
of the command.
ERASE Id!] filename
or
u-h], t o:l Ilrename
FORMAT -
Initializes the diskette in the designatedorive or the default
drive.
Caution: Formatting destroysall data on the oiskette.
F o R & r A rt d : l t / s l L / 1 1L / 8 1a / v l I / B J
The optional parameters of the FOhiviAT comnr&ndhave the
lollowing meanings:
/S
-
c&usesthe operating system liles to be placeo on
the new oisk.
/1
-
causesthe aisk to be formatteo only for singlesioed use.
/8
-
formats the oiskette for 8 sectors per track. (The
default is 9.)
/V
-
prompts you f or a volume label which will be
written on the disk to uniquely identify it.
Note: /8 and /V cannot both be entered at the same
Em;.
/B
-
ellows any system of DOS to be placed on the
diskette. Otherwise,only versions2,00or 2.10
may be placed on it,
Note: /V and /S cannot be usedwith /B
A2-4
Example: To format the disk in <iriveB for single-sideduse,
with a volunrenumber, enter
FORIVIATB:/l/V
The system dispiaysthe following messages
Insert new diskette for drive B:
and strike any key when ready
After you have carried out these instructions, the message
Formatting...
appears. llhen formatting is complete, the system prompts
Format complete
Volume label (11 character, ENTEITfor none)?
!!hen you have respondedto the prompt, the system will
oispiay
xxxxxx bytes total disk space
xxxxx bytes usedby system
xxxxxx bytes available on disk
Format another (Y/N )?
Enter Y to format another diskette, N to end the lormat
program.
A P P E ND I X3
SN D T H E I R
C O N T R O LC H A R A C T E RA
P E R LD E F I N I T I O N S
Character
Number
dec (hex)
g
1
2
3
5
6
7
8
q
Lg
11
72
74
-tc
q
1
2
3
4
5
o
7
8
I
A
B
L
D
E
F
16
rg
18
19
2g
27
22
23
24
12
l1
26
27
28
29
30
e1
32
727
l.t
74
15
lo
18
19
1B
1D
l-tr
1F
2g
3F
ASCII
Abbreviation
PERL
Abbreviation
< NU L >
<SOH>
<STX>
<ETX>
<EOT>
<ENQ>
<ACK>
< B EL >
<BS>
<H T >
<LF>
<VT>
<FF>
<C R >
NUL
SOH
STX
ETX
EOT
ENQ
ACK
BEL
BS
HT
LT
VT
FF
CR
SO
<so>
<SI>
<DLE>
<DC1>
<DC2>
<DC3>
<DC4>
< N AK >
< SY N >
< ET B >
<C A N >
<E NI>
< SU B >
< E SC >
<FS>
< GS>
<RS>
<US>
<SP>
<DEL>
DLE
DC1
DC2
DC3
DC4
NAK
SYN
ETB
CAN
E[T
SUB
ESC
FS
GS
RS
US
SP
DEL
8 /86
Alternate
Abbreviation
<C T R L A >
<C T R L B >
<C T R L C >
<C T R L D >
<C T R L E >
<C T R L F >
<C T R L G >
<C T R L H >
< CTRLI>
<C T R L J >
<C T R L K >
<C T R L L >
< cTRLlvi>
<C T R L N >
<CT RLO>
<C T R L P >
<c T R L Q >
<C T R L R >
<CTRLS >
<C T R L T >
<CTRLU>
< CTRLV >
<CTRLW>
<C T R L X >
<CTRLY>
<C T R L Z >
<BLAN K>
A P P E ND I X 4
S A M P L EP E R LA P P L I C A T I O N
M A I N P R O C E D U R ED: I S K I O
taEt
6xanple
lE of PERL'c
rcD Thl!
PSRL eppl lcation.
!€m turnL€y
reD
reD
rem
ren
r.cLl
ss
ho|l to
bulfd
a
to loop thlou8h
the liBI LE lool) untll
th6 EXIT
Set up the loop condltion
th€ o6nu.
Once th€ EXIT optlotr
ls rGlccted,
is rcl€ct€d
fron
option
"y"
have the value
.nd th6 I{HILE loop wLII ten0lBate.
EXIT-FLAG$ will
<>
"y"
plecc
on the scre€n
the title
of our proc€dure
Aftcr
the scr€en
Ls clcrred,
th€ tttle
be Ln
lrlth
! box drqxn around lt.
It
13 lDportant
that
centelcd
box r.Lll
use the v.lue
of titlei
the verlable
titlct
because the ploccdure
This ic an .xatBple of hon the
and draw the box for
the h6ader.
to ccnter
plocedule
that
Lt ls used
val.ue of the varlable
exists
b€yond thc culrent
1n,
tltl€t
rah
rs
dlsLlo
= 'n"
6xlt-fla8t
whlle
exlt-fla83
cl6ar
reD
r€ta
r6h
r€m
r€D
r6m
I,/O capablLitl€E
It builds
a E6nu
l! th€ bsln proc€dur€
of ou! rpplicatton,
Thls plocGdurc
to dr.8k or to read froB disk lthat
Day r€I6ct
to lfrlte
froE trblch the u!€!
r.hich 1. to EXIT frorn this
wlittet.
fh6!6
is a th1!d
optton
tras plevlously
procedu!6
and rGtuln
to PERL-
Droc6durc
lcn
rcm
rcD
disL
Drel'
the
curso!
displey
cu!!o!
display
culro!
dlsplay
:
"DISK
L/O
TESI
Denu
10,2?
'1 Be.d
11, 2?
"2 lfrltc
13,2?
"9 Exlt"
aDd display"
detr
to
d.t.flfc"
A4-2
!6b
the Dadu is
Nor. thrt
UNTIL loop tr us6d to
user to ante! a !, 2
ltao 1s cnt6r.d,
thc
r.D
rcn
rcn
rcn
ptoDDt the uaer to! the DeDu itcti
dre*n,
thc !,nput.
valldate
In othc! r,otds, tc
So
oE I and cvcltthlD8
clto lc lnvllld.
henu
for th6 dcllted
uler ls rc-proDpt.d
: 1 o! ocnu-LtoD!
bcnu_ltornl
uDtll
culco! 20,2?
"Enter'
D.nu lt€ro de!1r6d
Lnput
.nd untl I
reD A valid
Denu itcD
hls
bcan cniorcd,
= 2 ot Denu-It.o:
Thc
dacir.d.
only Fant th6
if an lDvalld
ltcn.
= I
: ",D.nu-itcD:
so now parforD
the lppropriato
Plocesc
lcb
lcb
r.n
16'|
!.n
!6D
FREADII{P
1 usca procedurc
nRITOUT
2 ur€r
Droccdu!€
Ll
9 rllf
the ulcr
ttloDpt
If th6y .!c
l)!.occdule.
bc rcdrartD.
elll
Ol)tlon
Option
Optlon
& dllPlay
to rcrd
t dlsk fl1c
fll€
to croatc
r disl
r.aDt
thrv
th.t
rrc
sule
they
axlt,
othorwlle
thcn 1t t tll
lts
codt.nts
to cxLt
thic
thc 6cr66n
b6nu-1tcDx
:
f!6!dlnp
l a 2 |
fnritout
is 9 :
l e s P : 0
resP : 1 o! !6sP - 2
untll
cufro!
23, 1
"A!e
Input
You 3ul6 (Y/n)";!6sPt
= "Y" then
if rcapt
lGsP = 1
: "Y"
6x1t-f1r8$
€l !e
= "n" th€n
lf
resPt
t ' s P : 2
cnd lf
cnd lf
.Dd uDtil
€nd case
6nd r.hi16
and l)roc6dur6
cale
16 I
SUBPROCEDURES
box
raD
r6tn
len
!6n
ren
lcE
rPPlLcation.
T116 header
procGdule
this
di6pLay6
th6 h€ador fo!
Thir
of th€ aPPllcation
around th€ tltl6
box drlwn
consist6
of a c€nt6t6d
uPon the size of thc titLe.
d.peddcDt
The rlz6
of the box i.r dirgctly
cannot
be accessed
tloo
the
thlt
shors
tho u66! chlract€r'E
This
axenplo
oct!|l
codes ln
by uslng thelr
lre
tcccs!€d
Th€se chtllactetB
h€yboard.
deteits.
turthe!
fo!
Se€ youti PERL use! Dalual
a strlnfi.
procedur€
!6D
!€B
leD
box
of th13 .PPllcltlon.
titlct
contalns
the tltlc
The vrriable
plocodure.
lfe itaDt to knor. the LcnSth
ls s€t by the invoklng
lt.
to be rble
to center
tltle
ln orde!
tltl€_sizel
= 16n ( tttleg
)
It's
of
value
th€
A4-3
retn lf€ calcuL.tc
rtart_co1t
:
the BtertLag
coluDn fo!
38 - lnt((tltt._Elzel
dr.r.ing
the bo)(.
/ 2) + .5)
teE
rert We bui.ld a striB8 of '\315"'8.
that
\315 ls th€ octaL code for . chalacte!
!6n ls us6d !s the strlL8ht
IiD6 ln ou! box.
It lE ectually
2 ps!'ellel
I1n6E.
rtraht-llnet:'\315\315\315\315\315\315\315\315\315\315\315\315\315\315
!6m
reb Thls liDe allows us to lncrease
rem concat€natlon
opelatlons.
th6 lcnath
of the strlng
by urlng
strlng
taeb
rtrght-llDet
= 5t!ght_1lnet+strght_1lnci+strght_ltnct+strght_11net
r6b Dtari the top of th6 bo)<. \311 ls the uppc!
rcD ls th6 upper r18ht co!n6! charact€r.
lctt
corDer chuacter
cursor 1, start-coLl
dlspl.sy \311 + left$(strght_I1n€3,t1tle_slz6x+2)
reD Drarr the titl6
li.n€ in the box,
ctrrso! 2, start_colX
" + title$
displey
\272
r6h
16r! Dlaw
rear \2?,t
!er|
of the
the bottoD
Is the IoF€r
flSht
cursor
dlsplay
reD
ren
Noll
the
3, start_col:
"\310"
+
thet
th6
Invoklng
tncludins
end \2?3
+ "\2?3'
(\272).
the box lln6s
+ " \272"
box. \310 ic the
corlte.
charactcr.
10r.61 lef!
the
procodule
charsctei
and
+ "\27{
]eftt(str'ght_llnet,tltl6_!iz€l+2)
box ls drewn,
ploc€dure.
corn€r
pellorros
an
lEpl.lclt
rctuln
to
end proc€dule
freadinp
lch
rcm
rcn
r6D
rGD
t€D
treadLnp.
It !6eds the contents
of e dLsk file
.nd dlsl)Thls is proc.du!6
to thc consol6.
The nlne of thc dlsk fil€
t5 TBSTFILE .nd lt
1r
Layg lt
thc ftle
nahe bay be
hardcodcd
ln our cxeDl)]cIt should be Dotcd that
ehos€ valu€
ua!06.
Thls ls loft
by . 6t!1DE vallabl.
16 the file
rcplec6d
ths readc!!s aa ercrclle
fo!
Drocedure
cI€er
freedj.Dp
60 that
the procodure
!€D Set th6 loop condltloD
th€ fil..
mr€n
r null(
rcm until
) ls r6rd fron
rem froD the 1oop.
rell
= " "
lnsli
rhi.l€
an!8 <>
lcad enst froE
dllplly
anst
etrd whlJ.e
"tsstfLl6"
w111 loop
e auII
lE
LD the liHIl,E loop
t€ad,
then exit
A4-4
rcIn
leD A null
hes becn reld
cIose "tcstfllc
lem
leE
len
!6n
!€b
rcn
r€b
so clore
th6 l1le.
"
Now thrt the ftle
is cLosed, rLlot| the usc! to vj.ew the screen for as
loag a! thcy llkc.
Thir ls .ccooplLlhcd
by plobptlng
th€ user for
input.
The input,
ln thls cere eny L6y, sl8:rlfles
the usel's deslre to
contlnuc ,lth
th€ procodurc.
In ou! cnmpla,
th€ proc€dur€ perlorEls aD
iDpllclt
retura to the Droccdurc that iDvokod lt.
dlsplay
"Plcss r kay to coatlouo..."
dlsphy
ai = Inleyi
cnd Daoccdule
fwritout
rFn
lcrn T}ls l)roc6dur6 DlollDtc tha u!c! fo! rt!1n8
lero Th6 dlsl
fllc
b!n. l! haldcodcd arttd lt c.n
rab Leble rhoc6 velue La the t1l,c Darc.
data eDd thcn l)l.rc6s it on dlst.
b. !.pl!c6d
rlth
a stling
var-
teD
I)rocodulc
cfcar
fnrltout
!6b
')
reb Set th€ coodltioa
for looplng thlough the I{BILE loop Ettll
a Dull(
ls
!€b anter.€d by the u!e!.
A DuII 1s .nt6!.d
by pr6s6ln8 thg R8TURN Ley at th6
rcD l)roEpt.
Thc DulI ls stoled LD th6 dist llle.
ra3t = "
nh1l.c anst <> ""
lnput "Ettc!
strlng to p1ac6 oD dilk
r.rit€ rnc$ to "testfl I€"
.nd Phile
r6b
rca
t6d
A
lull
closc
|ia!
olteled
!o
clos.
th6
date
: ",anst
flle
r.od
end
tha
Droc.dure.
"tcEtfi,l.6"
latt
r6h
!6n
Otrcc the
lDvoI(1Dg
cDd ploc6dure
file
is closcd,
p?ocodulc,
th.
proc€dure
pelforDs
an iDpllclt
retuln
to
th6
A P P E N D I X5
PERLRESERVED
WORDS
You can use the wordslisted below as part of command,variable,or
procedurenames,but not at the beginningof the name. For example,the
namerlbreakkey"is illegal,but I'keybreakt'islegal.
break
devices
lnKeys
nrinf
screen
until
case
display
month$
procedure
system
while
close
dos
open
readkey$
then
date$
else
paraliel
rem
time$
day$
if
perl
save
timer
The following words can form part of a variable,procedure,or command
name,but do not use them as namesexactly as written. For example,
I'appendi'is not a legal name, but !'appendlr'would
be legal.
append
eof
Iibrary
receive
speed
write
as
for
log
redirect
step
close
from
next
re w ind
to
cursor
init
output
send
use
def ine
lnput
r ead
set
wait
The charactersthat follow havespecific functionsin PERL. Do not use
them in a command,variable,or procedurename unlessyou intend then,
perform their functions.
l - + * / $ %^ & O \ < > " ? ' @= |
PERLSTATEMENTS
The number at th€ end of each definition is the psge wh€|e you will find detsiled
instructions for using the staternent,
Function
append (var)
to
Definition
Punction
Definition
( f ilenr.Be )
default
See ncasei. (4-32)
Adds tie voriable to the
end of the previouslyexisting sequential file
named. The filename
argrment may be an
expression. ({-.10)
See "define". (4-39)
TlansferE control out of a
loop. Conbol goes to the
next statement immediately toUowing the loop in
which tle "brealn occufs.
\4-37)
break
c a s e { e x p r ) i s ( c o n s t )i
( s t a t e m e n ! ). . .
defaul.t: (statenent) end case
Specifies which of several
actions will be taken, depending on the value of the
expfession, (4-32)
define
(var)
(port
nane)
Establishes tie bufter va. to
contain the se.ial input/output
of the named po.t. (4-39)
See ndisplay devices". (4-1?)
dev ice 6
diD
(var (i) )
display
d j.splay
dos
(desired
devices
I corunand or
Allocates memory fo. the
array var(i), 8nd specilies that
i is its largest subscript. A
variable may have up to three
dimensions. ({-36)
output )
Specifies and formats output
to the monitor. (4-24)
Displaysthe configurationsfor
all devices in the system
configuration file, (4-1?)
batchfile]
Returns control to the
opersting system. PERL
remains in memofy. (4-13)
Erases the monitoa screen.
14-24)
close
as
D
o
o
o
=
o
o
(ct
c
CL
o
-h
Closes tle robot grippefs.
({-1S)
down (&n)
Moves the robot down a
specified distancefrom its
present position. (4-18)
o
Closes th€ sequential tile
specified. The {ilename
aagument may De an
expression. (4-"10)
else
See "if'.
end Procedure
Statement which ends every
procedure and subroutine,
( 4 _1 1 )
!
111
eof
End-of-file function. checks
to see il the present record is
the last h the lile. (4-42)
(filenane)
continuous (robot po€itions) end
cont inuous
Movesthe robot through
the specifiedpositions
without stopping.(a-19)
cursor (b line no.), (v colunn no.)
Movesthe culsor to the
specifiedlocation on the
monitor screen. Line 9nd
colurnnnumbersmay be
expressions.({-2,1)
dates
Outputstie date to the
screen,or appendsit to a file.
(1-43)
day$
Outputsthe day of the week
to the screen,or appendsit to
I file, (4-"{3)
({-31)
to
for (var) = (expression)
(expression)
[step (express ion) ]
First line of a program
loop. (4-34)
fraln
See iredirectn ({-28) and
ireadrr(4-.t0).
(expression)
if
then (6t atehent )
I erse (€tatement)l eno rt
AUows different actions to
foUow, depending on
whether the expressionis
bue or not. (4-31)
-t
D
r
guideto PERL
Reference
The following alphabetical listing gives a format and a brief summary ofthe use of each PERL
function or statement. For complete descriptions, with examples, see the indicated pages in
Section 4 of this manual.
N U M E R I CF U N C T I O N S
ln using these functions, express all angles in rqdians, See page 4-5 for examples.
Function
Definition
Function
Defioition
abs(x)
Absolutevalue of x.
expl0 (x)
Exponentto base10;returns
l0 to the xt} power.
arccoE {x)
Arccosine, in radians,of x.
int (x)
Integer part of x. x i{iu be
truncated;to round,use
int(x + 0.5).
Natural logarithm of x.
arcsin
(x)
A.csine, ir radians,of x.
arctan
(x)
Arctangent, in radians,of
x.
L o g( x )
cos1x,
Cosine of x radians.
lo9l0
qsc(x)
Cosecant of x radians.
Ein(x)
Sineof x fadians.
cot{x)
Cotangent of x radians.
sqrt (x)
&uare root of x.
e x p( r )
Exponent; returns e to the
xur power.
tan (x)
Tangentof x radians.
(x)
Loga.ithm to base l0 oI x.
S T R I N GF U N C T I O N S
For examples of these lunctions, se€ pages,l-6 and 4-7 of this manual.
Function
Definition
Function
Definition
+
Concatenatestrings,
LeftS (x$ 'n)
Theleftn charactersin x$.
a6c(x$)
ASCIIcodefor first
characterof x$.
Ien (xS)
Lengthof string x$.
chrI (x)
Characterwith ASCIIcode
x.
nid$ (x$ ' i)
!rid$ (r$. i rn)
at
n cha.actersbeginning
positioni in xl,
x$ = inkey$
rS - readkeys
Pausesuntil a character is
input lrorn the keybo$d,
then sssEnslt to xt,
Acceptsa characterinput
Irom the keyboard'but does
not pauseif noneis input.
right$ (x9.n)
Therightmostn charactersin
x$.
str $(x)
String constrant represent-ug
the numeric value x.
val (x$)
Numefic value of string xS.
lnstr (rS,yS)
i n 6 t r ( n . r S , y S) r S .
The positionot the lst
gccurrenceof y$ in x$,
Moy beginse$ching at the
nth position.
PERLSTATEMENTS
lhe numberat th€ cnd of clch detinltion b thc pagerherc you xlll fild detailed
lnstructionslc usingthc stltcmcnL
Function
( d e vi c e )
init
inkeyS
input
Definition
Punction
Causes initislization of tle
device narned. ({-17)
procedure
Pauses to accept a character input from the keybo8rd. (4-28)
Ipronptl
(var i able )
Pauses until a variable is
input from the keyboard,
l4-25)
is
See "case'. (4-32)
Iibrary
Loads I previouslytreated
file containing all the subprocedures used in a main
p.ocedure. ({-15)
(p!oced ur e name)
ljnk
Definition
(nane)
Begins every procedure and
$broutine. (4-ll)
read
(var)
fron
Read the next reco.d from the
file into memory. The
filenarne argunent may be an
exp.ession. (4-{0)
readkeys
receive
Readsa character lrom tle
keybosrd buffer il 8 key has
been pressed. (4-29)
(var)
lo9
relative
(x,y,z,ptt,
nonth$
Outputsthe presentmonth
to th€ screen,or appendsit
to a tile. (4-"13)
next (va!)
Last line ol a programloop
which beginswiti 'lor". (,t-34)
oPen
Opensthe robot grippers. ({-18)
ren
(coltunent)
Returnscontrol to the
executingproceduresfter use
of the 'dos" command.(4-13)
pr int
pr int
Sendssubsequent
output to the
printer. (4-30)
acreen
Outputst}|e entire pfesent
contentsof the screento tie
printer. (4-30)
Beginsa comment. Use "rern"
at tle beginning of a line, or ',
I n to sppenda comment to the
eod of s iine. (4-11)
rewind (f i lename)
After reading or writing to
I file, return to the
beginning. (4-{0)
6ave
hfites the Directory in
memory to the disk file
PERL.DIR. (4-14)
5Cl een
See "p.int sc.een'r (4-30)
aend (var)
Writes the contents of
buffer var to a defined
serial poft. (4-39)
see iredirect'. (4-28)
per I
fron
Moves the robot .elative to its
present position. The
a.guments specify m in the x,
y, and z directions and degfees
ot pitch and rou. (4-18)
(dest i nat ion)
Createsa file on disk
which will containevefything sent to the scleen. 4-16)
(devjce) 9! to (device)
Changes the standafd input or
output device until the next
redirect statement. (4-28)
input
(2-r8)
Reads the PERL Di|ectory
from disk, and makes a
backup copy in the file
PERL.BAK. (4-14)
Readsfrom a delined serial
port into the buffer named
va!. (4-39)
redirect
Links all tle subprocedues
used in a main procedure.
Ioad
(f ilena.De)
(no. ) for (quantity
6et tiner
(type of t i m e )
tine)
of
Sets one of the l0 software
timers, (4-20)
PERLSTATEMENTS
The number ot the cnd ot clch definltion b ihe pagc xhqc you rlll
inst uctions fo. using the rtatemGnL
Functioh
Definition
6peed ( integer
or
flnd detailed
Function
variabLe)
Definition
(digtance)
up
Move the.obot up frorn its
pfesent position a specified
distarce. (4-18)
Sets tle speed of the
robot; 0 is slo*est, 9 is
fastest. (4-19)
use (device
step
See "for'. (4-34)
6 tOp
Aborts procedure
execution and returns to
the DCP. (4-14)
6 us p e n d
Halts procedureexecution
until you either continue
(I8) or abort (F?), (a-1a1
6ys t etn
Retu.ns control to the
operatlng system; abof ts
PERL. (4-14)
the n
See iil''. (4-31)
Outputs the p.esent time of
dsy to the screen,of appends
it to a file. (4-.13)
t ime!
See tset timef". (4-20)
to
See ifor'
until
un t i.I
(conditi.on)
(4-34)
(statehents)
=
equal to
<
<:
>
>:
AND
OR
NOT
less than
less than or equal to
gTeaterthan
greater than or equal to
l o g i c a lA N D
losical OR
lo;ical NOT
eait
for
( n u m b e r)
tir|er
$ait tor the time set on the
specified timer to elapse,
(4-20)
wbile
trhiLe
erite
(condition)
(vrr)
to
(statements)
end
Carry out the statehents as
long as tie condjtion is lrue.
(4-22)
(fj.lenahe )
pl,aces the vafiable in
the new
aequentialfile named. The
filensme argument may be an
expression, (4-.{0)
5ignals I conrment appended
to a tine. See ,rem'. (4_12)
end
RELATIONAL
AND LOGICAL
OPERATORS
ODeration
TeIs which of two similar
modules (e.g. robots) is to be
used. (4-12)
i
Cany out the statements until
the condition is true. ({_22)
Operator
n a t n e)
\ (code for
char ac ter )
Accesses tie IBtt pC
character set. (4_26)
ARITHMETIC
OPERATORS
Opersiion
Addition
Subtraction
Multiplicstion
Divjsion
Modulus
Negation
Operator
+
.
/
@
--
Expressjon
aio
a-b
a.b
a/b
a@b
-a