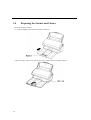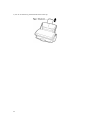
1
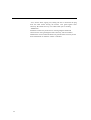
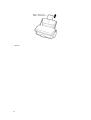
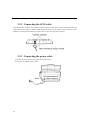
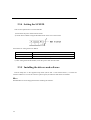
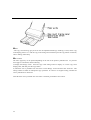
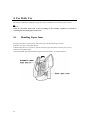
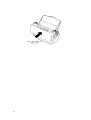
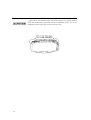
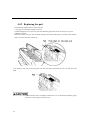
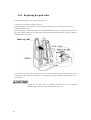
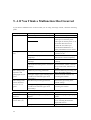
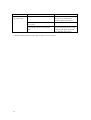
M3091DC
Image Scanner User' Guide
ÿ
Notice to American
Users
Federal Communications Commission
Radio Frequency Interference Statement
Notice: This equipment has been tested and found to comply with the limits for a
Class B digital device, pursuant to Part 15 of FCC Rules. These limits are
designed to provide reasonable protection against harmful interference in a
residential installation. This equipment generates, uses, and can radiate radio
frequency energy and, if not installed and used in accordance with the
instructions, may cause harmful interference to radio communications. However,
there is no guarantee that interference will not occur in a particular installation. If
this equipment does cause harmful interference to radio or television reception,
which can be determined by turning the equipment off and on, the user is
encouraged to try to correct the interference by one or more of the following
measures:
• Reorient or relocate the receiving antenna.
• Increase the separation between the equipment and receiver.
• Connect the equipment into an outlet on a circuit different from that to which
the receiver is connected.
• Consult the dealer or an experienced radio/TV technician for help.
FCC warning: Changes or modifications not expressly approved by the party
responsible for compliance could void the user's authority to operate the
equipment.
Notes
• The use of a non-shielded interface cable with the referenced device is
prohibited. The length of the parallel interface cable must be 3 meters (10 feet)
or less. The length of the serial interface cable must be 15 meters (50 feet) or
less.
• The length of the power cord must be 3 meters (10 feet) or less.
Notice to Canadian
Users
This digital apparatus does not exceed the class B limits for radio noise emissions
from digital apparatus set out in the Radio Interference Regulations of the
Canadian Department of Communications.
Le présent appareil numériqué n'émet pas de bruits radioélectnques dépassant les
limites applicables aux appareils numériques de la classe B prescrites dans le
Règlement sur le brouillage radioélectrique édicté par le ministère des
Comunications du Canada.
Notice to German
Users
Bescheinigung des Herstellers/Importeurs
Hiermit wird bescheinigt, daß der/dieldas
• M3091DC in Übereinsstimmung mit den Bestimmungen der
• AmtsblVfg 243/1991 funk-entstört ist. Der Deutschen Bundesport wurde das
inverkehrbringen dieses Gerätes angezeigt und die Berechtigung zur
Überprüfung der Serie auf Einhaltung der Bestimmungen eingeräumt.
•Maschinenlärminformationsverordnung 3. GS GV, 18.01.1991:
Der höchste Schalldruckpegel beträgt 70 dB (A) order weniger gemäß ISO
/7779.
The contents of this manual may be revised without prior notice and without
obligation to incorporate changes and improvements into units already shipped.
Every effort has been made to ensure that the information included here is
complete and accurate at the time of publication, but Fujitsu cannot be held
responsible for errors and omissions.
Copyright © 1995,1996,1997 Fujitsu Limited
Printed in Japan. All rights reserved. No part of this manual may be reproduced or
translated, stored in a database or retrieval system, or transmitted, in any form or
by any means, electronic, mechanical, photocopying, recording, or otherwise,
without the prior written permission of the Fujitsu Limited.
C150-E???-??EN, ??? 1998
Trademark Acknowledgment
Fujitsu are registered trademarks of Fujitsu Limited.
Safe Operation
About this user's guide
This user's guide contains important information about using the M3091DC safely. Read this guide
thoroughly before using the M3091DC. Do not use the M3091DC until you have read and thoroughly
understood the section "Precautions for Safety." Keep this manual in a safe place as long as you use the
M3091DC.
Preface
Thank you for purchasing the M3091DC image scanner. The M3091DC image scanner reads high-color
images. This user's guide explains the basic methods for using the scanner. Read the guide carefully so
that you will use the scanner correctly.
In this manual, we abbreviate "Microsoft® Windows NT® operating system" to "Windows NT®" and
"Microsoft ® Windows ® 95 operating system" to "Windows ® 95."
Microsoft, Windows, and Windows NT are registered trademarks of Microsoft Corporation in the United
States and other countries.
Other company names and product names are trademarks or registered trademarks of their respective
owners.
FUJITSU's
Information
Liability
and
Other
Important
The user assumes all responsibility for the use of the scanner unit, software used by the scanner, and this
manual, all of which are provided as the M3091DC product.
FUJITSU takes no responsibility for any damage or data loss caused by the use of the M3091DC.
Any compensation for damage caused by the M3091DC will in no event exceed the price paid by the
user for the M3091DC.
Software contained in the M3091DC and update software provided by FUJITSU for the M3091DC must
only be used in the M3091DC. Modification or disassembly of the software is not allowed.
Message Conventions
Alert Messages Conventions
This manual uses alert messages to protect users and other persons in the vicinity of the scanner from
personal injury and property damage. An alert message consists of an alert signal and alert text. The
alert signal consists either of an alert symbol and a signal word or of simply a signal word.
Indicates a hazardous situation that could result in personal injury if the user
does not perform the procedure correctly.
Indicates a hazardous situation could result in minor or moderate personal injury
if the user does not perform the procedure correctly. This alert signal also
indicates potential damage to the product or other property if the user does not
perform the procedure correctly.
The following alert indications are used in this manual together with those
above to indicate a specific hazard.
indicates a warning or an action requiring caution. The symbol in the
triangle indicates the type of hazard (in the example, electric shock).
indicates actions that are prohibited. An image inside the symbol or text
above it provides more concrete information in the example, disassembly is
prohibited).
indicates an action that must be complied with. An image inside the circle or
text above it provides more concrete information (in the example, the
information is to always remove the power plug from the outlet).
Safety Precautions
The following provides important information about the M3091DC. Be sure to comply with this
information to ensure that you use the M3091DC in a safe manner.
Precautions regarding power
-
-
-
-
-
Insert the AC adapter only in a 110 VAC outlet rated at 15 A. Do not use a
multiple receptacle plug. Disregarding these precautions may cause a fire or
electric shock.
Do not scratch, damage, or otherwise alter the power cord. Do not put
heavy objects on the power cord, and do not pull or bend it. Disregarding
these precautions may damage the power cord, causing fire or electric
shock.
Be sure to use the power cord (AC adapter) attached to the scanner. Do not
use an extension cord. Disregarding this precaution may result in abnormal
heat or a fire.
Do not use a power cord or AC adapter that is damaged, or an outlet with a
loose socket. Disregarding this precaution may result in a fire or electric
shock. Return the damaged item to the store where you purchased it, or
contact FUJITSU.
Disconnect the AC adapter before connecting an interface cable or optional
product. Disregarding this precaution may result in electric shock.
Do not insert or remove the AC adapter with wet hands. Disregarding this
precaution may result in electric shock.
-
Clean a dusty AC adapter or outlet with a dry cloth. Using a dusty adapter
or outlet can cause a fire.
-
In the following cases, stop using the scanner, remove the AC adapter from
the outlet, and contact the store where you purchased the scanner or contact
FUJITSU.
You see smoke coming from the scanner, or the outside of the scanner is hot
to the touch.
You hear any unusual sounds.
Water gets into the scanner
Continuing to use the scanner in any of these conditions may cause a fire.
- If you hear thunder nearby, remove the AC adapter from the outlet. Failure
to do so may result in damage to the scanner and any connected devices.
-
Insert the AC adapter fully and securely into the outlet. Failure to do so
may cause a fire or a failure.
-
Be sure to disconnect the AC adapter from the outlet before cleaning,
maintaining, or repairing the scanner.
If you clean or maintain the scanner without disconnecting the AC adapter
from the outlet, you may receive an electric shock.
If you will not be using the scanner for a long time, be sure to disconnect the
AC adapter from the outlet for safety reasons. Failure to do so may cause a
fire or a failure.
-
ÿ
-
When disconnecting the AC adapter from the outlet, be sure to hold the
plug. Pulling the power cord may damage the cord, causing a fire or electric
shock.
- Do not stare at the fluorescent lamp.
- Conduct the following inspections at least once a month.
Is the AC adapter plugged into the outlet securely?
Is the AC adapter warmer than usual to the touch, or is it rusted or warped?
Is there any fine dust on the AC adapter and outlet?
Is the power cord cracked or scratched?
If you find any abnormal condition, contact the store where you purchased the
M3091DC or contact FUJITSU.
Precautions for installing and moving the scanner
-
-
-
ÿÿ
Do not install the scanner in a high-temperature, high-humidity, badly
ventilated, or dusty environment. Doing so may cause a fire or electric
shock.
Do not install the scanner near a heating source such as a stove or a heater,
or near flammable materials such as volatile substances or a curtain. Doing
so may cause a fire.
Do not use the scanner in wet environments such as a bathroom or shower
room. Doing so may cause a fire or electric shock.
-
-
-
ÿ
Do not place the scanner on an unstable surface such as one subject to
strong vibration or one that is uneven. Doing so may cause the scanner to
fall or tip over, causing injuries.
Do not leave the scanner for a long time where it is hot, as in direct sunlight
or in a car under exposed to direct sunlight. Doing so may cause the cover to
overheat, deform, or melt, or cause the scanner to overheat, resulting in a
fire.
Before moving the scanner, be sure to disconnect the AC adapter from the
outlet. Failure to do so may damage the power cord, resulting a fire or
electric shock, or cause the scanner to fall or tip over, causing injury.
Precautions for using the scanner
-
-
-
-
-
ÿ
Do not put a vase, flowerpot, cup, or other object containing a liquid on the
scanner. If water spills, a fire or electric shock could result.
Do not put metallic objects on the scanner. If a paper clip, staple or other
metallic object, or a flammable material slip enters the scanner through a
vent, a short circuit may occur, causing a fire or electric shock.
Do not spray water on the scanner or otherwise allow it to become damp.
Doing so may cause a fire.
Do not insert or drop any foreign object such as a combustible into the
scanner through any opening (for example, opening for paper). Doing so
may cause a fire or electric shock.
If a foreign object (metallic object, water or other liquid) gets into the
scanner, immediately disconnect the AC adapter from the outlet, then
contact the store where you purchased the scanner or contact FUJITSU.
Continuing to use the scanner may cause a fire or electric shock.
If you drop the scanner or if the cover is damaged, disconnect the AC
adapter from the outlet, then contact the store where you purchased the
scanner or contact FUJITSU. Continuing to use the scanner may cause a
fire or electric shock.
Never open panels and covers secured by screws. High voltage inside the
scanner can result electric shock.
Do not modify the scanner or switch any parts. Doing so may cause a fire.
-
-
-
Do not use a highly flammable spray near the scanner. Doing so may cause
a fire.
Do not put heavy objects on the scanner. Do not subject the scanner to
shock. Doing so may cause the scanner to fall or tip over, causing injuries.
Do not cover vents or other openings (such as the opening for paper) of the
M3091DC. If a vent is covered, the M3091DC will overheat, causing a fire.
Do not cover the M3091DC while in use with a cloth or wrap it up. Doing
so will cause the M3091DC to overheat, causing a fire.
To prevent injury, be careful not to touch sharp edges when removing paper
after a paper jam or repairs.
To prevent injury, do not touch the inlet and paper outlet while the
M3091DC is operating.
Be careful that your necktie or necklace is not caught inside the scanner
when removing paper after a paper jam or repairs.
Read this manual carefully to ensure the correct connection of cables. If you
use the scanner when it is not connected correctly, the scanner and
peripheral devices may be damaged.
Do not dispose of the scanner as ordinary waste. The fluorescent lamp
contains mercury, and must be disposed of at a waste treatment facility
Obey the municipal ordinances or regulations when disposing of fluorescent
lamps.
July 1998
1. 1st edition July 1998
ÿ
INDEX
1.
BEFORE USING THE SCANNER .............................................................................................. 16
1.1
OVERVIEW ................................................................................................................................ 16
1.1.1
Function ........................................................................................................................... 16
1.2
CHECKING THE PACKING CONTENTS ........................................................................................ 17
1.3
NAME AND FUNCTIONS OF PARTS ............................................................................................. 18
2.
DEVICE INSTALLATION AND CONNECTION ..................................................................... 21
2.1
PROHIBITED INSTALLATION LOCATIONS.................................................................................... 21
2.2
MOUNTING THE PAPER SUPPORT .............................................................................................. 23
2.3
CONNECTING CABLES ............................................................................................................... 25
2.3.1
Precautions for connection .............................................................................................. 25
2.3.2
Connecting the SCSI cable............................................................................................... 26
2.3.3
Connecting the power cable............................................................................................. 26
2.3.4
Setting the SCSI ID .......................................................................................................... 27
2.3.5
Installing the drivers and software................................................................................... 27
2.4
PREPARING THE STACKER ......................................................................................................... 28
3.
USING THE SCANNER ............................................................................................................... 30
3.1
PRECAUTIONS ON USING THE SCANNER.................................................................................... 30
3.2
BEFORE SCANNING OR COPYING A DOCUMENT ........................................................................ 31
3.2.1
Checking the state of a document..................................................................................... 31
3.2.2
Loading a document......................................................................................................... 33
3.3
SCANNING A DOCUMENT .......................................................................................................... 34
3.4
COPYING A DOCUMENT............................................................................................................. 36
4.1
HANDLING PAPER JAMS............................................................................................................ 38
4.2
DAILY MAINTENANCE............................................................................................................... 41
4.3
CLEANING THE SCANNER.......................................................................................................... 42
4.3.1
Cleaning scanner surfaces and the paper support........................................................... 42
4.3.2
Cleaning the automatic paper feed section ...................................................................... 43
4.4
CONSUMABLES ......................................................................................................................... 45
4.4.1
Consumable part number and replacement cycle ............................................................ 45
4.4.2
Replacing the pad ............................................................................................................ 46
4.4.3
Replacing the pick roller.................................................................................................. 47
5.
A IF YOU THINK A MALFUNCTION HAS OCCURRED ...................................................... 48
6.
INSTALLATION SPECIFICATIONS ......................................................................................... 50
ÿ
1. Before Using the Scanner
This chapter outlines the features of the M3091DC image scanner and lists its parts.
Overview
This section outlines the features of the M3091DC image scanner.
1.1.1 Function
The M3091DC is an image scanner that reads high-color images. By using the supplied software, you
can do the following:
- Scanning software allows data read by the M3091DC to be stored as data in a tiff and other formats
on a PC.
- Copying software allows data read by the M3091DC to be output to a printer connected to a PC.
The following are the features of the M3091DC:
- High-quality ADF
Implements paper feed quality comparable to that in business scanners.
- Double-sided color reading
Both sides of a page can be read at on time in full color.
- Compact body for easy installation
Since the scanner body is light and has a compact design, installation is easy.
ÿ
1.2
Checking the Packing Contents
The M3091DC is packed together with accessories. Special packing materials are used to protect the
scanner and accessories. When you unpack the box, use the figure below to make sure check all parts
required for assembly have been packed.
If any part is missing or defective, contact the store where you purchased the M3091DC.
+ Image Scanner
+ Chuter (1)
+ Stacker
+ AC adapter
+ AC Cable (North America Type)
+ AC Cable (European Type)
+ Setup disk (CD)
+ User's Manual (CD)
* The software disk contains MImage and MCopy
+ User's Manual (this manual)
+ Quick Connection Guide
ÿ
1.3
Name and Functions of Parts
This section lists the names and features of parts.
ÿ
Product name
Chuter
Paper guide
Automatic paper feed section (ADF)
Copy gray level dial
Operator’s panel
7 element LED
Function
Loads a page of the original.
Guides a page so that it is fed straight.
Reads a page automatically
Adjusts the copy gray level (dark/light) to one of five
levels
- Light on : Next scan shall be done by Simplex
- Blinking : Next scan will be Duplex
->
: This sign appears for three (3) seconds when you
push "Scan" button or "SendTo" button.
It shows Registered Application has been started
up. Only, when Launcher is not started up in
advance, application would not start even though
this indication appears. Select "Start" menu →
"Startup" → "M30931DC Launch" to start up
Launcher.
As it normally starts up automatically when you
turn the PC power on, it is unnecessary.
Refer to HELP in Launcher about the details of
"Scan" as well as "SendTo" button functions.
- P or 0
It indicates the scanner is under initialization. As
soon as "1" appears, push the "next" button.
Function switch
Double-side switch
Send to button
Scan button
Power lamp
Stacker
ÿ
Sets the number of copies.
Changes the read mode.
The read mode is displayed on the copy count display
panel
Copies the loaded page.
Scans the loaded page.
On when power is turned on.
Stacks read pages.
Product name
Cover open lever
Connector for AC adapter
Interface connector
SCSI terminating resistor switch
SCSI ID switch
Product name
Feed roller, discharge roller, plastic roller
Function
Opens and closes the automatic paper feed section.
Connects the AC adapter.
The interface cable is connected to the PC.
Set to ON if the scanner is the last device on the chain;
otherwise, set to OFF. (ON is the factory setting.)
Sets the ID (ID = 5 is the factory setting).
Function
Feeds a page.
2. Device Installation and Connection
Connect the image scanner to the PC.
Install and connect the scanner as described below: For the dimensions of the scanner, refer to Appendix
A, "Installation Specifications."
2.1
Prohibited Installation Locations
Note the following regarding installation location and environment.
- Fire, electric shock
Since the M3091DC scanner contains high voltage components, do not
disassemble or modify it.
When mounting or removing an optional device, turn off the main unit,
disconnect the power plug from the outlet, and then follow the instructions.
- Tipping over, falling
Do not put the scanner on an unstable surface. Put the scanner on a flat
surface not affected by Vibration so that it rests evenly on the surface and so
that the rubber feet rest securely on the floor or desk surface.
Do not put heavy objects on the scanner, and do not do work on the
scanner.
- Fire, electric shock
Do not put the scanner in direct sunlight or near a heater, or in a highhumidity or dusty location. Use the scanner in a location with good air
circulation and ventilation.
- Fire
Do not cover vents. Doing so will cause the scanner to overheat.
ÿ
- Fire, electric shock, tipping over, falling. Be sure to disconnect the plug
from the outlet before moving the scanner. Also guard against static
electricity. Be careful not to trip over cables while you are working.
- Malfunction
Install the scanner away from sources of strong magnetic fields and
electrical noise. Also guard against static electricity, which can lead to
malfunctions. Choose materials that do not generate static electricity for the
floor and the desk on which the scanner is installed.
2.2
Mounting the Stacker and Chuter
Mount the Stacker and Chuter on the scanner as follows:
1) While holding the supplied stacker, insert it in such way that it slide into the holes in the scanner.
2) While holding the supplied Chuter, insert it in such a way that the tabs slide into the holes in the
scanner.
3) For an A4 document, pull the handle of the Chuter up.
1. Handle
2.3
Connecting Cables
This section explains how to connect the power cable and SCSI cable,
and how to install the drivers and software.
2.3.1 Precautions for connection
Fire, electric shock
- To mount or remove equipment, turn off the main unit, disconnect the power
plug from the outlet, and then follow the instructions.
- Use only the specified voltage. Do not use a multiple receptacle plug.
- Do not insert or disconnect the power cable and AC adapter with wet hands.
- With a dry cloth, wipe off any dust on the edges of the power cable or
mounting surface of the edges.
- Do not damage the power cable by putting heavy objects on it or pulling,
forcibly bending, twisting, or heating it.
- If the power cable or the outlet is damaged, do not use the cable.
Fire, electric shock, failure
- Insert the power cable fully and securely into the outlet.
- Disconnect the power cable by holding the plug to remove it from the outlet.
- Do not supply power to the scanner from the same outlet as a device, such as a
copy machine and shredder, which consumes a lot of power.
2.3.2 Connecting the SCSI cable
Insert the interface cable into the interface connector on the scanner until it clicks. Connect the other end
of the cable to the scanner or another SCSI peripheral device. If the scanner is the last device on the
SCSI bus, turn the SCSI terminating resistor switch to ON (ON is the factory setting).
2.3.3 Connecting the power cable
1) Connect the power cable to the power inlet on the scanner.
2) Insert the AC adapter into the outlet.
2.3.4 Setting the SCSI ID
This section explains how to set the SCSI ID.
1) Disconnect the power cable from the outlet.
2) Set the device address using the SCSIID switch on the rear of the scanner.
Precautions for setting the device address
Address No.
0-7
8, 9
Description
Can be set
If 8 or 9 is set, factory setting (SCSI ID = 5) is used.
3) After setting the SCSI ID number, insert the power cable into the outlet.
2.3.5 Installing the drivers and software
Execute Setup.exe on the supplied setup disks (driver disk 1 and software disk 1) to install the
software and drivers. To use the scanner's operator panel, all software disks must be installed.
Note
Read Readme.txt on the floppy disk before installing the software.
2.4
Preparing the Stacker and Chuter
Set up the stacker as follows.
1) Hold the handle of the stacker and pull it toward you.
2) Put your finger in the recess near the base of the stacker and raise the paper stopper.
3) For an A4 document, pull the handle of the Chuter up.
3. Using the Scanner
Set a document on the chuter. The document will read by the automatic page feeding system.
This chapter contains precautions on using the scanner, and explains how to set the SCSI ID and how to
read a document.
3.1
Precautions on Using the Scanner
Note the following when you use the scanner:
Fire, electric shock
- If an abnormal condition occur (for example, overheating, smoke, stench, or
noise), immediately turn off the scanner and then be sure to disconnect the
power plug from the outlet. Check first that no more smoke is not being emitted
and then contact the distributor (or maintenance service center). Do not attempt
to repair the scanner yourself, since doing so is very dangerous.
- Do not insert or drop metallic objects or flammable materials into the device
through vents or other openings.
- If you drop anything into the scanner or the cover has been damaged,
disconnect the power plug from the outlet to turn off the device. Contact the
distributor (or maintenance service center).
- Fire, electric shock, failure
Make sure that no liquids, such as coffee, or metallic objects, such as paper
clips, get into the scanner.
Do not spray water on the scanner or allow it to become wet.
If foreign objects such as water, other liquids, or metallic objects fall into the
scanner, immediately disconnect the power plug from the outlet. Contact the
distributor (or maintenance service center). Extra care is especially required if
small children have access to the scanner.
If you will not be using the scanner for a long time, be sure to disconnect the
AC adapter from the outlet for safety reasons.
- Catching clothes
Be careful that sleeves, neckties, or hair is not caught in moving parts such
as gears and rollers.
- Damage
If you hear thunder nearby, disconnect the power cable from the outlet.
Failure to do so may damage the scanner or other equipment.
- Failures
To prevent malfunctioning, do not push too hard on the automatic paper
feed section or put heavy objects on it.
Point
- Clean the scanner periodically as described in Section 4.3.2, "Cleaning the automatic paper feed
section."
3.2
Before Scanning or Copying a Document
This section explains required operations before scanning or copying a document.
Note that if a method other than those explained here are used, paper jams, read errors, other
malfunctions may occur.
3.2.1 Checking the state of a document
This section explains which documents can be read and which cannot.
ÿ
Documents that can be read
The following lists the documents that can be read:
Paper quality
- High-quality paper
- PPC paper (paper specified by Xerox)
Basis weight
45 kg/ream to 90 kg/ream (52.3g/m2 - 104.7g/m2)
Size
A4, A5, B5, letter size, card Business size (A8)
Documents that are hard to read
Some types of documents are hard to read. Check whether the document can be read reliably before
starting operation. The following types of paper are sometimes hard to read:
- Paper with paper clips or staples
- Paper with ink that has not dried yet
- Paper with uneven thickness (envelopes and pasted paper)
- Large-size paper with wrinkles or curls
- Folded or ripped paper
- Tracing paper
- Coated paper
- Carbon paper, pressure-sensitive paper
- Paper larger than wider than letter size (216 mm) or the top-to-bottom length of legal size paper(355
mm)
- Material other than paper, such as cloth, metallic sheets, or OHP transparencies
- Photographic paper
- Paper with perforations around the edges
- Paper with any shape other than rectangular
- Paper thinner than 45 kg/ream (52.3g/m2) or thicker than 90 kg/ream (104.7g/m2)
- Paper with a nonstandard width
3.2.2 Loading a document
This section explains how to load a document.
Preparing the document
Prepare the document for loading as follows:
- Take a stack of pages 4 mm. Hold the pages lightly with both hands and then bend them upwards in
the middle.
- While holding the pages firmly so that the beveling at both ends is preserved, flatten the bottom of
the stack. The stack will bulge so that air flows between the pages.
- Repeat the above action two to three times.
- Grasp the stack by the two remaining sides and riffle the paper again.
Arranging the edge
A document will be read better if the edge that is inserted is adjusted.
3.3
Scanning a Document
This section explains how to scan a document.
1) Check that the PC and the scanner are turned on.
2) Check the state of the document. Refer to Section 3.2.1, "Checking the state of a document."
3) Thoroughly riffle the document to be loaded. Refer to Section 3.2.2, "Loading a document."
4) Place the document on the paper support.
- Use the following guideline for the number of pages to be loaded: For A4 paper, or the legal size or
smaller: thickness of document 4 mm or less (50 pages of 55kg/ream (64g/m2)Paper)
- Align the edge that will be inserted. Refer to Section 3.2.2, "Loading a document."
- Load the pages as follows according to whether single-side read or double-side read is used:
Single-side: Place the side to be read face down.
Double-side: Place the first page face down.
- Insert the document until the edge touches the inner part of the automatic paper feed section. If you
insert the document with too much force, two or three sheets may be fed. Check that the edge of the
document is not dog-eared.
5) Move the paper guides to fit the width of the document. This ensures that the document is straight. If
there is a gap between paper guides and the document, the document may be read obliquely.
6) Press the double-side switch to change the read mode.
Copy count display panel on Single-side read mode
Copy count display panel blinking: Double-side read mode
7) Press the scan button on scanner.
8) When the document has been completely read, remove it from the stacker.
Note
- Simple editing of images in a scanned document can be done using MImage. Edited images can be
stored in tiff and other image formats.
3.4
Copying a Document
This section explains how to copy a document.
1) Check that the PC, printer, and the scanner are turned on.
2) Check the state of a document.
Refer to Section 3.2.1, "Checking the state of a document."
3) Thoroughly riffle the document to be loaded.
Refer to Section 3.2.2, "Loading a document."
4) Place the document on the paper support.
- Use the following guideline for the number of pages to be loaded: For A4 paper, or the legal size or
smaller: thickness of document 4 mm or less (50 pages of 64 g/!!m2!! paper)
- Align the edge that will be inserted. Refer to Section 3.2.2, "Loading a document."
- Load the pages as follows according to whether single-side read or double-side read is used:
Single-side: Place the side to be read face down.
Double-side: Place the first page face down.
- Insert the document until the edge touches the inner part of the automatic paper feed section. If you
insert the document with too much force, two or three sheets may be fed. Check that the edge of the
document is not dog-eared.
5) Move the paper guides to fit the width of the document. This ensures that the document is straight. If
there is a gap between paper guides and the document, the document may be read obliquely.
6) Specify the number of copies using the copy count setting switch.
7) Adjust the copy gray level using the copy gray level dial as required.
8 Press the double-side switch to change the read mode.
Copy count display panel on: Single-side read mode
Copy count display panel blinking: Double-side read mode
9) Press the copy button on the scanner.
The set document is read and output from the printer.
10) When the document has been completely read, remove it from the stacker.
Note
- The copy count and copy gray level can also be adjusted with MCopy. If MCopy is used, set the copy
count display panel to "C" with the copy count setting switch and then press the copy button. For details,
refer to MCopy online help.
Precautions
The entire page may not be printed depending on the size of the printer's printable area. To print the
entire page in a document, do the following:
a) Display the MCopy screen. Press the copy count setting switch to display "C" on the copy count
display panel, and then press the copy button.
b) Check the "Fit to printable area" check box on the MCopy screen and then click "Execute". This
setting remains in effect for subsequent copy operations. To return to its original setting, uncheck the
"Fit to printable area" check box.
Note that if the "Fit to printable area" check box is checked, performance slows down.
4. For Daily Use
This chapter explains the handling of paper jams, daily maintenance, and cleaning of the scanner.
C Note
Clean the automatic paper feed section according to the cleaning standard in Section4.3.2,
"Cleaning the automatic paper feed section."
4.1
Handling Paper Jams
If a page jams while it is being read, remove the page with the following procedure:
1) Remove the page on the paper support.
2) While lifting the cover open lever, pull the automatic paper feed section toward you to open it.
3) Remove the jammed paper.
4) Push the middle part of the automatic paper feed section back to its original position.
- When pushing the automatic paper feed section back to its original position,
check that the automatic paper feed section is completely closed. If it is not
completely closed, a paper jam or read errors may occur.
4.2
Daily Maintenance
To ensure long life of the image scanner, certain actions are required every day. Keep the following in
mind while using the scanner.
- If scanner surfaces, the paper support, or automatic paper feed section become dirty, clean them as
explained in Section 4.3, "Cleaning the Scanner." Especially, be sure to clean the automatic paper feed
section.
ÿ
4.3
Cleaning the Scanner
This section explains how to clean the image scanner.
Fire, electric shock
-
Before cleaning the scanner, disconnect the power plug of the AC adapter
from the outlet to turn the scanner off.
4.3.1 Cleaning scanner surfaces and the paper support
The following explains how to clean scanner surfaces and the paper support.
- Clean scanner surfaces and the paper support with a dry cloth or with a cloth moisten with a little
neutral detergent or isopropyl alcohol.
C Note
Never use thinner or other organic solvents.
- Make sure that water does not leak into the scanner while cleaning it.
4.3.2 Cleaning the automatic paper feed section
As a standard, clean the automatic paper feed section after reading 1000 pages. The standard depends
on type of page to be read. For example, cleaning will be necessary after a fewer number of pages for
pages on which the toner does not adhere as strongly. Clean the automatic paper feed section as follows
(refer to the figure on the next page).
1) To open the automatic paper feed section, pull it while lifting the cover open lever.
2) In the following locations with a dry cloth or a cloth moistened with isopropyl alcohol.
Pad
Automatic paper
glass surface
Clean from the top downward (direction of arrow). Be careful that you
are not caught by the pick arm or pick spring.
feed
Clean lightly.
Pick roller
Clean lightly so that the roller surface is not damaged. In particular,
black specks clinging objects cling to the surface affect paper feed
performance, so cleaning must be thorough.
Feed roller
Clean lightly so that the roller surface is not damaged. In particular,
black specks clinging objects cling to the surface affect paper feed
performance, so cleaning must be thorough.
Plastic roller
Clean lightly so that the roller surface is not damaged. In particular,
black specks clinging objects cling to the surface affect paper feed
performance, so cleaning must be thorough.
Discharge roller
Clean lightly so that the roller surface is not damaged. In particular,
black specks clinging objects cling to the surface affect paper feed
performance, so cleaning must be thorough.
Paper guide surface
(white portion)
Clean lightly.
3) Push the automatic paper feed section back to its original position.
- When pushing the automatic paper feed section back to its original position,
check that the automatic paper feed section is completely closed. If it is not
completely closed, a paper jam or read errors may occur.
4.4
Consumables
This section lists the consumables explains pad replacement and pack roller replacement.
Fire, electric shock
- To replace scanner consumables, disconnect the power plug of the AC adapter
from the outlet to turn off the device before replacement.
4.4.1 Consumable part number and replacement cycle
The following lists the product names of consumables and their replacement cycles.
No.
P
Q
Product name
Pad unit
Pick roller unit
Part number
PA03209-F010
PA03209-F012
Replacement cycle (standard)
12,000 pages or one year
50,000 pages or one year
The replacement cycles are the standard values when high-quality 90 kg/ream (104.7g/m2) A4 paper is
used. The replacement cycles depend on the paper used.
4.4.2 Replacing the pad
The following explains how to replace the pad.
1) If a page is on the paper support, remove it.
2) While lifting the cover open lever, pull the automatic paper feed section toward you to open it.
3) Remove the pad.
Push down on the pick arm with one hand, and pinch both ends of the pad (a, b) with the other hand to
pull it out in the direction of the arrow.
4) To mount a new pad, push up the pick arm with one hand, and mount the new one with the other
hand.
- Check that the pad is completely mounted. If it is not mounted completely, paper
feed errors such as paper jams may occur.
4.4.3 Replacing the pick roller
The following explains how to replace the pick roller.
1) If a page is on the paper support, remove it.
2) While lifting the cover open lever section, pull the automatic paper feed toward you to open it.
3) Remove the pick roller.
Push retaining tab 1 of the pick roller inward and hold the handle to lift it, rotating it in the direction of
the arrow. Push retaining tab 2 on the opposite side inward, and remove the pick roller by rotating it
in the direction of the arrow.
4) To mount a new pick roller, insert the new one so that the retaining tabs slide into the holes of the
scanner pick roller. Push the retaining tab 1, retaining tab 2, and the middle of the pick roller so it is
inserted fully.
- Check that the pick roller is completely mounted. If it is not mounted
completely, paper feed errors such as paper jams may occur.
5. A If You Think a Malfunction Has Occurred
If you think a malfunction has occurred while you are suing the image scanner, check the following
points.
Symptom
No power
When problem occurs frequently
Is the AC adapter connected correctly?
Reading does not
start
Is the page inserted fully inserted?
Is the automatic paper feed section closed
completely?
Is the interface cable connected
Correctly?
Is the SCSI terminating resistor switch set
correctly?
The reading results
of pictures and
photographs are not
good
The reading results
of text characters
and lines are not
good
Symptom
Image sheared or
distorted
Multiple feeding
occurs often. (*1)
Is half-tone processing performed?
Is the paper support, paper retaining plate,
or inside of the automatic paper feed
section dirty?
Was half-tone processing performed?
Is the paper support, paper retaining plate,
or inside of the automatic paper feed
section dirty?
When problem occurs frequently
Is the page set straight on the paper
support?
Is the pad dirty?
Is the pad consumed?
Location to check
Connect the AC adapter correctly.
Disconnect the AC adapter to turn
off the power. Insert the power
cable again to turn the power on. If
the scanner does not turn on,
contact the store where you
purchased the M3091DC or a
nearby maintenance service center.
Insert the page lightly until
resistance is met
Check whether the automatic paper
feed section is closed completely.
Connect the interface cable
correctly.
Set to ON if the scanner is the last
device in the chain; otherwise, set
to OFF.
Select the half-tone processing you
like in the scanner settings.
Clean as directed in Section 4.3,
"Cleaning the Scanner."
Select binary processing in the
scanner settings.
Clean as directed in Section 4.3,
"Cleaning the Scanner."
Location to check
Straighten the page using the paper
guides.
Clean the pad as directed in Section
4.3.2, "Cleaning the automatic
paper feed section."
Replace the pad.
Symptom
Paper is not fed
(stops part way)
When problem occurs frequently
Is the pick roller dirty?
has the pick roller reached the end of its
service life?
Is any foreign object on the transport
path?
Location to check
Clean the pick roller as directed in
Section 4.3.2, "Cleaning the
automatic paper feed section."
Replace the pick roller.
Remove the foreign object on the
transport path. Refer to Section
4.1, "Handling Paper Jams."
* Multiple feeding means that more than one page is read at one time.
6. Installation Specifications
The following lists the installation specifications for the M3091DC.
Item
Dimensions (mm)
Width
308.5
Weight (kg)
Input power
Voltage
Number of phases
Frequency
Power consumption Operating
Stopped
Temperature
and Scanner state
humidity tolerances
Temperature (C)
Humidity (%)
Operating
Specification
Depth
154
2.3
100V - 240V
Single phase
50/60 Hz
28 W or less
4.5 W or less
Stopped
Height
130
Storage/transport
15 - 35
-20 - 60
-20 - 60
30 - 80
8 - 95
8 - 95
Dimensions
ÿ