1
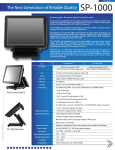
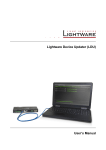
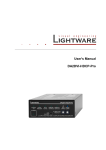
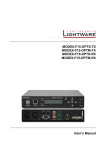
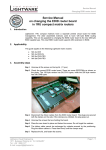
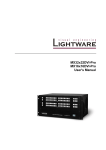
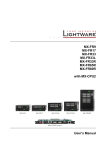
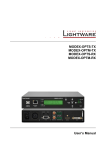
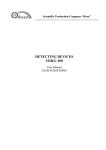
PSUx10-200-12V PSUx10-200-5V PSUx20-400-12V PSUx20-400-5V User’s Manual SAFETY INSTRUCTIONS Class I apparatus construction. This equipment must be used with a main power system with a protective earth connection. The third (earth) pin is a safety feature, do not bypass or disable it. This equipment should be operated only from the power source indicated on the product. To disconnect the equipment safely from power, remove the power cord from the rear of the equipment, or from the power source. The MAINS plug is used as the disconnect device, the disconnect device shall remain readily operable. There are no user-serviceable parts inside of the unit. Removal of the top cover will expose dangerous voltages. To avoid personal injury, do not remove the top cover. Do not operate the unit without the cover installed. The apparatus shall not be exposed to dripping or splashing and that no objects filled with liquids, such as vases, shall be placed on the apparatus. The apparatus must be safely connected to multimedia systems. Follow instructions described in this manual. Replacing the AC fuse WEEE Unplug the AC power cord from the equipment Locate the AC fuse on the rear of the unit Replace only the AC fuse as indicated on the rear panel of the unit: 5 A fast blowing Connect the power cord to the switcher and to the AC power source. Make sure the switcher is working properly. ( W as te E l e c tr ic a l & E lec tr on ic E q u ipm en t ) Correct Disposal of This Product This marking shown on the product or its literature, indicates that it should not be disposed with other household wastes at the end of its working life. To prevent possible harm to the environment or human health from uncontrolled waste disposal, please separate this from other types of wastes and recycle it responsibly to promote the sustainable reuse of material resources. Household users should contact either the retailer where they purchased this product, or their local government office, for details of where and how they can take this item for environmentally safe recycling. Business users should contact their supplier and check the terms and conditions of the purchase contract. This product should not be mixed with other commercial wastes for disposal. PSUx10-200, PSUx20-400 User’s Manual DECLARATION OF CONFORMITY We, Lightware Kft. 1071 Budapest Peterdy str. 15 HUNGARY as manufacturer declare, that the products PSUx10-200 PSUx20-400 (Power supply unit) in accordance with the EMC Directive 2004/108/EC and the Low Voltage Directive 2006/95/EEC are in conformity with the following standards: EMI/EMC .................... EN 55103-1 E3, EN 55103-2 Safety .......................................... EN 60065 Class I Date: 01.07.2013. Name: Gergely Vida (Managing Director) Signed: Section 1. Introduction Page 3 / 9 1. Introduction Thank you for choosing Lightware rack mountable power supplies. The units are all housed in a 1U solid metal rack enclosure for durability and easier mounting. 5V and 12V DC output versions are also available with 10 and 20 output connectors. Several protections are built in like short circuit, overload, over voltage, over temperature which features make these PSUs really trustful. The units are designed to supply devices made by Lightware, the compatible appliances are listed in section 2.4. Box contents Power supply unit IEC power cable Info: Please note that DC power cables are not supplied with the product. 2. Control and connections Info: The main differences among the variants are the number of the DC connectors and the voltage range; PSUx20-400-12V can be seen on the photos. 2.1. Front view 1 Power LED 1 Power LED Power LED lights green when the unit is powered on. 2.2. Rear view 1 AC connector Power AC switch Page 4 / 9 2 3 DC connectors 1 AC connector Standard IEC power connector. Accepts 100 to 240 Volts, 50 or 60 Hz power sources. 2 Power switch The power supply can be switched ON/OFF with this switch. 3 DC connectors Locking DC connectors for the appliances that are desired to supply. Section 1. Introduction PSUx10-200, PSUx20-400 User’s Manual 2.3. Connecting devices Step 1. Place the power supply unit in the rack and fix it by screws with the mounting ears. Step 2. Connect the DC cables to the power supply and to the extender units. Step 3. Connect the AC power cable to the power supply. Step 4. Switch on the appliance. Info: Please note that fixing screws and DC power cables are not supplied with the appliance. Info: If the power supply cannot be switched on, please check the IEC power cable, the AC mains and the fuse at the AC connector on the back of the unit. If the LED on the front panel does not light up at all, the unit is most likely damaged and further use is not advised. Please contact [email protected]. 2.4. Compatibility The following table contains those Lightware products that are compatible with the power supplies and also the technical data of the DC plug: Power supply Type DC plug PSUx10-200-5V PSUx20-400-5V PSUx10-200-12V PSUx20-400-12V 2.5/5.5 mm 2.1/5.5 mm Compatible Lightware products Type DC plug DVI-OPT 110 series, DP-OPT 150 series 1.35/3.5 mm EDID Manager V4 DVISL-Extenders DVIDL-Extenders HDMI-Extenders DA2DVI-HDCP-Pro DA2DVI-DL DP-OPT 100 series DVIDL-OPT series HDMI-OPT series UMX-OPT series DVI-TP series Remote control panels 2.5/5.5 mm HDMI-TPS 90 series DVI-HDCP-TP series (50, 100 series) 2.1/5.5 mm HDMI-TP series (50, 100 and 200 series) UMX-TP series Table 2-1. Compatible Lightware products and DC plugs Info: Cables are available at Lightware, please contact [email protected]. Section 2. Control and connections Page 5 / 9 2.5. Locking DC connectors DC cables from Lightware contain locking DC connector that establishes robust and safe power connection. After plugging it in, turn the plug clockwise as you can see on the following figure. Figure 2-1. Locking DC connector Info: Do not forget to turn the plug counterclockwise before trying to disconnect the cable. 2.6. Schematic of PSUx10-200-5V and PSUx10-200-12V AC mains 10 x DC connector o + + Power supply Figure 2-2. Schematic wiring of PSUx10-200-5V and PSUx10-200-12V 2.7. Schematic of PSUx20-400-5V and PSUx20-400-12V AC mains 10 x DC connector 10 x DC connector o + Power supply + Power supply Figure 2-3. Schematic of PSUx20-400-5V and PSUx20-400-12V Info: If any of the DC connectors gets faulty, the other DC connectors will be usable due to the design of the appliance. Page 6 / 9 Section 2. Control and connections PSUx10-200, PSUx20-400 User’s Manual 3. Specifications Power Power supply ............................................................................................. Internal Input ................................................................................. 100-240 V AC 50/60 Hz Output (PSUx10-200-5V, PSUx20-400-5V)............ 5V/2.2A (on 10 or 20 outputs) Output (PSUx10-200-12V, PSUx20-400-12V) ..... 12V/1.1A (on 10 or 20 outputs) Nominal power (PSUx10-200) ...................................................................... 200W Nominal power (PSUx20-400) ...................................................................... 400W General Compliance ....................................................................................................... CE EMI/EMC ........................................................................EN 55103-1, EN 55103-2 Safety ......................................................................................... EN 60065 Class I Warranty .................................................................................................... 3 years Operating temperature ............................................... -20 to +70°C (-4 to +158°F) Operating humidity ................................................... 10% to 90%, noncondensing Cooling ..................... Fan (2 pcs., 40 mm diam.), air flows right to left (front view) Protection against ...... Short circuit / Overload / Over voltage / Over temperature Enclosure Rack mountable .................................................................................Yes, 1U high Material .................................................................................................1 mm steel Dimensions in mm .............................................. 446(482)W x 182D x 43.9H mm Net Weight (PSUx10-200) ........................................................... 2870 g / product Net Weight (PSUx20-400) ........................................................... 3430 g / product Connectors AC Power connector ....................................................... Standard IEC receptacle DC power connector (5V version) .................... locking DC connector, 2.5/5.5 mm DC power connector (12V version) .................. locking DC connector, 2.1/5.5 mm Section 3. Specifications Page 7 / 9 3.1. Mechanical drawings 43,9 Front view 482 Rear view Top view 182 446 Left view Info: The main difference among the variants is the number of the DC connectors; PSUx20-400-12V can be seen on the drawings. Page 8 / 9 Section 3. Specifications PSUx10-200, PSUx20-400 User’s Manual 4. Warranty Lightware Visual Engineering warrants this product against defects in materials and workmanship for a period of three years from the date of purchase. The customer shall pay shipping charges when unit is returned for repair. Lightware will cover shipping charges for return shipments to customers. In case of defect please call your local representative, or Lightware at Lightware Visual Engineering H-1071 Budapest, Peterdy Street 15, HUNGARY E-mail: [email protected] 5. Document revision history Document Release Date Changes Editor Rev. 1.0 14-01-2015 Initial version Laszlo Zsedenyi Section 4. Warranty Page 9 / 9