1
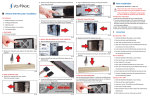
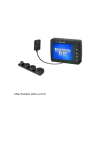
1
Camera Introduction
Features:
The MagicImage 500 combines all the features professional
photographers and advanced enthusiasts demand – all in
one digital imaging powerhouse. The only limit to the
MagicImage 500 is your imagination. The camera has the
following features:
.1280 X 960 and 1024 X 768 resolution.
.800K CCD Digital Camera.
.4MB of removable Smart Media Memory.
.Built in Flash.
.Automatic power saving feature.
.Compact, light weight and easy to carry.
Systems requirement:
IBM PC or PC-compatible
1. Microsoft Windows 95 /98 or Windows NT3.51/4.0
2. 24MB memory ,32MB is recommended
3. VGA color display (TRUE color mode support is
recommended)
4. CD-ROM drive and a 3.5” floppy drive
5. Available RS232 Serial port.(115200 Baud Rate transfer
required )
1
Package contents:
Camera
PC serial cable
User's manual
Quick Start Guide
Pouch and Strap
2 AA Alkaline Batteries
4MB memory card
CD Software
TWAIN Driver
*3V AC Adapter (optional)
Digital Camera
Memory card
Batteries
Quick Start Guide
1. U - - - - - - ( 1) D - - - - ( 2) - - - - - - ( 3) - - - - ( 4) - - - ( 5) - - - - - - - - - - - - - ( 6) - - - - - - - ( 7) - - - - - ( 8) - ( 9) - - - - - - - - - (1 0 )- - - - - - (1 1) - -
11 .
( O ptio na l)
1.
2.
10 .
3.
9.
4.
8.
5.
7.
2
6.
CD Software
Pouch
User's manual
PC serial cable
Strap
TWAIN Driver
* 3V AC Adapter (optional)
2
Camera Preparation
Loading the batteries
To load the batteries, open the battery compartment
(figure1) and insert the batteries provided with the
camera (figure 2).
¡
´
P lease note the corre ct p ositive (+) and
ne gative (-) polarity as sho w n in figure 2.
2
Attaching the strap:
Attach the strap as shown
below
3
Memory card installation:
Insert the memory card as shown on the image
below.
Note:The camera will not function if the memory card is not
inserted into the camera’s memory compartment.
Note: Any new memory card used for the first time needs to
be formatted (please see P.13 for formatting procedures).
Note: Be sure to turn the power off
when you want to replace the
memory card to avoid causing
2
damage to the card.
1
1
Setting the pouch:
Use the provided pouch to protect
the camera when not in
use.See diagram below.
2
Purse function as shown in
figure 3
3
4
3
Camera Buttons / Functions:
Flash M ode b utto n
P icture d ele tion b utton
(D EL )
L C D P a ne l
M od e se le ction
butto n
S hutter relea se
bu tton
C o m pu ter
conne ctio n p ort
M em o ry ca rd
cove r
D C 3 V inp ut
te rm ina l
S trap eye le t
Button operation / Functions:
1
MODE
4 different modes will appear on the panel in
following sequence when you press the mode
button.
Nomal/Self-timer mode: Press the mode button
once to switch from Normal to Self-timer mode.
1
2
S elf-tim e r
Note:” 1 ” is normal condition
Note: The Self-timer gives you 10 seconds
before it captures the image
5
High/Low resolution mode: Press the mode
button for 3 seconds to switch from High to Low
resolution mode.
2
1
Note: ” H ” refer to 1280x960 pixels resolution
” L ” refer to 1024x768 pixels resolution
2
3
DEL
The Delete button allows you to delete a single
image or all images stored on the camera
(refer to P.10 for additional information).
The flash can be set to any of the following 3
modes: Flash Off (Default), Auto (Auto Flash),
and Fill-In Flash (Flash On).
1
2
3
F la sh o ff
A uto flash
F ill-in flash
Front of camera:
Flash
Self-Tim er
Lamp (Red)
Vie w fin der
6
M AC R O
S witch
Len s
MACRO mode operation:
Macro mode is shown on the diagram below.
Refer to P.12 for additional information.
MACRO switch enlarged from the side view.
Back of camera:
¡P o w er
O´
n directio n
enlarged diagram
Viewfinder
Power On/O ff B utton
Shooting-R eady LED
(G reen)
Bottom of camera:
Tripod Bush
7
4
LCD Panel Display:
1
2
4
3
14
5
13
12
11
10
6
HL
E RA S E A LL
9
7
8
1
1
Fill-in Flash mode
2
Flash Off mode
Self-timer
3
PC linked indicator.
4
Counter
5
L
6
AUTO
8
4
Image is in 1024x768 pixels resolution.
Auto flash mode
7
a.Batteries are
fully charged.
8
7
b.Batteries are
drained.
Memory card storage condition (from zero to
full marks)
9
MACRO mode (push MACRO switch to
1. Delete all saved
image data.
2. Format memory card
)
Delete last
picture
(Please refer to P.12, P.15)
11
Memory card is full. Delete unwanted images or
replace memory card with an empty one. If possible,
transfer the images to your computer and clear the
memory.
12
H
13
14
Image is in 1280x960 pixels resolution.
The camera is saving the picture just taken. Take
the next picture when the message disappears.
Memory card is properly inserted. Blinking
indicates there is no memory card inserted.
9
5
Basic Operations:
Taking pictures:
(1) Turn the power on.
(2) Set the resolution mode you need and/or the NORMAL/
MACRO switch position.
(3) Frame the subject in the viewfinder.
(4) Press the shutter release button halfway for focusing,
until the green (shooting-ready) LED stops blinking,
which indicates the camera is ready to take the picture.
(5) Press the shutter release button all the way down and
you should see " BUSY " on the LCD. The image is
being saved.
(6) When "BUSY" disappears, the image has been saved.
Please keep the lens clean to ensure better image quality.
Please use a lintless cloth to clean gently in one direction
the surface of lens when cleaning.
Deleting pictures:
(1) Deleting last picture: Press the DEL button once and
press the shutter release button.
(2) Delete all pictures: Press DEL button twice till
"ERASE ALL" is displayed on the LCD. Then press
the shutter release button and all of the pictures in the
memory card will be deleted.
10
Using flash:
The camera has three flash shooting modes:
Note:Effective distance of flash is 1m~1.5m.
AUTO
Auto flash: Flash will automatically fire under
dim light setting
Fill-in flash mode:The flash will always fire whenever
you take pictures. In low-light condition or back light
situation, it is recommended to use this mode.
Flash off mode: Flash will not function under this
mode.
Self - timer mode:
Under this mode, the shutter will be delayed for about 10
seconds before taking the picture.
(1)Press the “Mode” button to self-timer mode
(2)Use a tripod or set the camera over a steady surface (to
ensure the camera will not fall or move while taking the
picture).
(3)Compose the picture and reserve a space for yourself
later.
(4)Focus your subject by pressing the shutter release button
half way until the green LED stops blinking. Press the
shutter release button all the way down to start the
11
self-timer countdown. The red self-timer LED light
will blink for about 10 seconds before the shutter is
released.
(5) Wait until the green LED stops blinking, which indicates
the camera is ready for the next picture.
Macro mode:
Under "MACRO" mode, focus is set at 20 cm.
Macro mode provides a function of portrait.
(1) Push the Marco switch to "
".
(2) Press the shutter release button
(3) When the "BUSY" sign disappeared, shooting is
completed.
Focus your subject within the printed
picture area of Micro mode viewfinder.
Important:
Always remember to switch it back to the Normal "
"
position. Your images will be blurry or out of focus if you
leave it on the Macro mode position.
Automatic power saving function:
1.Your camera has an automatic power saving function. The
camera will shut off automatically after being idle for 3
minutes.
12
How to use the memory card:
One 4MB memory card (SSFDC 4MB 3.3 Volt) is
provided with the camera. If you need to increase the
storage capacity of your camera or simply own additional
memory cards, you may purchase them separately.
Please contact us for the nearest authorized dealer.
Follow these instructions when installing or replacing the
memory card:
(1) Turn off the power on the camera
(2) Open the
memory card cover located on the side of the camera.
(3) Insert or replace the memory card (make sure the
memory card is inserted the right way).
(4) If you are
inserting a new memory card, you need to format it before
you use it (see instructions below).
(5) Close the
memory card cover.
Important:
How to format a memory card: Once the memory card has
been placed inside the camera, press the “DEL” button Twice
until “ERASE ALL” is shown on the screen. Press the
shutter release button. When BUSY is no longer shown,
the camera has finished formatting the memory card.
Note : When removing the memory card, please be sure to
turn off the power to avoid causing damage to the
memory card.
13
How to connect the camera to your
personal computer
(1) Find an available COM port on your computer (COM1 or
COM2). Connect the serial cable to the COM port.
(2) Connect the other end of the serial cable to the digital
camera (Port marked “DIGITAL”).
Observe image below for more details.
C a m e ra sid e e nlarg ed d ia gram
How to install MGI PhotoSuite SE
PhotoSuite SE is a powerful imaging / editing software tool
that allows you to capture and edit images.
To install the software, insert the MGI CD into your CD-ROM
drive and follow the steps below:
(1) Click on the “Start” button and select “Run”.
(2) Type the following command:
D:\setup.exe
(Where D is the letter of your CD-ROM drive)
(3) The installation wizard will guide you through the
installation process.
14
6
Using the TWAIN Driver Interface
Getting to know the TWAIN interface
The digital camera is shipped with a user-friendly software
(TWAIN interface) that you can use to download the
pictures that you have taken with the camera. TWAIN is
an industry standard interface for scanners and digital
cameras. The TWAIN Interface works in combination with
any TWAIN compliant image processing application, such
as MGI PhotoSuite. The image processing application is
often referred to as the host application.
Install TWAIN Driver
The TWAIN drivers can be install by following the instructions below:
(1) Insert the floppy disk that contains the TWAIN drivers into your
floppy drive.
(2) Click on the “Start” button and select “Run”.
(3) Type the following command:
A:\setup.exe
(Where A is the letter of your floppy drive)
(4) When you get the window below, click on the OK button.
15
You can push the START button to install the TWAIN
driver. Or it will begin the installation automatically after 10
seconds.
Transferring images to your computer
The following illustration provides an overview of the TWAIN
interface and also how to download photographs from your
camera to your computer. We use MGI PhotoSuit as our TWAIN
compliant image processing application.
1. Execute or open the TWAIN compliant image processing
application : MGI PhotoSuite.
2. Select TWAIN Source. (File
Get Photos From
Select Source)
3. Choose MagicImage 500
Note : You need to select the Source just one time ( Step 2 and
step 3 ) after you install the TWAIN Driver.
16
4. Acquire (File
Get Photos From
Camera/Scanner)
4.1 Retrieving thumbnail (Connection Port Auto Detect.)
4.2 Thumbnail: After acquire, you will get the thumbnails of
your pictures.
17
5. If you can not connect or retrieve the images,
check the connection and push the “ Preview “
button again.
6. Getting pictures: Please select the picture you want,
and click on the “get pictures“ button.
18
6.1 Open pictures
If you want to view the full-size picture before
saving it to disk, select the “Open Pictures”
6.2 After you pressed the “GET Picture“ button, the full-size
picture will popup and the thumbnail window will be minimized to the bottom-left corner.
6.3 Save to disk [Do not open]
If you want to save the pictures to disk directly, please
select the “Save to Disk [Do not open]”.
19
You can select your favor directory to save the pictures, just
pushing the browse button “…”.
The prefix will become the first part of the pictures’ filenames.
For example, if you select pictures 0001, 0003 and 0010 to
save to disk, and the prefix is “Pic”. Then the pictures’
filenames will be Pic0001.jpg, Pic0003.jpg and Pic0010.jpg.
A special case is that if there is a file named Pic0001.jpg in
the directory already, the new downloaded picture 0001 will
be saved as Pic0001-1.jpg, automatically.
20
7. Erasing pictures: Select the pictures you
want to erase and click on the “ERASE “ button.
Note: The “ERASE Picture” function may take more than one
minute. Please wait for a while.
21
7
MagicImage 500 Specifications
Image Devices
1/3”-CCD w/800k pixels
Color depth
24 bits true color
Resolution
1280x960 pixels,1024x768 pixels
Auto Exposure
Yes
Exposure/lris
100
(Control-ISO Rating)
White |Balance
Shutter speed
Flash
Self Timer
Lens
Auto
1/30 ~ 1/1000
Build-in Flash light
10 secs
Fix; f=6.6mm (equivalent to a 47mm lens
on a 35mm camera)
Focus Range
Macro:8.6”(20cm)
Normal:51.2”~ infinity(130cm~ infinity)
Aperture
F=2.8
Format
JPEG
Recording Media
Image Capacity
Delete Picture
Removable SSFDC*4M
XGA:1024*768:30 images at 4M
Yes (ALL/Select)
Battery
2*AA Alkaline Battery
Interface
RS-232
Dimension(W*H*D)
80mm (W) *84mm (H) *32mm (D)
Weight(without battery) around 190g
Subject to technical change without notice
22
8
Cautions and Troubleshooting:
Cautions:
Do not use a power supply that is over 3 Volts (DC in). Be
aware that failing to comply with this warning can damage
the internal components of the camera as well as putting
you at risk of an electric shock / fire.
Only use I/OMagic approved power supplies with the camera.
Do not use excessive force to pull or twist the adapter cable
or connector.
Before disconnecting the cord, make sure the camera is
turn off.
Make sure you turn off the camera and disconnect any
power supply when the camera is not in use.
Keep camera equipment away from the elements
(Excessive Heat or Cold) to ensure proper operation.
Remove the batteries from the camera when it will not be
used for long period of time.
No RS-232C cable longer than 3 m shall be connected to
the camera when used with PC.
Troubleshooting:
The following section describes common problems
you may encounter, along with some suggestions on how
to resolve them. Please follow any instructions carefully
and step by step.
23
My camera behaves strangely or it does not
work like it’ supposed to. What is the problem?
Check your batteries and make sure they are in optimal
condition. Also make sure your camera was installed
properly.
My COM port is disabled in the BIOS set-up. How can I
enable it?
In the BIOS set-up, change the COM port setting to Enabled. If
you need additional help, consult your motherboard user’s
manual.
I can not acquire or download the images from my
MagicImage digital camera. I get an error that states Twain
drivers not detected or installed.
First of all make sure the camera and the software are installed
properly. Also, make sure the camera is turned ON and connected properly. Make sure you are using a valid COM port.
When you open the MGI PhotoSuite software, make sure you
are selecting the MagicImage 500 as your source device. Double
check all steps on this manual if nothing else works.
The picture quality is not acceptable or sharp. At times the
pictures are dark.Is there something wrong with the camera?
Digital cameras are sensitive to light. Lighting conditions are
very important when taking pictures, make sure you place the
object to be photographed in a good lighting location.
I click on the Download button and a window shows the
actual bytes transferred. I notice the size is zero and
nothing appears to happen, what is the matter?
24
There are several reasons that can cause this
problem. The main reason is using the wrong COM
port setting. Make sure you select the right COM port
before you start to download your pictures. Other reasons
include weak batteries and camera not turn on.
Will the camera work without the moemory card?
No, the camera will not work without the memory card. The
camera does not have any internal memory.
When the camera is set to MACRO the pictures are blurry,
Why?
MARCO is used only when taking pictures from 20cm away or
close range. For objects located more than 20 CM, use the
normal mode.
25
LCD Display
Panel
messages
Measures to be taken
No. display in the LCD
1.Please check if the positive and
negative polarity is set correctly.
2.Please check if batteries are drained.
Wrong image showed
Batteries become weak, please
prepare new batteries for replacement.
Mark is blinking
Batteries are too low to run the
and power automatically camera,please replace with new
cuts off after 5 seconds. batteries.
Mark shown
Mark is blinking
“FULL” is shown
Batteries become weak, please
prepare new batteries for replacement.
There is no memory card inserted,
please insert it.
Memory card is full, please delete
the images stored, or replace the
memory card (if you have additional
memory cards).
“E1” is shown
1.The data in the memory card might
be out of order. Please use “ERASE
ALL” to format the memory card, and
try again.
2. If “E1” still shown, the memory card
might be damaged. Replace the
memory card with a new one and try
again.
“E2” is shown
Memory card protected, please remove
the tag on the memory card.
26
Contacting I/OMagic Tech Support
If you experience problems with this I/OMagic product and you
can not find an answer in the previous Trouble Shooting sections,
you can contact I/OMagic’s Technical Support Staff.
Please have the following information ready when you call:
The product you are having problems with.
The operating system you are using.
A list of other hardware installed on your machine.
A detailed description of the problem.
You can contact I/OMagic’s Technical Support staff at the
following numbers:
Phone:
(949) 597 – 2462 (Monday through Friday
from 8AM to 5PM PST).
Fax:
(949) 380 - 0696
Internet and e-mail: http://www.iomagic.com
(go to the “Tech Support” section).
Mail:
I/OMAGIC Corporation
ATTN: Technical Support
6 Autry
Irvine, CA 92618
Register Your I/OMagic Product
Please take the time to send in your registration card. The
serial number of your MagicImage 500 CCD Digital Camera
is located on the camera itself.
27
Alternatively, you can register your product on-line
at our Web site. This is actually the fastest way to
receive the latest I/OMagic product information and
updates. The Web URL address to the registration page is:
http://www.iomagic.com/registration_page.htm
Again, we would like to thank you for buying I/OMagic products.
28
29
30