1
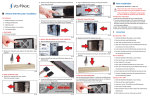
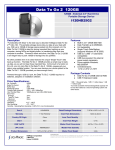
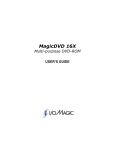
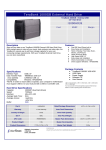
MagicVision USB
Internet Video Conferencing Camera
USER’S GUIDE
Dear I/OMAGIC Customer:
Congratulations on the purchase of your MagicVision USB Internet Video
Conferencing Camera. We can assure you that it is made from new stateof-the-art chipsets and components. Your product has also gone through
the most rigorous test and quality assurance procedures in the industry.
All of the employees at I/OMAGIC want to express our sincere gratitude for
your decision to purchase our product. Our commitment to you is to
provide a product that is easy to install and use. I/OMagic will also assist
you with installation, if needed, and ensure that our resellers provide you
the highest level of sales and service.
I/OMAGIC began with one PCMCIA sound product in 1993. Since then our
company has grown and now offers more than fifteen products in the
multimedia market, including internal CD-ROM drives, PCMCIA CD-ROM
drives, 3D stereo sound cards, Wavetable sound cards, 3D video cards, and
PCMCIA modems. In the coming months we will introduce our latest
Digital Cameras, scanners, USB devices and many other exciting
technologies.
We encourage you to browse our web site at http://www.iomagic.com
to thoroughly review our complete product offering. We hope you enjoy
using your new product, and look forward to earning your business in the
coming years.
Sincerely,
Michael R. Dendo
Vice President of Sales
2
Copyright Statement
It is a criminal offence, under applicable copyright laws, to make unauthorised copies of
copyright-protected material, including computer programs, films, broadcasts and sound
recordings. This equipment should not be used for such purposes.
Notice:
I/OMAGIC Corporation makes no warranty of any kind with regards to
this material, including, but not limited to, the implied warranties of
merchantability and fitness for a particular product.
I/OMAGIC Corporation shall not be liable for errors contained herein
or for incidental consequential damages in connection with the
furnishing, performance, or use of this material.
Every effort has been made to ensure that the information in this
manual is accurate. I/OMAGIC Corporation is not responsible for
printing or clerical errors.
Mention of third party products is for information purposes only and
constitutes neither an endorsement nor a recommendation.
I/OMAGIC Corporation assumes no responsibility with regards to the
performance of these products.
This document contains proprietary information, which is protected by
copyright (see below).
The information contained in this document is subject to change
without notice.
Trademarks:
Microsoft is a registered trademark of Microsoft Corporation.
Windows, Windows 95 and the Windows 98 logo are trademarks of
Microsoft Corporation. IBM is a registered trademark of International
Business Machines Corporation. All other trademarks and product
names used within this manual are the property of their respective
companies and are hereby acknowledged.
Copyright:
© 2000 I/OMAGIC Corp. all rights reserved.
No part of this
publication may be reproduced, transmitted, transcribed, stored in a
retrieval system, or translated into any language or computer
language, in any form, by any means, without prior written consent of
I/OMAGIC.
Warranty:
I/OMAGIC Corporation warrants that the products it sells will be free
from defects in materials and workmanship. Consult the warranty card
for complete warranty information.
3
FCC Compliance Statement
This device complies with Part 15 of the FCC Rules. Operation is subject to the following two
conditions:
1.
This device may not cause harmful interference, and
2.
This device must accept any interference received, including interference that may
cause undesired operation.
FCC Warning Statement
This equipment has been tested and found to comply with the limits for a Class B digital
device, pursuant to Part 15 of the FCC Rules. These limits are designed to provide reasonable
protection against harmful interference in a residential installation. This equipment generates,
uses and can emit radio frequency energy and, if not installed or used in accordance with the
instructions, may cause interference to radio communications. However, television reception
interference can be determined by turning the equipment off and on. The user is encouraged
to correct the interference by one or more of the following measures:
!
Reorient or relocate the receiving antenna
!
Increase the separation between the equipment and the receiver
!
Connect the equipment into an outlet different from that to which the receiver is
connected
!
Consult the dealer or an experienced radio/TV technician for help.
CAUTION
Changes or modifications not expressly approved by the party responsible for compliance
could void the user’s authority to operate the equipment.
FOR EUROPE
“The drive is in conformity with the EMC directive and low-voltage directive.”
4
Table of Contents
INTRODUCTION
ABOUT YOUR MAGICVISION USB
PACKAGE CONTENTS
SYSTEM REQUIREMENTS
FEATURES
SPECIFICATIONS
INSTALLATION
INSTALLATION UNDER WINDOWS 98 OR WINDOWS 98 SE
REINSTALLING YOUR MAGICVISION USB CAMERA DRIVERS
USING YOUR MAGICVISION USB CAMERA
TAKING YOUR FIRST PICTURE
PC-EYE APPLICATIONS
VIDEO PLAYER
Capturing live video
How to use the Security Feature
VIDEO MAIL
PHOTO CARD
How to create a Photo Card
PHOTO MAGIC
NETMEETING
PHOTO BROWSER
PHOTO EZ
Creating Images
Opening Images
Special effects on images
(Basics) Transforming images
Managing album
TROUBLESHOOTING
HARDWARE FAQS
SOFTWARE FAQS
6
6
6
6
7
8
9
9
17
18
18
20
21
22
23
24
25
26
26
28
28
29
30
30
30
31
31
32
32
33
CONTACTING I/OMAGIC
37
REGISTER YOUR I/OMAGIC PRODUCT
38
5
INTRODUCTION
About your MagicVision USB
The MagicVideo USB provides exceptional video quality with the power to
capture, create, and communicate in full-color, full-motion video directly
from your PC. Express yourself with high quality 640x480 (VGA) resolution
pictures and videos. The MagicVision USB offers the following features and
software:
!
!
!
!
!
!
!
!
640 X 480 resolution.
Video Mail – Create video clips.
Photo Cards – Greeting card maker.
Photo Browser – Thumbnail view of you pictures.
Video Player – Security over the Internet.
Photo EZ – Photo album with image grab.
Photo Magic – Image grab & effect creator.
Games.
Package Contents
The MagicVision USB package contains the following items:
!
!
!
MagicVision USB camera.
MagicVision USB user’s manual (This Document).
MagicVision installation / software CD.
System Requirements
Minimum system requirements for your MagicVision USB:
!
!
!
!
!
!
!
!
6
Pentium 233 or higher. (Pentium II 300 recommended).
32 MB RAM.
USB equipped system.
16 Bit color display adapter.
Windows 98 or Windows 98 SE.
CD-ROM drive (for driver and software installation).
Full duplex sound card (optional).
Microphone and speakers (optional).
Features
1
3
2
4
1
2
3
4
Snapshot button.
Focus adjustment.
Lens cover.
Camera base.
7
Specifications
Sensor:
300K CMOS Image Sensor.
Aperture:
F/2.0.
View Angle:
60 Degree.
Geometry Distortion:
< 3%.
Variable Focus Range:
½” to Infinity.
Color Features:
!
!
!
!
Driver Compliant With:
WDM Driver, Active Movie, TWAIN, Video
for Windows.
Bundled Software:
!
!
!
!
!
!
!
!
Video Capture Rate:
Up to 30 FPS.
Picture / Image Format:
BMP, TIFF, JPEG, AVI, and EXE.
8
24bit true color up to 16.7M color.
Auto White balancing.
Hue, Saturation, Contrast adjustments.
Banding Filter.
MS NetMeeting.
Video Mail.
Photo Card Maker.
Photo Browser.
Video Player.
Photo EZ.
Photo Magic.
Games.
INSTALLATION
Handling Static-Sensitive Devices
The MagicVision USB Internet Video Conferencing Camera, like
all electronic equipment, is static sensitive. Please take all the
proper precautions when handling this device.
Note: In this section you will install the MagicVision USB and all the
software necessary to operate the camera. We ask you to familiarize
yourself with the camera as well as your computer system before
proceeding. Follow the instructions step by step and pay attention to any
special instructions given within.
Installation under Windows 98 or Windows 98 SE
Do not connect your MagicVision USB camera to your USB port.
Wait until you are prompted to do so during the installation
process.
1
Unplug all your USB devices before you start your system
(except your USB keyboard or mouse).
2
Turn on your PC.
3
Once in Windows, insert the installation CD into your CD-ROM
drive.
4
The installation program will start automatically. If the program
does not start, follow the instructions below:
9
1.
2.
3.
4.
5.
Click on the “Start” button.
Click on the “Run” option.
Click on the “Browse” button.
Browse to you CD-ROM drive and select the SETUP.EXE file.
Click on the “OK” button.
5
Read and Click on the “Next” button when you see the screen
below.
6
Select your AC power frequency for banding filtering. If you are
in the U.S.A, Canada, Korea, or Taiwan select 60 HZ. Click on the
“Next” button.
10
7
Depending on your system, you may be asked to insert your
Windows 98 CD.
8
If the New Install Wizard cannot find your Windows 98 CD, Click
on the “Other Location” button and browse to the right location.
Note: If you have your Windows 98 CAB files on your hard drive, browse to
that location.
11
9
The Wizard is now ready to install the necessary files and
drivers to your PC. Click on the “Next” button.
10
The Wizard will now ask you to plug in the MagicVision USB
connector into your computer’s USB port. At this point do so.
11
The Wizard will find your MagicVision USB camera.
12
12
When the MagicVision USB camera has been installed, a test
will be performed. This test window confirms the successful
installation of the camera by showing you the first live pictures
from your MagicVision USB camera.
Important: Make sure the lens cover is open.
Note: On the test window, you have the option to adjust the video settings
by clicking on the “Adjust” button.
13
Once you are finished with the adjustments click on the “Close”
button on your test window.
13
14
At this point you need to install the camera applications. Click
on the “Install Camera Application” button.
15
We include PC-EYE 1.2 with your MagicVision USB camera. This
application gives you most of the features discussed earlier on
the manual. Click on the “Next” button.
16
Select the directory where you want the applications installed.
Click on the “Next” button.
14
17
Next, select the program group name. Click “Next”.
18
At this point you can select the applications you want to install.
We recommend you install all the applications. Click on the
“Next” button when you are ready to install the applications.
Note: Make sure you have enough hard disk space to install the
applications.
19
After the applications have been installed, you will see the
window below. At this point you are ready to start using your
MagicVision USB camera and applications.
15
Installing NetMeeting 3.01
If you wish to install NetMeeting 3.01, follow the instructions below:
1. Once in Windows, insert the installation CD into your CD-ROM drive.
2. The installation program will start automatically. If the program
does not start, follow the instructions below:
!
!
!
!
!
Click on the “Start” button.
Click on the “Run” option.
Click on the “Browse” button.
Browse to you CD-ROM drive and select the SETUP.EXE file.
Click on the “OK” button.
3. Click on the NetMeeting button.
4. Follow the instructions on your screen.
16
Reinstalling your MagicVision USB camera
drivers
If you need to reinstall your MagicVision USB camera or any of the
applications follow the instructions below:
1. Once in Windows, insert the installation CD into your CD-ROM drive.
2. The installation program will start automatically. If the program
does not start, follow the instructions below:
!
!
!
!
!
Click on the “Start” button.
Click on the “Run” option.
Click on the “Browse” button.
Browse to you CD-ROM drive and select the SETUP.EXE file.
Click on the “OK” button.
3. Click on the Reinstall button.
4. Follow the instructions on your screen.
This concludes the installation section for your MagicVision USB
camera and applications. In the next section we explain how to use
your MagicVision USB camera and applications. If you encountered
problems while installing this device, make sure you read the
Troubleshooting section located of this manual.
17
USING YOUR MAGICVISION USB CAMERA
In this section you will learn how to operate your MagicVision USB camera
and the PC-EYE software package.
Taking your first picture
1
Once in Windows, click on the “Start” button > “Programs” >
PC-Eye > PC-Eye icon.
Note: Make sure the lens cover is open.
2
When you get the PC-Eye control panel, click on the “Settings”
button.
Settings
18
3
Select “Microsoft WDM Image Capture” under the “Video Driver
List”. Click on the “OK” button.
4
Select the desire “Resolution” and click on the “Snapshot”
button.
Snapshot
button
Resolutions
5
The image will be displayed on a separate window.
19
PC-Eye Applications
Photo Card
Video Mail
Photo Magic
NetMeeting
Video
Player
Snapshot
Button
Photo
Browser
Resolution
Photo EZ
Help Button
Settings Button
PC-Eye comes with many applications designed to capture and process
images and live video. All applications can be started from the application
control panel. The application control panel can be started by clicking on
the PC-Eye icon on your desktop or by using the start menu. If you are
using the start menu, select programs followed by PC-Eye.
Below you will find a list of all the different applications and a description
of what they can do for you:
1.
2.
3.
4.
5.
6.
7.
20
Video Player – View live, motion detected and message videos
Video Mail – Record and compress videos for email or archive
Photo Cards – Create personalized electronic cards
Photo Magic – Add special effects to photos
NetMeeting – Video conference in a network environment
Photo Browser - Manage video and photo files
Photo EZ – Photo acquisition and photo album
Video Player
Video Player is an application for showing captured video from your
MagicVision USB camera. There are two parts to Video Player; video panel
and video monitor.
Video panel: From here you can capture, save, and playback live video
directly from your MagicVision USB camera.
1
2
10
3
9
4
5
8
6
7
1
Help button.
2
Set-up button. From here you can adjust the video format,
video source, select a camera driver, and capture audio.
3
Normal button. Go from playback mode to normal.
4
Switch button. Switch from Video Panel to Video Monitor
mode.
5
160 X 120 resolution.
6
Playback button.
7
Record or Capture button.
8
Save button.
9
640 X 480 resolution.
10
320 X 240 resolution.
21
Capturing live video
1. Once you are inside Video Player, select Video Panel mode.
2. Select the desire resolution by clicking on S, M, or L on the Video
Panel.
3. Point your MagicVision USB camera to the subject you want to
record.
4. Click on the “Record or Capture” button.
5. When you are finished recording, click on the stop button located on
the upper right corner of the video screen.
6. Click on the “Save” button. Save the file to your hard drive or
storage location.
7. To view the video clip, click on the “Playback” button and select the
file that you just created and click the “OK” button. The video clip
will start to play.
Video monitor is an application to display live video on the screen. You
can use it to watch the door or any other places while you are working at
the computer. You can set up the timer to capture video while you are not
at the computer. Use motion detection to capture video to your hard disk
for you to view later. There are two layouts for the Video Monitor, small
footprint and large footprint. Press the red arrow button to change the
layout size.
Switch
22
1
2
9
8
3
4
7
5
6
1
Playback button. Playback files captured by your
MagicVision USB camera in Video Monitor mode.
2
Settings button. From here you can adjust general settings
as well as the timer, security, messages, alarm, pager, and email settings.
3
Switch from “On Top” to “Not On Top”.
4
Help button.
5
Playback Message button.
6
Security Activation button.
7
Positioning buttons.
8
Switch from small view to large view.
9
Switch from Video Monitor to Video Panel.
How to use the Security Feature
1. Once you are inside Video Player, select Video Monitor mode.
2. Click on the Settings button.
23
3. Select and configure the different settings within the security tab
and click on the Ok button.
4. Point your MagicVision USB camera to the subject you want to
record.
5. Click on the “Security” button. When the camera detects motion,
video will be captured and saved for your viewing.
6. When you are ready to view the captured video, click on the
“Playback” button and select your clip from the list. To play it, click
on the “Play” button.
7. To de-activate the security feature, just click on the “Security”
button again.
Video Mail
Video Recorder is your digital VCR. Use Video Recorder to record video and
send it through email over the Internet. Video Mail is amazingly simple to
use, just set the video size and start recording.
Video Screen
Save
E-mail
Settings
Resolutions
Play
Stop
Pause
24
Record
Photo Card
Photo Cards contains hundreds of subtle graphics and photos designed by
professional artists. All cards are sorted into 20 groups for easy access.
After you have selected a card, customize it to your needs. Capture and
add a photo. Add some text. Add music or record a voice message. Use the
editing tools to personalize your card. Once you are finished, save it to a
file. Now, you can print it and mail it to a friend. Or create an Executable
File from your card and email it to a friend.
Templates
Work Area
25
How to create a Photo Card
Once Photo Cards starts, you will see all the templates with all the
categories. To make your own card, follow the steps below:
1. Select a Template and click on it.
2. Select a specific card and click on it.
3. Now, you will be in the working area. Here, you personalize your
card. Start by adding an image file or a captured photo. Accomplish
that by clicking on the “Photo” button. Select your camera name
(TWAIN Driver) from the list and click on “Select”. The video screen
will be displayed. Adjust resolution, color, etc. Once you are ready,
click on the “SHOOT!!” button. The image will appear on the Card.
4. Next, add greeting text or your name (optional).
5. Add background music and record your voice (optional).
6. Finally, save your completed card, by clicking on the “Save” button.
You can save it as an executive file or as an image.
7. Print your card or created an Executable File to email as an
attachment.
Photo Magic
Photo Magic is ideal for adding special effects to your photos and it is
simple to use. Open an image file and start adding special effects. There
are more than 60 special effects to choose from. When you are finished
adding special effects, save the image to a file.
Effects
26
2
1
4
3
6
5
8
7
1
Open File
2
Undo
3
Redo
4
Save
5
Exit
6
Help
7
Import / Capture
8
Minimize
The special effects are divided into three categories; color manipulation,
transformation and blurring. A preview image of each special effect is listed
to the left pane. Some special effects have more options (sub-effects).
Additional options are listed at the bottom. Press the right mouse button to
exit the additional options. The result of applying the last special effect is
shown in the large window to the right. Since each special effect has a
preview icon, in most cases, it is easy to determine the result. You can
quickly go through the special effects, applying them to your photo by
clicking on them. If you do not like the result, press the Redo button and
start adding special effects again. When you finished, remember to save
the result to a file.
27
NetMeeting
NetMeeting provides people around the world with a whole new way of
communicating. With NetMeeting you can participate in meetings,
collaborate in files using NetMeeting features, and share information over
the Internet or your corporate intranet.
NetMeeting features
NetMeeting features allow you to place calls using directory servers,
conferencing servers, and Web pages. NetMeeting makes it easier to place
calls over the Internet, your organization's intranet, and with telephones.
You can work easily with other meeting participants by sharing programs.
Only one computer needs to have the program, and all participants can
work on the document simultaneously. In addition, people can send and
receive files to work on.
NetMeeting's audio and video let you see and hear other people. Even if
you are unable to transmit video, you can still receive video calls in the
NetMeeting video window.
With the Chat feature, you can talk with multiple people. In addition, Chat
calls can be encrypted, ensuring that your meetings are private.
Using the Whiteboard, you can explain concepts by diagramming
information, using a sketch, or displaying graphics. You can also copy
areas of your desktop or windows and paste them to the Whiteboard.
Photo Browser
Photo Browser or Video Manager manages your video data. Use it to save
video and photo data into your own folders. Retrieving video and photo
data from these folders will be easier. Drag a data file and drop it onto an
application button to access the application with the data file.
28
Custom
Directory
Images
Setting up a new custom directory
1. Once inside Photo Browser, click on the “Custom Directory” button.
2. Select the folder where you have images stored and click on the
“OK” button.
3. All your images are going to be presented in a thumbnail format.
Photo EZ
Photo EZ is a professional quality image editing software with a highly
intuitive interface. With Photo EZ you will be able to:
!
!
!
!
!
Retouch and edit photos and images.
Create great Web graphics.
Add impact by enhancing your photos with professional artistic
effects.
Easily view and manage all your images using the crisp thumbnail
previews.
Share photos with family and friends
29
Creating Images
1.
2.
3.
4.
5.
From the File menu, choose New to open the New Image dialog.
Enter the vertical and horizontal size in pixel unit.
Enter dot per inch.
Enter the OK button.
A blank white photo will appear with a no name title.
Opening Images
From the File menu, choose Open to load an existing image file. Supported
file types are Bitmap, JPEG, GIF, and TIFF. If the photo is bigger than the
photo display area, the photo will be scaled down to fit.
Photo Album focuses on True Color format. All features are designed to
process True Color photos. A few features are able to deal with other
formats. Photos in other formats should be converted to True color for best
result.
Try not to open too many images. Lots of opened images can result in
insufficient memory or frequent hard disk accessing. If this happens, close
unused open images
Special effects on images
1. To enable Specials in the menu bar, open a photo and set focus on it.
2. Choose Specials in the menu bar.
3. The following functions are listed in the Specials menu.
!
!
!
!
!
!
!
30
Filters
Soften
Sharpen
Emphasize edge
Find edge
Mosaic
Blur
!
!
!
!
!
!
!
Add noise
Negate
Motion
Emboss
Average
Minimum
Maximum
(Basics) Transforming images
1. To enable Basics in the menu bar, open a photo and set focus on it.
2. Choose Basics in the menu bar.
3. The following functions are listed in the Basics menu.
!
!
!
!
!
!
!
!
Flip Vertically
Flip Horizontally
Rotate
Resize
Brightness
Contrast
Hue
Saturation
Managing album
1. Choose Album in the menu bar.
2. The following album management functions are shown.
!
!
!
!
!
!
!
!
!
!
!
!
!
!
!
!
Select TWAIN
Acquire
Acquire to Album
Open
Search
Save
Edit
Close
Delete
Add current Photo Album
Add photos to album
Add files to album
Load Photo Album
Search Photo Album
Edit Photo Album
Delete Photo Album
31
TROUBLESHOOTING
The following section describes common problems you may encounter,
along with some suggestions for resolving them.
Hardware FAQs
Q. Why do I receive the error message "Camera is not present or already in
use"?
A. Verify that the USB connection is secure. Check the "Imaging Device"
category under the Device Manager. If the camera is installed properly,
there will be an entry in this section for the video camera. If this entry
does not exist, or is listed with a yellow exclamation mark, remove it, and
reinstall the drivers.
Q. During installation I receive the message "Your USB port has not been
detected".
A. This error message indicates a possible problem with the detection of
the USB ports by Windows. Verify that the USB Port is correctly listed in
Device Manager. To do this, right click on "My Computer" and select
"Properties". Click on the "Device Manager" tab and check for the category
name "Universal Serial Bus Controller." If this entry is missing, the USB
ports are not being properly detected by Windows. It is possible that your
USB port may need to be enabled in your system's BIOS.
Q. When booting the PC with the USB camera plugged in, it hangs up the
system.
A. Change the BIOS settings to support USB legacy device. Change the
BIOS settings to support USB keyboard.
Q. There is a yellow exclamation point on my USB Host Controller in the Device
Manager.
A. You may have a conflict between your USB port and another device in
your computer. If the USB port you are using has the same IRQ as another
device in your computer, your camera may not work properly. You must
assign an available IRQ to the conflicting device from the Device Manager.
32
Q. There is a yellow exclamation point on my video camera in the Device
Manager.
A. There may be a conflict with the camera or the camera is not installed
properly. Remove all the USB PC cameras listed in the Device Manager that
has the conflict, then click the refresh button. You may need to reboot the
computer.
Q. The USB controller or the USB root hub is not listed or has a yellow
exclamation point in the Device Manager.
A. The USB port is not installed correctly. Remove all the USB components
under the Universal Serial Bus Controller category in Device Manager. From
the Device Manager, click on “Refresh” to reinstall the USB components.
You may be prompted to insert your Windows 98 CD.
Q. Why do I not have a Universal Serial Bus Controller in the Device Manager?
A. You must enable your USB port in the BIOS. Consult your Computer
Users guide, or contact your motherboard manufacturer.
Q. When starting a video conferencing session, I get the error message “Could
not initialize the capture device, or USB camera.”
A. Make sure that the USB plug is inserted and that the device is listed in
the Device Manger. Make sure that your application has selected the proper
video capture driver for your device (the Video for Windows capture driver
is listed in Control Panel; Multimedia; Advanced; Video Capture Devices).
Some applications give you the option to select the video capture device.
Software FAQs
Q. The audio reception seems poor. How do I improve it?
A. Audio quality can be affected by several different factors. Because
slower computers may exhibit a lag in the audio, it is important to make
sure your computer meets the minimum system requirements. Other
programs running in the background may also interfere with the audio
quality. Try closing all running programs. Running in full-duplex versus
half-duplex will increase the audio quality. Bandwidth issues with the
33
Internet Service Provider (ISP) may also interfere with the audio quality.
The slower the connection, the worse the audio quality will be.
Q. My video reception seems poor. How do I improve it?
A. Several factors may affect the quality of the video reception. If a slower
computer or slower internet connection is being used, you may experience
poorer video reception and choppier video. It is important that your
computer meets the minimum system requirements. Try choosing a
smaller image size to conference in. The USB camera works best in areas
where there is sufficient light.
Q. Why can't I hear anyone during a web conference?
A. This is most likely due to the microphone not working or not being
properly connected to the sound card. Please also check if the computer
volume is turned off or set very low. Additionally, you should check to
make sure that your speakers are properly connected to the computer.
Q. Why do I receive the error message "The directory server could not be
found..." when I try to connect to an ILS (Internet List Server)?
A. If you are trying to connect to an ILS and receive this error message, it
means the directory server is busy. You may need to log into a different
ILS or try back at a later time.
Q. The live video display freezes when opening other applications.
A. Set the Display Adapter number of colors to 16 bit. Reduce the
Hardware acceleration of the PC Display Adapter (this may happen only on
several specific display adapter cards). Go to Control Panel and click on
Display. Select the Tab Setting, then click on Advanced Properties, select
the tab Performance and you will see the Hardware acceleration bar.
Reduce the performance to None.
Q. How do I configure NetMeeting to use America Online (AOL) to access the
Internet?
A. To use NetMeeting with AOL as your ISP, you must use AOL version 3.0
or later. This software installs an AOL adapter in Network properties that
allows you make a 32-bit Transmission Control Protocol/Internet Protocol
(TCP/IP) connection to AOL. NetMeeting does not require additional
configuration.
34
Q. Why doesn’t the colors look right when I share programs in NetMeeting?
A. This behavior can occur when the computers participating in the
NetMeeting conference are using a color palette of more than 256 colors.
NetMeeting supports sending only up to 256 colors across a network
connection. Try changing the Color Palette setting to High Color (16 Bit) or
lower.
Q. During video conferencing with NetMeeting, both parties cannot speak
simultaneously, but have to take turns speaking.
A. Determine whether the sound cards and drivers are capable of fullduplex audio, and verify that full-duplex audio is enabled in NetMeeting on
both computers.
Q. Why do I hear a delay or echo when I'm using the audio feature in
NetMeeting?
A. To prevent voices from echoing during a NetMeeting conference, move
the microphone away from the speakers and decrease the volume of the
speakers. Using a headphone will help also.
Q. Why do I see a black screen when I view the My Video window in
NetMeeting?
A. The video capture card may be configured to use an unsupported video
format. Currently, Microsoft NetMeeting supports the following video
formats: RGB4, RGB8, RGB16, RGB24, and YVU9. Also verify that only one
video capture device is installed on your system. You can do this by going
to Control Panel -> Multimedia -> Devices -> Video Capture. You should
only have “Microsoft WDM Image Capture” listed. The video capture card
could also be using video overlay mode. (Video overlay mode is not
supported by Microsoft NetMeeting).
Q. In PC-EYE, Why does the video frame rate drop when the video frame size
becomes larger?
A. Increasing the video frame size will increase the amount of data to be
transmitted. A higher bandwidth (faster internet connection) can improve
the frame rate. Faster CPU and hard drive can improve performance as
well.
35
Q. I have removed the PC-EYE program files using the Windows Explorer (File
Manager) but the program links are still there. How can I remove them?
A. Install PC-EYE again and use the PC-EYE uninstall program
(uninstall.exe) to completely remove all the PC-EYE software.
Q. My computer says that the JAPI.DLL file has become corrupted. How do I fix
this problem?
A. The JAPI.DLL file may get corrupted when PhotoShop is loaded after PCEYE. You will have to reinstall PC-EYE to replace that DLL file.
36
CONTACTING I/OMAGIC
If you experience problems with this I/OMAGIC product and you cannot
find an answer in the previous Trouble Shooting sections, you can contact
I/OMagic’s Technical Support Staff.
Please have the following information ready when you call:
!
!
!
!
The product you are having problems with.
The operating system you are using.
A list of other hardware installed on your machine.
A detailed description of the problem.
You can contact I/OMagic’s Technical Support staff at the following
numbers:
Phone:
(949) 597 – 2462 (Monday through Friday from
8AM to 5PM PST).
Fax:
(949) 380 - 0696
Internet and e-mail:
http://www.iomagic.com (go to the “Tech
Support” section).
Mail:
I/OMAGIC Corporation
ATTN: Technical Support
6 Autry
Irvine, CA 92618
37
REGISTER YOUR I/OMAGIC PRODUCT
Please take the time to send in your registration card. The serial number of
your MagicVision USB camera is located on the back of the camera.
Alternatively, you can register your product on-line at our Web site. This is
actually the fastest way to receive the latest I/OMagic product information
and updates. The Web URL address to the registration page is:
http://www.iomagic.com/registration_page.htm
Again, we would like to thank you for buying I/OMagic products.
38
DT-CMUSB1-006
VER 1.0