1
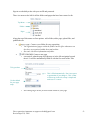
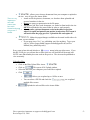
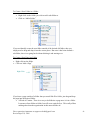
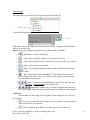
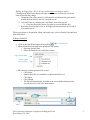
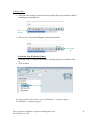
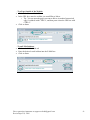
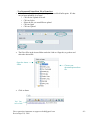
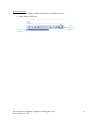
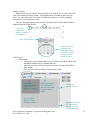
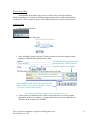
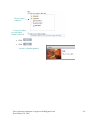
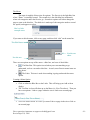
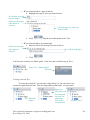
The Webedit User Manual
Contents
1. Getting Started
a. Creating a New Page
b. Uploading Files
c. Creating a New Folder
2. Editing a Page (Giving it content)
a. Basics
b. Adding an Image
i. Editing an Image
c. Adding a Flash File
d. Adding a Link
i. …To Another Page Within the Website
ii. …To a Page Outside of the Website
iii. …To an E-Mail Address
iv. …To a Document/Picture/Data File of Some Sort
v. Finishing Adding a Link
e. Removing a Link
f. Creating a Table
i. Making Changes to the Table
ii. Table Wizard
3. Related Links
4. What’s New Today
5. The Menu
a. Creating a Menu Option
b. Creating a Second Tier
c. Creating a Third Tier
Direct questions/comments to [email protected]
Revised April 18, 2008
2
2
3
3, 4
5
5
6
7
8
11
12
16
17
19
19
20
21
-1-
Sign in at webedit.byu.edu with your net ID and password.
There is a menu on the left for all the folders and pages that have been created so far.
Top Menu
Folders
Pages
Along the top of this menu are four options: add a folder, add a page, upload files, and
publish the site
•
: Creates a new folder for easy organizing
o The organization of pages within the folders has no effect whatsoever on
how they are organized within the actual website.
o See page 4 for more information on folders
•
: Creates a new page
o File name is what the page will show up as in the left navigation bar and
the url. It will be automatically filled in with the first word of the Title.
Title goes here
Use the default
for your page
setup.
This is filled automatically. Don’t use spaces
or punctuation if you change it. This is what
will show up in the url so keep it simple and
make sure it’s correct.
o See Editing Pages below for how to add content to your page
Direct questions/comments to [email protected]
Revised April 18, 2008
-2-
•
: allows you to choose documents from your computer to upload to
the site. They all go to the Assets folder.
These are very
o Assets are all the pictures, documents, etc. that have been uploaded and
important to
are used somehow in the site.
note and I
o Do not use spaces or punctuation in the file name.
cannot stress
o All pictures, pdf files, word documents, etc. linked to from/used in the site
how much
MUST be uploaded to the assets folder in order to work properly.
frustration they
o *Just because a picture/document works in the editor or preview
can prevent if
when it is copied and pasted from another location does NOT mean it
heeded.
will work when the page goes live! Upload the file and replace it!
•
: Makes the pages/changes available on the actual world-wide web
when you are finished.
o If your page is not “live” yet, publishing won’t do anything. To get your
site live, talk to Logan Smith ([email protected]) or Ken
Millard (ken_millard.byu.edu).
Every page (when selected) also has a
button in the top right corner. If you
hit this, it will give you a better idea of what your site will look like on the actual web.
NOTE: some functionality does not work in the preview. The site must be published to
view accurately.
Uploading Files
•
Click on the Blue Upload Files Arrow
•
•
Click on
This opens a File Upload window.
Select the file from your computer you would like to upload.
•
Click
o
Allows you to upload up to 10 files at once.
o You can select a ZIP file and check the
multiple files at once
•
box to upload
Uploads the selected files to the Assets folder.
Direct questions/comments to [email protected]
Revised April 18, 2008
-3-
To Create a New Folder in a Folder
•
•
Right click on the folder you wish to add a sub-folder to
Click on “Add a Folder”
If you accidentally create the new folder outside of the desired old folder, then you
simply need to drag and drop it into the correct place. But once it has been deemed a
sub-folder, there is no going back without deleting it and starting over.
To Create a New Page in a Folder
•
•
Right click on the folder
Click on “Add a Page”
Right Click
If you have a page outside of a folder that you would like IN a folder, just drag and drop
the page into the desired folder.
• A Word of Caution: There is no way to de-folderize a page once it is in a folder.
It can move from folder to folder, but will never again be free. This really affects
nothing other than the organization in this menu and the url.
Direct questions/comments to [email protected]
Revised April 18, 2008
-4-
Editing Pages
Select the page you would like to edit from the menu bar on the left.
Select a page
Click the Edit button on the top of the center box.
This one
This takes you to a new page with a toolbar across the top. This page will henceforth be
referred to as Page Edit.
Basics (if you use computer writing documents, these should be familiar):
•
Spellchecker: checks the spelling
•
Copy: makes a copy of whatever text or items are selected
•
Paste: inserts into the body of text whatever was previously cut or copied
•
Undo: undoes the previous actions
•
Redo: if you undo something you didn’t want to, hit this one and it will
undo the undo
•
Bold: makes the selected font Bold. Or, if the selected font is already
bold, will make it normal. Also, if you click it before typing, will make all new
text bold until being deselected.
•
Italics, Underline, and Strikethrough: same rules as Bold, but will
italicize, underline, or strikethrough the text respectively.
•
Alignments, change how the content is aligned within the page.
Left, center, right, align respectively. Justify spaces everything out to the margins.
Advanced
At the bottom left of the page are two symbols. These change the way you view
the content.
•
Let’s you view the html of the content. It is not needed to create the content
and is meant for the rare occasion.
•
Takes you back to the default view of the content from the html view.
Direct questions/comments to [email protected]
Revised April 18, 2008
-5-
Adding an Image
•
•
Click on the Image Editor icon in the toolbar
IF the Image has already been uploaded to the system:
o Open the Assets Folder
o Select the Picture you would like to enter
Looks like this
Open Assets folder
Select a picture
Toco Toucan here will have
problems because of the space
in the name.
•
IF it has not yet been uploaded, do so now!
o Click Select
o Find the image you would like to upload and click on it
Make sure there are no spaces in the file name
o Click Open
o Click Upload
o The picture will automatically be added to the assets folder and opened for
you.
Step 2
Step 1
Step 3
•
•
Changing the Alignment will change where the image sits on the page
o Normal sits it within the text wherever the text-cursor happens to be
o Left “floats” it to the left, so the text will be worked around the image
o Right is the same as Left, except the image is on the Right side of the page
o Alignment can also be changed later with the alignment buttons in the
toolbar across the top. See Basics above.
Textual Description is what will show up when you mouse over the picture, or
will show up if the picture doesn’t.
Direct questions/comments to [email protected]
Revised April 18, 2008
-6-
Editing an Image (Note: this is only accessible before inserting the photo)
Clicking on the Edit Picture button will open a new screen in which you can do all
sorts of fun and crazy things.
1. Change the Size of the picture by clicking on it and then moving your mouse
around until you achieve the size you want it to be.
2. Crop the Picture by selecting the Crop Picture icon in the top left
a. Cover the part of the picture you want to use with the blue box
3. Rotate the Picture to the Left or to the Right will turn the picture on its side or
even upside down!
When your picture is all uploaded, edited, and ready to go, click on Finish (if needed) and
then click Insert!
Adding a Flash File
•
•
Looks like this
Click on the InsertFlash button in the toolbar
IF the Flash file has already been uploaded to the system:
o Open the Assets Folder
o Select the Flash file you would like to enter
Open Assets folder
Select a flash
file (.swf files)
•
IF it has not yet been uploaded, do so now!
o Click Select
o Find the flash file you would like to upload and click on it
o Click Open
o Click Upload
o The file will automatically be added to the assets folder and opened for
you; all you have to hit is the Insert button!
Step 2
Step 1
Step 3
Direct questions/comments to [email protected]
Revised April 18, 2008
-7-
Adding a Link…
•
Select the text (or image) or enter the text (or image) that you would like to link to
something or somewhere else.
Text is
selected
•
Click on the “Custom Link Manager” button in the toolbar
The middle
one
…To Another Page Within the Website
• Under the Link to a Page tab (the default), select the page you would like to link
to
• Click on Insert
Select a page
To a page outside of the website, to an e-mail address – continue to page 8
To a document – continue to page 9
Direct questions/comments to [email protected]
Revised April 18, 2008
-8-
…To a Page Outside of the Website
• Click on the External Link Tab
• In the URL box, enter the website you would like to link to.
o Tip: You can open the page you want to link to in another browser/tab,
copy it’s address with CTRL+C, and then paste it into the URL box with
CTRL+V
• Click on Insert
Enter the site’s address here
…To an E-Mail Address
• Click on the E-Mail Link tab
• Enter the desired e-mail address into the E-Mail box
• Click on Insert
Enter the e-mail address here
Direct questions/comments to [email protected]
Revised April 18, 2008
-9-
…To a Document/Picture/Data File of Some Sort
• If the file has already been uploaded, skip to the next black bullet point. If it has
not yet been uploaded, do so now!
o Click on the Upload a File tab.
o Click on Select
o Select the file you would like to upload
o Click on Open
o Click on Upload.
•
The file will be in the Assets folder under the Link to a Page tab, so go there and
select the desired file.
Open the Assets
folder
•
Choose your
document/picture/data
file
Click on Insert
Yay! You
have a link!
Direct questions/comments to [email protected]
Revised April 18, 2008
- 10 -
Removing a Link
• Select the text/image with the link that you would like to remove
• Hit the Remove Link icon
Select
the text…
Direct questions/comments to [email protected]
Revised April 18, 2008
…and
click the
button
- 11 -
Creating a Table
•
Click on the Insert Table button, which opens a drop-down menu
Insert Table Button
•
Move your mouse over the white boxes to choose how many rows and columns
you want
Blue boxes show what
you’ve selected
It also tells you
your dimensions
•
Click and the table will be inserted for your filling pleasure!
The cells will expand
as they are filled
Direct questions/comments to [email protected]
Revised April 18, 2008
- 12 -
Making Changes
When you have a cell selected, there will be a circle with an “X” in it above the cell.
This circle deletes the entire column. The triangles insert a column to the respective
sides. The circle on the left side of the cell deletes the entire row, with the triangles
inserting rows to the respective sides.
You can also make changes to the table by clicking the Insert Table button with the
buttons below the Table Wizard.
Circles and
triangles for
adding or deleting
rows/columns
Insert Table Button
These can be used
to change your
table and are also
accessible by right
clicking on a cell
within the table.
Table Wizard
• Table design
o Choose how many columns and rows you want in your table with the Plus
and Minus buttons next to Columns and rows
o Also lets you merge cells and rows as you desire with the Column/Row
Span buttons
o You can select different cells by clicking in the graph
Change the
number
of columns
Change the
number of columns
Merge the selected
cell with the one
directly to the right
(or divide them
again)
You can select
different cells by
clicking on them
Direct questions/comments to [email protected]
Revised April 18, 2008
Change the
number of rows
Merge the selected
cell with the one
directly below (or
divide them again)
- 13 -
•
Table Properties
o Dimensions sets how large you want your table to be if you want it to be a
fixed size
Just entering a number sets how many pixels it will be
Adding a % will set what percent of the page it will take up
This table will be 346
pixels wide, and will be a
tenth of the page high.
o Layout
Background lets you choose a color for your table to be
Choosing a color fills in
the whole table. The
white box with an X
means “No Fill”
Alignment refers to where the table will sit on the page
Aligns Left
Aligns Center
Aligns Right
Cell Spacing is the space between cells, the larger the number, the
further apart they’ll be
…are further apart than
the cells in this table
*Neither Spacing nor Padding adds the borders; that was just to make it easier to see the
effects. Borders are discussed below.
Direct questions/comments to [email protected]
Revised April 18, 2008
- 14 -
•
•
Cell Padding is the space between what’s inside the cell and the
cell wall, so the larger the number, the further apart from the wall
the text will be
Cell Id is a way to name the cell, sort of like a title.
o Background image allows you to choose a picture to use as the
background of your table.
o Border lets you add borders! As well as choosing the color and thickness.
Cell Properties
o Each selection (Alignment, Background, Dimensions, etc.) applies only to
the cell selected in the grey grid.
Look under Table Properties for directions; they’re the same except Cell
Properties applies the changes ONLY to the selected cells instead of the whole
table.
Accessibility
o Heading Row allows you to add a title to your table
o Heading Column does something…like put the title underneath the table
when there is no Heading Row
o Caption Alignment affects where the caption goes in relation to the table,
either floating above or sitting right on top
o Caption: This is the title of your table
o Summary: No idea what this does
o Associate cells with headers means the size of the caption is affected by
the table
Direct questions/comments to [email protected]
Revised April 18, 2008
- 15 -
Related Links
On the left side of the page is a box called Related Links. This is where you can
put handy links that you want accessible from every page. Click the edit button to open
the Link Manager. Note: The links will appear in the order you enter them.
Clicking this leads to
something like this.
There are no links yet
so let’s add one!
•
•
•
Click Add a Link
Text is what will show up on the side as the link.
Select the page you want to link to, or enter the complete url for an external page.
Choose a page
in the site…
…or out of it. Make
sure the proper radio
button is selected
•
Enter the full url, it’s easiest to copy and paste
Click
You now have a link!
Direct questions/comments to [email protected]
Revised April 18, 2008
- 16 -
What’s New Today
At the bottom of the Home Page, there is a What’s New Today bar which is
handy for posting news of interest, announcing upcoming events, or other little blurbs as
you deem fit. Once created, the items can be edited at any time, and are easily removed.
Adding an Item
•
Click on the Edit button
•
Click Add a What’s New Item
•
Enter a headline, choose a picture (if desired), and then enter the synopsis which
should be a SHORT little blurb about the item.
Enter a headline
Click Browse to find a picture of the
appropriate size (130x85) on your
computer, select and click Open
Selected image is entered here
Enter a SHORT blurb in this box (optional), links
can be added w/in the text if wanted (i.e. “more” or
“Click here” leads to the full story)
•
*See Adding a Link above (pages 7-9)to add links to the text
Choose where you want the Item to link to for the full story or a more in-depth
description of the item, whether it’s a page within the site or from a different site.
The link will be created in the headline.
Direct questions/comments to [email protected]
Revised April 18, 2008
- 17 -
Choose a page
in the site…
…or out of it. Make
sure the proper
button is selected
•
Click
•
Click
Enter the full url, it’s easiest to copy and paste
You have a finished product!
Direct questions/comments to [email protected]
Revised April 18, 2008
- 18 -
The Menu
The menu is capable of three tiers for options. The first tier is the light blue line
where “Home” is normally located. The second tier is the dark blue line underneath
where sub-categories under the first tier go. Second tier options will either change the
page or open to the third tier. The third tier is made up of sub-categories under a second
tier option, and appears as a box.
Here’s a little
example menu.
If you want to edit the menu, click on any page, and then click “edit” on the menu bar.
This Edit Button
Not this one
either.
Not this one.
There are two options on top of the menu: a blue box, and a set of chain links.
•
The Blue Box: This option is used when you want something to go
underneath, such as a second or third tier. As such, most first tier menu items are
blue boxes.
•
The Links: This one is used when nothing is going underneath the menu
option.
Creating a Menu Option
•
•
Click on either the Blue Box or the Links. This will bring up an Add an Item
display.
The Text Box is what will show up on the Menu (i.e. First Tier above). Then you
have two options: Link to a page within the site or Link to an external page.
Menu Text (ie First Tier or Home)
•
Select the Radio Button for which you want: Link to a page in the site or Link to
an external page
Direct questions/comments to [email protected]
Revised April 18, 2008
- 19 -
o IF you selected Link to a page in this site
Highlight the page or Asset you want to link to
It will show up on the
menu as Page 1
Make sure the proper
radio button is
selected.
Select the page (or Asset) you
want to link to
Click
Skip the next bullet points to the “You”
o IF you selected Link to an external page
Enter the full url for the page you want to link to
Make sure the proper
radio button is
selected.
Full url with http://
Click
You have now created a new Menu option. Click Save and it will show up on Tier 1.
Ta-da! Tier 1 Menu Option!
Like this!
Creating a Second Tier
To create the second tier, you can either “drag & drop” or you can create it as a
second tier option from the start. First: the drag and drop with Page 1 we just created.
1.
2.
Select the
Option.
Direct questions/comments to [email protected]
Revised April 18, 2008
3.
Drag it up.
The cursor will
be a hand and
the First Tier
underlined.
Release the
mouse button.
It is now Tier 2.
- 20 -
OR you can create it as a Tier 2 from the start.
1.
Select the
Option.
2. Follow the directions
for creating a menu option
as found above.
3.
It is automatically
created as a Tier 2.
Creating a Third Tier
When creating the second tier that will be the pull-down for the third tier, select
“Link to an external page” but leave it blank! Then follow the directions for creating the
second tier options above, but move it down a level.
Make sure the proper
radio button is
selected.
Leave this Blank
2. Follow the directions
for creating a menu option
as found above.
1.
Select the Option.
3.
You have a Tier 3!
Going to the Preview
will let you see your
handiwork.
Direct questions/comments to [email protected]
Revised April 18, 2008
- 21 -