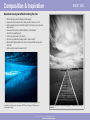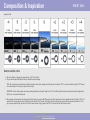
1
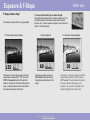
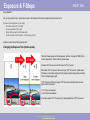
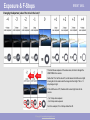
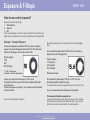
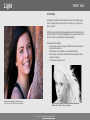
Contents
BRENT MAIL
INTRODUCTION
Beautiful image of my daughter. I asked her to put on her Christmas dress and
dance for me in the orchards. I wanted to create an image that shows depth but
still attracts the viewers eye back to the girl.1/1000sec at f4, 1250 ISO with a
200mm lens. Notice I used the rule of 3rds (read chapter on Composition).
3
I. HOW YOUR CAMERA WORKS
5
II. EXPOSURE & F-STOPS
6
III. HISTOGRAMS
15
1. LIGHT
18
2. LENSES & OPTICS
24
3. APERTURE & DEPTH OF FIELD
26
4. TIME/SHUTTER SPEED
31
5. ISO & NOISE
35
6. COMPOSITION
38
7. INSPIRATION
43
Glossary
45
Exposure Chart
46
© Copyright brentmailphotography.com
Introduction
BRENT MAIL
What this book will do for you.
2nd edition: We have re-written this book to be even more effective in explaining...
“The Key Elements that are needed to Create the most Breathtaking and Stunning Photos, even if you have never used a
Digital SLR Camera before”, in easy-to-understand English, with lots of visual examples and diagrams.
Who should read this book?
If you have ever wanted to take stunning photos, that you can be proud of, but have not quite grasped all the “technical things” to do with photography like
aperture, depth of field and shutter speed, then this book is for you. Or, maybe you just need to brush up on your basic photography skills and find some
new inspiration?
Who is Brent Mail?
Hi, my name is Brent Mail, and I'm a full-time professional photographer and photography teacher.
I run a successful photography studio in a small coastal town in Australia; have published a sold-out
landscape photography book; teach photography workshops & classes; and have been lucky to win
many photography awards along the way.
But, I started at the beginning just like you.
“I know how complex, confusing and frustrating photography can be when you
first try it”. All the components, accessories and jargon seem to come from another world. Have
you ever tried to read the user manual, and then just given up 'cause it all seems too hard?
It wasn't until I was 30 years old that I decided I was going to change careers and become a professional photographer. This is not an easy thing to do
when you have a family and expenses. In fact, I had to make do with my first camera on a time-share arrangement with a work colleague where I would
use it every second weekend. I couldn't complain—it was a proper SLR camera with a decent lens, and that was where I started learning photography.
After years of working as a freelance photographer selling images to magazines and newspapers, I landed my first professional job: photographing the US
snowboarding finals on the ski slopes in Colorado, USA.
© Copyright brentmailphotography.com
Introduction
BRENT MAIL
Fast-foward 10 years or so into the future - my dedication to photography has not waned. I have sought out every master photographer's secret and tried
and tested everything I could get my hands on. Now, I want to share these secrets in a simply worded and easy-to-read book made especially for beginner
photographers like you.
What elements are found in every great photograph?
If you look at some of the great photographs that are out there, you will notice some things that are common to all of them.
They all have certain basic elements professional photographers have applied in their work, to creating these amazing images.
Something in common:
This book breaks down these basic elements for creating beautiful images into seven essential ones:
1. light
2. lens
3. aperture & depth of field
4. time/shutter speed
5. ISO
6. composition
7. inspiration
2.
8.
© Copyright brentmailphotography.com
“The Bay” as seen from high above. This is the only way to see what Port Stephens (my home) looks like… Amazing!
How Cameras Work
BRENT MAIL
To properly understand the seven essential elements, we first need to understand how a camera works.
Looking through the camera:
Taking the picture:
How does light travel through a SLR camera?
Once the shutter release button (the button pressed to take the
photograph and which controls the shutter) is pressed, this happens:
LIGHT travels through the...
LENS where it is focused and then goes through the...
APERTURE (hole) and then bounces off the mirror, and prism through the eye piece to
be viewed by the photographer.
COMPOSITION of the scene takes place when the photographer looks through the lens.
How light travels through a digital SLR camera when photographer looks through the eye-piece (top),
and when shutter release button is pressed, exposing sensor to light (right).
The mirror will flip up and
LIGHT travels through the...
LENS where it is focused and then goes through the...
APERTURE (hole) and the shutter is opened for a certain amount of...
TIME to expose the sensor...
ISO (sensitivity) to the light. When the shutter speed (time) has been
reached, the shutter will close and the mirror will drop down again to
allow the photographer to see through the lens again.
This is why this type of camera is called an SLR (single lens reflex)
camera, because the mirror flips up and then down again every time an
image is captured.
© Copyright brentmailphotography.com
Exposure & F-Stops
BRENT MAIL
When taking a picture, whether indoors or out, you have to consider the light conditions so you can set the camera right in terms of
'exposure' and 'F-stops'.
Exposure is basically the brightness of your image.
Another way of looking at exposure is to think of it as the amount of light
recorded by your digital sensor:
Examine this black & white image.
No exposure to light
Just enough exposure to light
Too much exposure to light
Example of what black & white print would look like. From left to right, underexposed, properly exposed, and the over-exposed to light.
Remember the old days of film? What would happen if we were to print a
roll of black & white film that was not exposed to light, and then exposed
to light for too long?
A totally black image has had no exposure to light (under-exposed), and
when you print that image it will be black, and there will be no detail at all.
On the other side of the scale, a totally white image has been exposed to
light for too long (over-exposed) and will also have no detail in the final
print.
A properly exposed image will have detail in the lightest (highlights) part of
the print as well as in the shadows. On the right is a properly exposed
image with details in the highlights (boats and sky) as well as details in the
shadows (water and trees).
Black & white print that is properly exposed. Notice that there are details in the
shadows as well as the highlights. The 60 means that this image was exposed at
1/60th of a second, that is called shutter speed.
© Copyright brentmailphotography.com
Exposure & F-Stops
BRENT MAIL
Changing the Exposure of the Marina
Below is a diagram that shows what happens when we shoot the exact same scene, but adjust the exposure (brightness of the image):
Start in the middle with the 0, this image is properly exposed. (I photographed this image at 1/60th of a second – shutter speed)
If you move to the left of 0, each image has half as much light and is darker or under-exposed.
These are labelled with -1 (1 stop under-exposed), -2 (2 stops under-exposed) and -3 (3 stops under-exposed) etc.
If you move to the right of 0, each image has 2x as much light and is lighter or over-exposed.
These are labelled with +1 (1 stop over-exposed), +2 (2 stops over-exposed) and +3 (3 stops over-exposed) etc.
Notice how the image gets progressively brighter from left to right?
Each image (from left to right) has double the amount of light as the one next to it. This is called 1 f-stop change in light.
The same goes in the opposite direction, from right to left, there is 1 f-stop change in light, because there is half as much light as compared to
corresponding image on the right.
Lets look at this in more detail:
© Copyright brentmailphotography.com
Exposure & F-Stops
F-Stops, what are they?
The best way to explain this is by using examples.
1 F-Stop Under-exposed (darker)
This image is 1 f-stop under-exposed, notice the
shutter speed is double that of 1/60th second. At
1/125th of a second will let in half the light, the
shutter is only open for half the time. Because this
image is under-exposed we start to lose details in
the darkest (shadows) part of the print.
BRENT MAIL
1 F-stop is either half the light, or double the light.
Most digital SLR cameras allow us to adjust exposure by 1/3 of
an f-stop increments. That means we have more control of
exposure. So - 3 clicks in exposure change on your camera will
result in 1 full f-stop change.
Properly Exposed
This image is properly exposed at
1/60th second. There are details in
the lightest and darkest parts of this
image.
© Copyright brentmailphotography.com
1 F-Stop Over-exposed (lighter)
This image is 1 f-stop over-exposed, notice the
shutter speed is half that of 1/60th second, at
1/30th second. This will let double the light into
the camera. Because this image is overexposed, notice we start to lose details in the
brightest (highlights) parts of the image.
Exposure & F-Stops
BRENT MAIL
The exposure for this image has to be dead-on correct. With
so much black and dark shadows my camera would have
given me an incorrect exposure reading in Automatic mode.
I photographed this image in Manual Mode on my digital SLR
camera, and used my flash to light up the subject to get him to
“jump” out of the image.
Shot at 1/100th sec at f4 with a 24mm lens, using off-camera
flash.
© Copyright brentmailphotography.com
Exposure & F-Stops
BRENT MAIL
Recap Needed?
OK, try to stay with me here, I know this may seem a bit complex at first: Lets recap what we have learned so far:
Exposure is the brightness of your image.
• It's under-exposed if it is too dark.
• It's over-exposed if it’s too light.
• Details of the subject in both cases suffer.
• Double the light or half the light is 1 f-stop change in light.
Lets have another look at that exposure chart:
Changing the Exposure Time (shutter-speed).
This chart shows exposure of the same scene, but here I change the TIME that the
scene is exposed for. This is called the shutter speed.
60 means 1/60th of a second and 30 means 1/30th of a second.
Notice that 1/30th of a second is twice as long as 1/60th of a second, so that means
that twice as much light is being let into the camera and the image is twice as bright.
This is 1 f-stop change in light.
1/15th of a second is twice as long as 1/30th of a second, therefore twice as much
light is let into the camera.
+1 is 1 f-stop over-exposed.
+2 is 2 f-stops over-exposed.
So in this example, 1/15th of a second is 2 f-stops brighter than 1/60th of a second.
© Copyright brentmailphotography.com
Exposure & F-Stops
BRENT MAIL
Changing the Aperture (size of the hole in the lens)?
This chart shows exposure of the same scene, but here I changed the
APERTURE in the camera.
Notice that f11 is half the size of f8, so that means that half as much light
is being let into the camera and the image is half as bright. This is 1 fstop change in light.
F16 is half the size of f11, therefore half as much light is let into the
camera.
-1 is 1 f-stop under-exposed.
-2 is 2 f-stops under-exposed.
So in this example, f16 is 2 f-stops darker than f8.
© Copyright brentmailphotography.com
Exposure & F-Stops
BRENT MAIL
How do we control exposure?
Exposure is controlled by 3 things:
1. Shutter Speed
2. Aperture
3. ISO
These all work together to control the amount of light that is recorded by your
digital sensor. If we decrease one, we can compensate by increasing another.
Example 1: Constant Exposure
Consider the images above and start at 1/60th of a second as properly
exposed. Let's say the the aperture is f8 and the ISO is 100. (Don't worry
about ISO at this stage, so let's fix it at a constant 100.)
Properly exposed:
T=60
A=f8
ISO=100 (fixed)
So we increase the aperture hole from f8 to f5.6, (have a look at my
diagram below, notice the bigger hole).
Properly exposed:
T=125 (was 60)
A=f5.6 (was f8)
ISO=100 (fixed)
T = Time = Shutter Speed
A = Aperture = Size of the Aperture/Hole
What did we do here?
Lets say we increase the shutter speed to 1/125th second.
This means the shutter is open for half the time, therefore half the light
enters the camera.
This will under-expose our image by 1 stop, because less light is allowed
to enter the camera.
How can we compensate for less light?
By opening the aperture by 1 stop, which will let in more light (bigger
hole).
We increased the shutter speed (1/60th sec to 1/125th sec), thus
decreasing the light that enters the camera.
To compensate for less light, we opened the aperture more (f8 to f5.6).
Can you see how aperture and shutter speed work together?
This also works the other way around, too.
If we decrease the aperture (size of the hole), we will need to increase
the shutter speed (increase the time that the shutter is open, and lets
light onto the sensor) to compensate for the smaller aperture..
© Copyright brentmailphotography.com
Exposure & F-Stops
BRENT MAIL
Here is that example illustrated in terms of actual photos:
Properly exposed:
T=60
A=f8
ISO=100 (fixed)
Properly exposed:
T=125 (was 60)
A=f5.6 (was f8)
ISO=100 (fixed)
Practice makes perfect:
Have another look at these examples and the next, and then go out and try them for yourself. Try to keep the exposure constant by adjusting only the
aperture and time (shutter speed), and do this all in Manual Mode. The key here is to practice this concept, and at first it may feel really foreign to
you, but after a while it will become easy.
© Copyright brentmailphotography.com
Exposure & F-Stops
BRENT MAIL
Example 2: Constant aperture, adjusting TIME & exposure.
Here is the example we used in the exposure training video. We used a constant Aperture and ISO, and only changed the shutter speed to change the
exposure.
1 F-Stop Under-exposed (darker)
Properly Exposed
1 F-Stop Over-exposed (lighter)
This image is 1 f-stop under-exposed, notice the
shutter speed is double that of 1/60th second. At
1/125th of a second will let in half the light, the
shutter is only open for half the time. Because
this image is under-exposed we start to lose
details in the darkest (shadows) part of the print.
This image is properly exposed at
1/60th second. There are details in
the lightest and darkest parts of this
image.
© Copyright brentmailphotography.com
This image is 1 f-stop over-exposed, notice
the shutter speed is half that of 1/60th second,
at 1/30th second. This will let double the light
into the camera. Because this image is overexposed, notice we start to lose details in the
brightest (highlights) parts of the image.
Exposure & F-Stops
BRENT MAIL
Histograms
What are those funny diagrams that look like
mountain ranges?
Histograms are a graphical representation of the
tonal range in your image. Basically they
represent the exposure of your image, from the
blacks (shadows) on the left all the way to the
whites (highlights) on the right hand side.
How do I read a histogram?
Lets take a properly exposed image and have a
look at the histogram.
Black
Grey
White
(Darkest tone ---------------------------- Lightest tone)
Notice the most of the tonal information ranges
from totally black on the left, all the way to totally
white on the right hand side. The mid tones are in
the middle.
Long Exposure landscape photograph of Shoal Bay, Port Stephens, using a wide angle lens and small aperture
to create a large depth of field (part of the image that is in focus). 110seconds at f16, 100 ISO with a 21mm lens.
© Copyright brentmailphotography.com
Exposure & F-Stops
2 F-Stops Under-exposed (darker image)
This image is 2 f-stop under-exposed, and the
histogram peaks are closer to the left hand side.
Because this image is under-exposed we start to
lose details in the darkest (shadows) part of the
print, this is called clipping the shadows.
BRENT MAIL
Properly Exposed
This image is properly exposed at
1/60th second. The histogram peaks
are equally spaced between the left
and right hand sides. There are
details in the lightest and darkest
parts of this image.
2 F-Stops Over-exposed (lighter image)
This image is 2 f-stops over-exposed,and the
histogram peaks are closer to the right hand
side. Because this image is over-exposed we
start to lose details in the brightest (highlights)
parts of the image, this is called clipping the
highlights.
This image has a lot of lighter tones in it, notice the
histogram is peaking closer to the right hand side of the
graph. Also, it is not over-exposed because there is no
clipping in the highlights (the graph does not touch the
right hand side).
© Copyright brentmailphotography.com
Exposure & F-Stops
BRENT MAIL
The Essence:
How your camera works
• Light enters the camera through the camera lens.
• The lens focuses the light and sends it through the aperture, which can open and close to let more or less light inside.
• Once the shutter release button is pressed, a mirror will flip up and down to expose the sensor (ISO) to the light.
Exposure is the brightness of your image.
• It's under-exposed if it is too dark.
• It's over-exposed if it’s too light.
• Details of the subject in both cases suffer.
• Double the light or half the light is 1 f-stop change in light.
To adjust exposure:
• Aperture is also adjusted as indicated by f-stops
• Time by adjusting the shutter speed
• Sensitivity by setting the ISO
To gauge the correct exposure of your image before taking the photo, glance at the histograms.
• Peaks touching the left part of the graph indicate it’s too dark.
• Peaks touching the right part mean it’s too light.
© Copyright brentmailphotography.com
Light
BRENT MAIL
Photography literally means “to draw with light”
The first key element for creating photographic images is light, which comes from a variety of sources, both natural and man-made. Without light, there can
be no photography!
George Eastman, the American innovator who founded the Eastman Kodak Company and who invented roll film, helping bring photography go
mainstream, once said, “Light makes photography. Embrace light. Admire it. Love it. But above all, know light. Know it for all you are worth, and you will
know the key to photography.”
© Copyright brentmailphotography.com
Light
BRENT MAIL
Light is THE most important element!
It is broken down into four main categories:
1. Quality of the light (mood)
2. Direction of the light
3. Hard light
4. Soft light
1. Quality of the light
This is the first and most important category of light as it add mood to a
scene. What quality do you have, and how do you find the best quality
light?
Ever wonder why people love sunrise and sunset pictures? Precisely
because of the mood it puts them in when they see the varying qualities of
light.
There are a number of factors that effect the quality of light: The time of
day, atmospheric conditions (cloud cover & dust in the air), light intensity,
light colour (temperature), and whether the light is transmitted or reflected
or both.
Golden Hour (best quality light of the day)
Just before and after sunrise or sunset—twilight.
I love this time of day to photograph landscapes, because the light has a
definite mood to it. Light passes through the most atmosphere at this time,
and has the most amazing colours and quality.
Sunset photograph during the golden hour from the rocks in Anna Bay. 1/8sec at f10,
100 ISO with a 17mm lens.
Continue to look at light in a different way, and try to see the different
characteristics it displays in different conditions.
© Copyright brentmailphotography.com
Light
BRENT MAIL
2. Direction of the light
This is usually where the main light is coming from. The direction of the
light can dramatically effect an image, especially in the studio where the
direction can be controlled.
There are 3 main directions of light:
1. Front light
This is when the source of light is behind the photographer and the
light illuminates the subject from the front. This direction of light is
usually great for portraits and commercial photography.
2. Side light
Light that hits the subject from the side. This lighting adds depth to
an image. This direction of light is usually great for adding mood to
portraits and landscapes.
3. Back light
When the light comes from behind the subject. This means that
photographers are shooting into the light. This can be difficult for a
beginner because the camera's built-in light meter can be way off,
and quite often photographers need to add artificial light when
shooting portraits. This direction of light is usually great for
silhouettes and fine art photography.
Portrait photo where the main light is directly behind the subject. 1/800sec at f4, 100 ISO
with a 120mm lens.
Main light is coming from
the flash on the camera,
with the sunset behind the
model. 1/60 sec at f10, 100
ISO with a 70mm lens.
© Copyright brentmailphotography.com
Light
BRENT MAIL
3. Hard light
This is when direct sunlight or a “bare bulb” studio light is brought into use
in the composition. Hard light usually comes from a relatively small
surface area.
It is great for landscape photography because the light penetrates the
water and creates very high contrast (very light highlights and very dark
shadows) images with vivid colours. When you use hard light, texture is
shown very well, too.
Characteristics of hard light:
• High contrast – where the degree of difference between black and
white is at its maximum
• Hard dark shadows – dark, well-defined shadows with brilliant
highlights and strong form
• Burned out highlights – when a patch of the image is so bright that it
couldn't be any brighter, this means that there is no way that any
detail can be brought out of this part of the image whatever you do
• texture – the perceived surface quality
• vivid colours – distinctive colours of all areas in the photograph
Example of hard light – direct sunlight is great for landscapes. 90seconds at f18,
100 ISO with a 17mm lens.
Right: Using hard light and high contrast to display a body-scape in the studio.
Notice the light is behind and above the model, this is called 'rim lighting'.
1/200 sec at f5.6, 100 ISO using a 70mm lens and one studio strobe.
© Copyright brentmailphotography.com
Lenses & Optics
BRENT MAIL
Lenses focus the light onto the digital sensor.
Lenses come in many different configurations and qualities.
When it comes to lenses, you get what you pay for in most cases. The more expensive the lens, normally this translates to a better quality lens.
When purchasing a lens, you will need to consider what you will be photographing, or the subject of you photography. Is it landscapes, portraits, action,
macro or events like weddings.
What size lens will you need?
Here are a few guidelines for lens selection:
Landscapes: Super wide angle 16mm to wide angle 35mm
Portraits: Standard 50mm to telephoto 200mm
Weddings: zoom lenses from wide angle 35mm to telephoto 200mm
Sports & wildlife: Telephoto 135mm-300mm to super telephoto
400mm and up, with a very large aperture (f2.8 to f4)
• Macro: Special macro lenses with high magnification
•
•
•
•
Zoom lenses or fixed focal length lenses?
Zoom lenses can be more versatile, great for weddings and portraits.
Modern zoom lenses are normally heavier and more expensive than their
fixed focal length equivalents.
Fixed focal length lenses normally come with a much larger aperture, and
with that, photographs will have a shallower depth of field. This lens type
is great for portraits.
You might need to carry more fixed focal length lenses to cover the same
situations as you would for only one zoom lens.
Fixed focal length lenses force you to move around and compose the
scene, which sometimes is a good thing.
A collection of Canon lenses for DSLR cameras. Some of these lenses cost over
$20,000 but are worth every cent.
© Copyright brentmailphotography.com
Lenses & Optics
BRENT MAIL
What to look for in a lens
First to look for is the aperture number is directly co-related to the light gathering capabilities of that particular lens. This determines the size (diameter) of
the glass. An f1.2 lens is a lot bigger, heavier and more expensive than a f5.6 lens.
Think also of the contrast it achieves by looking at the quality of the glass from which it is made. It goes without saying that you need to think about the
material, whether it is plastic, glass or aluminium.
The construction and engineering that goes into the lens is another factor that will determine the cost of the lens.
Basically, you get what you pay for. There are lenses that lasted me 10 years and are still going strong
The Essence:
Lenses focus the light, so when choosing which one your will use, consider your
subject
•
•
•
•
•
landscape
portrait
weddings
sports & wildlife
macro
...and be prepared for the light conditions.
Here I used a very long lens to get a close-up of the setting sun. 1/320th sec at f/8
using my 400mm lens.
© Copyright brentmailphotography.com
Light
BRENT MAIL
4. Soft light
Soft light is the opposite of hard light, that means that the light comes
from a relatively large surface area, like a cloudy sky, or a large “soft
box” in a studio.
Soft light is great for portrait photography because it makes a face and
skin look smooth. That is why photographers use large soft boxes in the
studio to create very soft light for model photography.
Characteristics of soft light:
• Low contrast - where the degree of difference between black and
white is at its minimum
• Soft shadows (or no shadows) – less defined shadows
• Little texture – when there is little detail in the perceived surface
quality of a subject
• Can make a subject look dull
Shade creates beautiful soft light for portraits.
1/200 sec at f4, 100 ISO using a 100mm lens.
Using soft light in the studio to create this beautiful model image.
1/200 sec at f4, 100 ISO using a 150mm lens.
© Copyright brentmailphotography.com
Light
BRENT MAIL
The Essence:
There can be no photography without light, whether it's natural or man-made.
To do photography, you must understand it's four main categories:
1..Quality.
2..Direction.
3..Hard light.
4..Soft light.
"...know light... and you will know the key to photography." -George Eastman, Kodak founder
© Copyright brentmailphotography.com
Aperture & Depth of Field
BRENT MAIL
Aperture is the size of the hole inside your lens.
What does aperture do?
Aperture effects the exposure of your image. The larger the
aperture (bigger hole) the more light your lens will let into
your camera.
*Please refer to the exposure section for more details on how to use
aperture to control exposure.
Depth of Field:
Aperture also effects the depth of field in your image, which is the range of sharpness either
side of the focus point. Large depth of field means that everything is in focus and a shallow
depth of field means that only part of the image is in focus (the focal point of the image, or the
point of interest in the image)
What else effects depth of field?
Depth of field is shallower (less sharp either side of the focus point) when:
-there is large aperture (from f2.0 to f5.6)
-when you used very close focus
-when telephoto lenses (more magnified lenses, or longer lenses) are used
Depth of field is greater (more sharp either side of the focus point) when:
-there is small aperture (from f11 to f22)
-when you use far away focus
-when wide angle lenses are used
Shallow depth of field: Notice that Milly's face is in focus but
the background and foreground is out of focus.
© Copyright brentmailphotography.com
Aperture & Depth of Field
Large Aperture = Shallow Depth of Field
BRENT MAIL
Small Aperture = Large Depth of Field
This image was taken with an aperture
value of f4. This is a large (wide)
aperture and this image has a shallow
depth of field, this means that the blue
block is in focus and all other Lego
blocks are out of focus. Notice you can
NOT read the Lego symbol on the red
block.
This image was taken with an
aperture value of f22. This is a small
aperture and this image has a large
depth of field, this means that the
blue block is in focus as well as the
red and grey blocks. You can even
read the Lego symbol on the red
block.
Have a look at the grey line at the back of the photograph.
Compare this to the image on the right.
Have a look at the grey line at the back of the photograph,
notice how it is more defined than the image on the left.
© Copyright brentmailphotography.com
Aperture & Depth of Field
When do you use depth of field?
Shallow depth of field: Portraits
When you photograph portraits, you want the person (or their face) to
stand out of the photograph. Their face needs to be the point of interest in
the image.
This can be achieved by using shallow (small) depth of field.
When I photograph people, I always shoot “wide open” on the aperture,
that means that I shoot as large as the aperture will go, which is normally
f4 or sometimes even f2.8. The only exception to this rule is when I have a
group of people and they are different distances from the lens, then I need
to “close down” the aperture to make sure that everyone is in focus.
Example of using shallow depth of field in
portraits:
In this photograph of Taylah on the right, I wanted her
face to be in focus and everything else to be out of
focus. The feature or focal point of this image is her
face (and eyes). How did I achieve shallow depth of
field in this image?
I used a large aperture of f4.0
and a Telephoto Lens of 200mm
and she was relatively close to me, maybe 2-3m
away.
Did I achieve what I wanted by using depth of field?
Does Taylah's face feature in this image? Are your
eyes naturally directed to her face and eyes?
© Copyright brentmailphotography.com
BRENT MAIL
Aperture & Depth of Field
BRENT MAIL
Large depth of field: Landscapes
When you photograph landscapes, we want image to be in focus, from
the foreground to the horizon/background. This means you need to have
a large depth of field.
When I photograph landscapes, I normally shoot with a wide angle lens
and a very small aperture in the range of f11, f16 or smaller (f22). This
sometimes means that I need to use a tripod because with such a small
aperture, I would need a slow shutter speed to compensate for the
minimal light that enters the camera to keep my images properly
exposed, and with a slow shutter speed, I can not hand-hold my camera
without getting camera shake (blurred images).
Example of using large depth of field in
landscape photography:
In this photograph of Zenith beach on the left, I
wanted to rocks in the foreground as well as the
mountain peak and clouds to be in focus. How did
I achieve a large depth of field in this image?
I used a small aperture of f14 and a Wide Angle
Lens of 17mm and I focused far away from me
(mid way in the image)
Landscape photograph of Zenith Beach. 90seconds at f14, 50 ISO with a 17mm lens. I
also used a Neutral Density filter so that I could capture the wave movement to look like
milk by using a very long exposure of 90 seconds.
Did I achieve what I wanted by using depth of
field? With everything in focus, you need to think
about composition to make the image appealing to
the viewer. Look for leading lines, points of focus,
texture and light, and dark areas of the image. This
will be further discussed in the final essential skill.
© Copyright brentmailphotography.com
Aperture & Depth of Field
BRENT MAIL
The Essence:
The aperture inside the lens is the hole where light will pass through.
It affects the depth of field of your image, or whether just one aspect of the image will be in focus or the whole scenery.
• Smaller aperture will give greater depth of field
• Larger aperture will give a shallower one.
Newcastle Ocean Baths: Here I used a small
aperture and very long shutter speed to create this
image. 90 seconds at f18 with a 17mm wide angle
lens. See the clouds moving?
© Copyright brentmailphotography.com
Time/Shutter Speed
BRENT MAIL
Shutter Speed is the TIME that light is exposed on to the sensor, or the time that the shutter is OPEN.
What does shutter speed do?
Shutter speed effects exposure, just like aperture does. The slower the shutter speed,
(which means that the shutter is open for longer), the more light that enters the
camera, and the brighter the exposure.
Sharp or Blurry images.
Shutter speed also effects whether your images will be sharp or blurry when
photographing a moving subject. When photographing portraits, we need to consider
how much movement is involved and what shutter speed to use.
What shutter speed can you hand-hold the camera?
What shutter speed can you hand-hold your camera and not get a blurred image,
without needing a tripod?
This will depend on the lens you have on your camera. If you have a 50mm lens
(standard lens) then you can hand hold your camera at 1/50th second. If the lens is
100mm, then you can hand hold at 1/100th second. With a 200 mm lens, you can
hand hold at 1/200th sec; a 300mm lens, at 1/300th second. Can you see the pattern?
Xmm lens = 1/X seconds shutter speed.
Tip: If you don't have a tripod handy, try to lean up against a wall, or kneel down and
rest your camera on your knee, that way you can stabilise your camera and shoot at
slower shutter speeds without needing a tripod.
Using a relatively slow shutter speed of 1/30th sec I was able to show
movement in this image by panning while keeping the subject relatively sharp
and in focus. 1/30sec, at f22 and 100 ISO using a 24mm lens. I also used a
flash to keep parts of Wesley's body sharp.
© Copyright brentmailphotography.com
Time/Shutter Speed
BRENT MAIL
Slow shutter speed
Fast shutter speed
This image was taken with a shutter speed of 1/15sec. This is a
slow shutter speed and as a result this image is blurred. This
image does show movement and can be considered artistic.
This image was taken with a shutter speed of 1/500sec. This is
a fast shutter speed and as a result this image is sharp with
Wesley and the background crisp. This image does NOT show
movement and looks like Wesley is frozen in the air.
This image would have been much better if the background
was slightly blurred to show movement, but the subject was
sharp.
© Copyright brentmailphotography.com
Time/Shutter Speed
BRENT MAIL
So how do you get creative with shutter speed?
Think about movement, and how you can show movement in a whole new
way to your audience.
So what happens when you want to slow down the shutter, but there is
way too much light. Look at the example below, the magic word here is
'filters'.
Take the ocean and the movement of waves as an example. How can you
show water movement as blurred and milky and give the image a whole,
new feeling? Well, you can wait for the light to be really dark and then
shoot with a very slow shutter speed, like just after sunset.
Waiting until after the sun has set, I captured this slow shutter speed image and the wave
movement. 1/8th sec at f10 with 100 ISO using a 17mm wide angle lens.
Here I used a 10 stop ND filter to reduce the light by 1000 times, so that I
could capture a slow shutter speed image in full daylight. Why? So that I
could create an image where there is cloud as well as wave movement...
something different. 150seconds at f16 with 50 ISO and using a 17mm lens
and a 10 stop ND filter.
© Copyright brentmailphotography.com
Time/Shutter Speed
BRENT MAIL
The Essence:
The time the shutter stays open is called the shutter speed
and will dictate whether the image you are photographing will be:
• Sharp
• Blurred
When it comes to action or sports photography, you need to
freeze the action, which means a very fast shutter-speed.
Here I used 1/1000th second shutter-speed at f5 with my 200mm lens.
© Copyright brentmailphotography.com
ISO
BRENT MAIL
ISO is the sensitivity of your digital sensor to light.
ISO is equivalent to film speed (Kodak 100 TMAX Pro or Agfa APX 400 or Fuji Neopan Pro 1600).
What does ISO do?
ISO effects the exposure of your image. The higher the ISO, the more sensitive your digital
sensor is to light. Just like aperture and shutter speed effect the exposure of your image, the ISO
setting of your camera is the 3rd key component to making sure your exposure is correct.
SO 100, taken at 1/100th sec at f4 (low ISO)
In the example on the right, we photographed the same object and only changed the ISO
(kept the aperture and shutter speed constant), notice how the object gets brighter as we
increase the ISO from 100 to 800 then finally 3200 in the bottom image.
ISO becomes very important when the light is 'bad' or fading, or you are inside a house and it's
dark. In recent years, camera manufacturers have made great improvements in the digital sensor
design and now photographers can use ISO of up to 12800 and higher, with minimal degradation
to the image quality.
ISO 800, taken at 1/100th sec at f4 (mid ISO)
Wedding Photographers Nightmare!
In the old days, when shooting a wedding in a dark church where no flash is allowed, it was very difficult to get
any images that were any good, because you had to use a relatively fast shutter speed of (1/60 th of a second),
to capture movement with wide open apertures of f2.8 and at 1600 ISO. There was still not enough ambient
light to correctly expose and image, not even half the amount needed. Nowadays, you can dial up the ISO to
12500 and shoot at 1/200th at f2.8 on a telephoto lens (hand held) and still have great images.
What this means is that ISO is a photographer's friend, and by using it correctly, photographers
are able to photograph in situations that they could not in the past.
ISO 3200, taken at 1/100th sec at f4 (high ISO)
© Copyright brentmailphotography.com
ISO
BRENT MAIL
Why not use a high ISO all the time then?
The short answer to this question is NOISE. The higher the ISO, the more noise or degradation to
your image. This means that the tones are not as smooth. Consider the following examples:
© Copyright brentmailphotography.com
ISO
BRENT MAIL
The Essence:
ISO effects the Exposure. (Just like shutter-speed and aperture do)
Changing the ISO to control how much light you need may affect
• ‘noise’ or degradation of colour quality.
© Copyright brentmailphotography.com
Composition & Inspiration
BRENT MAIL
Composition
What is the subject of your picture, and what is the emotional response you want to evoke from the viewer?
Composition is where creativity comes into play. How you display your subject, and what tools (aperture, lens, shutter speed, exposure and light) you
choose will effect the final composition. This is how you really get those breathtaking images you can be proud of.
Following are a few rules and guidelines I use to achieve images that stand out, or tell a story.
Rule of Thirds
This is where photographers break up a picture into 1/3 blocks horizontally and
vertically. Where the lines intersect are our points of interest. The eye naturally
moves to areas within the image looking for points of interest, or lighter areas,
or areas that are in focus or have more contrast. There areas should fall within
the intersection points, to create a pleasing composition.
In this example, the rock on the beach is a point of interest and it falls into the bottom right
intersection point. Notice the horizon is not in the middle of the image, but closer to the top 3rd.
Landscape image using the Rule of Thirds to direct the viewer's eye to
points of interest within the image. In the image above, there is a main
point of interest (smooth pebble) at the bottom right intersection point, as
well as another point of interest is the brighter flowing water at the top left
intersection point.
© Copyright brentmailphotography.com
Composition & Inspiration
BRENT MAIL
Movement. Here, the Rule of Thirds is used where the focus point is
Wesley's head. Because there is movement, there is space for him to
jump into. 1/300sec
In this image of Milly, I used the Rule of Thirds and cropped the image to make
her eyes the focal point. Taken in studio at aperture f4.5 using a 200mm lens.
© Copyright brentmailphotography.com
Composition & Inspiration
BRENT MAIL
Leading Lines
Sometimes, I like to add leading lines into my landscapes to lead the eye of the
viewer into the image.
Here I have used leading lines and the Rule of Thirds. The horizon falls on the
bottom 3rd of the image and the foot path leads the viewer into the image.
In this image, I use the old wooden pier to lead the viewers eyes into the landscape
image and towards the marina and boats. Notice the image is much lighter in the middle
where I want the viewer to focus their attention. 210seconds at f20 using a 17mm lens.
© Copyright brentmailphotography.com
Composition & Inspiration
BRENT MAIL
Using Light & Darkness (Contrast)
Using Sharpness & Texture
Using light and dark and
contrast to draw the viewers
eye to the very dark rocks in a
sea of white wash. 30second
exposure at f16 using a 40mm
lens.
What is the point of interest in
this image? Can you guess?
The rock in the lower 3rd of the
image is sharper than the rest of
the rocks and it has great
texture on it. 109seconds at f16
using a 20mm lens.
Negative Space
Sometimes the image will look a lot
better if you leave some room around
the subject, this is called negative
space.
In this example of an underwater image, I have
left room below Brooke to swim into. I have
intentionally cropped this image to include this
negative space. 1/320sec at f4 with a 24mm lens
in an underwater housing.
© Copyright brentmailphotography.com
Composition & Inspiration
BRENT MAIL
Questions to ask yourself before taking the shot.
• What is the main point of interest in this image?
• How much of the scene should I show, should I zoom in, or out?
• Is there a better angle to take this image? Try to bend your knees and
move around.
• How would this look in portrait orientation, or landscape?
• Are there any leading lines?
• Is there any symmetry in this scene?
• Are there any distracting backgrounds I need to avoid?
• What is the brightest park in this scene, or the part that has the most
contrast?
• Is there a story here that I want to tell?
Underwater image of a wave breaking in Samoa. Notice where your eyes go, most
probably to the lightest part of the wave. 1/8000 sec at f5 using a 30mm lens in an
underwater housing.
Here I used symmetry to create something different.150seconds at f16 using a
40mm lens.
© Copyright brentmailphotography.com
Composition & Inspiration
BRENT MAIL
Inspiration
“Start with the end in mind”
The vision or inspiration behind the picture. Why do you want to take this picture in the first place, what have you go in mind?
What gets you up in the morning to go out and take pictures? Who or what inspires you?
Where I get my inspiration:
Want to learn more?
Here are a few places I get my daily inspiration and see what some of the best
photographers in the world are up to.
Check out my video series on
these seven essential elements
and photography skills, and go
on location with me while I
photograph and explain how I do
it all.
www.500px.com
www.deviantart.com
www.redbubble.com
Where to find me:
brentmailphotography.com for photo tips and training
Google+ where I post all of the time
Facebook like us here
Thank you for reading this book. Please leave me
some feedback on my main website
brentmailphotography.com or send me an email
from there. Big thanks to Karla Pascua-Buela, my
admin assistant, for providing much-needed
beginner's insights.
500px.com is one of the websites I visit every day to get my inspiration.
Cheers, and have a great day!
There are many great resources out there, and many great photographers. Find
one or two and follow them, maybe even ask them for help. You may be
surprised by how much you can learn.
© Copyright brentmailphotography.com
Composition & Inspiration
BRENT MAIL
The Essence:
When it comes to composition, unleash your creativity!
Display your subject by mastering your ‘tools’ (aperture, lens, shutter speed, exposure and light), and be guided by the basic rules in photography.
Be ‘inspired’ by framing a shot according to the Rule of Thirds, by using leading lines, or playing with contrast, texture and negative space.
Ultimately, how you use all these will tell your story.
© Copyright brentmailphotography.com
Composition & Inspiration
BRENT MAIL
GLOSSARY (what do all these words mean?)
Light – A fundamental part of photography, photographers use light in their compositions whether it’s natural or artificial, direct or diffused.
Aperture – It is defined as the size of the opening of the lens. It controls the amount of light entering and hitting the sensor of the camera.
Shutter – A device that allows light to pass through the aperture for a determined period of time.
Shutter release – A button that's usually found on the right-hand side of the camera that you press to take a picture.
ISO – The ISO number indicates how quickly a camera’s sensor absorbs light. The higher the ISO number, the faster the camera absorbs light, meaning you can take better
photos in lower light.
Sensor – Described as the digital version of film. A device that converts an optical image into an electric signal by receiving light through the lens and focuses that light into an
image.
Exposure - The amount of light that falls on the image sensor when taking a photograph. It varies with the shutter speed, aperture, ISO sensitivity and obviously the ambient light.
F-stops – In particular it is the ratio of the focal length divided by the diameter of the aperture (opening) hence the larger the f/stop the smaller the aperture and same for vice
versa.
Histograms – A graph that shows the brightness range of a photo to decide if it has correct exposure.
Depth of field – The distance between the closest and the farthest point in the image that are relatively in focus. It can be varied with lens aperture, focal length, zoom, and the
distance to the object being photographed.
Landscape – An image of land and/or sea, with little or no people in the picture.
Portrait – Refers to studio or outdoor photography where people are the main subject of the image.
Macro – An image taken close-up with all its various magnifications and forms.
Contrast – The term used to describe the difference between the dark and the light areas of an image.
Commercial – Wedding, fashion and industrial photography work.
Noise – It is the unwanted graininess and color saturation in a particular image. It shows up at various shutter speeds and at higher ISO numbers.
Texture – The detail of surface irregularities captured in a photograph.
© Copyright brentmailphotography.com
Composition & Inspiration
BRENT MAIL
Exposure Chart:
How to read this chart:
1. Start in the middle, at the properly exposed image. (1/60 th second at f8)
2. Only use shutter-speed OR aperture values to calculate exposure change.
TIME: This means that you should block out (hide) the aperture values when working with shutter speed, for example: 1/30 th of a second is double the light of 1/60th second,
at a constant aperture. The shutter is open for twice as long.
APERTURE: Hide the shutter-speed values when working with Aperture. Example: Going from f8 to f11 we half the light entering the camera because the hole (aperture) is
half the size, at a constant shutter-speed.
3. When working out how aperture will compensate for shutter speed, you can use BOTH aperture and shutter-speed values, but in opposite directions. Example: If 1/60 th of a
second at f8 is correcly exposed, then if we half the shutter speed to 1/30 th second, thus letting in twice the light, then we need to make the aperture hole smaller to f11 to
get a correctly exposed image. See how 1/60th f8 is the same amount of light (exposure) as1/30th f11 asuming that the ISO remains constant.
© Copyright brentmailphotography.com