1
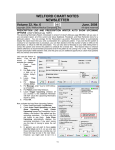
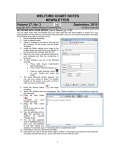
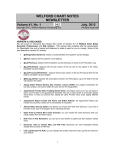
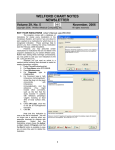
WELFORD CHART NOTES
NEWSLETTER
Volume 41, No. 6
December, 2012
copyright 2012, Welford Medical Computing, Inc.
All rights reserved
CUSTOMIZE YOUR LAB BOOK CATEGORIES (User’s Manual, pgs. 1266-1267)
Version 6.2 lets you customize the use of Lab Book
Categories (User’s Manual, pg. 808). (If you have not
already set up Lab Book Categories, do so using Lab
Book\Utility\Assign Categories). Let’s see how this is
done.
1. Press System\Lab Book Options.
2. Check Organize by Category.
3. You now have the option of sorting tests within
each Category either alphabetically or
chronologically. (Prior to version 6.2, results
were always sorted chronologically. However,
you may well prefer sorting them alphabetically,
which results in the same test being grouped
together so that you can more quickly spot
trends in an individual test).
4. Press OK to store your settings.
You also can rearrange the order in which the Categories
are listed when you display results in the Lab Book
organized by Category.
1. Press View\Lab Book.
2. Enter the name of any patient.
3. Press Utility\Category Editor.
4. Press Change Display Order.
5. If you simply want the Categories in
alphabetical order, press the Sort button.
6. If instead you wish to have a customized
order, you can move any Category up or
down by clicking on it with your left
mouse button, dragging your mouse up
or down, and releasing your left mouse
button. You can accomplish the same
thing by repeatedly pressing the Move
Up or Move Down buttons.
7. Press OK to store your changes.
NEW @FUNCTIONS (User’s Manual,
pg. 1261)
Version 6.2 adds a number of @functions,
including:
•
@AllergyTable_Numbered: this is a
replaced with a table of the patient’s
allergy information, with each line
16
numbered. This is the same as @AllergyTable except that each line is numbered.
•
@Email: this is replaced with the patient’s e-mail address (stored in the Name Editor).
•
@LastPharmacy: this is replaced with the name, address, and telephone number of the last
pharmacy recorded for the patient in the Prescription Log. If you want to have this information
automatically displayed when you open a patient’s chart, create a Chart Summary Template, place
this @function inside that Template, and check Tools\Writer Options\Auto Open Options\Chart
Summary.
•
@LastPlanPatient: this is replaced with the Plan section of the patient’s most recent visit stored in
the Visiter, with dosing instructions translated into plain English. Use this inside a Visit Summary
Template to automatically include your plan in the Visit Summary. This is useful if you permanently
store the note at the time of the visit just before printing the Visit Summary.
•
@LastProvisionalPlanPatient: this is replaced with the Plan section of the patient’s most recent
note stored in Provisional Notes, with dosing instructions translated into plain English. Use this
inside a Visit Summary Template to automatically include your plan in the Visit Summary. This is
useful if you provisionally store the note at the time of the visit before printing the Visit Summary.
•
@RxLogLastVisit: this is replaced with entries in the Prescription Log matching the date of the
patient’s most recent visit. This is handy if you generate a Visit Summary after the visit is complete
and you wish to include in the Visit Summary a list of the prescriptions that you generated at the
time of the visit. Append “_Method” to include the Method from the Prescription Log entry. Append
“_Pharmacy” to include the name of the Pharmacy from the Prescription Log entry
PATIENT PORTAL SKIPPED LAB TESTS (User’s Manual, pgs. 1270-1271)
If you are using the Patient Portal to inform your patients of their test results, you can designate
specific tests that you do NOT wish to display on the Patient
Portal so that you can inform the patient of these results in
person rather than having the patient learn of the results over
the Internet. Let’s see how this is done:
1.
To activate the Patient Portal if you have not
already done so, set Reports\Meaningful
Use\Patient
Portal
Permission
Log\Options\Update
Portal
Every
<n>
Seconds to a number other than 0 (e.g. 4 or 5)
and set Reports\Meaningful Use\Patient Portal
Permission Log\Options\Include Lab results
for the past <n> days to a number other than 0
(e.g. 30).
Press Reports\Meaningful Use\Patient Portal
2.
Permission Log\Options\Skip.
3.
Press Add to add a new test to this list. Tests on
this list are NOT sent to the Patient Portal.
Type in the name of the Test you wish to Skip
4.
and press OK.
SEND US YOUR TIPS
If you have tips, shortcuts, questions, or suggestions for future newsletter topics, please send them to us at:
Welford Medical Computing, Inc.
or
MEDCOM Information Systems
3779 Hermitage Trail
2117 Stonington Avenue
Rockford, IL 6111
Hoffman Estates, IL 60195
17