1
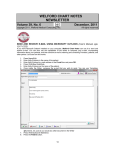
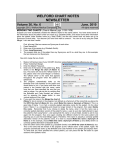
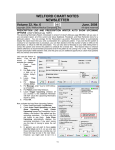
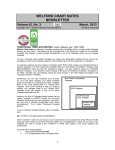
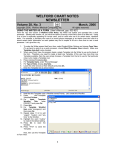
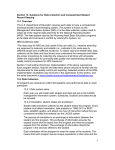
WELFORD CHART NOTES
NEWSLETTER
Volume 39, No. 3
copyright
September, 2011
2011, Welford Medical Computing, Inc.
All rights reserved
ANATOMICAL DRAWINGS (User’s Manual, pg. 1207)
Welford Chart Notes comes with a set of anatomical drawings which make it easy for you to create
diagrams of parts of the body to demonstrate locations of skin lesions, pain, etc. Let's see this in action:
1. Press Write\New Note\Note.
2. Specify Kelly Erickson is the name of
the patient and press OK.
3. Inside the Writer, type: "She has a 3
mm papule on the dorsal aspect of her
right foot."
4. Press <ENTER> to skip a line.
5. Press
<right
mouse
button>\Image\Link.
6. In the File Open window, navigate to
the \CHART\ANATOMY folder.
7. For File Name, select foot-left.jpg and
press Open (or double-click the
image).
8. The image now appears inside the
Writer. You can click your mouse on it
and drag it around to another location in your note if you wish.
9. Right-click the image to open it inside the Image Editor. (User’s Manual, pgs. 1109-1112).
in the lower right corner of the Image Editor if you
10. Press the Zoom in button
wish to make the image larger before you edit it.
11. Click on the Draw button to turn your cursor into a drawing tool.
12. Click on the red paint chip on the right side of the screen to change the cursor to a red drawing tool.
13. Click on the image of the foot and drag your mouse around to draw a picture of the image. (Hint:
you can use the Fill tool
to fill in a region that you have outlined with the Draw tool).
14. Click on the Arrow tool
to change your cursor to an arrow.
15. Click on the black paint chip to change the arrow to a black arrow.
16. Click the right arrow button to change the direction of the arrow so
that it is pointing to the right.
17. Click your mouse just to the left of the lesion that you drew on the foot so that the head of the arrow
points directly to the lesion.
18.
19.
20.
21.
22.
23.
24.
25.
so that you can add text to the image.
Click on the Text tool
In the text entry box, type in: "papule".
Change the font size to 18.
Click your mouse somewhat to the left of the black arrow to place
the word "papule" to the left of that arrow.
Press OK to store the edited image.
In the Save As window, give the image a new name, such as “C:\CHART\Erickson Foot
09012011.JPG”.
Press Save.
Note that your revised image is now inside the Writer.
7
26. Position your mouse to the lower right corner of the image in the
Writer. The cursor changes to a diagonal double-headed arrow.
27. Drag the diagonal double-headed arrow down and to the right to
enlarge the image inside the Writer.
You can use this same method to add any sort of anatomical drawings to
your notes. You can also embed anatomical drawings in your Templates, so
that you only need to open the Image Editor to annotate the image when
using the Template inside a note. You can add your own anatomical drawings
to the \CHART\ANATOMY folder.
PARSER ENHANCEMENTS (User's Manual, pgs. 1225-1228)
The Parser in Version 6.1 has several enhancements which make it much easier for you to comply with
Meaningful Use requirements. Let's see how to implement these:
1. Press System\Parser Options.
2. Check Parse Demographics.
If your note mentions the
patient's race, ethnicity, or
language, these items are then
parsed and stored into the
Name Editor, allowing you to
comply with the Meaningful
Use requirement that these
elements be stored on each
patient.
3. In
the
Medication
Reconciliation Label field,
enter:
"Medication
reconciliation
has
been
performed today” or any other
phrase that you wish to use
inside your notes to declare
the fact that you have
performed
a
medication
reconciliation. The Parser will
look for this phrase inside your
note, and if it finds it, it will add
it to the Parser Quick
Summary, and thus allow you
to record the fact that the
patient has had a medication
reconciliation
performed,
giving you credit for this
Meaningful Use requirement. If
you perform medication reconciliation regularly, you may well want to add your Medication
Reconciliation Label sentence to your Templates so that this information is included in every note.
You might also consider creating a Contraction which is replaced with your Medication
Reconciliation Label so that you can quickly add this sentence to a note after you perform a
Medication Reconciliation.
4. Check Parse Referrals (in addition to checking Reports\Meaningful Use\Options\Referrals). When
you then declare the patient to have a referral to another provider, the program automatically
generates a CCD, allowing you to comply with the Meaningful Use Requirement that referrals
generate a CCD.
5. Check Parse Smoking Status. When your note mentions the smoking status of the patient in the
sentence, the program automatically updates the Smoking Status, allowing you to comply with this
Meaningful Use requirement.
SEND US YOUR TIPS
If you have tips, shortcuts, questions, or suggestions for future newsletter topics, please send them to us at:
Welford Medical Computing, Inc.
or
MEDCOM Information Systems
3779 Hermitage Trail
2117 Stonington Avenue
Rockford, IL 61114
Hoffman Estates, IL 60195
8