1
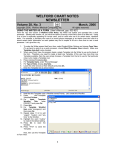
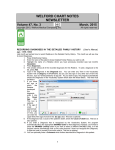
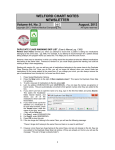
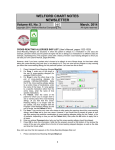
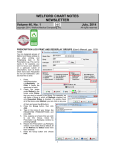
WELFORD CHART NOTES
NEWSLETTER
Volume 42, No. 3
March, 2013
copyright 2013, Welford Medical Computing, Inc.
All rights reserved
CONDITIONAL TEMPLATE NESTING (User’s Manual, pgs. 1283-1286)
Welford Chart Notes has allowed a Template to embed other Templates within it, a feature called Template
Nesting, for many years. This feature has the advantage that if you change the contents of an embedded
Template, that change is carried through automatically to all of the Templates which use the changed
Template.
To nest a Template within another Template, you simply type “@Template” followed by the name of the
Template you wish to nest (replacing spaces in the Template name with the underscore (_) character.)
For example, suppose you have created a Template called “ROS” which contains your standard Review of
Systems questions. You then include that Template inside your “New Patient Consultation” Template using
“@TemplateROS” where you wish the Template to appear. You also include it inside your “Complete
Physical” Template. If you decide to make a change to the items in the Review of Systems, changing it in
the “ROS” Template also automatically makes the same changes in the “New Patient Consultation” and
“Complete Physical” Templates.
Furthermore, you can nest Templates up to 8 levels.
So, as in the above example, your “ROS” Template
could include within it a “Cardiovascular ROS” Template,
which in turn could include within it a “Cardiac ROS”
Template. (This would constitute a total of 3 levels of
nesting). Any changes made to the “Cardiac ROS”
Template would also appear in any of the above
Templates that make use of it.
However, this form of Template Nesting means that the
nested Template is ALWAYS brought into its parent
Template (which is fine for many purposes). But what if
you only want a Template incorporated under certain
circumstances? This is called “Conditional Template
Nesting”.
To use Conditional Template Nesting, within a Template,
type:
@If <condition> then @Template<TemplateName>
where <condition> stands for any clause or set of clauses that can be evaluated as being TRUE or FALSE
(using the same engine as the Rule Reminder Editor) and <TemplateName> stands for the name of the
Template you wish to include if the <condition> is TRUE (with spaces in the name replaced with
underscores).
Let’s start with a simple example:
1.
Press Libraries\Templates\Add
2.
For Template Name, enter “Smoking Advice”.
5
3.
4.
Use any age, gender, Type of Note and press OK.
In the Writer, type in advice on how to quit smoking, e.g.
5.
(You can make this as brief or elaborate as you wish). Press <F10> to store your Template.
Now, we’ll
smoker.
1.
2.
3.
4.
5.
6.
make another Template which calls the “Smoking Advice” Template, but only if the patient is a
Press Libraries\Templates\Add.
Enter “Visit Summary” as the name of the Template.
Specify Visit Summary as the Type of note and press OK.
Type in whatever elements you wish to have as part of your Visit Summary Template.
At some point within your Visit Summary Template, type:
Press <F10> to store your Template.
When you use this Visit Summary Template, if the patient is a Smoker, the Smoking Advice Template will
appear at this location; whereas if the patient is not a smoker, the Smoking Advice Template is omitted from
what is displayed and printed.
Note that the <condition> needn’t be as simple as “smoker”. It can include many items combined with “and”
and “or”, like “@if female and age > 50 and age <80 and last mammogram > 1 year ago” to include some
tailored advice to women who are overdue for mammograms as to the importance of regular mammograms,
while omitting this information from Templates of women who are up-to-date in their mammograms.
Note that Template Nesting is different from Template Merging (User’s Manual, pgs. 704-707) and Template
Auto-Merge (see Newsletter April, 2002, User’s Manual pgs. 708-709), both of which eliminate redundant
lines in the merged Templates.
With Template Merge, you can combine multiple Templates into a single note by pressing Write\New Note,
choosing the Document Type, and when the list of Templates appears, select a Template, press Merge,
select another Template, press Merge, etc., until you are done selecting Templates to include in your note;
then press Cancel to move on to the Writer.
With Template Auto-Merge, the program automatically merges any relevant Templates, removing any
redundant lines, when you specify the patient’s Chief Complaint. The program looks up any Templates with
Topics matching those listed in the Chief Complaint and merges them into a single Template which is then
inserted into your note.
SEND US YOUR TIPS
If you have tips, shortcuts, questions, or suggestions for future newsletter topics, please send them to us at:
Welford Medical Computing, Inc.
or
MEDCOM Information Systems
3779 Hermitage Trail
2117 Stonington Avenue
Rockford, IL 6111
Hoffman Estates, IL 60195
6