Download AL20081124

Transcript
Manual Version AL20081124-9
AutoLog 6.3
1
Software Instruction Manual
Copyright JAVS 1981-2008
AutoLog 6.3
Software Instruction Manual
Table of Contents
About AutoLog 6.3..............................................................................................6
Getting Started ....................................................................................................7
AutoLog User Interface ......................................................................................8
Tool Tips ...................................................................................................8
Scheduling a Case ............................................................................................11
CaseScheduler’s Role ...........................................................................11
Cases Scheduled Today............................................................................... 11
Logging a Case .................................................................................................11
Find Case ....................................................................................................... 12
Select a Case .................................................................................................15
Preparing a Case .......................................................................................16
New Case ....................................................................................................... 16
Adding Attorneys and Contacts...............................................................18
Creating a New Attorney........................................................................20
Adding a Contact ...................................................................................22
Recording and Log Entries...........................................................................24
Witnesses and Exhibits ................................................................................ 26
To add a witness to the case: ...................................................................26
To edit witness information:..................................................................... 29
To delete a witness:...................................................................................29
To print a witness list ................................................................................ 29
To add an exhibit to the case: .................................................................. 30
To edit an exhibit: ......................................................................................31
To delete an exhibit:.................................................................................. 31
To print an exhibit list ............................................................................... 31
Logging Witnesses and Exhibits.............................................................. 32
Next Case....................................................................................................... 34
User Preferences .............................................................................................. 35
Settings .......................................................................................................... 35
Proceedings Menus ......................................................................................36
Case Log Display ..........................................................................................36
User Profile .................................................................................................... 37
Case Properties.................................................................................................38
Case Information........................................................................................... 38
Case History .................................................................................................. 38
Managing Case Information .........................................................................39
Add a Witness ............................................................................................39
Remove a Witness..................................................................................... 40
Copyright JAVS 1981-2008
2
AutoLog 6.3
Software Instruction Manual
Edit a Witness ............................................................................................41
Add an Exhibit............................................................................................43
Remove an Exhibit..................................................................................... 44
Edit an Exhibit............................................................................................45
Managing Users and Contacts .................................................................46
Edit Attorneys Information.................................................................... 46
Remove an Attorney ..............................................................................47
Edit Plaintiff and Defendant Information..............................................47
Remove a Plaintiff or Defendant ........................................................... 48
Managing Attorneys in Case Properties vs. Case Log Properties ........48
Case Log Properties ..............................................................................48
To edit/add attorneys using Case Properties ......................................49
To edit/add attorneys using Case Log Properties...............................49
Attorneys Assigned to this Case/Day .................................................. 50
Log Events ........................................................................................................50
Add a Log Event ............................................................................................51
Adding Custom Log Events......................................................................51
Time Stamping Log Events ...................................................................51
Edit a Log Event ............................................................................................52
Public/Private Case Logs ......................................................................53
Delete a Log Event ........................................................................................ 53
Event Notes.................................................................................................... 54
Add Public Event Note ..............................................................................54
Add Private Event Note ............................................................................. 54
Edit Event Note ..........................................................................................55
Delete Event Note ......................................................................................55
Case Notes..................................................................................................... 55
Review Event .................................................................................................56
Edit Case Log ................................................................................................ 56
To edit the case log ...................................................................................56
To edit an event note .................................................................................59
To delete a log event .................................................................................60
Find Log Event........................................................................................... 61
Copy To Clipboard..................................................................................... 61
Printing the Case Log................................................................................ 62
Printing and Publishing....................................................................................64
Printing...........................................................................................................64
Print Current Case Log..............................................................................64
Print All Today’s Case Logs ..................................................................... 65
Print Case History......................................................................................66
Printing from Case Properties.................................................................. 67
Print Today’s Schedule ............................................................................. 69
Printing Witness and Exhibit Lists........................................................... 70
Publishing......................................................................................................71
3
Copyright JAVS 1981-2008
AutoLog 6.3
Software Instruction Manual
Publish Current Case ................................................................................ 71
Publish an Entire Day’s Cases .................................................................75
Publish Today’s Cases..............................................................................78
Publish Selected Case ..............................................................................79
HTML Log .......................................................................................................... 80
Capture Controls...............................................................................................82
Playback Controls............................................................................................. 83
Instant Review ...............................................................................................83
Playback.........................................................................................................83
System Settings................................................................................................ 84
Public/Private System Modes....................................................................... 84
Camera Settings ............................................................................................84
On-Screen Display/Microphone Titles.........................................................85
Utilities............................................................................................................... 87
Edit User and Edit Site Utilities.................................................................... 87
To launch the Edit Site utility.................................................................... 87
To add a case type .................................................................................88
To delete a case type ............................................................................. 88
To add a department ..............................................................................89
To delete a department.......................................................................... 89
To launch the Edit Users utility ................................................................ 90
General Tab ............................................................................................91
Security Tab............................................................................................94
Find Case Utility ............................................................................................97
To Start an Existing Case.......................................................................... 97
To Edit a Case Log ....................................................................................98
To View a Case........................................................................................... 99
To Publish a Case......................................................................................99
To Edit Case Properties ............................................................................99
Configure Shortcuts....................................................................................100
Undockable Windows .................................................................................101
Load Default Tool Arrangement.................................................................102
Video Settings .............................................................................................102
Find Log Event ............................................................................................105
Copy Event Log to Clipboard..................................................................... 105
Tools............................................................................................................. 105
Controlling the A/V Processor .......................................................................106
Switching System Modes ...........................................................................106
Mode Activation........................................................................................... 106
Controlling Camera Locks..........................................................................107
Copyright JAVS 1981-2008
4
AutoLog 6.3
Software Instruction Manual
Video Conference........................................................................................108
User Rights......................................................................................................109
Appendix-A......................................................................................................110
Activation..................................................................................................... 110
Online Activation .....................................................................................110
Phone Activation .....................................................................................111
15 Day Trial Period ..................................................................................113
Appendix-B......................................................................................................114
Safe-Mode ....................................................................................................114
Appendix C......................................................................................................120
Help Menu ....................................................................................................120
August 2008 ADDENDUM - AUTOLOG 6.3.1.................................................121
Send To Log.................................................................................................122
Include Owner.............................................................................................. 124
Find Case Sorting........................................................................................125
Was this manual helpful? E-mail comments to [email protected]
5
Copyright JAVS 1981-2008
AutoLog 6.3
Software Instruction Manual
About AutoLog 6.3
AutoLog 6.3™ works hand-in-hand with the JAVS® Digital Recorder™ to create an Audio/Video
(A/V) record of the court with a complete log of events for each case tried in the courtroom.
The AutoLog software enables one or more users on different PCs to create a log of events for
each and every courtroom case. Log events are digitally time stamped and link directly to an A/V
file created and stored on the Digital Recorder. All of these events are stored in an ODBCcompliant database for ease of use and distribution.
A control panel allows you to monitor and manage your room’s A/V settings, permitting you to
easily switch system modes (e.g., bench conference, exclude witness, etc.), and view your
microphone levels. Public and private buttons are also included to let you quickly switch between
public and private testimony. All private testimony is automatically withheld from the public record;
moreover, system modes can be configured to automatically switch from public to private
testimony.
The CaseScheduler™ button allows the user to conveniently open the application for when, or if,
a case needs to be re-scheduled.
Last, but not least, a video window displays the video as it is recorded by multiple cameras and
microphones and relayed via A/V files to the Digital Recorder.
This manual assumes that CaseScheduler has been installed on the system and that the user
has all User Rights (see your administrator for details on your particular user rights).
AutoLog 6.3 features:
 An easy-to-use interface
 Digital time stamping of every log event in the courtroom
 A log of events linked directly to the A/V record for every case
 An ODBC-compliant database (SQL 2005)
 Customizable hotkeys and proceedings menus
 Editable Exhibit and Witness lists
 Private recordings and case notes (automatically withheld from public copies of the official
record)
 Capacity to switch system modes and monitor microphone levels
 A video window that allows viewing of recorded video as relayed to the Digital Recorder
 Direct communication with CaseScheduler to display the current case schedule
 Entry and logging of multiple plaintiffs, defendants, exhibits, and attorneys for each case
 Courtroom information in the title bar, for operators who are monitoring more than one
courtroom
 Right-click Review Event feature to case log events, allowing user to launch CaseViewer 3
and display associated media corresponding to the event timestamp. This appears to the
user as “Review Event”
 Improved USB Record-Light Integration
 Improved Microphone Tally/VU meter displays and integration
Copyright JAVS 1981-2008
6
AutoLog 6.3
Software Instruction Manual
 Playback VCR controls (CT-4a ONLY)
 Print options in the Witness and Exhibits tabs associated with a case, allows generating
reports as desired
 Enhanced window docking capabilities within the main view and tools, making it easier to
manage and customize the overall layout in the main display screens
 Modified various report layouts to provide more room for dynamically sized columns
 Camera Locks and System Modes tabs, allowing independent configuration and viewing in
a variety of ways within the application
 Help menu links to online application documentation
 Secure Department Filtering
 Enhanced Case Reports
 Improved User and Site management
 More case information provided in the user interface
Getting Started
Before you can use the AutoLog application a user name and password must be assigned to you.
AutoLog has been designed with specific user rights in mind, which means that your court
administrator can assign various rights that give you the ability to access certain functions of the
application. (See the User Rights section of this manual).
Login
To access AutoLog, a user must first login. See your administrator for User Name and Password,
and the user rights assigned to you.
Launch AutoLog, type in your User Name and Password,
select a location and press Login.
7
Copyright JAVS 1981-2008
AutoLog 6.3
Software Instruction Manual
AutoLog User Interface
AutoLog is laid out in a practical, easy-to-use format. You’ll find that the Graphical User
Interface—or GUI—is quite simple to navigate.
AutoLog’s interface is composed of moveable tiled windows and buttons. Reference the diagram
below:
1) Menus, Cases and Logging Toolbars
2) Proceedings/Witnesses/Exhibits view window
3) Cases Logged Today and Scheduled Today (Cases View)
4) AutoLog/CaseScheduler buttons
5) Case Log window
6) Video window
7) Capture Controls/System Modes/Camera Locks
8) Audio Monitor, Tally Display and Playback controls
Tool Tips
By allowing your pointer to hover over a button, you can activate its tool tip. This is a small text
box that pops up with additional information about the function that particular button activates.
Copyright JAVS 1981-2008
8
AutoLog 6.3
Software Instruction Manual
1) Menus, Cases and Logging Toolbars:
All menu items and function buttons are located in this area of the interface. In most
instances the buttons on the toolbars are also a menu item.
2) Proceedings/Witnesses/Exhibits view window:
This area of the interface has three views accessible through tabs.
The Proceedings tab includes all proceedings menus supplied
by JAVS or user created. The Witnesses tab includes a list of
available witnesses associated with the case and buttons to add,
edit or delete any witness. The Exhibits tab includes a list of
available exhibits associated with the case and buttons to add,
edit or delete any exhibit. Each tab includes a print list button.
3) Logged Today and Scheduled Today (Cases View):
This area of the interface has two views. The Scheduled Today view shows all the cases
that have been scheduled for the current day. The Logged Today view shows all the
cases that have been logged for the current day with an array of printing, publishing and
viewing options available for any case in the view. Case Properties are available for any
case in the list and the list can be manually updated using the Refresh button. Cases can
also be deleted from the
schedule.
If Department Filtering has been enabled in JAVS SiteManager, cases
in other departments may not be available to the user. These cases
will be grayed out and have the department name listed in the Case
Number column.
4) AutoLog/CaseScheduler buttons:
These buttons are for launching the JAVS CaseScheduler
application when in AutoLog and for launching AutoLog when
in CaseScheduler.
9
Copyright JAVS 1981-2008
AutoLog 6.3
Software Instruction Manual
5) Case Log window:
This area of the interface is for logging all the events
associated with the case. The entries can include
proceedings, manual log events and case notes.
Notes associated with any proceeding will also be
included in this view
6) Video window:
The video window will display the output of the JAVS automatic
switching system. There are also options for viewing the
cameras over TCPIP.
7) Capture Controls/System Modes/Camera Locks:
This area of the interface includes all the buttons needed to control the recording of the
court proceedings, including manual public and private buttons. This window also shows
the status of the recording and the system connection. A real-time clock is provided and
is driven by the recording device. The two round icons show how many recorders are
connected and the record status of each recorder. There is a System Modes tab which
allows the user easy access to the individual system modes and a Camera Locks tab
(CT-4 systems only) for easy access to the camera locks.
CT-4
8) Audio Monitor, Tally Display and Playback controls:
The Audio Monitor allows the user to monitor all the microphone inputs as well as tallies
from the JAVS automatic mixer. The Microphone Tally panel allows monitoring of tallies
only.
The Playback Control
panel allows for control
of the playback VCR as
well as instant review
functions.
(CT-4 systems only)
CT-4
Copyright JAVS 1981-2008
10
AutoLog 6.3
Software Instruction Manual
Scheduling a Case
Although the primary role of AutoLog is for logging and managing case information, it also has the
ability to schedule cases for the current day. While this is useful, scheduling cases for other days,
and/or months, is best suited for JAVS CaseScheduler.
CaseScheduler’s Role
The basic package of AutoLog and CaseScheduler coordinates a courtroom’s
schedule based on the day, month, or work week. With the CaseServer™ upgrade,
information can be shared among multiple courtrooms. No matter the package, this
live network-based system allows you to schedule—on any date—case files and
define their properties.
In this method, the basic groundwork for a case file (i.e., information attributed in the case’s
properties) can be laid out in advance in CaseScheduler; thus, the essential information is in
place when you access the case through your AutoLog session. Once the properties have been
set in CaseScheduler, you’re ready to begin creating your courtroom’s case log, no matter where
you’re logged in. For more information on how to schedule a case using CaseScheduler, see the
JAVS CaseScheduler user manual.
Cases Scheduled Today
AutoLog is designed to work concurrently with CaseScheduler. When AutoLog opens, it displays
the Case Schedules as entered with CaseScheduler in the Scheduled Today box. For each given
day that AutoLog is opened, a new list will appear in the Scheduled Today list containing all the
cases that were scheduled for that day by CaseScheduler.
Logging a Case
The main function of AutoLog is to create case logs of the day’s proceedings, to manage case
information, and to control the recorded media related to each case. Before logging can begin,
the user must first either create a new case or have a case in the docket (Scheduled Today list)
available for logging.
11
Copyright JAVS 1981-2008
AutoLog 6.3
Software Instruction Manual
Find Case
(Alphebetical-Most Recent)
The Find Case function allows a user to locate cases that have already been logged. Utilizing a
contextual string search, Find Case can locate a previously logged case by the user typing in the
case number or part of the case number. As with all search functions, the more information
entered in the search criteria field the more likely chance of an accurate find.
If Department Filtering has been enabled in JAVS SiteManager, users other than administrators
will only be able to find cases assigned to their department or cases that have no department
assignment.
The Find Case window gives the user options to: Start a case, edit the case log, edit case
properties, add the case to today’s schedule, view a case and publish a case. All of these options
will be discussed later in this manual. (Find Case Utility )
To find a case:
1. Press the Find Case button or select the menu item Case>Find Case.
2. The Find Case window will open.
3. Press the Search button and all
the cases in the database will
appear in the results list.
4. Type in a partial case number and select the “starts
with” variable. Press the Search button and only a case
that starts with that case number will be found.
5. Select the “contains” variable and upon pressing the
search button, any case that contains the entered text in
the search field will be found.
6. Type in a specific case number and select the “starts
with” variable. Press the Search button and the specific
case is found.
Copyright JAVS 1981-2008
12
AutoLog 6.3
Software Instruction Manual
7. As a Case Number is selected, the data will drilldown through the Date, Courtroom, and
finally Case Properties columns.
8. Select the desired Case Number and the date(s) of the case are displayed in the Date field.
9. Select the appropriate Date and the applicable courtrooms are displayed for that date in the
Courtroom field.
10. Select the appropriate Courtroom and properties for the case are displayed in the Case
Properties field.
13
Copyright JAVS 1981-2008
AutoLog 6.3
Software Instruction Manual
11. From this point all the options in the Find Case window are now
available.
12. Press the Add to Today’s Schedule button and a Select Time
window will open.
13. Set the appropriate time for the case and press the Add to schedule button.
14. Close the Find Case window.
15. The case will appear in the Scheduled Today list.
Copyright JAVS 1981-2008
14
AutoLog 6.3
Software Instruction Manual
Select a Case
This method allows the user to select a case from the Scheduled Today list that was prescheduled by CaseScheduler or added to the schedule by the AutoLog Find Case function.
To select a case on the day’s docket:
1. In the Cases View select the Scheduled Today tab. Double-click the case you need to
access; the Start Case dialog box opens.
2. Make sure the case information
is correct (i.e., case number,
case type, case title,
department, court personnel,
etc.).
3. Change the Judge/Justice,
Bailiff/Sheriff, or
Clerk/Stenographer, by using
the drop-down menu to select
the appropriate personnel.
4. If the user has set their personal preferences, (Edit>User Preferences) pressing the
Defaults button will populate the appropriate fields.
5. Press the Prepare to Start Case button if you want to queue the data without initiating
recording, or press the Start Case button to begin recording. You can also add the case to
today’s docket by pressing the Add to Schedule button.
15
Copyright JAVS 1981-2008
AutoLog 6.3
Software Instruction Manual
Preparing a Case
The Prepare to Start Case function allows the user to assign a case’s startup properties in a
queue (see Case Properties). It primes the A/V system and prepares the data to initiate that
particular case without going into Record mode. For example, a clerk is able to assign properties
to a case, such as previously unknown court personnel (attorneys, bailiff, etc.), as they arrive and
have this data in the queue prior to the judge’s arrival in the courtroom.
New Case
AutoLog can schedule a case for the current day only and will reflect as a schedule in
CaseScheduler for that day if the Add to Schedule function is used. If having the case
documented as a schedule for that day is not important, the user can choose to start the case
immediately.
To create a new case:
1. Press the New Case button or select the menu item Case>New Case. The Start Case
window will open.
Copyright JAVS 1981-2008
16
AutoLog 6.3
Software Instruction Manual
2. To start a case, AutoLog requires a Case Number. You can enter your own case number
or use the number auto-generated by AutoLog. The number consists of the year, month,
day and time of day. Each time a new case is started, AutoLog will generate a unique
number based on these parameters. If more than one case is created within 1 minute,
AutoLog will add a “-1,-2,” to the end of the number to keep it unique.
3. Use the Case Type pulldown to select the type of
case you will be logging.
(The user can create their
own case types; these are
default case types created
for the user’s convenience.
For more information refer
to the Edit Site section of
this manual).
4. Type in the name of the case in the Case Title field.
5. Use the Department pull-down to choose the department the case will be held in.
(The user can create their
own Departments;
For more information refer
to the Edit Site section of
this manual).
17
Copyright JAVS 1981-2008
AutoLog 6.3
Software Instruction Manual
6. Court personnel can be selected by using the court personnel pull-downs. Select the
appropriate staff for the current case. If the user has set their personal preferences,
(Edit>User Preferences) pressing the Defaults button will populate the appropriate fields.
Adding Attorneys and Contacts
The database for JAVS AutoLog contains attorney and contact information available to use for
each new case. If supplied, this information is entered into the database upon initial installation of
the AutoLog system. If this information is not supplied, AutoLog gives the user the ability to add
new users and contacts.
To add a prosecuting or defense attorney:
1. In the Start Case window there are four fields relevant to attorneys and contacts. Press the
Edit button to the right of the field labeled Prosecution.
2. The Edit Prosecution Attorneys window will
open.
In the lower portion of the window is a database
search function for locating prosecuting attorneys
that already exist in the database.
Copyright JAVS 1981-2008
18
AutoLog 6.3
Software Instruction Manual
3. If information for the available attorneys has previously been entered into the database,
press the Search button and a list of all attorneys will appear.
You can limit the search
results by typing in a
name or part of a name
before pressing Search.
The Search function will
search both first and
last name fields.
4. Once located, select the
attorney from the list
and press the Add to
this case button.
5. The attorney will appear
in the Attorneys
assigned to this case
and Attorneys
assigned to this day
lists.
19
Copyright JAVS 1981-2008
AutoLog 6.3
Software Instruction Manual
Creating a New Attorney
An attorney for a case may be new to the courthouse and probably will not be in the database. By
adding this information, that attorney will be made available for future database searches.
To add a new attorney:
1. Press the Create new button
in the upper portion of the
Edit Prosecution Attorneys
window and the Edit User
window will open.
Each user will be assigned a
unique ID (first initial followed
by last name) and can
become an AutoLog user with
individual operating rights.
(See Edit Users)
2. Fill in all relevant information
and press the OK button.
Copyright JAVS 1981-2008
20
AutoLog 6.3
Software Instruction Manual
3. The newly created attorney will appear in the Attorneys assigned to this case and the
Attorneys assigned to this day lists.
4. After making the attorney selection(s), press the OK button and the attorney(s) will appear
in the Prosecution field in the Start Case window.
5. Follow the same procedures for adding Defense attorneys as for Prosecuting attorneys.
21
Copyright JAVS 1981-2008
AutoLog 6.3
Software Instruction Manual
Adding a Contact
A contact is considered, in this case, to be a defendant or plaintiff. (Witnesses are also contacts
and will be addressed later in this manual).
To add a plaintiff or defendant:
1. Press the Edit button to the right of the
Plaintiff field and the Edit Plaintiffs
window will open.
2. For Plaintiffs that already exist in the database, type in their name or part of their name
and press the Search button to find the particular contact.
3. Press the Add to this Case button to add them to the
case.
4. For new Plaintiffs, press
the Create New button
and the Edit Contact
window will open.
5. Fill in the relevant
information and press the
OK button.
Copyright JAVS 1981-2008
22
AutoLog 6.3
Software Instruction Manual
6. The newly created contact will appear in the People assigned to this case list and will
be available for searching in the database.
7. Press the OK button in the Edit Plaintiffs window and the new contact will appear in the
Plaintiffs field in the Start Case window.
23
Copyright JAVS 1981-2008
AutoLog 6.3
Software Instruction Manual
8. Follow the same procedures for adding Defendants as for Plaintiffs.
9. After completing all information, press the Start Case button, the Prepare to Start Case
button or the Add to Schedule button.
Recording and Log Entries
Once a case is started, the next step is to initiate log
entries. AutoLog provides a default set of proceedings
menus to use for entering into the case log. These
menus can be added to, or changed, to suit the user’s
needs.
Each set of menus provides the user with commonly
used proceedings and any menu can be used at anytime
during a court session.
To enter proceedings into the Case log:
1. Start a case by pressing the Start Case button.
2. The system will go into record as indicated by the Record Message Bar and the Record
Indicator.
Record Message Bar
Record Indicator
Copyright JAVS 1981-2008
24
AutoLog 6.3
Software Instruction Manual
Optional USB External Record Light
If installed, the USB External Record Light will also be illuminated when the system goes into
record. The External Record Light will stay on consistently when in the Public mode and will flash
if the system is placed into the Private mode.
3. Once the system goes into record, a log entry will be made indicating that the case has
started and the proceedings menu will become active and ready for use.
4. Double-click on a proceeding in the Proceedings Menu list and a log entry will be made
indicating that proceeding. You can continue to double-click any menu item or you can
press the Enter key on the keyboard and automatically advance to the next item in the list,
ready for use with the Enter key.
25
Copyright JAVS 1981-2008
AutoLog 6.3
Software Instruction Manual
Witnesses and Exhibits
Once a case is started, witnesses and exhibits can be introduced throughout the course of the
session. While entering witnesses and exhibits can be done prior to the case starting, it is more
likely that you will be adding them as they appear.
To add a witness to the case:
1. Select the Witnesses tab in the Proceedings/Witnesses/Exhibits view window.
2. There are 4 icons in the upper left portion of the window for
adding, editing, deleting and printing a witness.
3. Press the Add Witness icon and the
Edit Witnesses window will open. Or
select the menu item Edit>Add
Witness.
Copyright JAVS 1981-2008
26
AutoLog 6.3
Software Instruction Manual
4. Type the witness’s name or part of the name in the Search All Witnesses field and press
the Search button. If the witness exists in the database they will appear in the search list.
5. Press the Add to this case button and the witness will appear in the People assigned to
this case list.
If the witness is not a part of your current database, the search results will show a
message “No matching entries found.” A new witness record will need to be created.
27
Copyright JAVS 1981-2008
AutoLog 6.3
Software Instruction Manual
6. Press the Create New button and the Witness Edit window will
open.
7. Type in the relevant information for
the witness and press the OK
button.
Be sure to include the Party
assignment for the witness.
8. The new witness name will appear
in the People assigned to this
case field.
9. Press the OK button and the witness will appear in the Witnesses view and display the
assignment for the witness. The witness is now available for logging.
Copyright JAVS 1981-2008
28
AutoLog 6.3
Software Instruction Manual
To edit witness information:
1. Select the witness to edit and press the Edit Witness button; the Witness Edit window will
open.
2. Change the information as needed and press the OK button.
To delete a witness:
1. Select the witness to be deleted and press the Delete Witness button.
2. A Delete Witness confirmation screen will open. Select Yes and the
witness will be removed from the case.
To print a witness list:
1. Press the Print Witness List icon in the Witness view and a hard copy will be sent to a
connected printer.
29
Copyright JAVS 1981-2008
AutoLog 6.3
Software Instruction Manual
To add an exhibit to the case:
1. Select the Exhibits tab in the Proceedings/Witnesses/Exhibits view window.
2. There are 4 icons in the upper left portion of the
window for adding, editing, deleting and printing an
exhibit.
3. Press the Add Exhibit button and the Edit Exhibit window will open.
Or select the menu item Edit>Add Witness.
4. The Exhibit name is
automatically entered and
numbered based on the
party assignment button
selected. Select a party
assignment and give the
exhibit a description. Press
the OK button.
NOTE: You can type in an exhibit name if you do not wish to use the automatic naming
convention.
5. If the system is in record, you can use the Enter into log button and the exhibit will be time
stamped and placed into the case log.
6. The Exhibit will appear in the Exhibits view and is available
for logging.
Copyright JAVS 1981-2008
30
AutoLog 6.3
Software Instruction Manual
To edit an exhibit:
1. Select the exhibit to edit and press the Edit Exhibit button.
2. The Edit Exhibit window will open. Change the information as needed and press the OK
button.
To delete an exhibit:
1. Select the exhibit to be deleted and press the Delete Exhibit button.
2. A Delete Exhibit confirmation window will open. Press Yes and the exhibit will be deleted
from the case.
To print an exhibit list:
1. Press the Print Exhibit List icon in the Exhibit view and a hard copy will be sent to a
connected printer.
31
Copyright JAVS 1981-2008
AutoLog 6.3
Software Instruction Manual
Logging Witnesses and Exhibits
After adding the witnesses and exhibits to the case, they become available for logging into the
case log.
To add a witness to the case log:
1. Start the case and select the Witnesses tab in the
Proceedings/Witnesses/Exhibits view window.
2. Locate the witness in the list and double-click on the
witness’s name; the Witness Event window will open.
3. There are five separate
log events associated
with a witness. Choose
the appropriate event by
clicking once with the
mouse and press the
Log Selected Event
button; the log event will
appear in the case log.
NOTE: A quicker option
for entering the Witness
Event is to double-click
the event and it will
appear in the case log.
Copyright JAVS 1981-2008
32
AutoLog 6.3
Software Instruction Manual
To add an exhibit to the case log:
1. Start the case and select the Exhibits tab in the Proceedings/Witnesses/Exhibits view
window.
2. Locate the exhibit in the list and
double-click the item name; the
Case Log Event window will
open.
3. Add any notes to be
associated with the exhibit by
pressing the Add note button.
33
Copyright JAVS 1981-2008
AutoLog 6.3
Software Instruction Manual
4. After entering any note for the exhibit, press the OK button and the exhibit will be added to
the case log.
NOTE: All case log events can be edited, and notes can be added to each event. These notes
will be displayed in the notes column of the case log. User rights will determine if a user can, or
cannot, view these notes (i.e., if the notes were set as private).
Next Case
The Next Case icon indicates the next scheduled case on the
docket. Once a case is started, a green checkmark will appear
beside that case in the Scheduled Today list and the next case in
chronological order will display the Next Case icon.
To proceed to the next scheduled case:
1. Press the Next Case button or select the menu item Case>Next Case and the Start Case
window opens for the next case on the docket.
2. Make sure the case information is correct (i.e., case number, case type, case title, court
personnel, etc.).
3. Press the Start Case button and the next case starts. This is reflected under the Logged
Today list in the Cases view.
Copyright JAVS 1981-2008
34
AutoLog 6.3
Software Instruction Manual
User Preferences
Managing user default information is accomplished by
reviewing and assigning information under the menu item
Edit>User Preferences. Once set, these will become the
defaults for that user.
The User Preferences window contains tabs for Settings, Proceedings Menus, Case Log
Display and User Profile.
Settings
The Settings tab lists the default Judge/Justice,
Clerk/Stenographer, Bailiff/Sheriff and
Department/Division for the current user.
These defaults will appear in the Start Case
dialog for each user when a case is started.
To change log defaults:
1. Select the down arrow to the right of each
field and choose court personnel and
department from the list.
2. Use the Confirm stop recording
checkbox to have AutoLog prompt you
any time you stop recording.
35
Copyright JAVS 1981-2008
AutoLog 6.3
Software Instruction Manual
Proceedings Menus
The Proceedings Menus tab lists all of the default Proceedings Menus provided in the AutoLog
database for the current user.
Every Proceedings Menu can be edited or deleted to fit your needs by using the Edit or Delete
buttons.
You can also create your own Proceedings
Menu by clicking the New button.
Check the Automatically Increment
Proceedings to use the Enter key when
logging.
To add or edit a new Proceedings Menu:
1. Click the New button to add a new menu,
or select a menu to edit and press the Edit
button. The Edit Proceedings Menu
window opens.
2. Add, or edit, the menu’s name in the
Menu Name field. If you wish to add
additional proceedings, press the New
button, (this will add the new text in
descending order) or the Insert button
(this will add the text above the selected
text) and type description in the Text field.
Use the Up and Down arrows to move a
selected item up or down in the list. Use
the Delete button to remove selected
proceeding text in this field.
3. Press the Save button.
Note: You can edit the text by double clicking on the text and typing your change.
Case Log Display
This option allows users some control of what
Log Events are displayed in the Case Log
window, including messages marked as Private
and System Mode messages.
Copyright JAVS 1981-2008
36
AutoLog 6.3
Software Instruction Manual
User Profile
This utility will allow the user to change their personal information.
To change your personal information:
1. Select the User Profile tab and a personal information form will appear.
2. Change or add your personal information as needed and press the OK button. Your
personal information has now been changed in the database.
37
Copyright JAVS 1981-2008
AutoLog 6.3
Software Instruction Manual
Case Properties
In the JAVS software set, the ever-changing details of a case are called the Case Properties.
Several of these properties can change on a day-to-day basis. These changes can be assigned
and edited in either AutoLog or CaseScheduler by using the Case Properties function. Case
Properties can be accessed on a current case basis or on a logged case basis.
Case Information
Under the Case Information tab you can review, add, edit or delete certain attributes of a case.
Most of the details in Case Information can be modified as need be (dates are managed in
CaseScheduler). In addition to being able to edit a case’s title, you can add or edit information
pertaining to the prosecution, defense, witnesses or exhibits. The Case Number cannot be
changed.
Case History
The Case Properties dialog window also contains a tab to the Case History. This function lists
every case’s log date(s), and from here the Case Log information may be viewed or printed.
Copyright JAVS 1981-2008
38
AutoLog 6.3
Software Instruction Manual
Managing Case Information
When a new case is created, all information entered at the time of creation is stored with that
case. All information related to a case such as attorneys, plaintiffs, defendants, witnesses and
exhibits can be added or changed at any time for each case through the Case Properties dialog.
Although any case can have it’s case properties modified, the following instructions will be for the
current case.
Add a Witness
To add a witness using Case Properties:
1. Start or Prepare a case as outlined in the New Case section of this manual.
2. Press the Case Properties button or select Case>Case Properties and the Case
Properties window
opens.
3. Press the Edit button to the right of the
Witness field and the Edit Witnesses
window opens.
4. Follow the procedure for searching, or
adding, a witness as outlined in the
Witnesses and Exhibits section, step 4,
of this manual.
39
Copyright JAVS 1981-2008
AutoLog 6.3
Software Instruction Manual
5. Press OK and the witness is added to the Witness Field in the Case Properties window.
Press the Close button to close the Case Properties window and the witness will appear in
the Witnesses view.
Remove a Witness
To remove a witness using Case Properties:
1. Start or Prepare a case as outlined in the New Case section of this manual.
2. Press the Case Properties button or select Case>Case Properties and the Case
Properties window opens.
3. Press the Edit button to the right of the
Witness field and the Edit Witnesses
window opens.
4. Select the witness to be removed. Press the
Remove From Case button.
5. A “Remove People?” prompt
appears.
6. Press Yes and the witness(s) is
removed from the case.
NOTE: If a witness has been logged as part of a case, they cannot be removed.
Copyright JAVS 1981-2008
40
AutoLog 6.3
Software Instruction Manual
Edit a Witness
To edit witness information using Case Properties:
1. Start or Prepare a case as outlined in the New Case section of this manual.
2. Press the Case Properties button or select Case>Case Properties and the Case
Properties window opens.
3. Press the Edit button to the right of the Witness field and the Edit Witnesses window
opens.
4. Select the witness to be edited and press the
Edit Contact’s Info button and the Witness
Edit window opens.
41
Copyright JAVS 1981-2008
AutoLog 6.3
Software Instruction Manual
5. Change the witness information as
needed and press OK.
6. You will return to the Edit Witness
window. You can choose to edit
another witness or press OK and
return to the Case Properties
window.
Copyright JAVS 1981-2008
42
AutoLog 6.3
Software Instruction Manual
Add an Exhibit
To add an exhibit using Case Properties:
1. Start or Prepare a case as outlined in the New Case section of this manual.
2. Press the Case Properties button or select Case>Case Properties and the Case
Properties window opens.
3. Press the Edit button to the
right of the Exhibit field and
the Exhibits window opens.
4. Press the Create New button and the Exhibit Info window will open
5. Use the auto generated
name or enter the exhibit
name and relevant exhibit
information in the text fields.
Make sure to check the
appropriate box to
designate the exhibit for the
Prosecution, Defense, or
Generic/Joint.
43
Copyright JAVS 1981-2008
AutoLog 6.3
Software Instruction Manual
6. Press OK and the exhibit is added to the Exhibit List in the Exhibits window. Press OK to
return to the Case Properties window. Press the Close button to close the Case
Properties window and the exhibit will appear in the Exhibits view.
Remove an Exhibit
To remove an exhibit using Case Properties:
1. Start or Prepare a case as
outlined in the New Case
section of this manual.
2. Press the Case Properties
button or select Case>Case
Properties and the Case
Properties window opens.
3. Select the Edit button to the right of
the Exhibit field and the Exhibits
window will open.
Copyright JAVS 1981-2008
44
AutoLog 6.3
Software Instruction Manual
4. Select the exhibit to be removed and press the Remove from case button. A “Delete
Exhibit?” prompt appears.
5. Press Yes and the exhibit is permanently deleted from the case.
NOTE: If an exhibit has been logged as part of a case, it cannot be removed.
Edit an Exhibit
To edit exhibit information using Case Properties:
1. Start or Prepare a case as outlined in the New Case section of this manual.
2. Press the Case Properties button or select Case>Case Properties and the Case
Properties window opens.
3. Select the Edit button to the right of the
Exhibit field and the Exhibit Info window
will open.
4. Change the exhibit information as
needed and press OK. The exhibit
information has now been
changed.
45
Copyright JAVS 1981-2008
AutoLog 6.3
Software Instruction Manual
Managing Users and Contacts
Attorneys, Plaintiffs and Defendants can also be added and edited in the Case Properties
window.
The dialog for Plaintiff, Prosecution, Defendant and Defense is the same as for the New Case
dialog and is accessed for each by pressing the Edit button to the right of the field. (See Adding
Attorneys and Contacts).
Edit Attorneys Information
To edit an attorney’s information:
1. Press the Edit button to the right of either attorney’s field.
The Edit Prosecution or Defense Attorneys window will open.
2. Press the Edit Attorneys Info button.
The Edit Users window will open.
3. Select any attorney from the list and personal information will appear for that user. Change
or add any information and press the Save button. The information for that attorney has
now been changed.
Copyright JAVS 1981-2008
46
AutoLog 6.3
Software Instruction Manual
Remove an Attorney
To remove an attorney from the case:
1. Press the Remove from Case button and a Remove Users? confirmation window will
open. Select Yes to remove the selected attorney.
NOTE: If an attorney has been part of a case that has been logged, you will not be able to
remove them.
Edit Plaintiff and Defendant Information
To edit a Plaintiff or Defendant:
1. Press the Edit button to the right of either Plaintiff or Defendant field’s.
The Edit Plaintiff-Defendant window will open.
2. Press the Edit Contact Info button and the Edit
Contacts window will open.
3. Select the name of the Plaintiff-Defendant to edit their personal information. Change or
add personal information as needed and press the Save button.
47
Copyright JAVS 1981-2008
AutoLog 6.3
Software Instruction Manual
Remove a Plaintiff or Defendant
To remove a plaintiff or defendant:
1. Select the Plaintiff or defendant from the Edit Plaintiff-Defendant window. Press the
Remove from Case button. A Remove people? Confirmation window will open.
2. Press the Yes button to remove the Plaintiff-Defendant. The party is removed from the
case.
Managing Attorneys in Case Properties vs. Case Log Properties
Attorneys can be associated with a case in numerous ways. Typically created or assigned at the
initiation of a new case, in some instances a particular attorney may not be available for a case
on a given day and a colleague may have to take over representation. In this scenario, the new
attorney will have to be added to the day’s case and become a part of the case properties.
Case Log Properties
Whereas “top-level” details are assigned to a case in the Case Properties function, the Case Log
Properties are the selected details that get logged with a case, including the defaults for judge,
bailiff, clerk and attorneys.
Once the Case Properties have been assigned to a case on the front end, Case Log Properties
are what permit you to review or change case information during the court session.
As in Case Properties, Case Log Properties also gives you access to the add/edit functions for
significant court personnel.
Copyright JAVS 1981-2008
48
AutoLog 6.3
Software Instruction Manual
To edit/add attorneys using Case Properties:
1. Start or Prepare a case as outlined in the New Case section of this manual.
2. Press the Case Properties button or select Case>Case Properties and the Case
Properties window opens.
3. Press the Edit button next to the Prosecution or
Defense text field and the Edit (Prosecution
or Defense) Attorneys window opens.
NOTE: You can add or remove attorneys to or
from the case properties. You can also use the
Search button to find attorneys in your
database. If the attorney does not exist in your
database, press the Create New button to add
them.
For more details, refer to the Adding Attorneys
and Contacts section of this manual.
4. Press OK once you have made the appropriate
changes.
To edit/add attorneys using Case Log Properties:
1. Select the menu item Case>Case Log Properties and the Case Log Properties window
opens.
2. Press the Edit button next to the attorney text field and the Edit (Prosecution or Defense)
Attorneys window opens.
For more details, refer to the Adding Attorneys and Contacts section of this manual.
3. Press OK once you have made the appropriate changes.
49
Copyright JAVS 1981-2008
AutoLog 6.3
Software Instruction Manual
Attorneys Assigned to this Case/Day
Attorneys assigned to a particular case aren’t always required to attend every proceeding.
AutoLog enables you to designate on which days the case attorneys are present or not. In the
Edit Prosecution Attorneys and Edit Defense Attorneys windows are two columns: one for
attorneys assigned to the case and another for those in attendance that particular day.
To assign case attorneys to a particular day:
1. Select the menu item Case>Case Log Properties to access the Edit Attorneys function.
2. Regarding their attendance in the courtroom, use the Add or Remove buttons to assign
case attorneys to a particular day.
3. If a new attorney needs to be created, press the Create New button. For more details, refer
to the Adding Attorneys and Contacts section of this manual.
4. Press OK when finished. The attorneys are now assigned to the day’s proceedings.
Log Events
AutoLog automatically creates a Log Event when a case starts, when a case is recessed or
resumes, when a case ends, and when system events take place (i.e., Bench Conference, Voire
Dire, etc.).
In addition, AutoLog also allows
users to log events manually by
using an array of functions and
utilities.
If a case was previously logged,
you can view those logged
events along with the current
day’s events.
Select View>All Case Events.
Copyright JAVS 1981-2008
50
AutoLog 6.3
Software Instruction Manual
Add a Log Event
Most log events are added through the Proceedings menu, the Witnesses menu, the Exhibits
menu, or the Add Log Event button. Note that Proceedings, Witnesses, and Exhibits are all tabs
in the same window view (see AutoLog User Interface for more information).
Adding Custom Log Events
To add a log event to the case log other than the ones in the Proceedings, Witnesses, and
Exhibits tabs:
1. Press Add Log Event button in the logging toolbar or select the menu item Edit>Add Log
Event and the Case Log Event window opens.
2. Fill in the Event Text field with the Log
Event title.
3. Press the OK button. The Log Event
has now been added.
Time Stamping Log Events
In order to maintain an accurate case log, AutoLog time stamps a Log Event the moment the Add
Log Event button is pressed--thus stamping the event as soon as it occurs, not when the related
data has been entered and the OK button pressed, as this process can take from several
seconds to even a minute or two later.
51
Copyright JAVS 1981-2008
AutoLog 6.3
Software Instruction Manual
Edit a Log Event
To edit a case log event:
1. Select the Log Event you wish to edit in the Case Log window. Press the Edit Log Event
button or select the menu item Edit>Edit Log Event. You can also double-click on the
Entry and the Case Log Event window opens.
2. Make the desired changes to the
Event Text or Event Time.
NOTE: To change a log event’s time,
select the hour, minute, or second
and use the up/down arrow to change
it; or manually key in the time. This
could change the placement of the
event if the time stamp precedes or
follows another log event. Also,
depending on your rights, you may
not be able to change the Event
Time.
NOTE: System events such as Start Case, Recess Case, Resume Case, End Case and mode
change messages cannot be edited.
Copyright JAVS 1981-2008
52
AutoLog 6.3
Software Instruction Manual
Public/Private Case Logs
In some cases, not every event is intended to be logged in the public record of a proceeding.
Clicking the “Public Event” or ” Private Event” radio buttons controls whether or not the log
event appears on the case log entry intended for the public record. A private event is not
available in the printed case log or viewable without certain user rights. This is a reversible
process—meaning an entry marked as private can once more be made public if desired—unless
the event was created in a Private System Mode (see System Settings).
To make a log event private:
1. Double-click on a Log Event in the Case Log window; the Case Log Event window opens.
2. Select the Private Event radio button.
3. Press the OK button. The Log Event has now been edited and made private as indicated
by the Private Event icon.
Delete a Log Event
To delete a log event:
1. Select the Log Event you wish to delete in the Case Log window.
2. Press the Delete Log Event button or select the menu item Edit>Delete Log Event.
3. A Delete Event? confirmation will appear.
Press Yes and the event will be deleted.
WARNING!
Make sure you’ve selected the CORRECT Log Event to delete. This process cannot be undone.
53
Copyright JAVS 1981-2008
AutoLog 6.3
Software Instruction Manual
Event Notes
An Event Note typically consists of pertinent information entered as an addendum to a Log Event.
Like any Log Event, Event Notes are editable by double-clicking in the notes column of the event
to access its properties.
Event Notes may be entered as public or private. By default, Event Notes are entered as notes
for the public record. If needed, AutoLog users can annotate private notes viewable only by those
with the appropriate user rights. Private notes are not included as part of a case log’s public
record, unless they are specifically marked as such.
Log Event notes are tagged by your user name. With the appropriate rights, other users may be
able to add, edit, or delete Event Notes.
Add Public Event Note
To add a Public Event Note to an existing
Log Event:
1. Double-click the Log Event in the Case
Log window. The Case Log Event
window opens with the Log Event listed
in the Event Text field.
2. Press the Add Note button and the
Notes entry field becomes active.
3. Enter text in the Notes entry field.
Ensure the Public Note radio button is
selected.
4. Press the OK button. The note appears
in the Log Event’s Notes column.
NOTE: Double-clicking on the event field of the Log Event will open the Case Log Event window.
To activate the Notes, select the Add Note button. However, if you double-click on the notes field
of the Log Event, the Notes entry field will automatically become active when the Case Log Event
window opens.
Add Private Event Note
To add a Private Event Note to an existing Log Event:
1. Double-click the Log Event in the Case Log window. The Case Log Event window opens
with the Log Event listed in the Event Text field.
2. Press the Add Note button to activate the Notes entry field; enter desired text.
3. Under the Notes text field, Ensure the Private Note radio
button is selected.
4. Press the OK button. The note appears marked as Private in the Log Event’s Notes
column.
NOTE: Other users may be able to view your private notes if they have assigned user rights.
Copyright JAVS 1981-2008
54
AutoLog 6.3
Software Instruction Manual
Edit Event Note
To edit an Event Note:
1. Double-click the Notes field of the Log Event. The Case Log Event window opens with
the Log Event listed in the Event Text field.
2. Make the desired changes to the text in the Notes field.
3. Press the OK button. The edited Event Note appears in the Log Event’s Notes column.
Delete Event Note
To delete an Event Note:
1. Double-click the Notes field of the Log Event. The Case Log Event window opens with
the Log Event listed in the Event Text field.
2. Press the Delete Note button to remove the information in the
Notes field.
3. Press the OK button. The Event Note has now been deleted from the Log Event’s Notes
column.
NOTE: Make sure you’ve selected the CORRECT Log Event. This process cannot be undone.
Case Notes
Case Notes differ from Event Notes in that they are not associated with any particular log event.
AutoLog will handle the Case Note just like a log event and will be time stamped at the point of
initiation. The Event Text field cannot be changed like a log event and will always read “Case
Note Entry”. You can, however, change the Event Time and the note(s) associated with the Case
Note and the event and notes can be public or private.
To add a Case Note that is not linked to an event:
1. Press the Add Case Note button or select the
menu item Edit>Add Case Note. The Case
Log Event window opens with “Case Note
Entry” listed in the Event Text field.
2. Enter text in the Notes text field or change the
event time.
55
Copyright JAVS 1981-2008
AutoLog 6.3
Software Instruction Manual
3. Press the OK button. The Case Note appears in the Case Log window as its own log
event.
Review Event
The Review Event function allows the user to review the case log and associated audio and video
media by launching JAVS CaseViewer.
To review the case log from a selected log event:
1. Right click on any event logged from the proceedings menu or manually logged by the
user, i.e. Add Log Event or Add Case Note. A Review Event selection will appear.
2. Left click the Review Event selection and JAVS CaseViewer will open and play from the
selected log event.
Edit Case Log
For each case that is recorded and ended, AutoLog creates a case log that consists of the log
display including any event notes or case notes associated with that case. The case will appear in
the Logged Today view. Limited editing can be performed on the case log and a hard copy can
also be printed of the log.
To edit the case log:
1. In the Logged Today view, select the
desired case for case log editing.
NOTE: A case must have been started or prepared to appear in the Logged Today view.
Copyright JAVS 1981-2008
56
AutoLog 6.3
Software Instruction Manual
2. Press the Edit Case Log button and the Edit Case Log window will open.
57
Copyright JAVS 1981-2008
AutoLog 6.3
Software Instruction Manual
3. Double-click on any event in the Edit Case Log window, or select an event and press the
Edit Log Event button and the Case Log Event window will open.
4. Edit the Event Text, change the Event Time, or make the event public or private. (See how
to make a log event private in the Edit a Log Event section of this manual).
Copyright JAVS 1981-2008
58
AutoLog 6.3
Software Instruction Manual
5. Press the OK button and you will return to the Edit Case Log window with the event text or
time changed, and/or a public or private indication to the event.
To edit an event note:
1. In the Edit Case Log window, double-click the Notes field of the
Log Event or Case Note to be changed, or select an event and
press the Edit Log Event button.
2. The Case Log Event window will
open with the notes field active.
3. Change the note(s) as needed, or
make the notes public or private.
(See Add Private Event Note
section of this manual).
59
Copyright JAVS 1981-2008
AutoLog 6.3
Software Instruction Manual
4. Press the OK button and you will return to the Edit Case Log window with the note(s)
edited, and/or a public or private indication to the note(s).
To delete a log event:
1. Select the event to be deleted in
the Edit Case Log window.
2. Press the Delete Log Event
button or use the Delete key on
the keyboard.
3. A “Delete Event?” confirmation
screen will appear.
4. Select Yes and the event has
been removed from the case
log.
WARNING!
Make sure you’ve selected the CORRECT Log Event to delete. This process cannot be undone.
Copyright JAVS 1981-2008
60
AutoLog 6.3
Software Instruction Manual
Find Log Event
A case log for any given day can be filled with many case log events--and events you wish to edit
can be hard to find. The Find Log Event function allows the user to do a string search of the log
events or event notes to more easily locate the event(s) for editing. This function is also available
for the current case log during a court session.
To find a log event or event note:
1. In the Edit Case Log window, press the Find Log Event button and
a Find Log Event search field will open.
2. Type in all or part of a word or string of words you wish to find and press the Find Next
button.
3. The Find Log Event
function will locate the
event(s) that contain
the search string
typed in the search
field.
4. Press Find Next
again to locate any
other events that
contain the specified
search string.
NOTE: The Find Log event will search the entire Log Event column as well as the Notes column.
Copy To Clipboard
The Copy to Clipboard button will copy the contents of the case log into the Windows clipboard
buffer and is available for pasting into any text editing program.
61
Copyright JAVS 1981-2008
AutoLog 6.3
Software Instruction Manual
Printing the Case Log
Once the case log has been edited to suit your needs, a hard copy can be produced if a local or
network printer is connected to your particular system.
To print a case log:
1. From the Edit Case Log window, press the Print Case Log button and the Case Log
Report window will open.
2. In the Filter section, you can select whether to
include public or private events and notes:
Include Private Events are the events that
have been marked as private by a user so that
users who do not have the rights cannot view
these events.
Include Notes will print all public notes
associated with each event.
Include Private Notes will print all notes, including those marked by the user as private.
Copyright JAVS 1981-2008
62
AutoLog 6.3
Software Instruction Manual
3. Press the OK button and the Case Log Report print preview will open.
4. Press the Print button to print the Case Log.
5. When finished printing, close the Edit Case Log window.
63
Copyright JAVS 1981-2008
AutoLog 6.3
Software Instruction Manual
Printing and Publishing
AutoLog provides tools for printing case logs, schedules, case histories, witness lists and exhibit
lists. It also provides tools for publishing the media (Audio/Video) associated with a case and
includes case logs and notes associated with each case.
Printing
AutoLog can generate a paper record of any case log or case log history as well as customize
what events and notes are printed.
Print Current Case Log
The Print Current Case Log command allows the user to print the case log of the case that is
currently in session.
To print the current case log:
1. Start or Prepare a case as outlined in the New Case section of this manual.
2. Select the menu item Case>Print Current Case Log, or press the Print Current Case
Log button.
3. The Case Log Report
window will open for the
current case.
4. For options to Include Private
Events, Notes and Private
Notes, see Printing the Case
Log section of this manual for
Case Log Report Filter
selections.
6. Press the OK button and the Case Log Report print preview will open.
Copyright JAVS 1981-2008
64
AutoLog 6.3
Software Instruction Manual
7. Press the Print button to print the Case Log.
Print All Today’s Case Logs
The Print All Today’s Case Logs command allows the user to print a hard copy of all the cases
that are in the Logged Today view.
To print all today’s case logs:
1. In the Cases View, select the Logged Today tab. A
list of all the cases logged for the current day will be
displayed. (If no cases have been logged today there
will be no list in the Logged Today view).
65
Copyright JAVS 1981-2008
AutoLog 6.3
Software Instruction Manual
Select the menu item
Case>Print All Today’s Logs;
the Case Log Report window
will open.
2. For options to Include
Private Events, Notes and
Private Notes, see Printing
the Case Log section of this
manual for Case Log
Report Filter selections.
3. Select all or particular cases
you wish to print. Press the
OK button and a Preview
window will open.
4. Since there are multiple cases to be printed in this example, the Preview window will show
each case on an individual page.
5. Press the Print button in the Preview window to complete the printing process.
Print Case History
The Print Case History command will allow the user to print an entire history of the current case
in session. As with all print commands, the user can choose to print public and private events and
case notes.
To print a case history:
1. Start or Prepare a case as
outlined in the New Case
section of this manual.
2. Select the menu item
Case>Print Case History
and the Case History Log
Report window will open.
3. For options to Include Private Events, Notes and Private Notes, see Printing the Case Log
section of this manual for Case Log Report Filter selections.
Copyright JAVS 1981-2008
66
AutoLog 6.3
Software Instruction Manual
4. In the Sessions section you can
choose either: 1) All Sessions and
the print will include every date that
the case was in session; or, 2) Date
Range and a choice of dates will be
available for printing; select the
date(s) for printing.
5. Press the OK button and a Preview window will open.
6. Press the Print button in the Preview window to complete the printing process.
Printing from Case Properties
Printing the current Case Log or the current Case History can also be printed from the Case
Properties window.
To print a case log from case properties:
1. Start or Prepare a case as outlined in the New Case section of this manual.
2. Select the menu item Case>Case Properties, or select the Case Properties button.
3. The Case Properties window for the current case will open.
67
Copyright JAVS 1981-2008
AutoLog 6.3
Software Instruction Manual
4. Select the Case History tab and dates associated with the current case will show in the
Log Date(s) column.
5. Select one of the dates in the list, and the Case Log Information column will show the
number of times the case was started and stopped for a given date.
6. You can choose to print any one of the dates by selecting a date
and pressing the Case Log button.
7. Selecting the Case History Log button will print individual case logs for all dates the case
has been in session.
8. The Case Log Report window will open. See Printing the Case Log section of this manual
for Case Log Report Filter and printer selections.
Copyright JAVS 1981-2008
68
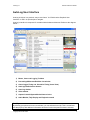
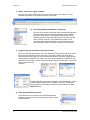
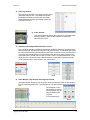
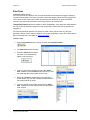
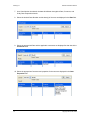
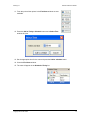
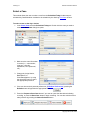
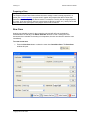
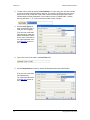
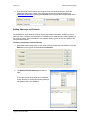
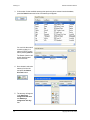
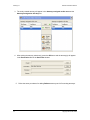
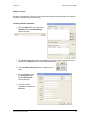
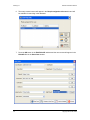
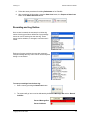
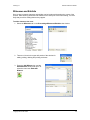
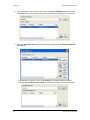
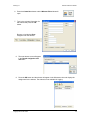
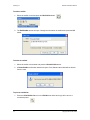
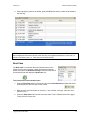
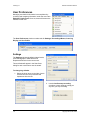
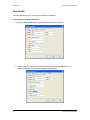
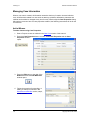
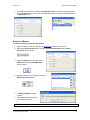
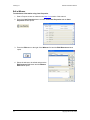
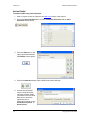
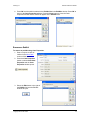
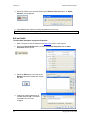
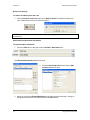
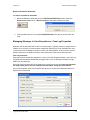
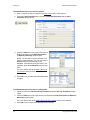
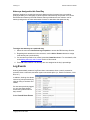
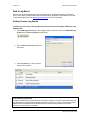
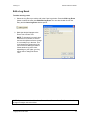
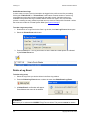
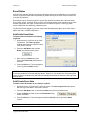
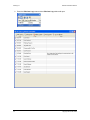
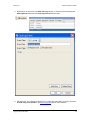
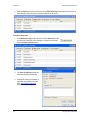
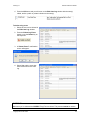
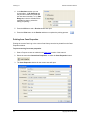
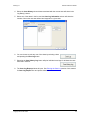
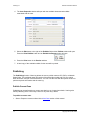
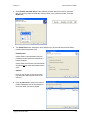
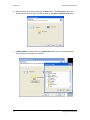
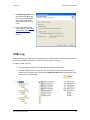
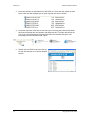
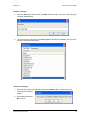
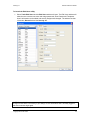
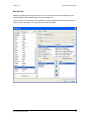
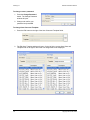
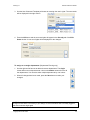
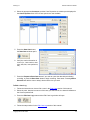
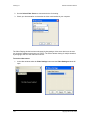
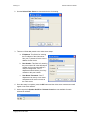
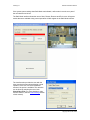
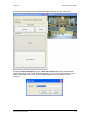
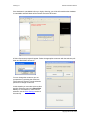
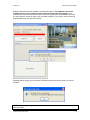
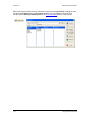
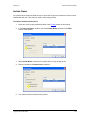
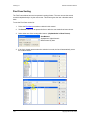
AutoLog 6.3
Software Instruction Manual
Print Today’s Schedule
AutoLog gives the user the ability to print a hard copy of the day’s schedule.
To print today’s schedule:
1. Ensure that there are cases scheduled in the
Scheduled Today view. See the JAVS
CaseScheduler manual for information on how to
schedule a case or see the Add to Today’s
Schedule section of this manual.
2. Press the Print Today’s Schedule button and the Scheduled Cases
Report will open.
3. Press the Print button in the
Preview window to
complete the printing
process.
4. A hard copy will be printed of today’s scheduled cases with the title of the case and the
scheduled time.
69
Copyright JAVS 1981-2008
AutoLog 6.3
Software Instruction Manual
Printing Witness and Exhibit Lists
If a case has witnesses and exhibits associated with it, a list of either or both can be printed to
hard copy. The witness and exhibit lists can be accessed through Case Properties, and can be a
case that has already been logged or a case that is currently in session.
To print a witness list:
1. Use the Find Case function to locate a case that contains witnesses and exhibits and add
to today’s schedule, or start a New Case and add Witnesses and Exhibits.
2. Start or Prepare the case.
3. Press the Case Properties button or select the menu item Case>Case Properties.
4. The Case Properties window will open with the available witnesses and exhibits
associated with the case.
5. Select the Edit button to the right of the Witness field and the Edit
Witnesses window will open. Press the Print Witnesses button and
the Witness List Report dialog window will open.
6. Press the Print button in the Preview window.
7. A hard copy of the available witnesses for the case will be printed.
To print an exhibit list:
1. Use the Find Case function to locate a case that contains witnesses and exhibits and add
to today’s schedule, or start a New Case and add Witnesses and Exhibits.
2. Start or Prepare the case.
3. Press the Case Properties button or select the menu item Case>Case Properties.
Copyright JAVS 1981-2008
70
AutoLog 6.3
Software Instruction Manual
4. The Case Properties window will open with the available witnesses and exhibits
associated with the case.
5. Select the Edit button to the right of the Exhibits field and the Exhibits window will open.
Press the Print Exhibits button and an Exhibit List Report window will open.
6. Press the Print button in the Preview window.
7. A hard copy of the available exhibits for the case will be printed.
Publishing
The Publishing function of AutoLog allows the user to publish cases to CD, DVD or a Network
Share folder. The published cases will consist of the audio/video media and CVL files, which
when launched, will open JAVS CaseViewer. You can view the case with the options chosen for
public and private information and the case log.
Publish Current Case
Publishing can be performed on a current case basis or on a logged case basis. AutoLog also
allows publishing of the current day’s cases or any other day’s cases.
To publish a current case:
1. Start or Prepare a case as outlined in the New Case section of this manual.
71
Copyright JAVS 1981-2008
AutoLog 6.3
Software Instruction Manual
2. Select the menu item Case>Publish Current Case and the JAVS Publishing Wizard main
screen will open.
3. Select Next and the Case
Selection Criteria screen
will appear.
You can choose to publish
only the current case, a
specific date for that case,
or the entire case history
for that case.
NOTE: A case history
means that a case has
been logged more than
once on different dates and
times.
4. Press the Next button when the Case Selection Criteria has been chosen.
Copyright JAVS 1981-2008
72
AutoLog 6.3
Software Instruction Manual
5. The Select Files screen
will appear, which will
allow you to select what
documents will be
included with the
published case.
Public/Private
Include Public Case
Information Only will
publish the media (audio
and video) that is marked
as public.
Include Public And Private
Case Information will
publish all the media
associated with the case.
Options
Here you can choose to include the case log, and public and/or private notes in the case log.
6. Press Next and the Select Action screen will appear.
You can choose to
publish to CD, DVD or to
a Network Share folder.
73
Copyright JAVS 1981-2008
AutoLog 6.3
Software Instruction Manual
If Network Share is selected, press the Select Folder button and you will be prompted to
select a folder for the media to be copied to.
7. After selecting the media type or folder, press the Next button and the copy and burn process
will begin. There will be a status bar to inform you of the progress. When the process is
finished, the Completed screen will appear. Press the Finish button and your files are ready
to view in JAVS CaseViewer.
For more information about viewing cases, see the JAVS CaseViewer user manual.
Copyright JAVS 1981-2008
74
AutoLog 6.3
Software Instruction Manual
Publish an Entire Day’s Cases
AutoLog gives you the ability to publish any day’s case logs. The case logs can be published to
CD, DVD or a Network Share folder. The published cases will consist of the audio/video media
and CVL files for each case, which when launched, will open JAVS CaseViewer. You can view
the case with the options chosen for public and private information and the case log.
To publish an entire day’s cases:
1. Select the menu item Case>Publish an Entire Day’s Cases and
the JAVS Publishing Wizard screen will open. Press the Next
button.
2. The next screen offers the choice to Publish today’s cases or Publish specified date.
Selecting Publish today’s cases will publish all cases in the Logged Today view.
75
Copyright JAVS 1981-2008
AutoLog 6.3
Software Instruction Manual
3. Select Publish specified date and the calendar pull down will become active. Select the
date you wish to publish and that date will be present in the pull down window. Press the
Next button.
4. The Select Files screen will appear, which will allow you to select what documents will be
included with the published case.
Public/Private
Include Public Case Information Only will
publish the media (audio and video) that is
marked as public.
Include Public And Private Case Information
will publish all the media associated with the
case.
Options
Here you can choose to include the case
log, and public and/or private notes in the
case log.
5. Press the Next button and a list of cases to
publish will appear. Use the checkboxes to
select the cases you wish to publish.
Copyright JAVS 1981-2008
76
AutoLog 6.3
Software Instruction Manual
6. Make selections as necessary and press the Next button. The Select Action screen will
appear and you select the type of media to publish to--CD, DVD or Network Share folder.
7. If Network Share is selected, press the Select Folder button and you will be prompted to
select a folder for the media to be copied to.
77
Copyright JAVS 1981-2008
AutoLog 6.3
Software Instruction Manual
8. After selecting the media type or folder, press the Next button and the copy and burn process
will begin. There will be a status bar to inform you of the progress. When the process is
finished, the Completed screen will appear. Press the Finish button and your files are ready
to view.
Publish Today’s Cases
The Publish Today’s Cases command works the same as Publish an Entire Day’s Cases, with
the exception of how it is initiated. The Publish Today’s Cases command resides in the Logged
Today view and allows the user to conveniently publish the current day’s cases at the end of a
court day.
To publish today’s cases:
1. In the Logged Today view, press the Publish Today’s Cases button and the JAVS
Publishing Wizard screen will open. Press the Next button.
Copyright JAVS 1981-2008
78
AutoLog 6.3
Software Instruction Manual
2. Select the Publish today’s cases in the Date Selection choices and press the Next button.
3. Follow the steps outlined in the Publish an Entire Day’s Cases section, step 4 of this
manual.
Publish Selected Case
The Publish Selected Case allows the user to publish a single case from the Logged Today
view. If the case has a history, the user can publish individual days the case was in session, the
current day or the entire case history.
To publish a selected case:
1. In the Logged Today view, select a case to publish
and press the Publish Selected Case button. The
JAVS Publishing Wizard screen will open.
2. Press the Next button and the Case Selection Criteria for the selected case will open.
79
Copyright JAVS 1981-2008
AutoLog 6.3
Software Instruction Manual
3. In Publishing Options, you
can choose to publish only
the current case, a specific
date for that case, or the
entire case history for that
case.
4. Press next and follow the
steps outlined in the Publish
an Entire Day’s Cases
section, step 4 of this
manual.
HTML Log
During Publishing, the case log is also integrated to an HTML browser for those users that are not
at an AutoLog station and need to view or print a case log or view a case.
To view an HTML case log:
1. Locate the folder or DVD or CD media that the files were published to.
2. Press the Folders button to see a file tree to the left of the screen and open the tree to
see the files you wish to view. The files in the published folder will be structured by case
number, year, month and day.
Copyright JAVS 1981-2008
80
AutoLog 6.3
Software Instruction Manual
3. Each case will have an associated CVL and HTML file. These files will contain the case
log for each case with multiple logs for given days the case was in session.
4. Locate the day folder of the case to view the log file. Selecting the Individual day folder
will show the files that are only related to that particular day. This folder will contain the
CVL file for JAVS CaseViewer, the media files that were recorded during the court
proceedings and the individual HTML log file.
5.
81
Double click the HTML file and the case log
for that case will open in an internet browser
window.
Copyright JAVS 1981-2008
AutoLog 6.3
Software Instruction Manual
Capture Controls
In the Capture Controls window, AutoLog monitors
connectivity status and also provides handy buttons for
starting, recessing, resuming, and ending cases, as well
as entering public and private recording modes.
Net Status: This display shows whether or not AutoLog
is connected to the PDR (Primary Digital Recorder) via a
network connection. If the status reads “Not Connected,”
a connectivity problem may exist.
Recording/Not Recording: Shows the status of the
current case and whether AutoLog is recording or not
recording...
Current Time: Shows the current time of AutoLog’s
event manager and is the time used to time stamp each
event.
Device Indicators: The two round icons show how many recorders are connected and the record
status of each recorder. Blue shows connected and not recording, Red shows connected and
recording and yellow indicates there is a problem with the recording service. If a connection
problem exists the icons will be grey.
Control Buttons: These controls enable quick access to the Start Case, Recess Case, Resume
Case, and End Case functions. The Public and Private buttons enable you to override the
public/private system mode settings (i.e., a bench conference mode marked as private can be
countermanded here by an operator with user rights). All buttons, when pressed, create a time
stamped log event.
 Start Case: Use this button to start a case when a case has been prepared using the
Prepare to Start Case function. This button will change to Recess Case when initiated.
 Recess Case: Once a case is started, the Start button becomes the Recess button. Use
this button to pause a case for break (e.g., lunch).
 Resume Case: Once the Recess button is pressed, the Recess Case button becomes
the Resume button. Use this button to resume a case that has been recessed.
 End Case: Use this button to end a case and unload it from AutoLog. Once a case is
ended, it will appear in the Logged Today list.
 Public/Private: Use these buttons to manually put AutoLog into a public or private state.
View Tabs: Shows the Capture Controls (Precision, CTVI and CT-4), System Modes (Precision,
CTVI and CT-4) and Camera Locks (CT-4 systems only).
Copyright JAVS 1981-2008
82
AutoLog 6.3
Software Instruction Manual
Playback Controls
This function is only available for the CT-4 system.
AutpLog 6.3 provides a playback control panel used for Instant review as well as provides normal
playback functions for the VCR for videotape presentations.
The Instant Review function is used in two separate applications: Control Center systems and
non-Control Center systems.
Instant Review
In a non-Control Center system, a playback VCR is used as a recorder during normal
proceedings. The Review button will set the system into an Instant Review mode by stopping
the playback VCR from recording and rewinding 30 seconds, and then goes into play. The Video
Out from the VCR is also routed to the courtroom monitor. You can use the playback functions on
the panel to control the VCR or you can continue to press the Review button to rewind back 30
seconds each time you press it. After each 30 seconds are achieved the VCR will go into play.
Pressing the Return button will advance the VCR to the point in which it came out of record when
Instant Review was initiated, and the system will put the VCR back into record.
In a Control Center system, the instant review function will
control a digital recorder that takes the place of the VCR.
Pressing the Review button will place Control Center in an
Instant Review mode. The Stop and Pause buttons will
place the Control Center Instant Review into the pause
mode and the Play button will initiate a play command.
Pressing Fast Forward and Rewind will advance or back up the Control Center Instant Review
playback. Press the Return button to set the system back into a normal recording mode.
Playback
The Playback control panel will also be used for playback of
any VHS tape inserted into the playback VCR. This playback
can be on or off the court record by pressing the Playback
Mode button located in the Modes panel.
To initiate playback mode:
1. While the system is in normal recording operation,
press the Stop button on the Playback Control
panel. The playback VCR will stop.
2. Press any of the VCR playback buttons to control
the VCR.
3. To place the playback on the court record, press the Playback Mode button (see Mode
Activation) and the VHS playback will be recorded.
4. To return the VCR to the record mode, use the VCR controls to place the VHS tape
where you want to go into record and press the Record button.
NOTE: For Control Center systems, the Show Monitor button on the Control Center screen must
be selected to route the playback to the courtroom monitor.
83
Copyright JAVS 1981-2008
AutoLog 6.3
Software Instruction Manual
System Settings
Public/Private System Modes
AutoLog’s audio/video capabilities are customizable, allowing your JAVS technician to configure a
wide variety of System Modes.
Some examples: A bench conference mode can be created to mark and record statements
between attorneys and the judge as private, strictly limiting reception to the bench; a mode for
video conference can be set up for a remotely-stationed A/V system to conduct special hearings;
or, perhaps a mode in the courtroom specifically dedicated for recording evidence and/or
presentations.
Once System Modes are set up, the System Settings utility allows the user to control if these
modes are public or private.
NOTE: CT-4A System Modes are preset. Precision, Precision Plus, and CT-Vi System Modes are
customizable.
To make a System Mode public or private:
1. Select Tools>System Settings; the System
Settings window opens.
2. Check the appropriate box in the Private
column to make it private, or un-check it to
make it public.
3. Press OK. The new System Mode privacy
settings are now active.
NOTE: You can also switch the current case log between public and private modes by selecting
menu item Case>Public Mode or Case>Private Mode.
Camera Settings
This function is only available for the CT-4A system.
This function allows you to customize your camera names. You can return the settings to their
default mode by selecting and clicking the Reset button, or click the Reset All button to change all
attributes back to their default label.
Copyright JAVS 1981-2008
84
AutoLog 6.3
Software Instruction Manual
To assign names/titles to cameras:
1. Select Tools>System Settings;
the System Settings window
opens.
2. In the System Modes tab, select
a camera in the Camera Name
field under Camera Locks.
3. Enter a new title for the desired
camera.
4. Click OK. New camera name is
now assigned.
NOTE: These camera names are reflected in the AutoLog interface for the user’s benefit in
controlling the A/V and switching modes; they do not change in the on-screen display.
On-Screen Display/Microphone Titles
This function is only available for the Precision, Precision Plus, and CT-Vi systems.
In Tools>System Settings, the Titles tab brings up the On-Screen Display settings: Microphone
Titles and System Titles.
AutoLog’s On-Screen display shows the assigned title for each person’s active microphone
whenever they are speaking.
To configure the On-Screen Display microphone settings:
1. Select Tools>System Settings; the System Settings window opens.
2. Select the Titles tab.
3. Select the applicable text field in the On-Screen Display list under Microphone Titles and
replace AutoLog’s default microphone titles with your own.
4. Press OK. Microphones have now been renamed in the On-Screen Display.
85
Copyright JAVS 1981-2008
AutoLog 6.3
Software Instruction Manual
Additionally, up to four courtroom System Titles are available in the System Field, which allow
you to further customize the on-screen display. The available selections are:
 Judge: Displays the current
judge’s name on-screen in the line
indicated.
 Case Number: Displays the
current case number in the
indicated line.
 Case Title: Displays the current
case title in the indicated line.
 Location: Displays the courtroom name in the indicated line.
 User-Defined: Allows user to type their own text for on-screen display in the indicated
line.
 None: No text displayed.
To select one of the six choices, click in
the System Field column to activate a
drop-down menu of choices.
To configure the On-Screen Display System Titles settings:
1. Select Tools>System Settings; the System Settings window opens.
2. Select the Titles tab.
4. Select the applicable text field in the On-Screen Display list under System Titles and
replace AutoLog’s default titles with your own.
5. Press OK. The On-Screen System Titles have now been renamed.
NOTE: Your system technician controls where t hese lines will be positioned in your on-screen
display.
Copyright JAVS 1981-2008
86
AutoLog 6.3
Software Instruction Manual
Utilities
JAVS AutoLog provides many utilities to allow the user to configure and customize the way they
do their job. Each utility discussed in this section may or may not be available to some users due
to the individual rights assignments made by your court administrator or IT department. This
section will assume that the user has all user rights.
Edit User and Edit Site Utilities
The Edit Users and Edit Site commands are utility tools used to add and edit users, assign
passwords and apply user types and user templates to users. (These utilities require the Edit
Users And Staff user right to be able to use the utility. Your Administrator can provide you with
specific rights).
To launch the Edit Site utility:
1. Select Tools>Edit Site and the Edit Site window will open. The Edit Site window allows
the user to add, edit or delete Case Types and Departments. JAVS provides a default list
of Case Types to choose from, and a Default department.
The Add, Edit and Delete buttons will be active for both Case Types and Department tabs.
The Edit button will only allow the user to change the name of the Case Type or
Department.
NOTE: You must press the Save button to retain your additions or changes.
87
Copyright JAVS 1981-2008
AutoLog 6.3
Software Instruction Manual
To add a case type:
1. Press the Add button and the Case Type Edit window will open. Type in the new case type
and press the OK button.
2. The new case type will appear in the Case Types list and will be available in the Case type
pull-down in the New Case dialog.
To delete a case type:
1. Select the Case Type to be deleted and press the Delete button. A delete Case Type
confirmation window will
appear.
2. Press Yes to delete and
No to cancel.
Copyright JAVS 1981-2008
88
AutoLog 6.3
Software Instruction Manual
To add a department:
1. Select the Department tab in the Edit Site window.
2. Press the Add button and a Department Edit window will open.
3. Type in the new department and press OK.
4. The new department will appear in the Departments list and will be available in the
Department pull-down in the New Case dialog.
To delete a department:
1. Select a department and
press the Delete button and
a Delete Department
confirmation window will
appear.
2. Select Yes to delete and No to cancel.
3. Press the Save button to save all of your changes and close the Edit Site window.
Note: You cannot delete a department if it has been part of a logged case.
89
Copyright JAVS 1981-2008
AutoLog 6.3
Software Instruction Manual
To launch the Edit Users utility:
1. Select Tools>Edit Users and the Edit Users window will open. The Edit Users window will
allow the user to create new users and assign passwords, User Classes and Templates.
User’s information can be edited and security assignments changed. The window consists
of two tabs, General tab and the Security tab.
NOTE: If a user’s information is changed by the same user, that user must Login again for the
changes to take effect. Conversely, if you change a users information that is currently logged in,
that user must also login again.
Copyright JAVS 1981-2008
90
AutoLog 6.3
Software Instruction Manual
General Tab
In the left hand column is a list of all the users in the current database. They are listed by Last
Name and First Name.
Select a user from the list and the right hand side of the window will show the personal
information for the user. You can change a user’s information by highlighting the fields to change,
and typing the information.
91
Copyright JAVS 1981-2008
AutoLog 6.3
Software Instruction Manual
To add a new user:
1. Press the Add New User button and the New User Wizard window will open, Type in the
new ID, personal information and password then press the Next button. (If a user already
exists, a Duplicate Name notice will appear. Select a new ID until successful).
2. The next window (below) of the wizard is for assigning the user class and template for the
user. Use the pull-down fields to assign the user. For a user to be able to log in to JAVS
AutoLog, they must first be assigned a password, a user class and user template. JAVS
has created a default set of User Classes and Templates to assign to new users or reassign to pre-existing users.
For Example:
If the new user is a judge, he can be assigned a User Class of Judge with a Template of
Judge Advanced. This Judge would have JAVS AutoLog and JAVS CaseScheduler
advanced user rights. A listing of assigned rights will appear when the Template is
selected.
Templates and User Classes are generally set up by JAVS or your Administrator. Users and
Group rights should be available through your Administrator. (See User Rights).
Copyright JAVS 1981-2008
92
AutoLog 6.3
Software Instruction Manual
3. Press the Finish button and you will return to the Edit Users window. The new user will
appear in the user list.
4. If Department Filtering is enabled, the Finish button will not be available in the second
window of the wizard. Pressing the Next button will open a department assignment
window; this window will contain a list of pre-created departments (either by the user or by
your JAVS technician: see Edit Site) for assigning users.
5. Select a department for assignment from the Departments list and press the single right
arrow. That department will be added to the Selected Departments list and the user will
only be able to access case information pertaining to that department.
6. Press the double right arrow to add all departments to the user or cltrl. Click to select
multiple departments.
6. Press the Finish button and the user will appear in the user list in the Edit User window.
NOTE: By default, Department filtering allows administrators to access all departments whether
they are assigned a department or not.
93
Copyright JAVS 1981-2008
AutoLog 6.3
Software Instruction Manual
Security Tab
Selecting the Security tab will give access to a user’s security information and display the user
assigned rights and the department(s) the user is assigned to.
In this window you can change a user’s password, change department assignment (Department
Filtering only) and change or re-assign User Class and Templates.
Copyright JAVS 1981-2008
94
AutoLog 6.3
Software Instruction Manual
To change a user’s password:
1. Press the Change Password
button. The Change Password
window will open.
2. Change and confirm your
password and press OK.
To change User Class and Template:
1. Press the Edit button to the right of the User Class and Template fields.
2. The Edit User Template window will open. On the left is the current User Class and
Template and on the right is where the new assignment will be displayed.
95
Copyright JAVS 1981-2008
AutoLog 6.3
Software Instruction Manual
3. Use the User Class and Template pull downs to re-assign the user’s rights. The new results
will be displayed in the right column.
4. Press the OK button and the new user rights will appear in the Security tab of the Edit
Users window. A new set of rights will be displayed for the changes.
To assign or re-assign departments: (Department Filtering only)
1. Use the right and left arrows to add and remove departments. The single
arrows will move one department at a time or the double arrows will move all
the departments. You can also select multiple departments by cntrl. select.
2. When all changes have been made, press the Save button to retain your
changes.
NOTE: If a user’s information is changed by the same user, that user must Login again for the
changes to take effect. Conversely, if you change a users information that is currently logged in,
that user must also login again
Copyright JAVS 1981-2008
96
AutoLog 6.3
Software Instruction Manual
Find Case Utility
This section will illustrate how to use the options available once a case is located. Refer to the
Find Case section of this manual for more information on how to find a case.
To Start an Existing Case:
1. Select the case you searched for, the data will drilldown through the Date, Courtroom, and
finally Case Properties fields.
2. Select the appropriate Case Number; the case’s dates are displayed in the Date field.
3. Select the appropriate Date, and the applicable courtrooms are displayed for that date in
the Courtroom field.
97
Copyright JAVS 1981-2008
AutoLog 6.3
Software Instruction Manual
4. Select the appropriate Courtroom, and the Case Properties are called up and displayed in
the Case Properties field. All Find Case options are now available.
5. Press the Start Case button;
the Start Case window opens.
6. Verify the case’s information is
correct (i.e., case number, case
type, date, title, court personnel,
etc.).
7. Press the Prepare to Start Case button if you want to queue the data without initiating
recording, or press the Start Case button to begin recording. Case starts. Pressing Add to
Schedule will add the case to today’s docket at the time you want.
To Edit a Case Log:
1. Follow the instructions on how to find a case in the Find Case section of this manual.
2. Select the case, date and courtroom of the case you searched for, the data will drilldown to
the Case Properties field.
3. Press the Edit Case Log button and the Edit Case Log window will open.
4. Follow the steps outlined in the Edit Case Log section of this manual.
Copyright JAVS 1981-2008
98
AutoLog 6.3
Software Instruction Manual
To View a Case:
1. Follow the instructions on how to find a case in the Find Case section of this manual.
2. Select the case, date and courtroom of the case you searched for, the data will drilldown to
the Case Properties field.
3. Press the View Case button and the JAVS CaseViewer application will open.
4. See the JAVS CaseViewer User Manual for more information on how to operate the
CaseViewer application.
To Publish a Case:
1. Follow the instructions on how to find a case in the Find Case section of this manual.
2. Select the case, date and courtroom of the case you searched for, the data will drilldown to
the Case Properties field.
3. Press the Publish Case and the JAVS Publishing wizard will open.
4. Follow the instructions in the Publish Current Case section of this manual.
To Edit Case Properties:
1. Follow the instructions on how to find a case in the Find Case section of this manual.
2. Select the case, date and courtroom of the case you searched for, the data will drilldown to
the Case Properties field.
3. Press the Edit Case Properties button and the Case Properties for the selected case will
open.
4. For more information, see the Case Properties section of this manual.
99
Copyright JAVS 1981-2008
AutoLog 6.3
Software Instruction Manual
Configure Shortcuts
JAVS AutoLog gives the user the ability to map the keyboard with shortcuts for their most used
commands with user configurable hotkeys. Once configured, the programmed keys will be saved
for each windows user.
The default configured keys in AutoLog are:
New Case………….Ctrl+N
Find Log Event…….Ctrl+F
Add Log Event……..F2
Add Case Note…….F3
To configure the keyboard for shortcuts:
1. Select the menu item View>Configure Shortcuts and the Configure Shortcuts window
will open.
2. Select the command you wish to set a hot
key for.
Copyright JAVS 1981-2008
100
AutoLog 6.3
Software Instruction Manual
3. Use the Shortcut for selected command pull down to choose the keystroke or
combination of keystrokes for the command. Press the Close button.
4. The command is ready to be used with the new shortcut.
5. You can set the keyboard back to the JAVS default by pressing the Load Defaults button.
(Warning: This action cannot be un-done).
Undockable Windows
AutoLog 6.3 allows the user to arrange the tool windows or tabs to any layout you choose. By
selecting the particular windows header bar or tab, the window can be pulled from its current
location and placed in another location. Double clicking the header or tab will also undock that
window to the previously positioned location or upper left of the screen if it has never been
moved.
There are two methods for moving and sizing windows:
Docked Method:
The docked method will allow you to use the docking controls to lock a window into place once it
has been moved. By selecting the window header or tab, move the window to the area of the
screen you want and roll over the docking controls. The controls will allow you to go left, right, up
or down and a highlighted area will appear indicating where the window will be positioned. If you
position over the center of the docking control, the window will be placed as a tab in that
particular window. The windows can be resized by holding the mouse pointer over the edge of a
window until the pointer turns into a resize cursor. Click and drag to the size you want.
Undocked method:
The undocked method will allow the user to move a tool window or tab to any position on the
screen and be free floating. By selecting the window header or tab, move the window to the area
of the screen you want and release the mouse, the window has been repositioned.
NOTE: Double-clicking on a window header will re-dock the window to the last docked position.
Conversely, double-clicking on a docked window header will place it in the last free floating
position.
101
Copyright JAVS 1981-2008
AutoLog 6.3
Software Instruction Manual
Load Default Tool Arrangement
Occasionally, windows could be adjusted for size or moved to a different position. The Load
default Tool Arrangement function will allow the user to set the AutoLog window arrangement
back to the default setting.
To set the window arrangement back to the default setting:
1. Select View>Load Default Tool Arrangement and the AutoLog window arrangement will reset to the default arrangement.
Video Settings
The Video Display window is where the user views the court proceedings. This window will follow
the action of the courtroom by displaying the switched camera views of the JAVS AutoLog
system. In most cases, the selection of video source will be the video card(s) installed in the
AutoLog computer.
To select the video source:
1. In the video window select the Video Settings button and the Video Settings window will
open.
Copyright JAVS 1981-2008
102
AutoLog 6.3
Software Instruction Manual
2. Use the Select Video Source to choose the device for viewing.
3. Check your documentation to determine the video card installed in your computer.
The Video Display window has been enhanced by integrating a video server device so the user
can connect to different courtrooms over TCPIP. The service allows viewing of multiple locations
by changing to the IP of the video server device.
To use the video server:
1. In the video window select the Video Settings button and the Video Settings window will
open.
103
Copyright JAVS 1981-2008
AutoLog 6.3
Software Instruction Manual
2. Use the Select Video Source to choose the device for viewing.
3. There are 4 fields that pertain to the video server setup:
a. IP Address: This field is for entering
the IP address of the video server.
See your IT personnel for the correct
address for the device.
b. Port Number: This field is for entering
the port number. 80 is the default port
number and in most cases will be a
valid port assignment. Your IT
department should inform you of any
variation to this port number.
c.
User Name / Password: Your IT
department can set up a user name
and password for secure access to
the video server
4. Once the setup is complete, press the OK button and the video server camera source will
appear in the video window.
5. Audio controls for Speaker On/Off and Volume Control are now available for each
selected IP address.
Copyright JAVS 1981-2008
104
AutoLog 6.3
Software Instruction Manual
Find Log Event
The Find Log Event utility allows the user to search the case log for log events, case notes and
event notes. Find Log Event is available in the current log or in the Edit Case Log function.
To find a log event:
1. On the tool bar press the Find Log Event button or select Edit>Find Log Event and the
Find Log Event window will open.
2. Type in all or part of the event or note in the search field to search for.
3. Press the Find Next button and Find Log Event will find any note or event that contains the
text typed in the search field.
4. Press Find Next again to continue the search or change the text for a new search.
NOTE: For more information, see the Edit Case Log section of this manual
Copy Event Log to Clipboard
The Copy Event Log to Clipboard utility allows the user to copy the contents of the case log
and paste it into a third party text editing program. Copy Event Log to Clipboard is available in
the current log or in the Edit Case Log function.
To copy the event log to clipboard:
1. Select Edit>Copy Event Log to Clipboard and the entire event log will be placed on the
copy clipboard. (Press the Copy to Clipboard button if in the Edit Case Log dialog).
2. Open a third party text editing program and select the paste function from that program.
3. The contents of the clipboard will be pasted into the text editing program.
Tools
By selecting View>Tools, you can toggle the following
windows in the AutoLog interface, turning them on
(checkmark is visible) or off (checkmark is hidden).
Turning a window off (un-checking it) will hide it from
view. Make sure a window’s checkmark is on to view
it.
105
Copyright JAVS 1981-2008
AutoLog 6.3
Software Instruction Manual
Controlling the A/V Processor
Switching System Modes
System Modes are set up by your JAVS technician.
Mode Activation
During the recording process, modes can be activated in one of three ways; using the Tools
menu and selecting the mode from the list, using the toolbar buttons or by using the System
Modes selection panel.
To activate system modes using the Tools menu:
1. Select the menu item Tools>System Modes
and a drop down list of available modes will
appear.
2. Select the mode to activate by selecting that
mode from the list. A log entry will be made
indicating the mode was activated and the
previous mode was deactivated.
3. Select the menu item Tools>System Modes and select the same
mode to deactivate and return to the normal mode or select
another mode. Log entries will be made indicating activation and
deactivation of each mode involved.
To activate system modes using the toolbar buttons:
1. Select the down arrow on the System
Modes button located on the toolbar. A
list of available modes will drop down.
2. Select the mode to activate by selecting
that mode from the list. A log entry will be
made indicating the mode was activated
and the previous mode was deactivated.
The System Modes button will now
indicate which mode you selected.
3. Press the System Mode button again to
deactivate and return to the normal mode
or select the down arrow and select
another mode from the list. Log entries
will be made indicating activation and
deactivation of each mode involved.
Copyright JAVS 1981-2008
106
AutoLog 6.3
Software Instruction Manual
To activate system modes using the selection panel:
1. At the bottom of the Capture Controls window,
select the System Modes tab. A System Modes
button panel will open.
2. Select the mode to activate by pressing any of
the mode buttons. A log entry will be made
indicating the mode was activated and the
previous mode was deactivated.
3. Select the Normal Mode button to deactivate
and return to the normal mode or select another
mode to activate.
NOTE: If the mode was set to be private in the System Settings window, a Private mode entry will
be made in the log.
Controlling Camera Locks
This function is only available for the CT-4A system.
You can control which cameras are active by accessing the Camera Locks function in the Cases
toolbar or by using the Camera Locks selection panel.
To switch to a specific camera using the toolbar buttons:
1. Press the Camera Locks drop-down menu in the Cases
toolbar and click the down arrow.
2. Select the appropriate Camera. The chosen camera will
automatically activate and begin a video feed to the video
window.
3. Select the Camera Lock button again to deactivate the
camera lock and return to a normal switching mode.
107
Copyright JAVS 1981-2008
AutoLog 6.3
Software Instruction Manual
To switch to a specific camera using selection panel:
1. At the bottom of the Capture Controls window,
select the Camera Locks tab. A Camera Locks
button panel will open.
2. Select the Camera to lock to by pressing any of
the camera lock buttons. The chosen camera will
automatically activate and begin a video feed to
the video window.
3. Select the camera lock button again to return the
system to a normal switching mode.
NOTE: With the CT-4A system, camera locks and system modes override each other. For
example, if you are currently in a private system mode such as bench conference and you elect
to activate another camera, AutoLog will automatically switch to the selected camera rather than
stay locked in the private system mode. Conversely, if you’ve selected this camera and then click
back to bench conference, the system will automatically return to the private system mode.
Video Conference
This function is only available for the CT-4A system.
The Video Conference button activates the video conference A/V mode. This function, when
activated will force a remote camera to the courtroom monitor while maintaining the normal
switching of the system to the recorders.
To activate the video conference function:
1. Select the Video Conference button located on the cases toolbar to activate the video
conference mode.
2. Select the Video Conference button again to deactivate the video conference mode.
Copyright JAVS 1981-2008
108
AutoLog 6.3
Software Instruction Manual
User Rights
Each user is assigned a user name and password and each user can be given all or limited user
rights. User rights give the ability to use certain functions in the AutoLog and CaseScheduler
applications or can be used to limit the use of certain functions. User classes and templates are
set up by your JAVS technician upon installation of the system and can be assigned by your
administrator (see Edit Users ).
AutoLog is broken down into 4 user types, AutoLog Basic, AutoLog Standard, AutoLog Power
and AutoLog Advanced. Each user type will be assigned through User Classes and Templates.
User classes and templates in the Edit Users function are based on the rights in this chart.
109
Copyright JAVS 1981-2008
AutoLog 6.3
Software Instruction Manual
Appendix-A
Activation
The JAVS software set requires that each user activate the software before it can be used. There
are three ways to activate the software; Online Activation, Phone Activation and a 15 day trial
period.
The first time AutoLog is launched an activation message will appear with three choices.
Online Activation
Select Online Activation and press Next. Enter the Serial Number and Password provided on
the Installation CD. Observe case sensitivity.
Copyright JAVS 1981-2008
110
AutoLog 6.3
Software Instruction Manual
After entering the Password and Serial Number press the Finish button and the JAVS AutoLog
login screen will appear. Type in your user name and password and AutoLog is ready to use.
Phone Activation
Select Phone Activation and press Next.
111
Copyright JAVS 1981-2008
AutoLog 6.3
Software Instruction Manual
A contact screen will appear with the JAVS help desk phone number. Contact the JAVS help
desk with the number provided, and give the Pin Number to the help desk technician. The JAVS
help desk will then provide you with the appropriate activation code for your particular system.
Type this number in the Activation Code field and press Finish. All numbers are case sensitive.
The JAVS AutoLog login screen will appear. Type in your user name and password and AutoLog
is ready to use.
Copyright JAVS 1981-2008
112
AutoLog 6.3
Software Instruction Manual
15 Day Trial Period
Select the Run Trial and press the Next button.
You will get a message indicating how many days are left on your trial period.
Press OK and the AutoLog login screen will appear.
Type in your User Name and Password and
AutoLog is ready to use.
113
Copyright JAVS 1981-2008
AutoLog 6.3
Software Instruction Manual
Appendix-B
Safe-Mode
AutoLog depends on the internal database for all of the information provided for normal operation
of the system. Case information such as judge, attorneys, witnesses and any other information
related to the case is stored in the database and retrieved by AutoLog on a continual basis.
Although this is vital information, AutoLog also records the video and audio provided by the
cameras and microphones, which is not dependant on the internal database.
Failures can occur in any electronic system and can be catastrophic to the user of the system.
Safe-Mode was put into place for just such failures. Although database failures are not common,
JAVS wants to ensure that if a database failure does occur, that the recorded Record continues
until the database is restored, thus, the Court Record is preserved through the recorded audio
and video.
When AutoLog is launched or if AutoLog is in the middle of a court proceeding and the database
is not available due to database failure, a message will appear; “System Error. Database
unavailable or system in safe mode” An additional window will also appear; “The database is
unavailable or system is in safe mode. AutoLog will close and start the safe mode interface”.
Press the OK button and the Safe Mode Interface will open.
Copyright JAVS 1981-2008
114
AutoLog 6.3
Software Instruction Manual
If the system was recording when Safe Mode was initiated, it will remain in record so no part of
the recorded Record is lost.
The Safe Mode interface allows the user to Start, Recess, Resume and End a case. All system
modes that were available during normal operation will also appear in the Safe Mode interface.
The Interface also provides the user with the
video monitor that was selected during normal
operation or the user can select a different
monitor if the option is available. This selection
can be found by selecting the menu item
View>Video Feed. (For more details on video
monitor selection, see the Video Settings section
of this manual).
115
Copyright JAVS 1981-2008
AutoLog 6.3
Software Instruction Manual
If no case was present when the Safe Mode was initiated, the user can start a new case.
Pressing the Start Case button will open a Start Case window with an auto generated case
number based on the year, month, day and time of day. The user can use this number or can reenter an appropriate case number. Press the Start Case button and the system will start
recording.
Copyright JAVS 1981-2008
116
AutoLog 6.3
Software Instruction Manual
If the database is unavailable before you login to Autolog, you will be informed that the database
is unavailable and Safe Mode will be initiated. Press the OK button.
A Select Courtroom prompt will appear. Select the appropriate courtroom with the selection pulldown and Safe Mode will launch.
You can change the courtroom you are
connected to by selecting the menu item
File>Connect to System. Use the selection
pull-down to change courtrooms.
In this situation you must also select a video
monitor. Select the menu item View>Video
Feed. (For more details on video monitor
selection, see the Video Settings section of
this manual).
117
Copyright JAVS 1981-2008
AutoLog 6.3
Software Instruction Manual
When the database becomes available a message will appear: “The database has become
available. Do you want to stop the current case and resume normal operation?” If it is
inconvenient to stop the case and continue normal AutoLog operation, press the No button and
you will continue to record the case in the Safe Mode Interface. If you wish to return to AutoLog,
press the Yes button and the case will stop.
Selecting Yes will prompt you to close the Safe Mode interface and launch AutoLog in normal
operation.
NOTE: It is necessary to stop a case in the Safe mode interface before returning to AutoLog
normal operation.
Copyright JAVS 1981-2008
118
AutoLog 6.3
Software Instruction Manual
When AutoLog is launched, you may continue the case by pressing Find Case, locating the case
and pressing the Start button in the Find Case window. For more details on the Find Case
function see the Starting an Existing Case in the Find Case Utility Section of this manual.
119
Copyright JAVS 1981-2008
AutoLog 6.3
Software Instruction Manual
Appendix C
Help Menu
The Help menu item contains selections for the AutoLog Manual and an About information
screen. The AutoLog Manual selection opens the AutoLog User Manual in PDF format. The User
Manual is a comprehensive look at AutoLog features, and step by step instructions on how to use
the many functions.
The AutoLog User Manual is also available for download at http://galileo.javs.com.
The About selection will provide information about the version of AutoLog, Libraries, Platform
and other pertinent information about your JAVS AutoLog system. This information is useful when
calling the JAVS HelpDesk.: 1-877-JAVS HLP (528-7457).
Copyright JAVS 1981-2008
120
AutoLog 6.3
Software Instruction Manual
August 2008 ADDENDUM - AUTOLOG 6.3.1
This addendum will cover the new feature set release of AutoLog 6.3.1. This feature set will
enhance the user’s interactive ability when operating the JAVS AutoLog system.
New Features Include:
 Send To Log: User selectable; Add Case Numbers to the Log.
 Include Owner: User selectable; Include user’s name associated with notes in
printout.
 Find Case Sorting: User selectable; Choose method of sorting the Find Case
results list. (Alphabetical or Most Recent).
121
Copyright JAVS 1981-2008
AutoLog 6.3
Software Instruction Manual
Send To Log
The Send To Log Feature allows the user to have one continuous recording for the day and add
case numbers to the log file. This is useful in a situation where the cases come one after the
other and stopping and starting recording is too time consuming. The case numbers will be added
as log events and will accept notes just like any other event. You can print or publish the log and
all the days cases will be reflected as a single day’s case. This selection is remembered with
each Window’s User and is not an AutoLog user only preference.
To send a case number to the log:
1. Select Edit>User Preferences and the User Preferences window will open.
2. Under the Settings tab select the Enable send to Log checkbox. Press OK.
3. A Send To Log icon will be added
to the Cases Scheduled window
icon list.
Copyright JAVS 1981-2008
122
AutoLog 6.3
Software Instruction Manual
4. Start the day’s recording; (it is recommended that you use the current day’s date as a case
number or a case number that is recognizable as a day long case).
5. Select a case from the Scheduled Today list and press the Send To Log icon. A green
check-mark will appear indicating a completed schedule and the case will be added as a
log event. The log event will include one editable note to include the CaseTtitle, Plaintiff,
Prosecution, Defendant and Defense.
6. You can add proceedings from the Proceedings list that pertains to that case. When that
case has completed, you can select another case from the Scheduled Today list and press
the Send To Log icon again. The next case has been added to the log.
Note: With Enable send to log checked, you can double click on a case in the Scheduled Today
list to add it to the log, conversely, you cannot load a case into the new case window from the
Scheduled today list with Enable Send To Log selected.
123
Copyright JAVS 1981-2008
AutoLog 6.3
Software Instruction Manual
Include Owner
The Include Owner option will allow the user to print Case Logs with or without the owner’s name
included with the note. This choice is made in the printing process.
To enable or disable Include Owner:
1. Select any of the printing methods outlined in the Printing section of this manual.
2. In the Case Log Report window, select the Include Notes checkbox in the Filter
section of the window.
3. When Include Notes is selected, the options will no longer be grayed out.
4. Select or deselect the Include Owner Checkbox.
5. Your selection will be reflected in the printout.
Copyright JAVS 1981-2008
124
AutoLog 6.3
Software Instruction Manual
Find Case Sorting
The Find Case window has now incorporated a sorting feature. The user can sort the search
results list alphabetically or by the most recent. This feature gives the user a broader search
base.
To sort the Find Case results list:
1. Follow the Find Case procedures outlined in this manual.
2. The Search button can be pressed before or after the sort method has been chosen.
3. Select either one of the sorting radio buttons. (Alphatabetical or Most Recent).
Sort Method
Alphabetical: Alpha-Numeric
Most Recent: By date
4. If the list is already present when the selection is made, the list will automatically sort to
the method chosen
125
Copyright JAVS 1981-2008