1
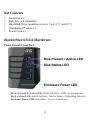
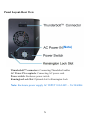
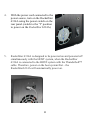
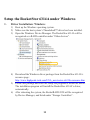
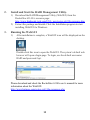
RocketStor 6314A Thunderbolt™ 2 Hardware RAID 4-Bay Storage Enclosure Quick Installation Guide V1.02 1 Table of Contents Table of Contents .................................................................................... 2 HighPoint RocketStor 6314A.................................................................. 3 Kit Contents ............................................................................................ 4 RocketStor 6314A Hardware .................................................................. 4 Setup Enclosure....................................................................................... 6 Setup the RocketStor 6314A under Mac ................................................. 9 Setup RocketStor 6314A under Windows ............................................. 11 Customer Support ................................................................................. 13 2 HighPoint RocketStor 6314A HighPoint's RocketStor 6314A Thunderbolt™ Storage Solution delivers up to 32 terabytes of high-performance, hardware RAID storage from a single cable connection! The fully integrated hardware RAID controller and removable disk modules were designed for today's fastest 6Gb/s storage devices perfect for professional, I/O intensive applications such as digital content creation and media post production. The RocketStor 6314A's robust, stylish aluminum construction ensures your storage stays cool while running at optimum efficiency. Key Features Stylish, compact and Whisper-Quiet Enclosure Thunderbolt™ 2 interface with 20Gbps of throughput in both channels 3.5” and 2.5” SAS/SATA Removable Disk Tray Modules RAID level 0, 1, 10, 5, 6 & JBOD Comprehensive Storage Management Suite 3 Kit Contents Enclosure x 1 Disk Tray x 4 (Installed) Hard Disk Drive mounting screw x 2 set (3.5” and 2.5”) Thunderbolt™ cable x 1 Power Cord x 1 RocketStor 6314A Hardware Panel Layout-Front View Device Present & Active LED: Solid/Flash Blue - HDD Access Indicator Device Status LED: Solid/Flash Red - Device Failure / Rebuilding Indicator Enclosure Power LED: Solid Blue - Power on Indicator 4 Panel Layout-Rear View (Note) Thunderbolt™ connectors: Connecting Thunderbolt cables AC Power IN receptacle: Connecting AC power cord. Power switch: Enclosure power switch. Kensington Lock Slot: Optional slot for Kensington Lock Note: Enclosure power supply AC INPUT 100-240V ~ 5A 50/60Hz 5 Setup Enclosure 1. Place the RocketStor 6314A on a level surface and remove each disk tray. 2. Carefully insert the 3.5” or 2.5” disk into each disk tray and secure them with the provided mounting screws. For 3.5” disk: Use the 3.5” screws (black color) to mount the disk to each side of the disk tray. 6 For 2.5” disk: Use the 2.5” screws (silver color) to mount the disk to the bottom of the disk tray. 3. Connect the RocketStor 6314A to the host system with the Thunderbolt™ cable, and then connect the RocketStor 6314A with a power source. 7 4. With the power cord connected to the power source, turn on the RocketStor 6314A using the power switch on the rear panel (switch to the “I” position to power on the RocketStor 6314A). 5. RocketStor 6314A is designed to be powered on and powered off simultaneously with the HOST system, when the RocketStor 6314A is connected to the HOST system with the Thunderbolt™ cable. Therefore, power on the host system first – the RocketStor6314A will automatically power on. 8 Setup the RocketStor 6314A under Mac 1. Verify the RocketStor 6314A’s RAID Controller Driver After connecting the RocketStor 6314A to the Mac system using the Thunderbolt™ cable and powering on the device, OS X should detect the RocketStor 6314A’s RAID controller, and display it under PCI Cards. Check the “Driver Installed” status for the “RocketRAID 4520 SAS Controller”. 2. “Yes” means the driver is loaded and working properly. “No” means the controller is detected but the driver has not been installed”. Install the Mac Driver for the RocketStor 6314A To download the Mac driver, please visit the RocketStor 6314A’s resources page on: http://www.hptmac.com/series-rs6314a-resources.php After downloading the software, double click the .dmg package to extract and double click the .pkg file to start the installation. Please follow the installation wizard to complete the driver installation. 9 3. Install the HighPoint RAID Management Utility(WebGUI): The Mac WebGUI is available from the RocketStor 6314A resources page: http://www.hptmac.com/series-rs6314a-resources.php After downloading the software, double click the .dmg file to extract software package and double click the .pkg file to install the Mac WebGUI. Follow the installation wizard to complete the WebGUI installation. 4. Using the WebGUI Start the WebGUI by double-clicking the icon found on the desktop: Please download and check the RocketStor 6314A user’s manual for more information about the WebGUI: http://highpoint-tech.com/PDF/RS/RS6314A/RS6314A_User_Manual.pdf 10 Setup the RocketStor 6314A under Windows 1. Driver Installation: Windows 1) Boot up the Windows operating system. 2) Make sure the host system’s Thunderbolt™ driver has been installed. 3) Open the Windows Device Manager. The RocketStor 6314A will be recognized as a RAID controller under “Other devices”. 4) Download the Windows driver package from the RocketStor 6314A’s resource page: http://www.highpoint-tech.com/USA_new/series-rs6314a-resource.htm 5) Extract the package and click the setup.exe program to install the driver. The installation program will install the RocketStor 6314A’s driver, automatically. 6) After rebooting the system, the RocketRAID 4520 will be recognized by Device Manager, and listed under “Storage Controllers”. 11 2. Install and Start the RAID Management Utility. 1) Download the RAID Management Utility (WebGUI) from the RocketStor 6314A’s resource page: http://www.highpoint-tech.com/USA_new/series-rs6314a-resource.htm 2) Extract the package and double Click the Installation program to start installing WebGUI for Windows. 3. Running the WebGUI 1) After installation is complete, a WebGUI icon will be displayed on the desktop. Double-click this icon to open the WebGUI. The system’s default web browser will open a login page. To login, use the default user name: RAID and password: hpt. Please download and check the RocketStor 6314A user’s manual for more information about the WebGUI: http://www.hptmac.com/series-rs6314a-resources.php 12 Customer Support If you encounter any problems while utilizing the HighPoint RocketStor 6314A, or have any questions about this or any other HighPoint Technologies, Inc. product, feel free to contact our Customer Support Department. FAQ: Web Support: Phone Support: http://www.highpoint-tech.com/websupport/kbn.php http://www.highpoint-tech.com/websupport/ (408) 240-6108 HighPoint Technologies, Inc. websites: http://www.highpoint-tech.com http://www.hptmac.com © Copyright 2015 HighPoint Technologies, Inc. All right reserved. 13