Download SMS Remote Software - Clinton Electronics
Transcript
SMS Remote Software User Manual Pro Series & Contender Series DVRs Table of Contents Chapter 1Overview 1.1 In This Manual 1.2 Overview 1.3 SMS Features 1.4 Product Information 1.5 System Requirements 1.6 Software Upgrade 1 1 1 1 1 1 1 Chapter 2Installation & Operation 2.1 Installation Procedures 2.2 Operating Procedures 2 2 3 Chapter 3SMS Admin 3.1 Description 3.2 Functions of the SMS Admin 3.2.1 Status 3.2.2 eMap 3.2.3 Config 3.2.4 Backup 4 4 4 4 7 9 11 Chapter 4SMS Live Viewer 4.1 Description 4.2 Functions of the SMS Live Viewer 13 13 15 Chapter 5Search Viewer 5.1 Description 5.2 Time Search 18 18 18 Chapter 6DVR Player 6.1 Description 6.2 DVR Player Functions 19 19 19 Chapter 1 Overview 1.1 In This Manual This manual describes the procedures for remote operation of the Pro and Contender Series DVRs through the proprietary Server Management Software (SMS) which is included with each Pro and Contender Series DVRs. The same software works with all the Pro and Contender Series models. There are no licensing agreements necessary to use this software. 1.2 Overview The remote software contains the SMS, Live Viewer and Search Viewer programs. • • • • SMS: Main administration program Live Viewer: Remote Surveillance & Camera Playback program Search Viewer: Remote Search program DVR Player: Recorded Video Playback program 1.3 SMS Features • • • • • • • Remote monitoring of live camera images Time and event search of recorded images Remote software eMapping Various Backup tools at a remote site Remote configuration for recording and camera setup Remote Command CD backup to a server 1.4 Product Information • SMS User’s Guide • SMS Installation CD (1 ea.) 1.5 System Requirements • • • • Operating System: Microsoft Windows 2000 or higher CPU: Intel Processor 800Mhz or higher RAM: 256MB or higher VGA: 16MB or higher 1.6 Software Upgrade • Any software upgrades: contact Clinton Electronics Technical Support at 800-549-6393. Sales: 1-800-447-3306 Support: 1-800-549-6393 www.clintonelectronics.com 1 Chapter 2 Installation & Operation 2.1 Installation Procedures 1. 2. 3. 4. 5. 2 Insert the SMS installation CD. Run the “Setup.exe” file. When Figure 1 dialog box is displayed, click “Next” button. Figures 2 and 3 show the default folder and location to save the SMS program files, or you can click Browse and select a folder, click “Next” button. Select additional tasks in Figure 4 to “Create a desktop icon”. Four icons (SMS, Live Viewer, Search Viewer and DVR Player) will be added to your desktop, click “Next” button. Figure 1 Figure 2 Figure 3 Figure 4 Sales: 1-800-447-3306 Support: 1-800-549-6393 www.clintonelectronics.com l Installation Procedures continued 6. In Figure 5 Setup is now ready to install on your computer, click “Install” button. 7. The install progress is indicated in Figure 6. 8. The final step in Figure 7 to complete the install, click “Finish” button. Figure 6 Figure 5 Figure 7 2.2 Operating Procedures After installing the SMS Software, the following icons will be added to your computer desktop: “SMS” “Live Viewer” “Search Viewer” “DVR Player” Run the programs by double-clicking the icons. The four programs can be active at the same time. Sales: 1-800-447-3306 Support: 1-800-549-6393 www.clintonelectronics.com 3 
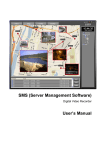
Chapter 3 SMS Admin 3.1 Description The SMS main administration program of the remote software consists of: Status, eMap, Config and Backup functions. The SMS program is an integrated software that controls system management, video monitoring, eMapping and backup of multiple Pro or Contender Series DVRs. The Graphical User Interface (GUI) of the SMS will be displayed. Refer to image below. 3.2 Functions of the SMS 3.2.1 Status Search Viewer Open Button eMap Tab Config Tab Close Button Minimize Button Backup Tab Live Viewer Open Button Client Setup Status Window Remote Site List Server Information Saving Log files Loading Log files Emergency Event List Sound On/Off 4 Sales: 1-800-447-3306 Support: 1-800-549-6393 www.clintonelectronics.com l Status continued Selection Description Remote Site List Displays the list of remote sites (Pro and Contender Series DVRs) registered in the SMS. Client Setup Allows user to setup each connection. (Refer to Client Setup pg. 6) Close Button Closes the SMS program. Minimize Button Minimizes the SMS program. Live Viewer Open Button Activates the ‘Live Viewer’ program. Search Viewer Open Button Activates the’ Search Viewer’ program. eMap Tab Opens the ‘eMap’ window. Config Tab Opens the ‘Configuration’ window. Backup Tab Opens the ‘Backup’ window. Status Window Displays the status of the Pro or Contender Series DVR currently connected. • Motion Detection • Alarm In • Video Loss • Camera On/Off • Alarm Out Server Information Displays the connection information of the Pro or Contender Series DVR system currently connected. • Name • IP Address • Alarm Numbers • Connected Camera • Software Version Emergency Event List Displays the ‘Event List’ from the Pro or Contender Series DVR currently connected. Save Button Saves the ‘Emergency Event List’ at the “C:\Program Files\SMS\Backup\Log” folder. Load Button Loads the saved ‘Emergency Event Log’ files from the “C:\Program Files\SMS\Backup\Log” folder in your computer. To make a Remote Server List, click the right button of the mouse when the mouse pointer is positioned on the Remote Site List area of the window, and click “Add Group”. In the “Add Group” pop-up window, enter a Group name in the “Group” text box, click “OK”. Default: Port - 7000, ID - remote, Password - 1111. After adding a Group, the “Add DVR” pop-up window will be displayed. Click the drop down button on the “Group” selection box, and select a Group in the drop down list. Enter a DVR name, IP Address, Port, ID and password in the respective text boxes, click “OK” button. To connect to the DVR, double-click the DVR on the Remote Server List. The Connection Status window will pop-up and the SMS Status Screen will display the live images from the DVR when the connection is completed. Sales: 1-800-447-3306 Support: 1-800-549-6393 www.clintonelectronics.com 5 Client Setup Double-click the “Client Setup” button on the Status window to display the Client Setup pop-up window. You can change the backup path by clicking button and the Client Setup window will display the ‘Disk Status”. Turn On or Off the “Disk Overwrite” function by clicking the check box next to ‘Disk Overwrite’. When not using the Disk Overwrite function, you can turn on “Disk Full Warning” and select the ‘Disk Usage %’ from the drop down list next to “Disk use:”. After the selections are made for the Client Setup window, click “OK” button. 6 Sales: 1-800-447-3306 Support: 1-800-549-6393 www.clintonelectronics.com 3.2.2 eMap The eMap function allows you to program maps in bitmap (BMP) format. You can locate any camera from any remote server to your map by dragging and dropping from the list. The live camera feed (Figure 8) on the emap below, has a convenient hot key function. The Graphical User Interface (GUI) of the eMap and the description of each GUI area is indicated below. Search Viewer Open Button Live Viewer Open Button Drag & Drop Local map in bitmap (.bmp) format Server Hot Keys Figure 8 Server/Camera/eMap List Saving Log files Loading Log files Emergency Event List Sound On/Off Live Hot Keys Sales: 1-800-447-3306 Support: 1-800-549-6393 www.clintonelectronics.com 7 l eMap continued When clicking the right button of the mouse while the mouse pointer is positioned on the ‘Live’ feed image (as shown in Figure 8 on pg. 7), the hot key pop-up menu will be displayed. Live Hot Keys Description Viewer Size Adjustment Adjust the viewer size by selecting x1/4, x1 or x4. Digital Zoom Allows user to zoom in or out to x1.5 or x2. OSD Setup Allows user to set up the On Screen Display (OSD) for the: • DVR • Date/Time • Camera Name • Event Print & Save Print the Live Image and save it in .jpg format. Live Recording Record the live screen to your computer. The files will be saved in: “C:\SMS\Backup\Live\Server Name” folder Delete eMap Delete the live camera on the map. By clicking the right button of the mouse on the “Base Group” server folder icon, the hot key pop-up menu (Figure 9) allows you to Add/Modify/Delete Groups, Add DVR servers or Connect/Disconnect to a Group. By clicking the right button of the mouse on a named Group server folder, the hot key pop-up menu allows (Figure 10) you to Select/Modify/Add/Delete DVR server or check DVR Information. By clicking the right button of the mouse on an eMap server folder, the hot key pop-up menu (Figure 11) allows you to Add eMaps. By clicking the right button of the mouse on “+” next to the eMap folder icon to view the drop down list and select an eMap location site. The hot key pop-up menu (Figure 12 ) allows you to Connect/Disconnect a DVR Group, Delete eMap or Load Map Image File to the eMap selection list. 8 Figure 9 Figure 10 Figure 11 Figure 12 Sales: 1-800-447-3306 Support: 1-800-549-6393 www.clintonelectronics.com 3.2.3 Config The SMS allows to change DVR system settings remotely, but this function is user password protected. The Graphical User Interface (GUI) of the Config, and the description of each GUI area for the Pro Series and Contender Series DVRs will be displayed. You can save the current configuration by clicking the “Save” button, and load the saved configuration by clicking the “Load” button. Pro Series : Contender Series : Sales: 1-800-447-3306 Support: 1-800-549-6393 www.clintonelectronics.com 9 l Config continued Configuring the DVR remotely is a two-step process. 1. Make the changes you want through the same type of menu’s available on the DVRs front panel. 2. Upload the changes to the desired DVRs. Select the DVR by clicking on the server folder, then make your changes. After making your changes, click the “Save” button to save the changes or click the “Cancel” button to exit from the menu without saving. To apply these changes to the DVR, click the Setup Servers button, then the “Password” pop-up window will be displayed. Type password in the “Password:” text box, click “OK”. Default: Password - 1234. *To change the password, type the new password in the “Password:” text box, click “Change”. NOTE: Keep the password confidential to prevent changes by unauthorized users. Once the password has been entered, click “OK” button, and the following window will be displayed. Double-Click Server Names When double-clicking the DVR names on the server folder list, the DVR will be listed to the right. From that list, click on the DVR you want to change and click the “Upload” button. The changed configuration will be applied to the selected DVRs. You can save any DVR configuration to your PC by clicking the “Save” button in the Config menu or you can reload the saved configuration from your PC. When clicking the “Save” button, the current configuration will be saved at “C:\Program Files\SMS\Backup\Config” folder. 10 Sales: 1-800-447-3306 Support: 1-800-549-6393 www.clintonelectronics.com 3.2.4 Backup The SMS Backup Screen displays 4 different backup windows and you can backup the recorded images by four different backup methods: Direct / Event / Schedule / CD Backup Direct Backup 1. 2. 3. 4. 5. 6. 7. Click “Direct” tab. Click the “Server Selection” button drop down list, and select a DVR for backup. When selecting a DVR, the Days on the calendar that have recorded video will turn Blue. Click a Day that you want to backup. When selecting a Day, the Time Line that has recorded video will turn Blue and you can select the Time by moving the selection bar, then click “Accept” button. Double-click the channels that you want to backup on the Channel list. Each channel selected will be shown on the Download List. Click the “Start Download” button. Playback the downloaded files by using the Mini Player. Double-click one of the downloaded files on the download list. The Mini Player will be activated. The downloaded files will be saved at “C:\SMS\Backup\Direct\Server Name\Date” folder. NOTE: Actual download time will depend on the quality of your internet connection, the size and number of files to be downloaded. Event Backup Schedule Backup CD Backup Server Selection Button Time List Channel List Calendar Remote Site List Download List Sales: 1-800-447-3306 Support: 1-800-549-6393 www.clintonelectronics.com 11 l Backup continued Event Backup This feature allows users to backup selected events from a DVR to your PC by Camera, Day and Time. 1. 2. 3. 4. Click “Event” tab. Select the Channels, Time and Days. When clicking the “Add Event Backup” button, the event added will be created in the Download List. Click the “Start” button, the SMS program will start downloading video which has events only. NOTE: Actual download time will depend on the quality of your internet connection, the size and number of files to be downloaded. Schedule Backup 1. 2. 3. 4. 5. 6. 7. Click “Schedule” tab. Click the “Server Selection” button and select a DVR for Backup. Select Channels and Days that you want to backup. Set the Begin Time and End Time. Set the Download Start Time. Click the “Add Schedule Backup” button. The SMS will start downloading at the assigned Download Start Time. The downloaded files will be saved at “C:\SMS\Backup\Schedule\Server Name\Date” folder. NOTE: Actual download time will depend on the quality of your internet connection, the size and number of files to be downloaded. CD Backup The SMS allows you to remotely backup video to the CD Burner located on the DVRs front panel. 1. 2. 2. 3. 4. 5. 6. Click “CD Backup” tab. Click the “Server Selection” button and select a DVR you want to download to. Select All Channels. Set the Start Date/Time and Finish Date/Time. Click the “Get List” button and the Download list will be displayed. Select the Channels for downloading in Download List. Click the “Start Burning” button. NOTE: When the file size is bigger than one CD, you will be asked to put another CD in the CD tray once the first CD is full. 12 Sales: 1-800-447-3306 Support: 1-800-549-6393 www.clintonelectronics.com Chapter 4 SMS Live Viewer 4.1 Description The SMS Live Viewer is a powerful and reliable remote surveillance software, which provides a 64 channel remote monitoring function for live video from single or multiple sites. When events are detected at a remote site, the SMS Live Viewer displays the event information, and allows users to access the remote site directly to search the image associated with the event. The GUI of the SMS Live Viewer is shown below with a description of each GUI area. You can use the ‘Hot Key Menu’ by clicking the right button of the mouse on each GUI area. Close Button Search Viewer Open Button Minimize Button SMS Admin Open Button Monitoring/Playback Screen Server Hot Keys Drag & Drop Screen Hot Keys Remote Site List Screen Mode Buttons Utility Buttons Image Adjustment Sliders Event List Audio On/Off Start Recording Stop Recording Sales: 1-800-447-3306 Image Adjustment Support: 1-800-549-6393 PTZ Control Alarm Control www.clintonelectronics.com 13 l Live Viewer Description continued GUI Selection Area Description Monitoring/Playback Screen Displays live and/or recorded images from selected cameras. Displays “PB” on the screen while playing back video. No Video when the remote DVR system has no video input. NOTE: Screen Hot Keys Allows the use of Screen Hot Keys by clicking the right button of the mouse while the pointer is positioned on the Monitoring/Playback area. Event List Displays the event logs of a remote DVR system. Close Button Closes the ‘Live Viewer’ program. Minimize Button Minimizing the ‘Live Viewer’ program. Search Viewer Open Button Opens the ‘Search Viewer’ program. SMS Admin Open Button Opens the SMS Admin program. Remote Site List Displays DVRs that are added to the ‘Remote Site List’. Server Hot Keys Allows the use of Server Hot Key menu by clicking the right button of the mouse while the pointer is positioned on the ‘Remote Site List’ area. Screen Mode Buttons Allows the selection of Single/Quad/3x3/4x4/6/7/10/13/36/64/Select All Channels/Full Screen. Utility Buttons Enables various SMS Live Viewer utility programs: • Image Adjustment • Audio Control • PTZ Control • Alarm Control Image Adjustment Sliders Allows adjustment of viewed images: • Frame Rate • Contrast • Brightness • Filter Live Audio Allows users to turn On or Off Live Audio. Start Recording Allows users to ‘Start Recording’ live video directly to the PC. Stop Recording Allows users to ‘Stop Recording’ live video directly to the PC. 14 Sales: 1-800-447-3306 Support: 1-800-549-6393 www.clintonelectronics.com 4.2 Functions of the SMS Live Viewer Remote Sites oAdding/Deleting remote sites Click the right button of the mouse while the mouse pointer is positioned on the Remote Site List area. The hot key menu will be displayed. Add a Group first, then assign single or multiple DVRs to a Group. Refer to the images below. By clicking the right button of the mouse, the hot key menu pop-up menu (Figure 13 ) allows you to Add a Group. By clicking the right button of the mouse on a Group, the hot key menu pop-up (Figure 14 ) allows you to Add a DVR, Connect/ Disconnect to a Group or Add/Modify/Delete a Group. By clicking the right button of the mouse on a remote server, the hot key menu pop-up (Figure 15 ) Add/Delete/Modify the DVR, display the DVR information, Disconnect a remote site, view All Cameras, or do a Multi Search. Figure 13 Figure 14 Figure 15 oAdding/Deleting favorites Figure 16 Click the right button of the mouse, the hot key menu pop-up (Figure 16 ) allows you to Add/Modify/Delete Favorites, or Connect/Disconnect. oConnecting the Site Double-click a select DVR from the Remote Site List or select “Connect” on the hot key menu (Figure 16 ), then click the “All Camera menu” on the next pop-up menu. All the channels from the DVR server will be displayed; You can locate any camera from any server and swap the viewed camera channels by dragging and dropping. Sales: 1-800-447-3306 Support: 1-800-549-6393 www.clintonelectronics.com 15 l Functions of Live Viewer continued oScreen Mode Buttons To select the Screen Mode, click one of the 12 buttons. You can also select all channels by clicking the Full Screen button. Screen Mode Full Screen buttons button oSingle-Screen mode To view a specific image in the single-screen mode, move the cursor to that image and double-click the left mouse button. oReturn to the previous screen mode To return to the previous screen mode from the single-screen mode, double-click the left mouse button in the Monitoring/ Playback window. oScreen Hot Key Menu Click the right mouse button on the Monitoring/Playback window to display the hot key menu. Select the screen mode between single or multi. Zoom In/Out to 1.0x, 1.5x or 2x. Change Quality of Video. Selecting OSD Menu, DVR Name/Camera Name/Date/Time/Event. Turn On/Off the Direct X. Freeze the viewed image. Turn On/Off Recording. Turn On/Off Auto-Sequencing. Search the recorded video for playback. Select for the Search Control Pad. Print or Save the viewed image in .jpg format. 16 Sales: 1-800-447-3306 Support: 1-800-549-6393 www.clintonelectronics.com l Functions of Live Viewer continued Utility Buttons oImage Adjust Sliders Adjust the Frame Rate, Brightness, Contrast and Image Filter by clicking on the slider button and moving the sliders left or right. Frame Rate Brightness Contrast Image Filter Slider button oPTZ Control Keys Control the connected PTZ cameras by clicking the Advance button, and the pop-up Control Pad will be displayed. oAlarm Control Keys Control the Alarms by using the control pad shown below. Select a DVR from the drop down list menu and you can control the Alarms. Sales: 1-800-447-3306 Support: 1-800-549-6393 www.clintonelectronics.com 17 Chapter 5 SMS Search Viewer 5.1 Description The SMS Search Viewer is remote search software, which searches for recorded images on the remote DVR system or your computer and plays back the found images. In addition to time search and playback functions, the file (image) save and file (image) print functions are provided. Features of the SMS Search program are as follows: • • • • • Time and Event Search Zoom Various Image enhancement Save the current image Print the current image Screen Hot Keys Server Hot Keys Playback Screen Remote Site List Screen Mode Buttons Utility Buttons Time Search Slider Control Pad 5.2 Time Search In the time mode, the system searches for recorded images by Date/Time and plays back the found images. Selecting a date from the Calendar initializes Time Search. The dates for which recording is available are displayed in blue. When entering the search mode, recorded information available from the selected date is shown on the recording status window. The recorded data is displayed by time (in hour segments). A green line indicates the selected time (in hour segment) that will be played back. Select a specific hour by clicking the mouse or dragging the pointer on the desired hour segment. Video image will be played back starting with the first image captured within the one-hour segment. If you want to view images for a different date, select the Date in the Calendar by clicking the “Select Date” button. 18 Sales: 1-800-447-3306 Support: 1-800-549-6393 www.clintonelectronics.com Chapter 6 DVR Player 6.1 Description The DVR Player is a software application that is used for playing video files saved on a user’s PC. While backing up using USB or DVD/CD from a DVR, video files are saved together with the DVR Player. Thus, video files saved on a user’s PC can be played without installing the SMS software separately. 6.2 DVR Player Functions The DVR Player functions are the same as those of the Local Search of the Search Viewer. Sales: 1-800-447-3306 Support: 1-800-549-6393 www.clintonelectronics.com 19 v.06.01.10