1
Model 7400
OPERATOR MANUAL
DORAN SCALES, INC.
1315 PARAMOUNT PKWY.
BATAVIA, IL 60510
1-800-262-6844
FAX: (630) 879-0073
http://www.doranscales.com
MANUAL REVISION: 1.0
MAN0198
10/3/2005
INTRODUCTION
Introducing the Doran Scales Excel Series, Model 7400 Digital Scale Indicator.
This scale uses state of the art technology to provide you with a low cost solution
to the most demanding weighing applications. With ease of use and setup in
mind, the scale is simple to set up and ready to use. The Model 7400 offers
many features. A few of these features are listed below:
?
?
?
?
?
?
?
?
?
?
?
?
?
?
?
?
?
?
?
?
?
?
?
?
?
NTEP certification for Class III installations to 10,000d.
Display Resolution from 250 to 50,000 divisions.
A six digit, 0.56" red LED display for easy reading.
lb, kg, oz, g, lb-oz display units supported.
Fully configurable duplex printer port with RS232 support.
EEPROM nonvolatile data storage of all calibration and setup information.
Microprocessor monitoring system to prevent scale failure under severe fault
conditions.
Support for up to four 350 ohm load cells.
115/230 VAC 50/60 Hz (jumper selectable) operation.
Field selectable digital filtering.
Software configurable remote push-button support (Optional).
Non NTEP parameters are user configurable.
Password protected, Front Panel Calibration Access Feature (Optional).
60 hours of battery operation, with built in charger (Optional).
Six digit, 0.56" red LED remote display (Optional).
4-20mA analog output (Optional).
Wired Ethernet Communication port (Optional).
USB Communication port (Optional).
Wireless Ethernet Communication port (Optional).
RS485 Communication port (Optional)
Four Internal Mechanical or Solid State Relay outputs for non-battery models
(Optional)
Eight External Relay outputs for non-battery models (Optional)
Fiber Optic Communication (Optional)
Multi-tone Audible Alarm (Optional)
Peak and Hold, Product Grading software
2
Unpacking Your Scale
Before unpacking your Doran scale, please read the instructions in this section.
Your new scale is a durable industrial product, but it is also a sensitive weighing
instrument. Normal care should be taken when handling and using this product.
Improper handling or abuse can damage the scale and result in costly repairs
that may not be covered by the warranty. If you notice any shipping damage,
notify the shipper immediately. Please observe the following precautions to
insure years of trouble free service from your new scale.
?
?
?
?
DO NOT drop the scale indicator or scale platform.
DO NOT immerse the scale indicator or platform.
DO NOT drop objects on the platform.
DO NOT pick up the scale platform by the "spider."
Carefully remove the scale from the shipping carton. Be sure to retain all
shipping materials in case the scale must be shipped elsewhere.
Setup and Installation
INSTALLATION:
Locate the desired position for the scale platform and indicator. The platform
location should be flat, level and free of any obstructions which might interfere
with the operation of the scale platform.
When installing your scale, make sure that an AC power outlet is close to the
scale and easily accessible.
Place the scale on a flat level surface free from any obstructions which might
interfere with the operation of the scale platform.
ELECTRICAL CONNECTIONS:
Prior to connecting your scale to power, check the serial number tag on the
indicator for the correct operating voltage. Verify that the power you connect the
scale to matches the rated voltage.
Be sure the AC power is not excessively noisy - this can occur if large inductive
loads, such as solenoids or motors, are on the same power line. The Model 7400
has a filtered power supply to reduce the effects of normal line noise, but severe
fluctuations may cause operation problems. If problems occur, noise producing
devices may have to be suppressed to minimize their effect.
3
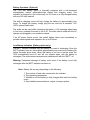
Quick Start User's Guide
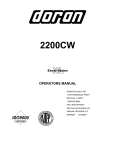
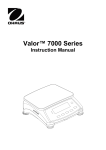
7400
UNDER
ACCEPT
OVER
NEG
lb
ZERO
kg
BATT
oz
MOT
g
ZERO
Figure 1. 7400 Front Panel Layout
Basic Weighing Operations:
1) Remove all items from the scale platter.
2) Press ZERO to zero the scale. The weight display should now read zero.
3) Place an item on scale platter and wait for the motion (MOT) indicator to turn
off, indicating a stable weight.
Power Up (AC Operation)
Plug in scale.
Power Up (Battery option only):
Press and release ZERO to turn on the scale.
Turn Off (Battery option only):
1) To turn off manually, press and hold the ZERO pushbutton for 2 seconds or
until the display shows "rel Pb." Then release, the ZERO pushbutton and the
indicator will turn off.
OR
2) The scale will turn off automatically at the end of the programmed power on
time delay when that mode is selected.
4
Indicators:
The Doran 7400 has a main display and eleven indicator lights. These indicators
provide the operator with information about the scale and the current weighing
operation. The main display is used to provide the operator with the current
weight. The units indicators, located on the right of the main display, show the
current measurement units.
? The Motion (MOT) located on the left side of the display, informs the operator
when the scale is in Motion.
? The Center of Zero (ZERO) indicators, located on the left side of the display,
informs the operator when the scale is at Zero.
? The negative (NEG) indicator informs the operator whether the weight display
is showing a negative weight.
? The low battery (BATT) indicator is avaliable when battery option is installed.
The BATT indicator informs the operator, that a battery charge is required.
? Checkweigh information is provided by the OVER, ACCEPT and OVER lights.
ZERO:
The ZERO push button is used to zero the scale prior to making a reading. The
zero button can function over the full range of the scale. To zero the scale, wait
until the scale is stable and press the ZERO button. The scale will zero
immediately. The 7400 will not zero if the scale is in motion. The 7400 is
equipped with an optional Zero on Demand feature which holds zero requests
until motion stops. This option may be activated during the scale setup
procedure. Refer to your dealer or Instruction manual for details.
UNITS: (Optional)
The UNITS button permits the operator to change the scale units by pressing a
button. After pressing UNITS, the units indicator will immediately display the
current weighing unit. The UNITS button has several configuration parameters
which can disable the UNITS button or limit the display units available. Refer to
your dealer or Instruction manual for details.
PRINT: (Optional)
The PRINT button permits the operator to print the current weight by pressing a
button. Like the ZERO button, the user must wait for motion to stop before
pressing the PRINT button. The current weight will then be transmitted to the
printer. When the data is transmitted, the left most display digit will momentarily
display a "r" to confirm data transmission. The 7400 has a "Print on Demand"
feature which stores a PRINT request until the scale is stable. Once stable, the
scale transmits the current weight to the printer. The 7400 also has several
automatic print options which may be used to simplify printer operation. Refer to
your dealer or Instruction manual for details.
5
Basic Checkweighing Reference Guide
Over, Under and Accept Checkweighing Operation:
1) Place the desired target weight on scale platter.
2) Press ZERO to zero the scale. The weight display should now read zero.
3) Remove the target weight from scale platter.
4) Place an item on the scale platter and wait for the motion (MOT) to turn off,
indicating a stable weight.
5) Place an item on the scale platter, and note the status of the UNDER,
ACCEPT, OVER indicators.
6) The OVER (red) light will indicate when the item’s weight is greater than the
Checkweigh band limit.
7) The UNDER (yellow) light will indicate when the item’s weight is less than the
Checkweigh band limit.
8) The ACCEPT (green) light will indicate when the item’s weight is within the
Checkweigh band limit.
NOTE: The over and under tolerances around zero can be configured with the
O.U. parameter. Zero Band checkweighing is the only checkweighing operation
available for the model 7400.
6
Battery Operation: (Optional)
The 7400 with battery option is internally equipped with a self-contained
rechargeable, sealed, gelled-electrolyte battery and charging circuit. The
indicator is designed to run continuously for 60 hours on a fully charged battery
with one 350 ohm load cell.
The built-in charging circuit will fully charge the battery in approximately four
hours. To charge the battery, simply plug the line cord into a standard 115V
(230V optional) wall outlet.
The scale can be used while recharging the battery. A full recharge takes place
in four hours, whether the scale is on or off. The scale can be used with the AC
charger cord plugged in on a continuous basis.
If an AC power failure occurs, the scale's battery takes over immediately to
provide uninterrupted scale operation for up to 60 hours.
Low Battery Indication (Battery option only):
The BATT indicator indicates that the battery is in need of recharging. Once the
BATT indicator turns on, there will be approximately one more hour of battery life
before the scale shuts down. When the battery is too low to run the scale, the
7400 automatically turns off and will not operate again until the battery is
recharged. The scale remains accurate and useable even with the "BATT" on.
Warning: Permanent damage to battery could occur if the battery is not fully
recharged after the BATT indicator has been on.
Note: Battery life can vary depending on the following:
1. The number of load cells connected to the indicator.
2. The operating temperature.
3. Whether or not the battery is fully charged after each low battery
event.
4. Any installed communications, output or beeper options.
7
Troubleshooting
Scale Messages:
Message
"rEL Pb" Release push
button.
"Ldg 0" Loading zero.
Meaning
The scale has detected that a key has been depressed for
more than 3 seconds.
The scale is attempting to zero the scale upon startup.
This message will remain until scale is stable.
Common Problems and Solutions
Problem:
Weight reading will not
repeat or scale does not
return to zero when weight
is removed.
Scale weighing range is
limited, and will not indicate
full capacity or go into
overload.
What to Do or Check:
Make sure that there is nothing caught in the platform under
or around the load cell or spider interfering with its
movement.
Make sure that there is nothing caught in the platform under
or around the load cell or spider which would interfere with
their movement.
Make sure all four overload stops are properly set. Take the
platter off the platform, invert it and place it back on the
spider. With 1/2 of the scale's capacity in test weights
concentrated over a corner of the platform, there should be
approximately 1/32" of clearance between the stop and the
bottom of the spider. Check all four corners then recalibrate
the scale. If the problem persists, it is possible that the
scale is being shock-loaded causing the load cell to be
shifted.
Scale will not come to zero Make sure that the scale is stable ("MOT" annunciator is
when the ZERO button is
off) when ZERO is pressed. If excessive motion is a
pressed.
problem, then it may be necessary to activate the latching
zero feature (2Od) or lengthen the filter time (Av C32).
There may be a problem with the touch-panel or main
board.
Weight readings don't seem Make sure that there is nothing caught in the platform under
to be correct.
or around the load cell or spider which would interfere with
their movement.
Check the scale's accuracy with a test weight. Recalibrate if
necessary.
Scale drifts off of zero.
Check for air currents and/or vibration around the scale. If
that is the cause it may be necessary to set the AZT
aperture to a wider setting to compensate.
Scale reading is bouncing
Check for air currents and/or vibration around the scale. If
or "flighty".
that is the cause it may be necessary to set the Digital
Averaging to a higher setting to stabilize the reading.
If you are still experiencing a problem with your scale, or if the problem you are having is
not covered in the above list, please contact your Doran Scales authorized dealer.
8
Error Messages
Error Message
"udr-Ld" Scale underload
"ovr-Ld"
"grs-oL"
"grs-uL"
"SU 0 E"
"Err EP"
"Er Ad"
"no SAV"
"Err 1"
error
What to Do or Check:
The scale is in underload. The load on the scale is less
then the minimum scale capacity by more than -20%.
Recalibrate scale or add additional dead load.
Scale overload
The scale is in overload. The load on the scale platform
exceeds the scale capacity by more than 103%. Remove
excess weight from scale platform.
Gross overload
The scale is in gross overload. The load exceeds the scale
ratings and might result in damage to the scale. Remove
excess weight immediately. Ignore this message for the
first five seconds after power up.
Gross underload The scale is in gross underload. The load exceeds the
minimum scale ratings and might result in damage to the
scale. Loadcell connections might be wired in reverse.
Startup zero error The scale was not stable, or a weight in excess of full load
was present on the platter when the scale started.
Remove the weight and wait. The scale will zero once it
becomes stable.
EEPROM error
The setup parameters loaded in nonvolatile memory have
become corrupted. The scale requires reinitialization by a
qualified scale technician.
A/D failure
The scale has detected a failure in A/D circuit. Have the
scale serviced by a qualified scale repair technician.
Values not saved. The scale has not successfully stored or verified parameter
value in nonvolatile memory.
Program ROM
The program memory in the scale has become corrupted.
Have scale serviced by a qualified scale repair technician.
9