1
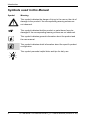
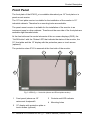
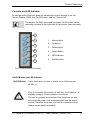
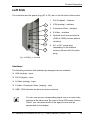
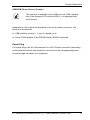
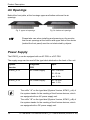
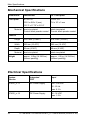
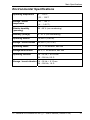
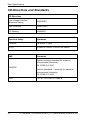
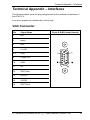
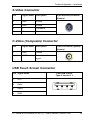
Contents
Contents
Introduction.......................................................................................................... 3
Symbols used in this Manual ................................................................................. 4
Important Instructions......................................................................................... 5
Note on the Warranty............................................................................................. 5
Exclusion of Accident Liability Obligation............................................................... 5
Liability Limitation / Exemption from the Warranty Obligation ................................ 5
Safety Instructions .............................................................................................. 6
FCC Statement ...................................................................................................... 8
Electromagnetic Compatibility................................................................................ 8
Scope of Delivery................................................................................................. 9
Optional Parts ........................................................................................................ 9
Type Labels and Product Identification.................................................................. 9
Product Description .......................................................................................... 10
Front Panel .......................................................................................................... 11
Display ............................................................................................................ 12
Display with Touch Screen.............................................................................. 12
Controls and LED Indicator ............................................................................. 13
Left Side .............................................................................................................. 15
Interfaces ........................................................................................................ 15
Power Plug...................................................................................................... 17
Air Openings ........................................................................................................ 18
Power Supply ...................................................................................................... 18
Power Cord Connection....................................................................................... 19
AC Connection ................................................................................................ 19
DC Connection................................................................................................ 20
On Screen Display (OSD).................................................................................... 22
Operation of the OSD Menu............................................................................ 22
Installation Instructions .................................................................................... 23
Instruction for Mounting ....................................................................................... 23
Panel Mount Version ........................................................................................... 24
Rack Mount Version ............................................................................................ 24
15" Industrial LCD Monitor KFM15_e – User’s Manual (Version 2.20)
1
Contents
Monitor Connecting and Turning On ...............................................................25
Installation of the Touch Screen Software............................................................26
Calibrating the Touch Screen ..........................................................................27
Maintenance and Prevention ............................................................................28
Main Specifications............................................................................................29
Mechanical Specifications ....................................................................................30
Electrical Specifications .......................................................................................30
Environmental Specifications ...............................................................................31
CE-Directives and Standards ...............................................................................32
Technical Appendix – Interfaces ......................................................................33
VGA Connector ....................................................................................................33
DVI-D Connector (Single Link) .............................................................................34
S-Video Connector...............................................................................................35
C-Video (Composite) Connector ..........................................................................35
USB Touch Screen Connector .............................................................................35
Serial Touch Screen Connector (RS232) .............................................................36
Technical Support..............................................................................................37
Returning Defective Merchandise ........................................................................38
2
15" Industrial LCD Monitor KFM15_e – User’s Manual (Version 2.20)
Introduction
Introduction
Kontron Embedded Computers would like to point out that the information
contained in this manual may be subject to technical alteration, particularly as a
result of the continuos upgrading of Kontron Embedded Computers products. The
attached documentation does not entail any guarantee on the part of Kontron
Embedded Computers with respect to technical processes described in the
manual or any product characteristics set out in the manual. Kontron Embedded
Computers does not accept any liability for any printing errors or other
inaccuracies in the manual unless it can be proven that Kontron Embedded
Computers is aware of such errors or inaccuracies or that Kontron Embedded
Computers is unaware of these as a result of gross negligence and Kontron
Embedded Computers has failed to eliminate these errors or inaccuracies for this
reason. Kontron Embedded Computers expressly informs the user that this
manual only contains a general description of technical processes and
instructions which may not be applicable in every individual case. In cases of
doubt, please contact Kontron Embedded Computers.
This manual is protected by copyright. All rights are reserved by Kontron
Embedded Computers. Copies of all or part of this manual or translations into a
different language may only be made with the prior written consent of Kontron
Embedded Computers. Kontron Embedded Computers points out that the
information contained in this manual is continuously being updated in line with the
technical alterations and improvements made by Kontron Embedded Computers
to the products and thus this manual only reflects the technical status of the
products by Kontron Embedded Computers at the time of printing.
© 2007 by Kontron Embedded Computers
Printing and duplication, even of sections, is only permissible with the express
approval of
Kontron Embedded Computers GmbH
Oskar-von-Miller-Str. 1
85386 Eching near Munich
Germany
15" Industrial LCD Monitor KFM15_e – User’s Manual (Version 2.20)
3
Introduction
Symbols used in this Manual
Symbol
Meaning
This symbol indicates the danger of injury to the user or the risk of
damage to the product if the corresponding warning notices are
not observed.
This symbol indicates that the product or parts thereof may be
damaged if the corresponding warning notices are not observed.
This symbol indicates general information about the product and
the user manual.
This symbol indicates detail information about the specific product
configuration.
This symbol precedes helpful hints and tips for daily use.
4
15" Industrial LCD Monitor KFM15_e – User’s Manual (Version 2.20)
Important Instructions
Important Instructions
This chapter contains instructions which must be observed when using your
industrial LCD monitor KFM15_e.
The manufacturer’s instructions provide useful information on your industrial
LCD monitor KFM15_e.
Note on the Warranty
Due to their limited service life, parts which by their nature are subject to a
particularly high degree of wear (wearing parts) are excluded from the warranty
beyond that provided by law. This applies to the display backlighting, for example.
Exclusion of Accident Liability Obligation
Kontron Embedded Computers shall be exempted from the statutory accident
liability obligation if the user fails to observe the safety instructions.
Liability Limitation / Exemption from the
Warranty Obligation
In the event of damage to the device caused by failure to observe the hints in this
manual and on the device (especially the safety instructions), Kontron Embedded
Computers shall not be required to honor the warranty even during the warranty
period and shall be exempted from the statutory accident liability obligation.
15" Industrial LCD Monitor KFM15_e – User’s Manual (Version 2.20)
5
Safety Instructions
Safety Instructions
Please read this section carefully and observe the instructions for your own safety
and correct use of the device.
This chapter also contains information on approval and interference suppression
of your KFM15_e.
The device has been built and tested by Kontron Embedded Computers in
accordance with EN 60950/VDE 0805 and left the company in a perfectly safe
condition.
In order to maintain this condition and ensure safe operation, the user must
observe the instructions and warnings contained in this manual.
❏ The device must be used in accordance with the instructions for use.
❏ The electrical installations in the room must correspond to the requirements of
the respective regulations.
❏ Take care that there are no cables, particularly power cables, in areas where
persons can trip over them.
❏ Do not use a power cable in sockets shared by a number of other power
consumers. Do not use an extension cable.
❏ Only use the power cord supplied.
❏ The unit is only completely disconnected from the main power source when
the power cord is disconnected either from the power source or from the unit.
Therefore, the power cord and its connectors must always remain easily
accessible.
❏ Only devices and components which fulfill the requirements of a SELV circuit
(Safety Extra Low Voltage) in accordance with EN 60950 may be connected
to the interfaces of the system.
❏ All plugs on the connection cables must be screwed or locked to the housing.
6
15" Industrial LCD Monitor KFM15_e – User’s Manual (Version 2.20)
Safety Instructions
❏ Maintenance or repair on the open device may only be carried out by qualified
personnel authorized by Kontron Embedded Computers familiar with the
associated dangers.
❏ It is not allowed to open the device.
❏ Only original accessories approved by Kontron Embedded Computers may be
used.
❏ It must be assumed that safe operation is no longer possible,
– if the device has visible damage or
– if the device no longer functions.
In these cases the device must be shut down and secured against
unintentional operation.
15" Industrial LCD Monitor KFM15_e – User’s Manual (Version 2.20)
7
Safety Instructions
FCC Statement
This equipment has been tested and found to comply with the limits for a Class A
digital device, pursuant to Part 15 of the FCC Rules. These limits are designed to
provide reasonable protection against harmful interference when the equipment is
operated in commercial environment. This equipment generates, uses, and can
radiate radio frequency energy and, if not installed and used in accordance with
the instruction manual, may cause harmful interference to radio communications.
Operation of this equipment in residential area is likely to cause harmful
interference in which case the user will be required to correct the interference at
his own expense.
Electromagnetic Compatibility
This product has been designed for industrial, commercial and office use,
including small business use. The most recent version of the EMC guidelines
(EMC Rules 2004/108/EC) and/or the German EMC laws apply. If the user
modifies and/or adds to the equipment (e.g. installation of add-on cards), the
prerequisites for the CE conformity declaration (safety requirements) may no
longer apply.
8
15" Industrial LCD Monitor KFM15_e – User’s Manual (Version 2.20)
Scope of Delivery
Scope of Delivery
❏ Industrial LCD monitor KFM15_e (A or B)
❏ This user manual for the industrial LCD monitor KFM15_e
❏ KFM – OSD-Menu - Description
❏ AC power cord (for AC version only)
❏ VGA-cable connector (2 m)
❏ 8x M4 nut
❏ DC Phoenix connector power plug terminal (for DC version only)
Optional Parts
❏ USB or serial (COM) touch screen cable connector depending on the ordered
touch screen terminal configuration (optional)
Available lengths for:
USB cable connector (Type A, male - Type A, male): 2m, 5m
COM (RS232) cable connector: 2 m, 5 m, 10 m
❏ VGA cable connector
Available lengths: 2 m, 5 m, 10 m)
❏ DVI cable connector
Available lengths: 2 m, 5 m)
❏ CD-ROM with the installation software and the driver for touch screen (if the
KFM15_e is ordered with the optional touch screen)
Type Labels and Product Identification
The type label of your monitor KFM15_e is attached at the back of the device.
Type label
Product identification
KFM15_e - A
Industrial LCD Monitor KFM15_e with AC power supply unit
KFM15_e - B
Industrial LCD Monitor KFM15_e with DC power supply unit
15" Industrial LCD Monitor KFM15_e – User’s Manual (Version 2.20)
9
Product Description
Product Description
The KFM15_e is an industrial LCD monitor designed for high-performance
industrial applications. The solid type of enclosure offers to the monitor a
mechanical stability. KFM15_e is therefore proper for industrial use. Excellent
image representation, simple menu-driven handling and plug & play ability round
off the qualities of this monitor.
The built-in display is a 15" TFT XGA display with 1024 x 768 resolution and
2
350 cd/m luminance (brightness).
The protection pane built-in front of the display is made of special glass and
protects the display from destruction of mechanical manner, for example get dirty,
scratches at the display surface.
The representation quality of the display is optimised also by the antireflection
property of the protection pane.
Optionally the monitor can be equipped with a touch screen.
The KFM15_e comes with VGA (analog)-, DVI (digital)-, S-Video (analog)-,
Composite-video (analog)- signal inputs and provides compatibility with the
existing and the future computer-generation.
The KFM15_e can be equipped with an AC or a DC power supply unit.
The supply voltage range is indicated at the type label. The type label and the
approval marks are placed on the back of the unit.
Fig 1: Industrial LCD monitor KFM15_e (shown as 19" rackmount version)
Please take care when installing and powering on the
monitor, that the air openings at the bottom and upper side
of the device (behind the front panel) must be not
obstructed by objects.
10
15" Industrial LCD Monitor KFM15_e – User’s Manual (Version 2.20)
Product Description
Front Panel
The front plate of the KFM15_e is available alternatively as 19" front plate or in
panel mount version.
The 19" front plate version is suitable for the installation of the monitor in 19"
industrial cabinets. Therefore four mounting holes are available.
The panel mount version is suitable for the installation of the monitor in an
instrument panel or other cabinets. Therefore at the rear side of the front plate are
available eight threaded studs.
At the front side are the control elements of the on screen displays (OSD), the
“On/Off-button” with the “Status LED” that indicate the status of the monitor, the
19" front plate and the 15" display with the protection pane or touch screen
(optional).
The protection class IP 65 is ensured at the front side of the monitor.
1
2
3
4
4
Fig. 2: KFM15_e – front side (shown as19"front plate version)
1
Front panel (shown as 19"
rackmount frontpanel9
2
15" display with protection plate or
touch screen (optional)
3
Controls and LED-indicator
4
Mounting holes
15" Industrial LCD Monitor KFM15_e – User’s Manual (Version 2.20)
11
Product Description
Display
The built-in display is a 15" TFT XGA display with a resolution of 1024 x 768 and
2
350 cd/m of luminance (brightness). In front of the display is installed a glass
protection pane with antireflection properties. This protects the display surface
from dirt and scratches also. The technical specifications of the built-in display are
listed in the chapter “Main Specifications”.
Display with Touch Screen
The KFM15_e can be equipped optionally with a resistive touch screen. The
installed touch screen is a 4-wire resistive touch screen. The terminal
configuration of the touch screen can be alternatively an USB or a COM interface.
The touch screen is connected by means of provided cables via the
COM (RS232) or USB interface to an external PC with corresponding interface.
The display surface of the KFM15_e is also mechanically protected through the
touch screen. The touch screen registers contact of a finger or a pen and moves
the mouse pointer. These functions under integration of the necessary software
only (see chapter “Installation of the Touch Screen Software ”).
You get the corresponding touch screen driver for your operating system on a
storage media (CD-ROM) supplied.
12
15" Industrial LCD Monitor KFM15_e – User’s Manual (Version 2.20)
Product Description
Controls and LED Indicator
At the right side of the front plate are situated the control buttons of the On
Screen Display (OSD), the “On/Off button” and the “Status LED”.
The keys of the OSD menu and the power On/Off button can be
optionally mounted to the right side of the monitor (rear-mounted).
1
2
3
4
5
6
1
Menu-button
2
Up-button
3
Down-button
4
Select-button
5
LED-indicator
6
On/Off-button
Fig. 3: Controls and LED-indicator
On/Off Button and LED-Indicator
On/Off Button
Press this button, in order to switch on or off the monitor
KFM15_e.
Even if you switch the monitor off with the “On/Off-button”, a
standby voltage is further present in the device.
The unit is complete disconnected from the power source,
only when the power cord is disconnected from the power
source. Therefore the power cord and its connectors must
always remain easily accessible.
15" Industrial LCD Monitor KFM15_e – User’s Manual (Version 2.20)
13
Product Description
Status-LED
(green)
This LED lights up green, if the monitor is switched on and the
data source is available.
Prerequisite:
The power cord must be connected to a corresponding power
source.
Status-LED
(orange)
This LED lights up orange, if the monitor is switched off or no data
source is available.
Prerequisite:
The power cord must be connected to a corresponding power
source.
If this LED does not light up after turning on the device, then you
have to check the mains power source.
On Screen Display Buttons
The push buttons of the On Screen Display allow you to select, to
scroll, to install in the OSD main menu or OSD submenu (see
chapter “On Screen Display (OSD)”.
14
15" Industrial LCD Monitor KFM15_e – User’s Manual (Version 2.20)
Product Description
Left Side
The interfaces and the power plug (AC or DC) are on the left side of the monitor.
1
1
DVI-D (digital) - interface
2
VGA (analog) - interface
3
Composite-Video - interface
4
S-Video - interface
5
Optional touch screen terminal
(USB or COM2) (shown without
interface)
6
AC- or DC- power-plug
(depending on the ordered
version) (shown with AC power
plug)
2
3
4
5
6
Fig. 4: KFM15_e - left side
Interfaces
The following interfaces with standard pin assignments are available:
❏ VGA (analog) - input
❏ DVI-D (digital) - input
❏ S-Video (analog) - input
❏ C-Video -Composite Video- (analog) - input
❏ USB / COM interface as the touch screen terminal
You can connect one corresponding signal source to each video
interface at the same time. By means of the OSD-menu function
“Select” you can select which of the signal source shall be
represented on the display.
15" Industrial LCD Monitor KFM15_e – User’s Manual (Version 2.20)
15
Product Description
VGA – Input
The VGA-input is a 15-pin D-SUB connector (female), and allows you to connect
an analog graphic card, by use of the supplied VGA-cable connector. The
industrial LCD monitor KFM15_e supports at this interface data transfer with a
resolution up to 1024 x 768 (XGA), @ 85 Hz and Sync-On-Green (SOG).
DVI-D – Input
This Input is configured as a DVI-D “digital” (female) interface. This interface
support digital data transfer.
The industrial LCD monitor KFM15_e supports at this interface data transfer with
a resolution up to 1024 x 768 (XGA).
S-Video – Input
The S-Video-input is a 4-pin mini DIN connector (female), and allows you to
connect external analog signal sources as e.g. DVD- or video-player.
The industrial LCD monitor KFM15_e supports at this interface TV pictures format
PAL (768 x 576), NTSC (640 x 480) and SECAM.
Composite-Video – Input
The Composite-Video input is a cinch connector (yellow)(female), and allows you
to connect external analog signal sources as e.g. DVD- or video-player.
The industrial LCD monitor KFM15_e supports at this interface TV pictures format
PAL (768 x 576), NTSC (640 x 480) and SECAM.
16
15" Industrial LCD Monitor KFM15_e – User’s Manual (Version 2.20)
Product Description
USB/COM Touch Screen Terminal
This interface is available (as an USB or serial COM interface)
only if the industrial LCD monitor KFM15_e is equipped with
touch screen.
Depending on the ordered configuration of the touch screen connector, this
interface is provided as:
❏ USB interface (version 1.1, type A, female) or as
❏ Serial COM interface (9 pin D-SUB socket), RS232 configured.
Power Plug
The power plug is an AC-inlet connector or a DC-Phoenix connector (depending
on the ordered version) and allows the connection to the corresponding power
source through the power cord (supplied).
15" Industrial LCD Monitor KFM15_e – User’s Manual (Version 2.20)
17
Product Description
Air Openings
Behind the front plate, at the housings upper and bottom side are the air
openings.
Fig. 5: upper air openings
Fig. 5a: bottom air openings
Please take care when installing and powering on the monitor,
that the air openings at the bottom and upper side of the device
(behind the front panel) must be not obstructed by objects.
Power Supply
The KFM15_e can be equipped with an AC PSU or a DC PSU.
The supply range can be read off the type label attached on the back of the unit.
System
Version
Integrated
PSU
Input
KFM15_e - A
AC Power Supply
100 - 240 VAC
50 - 60 Hz
max. 0.3 A
KFM15_e - B
DC Power Supply
18 - 36 VDC
max. 1.5 A
The suffix "-A" on the type label (System Version, KFM15_e-A) of
the system stands for the marking of the Kontron-devices, which
are equipped with an AC power supply unit.
The suffix "-B" on the type label (System Version, KFM15_e-B) of
the system stands for the marking of the Kontron-devices, which
are equipped with a DC power supply unit.
18
15" Industrial LCD Monitor KFM15_e – User’s Manual (Version 2.20)
Product Description
Power Cord Connection
Please observe the hints described in the chapter “Safety
Instructions”.
The voltage of the power source must agree with the voltage
value on the type label.
AC Connection
AC power plug
Abb. 6: AC power plug
1. Connect the supplied AC power cord into the system AC power plug.
2. Connect the other end of the AC power cord into a corresponding outlet.
Use the power cord suitable for the power supply in your country.
Do not remove or alter the grounding prong on the power cord. In
situations where a two-slot receptacle is present, have it replaced
with a properly grounded three-prong grounding type receptacle.
15" Industrial LCD Monitor KFM15_e – User’s Manual (Version 2.20)
19
Product Description
DC Connection
The length of the DC connecting wires may not exceed 10 m.
DC Phoenix
connector
DC Phoenix
connector with
plug terminal
–
–
+
+
Fig. 7: DC Phoenix connector
Fig. 7a: DC Phoenix connector with plug
terminal (supplied)
For the DC connection prepare the connecting wires using the supplied Phoenix
plug terminal.
2
1. Cut the required length of two isolated wires (∅ up to 1.5 mm ).
2. Strip each end 5 –7 mm.
3. Twist the striped wire ends and tin it with solder.
4.
Loosen the two slotted pan head screws of the DC plug terminal far enough
so that you can insert the end of the power cord.
1
2
3
4
Fig. 8: Phoenix plug terminal with positive and negative voltage wire (example)
20
1
Phoenix plug terminal
3
Negative voltage wire (black)
2
Slotted pan head screws
4
Positive voltage wire (red)
15" Industrial LCD Monitor KFM15_e – User’s Manual (Version 2.20)
Product Description
5. Insert the negative and positive voltage wire into the corresponding clamp of
the Phoenix plug terminal. Make sure that you have the right polarity of the
connection (see Fig: 7a).
6. Fasten the screws to secure the negative and positive voltage wire into the
clamps of the plug terminal.
The second end of each wire will be prepared as required for the
connection to the DC power supply.
Connect the KFM15_e to the DC power source as follows:
7. Plug the one end of the DC cable connection (Phoenix plug terminal) to the
Phoenix plug of the KFM15_e.
8. Connect the other end of the DC cable connector to a corresponding DC
power source.
15" Industrial LCD Monitor KFM15_e – User’s Manual (Version 2.20)
21
Product Description
On Screen Display (OSD)
Over the On Screen Display (OSD) can be installed the features, as OSD position
and time, brightness, contrast, color, sharpness and others.
Some of these menus have sub-menus.
The push buttons allow to select, to scroll, to install in the OSD main menu or
OSD-submenu.
Operation of the OSD Menu
1. Press <Menu> to display the main-menu.
2. The buttons <Up> and <Down> allows moving between the functions of the
main-menu by use of.
3. Press the button <Menu> to choose a main-menu function.
4. The buttons <Up> and <Down> allow moving between the sub-function.
5. Press the button <Menu> to choose a sub menu function.
6. The button <Up> (to increase) and the button <Down> (to decrease) allows
the adjustment of the sub-menu values.
7. Press the button <Menu> to choose the sub menu values.
8. To save a new setting, press the button <Menu> of the KFM15_e..
9. Press the button <Select> to leave the sub-menu.
10. Press the button <Select> to leave the main-menu.
The OSD menu and the possible settings are described in the
provided “KFM - OSD Menu Description” documentation.
22
15" Industrial LCD Monitor KFM15_e – User’s Manual (Version 2.20)
Installation Instructions
Installation Instructions
Please observe the described hints in the chapter “Safety
Instructions” and the specification listed in the chapter “Main
Specifications”.
Instruction for Mounting
Please take into account the needed free space on the interface
side, before you install the monitor into an industrial cabinet, an
instrument panel or other cabinets.
You find the description of the interfaces being available in the
section “Interfaces”.
Important Instructions!
KFM15_e has to be installed only by trained and qualified
personal.
Make sure there is sufficient air circulation around the device
when installing the KFM15_e.
The openings for cooling (on upper and bottom side of the device)
must not be obstructed.
When installing KFM15_e into an industrial cabinet, leave at least
5 cm (approx. 2”) of free space around the unit to prevent the
device from possibly overheating!
The 19” industrial cabinet must stand firmly in place.
If further stabilisation is necessary, then bolt the industrial cabinet
to the floor or anchor it on the wall.
The voltage feeds must not be overloaded. Adjust the cabling and
the external overcharge protection to correspond with the
electrical values indicated on the type label.
The type label is located on the left side of the monitor.
15" Industrial LCD Monitor KFM15_e – User’s Manual (Version 2.20)
23
Installation Instructions
Panel Mount Version
If you install the panel version of the KFM15_e into an instrument panel or other
cabinet, use the eight threaded studs M4 on the rear side of the front plate.
For the panel assembly, cut a window and eight pre-drill holes according
figure 6. The system must be attached firmly with eight M4 metric nuts. Before
mounting, remove the protective film on the rubber seal at the rear side of the
display front plate. The contact surface with the rubber seal must be clean and
flush.
Fig. 6: Hole pattern for the KFM15_e, Panel mounting
(all values in mm)
Rack Mount Version
If you install the rack mount version of the KFM15_e into a 19" industrial cabinet,
at the front plate four mounting holes, are at your disposal.
The system has a height of 7U and will be secured with four screws in the 19"
industrial cabinet.
24
15" Industrial LCD Monitor KFM15_e – User’s Manual (Version 2.20)
Monitor Connecting and Turning On
Monitor Connecting and Turning On
The industrial LCD monitor KFM15_e can be connected to IBM PC-systems
equipped with corresponding graphics capability.
1. Connect the PC-system’s video signal-output interface to the video signalinput of the KFM15_e, by use of the supplied video signal cable (depending
on your ordering).
2. If your KFM15_e is equipped with touch screen (COM or USB terminal) you
have to connect the touch screen terminal to the corresponding interface of
the PC system by use of the supplied touch screen cable connector.
3. Connect the power cord as described in the chapter “Power Cord
Connection”.
4. Push the Power On/Off-button to turn on the monitor.
The PC needs to be set to an appropriate graphics mode that
has the same resolution with the LCD panel to have clear screen
image.
The colour representation of the image on each monitor can
differ by physically causes and is dependent on the video signal
source.
If you prefer another colour temperature or want to adapt the
colour representation of images on two monitors, you have to
install these features in the OSD menu under “Color”.
Execute these settings only after reaching of the full operating
temperature of the monitor (approx. 30 minutes).
When the screen is not in use, it must be turned off or the pattern
must be frequently changed by a screen saver.
If it displays the same pattern for a long period of time,
brightness down or “image sticking” may develop due to the
structure of LC-Displays.
15" Industrial LCD Monitor KFM15_e – User’s Manual (Version 2.20)
25
Monitor Connecting and Turning On
Installation of the Touch Screen Software
The drivers are on the included CD-ROM for the following operating systems:
❏ DOS
❏ Windows 9x / Me
❏ Windows 2000 / XP
❏ Windows CE
❏ Linux
After installing the touch screen driver, be sure to restart your
computer to load and activate the touch screen driver.
Afterwards you calibrate the touch screen.
26
15" Industrial LCD Monitor KFM15_e – User’s Manual (Version 2.20)
Monitor Connecting and Turning On
Calibrating the Touch Screen
After the installing and connecting your KFM15_e monitor and installing the touch
screen, you have to calibrate the touch screen. Calibration serves two purposes:
❏ Sets the active area of the touch screen
❏ Aligns the active area of the touch screen to the screen’s image
Before you calibrate the touch screen, let the monitor warm up
for 30 minutes and then center the screen’s image within the
screen area.
Calibration aligns the active touch-sensitive area of the touch screen with the
image on the display. Calibration also determines the edges of the screen’s image
and locates the center of the touch screen. If the touch screen is not calibrated
properly, the active area of the touch screen may not be aligned with the screen’s
image or may be unnecessarily small in size.
To calibrate the touch screen, open the touch screen control panel program, and
then select “Calibration”. Follow the directions displayd on the screen. Fore more
information on calibration, refer to the user documentation enclosed on the
supplied CD with the touch screen drivers.
Whenever you change the resolution you have to calibrate the
touch screen.
15" Industrial LCD Monitor KFM15_e – User’s Manual (Version 2.20)
27
Maintenance and Prevention
Maintenance and Prevention
Kontron Embedded Computers devices require minimal maintenance and care to
keep them operating correctly.
❏ Occasionally wipe the system with a soft dry cloth.
❏ Remove persistent dirt by use of a soft, slightly damp cloth (only use a mild
detergent).
Use no abrasives, abrasion sponges, steel wool, metal threads,
or solvent like alcohol, acetone, washing gasoline to clean the
displays protection pane or the surface of the touch screen.
28
15" Industrial LCD Monitor KFM15_e – User’s Manual (Version 2.20)
Main Specifications
Main Specifications
TFT LCD Display
Diagonally (Size)
active area
15"
(304.1 x 228.1 mm)
Resolution
1024 x 768
Pixel Pitch
0.297 mm x 0.297 mm
Colors
262144 colors
Backlight
2x CCFT
Brightness
350 cd/m2
Viewing angle (r / l / u / d)
75° / 75° / 55° / 60°
Contrast ratio
350:1
Touch screen
(optional)
Type: 4-wire resistive
Terminal connection(optional):
as COM (RS232) or USB 1.1 connector
Interfaces
At the left side (rear-mounted):
1x VGA (analog) - input
1x DVI-D (digital) - input
1x S-Video (analog) - input
1x Composite Video(analog) - input
Operating elements
At the front side or optional right side (rear-mounted):
1x On/Off-button
for image representation adjustment on-screen:
1x Menu-button of OSD
1x Up-button of OSD
1x Down-button of OSD
1x Select-button of OSD
LED-indicator
Plug & Play
compatibility
At the Front side:
1x Status LED
VESA DDC1/2B EDID Ver. 1.3
AC or DC Power plug At the left side (rear-mounted)
Backlight lifetime
50,000 h
Protection class
IP65 frontal
15" Industrial LCD Monitor KFM15_e – User’s Manual (Version 2.20)
29
Main Specifications
Mechanical Specifications
Dimensions
Panelmount
19" Front plate
Front plate:
HxWxD
333.5 x 450 x 3 (mm)
13.13" x 17.72" x 0.118"
HxWxD
7U x 19" x 3 mm
steel zinc-plated
Frontal: black powder coated
steel zinc-plated
Frontal: black powder coated
Height
276.5 mm (10.886")
276.5 mm (10.886")
Width
393 mm (15.472")
393 mm (15.472")
Depth
60 mm (2.362")
60 mm (2.362")
Material
steel zinc-plated
steel zinc-plated
approx. 6.5kg (14.330 lbs.)
(without packing)
approx. 6.5 kg (14.330 lbs.)
(without packing)
Material
Chassis
Weight
Electrical Specifications
System
Version
Integrated
PSU
Input
KFM15_e - A
AC Power Supply
100 - 240 VAC
50 - 60 Hz
max. 0.3 A
KFM15_e - B
DC Power Supply
18 - 36 VDC
max. 1.5 A
30
15" Industrial LCD Monitor KFM15_e – User’s Manual (Version 2.20)
Main Specifications
Environmental Specifications
Operating temperature
0 … +50°C
(32 … 122°F
Storage / transit
temperature
-20 … +60 °C
(-4 … 140 °F )
Relative humidity
(operating)
20 - 80 % (non condensing)
Humidity (storage)
5 - 95 % (non condensing)
Operating altitude
10,000 ft (3,048 m)
Storage / transit altitude
40,000 ft (12,191 m)
Operating shock
5 G, 11 ms duration, half sine
Storage/transit shock
30 G, 11 ms duration, half sine
Operating vibration
10 – 58 Hz, ± 0.075 mm
58 – 500 Hz, 0.5 G
Storage / transit vibration 10 – 58 Hz, ± 0.15 mm
58 – 500 Hz, 1.0 G
15" Industrial LCD Monitor KFM15_e – User’s Manual (Version 2.20)
31
Main Specifications
CE-Directives and Standards
EC Directives
Low Voltage Directive
(Electrical Safety)
2006/95/EC
EMC Directive
2004/108/EC
EC Marking
93/68/EEC
Electrical Safety
Standards
EUROPE
EN 60950-1: 2006
U.S.A.
to meet UL 60950-1: 2003 First Edition
EMC
Standards
Generic emission standard for industrial
environments (Emission):
EN 61000-6-4: 2001
EUROPE
Generic standards – Immunity for industrial
environments (Immunity):
EN 61000-6-2: 2005
USA
32
FCC 47 CFR Part 15, Class A
15" Industrial LCD Monitor KFM15_e – User’s Manual (Version 2.20)
Technical Appendix – Interfaces
Technical Appendix – Interfaces
The following tables show the plug assignments for the external connections of
the KFM15_e.
Low-active signals are indicated by a minus sign.
VGA Connector
Pin
Signal Name
1
red
2
green
3
blue
4
4 is NC
5–8
GND
9
Fused VCC
10
GND
11
NC
12
DDC Data
13
HSYNC
14
VSYNC
15
DDC Clock
15-pin D-SUB-Socket (female)
15" Industrial LCD Monitor KFM15_e – User’s Manual (Version 2.20)
33
Technical Appendix – Interfaces
DVI-D Connector (Single Link)
Pin
Signal Name
Description
1
TMDS2–
Differential TMDS Data 2–
2
TMDS2+
Differential TMDS Data 2+
3
GND
TMDS Shield
4–5
NC
Reserved for future use
6
DVI_SCL
DDC EDID data clock
7
DVI_SDA
DDC EDID data
8
NC
Reserved for future use
9
TMDS1–
Differential TMDS Data 1–
10
TMDS1+
Differential TMDS Data 1+
11
GND
TMDS Shield
12–13
NC
Reserved for future use
14
DVI_5V
5V / 100mA Power Supply
15
GND
Ground
16
DISPDET
Hot Plug Detection
17
TMDS0–
Differential TMDS Data 0–
18
TMDS0+
Differential TMDS Data 0+
19
GND
TMDS Shield
20–21
NC
Reserved for future use
22
GND
TMDS Shield
23
TMDSSCL–
Differential TMDS Clock–
24
TMDSSCL+
Differential TMDS Clock +
C1
NC
C2
NC
C3
NC
C4
NC
C5– C6
GND
34
DVI-D-Connector
(female)
Ground
15" Industrial LCD Monitor KFM15_e – User’s Manual (Version 2.20)
Technical Appendix – Interfaces
S-Video Connector
Pin
Signal Name
Description
1
GND
Ground
2
GND
Ground
3
Y
Luminance
4
C
Chrominance
4-pin MiniDIN-Connector
(female)
C-Video (Composite) Connector
Pin
Signal Name
Description
1
GND
Ground
2
CVBS
Composite video
signal
Cinch-Connector (yellow)
(female)
USB Touch Screen Connector
Pin Signal Name
1
VCC
2
Data–
3
Data+
4
GND
4 pin USB-Socket
Type A Version 1.1
15" Industrial LCD Monitor KFM15_e – User’s Manual (Version 2.20)
35
Technical Appendix – Interfaces
Serial Touch Screen Connector (RS232)
Pin Signal Name
1
DCD (Data Carrier Detect)
2
RXD
(Receive Data)
3
TXD
(Transmit Data)
4
DTR
(Data Terminal Ready)
5
GND (Signal Ground)
6
DSR
(Data Set Ready)
7
RTS
(Request to Send)
8
CTS
(Clear to Send)
9
RI
(Ring Indicator)
36
9 pin D-SUB-Socket
15" Industrial LCD Monitor KFM15_e – User’s Manual (Version 2.20)
Technical Support
Technical Support
For technical support, please contact our Technical Support department.
Tel:
+49 (0)9461 950-104
Fax:
+49 (0)9461 950-200
e-mail: [email protected]
Make sure you have the following information on hand when you call:
• the unit part id number (P/No #),
• and the serial number (S/No #) of the unit (provide the serial
number found on the type label, placed on the right side of the system).
Be ready to explain the nature of your problem to the service technician.
If you have questions about Kontron Embedded Computers or our products and
services, you may reach us at the aforementioned numbers, or at:
www.kontron.com or by writing to:
Kontron Embedded Computers GmbH
Oskar-von-Miller-Str. 1
85386 Eching
15" Industrial LCD Monitor KFM15_e – User’s Manual (Version 2.20)
37
Technical Support
Returning Defective Merchandise
Before returning any merchandise, please:
1. Contact our Customer Service department
to obtain an RMA (Return Material Authorization) number.
Fax:
(+49) 8165-77 412
[email protected]
e-mail:
2. Make sure that you receive an RMA number from Kontron Embedded
Computers-Service before returning any merchandise. Clearly write or mark
this number on the outside of the package you are returning.
3. Describe the device failure behavior.
4. When returning goods, include the name and telephone number of a person
whom we can contact for further explanations if necessary. Where applicable,
always include all duty papers and invoice(s) associated with the item(s) in
question.
5. When returning a unit:
• Ensure that the unit is properly packed in the original box.
• Include a copy of the RMA form.
38
15" Industrial LCD Monitor KFM15_e – User’s Manual (Version 2.20)