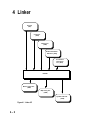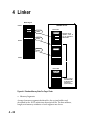
1
ADSP-2100 Family
Assembler Tools
& Simulator Manual
SECOND EDITION (11/94)
Fa
ADSP-2100 Family
Assembler Tools & Simulator Manual
Literature
ADSP-2100 FAMILY MANUALS
ADSP-2100 Family User’s Manual (Prentice Hall)
Complete description of processor architectures and system interfaces.
ADSP-2100 Family Assembler Tools & Simulator Manual
ADSP-2100 Family C Tools Manual
ADSP-2100 Family C Runtime Library Manual
Programmer’s references.
ADSP-2100 Family EZ Tools Manual
User’s manuals for in-circuit emulators and demonstration boards.
APPLICATIONS INFORMATION
Digital Signal Processing Applications Using the ADSP-2100 Family,
Volume 1 (Prentice Hall)
Topics include arithmetic, filters, FFTs, linear predictive coding, modem
algorithms, graphics, pulse-code modulation, multirate filters, DTMF,
multiprocessing, host interface and sonar.
Digital Signal Processing Applications Using the ADSP-2100 Family,
Volume 2 (Prentice Hall)
Topics include modems, linear predictive coding, GSM codec, sub-band
ADPCM, speech recognition, discrete cosine transform, digital tone
detection, digital control system design, IIR biquad filters, software uart
and hardware interfacing.
SPECIFICATION INFORMATION
ADSP-2100/ADSP2100A Data Sheet
ADSP-21xx Data Sheet
ADSP-21msp50A/55A/56A Data Sheet
ADSP-21msp58/59 Preliminary Data Sheet
ADSP-2171/72/73 Data Sheet
ADSP-2181 Preliminary Data Sheet
© 1994 Analog Devices, Inc.
ALL RIGHTS RESERVED
PRODUCT AND DOCUMENTATION NOTICE: Analog Devices reserves the right to change this
product and its documentation without prior notice.
Information furnished by Analog Devices is believed to be accurate and reliable.
However, no responsibility is assumed by Analog Devices for its use, nor for any infringement of
patents, or other rights of third parties which may result from its use. No license is granted by implication
or otherwise under the patent rights of Analog Devices.
PRINTED IN U.S.A.
Printing History
SECOND EDITION
11/94
For marketing information or Applications Engineering assistance, contact your local
Analog Devices sales office or authorized distributor.
If you have suggestions for how the ADSP-2100 Family development tools or
documentation can better serve your needs, or you need Applications Engineering
assistance from Analog Devices, please contact:
Analog Devices, Inc.
DSP Applications Engineering
One Technology Way
Norwood, MA 02062-9106
Tel: (617) 461-3672
Fax: (617) 461-3010
e-mail: [email protected]
Or log in to the DSP Bulletin Board System:
Telephone number (617) 461-4258
300, 1200, 2400, 9600 baud, no parity, 8 bits data, 1 stop bit
For additional marketing information, call (617) 461-3881 in Norwood MA, USA.
Contents
CHAPTER 1 OVERVIEW & INSTALLATION
1.1 INTRODUCTION ................................................................................................... 1-1
1.2 CONTENTS OF THIS MANUAL ............................................................................. 1-3
1.3 SYSTEM DEVELOPMENT PROCESS .................................................................. 1-5
1.4 CONSTANTS .......................................................................................................... 1-7
1.5 NUMERIC BASES .................................................................................................. 1-8
1.6 CHARACTER SET ................................................................................................. 1-8
1.7 SYMBOLS .............................................................................................................. 1-9
1.7.1 Case-Sensitivity ................................................................................................. 1-9
1.8 ASSEMBLER EXPRESSIONS ............................................................................. 1-10
1.9 MANUAL NOTATION CONVENTIONS ................................................................ 1-11
1.10 SOFTWARE INSTALLATION & RELEASE NOTES .......................................... 1-12
1.10.1 Files & Environment Variables ...................................................................... 1-12
1.10.2 Example Architecture & Source Code Files ................................................ 1-13
CHAPTER 2 SYSTEM BUILDER
2.1 INTRODUCTION ..................................................................................................... 2-1
2.1.1 Memory-Mapped Control Registers ................................................................. 2-3
2.2 RUNNING THE SYSTEM BUILDER ....................................................................... 2-3
2.3 SYMBOL USAGE & RESERVED KEYWORDS ..................................................... 2-4
2.4 SYSTEM SPECIFICATION FILE ............................................................................ 2-5
2.4.1 ADSP-2100 Example File ................................................................................... 2-5
2.4.2 ADSP-2101 Example File ................................................................................... 2-6
2.5 SYSTEM BUILDER DIRECTIVES .......................................................................... 2-7
2.5.1 Naming Your System (.SYSTEM) ....................................................................... 2-7
2.5.2 Identifying The Processor (.ADSP21XX) .......................................................... 2-8
2.5.3 MMAP Pin (.MMAP) ............................................................................................ 2-8
2.5.4 Memory Segment Declarations (.SEG) ............................................................. 2-9
2.5.4.1 .SEG Directive Examples .............................................................................. 2-11
2.5.4.2 Segment Mapping For Emulator .................................................................. 2-11
2.5.5 Memory-Mapped I/O Ports (.PORT) ................................................................ 2-12
2.5.6 System Builder Constants (.CONST) ............................................................. 2-12
2.6 PROCESSOR-SPECIFIC CONSIDERATIONS .................................................... 2-13
2.6.1 ADSP-2100 Systems ........................................................................................ 2-13
2.6.2 ADSP-2105 & ADSP-2115 Systems ................................................................ 2-14
2.6.2.1 Generating 1K Boot Pages .......................................................................... 2-14
2.6.2.2 2105/2115 To 2101 Upgrade .......................................................................... 2-14
2.7 ADSP-2101 MEMORY-VARIANT PROCESSORS ............................................... 2-15
2.8 DESIGNING PAGED MEMORY SYSTEMS ......................................................... 2-16
2.8.1
2.8.2
2.8.3
2.8.4
2.8.5
System Builder Features For Paged Memory ................................................
Using Segment Names For Pages ..................................................................
Assembler Features For Paged Memory .......................................................
C Compiler Features For Paged Memory .......................................................
Using Paged Addresses In Simulator ............................................................
2-16
2-18
2-19
2-19
2-20
CHAPTER 3 ASSEMBLER
3.1 INTRODUCTION ..................................................................................................... 3-1
3.2 ASSEMBLER PREPROCESSORS ........................................................................ 3-3
3.3 RUNNING THE ASSEMBLER ................................................................................ 3-3
3.3.1 Assembler Switch Options ................................................................................ 3-5
3.3.2 Case-Sensitivity (-c) ........................................................................................... 3-6
3.3.3 Define An Identifier (-d) ..................................................................................... 3-6
3.3.4 Expand INCLUDE Files In List File (-i) .............................................................. 3-7
3.3.5 Generate Listing File (-l) .................................................................................... 3-7
3.3.6 Expand Macros In List File (-m) ........................................................................ 3-7
3.3.7 Renaming Output Files (-o) ............................................................................... 3-7
3.3.8 Disable Semantics Checking (-s) ...................................................................... 3-8
3.4 ASSEMBLY LANGUAGE CONVENTIONS ............................................................ 3-8
3.4.1 Symbols & Keywords ......................................................................................... 3-8
3.4.2 Assembler Expressions .................................................................................. 3-10
3.4.3 Buffer Address & Length Operators .............................................................. 3-11
3.4.4 Comments ......................................................................................................... 3-12
3.5 USING THE C PREPROCESSOR ........................................................................ 3-13
3.5.1 Example: Conditional Assembly ..................................................................... 3-13
3.5.2 Example: C-Style Macros ................................................................................ 3-14
3.6 WRITING PROGRAMS ......................................................................................... 3-15
3.6.1 Program Structure ........................................................................................... 3-15
3.6.2 Setting The Memory-Mapped Control Registers ........................................... 3-16
3.7 ASSEMBLER DIRECTIVES ................................................................................. 3-22
3.7.1 Program Modules (.MODULE) ......................................................................... 3-22
3.7.1.1 Bootable Modules ......................................................................................... 3-24
3.7.1.2 STATIC Modules ............................................................................................ 3-25
3.7.2 Data Variables & Buffers (.VAR) ...................................................................... 3-28
3.7.2.1 More On Circular Buffers .............................................................................. 3-30
3.7.2.2 Special Case: Circular Buffer Lengths Of 2n .............................................. 3-32
3.7.3 Initializing Variables & Buffers (.INIT) ............................................................. 3-33
3.7.3.1 Data Initializing In System Hardware .......................................................... 3-35
3.7.4 Naming Ports For The Assembler (.PORT) .................................................... 3-36
3.7.5 Including Other Source Files (.INCLUDE) ...................................................... 3-37
3.7.6 Macros ............................................................................................................... 3-38
3.7.6.1 Defining Macros (.MACRO) .......................................................................... 3-38
3.7.6.2 Local Labels In Macros (.LOCAL) ................................................................ 3-39
3.7.6.3 Macro Example .............................................................................................. 3-40
3.7.7 Global Data Structures (.GLOBAL) ................................................................. 3-40
3.7.8 Global Program Labels (.ENTRY) ...................................................................
3.7.9 External Symbols (.EXTERNAL) .....................................................................
3.7.10 Assembler Constants (.CONST) ...................................................................
3.7.11 Locating Code & Data In Memory Segments (.PMSEG, .DMSEG) 3-42
3.7.12 Paged Memory Systems (.PAGE) ..................................................................
3.8 INITIALIZING YOUR PROGRAM IN MEMORY ....................................................
3.8.1 Using The PROM Splitter To Initialize ROM ....................................................
3.8.2 Initializing RAM In Source Code .....................................................................
3.9 LIST FILE FORMAT .............................................................................................
3-41
3-41
3-42
3-43
3-44
3-45
3-45
3-46
CHAPTER 4 LINKER
4.1 INTRODUCTION ..................................................................................................... 4-1
4.2 RUNNING THE LINKER ......................................................................................... 4-3
4.2.1 Placing Modules On Boot Pages ...................................................................... 4-4
4.2.2 Linker Switch Options ....................................................................................... 4-5
4.2.2.1 Specify Architecture File (-a) ......................................................................... 4-6
4.2.2.2 Create C Runtime Stack (-c) ........................................................................... 4-6
4.2.2.3 Search Paths For Library Routines (-dir & ADIL) ......................................... 4-7
4.2.2.4 Output Filenames (-e) ..................................................................................... 4-8
4.2.2.5 ADSP-21xx Runtime C Library Linked (-lib) ................................................. 4-8
4.2.2.6 Copy Library Routines Onto Boot Pages (-p) ............................................... 4-8
4.2.2.7 C Runtime Stack In PM (-pmstack) ................................................................ 4-9
4.2.2.8 ROM Version Of ADSP-21xx Runtime C Library (-rom) ............................... 4-9
4.2.2.9 Create Runtime C Heap (-s) ............................................................................ 4-9
4.2.2.10 Fast Library File Searched (-user) ............................................................. 4-10
4.3 HOW THE LINKER WORKS ................................................................................. 4-10
4.3.1 Memory Allocation ........................................................................................... 4-10
4.3.1.1 Boot Memory Allocation ............................................................................... 4-12
4.3.2 Symbol Resolution ........................................................................................... 4-13
4.4 USING LIBRARY FILES OF YOUR ROUTINES .................................................. 4-14
4.4.1 Building A Single Library For Fast Access ................................................... 4-15
4.4.2 Library Search Sequence ................................................................................ 4-16
4.5 MULTIPLE BOOT PAGE SYSTEMS .................................................................... 4-17
4.5.1 Rebooting Under Program Control................................................................. 4-18
4.5.2 Example: Sharing A STATIC Buffer ................................................................ 4-18
4.5.3 Example: Using Static & Dynamic Segments ................................................ 4-20
4.6 MAP LISTING FILE .............................................................................................. 4-23
CHAPTER 5 PROM SPLITTER
5.1 INTRODUCTION .....................................................................................................
5.2 RUNNING THE PROM SPLITTER .........................................................................
5.2.1 Example: Generating PM & DM Files ...............................................................
5.2.2 Example: Generating BM Files Only .................................................................
5-1
5-1
5-2
5-3
5.3 PROM SPLITTER OUTPUT FILES ........................................................................ 5-3
5.3.1 Byte-Stream Output For PM & DM .................................................................... 5-3
5.3.2 Boot Memory Organization ............................................................................... 5-5
5.4 BOOT PAGES SMALLER THAN 2K ...................................................................... 5-6
5.4.1 1K Boot Pages For ADSP-2105, ADSP-2115 .................................................... 5-6
5.4.2 Boot Memory Address Line Usage ................................................................... 5-7
5.5 BOOT LOADER OPTION ....................................................................................... 5-8
5.5.1 How To Prepare Your Program For The Boot Loader .................................... 5-12
5.5.2 Simulating A Boot Loader Program ............................................................... 5-13
5.6 HIP BOOT FILES (HIP SPLITTER) ...................................................................... 5-13
APPENDIX A INSTRUCTION CODING
A.1 OPCODES
A.2 ABBREVIATION CODING
APPENDIX B FILE FORMATS
B.1 DATA FILES (.DAT) ............................................................................................... B–1
B.1.1 Assembler/Linker Buffer Initialization Files ................................................... B–1
B.1.1.1 Integer Data .................................................................................................... B–1
B.1.1.2 Non-Integer Data ............................................................................................ B–2
B.1.1.3 Comments ...................................................................................................... B–2
B.2 MEMORY IMAGE FILE (.EXE).............................................................................. B–2
B.3 SYMBOL TABLE FILE (.SYM) .............................................................................. B–4
B.4 PROM IMAGE FILES (.BNU, .BNM, .BNL) ........................................................... B–5
B.4.1 HIP BOOT FILES (.HIP) ..................................................................................... B–6
B.4.2 INTEL FORMAT ................................................................................................. B–6
B.4.3 MOTOROLA S FORMAT ................................................................................... B–8
APPENDIX C ERROR MESSAGES
C.1
C.2
C.3
C.4
C.5
INTRODUCTION .................................................................................................... C-1
SYSTEM BUILDER ERRORS ............................................................................... C-1
ASSEMBLER ERRORS ......................................................................................... C-4
LINKER ERRORS ................................................................................................ C-13
PROM SPLITTER ERRORS ................................................................................ C-20
APPENDIX D INTERRUPT VECTOR ADDRESSES
D.1 VECTOR TABLES .................................................................................................. D-1
Overview & Installation
1.1
1
INTRODUCTION
The ADSP-2100 Family Development Software is a complete set of
software design tools. The software includes assembly and C language
programming tools and processor simulators that facilitate DSP system
development and debugging. The development software runs on the IBM
(or IBM-compatible) PC and SUN4 workstation platforms.
The development software includes several programs: System Builder,
Assembler, Linker, PROM Splitter, Simulators and C Compiler. This
manual describes the first five programs, referred to collectively as the
assembler tools and simulators.
For information on the ADSP-2100 Family C Compiler, refer to the ADSP2100 Family C Tools Manual & ADSP-2100 Family C Runtime Library Manual,
respectively. For information on the architecture and system interface of
each processor, refer to the ADSP-2100 Family User’s Manual.
The ADSP-2100 Family includes the following processors:
Processor
ADSP-2100/ADSP-2100A
ADSP-2101
ADSP-2105
ADSP-2115
ADSP-2111
ADSP-21msp50/55/56
ADSP-2171
Description
DSP microprocessor
DSP microcomputer
DSP microcomputer
DSP microcomputer
DSP microcomputer with host interface port
Mixed-signal DSP microcomputer
DSP microcomputer with host interface port
This manual provides complete information on developing programs for
all of the processors.
1–1
1 Overview & Installation
Mask-programmable ROM versions of the processors, such as the ADSP2102 and ADSP-2106, are not specifically named in text; however, these
devices are programmed in the same way as the standard components.
Other processors added to the ADSP-2100 Family in the future will be
fully code-compatible, allowing the use of the ADSP-21xx Development
Software and this manual.
In this manual, the term “ADSP-21xx” is used generically to refer to one or
all of the ADSP-2100 Family processors. The term “ADSP-2100” is used to
denote both the ADSP-2100 and ADSP-2100A.
Please note that any software features or text references pertaining to boot
memory, internal or on-chip memory, are applicable to all ADSP-21xx
processors except the ADSP-2100. This processor has no on-chip memory
and does not use boot memory.
Each release of the software is shipped with a Release Note. This note
describes the current version and provides information on any upgrades to
the software. Please be sure to return the registration card enclosed
with your shipment! This allows us to keep you informed about
subsequent releases of the software.
1–2
Overview & Installation 1
1.2
CONTENTS OF THIS MANUAL
This manual describes the development software in the following
chapters:
• Chapter 2 System Builder
The system builder is a software tool for describing the target hardware.
You create a system specification source file which specifies the amount of
RAM and ROM, the allocation of program and data memory, and
memory-mapped I/O ports of the target hardware environment. Highlevel constructs are used to simplify this task.
• Chapter 3 Assembler
The assembler processes your assembly language programs. It supports
the syntax of the ADSP-2100 Family instruction set and provides flexible
macro processing. A C language preprocessor handles C preprocessor
directives in source code. Source code is partitioned into a defined set of
modules (files). A full range of diagnostics is provided.
• Chapter 4 Linker
The linker processes separately-assembled modules and generates an
executable memory image file. It can search for library routines to link in.
It maps the linked code and data to the target system hardware, as
specified by the system builder output, and can produce multiple boot
page image files for processors with boot memory.
• Chapter 5 PROM Splitter
The PROM splitter reads the linker-output executable file and generates
PROM burner compatible files in a variety of industry standard formats.
These file formats are specified in Appendix B.
• Chapter 6 Simulator Introduction
This chapter provides an overview of the ADSP-2100 Family Simulator
Utility.
1–3
1 Overview & Installation
• Chapter 7 Getting Started
This chapter shows you how to invoke the simulator program, then uses
an example program to demonstrate some of the basic simulator
operations. Follow the directions in this tutorial to familiarize yourself
with the simulator and its capabilities.
Chapters 8 through 12 contain reference material. They cover all simulator
operations, grouped by function.
• Chapter 8 User Interface
This chapter describes all of the elements of the simulator’s user interface.
It describes how to customize the interface to suit your needs. It covers
window manipulation, command line operations, and the use of the
functions keys and mouse.
• Chapter 9 Registers & Memory
Register and memory functions allow you to view the contents of all
processor registers and all locations in memory. In most cases, you can
change a register or memory location’s contents directly. You can also
save the contents of memory to files.
• Chapter 10 Setup & Debug
Setup includes loading the program to be simulated and configuring
external inputs. Control and debug functions include starting and
stopping the execution of your program and resetting the simulated
processor. You can set breakpoints, break conditions and watchpoints.
The simulator also provides trace and profile information; the trace
records bus activity, and the profile records program execution patterns.
• Chapter 11 I/O Operations
The I/O functions configure all simulated data input and output. You can
simulate various types of data transfers through I/O ports, serial ports
(SPORTs), the host interface port (HIP) and the analog interface.
• Chapter 12 Miscellaneous Functions
This chapter describes miscellaneous simulator functions, such as
evaluating expressions.
1–4
Overview & Installation 1
• Chapter 13 Command Reference
This chapter contains summaries of commands and their syntax, window
operations, and function key definitions.
These chapters are supplemented by several appendices:
• Appendix A, Instruction Coding, gives the 24-bit opcode of each
instruction.
• Appendix B, File Formats, describes the exact format for input and
output files used by the development software.
• Appendix C, Error Messages, lists and defines all error messages
generated by the development software.
• Appendix D, Interrupt Vector Addresses, gives the interrupt and
startup vector addresses for each ADSP-21xx processor.
• Appendix E, Simulator Error Messages.
• Appendix F, Simulator Data File Formats.
1.3
SYSTEM DEVELOPMENT PROCESS
Figure 1.1 shows a flow chart of the ADSP-21xx system development
process. The development process begins with the task of defining the
target system hardware. To define the hardware environment, you use the
system builder software tool. You must write a system specification file as
input to the system builder; this file describes the target hardware
configuration. The system builder reads the file and generates an
architecture description file which passes information about the target
hardware to the linker, simulator, and emulator (if used).
You begin code generation by creating assembly language source code
modules. An assembly code module is a unit of assembly language
comprising a main program, subroutine, or data variable declarations.
Each code module is assembled separately by the assembler. Several
modules are then linked together to form an executable program (memory
image file).
1–5
1 Overview & Installation
SYSTEM
BUILDER
STEP 1:
DESCRIBE ARCHITECTURE
SYSTEM
ARCHITECTURE
FILE
STEP 2:
GENERATE CODE
C SOURCE
FILE
STEP 3:
DEBUG SOFTWARE
STEP 4:
DEBUG IN TARGET SYSTEM
STEP 5:
MANUFACTURE FINAL SYSTEM
ANSI
C COMPILER
ASSEMBLER
SOURCE
FILE
EZ-LAB EVALUATION BOARD
OR
THIRD-PARTY PC PLUG-IN CARDS
FULL-FEATURED EMULATOR
OR
EZ-ICE EMULATOR
TESTED &
DEBUGGED
DSP BOARD
= USER FILE OR HARDWARE
= SOFTWARE DEVELOPMENT TOOL
= HARDWARE DEVELOPMENT TOOL
Figure 1.1 ADSP-21xx System Development Process
1–6
ASSEMBLER
LINKER
SOFTWARE SIMULATOR
TARGET
BOARD
PROM SPLITTER
EXECUTABLE
FILE
Overview & Installation 1
The linker reads the target hardware information from the architecture
description file to determine placement of code and data fragments. In the
assembly modules you may specify each code/data fragment as
completely relocatable, relocatable within a defined memory segment, or
non-relocatable (placed at an absolute address). Non-relocatable code or
data modules are placed at the specified memory address, provided the
memory area has the correct attributes. Relocatable objects are placed in
memory by the linker.
Using the architecture description file and assembled code modules, the
linker determines the placement of relocatable code and data modules,
and places all modules in memory locations with the correct attributes
(CODE or DATA, RAM or ROM). The linker generates a memory image
file containing a single executable program which may be loaded into a
simulator or emulator for testing.
The simulator provides windows that display different portions of the
hardware environment. To replicate the target hardware, the simulator
configures its memory according to the architecture description file
generated by the system builder, and simulates memory-mapped I/O
ports. This simulation allows you to debug the system and analyze
performance before committing to a hardware prototype.
After fully simulating your system and software, an emulator is employed
in the prototype hardware to test circuitry, timing, and real-time software
execution. The emulator has overlay memory which can be used in place
of target system memory components.
The PROM splitter software tool translates the linker-output program
(memory image file) into an industry-standard file format for a PROM
burner. Once you burn the code into PROM devices and plug an
ADSP-21xx processor into the target board, your prototype is ready to
run.
1.4
CONSTANTS
Constants include numeric constants and symbols defined as constants.
Symbolic constants may be used anywhere in place of numeric constants.
The symbol must be declared as a constant with the .CONST directive, for
either the system builder or assembler. A system builder constant
declaration does not carry over to the assembler, however—you must
write new declarations for constants in your assembly source code.
1–7
1 Overview & Installation
1.5
NUMERIC BASES
The numeric bases which may be used in source code are hexadecimal,
octal, binary, and decimal. They are specified in the following ways.
For hexadecimal numbers, prefix a 0x (zero and x) or H#:
0x24FF
H#CF8A
For octal, prefix a 0 (zero):
0777
Binary numbers are indicated with the prefix B#:
B#01110100
For decimal (the default) there is no prefix to denote the base.
Sign ( + or - ) may be specified:
1024
1.6
+1024
-55
CHARACTER SET
The ADSP-21xx Development Software recognizes the following
characters:
• Upper-case letters “A” through “Z”
• Lower-case letters “a” through “z”
• Digits “0” through “9”
• ASCII graphics characters—i.e., the printing characters other than
letters and digits (punctuation, etc.)
• ASCII non-graphics: space, tab, carriage return, line feed, form feed
(The “newline” character or characters are interpreted according to the
conventions of the environment in which they occur.)
1–8
Overview & Installation 1
1.7
SYMBOLS
A symbol is a character string used in one of two ways. Symbols which
you define in a system builder input file or in assembly language code are
used to represent something such as a memory segment, address, or data
value. Other symbols are reserved keywords recognized by the system
builder or assembler. These reserved symbols are listed in Chapters 2
and 3.
A symbol defined in assembly language can be a module name, data
variable, data buffer, program label, I/O port, macro, or constant.
Symbols consist of one character from the set:
• Upper-case letters “A” through “Z”
• Lower-case letters “a” through “z”
• The underscore character “_”
followed by any sequence of characters from the set:
•
•
•
•
Upper-case letters “A” through “Z”
Lower-case letters “a” through “z”
The underscore character “_”
Digits “0” through “9”
In other words, your symbols may not start with a digit. A symbol may be
a maximum of 32 characters long. Here are some examples of typical
symbols and what they might name:
main_prog
xoperand
input_array
subroutine1
AtoD_INPUT
1.7.1
assembly language program module
data variable
data buffer
program label
memory-mapped port
Case-Sensitivity
The ADSP-21xx assembly language development software can be set to be
either case-sensitive, with differentiation between upper and lower-case
letters, or non-case-sensitive, treating upper and lower-case versions as
the same character.
The software tools are by default case-insensitive, and you can enter text
in any combination of upper and lower-case. The C language, however, is
1–9
1 Overview & Installation
a case-sensitive programming environment, and if the ADSP-2100 Family
C Compiler is used to generate your programs then the system builder
and assembler must be set for case-sensitivity. This is accomplished by
means of an invocation line switch (-c). See Chapters 2 and 3 for further
details.
1.8
ASSEMBLER EXPRESSIONS
The ADSP-2100 Family Assembler can evaluate simple expressions in
source code. An expression may be used wherever a numerical constant is
expected.
Two kinds of expressions are allowed:
• an arithmetic or logical operation on two or more integer constants
examples:
29 + 129
(128 - 48) * 3
0x55 & 0x0F
• a symbol plus or minus an integer constant
examples:
data - 8
data_buffer + 15
startup + 2
The symbols are either data variables, data buffers, or program labels. All
of these symbols actually represent address values which are determined
by the linker. Adding or subtracting a constant specifies an offset from the
address.
Simple arithmetic or logical expressions can be used to declare symbolic
constants with the .CONST directive of the system builder and assembler.
These expressions may use the following operators, which are a subset of
the operators recognized by the C programming language (listed in order
of precedence):
( )
~ */ %
+ << >>
&
|
^
1 – 10
left, right parenthesis
ones complement, unary minus
multiply, divide, modulus
addition, subtraction
bitwise shifts
bitwise AND
bitwise OR
bitwise XOR
Overview & Installation 1
Expressions may also be used when entering commands in one of the
ADSP-2100 Family Simulators. The simulators recognize an additional set
of expression elements and operators; these are detailed in the
“Expressions” section of Chapter 6, Simulator Introduction.
The most important difference between assembler expressions and
simulator expressions is that memory contents (such as data variables)
and processor register contents may be used as operands in the simulator
only. The assembler cannot evaluate memory and register values at
assembly-time; the simulator, however, has access to the instantaneous
values of simulated memory and registers.
1.9
MANUAL NOTATION CONVENTIONS
This section provides you with a list of notation conventions used in this
manual.
• Keywords (system-reserved symbols) are shown in text with
UPPERCASE characters, although they may actually be entered in
either upper or lower-case. Both forms of the keyword are reserved.
• A lower-case word highlighted in italics, such as jumplabel, generally
represents a user-defined symbol such as a program label, data
variable, or filename.
• Square brackets, [ ], enclose optional items, memory segment size
(in the system builder’s .SEG directive), or data buffer length (in the
assembler’s .VAR directive).
• An ellipsis, … , indicates that the preceding item(s) may be repeated.
• The term ADSP-21xx is used generically to refer to one or all of the
ADSP-2100 Family processors.
• The term ADSP-2100 is used to denote both the ADSP-2100 and
ADSP-2100A.
• The acronyms DM, PM, and BM, are used in place of data memory,
program memory, and boot memory, respectively.
• Since the assembler’s .VAR directive is used for declaring both singleword data variables and multiple-word data buffers, the term data
buffer denotes both variables and buffers.
1 – 11
1 Overview & Installation
1.10
SOFTWARE INSTALLATION & RELEASE NOTES
Details of the software installation procedure may differ from release to
release; the release note shipped with each new version will provide these
details. You should always check the release note for new steps to be
followed when installing the software.
Installation instructions for the different host platforms are given in
separate release notes for each.
1.10.1
Files & Environment Variables
The installation procedure copies various subdirectories and files onto
your hard disk. The files are located in a default installation directory or in
a different directory you have chosen; see your release note for the name
of the default directory. You should find the following executable
program files installed:
Filename
Description
BLD21.EXE
ASM21.EXE
ASMPP.EXE
ASM2.EXE
LD21.EXE
LIB21.EXE
SPL21.EXE
HSPL21.EXE
System Builder
Assembler C Preprocessor
Assembler Preprocessor
Assembler
Linker
Librarian
PROM Splitter
HIP Splitter (for use with ADSP-2111 & ADSP-21msp50)
Future releases of this software may include different files. Consult your
release note for up-to-date information.
The following environment variables are created and assigned default
values by the install program:
Environment
Variable
Description
ADI_DSP
ADII
path to the directory containing the installed files
path(s) to INCLUDE directories, used with Assembler
This is the complete set of environment variables for the ADSP-21xx
Development Software including simulators and C compiler.
1 – 12
Overview & Installation 1
All five environment variables are created when you install any portion of
software. The environment variables are needed for proper operation of
the software.
Once the software is successfully installed you are ready to write code and
use the assembler tools.
1.10.2
Example Architecture & Source Code Files
A number of system programming examples are included with the
development software. These files are located in a directory named
\EXAMPLES which is installed at the top level of the installation
directory. The examples are provided to help you learn how to write
ADSP-21xx programs and use the assembler software.
The files are named according to an example number. Each example
includes a .SYS system architecture file, one or more .DSP assembly code
files, and a .BAT batch file. Executing the batch file will invoke the system
builder, assembler, and linker in order to create an .EXE executable
program file which can be loaded and run on an ADSP-21xx simulator.
1 – 13
1 Overview & Installation
1 – 14
System Builder
2.1
2
INTRODUCTION
The system builder is a software tool for describing your hardware
environment. Each ADSP-21xx system can have a unique hardware
configuration and may use different amounts of memory. The system
builder output specifies your hardware configuration, including memory
and parallel I/O ports, in a file format read by the linker and simulators.
The linker requires this information in order to allocate code and data
storage to the available memory space. The simulators must accurately
model your system architecture and the ADSP-21xx processor it is based
on.
The system builder may also be used to preset the memory map for an
ADSP-21xx emulator. See the section of this chapter called “Segment
Mapping For Emulator” for details.
Figure 2.1 shows the memory configurations available—the maximum
number of addressable words in each memory space—for each processor.
The system builder will only allow you to create system architecture
descriptions within these limits.
ADSP-2100
(all memory external)
Data Memory
(16-bit data)
Program Memory
(24-bit code, 16/24-bit data)
16K maximum
16K mixed code & data
or
32K (16K code, 16K data)
ADSP-2105
ADSP-2115
ADS
ADS
ADSP-
14.5K maximum
(.5K internal, 14K external )
15K m
(1K interna
15K maximum
(1K internal, 14K external )
16K m
(2K interna
8K maximum
(32K bytes organized
in 32-bit words)
16K m
(64K byte
in 32-b
Boot Memory
(24-bit code, 16/24-bit data,
padded to 32-bit word width)
Figure 2.1 ADSP-2100 Family Memory Configurations
2–1
2 System Builder
Each memory space is addressed separately. Addresses in program
memory are different from addresses in data memory. Boot memory
addresses are unique and are used only by the processor during booting.
(Note: Boot memory does not exist for the ADSP-2100.)
You must write a system specification source file as input to the system
builder; this file describes your target hardware. The system builder
directives described in this chapter are used to write the file.
The system builder processes the input file and generates an architecture
description file with the filename extension .ACH. The architecture
description file is interpreted by the linker in order to place relocatable
code and data fragments in memory. The file is also read by the simulator
to model the system memory configuration and by the emulator to set up
target system memory-mapping. The system builder outputs error
messages if any are detected, otherwise a summary of the architecture is
displayed on the screen. You should use operating system commands to
capture this output into a file if you need to refer to it for debugging or
documentation purposes.
System Specification
File [.SYS]
SYSTEM BUILDER
Architecture
Description
File (.ACH)
Error Messages
or
Architecture Summary
(Use operating system commands
to capture screen output)
Figure 2.2 System Builder I/O
2–2
System Builder 2
2.1.1
Memory-Mapped Control Registers
All ADSP-21xx processors except the ADSP-2100 have a set of memorymapped control registers which configure various modes of processor
operation. These registers are located in the reserved portion of internal
data memory on each chip. This memory space is the top 1K of internal
DM, addresses 0x3C00-0x3FFF.
You may not declare a memory segment in this space, and the control
registers cannot be defined in the system builder input file. Instead, each
register must be initialized in your assembly language programs by
writing a data word to the appropriate address. (Writes and reads to the
register locations are allowed even though this segment of memory cannot
be declared with the system builder’s .SEG directive.) The address and
format of each control register is given in Appendix E of this manual and
in the Control/Status Registers appendix of the ADSP-2100 Family User’s
Manual.
See the section “Setting the Memory-Mapped Control Registers” in
Chapter 3 for further information on this topic.
2.2
RUNNING THE SYSTEM BUILDER
To invoke the system builder from your operating system, type:
BLD21 filename[.ext] [-c]
where filename is your system specification source file. The filename may
have an extension; if none is present, the system builder appends the
default extension .SYS to the filename. The system builder will generate
an output architecture description file called filename.ACH, using the
filename of your input.
There is one optional command line switch for the system builder. The -c
switch makes the system builder case-sensitive, preserving your usage of
upper and lower-case characters. This option is provided primarily for
compatibility with the ADSP-2100 Family C Compiler, which is always
case-sensitive.
If the -c switch is not used, the system builder output is in all uppercase.
You must use this switch in order to preserve any lower-case characters
entered. This is necessary if the assembler is to be run with its casesensitive switch, as is required when assembling compiled C code. If you
2–3
2 System Builder
refer (in assembly language code) to a memory segment declared for the
system builder in lower-case, and the assembler is run in case-sensitive
mode, the segment name will not be recognized unless it’s case is
preserved by the system builder.
If you forget the syntax for invoking the system builder, type:
BLD21
-help
This will show you how the command must be entered. The -help switch
works with all of the development software tools.
2.3
SYMBOL USAGE & RESERVED KEYWORDS
In the system specification file you assign symbolic names to the target
system itself, to memory segments, and to memory-mapped I/O ports.
You can use the memory segment names in your program to assign code
and data fragments to that segment. The assignments are passed from the
assembler to linker, which determines the exact placement of your
program in memory.
All symbolic names must be unique. A symbolic name is a string of letters,
digits, and underscores with a letter or underscore as the first character. A
small group of symbols are reserved for use as keywords by the system
builder—you may not use these symbols in your system specification file.
Table 2.1 lists the system builder keywords.
ABS
ADSP2100
ADSP2101
ADSP2105
ADSP2111
ADSP2150
BOOT
CODE
CONST
DATA
DM
ENDSYS
MMAP0
MMAP1
PM
PORT
RAM
ROM
SEG
SYSTEM
Table 2.1 System Builder Keywords
Assembler keywords, listed in Chapter 3, are also reserved for use by the
development software. Please consult this list also before you choose
names for your system components. If you use a reserved keyword the
linker will generate errors when you attempt to link your program.
2–4
System Builder 2
2.4
SYSTEM SPECIFICATION FILE
The system specification source file specifies the amount of data and
program memory in your system. For those processors with boot memory,
the file also declares each page of boot memory which will be used.
Comment fields are enclosed within braces, { }, and may be placed
anywhere in the file. Nested comments are not allowed.
You can generate your file with any editor that produces plain text files.
Do not use a word processor which embeds special control codes.
2.4.1
ADSP-2100 Example File
Figure 2.3 is an example of a system specification source file for an
ADSP-2100 system. (The term “ADSP-2100” is used to denote both the
ADSP-2100 and ADSP-2100A processors.)
.SYSTEM fir_system;
.ADSP2100;
.SEG/PM/ROM/ABS=0/CODE prog_mem[4096];
.SEG/PM/RAM/ABS=4096/DATA coeff_table[15];
.SEG/DM/RAM/ABS=0/DATA delay_line[15];
.PORT/DM/ABS=16382 ad_sample;
.PORT/DM/ABS=16383 da_data;
.ENDSYS;
{system name}
{specifies processor}
{code storage}
{coefficients table}
{data storage}
{memory-mapped port}
{memory-mapped port}
Figure 2.3 ADSP-2100 System Specification File
The first directive in the file is the .SYSTEM directive. This directive
assigns the name fir_system to the architecture description and marks the
start of the file.
The .ADSP2100 statement identifies the processor type, here naming the
ADSP-2100 microprocessor. This statement is required.
The .SEG directives declare the system memory segments and their
characteristics. The memory segments can be declared in any order. In this
example three segments are declared.
The first, prog_mem, is a 4K-word segment which will store program code.
The coeff_table segment is 15-word block of program memory declared to
store data; the data will be a set of FIR filter coefficients. The third
segment, delay_line, is needed to store intermediate data of the filter
algorithm. This segment exists in ADSP-2100 data memory.
2–5
2 System Builder
The two .PORT directives declare memory-mapped I/O ports for system
input and output. The port names ad_sample and da_data suggest external
connections to analog-to-digital and digital-to-analog converters. The
ports are located at the data memory addresses given with the ABS
(absolute address) qualifier. The port names become program symbols
which can be used in code to read or write to the ports.
The last statement in a system specification file is the .ENDSYS directive.
The system builder stops processing when it encounters the .ENDSYS
directive.
2.4.2
ADSP-2101 Example File
Figure 2.4 is an example of a system specification source file for an
ADSP-2101 system.
The first directive in the file is the .SYSTEM directive. This directive
assigns the name fir_system to the architecture description and marks the
start of the file.
The .ADSP2101 statement identifies the processor type, here naming the
ADSP-2101 microcomputer. This statement is required.
The .MMAP0 directive specifies the state of the MMAP pin on the
ADSP-2101 device in this system. Defining MMAP as 0 indicates that boot
memory is to be loaded into the chip’s internal program memory,
beginning at address 0x0000.
The .SEG directive declares the system memory segments and their
characteristics. The memory segments can be declared in any order. In this
example, the segments declared comprise the full on-chip and off-chip
program and data memory configuration of the ADSP-2101.
.SYSTEM fir_system;
.ADSP2101;
.MMAP0;
.SEG/ROM/BOOT=0 boot_mem[2048];
.SEG/PM/RAM/ABS=0/CODE/DATA int_pm[2048];
.SEG/PM/RAM/ABS=2048/CODE/DATA ext_pm[14336];
.SEG/DM/RAM/ABS=0/DATA ext_dm[14336];
.SEG/DM/RAM/ABS=14336/DATA int_dm[1024];
.ENDSYS;
Figure 2.4 ADSP-2101 System Specification File
2–6
{system name}
{specifies processor}
{boot loading enable}
{boot page zero}
{internal program mem}
{external program mem}
{external data mem}
{internal data mem}
System Builder 2
(Note: Referring to program memory and data memory does not include
boot memory, which should be thought of as a unique memory space in
the system architecture.)
The boot_mem segment is a 2K-word segment for one page of boot
memory. If this system was based on the ADSP-2105 rather than
ADSP-2101, the boot page segment would be 1K (or less) in size.
The int_pm declaration identifies the 2K-word on-chip program memory
space starting at absolute address 0. In the ADSP-2101 (as well as
ADSP-2105, ADSP-2111, and ADSP-21msp50) this memory can store both
code and data and should be explicitly declared in this way. The following
statement line declares ext_pm as a 14K-word segment for off-chip
program memory, starting at address 2048, which may also store code
and data.
Next, ext_dm is declared as a 14K-word segment for off-chip data storage
starting at address 0 (in data memory, as opposed to address 0 in program
memory). The int_dm segment declares the 1K-word on-chip data memory
space starting at address 14336. The 1K of on-chip data memory above this
is reserved for memory-mapped control registers and may not be declared
as a segment.
The last statement in a system specification file is the .ENDSYS directive.
The system builder stops processing when it encounters the .ENDSYS
directive.
2.5
SYSTEM BUILDER DIRECTIVES
This section describes each system builder directive and its syntax. The
format of some directives requires arguments and qualifiers. Qualifiers
immediately follow the directive and are separated by slashes; arguments
follow the qualifiers. The general form of directives is:
.DIRECTIVE/qualifier/qualifier …
2.5.1
argument;
Naming Your System (.SYSTEM)
The .SYSTEM directive must be the first statement in the system
specification source file. You name your ADSP-21xx system with the
symbol given as an argument for this directive. The system name will be
displayed in the simulator.
2–7
2 System Builder
The .SYSTEM directive has the form:
.SYSTEM system_name;
The .ENDSYS directive must be the last statement in the file. System
builder processing terminates at the .ENDSYS directive.
The .ENDSYS directive has the form:
.ENDSYS;
2.5.2
Identifying The Processor (.ADSP21XX)
This directive identifies which ADSP-2100 Family processor is used in
your system. This information is passed to the linker and simulator via the
.ACH output file. The linker is then able to allocate code and data storage
according to the addressable memory limits of each processor. This
directive takes one of the following forms:
.ADSP2100;
.ADSP2101;
.ADSP2105;
.ADSP2111;
.ADSP2150;
.ADSP2151;
used for ADSP-2100 & ADSP-2100A
.ADSP2101MV;
.ADSP2101P;
used for ADSP-2101 memory-variant processor (e.g. ADSP-2115)
used for ADSP-2101 paged memory system
used for ADSP-21msp50 & ADSP-21msp55
used for ADSP-21msp51 & ADSP-21msp56
When the ADSP-21msp50 Simulator is invoked with an ADSP-21msp51
architecture file, the simulator automatically configures itself for the onchip memory map of the ADSP-21msp51. If an ADSP-21msp51
architecture file is used and the ROMENABLE bit is set to 1, the simulator
configures program memory locations PM[0x800] - PM[0x1000] as ROM.
The ROMENABLE bit is displayed in the simulator’s Control Registers
window.
2.5.3
MMAP Pin (.MMAP)
This directive is used only for the ADSP-2100 Family processors which
have on-chip memory, boot memory, and an MMAP pin (i.e. all except the
ADSP-2100). The directive specifies the logic state of the processor’s
MMAP pin in the target system.
2–8
System Builder 2
This directive takes one of two forms:
.MMAP0
.MMAP1
MMAP pin held low
MMAP pin held high
If .MMAP0 is used, boot loading takes place at reset and on-chip program
memory starts at address 0x0000. If .MMAP1 is used, boot loading is
disabled and on-chip program memory is mapped to the top (highest
addresses) of program memory space.
When this directive is omitted, the simulator default is MMAP=1.
2.5.4
Memory Segment Declarations (.SEG)
The .SEG directive defines a specific section of system memory and
describes its attributes. There is no default memory map—you must
define all system memory with .SEG directives. This information is passed
to the linker, simulator, and emulator via the .ACH output file.
The .SEG directive has the form:
.SEG/qualifier/qualifier …
seg_name[length];
The segment is assigned the symbolic name seg_name. Assigning a name
to the segment allows you to explicitly place code and data fragments in
it. This is accomplished in assembly language with the assembler’s SEG
qualifier.
You must specify the segment length inside brackets. This value is
interpreted as the number of words (either 16-bit data or 24-bit
instructions) in the segment.
Data memory segment size in bytes is 2x the word count while program
memory segment size in bytes is 3x the word count. Boot memory
segment size in bytes is 4x the word count, due the padding of boot
memory with an extra byte per word in order to place the beginning of
each word on an even byte boundary (see Chapter 5, PROM Splitter, for
further details).
The following two qualifiers are required for the .SEG directive:
PM or DM or BOOT=0-7
RAM or ROM
memory space
memory type
2–9
2 System Builder
Four others are optional:
ABS=address
DATA or CODE or DATA/CODE
EMULATOR or TARGET
INTERNAL
absolute start address
what is stored in segment
preset emulator memory map
located in on-chip memory of ADSP2101 memory-variant processor
The PM/DM/BOOT qualifier indicates which memory space the segment
is in: program memory, data memory, or boot memory. (Remember that
boot memory space does not exist for the ADSP-2100.) The remaining
qualifiers specify the memory type, the starting address of the segment,
what is stored (DATA and/or CODE), and how the emulator’s memory
map is preset.
If you are using one of the ADSP-21xx emulators, see “Segment Mapping
For Emulator” below.
Each memory space is addressed separately: address 16 in program
memory is different from address 16 in data memory.
PM memory segments can store CODE only, DATA only, or both CODE
and DATA. If you give neither of these qualifiers the default is to CODE.
For a PM segment to contain code and data, both qualifiers must be used.
The ADSP-21xx processors require that any data transfers to or from
program memory must be made with segments which have the DATA
attribute. If your system requires that executable code be written or read
by the processor, the segments to be accessed should be declared with
both the CODE and DATA qualifiers.
DM memory segments must be DATA only; this is the default if the
DATA qualifier is omitted. An error is generated if a DM segment is
assigned the CODE attribute.
BOOT memory segments default to both CODE and DATA since boot
memory will store both in most systems, and the qualifiers may be
omitted. The BOOT qualifier must specify one page number only: for
example, BOOT=0. You must have a separate segment declaration for each
boot page of your system.
2 – 10
System Builder 2
A system may have up to 8 boot pages, with page numbers from 0 to 7.
Each ADSP-2101, ADSP-2111, and ADSP-21msp50 boot page can store up
to 2K words of code and data. Each ADSP-2105 and ADSP-2115 boot page
stores up to 1K words. Do not use the ABS qualifier for boot pages—the
system builder assigns appropriate boundary addresses.
2.5.4.1 .SEG Directive Examples
The example
.SEG/PM/RAM/ABS=0/CODE/DATA
restart[2048];
declares a program memory RAM segment called restart which is located
at address 0. The segment may hold 2048 words of code and data.
The example
.SEG/ROM/BOOT=0
boot_mem[1536];
declares the boot memory segment boot_mem which is located on boot
page 0 (automatically corresponding to address 0 in boot memory). The
length of the segment is 1536 words. Boot memory segments should
always be ROM.
2.5.4.2 Segment Mapping For Emulator
The system builder allows you to preset the memory map for an
ADSP-21xx emulator via the .ACH file. Two optional qualifiers of the
.SEG directive are used for this purpose:
/EMULATOR
maps segment to emulator overlay memory
or
/TARGET
maps segment to target board memory
These settings will configure the emulator’s memory map when the
emulator program is invoked. The segments must be mapped in blocks of
1K or larger. Once the emulator is running you can change the memory
map with emulator commands.
If you are using the emulator in standalone mode (i.e. without a target
board), you must map all memory segments to EMULATOR. You may
also want to map all segments to EMULATOR during the initial stages of
hardware/firmware integration. Consult your ADSP-21xx Emulator
Manual for further information.
2 – 11
2 System Builder
2.5.5
Memory-Mapped I/O Ports (.PORT)
The .PORT directive declares a memory-mapped I/O port. You must
assign a unique name and address to each port in your system. Ports can
be located in either data or program memory. For those processors with
internal memory, ports may be assigned addresses in external memory
only.
The .PORT directive takes one of two forms:
.PORT/DM/ABS=address
port_name;
or
.PORT/PM/ABS=address
port_name;
The DM qualifier indicates that the port is located in data memory; PM
indicates placement in program memory. If neither qualifier is used, the
default is to DM. The port is located at the absolute address you specify
(with the ABS qualifier), and is assigned the symbol port_name. This
symbol can be used in assembly language instructions to access the port.
For example,
.PORT/DM/ABS=0x0400
ad_sample;
declares a port named ad_sample which is located at data memory address
1024 (decimal). Assembly code references to this symbol are interpreted
by the linker based on the contents of the .ACH file.
Data memory-mapped ports allow 16-bit read/writes while program
memory-mapped ports allow either 16 or 24-bit transfers. (Refer to the
ADSP-2100 Family User’s Manual for a description of 24-bit data transfers
in program memory.)
2.5.6
System Builder Constants (.CONST)
The .CONST directive defines system builder constants. Once you declare
a symbolic constant you may use it in place of the actual number. This
symbol definition is recognized only by the system builder, however—it is
not carried over to the assembler or simulator.
The .CONST directive has the form:
.CONST constant_name = constant or expression, … ;
2 – 12
System Builder 2
Only an arithmetic or logical operation on two or more integer constants
may be given as an expression; symbols are not allowed. See “Assembler
Expressions” in Chapter 1 for an exact definition of allowed expressions.
A single .CONST directive may contain one or more constant declarations,
separated by commas, on a single line. A list of multiple declarations may
not be continued on the following line.
To equate the symbol taps to 15, for example, you would give the .CONST
directive as follows:
.CONST taps=15;
2.6
PROCESSOR-SPECIFIC CONSIDERATIONS
Due to several unique characteristics of the ADSP-2100, ADSP-2105, and
ADSP-2115, the following guidelines should be kept in mind when
writing system specification files for these processors.
2.6.1
ADSP-2100 Systems
Two different program memory configurations are possible for the
ADSP-2100:
• 16K words of mixed code and data
or
• 32K words—16K of code only, 16K of data only
The 32K extended configuration requires the use of the processor’s PMDA
output as an additional (high-order) address line for program memory. If
this configuration is employed, the lower 16K must be code-only. PM
segments declared in this region must have the CODE qualifier only. The
upper 16K space must be data-only. PM segments declared in this region
must have the DATA qualifier only.
If your ADSP-2100 system includes the 32K extended program memory
space, the system builder will generate an error message if you attempt to
declare a PM segment with both the CODE and DATA qualifiers.
2 – 13
2 System Builder
2.6.2
ADSP-2105 & ADSP-2115 Systems
Since the ADSP-2105 and ADSP-2115 has half the internal memory of the
ADSP-2101, the internal memory space which may be declared is limited
by the system builder. You may not declare memory segments in any
portion of the following address ranges:
Internal DM addresses
Internal PM addresses (MMAP=0)
Internal PM addresses (MMAP=1)
14848-15359 (0x3A00-0x3BFF)
1024-2047 (0x0400-0x07FF)
15360-16383 (0x3C00-0x3FFF)
These ranges correspond to the ADSP-2101’s upper 1K of internal PM and
upper 1⁄2K of internal DM, which are not present in the ADSP-2105/ADSP2115. Since the linker extracts information from the .ACH file generated by
the system builder, it will not allocate any code or data to these memory
ranges.
The ADSP-2101 simulator is used for simulation of ADSP-2105 and ADSP2115 systems. When you invoke this simulator with an ADSP-2105
architecture file or ADSP-2115 (.ADSP2101MV memory variant)
architecture file it configures itself for the different amount of on-chip
memory. The portions of on-chip memory of the ADSP-2101 which do not
exist in these processors will be displayed as non-existent.
2.6.2.1 Generating 1K Boot Pages
Since the ADSP-2105 and ADSP-2115 have 1K-size boot pages, your boot
page declarations should specify segment sizes of 1024 or less. For
example:
.SEG/BOOT=0/ROM
page_0[1024];
When you later use the PROM splitter to prepare burn files for the boot
PROM devices, you must use the PROM splitter’s -bs switch to generate
1K-size pages. (See Chapter 5, PROM Splitter, for details.)
2.6.2.2 2105/2115 To 2101 Upgrade
The ADSP-2105 and ADSP-2115 are pin-compatible with the ADSP-2101,
providing a direct upgrade option for your system. A few details
concerning the upgrade should be kept in mind when designing the
ADSP-2105/ADSP-2115 system.
2 – 14
System Builder 2
You will be able to upgrade without hardware modifications if you
initially design your hardware and firmware to use 2K-size boot pages
(which store only 1024 words). To do this you should declare 2048-word
boot page segments, such as:
.SEG/BOOT=0/ROM
page_0[2048];
Since your ADSP-2105/ADSP-2115 program must be booted in 1K pages,
boot memory for the system will (at first) have an unused 1K of memory
between each page of ADSP-2105 code/data. The processor will correctly
boot each 1K page of the program, however, ignoring the blank segments
in between.
In other words, the 2K-size boot pages will have code/data only in the
lower half of each page (word addresses 0-1023)—the upper half will be
blank. When you upgrade the system to the ADSP-2101, you can then use
the PROM splitter to generate full-size 2K boot pages for your program.
2.7
ADSP-2101 MEMORY-VARIANT PROCESSORS
Memory-variant processors such as the ADSP-2115 are ADSP-2101
derivatives that contain varying on-chip memory configurations. The data
sheet for each of these devices specifies its memory configuration. To
support simulation of ADSP-2101 memory variants, the development
software lets you easily configure the system architecture file and
simulator for the specific memory-variant processor you are using.
Systems based on a memory-variant processor may be defined with any
amount of program memory (PM) from 0 - 16K words and with any
amount of data memory (DM) from 0 - 15K words. Portions of PM and
DM memory space may be freely defined as either ROM and/or as
INTERNAL (i.e. on-chip). You make these definitions in the .SYS system
architecture file you write. After the system builder processes your .SYS
file, the .ACH file created is read by the linker and ADSP-2101 Simulator.
Here are the steps to follow for simulating an ADSP-2101 memory-variant
processor:
1. Use the following system builder directive in your .SYS system
builder input file:
.ADSP2101MV
2 – 15
2 System Builder
2. For any of your memory segments located in the memory-variant
processor’s on-chip memory, use the /INTERNAL qualifier on the
corresponding .SEG directive (in your .SYS file).
3. For any of your memory segments which are ROM, use the /ROM
qualifier on the corresponding .SEG directive.
4. Assemble, link, and simulate your program in the usual fashion. The
linker and ADSP-2101 Simulator will read the .ACH architecture file
generated by the system builder, defining internal and/or ROM
memory segments accordingly.
2.8
DESIGNING PAGED MEMORY SYSTEMS
The development software lets you design ADSP-2101 systems that
address a larger external memory space by implementing a paged data
memory scheme. Only data memory may be extended in this way, not
program memory.
Figure 2.5 shows an example of this type of system, with the data memory
of the ADSP-2101 extended with three additional pages. Page 0 is the
standard 16K data memory space of the ADSP-2101. In a paged memory
system, page 0 is divided into data space, I/O space, and on-chip data
memory (addresses 0x3800 - 0x3FFF).
The value of PAGESIZE, which you must specify in the system builder,
determines the boundary between the data space and I/O space. The value
of DMIOEND, which you must also specify and which cannot be larger
than 0x37FF, is the last address of I/O space. The I/O space will contain
memory-mapped I/O ports as well as a special memory-mapped location:
the DM page register.
The code modules, data buffers, and data variables that you store in paged
memory must be confined to their own page, and may not cross page
boundaries.
2.8.1
System Builder Features For Paged Memory
You must use the .ADSP2101P directive to generate a .ACH architecture
file for a paged memory system. To create 4K-size pages, for example, you
would use the following directive statement in your .SYS input file:
.ADSP2101P/PAGESIZE=4096;
system,}
2 – 16
{Paged memory
{ 4K pagesize}
System Builder 2
DM Page Register
DM Page Register
0x0000
0x0000
User-Definable
Page Size
DMPGREG
On-Chip
Data Memory
0x0000
0x0003
0x0000
data space
PAGESIZE
PAGESIZE
DM Page Register
0x0002
data space
data space
I/O space
DM Page Register
0x0001
0x0000
data space
PAGESIZE
PAGESIZE
DM Page Register
DMIOEND
0x3800
1K Internal DM RAM
Memory-Mapped
Control/Status Registers
0x3C00
0x3FFF
Figure 2.5 ADSP-2101 Paged Data Memory System
The PAGESIZE qualifier defines the number of data space words in each
memory page. Default page size is 8192 if the PAGESIZE qualifier is
omitted.
You must also use the system builder to define a DM page register for
your system. The page register is used to address different pages. In the
example of Figure 2.5, the DM page register numbers the data memory
pages from 0 to 3.
The DM page register must be defined as a memory-mapped location with
the .PORT directive, and must be named DMPGREG. To locate the DM
page register at address 8192 (0x2000) in data memory, for example, the
following statement would be used:
.PORT/DM/ABS=0x2000
DMPGREG;
{DM page register}
The DM page register must be implemented as a memory-mapped
register in your system hardware. The register’s outputs should be used as
the upper address lines for all data memory; these lines will select
between the different pages. Figure 2.6 shows an example hardware
configuration which implements 16 pages of DM, each with 8K words of
16-bit data storage.
2 – 17
2 System Builder
WR
RD
DMS
8-Bit Latch
x374
Decoded Write Line
DATA
D13
D0
Q0
D12
D11
D1
D2
Q1
Q2
D10
D9
D8
D3
D4
D5
Q3
Q4
Q5
ADSP-2101
RD
WR
128K x 8
SRAM
RD
WR
128K x 8
SRAM
ADDRESS
Figure 2.6 128K Paged Data Memory System
2.8.2
Using Segment Names For Pages
A special syntax of the /ABS qualifier (of system builder’s .SEG directive)
lets you define and name a memory segment which is located on a specific
page of data memory. The format of this directive is:
.SEG/qualifiers/ABS=pg#:addr
seg_name[seg_length];
This syntax specifies the page number and starting address (in decimal
format, from 0 to 16,383) of the segment. The DM, RAM/ROM, and
DATA qualifiers must also be given.
For example, to define segment names for the data memory pages shown
in Figure 2.5, the following directives would be used:
.SEG/DM/RAM/DATA/ABS=0:0
.SEG/DM/RAM/DATA/ABS=1:0
.SEG/DM/RAM/DATA/ABS=2:0
.SEG/DM/RAM/DATA/ABS=3:0
2 – 18
page0[4096];
page1[4096];
page2[4096];
page3[4096];
System Builder 2
Your C source and/or assembly source modules can now be placed in one
of these page-specific segments by using the assembler’s /SEG qualifier or
the C compiler’s -DMSEG switch.
2.8.3
Assembler Features For Paged Memory
The assembler recognizes a special directive that designates paged
memory systems. This directive, .PAGE, must be used in all assembly
source modules that are part of the paged memory system:
.PAGE;
A new assembler operator, PAGE buffer_name, can be used to extract the
page number (upper address bits) of a data buffer/data variable:
AX0=PAGE array0;
{Get page number of array0}
This instruction determines the page number of the buffer array0 and
loads it into AX0. Note that the PAGE operator works like the assembler’s
address pointer (^) and length of (%) operators.
2.8.4
C Compiler Features For Paged Memory
The C compiler has several invocation switches that support paged
memory systems. When compiling code for a paged memory system, use
the -FARDATA switch:
CC21 sourcefile.c -FARDATA
The -FARDATA switch tells the compiler that the data variables and
arrays in sourcefile.c will be used in a paged memory system, and that page
addressing information (i.e. high-order address bits) is to be generated for
these variables/arrays. For the variables and arrays located in DM, the
compiler generates code that uses the page number contained in the DM
page register (DMPGREG, previously defined in the system builder).
If you use the -FARDATA switch to store data in paged memory, you
must define segment names into which your data is placed by the
compiler. The -FARDATA switch instructs the compiler to locate all DM
data from sourcefile.c in a default DM segment named DDEFAULT . You
must define the DDEFAULT segment in the system builder before
compiling and linking. For the example system shown in Figure 2.5,
page 0 could be defined as the DDEFAULT segment with the following
system builder statement:
.SEG/DM/RAM/DATA/ABS=0:0
DDEFAULT[4096];
2 – 19
2 System Builder
The compiler’s -DMSEG switch can be used to override default placement.
For example, to locate the DM data from src1.c in a memory segment
named table3 (instead of DDEFAULT ), the compiler would be invoked
with this command line:
cc21 src1.c
-fardata -dmseg table3
The -FARDATA switch has several other effects on the compiled code and
on the C runtime environment:
1. The runtime stack will be located in the ADSP-2101’s internal
memory. Default placement is in DM, unless the compiler’s
-pmstack switch is used.
2. The compiler assigns a single page of data memory to each
compiled function. When the function is executed, it will only
be able to access DM-resident data on that page.
3. Some of the functions of the Runtime C Library use a small
amount of memory—this memory will be located the ADSP2101’s internal memory.
2.8.5
Using Paged Addresses In Simulator
When simulating a system with paged memory, you can specify memory
addresses with page information while working in the ADSP-2101
Simulator. The syntax for paged memory addresses includes the page
number and address (in decimal format, from 0 to 16,383):
syntax
DM(pg#:addr)
2 – 20
example
dm(0:8193)
Assembler
3.1
3
INTRODUCTION
The ADSP-2100 Family Assembler translates your assembly language
code into object code. A unit of assembly language code is called a
module; the modules you input to the assembler are called source
modules. Each source module must be contained in a separate file.
Separately-assembled modules are linked together to form a single
executable program.
Your source code is written in ADSP-21xx assembly language or
generated by the ADSP-2100 Family C Compiler. Assembler directives are
used to define data variables, data buffers, and macros. You can create
source code files with any editor that produces plain text files. Do not use
a word processor which embeds special control codes.
Various programming techniques are explained throughout this chapter.
Additional information and program examples can be found in the “Using
Library Files Of Your Routines” and “Multiple Boot Page Systems”
sections of Chapter 4.
Figure 3.1, on the following page, shows the assembler input and output
files. The assembler reads the input file and generates four types of output
files: an object file (.OBJ), a code file (.CDE), a list file (.LST), and
initialization file(s) (.INT). The object file, code file and initialization files
are passed to the linker. The object file contains information about
memory allocation and symbol definitions. Memory allocation is the
process in which the linker decides where to store your program’s code
and data fragments. The code file contains ADSP-21xx instruction opcodes
with unresolved symbols marked. Initialization files contain data for
initializing data buffers. The list file, which is optional, gives you
information to help understand and document the assembly process.
(Note: Since the assembler’s .VAR directive is used for declaring both
single-word data variables and multiple-word data buffers, the term “data
buffer” is used to denote both variables and buffers.)
3–1
3 Assembler
Assembly Language
Source Code File
[.DSP]
INCLUDE File(s)
ASSEMBLER
List File
(.LST)
Initialization Data File
(.INT)
Object File
(.OBJ)
Code File
(.CDE)
Figure 3.1 Assembler I/O
3–2
Assembler 3
3.2
ASSEMBLER PREPROCESSORS
The assembler has three executable components:
• C language preprocessor
• assembler preprocessor
• core assembler
The two preprocessors of the assembler are an ANSI-standard C language
preprocessor and an assembler preprocessor. The C preprocessor handles
C directives such as #define and #include. The assembler preprocessor
handles ADSP-21xx assembler directives such as .MODULE and .VAR.
Figure 3.2, on the following page, shows the flow of assembler execution.
The assembler’s C preprocessor allows the use of C preprocessor
directives such as #include in assembly code. The C preprocessor handles
these directives in the same way as a compiler’s preprocessor would. See
Section 3.5, “Using The C Preprocessor” for examples of how to use this
feature.
Note that the C preprocessor cannot accept assembler-style comments
enclosed in brackets, { }. To place a comment on the same line as a C
preprocessor directive (beginning with the “#” character), use the C
convention for comments:
#directive
3.3
/* comment */
RUNNING THE ASSEMBLER
To invoke the assembler from your operating system, enter:
ASM21 filename[.ext] [-switch …]
Filename is the input file, which must contain only one source code
module. The filename may have any extension; if none is present, the
assembler appends the default extension .DSP to the filename.
The optional invocation switches control various aspects of assembler
execution. They may be entered in either upper or lower-case. Multiple
switches must be separated by at least one space.
3–3
3 Assembler
“ASM21”
C Preprocessor
Assembler Preprocessor
Core Assembler
.CDE File
.OBJ File
.INT File
.LST File
Figure 3.2 Assembler Execution Flow
3–4
Assembler 3
If you forget the syntax for invoking the assembler, type:
asm21 -help
This will show you how the command must be entered and will display a
list of the available switches. The -help switch works with all of the
development software tools.
If you are assembling source code generated by the ADSP-21xx C
Compiler, the assembler must be invoked with its -c and -s switches. Since
the compiler and the C environment are normally case-sensitive while the
assembler is not, the -c switch must be used to make the assembler casesensitive also. The -s switch should be given because the compiler may
generate multifunction instructions which are not in the conventional,
logical sequence. These instructions will, however, assemble and execute
correctly. Consult the ADSP-2100 Family C Tools Manual & ADSP-2100
Family C Runtime Library Manual for further information.
3.3.1 Assembler Switch Options
The assembler switches are listed below in Table 3.1; some require
arguments as shown.
Switch
-c
-didentifier[=literal]
-i [depth]
-l
-m [depth]
-o filename
-s
-2159
-2171
-2181
Effect
Make assembler case-sensitive
Define identifier for C preprocessor
Show contents of INCLUDE files in .LST file
.LST list file generated
Macros expanded in .LST file
Rename output files
No semantics checking on multifunction
instructions
Assembles instructions unique to
ADSP-21msp5x processors
Assembles instructions unique to ADSP-217x
processors
Assembles instructions unique to ADSP-2181
processor
Table 3.1 Assembler Switches
3–5
3 Assembler
3.3.2
Case-Sensitivity (-c)
The -c switch causes the assembler to be case-sensitive, primarily for
compatibility with code compiled by the ADSP-2100 Family C Compiler.
The C language is a case-sensitive environment. If the -c switch is not
given, the assembler will not differentiate between upper and lower-case
characters and all symbols will be output in upper-case. You must use this
switch in order to preserve any lower-case characters entered.
If you are assembling source code produced by the compiler, you should
use the -c switch when invoking the assembler. (Normally the compiler
itself invokes the assembler, using the -c switch in the call.)
3.3.3
Define An Identifier (-d)
The -d switch defines a C-style identifier for the assembler’s C
preprocessor in the same way as the #define directive. The switch is given
in the following manner:
-didentifier[=literal]
The identifier is a string of characters and digits, as specified by the C
standard. This specification is the same as that for an ADSP-21xx assembly
language symbol. The identifier may be set equal to a C literal—either a
constant or string literal.
Here are some examples of the -d switch:
-Djunk
-dten=10
-dname=”Jake”
One way to use the -d switch is shown in the following assembly code:
CNTR=n;
DO this_loop UNTIL CE;
...
...
this_loop: ...
{last instruction of loop}
Now you can choose a value for the loop counter n when you invoke the
assembler. Assume that this_loop is in your input file named source_file:
asm21 source_file
-dn=100
See the section “Using The C Preprocessor” for an example of using the -d
switch to implement conditional assembly.
3–6
Assembler 3
3.3.4
Expand INCLUDE Files In List File (-i)
The -i [depth] switch causes the contents of files named with the
assembler’s .INCLUDE directive to be shown in the .LST output file.
Specifying a value for [depth] determines the depth of nested INCLUDE
files to be shown. If depth is not specified, then all nested files are
expanded. Here are two examples of the -i switch:
-i
-i 3
If the -i switch is not used, these directives remain in the form “.INCLUDE
filename.” See the “Including Other Source Files” section of this chapter for
further information.
3.3.5
Generate Listing File (-l)
The assembler produces a list file (.LST) if the -l switch is given. This file
provides address and opcode information to help you interpret the
assembly results. The format of the .LST file is described in “List File
Format” at the end of this chapter.
3.3.6
Expand Macros In List File (-m)
The -m [depth] switch causes the assembler to expand your macros in the
.LST file. This means that the complete set of instructions executed by the
macro will be shown. Specifying a value for [depth] determines the depth
of nested macro calls to be expanded. If depth is not specified, then all
nested macro calls are expanded. Here are two examples of the -m switch:
-m
-m 2
If the -m switch is not used, these directives retain the form of their singleline invocation (e.g. “macroname”). See the “Macros” section of this chapter
for further information.
3.3.7
Renaming Output Files (-o)
The -o switch can be used to rename the assembler’s output files (.OBJ,
.CDE, .INT, .LST). For example, if your input file is named source1.dsp
and you want to rename the output files src1.obj , src1.cde ,
src1.int , and src1.lst , invoke the assembler in this way:
asm21 source1 -o src1
3–7
3 Assembler
3.3.8
Disable Semantics Checking (-s)
Giving the -s switch prevents the assembler from checking the semantics
(conventional ordering) of multifunction instructions in your code.
ADSP-21xx multifunction instructions may have multiple clauses which
have a logical left-to-right ordering. The clauses may, however, be listed in
a different order and still assembled correctly. If this happens the
assembler normally generates a warning message for you; the -s switch
switch inhibits these warnings.
As long as the individual clauses of a multifunction instruction are legal,
the proper opcode will be generated regardless of the order in which they
are given. The assembler’s warning messages are only intended to point
out instructions which may appear confusing or misleading.
3.4
ASSEMBLY LANGUAGE CONVENTIONS
This section describes language conventions specific to the assembler. See
Chapter 1 for a complete discussion of conventions including numeric
bases, character set, symbols, and manual notation.
3.4.1
Symbols & Keywords
Symbols and keywords are character strings. A symbol is a string which
you define in assembly language; the symbol can be a module name, data
variable, data buffer, program label, I/O port, macro, or constant. A
symbol may be a maximum of 32 characters long and may not start with a
digit (“0”-“9”). Here are some examples of typical symbols and what they
might name:
main_prog
xoperand
input_array
subroutine1
AD_INPUT
assembly language program module
data variable
data buffer
program label
memory-mapped port
Symbols may be entered in any combination of upper and lower-case
characters, but the assembler will convert all characters to upper-case if
the -c switch is not used. Examples of symbols and filenames are shown in
italics throughout this manual.
3–8
Assembler 3
The same symbol may be declared and separately used in different source
code modules. Symbols are recognized only within the scope of the local
module—unless they are declared as GLOBAL or ENTRY. This type of
symbol can be referenced by all modules and must originate in one
module only. See the descriptions of the assembler’s .GLOBAL, .ENTRY,
and .EXTERNAL directives later in this chapter.
Table 3.2 lists the reserved assembler keywords. You may not use a
keyword as a symbol in your code. Because the assembler is caseinsensitive by default, both the upper and lower-case versions of
keywords are reserved. Keywords are shown in UPPERCASE throughout
this manual.
ABS
AC
AF
ALT_REG
AND
AR
AR_SAT
ASHIFT
ASTAT
AUX
AV
AV_LATCH
AX0
AX1
AY0
AY1
BIT_REV
BM
BY
C
CACHE
CALL
CE
CIRC
CLR
CLEAR
CNTR
CONST
DIS
DIVS
DIVQ
DM
DO
EMODE
ENA
ENDMACRO
ENDMOD
ENTRY
EQ
EXP
EXPADJ
EXTERNAL
FOREVER
FLAG_IN
FLAG_OUT
GE
GLOBAL
GT
I0
I1
I2
I3
I4
I5
I6
I7
ICTRL
IDLE
IF
IFC
IMASK
INCLUDE
INIT
JUMP
L0
L1
L2
L3
L4
L5
L6
L7
LE
LOCAL
LOOP
LSHIFT
LT
M0
M1
M2
M3
M4
M5
M6
M7
MACRO
MF
M_MODE
GO_MODE
MODIFY
MODULE
MR
Table 3.2 Assembler-Reserved Keywords
MR0
MR1
MR2
MSTAT
MV
MX0
MX1
MY0
MY1
NAME
NE
NEG
NEWPAGE
NOP
NORM
NOT
OR
PASS
PC
PM
POP
PORT
POS
PUSH
RAM
REGBANK
RESET
RND
ROM
RTI
RTS
RX0
RX1
SAT
SB
SEG
SEGMENT
SET
SHIFT
SI
SR
SR0
SR1
SS
SSTAT
STATIC
STS
SU
TEST
TIMER
TOGGLE
TOPPCSTACK
TRAP
TRUE
TX1
TX0
UNTIL
US
UU
VAR
XOR
3–9
3 Assembler
3.4.2
Assembler Expressions
The ADSP-2100 Family Assembler can evaluate simple expressions in
source code. An expression may be used wherever a numerical value is
expected.
Two kinds of expressions are allowed:
• an arithmetic or logical operation on two or more integer constants
examples:
29 + 129
(128 - 48) * 3
0x55 & 0x0F
• a symbol plus or minus an integer constant
examples:
data - 8
data_buffer + 15
startup + 2
The symbols are either data variables, data buffers, or program labels. All
of these symbols actually represent address values which are determined
by the linker. Adding or subtracting a constant specifies an offset from the
address.
(Note: Since the assembler’s .VAR directive is used for declaring both
single-word data variables and multiple-word data buffers, the term “data
buffer” is used to denote both variables and buffers.)
Simple arithmetic or logical expressions can be used to declare symbolic
constants with the .CONST directive of the system builder and assembler.
These expressions may use the following operators, which are a subset of
the operators recognized in the C language environment (listed in order of
precedence):
( )
~ */ %
+ << >>
&
|
^
3 – 10
left, right parenthesis
ones complement, unary minus
multiply, divide, modulus
addition, subtraction
bitwise shifts
bitwise AND
bitwise OR
bitwise XOR
Assembler 3
Expressions may also be used when entering commands in one of the
ADSP-2100 Family Simulators. The simulators recognize an additional set
of expression elements and operators.
The most important difference between assembler expressions and
simulator expressions is that memory contents (such as data variables)
and processor register contents may be used as operands in the simulator
only. The assembler cannot evaluate memory and register values at
assembly-time; the simulator, however, has access to the instantaneous
values of simulated memory and registers.
3.4.3
Buffer Address & Length Operators
Two special operators are recognized by the assembler. The address
pointer (^) and length of (%) operators are used with data buffer names:
^buffer_name is evaluated as the base (first) address of the buffer
%buffer_name is evaluated as the length (number of words) of the buffer
The ^ operator can also be used with variables, which are simply singlelocation buffers:
^variable_name gives the address of the variable
Simple expressions may be created by adding or subtracting a constant
from the operator term:
^buffer_name ± constant
%buffer_name ± constant
For example:
^array + 3
%array - 10
3 – 11
3 Assembler
The assembler operators are used to load L (length) and I (index) registers
when setting up circular buffers:
.VAR/DM/RAM/CIRC real_data[n]; {n=number of }
{input samples}
I5=^real_data;
{buffer base address}
L5=%real_data;
{buffer length}
M4=1;
{post-modify I5 by 1}
CNTR=%real_data;
{loop counter=buffer length}
DO loop UNTIL CE;
AX0=DM(I5,M4);
{get next sample}
…
{now process sample stored in AX0}
loop:
…
This code fragment initializes I5 and L5 to the base address and length,
respectively, of the circular buffer real_data. The buffer length value
contained in L5 determines when addressing wraps around to the top of
the buffer. Further information on circular buffers can be found in the
“Data Variables & Buffers” section of this chapter and in the Data Transfer
chapter of the ADSP-2100 Family User’s Manual.
3.4.4
Comments
You may insert comments anywhere in a source code file, enclosed by
braces, { }, except on C preprocessor directive lines. Nested comments
are not allowed.
Multiple-line comments enclosed by a single pair of braces may not have a
pound sign (“#”) at the beginning of any line.
Assembler directives may only have one-line comments—the comment
cannot be continued on the following line. If you need more space to
continue a comment, begin a new comment field on the next line.
Note that the C preprocessor cannot accept assembler-style comments
enclosed by braces. To place a comment on the same line as a C
preprocessor directive (beginning with the “#” character), use the C
convention:
#directive
3 – 12
/* comment */
Assembler 3
3.5
USING THE C PREPROCESSOR
The ADSP-21xx assembler includes a C preprocessor which allows you to
use directives such as #define, #ifdef, #include, etc. in your assembly
language code. The preprocessor handles these directives as well as any
related code (e.g. expansion of macros created with the #define directive).
The C preprocessor directives which can be used are as follows:
Directive
#include
#define
#undef
#if
#ifdef
#ifndef
#else
#endif
Meaning
Insert text from another source file
Define a macro
Remove a macro definition
Conditionally include text, depending on the value of
an expression that evaluates to a constant
Conditionally include text, depending on whether a
macro name is defined
Conditionally include text, with the logic of the
test opposite that of #ifdef
Include text if the previous #if , #ifdef , or #ifndef
test failed
Terminate conditional text
These directives allow various programming techniques. For example,
you can implement conditional assembly or define macros by using the C
preprocessor directives #ifdef and #define . An example of each of
these is given below.
3.5.1
Example: Conditional Assembly
The assembler’s -d switch is intended for use in conjunction with the C
preprocessor. This switch allows you to define a C-style identifier for the
preprocessor, just as the #define directive does. A common use of this
capability is to implement conditional assembly, as shown in the
following example.
If a portion of assembly code is written only for debugging, it can be
included in a module of your main program and conditionally assembled
when desired. To allow this, the debug code should be placed inside an
#ifdef block which is evaluated by the C preprocessor.
3 – 13
3 Assembler
Take the following block of code, for example:
#ifdef debug
/* assemble if debug is defined */
...
... debug assembly code
...
#endif
If debug is defined with the -d switch, the C preprocessor will delete the
#ifdef and #endif directives, leaving the debug code in place for the
assembler; the debug code will be assembled into the program module. If
debug is not defined, then the C preprocessor will delete the entire block
prior to assembly.
In order to preserve and assemble the debug code, the assembler would be
invoked in this way:
asm21 source_file
3.5.2
-ddebug
Example: C-Style Macros
While the assembler’s .MACRO directive allows you to create macros in
your source code (see “Defining Macros” later in this chapter), the C
preprocessor can also be employed to define macros. This is accomplished
with the #define preprocessor directive, in exactly the same way as in C.
Here is a simple example:
#define mac MR=MR+MX0*MY0(RND)
AR=AX1-AY1;
MY0=AR;
MX0=DM(I1,M0);
mac;
In this case the macro mac is defined as an ADSP-21xx multiplyaccumulate instruction. The macro is replaced by this instruction
everywhere it appears in your source code. Notice that the #define
directive line does not require a terminating semicolon but the macro
invocation does.
A macro invocation may not contain additional program statements (i.e.
instructions, preprocessor directives, or other macro invocations) on the
same line of source code.
3 – 14
Assembler 3
You can also pass arguments to a macro. The following example is a
macro which copies a word from data memory to program memory:
#define copy(src,dest) \
AX0=DM(src); \
PM(dest)=AX0;
(The backslash characters indicate that the macro definition continues on
the next line.) If the macro is now invoked with absolute addresses for src
and dest, it executes the copy operation using direct addressing:
copy(0x3F,0xC0)
3.6
WRITING PROGRAMS
The remainder of this chapter tells you how to write assembly language
programs for the ADSP-2100 Family of DSP microprocessors. You can
generate your programs with any editor that produces plain text files. Do
not use a word processor which embeds special control codes.
A program consists of assembly language instructions, assembler
directives, and C preprocessor directives. This section explains everything
you need to know about using assembler directives.
Additional programming techniques are explained in two sections of
Chapter 4: “Using Library Files Of Your Routines” and “Multiple Boot
Page Systems.”
For programming examples of various applications, consult Digital Signal
Processing Applications Using The ADSP-2100 Family.
3.6.1
Program Structure
The basic unit of an ADSP-21xx program is a module. A program consists
of one or more modules which are separately assembled and then linked
together.
A module is defined by two directives:
.MODULE module_name;
…
…
...
.ENDMOD;
3 – 15
3 Assembler
Each module must be contained in its own file; in other words, only one
module is allowed per file. Each statement within the module can be an
instruction, directive, or macro invocation.
A semicolon terminates each statement. Program labels are placed at the
start of a line and followed by a colon:
startup:
I0=2;
{beginning of program}
Individual lines in the source file must be no more than 200 characters in
length.
3.6.2
Setting The Memory-Mapped Control Registers
The ADSP-2101, ADSP-2105, ADSP-2111, and ADSP-21msp50 processors
all have a set of memory-mapped control registers which configure
various modes of processor operation. These registers are located in the
reserved portion of internal data memory on each chip. This memory
space is the top 1K of internal DM, addresses 0x3C00-0x3FFF.
Each register must be loaded in your assembly language programs by
writing a data word to the appropriate address. The address and format of
each control register is given in Appendix E of this manual.
Either indirect or direct addressing can be used to access the control
registers; however, in the interests of clarity we recommend using direct
addressing in conjunction with symbolic names for the register addresses.
This method, together with appropriate commenting, makes your
programs easier to read and understand.
Figure 3.3 on page 3-18 shows a sample subroutine module which names
and initializes the 17 control registers of the ADSP-2101. Note that the
assembler’s .CONST directive is used to define symbolic names for the
register addresses.
To set up the control registers as defined in this example, you would call
the subroutine in your program with the following instruction:
CALL init2101;
Table 3.3 shows the ADSP-2101’s set of memory-mapped registers, the
register addresses in data memory, and a suggested mnemonic symbol for
each. Tables 3.4, 3.5, and 3.6 provide similar information for the remaining
ADSP-21xx processors.
3 – 16
Assembler 3
Register Name
System Control Register
Data Memory Wait State Control Register
Timer Period
Timer Count
Timer Scaling Factor
SPORT0 Multichannel Receive
Word Enable Register (32-bit)
SPORT0 Multichannel Transmit
Word Enable Register (32-bit)
SPORT0 Control Register
SPORT0 Serial Clock Divide Modulus
SPORT0 Rcv Frame Sync Divide Modulus
SPORT0 Autobuffer Control Register
SPORT1 Control Register
SPORT1 Serial Clock Divide Modulus
SPORT1 Rcv Frame Sync Divide Modulus
SPORT1 Autobuffer Control Register
DM addr
0x3FFF
0x3FFE
0x3FFD
0x3FFC
0x3FFB
0x3FFA
0x3FF9
0x3FF8
0x3FF7
0x3FF6
0x3FF5
0x3FF4
0x3FF3
0x3FF2
0x3FF1
0x3FF0
0x3FEF
Suggested Assembly
Code Name
Sys_Ctrl_Reg
Dm_Wait_Reg
Tperiod_Reg
Tcount_Reg
Tscale_Reg
Sport0_Rx_Words1
Sport0_Rx_Words0
Sport0_Tx_Words1
Sport0_Tx_Words0
Sport0_Ctrl_Reg
Sport0_Sclkdiv
Sport0_Rfsdiv
Sport0_Autobuf_Ctrl
Sport1_Ctrl_Reg
Sport1_Sclkdiv
Sport1_Rfsdiv
Sport1_Autobuf_Ctrl
Table 3.3 ADSP-2101 Control Registers & Suggested Symbolic Names
If you choose to use the suggested symbols, you need not write out the
.CONST declarations as is done in the subroutine of Figure 3.3. The
default declarations are provided for you in four files included with the
development software:
Contains .CONST declarations
Filename
for symbolic addresses of:
DEF2101.H
Table 3.3
DEF2105.H
Table 3.4
DEF2111.H
Table 3.5
DEF2150.H
Table 3.6
All you have to do is include the appropriate file in your source code with
the assembler’s .INCLUDE directive. For example, to use the pre-defined
symbols for the memory-mapped registers of the ADSP-2105, place the
following statement in your initialization module:
.INCLUDE <DEF2105.H>;
If the file to be included is in the current directory of your operating
system, only the filename need be given inside brackets. If the file is in a
different directory, however, you must give the path of this directory with
the filename (see the section “Including Other Source Files” later in this
chapter).
3 – 17
3 Assembler
{Set up control registers for ADSP-2101 SPORTs and Timer)
{DM(0x3FEF) - DM(0x3FFF) are initialized in 35 cycles}
.MODULE/BOOT=0
Set_Up_2101_Ctrl_Regs;
.CONST Sport1_Autobuf_Ctrl
=0x3FEF;
.CONST Sport1_Rfsdiv
=0x3FF0;
.CONST Sport1_Sclkdiv
=0x3FF1;
.CONST Sport1_Ctrl_Reg
=0x3FF2;
.CONST Sport0_Autobuf_Ctrl
=0x3FF3;
.CONST Sport0_Rfsdiv
=0x3FF4;
.CONST Sport0_Sclkdiv
=0x3FF5;
.CONST Sport0_Ctrl_Reg
=0x3FF6;
.CONST Sport0_Tx_Words0
=0x3FF7;
.CONST Sport0_Tx_Words1
=0x3FF8;
.CONST Sport0_Rx_Words0
=0x3FF9;
.CONST Sport0_Rx_Words1
=0x3FFA;
.CONST Tscale_Reg
=0x3FFB;
.CONST Tcount_Reg
=0x3FFC;
.CONST Tperiod_Reg
=0x3FFD;
.CONST Dm_Wait_Reg
=0x3FFE;
.CONST Sys_Ctrl_Reg
=0x3FFF;
.ENTRY init2101;
init2101:
{================== SET UP SERIAL PORT 1 REGISTERS ==================}
AX0=0; DM(Sport1_Autobuf_Ctrl)=AX0; {Autobuffering disabled}
AX0=0; DM(Sport1_Rfsdiv)=AX0;
{RFSDIV not used}
AX0=0; DM(Sport1_Sclkdiv)=AX0;
{SCLKDIV not used}
AX0=0; DM(Sport1_Ctrl_Reg)=AX0;
{Ctrl reg functions disabled}
Figure 3.3 Initializing Control Registers Using Symbolic Addresses
3 – 18
Assembler 3
{================== SET UP SERIAL PORT 0 REGISTERS ==================}
AX0=0;
DM(Sport0_Autobuf_Ctrl)=AX0; {Autobuffering disabled}
AX0=255;
DM(Sport0_Rfsdiv)=AX0;
{RFSDIV=255 for 8 kHz interrupts
from 2.048 MHz SCLK}
AX0=2;
DM(Sport0_Sclkdiv)=AX0;
{SCLKDIV=2 gives 2.048 MHz SCLK
with 12.288 MHz crystal}
AX0=0x6B27; DM(Sport0_Ctrl_Reg)=AX0;
{Multichannel disabled,
internally-generated SCLK,
RFS required, TFS required,
normal frame sync width,
internal RFS, internal TFS,
serial data is u-law, 8-bit PCM}
AX0=0;
DM(Sport0_Tx_Words0)=AX0;
{TX on TDM channels 15-00}
AX0=0;
DM(Sport0_Tx_Words1)=AX0;
{TX on TDM channels 31-16}
AX0=0;
DM(Sport0_Rx_Words0)=AX0;
{RX on TDM channels 15-00}
AX0=0;
DM(Sport0_Rx_Words1)=AX0;
{RX on TDM channels 31-16}
{================ SET UP TIMER REGISTERS ==================}
AX0=0;
DM(Tscale_Reg)=AX0;
{timer not used}
AX0=0;
DM(Tcount_Reg)=AX0;
AX0=0;
DM(Tperiod_Reg)=AX0;
{============== SET UP SYSTEM AND MEMORY ==============}
AX0=0;
DM(Dm_Wait_Reg)=AX0;
{no DM wait states}
AX0=0x1018; DM(Sys_Ctrl_Reg)=AX0;
{SPORT0 enabled, SPORT1 disabled,
use FI,FO,IRQ0,IRQ1,SCLK instead,
BOOT_PAGE=0, BMWAIT=3, PMWAIT=0}
RTS;
.ENDMOD;
3 – 19
3 Assembler
Register Name
System Control Register
Data Memory Wait State Control Register
Timer Period
Timer Count
Timer Scaling Factor
SPORT1 Control Register
SPORT1 Serial Clock Divide Modulus
SPORT1 Rcv Frame Sync Divide Modulus
SPORT1 Autobuffer Control Register
DM addr
0x3FFF
0x3FFE
0x3FFD
0x3FFC
0x3FFB
0x3FF2
0x3FF1
0x3FF0
0x3FEF
Suggested Assembly
Code Name
Sys_Ctrl_Reg
Dm_Wait_Reg
Tperiod_Reg
Tcount_Reg
Tscale_Reg
Sport1_Ctrl_Reg
Sport1_Sclkdiv
Sport1_Rfsdiv
Sport1_Autobuf_Ctrl
Table 3.4 ADSP-2105 Control Registers & Suggested Symbolic Names
Register Name
System Control Register
Data Memory Wait State Control Register
Timer Period
Timer Count
Timer Scaling Factor
SPORT0 Multichannel Receive
Word Enable Register (32-bit)
SPORT0 Multichannel Transmit
Word Enable Register (32-bit)
SPORT0 Control Register
SPORT0 Serial Clock Divide Modulus
SPORT0 Rcv Frame Sync Divide Modulus
SPORT0 Autobuffer Control Register
SPORT1 Control Register
SPORT1 Serial Clock Divide Modulus
SPORT1 Rcv Frame Sync Divide Modulus
SPORT1 Autobuffer Control Register
HIP Interrupt Mask Register
HIP Status Register 7
HIP Status Register 6
HIP Data Register 5
HIP Data Register 4
HIP Data Register 3
HIP Data Register 2
HIP Data Register 1
HIP Data Register 0
DM addr
0x3FFF
0x3FFE
0x3FFD
0x3FFC
0x3FFB
0x3FFA
0x3FF9
0x3FF8
0x3FF7
0x3FF6
0x3FF5
0x3FF4
0x3FF3
0x3FF2
0x3FF1
0x3FF0
0x3FEF
0x3FE8
0x3FE7
0x3FE6
0x3FE5
0x3FE4
0x3FE3
0x3FE2
0x3FE1
0x3FE0
Suggested Assembly
Code Name
Sys_Ctrl_Reg
Dm_Wait_Reg
Tperiod_Reg
Tcount_Reg
Tscale_Reg
Sport0_Rx_Words1
Sport0_Rx_Words0
Sport0_Tx_Words1
Sport0_Tx_Words0
Sport0_Ctrl_Reg
Sport0_Sclkdiv
Sport0_Rfsdiv
Sport0_Autobuf_Ctrl
Sport1_Ctrl_Reg
Sport1_Sclkdiv
Sport1_Rfsdiv
Sport1_Autobuf_Ctrl
Hmask_Reg
HSR7_Reg
HSR6_Reg
HSR5_Reg
HSR4_Reg
HSR3_Reg
HSR2_Reg
HSR1_Reg
HSR0_Reg
Table 3.5 ADSP-2111 Control Registers & Suggested Symbolic Names
3 – 20
Assembler 3
Register Name
System Control Register
Data Memory Wait State Control Register
Timer Period
Timer Count
Timer Scaling Factor
SPORT0 Multichannel Receive
Word Enable Register (32-bit)
SPORT0 Multichannel Transmit
Word Enable Register (32-bit)
SPORT0 Control Register
SPORT0 Serial Clock Divide Modulus
SPORT0 Rcv Frame Sync Divide Modulus
SPORT0 Autobuffer Control Register
SPORT1 Control Register
SPORT1 Serial Clock Divide Modulus
SPORT1 Rcv Frame Sync Divide Modulus
Analog Autobuffer/Powerdown Ctrl Reg
Analog Control Register
ADC Receive Data Register
DAC Transmit Data Register
HIP Interrupt Mask Register
HIP Status Register 7
HIP Status Register 6
HIP Data Register 5
HIP Data Register 4
HIP Data Register 3
HIP Data Register 2
HIP Data Register 1
HIP Data Register 0
DM addr
0x3FFF
0x3FFE
0x3FFD
0x3FFC
0x3FFB
0x3FFA
0x3FF9
0x3FF8
0x3FF7
0x3FF6
0x3FF5
0x3FF4
0x3FF3
0x3FF2
0x3FF1
0x3FF0
0x3FEF
0x3FEE
0x3FED
0x3FEC
0x3FE8
0x3FE7
0x3FE6
0x3FE5
0x3FE4
0x3FE3
0x3FE2
0x3FE1
0x3FE0
Suggested Assembly
Code Name
Sys_Ctrl_Reg
Dm_Wait_Reg
Tperiod_Reg
Tcount_Reg
Tscale_Reg
Sport0_Rx_Words1
Sport0_Rx_Words0
Sport0_Tx_Words1
Sport0_Tx_Words0
Sport0_Ctrl_Reg
Sport0_Sclkdiv
Sport0_Rfsdiv
Sport0_Autobuf_Ctrl
Sport1_Ctrl_Reg
Sport1_Sclkdiv
Sport1_Rfsdiv
Codec_Autobuf_Ctrl
Codec_Ctrl_Reg
Codec_Rx_Data
Codec_Tx_Data
Hmask_Reg
HSR7_Reg
HSR6_Reg
HSR5_Reg
HSR4_Reg
HSR3_Reg
HSR2_Reg
HSR1_Reg
HSR0_Reg
Table 3.6 ADSP-21 msp50 Control Registers & Suggested Symbolic Names
3 – 21
3 Assembler
For indirect addressing of the memory-mapped registers, an I register and
M register are used to maintain the address of the control register. If these
DAG (data address generator) registers are incorrectly initialized or
mistakenly overwritten, the control registers will be incorrectly set. This
type of bug can be difficult to detect in code.
(Note: You may notice that some ADSP-21xx program examples given in
this and other manuals use indirect addressing for setting control
registers. These examples are provided to demonstrate that although
direct addressing is recommended, indirect addressing may also be used.)
3.7
ASSEMBLER DIRECTIVES
Assembler directives control the assembly process. They are handled by
the assembler’s preprocessor—unlike instructions, they do not produce
opcodes when the source file is assembled.
An assembler directive starts with a period and ends with a semicolon.
Some directives take qualifiers and arguments, as shown below. Qualifiers
immediately follow the directive and are separated by slashes; arguments
follow the qualifiers. The general form of a directive is:
.DIRECTIVE/qualifier/qualifier …
argument;
{comment}
Assembler directives may only have one-line comments—the comment
cannot be continued on the next line. If you need more space to continue a
comment, begin a new comment field on the next line.
3.7.1
Program Modules (.MODULE)
The .MODULE directive marks the beginning of a program module and
defines the module name. Source code files may contain only one module.
This directive has the form:
.MODULE/qualifier/qualifier …
module_name;
Qualifiers consist of any of the following:
RAM or ROM
ABS=address
SEG=seg_name
BOOT=0-7
STATIC
3 – 22
memory type
absolute start address (do not use with STATIC)
module placed in system builder-declared segment
copy of module placed on boot page(s)
prevent overwriting of module during boot page loads
Assembler 3
The BOOT and STATIC qualifiers are used only for systems with boot
memory (i.e. with all family processors except the ADSP-2100). A second
method of placing modules on boot pages is provided by the linker’s -i
switch; see “Placing Modules On Boot Pages” in Chapter 4.
Memory type defaults to RAM if not specified. The ABS qualifier places
the module’s code at a particular address in program memory, making it
non-relocatable. This means that that the linker is forced to reserve
memory for the module at the specified address. Modules which do not
have the ABS qualifier are relocatable.
The SEG qualifier locates the module in a specific memory segment which
is declared in the system specification file. If you use both the ABS and
SEG qualifiers, and specify an absolute address which is not in the named
segment, you will see an error message when the linker is run.
The BOOT qualifier is used to place a copy of the module on any number
of boot pages. The module will be stored in boot memory until it is loaded
and executed. You can locate copies of a module on several boot pages to
allow its contents (code and/or data) to be accessed by the code on each
page, for example .MODULE/BOOT=0/BOOT=1/BOOT=2. Another way
to accomplish this is with the use of the STATIC qualifier, which preserves
the module in program memory when boot pages are loaded (see
“STATIC Modules” below).
The BOOT qualifier also applies to all .VAR data variable and buffer
declarations within a module—remember that boot memory, and
program memory in general, can contain both code and data.
The .ENDMOD directive marks the end of a source code module. The
assembler stops when it reaches the .ENDMOD directive.
Here are some examples of module declarations:
.MODULE/SEG=fir
filter_routine;
This statement declares the relocatable module filter_routine, located in a
memory segment named fir which is defined in the system builder-output
.ACH file.
.MODULE/RAM/ABS=0x0040
main_prog;
This example declares main_prog which is to be located in program
memory RAM at address 40 (hexadecimal).
3 – 23
3 Assembler
3.7.1.1 Bootable Modules
A system may have up to 8 boot pages. (Note: Boot memory space does
not exist for ADSP-2100 systems.)
When you choose attributes for bootable modules with the RAM, ROM,
SEG and ABS qualifiers, they apply to the memory where the code is
located at runtime—program memory, not boot memory. Thus when
configuring the runtime memory map of your system you should think
only in terms of program and data memory.
The linker determines where code and data will be located in program
and data memory according to your segment declarations for the system
builder and your module declarations for the assembler. The linker also
constructs the boot pages, but you cannot directly specify where a module
is to be placed in boot memory.
Here is one more way to think about the difference between boot memory
addresses and program memory addresses: the processor cannot fetch and
execute an instruction from boot memory; an entire boot page must first
be loaded and then the code is executed from on-chip program memory.
If you want a module (or variable/buffer) to exist in processor memory,
either internal or external, during the execution of a particular boot page,
you must give it the BOOT qualifier to associate it with that page. This
causes the linker to reserve space for the object in the time frame when the
page is being executed.
The linker-output map listing file (.MAP) shows you the layout of your
program in boot memory as well as the corresponding mapping of code in
runtime program memory (after booting occurs). You can use this file to
help understand the transfer from boot memory to runtime memory.
For example, the following directive redeclares the module main_prog
from above. This time the module will be stored on boot page 0 until
runtime.
.MODULE/RAM/ABS=0x0040/BOOT=0
main_prog;
The RAM and ABS qualifiers of this directive apply to the processor’s
internal program memory (assuming that MMAP=0).
3 – 24
Assembler 3
Here is an example which stores copies of a relocatable module on
multiple boot pages:
.MODULE/RAM/BOOT=0/BOOT=2/BOOT=3
shifter;
(See the section “Multiple Boot Page Systems” in Chapter 4 for more
information on using multiple boot pages.)
3.7.1.2 STATIC Modules
If you write a code module to be used with multiple boot pages, a
subroutine, for example, you will want the code to remain in place as the
different pages are booted. Giving the STATIC qualifier with the module’s
declaration will accomplish this. (The ABS qualifier cannot be used with
the STATIC qualifier.)
The STATIC qualifier prevents the overwriting of a module when a boot
page is loaded, either page 0 at reset (if MMAP=0) or pages 1-7 under
software control. The linker assures this when it determines the placement
of your program in memory. If a module is not declared as STATIC, it
may be partially or completely overwritten by the contents of any boot
page. This applies to modules in both internal and external memory.
When the linker allocates memory to store your program, it considers nine
independent time frames of memory: non-booted program and data
memory and boot pages 0-7. Non-booted memory is defined as the initial
state of PM and DM before any boot page is loaded or any code executed.
The nine time frames are considered independent of one other unless the
STATIC qualifier is used on a code module (or data buffer) declaration. In
the absence of any STATIC declarations, the linker assumes that each of
the nine frames starts with a clean slate of PM and DM and that each boot
page has the entire memory map available when it is booted.
Thus the code and data of boot page 0 can normally be placed anywhere
by the linker, without regard for any pre-existing memory contents (nonbooted values), the code and data of boot page 1 can be placed anywhere
without regard for the page 0 values, and so on.
3 – 25
3 Assembler
The rule to follow is:
If you have a code module or data buffer which must not be
overwritten when a new boot page is loaded, you should use the
STATIC qualifier in its declaration. Otherwise, the linker assumes that
all memory is available to the new page and that it may overwrite any
existing code/data.
Figures 3.4 and 3.5 illustrate the effect of the STATIC qualifier. Say you
have a subroutine named routine1 located in external program memory of
the ADSP-2101. The subroutine is called by code stored on boot page 0.
This boot page also contains a 16-word buffer named coeffs which is
declared in a module named bootfilter. Both routine1 and coeffs are
relocatable within a system builder-defined memory segment called
ext_pm and are declared with the following statements:
.MOD/SEG=ext_pm/RAM
routine1;
.MOD/RAM/BOOT=0 bootfilter;
.VAR/SEG=ext_pm/PM/RAM coeffs[16];
ADSP-2101
Boot page 0
coeffs
2K
Internal
program memory
ROM
2K
RAM
External
program memory
routine1
coeffs
14K
RAM
Figure 3.4 Overwriting Of Non-Static Module
3 – 26
Assembler 3
Since routine1 has not been declared as static, the linker ignores it when
determining the location of coeffs in runtime program memory. The linker
may therefore decide to reserve space for coeffs in a portion of memory
which overlaps routine1. When page 0 is booted, coeffs is loaded into the
ADSP-2101’s internal program memory from where it is copied to external
PM (by code which you must write and include on boot page 0). Figure
3.4 shows how coeffs can overwrite routine1 in this case.
If, however, routine1 is declared as a static module, the linker will reserve
its address space and locate coeffs elsewhere in external program memory:
.MOD/SEG=ext_pm/RAM/STATIC
routine1;
This is shown below in Figure 3.5.
ADSP-2101
Boot page 0
coeffs
2K
Internal
program memory
2K
RAM
ROM
External
program memory
routine1
coeffs
14K
RAM
Figure 3.5 Static Module Preserved
3 – 27
3 Assembler
3.7.2
Data Variables & Buffers (.VAR)
The .VAR directive declares data buffers. A data buffer is an array of
memory locations. A variable is declared as a single-location buffer. You
must declare all variables and buffers before referencing them in code. If a
buffer is initialized with the .INIT directive, the declaration and
initialization must occur in the same module.
The .VAR directive has the form:
.VAR/qualifier/qualifier …
buffer_name[length], … ;
The default declaration, with no qualifiers or length specified, is a
relocatable one-word variable in data memory RAM. A single .VAR
directive may declare any number of buffers, separated by commas, on
one line (up to 200 characters).
When multiple variables and buffers are declared on the same line, the
linker places them in contiguous memory locations. If multiple buffers are
declared on one line and the CIRC qualifier is used, a single circular buffer
is created—the individual buffers will be simple linear buffers only. (See
the examples below under “More On Circular Buffers.”)
Qualifiers consist of any of the following:
PM or DM
RAM or ROM
ABS=address
SEG=seg_name
CIRC
STATIC
located in program or data memory
memory type
absolute start address (do not use with STATIC)
buffer placed in system builder-declared segment
circular buffer
prevent overwriting of buffer during boot page loads
(The STATIC qualifier is used only for systems with boot memory,
including all family processors except the ADSP-2100.)
Buffers may be located in either program memory, PM, or data memory,
DM, with default to data memory. Memory type defaults to RAM for both
DM and PM if not specified. The ABS qualifier places the buffer at a
particular start address, making it non-relocatable. The SEG qualifier
locates the buffer in a specific memory segment which has been declared
in the system architecture file.
3 – 28
Assembler 3
The CIRC qualifier defines the buffer as circular. A buffer will be
addressed in a linear fashion unless the CIRC attribute is applied.
The STATIC qualifier prevents the overwriting of a buffer when a boot
page is loaded. If you want to use a buffer with code from multiple boot
pages, it must remain unaltered as the different pages are booted.
Assigning the buffer the STATIC attribute will accomplish this. Static
buffers are handled by the linker in exactly the same way as static
modules—see the section “STATIC Modules” above for further details.
To declare a variable, give the .VAR directive with no buffer length:
.VAR/DM/RAM/ABS=0x000A
seed;
This statement declares a one-word variable called seed in data memory
RAM, at address 10 (decimal).
The following is an example of a buffer declaration:
.VAR/PM/RAM/SEG=pmdata
coefficients[10];
Here a linear buffer is declared in program memory RAM, which is
relocatable within a segment called pmdata. The buffer name is coefficients
and it consists of ten locations in program memory. The buffer length
must be placed inside brackets: coefficients[10].
(In this manual’s notation brackets are typically used to indicate a
specification which is optional. The .VAR, .INIT, and .INCLUDE
directives are the only instances of assembler syntax where brackets or
angle brackets are required.)
This example declares a relocatable circular buffer whose length is the
value of the constant taps.
.CONST taps=15;
.VAR/DM/CIRC data_buffer[taps];
3 – 29
3 Assembler
3.7.2.1 More On Circular Buffers
Circular buffers can only be located at certain boundaries in memory due
to characteristics of the ADSP-21xx processors’ circular buffer addressing
hardware. In general, a circular buffer must start at a base address which
is a multiple of 2n, where n is the number of bits required to represent the
buffer length in binary notation. (Refer to the following section for a
discussion of the special case when buffer length equals 2n.)
The linker will handle this requirement for relocatable circular buffers.
You must do so, however, if you explicitly choose the buffer’s base
address with the ABS qualifier. The following information is provided to
help you understand where you may locate your circular buffers in
memory.
This statement declares a circular buffer of five locations:
.VAR/CIRC
aa[5];
Since three bits are needed to represent the length of aa, the linker will
assign the buffer a base address which is a multiple of eight. The three
least significant bits of this address are zeros.
If multiple buffers are declared on one line and the CIRC qualifier is used,
a single circular buffer is created—the individual buffers will be simple
linear buffers only. The length of the composite circular buffer is the sum
of the lengths of each individual buffer.
For example, this declaration creates one 15-word circular buffer (depicted
in Figure 3.6):
.VAR/CIRC
aa[5],bb[5],cc[5];
The base address of the circular buffer is aa; this is the symbol used to
access the buffer in code. The address of bb is aa+5 and the address of cc is
is aa+10. The three five-word buffers can be individually accessed as linear
buffers.
Since the value 15 requires four bits for binary representation, the circular
buffer aa is located at an address which is a multiple of sixteen (four LSBs
equal to zero).
3 – 30
Assembler 3
The following example uses three .VAR directives to declare three
different circular buffers:
.VAR/CIRC
.VAR/CIRC
.VAR/CIRC
aa[5];
bb[5];
cc[5];
Because they are declared separately, the buffers will not be contiguous—
see Figure 3.7.
buffer addresses
(least significant byte)
buffer address
(least significant byte)
xxxx0000
xxxx0001
xxxx0010
xxxx0011
xxxx0100
aa
xxxx0101
xxxx0110
xxxx0111
xxxx1000
xxxx1001
bb
xxxx1010
xxxx1011
xxxx1100
xxxx1101
xxxx1110
cc
Figure 3.6 Composite Circular Buffers
xxxxx000
xxxxx001
xxxxx010
xxxxx011
xxxxx100
aa
xxxxx000
xxxxx001
xxxxx010
xxxxx011
xxxxx100
bb
xxxxx000
xxxxx001
xxxxx010
xxxxx011
xxxxx100
cc
Figure 3.7 Individual Circular Buffers
3 – 31
3 Assembler
This example creates the structure for a sine/cosine lookup table:
.VAR/CIRC
sin[256],cos[768];
A single circular buffer is defined which has a length of 1024. To access the
buffer in code, you can initialize DAG index registers and buffer length
registers with the following instructions:
I0=^cos;
L0=1024;
I1=^sin;
L1=1024;
{^ is the “address pointer” operator}
These instructions load I0 and I1 with the base addresses of cos and sin.
The corresponding L registers are loaded with the length of the circular
buffer to enable wraparound addressing. A circular buffer is only
implemented when an L register is set to a non-zero value.
Refer to the Data Transfer chapter of theADSP-2100 Family User’s Manual
for further information on circular buffers.
(Note: For linear (i.e. non-circular) indirect addressing, L registers must be
set to zero. Do not assume that the processor’s L registers are
automatically initialized or may be ignored if you are not using circular
buffers; the I, M, L registers contain random values following reset. Your
program must initialize the L registers corresponding to any I registers it
uses.)
3.7.2.2 Special Case: Circular Buffer Lengths Of 2n
One difference exists between the ADSP-2100 and all other ADSP-21xx
processors for circular buffer placement—when the buffer length is an
exact power of two. In all cases, a certain number of low-order bits of the
base address of a circular buffer must be zeros. When the buffer length is
an exact power of 2, however, the ADSP-2100 requires one more such
zero.
For example, all ADSP-21xx processors except the ADSP-2100 can have
two eight-word circular buffers located in consecutive memory blocks.
The ADSP-2100, however, uses memory less efficiently for circular buffer
lengths which are a power of two and must leave an eight-word block
between the two buffers. In other words, the base address of an
ADSP-2100 eight-word circular buffer must be a multiple of sixteen while
it need only be a multiple of eight for an ADSP-21xx circular buffer.
3 – 32
Assembler 3
3.7.3
Initializing Variables & Buffers (.INIT)
The .INIT directive can be used to initialize variables and buffers in ROM.
The initialization data is incorporated into the memory image file of your
program by the linker; the PROM splitter translates the ROM portions of
this file into a format suitable for an industry-standard PROM burner.
Initialization values may be listed in the directive statement or supplied
by an external file; the .INIT directive takes one of the following forms:
.INIT buffer_name:
constant, constant, … ;
.INIT buffer_name:
^other_buffer or %other_buffer, … ;
.INIT buffer_name:
<filename>;
The ^ and % operators can be used to initialize the buffer or variable with
the base address or length of other buffer(s). Any combination of
constants, buffer address pointers, and buffer length values may be given,
separated by commas.
Here are some examples:
.INIT seed: 0x3FFF;
This statement initializes the variable seed with a hexadecimal constant.
.INIT seed_values: 1,2,3,5,7;
This initializes the buffer seed_values with the listed constants.
.INIT buffer_ptr: ^input_buf;
Here the variable buffer_ptr is initialized to point to the start of the buffer
input_buf.
You can initialize only part of a data buffer by giving an offset from the
base address:
.INIT buffer_name[offset]:
Now the initialization value(s) will be placed starting at the address
buffer_name + offset.
3 – 33
3 Assembler
The following statement, for example, initializes the eighth, ninth, and
tenth elements of the buffer coeffs with the values 2, 3, and 4:
.INIT coeffs[7]: 2,3,4;
The third form of the .INIT directive gives the name of a file which
contains the initialization values. The assembler establishes a pointer to
this file and the initialization data is incorporated when the linker is run.
The following example causes the linker to initialize the buffer cos with the
contents of the file cosines.dat:
.INIT cos: <cosines.dat>;
If the initialization file is in the current directory of your operating system,
only the filename need be given inside brackets. If the file is in a different
directory, however, you must give the path of this directory with the
filename. For example, if inits.dat is the initialization file for a buffer
named samples, and is located in the DOS subdirectory
C:\2101\filter3\ , then the .INIT directive should be given in this
way:
.INIT samples: <C:\2101\filter3\inits.dat>
This allows the linker to find the file.
Initializing from files is useful for loading buffers with data generated by
other programs such as filter coefficients or FFT twiddle factors. Since the
linker reads and incorporates the contents of these files, a change in the
data only requires relinking your program; there is no need to reassemble.
Data variables and buffers can also be initialized with seven-bit ASCII
character codes. The following statement, for example,
.INIT inputs: ‘ABCD’;
initalizes the first four locations of the data buffer inputs with the ASCII
codes for the letters A, B, C, and D. The ASCII codes are placed in the
lower seven bits of the 16-bit data memory words or in bits 8-14 of the 24bit program memory words.
3 – 34
Assembler 3
A special syntax of the .INIT directive, .INIT24, lets you store 24 bits of
data in a program memory word, rather than the normal 16 bits. This
allows you to access the lower 8 bits of each 24-bit program memory word
when initializing data buffers or variables in source code. For example,
while this statement computes a 14-bit address:
.INIT var: ^label + 10
this statement computes a 24-bit address:
.INIT24 var: ^label + 10
3.7.3.1 Data Initializing In System Hardware
The linker-generated .EXE memory image file contains all of your
program’s code and initialization data. Generating this file does not,
however, guarantee that the code and data will be loaded into memory;
the file merely specifies what should be present in memory for the program
to run correctly. You must provide the means by which memory is
actually loaded.
Once the linker creates a memory image file for your program, there are
two ways to accomplish initialization: 1) burn PROM memory devices for
ROM-based buffers, and 2) write code in your program to copy
initialization data to buffers in RAM.
You can initialize ROM buffers by using the PROM splitter in one of two
ways:
• to generate files to burn PROM memory devices for off-chip program
or data memory, or
• to generate files to burn PROM memory devices for boot memory;
variables and buffers in on-chip program memory will be initialized
when booting occurs (for ADSP-21xx processors with internal and boot
memory)
Variables and buffers located in program or data memory RAM must be
initialized by your program. The exception to this rule is the internal
program memory RAM of the ADSP-2101, ADSP-2105, ADSP-2111, and
ADSP-21msp50. This RAM space can be initialized by the booting
operation (as described above).
3 – 35
3 Assembler
Three types of memory must be initialized in source code:
• off-chip program memory RAM
• off-chip data memory RAM
• on-chip data memory RAM
To initialize buffers in these memory spaces, you must have the data
stored in ROM memory devices—either off-chip data, program, or boot
memory—and include code in your program which will copy the data to
its assigned location. An example of such a custom “loader” routine is
shown below:
.VAR/PM/ROM sin_init[64];
.VAR/DM/RAM sin_table[64];
.INIT sin_init: <sin.dat>;
{copy initialized buffer, sin_init, from PM ROM to DM RAM}
M0=1;
M4=1;
I0=^sin_table;
I4=^sin_init;
CNTR=%sin_table;
DO sin_copy UNTIL CE;
AX0=PM(I4,M4);
sin_copy:
DM(I0,M0)=AX0;
For initialization data stored in boot memory, the loader routine must
perform the copy operation from internal program memory after booting
occurs.
3.7.4
Naming Ports For The Assembler (.PORT)
The .PORT directive names a memory-mapped I/O port which has
already been declared for the system builder (and is defined in the .ACH
file). The port’s attributes and address in memory are specified in the
system builder declaration and need not be repeated for the assembler.
The .PORT directive has the form:
.PORT port_name;
If you need to access the port in other code modules of your program, you
should name it with both the .PORT and .GLOBAL directives in this
3 – 36
Assembler 3
module. You should then list the port with the .EXTERNAL directive in
the other modules. (See the descriptions of .GLOBAL and .EXTERNAL
below.)
The linker reads information about the port from the .ACH file and
resolves all references to it.
3.7.5
Including Other Source Files (.INCLUDE)
The .INCLUDE directive is used to include another source file in the file
being assembled. The assembler opens, reads, and assembles the indicated
file when it encounters the .INCLUDE statement line. The assembled code
is incorporated into the output .OBJ file. When the assembler reaches the
end of the included file it returns to the original source file and continues
processing.
The .INCLUDE directive has the form:
.INCLUDE <filename>;
If the file to be included is in the current directory of your operating
system, only the filename need be given inside brackets. If the file is in a
different directory, however, you must give the path of this directory with
the filename (or with the ADII environment variable; see below). For
example, if the file to be included is named newcode and is located in a PC
subdirectory C:\2111\filters\, then the .INCLUDE directive must be
given in this way:
.INCLUDE <C:\2111\filters\newcode>;
This allows the assembler to find the file.
Alternatively, you can specify the path by using the ADII environment
variable. Setting ADII equal to the path also allows the assembler to locate
the file. In this case you can give the filename without its path in the
.INCLUDE directive.
Included files may in turn have .INCLUDE statements within them—
nesting of include files is limited only by memory. Included files may not,
however, contain C preprocessor directives (e.g. #define). To include a file
that contains C processor directives, use the C preprocessor directive
#include instead of .INCLUDE.
3 – 37
3 Assembler
The .INCLUDE directive allows modular programming. For example, in
many cases it is useful to develop a library of subroutines or macros which
are shared between different programs. Rather than rewriting the routines
for each program, you can incorporate the macro library into an
assembled module using the .INCLUDE directive.
Example:
.INCLUDE <macro_lib>;
3.7.6
Macros
Macros are created with the assembler’s .MACRO directive. Macros are
useful for repeating frequently-used instruction sequences in your source
code. By passing arguments to a macro, it can be employed as a generalpurpose routine and shared by different programs.
Macro nesting is limited only by memory availability when the assembler
is run. Nested macros must be declared in this order: inner macro first, …,
outer macro last. All constants used in macros must be declared before the
macro declarations.
3.7.6.1 Defining Macros (.MACRO)
A macro is defined by two directives:
.MACRO macro_name(argument, argument, … );
…
…
.ENDMACRO;
Each statement within the macro can be an instruction, directive, or
macro invocation. The .ENDMACRO directive marks the end of a macro
definition.
A macro is invoked with its name. To execute a macro named quickloop,
for example, simply use the following statement in your source code:
quickloop;
macro invocation
A macro invocation may not contain additional program statements (i.e.
instructions, preprocessor directives, or other macro invocations) on the
same line of source code.
3 – 38
Assembler 3
Macro arguments, which are optional, take the form:
%n
n=0,1,2, … ,9
The following example defines a macro with three arguments:
.MACRO memory_transf(%0,%1,%2);
In the macro’s code, the arguments are marked by the placeholders %1,
%2, %3, etc. When the macro is invoked, the placeholders are replaced by
argument values passed in the call. The correct number of arguments
must be passed.
When the macro is called, the arguments passed may be anything listed in
Table 3.7 below.
Argument
constant or expression
symbol
^symbol
%buffer
Exceptions
none
may also be any reserved keyword except
MACRO, ENDMACRO, CONST, INCLUDE
“^%n” not allowed
“%%n” not allowed
Table 3.7 Legal Macro Arguments
The ^ and % operators may not be used with argument placeholders in
the macro definition. However, an argument passed to the macro may use
these operators. For example, you could invoke the macro read_data(%0)
and point to a buffer address with the argument passed:
read_data(^input);
(Note: Another way to define macros is with the #define C preprocessor
directive.)
3.7.6.2 Local Labels In Macros (.LOCAL)
The .LOCAL directive is given with program labels used in macros. The
.LOCAL directive instructs the assembler to create a unique version of the
label at each invocation of the macro. This prevents duplicate label errors
from occurring when a macro is called more than once in a code module.
3 – 39
3 Assembler
The .LOCAL directive has the form:
.LOCAL macro_label, … ;
The assembler creates unique versions of macro_label by appending a
number to it; this can be seen in the simulator or in the .LST file if macros
are expanded.
See Figure 3.8 for an example of the .LOCAL directive.
3.7.6.3 Macro Example
Figure 3.8 shows an example of a macro declaration and invocation. The
macro is a general purpose routine which transfers the contents of a data
buffer from one memory space to another.
{MACRO declaration}
.MACRO memory_transf(%0,%1,%2,%3,%4); {pass five arguments}
.LOCAL transf;
I4=%0;
{set I4 to source start address}
I5=%1;
{set I5 to destination start address}
M4=1;
{set pointer to increment by 1}
CNTR=%2;
{set length of buffer}
DO transf UNTIL CE; {transfer data}
SI=%3(I4,M4);
{transfer from type %3 memory}
transf: %4(I5,M4)=SI;
{transfer to type %4 memory}
.ENDMACRO;
{MACRO invocation}
memory_transf(^coeff_table, ^buffer, buff_length, PM, DM);
Figure 3.8 Macro Example
Note that the reserved keywords PM and DM are passed to the macro as
arguments.
3.7.7
Global Data Structures (.GLOBAL)
The .GLOBAL directive allows variables, buffers, and ports to be
referenced outside of the module they are declared in. If you declare one
of these structures in a code module, you must name with the .GLOBAL
directive in order to reference it in other modules.
3 – 40
Assembler 3
The .GLOBAL directive has the form:
.GLOBAL internal_symbol, … ;
Example:
.VAR/PM/RAM coeffs[10];
.GLOBAL coeffs;
{make buffer visible }
{ outside of module}
Once the symbol is made global, other modules may reference it by
identifying the symbol as EXTERNAL (see below).
3.7.8
Global Program Labels (.ENTRY)
The .ENTRY directive allows program labels to be referenced in other
modules. This lets you use the label for subroutine calls or inter-module
jumps.
The .ENTRY directive has the form:
.ENTRY program_label, … ;
Example:
.ENTRY fir_start;
module}
{make label visible outside
Once the label is declared as an entry point, other modules may reference
it by identifying the label as EXTERNAL.
3.7.9
External Symbols (.EXTERNAL)
The .EXTERNAL directive allows a code module to reference global data
structures (variables, buffers, and ports) and entry labels declared in other
modules. The symbol in question must be defined as a GLOBAL or
ENTRY symbol in the module in which it originates and must be defined
as an EXTERNAL in all others before it can be referenced.
This directive has the form:
.EXTERNAL external_symbol, … ;
Example:
.EXTERNAL fir_start;
{entry label in different
3 – 41
3 Assembler
module}
3.7.10
Assembler Constants (.CONST)
The .CONST directive defines assembler constants. Once you declare a
symbolic constant you may use it in place of the actual number.
The .CONST directive has the form:
.CONST constant_name = constant or expression, … ;
Only an arithmetic or logical operation on two or more integer constants
may be given as an expression; symbols are not allowed. See “Assembler
Expressions” in Section 3.4.
A single .CONST directive may contain one or more constant declarations,
separated by commas, on a single line. A list of multiple declarations may
not be continued on the following line.
Example:
.CONST taps=15, taps_less_one=14;
3.7.11
Locating Code & Data In Memory Segments (.PMSEG, .DMSEG)
The .PMSEG and .DMSEG directives are similar to the /SEG qualifier of
the .MODULE and .VAR directives. These directives have the following
syntax:
.PMSEG pmseg_name;
.DMSEG dmseg_name;
The .PMSEG directive causes the linker to locate all of the module’s code
and data structures in the program memory segment pmseg_name. The
.DMSEG directive causes the linker to locate all of the module’s data
structures in the data memory segment dmseg_name. MODULE directive
in a source code file. The pmseg_name and dmseg_name segments must be
previously defined in the system builder’s .ACH architecture file.
To locate all code and data of a source module in a system-builder-defined
memory segment, normally you must repeat the /SEG qualifier on the
.MODULE statement and on all .VAR declarations within the module. The
PMSEG and .DMSEG directives can be used instead of the repeated /SEG
qualifiers. These directives can also be used individually, to group data or
3 – 42
Assembler 3
code separately.
The .PMSEG and .DMSEG directives must be placed above the .MODULE
directive in your source code file.
Here is an example that locates only the DM data of a module in a
segment named Audio_Samples:
.DMSEG Audio_Samples;
.MODULE/RAM Sample_Input;
.VAR/DM/RAM/CIRC sample_buffer[15];
.VAR/DM/RAM other_buffer[5];
.VAR/DM/RAM another_buffer[5];
.VAR/DM/RAM variable1;
...code for SAMPLE_INPUT routine...
.ENDMOD;
The code for the SAMPLE_INPUT routine will assemble and link
normally, and will be stored in program memory.
3.7.12
Paged Memory Systems (.PAGE)
The system builder’s .ADSP2101P directive creates a .ACH architecture
file for paged memory systems. The assembler’s .PAGE directive must be
used in all source code modules that are part of the paged memory
system:
.PAGE;
The .PAGE directive must be placed above the .MODULE directive in
your source code file.
A special assembler operator, PAGE variable_name, can be used to extract
the page number (upper address bits) of a data variable/buffer:
AX0=PAGE array0;
{Get page number of array0}
This instruction determines the page number of the buffer array0 and
loads it into AX0. Note that the PAGE operator is similar the assembler’s
address pointer (^) and length of (%) operators.
The code modules, data buffers, and data variables that you store in paged
memory must be confined to their own page, and may not cross page
boundaries.
3 – 43
3 Assembler
3.8
INITIALIZING YOUR PROGRAM IN MEMORY
The linker reads assembler-output .OBJ files and generates an .EXE
memory image file. After you assemble and link your program, you have
the memory image file which contains all of the program’s code and data.
This file is essentially a snapshot of system memory prior to the start of
execution. Simply generating this file, however, does not guarantee that
the code and data will be initialized in memory; the file only specifies
what should be present in memory for the program to run correctly. You
must provide the means by which RAM and ROM memory is actually
loaded.
There are two ways to do this: 1) burn PROM memory devices, and
2) write routines in your program to copy code and data to the proper
locations in RAM. These methods are described in the following two
sections. Figure 3.9 below shows which method may be used for each
memory space and memory type of the ADSP-2100 Family processors.
PROCESSOR & AVAILABLE MEMORY SPACES/TYPES
ADSP-2100
ADSP-21xx
(all others)
external PM ROM
INITIALIZATION
METHOD
Burn PROM
chips
external PM ROM
Write source code to
copy code/data from
external ROM
external PM RAM
external DM ROM
external DM RAM
external DM ROM
internal PM RAM
(via Boot Memory PROMs)
internal DM RAM
external PM RAM
Write source code to copy
code/data from internal
PM RAM (after booting)
Figure 3.9 How To Initialize Memory
3 – 44
external DM RAM
Assembler 3
(The ADSP-21xx simulators automatically initialize all regions of memory,
whether internal, external, RAM or ROM; this is done to simplify
simulator-based debugging. However, you must remember that
initialization is not automatic in hardware.)
3.8.1
Using The PROM Splitter To Initialize ROM
Once the linker creates a memory image file of your program, you can use
the PROM splitter to accomplish initialization in one of two ways:
• by generating files to burn PROM memory devices for off-chip
program or data memory, or
• by generating files to burn PROM memory devices for boot memory;
on-chip program memory RAM will be initialized when booting
occurs (for ADSP-21xx processors with internal and boot memory)
The PROM splitter translates ROM portions of the .EXE file into a format
suitable for industry-standard PROM burners.
3.8.2
Initializing RAM In Source Code
RAM-type system memory must be initialized by your program. The
exception to this rule is the internal program memory RAM of the
ADSP-2101, ADSP-2105, ADSP-2111, and ADSP-21msp50. This RAM
space can be initialized by the booting operation (as described in
Section 3.8.1).
Three types of memory must be initialized in source code:
• off-chip program memory RAM
• off-chip data memory RAM
• on-chip data memory RAM (for the ADSP-21xx processors named
above)
To initialize these memory spaces, you must have the code and data
stored in ROM memory devices—either off-chip data, program, or boot
memory—and include source code in your program which will copy the
information to its assigned location. One copy loop is needed for each
discontiguous segment of memory to be loaded.
For initialization information stored in boot memory, the loader code
must perform the copy operation from internal program memory after
booting occurs. This process can be automated by means of the PROM
splitter’s boot loader option (-loader switch). See Chapter 5 for a full
description of this feature.
3 – 45
3 Assembler
3.9
LIST FILE FORMAT
The .LST list file allows you to interpret the results of the assembly
process. An example of a list file is shown in Figure 3.10. The
following information is found in this file:
addr
Offset from module base address
inst
Opcode (an appended “u” indicates that the opcode
contains an undefined field)
source line
Source file line number and code
Four assembler directives may be used to format the .LST list file
output. These directives are:
.NEWPAGE
.PAGELENTH lines
.LEFTMARGIN columns
.INDENT columns
.PAGEWIDTH columns
inserts a page break in the printed output
inserts page breaks after specified number of lines
indents left margin specified number of columns
indents source code specified number of columns
sets right margin to specified number of columns
The .NEWPAGE and .PAGELENGTH directives can be used to paginate
the output in a logical fashion, while .LEFTMARGIN, .INDENT and
.PAGEWIDTH are used to make each page more readable. These
directives may be placed anywhere in your source code file.
3 – 46
Assembler 3
Analog Devices Inc.
C:\2101_System\fir2101.app
addr inst
source line
1
2
3
4
5
6
0000
0001
0002
0003
0004
0005
0006
0007
0008
0009
ADSP-21XX Assembler Version 3.0
Fri May 13 11:04:39 1990
.MODULE/RAM/BOOT=0 FIR_ROUTINE;
.CONST TAPS=15;
.ENTRY FIR_START;
Page 1
{ relocatable interrupt }
{ service routine module }
{make label visible outside
.EXTERNAL DATA_BUFFER, COEFFICIENT; {make global buffers
visible
7
8
9
3C00E5 10 FIR_START: CNTR = 14;
{N-1 passes within DO loop}
0D0388 11
SI = RX0;
{read from SPORT0}
680080 12
DM(I0,M0) = SI;
E89800 13
MR=0, MY0=PM(I4,M4), MX0=DM(I0,M0);
14
15
14000Eu 16
DO CONVOLUTION UNTIL CE;
E80000 17 CONVOLUTION: MR=MR+MX0*MY0(SS), MY0=PM(I4,M4), MX0=DM(I0,M0);
18
19
20400F 20
MR=MR+MX0*MY0(RND); {Nth pass with rounding}
050000 21
IF MV SAT MR;
{saturate if overflowed}
0D0C9C 22
TX0 = MR1;
{write to sport 0 transmit}
0A001F 23
RTI;
{return from interrupt}
24 .ENDMOD;
Figure 3.10 List File Menu
3 – 47
3 Assembler
3 – 48
Linker
4.1
4
INTRODUCTION
The ADSP-21xx linker generates an executable program by linking
together separately-assembled modules. The linker’s primary output is a
memory image file for the program which has the filename extension
.EXE. This file is loaded into the ADSP-21xx simulators and emulators for
debugging. Once the program is fully debugged, the PROM splitter tool is
used to generate PROM burner files from the memory image file.
As described in the previous chapter, the assembler processes each source
code module and outputs an object file (.OBJ), a code file (.CDE), and an
initialization file (.INT). The object file contains memory allocation and
symbol information, while the code file contains ADSP-21xx opcodes with
unresolved symbols marked. The initialization file contains information
regarding data variables and buffers. The initialization data must be
supplied by data files named with the assembler’s .INIT directive. The
linker reads data from these files and incorporates it into the .EXE
memory image file. Changes in initialization data only require relinking.
Figure 4.1, on the following page, shows the files input and output by the
linker.
The linker scans each assembled module and resolves global/external
symbol references between modules. It assigns (“allocates”) addresses to
relocatable code and data fragments. The linker also reads the .ACH
architecture description file in order to construct the system memory map
and allocate code and data to it. You must identify your architecture file
for the linker with the -a invocation line switch.
The linker can generate three different files. The .EXE memory image file
is always created—this is the executable program—and contains the
actual opcodes and data to be stored in memory. The optional .MAP map
listing file summarizes information regarding the linked program. The
optional .SYM symbol table file lists all symbols encountered by the
linker, their absolute values and their scope of reference. This file is also
used by the ADSP-21xx simulators and emulators.
4–1
4 Linker
Init Files
(.INT)
Code Files
(.CDE)
Object Files
(.OBJ)
Buffer Initialization
Data Files [.DAT]
Architecture
Description
File (.ACH)
LINKER
Memory Image File
(.EXE)
Map Listing File
(.MAP)
Symbol Table File
(.SYM)
Figure 4.1 Linker I/O
4–2
Linker 4
The initialization data files (.DAT) are not explicitly named in the linker
invocation since they are specified (with the .INIT directive) in the source
code files. The data files are incorporated by the linker. When changes are
made in the data files, simply relink to incorporate the new data.
(Note: Since the assembler’s .VAR directive is used for declaring both
single-word data variables and multiple-word data buffers, the term “data
buffer” includes both variables and buffers.)
4.2
RUNNING THE LINKER
The linker is invoked this way, listing the files to be processed:
LD21 file1 [file2 …] [-switch …]
For example:
ld21 main sub1 sub2 -a archfile
Each input file must contain only one module. If the files are not in the
current directory of your operating system, a path must be given with
each filename to enable the linker to find the directory where it is stored.
The filenames must identify the assembler-output files with no extension
(i.e. .CDE, .OBJ, .INT). The linker-output files are given the default
filename 210X. You can rename these files by using the -e switch (see
“Linker Switch Options” below).
The linker can also be invoked with the -i switch, which names a separate
file containing a list of files to link:
LD21 -i file_all [-switch …]
In this case the linker reads the indirect list file file_all, which must be a
simple text file with one path/filename per line.
Other optional switches control various aspects of linker operation. They
may be entered in either upper or lower-case. Multiple switches must be
separated by at least one space.
4–3
4 Linker
The linker allocates memory to modules according to the order in which
the input files are listed. For modules which contain circular data buffer
declarations, changing the order of input files may determine whether or
not a program can be successfully linked in the available memory space.
This leads to the following guideline:
Modules containing circular buffers of different sizes should be listed
according to descending buffer size.
This forces the linker to allocate memory to the larger circular buffers first
(which have greater restrictions on allowable base addresses).
If you forget the syntax for invoking the linker, type:
LD21 -help
This will show you how the command must be entered and will display a
list of the available switches. The -help switch works with all of the
development software tools.
If you are assembling source code generated by the ADSP-21xx C
Compiler, the linker must be invoked with its -c switch. Refer to the
ADSP-2100 Family C Tools Manual and ADSP-2100 Family C Runtime
Library Manual for further information.
4.2.1
Placing Modules On Boot Pages
The linker provides an alternative to the assembler’s .SEG/BOOT
directive for setting modules in boot memory pages. The linker’s indirect
file option is employed to accomplish this.
To have the linker place a copy of a module on one or more boot pages,
list the module’s filename in this way in the indirect file:
filename B hh
The hh parameter is a two-character hex number which selects the boot
pages to include the module. It is an 8-bit selector for pages 0-7; any bit
which equals 1 indicates placement on that page:
hh7-0 =
4–4
pg7
pg6
pg5
pg4
pg3
pg2
pg1
pg0
Linker 4
For example, the following line contained in an indirect list file
subprog B 1F
causes the linker to place a copy of subprog on boot pages 0-4. The linker
must be invoked with its -i switch, naming the indirect list file. Note that
the hh selector does not need the “0x” hexadecimal prefix.
4.2.2
Linker Switch Options
The linker switches are listed below in Table 4.1; some require arguments
as shown.
Switch
-a archfile
-c
-dir directory; …
-dryrun
-e executable
-g
-i file_all
-lib
-p
-pmstack
-rom
-s heap_size
-user fastlibr
-x
Effect
Architecture description file archfile.ACH read by linker
Runtime stack created for compiled C programs (in DM)
Specify directories to search for library routines
Quick run to test for link errors (no .EXE file generated)
Output files given filename executable (default is 210X)
.SYM symbol table file generated
Files listed in indirect file file_all are linked
ADSP-21xx Runtime C Library linked (use only with -c)
Assign library routines to boot pages where called
C stack moved to program memory (only with -c)
ROM version of Runtime C Library used (use only with -c)
Create runtime C heap (use only with -c)
Search fast library file generated by LIB21 library builder utility
.MAP listing file generated
Table 4.1 Linker Switches
The .SYM symbol table file, generated with the use of the -g switch, is
helpful for debugging programs with the ADSP-21xx simulators. The
simulators read program symbol definitions from this file, allowing
variables and address labels to be easily referenced.
4–5
4 Linker
4.2.2.1 Specify Architecture File (-a)
You must identify your .ACH architecture description file for the linker
with this switch. The filename can be given without the .ACH extension:
LD21 file1 file2 -a archfile
The linker requires the information found in this file in order to allocate
the code and data of your program to the available system memory.
4.2.2.2 Create C Runtime Stack (-c)
The -c switch should be used when you are linking program modules
generated by the ADSP-2100 Family C Compiler. These programs require
the use of a runtime stack. Giving the -c switch causes two things to
happen. First, the linker creates the label
____top_of_ram
(four leading underscores)
which is assigned to the highest available address in data memory (or
program memory, if the -pmstack switch is given).
Second, the linker locates and links the C runtime header, which is an
assembly language file required by compiled C programs. The
____top_of_ram label is used by the runtime header to locate and initialize
the stack in processor memory. The runtime header sets up the registers
used to control the stack and calls the main routine of the C program. The
stack has no limit on its size; it is allowed to grow larger (toward lower
addresses) whenever new values are pushed onto it. The ADSP-2100
Family C Tools Manual and ADSP-2100 Family C Runtime Library Manual
provides detailed information regarding the runtime stack.
Different versions of the runtime header are used for each ADSP-21xx
processor. These files, provided with the C compiler software, have
filenames indicating which processor each is used with. You must choose
the proper files for your system processor and rename them as
run_hdr.OBJ
run_hdr.CDE
run_hdr.INT
before linking. The linker searches for files with these names. You may
also choose to modify the .DSP assembly source file of the runtime header
for your C program; the source files are provided to allow this. In this case
4–6
Linker 4
you must edit and reassemble the runtime header module before linking.
Refer to the “Runtime Header” section of Chapter 2 in the ADSP-2100
Family C Tools Manual and ADSP-2100 Family C Runtime Library Manual for
specific filenames and procedures.
The ADIRTH environment variable is used to locate the runtime header
file for the linker. The linker will search for this file according to the path
specified by ADIRTH. You must set the environment variable to point to
the directory in which the file is stored. If, for example, you left the file in
the Release 4.0 default directory in which it was installed, the DOS
command to set ADIRTH would be:
SET ADIRTH=C:\ADI_DSP\LIB\
The final slash must be present; do not include extra spaces. (Note:This
default directory may have a different name in future releases; be sure to
check your release note for the exact directory name.)
If the linker is invoked with the -c switch but cannot find the proper
runtime header file it will issue an error message. (Note: Only required for
Release 4.0 or earlier.)
4.2.2.3 Search Paths For Library Routines (-dir & ADIL)
The linker allows you to use files of frequently-used routines as libraries.
When a program being linked calls one of the library routines, the linker
automatically searches for and links in the appropriate file.
You must tell the linker where to find your library files by using either the
-dir switch or the ADIL environment variable. The linker searches the
path/directories specified by ADIL first, and then those named with the
-dir switch (if necessary).
For example, to set the ADIL environment variable to the subdirectory
C:\DSP\LIBRARY\ on a PC, you would enter:
SET ADIL=C:\DSP\LIBRARY\
If you are listing multiple DOS paths, they must be separated by
semicolons. The final slash must be present. Do not include extra spaces.
4–7
4 Linker
In the Unix environment on a Sun workstation, the same command would
look like this:
setenv ADIL “/dsp/library/INCLUDE/”
You can specify a maximum of 20 directories with ADIL.
After searching for library routines according to ADIL, the linker searches
the paths named with the -dir switch (if it is given).
See the section “Using Library Files of Your Routines” below for further
information. (Note: Only required for Release 4.0 or earlier.)
4.2.2.4 Output Filenames (-e)
The -e switch allows you to name the linker-output files. If this switch is
not used, the default filenames are 210X.EXE, 210X.SYM, and 210X.MAP.
4.2.2.5 ADSP-21xx Runtime C Library Linked (-lib)
This switch should be given if the program being linked has been
generated by the ADSP-2100 Family C Compiler and employs any of the
ADSP-21xx Runtime C Library functions. This library is a set of
ANSI-standard and digital signal processing routines intended for use in
C programs. The -lib switch causes the linker to search the C library and
link any functions called.
The -lib switch is used only in conjunction with the -c switch. Refer to the
ADSP-2100 Family C Runtime Library Manual for further information on the
Runtime C Library.
4.2.2.6 Copy Library Routines Onto Boot Pages (-p)
The -p switch causes the linker to place copies of library routines on each
boot page where they are called. This switch should be given even if the
routine (or routines) are called only on one page.
A convenient way to use this switch is to keep your frequently-used
routines in files located in the current directory and use the DOS
convention for the current directory (a period) with the -dir switch:
LD21 file1 file2
4–8
-p -dir .
“.” is the DOS notation for the
current directory
Linker 4
Now the linker will find all calls to these routines in your boot pages and
attach the appropriate code to each.
(Note: The linker will not automatically search the current directory. If
this is where you store your library files you must use the -dir switch or
ADIL to point to it.)
The -p switch may only be used for systems with boot memory—
including all ADSP-21xx processors except the ADSP-2100.
4.2.2.7 C Runtime Stack In PM (-pmstack)
The -c switch causes the linker to implement a runtime stack in data
memory for a program generated with the ADSP-21xx C Compiler. Giving
the -pmstack switch moves the stack to program memory.
If your program was compiled with the C compiler’s -pmstack switch, it
must be linked with the linker’s -pmstack switch. The -pmstack switch
may only be used in conjunction with the -c switch. (Note: Only allowed
for Release 4.0 or earlier.)
4.2.2.8 ROM Version Of ADSP-21xx Runtime C Library (-rom)
The functions of the ADSP-21xx Runtime C Library may be located in
ROM or RAM by the linker, with default to RAM. If the C Compiler’s
-crom switch has been used to locate code modules and library functions
in ROM, the linker must be invoked with its -rom switch.
The -rom switch is used only in conjunction with the -c switch.
(Note: Only allowed for Release 4.0 or earlier.)
4.2.2.9 Create Runtime C Heap (-s)
The -s heap_size switch causes the linker to implement a runtime heap for a
program generated with the ADSP-21xx C Compiler. The -s switch may
only be used in conjunction with the -c switch, which causes the creation
of a runtime stack. The heap_size argument, which must be given as an
integer, is evaluated by the linker in units of memory words.
You must use the -s switch to create a heap when employing the malloc,
calloc, or free routines of the ADSP-21xx Runtime C Library. These routines
provide runtime memory management via the heap.
4–9
4 Linker
Normally the top of the stack is located at the highest available address in
data memory (or program memory, if the -pmstack switch is given) and
grows downward, toward lower addresses. When the -s heap_size switch
is given, a heap is created at the highest available address in memory. The
stack is shifted down, and starts just below the bottom of the heap (as
defined by the heap_size parameter you have specified).
When the -s switch is given, the linker creates the artificial symbol
____top_of_stack
(four leading underscores)
which is assigned the following address:
____top_of_stack=____top_of_ram - heap_size
This symbol is used by the runtime header to define and maintain the
stack. (Note: Only allowed for Release 4.0 or earlier.)
4.2.2.10 Fast Library File Searched (-user)
The -user switch names a fast library file which you have generated with
the LIB21 library builder utility. When this switch is given the linker will
search only the indicated file for library routines to link. See “Building a
Single Library for Fast Access” below.
4.3
HOW THE LINKER WORKS
The succeeding text explains how the linker functions when it processes
your code modules. By better understanding how the linker makes
decisions you can structure your program for more efficient use of
memory.
The job of the linker is to combine assembled code modules and
initialization data into an executable program called a memory image file
(.EXE). The two primary tasks are allocation of memory and resolution of
symbols.
4.3.1
Memory Allocation
The linker reads each code module and data variable/buffer declaration
for the characteristics of the memory in which it is to be stored—RAM or
ROM, PM or DM, segment name, etc. The linker also reads the contents of
the .ACH architecture description file to see what memory spaces and
characteristics are available.
4 – 10
Linker 4
The linker assimilates all of this information and places each module,
buffer, and variable in the correct type of memory. If an object has an
absolute address specified with the ABS qualifier, it is called nonrelocatable. If no absolute address is given for an object, it is relocatable.
The linker must assign address space to each relocatable item.
When the segment name qualifier (SEG) is combined with an ABS
specification, the declared object is again non-relocatable. If the SEG
qualifier is used without an absolute address, however, the declared object
is relocatable within the named segment only.
The linker places objects in memory in the following sequence:
1. Non-relocatable objects—data buffers and modules with the ABS
qualifier
2. Circular buffers relocatable within a segment—data buffers with
the CIRC and SEG qualifiers
3. Modules & non-circular buffers relocatable within a segment—
modules and data buffers with the SEG qualifier
4. Relocatable circular buffers—data buffers with the CIRC modifier
5. Relocatable modules & non-circular buffers—all remaining
modules and non-circular buffers
For ADSP-21xx processors with on-chip and boot memory, the linker will
place as much bootable code and data as possible in the on-chip address
space before using external memory.
Circular buffers can only be located at certain boundaries in memory due
to characteristics of the ADSP-21xx processors’ circular buffer addressing
hardware. In general, a circular buffer must start at a base address which
is a multiple of 2n, where n is the number of bits required to represent the
buffer length in binary notation.
The linker places circular buffers in memory according to this restraint. If
a circular buffer has a length of 13, for example, it is placed at a base
address which is a multiple of 16.
A complete discussion of this topic is found in the two sections pertaining
to circular buffers under “Data Variables & Buffers” in Chapter 3.
4 – 11
4 Linker
4.3.1.1 Boot Memory Allocation
A system may have up to 8 boot pages. A single boot page can store up to
2048 24-bit program memory words for the ADSP-2101, ADSP-2111, and
ADSP-21msp50. ADSP-2105 and ADSP-2115 boot pages store up to 1024
words.
The important concept to keep in mind for a booting system is the
distinction between what happens when linking and what happens at
runtime. Any code module declared with the BOOT qualifier is placed in
the boot memory space by the linker. This placement, however, is only for
program storage prior to runtime (when the page is booted and executed).
The linker must also allocate address space for a bootable module’s
code/data in program or data memory, where it is located at runtime.
Thus the linker allocates space in both boot memory and program/data
memory for all bootable modules. By doing so, the linker provides the
logical interfacing of boot storage to runtime memory.
If you want a non-booted routine or data buffer to exist in processor
memory (either internal or external) during the execution of a particular
boot page, you must use the BOOT module qualifier to associate it with
that page. This, together with the STATIC qualifier, causes the linker to
reserve space for the object during the time frame when the page is
executed.
The linker-output map listing file (.MAP) shows you the layout of your
program in boot memory as well as the corresponding mapping of code in
runtime program memory (after booting occurs). You can use this file to
help understand the transfer from boot memory to runtime memory.
You cannot specify where a module will be placed in boot memory—the
linker controls this function, constructing efficiently-packed boot pages.
(Note: All ADSP-21xx processors except the ADSP-2100 have boot
memory.)
4 – 12
Linker 4
4.3.2
Symbol Resolution
To resolve program symbols, the linker must equate each symbol to a
specific address in memory. Program labels and variable/buffer names
are the symbols you define in your source code. The assembler simply
passes these on to the linker, which must determine the address of each
after placing all modules in memory.
A symbol can only be referenced within the module where it is defined
unless it is given the ENTRY or GLOBAL attribute. These assembler
directives expand the scope of reference of a symbol beyond the local
module. Other modules must declare the symbol as EXTERNAL before
referencing it.
For each EXTERNAL reference in a module, the linker searches all other
modules for ENTRY or GLOBAL definitions of the symbols. An error is
flagged if the search detects multiple matches. If the search fails, the linker
conducts a library file search according to the sequence outlined in
“Library Search Sequence,” above. This search traverses the directories
pointed to by the ADIL environment variable, as well as any named with
the library switches (-user, -dir).
If the unresolved symbols are not found by the library search, the linker
issues an error message.
Once the allocation of memory is complete and all external references
resolved, the linker assigns an address value to each symbol.
The linker generates a .SYM symbol table file (if the -g switch is given)
which contains a list of all program symbols encountered and their
resolved addresses. This file shows you which symbols may be referenced
by each module.
Appendix B describes the format of the .SYM file. The .SYM file is used by
the ADSP-21xx simulators and emulators to allow symbolic references
during debugging.
4 – 13
4 Linker
4.4
USING LIBRARY FILES OF YOUR ROUTINES
The ADSP-21xx linker lets you use library files of your frequently-used
routines and subroutines. The library routines are made available to any
program being linked. By simply referencing a routine in code you cause
the linker to search for and link in the appropriate library file.
You must take the following steps to prepare your libraries:
What You Do
1.
Write the library routines, placing a label at the start of each one.
Declare these labels as global ENTRY points (with the assembler’s
.ENTRY directive).
2.
Declare the start label of a library routine as EXTERNAL in any
module of your program which calls or jumps to the routine. Use
the .EXTERNAL directive.
3.
Assemble the library routines in one or more modules (one module
per file).
4.
Tell the linker where to find your library files. The path/directory
of each file must be specified with the ADIL environment variable
or the -dir switch.
Now when you link a program which uses any of your library routines,
the linker does the following:
What The Linker Does
4 – 14
1.
Allocates the program to memory, collects all symbols in the
program, and attempts to determine the address for each label
referenced. (This is known as “symbol resolution,” described
earlier in this chapter.)
2.
Since the library routine labels are unresolved symbols, the linker
automatically opens and searches every .OBJ file found in the
directories specified by ADIL and -dir. All labels defined as global
ENTRY points are examined. (Note: The file and module names
are irrelevant in the search process.)
3.
Any file containing a label referenced by the program is included
in the linkage.
Linker 4
When searching through your library directories, the linker first goes to
the directories specified by ADIL and then those named with the -dir
switch (if necessary).
For ADSP-21xx systems with multiple boot pages, the linker’s -p switch
should be given if any library routines are used. This switch causes the
linker to place copies of the routines on all pages necessary.
4.4.1
Building A Single Library For Fast Access
The ADSP-21xx development software includes a library builder utility
program called LIB21 which allows you to write a set of library routines
and pack them into one file for fast access. Once the library file is
generated, invoking the linker with the -user fastlibr switch causes it to
search the file fastlibr, extracting and linking only the routines needed.
Using the LIB21 utility and -user switch accomplishes the same thing as
the -dir switch or ADIL environment variable—your library routines are
linked with the executable program. The advantage of LIB21 is that the
linker runs faster, since it can search a single file faster than searching
through several. LIB21 makes this possible because it can include multiple
modules in one file, whereas the assembler and linker normally allow only
one per file.
The LIB21 utility is invoked in one of two ways:
LIB21 fastlibr file1 [file2 …] [-v version]
or
LIB21 fastlibr -i file_all [-v version]
The output file FASTLIBR.A is created by LIB21. This file combines the
individually-assembled modules named on the command line (file1, file2,
etc.) if the first form is used. These inputs should be listed with no
filename extension (i.e. .OBJ, .CDE, .INT).
The -i switch has the same effect here as in the linker invocation. The
file_all file is read for a list of files to place in the output. The list must be a
simple text file with one path/filename per line.
The -v switch allows you to imbed a version number for the routines in
the library module; version must be a simple character string. The version
string does not affect code execution.
4 – 15
4 Linker
To locate the fast library file, the linker first searches the current directory
and then, if necessary, those specified by the ADIL environment variable.
Here is an example of how to generate a fast library file:
LIB21 filter taps coeffs start_input -v V1.0
LIB21 builds the file FILTER.A, combining the three input modules. The
character string “V1.0” is embedded in the file. If the linker is now
invoked with
LD21 main sum graph -user filter
the modules main, sum, and graph are linked. Assuming that one or more
library routines from FILTER.A are called, the linker extracts each one
required and includes them in the linkage.
4.4.2
Library Search Sequence
There are several ways to use library routines in conjunction with the
linker: the -dir switch, ADIL environment variable, LIB21 utility and
-user switch, and -lib switch. When various combinations of these
methods are employed, the linker will conduct its search in the following
order:
1.
If the -user switch is given, the fastlibr file is opened and searched.
Directories searched to find this file are:
a. current directory first, then
b. ADIL directories (if necessary)
2.
If the -lib switch is given, the ADSP-21xx Runtime C Library is
searched. ADIL directories are searched to find the library. (See the
ADSP-2100 Family C Tools Manual and ADSP-2100 Family C
Runtime Library Manual.)
3.
ADIL directories are searched for remaining unresolved
references.
4.
If the -dir switch is given, the directories listed as switch
arguments are searched last.
Note that for library files other than those generated by the LIB21 utility
(Step 1 above), the linker will not search the current directory unless
specifically instructed to by ADIL or -dir.
4 – 16
Linker 4
4.5
MULTIPLE BOOT PAGE SYSTEMS
Implementing multiple boot page systems can be straightforward or
complex, depending on how much code and data is to be shared between
pages. If each page is completely independent, containing all information
it needs, memory allocation by the linker is a relatively simple function.
(Note: All ADSP-21xx processors except the ADSP-2100 have boot
memory.)
Many systems, however, must share code or data structures between boot
pages. Standard linker operation does not allow this, since the linker
wipes out the pre-existing memory map for each boot page. To prevent
this, you must use one of the following techniques:
• repeating the assembler’s BOOT qualifier on a module (containing
code and/or data structures), listing each page on which it is required
• giving the linker’s -p switch to copy library routines to each page
necessary
• using the assembler’s STATIC qualifier to preserve a module or data
buffer/variable in memory as new pages are booted
These techniques can be used individually or in combination to achieve
various results. The first two techniques have the same end result, but the
STATIC qualifier is a completely different mechanism. Applying this
qualifier prevents the overwriting of a module (or buffer) when a boot
page is loaded, either page 0 at reset (if MMAP=0) or pages 1-7 under
software control. This applies to modules/buffers in both internal and
external processor memory.
When the linker allocates memory to store your program, it considers nine
independent time frames of memory: non-booted program and data
memory and boot pages 0-7. Non-booted memory is defined as the initial
state of PM and DM before any boot page is loaded or any code executed.
The nine time frames are considered completely independent of one other
unless the STATIC qualifier is used on a code module (or data buffer)
declaration. In the absence of any STATIC declarations, the linker assumes
that each of the nine frames starts with a clean slate of PM and DM and
that each boot page has the entire memory map available when it is
booted.
4 – 17
4 Linker
4.5.1
Rebooting Under Program Control
Booting a new page during program execution is described in the Memory
Interface chapter of the ADSP-2100 Family User’s Manual. Execution
branches from one page to another as software-forced reboots occur.
Rebooting is controlled by the System Control Register, the ADSP-21xx
memory-mapped register located at address 0x3FFF in internal data
memory. This register contains the BFORCE (boot force) bit and the
BPAGE (boot page select) field.
Programs implemented in multiple boot pages execute in the following
way:
1. Page 0 is booted and executed at system reset.
2. When a new page is to be booted, the BPAGE select bits are set by an
instruction of the page 0 code.
3. With the next page selected, the reboot is initiated by setting the
BFORCE bit. Internal program memory is loaded from the new
page; internal data memory is unchanged.
4.5.2
Example: Sharing A STATIC Buffer
This section presents an example of sharing a data buffer among several
boot pages. The same method could be used to share a subroutine,
allowing it to be called by code from different pages. This example uses
2K-size boot pages, which are realizable for the ADSP-2101, ADSP-2111,
and ADSP-21msp50.
The STATIC qualifier is used in this example to prevent overwriting of the
buffer as software-forced reboots occur. Boot pages zero, one, and two are
to share the buffer; the code booted from each of these pages accesses the
data. The buffer is declared in source code stored on boot page 0:
.VAR/PM/RAM/STATIC dat1[64];
.GLOBAL dat1;
.INIT dat1: <frames.dat>;
The buffer is named dat1, is 64 words long, and is defined as GLOBAL to
make it visible outside of the module it is declared in. Other modules
must define dat1 as EXTERNAL in order to reference it; this includes
modules on any of the three boot pages.
4 – 18
Linker 4
The linker reads 64 data values from the file frames.dat to initialize dat1
with. The data is included in the boot memory portion of the .EXE
memory image file. This file is translated by the PROM splitter into a file
used to burn boot PROM chips.
Figure 4.2 shows the memory images of boot pages zero, one, and two.
Notice that the linker places the STATIC object dat1 at the top of page
zero. The linker also reserves (at least) the 64 highest addresses of pages
one and two for dat1. If too much code has been designated for storage on
either of these pages and the address space of dat1 would be overlapped,
the linker generates an error message.
Boot Page 0
word
addresses
0x0000
entire page is booted
(page length=255)
Boot Page 1
Boot Page 2
only page length
is booted
only page length
is booted
code
page length
page length
code
page length
code
0xFF
filler bytes
0x07FF
dat1[64]
Initialized buffer dat1 —
initialization data included
in boot memory image file
and burned into boot PROM
Top of pages 1 & 2
left unused by linker—
nothing loaded from
here during booting and
dat1 is not overwritten in
on-chip program memory
Figure 4.2 Boot-Loaded STATIC Data Buffer
4 – 19
4 Linker
This placement is what preserves the buffer in on-chip program memory,
because only the page lengths of pages one and two are loaded. The boot
address circuitry of ADSP-21xx processors loads on-chip program
memory starting at the highest address used (as defined by the page
length) and decrementing to zero. Since these pages contain less than
(2048 - 64) words, they will not overwrite dat1 when booted. The PROM
splitter calculates the length of each boot page and stores it in the fourth
byte of the page (page byte address 0x0003). Because initialization data for
dat1 is contained in the page zero image, the page length to be loaded is
255 and the entire page is booted. The linker places 0xFF filler bytes in the
region of page zero between the end of code and dat1.
(Note: The pagelength of a boot page is defined as:
pagelength= (number of 24-bit PM words ⁄ 8) - 1
Further information on this topic can be found in the “Boot Memory
Interface” section of the Memory Interface chapter in the
ADSP-2100 Family User’s Manual.)
One alternative to using the STATIC qualifier to create a shared routine or
buffer is to locate the object in memory yourself with the ABS address
qualifier. The address must be chosen such that it is higher in memory
than the page length of largest boot page. In this case you are doing the
job of the linker—placing the object in memory and assuring that it is
never overwritten during a boot page load. This requires an exact
determination of the memory map of your entire program. For complex
systems this may prove difficult; letting the linker to do the work for you
is usually easier.
4.5.3
Example: Using Static & Dynamic Segments
This section describes a more comprehensive example of a multiple boot
page system. We will use the ADSP-2101 as the system processor and
create a system specification file defining static and dynamic memory
segments. The static segment will contain code used by all boot pages,
while the dynamic segment will contain code specific to each page.
The system will utilize boot pages zero, one, and two. Page 0 is booted at
reset. When pages 1 and 2 are later booted, each will partially overwrite its
predecessor in ADSP-2101 internal program memory. The portion
overwritten will be the “dynamic” segment and the portion preserved will
be the “static” segment.
4 – 20
Linker 4
Here is the system specification file (input to system builder) for this
example:
.SYSTEM overlay_test;
.ADSP2101;
.MMAP0;
.SEG/PM/RAM/CODE/ABS=0
dynamic[0x400]; {lower 1K of on-chip PM}
.SEG/PM/RAM/CODE/DATA/ABS=0x400 fixed[0x400]; {upper 1K of on-chip PM}
.SEG/DM/RAM/DATA/ABS=0x3800
int_dm[0x400]; {on-chip DM}
.SEG/BOOT=0/ROM
.SEG/BOOT=1/ROM
.SEG/BOOT=2/ROM
boot0[0x800];
boot1[0x800];
boot2[0x800];
{boot page 0}
{boot page 1}
{boot page 2}
.ENDSYS;
The segments named dynamic and fixed are located in internal program
memory. All code which is common to all boot pages is placed in fixed; all
code not common among boot pages is placed in dynamic. The segment
size of 1024 is chosen here for simplicity only—for an actual digital signal
processing application this segment size would be dictated by the amount
of code common to each boot page.
The following statements declare a set of three page-specific modules for
each boot page:
.MODULE/RAM/SEG=dynamic/BOOT=0
.MODULE/RAM/SEG=dynamic/BOOT=0
.MODULE/RAM/SEG=dynamic/BOOT=0
mod01;
mod02;
mod03;
.MODULE/RAM/SEG=dynamic/BOOT=1
.MODULE/RAM/SEG=dynamic/BOOT=1
.MODULE/RAM/SEG=dynamic/BOOT=1
mod11;
mod12;
mod13;
.MODULE/RAM/SEG=dynamic/BOOT=2
.MODULE/RAM/SEG=dynamic/BOOT=2
.MODULE/RAM/SEG=dynamic/BOOT=2
mod21;
mod22;
mod23;
4 – 21
4 Linker
This statement declares a single module to be used by all three pages:
.MODULE/RAM/STATIC/SEG=fixed/BOOT=0
common_mod;
Finally, assume that the following buffer declaration is contained in some
other module booted from page 0:
.VAR/DM/RAM/STATIC/SEG=int_dm
common_buf[100];
This data buffer stores an array of 100 values which must be accessed and
modified by code from all three boot pages. Accordingly, the structure is
declared as STATIC to assure that its existing state is preserved as pages 1
and 2 are booted. The module which declares and initializes common_buf
must include code to copy the array from internal PM to internal DM after
it is booted. The linker only reserves space for the buffer in on-chip data
memory; it does not provide the mechanism to get the data there.
Figure 4.3 shows the memory images of boot pages 0, 1, and 2 after the
program is linked. Figure 4.4, on page 4-24, shows the state of ADSP-2101
internal memory after page 0 is booted and common_buf is copied to data
memory.
The boot circuitry of ADSP-21xx processors loads internal program
memory starting at the highest address used and decrementing to zero.
The lower addresses are loaded with every boot. Since pages 1 and 2 only
boot code into the dynamic segment, the fixed segment is not overwritten.
This allows common_mod to remain uncorrupted in memory. Because
common_buf is also declared as STATIC, the linker will not overwrite the
array with any data booted from pages 1 and 2.
Note that while this example system uses only on-chip memory, similar
methods must be used to implement static segments and preserve static
objects in off-chip memory. The linker allocates off-chip storage for booted
code and data if necessary; anything in external memory may be
overwritten by code or data copied off-chip from newly-booted pages
unless precautions are taken (i.e. STATIC qualification).
4 – 22
Linker 4
word
addresses
0x0000
Boot Page 0
mod01
mod02
mod03
Boot Page 1
mod11
mod12
mod13
Boot Page 2
mod21
mod22
mod23
common_buf[ ]
0x0400
common_mod
0x07FF
Figure 4.3 Common & Page-Specific Objects In Boot Memory
4.6
MAP LISTING FILE
The .MAP map listing file helps you interpret the results of linking. Using
the linker’s -x switch generates this file. The file provides the following
information.
• Symbols
A cross-referenced listing of all program symbols, arranged by module.
The list of symbols referenced by each module is shown, with the
following information for each symbol:
Symbol type
Address
Length
Memory space
module name, buffer/variable name, or program label
base address for modules & buffers
for modules & buffers
PM, DM, or BM
4 – 23
4 Linker
Boot Page 0
ADSP-2101
0x0000
mod01
mod02
mod03
booted at
RESET
common_buf[ ]
booted at
RESET
common_mod
booted at
RESET
Internal PM
dynamic
mod01
mod02
mod03
Segment names
dynamic , fixed , &
int_dm defined for
PM and DM
0x0400
fixed
common_mod
0x07FF
Internal DM
int_dm
common_buf[ ]
Array is copied
from PM to DM
by booted code
executed at
system startup
Figure 4.4 Runtime Memory State For Page 0 Code
• Memory Segments
A map of memory segments declared for the system builder and
described in the .ACH architecture description file. The base address,
length, and memory attributes of each segment are shown.
4 – 24
Linker 4
• Boot Memory & Runtime Program Memory
An address map of modules and data structures on each boot page, and
the corresponding map of booted code in internal program memory.
Information on boot PROM byte addresses and required PROM sizes is
also provided.
• Fixed vs. Dynamic Memory
Maps of fixed program memory, dynamic data memory, and fixed data
memory. These maps include address, length, and memory attribute
specifications.
• Error Messages
See Appendix C for error message definitions.
• Libraries
A list of library files searched and linked.
An example map listing file is shown in Figure 4.5.
ADSP-21XX Linker Version 3.0
Analog Devices, Inc.
final (final.exe) mapped according to FIR_SYSTEM (sysb2101.ach)
xref for module: MAIN_ROUTINE
MAIN_ROUTINE
DATA_BUFFER
COEFFICIENT
RESTARTER
CLEAR_BUFFER
WAIT
FIR_START
pm
dm
pm
pm
pm
pm
boot memory page(s) 0,
0:0000 [003B]
module(global)
0:3800 [000F]
variable(global)
0:0040 [000F]
variable(global)
0:001C
label
0:0024
label
0:0039
label
0:004F [0000]
extern(FIR_ROUTINE)
xref for module: FIR_ROUTINE
FIR_ROUTINE
FIR_START
CONVOLUTION
COEFFICIENT
DATA_BUFFER
boot memory page(s) 0,
pm 0:004F [000A]
module(global)
pm 0:004F
label
pm 0:0054
label
0:0040 [000F]
extern(MAIN_ROUTINE)
0:3800 [000F]
extern(MAIN_ROUTINE)
(listing continues on next page)
4 – 25
4 Linker
21xx memory per FIR_SYSTEM (sysb2101.ach):
internal 2101 pm ram mapped to 0000 - 0800 (auto booted at reset)
internal 2101 dm ram mapped to 3800 - 3BFF
0000 - 07FF [ 2048.] external bm rom code BOOT_MEM
0000 - 07FF [ 2048.] internal pm ram data/code INT_PM
0800 - 3FFF [ 14336.] external pm ram data/code EXT_PM
3800 - 3BFF [ 1024.] internal dm ram data INT_DM
0000 - 37FF [ 14336.] external dm ram data EXT_DM
boot memory and bootable runtime program memory map:
boot page 0 (auto boot)
bm:0000-003A (x8rom:0000-00EB)
pm:0000-003A [59.]
ram module
MAIN_ROUTINE of MAIN_ROUTINE
bm:0040-004E (x8rom:0100-013B)
pm:0040-004E [15.]
ram circ variable COEFFICIENT of MAIN_ROUTINE
bm:004F-0058 (x8rom:013C-0163)
pm:004F-0058 [10.]
ram module
FIR_ROUTINE of FIR_ROUTINE
8k of boot memory rom space required for this bootable runtime map.
Most convenient boot memory rom size is 8k bytes (64k bits).
fixed program memory map:
fixed program memory rom:
fixed program memory ram:
0.
0.
dynamic data memory map:
boot page 0
3800 - 380E [15.]
ram circ variable
fixed data memory map:
fixed data memory rom:
fixed data memory ram:
DATA_BUFFER of MAIN_ROUTINE
0.
0.
21xxlnk: final, 21xx memory use:
program memory rom: 0.; program memory ram: 0.;
data memory rom: 0.; data memory ram: 0.
Figure 4.5 Map Listing File
4 – 26
PROM Splitter
5.1
5
INTRODUCTION
The PROM splitter extracts the ROM portion of the linker-output .EXE
memory image file and formats the information for use with PROM
programmers.
The PROM splitter can generate files for program, data, or boot memory.
Three files are created for program memory to organize the PROMs in
three-byte words corresponding to the 24-bit ADSP-21xx instructions.
Two files are created for data memory to group data into two-byte words,
and one byte-wide files are output for boot memory.
Byte-stream files may be created for program and data memory, for
vertical rather than horizontal organization of words. The PROM splitter
can generate the PROM burn files in Motorola S Record or Intel Hex
Record format. Motorola S2 format is also supported, but only for bytestream output.
5.2
RUNNING THE PROM SPLITTER
The command used to invoke the PROM splitter is:
SPL21 imagefile PROMfile [-switch …]
Each run generates a single output file for one type of ADSP-21xx
memory—program, data or boot. If you need to create files for more than
one memory type, you must run the PROM splitter one time for each.
The imagefile input is the .EXE file of your program generated by the
linker. This file must have the .EXE extension appended by the linker;
otherwise the PROM splitter will not recognize it.
You must name the output PROMfile each time the PROM splitter is run.
If you are producing files for more than one memory space (i.e. PM, DM,
BM), different filenames should be chosen each time to avoid overwriting
the results of the previous run.
5–1
5 PROM Splitter
Five command line switches are used with the PROM splitter, one
required and four optional:
switch
Memory space
PROM file format
Boot page size
Boot page boundaries
Boot loader
possible forms
-pm, -dm, -bm
-s, -i, -us, -us2, -ui
-bs pagesize
-bb boundary
-loader
required
optional: defaults to -s
optional: default=2K
optional: default=2K
optional
The memory space and PROM file format switches are defined as follows:
-pm
-dm
-bm
program memory
data memory
boot memory
-s
-i
-us
-us2
-ui
Motorola S record
Intel Hex record
Motorola S record byte-stream
Motorola S2 record byte-stream
Intel Hex record byte-stream
not used in ADSP-2100 systems
default
used with -pm or -dm only
used with -pm or -dm only
used with -pm or -dm only
The -bs, -bb, and -loader switches are described in later sections of this
chapter. The -bs and -bb switches let you create 1K-size boot pages for the
ADSP-2105 and ADSP-2115 processors.
5.2.1
Example: Generating PM & DM Files
To generate PROM burn files for program and data memory, you must
run the PROM splitter twice:
spl21 fir_sys pmburn
spl21 fir_sys dmburn
-pm
-dm
Here the memory image file produced by the linker is FIR_SYS.EXE,
which contains code and data to be stored in PROMs for program and
data memory. Note that each run’s output is given a unique filename so
that it does not overwrite the previous result. The output files are created
in Motorola S record format since no PROM format switch is used.
5–2
PROM Splitter 5
5.2.2
Example: Generating BM Files Only
Many ADSP-21xx systems use only boot memory for program storage,
with no PROM-based program or data memory. For these systems, the
PROM splitter is only run once to create the boot memory PROM file, for
example:
spl21 iir_sys bootburn
-bm -i
Here the -i switch is used to generate the file in Intel Hex record format.
5.3
PROM SPLITTER OUTPUT FILES
The PROM splitter generates three byte-wide files when the -pm switch is
set. One file contains the upper bytes of the 24-bit words and has the
filename extension .BNU. A second file contains the middle bytes and has
the filename extension .BNM, and the third file contains the lower bytes
and has the filename extension .BNL.
The PROM splitter generates two files when the -dm switch is set. One
file contains the upper bytes of the 16-bit data words and has the filename
extension .BNM. The second file contains the lower bytes and has the
filename extension .BNL. The .BNU file is created but not used.
The PROM splitter generates one file when the -bm switch is set. This file
includes the code and data for all pages of boot memory and has the
filename extension .BNM. The .BNU and .BNL files are created but not
used.
Figure 5.1 on the next page shows the files output by the PROM splitter.
5.3.1
Byte-Stream Output For PM & DM
If byte-stream output is chosen with the -us, -us2, or -ui switch, a single
file is generated (.BNM) for vertical organization of words in memory.
This format may only be selected for program or data memory—not boot
memory.
The byte-stream output file is arranged with the most significant byte of
each word preceding the less significant byte(s), from lower address to
higher address—in other words, the high-order byte of each word is
located at the lowest address. The 24-bit words of program memory
require sequences of three bytes, while the 16-bit words of data memory
require sequences of two bytes.
5–3
5 PROM Splitter
Memory
Image File
(.EXE)
PROM SPLITTER
Output may be any one of:
–pm switch,
3 usable files:
–dm switch,
2 usable files:
–bm switch,
1 usable file:
Program
Memory
Output
(.BNU)
(Discard)
(.BNU)
(Discard)
(.BNU)
Program
Memory
Output
(.BNM)
Data
Memory
Output
(.BNM)
Boot
Memory
Output
(.BNM)
Program
Memory
Output
(.BNL)
Data
Memory
Output
(.BNL)
(Discard)
(.BNL)
–ui, –us, –us2
switches,
byte-stream file:
Program
Memory
or Data
Memory
Output
(.BNM)
Figure 5.1 PROM Splitter I/O
If you have assigned any absolute addresses to memory objects, the
information is lost in byte-stream format.
You cannot generate byte-stream files from input which contains
discontiguous blocks of memory (non-relocatable segments with unused
blocks of memory in between). Your program modules must either be
relocatable or you must place them in contiguous blocks of memory.
5–4
PROM Splitter 5
5.3.2
Boot Memory Organization
Boot memory is byte-wide and organized in vertical groups of four-byte
words. The high-order byte of each word is located at the lowest address
of the four-byte group.
Each 32-bit word consists of a 24-bit instruction padded with an extra
byte. The pad bytes (0xFF) are ignored except for the first of each boot
page. The pad byte of the first word on a page gives the length of that
page. The page lengths are calculated by the PROM splitter and inserted
in the PROM image file; for page 0 this value is located at PROM byte
address 0x0003.
The PROM splitter calculates the length of each boot page in this way:
Page length =
Number of 24-bit instructions
–––––––––––––––––––––––––––––
8
-1
(The number of instructions must be rounded up to a multiple of eight.)
For example, a page length of zero indicates eight words, residing in
thirty-two sequential bytes. The maximum page length of 255 indicates
2048 words. Refer to the ADSP-2100 Family User’s Manual for further
information on boot memory interfacing.
Each boot page must contain a number of words which is a multiple of
eight—if necessary, the PROM splitter adds extra filler words
(0xFFFFFFFF) at the end of the page to assure this.
5–5
5 PROM Splitter
5.4
BOOT PAGES SMALLER THAN 2K
The PROM splitter’s -bs pagesize and -bb boundary switches allow the
creation of boot pages smaller than 2K. ADSP-21xx systems with boot
memory normally load boot pages which contain 2K words. ADSP-2105
and ADSP-2115 systems, however, require 1K-size boot pages, and you
may also wish to use smaller page sizes in ADSP-2101, ADSP-2111, or
ADSP-21msp50 systems. This lets you retain the benefits of multiple-page
systems with smaller programs, while conserving circuit board space by
using smaller boot EPROMs.
When the PROM splitter is run for boot memory without the -bs switch,
the default-size 2K boot pages formed can store 2048 words. By using the
-bs switch you can create smaller boot pages; the pagesize argument may
be any value from 0 to 2048 and must be entered in decimal:
0 ≤ pagesize ≥ 2048
(default=2048)
The -bb switch is used to make the smaller boot pages contiguous in
memory. The boundary argument determines where consecutive boot
pages start, and may take the following values:
boundary=2048, 1024, 512, or 256
(default=2048)
If pagesize=1024 and boundary=2048, for example, the 1K pages will start at
addresses that are multiples of 2048: 0, 2048, 4096, 6144, 8192. This leaves
an unused 1K space between each—changing boundary to 1024 eliminates
the wasted PROM space.
Note that the ADSP-2101, ADSP-2111 and ADSP-21msp50 simulators are
only able to simulate the booting of 2K-size pages. If you create smaller
boot pages, therefore, you cannot use the simulators’ LR command to load
the boot memory PROM file and simulate booting. The L command,
however, can always be used to load and simulate the .EXE file containing
your executable program. (The ADSP-2101 simulator is used for ADSP2105 and ADSP-2115 systems.)
5.4.1
1K Boot Pages For ADSP-2105, ADSP-2115
To generate contiguous 1K-size boot pages for an ADSP-2105 or ADSP2115 system, use the -bs and -bb switches with pagesize and boundary equal
to 1024:
spl21 imagefile promfile
5–6
-bm -bs 1024 -bb 1024
PROM Splitter 5
5.4.2
Boot Memory Address Line Usage
If you use the -bs and -bb switches to generate contiguous boot pages
smaller than 2K for an ADSP-2101, ADSP-2111, or ADSP-21msp50 system,
or to generate boot pages smaller than 1K for an ADSP-2105 or ADSP-2115
system, you must modify the address bus connections to boot memory in
your system:
pagesize
1024
512
256
disconnect from boot memory
A12*
A12, A11
A12, A11, A10
* It is not necessary to disconnect A12 in an ADSP-2105 or ADSP-2115
system.
These modifications allow the processor to address the smaller boot pages
in a continuous fashion, without empty blocks of memory in between.
For example, while normally (with 2K pages) the ADSP-2101 uses the
following connections to address boot memory,
• D23 , D22, A13 select the boot page number (0-7)
• A12-A0 select the byte address (0-8191) on each page
by disconnecting A12 and A11 the ADSP-2101 can boot 1⁄2K-size pages
located in contiguous memory. The D23, D22, A13, and A10-A0 lines then
address the total boot memory space of 4K words (16K bytes).
For ADSP-2105 and ADSP-2115 systems with standard 1K-size boot pages,
address line A12 is not needed and always equals zero when accessing boot
memory. (A12 may be necessary, however, for accessing off-chip program
memory.) To address 1K-size boot pages, the ADSP-2105 and ADSP-2115
use the following connections:
• D23 , D22, A13 select the boot page number (0-7)
• A11-A0 select the byte address (0-4095) on each page
Note: The -bs switch must be used for 1024 boot page size for the ADSP2105 & ADSP-2115, but boot boundaries may be 1024 or 2048 -- use the -bb
switch for 1024 boundaries.
5–7
5 PROM Splitter
5.5
BOOT LOADER OPTION
The boot loader option (-loader switch) of the PROM splitter generates a
bootable version of your program which automatically initializes all
necessary ADSP-21xx RAM memory spaces from internal program
memory. Memory loading routines are added to your program to perform
the initialization following each boot page load.
The standard booting operation of the ADSP-2101, ADSP-2111, and
ADSP-21msp50 loads only the processor’s internal 2K of program
memory RAM at reset. None of the other memory spaces—internal data
memory, external program memory, or external data memory—are
loaded. If your bootable program requires the initialization of any of these
memory spaces which are RAM, you must write routines to copy the
code/data from internal PM to the necessary locations, or use the -loader
switch. (The alternative is to use initialized ROM devices for external
memory.) See the section “Initializing Your Program in Memory” in
Chapter 3.
The boot loader option also lets you create multiple-page programs which
are completely booted at reset—the code and data is booted into internal
PM and copied to the other memory spaces, one page at a time.
To use the boot loader option for an ADSP-2101, ADSP-2111, or ADSP21msp50 system with 2K-size boot pages, invoke the PROM splitter with
only the -loader switch and a PROM file format switch:
SPL21 imagefile PROMfile -loader [-s] [-i]
To use the boot loader option for an ADSP-2105 or ADSP-2115 system
with 1K-size boot pages, invoke the PROM splitter with the -loader
switch, a PROM file format switch, and the -bs and -bb switches with
pagesize and boundary set to 1024:
SPL21 imagefile PROMfile -loader -bs 1024 -bb 1024 [-s] [-i]
Do not use the -bm, -pm, or -dm switches—a boot memory .BNM file is
automatically generated. The output file should be used to burn boot
memory EPROMs. Your entire executable program is contained in this
file, including all code and data to be copied to program and data memory
RAM.
5–8
PROM Splitter 5
The booting and copying process is pictured in Figure 5.2, for ADSP-2101
2K-size boot pages.
The -loader switch causes the PROM splitter to scan the input .EXE file for
external PM RAM segments and internal or external DM RAM segments;
it creates as many boot pages as necessary to store the code and data,
regardless of how many pages are declared in the system specification file.
In addition, small loader routines are constructed and placed at the
beginning (low addresses) of each page.
Boot Memory
Booting
at RESET
ROM
16K
ADSP-2101
Program
Memory
2K
RAM
Data
Memory
1K
1K
External
Program Memory
“Loader” routines
copy code/data
to off-chip PM
“Loader” routines
copy data to
off-chip DM
RAM
“Loader” routines copy
data to on-chip DM
RAM
14K
External
Data Memory
Reserved
RAM
14K
Figure 5.2 Program Booting & Memory Initialization
5–9
5 PROM Splitter
Figure 5.3 shows a program created with the -loader switch which is
contained on boot pages 0, 1, and 2. The loader routines for pages 0 and 1
include several loops, each of which copies a segment of code or data to
the appropriate destination in PM or DM after booting. One copy loop is
needed for each discontiguous segment. At the end of each page’s loader
routine is a sequence of instructions which force a software boot of the
next page. The last page, page 2, does not have a loader routine—it
contains the first 2K page of the complete executable program. When this
page is booted, program execution begins at address 0 in the ADSP-21xx’s
internal PM.
Boot Page 0
addr 0
Loader
routine
initialization (src1,dest1)
copy loop1
initialization (src2,dest2)
copy loop2
initialization (src3,dest3)
copy loop3
Boot Page 1
addr 0
Loader
routine
initialization (src1,dest1)
copy loop1
initialization (src2,dest2)
copy loop2
Boot Page 2
addr 0 start of executable program
software-forced boot
of page 2
...
...
software-forced boot
of page 1
unused
addr 0x3FF
code & data
addr 0x3FF
code & data
Figure 5.3 Boot Loader Program Example
5 – 10
First page (2K) of
executable program
unused
addr 0x3FF
PROM Splitter 5
The -loader switch causes the PROM splitter to assign code and data to
each boot page (except the last) starting at the highest address and
working down (see Figure 5.3). An unused region will usually be left in
the middle of each page.
After page 0 is booted, code and data segments are copied by the page 0
loader routine to the appropriate destinations. Page 0 then forces a
software boot of page 1, whose loader performs the same operation.
Successive boots continue until your entire program is loaded, up to a
maximum boot memory space of 15K.
For the example of Figure 5.3, the following sequence of events will occur
after system reset:
1. Page 0 is booted into the ADSP-21xx’s internal PM. The Page 0
loader routine is executed, copying the Page 0 code and data to
internal DM, external PM, and/or external DM.
2. Page 1 is booted by the Page 0 loader routine. The Page 1 loader
routine is executed, performing the necessary copies of code and
data. This completes the initialization process.
3. Page 2 is booted by the Page 1 loader routine. Main program
execution is started at address 0.
When setting the memory-mapped System Control Register for softwareforced boots, the loader routines set the BWAIT (Boot Wait States) field of
this register to the default value of 3. Refer to the “Boot Memory Interface”
section of the Memory Interface chapter in the ADSP-2100 Family User’s
Manual for further information.
5 – 11
5 PROM Splitter
5.5.1
How To Prepare Your Program For The Boot Loader
If you intend to use the PROM splitter’s -loader switch to generate a
bootable, auto-initializing version of your ADSP-21xx program, the
following steps should be taken:
1. Declare the maximum number of boot pages allowed, eight, in your
system architecture file.
2. Write your assembly modules without using the /BOOT qualifier on
the .MODULE directive.
3. Assemble and link.
4. Invoke the PROM splitter with the -loader switch. As the PROM
splitter processes your program, a message is displayed indicating
the number of boot pages created. (To save this information, use
operating system commands to capture the text into a file.)
When using the boot loader option you should not assign the assembler’s
/BOOT qualifier to your program modules. This allows the PROM splitter
to determine boot page placement for each module.
Note that when copying code/data to external PM or DM, the loader
routines added to your program may write to memory locations other
than those used by the main program. For example, if the main program
initializes locations DM[0x03FF] and DM[0x0401], and a memory-mapped
I/O port is declared at DM[0x0400], the loader routine may write an
undefined value to the port. You must ensure that such spurious writes do
not cause errors in your system. One way to do this is to declare a unique
memory segment (with the system builder’s .SEG directive) in the system
architecture file for all of your ports. If no code or data is located in this
segment, the ports will not be overwritten during memory initialization.
5 – 12
PROM Splitter 5
5.5.2
Simulating A Boot Loader Program
Since the boot loader function is implemented by the PROM splitter and
not by the linker, you must use the PROM splitter-output .BNM file to
simulate the bootable program. The linker-output .EXE file contains no
boot memory information.
To load the .BNM file into an ADSP-21xx simulator or emulator, use the
LR (Load ROM file) command instead of the L command. The booting
and memory initialization process can then be observed during program
execution.
5.6
HIP BOOT FILES (HIP SPLITTER)
The HIP splitter is a utility program similar to the PROM splitter which
allows the generation of files that can be loaded through the host interface
port (HIP) of the ADSP-2111 and ADSP-21msp50. The HIP splitter is
invoked with the following command:
HSPL21 imagefile
[addr] [-boot] [-i]
The imagefile input is the .EXE file of your program generated by the
linker. This file must have the .EXE extension appended by the linker;
otherwise the HIP splitter will not recognize it. The optional addr
parameter specifies an offset from zero for the starting address of the HIP
load file. This parameter must be entered as a hex number, without the
“0x” prefix.
The output file generated by the HIP splitter is always named
IMAGEFILE.HIP. The file format is similar to that of a .BNM file created
for program or boot memory by the PROM splitter—the first byte booted
into the processor’s HDR3 register contains the page length. The default
PROM image format of the file is Motorola S Record. Using the -i switch
generates Intel Hex format instead.
If the HIP splitter is invoked without the -boot switch, the
IMAGEFILE.HIP file contains 24-bit program memory words placed in
this order: high byte, middle byte, low byte. To place the three bytes in
the order used by the ADSP-21xx startup booting operation, high byte,
low byte, middle byte, use the -boot switch. Loading the program
memory words in this order may be more convenient in some systems.
5 – 13
5 PROM Splitter
The HIP booting operation can be simulated with the use of the HB
command in the ADSP-2111 and ADSP-21msp50 simulators. Refer to the
“Booting Through The Host Interface Port” section of Chapter 10, Setup &
Debugging, for further details.
5 – 14
Instruction Coding
A.1
A
OPCODES
This appendix gives a summary of the complete instruction set of the
ADSP-2100 family processors. Opcode field names are defined at the
end of the appendix. Any instruction codes not shown are reserved for
future use.
Type 1:
ALU / MAC with Data & Program Memory Read
23 22 21 20 19 18 17 16 15 14 13 12 11 10 9 8 7 6 5 4 3 2 1 0
1 1
PD
DD
AMF
Yop
Xop
PM PM DM DM
I
M
I
M
Type 2:
Data Memory Write (Immediate Data)
23 22 21 20 19 18 17 16 15 14 13 12 11 10 9 8 7 6 5 4 3 2 1 0
1 0 1 G
DATA
I
M
Type 3:
Read /Write Data Memory (Immediate Address)
23 22 21 20 19 18 17 16 15 14 13 12 11 10 9 8 7 6 5 4 3 2 1 0
1 0 0 D RGP
ADDR
REG
Type 4:
ALU / MAC with Data Memory Read / Write
23 22 21 20 19 18 17 16 15 14 13 12 11 10 9 8 7 6 5 4 3 2 1 0
0 1 1 G D Z
AMF
Yop
Xop
DREG
I
M
Type 5:
ALU / MAC with Program Memory Read / Write
23 22 21 20 19 18 17 16 15 14 13 12 11 10 9 8 7 6 5 4 3 2 1 0
0 1 0 1 D Z
AMF
Yop
Xop
DREG
I
M
A–1
A Instruction Coding
Type 6:
Load Data Register Immediate
23 22 21 20 19 18 17 16 15 14 13 12 11 10 9 8 7 6 5 4 3 2 1 0
0 1 0 0
DATA
DREG
Type 7:
Load Non-Data Register Immediate
23 22 21 20 19 18 17 16 15 14 13 12 11 10 9 8 7 6 5 4 3 2 1 0
0 0 1 1 RGP
DATA
REG
Type 8:
ALU / MAC with Internal Data Register Move
23 22 21 20 19 18 17 16 15 14 13 12 11 10 9 8 7 6 5 4 3 2 1 0
0 0 1 0 1 Z
AMF
Yop
Xop
Dest
Source
DREG
DREG
Type 9:
Conditional ALU / MAC
23 22 21 20 19 18 17 16 15 14 13 12 11 10 9 8 7 6 5 4 3 2 1 0
0 0 1 0 0 Z
AMF
Yop
Xop 0 0 0 0
COND
Type 10: Conditional Jump (Immediate Address)
23 22 21 20 19 18 17 16 15 14 13 12 11 10 9 8 7 6 5 4 3 2 1 0
0 0 0 1 1 S
ADDR
COND
Type 11: Do Until
23 22 21 20 19 18 17 16 15 14 13 12 11 10 9 8 7 6 5 4 3 2 1 0
0 0 0 1 0 1
ADDR
TERM
Type 12: Shift with Data Memory Read / Write
23 22 21 20 19 18 17 16 15 14 13 12 11 10 9 8 7 6 5 4 3 2 1 0
0 0 0 1 0 0 1 G D
SF
Xop
DREG
I
M
A–2
Instruction Coding A
Type 13: Shift with Program Memory Read / Write
23 22 21 20 19 18 17 16 15 14 13 12 11 10 9 8 7 6 5 4 3 2 1 0
0 0 0 1 0 0 0 1 D
SF
Xop
DREG
I
M
Type 14: Shift with Internal Data Register Move
23 22 21 20 19 18 17 16 15 14 13 12 11 10 9 8 7 6 5 4 3 2 1 0
0 0 0 1 0 0 0 0 0
SF
Xop
Dest
Source
DREG
DREG
Type 15: Shift Immediate
23 22 21 20 19 18 17 16 15 14 13 12 11 10 9 8 7 6 5 4 3 2 1 0
0 0 0 0 1 1 1 1 0
SF
Xop
exponent
Type 16: Conditional Shift
23 22 21 20 19 18 17 16 15 14 13 12 11 10 9 8 7 6 5 4 3 2 1 0
0 0 0 0 1 1 1 0 0
SF
Xop 0 0 0 0 COND
Type 17: Internal Data Move
23 22 21 20 19 18 17 16 15 14 13 12 11 10 9 8 7 6 5 4 3 2 1 0
0 0 0 0 1 1 0 1 0 0 0 0 DST SRC Dest
Source
RGP RGP REG
REG
Type 18: Mode Control
23 22 21 20 19 18 17 16 15 14 13 12 11 10 9 8 7 6 5 4 3 2 1 0
0 0 0 0 1 1 0 0
TI
MM
AS
OL BR SR GM 0 0
Definitions for the field names shown (TI, MM, AS, OL, BR, SR, GM) can be found
under “Mode Control Codes” at the back of this appendix.
A–3
A Instruction Coding
Type 19: Conditional Jump (Indirect Address)
23 22 21 20 19 18 17 16 15 14 13 12 11 10 9 8 7 6 5 4 3 2 1 0
0 0 0 0 1 0 1 1 0 0 0 0 0 0 0 0 I 0 S COND
Type 20: Conditional Return
23 22 21 20 19 18 17 16 15 14 13 12 11 10 9 8 7 6 5 4 3 2 1 0
0 0 0 0 1 0 1 0 0 0 0 0 0 0 0 0 0 0 0 T COND
Type 21: Modify Address Register
23 22 21 20 19 18 17 16 15 14 13 12 11 10 9 8 7 6 5 4 3 2 1 0
0 0 0 0 1 0 0 1 0 0 0 0 0 0 0 0 0 0 0 G I
M
Type 22: Conditional TRAP (ADSP-2100 Only)
23 22 21 20 19 18 17 16 15 14 13 12 11 10 9 8 7 6 5 4 3 2 1 0
0 0 0 0 1 0 0 0 0 0 0 0 0 0 0 0 0 0 0 0 COND
Type 23: DIVQ
23 22 21 20 19 18 17 16 15 14 13 12 11 10 9 8 7 6 5 4 3 2 1 0
0 0 0 0 0 1 1 1 0 0 0 1 0 Xop
0 0 0 0 0 0 0 0
Type 24: DIVS
23 22 21 20 19 18 17 16 15 14 13 12 11 10 9 8 7 6 5 4 3 2 1 0
0 0 0 0 0 1 1 0 0 0 0 Yop
Xop
0 0 0 0 0 0 0 0
Type 25: Saturate MR
23 22 21 20 19 18 17 16 15 14 13 12 11 10 9 8 7 6 5 4 3 2 1 0
0 0 0 0 0 1 0 1 0 0 0 0 0 0 0 0 0 0 0 0 0 0 0 0
A–4
Instruction Coding A
Type 26: Stack Control
23 22 21 20 19 18 17 16 15 14 13 12 11 10 9 8 7 6 5 4 3 2 1 0
0 0 0 0 0 1 0 0 0 0 0 0 0 0 0 0 0 0 0 PP LP CP SPP
Type 27: Call or Jump on Flag In (Not ADSP-2100)
23 22 21 20 19 18 17 16 15 14 13 12 11 10 9 8 7 6 5 4 3 2 1 0
0 0 0 0 0 0 1 1
Address
Addr FIC S
12 LSBs
2 MSBs
Type 28: Modify Flag Out (Not ADSP-2100)
23 22 21 20 19 18 17 16 15 14 13 12 11 10 9 8 7 6 5 4 3 2 1 0
0 0 0 0 0 0 1 0 0 0 0 0
FO FO FO FO
COND
FL2
FL1 FL0 FLAG_OUT
Type 29: Reserved
23 22 21 20 19 18 17 16 15 14 13 12 11 10 9 8 7 6 5 4 3 2 1 0
0 0 0 0 0 0 0 1 x x x x x x x x x x x x x x x x
Type 30: No Operation (NOP)
23 22 21 20 19 18 17 16 15 14 13 12 11 10 9 8 7 6 5 4 3 2 1 0
0 0 0 0 0 0 0 0 0 0 0 0 0 0 0 0 0 0 0 0 0 0 0 0
Type 31: Idle (Not ADSP-2100)
23 22 21 20 19 18 17 16 15 14 13 12 11 10 9 8 7 6 5 4 3 2 1 0
0 0 0 0 0 0 1 0 1 0 0 0 0 0 0 0 0 0 0 0 0 0 0 0
Type 32: Slow Idle (Not ADSP-2100)
23 22 21 20 19 18 17 16 15 14 13 12 11 10 9 8 7 6 5 4 3 2 1 0
0 0 0 0 0 0 1 0 1 0 0 0 0 0 0 0 0 0 0 0
DV
A–5
A Instruction Coding
A.2
ABBREVIATION CODING
AMF
ALU / MAC Function codes
0 0 0 0 0
No operation
MAC Function codes
0
0
0
0
0
0
0
0
0
0
0
0
0
0
0
0
0
0
0
0
0
0
1
1
1
1
1
1
1
1
0
0
0
1
1
1
1
0
0
0
0
1
1
1
1
0
1
1
0
0
1
1
0
0
1
1
0
0
1
1
1
0
1
0
1
0
1
0
1
0
1
0
1
0
1
X*Y
MR + X * Y
MR - X * Y
X*Y
X*Y
X*Y
X*Y
MR + X * Y
MR + X * Y
MR + X * Y
MR + X * Y
MR - X * Y
MR - X * Y
MR - X * Y
MR - X * Y
(RND)
(RND)
(RND)
(SS)
(SU)
(US)
(UU)
(SS)
(SU)
(US)
(UU)
(SS)
(SU)
(US)
(UU)
Clear when y = 0
ALU Function codes
1
1
1
1
1
1
1
1
1
1
1
1
A–6
0
0
0
0
0
0
0
0
1
1
1
1
0
0
0
0
1
1
1
1
0
0
0
0
0
0
1
1
0
0
1
1
0
0
1
1
0
1
0
1
0
1
0
1
0
1
0
1
Y
Y+1
X+Y+C
X+Y
NOT Y
-Y
X-Y+C-1
X-Y
Y-1
Y-X
Y-X+C-1
NOT X
Clear when y = 0
PASS 1 when y = 0
X when y = 0
X + C - 1 when y = 0
PASS -1 when y = 0
- X when y = 0
-X + C - 1 when y = 0
Instruction Coding A
1
1
1
1
COND
0
0
1
1
0
1
0
1
X AND Y
X OR Y
X XOR Y
ABS X
0
0
0
0
1
1
1
1
0
0
0
0
1
1
1
1
0
0
1
1
0
0
1
1
0
0
1
1
0
0
1
1
0
1
0
1
0
1
0
1
0
1
0
1
0
1
0
1
Equal
Not equal
Greater than
Less than or equal
Less than
Greater than or equal
ALU Overflow
NOT ALU Overflow
ALU Carry
Not ALU Carry
X input sign negative
X input sign positive
MAC Overflow
Not MAC Overflow
Not counter expired
Always true
EQ
NE
GT
LE
LT
GE
AV
NOT AV
AC
NOT AC
NEG
POS
MV
NOT MV
NOT CE
Counter Stack Pop codes
0
1
D
1
1
1
1
Status Condition codes
0
0
0
0
0
0
0
0
1
1
1
1
1
1
1
1
CP
1
1
1
1
No change
Pop
Memory Access Direction codes
0
1
Read
Write
A–7
A Instruction Coding
DD
Double Data Fetch Data Memory Destination codes
0
0
1
1
DREG
Data Register codes
0
0
0
0
0
0
0
0
1
1
1
1
1
1
1
1
DV
0
0
1
1
0
0
1
1
0
0
1
1
0
0
1
1
0
1
0
1
0
1
0
1
0
1
0
1
0
1
0
1
AX0
AX1
MX0
MX1
AY0
AY1
MY0
MY1
SI
SE
AR
MR0
MR1
MR2
SR0
SR1
0
0
0
1
0
0
0
1
0
0
0
1
0
0
0
Normal Idle instruction (Divisor=0)
Divisor=16
Divisor=32
Divisor=64
Divisor=128
FI condition code
1
0
A–8
0
0
0
0
1
1
1
1
0
0
0
0
1
1
1
1
Divisor codes for Slow Idle instruction (IDLE n)
0
0
0
0
1
FIC
AX0
AX1
MX0
MX1
0
1
0
1
latched FI is 1
latched FI is 0
FLAG_IN
NOT FLAG_IN
Instruction Coding A
FO
G
Control codes for Flag Output Pins (FO, FL0, FL1, FL2)
FO:
Set, reset, or toggle the output flag.
0
0
1
1
No change
Toggle
Reset
Set
0
1
0
1
Data Address Generator codes
0
1
I
Index Register codes
G=
0 0
0 1
1 0
1 1
LP
0
I0
I1
I2
I3
1
I4
I5
I6
I7
Loop Stack Pop codes
0
1
M
DAG1
DAG2
No Change
Pop
Modify Register codes
G=
0 0
0 1
1 0
1 1
0
M0
M1
M2
M3
1
M4
M5
M6
M7
A–9
A Instruction Coding
Mode Control codes
PD
SR:
BR:
OL:
AS:
MM:
GM:
TI:
Secondary register bank
Bit-reverse mode
ALU overflow latch mode
AR register saturate mode
Alternate Multiplier placement mode (not ADSP-2100)
GOMode; enable means go if possible (not ADSP-2100)
Timer enable (not ADSP-2100)
0
0
1
1
No change
No change
Disable
Enable
Double Data Fetch Program Memory Destination codes
0
0
1
1
PP
0
1
0
1
AY0
AY1
MY0
MY1
PC Stack Pop codes
0
1
A – 10
0
1
0
1
No Change
Pop
Instruction Coding A
REG
Register codes
Codes not assigned are reserved for future use.
RGP =
0 0 0
0 0 0
0 0 1
0 0 1
0 1 0
0 1 0
0 1 1
0 1 1
1 0 0
1 0 0
1 0 1
1 0 1
1 1 0
1 1 0
1 1 1
1 1 1
S
0
1
0
1
0
1
0
1
0
1
0
1
0
1
0
1
00
AX0
AX1
MX0
MX1
AY0
AY1
MY0
MY1
SI
SE
AR
MR0
MR1
MR2
SR0
SR1
01
I0
I1
I2
I3
M0
M1
M2
M3
L0
L1
L2
L3
-
10
I4
I5
I6
I7
M4
M5
M6
M7
L4
L5
L6
L7
-
11
ASTAT
MSTAT
SSTAT (read only)
IMASK
ICNTL
CNTR
SB
PX
RX0
TX0
RX1
not ADSP-2100 registers
TX1
IFC (write only)
OWRCNTR (write only)
-
Jump/Call codes
0
1
Jump
Call
A – 11
A Instruction Coding
SF
Shifter Function codes
0
0
0
0
0
0
0
0
1
1
1
1
1
1
1
1
SPP
0
1
0
1
0
1
0
1
0
1
0
1
0
1
0
1
LSHIFT
(HI)
LSHIFT
(HI, OR)
LSHIFT
(LO)
LSHIFT
(LO, OR)
ASHIFT
(HI)
ASHIFT
(HI, OR)
ASHIFT
(LO)
ASHIFT
(LO, OR)
NORM
(HI)
NORM
(HI, OR)
NORM
(LO)
NORM
(LO, OR)
EXP
(HI)
EXP
(HIX)
EXP
(LO)
Derive Block Exponent
0
1
0
1
No change
No change
Push
Pop
Return Type codes
0
1
A – 12
0
0
1
1
0
0
1
1
0
0
1
1
0
0
1
1
Status Stack Push/Pop codes
0
0
1
1
T
0
0
0
0
1
1
1
1
0
0
0
0
1
1
1
1
Return from Subroutine
Return from Interrupt
Instruction Coding A
TERM
Termination codes for DO UNTIL
0
0
0
0
0
0
0
0
1
1
1
1
1
1
1
1
X
0
0
0
0
1
1
1
1
0
0
0
0
1
1
1
1
0
0
1
1
0
0
1
1
0
0
1
1
0
0
1
1
0
1
0
1
0
1
0
1
0
1
0
1
0
1
0
1
Not equal
Equal
Less than or equal
Greater than
Greater than or equal
Less than
NOT ALU Overflow
ALU Overflow
Not ALU Carry
ALU Carry
X input sign positive
X input sign negative
Not MAC Overflow
MAC Overflow
Counter expired
Always
NE
EQ
LE
GT
GE
LT
NOT AV
AV
NOT AC
AC
POS
NEG
NOT MV
MV
CE
FOREVER
X Operand codes
0
0
0
0
1
1
1
1
0
0
1
1
0
0
1
1
0
1
0
1
0
1
0
1
X0 (SI for shifter)
X1 (invalid for shifter)
AR
MR0
MR1
MR2
SR0
SR1
A – 13
A Instruction Coding
Y
Y Operand codes
0
0
1
1
Z
Y0
Y1
F (feedback register)
zero
ALU/MAC Result Register codes
0
1
A – 14
0
1
0
1
Result register
Feedback register
File Formats
B.1
B
DATA FILES (.DAT)
The .DAT file format is used for data buffer initialization. The format is
generally the same for all uses, with some restrictions as detailed
below. The .DAT extension is a DOS convention only and is not
required by the linker.
These files contain text only: the characters for hexadecimal, decimal,
and binary data. Any standard text editor can be used to create the
files.
B.1.1
Assembler/Linker Buffer Initialization Files
The .INIT assembler directive names a file from which to initialize a
data buffer. You must create this file and specify it in source code with
the .INIT directive. The file should be located in the directory from
which the linker is invoked (the current directory), or the path to the
file’s directory must be given in the .INIT directive. The linker reads
this file and initializes the buffer in the .EXE memory image file. The
data file may be any length.
B.1.1.1 Integer Data
The standard format of a buffer initialization file is a single fourcharacter or six-character hexadecimal number per line (carriage
returns are ignored). ADSP-21xx data memory stores 16-bit words
while program memory can store 16-bit or 24-bit data words.
Buffer initialization files for data memory should contain fourcharacter hexadecimal words. If a file for data memory contains sixcharacter words, however, the four least significant characters of each
number are used and the other two are ignored. For example, if your
data file contains these lines:
002222
2222
220001
B–1
B File Formats
The data loaded into memory is:
2222
2222
0001
Files for program memory may contain four-character or six-character
hexadecimal data words. If you are using four-character (16-bit) data,
you must pad each data word with two zeros at the right to properly
align the word in memory. For example, if your data is
1234
4321
then the initialization file should contain:
123400
432100
B.1.1.2 Non-Integer Data
Buffer initialization files can contain decimal numbers with fractional
components. However, these non-integer values are treated by the
linker as integers; the fractional component is ignored (not rounded).
For example, the value 5.862 is loaded in memory as 5.
B.1.1.3 Comments
Comments can be placed on each line in a buffer initialization file,
anywhere to the right of the data. The comments must be enclosed in
brackets: {comment}.
B.2
MEMORY IMAGE FILE (.EXE)
The .EXE memory image file is created by the linker. This file contains
the memory images of your executable system. Memory images
include assembled and resolved opcodes and initialized data buffers.
The memory image file is used to load executable code into the
simulator, emulator and PROM splitter.
The first three characters of this file are <ESC> <ESC> i. These
characters tell the emulator that the succeeding code is upload
information for program, data, and boot memory (if used). <ESC>
sequences are ignored by the simulator and the PROM splitter.
B–2
File Formats B
Each kernel of information which can be loaded into a particular
region of memory is indicated by one of the following: @PA, @PO,
@DA, @DO, @BO. The P indicates program memory; D indicates data
memory; B indicates boot memory; O indicates ROM; A indicates
RAM.
Following the @XX header is a four-character hexadecimal start
address for the upload, and then the sequence of words to be loaded.
These words contain six hex characters for PM and BM, and four
characters for DM.
Each kernel is terminated by a #nnnnnn… line. Kernels can be in any
order. The file ends with <ESC> <ESC> o to tell the emulator that the
upload is complete. An example .EXE file is shown below:
<ESC> <ESC>i
@PO
0004
1C007F
1C05BF
0A000F
#123123123123
@DA
0000
2D40
0000
#123123123123
@BO
0000
03242A
025B26
01921C
#123123123123
@PO
6000
7FFFFF
7FFD88
80009E
#123123123123
@BO
0800
0A000F
FD887F
025B26
#123123123123
@DA
0182
0040
#123123123123
@DA
0183
0000
#123123123123
<ESC> <ESC>o
B–3
B File Formats
Notice that the boot memory words in this file are only 24 bits wide,
instead of 32 bits wide as in boot memory EPROM devices. The 32-bit
boot memory words are generated by the PROM splitter. Boot memory
addresses in the .EXE file are word addresses (similar to program
memory addresses), rather than PROM byte addresses.
The linker treats boot memory as an array of 24-bit program memory
words divided into 8 pages. The page number is embedded in the @BO
address. To obtain the page number of any address, divide it by 2048
and drop the remainder (for 2K-size pages).
B.3
SYMBOL TABLE FILE (.SYM)
The .SYM symbol table file is created by the linker to allow symbolic
debugging. It lists all symbols encountered by the linker and their
associated addresses. A separate list is generated for each module
indicating which symbols can be referenced within the scope of the
module.
The first three characters of this file are <ESC> <ESC> d. <ESC>
sequences are ignored by the simulator. These characters tell the
emulator that the succeeding code is the debug symbol information.
<ESC> sequences are ignored by the simulator.
The _m directive names a source code module and gives its base
address. This directive takes the form
_mmodulename addr
where addr is the hexadecimal base address. A p, d, or b# is appended
to indicate placement in program, data, or boot memory. The boot
page number is specified by b#.
Each line following the _mmodulename directive names a symbol which
can be referenced within the context of the module. The symbol’s
address and memory origin (p, d, or b#) are also given. A ZZZZ in the
address field indicates that the address for that symbol was never
resolved (not all symbols have memory addresses associated with
them).
The file is closed by <ESC> <ESC> o to tell the emulator that the file
transmission is complete.
B–4
File Formats B
The following is an example of a symbol table file for a single module
in program memory:
<ESC> <ESC>d
_mFFT 0004p
REAL_OUTPUT 1000d
IMAGINARY_OUTPUT 2000d
MAGN 0100d
SIN_COEF 6000p
COS_COEF 6080p
FFT_START 0020p
BUTTERFLY_LOOP 0033p
GROUP_LOOP 0037p
STAGE_LOOP 0040p
<ESC> <ESC>o
The following example shows the .SYM file for the sample ADSP-2101
program shown at the end of Chapter 3. This program consists of two
modules located on boot page 0:
<ESC> <ESC>d
_mFIR_ROUTINE 000Fb0
FIR_START 000Fb0
CONVOLUTION 0014b0
COEFFICIENT 0000b0
DATA_BUFFER 3800d
_mMAIN_ROUTINE 0019b0
DATA_BUFFER 3800d
COEFFICIENT 0000b0
RESTARTER 0035b0
CLEAR_BUFFER 003Db0
WAIT 0052b0
FIR_START 000Fb0
<ESC> <ESC>o
B.4
PROM IMAGE FILES (.BNU, .BNM, .BNL)
PROM image files are generated by the PROM splitter. The files are
used with an industry-standard PROM burner to program memory
devices for your hardware system. One file is needed for each memory
chip to be programmed. The file format depends on which switch
options you choose when invoking the PROM splitter. See Chapter 5.
B–5
B File Formats
Three types of image files are generated by the PROM splitter: .BNU for
the upper bytes of 24-bit words, .BNM for the middle bytes, and .BNL
for the lower bytes.
The files can be generated in either Intel Hex format or Motorola S
format.
B.4.1
HIP Boot Files (.HIP)
The HIP splitter utility program generates program files which may be
booted via the host interface port of the ADSP-2111 or ADSP-21msp50.
These files are similar in format to a .BNM file produced by the PROM
splitter for program or boot memory—the first byte of the file, which is
booted into the processor’s HDR3 register, contains the page length (see
file format descriptions below). These files are generated in Motorola S
Record format and are given the filename extension .HIP.
B.4.2
Intel Format
The examples below show the Intel format for a .BNM program memory
file, a byte stream program memory file, and a boot page memory file.
Each line of the file is a data record with the exception of the last line,
which is the end of file record. Larger files contain additional data
records.
Program Memory .BNM File
:0A0004003C40343434261422260850
:00000401FB
data record
end of file record
This file format is obtained by using the -pm and -i switches. The file
contains the middle bytes of 24-bit program memory words. The data
records are organized into the following fields:
:0A0004003C40343434261422260850
: ................................
0A ..............................
0004 ..........................
00 ........................
3C ......................
08 ....
50 ..
B–6
start character
byte count of this record
address of first data byte
record type
first data byte
last data byte
checksum: twos complement
negation of binary summation
(least significant 8 bits) of
preceding bytes, including byte
count, address and data bytes
File Formats B
:00000401FB
: ................................
00 ..............................
0004 ..........................
01 ........................
FB ......................
start character
byte count (zero for this record)
address of first byte
record type
checksum
Program Memory .BNM Byte Stream File
:1E0000003C005540008034000034001434000826180F1400C222E00F26300208000F36
:00001F01E0
data record
end of file
record
This file format is obtained by using the -pm and -ui switches; the file
contains all three bytes of program memory words. The fields are the
same. Note that every third data byte (shown in bold) corresponds to
the previous example file.
Boot Memory .BNM File (2K boot pages)
:200000001111000A000100FF001100FF011100FF111100FF100000FF110000FF111000FF33
:20002000000000FF000100FF110000FF111000FF000100FF001100FF011100FF3C00E5FF50
:200040000D0388FF680080FFE89800FF14014EFFE90000FF20400FFF050000FF0D0C9CFF33
:200060000A001FFF18035FFF000000FF000000FF000000FF0A001FFF000000FF000000FFBC
:20008000000000FF0A001FFF000000FF000000FF000000FF1800FFFF000000FF000000FF28
:2000A000000000FF0A001FFF000000FF000000FF000000FF0A001FFF000000FF000000FFF6
:2000C000000000FF0A001FFF000000FF000000FF000000FF3400F8FF3800F8FF340014FF5B
:2000E000380014FF378000FF380000FF3C00F5FF1403DEFFA00000FF37FEF1FFA00004FF3D
:20010000A00004FFA00004FFA00004FFA00004FFA00BF4FFA00034FFA69274FFA00004FF94
:20012000A00004FFA00004FFA00004FFA00004FFA00004FFA00004FFA70004FFA10004FF9F
:2000A0003C0004FF3C0183FF028000FF18052FFFFFFFFFFFFFFFFFFFFFFFFFFFFFFFFFFFE5
:00000001FF
data record
data record
data record
data record
data record
data record
data record
data record
data record
data record
data record
end of file
This file format is obtained by using the -bm and -i switches. The file
contains four-byte boot memory words on 2K-word pages. The records
have the same fields as described above with the following additions:
• Every fourth data byte is a pad byte (FF) inserted to produce the 32-bit
word width.
• The pad byte of the first data word (0A), at PROM byte address
0x0003, is the page length for this boot page.
• Pad bytes are added to the last data record to make the number of
words on the page a multiple of 8.
B–7
B File Formats
B.4.3
Motorola S Format
Motorola S Record format is similar to the Intel standard. The example
below shows an S Record .BNM file containing the middle bytes of
program memory words. Each line of the file is a data record with the
exception of the last line, which is the end of file record. Larger files
contain additional data records.
Program Memory .BNM File
S10D00043C4034343426142226084C
S903000DEF
data record
end of file record
This file format is obtained by using the -pm and -s switches. The
records are organized into the following fields:
S10D00043C4034343426142226084C
S1 ..............................
0D ............................
0004 ........................
3C ......................
08 ....
4C ..
start character
byte count of this record
address of the first data byte
first data byte
last data byte
checksum: ones complement of
binary summation (least
significant 8 bits) of preceding
bytes, including byte count,
address and data bytes
S903000DEF
S9
03
000D
EF
start character
byte count of this record
address of the first byte
checksum
The Motorola format may also be used to create a byte stream file
containing all three bytes of program memory—this is the S2 format.
See Chapter 5, PROM Splitter, for the complete set of options.
B–8
Error Messages
C.1
C
INTRODUCTION
This appendix lists and provides a definition of all error messages
generated by the ADSP-21xx assembler software.
C.2
SYSTEM BUILDER ERRORS
The system builder generates messages for syntax errors and system
architecture definition errors. Syntax errors are errors in usage of the
system builder directives in the input file. Architecture definition errors
are primarily errors in memory configuration, and may be either fatal or
non-fatal. Error sources must be corrected in the input file.
Boot memory segment out of range of address space
Upper limit of boot memory addressing is 16K.
BOOT page exceeds max boot page size
Boot page segment declared with length greater that 2048.
BOOT page must be on a 2K word boundary
Boot page segments do not accept the ABS modifier; the first address
of a boot page is always equal to the boot page number * 2048.
Code/data- 24 required bits in memory width
Info only: 24-bit word width in PM.
Data Memory from 0x3a00 to 0x3bff is not valid in ADSP2105
parts
Non-existent memory in ADSP-2105 systems.
Data memory segment exceeds 16K boundary
Memory boundary limit exceeded.
Data memory segment out of range of address space
Upper limit of data memory addressing is 16K.
Divide by zero in expression
Arithmetic error.
C–1
C Error Messages
DM segment can have DATA attribute only
Segment declared in data memory may not have the CODE qualifier.
DM segment cannot exceed physical address h#3fff
Segment declared in data memory address beyond 0x3FFF.
Expecting a constant at symbol symbol
Numeric constant required in place of the named symbol.
Expecting 'ABS' at symbol symbol
Keyword 'ABS' required in place of the named symbol.
Expecting an identifier at symbol symbol
User-defined identifier required in place of the named symbol.
Expecting directive at symbol symbol
System builder directive required in place of the named symbol.
Expecting segment modifier at symbol symbol
Segment qualifier required in place of the named symbol.
Expecting 'SYSTEM' at symbol symbol
'.SYSTEM' must be the first text read by the System Builder.
Expecting '.' at symbol symbol
'.' required in place of the named symbol.
Expecting ']' at symbol symbol
' ]' required in place of the named symbol.
Expecting '=' at symbol symbol
' =' required in place of the named symbol.
Expecting '/' at symbol symbol
' /' required in place of the named symbol.
Expecting ';' at symbol symbol
' ; ' required in place of the named symbol.
FATAL ERROR: Boundary error occurred
Memory boundary limit exceeded.
C–2
Error Messages C
FATAL ERROR: Impossible PM configuration
Program memory configuration not allowed.
FATAL ERROR: Overlap occurred
Two or more declared segments overlap.
FATAL ERROR: Unable to open filename for reading
System Builder cannot find .SYS file or cannot create .ACH file; 1) the
path/filename specified is incorrect or not allowed, 2) file does not
exist, or 3) operating system condition.
FATAL ERROR: Used invalid memory on ADSP2105 part
Non-existent portion of PM or DM declared.
Internal Program Memory from 0x400 to 0x7FF is not valid in ADSP2105
parts
Non-existent memory in ADSP-2105 systems with MMAP=0.
Invalid memory type 'BOOT'
No boot memory in ADSP-2100 systems.
No DM memory at addresses 0x3a00-0x3bff
Non-existent memory in ADSP-2105 systems.
NOTICE: ? no PM found
No program memory segment was declared.
Ports are not allowed in boot memory
I/O ports may only be placed in data or program memory.
Problem mallocing enough memory
Not enough memory is available on host computer for System
Builder to continue running.
Program Memory out of range of 2105 address space 0 - 0x3bff
Upper limit of memory in ADSP-2105 systems with MMAP=1.
Program memory segment out of range of address space
Upper limit of program memory addressing is 16K.
Program memory segment out of range of address space for ADSP2100
Upper limit of program memory addressing is 32K for ADSP-2100 systems.
C–3
C Error Messages
Trying to redeclare symbol symbol
The named symbol is declared twice in the input file.
Warning: Absolute address specified for boot page will
be ignored. Segment address will be boot page * 2K.
Boot page segments do not accept the ABS modifier; the first address
of a boot page is always equal to the boot page number * 2048.
Warning: Missing semicolon after ENDSYS directive
A semicolon must always terminate an instruction or directive.
You must specify memory segment address
ABS qualifier was omitted in a segment declaration.
You must specify memory segment area
PM, DM, or BOOT qualifier was omitted in a segment declaration.
You must specify memory segment type
ROM or RAM qualifier was omitted in a segment declaration.
C.3
ASSEMBLER ERRORS
ADI_DSP environment variable not set up
ADI_DSP gives path to installed software; verify proper installation
and check PATH statement.
ASMPP could not activate \ASMPP.EXE. Execution terminated
Standard preprocessor cannot run; verify proper software installation
and check PATH statement.
Boot page out of range
Page number specified is invalid.
Divide by zero in expression
Arithmetic error.
Do labels cannot be external
DO loop cannot reference an external label.
Do loop terminates do loop at symbol symbol
A DO instruction may not be the last instruction of a DO loop.
C–4
Error Messages C
Dreg of data memory access must be one of: AX0, AX1, MX0, MX1
Incorrect data register used in instruction.
Dreg of program memory access must be one of: AY0, AY1, MY0, MY1
Incorrect data register used in instruction.
.ENDMACRO must be preceded by macro definition
Code preceding .ENDMACRO statement does not form a proper
macro definition.
Expecting a condition at symbol symbol
Instruction condition code required in place of the named symbol.
Expecting a constant at symbol symbol
Numeric constant required in place of the named symbol.
Expecting a data format at symbol symbol
'UU', 'SU', 'US', or 'SS' required in place of the named symbol (in
an instruction).
Expecting a filename at symbol symbol
An assembler or C preprocessor directive which requires a
filename is given without one (e.g. #include, .INCLUDE, .INIT).
Expecting a macro argument at symbol symbol
Incorrect number or form of arguments/parameters given in a
macro definition or invocation.
Expecting a place holder at symbol symbol
%n placeholders (arguments) must be used in a macro definition.
Expecting an identifier at symbol symbol
User-defined identifier required in place of the named symbol.
Expecting an index register at symbol symbol
Index register required in place of the named symbol (in an
instruction).
Expecting an integer at symbol symbol
Immediate integer operand required in place of the named symbol
(in an instruction).
C–5
C Error Messages
Expecting AR as the destination of the alu operation
AR required in instruction.
Expecting 'AV', 'AC', 'MV' or 'CE' at symbol symbol
Instruction condition code required in place of the named symbol.
Expecting 'AX0', 'AX1', 'MX0', or 'MX1' for DM read
'AX0', 'AX1', 'MX0', or 'MX1' required in instruction.
Expecting 'AY0', 'AY1', 'MY0', or 'MY1' for PM read
'AY0', 'AY1', 'MY0', or 'MY1' required in instruction.
Expecting binary operator at symbol symbol
Logical (not bitwise) expression operator required in place of the
named symbol.
Expecting 'C' at symbol symbol
'C' (carry bit) required in place of the named symbol (in an
instruction).
Expecting 'DM' at symbol symbol
'DM' required in place of the named symbol (in an instruction);
immediate addresses must be in data memory.
Expecting 'ENA' or 'DIS' at symbol symbol
'ENA' or 'DIS' required in place of the named symbol (in an
instruction).
Expecting .ENDMACRO at symbol symbol
A macro definition is not properly terminated with the
.ENDMACRO directive.
Expecting 'EXP' at symbol symbol
'EXP' required in place of the named symbol (in an instruction).
Expecting 'EXPADJ' at symbol symbol
'EXPADJ' required in place of the named symbol (in an
instruction).
Expecting 'HI', 'LO', or 'HIX' at symbol symbol
'HI', 'LO', or 'HIX' required in place of the named symbol (in an
instruction).
C–6
Error Messages C
Expecting 'HI' or 'LO' at symbol symbol
'HI' or 'LO' required in place of the named symbol (in an instruction).
Expecting 'I0', 'I1', 'I2', or 'I3' for DM index
register
'I0', 'I1', 'I2', or 'I3' required in instruction.
Expecting 'I0', 'I1', 'I2', or 'I3' at symbol symbol
'I0', 'I1', 'I2', or 'I3' required in place of the named symbol (in an
instruction).
Expecting 'I4', 'I5', 'I6', or 'I7' at symbol symbol
'I4', 'I5', 'I6', or 'I7' required in place of the named symbol (in an
instruction).
Expecting 'M0', 'M1', 'M2', or 'M3' at symbol
M0-M3 must be used if I0-I3 are used (in an instruction).
symbol
Expecting 'M4', 'M5', 'M6', or 'M7' at symbol symbol
'M4', 'M5', 'M6', or 'M7' required in place of the named symbol (in an
instruction).
Expecting MODULE directive at symbol symbol
The .MODULE directive must be the first statement in any file which
the assembler reads.
Expecting MODULE qualifier at symbol symbol
MODULE qualifier required in place of the named symbol.
Expecting MR as the destination of the mac operation
MR required in instruction.
Expecting 'MR' at symbol symbol
'MR' required in place of the named symbol (in an instruction).
Expecting 'OR' at symbol symbol
'OR' required in place of the named symbol (in an instruction).
Expecting 'PM' at symbol symbol
'PM' required in place of the named symbol (in an instruction).
Expecting 'PUSH' or 'POP' at symbol symbol
'PUSH' or 'POP' required in place of the named symbol (in an
instruction).
C–7
C Error Messages
Expecting 'RND' at symbol symbol
'RND' required in place of the named symbol (in an instruction).
Expecting segment name at symbol
Segment name required in place of the named symbol (in an
instruction).
Expecting shift operand at symbol symbol
Shift operand required in place of the named symbol (in an
instruction).
Expecting 'STS' at symbol symbol
'STS' required in place of the named symbol (in an instruction).
Expecting VAR qualifier at symbol symbol
VAR qualifier required in place of the named symbol.
Expecting '1' at symbol symbol
'1' required in place of the named symbol (in an instruction).
Expecting '0' at symbol symbol
'0' required in place of the named symbol (in an instruction).
Expecting '0' or '1' at symbol symbol
'0' or '1' required in place of the named symbol (in an instruction).
Expecting ']' at symbol symbol
']' required in place of the named symbol.
Expecting '-' at symbol symbol
'-' (subtract) required in place of the named symbol (in an
instruction).
Expecting '*' at symbol symbol
'*' (multiply) required in place of the named symbol (in an
instruction).
Expecting '(' at symbol symbol
'(' required in place of the named symbol (in an instruction).
Expecting ',' at symbol symbol
',' required in place of the named symbol (in an instruction).
C–8
Error Messages C
Expecting '=' at symbol symbol
'=' required in place of the named symbol (in an instruction).
Expecting ')' at symbol symbol
')' required in place of the named symbol (in an instruction).
Expecting ':' at symbol symbol
':' required in place of the named symbol (in an instruction).
Expecting ';' at symbol symbol
';' required in place of the named symbol (in an instruction).
Failed to open '#include' file filename
File to be included by C preprocessor was not found; 1) the
path/filename given was incorrect, or 2) file does not exist.
FATAL: Unable to execute ' ASM2'
Core assembler cannot run; verify proper software installation and
check PATH statement.
FATAL: unable to execute ' ASMPP'
Standard preprocessor cannot run; verify proper software
installation and check PATH statement.
FATAL ERROR: Ran out of memory
Assembler cannot process current file in available memory.
Reduce file size or increase amount of memory available on PC.
FATAL ERROR: unable to open filename for reading
Assembler cannot find the named input file; 1) the path/filename
specified is incorrect, or 2) file does not exist.
FATAL ERROR: unable to open filename for writing
Assembler cannot create the named file due to an operating
system condition, such as a bad filename or full disk.
Illegal address operand symbol
Immediate operand required in place of the named symbol (in an
instruction).
Illegal address specified
Address is in un-declared memory or is invalid.
C–9
C Error Messages
Illegal data specified
Data is invalid.
Illegal do until term at symbol symbol
DO UNTIL instruction has an illegal termination condition.
Illegal do until not term at symbol symbol
DO UNTIL NOT instruction has an illegal termination condition.
Illegal exponent symbol
Exponent is out of range (in an immediate shift instruction).
Illegal INIT value symbol
Buffer initialization value is invalid.
Illegal length specified
Buffer length is invalid.
Illegal length operator usage
'%' (length of) operator incorrectly used.
Illegal lhs 'item'
Item named is invalid when located to the left of equal sign (in an
instruction).
Illegal mode operand symbol
Mode operand required in place of the named symbol (in an
instruction).
Illegal multi-function
Incorrect instruction syntax used (illegal operands included).
Illegal offset specified
Buffer address offset is invalid.
Illegal operand symbol
Instruction operand required in place of the named symbol.
Illegal rhs 'item'
Item named is invalid when located to the right of equal sign (in
an instruction).
C – 10
Error Messages C
Illegal stack operand symbol
Stack operand required in place of the named symbol (in an
instruction).
Illegal yop symbol
Instruction yop required in place of the named symbol.
Illegal xop symbol
Instruction xop required in place of the named symbol.
INCLUDE must be preceded by '.'
Assembler directives must start with a period (C preprocessor
include directive is #include).
.LOCAL valid only in macro definitions
.LOCAL statement detected within code which does not form a
proper macro definition.
MACRO must be preceded by '.'
Assembler directives must start with a period.
Multiple do's to the same address
Illegal do loop.
symbol
Must use DAG0 for data memory access
Incorrect data address generator used in instruction.
Not enough arguments to macro
The number of parameters passed in a macro invocation must
match the number of arguments declared.
Place holder out of range at symbol symbol
The %n placeholders (arguments) in a macro definition must be in
consecutive numerical order: %1, %2, %3, etc.
Preprocessor failed to open \filename
Input filename was not found; 1) the path/filename given was
incorrect, or 2) file does not exist.
Problem mallocing enough memory
Memory allocation limit or restriction reached.
C – 11
C Error Messages
Result register contention
Two or more instructions executed in the same cycle use the same
result register.
Too many arguments to macro
The number of parameters passed in a macro invocation must
match the number of arguments declared.
Trying to redeclare symbol as a buffer
Named symbol is declared twice.
Trying to redeclare symbol as an external
Named symbol is declared twice.
Trying to redeclare symbol as a label
Named symbol is declared twice.
Trying to redeclare symbol as a port
Named symbol is declared twice.
Trying to redefine symbol
The named symbol has already been defined within the current
module.
Unable to open filename for reading
Filename given with .INCLUDE directive was not found; 1) the
path/filename given was incorrect, or 2) file does not exist.
Undefined do addr: address
Address specified in non-existent memory.
Undefined symbol: symbol
Named symbol is not declared properly.
Warning: Illegal base address for circular buffer
Circular data buffers may only start at particular addresses in
memory. Refer to the sections “More On Circular Buffers” and
“Special Case: Circular Buffer Lengths of 2n” in Chapter 3 of this
manual.
Warning: Illegal register access inferred
Incorrect register usage.
C – 12
Error Messages C
C.4
LINKER ERRORS
The linker generates error messages, warning messages, and
informational messages. Some errors allow the linker to continue
running in order to detect additional problems, but fatal errors halt the
linking process. Both error types are reported to the display, as well as
a limited number of warning and informational messages. Error
sources must be corrected.
Several categories of linker errors are detected. The most common
messages point out memory allocation and symbol reference problems.
These errors can result from insufficient memory declarations,
improper absolute address specifications, undefined symbol
references, etc.
Assembler detected errors in module modulename
(Operating System Error)
Assembly errors are flagged in the specified module; source code
must be corrected and re-assembled.
-c switch must be used with -lib switch
The -lib switch links the ADSP-2100 Family Runtime Library of C
functions, requiring the use of the linker’s -c switch (for compiled
C programs).
Calling broken software
(Software Error)
Software failure detected in linker or assembler.
Can't create executable file filename
(Operating System Error)
Linker cannot create .EXE file due to an operating system
condition, such as a bad filename or full disk.
Can't create list file filename
(Operating System Error)
Linker cannot create .MAP file due to an operating system
condition, such as a bad filename or full disk.
Can't create symbol file filename
(Operating System Error)
Linker cannot create .SYM file due to an operating system
condition, such as a bad filename or full disk.
C – 13
C Error Messages
Can't create temporary name
(Operating System Error)
Linker is unable to complete the directory search. When searching
a directory for files to link, the linker must create a temporary file
containing a list of the directory’s contents; this error is seen when
insufficient memory is available for the file on the host computer
or if the list is not found.
Can't find symbol of module modulename in symbol
table
(Software Error)
Linker has allocated memory for a symbol (buffer, module, or
address label) without error, and added symbol to the symbol
table; when the linker subsequently tries to assign an address,
however, the symbol is not present in the symbol table (linker
failure).
Can't open architecture file filename
(Operating System Error)
Linker can’t find .ACH file; 1) default filename not found, and no
alternative specified with the -a switch, 2) the path/filename
specified with -a switch is incorrect, or 3) file does not exist.
Can't open buffer init file filename
(Operating System Error)
Linker cannot find buffer initialization file; 1) the path/filename
specified (in .INIT assembler directive) is incorrect, or 2) file does
not exist.
Can't open code file filename
(Operating System Error)
Linker cannot find the named .OBJ file to link; 1) the path/
filename specified is incorrect, or 2) file does not exist.
Can't open file filename
The linker cannot locate the assembler-output .CDE file named; 1)
the path/filename given was incorrect, or 2) file does not exist.
Can't open input list file filename
(Operating System Error)
File named with -i switch is not found; 1) the path/filename
C – 14
Error Messages C
specified is incorrect, or 2) file does not exist.
Can't open library file filename
(Operating System Error)
Linker cannot find the named .OBJ file to link; 1) the search
path/directories specified (with ADIL environment variable or
-dir switch) are incorrect, or 2) file does not exist.
Can't open library object file filename
The linker cannot locate the named routine of the ADSP-2100
Family Runtime C Library: verify proper software installation.
Can't open temp file filename
(Operating System Error)
Linker cannot find temporary file it created during directory
search.
Can't place symbol of module modulename
(Memory Allocation Error)
The data buffer or code module named by symbol cannot be placed
in
memory.
/ at address address
Object is declared at absolute address specified (with ABS
qualifier), but cannot be placed there.
/ contention at address
Two objects have been declared at the same absolute address or
overlap each other at the specified address.
/ for boot page page#
Object is to be placed in boot memory on page number listed.
/ no appropriate pm,dm ram available
Object to be placed is declared in PM RAM or DM RAM; this
memory type does not exist in architecture.
/ no appropriate pm,dm rom available
Object to be placed is declared in PM ROM or DM ROM; this
memory type does not exist in architecture.
/ not enough pm,dm rom,ram left
Not enough of the specified memory type is available to complete
C – 15
C Error Messages
placement of object.
/ (Warning) placement forced to be external
Object declared in internal DM or PM; linker is placing object in
external DM or PM, however, due to shortage of on-chip memory
space (WARNING ONLY).
/ requires # words of pm,dm rom,ram
Relocatable object has length (in words) shown, and is declared in
memory type
specified
ONLY).
/ requires
# words
of(INFORMATION
pm,dm rom,ram
from a segment named
segname
Object is relocatable within named segment, has length (in words) shown, and is
declared in memory type specified (INFORMATION ONLY).
/ symbol of module modulename
Symbol specifies the data buffer or code module being placed
(INFORMATION ONLY).
.....check for conformity with arch. description
systemname (filename)
The system architecture file specified for the linker is inconsistent with
the memory configuration required by the modules being linked.
Circular buffer buffername has bad absolute address
0x0XXX
Circular data buffers may only start at particular addresses in
memory. Refer to the sections “More On Circular Buffers” and
“Special Case: Circular Buffer Lengths of 2n” in Chapter 3 of this
manual.
Construct too large from filename— examine source
A .INIT directive in the named input file contains too many data
values.
Declaration of symbol in module modulename1 is
inconsistent with its use in modulename2
A symbol can name various objects: a module, data variable/buffer,
program label, memory-mapped port, macro, or constant. The named
symbol is used in different ways in the two modules indicated.
Errno: # Can't execute MSDOS command: command
(Operating System Error)
Linker has given a DOS command which is not correctly executed;
C – 16
Error Messages C
DOS error number listed is returned to linker.
Fail on fseek: filename
(Operating System Error)
Linker is unable to complete a file or directory search.
Failed request to alloc more memory
(Operating System Error)
Not enough memory is available on host computer for linker to
continue running.
filename too big- breakup sources
The name .OBJ file is too large for linker to process.
Global buffername declared in modules modulename1 and
modulename2 (maybe others)
(Symbol Reference Error)
A global buffer should only be declared in one module to prevent
conflicting usage.
Module name modulename duplicated
(Symbol Reference Error)
Two or more modules to be linked have the same name; a unique
name must be given to each.
New module search fail
(Software Error)
A module name is not found in symbol table (linker failure).
Offset on symbol in module modulename forces address
out of range
The variable/buffer or program label named is used with an offset
(symbol ± offset) which generates an out-of-range address.
Opcode with bad unresolved field
(Software Error)
Opcode generation mechanism of the assembler is not operating
correctly (assembler failure).
Sources too large filename
The name .OBJ file is too large for linker to process.
Symbol made global twice in modulename
The named symbol is declared as GLOBAL in two different modules.
C – 17
C Error Messages
The module named is the second occurrence.
Symbol of module modulename not linked
(Symbol Reference Error)
The data buffer or address label listed is declared as .EXTERNAL
in this module, but is not declared as .GLOBAL or .ENTRY in
another module.
Symbol of modulename is bootable but ref’d as if not
(Symbol Reference Error)
The buffer or module named is stored in boot memory; a nonbootable program has referenced or called the bootable object,
which may not have been booted yet.
Symbol of modulename is not part of boot page page#
(Symbol Reference Error)
The buffer or subroutine (module) named is referenced on the
boot page specified, but a copy is not located on the page.
Symbol of modulename1 ref'd in modulename2 is not
part of boot page page#
(Symbol Reference Error)
The global buffer or address label named by symbol is referenced
(in the second module named) on the boot page specified, but a
copy is not located on the page.
Too many files specified in filename— max = n
The indirect file used with the linker’s -i switch names too many
files for the linker to process.
Too many files to link— max = n
Too many input files are listed on the linker invocation line.
Unable to create temporary files
This message may indicate that the linker has run out of space on
your hard disk—you should attempt to increase the amount of
memory available on the disk.
Unable to open user library file filename
The linker cannot locate your library file; 1) the file’s path cannot
C – 18
Error Messages C
be determined, or 2) file does not exist.
Unable to open standard library file filename
The linker cannot locate the named routine of the ADSP-2100
Family Runtime C Library: verify proper software installation.
Usage of symbol in module modulename implies it is
in pm,dm, it is not
(Symbol Reference Error)
The object named is declared in PM or DM; it is referenced in the
code module named as if to be found in the other memory space.
Usage of symbol in module modulename is
inconsistant with declaration
(Symbol Reference Error)
The buffer name or address label shown is misused in code; for
example, using a variable name as an entry point.
(Warning) Boot memory images for boot page
page#
larger than declared boot memory in arch.
description
The total amount of code and data designated for storage on the
specified boot page exceeds the size of the system builderdeclared boot page segment.
(Warning) Bootable image of n K bytes larger than
boot memory n K bytes— check arch. description
systemname (filename)
The total amount of code and data designated for storage in boot
memory exceeds the declared size of boot memory.
(Warning) Bootable module modulename placed
externally at PM[0xXXXX]— it will not be booted
The total amount of boot memory declared has been allocated by
the linker—the named module will be placed in external program
memory.
(Warning) Initialization data for buffername in
module modulename is longer than buffer
C – 19
C Error Messages
Initialization file contains more data than can be loaded into
buffer (WARNING ONLY).
(Warning) No boot memory for bootable images— check
arch. description systemname (filename)
Some (or all) of the modules being linked are designated for
storage in boot memory, but the system architecture file specified
for the linker does not have any BM declared.
(Warning) No path to module modulename
The linker cannot locate the named module in any of the input
files—check the path/filenames given.
C.5
PROM SPLITTER ERRORS
Mixed memory types
The PROM splitter may only be invoked with one memory type
switch: -dm, -pm, or -bm.
Illegal boot memory size
The amount of code and data designated for boot memory exceeds
the total available.
Can't open file
The PROM splitter cannot locate the .EXE file named as input;
1) the path/filename given was incorrect, or 2) file does not exist.
Can't open memory image file
The PROM splitter cannot locate the .EXE file named as input;
1) the path/filename given was incorrect, or 2) file does not exist.
Boot code is larger than Boot page
The amount of code and data designated for a specific boot page
exceeds its storage capacity.
Loader image does not fit in 8 boot pages
The program contained in the input file is too large for the loader
option (-loader switch).
Loader BM and specified BM overlap
An object specified for storage in boot memory is located at an
address needed by the program generated with the -loader option.
C – 20
Interrupt Vector Addresses
D.1
D
VECTOR TABLES
The interrupt controller of ADSP-21xx processors allows the
processors to respond to various interrupts. Depending on the
configuration of SPORT1 (for all processors except the ADSP-2100),
there may be one or more interrupts generated by external devices.
Additional interrupts can be generated internally by serial ports, timer,
host interface port, and analog/digital converters, depending on
which processor is being used.
The processor responds to interrupts by shifting control to the
instruction located at the appropriate interrupt vector address. The
tables below show the interrupt vector addresses and program startup
address for each processor.
Interrupt Source
IRQ0
IRQ1
IRQ2
IRQ3
program startup at RESET
Interrupt Vector
0x0000
0x0001
0x0002
0x0003
0x0004
ADSP-2100 Interrupts & Interrupt Vector Addresses
Interrupt Source
program startup at RESET
IRQ2
SPORT0 Transmit
SPORT0 Receive
SPORT1 Transmit / IRQ1
SPORT1 Receive / IRQ0
Timer
Interrupt Vector
0x0000
0x0004 (highest priority)
0x0008
0x000C
0x0010
0x0014
0x0018 (lowest priority)
ADSP-2101 Interrupts & Interrupt Vector Addresses
D–1
D Interrupt Vector Addresses
Interrupt Source
program startup at RESET
IRQ2
SPORT1 Transmit / IRQ1
SPORT1 Receive / IRQ0
Timer
Interrupt Vector
0x0000
0x0004 (highest priority)
0x0010
0x0014
0x0018 (lowest priority)
ADSP-2105 Interrupts & Interrupt Vector Addresses
Interrupt Source
program startup at RESET
IRQ2
HIP Write from Host
HIP Read to Host
SPORT0 Transmit
SPORT0 Receive
SPORT1 Transmit / IRQ1
SPORT1 Receive / IRQ0
Timer
Interrupt Vector
0x0000
0x0004 (highest priority)
0x0008
0x000C
0x0010
0x0014
0x0018
0x001C
0x0020 (lowest priority)
ADSP-2111 Interrupts & Interrupt Vector Addresses
Interrupt Source
program startup at RESET
IRQ2
HIP Write from Host
HIP Read to Host
SPORT0 Transmit
SPORT0 Receive
DAC Transmit
ADC Receive
SPORT1 Transmit / IRQ1
SPORT1 Receive / IRQ0
Timer
Powerdown
Interrupt Vector
0x0000
0x0004 (highest priority)
0x0008
0x000C
0x0010
0x0014
0x0018
0x001C
0x0020
0x0024
0x0028 (lowest priority)
0x002C
ADSP-21msp50 Interrupts & Interrupt Vector Addresses
D–2