1
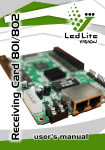
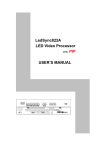
Table of Contents Table of Contents.............................................................................................................................1 Chapter 1. Introduction..................................................................................................................2 Chapter 2. Software Installation and Uninstall............................................................................5 2.1 Software Installation.........................................................................................................5 2.2 Uninstall .............................................................................................................................7 Chapter 3. Software and Hardware Setup....................................................................................8 3.1 Software Setup...................................................................................................................8 3.2 Receive card Setup ..........................................................................................................10 3.3 Display connection Setup................................................................................................13 Chapter 4. Setup the graphics card:............................................................................................16 Chapter 5. Setup the graphics card:............................................................................................21 Chapter 6. Appendix:....................................................................................................................24 6.1 Appendix 1:Signal Cable Production Process ............................................................24 6.2 Appendix 2:Sender Card Interface Explanation .......................................................24 6.3 Appendix 3:Reciver Card Interface Explanation ......................................................25 Chapter 7. Common Troubleshooting .........................................................................................26 -1- Chapter 1. Introduction Dear friends: Thank you again for choosing Natural Power products and it’s really our honor to have your support in our development. In order to keep the Natural Power brand screens working well under the right operation, we briefly summarize the application and items to attention as follows for your references. Users must take these items to heart seriously before installing and debugging the screen. ☆ Notice: a. Fellow with “user manual’ in steps: b. Moisture proof:Humidity requirements: maximum working temperature should be less than 92% relative humidity; c. water proof:For indoor application screen, do not pour water .For outdoor screen, is considering in design under natural conditions in the waterproof design, must not think that will water injection case inside. d. dust proof:Don't put The screen placed in The dusty environment . Should be cleaned regularly screen surface of dust. e. Reasonable temperature and Humidity: working environment temperature -20°C≤t≤80°C Storing environment temperature -40°C≤t≤60°C Humidity :10—90%RH f. One piece of main power cable can support 12A at most. g. For the first time when use screen, with 20% of the brightness work half an hour after heating dehumidification normal use. Notice: to get a good working environment for LED display, make sure that thermal insulation system and heat removal system can be designed and be installed during installation of LED display. h. Requirement of power supply: Voltage of power supply of LED display: 220V±10% frequency: 50HZ±5%, safe and reliable access to the ground, reliable isolation between ground wire and zero line, input power far from large power electric appliance. Any questions during the installation and operating please read our manual accordingly or contact us directly. In order to maintain and use a high-quality display, your suggestion or comment welcomed. i. security recommendations, for no relevant qualification of the staff, do not open the cabinet interior. The high pressure, prevent to get an electric shock. -2- ☆ Use process Running environment Operating system 1、Chinese and English Windows98/me/2000/NT/XP/Win7 Hardware configuration 1、CPU: Pentium 2 GHz above 2、memory:1G 3、ATI card: The memory 256 M above, DVI output Related software 1、Media Player-- Must be installed 2、OFFICE2007-- If need to WORD document must be installed 3、RealPlayer-- If need to broadcast RealPlayer file must be installed ☆ LED display Hardware List: a. LED display screen b. Signal cable between panels c. Power cable between panels d. Control system-sender card (to be installed inside the computer) e. Receive card(to be installed inside of each panel) f. Computer mainframe (including DVI signal output and port) g. Other accessories h. Hardware Setup: i. Insert the DVI card into the AGD slot on mother board, set up the drivers’ software for DVI card. j. Insert the sender card in the empty PCI slot(if there is such a card or slot) k. Connect the sender card and DVI card with the DVI cable. l. Link the control wire with the USB cable. m. Connect the network cable with the receive card according the engineering drawing n. Set up and test the screen after check all the cable connection completely. Tips: the sender card and ATI card connection schemes -3- Software Setup DVI card installation: Insert the Graphics card driver into CD-ROM drive, then the software will install automatically, just follow the steps as screen prompts. First, Install DirectX8.1, and then install driver, finally install control panel. (Please refer to ATI graphics card installation manual for detail installation progress. If the card not from our company, please fellow the manual book which with the card, and set the card as clone mode). Play software To install dedicated player of large screen and LED studio software or other control software, insert the attached application software CD into CD-ROM and copy or install all programs to the computer. ☆ LED display operating process 1、 To switch on LED display: First, start your computer, second, switch on LED display. Connect all equipments into power (ensure that input voltage is in line with requirement of product), switch on LED screen (It shows that LED screen is turned on if there is regional flickering when plug in).Next, start your computer, make sure that display card is set up correctly (if not, no picture can be seen, that is black screen). Then open control software, set parameters of pixel size and display area (It doesn’t affect picture display of the LED screen). 2、Switch off LED screen: Turn off LED screen power first, close operating software, and then shut down computer. ☆ Troubleshooting Check all cables connected correctly; check signal cable connected correctly, make sure signal input and output on receive card connect with right interface. Check system connected correctly (please refers to system connection manual), make sure all the software install completely, which include Graphics card set up (please refer to Graphics card set up manual), and operating software installation. -4- Chapter 2. Software Installation and Uninstall 2.1 Software Installation “LED Studio’ can be easily installed, as shown below: put the “LED Studio” installation CD into the CD-ROM, then select this CD-ROM; double click it with your mouse, Open software installation package as shown in Figure 2-1,open the “Software operation” folder,double click the installation programs shown in Figure 2-2. After that, simply follow the instruction on the screen. Software operation Note: This software is protected by a serial number. Please enter the correct serial number in order to process the installation. Please ask the products provider for the correct serial number. Picture 2-1 -5- Picture 2-2 After “LED Studio” software has been successfully installed, there will be a “LED Software” program group in the [Start] / [Program], then move to the “LED Software” under this program group, click to start. Also there will be a “LED Studio” short-cup on your desktop: as figure 2-3. Also, you can start the program by double click on the icon. Picture 2-3 -6- 2.2 Uninstall “LED Studio” software provide an auto-uninstall function, for your convenience to delete all “LED Studio” files, program groups and short-cuts, users can either select “Delete LED Studio” under the “LED Software” group, or go to the [Control Panel], select [add/delete program] to undergo quick uninstall. (Uninstall window as show in Figure 2-4), now select “Automatic” can delete all files, program groups and short-cuts. Picture 2-4 -7- Chapter 3. Software and Hardware Setup 3.1 Software Setup Please check whether the setup of ATI card correct or not before usage of LED studio (please see the Usage Introduction of ATI for the install and setup of ATI drive). Turn on the screen power when the preparation is ready, then there is territorial glittering when the screen is instant electrified which shows the screen is working. Next double click the LED Studio icon on the desk(see the picture 2-3) to start the software, then click the menu to choose Software Setup to enter the window of software setup(see the picture 3-1),then set up the size of window. Picture 3-1 -8- 3.2 Receive card setup When inputting the Linsn in the window of Software Setup, there will pop up Enter code (see the picture 3-2), input the Code 168 in the textbox then enter to the window of Hardware parameter setup. See the picture 3-3 Picture 3-2 -9- Notice: to avoid the engineer’s disoperation then lead to the disorder of screen, there is no Linsn inputting window when designing the software. When it is necessary to set up or revise the parameter of screen, the engineer can input the Linsn in the Software Setup directly then enter the window of Hardware parameter setup.(See picture 3-4). Picture 3-3 Picture3-4 After enter the window of Hardware parameter setup, select Receiver Card to enter the window of Receiver Card Setup to set up the parameter, click the Load from the Documents there will pop up the window of Open (see picture 3-4), you can select the document of “.RCG” which is corresponding with the screen in this window, then just click the OK button. Now the screen hardware parameter shows on the window of Hardware Setup, last click the button of “Send to receiver” and “Save on the receiver”., which could make the screen’s hardware parameter be saved in the Receiver Card. - 10 - Notice: 1. 1 Receiver Card on your existing procedures have been downloaded, no abnormalities in the Receiver Card, do not need to receive the card set 2. the parameter Document which is corresponding with the screen you purchase (RCG format) please see the disk(see picture 3-5). Picture 3-5 - 11 - 3. Users receive card parameter setting the matters needing attention a. Refresh FRQ: above 300HZ b. Gray level: above 4096 c. Scan clock: 12-18MHZ (see picture 3-6) Picture 3-6 3.3 Display Connection setup After receiving card parameters finished, click the "Display Connection" to enter the relevant settings page, enter the display number, for example, send a screen to enter the three cassette 3, with a to type 1, point "update screen number "and then set the screen were the type (select the type of screen) and card number (with the length of the input display how many (X), a high number of cards with the (Y)), computer will show floor plans, as long as the connection to send the card to receive cards is defined as the first(The back of screen resolution see picture 3-7), enter the corresponding data, and then set the second receiver card that connecting with the first receiver card, enter the corresponding data. So click around and then set up a success .Finally, click the button of “Send to receiver” and “Save on the receiver”. - 12 - Picture 3-7 Picture 3-8 - 13 - Or click “Load from file” button and then pop up the window of Open (see picture 3-6 for example): which is corresponding with the screen in this window, then click “Send to file” and “Save to file”. Picture 3-6 - 14 - Chapter 4. Program broadcast steps ☆Open the LedStudio,Click on the menu of the "file" operation,select “New file” see picture 4-1 Picture 4-1 ☆Click on the "New page of programs " in the popup dialog box select "Add step"(see pictures 4-2),Pop-up programs Settings window ,Click “New window” in the popup dialog box select "File window"(see pictures 4-3) - 15 - Picture 4-2 Picture 4-3 - 16 - ☆By above steps we successful create a document window, you can named the new file,according to the pixel of the screen modifying the size of the window play and other related parameters (see picture 4-4). Picture 4-4 - 17 - ☆Mainly introduced how to load the video files,click “Add File”(see picture 4-5), pop-up window to load the file, select the video file you want to play to (see picture 4-6)Other programs broadcast way see “LED Studio user's manual” Picture 4-5 Picture 4-6 - 18 - Chapter 5. Setup the graphics card 5.1 NVIDIA graphics card NVIDIA card can be easily installed, as shown below: Put the installation CD into the CD-ROM, The Installation Menu will automatically pop up. (if not, then select this CD-ROM, double click it with your mouse)Then select “driver” to start the Installation Guide. Then reset computer. Step 1: Only windows 98/xp operating system supports this settings, however some settings must be done as well: Right click on the space on the desktop, a menu like picture5-1 will appear . Picture 5-1 Select NVIDIA Control Panel: Appearing a NVIDIA Control Panel. Then select Standard settings on the top of shortcut menu and setup the multiple displays, it comes into multiple displays settings like picture 5-2: Picture 5-2 First select the display you want to use: analog display+crystal view and apply. Second choose the Nview display mode to use: The same on both displays (clone) and apply. - 19 - Step 2 Select the change resolution, you can change the color settings reduce flickering or adjust the amount of information appearing on the display. 1, Press the analog display monitor. Set this monitor display resolution: 1024 by 768 pixels, color quality highest (32-bit color), refresh rate 60HZ. Then press the crystal display, all settings are the same analog display: display resolution: 1024 by 768 pixels, color quality highest (32-bit color), refresh rate 60HZ. And presses apply. Look at the picture5-3 and picture 5-4: Picture 5-3 Picture 5-4 - 20 - Step 3 Right click on the space on the desktop, a menu will appear. Select properties: Appearing a properties menu, click on “settings” and “advanced” button, it comes into display monitor and choose troubleshoot like picture 5-5. Adjust the hardware acceleration to full, choose the enable write combining and apply .Then reset computer. Picture 5-5 If the led screen shows some problem, please adjust the hardware acceleration to good. - 21 - Chapter 6. Appendix 6.1 Appendix 1:Signal Cable Production Process 6.2 Appendix 2:Sender Card Interface Explanation - 22 - 6.3 Appendix 3:Reciver Card Interface Explanation - 23 - Chapter 7. Common Troubleshooting Q1:.Open the LED Studio can’t find LED screen see picture 7-1 图 7-1 A: Please check to the USB cable that sender card connected to the computer Q2: Open the LED Studio ,find the screen is black (Screen working will show a picture of desktop area) A: First check the indicator of sender card ,If you find that red(Power indicator) light, green indicator does not blink, Open the computer's graphics card control panel settings the multiple displays(see picture 7-2) Picture 7-2 After setting the problem is not resolved and the sender card green indicator is still not blinking, ATI card or sender card is damaged, replace - 24 - Q3: Open the LED Studio ,find the screen is black A1: Q2 has been carried out to confirm the setting, Send cards have also been working ( red light , green light flashing ) ,then please check the receiver card that connected to send cards. If you find that red(Power indicator) light, green indicator does not blink;then no signal receiver card .Please check the data cable is connected, If the connection is good the problem persists ,receive card or data cable is damaged , replace A2: Check whether loading the ".RCG" format file. See chapter 3.2 for more steps Q4: All cabinets show the same picture A: Not loaded the". CON" format file .See chapter 3.3 for more steps - 25 -