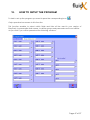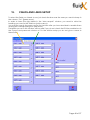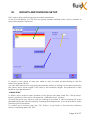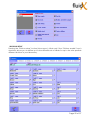
1
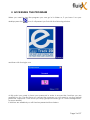
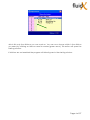
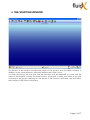
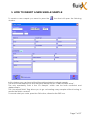
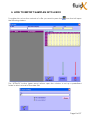
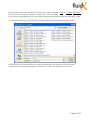
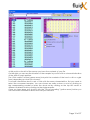
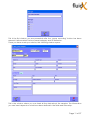
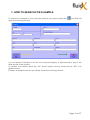
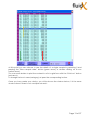
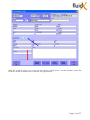
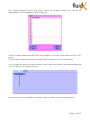
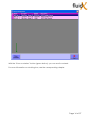
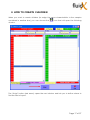
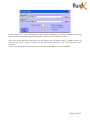
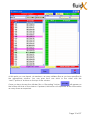
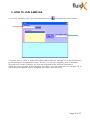
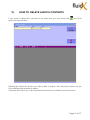
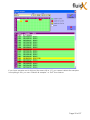
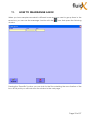
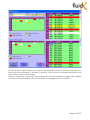
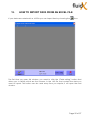
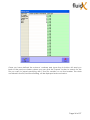
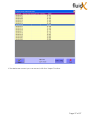
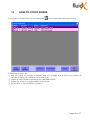
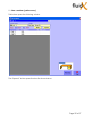
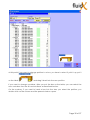
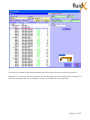
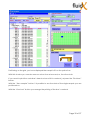
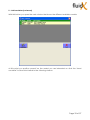
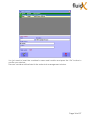
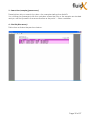
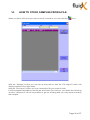
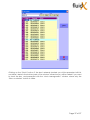
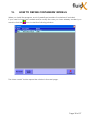
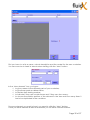
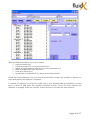
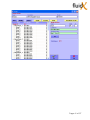
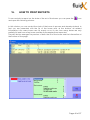
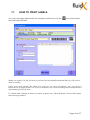
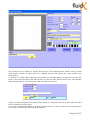
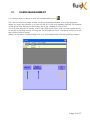
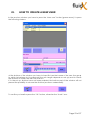
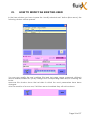
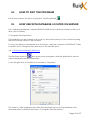
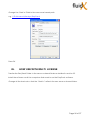
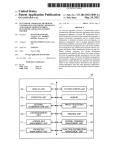
EasyTrack USER MANUAL Easytrack2D 2.0 Rev. 04 1. INDEX 1. 2. 3. 4. 5. 6. 7. 8. 9. 10. 11. 12. 13. 14. 15. 16. 17. 18. 19. 20. 21. 22. 23. 24. INDEX ACCESSING THE PROGRAM THE STARTING WINDOW THE ICON BAR HOW TO INSERT A NEW SINGLE SAMPLE HOW TO IMPORT SAMPLES INTO A BOX HOW TO SEARCH FOR A SAMPLE HOW TO CREATE CHILDREN HOW TO JOIN SAMPLES HOW TO DELETE A BOX‟S CONTENTS HOW TO REARRANGE A BOX HOW TO IMPORT DATA FROM AN EXCEL FILE HOW TO STOCK BOXES HOW TO STOCK SAMPLES FROM A FILE HOW TO DEFINE CONTAINERS‟ MODELS HOW TO PRINT REPORTS HOW TO PRINT LABELS HOW TO SETUP THE PROGRAM FIELDS AND LINKS SETUP GROUPS AND DIVISIONS SETUP USERS MANAGEMENT HOW TO CREATE A NEW USER HOW TO MODIFY AN EXISTING USER HOW TO EXIT THE PROGRAM 2 3 5 6 7 8 12 17 20 21 23 25 28 36 38 42 43 47 48 49 52 53 54 55 Page 2 of 57 2. ACCESSING THE PROGRAM When you want to start the program you can go in its folder or, if you have it on your desktop press the icon; it will present you first with the following window and then with the login one At this point you need to insert your password in order to access the functions you are qualified to use. The first time you access the program you will need to use the default password “supervisor” that will let you setup groups and users (go to “Users management” for more details). If divisions are enabled you will then be presented the window Page 3 of 57 which lists only the divisions you can work on. You can now choose which is the division you need, by clicking on the box near its number (green arrow). This action will open the starting window. If divisions are not enabled the program will directly pass to the starting window. Page 4 of 57 3. THE STARTING WINDOW The first line in the window contains the name of the product and its version number, in addition to the usual Windows “Minimize, Restore and Close” icons. You then encounter the icon bar with the functions you are enabled to, a line with the name of the licence‟s owner, the main window, a line with, in order, the name of the user connected, the group it belongs to, the name of the function activated, day and date, the number of the client connected. Page 5 of 57 4. THE ICON BAR The active functions depend on the profile of the user connected. All the different available functions are: To insert a single new sample To insert multiple samples belonging to a scanned rack To make different kinds of search by: sample ID, box ID or name, date and fields name, To create a child box from an existing sample box To join different samples To delete samples To reorganize boxes To import data from an external Excel file To organize the samples into the containers To display the box contents and insert it into a container To define different models of containers To view the report on in process and already processed boxes To define and print labels with both linear and 2D barcode To define fields‟ names; to create groups; to access the available utilities. Only supervisors have access to this function To create a new user or to modify an existing one. Only supervisors have access to this function To exit the program Page 6 of 57 5. HOW TO INSERT A NEW SINGLE SAMPLE To create a new sample you need to press the window. icon that will open the following In this window you can insert all the information related to a single sample. The active fields depend on what has been defined in the “Fields and links setup”. The only mandatory field is the “ID Sample” which can be both numerical and alphanumeric. The “No refresh fields” flag allows you to go on inserting many samples without having to rewrite the fields„ contents. To record what you wrote, press the OK button, otherwise the EXIT one. Page 7 of 57 6. HOW TO IMPORT SAMPLES INTO A BOX To register into a box the contents of a file you need to press the the following window. icon that will open The “SETTINGS” button (green arrow) allows open the window to set up a predefined folder in which to look for the data files. Page 8 of 57 In this window you can also specify if the file you are to import is Tab or Comma Delimited. The files you can import must be text files with “.TXT” extension If you have to change path you can write it directly in the field or use the “BROWSE” utility. You can now press the “FILE IMPORT” button (yellow arrow) that opens the window At this point you choose the file you need and the Box File window will fill with data. If data are not properly displayed, you have to verify f the file format is correct. Page 9 of 57 At this point on the left of the screen you have the contents of your file. On the right you can see the situation of the samples in your file with a coloured indication of the state of each position. The “Print worklist” button (green arrow) lets print the contents of the box in a list or a grid form (depending on what you choose). To record information about a set of vials with the same characteristics, first you need to select the concerned samples. You can choose an entire column or row by clicking on the corresponding number or letter; the whole set by clicking on the top left corner or different scattered vials by clicking on the single samples. Once you have done your choice, with the “Group recording” (yellow arrow) button you can record the information about the vials you selected. Page 10 of 57 This is the first window you are presented after the “group recording” button has been pressed. It allows select the box name/category and its dimension. Once you have made your choice, the following window opens. This is the window where you can insert all the data about the samples. The information you can insert depend on what have been defined in the fields and links setup. Page 11 of 57 7. HOW TO SEARCH FOR A SAMPLE To search for a sample or a box into the archive, you need to press the open the following window. icon that will You can specify a Sample or Box ID, a box name/category, a date interval or any of the fields shown in the window. To confirm your search, press the “Ok” button (yellow arrow); otherwise the “Exit” one (green arrow). If there is a multiple result set you will be shown the following window Page 12 of 57 At this point you can choose to see the details of a single sample by selecting it and pressing the “Show sample data” button (green arrow) or double clicking on its row (yellow arrow). You can even decide to print the contents in a list or grid form with the “Print box” button (red arrow). To change the box‟s name/category just press the corresponding button. Once you have made your choice, you will be shown the window below; it is the same window shown if there is not a multiple set result.. Page 13 of 57 With this window open, you can: see the data, modify them, create children, print the sample‟s data and barcode or delete a single sample. Page 14 of 57 The “Create children” button (red arrow) opens the window in which you can list the child/children of the sample you are working on. Once you have inserted the IDs of the new sample/s, you can confirm them with the “Ok” button. The fact that children have been created will be made known in the Notes field. You can also stock the box choosing the “Stock” label (blue arrow) and then pressing the “Box stocking” button (green arrow). It shows the list of the available containers with its location, model and description. Page 15 of 57 With the “Show container” button (green button), you can see its contents. For more information on stocking box, see the corresponding chapter. Page 16 of 57 8. HOW TO CREATE CHILDREN When you want to create children (to assign the same characteristics to the samples contained in another box) you can choose the window. icon that will open the following The “Setup” button (red arrow) opens the next window and lets you to define where to find the files to import. Page 17 of 57 In this window you can indicate even how many children you want to create specifying the number in the prearranged field (yellow arrow) and what kind of file is. After you have specified the path, you can press the “Parental import” (green arrow) to choose the file to import. Once the file has been imported, you will have the next situation. If you have samples not yet archived, it will not be possible to create children Page 18 of 57 At this point you can import, at maximum, as many children files as you have specified in the appropriate window. You can pass from one child to the other with the “next”/”previous” buttons on the top of the window. Once you have chosen the children files, a “Recording” button will appear on the bottom left side of the window. If pressed, this button will duplicate all the information as many times as requested. Page 19 of 57 9. HOW TO JOIN SAMPLES If you have samples to join, you can choose the icon that opens the next window. You have now to write or read with a barcode reader the sample‟s ID in the field shown by the red arrow and press the “Insert” button. You can join together up to six samples. Every time you insert a sample, you can see its details in the sky-blue filed below. Once you have chosen all the samples you need, you can write the new sample‟s ID in the relating field (green arrow) and press the button with the arrow. Page 20 of 57 10. HOW TO DELETE A BOX’S CONTENTS If you want to delete the contents of an entire box you can chose the opens the next window. icon that Pressing the “Read file” button you will be able to search, with a browse window, for the file containing the samples to delete. Once the file chosen, you will be presented with the box‟s situation as shown below. Page 21 of 57 If you have samples not in this box (the ones with a “X”) you cannot delete the samples. I everything is fine, you can “Delete all samples” or “Exit” the window. Page 22 of 57 11. HOW TO REARRANGE A BOX When you have samples recorded in different boxes and you want to group them in the same box, you can use the rearrange function with the window. icon that opens the following Pressing the “Read file” button, you can look for the file containing the new situation of the box. At this point you will be shown the window in the next page. Page 23 of 57 In the top part of the window you can see the situation in the file; in the bottom part you have the actual situation of the box in archive; if the box has no samples the bottom left part of the window will be empty. With the “Read file” button you can change file; with the “Rearray samples” the samples not yet in this archived box will be recorded in it changing the box‟s situation. Page 24 of 57 12. HOW TO IMPORT DATA FROM AN EXCEL FILE If your data are contained in a .XLS file you can import then by choosing the icon. The first time you open this window, you need to click the “Fields setting” button that allows you to define which are the columns, in the .XLS file, that contain the data you want to import. This button can be used every time you require; it will open the next window. Page 25 of 57 Once you have defined the columns‟ numbers and types the ok button will send you back to the previous window where you can click the “Import” button to search for the file you want to import specifying also if the file contains or not the header. The data contained in the file, before recording, will be displayed as shown below. Page 26 of 57 If the data are correct you can record, with the “Import” button. Page 27 of 57 13. HOW TO STOCK BOXES If you want to stock boxes you can press the icon to open the following window. In this window you can: 1. see the status of a single container and move single boxes from one position to another or from one container to another one; 2. create a new container starting from a defined model; 3. search for a box or a single sample in the stock; 4. print the list of the containers created. Page 28 of 57 1 – Show container (yellow arrow) This button opens the following window The “Expand” button opens the tree like shown below Page 29 of 57 At this point if you want to change position to a box, you have to select it, pick it up, put it on the table and drag it back into the new position. If you want to change container, after you put the box on the table, you can select the new container from the list and continue as described before. On the contrary, if you want to insert a box into the tree, you select the position; you double click on the column and the present window opens Page 30 of 57 Put the box‟s name in the field and press the OK button to insert the box into the tree. Instead if you want to see the contents of a stocked box you can double click its name on the tree and press the “show samples” button to obtain the following state Page 31 of 57 Positioning on the grid, you have displayed the sample‟s ID on the yellow line. With this window you can also remove a box from a tree and, so, from the stock. If you need to print the container‟s tree structure with its contents, just press the “Print tree” button. With the “View sample” button it is possible to see the data of the single sample you are positioned on. With the “View box” button you arrange the printing of the box‟s contents. Page 32 of 57 2 – Add container (red arrow) With this button you open the next window that shows the different available models. At this point you position yourself on the model you are interested on click the “Insert container” button which leads to the following window Page 33 of 57 You just need to insert the container‟s name and location and press the “Ok” button to confirm your choices. The new container will be listed in the main stock management window Page 34 of 57 3 – Search box/sample (green arrow) These buttons let you search for a box o for a sample starting from their ID. You will then be presented with the container where the box or the sample are stocked and you will find yourself in the same situation as the point 1 – Show container. 4 – Print list (blue arrow) This button activates the preview window. Page 35 of 57 14. HOW TO STOCK SAMPLES FROM A FILE When you have a file and you want to stock it contains, you can click the icon. With the “Settings” button you can set up the path so that the “File import” button will directly position in the right folder. With the “File import” button you can choose the file you need to stock. If all the samples described in the file are archived in just one box you obtain the following window; otherwise it will not be possible to get on stocking and you may need to rearray the samples. Page 36 of 57 Clicking on the “Stock” button, if the box is already stocked you will be presented with its container‟s data in the bottom part of the window; otherwise you will be asked if you want to stock the box and presented with the “stock management” window where only the “Show container” button is visible. Page 37 of 57 15. HOW TO DEFINE CONTAINERS’ MODELS When you install the program, a set of predefined models of containers is included. If you want to insert new models and/or modify the ones you have already created, you need to click the icon to start the following window. The “New model” button opens the window in the next page. Page 38 of 57 First you have to write a name, a short description and the model for the new container. You can now star to insert its tree-structure starting with the “New” button. In the “New element” box, you have: to give a name to the different parts of your container; to give these parts an abbreviation; to decide their starting number; to indicate if they can contain boxes and, if they can, how many; to choose the relative position of the element in the tree and how many times it has to be duplicated in the container. For every element you want to insert, you need to click the “New” button. Once you have inserted at least one element you will have a similar situation. Page 39 of 57 With the different buttons, you can, in order: add new elements; modify the element you are positioned on; delete a single element (the one you are positioned on); shrink or expand the tree structure; undo your last action; recalculate coordinates if you have removed elements. Under the “New element” box you have the indication of the total number of boxes you have defined for this model of container. If, instead of creating, you want to modify one of your already existing containers, you just have to select it and press the “Modify container” button. Once you have chosen the element to change, press the “Modify” button and you will have the next situation Page 40 of 57 Page 41 of 57 16. HOW TO PRINT REPORTS To see and pint a report on the state of the art of the boxes you can press the and open the following window. icon In this window you can control the state of the boxes in process and already stocked. In fact you are presented with the list of the boxes and, at the bottom, all related information: how many boxes are full, empty or not in use; how many boxes are only partially full and how many boxes contain more samples than expected. The print button arranges the preview of both the list of the boxes and the information at the bottom of the page. Page 42 of 57 17. HOW TO PRINT LABELS You can manage labels both for samples and boxes with the the following window. icon that opens When you open it for the fist time you will see some predefined labels that you will not be able to modify. Once you have chosen the label you want to use and the printer, you can print a barcode for a single sample, for a set of samples or for a box inserting the requested data and pressing the OK button. To create and change a label you have to press the “Label settings” button that opens the following window. Page 43 of 57 The buttons “New”, “Change” opens the window Page 44 of 57 This window let you define or modify all the style of the labels sheet: labels‟ name, width and height, number of labels per row, margins, space inter labels, lab ware, printer and print format. To define or modify what is going to be written on a single label, you need to choose the type of the field and press the Add button to see the next frame where you can decide the precise position of the field, the text and the font format. Once you have inserted all the necessary data you can press the OK button and the field will be inserted into the label. If you are modifying the label or after the first insertion you will see also the following frame to modify or delete the fields already inserted. Page 45 of 57 To see the preview of what you are doing you just have to press the Preview Button. To save the new label or the modified label just press the Save label button. Page 46 of 57 18. HOW TO SETUP THE PROGRAM To start to set up the program you need to press the corresponding icon. Only supervisors has access to this function This function enables to select which fields and links will be used in your version of EasyTrack, to personalize their names, to define groups and passwords and to set utilities. As you click it, you will be presented the following windows: Page 47 of 57 19. FIELDS AND LINKS SETUP To select the fields you intend to use; just check the box near the ones you want to keep in the column “On” (green arrow). In order to have the right labels in the “New sample” window, you need to write the heading you want in the field box (yellow arrow). You can do exactly the same moves for the links after you have decided to enable them clicking the corresponding box (red arrow). The labels you set in this window will be used if you do not check the Division enable box in the Groups and password window or if in the division setup you do not give a name to these fields. Page 48 of 57 20. GROUPS AND DIVISIONS SETUP This function allows defining groups and their permissions. At the first installation you will find one group already defined which will be needed to setup the program: Supervisor. To create a new group of users you need to write its name double-clicking in the first empty line (green arrow). You can then decide how long the password should be just writing it in the box pointed by the yellow arrow (max length is 50) which is the minimum length. The password is case sensitive and alphanumeric. “GROUP SETUP” To select which actions each member of the group can take, press the “Group setup” button (red arrow); this action will open the “Operator setup” window. Choose the group you want to work on clicking on its name; it will be pointed out in red (predefined groups will not be listed). Checking the single boxes, you can decide to which functions give it permission. To confirm your choices press the “Ok” button, to go back to the previous windows without confirming press the “Exit”. Page 49 of 57 “DIVISION SETUP” Pressing the “Division setup” button (blue arrow), visible only if the “Division enable” box is checked, allows you to define up to nine different sets of labels for up to the nine possible different divisions in your laboratory. Page 50 of 57 To enable divisions will affect both the first window you will be presented after logging in and the user‟s windows. Every time you check or uncheck the “Division enable” box, the program will have to restart to carry out the changes. Page 51 of 57 21. USERS MANAGEMENT To manage users you have to click the corresponding icon. This is the function that helps create, modify and enable/disable users of the program. When you open the window, you can see the list of the users already defined, the number of the group they belong to and if they are in the “disabled” state or not. You can then decide to create a new user clicking the “New user” button (green arrow), to modify an existing one by clicking the “Modify selected user” one (blue arrow) or to exit the window (yellow arrow). When you click the corresponding icon, you will be presented with the following window. Page 52 of 57 22. HOW TO CREATE A NEW USER In the previous window you have to press the “New user” button (green arrow); it opens the following window. At the bottom of the window you have to insert first and last name of the user, the group to which he belongs to, his password (the min. length depends on set up) and to check the divisions on which the user can work on. If, in the set up, divisions have not been enabled, the bottom part of the window will not present the possibility to choose the divisions (as shown underneath). To confirm you insertion press the “Ok” button, otherwise the “Undo” one. Page 53 of 57 23. HOW TO MODIFY AN EXISTING USER In the Users window you have to press the “Modify selected user” button (blue arrow); the following window will be opened. You can now modify the user‟s settings (first and last name, group, password, divisions) and/or disable/enable him just by writing in the corresponding fields and/or checking the boxes. Moreover this window shows the last date in which the user‟s parameters have been changed. As in the creation of a new user, if divisions are not enabled they will not be shown. Page 54 of 57 24. HOW TO EXIT THE PROGRAM In the Users window you have to press the “Modify selected 25. HOW USE WITH DATABASE LOCATED ON SERVER The underlying database is called EASTRACK.MDB and is by default located on the local drive, this is normally: C:\Program Files\EasyTrack\ The Database can be located on a server for automatic backup or for multi access using the multi lecense version of the software. To move the data to a shared drive on the server, copy the complete “EASYTRACK” folder located in the C:\Program Files\ directory to the network drive e.g. \\Fluidx-server\Backup\EasyTrack The EasyTrack shortcut also needs to be changed so that the application uses the correct database and associated files. To do this right click on the Shortcut and select “Properties” The “Start in:” field designates the folder that EasyTrack will use for the database and associated files, by default this will be “C:\Program Files\EasyTrack\” Page 55 of 57 Change the “Start in:“Field to the new server based path. e.g. \\Fluidx-server\Backup\EasyTrack Press OK 26. HOW USE WITH MULTI LICENSE Transfer the EasyTrack Folder to the server or shared folder as detailed in section 25. Install the software on all the computers that need to run the EasyTrack software. Change all the shortcuts so that the “Start in:” reflects the new server or shared folder. Page 56 of 57 fluidX Ltd Unit 6 Monks Heath Hall Workshops Chelford Road Nether Alderley Macclesfield Cheshire SK10 4SY Tel: +44 1625 861 614 Fax: +44 1625 861 615 Email: [email protected] Page 57 of 57