1
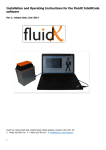
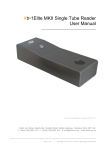
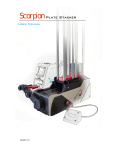
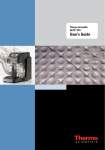
Operating Instructions For The X-Seal Plate Piercing System __________________________________ Version 1 Release 1 Nov 2009 ©FluidX Ltd. FluidX Ltd. Monks Heath Hall, Chelford Road, Nether Alderley, Cheshire, SK10 4SY, UK. T: +44(0) 1625 861 614 F: +44(0) 1625 861 615 E: [email protected] www.fluidx.co.uk 1 Operating instructions for the X-Seal Plate Piercing System This document is for information only; the manufacturer accepts no liability for errors contained herein or for incidental or consequential damages with the furnishing, performance, or use of this material. Unless otherwise specified references to names or parts is purely casual and has the purpose of illustrating the product. The contents of this publication may not be reproduced in any form or by any means (including electronic storage and retrieval or translation into a foreign language) without prior agreement and written consent from the copyright owner. The information contained in this document is subject to change without notice. All rights reserved. 2 Operating instructions for the X-Seal Plate Piercing System TABLE OF CONTENTS 1. 2. 3. 4. INTRODUCTION WARNINGS 4 APPLICABLE RULES 5 SPECIFICATIONS 5 GENERAL DESCRIPTION 6. 7. 6 MAIN COMPONENTS 6 CONTROL PANEL 6 REAR POWER INTERFACE 7 INSTALLATION 8 PRELIMINARY 8 VOLTAGE CHECK 8 TO CHANGE THE VOLTAGE SETTING 9 SET UP TO SET UP OPERATING MODE 5. 4 10 10 BASIC FUNCTIONS 11 RUN CYCLE 11 LOADING PROCEDURE 12 TROUBLESHOOTING 14 INTRODUCTION 14 ERRORS 14 MAINTENANCE PERIODICAL MAINTENANCE 15 15 8. ACCESSORIES 15 9. DISPOSAL 16 3 Operating instructions for the X-Seal Plate Piercing System 1. INTRODUCTION The X-Seal Plate Piercing System (PPS) is a reliable semiautomatic device designed to quickly and correctly piercing of seals on sample-plate. An interchangeable piercing head, and easily fitted plate adapter, allow the PPS to be used with most plates available including standard plates, PCR plates and deep-well plates, with 96 or 384 wells (square or round design). The number of perforating cycles required can be selected by the user to suit plate type. Easy to use, with just three steps: Place the plate on the adapter, cover with frame and the piercing head Close the drawer. The piercing process will then start automatically. Open the drawer and remove the pierced plate. WARNINGS Before use please read the following warnings carefully: This product must only be used in accordance with proper safety standards and procedures, together with the instructions contained in this manual. The PPS has been designed and manufactured to conform to international safety specifications. Users should be aware of the potential hazards associated with the equipment. All operators should read and observe the safety precautions and warnings given in this manual before using the PPS. If the PPS is used in a way not specified within this manual any inbuilt protection may not be adequate. The following caution and safety signs are used in this manual: WARNING. Please refer to manual. The machine is designed for indoor laboratory use only, at an altitude of less than 2200m above the sea level, within a temperature range of 15°C to 35°C and a relative humidity range of 5% to 85% non condensing. If the instrument is stored outside these ranges, it should be left to stand until it equilibrates to within the above limits. Ensure that the voltage selection switch is set to the correct voltage and that the correct fuse for the required voltage setting is fitted. Do not work outside the rated power supply range. Use the cleaning method recommended by the manufacturer. Ensure the unit is only connected to an earthed supply. There are no user accessible or serviceable parts inside the unit. Do not remove the unit’s cabinet. 4 Operating instructions for the X-Seal Plate Piercing System WARNING Risk of electrical shock (high voltage) This equipment should only be dismantled by properly trained personnel, removing the top case exposes potentially lethal mains voltages. APPLICABLE RULES 2006/95/CE Low Voltage Directive 2004/108/CE Electromagnetic Compatibility Directive 2002/96/CE amended 2003/108/CE WEEE Directive SPECIFICATIONS Height 310mm. Depth 275mm. Width 181mm. Weight 10kg Voltage 230/115/100 ±10%Vac Frequency 47/63Hz Power 100W Temperature range Operative: 18°C - 35°C Storage: -20°C – 40°C Relative humidity 5 20% - 80% not condensing Operating instructions for the X-Seal Plate Piercing System 2. GENERAL DESCRIPTION MAIN COMPONENTS Fig1 Cabinet Control panel Rear Power Interface Electronic circuit Handling system (motor, sensors) Plate adapter Plate Frame Metallic pierce head CONTROL PANEL 1 2 3 4 5 Fig2 6 1 Amber light =Status indicator 2 M key = Set-up/Run mode key 3 Three Digit LED display 4 = Directional key (up) 5 = Directional key (down) Operating instructions for the X-Seal Plate Piercing System REAR POWER INTERFACE Fig3 7 1 Power Setting 115/230 Vac and Fuse Holder 2 I/O Power Switch 3 Main Power Plug Operating instructions for the X-Seal Plate Piercing System 3. INSTALLATION PRELIMINARY After unpacking make sure all packing and fixtures are retained, as the unit must always be transported in the original packing to avoid damage. The manufacturer accepts no responsibility for damage incurred unless the unit is correctly packed and transported in this way. Remove the PPS unit from its packaging. The PPS must be placed on a level surface, away from direct sunlight, ensuring access to the power switch on the back of the unit. Ensure that the vents on the cabinet are not obstructed. The main voltage selector switch should be checked to ensure that the voltage has been set at the correct value. Connect the unit to the main power supply and switch on the switch I/O of the rear power interface. VOLTAGE CHECK Be sure that the equipment is not connected to the mains power. On the back of the PPS there a connection panel with: Power setting 230/115 Vac and fuse holder On/off power switch Main power plug The setting voltage is written in white on a red background on the top of power setting and fuse holder. The PPS is factory set to 230V. 8 Operating instructions for the X-Seal Plate Piercing System Fig4 Fig5 TO CHANGE THE VOLTAGE SETTING Open fuse holder compartment with a screwdriver, fig 4. With the screwdriver, extract the fuse holder, fig 5. Replace the two fuses with two with the following characteristics, see the table below. Power Voltage (EN 60127) 115v 2A (T) 230v 1A (T) Insert the fuse holder keeping the set voltage label at the top. Close the fuse compartment pressing gently. If the fuse is correctly inserted the voltage selected will be seen. 9 Operating instructions for the X-Seal Plate Piercing System 4. SET UP TO SET UP OPERATING MODE Turn the PPS on. To enter the Set-up mode, press and release the “M” key. The display will show a flashing “S” and the last set buzzer function. The buzzer function can be enabled “on” or disabled “no” using the keys. Pressing the “M” key again to store the audible warning set. It is then possible to set the cycle number. The display will show a flashing “c” and last set cycle number. The cycle number can be decreased or increased using the keys. “c” can be set between 1 to 10 with steps of 1. Press the “M” key again to store the new cycle number value and exit from the set-up menu. The unit will return to the “run cycle”. 10 Operating instructions for the X-Seal Plate Piercing System 5. BASIC FUNCTIONS RUN CYCLE Turn on the system. The display will show the firmware release information. The unit will automatically go to the home position with: Active “open drawer sensor” and “motor home sensor” activated. The drawer will be released. The display shows “Rdy” indicating that the system is ready for piercing. The amber LED will remain on. Open the drawer and load the adapter. Place the plate over the adapter. Place the frame over the plate and then place the pierce head above. Close the drawer. (The loading procedure is explained further in the next section). Keep the drawer pressed until the unit emits an audible warning to indicate that the “close drawer sensor” is activated and the drawer is locked. The unit moves the plate & piercing head assembly upwards, applying an appropriate pressure. During piercing operation the display will show “Bsy” and the amber LED will flash. When the set piercing cycles are completed an audible warning sound is emitted and the display will show “Rdy”. The amber LED remains on, but not flashing. The unit moves the plate & piercing head assembly back to the home position and the drawer is released. The operator can remove the pierced plate. A new cycle can be started. 11 Operating instructions for the X-Seal Plate Piercing System LOADING PROCEDURE The following steps should be used to load the PPS. 1. Open the drawer 2. Place the adapter inside the drawer 3. Place the plate over the adapter 12 Operating instructions for the X-Seal Plate Piercing System 4. Put the frame on the plate 5. Place the piercing head on top 6. Close the drawer. 13 Operating instructions for the X-Seal Plate Piercing System 6. TROUBLESHOOTING INTRODUCTION Possible errors generated by the PPS are summarized in this section. If the solutions suggested are not successful please contact your supplier. ERRORS Errors are shown on the display and the PPS will emit an intermittent warning sound. The amber LED will be off. The errors are: Er1 The system is unable to reach the home position within a defined time Er2 The motor cannot achieve the compression force within a defined time Er3 The motor cannot reach the home position (activating the home sensor) within a defined time; Er4 The system has detected a motor overload prior to reaching the home position Er5 “open drawer sensor” active during rise movement Er6 Home position sensor” is not activated during the piercing operation within a defined time; If “Er2” is displayed, first check that the adapter, plate, frame and piercing head have been loaded correctly. If “Er5” is shown, the error may be caused by the drawer not being pressed in for the amount of time required to lock it. Retry. Other errors may be rectified by switching the PPS off, then on again, and retrying. 14 Operating instructions for the X-Seal Plate Piercing System 7. MAINTENANCE PERIODICAL MAINTENANCE The PPS does not require servicing, but should be cleaned regularly: The PPS can be cleaned with a cloth dipped in water or ethanol (methanol, formaldeyde can also be used); The unit should not be immersed in solvents Do not use acetone or abrasive cleaners No parts are to be autoclaved In case of radioactive spillages it is recommended to use an appropriate cleaning agent For any other maintenance operation not indicated in this manual, please contact your Supplier. Any cleaning procedure must be performed with the power OFF, and the power cable disconnected. 8. ACCESSORIES The PPS is designed to be used with the following accessories: Plate adapter Cat No Description 6.09.553 Adapter for standard plate 6.09.556 Adapter for 96 PCR plate 6.09.301 Adapter for deep-well plate Frame Cat No Description 6.09.550 PPS Frame Metallic piercing head 15 Cat No Description 6.09.555 Metallic piercing head for 384 SBS round well Ask Metallic piercing head for 96 SBS round well Ask Metallic piercing head for 384 SBS square well Ask Metallic piercing head for 96 SBS square well Operating instructions for the X-Seal Plate Piercing System 9. DISPOSAL According to the Directive 2002/95/CE, 2002/96/CE and 2003/108/CE, concerning the restriction of the use of certain hazardous substances in the electrical and electronic equipment and the waste disposal. The symbol of the crossed bin shown on the equipment or on its packaging indicates that the product is to be collected separately from the other waste. Thereof the user must deliver the equipment to the appropriate collection points for electrical and electronic waste or to his sale representative (if a new similar equipment is bought). The appropriate separated collection allows recycling, treatment and disposal of the unit. It reduces negative effects on the environment, human health and allows the unit to be recycled where possible. Be aware that the abusive disposal of the product causes the application of administrative sanctions according to the laws in force. Please contact your supplier for further information. 16 Operating instructions for the X-Seal Plate Piercing System Manufactured for: Manufactured by: fluidX Ltd. Monks Heath Hall Helford Road Nether Alderley Cheshire SK10 4SY UK HTA Srl Via del Mella, 77/79 Brescia I-25131 Italy Tel: +44 (0) 1625 861 614 Fax: +44 (0) 1625 861 615 Email: [email protected] www.fluidx.co.uk Page 1 of 17 Tel: +39 (0) 030 3582920 Fax: +39 (0) 030 3582930 www.hta-it.com Operating Instructions For The X-Seal Manual Thermal Sealer