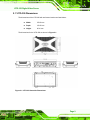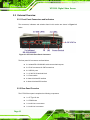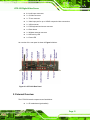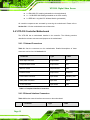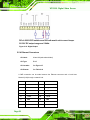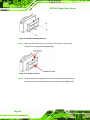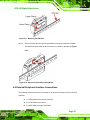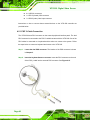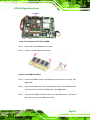
1
VITO-350 Digital Video Server VITO-350 Digital Video Server IEI Technology Corp. MODEL: VITO-350 Intel© Celeron® M Mobile Digital Video Server with 16-Channel Video Inputs, 4-Channel Audio Inputs, Wireless LAN, CF, PCMCIA, TV-out, S-Video and DIO User Manual Page I Rev. 2.00 – 31 March, 2009 VITO-350 Digital Video Server Revision Date Version Changes 31 March, 2009 2.00 Updated for VITO-350-R20 model July, 2008 1.00 Initial release Page II VITO-350 Digital Video Server Copyright COPYRIGHT NOTICE The information in this document is subject to change without prior notice in order to improve reliability, design and function and does not represent a commitment on the part of the manufacturer. In no event will the manufacturer be liable for direct, indirect, special, incidental, or consequential damages arising out of the use or inability to use the product or documentation, even if advised of the possibility of such damages. This document contains proprietary information protected by copyright. All rights are reserved. No part of this manual may be reproduced by any mechanical, electronic, or other means in any form without prior written permission of the manufacturer. TRADEMARKS All registered trademarks are the property of the registered trademark holder. All product names mentioned herein are used for identification purposes only and may be trademarks and/or registered trademarks of their respective owners. Page III VITO-350 Digital Video Server Table of Contents 1 INTRODUCTION..................................................................................................... 1 1.1 VITO-350 INTRODUCTION ......................................................................................... 2 1.2 VITO-350 HARDWARE OVERVIEW ............................................................................. 3 1.2.1 Motherboard Overview ...................................................................................... 3 1.2.2 VITO-350 Overview Photo................................................................................. 3 1.2.3 VITO-350 External Interfaces, Switches and LEDs........................................... 4 1.2.4 Technical Specifications..................................................................................... 5 2 CONTROLLER OVERVIEW................................................................................. 8 2.1 VITO-350 DIMENSIONS ............................................................................................. 9 2.2 EXTERNAL OVERVIEW .............................................................................................. 10 2.2.1 Front Panel Connectors and Indicators .......................................................... 10 2.2.2 Rear Panel Overview ....................................................................................... 10 2.3 INTERNAL OVERVIEW ................................................................................................11 2.4 VITO-350 CONTROLLER MOTHERBOARD ................................................................ 12 2.4.1.1 Onboard Connectors ................................................................................. 12 2.4.1.2 External Interface Connectors................................................................... 12 2.4.2 On-board Jumpers ........................................................................................... 14 2.4.3 On-board Connector Pinouts........................................................................... 14 2.4.4 Audio Connector .............................................................................................. 14 2.4.4.1 Power Switch Connector........................................................................... 15 2.4.5 TV Out Connector ............................................................................................ 16 2.5 VITO-350 EXTERNAL INTERFACE CONNECTORS ..................................................... 17 2.5.1 External Interface Connector Overview .......................................................... 17 2.5.2 9V~36V DC Terminal Block............................................................................. 19 2.5.3 DIO Connectors ............................................................................................... 20 2.5.4 Ethernet Connectors ........................................................................................ 22 2.5.5 Keyboard/Mouse Connector ............................................................................ 23 2.5.6 USB Combo Port.............................................................................................. 24 2.5.7 RS-232/422/485 Serial Communications Connectors ..................................... 24 2.5.8 Video Input Connector ..................................................................................... 25 Page IV VITO-350 Digital Video Server 2.5.9 VGA Connector ................................................................................................ 26 2.6 JUMPER SETTINGS .................................................................................................... 28 2.6.1 Clear CMOS Jumper........................................................................................ 28 2.6.2 CF Card Setup ................................................................................................. 30 2.6.3 COM Port Function Select Jumpers ................................................................ 31 2.6.4 DO Power Select.............................................................................................. 32 3 UNPACKING LIST ................................................................................................ 34 3.1 ANTI-STATIC PRECAUTIONS ...................................................................................... 35 3.2 UNPACKING .............................................................................................................. 35 3.2.1 Unpacking Precautions.................................................................................... 35 3.3 UNPACKING CHECKLIST ........................................................................................... 36 3.3.1 Package Contents............................................................................................. 36 3.3.2 Optional Package Contents ............................................................................. 37 4 INSTALLATION .................................................................................................... 38 4.1 VITO-350 INSTALLATION STEPS .............................................................................. 39 4.2 COMPACTFLASH® CARD INSTALLATION .................................................................. 39 4.3 HDD INSTALLATION................................................................................................. 40 4.4 VITO-350 SERIES MOUNTING ................................................................................. 42 4.4.1 Wall Mounting.................................................................................................. 42 4.4.2 DIN Mounting .................................................................................................. 43 4.5 EXTERNAL PERIPHERAL INTERFACE CONNECTIONS ................................................. 45 4.5.1 PS/2 Y-Cable Connection................................................................................. 46 4.5.2 LAN Connection (Single Connector) ............................................................... 47 4.5.3 Serial Device Connection (DB-9) .................................................................... 48 4.5.4 USB Connection (Dual Connector) ................................................................. 49 4.5.5 VGA Monitor Connection ................................................................................ 49 4.6 POWER UP ................................................................................................................ 50 4.7 WIRELESS LAN CONFIGURATION............................................................................. 52 5 TROUBLESHOOTING AND MAINTENANCE ................................................ 56 5.1 ANTI-STATIC PRECAUTIONS ...................................................................................... 57 5.2 VITO-350 CONTROLLER MAINTENANCE OVERVIEW ............................................... 58 5.3 CONTROLLER TROUBLESHOOTING ........................................................................... 58 5.3.1 The Controller Doesn’t Turn On ...................................................................... 58 Page V VITO-350 Digital Video Server 5.3.2 The Controller Doesn’t Boot Up ...................................................................... 59 5.3.3 More Troubleshooting ...................................................................................... 60 5.4 COMPONENT REPLACEMENT PROCEDURE ................................................................ 60 5.4.1 Motherboard Replacement............................................................................... 60 5.4.1.1 Motherboard Removal .............................................................................. 60 5.4.1.2 Motherboard Installation........................................................................... 64 5.4.2 SO-DIMM Replacement................................................................................... 64 5.4.3 CPU Module Replacement............................................................................... 66 5.4.3.1 CPU Module Removal.............................................................................. 66 5.4.3.2 CPU Module Installation .......................................................................... 66 A SAFETY PRECAUTIONS..................................................................................... 67 A.1 SAFETY PRECAUTIONS ............................................................................................ 68 A.1.1 General Safety Precautions ............................................................................. 68 A.1.2 Anti-static Precautions .................................................................................... 69 A.2 MAINTENANCE AND CLEANING PRECAUTIONS ........................................................ 69 A.2.1 Maintenance and Cleaning.............................................................................. 69 A.2.2 Cleaning Tools ................................................................................................. 70 B IEI ARGUS DIGITAL VIDEO SURVEILLANCE GUIDE ............................... 71 B.1 SYSTEM REQUIREMENT ........................................................................................... 72 B.2 FEATURES ................................................................................................................ 72 B.3 GETTING STARTED ................................................................................................... 73 B.4 MAIN CONSOLE ....................................................................................................... 81 B.4.1 Console Window .............................................................................................. 81 B.4.2 System Setting.................................................................................................. 84 B.4.3 General Setting................................................................................................ 84 B.4.4 Camera Setting ................................................................................................ 86 B.4.5 PTZ Setting ...................................................................................................... 89 B.4.6 User Account Setting ....................................................................................... 90 B.4.7 E-Mail Setting.................................................................................................. 91 B.4.8 Digital I/O Setting ........................................................................................... 94 B.4.9 Logview............................................................................................................ 95 B.5 SCHEDULE SETTING ................................................................................................. 98 B.5.1 Schedule Setting Tutorial: ............................................................................... 99 Page VI VITO-350 Digital Video Server B.6 GUARD SETTING .................................................................................................... 104 B.6.1 Guard Setting Tutorial:.................................................................................. 107 B.7 PLAYBACK ..............................................................................................................114 B.8 SMART SEARCH ......................................................................................................117 B.9 BACKUP ..................................................................................................................118 B.10 MISCELLANEOUS ................................................................................................. 120 B.10.1 Trouble shooting - Autorun.exe can’t auto launch....................................... 120 B.10.2 Installation software on Windows 2000....................................................... 124 B.10.3 Software Hot-key list ................................................................................... 127 B.10.3.1 Main Console ....................................................................................... 127 B.10.3.2 Playback ............................................................................................... 128 C HAZARDOUS MATERIALS DISCLOSURE ................................................... 130 C.1 HAZARDOUS MATERIAL DISCLOSURE TABLE FOR IPB PRODUCTS CERTIFIED AS ROHS COMPLIANT UNDER 2002/95/EC WITHOUT MERCURY ..................................... 131 Page VII VITO-350 Digital Video Server List of Figures Figure 1-1: VITO-350 Digital Video Server ..................................................................2 Figure 1-2: VITO-350 Overview [Front View] ..............................................................3 Figure 1-3: VITO-350 Overview [Rear View]................................................................4 Figure 2-1: VITO-350 Controller Dimensions..............................................................9 Figure 2-2: VITO-350 Front Panel Connectors .........................................................10 Figure 2-3: VITO-350 Rear Panel................................................................................11 Figure 2-4: Audio Connector Pinouts........................................................................15 Figure 2-5: Power Switch Connector Locations ......................................................16 Figure 2-6: TV-out Connector Pinout Locations ......................................................17 Figure 2-7: VITO-350 Standard External Interface Connectors ..............................19 Figure 2-8: Power Terminal Block .............................................................................19 Figure 2-9: DIO Interface Pinout Locations ..............................................................20 Figure 2-10: Digital Input (Dry contact) .....................................................................21 Figure 2-11: Digital Input (Wet contact).....................................................................21 Figure 2-12: Digital Output .........................................................................................22 Figure 2-13: LAN Connector ......................................................................................23 Figure 2-14: PS/2 Pinout and Configuration.............................................................24 Figure 2-15: COM Port Pinout Locations ..................................................................25 Figure 2-16: VGA Connector ......................................................................................27 Figure 2-17: Clear CMOS Jumper ..............................................................................30 Figure 2-18: CF Card Setup Jumper Location..........................................................31 Figure 2-19: COM Port Function Select Jumper Locations ....................................32 Figure 2-20: DO Power Select Jumper Location......................................................33 Figure 4-1: CF Card Installation .................................................................................39 Figure 4-2: Bottom Panel Retention Screws (Bottom) ............................................40 Figure 4-3: Bottom Panel Retention Screws (Side) .................................................40 Figure 4-4: HDD Bracket Retention Screws .............................................................41 Page VIII VITO-350 Digital Video Server Figure 4-5: HDD Retention Screws............................................................................41 Figure 4-6: HDD Installation .......................................................................................42 Figure 4-7: Mounting Bracket Retention Screw Holes ............................................42 Figure 4-8: Wall Mounting Dimensions (mm) ...........................................................43 Figure 4-9: DIN Rail Mounting Bracket......................................................................44 Figure 4-10: Screw Locations ....................................................................................44 Figure 4-11: Mounting the DIN RAIL..........................................................................45 Figure 4-12: Secure the Assembly to the DIN Rail...................................................45 Figure 4-13: PS/2 Keyboard/Mouse Connector........................................................47 Figure 4-14: LAN Connection.....................................................................................47 Figure 4-15: Serial Device Connector .......................................................................48 Figure 4-16: USB Connector ......................................................................................49 Figure 4-17: VGA Connector ......................................................................................50 Figure 4-18: Power Terminal Block ...........................................................................51 Figure 4-19: Power Switch .........................................................................................51 Figure 4-20: Power and Power LED...........................................................................51 Figure 4-21: Atheros Clinet Utility – Profile Management.......................................52 Figure 4-22: Available Infrastructure and Ad Hoc Networks ..................................53 Figure 4-23: Profile Name Setup................................................................................53 Figure 4-24: Security Selection..................................................................................54 Figure 4-25: Security Configuration ..........................................................................54 Figure 4-26: Current Status ........................................................................................55 Figure 5-1: Power Switch ...........................................................................................59 Figure 5-2: Bottom Panel Retention Screws (Bottom) ............................................61 Figure 5-3: Bottom Panel Retention Screws (Side) .................................................61 Figure 5-4: Front Panel Retention Screws................................................................62 Figure 5-5: Rear Panel Retention Screws.................................................................62 Figure 5-6: Motherboard Retention Screws .............................................................63 Figure 5-7: Motherboard Connectors........................................................................63 Figure 5-8: Preinstalled VITO-350 SO-DIMM.............................................................65 Figure 5-9: SO-DIMM Installation ...............................................................................65 Page IX VITO-350 Digital Video Server List of Tables Table 1-1: Technical Specifications .............................................................................7 Table 2-1: Peripheral Interface Connectors ..............................................................12 Table 2-2: Peripheral Interface Connectors ..............................................................13 Table 2-3: Onboard Jumpers......................................................................................14 Table 2-4: Audio Connector Pinouts (10-pin) ...........................................................15 Table 2-5: Power Switch Connector Pinouts ............................................................16 Table 2-6: TV-out Port Connector Pinouts ................................................................17 Table 2-7: External Interface Connectors .................................................................18 Table 2-8: 9~36V Power Connector Pinouts .............................................................19 Table 2-9: DIO Interface Pinouts ................................................................................20 Table 2-10: LAN Connector Pinouts ..........................................................................23 Table 2-11: Keyboard Connector Pinouts .................................................................23 Table 2-12: USB Connector Pinouts ..........................................................................24 Table 2-13: COM Port Pinouts ....................................................................................25 Table 2-14: Video Input Connector Pinouts ..............................................................26 Table 2-15: VGA Connector Pinouts..........................................................................27 Table 2-16: Jumpers....................................................................................................28 Table 2-17: Clear CMOS Jumper Settings.................................................................29 Table 2-18: CF Card Setup Jumper Settings ............................................................30 Table 2-19: COM Port Function Select Jumper Settings.........................................32 Table 2-20: DO Power Select Jumper Settings ........................................................33 Table 3-1: Package List Contents ..............................................................................37 Table 3-2: Package List Contents ..............................................................................37 Page X VITO-350 Digital Video Server Chapter 1 1 Introduction Page 1 VITO-350 Digital Video Server 1.1 VITO-350 Introduction Figure 1-1: VITO-350 Digital Video Server The fanless and durable VITO-350 digital video server with anti-vibration and anti-shock protection is ideal for integration into digital video surveillance applications that operate in extreme environmental conditions. The VITO-350 supports up to 16 composite video inputs for NTSC/PAL/SECAM and four audio inputs. One TV-out port, one S-Video port and one VGA port enable the VITO-350 to display high quality video through diverse display devices. Two isolated RS-232/422/485 serial ports, 4-channel isolated digital input and output connectors and four USB connectors make the VITO-350 to communicate effectively with a host of external appliances. Two Gigabit Ethernet (GbE) controllers and wireless LAN module provide uninterrupted connectivity for network communication. The VITO-350 digital video server also supports one CF card and one PCIMCIA card. A 1 GB CF card preinstalled with a Windows® XP Embedded operating system is an OEM option to enhance the flexibility of the VITO-350. Page 2 VITO-350 Digital Video Server 1.2 VITO-350 Hardware Overview 1.2.1 Motherboard Overview The VITO-350 digital video server has an IEI motherboard integrated with an IEM-8522 CPU module. The IEM-9452 is a 1.06 GHz Intel® Celeron® M 423 CPU module with a single 200-pin SO-DIMM socket that preinstall a 1.0 GB DDR2 SDRAM SO-DIMM. 1.2.2 VITO-350 Overview Photo The VITO-350 has a wide variety of external interface connectors. Figure 1-2 is a labeled photo of the peripheral interface connectors on the front of the VITO-350. Figure 1-2: VITO-350 Overview [Front View] Figure 1-3 shows the standard external peripheral interface connectors on the back of the VITO-350. Page 3 VITO-350 Digital Video Server Figure 1-3: VITO-350 Overview [Rear View] 1.2.3 VITO-350 External Interfaces, Switches and LEDs External interfaces, switches and LEDs are accessed through the VITO-350 controller chassis include: 1 x CF Type I/II slot 1 x PCMCIA slot 1 x Audio line-out connector 1 x Audio line-in connector 4 x Audio input connectors 1 x Video input port for up to 16 BNC composite video connections 1 x VGA connector 1 x PS/2 keyboard and mouse connector 1 x Wireless antenna connector 2 x Isolated RS-232/422/485 serial communications ports 2 x RJ-45 connectors for GbE connections 4 x USB 2.0 ports 1 x S-Video connector 1 x TV-out connector 1 x 9~36V DC-IN terminal block 4-channel isolated DI interface 4-channel isolated DO interface The VITO-350 also contains the following switch and button: Page 4 VITO-350 Digital Video Server 1 x Power switch 1 x Reset button Status indicator LEDs on the front panel of the VITO-350 include: HDD LED Power LED 1.2.4 Technical Specifications VITO-350 controller technical specifications are listed in Table 1-1. See Chapter 2 for details. Specification VITO-350 CONTROLLER SPECIFICATIONS Controller CPU 1.06 GHz Intel® Celeron® M 423 CPU with 1 M L2 cache and a 533 MHz FSB Chipset Intel® 945GSE + ICH7 Memory One 1 GB 667 MHz DDR2 SDRAM SO-DIMM preinstalled (system max. 2 GB) OS Support Windows® XP Embedded or XP One CF card slot Storage One 2.5” or 1.8” hard disk drive bay POWER SPECIFICATIONS Power AT power Power Input 9 V DC ~ 36 V DC (e.q +24 V at 1.5 A), Min.: 36 W ENVIRONMENTAL SPECIFICATIONS Temperature 0ºC – 60ºC Humidity (operating) 5%~95% non-condensing Page 5 VITO-350 Digital Video Server Vibration 5 Hz ~ 17 Hz, 0.1"double amplitude displacement; 17 Hz ~ 640 Hz, 1.5 G acceleration peak to peak. Shock 10 G acceleration peak to peak (11ms) CHASSIS CONSTRUCTION AND COLOR Chassis Material Aluminum extrusion / Heavy-duty steel chassis Color Black and silver Mounting Support Wall mount, DIN rail mount Dimensions (WxDxH) 276.00 mm x 150.25 mm x 66.20 mm VIDEO CAPTURE Video Input 16 composite video channels, NTSC/PAL/SECAM auto sensing One TV-out Video Output One S-Video Capture Resolution NTSC: PAL/SECAM: 720 x 480 720 x 576 640 x 480 720 x 240 720 x 480 640 x 240 640 x 480 720 x 288 352 x 288 640 x 240 720 x 240 320 x 240 320 x 240 704 x 576 176 x 144 160 x 120 704 x 288 160 x 120 NTSC: total 120 fps at D1 for 16 channels Total Frame Rate PAL/SECAM: 100 fps at D1 for 16 channels AUDIO CAPTURE Audio Input Four analog audio input ports Sampling Rate 8-bit, 16-bit and 24-bit (hardware specs.) Quantization 8-bit, 16-bit and 24-bit (hardware specs.) Page 6 VITO-350 Digital Video Server EXTERNAL INTERFACES One line-out connector Audio One line-in connector VGA One female DB-15 connector USB Four USB 2.0 ports Keyboard/Mouse One keyboard/mouse connector Ethernet Two RJ-45 GbE connectors Serial ports Two male DB-9 isolated RS-232/422/485 serial ports One PC card slot supports PCMCIA Expansion slot One CF slot CHANNELS Digital Input 4-channel isolated DI Digital Output 4-channel isolated DO Table 1-1: Technical Specifications Page 7 VITO-350 Digital Video Server Chapter 2 2 Controller Overview Page 8 VITO-350 Digital Video Server 2.1 VITO-350 Dimensions The dimensions of the VITO-350 with wall mount bracket are listed below: Width: 275.00 mm Depth: 150.25 mm Height: 65.41 mm The dimensions for the VITO-350 are shown in Figure 2-1. Figure 2-1: VITO-350 Controller Dimensions Page 9 VITO-350 Digital Video Server 2.2 External Overview 2.2.1 Front Panel Connectors and Indicators The connectors, indicators and switches listed in this section are shown in Figure 2-2 below. Figure 2-2: VITO-350 Front Panel Connectors The front panel I/O connectors are listed below: 2 x Isolated RS-232/422/485 serial communications ports 2 x RJ-45 connectors for GbE connections 4 x USB 2.0 ports 1 x 9~36V DC-IN terminal block 1 x Power switch 4-channel isolated DI interface 4-channel isolated DO interface 2.2.2 Rear Panel Overview The VITO-350 rear panel comprises the following components: Page 10 1 x CF Type I/II slot 1 x PCMCIA slot 1 x Audio line-out connector 1 x Audio line-in connector VITO-350 Digital Video Server 4 x Audio input connectors 1 x S-Video connector 1 x TV-out connector 1 x Video input port for up to 16 BNC composite video connections 1 x VGA connector 1 x PS/2 keyboard and mouse connector 1 x Reset button 1 x Wireless antenna connector 1 x HDD activity LED 1 x Power LED An overview of the rear panel is shown in Figure 2-3 below. Figure 2-3: VITO-350 Rear Panel 2.3 Internal Overview The VITO-350 internal components are listed below: 1 x IEI motherboard (preinstalled) Page 11 VITO-350 Digital Video Server 1 x IEM-9452 CPU module (preinstalled on the motherboard) 1 x 1.0 GB DDR2 SO-DIMM (preinstalled on the CPU module) 1 x IEEE 802.11 b/g Mini PCI Wireless Module (preinstalled) All controller components are accessed by removing the motherboard. Please refer to Section 5.4.1.1 for the motherboard removal instruction. 2.4 VITO-350 Controller Motherboard The VITO-350 has a motherboard installed in the controller. The following sections describe the relevant connectors and jumpers on the motherboard. 2.4.1.1 Onboard Connectors Table 2-1 lists the connectors on the motherboards. Detailed descriptions of these connectors can be found in Section 2.4.3. Connector Type Label Audio input connector 10-pin header P1 CompactFlash® socket 50-pin socket CF1 Mini PCI socket 124-pin socket CN5 PCMCIA socket 68-pin socket PCMCIA1 Power switch connector 3-pin header POWER_SW1 SATA power connector 4-pin wafer CN10 TV-out connector 6-pin header CN6 Table 2-1: Peripheral Interface Connectors 2.4.1.2 External Interface Connectors Table 2-2 lists the external interface connectors on the motherboard. Connector Page 12 Type Label VITO-350 Digital Video Server Front Audio line-out connector Audio jack CN7 Panel Audio line-in connector Audio jack CN8 Keyboard/mouse connector PS/2 KB_MS1 Reset button Button CN9 Video input connector DB-25 connector CAPTURE1 VGA port connector DB-15 VGA1 Rear 9~36 V DC terminal block 2-pin connector POWER_CONN1 Panel Ethernet connectors (1) Dual RJ-45 ports J1 Ethernet connectors (2) Dual RJ-45 ports J2 DIO interface (1) 6-pin Phoenix PHOENIX_CONN1 DIO interface (2) 6-pin Phoenix PHOENIX_CONN2 RS-232/422/485 serial port (1) DB-9 COM1 RS-232/422/485 serial port (2) DB-9 COM2 USB ports (1) Dual USB ports CN1 USB ports (2) Dual USB ports CN2 Table 2-2: Peripheral Interface Connectors Page 13 VITO-350 Digital Video Server 2.4.2 On-board Jumpers Table 2-3 lists all the onboard jumpers of the motherboard. Description Label Type Clear CMOS JP4 3-pin header CF card master/slave JP5 2-pin header COM 1 and COM2 function select SW1 DIP switch DO power select JP2 2-pin header Table 2-3: Onboard Jumpers 2.4.3 On-board Connector Pinouts The following sections describe the motherboard pinouts and the controller components to which they have been connected. 2.4.4 Audio Connector CN Label: P1 CN Type: 10-pin header CN Location: See Figure 2-4 CN Pinouts: See Table 2-4 The 10-pin audio connector is connected to four external audio jacks on the rear panel of the VITO-350 controller. The four external audio jacks support four analog audio inputs for four video inputs. Page 14 VITO-350 Digital Video Server Figure 2-4: Audio Connector Pinouts PIN NO. DESCRIPTION PIN NO. DESCRIPTION 1 SIN1_A 6 SIN3_A 2 SIN1_A 7 SIN4_A 3 SIN2_A 8 SIN4_A 4 SIN2_A 9 GND 5 SIN3_A 10 N/C Table 2-4: Audio Connector Pinouts (10-pin) 2.4.4.1 Power Switch Connector CN Label: POWER_SW1 CN Type: 2-pin wafer (1x2) CN Location: See Figure 2-5 CN Pinouts: See Table 2-5 The power switch connector (POWER_SW1) on the motherboard is connected directly to the power switch on the front of the VITO-350. Page 15 VITO-350 Digital Video Server Figure 2-5: Power Switch Connector Locations PIN NO. DESCRIPTION 1 PWRBTN# 2 GND Table 2-5: Power Switch Connector Pinouts 2.4.5 TV Out Connector CN Label: CN6 CN Type: 6-pin header (2x3) CN Location: See Figure 2-6 CN Pinouts: See Table 2-6 The 2x3 pin TV out connector connects to a TV output by using an S-Video or RCA connector. The TV out connector makes displaying media data on a television easier. Page 16 VITO-350 Digital Video Server Figure 2-6: TV-out Connector Pinout Locations PIN NO. DESCRIPTION PIN NO. DESCRIPTION 1 TVSYNC 2 TVY 3 GND 4 TVC 5 GND 6 TVCVBS Table 2-6: TV-out Port Connector Pinouts 2.5 VITO-350 External Interface Connectors 2.5.1 External Interface Connector Overview Figure 2-7 shows the external interface connectors on the front and rear panel of the VITO-350 controller. These external interface connectors listed in Table 2-7 connect to external peripheral devices. Connector Type Label Front Audio line-out connector Audio jack CN7 Panel Audio line-in connector Audio jack CN8 Keyboard/mouse connector PS/2 KB_MS1 Reset button Button CN9 Video input connector DB-25 connector CAPTURE1 Page 17 VITO-350 Digital Video Server VGA port connector DB-15 VGA1 Rear 9~36V DC terminal block 2-pin connector POWER_CONN1 Panel Ethernet connectors (1) Dual RJ-45 ports J1 Ethernet connectors (2) Dual RJ-45 ports J2 DIO interface (1) 6-pin Phoenix PHOENIX_CONN1 DIO interface (2) 6-pin Phoenix PHOENIX_CONN2 RS-232/422/485 serial port (1) DB-9 COM1 RS-232/422/485 serial port (2) DB-9 COM2 USB ports (1) Dual USB ports CN1 USB ports (2) Dual USB ports CN2 Table 2-7: External Interface Connectors Other external LEDs locate on the front panel include: Page 18 HDD LED Power LED VITO-350 Digital Video Server Figure 2-7: VITO-350 Standard External Interface Connectors 2.5.2 9V~36V DC Terminal Block CN Label: POWER_CONN1 (motherboard label) CN Type: Terminal block CN Location: See Figure 2-7 CN Pinouts: See Table 2-8 and Figure 2-8 The power terminal block connects to 9V~36V DC power source. PIN DESCRIPTION 1 9~36V DC Power in 2 GND Table 2-8: 9~36V Power Connector Pinouts Figure 2-8: Power Terminal Block Page 19 VITO-350 Digital Video Server 2.5.3 DIO Connectors CN Label: PHOENIX_CONN1 and PHOENIX_CONN2 (motherboard label) CN Type: 6-pin Phoenix connector CN Location: See Figure 2-7 CN Pinouts: See Table 2-9 and Figure 2-9 The VITO-350 controller provides four-channel digital input and four-channel digital output through two 6-pin Phoenix connectors (Table 2-9). The digital input/output connector is managed through a Super I/O chip. The DIO connector pins are user programmable. PIN PHOENIX_CONN1 PHOENIX_CONN2 1 DIO_IN_VCC DIO_OUT_VCC 2 DIO_IN_0 DIO_OUT_0 3 DIO_IN_1 DIO_OUT_1 4 DIO_IN_2 DIO_OUT_2 5 DIO_IN_3 DIO_OUT_3 6 DIO_IN_GND DIO_OUT_GND Table 2-9: DIO Interface Pinouts Figure 2-9: DIO Interface Pinout Locations Page 20 VITO-350 Digital Video Server Dry contact levels (0: GND, 1: Open) Figure 2-10: Digital Input (Dry contact) 0 ~ 50V DC input range & 10 kHz speed Wet contact levels (0: +2 V max, 1: +4 V ~ +50 V) Figure 2-11: Digital Input (Wet contact) Page 21 VITO-350 Digital Video Server DO ch 2000 VDC isolation and 200 mA max/ch sink current keeps. 5V~30V DC output range and 10kHz. Figure 2-12: Digital Output 2.5.4 Ethernet Connectors CN Label: J1 and J2 (motherboard label) CN Type: RJ-45 CN Location: See Figure 2-7 CN Pinouts: See Table 2-10 A GbE connection can be made between the Ethernet connector and a Local Area Network (LAN) through a network hub. PIN DESCRIPTION PIN DESCRIPTION 1 TRD0P0 10 TRD3M0 2 TRD0M0 11 L0_100 3 TRD1P0 12 L0_1000 4 TRD1M0 13 ACT_0 5 +2.5V 14 +3.3V 6 GND 15 GND 7 TRD2P0 16 GND 8 TRD2M0 17 GND Page 22 VITO-350 Digital Video Server 9 TRD3P0 Table 2-10: LAN Connector Pinouts Figure 2-13: LAN Connector 2.5.5 Keyboard/Mouse Connector CN Label: KB_MS1 (motherboard label) CN Type: PS/2 CN Location: See Figure 2-7 CN Pinouts: See Table 2-11 and Figure 2-14 The VITO-350 keyboard and mouse connector is a standard PS/2 connector. PIN DESCRIPTION 1 KB DATA 2 MS DATA 3 GND 4 VCC 5 KB CLOCK 6 MS CLOCK Table 2-11: Keyboard Connector Pinouts Page 23 VITO-350 Digital Video Server Figure 2-14: PS/2 Pinout and Configuration 2.5.6 USB Combo Port CN Label: CN1 and CN2 (motherboard label) CN Type: USB Combo port CN Location: See Figure 2-7 CN Pinouts: See Table 2-12 USB devices connect directly to the USB connectors on the rear panel. PIN DESCRIPTION PIN DESCRIPTION 1 VCC_USB1 5 VCC_USB2 2 D- 6 D- 3 D+ 7 D+ 4 GND 8 GND Table 2-12: USB Connector Pinouts 2.5.7 RS-232/422/485 Serial Communications Connectors CN Label: COM1 and COM2 CN Type: DB-9 male connector CN Location: See Figure 2-7 CN Pinouts: See Table 2-13 and Figure 2-15 The RS-232/422/485 serial connectors (COM1 and COM2) provide serial connections in the RS-232 mode, RS-422 mode or RS-485 mode. Please refer to Section 2.6.3 for Page 24 VITO-350 Digital Video Server RS-232/422/485 mode select jumper setting. The two connectors are all directly mounted on the motherboard. PIN RS-232 RS-422 RS-485 1 DCD RX- DATA- 2 RX RX+ DATA+ 3 TX TX- - 4 DTR - - 5 GND GND GND 6 DSR - - 7 RTS TX+ - 8 CTS - - 9 RI - - Table 2-13: COM Port Pinouts Figure 2-15: COM Port Pinout Locations 2.5.8 Video Input Connector CN Label: CAPTURE1 CN Type: DB-25 male connector CN Location: See Figure 2-7 CN Pinouts: See Table 2-14 The DB-25 video input connector supports video inputs up to 16 channels. Page 25 VITO-350 Digital Video Server PIN DESCRIPTION PIN DESCRIPTION 1 1C_3 14 1B_2 2 1D_4 15 1A_1 3 2A_5 16 GND 4 2B_6 17 GND 5 2C_7 18 GND 6 2D_8 19 GND 7 3A_9 20 GND 8 3B_10 21 GND 9 3C_11 22 GND 10 3D_12 23 GND 11 4A_13 24 NC 12 4B_14 25 4C_16 13 4D_15 Table 2-14: Video Input Connector Pinouts 2.5.9 VGA Connector CN Label: VGA1 (motherboard label) CN Type: See VGA Connector CN Location: See Figure 2-7 CN Pinouts: See Figure 2-16 and Table 2-15 The standard 15-pin female VGA connector connects to a CRT or LCD monitor. PIN PIN DESCRIPTION 1 RED 2 GREEN 3 BLUE 4 NC 5 GND 6 GND 7 GND 8 GND 9 VCC / NC 10 GND NC 12 DDC DAT 11 Page 26 DESCRIPTION VITO-350 Digital Video Server PIN DESCRIPTION 13 HSYNC 15 DDCCLK PIN 14 DESCRIPTION VSYNC Table 2-15: VGA Connector Pinouts Figure 2-16: VGA Connector Page 27 VITO-350 Digital Video Server 2.6 Jumper Settings NOTE: A jumper is a metal bridge that is used to close an electrical circuit. It consists of two metal pins and a small metal clip (often protected by a plastic cover) that slides over the pins to connect them. To CLOSE/SHORT a jumper means connecting the pins of the jumper with Jumper the plastic clip and to OPEN a jumper means removing the plastic clip from a jumper. The jumpers on the motherboard of the VITO-350 controller are listed in Table 2-16. Description Label Type Clear CMOS JP4 3-pin header CF card master/slave JP5 2-pin header COM 1 and COM2 function select SW1 DIP switch DO power select JP2 2-pin header Table 2-16: Jumpers 2.6.1 Clear CMOS Jumper Jumper Label: JP4 Jumper Type: 3-pin header Jumper Settings: See Table 2-17 Page 28 VITO-350 Digital Video Server Jumper Location: See Figure 2-17 If the VITO-350 fails to boot due to improper BIOS settings, the CMOS can be cleared using the battery connector. Disconnect the battery from the connector for a few seconds then reconnect the battery. The CMOS should be cleared. If the “CMOS Settings Wrong” message is displayed during the boot up process, the fault may be corrected by pressing the F1 to enter the CMOS Setup menu. Do one of the following: Enter the correct CMOS setting Load Optimal Defaults Load Failsafe Defaults. After having done one of the above, save the changes and exit the CMOS Setup menu. The clear CMOS jumper settings are shown in Table 2-17. Clear CMOS Description Short 1-2 Keep CMOS Setup Short 2-3 Clear CMOS Setup Default Table 2-17: Clear CMOS Jumper Settings The location of the clear CMOS jumper is shown in Figure 2-17 below. Page 29 VITO-350 Digital Video Server Figure 2-17: Clear CMOS Jumper 2.6.2 CF Card Setup Jumper Label: JP5 Jumper Type: 2-pin header Jumper Settings: See Table 2-18 Jumper Location: See Figure 2-18 The CF Card Setup jumper sets the CF Type I card or CF Type II cards as either the slave device or the master device. CF Card Setup jumper settings are shown in Table 2-18. CF Card Setup Description Open Master Closed Slave Default Table 2-18: CF Card Setup Jumper Settings The CF Card Setup jumper location is shown in Figure 2-18. Page 30 VITO-350 Digital Video Server Figure 2-18: CF Card Setup Jumper Location 2.6.3 COM Port Function Select Jumpers Jumper Label: SW1 Jumper Type: DIP switch Jumper Settings: See Table 2-19 Jumper Location: See Figure 2-19 The COM Port Function Select jumpers set the communication protocols used by the serial communications ports (COM1 and COM2) as RS-232, RS-422 or RS-485. The COM Port Function Select settings are shown in Table 2-19. COM 1 SW1 RS-422 RS-485 Terminal Res. No. 1 On On -- No. 2 -- On -- No. 3 -- -- On SW1 RS-422 RS-485 Terminal Res. No. 4 On On -- No. 5 -- On -- COM 2 Page 31 VITO-350 Digital Video Server No. 6 -- -- On Table 2-19: COM Port Function Select Jumper Settings The COM Port Function Select jumper location is shown in Figure 2-19. To access the SW1 jumper, please remove the HDD access panel (refer to Section 4.3 Step 1). Figure 2-19: COM Port Function Select Jumper Locations 2.6.4 DO Power Select Jumper Label: JP2 Jumper Type: 2-pin header Jumper Settings: See Table 2-18 Jumper Location: See Figure 2-18 The DO Power Select jumper allows the digital output power to be set. DO Power Select jumper settings are shown in Table 2-18. Page 32 VITO-350 Digital Video Server DO Power Select Description Open Internal 5 V Closed External 5 V Default Table 2-20: DO Power Select Jumper Settings The DO Power Select jumper location is shown in Figure 2-18. Figure 2-20: DO Power Select Jumper Location Page 33 VITO-350 Digital Video Server Chapter 3 3 Unpacking List Page 34 VITO-350 Digital Video Server 3.1 Anti-static Precautions WARNING: Failure to take ESD precautions during the installation of the VITO-350 may result in permanent damage to the VITO-350 and severe injury to the user. Electrostatic discharge (ESD) can cause serious damage to electronic components, including the VITO-350 motherboard. Dry climates are especially susceptible to ESD. It is therefore critical that whenever the VITO-350 motherboard, or any other electrical component is handled, the following anti-static precautions are strictly adhered to. Wear an anti-static wristband: Wearing a simple anti-static wristband can help to prevent ESD from damaging the board. Self-grounding: Before handling the board touch any grounded conducting material. During the time the board is handled, frequently touch any conducting materials that are connected to the ground. Use an anti-static pad: When configuring the VITO-350 motherboard, place it on an antic-static pad. This reduces the possibility of ESD damaging the VITO-350 motherboard. Only handle the edges of the PCB: When handling the PCB, hold the PCB by the edges. 3.2 Unpacking 3.2.1 Unpacking Precautions When the VITO-350 is unpacked, please do the following: Follow the anti-static precautions outlined in Section 3.1. Make sure the packing box is facing upwards so the VITO-350 does not fall out of the box. Make sure all the components shown in Section 3.3 are present. Page 35 VITO-350 Digital Video Server 3.3 Unpacking Checklist NOTE: If some of the components listed in the checklist below are missing, please do not proceed with the installation. Contact the IEI reseller or vendor that sold the VITO-350 from or contact an IEI sales representative directly. To contact an IEI sales representative, please send an email to [email protected]. 3.3.1 Package Contents The VITO-350 is shipped with the following components: 1 VITO-350 digital video server 1 Null modem cable 4 Screw kit 1 PS/2 keyboard/mouse Y cable 1 DB-25 to 4-channel BNC cable 1 Wall mounting kit Page 36 VITO-350 Digital Video Server 1 Utility CD Table 3-1: Package List Contents 3.3.2 1 Optional Package Contents 1 GB CompactFlash® card with Windows® XP Embedded OS image, licensed sticker and SLD software CD (P/N: VITO-CF-350XPE-R10) 1 24VDC 45W power adapter, 90~264VAC input (P/N: 63000-UP0451E24P56L-RS) 1 DB-25 to 16-channel BNC cable 1 DIN rail mounting kit Table 3-2: Package List Contents Page 37 VITO-350 Digital Video Server Chapter 4 4 Installation Page 38 VITO-350 Digital Video Server 4.1 VITO-350 Installation Steps To install the VITO-350 please follow the installation steps below: Step 1: Install the HDD or CF card. Step 2: Mount the VITO-350. Step 3: Connect the external peripheral interface connectors to compatible external devices including: RS-232/422/485 serial devices Ethernet LAN External USB devices Keyboard/mouse VGA screen Step 4: Power on the controller Step 5: Configure the wireless LAN AP. Step 0: 4.2 CompactFlash® Card Installation To install the CF card, please follow the steps below. Step 1: Locate the CF slot on the front panel of the VITO-350. Step 2: Insert the CF card into the slot (Figure 4-1). Step 0: Figure 4-1: CF Card Installation Page 39 VITO-350 Digital Video Server 4.3 HDD Installation One 2.5” SATA HDD can be installed in the VITO-350 controller. To install the HDD, follow the instructions below. Step 1: Remove the eight bottom panel retention screws, six on the bottom panel and two on two side panels (Figure 4-2). Lift the bottom panel off the VITO-350. Figure 4-2: Bottom Panel Retention Screws (Bottom) Figure 4-3: Bottom Panel Retention Screws (Side) Step 2: The HDD bracket is secured inside the HDD access panel with four retention screws (Figure 4-4). Remove the four retention screws to remove the HDD bracket from the panel. Page 40 VITO-350 Digital Video Server Figure 4-4: HDD Bracket Retention Screws Step 3: Connect the HDD with the SATA cable secured on the HDD bracket. Step 4: Align the retention screw holes on the bottom of the HDD with the retention screw holes on the bracket. Step 5: Insert four retention screws from the bottom of the bracket to secure the HDD with the bracket (Figure 4-5). Figure 4-5: HDD Retention Screws Step 6: Replace the HDD bracket onto the HDD access panel and reinsert the four previously removed retention screws (Figure 4-6). Page 41 VITO-350 Digital Video Server Figure 4-6: HDD Installation Step 7: Reinstall the bottom panel. Step 0: 4.4 VITO-350 Series Mounting 4.4.1 Wall Mounting To mount the VITO-350 series, please follow the steps below. Step 1: Locate the four VITO-350 series mounting bracket retention screw holes on the sides of the chassis. Step 2: Align the retention screw holes on the first bracket with the VITO-350 series retention screw holes on one side of the chassis. Insert one of the retention screws into each of the retention holes. See Figure 4-7. Figure 4-7: Mounting Bracket Retention Screw Holes Page 42 VITO-350 Digital Video Server Step 3: Align the retention screw holes on the second bracket with the VITO-350 series retention screw holes on the other side of the chassis. Insert one of the retention screws into each of the retention holes. Step 4: Drill four properly spaced holes into the surface on which the controller is going to be mounted. Figure 4-8: Wall Mounting Dimensions (mm) Step 5: Insert one machine screw into each of the four retention holes on the bracket and into the wall or surface on which the VITO-350 series is mounted. 4.4.2 DIN Mounting To mount the VITO-350 controller onto a DIN rail, please follow the steps below. Step 6: Attach the DIN rail mounting bracket to the bottom panel of the controller. Secure the bracket to the controller with the supplied retention screws (Figure 4-9). Page 43 VITO-350 Digital Video Server Figure 4-9: DIN Rail Mounting Bracket Step 7: Make sure the inserted screw in the center of the bracket is at the lowest position of the elongated hole (Figure 4-10). Figure 4-10: Screw Locations Step 8: Place the DIN rail flush against the back of the mounting bracket making sure the edges of the rail are between the upper and lower clamps (Figure 4-11). Page 44 VITO-350 Digital Video Server Figure 4-11: Mounting the DIN RAIL Step 9: Secure the DIN rail to the mounting bracket by turning the top screw clockwise. This draws the lower clamp up and secures the controller to the DIN rail (Figure 4-12).Step 0: Figure 4-12: Secure the Assembly to the DIN Rail 4.5 External Peripheral Interface Connections The following external connectors are located on the front and rear panel of the VITO-350 controller: 1 x PS/2 keyboard and mouse connector 2 x RJ-45 Ethernet connectors 2 x DB-9 (male) serial port connectors Page 45 VITO-350 Digital Video Server 4 x USB 2.0 connectors 1 x DB-15 (female) VGA connector 1 x DB-25 (male) video input connector Instructions on how to connect these external devices to the VITO-350 controller are provided below. 4.5.1 PS/2 Y-Cable Connection The VITO-350 has a PS/2 connector on the external peripheral interface panel. The dual PS/2 connector is connected to the PS/2 Y-cable that came with the VITO-350. One of the PS/2 cables is connected to a keyboard and the other to a mouse to the system. Follow the steps below to connect a keyboard and mouse to the VITO-350. Step 1: Locate the dual PS/2 connector. The location of the PS/2 connector is shown in Chapter 3. Step 2: Insert the keyboard/mouse connector. Insert the PS/2 connector on the end of the PS/2 y-cable into the external PS/2 connector. See Figure 4-13. Page 46 VITO-350 Digital Video Server Figure 4-13: PS/2 Keyboard/Mouse Connector Step 3: Connect the keyboard and mouse. Connect the keyboard and mouse to the appropriate connector. The keyboard and mouse connectors can be distinguished from each other by looking at the small graphic at the top of the connector. Step 0: 4.5.2 LAN Connection (Single Connector) There are four external RJ-45 LAN connectors. The RJ-45 connectors enable connection to an external network. To connect a LAN cable with an RJ-45 connector, please follow the instructions below. Step 1: Locate the RJ-45 connectors. The locations of the RJ-45 connectors are shown in Chapter 2. Step 2: Align the connectors. Align the RJ-45 connector on the LAN cable with one of the RJ-45 connectors on the VITO-350. See Figure 4-14. Figure 4-14: LAN Connection Page 47 VITO-350 Digital Video Server Step 3: Insert the LAN cable RJ-45 connector. Once aligned, gently insert the LAN cable RJ-45 connector into the onboard RJ-45 connector. Step 0: 4.5.3 Serial Device Connection (DB-9) The VITO-350 has two male DB-9 connectors on the rear panel for three serial devices. Follow the steps below to connect a serial device to the VITO-350. Step 1: Locate the DB-9 connector. The location of the DB-9 connector is shown in Chapter 2. Step 2: Insert the serial connector. Insert the DB-9 connector of a serial device into the DB-9 connector on the external peripheral interface. See Figure 4-15. Figure 4-15: Serial Device Connector Step 3: Secure the connector. Secure the serial device connector to the external interface by tightening the two retention screws on either side of the connector. Page 48 Step 0: VITO-350 Digital Video Server 4.5.4 USB Connection (Dual Connector) The external USB Series "A" receptacle connectors provide easier and quicker access to external USB devices. Follow the steps below to connect USB devices to the VITO-350. Step 1: Locate the USB Series "A" receptacle connectors. The location of the USB Series "A" receptacle connectors are shown in Chapter 2. Step 2: Insert a USB Series "A" plug. Insert the USB Series "A" plug of a device into the USB Series "A" receptacle on the external peripheral interface. See Figure 4-16. Step 0: Figure 4-16: USB Connector 4.5.5 VGA Monitor Connection The VITO-350 has a single female DB-15 connector on the rear panel. The DB-15 connector is connected to a CRT or VGA monitor. To connect a monitor to the VITO-350, please follow the instructions below. Page 49 VITO-350 Digital Video Server Step 1: Locate the female DB-15 connector. The location of the female DB-15 connector is shown in Chapter 2. Step 2: Align the VGA connector. Align the male DB-15 connector on the VGA screen cable with the female DB-15 connector on the external peripheral interface. Step 3: Insert the VGA connector. Once the connectors are properly aligned, insert the male connector from the VGA screen into the female connector on the VITO-350. See Figure 4-17. Figure 4-17: VGA Connector Step 4: Secure the connector. Secure the DB-15 VGA connector from the VGA monitor to the external interface by tightening the two retention screws on either side of the connector. Step 0: 4.6 Power Up To power up the system, please do the following. Step 1: Make sure the system is properly mounted on a wall or on other surface. Step 2: Make sure all the peripheral connectors are properly connected to their Page 50 VITO-350 Digital Video Server respective devices. Step 3: Connect the power cable into the power terminal block on the rear panel. See Figure 4-18. Figure 4-18: Power Terminal Block Step 4: Connect the plug on the other side of the cable to the mains. Step 5: Push the power switch on the rear panel. See Figure 4-19. Figure 4-19: Power Switch Step 6: The power LED in the rear panel light up accordingly. See Figure 4-20. Figure 4-20: Power and Power LED Step 7: The system boots up and loads the respective Windows operating system. Step 0: Page 51 VITO-350 Digital Video Server 4.7 Wireless LAN Configuration To enable the wireless LAN of the VITO-350, the wireless access point (AP) has to be configured in the OS environment. To configure the wireless AP, follow the steps below. Step 1: Install the Atheros Clinet Utility from the driver CD that came with the VITO-350. Step 2: Launch the Atheros Clinet Utility. Step 3: In Atheros Clinet Utility, select Profile Management tab and click Scan button. Figure 4-21: Atheros Clinet Utility – Profile Management Step 4: A list of wireless AP is shown in the Available Infrastructure and Ad Hoc Networks window. Select one of the APs and click Activate button. Page 52 VITO-350 Digital Video Server Figure 4-22: Available Infrastructure and Ad Hoc Networks Step 5: Enter a name for this profile in the Profile Management window. Figure 4-23: Profile Name Setup Page 53 VITO-350 Digital Video Server Step 6: Select the Security tab and select a security option. Click Configure… button. Figure 4-24: Security Selection Step 7: The security configuration window appears. Please configure all the necessary information for the security settings. Click OK. Figure 4-25: Security Configuration Page 54 VITO-350 Digital Video Server Step 8: Click OK in the Profile Management window. Step 9: The information is shown in the Current Status tab of the Atheros Clinet Utility. Step 0: Figure 4-26: Current Status Page 55 VITO-350 Digital Video Server Chapter 5 5 Troubleshooting and Maintenance Page 56 VITO-350 Digital Video Server WARNING: Take Anti-Static precautions whenever maintenance is being carried out on the controller components. Failure to take anti-static precautions can cause permanent controller damage. 5.1 Anti-static Precautions WARNING: Failure to take ESD precautions during the installation of the VITO-350 may result in permanent damage to the VITO-350 and severe injury to the user. Electrostatic discharge (ESD) can cause serious damage to electronic components, including the VITO-350. Dry climates are especially susceptible to ESD. It is therefore critical that whenever the VITO-350, or any other electrical component is handled, the following anti-static precautions are strictly adhered to. Wear an anti-static wristband: Wearing a simple anti-static wristband can help to prevent ESD from damaging the board. Self-grounding: Before handling the board or opening the controller, touch any grounded conducting material. During the time the board is handled, frequently touch any conducting materials that are connected to the ground. Use an anti-static pad: When configuring the VITO-350, place it on an antic-static pad. This reduces the possibility of ESD damaging the VITO-350. Only handle the edges of the PCB: When handling the PCB, hold the PCB by the edges. Page 57 VITO-350 Digital Video Server 5.2 VITO-350 Controller Maintenance Overview NOTE: When doing maintenance operations on the controller, please follow the instructions in this chapter. Failure to follow these instructions may lead to personal injury and controller damage. To preserve the working integrity of the VITO-350 controller, the controller must be properly maintained. If controller components need replacement, the proper maintenance procedures must be followed to ensure the controller can continue to operate normally. 5.3 Controller Troubleshooting This section provides some simple troubleshooting suggestions. 5.3.1 The Controller Doesn’t Turn On If after turning the controller on, there is no power (indicated by the power LED on the front panel not turning on) please do the following: Step 1: Check that the power cable is properly connected to the terminal block on the controller rear panel. Step 2: Check that the power cable connector is properly plugged into the power source. Step 3: Make sure the power button is turned on. Page 58 VITO-350 Digital Video Server Figure 5-1: Power Switch Step 4: Plug the controller into a monitor and check to see if anything appears on the screen. If the boot-up screen appears it means the power LED has failed. To fix this problem, contact an IEI sales representative directly. Step 0: If the above steps have been completed and the controller still doesn’t turn on, please do the following. Step 1: Open the bottom panel. Step 2: Check that the power switch cable connector is properly connected to the motherboard. Step 3: Make sure the cable connecting the power switch to the motherboard is still properly attached to the power switch and has not been separated. Step 0: 5.3.2 The Controller Doesn’t Boot Up If the controller doesn’t boot up please do the following: Step 1: Check the power is turned on. See Section 5.3.1 above. Step 2: Make sure the SO-DIMM module is properly installed. Step 3: Make sure the CF Card is properly installed with a working operating system Step 4: Reset the controller using the reset CMOS jumper. Step 0: Page 59 VITO-350 Digital Video Server 5.3.3 More Troubleshooting Other problem that may occur is listed below: Nothing appears on the monitor after booting up the controller: Make sure the monitor is properly connected to the controller and the monitor is connected to a power supply and turned on. 5.4 Component Replacement Procedure WARNING: Take Anti-Static precautions whenever maintenance is being carried out on the controller components. Failure to take anti-static precautions can cause permanent controller damage. The controller components listed below can all be replaced if they fail: Motherboard SO-DIMM module CPU module CF Card HDD 5.4.1 Motherboard Replacement The motherboard replacement includes the following two procedures: Step 1: Removing the malfunction motherboard Step 2: Installing the replacement motherboardStep 0: 5.4.1.1 Motherboard Removal To remove the motherboard, please follow the steps below. Page 60 VITO-350 Digital Video Server Step 1: Power down the controller. Step 2: Disconnect all rear panel peripheral device connectors. Step 3: Remove the bottom panel. The bottom panel is secured to the controller with eight retention screws, six on the bottom panel and two on two side panels (Figure 5-4). Remove the eight retention screws and lift the bottom panel off the system. Figure 5-2: Bottom Panel Retention Screws (Bottom) Figure 5-3: Bottom Panel Retention Screws (Side) Step 4: Remove the front panel by removing the four front panel retention screws and four serial port retention screws. Page 61 VITO-350 Digital Video Server Figure 5-4: Front Panel Retention Screws Step 5: Remove the rear panel by removing the four rear panel retention screws, two video input port retention screws and two VGA port retention screws. (Figure 5-5). Figure 5-5: Rear Panel Retention Screws Step 6: Remove the four retention screws that secure the motherboard to the controller. (Figure 5-6) Page 62 VITO-350 Digital Video Server Figure 5-6: Motherboard Retention Screws Step 7: Remove the motherboard and disconnect the following connectors from the motherboard (Figure 5-7). Audio connector TV-out connector SATA connector SATA power connector Wireless LAN antenna connector Figure 5-7: Motherboard Connectors Page 63 VITO-350 Digital Video Server Step 8: Remove the CPU module. Step 9: Remove the Wireless module. Step 0: 5.4.1.2 Motherboard Installation To install the new motherboard or reinstall the old motherboard, please follow the steps below. Step 1: Install the previously removed CPU module and Wireless module. Step 2: Reconnect the following cable connectors to the motherboard (Figure 5-7). Audio connector TV-out connector SATA connector SATA power connector Wireless LAN antenna connector Step 3: Reinsert the four, previously removed motherboard retention screws to secure the motherboard to the controller. (See Figure 5-6) Step 4: Replace the front panel and bottom panel. Once replaced reinsert the nine previously removed retention screws (Figure 5-4 and Figure 5-5). Step 5: Remount the controller Step 6: Reconnect the peripheral devices to the peripheral device connectors on the front panel. Step 7: Power up the controller. Step 0: 5.4.2 SO-DIMM Replacement To replace a SO-DIMM, please follow the installation procedures that follow: Step 1: Remove the motherboard (see Section 5.4.1.1). Step 2: Locate the preinstalled SO-DIMM. Page 64 VITO-350 Digital Video Server Figure 5-8: Preinstalled VITO-350 SO-DIMM Step 3: Remove the old SO-DIMM from the socket. Step 4: Align the new SO-DIMM with the socket. Figure 5-9: SO-DIMM Installation Step 5: Insert the SO-DIMM. Push the SO-DIMM chip into the socket at an angle. (See Figure 5-9) Step 6: Open the SO-DIMM socket arms. Gently pull the arms of the SO-DIMM socket out and push the rear of the SO-DIMM down. (See Figure 5-9) Step 7: Secure the SO-DIMM. Release the arms on the SO-DIMM socket. They clip into place and secure the SO-DIMM in the socket.Step 0: Page 65 VITO-350 Digital Video Server 5.4.3 CPU Module Replacement The IEM-9452 CPU module replacement includes the following two procedures: Step 1: Removing the malfunction CPU module Step 2: Installing the replacement CPU moduleStep 0: 5.4.3.1 CPU Module Removal To remove the IEM-9452 CPU module, please follow the steps below. Step 1: Power down the controller. Step 2: Disconnect all rear panel peripheral device connectors. Step 3: Remove the motherboard. See Section 5.4.1.1 Step 4: Remove the SO-DIMM. See Section 5.4.2 Step 5: Remove the SATA cable. Step 6: The CPU module is connected to the motherboard with four ETX connectors. Disconnect the CPU module from the motherboard. Step 0: 5.4.3.2 CPU Module Installation To install the new CPU module, please follow the steps below. Step 1: Align the ETX connectors. Align the ETX connectors (X2, X3, X4 and X5) with the corresponding connectors on the VITO-350 motherboard. Step 2: Gently insert the connectors. Gently push the CPU module down to ensure the connectors are properly connected. Step 3: Reinstall the SO-DIMM and reconnect the SATA cable. Step 4: Reinstall the motherboard..Step 0: Page 66 VITO-350 Digital Video Server Appendix A A Safety Precautions Page 67 VITO-350 Digital Video Server WARNING: The precautions outlined in this chapter should be strictly followed. Failure to follow these precautions may result in permanent damage to the VITO-350. A.1 Safety Precautions Please follow the safety precautions outlined in the sections that follow: A.1.1 General Safety Precautions Please ensure the following safety precautions are adhered to at all times. Follow the electrostatic precautions outlined below whenever the VITO-350 is opened. Make sure the power is turned off and the power cord is disconnected whenever the VITO-350 is being installed, moved or modified. Do not apply voltage levels that exceed the specified voltage range. Doing so may cause fire and/or an electrical shock. Electric shocks can occur if the VITO-350 chassis is opened when the VITO-350 is running. Do not drop or insert any objects into the openings of the VITO-350. If considerable amounts of dust, water, or fluids enter the VITO-350, turn off the power supply immediately, unplug the power cord, and contact the VITO-350 vendor. DO NOT: o o o o Page 68 Drop the VITO-350 against a hard surface. Strike or exert excessive force onto the LCD panel. Touch any of the LCD panels with a sharp object In a site where the ambient temperature exceeds the rated temperature VITO-350 Digital Video Server A.1.2 Anti-static Precautions WARNING: Failure to take ESD precautions during the installation of the VITO-350 may result in permanent damage to the VITO-350 and severe injury to the user. Electrostatic discharge (ESD) can cause serious damage to electronic components, including the VITO-350. Dry climates are especially susceptible to ESD. It is therefore critical that whenever the VITO-350 is opened and any of the electrical components are handled, the following anti-static precautions are strictly adhered to. Wear an anti-static wristband: Wearing a simple anti-static wristband can help to prevent ESD from damaging any electrical component. Self-grounding: Before handling any electrical component, touch any grounded conducting material. During the time the electrical component is handled, frequently touch any conducting materials that are connected to the ground. Use an anti-static pad: When configuring or working with an electrical component, place it on an antic-static pad. This reduces the possibility of ESD damage. Only handle the edges of the electrical component: When handling the electrical component, hold the electrical component by its edges. A.2 Maintenance and Cleaning Precautions When maintaining or cleaning the VITO-350, please follow the guidelines below. A.2.1 Maintenance and Cleaning Prior to cleaning any part or component of the VITO-350, please read the details below. To clean the VITO-350, gently wipe it with a piece of soft dry cloth or a slightly moistened cloth. The interior of the VITO-350 does not require cleaning. Keep fluids away from Page 69 VITO-350 Digital Video Server the VITO-350 interior. Be cautious of all small removable components when vacuuming the VITO-350. Turn the VITO-350 off before cleaning the VITO-350. Never drop any objects or liquids through the openings of the VITO-350. Be cautious of any possible allergic reactions to solvents or chemicals used when cleaning the VITO-350. Avoid eating, drinking and smoking within vicinity of the VITO-350. A.2.2 Cleaning Tools Some components in the VITO-350 may only be cleaned using a product specifically designed for the purpose. In such case, the product will be explicitly mentioned in the cleaning tips. Below is a list of items to use when cleaning the VITO-350. Cloth – Although paper towels or tissues can be used, a soft, clean piece of cloth is recommended when cleaning the VITO-350. Water or rubbing alcohol – A cloth moistened with water or rubbing alcohol can be used to clean the VITO-350. Using solvents – The use of solvents is not recommended when cleaning the VITO-350 as they may damage the plastic parts. Vacuum cleaner – Using a vacuum specifically designed for computers is one of the best methods of cleaning the VITO-350. Dust and dirt can restrict the airflow in the VITO-350 and cause its circuitry to corrode. Cotton swabs - Cotton swaps moistened with rubbing alcohol or water are excellent tools for wiping hard to reach areas. Foam swabs - Whenever possible, it is best to use lint free swabs such as foam swabs for cleaning. Page 70 VITO-350 Digital Video Server Appendix B B IEI Argus Digital Video Surveillance Guide Page 71 VITO-350 Digital Video Server B.1 System Requirement CPU Intel Pentium 4 RAM 1GB (2GB or above recommended) Video RAM 2.4GHz with Hyper-threading 32 MB or above recommended ATI Radeon 9550 or above Display Chip NVIDIA 6200 or above Display Resolution 1024X768 24bits or above Operating System Windows2000 SP4 / Windows XP Pro SP2 DirectX 9.0c or above Required space for installation Recommended HD free space Supported Hardware 100MB 250GB or above IVC-168G/268G, IVCE-268G, PM-6814/6844 ,VITO-350 series cards B.2 Features Real-time Intelligent 16CH Video Surveillance Software Selection of 1/4/6/9/10/13/16 divided screen in Main Console Quick Search and Event List Search in Playback Real Time Status Display and Notification: Four recording modes to schedule or trigger recordings based on camera and Digital input Support DI/DO/PTZ Control Intelligent Guard Instant Response: On Screen Display, E-mail, Sound Alarm, Window Vibration, Digital Signal Output E-mail Alarm System once Triggered by Motion Detection Continuous and Event Triggered Recording Real Time Status Display and Notification: System, Video, Event, Alarm and backup status can be seen immediately Page 72 Main program execution actions can be configured Supports Different Speeds in Playback VITO-350 Digital Video Server Intelligent video analysis (Smart Search) Recorded video/audio archiving with backup features Support IVC-168G/268G, IVCE-268G, PM-6814/6844 ,VITO-350 series cards B.3 Getting Started Step 1: Simply place the setup disc into your optical drive and run Autorun. Step 2: Choose “Install Argus” on the menu Page 73 VITO-350 Digital Video Server NOTE: Install Windows 2000 Kits: Select this to install windows 2000 kits. (It’s necessary for user who uses Windows 2000 OS.) Install Horus: Select this to install the Argus Digital Video Surveillance software. User Manual: Select this to view the User Manual. (Adobe Reader is required.) Get Adobe Reader: Select this to get Adobe Reader from Adobe’s website. Exit: Select this to Exit this Menu screen. Step 3: Select the language once the “Choose Setup Language” window pop-up, and then click “Next” to continue the installation. Step 4: Select the device type that has been connected with the computer and click on “Next” to continue. For example, if you setup IVC-168G/268G, IVCE-268G, Page 74 VITO-350 Digital Video Server PM-6814/6844 video capture card, please select of “IVC Series Video Capture Card”. If you use Argus on VITO-350, please select of “VITO-350”. Step 5: The “Welcome” window will then pop-up, click on “Next” to continue. Page 75 VITO-350 Digital Video Server Step 6: Choose where to install the program. Click on “Change” button to browse your computer. Once the directory is specified, click on “Next” to continue. Step 7: The system is ready to install the program. Click on “Install” to begin the installation process. Page 76 VITO-350 Digital Video Server Step 8: The installation progress is started. Please wait a few minutes to complete the installation. Page 77 VITO-350 Digital Video Server Step 9: Click on “Finish” to exit the InstallShield wizard. Step 10: The user is prompted to enter the Argus serial number. This serial number may be found on the laser sticker on the companion CD. Enter the serial number in the field. Page 78 VITO-350 Digital Video Server Step 11: If the serial number is correct, Argus will pop-up the “Thank you for choosing ARGUS,…” message box. Click on “OK” to activate the software. Step 12: The system will then search for the hardware, If there is no any device been successfully connected, click “OK” on the “Device not found” message box to exit the program. For the supported hardware, please refer to “System Requirement” section. Step 13: Once device is found, the user is prompted to create an administrator account. This account allows full control of Argus. Enter a password for this administrator account in the “Password” field and re-enter it in “Password Confirm” field. Page 79 VITO-350 Digital Video Server Step 14: The user is then prompted to login by the administrator user name and password. Enter “administrator” in the “User Name” field. Enter the password you just created in the “Password” field. Step 15: The ARGUS starts up successfully. Step 0: Page 80 VITO-350 Digital Video Server B.4 Main Console The major features of Main Console. Monitors up to 16 channels of cameras Video recording schedule Cycling surveillance Full screen monitoring Status indications Supports PTZ cameras Motion based recording and alert Browser and export the event and system logs Support Hot Key control B.4.1 Console Window Minimize Exit Keypad Page Navigator PTZ Control Status Channel View Options Services Guard Setting Logview Cycle Slides Full Screen Playback Schedule Setting Console Setting Page 81 VITO-350 Digital Video Server Minimize This will minimize the main console Exit Selecting this will give you two options • By selecting “Exit Main Console” option this will exit the console itself • By selecting “Logout” option this will only logout the current user in use Keypad This allows you to enter the channel number for the current view. For example if you have 16 channels active, enter “4” to go to channel 4. Page Navigator This allows you to navigate in page mode, if you have more than one page active. PTZ Control If the channel that is selected supports PTZ function. You may control the camera’s panning, tilting and zooming function from here. If the selected channel does not support PTZ, this will not be actived. Status This will indicate the current time, date, user logged in, page, and whether or not the surveillance is on or off. Channel View Options There are 7 viewing options for the main console. • Single Channel • 2x2 Grid Channels • 3x3 Grid Channels Page 82 VITO-350 Digital Video Server • 4x4 Grid Channels • 1 Main Channel + 5 Secondary Channels • 2 Main Channel + 8 Secondary Channels • 1 Main Channel + 12 Secondary Channels Cycle slides This will cycle through individual slides. Full screen This will view the console in full screen. Services Two options will be available when selected • By selecting “Start Surveillance” all the preset functions from “Guard Setting” and “Schedule Setting” will be activated. • By selecting “Lock System”, all accessible buttons will be disabled until unlocked. Playback This opens the playback window portion of Argus. Find history of video records including individual channels. Search by motion detection within the video records. Set up the backup intervals. Create snapshot(s) of video records and save them as .bmp or .jpg. Guard Setting This opens the guard setting of the console. Sets individual channels for various functions including: channel Events, system event, digital input, on screen display, sound alarm, alert email, vibrate window, pop-up message, digital output control. Schedule Setting This enters the recording schedule setup. Allows to set the recording time and method for Page 83 VITO-350 Digital Video Server each individual channels. Logview View logs of individual channels and the console system itself. Allows exporting the logs into .CSV based files for easy viewing by Excel. Console Setting Adjust the console settings including: startup options, storage locations, display indicators, cameras, user accounts, E-mail account settings, contact information, digital I/O settings. B.4.2 System Setting This edits General, Camera, User Account, E-mail Digital I/O for your main console. Click on the Console Setting from mail console, select “System Setting” to edit the settings. B.4.3 General Setting This edits startup options, storage locations, status display, and OSD setting and language settings. Page 84 VITO-350 Digital Video Server Startup You may select startup options when Windows starts up by checking the following options: • Main Console: Boots up Argus when Windows OS started • Start Surveillance: Immediately starts surveillance services upon launching console • Full Screen: Immediately starts the console in full screen mode • Auto Login: Automatically logins with a preferred user account Status Display These options are for the lower left portion of the console status indicator. You may check these options to display them or not: • Current Date: Displays or hides the current date in the console’s status • Current Time: Displays or hides the current time in the console’s status OSD Setting OSD (On Screen Display) are the information displayed on individual channels – this also effects the recording as well. You may check these options to display them or not: • Show Translucent: Allows translucent effect • Show Date: Displays or hides the current date Page 85 VITO-350 Digital Video Server • Show Time: Displays or hides the current time • Show Channel Name: Displays or hides the channel name • Show Channel FPS: Displays or hides the channel’s frame per second • Show Channel Bitrate: Displays or hides the channel’s current bitrates Storage Here you can set where you would like to store recorded files/images. It allows you to add multiple directories, so if the top directory disk space hits the disk space mark, it will go to the next directory down on the list. The “Reserve Disk Space” option allows user to mark the amount of disk space to left over. The “Preserve Files” option allows user to store the recorded files for a certain amount of days if they would only like to store the files temporarily to reduce massive disk space usage. Language Setting Select a language you preferred to use. Click “OK” button to change the language right away. B.4.4 Camera Setting Channel List You will find all available devices in the channel list. Click on the device name, the camera image will display on the preview area. . Page 86 VITO-350 Digital Video Server Refresh Image This will refresh the current preview window’s image. A working channel is required to be selected in order to view the image here. Channel Settings This allows you to set various options, which may include video settings and record settings. Page 87 VITO-350 Digital Video Server Video Settings Analog Mode: You can select NTSC or PAL or and SECAM mode from here. Resolution: You can select the camera display resolution from here. Fame Rate: Show the camera video frame rate. NTSC mode is default as 30 frames per second and PAL/SCEAM mode are 25 frames per second. Video Compression: This version only supports MPEG4 recorded video compression. Record Settings Audio Mixer Device: Select an audio mixer device, each channel will auto linked to the right audio mixer. Record FPS: You setup recording frame rate for this channel. Record Quality: You setup the recording quality for this channel. Page 88 VITO-350 Digital Video Server B.4.5 PTZ Setting PTZ Settings This allows you to setup and test the camera’s PTZ setting. Follow the camera manufacturer’s instruction to install your PTZ camera to your computer. A PTZ camera is usually connected to the computer through RS-485 connector. Check/uncheck the box of “Enable PTZ” to enable/disable the PTZ function. PTZ Setting: Select Serial Port, Baud Rate, and Address according to your PTZ camera. PTZ Speed: Adjust the Pan, Tilt, Zoom speed by dragging the sliders respectively. PTZ Test Click on the test buttons to preview how your PTZ setting works. Page 89 VITO-350 Digital Video Server B.4.6 User Account Setting Name The name of the user account that’s being created Description The description of the user name of the account Password The password for the account that’s being created or being modified Disable User Account Disables the selected user account Page 90 VITO-350 Digital Video Server Permission: Check the permission to control how many function(s) can be performed by the existing user account Main Console Execute Main Console: Allows the user account to start the console System Setting: Allows the user to modify the system settings Surveillance Control: Allows the user to start or stop the current surveillance Schedule Setting: Allows the user to define the recording schedule(s) Guard Setting: Allows the user to start the guard service Playback Execute Playback: Allows the user to access the video playback section Backup Execute Backup: Allows the user to execute backup operations B.4.7 E-Mail Setting Page 91 VITO-350 Digital Video Server Click “Setup” button to setup E-mail account of sender. User Information User Name: You can input your email user name here. E-mail Address: You can input a sender’s email address here. Server Information SMTP Server Address: You input the SMTP address here. Login Information Account: You input your user account that’s associated with the SMTP server here. Password: You input your user password that’s associated with the SMTP server here. Test Click “Test” button to send a test mail to sender’s email address. Page 92 VITO-350 Digital Video Server Add You can add contact information for storage purposes. This includes name, email, phone, address and a description. Edit You can edit existing contact information by selecting it from the list and click on this button. Remove You can remove existing contact information by selecting it from the list and click on this button. Page 93 VITO-350 Digital Video Server B.4.8 Digital I/O Setting Foreign Device Module List Module Setting Module: You can input a module name here and press “Add” button to create a new module. The parameter of each digital output control is editable. Description: To describe the module you created in details. Module List: All modules will be listed here. Add: To create a new module. Update: To update the module. Remove: To remove the module. Foreign Device Setting Name: You can modify the name of the foreign devices. Signal Type: Edit the signal type from the drop-down menu. N/C is normal close; N/O is Page 94 VITO-350 Digital Video Server normal open. If your device is connected to a N/O pin on GPIO connecter, then you need to assign an N/C signal for event trigger. NOTE: Ensure to click “Update” button to update the settings in case any changes ever have been made to current active module. If you click only on “OK” to quit this, it won’t do any changes. B.4.9 Logview Event Log View the history of event that had been detected by the Guard setting. Step 1: Select a day you wish to view. Page 95 VITO-350 Digital Video Server Step 2: Select a Log Type you wish to filter. Step 3: Select the start and end time you wish to filter. Step 4: Click “Search” button to view log list. Step 5: Click “Export” to export the log list as .CSV file. Step 0: Event Log Type All: Show all logs. Motion Detection: Only show the event logs of motion detection. Reserve Disk Space Met: Only show the event logs of disk space has exhausted. Connection Lost: Only show the event logs of camera connection lost. Connection Recover: Only show the event logs of camera connection recover. Digital Input: Only show the event logs of digital signal input has been triggered. System Log View the history of system that had been modified. Step 2 Step 1 Step 3 Step 4 Step 5 Page 96 VITO-350 Digital Video Server Step 1: Select a day you wish to view. Step 2: Select a Log Type you wish to filter. Step 3: Select the start and end time you wish to filter. Step 4: Click “Search” button to view log list. Step 5: Click “Export” to export the log list as .CSV file. Step 0: System Log Type All: Show all logs. System Startup: Only show the system logs of main console is started. System Shutdown: Only show the system logs of main console is shutdown. User Login: Only show the system logs of user login. User Logout: Only show the system logs of user logout. System Setting: Only show the system logs of system settings have been modified. Guard Setting: Only show the system logs of guard settings have been modified. Schedule Setting: Only show the system logs of schedule settings have been modified. Start Surveillance: Only show the system logs of surveillance has been started. Preserved Files Delete Failed: Only show the system logs of auto delete recorded files failed. User Login Failed: Only show the system logs of user login failed. Motion Detection: Only show the event logs of motion detection. Reserve Disk Space Met: Only show the event logs of disk space has exhausted. Connection Lost: Only show the event logs of camera connection lost. Digital Input: Only show the event logs of digital signal input has been triggered. Page 97 VITO-350 Digital Video Server B.5 Schedule Setting Overview: When surveillance is activated, it is basically running on the schedule mode settings (if set). You can customize the schedule for certain periods of surveillance or based on events created from the guard settings for individual channels. Schedule Mode • Daily: For daily based surveillance • Weekly: For weekly based surveillance • Monthly: For monthly based surveillance • Custom: For longer periods of surveillance Page 98 VITO-350 Digital Video Server B.5.1 Schedule Setting Tutorial: How to Set a Basic Schedule First select your preferred schedule mode from the “Schedule Mode” • Daily: For daily based surveillance. Select start/stop time, for example, 5 PM and 12 PM. • Weekly: For weekly based surveillance. Select both the time and day(s) of the week. Page 99 VITO-350 Digital Video Server • Monthly: For monthly based surveillance. , Select both the time and the day(s) of the month. Page 100 VITO-350 Digital Video Server • Custom: For certain periods of surveillance. Select both the time and start/stop date. Next click “Add”. You will be prompted to set a time frame for the day. You may choose the record mode to be set to “Recorded by Event” if you have set an event in Guard settings. Advanced Settings is only available when “Recorded by Event” is selected. Click “OK” once you have finish setting your preferences. Page 101 VITO-350 Digital Video Server You will now have an added listing of time queue that you have created. You will need to start surveillance on the main console to activate the scheduling record. If the surveillance has been started, the status will be shown “Surveillance On” and there are symbols of light will be shown on channel. Yellow Light: This is to indicate that the Guard Setting has been activated. Red Light: This symbol is the scheduling record has been started. Page 102 VITO-350 Digital Video Server Page 103 VITO-350 Digital Video Server B.6 Guard Setting Add Event Remove Event Add Action Edit Event Remove Action Edit Action Overview: The Guard settings are to setup events and actions. For example, if you wish to have a certain channel to take action (such as sound indication) when an event occurs (such as motion detected), you would set it up through here. Add Event This adds an event to individual channel • Motion Detection: This option is available only for individual channel. This will set the channel to trigger an event when motion is detected by this particular channel. • Connection Lost: This option is available only for individual channel. This will be triggered when the camera connection lost. Page 104 VITO-350 Digital Video Server • Disk Space Exhausting: This option is a default setting in “System”. This will trigger an event when the “Reserve Disk Space” is met. • Digital Input: This option is available only for GPIO input. This will trigger an event when GPIO interface got a digital signal input. Remove Event This removes a selected event from individual channels. Edit Event This edits a selected event from individual channels. Add Action This adds an action into the selected event. • Display: Displays text when the event is triggered • Sound Alarm: Plays a sound when the event is triggered • E-mail: Sends out email, based on the E-mail settings when the event is triggered Page 105 VITO-350 Digital Video Server • Vibrate: Console’s Window vibrates when the event is triggered • Message: Displays a message box when the event is triggered • Digital Output Control: Send a digital signal to GPIO interface to control foreign devices when triggered. Firstly, you have to setup the digital output control for your device and select a proper Module that has been created in Digital I/O section of System Setting. Then setup the lasting time for the action(s) taken. Remove Action This removes a selected action from the selected event. Edit Action This edits a selected action from the selected event. Page 106 VITO-350 Digital Video Server B.6.1 Guard Setting Tutorial: How to create Motion Detection events for the Camera While in Guard Setting, select the camera that you want to add motion detection and click on “Add Event” ` An “Event Selection” window should pop up, select “Motion Detection” and click “OK” Page 107 VITO-350 Digital Video Server Drag the slider on the Sensitivity setting to choose how sensitive for each motion area to detect. If you move the slider to “High”, this will set the sensitivity higher. If you move the slider to the “Low”, this will set the sensitivity lower. Choose “All Area” to detect for everything that is on the camera screen. Page 108 VITO-350 Digital Video Server Choose “Custom” to set your own area to detect for motion, for example, you only want to detect motion from a portal. To use “Custom” for Region Definition, you’ll need to define the areas that you want to detect. First you would click on “Add”. Then, in the preview panel, click and hold to drag an area that you wish to detect. Click on “Remove” and click on the area you created to remove it. Click on “Clear All” to remove all areas created in the preview panel. Click “OK” once you’ve completed. Page 109 VITO-350 Digital Video Server Click on the “Motion Detection” that you have just created to see “Action”. By default, it should already have “Display” action added. Click “OK” to complete. You should now be back in main console. Try moving an object in front of the motion detected configured camera. Click on “Service” and choose “Start Surveillance” Page 110 VITO-350 Digital Video Server Page 111 VITO-350 Digital Video Server Try moving an object in front of the motion configured channel. You should be able to see a message displaying “Motion Detected” Tips • You can add more customized actions into the event for better notification: - Page 112 Display: You can input your own message for display by editing the default VITO-350 Digital Video Server - Sound Alarm: Alerts you through your computer’s speaker when the event gets triggered - E-mail: Alerts you through e-mail messaging with custom messaging (requires configuration). If checked the box of “Attach a snapshot”, the mail will attach a snapshot of motion detection. Page 113 VITO-350 Digital Video Server - Vibrate: Vibrates the whole console window. Move the slider to the right for longer vibration. Move the slider to the left for shorter vibration. B.7 Playback To open the recorded video, view the videos, search the events from the current opened video files, backup recorded files, view the logs, take snapshot, and print channel images. The major features of Playback as below. • Views up to 16 channels simultaneously • Playback speed controls up to 6x • Status information indicator • Enhanced search mode • Capture image frames • Print channel images • Easy access to back up videos • Browser and export the event and system logs • Voice switch and volume controls • Support Hot Key control Page 114 VITO-350 Digital Video Server Open Smart Search Backup Logview Snapshot Print Open Open existing video records that the main console has recorded Search Search the opened video records for specific action(s) Backup Set scheduled backup operations for safe keeping Snapshot Take a snapshot of the current channel Logview View the logs of events and the system itself Page 115 VITO-350 Digital Video Server Print Print the current active channel and all channels image. Page 116 VITO-350 Digital Video Server B.8 Smart Search Overview: Smart Search helps user to detect for motions in recorded videos automatically. To highlight specific motion detected areas by holding down the left mouse button and dragging in the Playback window area will speed up the investigation time. All Search events for all areas on the recorded video. Clear Clear any user created motion detected areas. Stop Stop the current search. Search Start the search. Sensitivity Drag the setting to the right for high sensitivity; drag the setting to the left for lower sensitivity Page 117 VITO-350 Digital Video Server Interval Drag the setting to the right for more frequent snapshot intervals; drag the setting to the left for less frequent snapshot intervals Save Image of Search Result Save the image to your file directory. Clear of Search Result Clear all the results in the search. B.9 Backup The major features of Backup as below. • Backup recorded video files, event logs and system logs. • Set date and time intervals • Video Preview • Delete recorded files after backup • Bundle playback program to view the backup files in anywhere Page 118 VITO-350 Digital Video Server Delete Record Files After Backup Once backup has completed the current files on the specified directory will be deleted. Search Inquiry the search based on the starting date and time. Directory Where the backup files you would like to store under. Play Play the current selected video for previewing purposes. Page 119 VITO-350 Digital Video Server B.10 Miscellaneous B.10.1 Trouble shooting - Autorun.exe can’t auto launch Normally the computer will play provided CD automatically. If not, please open “My Computer” from your start menu or desktop. Right click on your optical drive and choose either “AutoPlay”. Or if the computer never have any Flash Player ActiveX (version 9 or above) installed, you will have to install it first. Please click “Yes” when following message pop-up to download it. Click “OK” button to close the Information Bar. Page 120 VITO-350 Digital Video Server Select “Allow Blocked Content…” to start downloading the file. Click “Yes” button to continue. Click “Install” to start installing Adobe Flash Player Installer. Page 121 VITO-350 Digital Video Server You may now close the internet browser when “Success!” message is shown. At this moment, Autorun.exe will auto launch now, but it only shows the background of Autorun.exe. Please close the background of Autorun.exe by the left mouse key and re-start the Autorun.exe program. (Suggest to close…) Page 122 VITO-350 Digital Video Server To re-start the Autorun.exe, you may take out the CD from your optical deriver and place it back for automatically launch or repeat the other steps manually as mentioned previously. Page 123 VITO-350 Digital Video Server B.10.2 Installation software on Windows 2000 To install Argus on Windows 2000 OS, please install “Windows 2000 Kits” first. To install the kits please select “Install Windows 2000 Kits” on start up menu to install the programs. Select the language once the “Choose Setup Language” window pop-up, and then click “Next” to continue the installation. Page 124 VITO-350 Digital Video Server The “Welcome” window will then pop-up, click on “Next” to continue. Page 125 VITO-350 Digital Video Server You are now ready to install the program. Click on “Install” to begin the installation process. You will now see the installation progress. Please wait a few minutes to complete the installation. Once the installation completes, the InstallShield Wizard will ask for restarting your computer. Page 126 VITO-350 Digital Video Server Check “Yes” and click “Finish” to re-start computer now. If you select “No”, you have to restart your computer later otherwise installing Argus will get some troubles. B.10.3 Software Hot-key list B.10.3.1 Main Console Hot Key Ctrl + 2 Function Playback 1 Channel number input 1 2 Channel number input 2 3 Channel number input 3 4 Channel number input 4 5 Channel number input 5 6 Channel number input 6 7 Channel number input 7 8 Channel number input 8 9 Channel number input 9 Page 127 VITO-350 Digital Video Server 0 Backspace Enter Up (↑) Down (↓) Channel number input 0 Clear Channel number input Enter the Channel number Camera Tilt Up Camera Tilt Down Left (←) Camera Pan Left Right (→) Camera Pan Right + Camera Zoom in - Camera Zoon out Page UP Page Down Previous Page Next Page Home Go to the first Page End Go to the last Page Ctrl + G Start Surveillance/Stop Surveillance Ctrl + S System Setting Ctrl + L Logview Ctrl + F Full Screen Display ESC Normal Screen Display Tab Change Display Pattern B.10.3.2 Playback Hot Key Ctrl + 1 Space Function Main Console Play or Pause video Ctrl + Enter Stop video Up (↑) Speed Up Down (↓) Left (←) Speed Down Step Backward Right (→) Step Forward Ctrl + O Open Records Ctrl + M Smart Search Page 128 VITO-350 Digital Video Server Ctrl + P Print Ctrl + L Logview Ctrl+ I Snapshot Page 129 VITO-350 Digital Video Server Appendix C C Hazardous Materials Disclosure Page 130 VITO-350 Digital Video Server C.1 Hazardous Material Disclosure Table for IPB Products Certified as RoHS Compliant Under 2002/95/EC Without Mercury The details provided in this appendix are to ensure that the product is compliant with the Peoples Republic of China (China) RoHS standards. The table below acknowledges the presences of small quantities of certain materials in the product, and is applicable to China RoHS only. A label will be placed on each product to indicate the estimated “Environmentally Friendly Use Period” (EFUP). This is an estimate of the number of years that these substances would “not leak out or undergo abrupt change.” This product may contain replaceable sub-assemblies/components which have a shorter EFUP such as batteries and lamps. These components will be separately marked. Please refer to the table on the next page. Page 131 VITO-350 Digital Video Server Part Name Toxic or Hazardous Substances and Elements Lead Mercury Cadmium Hexavalent Polybrominated Polybrominated (Pb) (Hg) (Cd) Chromium Biphenyls Diphenyl Ethers (CR(VI)) (PBB) (PBDE) Housing X O O O O X Display X O O O O X Printed Circuit X O O O O X Metal Fasteners X O O O O O Cable Assembly X O O O O X Fan Assembly X O O O O X Power Supply X O O O O X O O O O O O Board Assemblies Battery O: This toxic or hazardous substance is contained in all of the homogeneous materials for the part is below the limit requirement in SJ/T11363-2006 X: This toxic or hazardous substance is contained in at least one of the homogeneous materials for this part is above the limit requirement in SJ/T11363-2006 Page 132 VITO-350 Digital Video Server 此附件旨在确保本产品符合中国 RoHS 标准。以下表格标示此产品中某有毒物质的含量符 合中国 RoHS 标准规定的限量要求。 本产品上会附有”环境友好使用期限”的标签,此期限是估算这些物质”不会有泄漏或突变”的 年限。本产品可能包含有较短的环境友好使用期限的可替换元件,像是电池或灯管,这些元 件将会单独标示出来。 部件名称 有毒有害物质或元素 铅 汞 镉 六价铬 多溴联苯 多溴二苯醚 (Pb) (Hg) (Cd) (CR(VI)) (PBB) (PBDE) 壳体 X O O O O X 显示 X O O O O X 印刷电路板 X O O O O X 金属螺帽 X O O O O O 电缆组装 X O O O O X 风扇组装 X O O O O X 电力供应组装 X O O O O X 电池 O O O O O O O: 表示该有毒有害物质在该部件所有物质材料中的含量均在 SJ/T11363-2006 标准规定的限量要求以下。 X: 表示该有毒有害物质至少在该部件的某一均质材料中的含量超出 SJ/T11363-2006 标准规定的限量要求。 Page 133