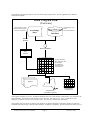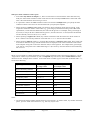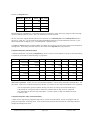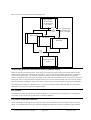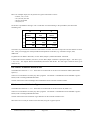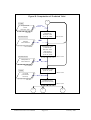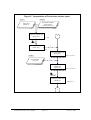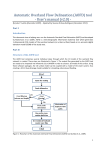
1
Cornell University, Department of Soil, Crop & Atmospheric Sciences SCAS Teaching Series No. T93-2 Revision 6 Ithaca, NY USA February 1997 $/(6 Automated Land Evaluation System ALES Version 4.65 User’s Manual February 1997 Printing David G. Rossiter Armand R. Van Wambeke ALES Project Department of Soil, Crop & Atmospheric Sciences (SCAS) Bradfield & Emerson Halls, 10th floor Cornell University Ithaca, NY 14853-1901 USA Internet: [email protected] FAX: +1 (607) 255-8615 or -2644 Voice: +1 (607) 255-3207 WWW: http://wwwscas.cit.cornell.edu /landeval/ales/ales.htm Internet discussion group: [email protected] “ALES computer program & documentation Cornell University 1988-1997” ALL RIGHTS RESERVED Correspondence regarding this manual or the ALES program should be addressed to: ALES Project Department of Soil, Crop & Atmospheric Sciences (SCAS) Bradfield Hall, 10th floor Cornell University Ithaca, NY 14853-1901 USA Internet: [email protected] FAX: +1 (607) 255-8615 or -2644 Voice: +1 (607) 255-3207 World Wide Web: http://wwwscas.cit.cornell.edu/landeval/ales/ales.htm Internet discussion group: [email protected] Notice: This documentation may be freely copied or translated, as long the copyright notice “ALES computer program & documentation © Cornell University 1988-1997” and this notice, is included unchanged. This document and all copies of it may not be sold without the express written consent of the Department of Soil, Crop, & Atmospheric Sciences, Cornell University. IBM and OS/2 are registered trademarks of International Business Machines. MS-DOS, PC-DOS and Microsoft Windows are registered trademarks of Microsoft Corp. DataTree is a trademark of InterSystems Corp. MUMPSis a trademark of the Massachusetts General Hospital. M is a trademark of M Technology Association. IDRISI is a trademark of Clark University. Other trademarks mentioned in the text are trademarks of their respective owners. Portions of this manual have previously been published in these references: Rossiter, D.G. 1994 Lecture notes: Land evaluation. SCAS Teaching Series T94-1, Department of Soil, Crop & Atmospheric Sciences, Cornell University, Ithaca NY. Rossiter, D.G., & A.R. Van Wambeke, 1991. Automated Land Evaluation System Version 3 User's Manual. Department of Soil, Crop & Atmospheric Sciences, Cornell University, Ithaca, NY. Rossiter, D.G. 1990. ALES: A framework for land evaluation using a microcomputer. Soil Use & Management 6(1): 7-20. Rossiter, D.G., & A.R. Van Wambeke, 1989. Automated Land Evaluation System Version 2 User's Manual. Department of Agronomy, Cornell University, Ithaca, NY. Rossiter, D.G., M. Tolomeo, & A.R. Van Wambeke, 1988. Automated Land Evaluation System Version 1 User's Manual. Department of Agronomy, Cornell University, Ithaca, NY. Rossiter, D.G. 1988. ALES: a microcomputer program to assist in land evaluation. Proc. International Workshop on Land Qualities in Space and Time, Wageningen, the Netherlands, 22-26 August 1988, Pudoc, Wageningen. Contents Introduction to the Manual ___________________________________________________________ 1 Objectives of this manual.................................................................................................. 1 How to use this manual..................................................................................................... 1 Acknowledgments ............................................................................................................ 2 Introduction to ALES________________________________________________________________ 4 The ALES program .......................................................................................................... 4 Background of the ALES project ...................................................................................... 6 Who uses ALES?.............................................................................................................. 8 Introduction to Land Evaluation______________________________________________________ 11 What is land evaluation?................................................................................................. 11 Outline of the land evaluation process............................................................................. 13 Stakeholder, client, evaluator, experts............................................................................. 14 The structure of an ALES evaluation .............................................................................. 14 Highlights of the ALES approach to land evaluation....................................................... 17 Example : Papua New Guinea Land Evaluation System .................................................. 20 Glossary of Land Evaluation........................................................................................... 24 An annotated bibliography of land evaluation ................................................................. 26 Installing, Configuring and Running ALES ____________________________________________ 31 System requirements....................................................................................................... 31 Installation procedure ..................................................................................................... 32 Running ALES under a single-tasking operating system (DOS)...................................... 39 Running ALES under Multi-tasking Operating Systems ................................................. 42 Installing and running ALES on a Novell Local Area Network....................................... 45 Customizing ALES......................................................................................................... 47 Removing ALES from your computer system.................................................................. 51 Learning ALES____________________________________________________________________ 52 Tutorial 1 : Consulting a model ...................................................................................... 53 Tutorial 2 : entering data and running an evaluation....................................................... 65 Tutorial 3 : Building a Model ......................................................................................... 99 Tutorial 4 : Refining a model........................................................................................ 143 Tutorial 5 : ALIDRIS ................................................................................................... 175 Building ALES models _____________________________________________________________ 182 Outline of the model building process........................................................................... 182 Physical and economic evaluations ............................................................................... 183 Defining Land Utilization Types................................................................................... 188 Land characteristics...................................................................................................... 199 Modifying Land Characteristic definitions.................................................................... 204 Decision procedures...................................................................................................... 204 Multi-valued land data.................................................................................................. 210 Working with multiple datasets .................................................................................... 210 ALES and other computer systems___________________________________________________ 212 ALES as part of an Integrated Land Evaluation System ................................................ 212 Interfaces with relational databases: the ALES ⇔ xBase interface................................ 217 Interfaces with GIS....................................................................................................... 225 Interfaces with word processors .................................................................................... 233 Interfaces with spreadsheets.......................................................................................... 234 ALES Version 4.65 Users Manual Page i February 1997 Interfaces between ALES systems ................................................................................. 234 File Formats ................................................................................................................. 236 Maintaining an ALES system _______________________________________________________ 246 Program errors ............................................................................................................. 246 Backup ......................................................................................................................... 247 Working with MUMPS datasets.................................................................................... 251 Managing large ALES models and datasets .................................................................. 252 The MUMPS environment............................................................................................ 253 References _______________________________________________________________________ 257 Appendix 1 - ALES program structure _______________________________________________ 261 Appendix 2: ALES knowledge base schema ___________________________________________ 270 Appendix 3 - ALES program flow ___________________________________________________ 272 “Do you have the time, to listen to me whine, about NOTHING and EVERYTHING all at once?” - ‘Basket Case’, Green Day ALES Version 4.65 Users Manual Page ii February 1997 Introduction to the Manual Welcome to ALES (the Automated Land Evaluation System), Version 4.65. ALES is designed as a tool for professional land evaluators, and also for those who want to learn more about land evaluation. We hope that it will be useful for your land evaluation activities. Objectives of this manual This manual has several objectives: √ First, we want you to understand the objectives of the ALES project in the context of land evaluation as a professional discipline. √ Second, we want you to be able to install and maintain the ALES program on your computer. √ Third, we want you to be able to use ALES as a tool in your land evaluation activities. √ Fourth, we want you to be able to integrate ALES into your entire land evaluation computer system, which may include Geographic Information Systems, natural resources databases, word processors, spreadsheets, optimization and decision support software, as well as ALES. Please refer to the table of contents for the organization of this manual. How to use this manual We suggest that you use the manual as follows. √ Read the Chapters ‘Introduction to ALES’ and ‘Introduction to Land Evaluation’ to understand the basic principles of land evaluation, where ALES fits in the land evaluation process, and the different categories of ALES users. √ Install the ALES software on your computer according to the instructions of the Chapter ‘Installing, Configuring and Running ALES’. This Chapter also explains how to interact with ALES, and how to run ALES from either a single-tasking or multi-tasking Operating System. √ Complete Tutorials 1 through 4. At the same time that you are working on the third and fourth tutorials (which cover model building), consult relevant sections of the Chapter ‘Building ALES models’, which explains the principles of model design. √ If you plan to integrate ALES with other software, read the Chapter ‘ALES and other computer systems’. √ If want to interface ALES with the IDRISI Geographical Information System, follow Tutorial 5 and refer to the relevant sections of the Chapter ‘ALES and other computer systems’ √ The system administrator at your location should read the Chapter ‘Maintaining an ALES system’ as well as the more advanced sections of the Chapter ‘Installing, Configuring and Running ALES’. √ As you build your own evaluations, you should refer to the Chapter ‘Building ALES models’, which explains the various alternative strategies for mode building. ALES Version 4.65 Users Manual Page 1 February 1997 Acknowledgments David G. Rossiter was responsible for the requirements analysis and logical design of the system, as well as its implementation, including system design, coding, testing, and documentation. He wrote this manual and supervised its translation into the Spanish language. He also developed the sample evaluations on which Tutorials 1, 2, 4 and 5 are based. Versions 1, 2 and 4 of ALES were developed when he was employed by the Department of Soil, Crop, & Atmospheric Sciences at Cornell University. He wrote Version 3 and developed the ALIDRIS module as a private consultant. He has given training courses on ALES and land evaluation methods in Brazil, Colombia, Indonesia, Mexico, the Philippines, the USA, and Venezuela. He supervised the translation of ALES into the Spanish language, and translated the updated V4.65 texts into Spanish and French. Professor Armand Van Wambeke, head of the International Soils Group, conceived of the idea that land evaluation software for the microcomputer would be of great benefit to the soil survey and land evaluation community worldwide, and initiated the project that grew into ALES. All through the project, his insistence that the software apply to practical objectives guided many design decisions. He critically read drafts of the manuals and suggested many changes that made them much clearer. He has publicized the ALES project in the course of his travels to Africa, Europe, and Latin America. He supervised the translation of ALES into the French language. Professor Christian Schvartz, of the Institut Supérieur d’Agriculture of the University of Lille, France, translated into French all texts included in Version 3 of the ALES software as well as most of the Version 3 User’s Manual. Dr. Ngongo Luhembwe , of the University of Zaire, contributed to the French translation of the sections of the Version 3 User’s Manual: tutorial exercise and building ALES models. Ms. Isabelle Castel translated the updated program texts of Version 4.5 into French. Ing. Agr. Antonio Jiménez, of the Venezuelan Ministry of the Environment was mainly responsible for the Spanish translation of the program texts and manual. He also developed new tutorials for the Spanish-language version of ALES. The Venezuelan Ministry of the Environment (Ministerio del Ambiente y de los Recursos Naturales Renovables MARNR) granted Ingeniero Jiménez leave with pay and provided him with transportation to Ithaca, so that he might work on the Spanish translation of ALES. The Directors General responsible were Dr. Aníbal Rosales and Dr. Claudio Caponi. Dr. Eugenio Marcano of the Universidad Nacional ‘Pedro Henríquez Ureña’ (Dominican Republic) and Dr. Juan Rouanet of Chile carefully reviewed Version 4 of the Spanish-language User’s Manual. Mr. Marwan Hendrisman of the Centre for Soil & Agroclimate Research, Bogor, W. Java, Indonesia, was responsible for the translation of ALES into the Indonesian language. His work was supported in part by the ALES project and in part by the Second Land Resource Evaluation and Planning Project, Part C. Strengthening Soil Resources Mapping (LREP-II/C), Project Leader Erik R. Jordens. The first version of the Indonesian texts was prepared by Dipl. Ing. Ulrike Wood of LREP-II/C. ALES users Anthony Young (ICRAF), Andrew Johnson (Queensland Division of Primary Industries), Stephen Paris and Ulrike Wood (FAO), Henny van Lanen and Miriam Hack-ten Broeke (Staring Centre, Wageningen), Patrick van Laake (FAO Costa Rica) provided detailed comments about various versions of ALES; their comments were as much as possible incorporated into subsequent versions. Professor Norman Scott, formerly Director of Research for the New York State College of Agriculture and Life Sciences, encouraged the project and provided the legal support of the College, as well as start-up funds. ALES Version 4.65 Users Manual Page 2 February 1997 The Cornell Institute for International Food and Agricultural Development (CIIFAD) supported the development of Version 4 by David Rossiter, as well as the translation into Spanish of the V3 manual and the development of the Spanish-language tutorials by Jiménez. They supported ALES training workshops in the Philippines and Indonesia. Mr. Michael Tolomeo, formerly of the International Soils Group developed the tutorial evaluation that accompanied Version 1 and a substantial part of the version 1 ALES User’s Manual. Ms. Christine DeRoller, formerly of the International Soils Group, developed several sample evaluations in the course of her MSc. work on land evaluation in Guatemala. Tutorial example 3 is based on her work. She also served as a particularly keen critic of ALES Version 2’s functionality and user interface. She helped with the initial Spanish translation of the menus. Mr. Tom Fredricks, John Godfrey, and John Lewkowicz from Veterinary Computer Services of the New York State College of Veterinary Medicine served as occasional consultants on programming questions. Tom Fredricks also served as the technical backstop for ALES from April 1991 through August 1992. Professor Larry Geohring of the Department of Agricultural Engineering at Cornell provided cost figures for land drainage that were used in Tutorial 2. Mr.Tom Bowditch wrote the original version of the data entry matrix (Menu 1.3 Option A). Project Ezra, a cooperative project between Cornell University and the International Business Machines Corporation's “Advanced Education Projects” program, provided the IBM PC/AT system on which ALES V1 and V2 was developed. Ms. Mary Ellen Niederhofer of Cornell’s Department of Soil, Crop, & Atmospheric Sciences has served as ALES project coordinator since mid-1989. She is responsible for inquiries and sales. ALES Version 4.65 Users Manual Page 3 February 1997 Introduction to ALES This Chapter provides an overview of the ALES program and project, as well as the different people who use ALES and the results of ALES land evaluations. The ALES program The Automated Land Evaluation System, or ALES, is a computer program that allows land evaluators to build expert systems to evaluate land according to the method presented in the Food and Agriculture Organization “Framework for Land Evaluation” (FAO 1976). It is intended for use in project or regional scale land evaluation. The entities evaluated by ALES are map units, which may be defined either broadly (as in reconnaissance surveys and general feasibility studies) or narrowly (as in detailed resource surveys and farm-scale planning). Since each model is built by a different evaluator to satisfy local needs, there is no fixed list of land use requirements by which land uses are evaluated, and no fixed list of land characteristics from which land qualities are inferred. Instead, these lists are determined by the evaluator to suit local conditions and objectives. To reiterate the key points: Eval uator s bui l d the i r own e xpe rt sy st e m s wi th ALES, tak i ng i nto ac c ount l oc al c ondi ti ons and obje c ti ve s. ALES i s not by i tse l f an e xpe r t syste m, and doe s not i nc l ude by i tse l f any k nowl e dge about l and and l and use . ALES i s a fram e work wi thi n whi c h e val uator s c an e xpr e ss the i r own, l oc al , k nowl e dge . ALES has seven components: 1) a framework for a knowledge base describing proposed land uses, in both physical and economic terms; 2) a framework for a database describing the land areas to be evaluated; 3) an inference mechanism to relate these two, thereby computing the physical and economic suitability of a set of map units for a set of proposed land uses; 4) an explanation facility that allows model builders to understand and fine-tune their models; 5) a consultation mode that allows a casual user to query the system about one land use at a time; 6) a report generator (on-screen, to a printer, or to disk files); and 7) a import/export modules that allow data to be exchanged with external databases, geographic information systems, and spreadsheets. This includes the ALIDRIS interface to the IDRISI geographic information system. ALES is not a GIS and does not itself display maps. It can, however, analyze geographic land characteristics if map units are appropriate defined, and it can directly reclassify IDRISI or Arc/Info maps with the same mapping unit legend as the ALES database. ALES Version 4.65 Users Manual Page 4 February 1997 The following diagram provides an overview of the ALES program flow. See the Appendix for a detailed computation diagram. ALES Program Flow (Overview) Land Utilization Types Land Use Requirements Economic parameters Land Mapping Units & their Land Characteristics Knowledge Base Data Base Revise models Infer & Compute Why? Screens Land Mapping Units Land Utilization Types Evalution Results Matrix - Physical Suitability NPV, B/C Ratio, IRR Gross Margin Land Qualities Predicted Yields Input amounts Export Document Document Reports Geographical Information Systems Spreadsheets & Optimizers The program is highly interactive, and takes advantage of the PC video display and keyboard. It is designed to be self-explanatory, and leads the user through a series of menus, data entry forms, ‘Why?’ explanations, and dialogues, as well as context-sensitive help screens. Function keys control most operations. The program user can choose to interact with ALES in any human language to which the display text has been translated (currently French, Spanish and Indonesian, in addition to English). Special attention has been given to ALES Version 4.65 Users Manual Page 5 February 1997 the creation, editing, and display of decision trees, which are the way in which the evaluator express expert knowledge about the relation between land and land uses In addition, model builders can write their own notes (‘annotations’) that can be displayed by the model user to explain the model builder’s reasoning. ALES runs on the IBM PC microcomputer and its successors and on “PC-compatible” machines (i.e. those which are not made by IBM, but which function similarly), under the PC-DOS operating system (or, MS-DOS for compatibles), version 2.3 or later. It requires at least 384 Kb of primary (RAM) memory (preferably 640 Kb) and a minimum of 3.5 Mb of space on a hard disk. Either a color or monochrome monitor may be used. It runs under Microsoft Windows V3.1, V3.11, Windows for Workgroups, Windows 95, and IBM OS/2 V2.1 or later, as well as under PC-DOS or MS-DOS. ALES is written in the MUMPS programming language, and uses the DataTree MUMPS language and database system. Background of the ALES project ALES was written to meet certain specific needs in the international land evaluation community. In this section, we discuss the demand that led to ALES, then why ALES was built, and a little history of the ALES program itself. Demand for information There is today a high demand worldwide for information on the suitability of land for a wide range of land uses. This demand comes from farmers and other rural land users, farmer cooperatives, banks and other lending agencies, planning offices, government ministries, and rural and urban development officers. The intent of the individual land user is to optimize the use of their land. The intent of the agencies is to plan or recommend the uses of land in a rational and equitable way, using the techniques of land use planning, primarily for rural and semi-urban development (FAO 1994). Recommendations and plans must usually be made quickly, in response to actual needs and current conditions. Land use planning has as its basic purpose to ensure that each area of land will be used so as to provide maximum social benefits, especially including food production and human health, without excessive degradation of the land resource. Planning has two aspects: the political and the rational. The political process is necessary to initiate and carry out land use planning, to set its objectives, and to arbitrate among competing interests. The rational, or technical, part of planning ensures that plans are feasible, that cost and return estimates are accurate, and that sufficient data have been collected and collated to ensure these. While the political aspect of land use planning is outside the scope of the land evaluator, clearly the expert knowledge of the agronomist, the production agriculture specialist, and other rural land use specialists, must form the basis of correct land use planning in its technical aspect. There are many sources of knowledge about land and land use. Even in less developed countries, there is often adequate information, such as soil surveys, about land resources, and much of this information is of high quality. Also, there is often a lot of information about the relation between land and land use. Much of this information is local, acquired over years of experience by local agriculturists as well as farmers. Often there has been relevant work at local experiment stations, or in other areas with similar environments. Each of these sources of knowledge is expressed differently, published (or not) in diverse locations, and held by different people. Why ALES? The aim of ALES is to allow land evaluators to collate, systematize, and interpret this diverse information using the basic principles of the FAO’s “Framework for Land Evaluation”, and to present the interpreted information (i.e., the results of the land evaluation exercise) in a form that is directly useful to land use planners. Our method was to write a computer program to be used by land evaluators, with the results of the program to be presented to land use planners. The program is designed to allow contributions from all relevant sources of knowledge. ALES Version 4.65 Users Manual Page 6 February 1997 A further objective is to use the large quantity of information that has been recorded to date in soil surveys and other land resource inventories, much of which is sitting unused on office shelves. There are a variety of reasons for this disuse, primary of which is that the surveys are not interpreted for various land uses, and secondly that surveys have widely different definitions of map units and land characteristics. So a major design objective of ALES is to allow the use of land data in almost any format, as well as easy interchange of computer-readable data with national soils databases and similar repositories of land data. This work is especially intended for application in less developed countries, since the opportunities for planning are greater there than in the developed countries. Planning implies a willingness to change, and in countries with developed agriculture, change is usually at the farm level, not involving larger-scale planning. Further, the need for change in agriculture is greater in those countries that can not feed themselves, provide meaningful occupations to their rural populations, or generate sufficient exports to stimulate their economic development. However, ALES is certainly applicable to many problems in developed countries. Examples are defining prime farmland for agricultural land preservation laws or other rural zoning, arriving at assessments of agricultural potential for taxation or land valuation, and performing soil survey interpretations. These countries usually have well-established soils databases, from which data can easily be imported into ALES; conversely, results from ALES can easily be exported to programs that perform further computations such as land valuation. History of ALES The ALES project was the outgrowth of the interests of Professor Armand Van Wambeke of the International Soils Group at Cornell, to make soil survey and other natural resource inventory information more useful to those responsible for land use decisions. This followed several years of work in the International Soils Group on the adequacy of soil resource inventories (Forbes et al. 1982). The project was initiated in summer 1987 with the hiring of David Rossiter to design and implement an automated land evaluation software. The FAO land evaluation method, which is outlined in the next Chapter, seemed to provide a useful starting point, being based on many years of expert consultation. However, methods based on the FAO method involve many repetitive calculations or table lookups, and so are tedious if many alternatives are to be compared. Also, matching tables can not express all required interactions between land characteristics. Manual procedures, both for construction of matching tables or similar methods, and for calculation of suitability, are time-consuming and error prone. Hence an automated procedure seemed like a natural development, and indeed there had been a few previous efforts in this direction, most notably the LECS system in Indonesia (Wood & Dent 1983, Purnell 1987). However, this successful system was developed for a specific area of the world (Sumatra), for a specific set of land uses, at a specific scale, and it requires a specific set of data1. It also uses maximum-limitation tables as its main inference mechanism. ALES, by contrast, is applicable to any area and any set of land uses; of course the evaluator must build a model and database for each situation. ALES’s decision trees provide a more flexible inference mechanism than matching tables. We attempted make the FAO method more widely applicable by making it available as a microcomputer program to individual development projects. We also incorporated a definite method of economic land evaluation. Consistent with the ‘small is beautiful’ philosophy of the project, we hope that evaluators will be able to use locally-available knowledge and data in a flexible model framework. Finally, we tried to write a fun, easy-to-use computer program, which would make the task of developing, refining, and testing land evaluation models as enjoyable as possible. Since Version 1 of ALES was released in summer 1988, there have been many important advances, until today we have Version 4.65, released in December 1996. Some of these advances were our own ideas and some were 1Also, at the time ALES was being developed, LECS was only available on mainframe computers and was not interactive. Since then, LECS has been added to the FAO’s “Agricultural Planning Toolkit” computer program. ALES Version 4.65 Users Manual Page 7 February 1997 suggested by ALES users over the years. We have attempted to keep the original philosophy of ALES, while adapting to changing needs and technology. Who uses ALES? This section explains the roles of the different people who use ALES or its products. The basic flow of information is as follows: √ First, model builders construct and validate ALES models for the set of Land Utilization Types to be considered in the study, working with a group of land use experts. √ Second, model users enter land data and ask the program to compute evaluation results. √ Third, evaluation consumers use the results of the evaluation to make their land use decisions. They might also use ALES in consultation mode. √ All the while, the system administrator ensures that the computer system, including ALES, is working correctly. The following sections explain these roles in more detail. Model builder This is the person who constructs the expert system within the ALES framework. This person can be the land evaluation specialist, or a specialist in the use of ALES working with the land evaluation project team. There is no need for the model builder to be a computer programmer or systems analyst; however, familiarity with the principles of systems analysis will certainly be helpful. The model builder is often a natural resource scientist (e.g. soil scientist) charged with conducting a land evaluation. Since no scientist is expert in every field, the model builder must build a team of land use experts to help make the decision decisions as models are built. Since these experts will not be versed in ALES terminology nor land evaluation methods, the model builder must translate the expert judgments into a form which ALES can use (e.g., decision trees). The model builder should be meeting with the eventual evaluation consumers from the very beginning of the project, to set objectives and priorities. Model builders enter ALES with the DOS batch (command) file ALES1. Entering the program in this mode, they are able to change the model, as well as the database. During validation of the model they spend a great deal of time working in the ‘Why?’ screens. They will probably print reports showing the structure of the evaluation models. Land use experts These are the specialists in different land uses who are interviewed by the model builder to determine the land utilization types to be included in the model, the land use requirements of these, and the set of land characteristics that are needed to evaluate land qualities. They may be agronomists, foresters, soil scientists, hydrologists, economists, sociologists, climatologists etc. 1Tutorials 3 and 4 explain how to use ALES in this mode. ALES Version 4.65 Users Manual Page 8 February 1997 Land use experts are not expected to use ALES directly, but they should review the models on-line with the aid of the model builder. Model user Once a model is completed, the model builder can turn it over to the model user, who enters land unit definitions and data for all the land units in the study area, using the data entry templates designed by the model builder. The model user then asks ALES to compute the evaluation for all land uses and all land areas, and asks for printed reports of the results. The model user is typically either a high-level clerk or a junior-level natural resource scientist. Model users enter ALES with the DOS batch (command) file EVALUATE1. Entering the program in this mode, they are not able to change the model, only the database and economic parameters such as prices and interest rates. Model users will probably print reports of evaluation results and the land unit database. Evaluation consumer The results of the evaluation are presented to the consumers. These include land use planners, farmers, farm advisors, in fact, anyone who has can make decisions which affect land use, and who has the means to carry out those decisions. For an evaluation exercise to be successful, it is critical that the potential consumers of the evaluation be involved from the beginning. They are the ones to set the priorities and objectives of the evaluation. Evaluation consumers are not expected to use ALES directly, but the model builder should be prepared to demonstrate the program, including the ‘Why?’ screens, to the consumers, so that they can see how the models were constructed. An interesting use of ALES is consultation mode. This is like a visit to the doctor: the program asks for values of each relevant land characteristic in turn, until it has enough information to determine the suitability of the land unit for a Land Utilization Type. To consult ALES, enter with the DOS batch (command) file CONSULT.2 In this mode, users can not change the model or economic parameters. However, they can record the values of the land characteristics that they entered during the consultation in a map unit in the database for later use, either in this mode or with the EVALUATE batch (command) file. System administrator This person works with the operating system, performs backups, adds and configures new hardware and programs, and so forth. The system administrator is responsible for installing and maintaining ALES. They may also be called on to interface ALES with other systems. The system administrator enters ALES with the DOS batch (command) file ALES, and may also use the DOS batch (command) file UTIL to maintain the MUMPS system.. 1Tutorial 2 explains how to use ALES in this mode. 2Tutorial 1 explains how to use ALES in this mode. ALES Version 4.65 Users Manual Page 9 February 1997 ALES Version 4.65 Users Manual Page 10 February 1997 Introduction to Land Evaluation This chapter introduces the concepts of land evaluation, and how they are realized in the ALES software. What is land evaluation? The result of a land evaluation is a prediction of the use potential of land for several actual or proposed land-use systems. In other words, land evaluation predicts how each land area would behave if it were used according to each of these systems. Its main purpose is to inform the process of allocation of land uses to land areas by individuals, collectives, or governments. As such, it is a tool for strategic decision making. A complementary purpose of land evaluation is to describe the limitations to land use, and based on these, appropriate management methods. Land evaluation can be an important method in support of rural development and planning worldwide. The success of the FAO framework (FAO 1976) and subsequent guidelines for application in diverse types of land uses and land areas (FAO 1983, FAO 1984, FAO 1985, FAO 1991, Siderius 1986) is an encouraging development. The following paragraph provides a brief review of the specialized terminology of land evaluation. For more information, the reader is encouraged to read the lecture notes of Rossiter (1994), the textbook of Dent & Young (1981), the review article of van Diepen et al. (1991), or one of the cited FAO bulletins. √ Land evaluation may be defined as ‘the process of assessment of land performance when used for specified purposes’ (FAO 1984). As such, it attempts to predict the behavior of each land unit for each actual and proposed land use. √ In a land evaluation exercise, the land use planner matches land areas, called Land Mapping Units (LMU) with land uses, called Land Utilization Types (LUT), to determine the relative suitability of each land area for each land use. √ Land Utilization Types are specified by a set of Land-Use Requirements (LUR), which are ‘the conditions of land necessary for the successful and sustained practice of [a given LUT]’ (FAO 1984). For example, a land-use including rainfed crops might include a LUR for ‘water for crop growth’. √ Land units are defined by the values of a set of Land Characteristics (LC), which are simple attributes of land that can be measured or estimated in routine survey. In the FAO approach, Land Characteristic values are usually combined into levels of Land Qualities (LQ), which are complex attributes of land which influence the suitability of land in a semi-independent manner. These are matched with the LUR one-by-one. Notice that Land Use Requirements express the demands of a land use, whereas Land Qualities express the supply, i.e., what a particular land area can offer. The distinction is partially semantic but mostly depends on one’s point of view. For example, a crop demands an adequate water supply: this is a LUR. On the other hand, a particular land unit can supply a certain amount of water: this is a LQ. In ALES, the model builder express the LUT in terms of its LUR’s, and the system computes the relevant LQ’s based on the land unit data. The suitability of each Land Mapping Unit for each Land Utilization Type is computed by: 1. Determining (measuring or estimating) the actual Land Characteristic values for the land unit, by field survey, laboratory measurements, remote sensing, etc.; 2. Combining these Land Characteristic values into Land Quality values (i.e., inferring the LQ from the set of LC’s); ALES Version 4.65 Users Manual Page 11 February 1997 3. Matching the Land Quality values with Land Use Requirements; 4. Combining these Land Quality values into land suitability classes (i.e., inferring the suitability from the set of LQ’s). There are two kinds of land suitability: √ Physical suitability, which expresses the degree to which the sustained implementation of the LUT on a certain land unit is feasible without unacceptable risk to the human or natural community; and √ Economic suitability, which is based on a calculation of the economic return which may be expected if the LUT in question is implemented on the land unit. The FAO methodology has three levels of detail: √ At the highest level is the Framework, which is the methodology with no content. ALES is an automated realization of the framework. √ At the middle level are specific Guidelines, which provide suggestions for content. √ At the lowest level is each separate evaluation, which incorporates parts of one or more Guidelines as well as local modifications. Traditions of land evaluation There are two main currents of land evaluation practice. The first follows the FAO Framework for Land Evaluation and subsequent guidelines. The FAO Framework itself developed from earlier land capability approaches that emphasize relatively permanent limitations to land use. In this tradition, overall land suitability of a specific land area for a specific land use is evaluated from a set of more-or-less independent land qualities , which may each limit the land-use potential. These evaluations almost always classify map units of natural resource inventories, such as the legend categories of a soil survey, into suitability subclasses, based on the number and severity of limitations to land use. ALES was developed within this tradition. The second tradition is more modern and depends intrinsically on mathematics and computation. It is usually called ‘quantified land evaluation’ (Beek et al. 1987; Bouma and Bregt 1989; Wagenet and Bouma 1993), and attempts to quantify some indicator of land suitability over an entire spatial field, which is usually divided into ‘small’ grid cells (as opposed to map units). Examples of indicators are predicted crop yield (Dumanski and Onofrei 1989) or individual land qualities such as pesticide leaching (Hack-ten Broeke et al. 1993). Empiricalstatistical models, system simulation models, geographical information systems, and geostatistical techniques are widely used in these land evaluations. Over the years, ALES has acquired some relation to this tradition: in particular, the use of formulas and the interfaces to GIS. ALES has been used as a preliminary step in quantified land evaluations, to provide a first-cut estimate of suitability, so that attention may be focused on the more promising alternatives (e.g., van Lanen et al. 1992). A third current in land evaluation practice, unfortunately not yet a tradition, is economic land evaluation (Johnson, Cramb et al. 1994; Rossiter 1995; Johnson and Cramb 1996), sometimes leading to attempts at optimal land allocation (Keyzer 1992). ALES is designed since V2 to provide various indicators of micro-economic land suitability. ALES Version 4.65 Users Manual Page 12 February 1997 Outline of the land evaluation process The land evaluation process is not only concerned with building ALES models. One overall structure can be seen in the following diagram. ALES is only involved in steps (7), through (11). (1) Identify Decision Makers, Objectives, & Means of Implementation (2) Define the spatial entities to be evaluated (3) Define the Land Utilization Types to be evaluated (4) Define the LUTs in terms of their Land Use Requirements (6) Identify data sources & survey if possible/necessary (5) Define the LURs in terms of their diagnostic Land Characteristics (7) Enter tabular data and maps for the LCs (8) Build (computer) models for land evaluation (9) Compute the evaluation (10) Calibrate the results (11) Present the results to the users (12) Assist with project implementation ALES Version 4.65 Users Manual Page 13 February 1997 Stakeholder, client, evaluator, experts These are the five types of actors in the land evaluation process: Stakeholder: all parties who will be affected by the results of the planning decisions taken on the basis of the land evaluation. Client: the person(s) or organization(s) that request the work and will act on the basis of its results. Evaluator: the person who carries out the land evaluation. An evaluator must understand concepts and methodology, and be able to use the computerized tools as necessary. The evaluator acts as an intermediary between users and experts. This person (presumably you, the reader) actually uses ALES. Land-use expert: a person who has information about a land use or land quality, in relation to the land, for example, soil scientists, agronomists, economists, and extension agents. Land resource expert: a person who has information on the land resource, for example, soil surveyors, climatologists, and census takers. The structure of an ALES evaluation In ALES, each evaluation consists of a set of Land Utilization Types (LUT), i.e. proposed land uses, and a set of Land Mapping Units (LMU), i.e. land areas being considered. Each map unit is evaluated for its suitability for each land utilization type, resulting in a suitability matrix. The overall ALES program flow is shown in a diagram in the previous Chapter. There are two kinds of suitability in the FAO system: physical and economic; ALES can evaluate for both, as explained in the following sections. Physical evaluation A physical suitability evaluation indicates the degree of suitability for a land use, without respect to economic conditions. It emphasizes the relatively permanent aspects of suitability, such as climate and soil conditions, rather than changeable ones, such as prices. It tends to concentrate on risks or hazards, e.g., to the environment, or absolute limitations, e.g., due to climate, of undertaking a given land utilization type on a given land area. The idea is that if a use is too risky or physically impossible, no economic analysis can justify it. In ALES, if a land unit is rated physically unsuitable (in the highest-numbered physical suitability class), it will not be evaluated economically; it is automatically in FAO suitability class ‘N2’ (permanently unsuitable under the assumptions of the LUT). For land that is not completely unsuitable, a physical evaluation can be used to divide the land into degrees of suitability, based purely on physical conditions. The advantage is that physical suitability doesn't change quickly. The disadvantages are: (1) land use decisions are very often based on economic considerations; (2) it is unclear, in the absence of an economic scale, how to determine degrees of suitability; (3) it is unclear, in the absence of an economic scale, how to compare two land utilization types. A physical evaluation can also be used to divide the land units into management groups. In this case, the physical suitability subclass designation shows the relative severity of the various limitations to use, and their type. For example, the subclass ‘3e/c’ might indicate that the rated land unit has moderate limitations (‘3’) for the rated land use, with the main limitations being due to erosion hazard (‘e’) and climate (‘c’). ALES Version 4.65 Users Manual Page 14 February 1997 Measures of economic suitability ALES is intended to provide the land use planner with a realistic estimate of the economic suitability of each land unit for each proposed land use. Economic suitability may be evaluated by several economic metrics (measures of value), including: (1) the predicted gross margin (GM), based on predicted variable costs and returns, in units of currency per hectare-year, over the lifetime of the project, without considering the time value of money, and without considering fixed costs of the economic unit (e.g., the farm); (2) the Net Present Value (NPV) of a LUT, in units of currency per hectare, over the lifetime of a project, called the planning horizon; (3) the Benefit/Cost Ratio (B/CR), based on the present values of cash in and out, in a dimensionless ratio (<1 : costs outweigh benefits, =1 : costs exactly equal benefits; >1 : benefits outweigh costs); (4) the Internal Rate of Return (IRR), based on the cash flows, in units of currency per hectare; Except for the gross margin, these all depend on the discount rate, which is the interest rate to be applied to future cash flows. In a commercial non-inflationary environment, this is the rate at which money may be borrowed. In an inflationary environment, if it is assumed that costs and prices will rise together with inflation, the discount rate can be set equal to the commercial interest rate, less the inflation rate (the so-called adjusted discount rate). For project analysis, the discount rate is often set to a lower value than the commercial interest rate, to reflect the social value of the project (a so-called social discount rate). Each of these metrics have their uses. 1. The gross margin is appropriate for LUT’s that do not involve any land improvements, with a one-year or shortterm rotation planning horizon. The gross margin is not susceptible to errors due to incorrect assumptions about the discount rate. LUTs with different planning horizons can be compared with this measure, since it is expressed on a per-year basis. The comments of Dent & Young (p. 177 in FAO 1983) are relevant here: “Because of the assumptions involved in discounted cash flow analysis, it is better to use gross margins as a basis for land suitability classification where possible, namely, where land improvements are not important or not costly in relation to annual production... Where capital investment is involved, it is still preferable to conduct the land evaluation initially in terms of repayment capacity, as gross margin and net income on an annual basis. This relatively firm figure can later be subjected to the less objective process of discounting.” Another way to use the gross margin is to divide it by the discount rate, thereby obtaining the capitalized value of the LUT. This metric is often used as a first approximation for the land’s intrinsic value, for land uses with a steady-state cash flow (i.e., no capital improvements). 2. The Net Present Value is the present value of all the cash flows predicted over the life of the LUT, i.e., each year’s cash flow discounted to the present. The NPV is, in theory1, equivalent to the selling price of a unit area of land that is used for the proposed LUT, since the land user would in theory be indifferent to realizing the LUT or receiving the NPV now and investing it. An important caution about the NPV is that it is only valid to 1Not taking into account social values regarding the desireability of owning land, nor any speculation about the future value of the land. ALES Version 4.65 Users Manual Page 15 February 1997 compare NPV’s for LUT’s with the same planning horizon: given equal NPV’s but different planning horizons, the LUT with the shorter planning horizon would be preferred, because the value of the land is realized sooner. 3. The Benefit/cost ratio expresses the NPV in terms of the leverage of each unit of currency invested. The higher the B/CR, the more return is expected for each unit of currency invested. Also, the higher the B/CR, the less risky the LUT, because a lower-than-expected benefit, or higher-than-expected cost, will still leave the BC/R greater than one. Many industries and lending agencies have guidelines for acceptable BC/R’s, e.g. that they be greater than 3. 4. The Internal Rate of Return is the discount rate below which the LUT has a positive NPV. If interest rates are higher, the project will lose money over its lifetime; if lower, it will make money. The IRR can also be used to express the risk of a LUT: the higher IRR is less risky, because faced with an unexpected rise in discount rate, the LUT with a high IRR will still be profitable. This measure is time-neutral, so can be used to compare LUT’s with different planning horizons. Economic land evaluation with ALES In an ALES model, Land Utilization Types may have any number of outputs, with any number of crops of each output over the planning horizon. Inputs are allocated to specific years within the plan, or may be related to the level of production of any output.. ALES can analyze rotations, multiple cropping systems, and intercrops. Outputs can have negative value (price), so that, for example, loss of topsoil could be reflected in the economic calculation. Environmental degradation outside the project area or other externalities can be treated in the same manner. Costs are of three types: 1. Inherent in the implementation of the LUT, called S1 costs in ALES; 2. Only incurred on certain land units that have limitations, i.e. non-optimum levels of land qualities, called additional costs in ALES, and 3. Related to the level of production, called production-dependent costs in ALES. Examples of these three types of costs are: (1) standard cultural practices such as plowing, planting, fertilizing, weeding etc. if they are carried out on all land that is used for the LUT; (2) additional lime needed to bring acid soils up to the proper reaction for a crop: note that this input is not be needed on naturally neutral soils, so the cost is only incurred on non-optimum land1; (3) manual labor for harvesting, which depends on the amount harvested, not the land area dedicated to the crop. ALES economic analysis generally does not include fixed costs of the economic unit (e.g., the farm), because these do not depend on the land area the farm. However, if a LUT is assumed to have a typical size, the fixed costs can be divided by this size and then included as a per-hectare S1 cost for the LUT. In this case, ALES’ ‘gross margin’ is really a ‘net (of fixed costs) margin’. The model builder may relate costs of production to land use requirements as follows: an increasing level of limitation (i.e., higher severity level of the corresponding land quality) can result in an increased cost of production (the additional costs mentioned in the previous ¶), a decreased yield, or both. Costs of production may be recurrent (termed annual costs in ALES) or in a specific year within the plan. 1 Note that the LUT description must specify that the farmer is aware of this difference (in lime requirement) between different land units, and will treat each land unit according to its need. ALES Version 4.65 Users Manual Page 16 February 1997 Costs are expressed by listing the number of units of inputs that are required; prices are maintained in a separate table. Thus if the price of an input or product changes, the entire cost of production can be recomputed. With the ease with which ALES computes yields and economic returns, the supposed disadvantage of economic evaluation, namely that economic conditions change quickly, evaporates. Within a few minutes, an ALES user can enter new economic parameters into a model, recompute an evaluation, and print the new results. Suitability classes Although ALES expresses its economic results in exact monetary amounts, the FAO Framework defines two suitability orders (S and N) and five suitability classes (S1, S2, S3, N1 and N2). For consistency with the Framework, ALES allows the exact economic results to be classified into four economic suitability classes: S1, S2, S3 and N1, separately for each of the four economic metrics (Menu 1.2.3 Options 2 - 5). As in the FAO Framework, class N2 is reserved for land that is physically unsuitable. In ALES this means land that is in the highest-numbered physical suitability class. Land in this class is not even analyzed in economic terms, because it has already been assigned to suitability class N2. Highlights of the ALES approach to land evaluation This section explains some of the more important features and limitations of the ALES implementation of the FAO Framework. ALES usually evaluates map units An important limitation of ALES is that is does not have any georeferencing capability and does not itself produce maps1, so that analyses can not easily take into account proximity or adjacency requirements. ALES usually makes statements about map units, i.e. sets of delineations on a map, and assumes that the properties of all delineations with the same name are identical, within the precision of the map unit description. Since the delineations of a map unit have diverse locations, it is rarely possible to assign a value to a geographic Land Characteristic. Map units in ALES are typically ‘natural’ units defined by a soil, climate, geomorphic or physiographic natural resources inventory. Geographical Information Systems (Burrough 1986) are ideal tools for spatial analysis, and the results of ALES analyses may easily be used as data layers in these systems; see the Chapter ‘ALES and other computer systems’ for more information. However, it is possible to use ALES to evaluate individual delineations or management units that have a specific location. It is also possible to define spatial Land Characteristics e.g., distance to market, adjacency to a protected area etc. and spatial Land Use Requirements, e.g., adjacency, and use these in decision trees. Since ALES has no map input or output, the data values for these LC’s would have to be obtained from maps or a GIS and entered in the ALES database by hand.2 ALES usually uses classified data In ALES, the entities that are used as the basis from which evaluation models are built (i.e. Land Characteristics) are most conveniently treated as classified data. That is, data values are from a small finite set of possibilities. 1See the Chapter ‘ALES and other computer systems’ for how to produce IDRISI and Arc/Info maps directly from ALES. 2If these values can be computed in a GIS and written as an xBase-format database or an ASCII table, ALES can import them (Menu 1.8 Option 3, Menu 1.3 Option 5). ALES Version 4.65 Users Manual Page 17 February 1997 These can either be ordinal (with an underlying continuous scale), e.g. for slope classes, or nominal (with no underlying ordering), e.g. for classes of soil texture. ALES also allows the model builder to define continuous Land Characteristics, that is, those whose data values are from an infinite set of possibilities in some range of the real numbers. An example is slope expressed in percent or degrees, as opposed to slope classes. ALES requires that these values be converted into analogous classified data values, by defining so-called commensurate land characteristics (i.e., with the same underlying scale of measurement), before land qualities can be determined. The ALES model builder must reason with classified data when building decision trees. There are several reasons for using classified data as the basis for models. Most important is that ALES is evaluating land areas, not single points, so that a single value on a continuous scale is not as meaningful as a class. Ordinal classes represent a range in which most of the variability in a map unit is presumed to fall. Nominal data, of course, has no continuous analog. If the ALES model builder wants to combine continuous land characteristic values into a composite value with some well-established formula (e.g. a soil loss equation or a regression model), this is allowed in ALES: a continuous land characteristic may be derived by a formula from a set of other continuous land characteristics (Menu 1.1.4c Option 3). The derived characteristic can be used in other formulas or directly converted to a classified LC for use in decision trees. ALES usually uses decision trees to express inferences The way in which the ALES model builder reasons with classified data is to build decision trees. These are hierarchical multi-way keys in which the leaves are results such as Land Quality single-factor ratings (severity levels), and the interior nodes (branch points) of the tree are decision criteria such as Land Characteristic values. These trees are constructed by the model builder, and traversed during the computation of an evaluation result, using actual land data, for each map unit to be evaluated. Figure 3.1 shows a simple decision tree, using the logic of Sánchez et al. (1982),which would allow ALES to determine the value of the land quality ‘potential for P-fixation by iron’ from the land characteristics (1) ratio of free Fe2O3 to clay in the topsoil, (2) percentage of clay in the topsoil, (3) hue of the topsoil matrix, and (4) topsoil structure. Note that ALES decision trees allow missing data to be replaced by other criteria, should the tree builder determine this is appropriate. In ALES, decision trees are used to determine: 1. Factor levels (called severity levels in ALES) of Land Qualities, from values of Land Characteristics (Menu 1.2.7 Option 4); 2. Expected proportional yields of outputs, from values of Land Qualities1 (Menu 1.2.6 Option 2); 3. Physical suitability subclasses, from values of Land Qualities2 (Menu 1.2.8 Option 1); and 1Proportional yield can also be determined by limiting or multiplicative yield factors, see the Chapter ‘Building ALES models’. 2Physical suitability subclasses can also be determined by the maximum-limitation method, see the Chapter ‘Building ALES models’. ALES Version 4.65 Users Manual Page 18 February 1997 Figure 3.1 A decision tree to determine whether there is a likelihood of high P-fixation by iron (after Sanchez et al. 1982) » ratio of free Fe2O3 to clay in the topsoil [< 0.15] — LOW P-FIXATION [_ 0.15] » percentage of clay in the topsoil [<35%] — LOW P-FIXATION [_35%] — HIGH P-FIXATION [Unknown] » hue of the topsoil matrix [R, 2.5YR, 5YR, 7.5YR] » topsoil structure [granular] — HIGH P-FIXATION [other] — LOW P-FIXATION [10YR, Y, G, B] — LOW P-FIXATION [Unknown] » hue of the topsoil matrix [R, 2.5YR, 5YR, 7.5YR] » topsoil structure [granular] —HIGH P-FIXATION [other] — LOW P-FIXATION [10YR, Y, G, B] — LOW P-FIXATION Discriminant entities are introduced by ‘»’ and underlined. Values of the entities are [boxed]. The level in the tree is indicated by the leader characters, ‘--’. Result values are introduced by ‘—’ and written in SMALL CAPITALS. 4. Values of classified Land Characteristics, from a set of other classified Land Characteristics1 (Menu 1.1.4 Option 4). Decision trees have several advantages as a method of expressing inferences. First, the model builder and user both have an explicit representation of the process used to reach a decision. Trees may be traced by hand or with the aid of ALES’ ‘Why?’ screens, so that the model user can see exactly how ALES reached a decision, which of course is based on the model builder’s logic. If many factors must be considered, decision trees may become cumbersome, since they grow exponentially with the number of factors. ALES therefore allows the use of multiplicative (proportional) and limiting yield factors, and the maximum limitation method for physical suitability, in addition to decision trees, in appropriate circumstances. In addition, the evaluator may introduce intermediate (inferred) Land Characteristics in order to break down one tree into several smaller components. ALES estimates yield as an optimum, which is reduced on less-than-optimum land ALES does not itself estimate yields by dynamic simulation modeling or empirical statistical modeling. Instead, the land evaluator uses historical records, models, or expert judgment to set an optimum yield of each output of each Land Utilization Type, and also specifies how that optimum yield is to be reduced on less-than-optimal land, either by means of multiplicative or limiting yield factors for Land Qualities that can affect yield (Menu 1.2.7 Option 5 & 6 or Menu 1.2.6 Option 3 & 4), or by means of a proportional yield decision tree of Land Qualities (Menu 1.2.6 Option 2). The setting of these yield factors or the construction of the yield decision tree is the most critical aspect of economic land evaluation with ALES. 1The use of dervied land characteristics is optional. ALES Version 4.65 Users Manual Page 19 February 1997 Example : Papua New Guinea Land Evaluation System As an example of a specific ALES evaluation, consider the model built by the Papua New Guinea Department of Agriculture in consultation with the FAO (Venema & Daink 1992). Its purpose was to evaluate the physical suitability of a wide variety of annual and semi-perennial species for smallholder rainfed agriculture, for a large part of the country at semi-detailed scale. Before looking at a specific ALES model, you must be very clear on this fact: Eac h ALES mode l i s bui l t i nde pe nde ntl y. The l i sts of Land Uti l i z ati on Type s, the i r Land Use Re qui r e me nts, the database and di agnosti c Land Char ac te r i sti c s, the map uni ts, and the de c i si on pr oc e dur e s we r e de si gne d by the l and e val uator to me e t the obje c ti ve s of a spe c i fi c c l i e nt i n a spe c i fi c pl anni ng e xe r c i se , and may we l l have nothi ng to do wi th the obje c ti ve s, c l i e nt, pl anni ng e xe r c i se , k nowl e dge sour c e s, database s e tc . i n anothe r e xe r c i se . The land evaluators defined the following 23 Land Utilization Types as a species plus a technology level, which is an appropriate level of generalization for an evaluation at this scale: +-------------------- Land Utilization Types ------------------------+ ¦ cardamom-lo° Elettaria cardamum, low capital input ¦ ¦ cashew-lo° Anacardium occidentale, low capital input ¦ ¦ chilli-lo° Capsicum frutescens, low capital input ¦ ¦ citrus-lo° Citrus spp, low capital input ¦ ¦ cocoa-hi° Theobroma cacao, medium to high capital input ¦ ¦ cocoa-lo° Theobroma cacao, low capital input ¦ ¦ coconut-lo° Cocus nucifera, low capital input ¦ ¦coffee(arab)-hi° Coffea arabica, medium to high capital input ¦ ¦coffee(arab)-lo° Coffea arabica, low capital input ¦ ¦ coffee(rob)-hi° Coffea canephora, medium to high capital input ¦ ¦ coffee(rob)-lo° Coffea canephora, low capital input ¦ ¦ maize-hi° Zea mays, high capital input ¦ ¦ mango-lo° Mangifera indica, low capital input ¦ ¦ oilpalm-hi° Elaeis guineensis, medium to high capital input ¦ ¦ oilpalm-lo° Elaeis guineensis, low capital input ¦ ¦ pepper-lo° Piper nigrum, low capital input ¦ ¦ pineapple-lo° Ananas comosus, low capital input ¦ ¦ potato-hi° Solanum tuberosum, medium to high capital input ¦ ¦ pyrethrum-lo° Chrysanthemum cinerariaefolium, low capital input ¦ ¦ rice upland-hi° Oryza sativa (upland), medium to high cap. input ¦ ¦ rubber-hi° Hevea brasiliensis, medium to high capital input ¦ ¦ rubber-lo° Hevea brasiliensis, low capital input ¦ ¦ vanilla-lo° Vanilla spp, low capital input ¦ +--------------------------------------------------------------------+ Each Land Utilization Type was defined by a set of Land Use Requirements. For example: +- Land Use Requirements for LUT 'rice upland-hi' -+ ¦c * temperature ¦ ¦e * erosion hazard ¦ ¦m * moisture conditions ¦ ¦r * rooting conditions ¦ ¦t * nutrient availability/retention capacity ¦ ¦w * oxygen availability (wetness) ¦ ¦x * soil toxicities (FeS2, CaCO3) ¦ ¦z * excess of salts (salinity, sodicity) ¦ +--------------------------------------------------+ ALES Version 4.65 Users Manual Page 20 February 1997 In this model, as in the original FAO Framework, each LUR of each LUT is measured in four severity levels: no limitation, slight limitation, moderate limitation, and severe limitation. (ALES is quite a bit more flexible in this regard) The database schema consists of the following diagnostic Land Characteristics: +----------------- Land characteristics ----------------------+ ¦altitude altitude / mean maximum and minimum temperature ¦ ¦anionfix anion fixation ¦ ¦ availp available phosphorus 2/3(0-25cm) + 1/3(25-100cm) ¦ ¦ awc1 available water holding capacity (0-25 cm) ¦ ¦ awc2 available water holding capacity (0-50 cm) ¦ ¦ awc3 available water holding capacity (0-100 cm) ¦ ¦ bs base saturation 2/3 (0-25 cm) + 1/3 (25-100 cm) ¦ ¦ cec cation exchange capacity (0-25 cm) ¦ ¦ deficit rainfall deficit ¦ ¦ depth effective soil depth ¦ ¦drainage soil drainage ¦ ¦erodibil soil erodibility ¦ ¦ exchk exchangeable potassium ¦ ¦landform landform ¦ ¦ minres mineral reserve (25-100 cm) ¦ ¦nitrogen total nitrogen (0-25 cm) ¦ ¦ ph soil reaction 2/3(0-25 cm) + 1/3(25-100 cm) ¦ ¦rainfall mean annual rainfall ¦ ¦ relief relief ¦ ¦salinity salinity ¦ ¦seasonal seasonal variability of monthly rainfall ¦ ¦ slope1 dominant slope ¦ ¦ slope2 sub-dominant slope ¦ ¦ soils soil classification (great group, Soil Taxonomy) ¦ ¦ stoni surface stoniness and rockiness ¦ ¦texture1 topsoil texture (0-25 cm) ¦ ¦texture2 subsoil texture (25-100 cm) ¦ +-------------------------------------------------------------+ Each of these is measured in classes, which are defined according to the available survey information. For example, + Class names for Land Characteristic 'landform' + ¦ 1. (1) : mangrove swamps ¦ ¦ 2. (2) : estuarine plains and deltas ¦ ¦ 3. (3) : beach ridge complexes ¦ ¦ 4. (4) : undifferentiated coastal plain ¦ ¦ 5. (12) : narrow alluvial floodplains ¦ ¦ 6. (13) : composite alluvial plains ¦ ¦ 7. (15) : meander floodplains ¦ ¦ 8. (18) : composite levee plains ¦ ¦ 9. (21) : back plains ¦ ¦10. (22) : back swamps ¦ ¦11. (23) : blocked valley swamps ¦ ¦12. (24) : undifferentiated swamps ¦ ¦13. (25) : braided floodplains ¦ ¦14. (26) : composite bar plain ¦ ¦15. (35) : volcano-alluvial plains ¦ ¦16. (0) : landforms other than class 1-15 ¦ +------------------------------------------------+ ALES Version 4.65 Users Manual Page 21 February 1997 The database itself consists of a list of the map units to be evaluated, along with the values of each land characteristic in the database schema1: +---- Land Mapping Units ---------+ ¦ 3,001,1 CENTRAL,RMU001,SOIL1 ¦ ¦ 3,001,2 CENTRAL,RMU001,SOIL2 ¦ ¦ 3,001,3 CENTRAL,RMU001,SOIL3 ¦ ¦ 3,002,1 CENTRAL,RMU002,SOIL1 ¦ ¦ 3,002,2 CENTRAL,RMU002,SOIL2 ¦ ¦ 3,002,3 CENTRAL,RMU002,SOIL3 ¦ +---------------------------------+ Each map unit has its data values, for example: Land Mapping Unit Data for '3,001,1 CENTRAL,RMU001,SOIL1' -------------------------------------------------------LC code data altitude 2 (600-1200m, 30-27 max, 19-16 min) anionfix 1 (no problem) awc1 4 (low) [3-5] awc2 3 (moderate) [5-10] awc3 2 (high) [10-15] bs 2 (moderate) [20-60] cec 1 (high) [25-100] deficit 3 (infrequent, slight deficit) depth 1 (deep) [100-200] drainage 1 (well) erodibil 3 (moderate) landform 0 (landforms other than class 1-15) minres 2 (moderate) nitrogen 2 (moderate) [.2-.5] ph 2 (acid, pH 5-6) rainfall 3 [2500-3000] relief 5 (very high) [300-1000] salinity 1 (none) [0-4] seasonal 3 (100- >200mm (moderate range)) slope1 5 [20-30] slope2 6 [30-90] soils 0 (soils other than class 1-6) stoni 1 (not stony/rocky) [0-1] texture1 2 (medium) texture2 2 (medium) 1 In the actual model there are 953 mapping units, derived from resource mapping units and subdivided into soil types. ALES Version 4.65 Users Manual Page 22 February 1997 The evaluators constructed decision trees to infer each Land Quality from its set of diagnostic Land Characteristics. In the following example, nutrient availability for high-input upland rice is inferred from soil reaction, cation exchange capacity, topsoil texture, and anion fixation. Land Utilization Type: rice upland-hi Land Use Requirement: ‘t’:* nutrient availability/retention capacity Severity Level decision tree > ph (soil reaction 2/3(0-25 cm) + 1/3(25-100 cm)) 1 (weakly acid to neutral, pH 6-7) > cec (cation exch capacity (0-25 cm)) 3 (low) [0-10 me/100 g soil] > texture1 (topsoil texture (0-25 cm)) 1 (coarse).............. : *3 [low] 2 (medium).............. : *2 [moderate] 3 (fine but friable & blocky) : =2 (medium) 4 (very fine (massive)). : =2 (medium) 5 (peats)............... : =2 (medium) 6 (rock)................ : =1 (coarse) 2 (moderate) [10-25 me/100 g soil] > anionfix (anion fixation) 1 (none)................ : *1 [high] 2 (moderate)............ : =1 (none) 3 (high)................ : *2 [moderate] 1 (high) [25-100 me/100 : =2 (moderate) 2 (acid, pH 5-6)........ : =1 (weakly acid to neutral) 3 (strongly acid, pH <5) > cec (cation exchange capacity (0-25 cm)) 3 (low) [0-10 me/100 g s : *3 [low] 2 (moderate) [10-25 me/1 : *2 [moderate] 1 (high) [25-100 me/100 : =2 (moderate) 4 (alkaline, pH 7-8).... : =3 (strongly acid) 5 (strongly alkaline, pH > 8) : *3 [low] Key: * > = a decision a land characteristic same as another branch Once the model was set up and the database constructed, ALES was asked to compute Land Quality values, and then combine these into overall physical suitability. The results is an evaluation matrix, of which the following is only a small part: Central Province, smallholder rainfed farming Physical Suitability Subclass Land Utilization Types Map units cardamon-lo cashew-lo chilli-lo citrus-lo cocoa-hi 3e 3e/m 3e 3e 4e 3,001,1 4w 4w 4w 4w 4w 3,007,1 4e/r 4e/r 4e/r 4e/r 4c/e/r 3,010,2 2e/n 3m 2e/n 2e/n 3c 3,013,2 3c/e 3c/e/m 3c/e 3c/e/n 4c 3,025,3 We can see from this matrix that the physical suitability varies over the landscape and for different land uses. For example, map unit ‘3,013,2’ is suitable (class 2) for cardamom, chili, and citrus but only marginally suitable for cashew and cocoa. For land use ‘citrus’ we have no highly suitable, one suitable, two marginally suitable, and two unsuitable map units. There are different reasons for the suitability rating. For example, map unit’3,007,1’ is not suitable for citrus because of excess wetness (‘w’), whereas map unit ‘3,010,2’ is not suitable because of high erosion risk (‘e’) and poor rooting conditions (‘r’). The evaluator can follow a series of ‘Why?’ screens to see how ALES arrived at each part of the result. ALES Version 4.65 Users Manual Page 23 February 1997 Glossary of Land Evaluation Classified value: one measured on a discrete scale. If the value is numeric, it is placed into a range which corresponds to the class.. Client: A person or organization that requests the work and will act on the basis of its results. Also called the user of the land evaluation results. Commensurate Land Characteristics: two or more LCs that have the same units of measurement. Continuous value: one measured on a continuous scale, with arbitrary precision. Decision tree: a hierarchical multi-way key, leading via a series of questions at the nodes of the tree to a decision at its leaves. Delineation (on a map): the undivided portion of a map sheet inside a continuous boundary line, and outside any contained continuous boundary line, if any. Economic land evaluation: an evaluation of suitability based on some economic measure of net benefits, should a given LUT be implemented on a given land area. Evaluations: specific evaluation exercises. Evaluator: A person who carries out the land evaluation. Framework: how to carry out an evaluation exercise. Geographical Information System (GIS): a computer system for the entry, editing, storage, transformation, analysis, and presentation of geographic data. Guidelines (directives): what factors (land qualities) to consider when evaluating for certain general kinds of land uses, how to evaluate these qualities. Land : an area of the earth’s surface, the characteristics of which embrace all reasonably stable, or predictably cyclic, attributes of the biosphere vertically above and below this area, including those of the atmosphere, the soil and underlying geology, the hydrology, the plant and animal populations, and the results of past and present human activity, to the extent that these attributes exert a significant influence on present and future uses of the land by humans. Land Characteristic (LC): a simple attribute of the land that can be directly measured or estimated in routine survey in any operational sense, including by remote sensing and census as well as by natural resource inventory. Cf. land quality. Land Quality (LQ): a complex attribute of land which acts in a manner distinct from the actions of other land qualities in its influence on the suitability of land for a specified kind of use; the ability of the land to fulfill specific requirements for a LUT. Cf. land characteristic. Land Quality class: see ‘severity level’. Land resource expert: a person who has information on the land resource Land Suitability: the fitness of a given type of land for a specified kind of land use. ALES Version 4.65 Users Manual Page 24 February 1997 Land-use expert: a person who has information about a land use or land quality, in relation to the land. Land Use Requirement (LUR): a condition of the land necessary for successful and sustained implementation of a specific Land Utilization Type Land Utilization Type (LUT): A kind of land use described or defined in a degree of detail greater than that of a major kind of land use. In the context of irrigated agriculture, a land utilization type refers to a crop, crop combination or cropping system with specified irrigation and management methods in a defined technical and socio-economic setting. In the context of rainfed agriculture, a land utilization type refers to a crop, crop combination or cropping system with a specified technical and socio-economic setting. A land utilization type in forestry consists of a technical specifications in a given physical, economic and social setting Major Kind of Land Use: A major subdivision of rural land use, such as rainfed agriculture, irrigated agriculture, grassland, forestry, recreation, annual crops, perennial crops, swamp rice cultivation, forest plantation, or natural forests. Map unit: a set of map delineations designated by a single name, and representing a single legend category. Minimum decision area: the size of the individual land areas for which decisions are to be made. Minimum legible delineation (MLD) of a map: the minimum legible size of a polygon on a map at a given scale, conventionally taken to be 0.4cm² on the map. Nominal value: a classified value whose scale of measurement is not ordered (cf. ordinal value), i.e., the order of the classes is arbitrary and therefore not meaningful. Optimum legible delineation (OLD) of a map: the minimum easily-legible size of a polygon on a map at a given scale, conventionally taken to be 4 times the minimum legible delineation (MLD) of 0.4cm², i.e. 1.6cm² on the map. Ordinal value: a classified value whose scale of measurement is ordered (cf. nominal value), i.e., the order of the classes is meaningful. Physical land evaluation: an evaluation based only on physical factors that determine whether a LUT can be implemented on a land area, and the nature and severity of physical limitations or hazards. Scale factor of a map: ratio of distance on the ground to distance on the map. The denominator of the conventional representation of map scale. For example, on a 1:50 000 map, the scale factor is 50,000, so that 1cm on the map represents 50,000cm on the ground, i.e. 500m. Severity level of a Land Quality: a classification of the LQ, indicating the degree of limitation or hazard associated with the LQ on a particular land area, from Level 1 = no limitation, upwards to some maximum. Stakeholders: all parties who will be affected by the results of the planning decisions taken on the basis of the land evaluation. Suitability: see land suitability. ALES Version 4.65 Users Manual Page 25 February 1997 Suitability classes: Divisions of suitability orders that indicate the degree of suitability, not simply suitable vs. not suitable. Suitability orders: Land is either suitable or not suitable for a LUT. Suitability subclasses: Divisions of suitability classes which indicate not only the degree of suitability but also the nature of the limitations that make the land less than completely suitable. Suitability units: Divisions of suitability subclasses, which have different management requirements. An annotated bibliography of land evaluation This is a brief list of texts and reference works on land evaluation. The material presented in these is sufficient to understand the FAO framework, its applications to various land uses, and its relation to other methods of land evaluation. For more background information on land evaluation, see the Cornell Land Evaluation Home Pages on the Internet at http://wwwscas.cit.cornell.edu/landeval/landeval.htm Texts Bridges, E. M. and Donald A. Davidson (eds.) (1982) “Principles and applications of soil geography”. Longman, London. An advanced British undergraduate text, with excellent summary chapters on soil survey, soil classification, automated data handling, agricultural and urban uses of soils information. Good bibliographies. Burrough, Peter A. (1986) “Principles of geographical information systems for land resources assessment”. Oxford Science Publishers, Monographs on Soil and Resources Survey No. 12, Clarendon Press, Oxford. An introduction to GIS for natural resources scientists, with some land evaluation examples. Dense but worthwhile. Davidson, Donald A. (1992). “The evaluation of land resources”. Longman Scientific, London. An advanced British undergraduate text on applications of soils information to planning. Excellent introduction to the literature. Update of the 1980 text “Soils and land use planning”. Mentions ALES in passing. Dent, David, and Anthony Young (1981). “Soil survey and land evaluation”. George Allen & Unwin. An advanced British undergraduate text, probably the best introduction to the subjects named in the title. Hudson, Norman (1995) “Soil conservation”, 3rd edition. Ames, IA: Iowa State University Press. This practical text on soil conservation has a good chapter on the land capability approach to land evaluation. Many examples are from Africa. McRae, S.G. & Burnham, C.P . (1981). “Land evaluation”. Monographs on soil survey, Oxford: Clarendon Press. viii, 239 pp. A comprehensive survey of physical land evaluation methods, including parametric systems and land capability classifications, in a wide variety of countries. Rossiter, D.G. (1994) “Lecture notes: Land evaluation”. SCAS Teaching Series T94-1, Department of Soil, Crop & Atmospheric Sciences, Cornell University, Ithaca NY USA. Lecture notes from a graduate-level course in land evaluation methods. Available on the Internet at http://wwwscas.cit.cornell.edu/landeval/le_notes/lecnot.htm ALES Version 4.65 Users Manual Page 26 February 1997 Sys, C., Van Ranst, E. & Debaveye, J. (1991) “Land evaluation, Part 1 : Principles in land evaluation and crop production calculations”; “Part 2 : Methods in land evaluation”. Agricultural Publications 7, General Administration for Development Cooperation, Brussels. This is the text used in the University of Ghent’s training course for professional soil scientists. Sys, C., Van Ranst, E., Debaveye, J. & Beernaert, F. (1993) “Land evaluation, Part 3 : Crop requirements”. Part 3 of the Ghent land evaluation training course. Agricultural Publications 7, General Administration for Development Cooperation, Brussels. These are the only publication where extensive crop requirement tables have been collected. Use with caution! These should be validated in each study area and for each Land Utilization Type. Primary sources Beatty, Marvin T., Petersen, Gary W., & Swindale, Leslie D. (eds.) (1979) “Planning the uses and management of land”, Agronomy Monograph 21, American Society of Agronomy, Madison, WI, USA. Large (1027 page) collection of articles on land use planning from the perspective of natural resource scientists. Emphasis on practical problems of land use in the USA. Beek, Klaas Jan (1978) “Land evaluation for agricultural development”. International Inst. for Land Reclamation and Improvement, Wageningen, publication 23. Subtitled “Some explorations of land-use systems analysis with particular reference to Latin America”. This is Beek's doctoral thesis, and is quite wide-ranging. Davidson, Donald A. (ed.) (1986) “Land evaluation”. Van Nostrand Reinhold/AVI. A collection of original influential papers on land evaluation. EUROCONSULT (1989). “Agricultural Compendium for rural development in the tropics and subtropics.” Amsterdam: Elsevier. This extremely useful compendium contains a good chapter on land classification methods, as well as a good introduction to economic & financial land evaluation. FAO Soil resources development and conservation service (1976) “A framework for land evaluation”. FAO Soils Bulletin 32, FAO, Rome. The original statement of the “FAO Framework”, this has been superseded by better and more comprehensive explanations in the later soils bulletins on the subject. FAO Soil resources development and conservation service (1983) “Guidelines: land evaluation for rainfed agriculture”. FAO Soils Bulletin 52, FAO, Rome. Specific guidelines for evaluating land for rainfed agriculture, based on the FAO framework. FAO (1984) “Land evaluation for forestry” FAO Forestry Paper 48, FAO, Rome. Specific guidelines for evaluating land for forestry, based on the FAO framework. FAO Soil resources development and conservation service (1985) “Guidelines: land evaluation for irrigated agriculture”. FAO Soils Bulletin 55, FAO, Rome. Specific guidelines for evaluating land for irrigated agriculture, based on the FAO framework. FAO Soil resources development and conservation service (1991) “Guidelines: land evaluation for extensive grazing”. FAO Soils Bulletin 58, FAO, Rome. Specific guidelines for evaluating land for extensive grazing, based on the FAO framework. FAO (1993) “Guidelines for land-use planning”. FAO Development Series 1 FAO, Rome, Italy. A short, wellillustrated booklet on rural land-use planning methodology, incorporating the FAO Framework for Land Evaluation as part of the planning process. ALES Version 4.65 Users Manual Page 27 February 1997 Klingebiel, A. A., & P. H. Montgomery, P.H. (1961) “Land capability classification”. USDA Agriculture. Handbook 210, Washington, DC. The source document for the land capability approach. Short and wellstated. Landon, J. R. (Ed.). (1984). “Booker tropical soil manual : a handbook for soil survey and agricultural land evaluation in the tropics and subtropics.” New York: Longman. A practical approach to land evaluation from the practicing soil surveyor’s point of view. Siderius, W. (ed.) (1986) “Land evaluation for land-use planning and conservation in sloping areas”. International Inst. for Land Reclamation and Improvement, Wageningen, publication 40. Specific guidelines for evaluating land in sloping areas, based on the FAO framework. U.S. Department of the Interior, Bureau of Reclamation (1951). “Irrigated land use, Part 2: Land classification.” Washington: U.S. Government Printing Office. The source document for the USBR land suitability classification for irrigation. Land evaluation theory van Diepen, C. A., Van Keulen, H., Wolf, J., & Berkhout, J. A. A. (1991). “Land evaluation: from intuition to quantification”. In: B. A. Stewart (Eds.), Advances In Soil Science (pp. 139-204). New York: Springer. A critical review of land evaluation concepts. Rossiter, D. G. (1996). A theoretical framework for land evaluation (with Discussion). Geoderma 72, 165-202. An attempt to classify land evaluation techniques. Includes an interesting discussion on the status and future of land evaluation. Rossiter, D. G. (1995). Economic land evaluation: why and how. Soil Use & Management 11, 132-140. Similar to the discussion of economic land evaluation in this manual, but in a wider context (i.e., not specific to ALES). Quantified Land Evaluation Three international symposiums have been held on these theme. The proceedings have been published: Beek, K. J., Burrough, P. A., and McCormack, D.E. (Eds.) (1987) . “Quantified land evaluation procedures: Proceedings of the international workshop on quantified land evaluation procedures held in Washington, DC 27 April - 2 May 1986”. International Institute for Aerospace Survey and Earth Sciences (ITC) Publication No. 6. Enschede, the Netherlands, ITC. This contains van Wambeke’s paper “Thinking small is beautiful in land evaluation”, which was the original philisophical basis of ALES. Bouma, J. and Bregt, A. K. (Eds). (1989). “Land qualities in space and time. Proceedings of a symposium organized by the International Society of Soil Science (ISSS), Wageningen, the Netherlands 22-26 August 1988”. Wageningen: Pudoc. Highly recommended. Wagenet, R. J. and Bouma, J. (Eds.) (1993). “Operational methods to characterize soil behavior in space and time”. Geoderma Vol. 60 Nos. 1-4. Amsterdam, Elsevier. ALES applications Delsert, E. (1993) “Quelles possibilites pour l'utilisation du logiciel ALES dans le contexte de l'agriculture française? : Application a l'évaluation des potentialités du blé en Lorraine.” Ing. Agr., Institut Supérieur d'Agriculture, Université Catholique de Lille. Application of ALES to wheat growing in the Lorraine region of France. ALES Version 4.65 Users Manual Page 28 February 1997 Johnson, A. K. L., & Cramb, R. A. (1991). “Development of a simulation-based land evaluation system using crop modeling, expert systems and risk analysis.” Soil Use & Management, 7(4), 239-245. They use ALES along with a linear program and the @RISK Monte Carlo simulation driver to assess land suitability for sugar cane in Queensland. van Lanen, H. A. J., Hack-ten Broeke, M. J. D. , Bouma, J., & de Groot, W.J.M. (1992). “A mixed qualitative/quantitative physical land evaluation methodology”. Geoderma 55: 37-54. A good example of using the right tool for each job: ALES for a semi-quantitative rapid assessment of problem areas, then a simulation model for more detailed assessment in critical areas. van Lanen, H. A. J. & Wopereis, H.. (1992). “Computer-captured expert knowledge to evaluate possibilities for injection of slurry from animal manure in the Netherlands”. Geoderma 54: 107-124. More from the Staring Centre team. van Lanen, H. A. J., van Diepen, C. A., Reinds, G. J., & De Koning, G. H. J. (1992). “A comparison of qualitative and quantitative physical land evaluations, using an assessment of the potential for sugar beet growth in the European Community.” Soil Use & Management, 8(2), 80-89. León Pérez, J. C. (1992). “Aplicación del Sistema Automatizado para la Evaluación de Tierras (ALES), en un sector de la cuenca del río Sinú (Córdoba, Colombia)”. Revista C.I.A.F. 13(1): 19-42. A physical suitability evaluation for a variety of tropical land uses in a semi-arid river basin. Results were transferred to the ILWIS GIS for spatial analysis and map display. Work of the “Augustín Codazzi” Geographical Institute of Colombia. Venema, J. H., & Daink, F. (1992). “Papua New Guinea Land Evaluation Systems (PNGLES).” Port Moresby: Papua New Guinea Department of Agriculture and Livestock. A comprehensive application of ALES for physical land evaluation at the country scale. Availability The FAO bulletins are available from the FAO publications representatives in each country. In the USA this is: UNIPUB, 4611-F Assembly Drive, Lanham MD 20706-4391, phone (301)-459-7666. Call them for stock numbers, prices, and availability. Some stock numbers are: Soils Bulletin 52: F2649, Soils Bulletin 55: F2798. FAO has publications representatives in many countries, typically a bookseller in the capital. For a list of the representatives in each country, and a current list of the publications in-print, request the “FAO publications catalog” from: Distribution and Sales section, FAO, Via delle Terme di Caracalla, 00100 Rome, Italy. They also have a Web site: http://www.fao.org/. UNIPUB is also the US representative for the ILRI publications. ILRI 23 is out of print. The 3-volume Sys land evaluation text can be obtained from: ABOS, Marsveldplein 5, bus 57, B-1050 Brussel, Belgium. The Rossiter land evaluation course notes can be obtained for the costs of reproduction from the Department of Soil, Crop & Atmospheric Sciences, 10th floor Bradfield Hall, Cornell University, Ithaca NY 14853-1901 USA, and can be downloaded from the Internet at ftp://ftp.cit.cornell.edu/pub/special/ALES/notes. The Oxford, George Allen & Unwin, VNR, Cornell, Iowa State, Elsevier, and Longmans texts are available through commercial booksellers. Agronomy Monograph 21 is available from: American Society of Agronomy, 677 S. Segoe Rd., Madison, WI 53711 USA. ALES Version 4.65 Users Manual Page 29 February 1997 ALES Version 4.65 Users Manual Page 30 February 1997 Installing, Configuring and Running ALES This chapter explains how to install, configure, and run the ALES program on your computer system. It has been updated for the newest version (DTM-PC/4.3M) of DataTree MUMPS, which requires a special PaperKey Certificate for installation, as explained below. The first section explains what kind of computer hardware and software you need in order to be able to install and run ALES. The second section explains how to install ALES. We assume that you understand the basics of your operating system (e.g. MS-DOS) and how to switch between disk drives, move in the directory structure, and use the keyboard. For some installation options you must know how to use a plain-text editor, such as the MS-DOS Editor or the MS-Windows Notepad. The third section explains how to run ALES under a single-tasking operating system (DOS). The fourth section explains how to run ALES under the multi-tasking operating systems DesqView, Microsoft Windows 3.1 and Windows 95, and OS/2. The fifth section explains how to install and run ALES on a Novell network. The sixth section explains how to customize ALES : language, screen colors, additional serial or parallel devices, and multiple groups of models. Finally, we explain how to remove ALES from a computer system. System requirements CPU (microprocessor): ALES will run on any processor of the Intel 8086 family (i.e., the processors found in the IBM PC/XT and its successors and compatibles) or functionally-equivalent processors (e.g., from Cyrix or AMD). For reasonable performance we recommend at least a 12MHz 80286. No special features of the 80386, 80486, or Pentium processors are used by ALES even if these chips are present. Co-processor: A math co-processor is not required nor used even if installed. Conventional (DOS) memory: ALES requires a minimum 384Kbytes of free RAM, but will run faster with more free memory up to the DOS limit of 640Kb, since the MUMPS system will use the extra space for more disk buffers. Expanded and extended memory: ALES does not need nor use these types of memory. Hard disk: ALES runs only on hard-disk systems. It uses a minimum 3.5Mb of hard-disk space as installed for the MUMPS system, the ALES program and support files, and a database sufficient for about five evaluations. As additional evaluations are added, hard disk space is increased by 0.5Mb at each expansion. A fast hard disk and/or a disk-caching program which uses extended or expanded memory (e.g., Microsoft’s SmartDrive) can dramatically speed up ALES. Diskettes: ALES uses diskettes for installation, and to save and restore models and databases. ALES Version 4.65 Users Manual Page 31 February 1997 Video: ALES writes to the monochrome (MDA or Hercules) or color (CGA or better) video screen, depending on which is selected in DOS. A graphics adapter (video card) is not required to run ALES, which uses only text mode video. If a color graphics adapter is installed, ALES can display its windows in various user-selected color schemes. Printer: A printer is not required to run ALES, only to obtain printed results. ALES does not use any special printer features, so any text printer can be used. Pointing device: ALES does not respond to a mouse or other pointing device. Operating system: ALES requires a computer capable of running one of the Microsoft operating systems MS-DOS or PC-DOS, V2.3 or higher, or another operating system that emulates MS-DOS either directly (e.g., DR-DOS) or in a ‘compatibility’ mode (e.g., OS/2 or the ‘vpix’ program running on Unix/386). Multitasking operating systems: ALES can run under several popular multitasking operating systems, such as OS/2 2.1 or OS/2 3 and 4 (“Warp”), DesqView V2.3 and MS-Windows V3.1, V3.11 (“Windows for Workgroups”), and Windows 95, but it is not written to take advantage of them (i.e. it does not use their windowing systems or multitasking). MUMPS language and database system: ALES is written in the MUMPS programming language (Lewkowicz 1988), and requires Version 4 of the DataTree MUMPS language (‘DTM-PC’) and database system (DataTree Inc., 1986) in order to run. Version 4.3 of DataTree MUMPS is supplied with ALES licenses after October 1992. With your ALES license you have also purchased a license from InterSystems Corp., who purchased DataTree in 1993, for the use of their MUMPS system. The Paper Key certificate explains this license. Since you purchased DataTree MUMPS through Cornell University, any questions about MUMPS or DataTree should be directed to the ALES project, not to InterSystems Corp. Installation procedure There are two main steps to the distribution: (1) install the DTM-PC language and database system, and then (2) install the ALES program. In addition, if you are going to run ALES under the multi-tasking operating systems Windows 3.1x, Windows 95, OS/2, or DesqView, there is a third step: (3) adjust ALES for your multi-tasking operating system. ALES is distributed on two diskettes (3.5" or 5.25" according to customer preference), and comes with a special hPaperKey Certificate which is necessary to install MUMPS. √ The first diskette is supplied by InterSystems, and contains DataTree MUMPS (‘DTM-PC’) and the MUMPS installation program, which you use to install MUMPS on your computer system. √ The second diskette is supplied by Cornell, and contains the ALES program as well as the ALES installation script (a batch file), which you use to install ALES, once the MUMPS system has been installed. The installation diskettes are write-protected; after installation you should keep them in a safe place, because you may need them again in a few months or years if you have a catastrophic hard disk failure and need to re-install ALES. You may also want to make a backup copy of the distribution set of diskettes, which will save you the trouble of having to write us for a replacement, should the original set be lost or damaged. Keep your PaperKey ALES Version 4.65 Users Manual Page 32 February 1997 certificate along with the distribution disks because you will need it if you ever re-install or move your ALES program to another computer or directory. Keep your distribution disks and PaperKey certificate in a safe place You must first decide where you want to install ALES in your hard disk directory structure. It is recommended that you install ALES in sub-directory \DTM on hard disk drive C:, as the installation procedure is designed for this special case. If you do this, the installation procedure will be very easy. If you elect to install on a different hard disk or in a different sub-directory, you will have to perform some additional steps (explained below) not included in the standard installation procedure before starting ALES for the first time. It is fairly easy to install ALES on a different drive from C: and/or on any path whose last directory is DTM. It is more difficult, but not impossible, to install ALES to a path whose last (lowest-level) directory is not DTM. Both of these cases are explained below. Step 1: Installing DataTree MUMPS Before you can install ALES, you must install DataTree MUMPS as follows. 1. Insert the DataTree distribution disk in a diskette drive. 2. At the DOS prompt, change to that drive (usually ‘A:’ or ‘B:’) so that it is the active drive, by typing the drive letter followed by a colon (for example ‘A:’) and pressing the Enter key. 3. At the DOS prompt for the diskette drive (typically ‘A:>’ or ‘B:>’ depending on which diskette you selected), type the command ‘install’ and press the Enter key. a:\>install 4. Follow the instructions on the screen, answering the questions as follows: √ In the first screen, press Enter to continue. √ In the second screen, accept the default (checked) option to install DTM-PC standalone (i.e., not on a network), by pressing Enter. √ In the third screen, answer N when you are asked if you wish to load some DataTree source code files. √ In the fourth screen, answer Y to continue with the installation. √ In the fifth screen, select the hard disk drive where MUMPS (and later ALES) should be installed. This should have about 3Mb (3,145,728) free space as a minimum. If possible, use drive C:. √ In the sixth screen, specify the path. If possible, accept the suggested path C:\DTM without changes. If you must change the path, if possible make sure that the final directory name in the path is DTM, for example ‘\MODELS\LECS\DTM’. ALES Version 4.65 Users Manual Page 33 February 1997 If you really insist on installing MUMPS and ALES to a path that does not end with ‘DTM’, you will have to edit the installation script INSTALL.BAT on the ALES distribution disk accordingly, changing all occurrences of ‘DTM’ to the directory name of your choice, before continuing with the installation of ALES. √ Ignore the message on the final installation screen that tells you how to use DTM-PC in programmer mode. Press Enter to complete the installation of MUMPS. Step 2: Installing ALES Once you have installed DataTree MUMPS, you are ready to install ALES. 1. Insert the ALES distribution disk in a diskette drive. 2. Change the DOS prompt to that drive, e.g., by typing a: at the DOS prompt. 3. Run the command install with one argument: the drive (and possibly the path) where you installed MUMPS, not including the final (lowest-level) directory name ‘DTM’. So, If you installed MUMPS to C:\DTM as recommended above, you would simply type: a:\>install c: If you installed MUMPS to a drive and/or path other than ‘C:\DTM’, enter the drive and path not including the final ‘\DTM’. For example, if you installed MUMPS to drive D:, directory \MODELS\LECS\DTM, you would issue the command: a:\>install d:\models\lecs As another example, if you installed MUMPS to drive D:, directory \DTM, you would issue the command: a:\>install d: If there is a problem during the installation, the script will tell you what went wrong. If you have installed MUMPS and ALES in directory ‘\DTM’ on hard disk drive ‘C:’, you should skip the rest of this section. If you did not install MUMPS and ALES in directory \dtm on hard disk drive C, you will have to make some changes to the MUMPS database description file, MUMPS.DBD, which was installed in the main sub-directory (‘...\DTM’) of the MUMPS program, before you can run ALES. As distributed, this file is essentially as follows: ALES Version 4.65 Users Manual Page 34 February 1997 ;ALES V4.6/DTM V4.3 MUMPS.DBD - Database description file as distributed ; with ALES V4.6 ; ;Last update: DGR 06-Dec-94 ; ;datasets ; ;program object code DATASET C:\DTM\ALES5\ALES5-RT ;program support files, except text DATASET C:\DTM\ALES5\ALES5-GB ;text databases (1 per language) DATASET C:\DTM\ALES5\LTX5E-GB DATASET C:\DTM\ALES5\LTX5F-GB DATASET C:\DTM\ALES5\LTX5S-GB DATASET C:\DTM\ALES5\LTX5I-GB ;ALES user evaluations DATASET C:\DTM\EVAL\EVAL-GBL ;namespaces ;program NSPACE ALES: ALES5-RT, ALES5-GB MAP ^Ltxt("f") TO MAP ^Ltxt("s") TO MAP ^Ltxt("i") TO ;users NSPACE EVAL: ALES5-RT, EVAL-GBL MAP ^Lform TO MAP ^Lmenu TO MAP ^Ltxt TO MAP ^Ltxt("f") TO MAP ^Ltxt("s") TO MAP ^Ltxt("i") TO MAP ^Lconfig("version") TO MAP ^Lconfig("mode") TO MAP ^Lstate TO MAP ^Lvideo TO END LTX5F-GB LTX5S-GB LTX5I-GB ALES5-GB ALES5-GB LTX5E-GB LTX5F-GB LTX5S-GB LTX5I-GB ALES5-GB ALES5-GB ALES5-GB ALES5-GB Edit this file with any pure text editor (one that doesn‘t insert hidden formatting codes), such as the MS-DOS editor or EDLIN, or with a word processor in ‘text-only’ mode. Find the lines that begin with the word ‘DATASET’. Change the disk and path name prefix in these lines (which as distributed is ‘C:\’, i.e. the root directory of disk ‘C:’) to the drive and directory where you actually installed ALES. Make sure to edit the first comment line (beginning with the semicolon ‘;’) to indicate your changes. Don’t alter any other lines. For example, if you elect to install ALES in directory ‘\MODELS\LECS\DTM’ on hard disk ‘D:’, the database description file would look like this: ALES Version 4.65 Users Manual Page 35 February 1997 ;ALES V4/DTM V4.3 Database definition - for PC/AT-386#3 ;edited by xyz, 30-Jan-1997 ; ;datasets ;program object code DATASET D:\MODELS\LECS\DTM\ALES5\ALES5-RT ;program support files, except text DATASET D:\MODELS\LECS\DTM\ALES5\ALES5-GB ;text databases (1 per language) DATASET D:\MODELS\LECS\DTM\ALES5\LTX5E-GB DATASET D:\MODELS\LECS\DTM\ALES5\LTX5F-GB DATASET D:\MODELS\LECS\DTM\ALES5\LTX5S-GB DATASET D:\MODELS\LECS\DTM\ALES5\LTX5I-GB ;ALES user evaluations DATASET D:\MODELS\LECS\DTM\EVAL\EVAL-GBL ... the rest of the file is not changed END Step 3: Adjust ALES to run under a multi-tasking OS If you are going to run ALES under Windows 3.1x, Windows 95, or OS/2, see the section ‘Running ALES under Multi-tasking Operating Systems’, below. In particular, you must adjust the batch files which start ALES if you are using Windows 95. Running ALES for the first time The first time you start DataTree MUMPS or any program that uses it (such as ALES) after installating DataTree MUMPS, you have to enter your special PaperKey code. The Paper Key is your proof of ownership of a license from DataTree (for MUMPS) as well as Cornell (for ALES). Y ou must e nte r your spe c i al Pape r K e y c ode the f i rst t i me you star t ALES or DataTr e e M UM PS. Locate your paper key, which is part of your license document from DataTree. Connect to the directory where you installed MUMPS and ALES, and type the command: ALES and press the ENTER key. You will see the message: Please enter the license registration information exactly as shown on your PaperKey Certificate: KEY: Ente r the Pape r K e y c ode e xac t l y as i t appe ars on the Pape r K e y for m, i nc l udi ng punc t uat i on and spac e s. This code looks something like 6000-001 E0594 U1 J4 L1 X3 V708230. Note that the code for your license will definitely be different from this example. ALES Version 4.65 Users Manual Page 36 February 1997 If you enter the key correctly, MUMPS will next prompt you for the supplier name. Enter this as it appears on the paper key certificate. This is usually CORNELL UNIVERSITY SCAS. Ente r the Suppl i e r Name e xac t l y as i t appe ars on the Pape r K e y for m, i nc l udi ng punc t uat i on and spac e s, and uppe r or l owe r c ase l e tte r s as shown. If you enter the supplier name correctly, MUMPS will next prompt you for the end user name. Enter this as it appears on the paper key certificate. This is usually your organization name. Ente r your O r gani z ati on Name e xac t l y as i t appe ars on the Pape r K e y for m, i nc l udi ng punc t uat i on and spac e s, and uppe r or l owe r c ase l e tte r s as shown. If you enter all three items correctly, ALES will start. The first time ALES starts up slowly, as it is expanding some of its data structures. NOTE for those with older PCs (early XT’s and clones): For MUMPS to run, the correct date and time must be known to the operating system. On later-model computers (since about 1986), or those with an add-in board containing a real-time clock, this is done automatically at system startup. On older PC’s, or on machines will malfunctioning clocks, you must enter the date and time when prompted by the operating system at system startup. If the operating system thinks that the current date is earlier than the creation date of the MUMPS program, MUMPS can not run, and you will see the message ‘license expired’ when you try to start ALES. Installing the ALIDRIS samples The ALIDRIS program itself comes as a module already compiled into ALES1. It requires no installation. In addition, there are some sample IDRISI files which work with the ALES tutorials that you may want to install. These are found in the self-extracting archive ALIDRIS.EXE on the ALES distribution diskette: alidris.exe testim4.img testim4.doc testa4.val testa4.dvl testim3.img testim3.doc testa3.val tutor5.img tutor5.doc ;self-extracting compressed file containing these files ;test image file for ALIDRIS Options 1, 2 (IDRISI ;documentation file for testim4 ;test attribute value file for ALIDRIS Options 3, ;documentation file for testa4 ;test image file for ALIDRIS Options 1, 2 (IDRISI ;documentation file for testim3 ;test attribute value file for ALIDRIS Options 3, ;image for ALES tutorial 5 ;documentation file for tutor5 V4) 4 (IDRISI V4) V3) 4 (IDRISI V3) To unpack these files, (1) copy ALIDRIS.EXE to a data directory (maybe the directory where you installed ALES, e.g. C:\DTM), and then (2) extract the sample files by running the command ALIDRIS; this will create all the files listed above. Then you can delete ALIDRIS.EXE. The image TUTOR5 is used in the fifth Tutorial. The other test files work with ALES model ‘Tutor2’ (the second Tutorial). 1 For more information on ALIDRIS and IDRISI, see section ‘ALIDRIS’ in the Chapter ‘ALES and other computer systems’. ALES Version 4.65 Users Manual Page 37 February 1997 If you want to experiment with ALIDRIS using the test files, uncompress them as explained above, and make sure that the IDRISI environment points to that directory (use the IDRISI ENVIRON command, if necessary). If necessary, load evaluation model ‘Tutor2’ (Tutorial 2) into ALES, using F8 at the list of models. The file ‘TUTOR2.ALS’, supplied on one of your ALES distribution disks, contains this model. In ALES, select model ‘Tutor2’. You can test ALIDRIS Options 1 and 3 right away, as these take Land Characteristics from the dat base. If you want to test Options 2 and 4, you will first have to compute an evaluation (Menu 1.4 ‘Evaluations’ Option 1 ‘Compute an evaluation’). Moving ALES to another location If you move ALES to another computer system (for example, a newer computer or a computer at another office) or to another disk or directory on the same system (for example, to rearrange the files on your hard disk), you will have to re-enter the PaperKey information the next time you start ALES or MUMPS. You don’t have to go through the whole installation procedure, you can copy MUMPS and ALES with the DOS ‘XCOPY’ command, or with a file manager such as XTree, or with the DOS ‘BACKUP’ and ‘RESTORE’ commands, but MUMPS and ALES won’t run in the new location until you re-enter the PaperKey information. Eac h c opy of DataTr e e M UM PS and ALES i s l i c e nse d for use on one c ompute r syste m at a ti me . Y ou may tr ansfe r ALES to anothe r syste m or e ve n l e ave i t i nstal l e d i n se ve r al syste ms, as l ong as the r e i s no possi bi l i t y that mor e than one c opy c an be use d at the same ti me . If you move ALES to another system, you can leave ALES installed on the original system if you remove the key so that ALES won’t run. You remove the key as follows: 1. Start MUMPS with the command: MUMPS /KEY. DTM responds by requesting a new paper key. 2. Enter the word DELETE. DTM responds with the message ‘license deleted’. You can now use the key in the new location. If you try to use ALES again on the computed where you deleted the key, you will be asked to re-enter the key, as explained in the previous section. If you move ALES to another disk or directory on the same system, you can leave ALES installed on the original disk or directory, and also leave the key, so that you can run ALES from either location. This does not violate your license agreement, because you can’t run both copies at the same time under a single-task operating system. Note: If you move ALES to a different disk or directory on the same or another system, you will have to edit MUMPS.DBD as explained in the installation instructions, above, so that the DATASET statements point to the data files in their new location. Batch files We have provided four one-line batch files, located in the directory where you installed the MUMPS program and ALES. that will start ALES in the various modes mentioned in the next section, as well as perform system maintenance functions. The commands are: √ ALES: all ALES functions are available, including model building. This is intended for the model builder. √ EVALUATE: all ALES functions except model building, and the ability to delete models and restore them from a backup, are available. This is intended for the model user. Land data can be entered or imported, evaluations can be computed, and reports printed. Economic parameters, including prices and interest rates, can also be edited. ALES Version 4.65 Users Manual Page 38 February 1997 √ CONSULT: enters consultation mode directly, to consult one or more ALES models about the suitability of a single tract for a single use. Land data can not be altered. This is intended for the occasional model user and for demonstrations. √ UTIL: runs system maintenance procedures, see the Chapter ‘Maintaining an ALES system’ for details. √ RMDTM: delete the MUMPS system. You may wish to include the main ALES sub-directory on your DOS search path, to allow you to start ALES from any directory. ALES should start within 30 seconds on a basic IBM-PC/XT, within 10 seconds on a IBM-PC/AT, and within 3 seconds on a 386 or faster machine. Running ALES under a single-tasking operating system (DOS) ALES has been designed to be easy to operate. The intellectual activity of constructing models and collecting data is difficult enough; interacting with the computer should not cause the land evaluator further difficulties. This chapter presents a brief summary of how the ALES user interacts with the program, and problems that might be encountered. Starting ALES from DOS There are three different commands to start ALES from DOS, each intended for a different type of user. All three commands are DOS batch files, which you run by typing the command name in the sub-directory in which ALES is installed. The three commands are: ALES: all ALES functions are available, including model building, data entry, computation of evaluations, reports, and interchange with other programs. This command is intended for the model builder. EVALUATE: all ALES functions, except model building, the ability to delete models and restore them from a backup, and the interfaces to IDRISI and xBase. Land data can be entered or imported, evaluations can be computed, the evaluation matrix and ‘why?’ screens can be displayed, and reports printed. Economic parameters, including prices and interest rates, can also be edited. This command is intended for the model user who should not be able to change the model itself, only data and economic parameters. CONSULT: enters consultation mode directly, to consult one or more ALES models about the suitability of a single tract for a single use. Models can not be modified. Land data from a consultation can be recorded in the database. This command is intended as an easy way to consult an ALES model for the occasional model user. It provides a simple way to determine the suitability of one land area at a time for one land use at a time. The same consultation mode may be accessed from the ALES command, Menu 1, Option 6, or from the EVALUATE command, Menu 1, Option 5. In addition, there is a command for system maintenance: UTIL: starts the MUMPS system maintenance modules; see the Chapter ‘Maintaining an ALES system’. ALES Version 4.65 Users Manual Page 39 February 1997 Interacting with ALES The operation of ALES should be fairly self-evident. There are no commands to memorize and type; the entire interaction is controlled by function keys (the ten keys marked ‘F1’ through ‘F10’), the special keys ‘Esc’ and ‘Enter’, and the cursor movement keys (the arrows and associated keys such as ‘Home’ located on a separate keypad). The only time you need to use regular (typing) keys is when you must enter information, such as a data value (although you can also use regular keys to move to an item in a list by typing its unique prefix). The screen usually displays multiple overlapping windows. As you make choices and perform actions, new windows appear and remain as long as they are relevant. Parts of all previous windows in which you made a selection are still visible underneath the active window, although they are dimmed to show that they are inactive. Only the frontmost window is active. That is, your actions only affect the window in front of all the others. The windows in ALES are not like those in OS/2, Macintosh OS, Motif, Microsoft Windows or other event-driven environments, because you can not move to any visible window. Instead, you have to complete the actions in the order in which the windows are presented to you. The order in which windows are displayed is shown in Appendix 1 ‘Program Structure’. The basic pattern of interaction with ALES is “move and do”. You move the highlight to a selection and then you press a function or special key to perform an action. Function keys, cursor control keys, typing In ALES, most of the interaction with is with special keys, that is, keys that aren’t used for typing text. There are four groups of keys: (1) Function keys: These are marked ‘F1’ through ‘F10’, and are located either on top (IBM extended) of or to the left (IBM PC) of the keyboard. These keys are used to perform actions on selected items. In general, their use in ALES is according to the context. Some function keys have a fairly consistent meaning: F1 and F2: Help: At almost every point in the program you can receive on-screen help by pressing the ‘F1’ key, the ‘F2’ key, or both. Generally, the ‘F1’ key displays information about the mechanics of the interaction, for example, what keys are active, and how to move the highlight. This is called form help. The ‘F2’ key, by contrast, is usually content help: it displays information about what is being requested. In the ‘Why?’ screens, the ‘F2’ key is the ‘Why?’ key. F3 : add a new item to a list; in the evaluation results matrix, recompute the evaluation. [In the decision-tree editor, enters a final decision at the currently-selected position.] Alt+F3 : in the data entry matrix, infers Land Characteristic values. F4 : delete the currently-highlighted item from a list. [In the decision-tree editor, inserts a subtree at the currently-selected position.] F5 : edit the currently-highlighted item. [In the decision-tree editor, cuts the currently-selected branch and saves it in the paste buffer.] Alt+F5: [In the decision-tree editor, deletes the currently-selected branch without saving it in the paste buffer.] F6: select all items in a list; copy an item in the list. [In the decision-tree editor, pastes a tree or branch that was saved in the paste buffer.] ALES Version 4.65 Users Manual Page 40 February 1997 Alt+F6: rename or replace an item in a list F7 : save all or part of an evaluation model to a disk file. [In the decision-tree editor, joins the currentlyselected branch to another branch.] F8: restore what was saved by ‘F7’. [In the decision-tree editor, cuts the entire tree and saves it in the paste buffer.] Alt+F8: [In the decision-tree editor, deletes the entire tree without saving it in the paste buffer.] F9: Notes: If the model builder wrote an annotation (note) for the currently-active entity, this key will display it. Items in lists that have associated notes are marked with small ‘degree’ signs: °. Alt+F9: enter or edit a note F10: Completes an interaction, saving any new information you entered. (2) Selection keys: Enter (may be labeled ‘Return’ or ‘↵’). Confirms a selection or a typed entry. Escape. Cancel an interaction without saving; go back one or more screens (3) Cursor motion keys: These are marked with directional arrows ‘←’, ‘→’, ‘↑’ , and ‘↓’ , or with descriptive names such as ‘Home’ and ‘PgUp’. These are used to move around in lists, data entry forms, and tables. The arrow keys ‘←’, ‘→’, ‘↑’ , and ‘↓’ move one line, cell, or cursor position in the appropriate direction. The Home and End keys move to the first and last items in selection boxes. The PgUp and PgDn move up and down one screenfull in selection boxes that are too long to fit on a screen, and scroll help texts and ‘Why?’ screens in the appropriate direction. (4) Typing keys, i.e. the ones with letters and numbers on them. Typing keys are used to tell ALES codes and names. They are also used to move around in selection boxes by typing the unique prefix of the item to which to move. At every point in the program, an annunciator line at the bottom of the screen shows which keys are active. The ‘form’ help (F1) also explains which keys are active. The cursor control keys are used to move around in selection boxes, among questions in a form, and in the decision tree editor. Leaving ALES You can only leave ALES, and return to the operating system, from the opening Menu. You can return from any point in the program to this menu by pressing ‘Esc’ (to cancel) or ‘F10’ (to confirm) enough times. Then press ‘F10’ or ‘Esc’ and you will leave ALES and return to DOS. Pr e ssi ng the ‘Esc ’ k e y e nough ti me s wi l l al ways ge t you out of ALES. ALES Version 4.65 Users Manual Page 41 February 1997 If you get really stuck, or want a fast way out of the program, press Ctrl+C (hold the ‘Ctrl’ key down while you press the ‘c’ key) at any point in the program. You will be asked if you really want to go back to the opening screen. If you answer ‘no’ you will be left in the same place in the program as when you pressed Ctrl-C. If you answer ‘yes’, you will return to the opening screen, from which you can exit the program. Ne ve r , e ve r , tur n off the c ompute r or r e boot DO S whi l e ALES i s r unni ng. Thi s may c or r upt the M UM PS database and may for c e you to r e i nstal l ALES fr om the or i gi nal di str i buti on di sk e tte s. Running ALES under Multi-tasking Operating Systems ALES was designed for a single-user, single-tasking Operating System (i.e., non-networked MS-DOS). Several multi-tasking Operating Systems are able to run MS-DOS programs, and ALES is able to run without problems in these OS’s. However, there is an important caution for all these systems: ** WARNING ** Ne ve r t ry t o run m ore t han one c opy of t he AL ES program at t he sam e t i m e unde r a mul ti -task i ng O pe r ati ng Syste m. It pr obabl y won’t wor k and i f i t doe s you r un a se r i ous r i sk of c or r upti ng your e val uati on mode l s and database s. Running ALES under OS/2 ALES runs well under the OS/2 operating system Version 2.0 or higher, including OS/2 V3.0 and V4.0 (‘Warp’), either as a full-screen or windowed DOS session, using OS/2’s Virtual Dos Machine (VDM). Although you can start ALES directly from the command line in a OS/2 DOS window or OS/2 DOS full-screen session, you will probably want to create a Presentation Manager object to automatically launch ALES with optimum settings. √ First, tear off a ‘program’ template (found in the OS/2 system ‘templates’ folder) to create a new program object in the Presentation Manager. You can drag it to the desktop or into any folder on the desktop. √ Right-click the new object to open its Settings Notebook. √ On the Program page, enter the path and program for the batch file that starts ALES, typically ‘C:\DTM\ALES.BAT’. √ On the General page, enter a name for the object (e.g., ‘ALES V4.65’) and, if you wish, select an icon. √ On the Window page, make sure to check the radio button ‘Open existing object’; this is very important to ensure that you don’t accidentally open more than one copy of ALES (although the second copy of ALES would probably refuse to run). √ On the Session page, click the radio button for ‘DOS Window’ and check the box for ‘Close on exit’. √ On this same page, select the ‘DOS settings’ button. This is where the real adjustment to DOS programs is done, and although it is a bit intimidating, it is the key to OS/2’s flexibility. Make sure the following are set: DOS_BACKGROUND_EXECUTION = ON ALES Version 4.65 Users Manual Page 42 February 1997 DOS_FILES = 30 DOS_HIGH = ON DOS_RMSIZE = 640 IDLE_SECONDS = 0 IDLE_SENSITIVITY = 1 This last setting prevents DataTree MUMPS from slowing down the system by constantly checking for keyboard activity. Other optional settings which might make your OS/2 system run faster are: DPMI_MEMORY_LIMIT = 0 EMS_MEMORY_LIMIT = 0 XMS_MEMORY_LIMIT = 0. Why O S/ 2 for ALES use r s? OS / 2 i s a r e l i a b l e , fa s t , t r u e mu l t i t a s k i n g op e r a t i n g s ys t e m t h a t h a s b e e n r e fi n e d for ove r e i gh t ye a r s a s of 1 9 9 6 . It r u n s e a ch DOS p r ogr a m i n a s e p a r a t e Vi r t u a l DOS ma ch i n e , a n d u n l i k e u n d e r M i cr os oft Wi n d ows , a n i l l -b e h a ve d DOS p r ogr a m ca n ’ t cr a s h t h e s ys t e m. DOS p r ogr a ms , l i k e Da t a T r e e M UM P S , ca n b e i n d i vi d u a l l y op t i mi ze d vi a t h e i r s e t t i n gs ( a s e x p l a i n e d for ALE S i n t h e p r e vi ou s ¶ ) . DOS p r ogr a ms , i n cl u d i n g ALE S , r u n fa s t e r t h a n i n n a t i ve DOS . Ce r t a i n l y for t h e u s e r wh o l i k e s DOS a p p l i ca t i on s a n d wh o h a ve a 3 8 6 / 3 3 or b e t t e r wi t h 6 t o 8 M B RAM , OS / 2 i s a n e x ce l l e n t ch oi ce . OS / 2 a l s o r u n s a l l Wi n d ows 3 . 1 a p p l i ca t i on s , i n cl u d i n g t h os e u s i n g Wi n 3 2 s u p t o Re v. 1 . 2 5 ( b u t n o t a p p l i ca t i on s wr i t t e n s p e ci fi ca l l y for Wi n d ows 9 5 ) , s o t h a t , for e x a mp l e , Ar c/ Vi e w 1 a n d 2 , Wor d 6 . 0 , E x ce l 5 . 0 , P a r a d ox for Wi n d ows e t c. r u n we l l u n d e r OS / 2 . You can cut and paste between ALES screens and OS/2, Win-OS/2, or other DOS programs, as long as ALES is running in a window (not full-screen) and the OS/2 system is set up to allow the clipboard to be shared. This is especially useful for exchanging text between a word processor and the ALES note editor. As with any DOS program under OS/2, use the Mark or Paste commands on the DOS window control menu. Running ALES under Microsoft Windows 3.1x ALES can run under the Microsoft Windows system Version 3.1 or Version 3.11 (“Windows for Workgroups”), in either standard or enhanced mode. ALES does not take advantage of any Windows features. The following explanation is intended for the experienced Windows user. ** War ni ng ** Do not at t e m pt t o run AL ES unde r M S Wi ndows 3. 0 or e ar l i e r . Upgr ade to M S Wi ndows Ve r si on 3. 1 or l ate r You can start ALES directly from the ‘MS-DOS prompt’ window, or even by using the ‘File, Run’ command (on ‘ales.bat’ etc.) from the Program Manager or File Manager. However, if you commonly run ALES under windows, it is worthwhile creating a ‘.PIF’ (configuration) file, and adding an icon to the Program Manager. The ‘.PIF’ (configuration) file for ALES should have the parameters: √ Video mode “text” √ 384 Kb conventional memory required √ 640 Kb conventional memory desired √ 0Kb XMS memory ALES Version 4.65 Users Manual Page 43 February 1997 √ Directly modifies “COM1” and “COM2” (the first two serial ports) √ “Close on exit” √ “Background”. You can choose to run full-screen or in a window (in which case, you might experiment with the ‘Fonts’ setting on the window’s ‘control’ menu). ALES can run in the background under Windows enhanced mode (which requires a 80386 or later processor); this is a nice feature for long computations, data import/export, or printed reports. You can cut and paste between ALES screens and Windows or other DOS programs, as long as ALES is running in a window (not full-screen) in enhanced mode. This is especially useful for exchanging text between a Windows or DOS word processor (e.g., Notepad) and the ALES note editor. Running ALES under Windows 95 Windows 95 is a lot like Windows 3.1x running in enhanced mode. Instead of making a PIF file with the PIF editor, you create a shortcut to the ALES.BAT (etc.) files. The ALES.BAT (etc.) files require an important modification before they will work in Windows 95. Put the following switch at the end of the second line in the batch files ALES.BAT, EVALUATE.BAT, CONSULT.BAT, and UTIL.BAT: /FM=1 So that the ALES.BAT file, for example, would look like: rem Start ALES in model-building mode mumps eval L /par=50k,12k,16k /fm=1 This tells MUMPS to use DOS-mode file access. The reason why ALES is not distributed with this switch already as the default, is that ALES runs considerably more slowly under DOS and Windows pre-95, and most ALES customers are not running Windows 95. Running ALES under DesqView ALES can run under the DesqView1 multitasking system Version 2.x, which is a reasonable multi-tasking alternative for the MS-DOS user who wants to run several programs at once, and who has a computer with several megabytes of expanded or extended memory (note that the companion product QEMM is required on 386 or later processor to make best use of extended memory). DesqView does not require a 386 or later processor, as does OS/2. The following explanation is intended for the experienced DesqView user. You must set up a DesqView menu item for ALES as follows. The program to run is the batch file ‘ALES’ in directory ‘C:\DTM’ (or wherever you installed ALES), and the data directory is the same. ALES requires a 384Kb partition, and can use up to 640Kb. It writes text directly to the screen but does not display graphics. It may use serial ports; it does not need diskettes. It does not require or use any extended or expanded memory, and it uses its own color schemes, not DesqView’s. On a 80386 processor or better you can elect to virtualize text, so that you can work on ALES in a small window. Otherwise, when the ALES window is made small, you can only scroll its 1 DesqView and QEMM are registered trademarks of Quarterdeck Office Systems. ALES Version 4.65 Users Manual Page 44 February 1997 contents, but not type or receive output. ALES can run in the background on a 80386 or better; this is a nice feature for long computations, data import/export, or printed reports. Installing and running ALES on a Novell Local Area Network This section is for experienced Novell network administrators who wish to install ALES on their local area network.. Many of the specific tasks will have to be modified according to the actual organization of each network. Also, modifications will probably be needed for Netware 4.x. Basic idea & legal considerations ALES runs as an application program under the DataTree MUMPS database & runtime system, DTM-PC V4.3, provided by InterSystems of Cambridge, MA. DTM-PC is sold and installed along with the ALES program itself. Cornell University packages DTM-PC with ALES, as a re-seller. It is possible to use the stand-alone (single-user) version of DTM-PC on a local area network, however, it is not possible to share data: each network user gets his or her own copy of the evaluation models (DTM-PC dataset EVAL-GBL). In effect, there are as many single-user copies of ALES installed as there are users logged in to ALES. The advantage of installing ALES on the network is that a user can log in from any workstation and access their own models. It is ideal for classroom instruction and practical laboratories, where each student works on their own exercise. Models can be exchanged among users exactly as in the case of single-user non-networked ALES: by saving to diskette (or shared network disk) with F7 and loading with F8. Legally, the network administrator must assure that no more users are using ALES at any one time than the number of single-user licenses purchased by the licensee (the network’s owner). Several network utilities exist that monitor usage and can control this. Otherwise you are in violation of your license with Cornell and with InterSystems. You must be in a position to justify your usage to Cornell or InterSystems, if asked. There are two keys to successful network installation: the network file system itself, and the file MUMPS.DBD. This is the Database Description file for the DTM-PC system. When DTM-PC starts, it looks in MUMPS.DBD to locate its files and how it should open them. You can edit it with a text editor such as MS-DOS EDIT or Epsilon. Step 1: Install DTM-PC and ALES on the server as a single-user program Follow the installation instructions in this Chapter, above. You will almost certainly install DTM-PC and ALES to a drive other than C:, and possibly to a different path as well. Follow the instructions for editing the configuration file MUMPS.DBD so that it points to the drive and directory where you installed DTM-PC. The path should always end in \DTM\ (with the final ‘\’). Start ALES for the first time and enter your PaperKey according to the instructions above. This is the only time that you will have to enter the PaperKey, unless you move the program. At this point you have a single-user DTM-PC installed on the server. Now you must make it shareable and give each user their own dataset. Step 2: Make the program read-only Every file in .\DTM and in .\DTM\ALES5 should be marked Read-only and Shareable, using a network utility such as FLAGS. Step 3: Copy the user dataset to each user’s private partition ALES Version 4.65 Users Manual Page 45 February 1997 Copy EVAL-GBL.IND and EVAL-GBL.DAT from .\DTM\EVAL where you installed ALES, to each user’s area, possibly to a sub-directory. This could be their mail directory or their private area on the server. This might even work on a high-capacity diskette (1.44Mb) for student exercises, but the dataset could not be expanded for more serious work. These files must be marked Read-write and not shareable with a network utility such as FLAGS. Step 4: Change each user’s configuration to include ALES Decide on a mapped drive letter, e.g. Z:, for the user dataset. Then in each user’s configuration file, enter a line like: MAP Z:=SYS::\USERS\USER2\EVAL replacing SYS:: etc. with the actual location of the user dataset. In the same file, map the directory where ALES is installed, e.g.: MAP Y:=SYS::\DTM again replacing SYS:: etc. with the actual location of the program. Now the user has two mapped drives, one pointing to the program and one to their own dataset. Step 5: Change the DTM-PC configuration Change the reference in MUMPS.DBD to dataset EVAL-GBL so that it points to the user’s mapped drive. For example: DATASET Z:EVAL-GBL instead of something like DATASET F:\DTM\EVAL\EVAL-GBL Change all the other datasets to be read-only, for example: DATASET F:\DTM\ALES5\ALES5-RT /RO Remove the namespace mappings of the temporary files to ALES5-GB, this will ensure that the temporary files are in each user’s private EVAL-GBL. So, remove these two lines from the mappings: MAP ^Lstate TO ALES5-GB MAP ^Lvideo TO ALES5-GB Finally, you must explicitly list the system databases SYS-GBL and SYS-RTN in MUMPS.DBD, and mark them as read-only as well (these are implicit in stand-alone DTM-PC): ;system datasets DATASET F:\DTM\SYS-GBL /RO DATASET F:\DTM\SYS-RTN /RO Here is an example of a completed MUMPS.DBD. This example only has English & Spanish texts. ALES Version 4.65 Users Manual Page 46 February 1997 ;ALES V4.65/DTM V4.3 MUMPS.DBD - Database description file ; for Novell networks ; ;datasets ; ;system datasets DATASET F:\DTM\SYS-GBL /RO DATASET F:\DTM\SYS-RTN /RO ;program object code DATASET F:\DTM\ALES5\ALES5-RT /RO ;program support files, except text DATASET F:\DTM\ALES5\ALES5-GB /RO ;text databases (1 per language) DATASET F:\DTM\ALES5\LTX5E-GB /RO DATASET F:\DTM\ALES5\LTX5S-GB /RO ;ALES user evaluations DATASET Z:EVAL-GBL ; ;namespaces ; ;program NSPACE ALES: ALES5-RT, ALES5-GB MAP ^Ltxt TO LTX5E-GB MAP ^Ltxt("s") TO LTX5S-GB ;user evaluations NSPACE EVAL: ALES5-RT, EVAL-GBL MAP ^Lform TO ALES5-GB MAP ^Lmenu TO ALES5-GB MAP ^Ltxt TO LTX5E-GB MAP ^Ltxt("s") TO LTX5S-GB MAP ^Lconfig("version") TO ALES5-GB MAP ^Lconfig("mode") TO ALES5-GB END Step 6: Assign Trustee rights Each user should have read-only access to the program in .\DTM and its sub-directories, and of course read-write access to their own copy of the dataset EVAL-GBL. The most convenient way to set up read-only access to the program is to make a group which includes the ALES users, and then give each ALES user rights to this group. Step 7: The user starts their own copy of ALES The user logs on, and switches to the mapped drive which points to the DTM-PC program. He or she then runs the program with the commands ales, evaluate, or consult as explained in Chapter 4 of the User’s Manual. Each user will be working on their own dataset, because MUMPS.DBD uses the mapped drive (e.g., Z:) to point to their own copy of EVAL-GBL.*. Customizing ALES You can change the way ALES looks or performs, as explained in the following sections. ALES Version 4.65 Users Manual Page 47 February 1997 Changing screen colors ALES runs on all PC video adapters, including the Monochrome Display Adapter (MDA), Color Graphics Adapter (CGA), Professional Graphics Adapter (PGA), Visual Graphics Adapter (VGA), and the Hercules graphics adapter. ALES is a text-mode DOS program, and expects a 80-column by 25-line display. ALES is distributed with a set of pre-defined color schemes, and in Menu 1.2 (‘System Options’), menu items 1 through 5 can be used to select color schemes for five types of screens: 1 the main screen 2 the banner (top) and annunciator (bottom or 25th) lines, 3 the help screens 4 consultation mode, and 5 annotations (user-defined notes) If you are running on a monochrome or Hercules adapter, you should set all these to one of the monochrome color scheme. On a color monitor, you can select different schemes until you find ones that are pleasing to you.1 If you are ambitious, you can add or edit color schemes. This is not part of ALES itself, it is a small stand-alone program, which you run with the DOS command: mumps ales Edit^Lzattr Use the ‘?’ key to get help for each question. The next time you start ALES, your revised or new color scheme should be in the list. Changing the human language ALES models and databases can be created in any human language that can be represented by the IBM character set; the language for these is determined by the model builder. The ALES program itself contains many texts, such as menus, data entry forms, prompts, and help screens. These were originally written in the English language, but most of them have been translated into French, Spanish, and Indonesian. You can change the language in which ALES displays its own texts with Menu 1.2 (‘System Options’), Option 6. Any texts that have not yet been translated will be displayed in the original English. If you don’t need one or both of the non-English languages, you can save some hard-disk space by deleting them from your system. To do this: 1. Delete the files LTX5F-GB.* (French) and/or LTX5S-GB.* (Spanish) and/or LTX5I-GB.* (Indonesian) from the sub-directory ‘DTM\ALES5’. 2. Edit the database description file MUMPS.DBD with a plain-text editor, deleting all lines which make reference to the file which you just deleted. These lines begin with the words ‘DATASET’ and ‘MAP’. For example, to delete the French texts you would remove the following lines: 1 The color scheme names are place names from central New York state and northern Pennsylvania, USA. Give yourself one Upstate New York Native point for each place you’ve visited, two points for each where you’ve visited the local roadhouse or Hotel, and three points for each where you’ve played sports or done business. ALES Version 4.65 Users Manual Page 48 February 1997 DATASET C:\DTM\ALES5\LTX5F-GB ... MAP ^Ltxt("f") TO LTX5F-GB The next time you start ALES, the language that you deleted will not be available for the program texts. However, any models written in French, Spanish, or Indonesian will of course still be in their original language. Adding output devices, including serial printers DataTree MUMPS (and therefore ALES) as delivered is configured to be able to output to two parallel printers (DOS device PRN and DOS device LPT2), the PC video screen, and DOS files. If you have additional peripheral hardware, or want to change the default communications parameters of the pre-configured ports, you must edit the device description file MUMPS.DEV. Look at this file, which is extensively commented, for information on how to add devices. In particular, if you have a serial printer or other device connected to the serial port, you will need to edit ‘mumps.dev’ so that MUMPS recognizes the serial ports (COM1 etc.). For example to configure COM1 for 8 bit characters, no parity, one stop bit, and flow control enabled, running at 9600 baud, add the following line to ‘mumps.dev’: ; Serial printer specification 100: PCTERM = P:COMM /speed=9600:parity="none":charbits=8:stopbits=1:xon=1: &plen=65:pwid=82:flen=63:fwid=80:lmar=2:tmar=2:wrcr=1:wrap=1 (Make sure to comment out any existing definition of device 100.) The key part of the entry is ‘ = P:COMM’; this tells MUMPS that the device is in class ‘P’, i.e., is a printer. Now device ‘COMM’ will appear on the list of printers, whenever you try to print from within ALES. Adding model groups One way to exchange information with another organization is to save each model as ‘.ALS’ files (using ‘F7’ from the list of evaluation models). Each file must be saved in turn from the source system to a separate ‘.als’ file, using ‘F7’, and then loaded in turn on the destination system, using ‘F8’. Another approach is to copy (using DOS) the entire EVAL namespace (i.e., the two files eval-gbl.ind and eval-gbl.dat) to diskette or network, and then exchange these with another organization. The namespace contains all the ALES models in the list of models. This section explains how to set up your ALES system to recognize more than one model group. Menu 2 ‘System Options’ Option C ‘Change model group’ may be used to switch between two or more completely different sets of ALES models, if the system manager sets up the system to allow this feature. A group is a set of ALES evaluation models in a single MUMPS namespace. Usually, all the models in the group are made by one organization. In the group method, the entire namespace (usually files ‘eval-gbl.*’) is re-named so as not to conflict with the existing ‘eval-gbl’, and then exchanged via diskette or network.1 1 Unfortunately, it is not possible to have two files named ‘EVAL-GBL.*’ named in the same Database Description (‘.dbd’) file, even if they are in different DOS directories. This is because DTM only uses the file name, not including the drive and path, in the second part of the ‘.dbd’ file. ALES Version 4.65 Users Manual Page 49 February 1997 To be able to change model groups, the model group must be listed in the MUMPS configuration file mumps.dbd. Here is an example configuration file with two model groups: the local evaluation group in namespace EVAL (i.e., the usual configuration), and a group of models created by an FAO project, in namespace FAO. Notice how the FAO models have their own dataset, but that the ALES program (‘ales5-rt’) and support files (‘ales5-gb’, ‘ltx5?gb’) apply to the FAO models as well as to the local evaluation models. In this example, the ‘eval-gbl.*’ supplied by the FAO project were re-named to ‘fao-gbl.*’ so as not to conflict with the local ‘eval-gbl’. ;ALES V4.5/DTM V4.3 MUMPS.DBD - Database description file ;with two model groups ;Last update: xyz 10-Dec-95 ; ;datasets ; ;program object code DATASET C:\DTM\ALES5\ALES5-RT ;program support files, except text DATASET C:\DTM\ALES5\ALES5-GB ;text databases (1 per language) DATASET C:\DTM\ALES5\LTX5E-GB DATASET C:\DTM\ALES5\LTX5S-GB ;ALES user evaluations DATASET C:\DTM\EVAL\EVAL-GBL ;** FAO evaluations DATASET D:\FAO\FAO-GBL ;namespaces ;program NSPACE ALES: ALES5-RT, ALES5-GB MAP ^Ltxt TO MAP ^Ltxt("s") TO ; ;local evaluation models NSPACE EVAL: ALES5-RT, EVAL-GBL MAP ^Lform TO MAP ^Lmenu TO MAP ^Ltxt TO MAP ^Ltxt("s") TO MAP ^Lconfig("version") TO MAP ^Lconfig("mode") TO MAP ^Lstate TO MAP ^Lvideo TO ; ;** FAO models NSPACE FAO: ALES5-RT, FAO-GBL MAP ^Lform TO MAP ^Lmenu TO MAP ^Ltxt TO MAP ^Ltxt("s") TO MAP ^Lconfig("version") TO MAP ^Lconfig("mode") TO MAP ^Lstate TO MAP ^Lvideo TO END ALES Version 4.65 Users Manual LTX5E-GB LTX5S-GB ALES5-GB ALES5-GB LTX5E-GB LTX5S-GB ALES5-GB ALES5-GB ALES5-GB ALES5-GB ALES5-GB ALES5-GB LTX5E-GB LTX5S-GB ALES5-GB ALES5-GB ALES5-GB ALES5-GB Page 50 February 1997 Removing ALES from your computer system If you need to remove ALES from a computer altogether: 1. Copy the file rmdtm.bat from the ALES directory to the root directory, or to a diskette. 2. Change to the directory where you copied ‘rmdtm.bat’, and issue the command: RMDTM C: or wherever you installed ALES. This will remove the paper key, MUMPS, and ALES, including all your ALES models. Make sure you have a backup of all your models as ‘.ALS’ files before removing ALES from your computer. 3. Now you can delete rmdtm.bat itself. ALES Version 4.65 Users Manual Page 51 February 1997 Learning ALES This chapter presents five tutorials that have been designed to teach you how to use ALES: Tutorial 1: Consulting an ALES model Tutorial 2: Entering data and running an ALES evaluation, using the ‘Why?’ screens Tutorial 3: Building a simple ALES model Tutorial 4: Advanced model-building techniques Tutorial 5: ALIDRIS (ALES to IDRISI interface) All ALES users should start with Tutorial 1, which explains how to interact with ALES. ALES users interested in building or modifying ALES models should continue with Tutorials 2, 3, and 4. Those whose only interest in using ALES is to evaluate using existing models need only complete Tutorial 2. Finally, Tutorial 5 is for those users who will be using the IDRISI Geographical Information System to present the results of their ALES evaluations. Throughout these tutorials: User Actions are written like this line, in the margin and marked with a diamond ‘’ √ The action verb will be in italics, for example, type, press, select etc. √ special keys, such as function keys, which you press are written in bold type, for example F1. √ Keys other than special keys that you press are written in Courier type, for example: Type This Text. Key terms are written like this the first time they appear, and marked with a ‘’ Extra information is written like this, indented. You can skip these on first reading. First-time ALES users sometimes think that the tutorial models are intended to be applied in all situations. Please understand that… Eac h ALES mode l i s bui l t i nde pe nde ntl y. The mode l you bui l d may have no r e se mbl anc e to the tutor i al e xampl e s. The l i sts of Land Uti l i z ati on Type s, the i r Land Use Re qui r e me nts, the database and di agnosti c Land Char ac te r i sti c s, the map uni ts, and the de c i si on pr oc e dur e s i n the se tutor i al s we r e de si gne d to be e duc ati onal , and may we l l have nothi ng to do wi th your obje c ti ve s, c l i e nt, pl anni ng e xe r c i se , k nowl e dge sour c e s, database s e tc . ALES Version 4.65 Users Manual Page 52 February 1997 Tutorial 1 : Consulting a model The objectives of this tutorial are: (1) to teach you how to interact with ALES, including the use of the letter, function and cursor control keys, and (2) to teach you how to consult an existing ALES model to determine the suitability of a particular land area for a single land use1. In addition, some of the model builder’s reasoning will be explained in notes like this. This tutorial should take about one hour to complete. In this tutorial you will learn to: √ start ALES in “consultation” mode √ interact with ALES using the keyboard √ follow decision trees to obtain Land Quality values √ view the results of a consultation on the screen √ end the consultation Before working on this tutorial, you must know how to: (1) interact with the microcomputer’s operating system (usually PC-DOS or MS-DOS); (2) how to name files and specify disk drives and directories; (3) how to use the keyboard. If you can use any other program that runs under DOS, such as a word processor or spreadsheet, you already know everything necessary to start with ALES. Otherwise, you should complete a tutorial or workshop on DOS fundamentals, before attempting the ALES tutorials. Starting ALES in ‘consultation’ mode2 If your ALES syste m i s not i nstal l e d on dr i ve ‘C:’ i n di r e c tor y ‘\ DTM ’, c hange the fol l owi ng two DO S c ommands ac c or di ngl y To start ALES in consultation mode from DOS: 1This tutorial does not explore all the capabilities of ALES’ ‘consult’ mode, it is mainly an introduction to interacting with ALES. 2This section assumes that you want to start ALES directly from DOS. You may also have installed ALES under a multitasking operating system such as OS/2, Microsoft Windows, or DesqView, or as an item in a menu system such as the MS-DOS shell, or you may normally start your programs from a shell such as the Norton Commander or Xtree Gold. In this case you should already know how to run CONSULT.BAT. ALES Version 4.65 Users Manual Page 53 February 1997 1. Change to the disk where ALES is installed. Typically this will be disk drive ‘c:’. Supposing this to be the case, at the DOS prompt: Type c: and Press the Enter key.1 If you are already working on disk ‘c:’, you can omit this command. 2. Change to the directory where ALES is installed. Typically this will be directory ‘\dtm’. Supposing this to be the case, at the DOS prompt: Type cd \dtm and Press Enter. If you are already connected to directory ‘\dtm’, you can omit this command. 3. Start ALES in ‘consultation’ mode: At the DOS prompt: Type consult and Press Enter2. At this point you should see the initial (“welcome”) screen, which includes the program name, your organization’s name, and the serial number. Press any key …for example, Enter, to continue beyond this screen. Selecting the evaluation model to consult The first interaction in ‘consultation’ mode is selecting the evaluation model to consult. The right side of the screen should now contain a selection box on the right, showing several lines3. Each line consists of an evaluation code (on the left) and the descriptive name which applies to the evaluation code (on the right). At the bottom of the screen is the annunciator line. This shows the active keys, along with a brief mnemonic to show their action. Notice on the annunciator (bottom) line of the screen is that the ‘F1’ and ‘F2’ keys can be used to get help. This is true at almost every point in the program. √ ‘F1’ is used to explain the mechanics of an interaction; i.e., how to interact with ALES. In ALES this is called form help. √ ‘F2’ is used to explain what is required, i.e. what the program is asking for. In ALES this is called content help. To see the form help, 1This key is variously called Return or Enter. It may be marked with a square arrow, ↵ 2This runs the DOS batch file CONSULT.BAT, which in turn starts the MUMPS run-time system, which loads ALES in ‘consult’ mode, and runs it. 3If there is only one line, you will not be able to move the cursor, only select the single evaluation. ALES Version 4.65 Users Manual Page 54 February 1997 Press F1 You should now be looking at an explanation of the keys that you can use. Notice that the annunciator line has changed to show a new set of active keys, this time for the help interaction itself. Also notice that the lower right corner of the help display says ‘...<more>...’; this indicates that there are more lines that can't fit in the box. You can display these lines by using the down arrow or ‘PgDn’ keys; move back up with the up arrow or ‘PgUp’. When you are done viewing the ‘F1’ help, Press F10 …to return to the list of evaluation models. Actually, you can return to the list by pressing either ‘F10’ (since you're ‘done’ looking at the help) or ‘Enter’ (since you're ‘confirming’ the help) or ‘Esc’ (since you're ‘canceling’ the help request) To see the content help, Press F2 You should now be looking at an explanation of what ALES expects, in this case, that you will select an evaluation model to consult, or leave the program. When you are done viewing the ‘F2’ help, Press F10 …to return to the list of evaluation models. For this exercise we will use the model named ‘Tutor1’, which is a very simple evaluation with only one Land Utilization Type.1 The aim here is to lead you as easily as possible through your first encounter with ALES, not to present a comprehensive evaluation model. Locate the line in the list of evaluations with the code (on the left) ‘Tutor1’. Notice that it has a descriptive name (on the right) of ‘ALES V4 Tutorial 1 : Simple Consultation’. This is the line we want to select. If ‘Tutor1’ does not appear in the list of evaluation models, you must first leave consultation mode (press Esc), and load it into your list of ALES models. The saved model ‘tutor1.als’ is included in the self-extracting archive ‘examples.exe’ on the distribution diskette. Copy this file to any convenient place on your hard disk and then run it to extract its files including ‘tutor1.als’, then start ALES with the DOS command ‘ales’, and then load ‘tutor1.als’ into the list of evaluations by using ‘F8’ when that list is displayed. There are several ways to select one item out of the list; to begin with we'll use the simplest way, namely, moving the highlight with the cursor motion keys. Press ↓ …and you will see the highlight move from the first line to the second. 1This example is a simplification of the more realistic New York State example used in Tutorial 2. ALES Version 4.65 Users Manual Page 55 February 1997 Press ↑ …and you will see the highlight move back to the first line. Press ↑ or ↓ as necessary to position the highlight on the line for model ‘Tutor1’. Throughout ALES, the model builder is able to leave annotations, or notes, for model users, such as you, to look at. These explain the evaluation as a whole or any part of it. Whenever a note is present, you will see the degree sign, ‘°’, to the right of the code. Looking at the list of evaluations, you should see a ‘°’ to the right of the code ‘Tutor1’. So the model builder has left a note for you. Let's look at it now. Notice that on the annunciator line shows that ‘F9’ is marked ‘Note’. So, Press F9 …to read the note for evaluation model ‘Tutor1’. You should now be looking at the note. It gives some background about the entire evaluation model. When you're done reading the note, Press F10 …to return to the list of evaluation models. The highlight should still be on ‘Tutor1’. Now we want to select this model for the consultation. So, Press Enter …to select the highlighted evaluation, namely ‘Tutor1’. The list of evaluations should now disappear, and the code of the evaluation model you selected (namely, ‘Tutor1’) should appear in the upper left corner of the screen (the banner area). The upper right corner of the screen has the Land Utilization Type code, in this case ‘ccc’ (which stands for conventional continuous corn)1 In the center of the screen should be a dialog box, asking if you want to start with data from an existing map unit definition. The default answer, ‘No’ is highlighted. Press Enter …to select the highlighted ‘No’ answer, in other words, to enter all the data for the consultation directly from the keyboard. You would answer ‘Yes’ if you had saved land unit data at the end of a previous consultation, or if you already had a database of map units from a comprehensive evaluation. The dialog box should now disappear, and the first decision tree box should appear. Following decision trees to obtain Land Quality values When ALES computes the suitability of a map unit, it begins by computing Land Quality values corresponding to the set of Land Use Requirements that the model builder defined for a Land Utilization Type. Corresponding to 1In this example we have only defined one Land Utilization Type; if there had been more, you would have been asked to select one. ALES Version 4.65 Users Manual Page 56 February 1997 each Land Use Requirement is a Land Quality, which is the attribute of the land that is to be matched with the requirement.1 In consultation mode, you follow this computation one step at a time. ALES asks you for the data that it needs in order to compute the first Land Quality value, then the second, and so forth until all Land Quality values have been computed. Once ALES has determined all the Land Quality values, it computes overall suitability ratings. In this simple model, there are only four Land Qualities to be determined: (1) erosion hazard, (2) moisture availability, (3) ‘me’: Conditions for mechanization, and (4) planting conditions. These four Land Qualities were considered the most important for mechanized maize production in New York State. Planting conditions determine how early maize can be planted, moisture availability determines how well the maize will grow, erosion hazard determines what conservation farming practices must be observed, and conditions for mechanization also determines the type and nature of field operations. Land Quality ‘e’: Erosion hazard The way in which ALES asks you for data in consultation mode is to lead you through each severity level decision tree in turn, one for each Land Use Requirement. On the screen now is a large window with the title “LQ e (erosion hazard)”. ALES is now going to determine the severity of the erosion hazard, on a scale of 1 to 42, for your particular land area. In consultation mode, you only see as much of the decision tree as necessary to make the next decision. Right now you are looking at the top level of the tree, i.e. the land characteristic that the model builder thought was most important to determine the severity level of the Land Quality ‘erosion hazard’. This first land characteristic is the slope of the land, and as you can see, it is measured in five classes: A, B, C, D, and EF3; the highlight is by default on the ‘unknown’ choice in the tree, the branch marked ?, since you haven’t yet selected a slope class. Once you have selected a slope class, other factors may be considered. Slope affects erosion hazard because the kinetic of energy of runoff is greater on steeper slopes. The model builder constructed the tree considering local conditions and the availability of data, while trying to keep the tree as simple as possible. When we consider how many factors can affect erosion hazard, we see that the tree could become excessively complicated. However, when the evaluation is restricted to a certain area, much of the variability is implicit in the context, and need not appear in the tree. For example, in clayey soils, the type of clay (kaolinitic, montmorillonitic, illitic etc.) can have a great effect on erodibility, but in the area of New York State for which this model was constructed, clays are predominantly illitic; hence the type of clay need not be included in the tree, as it is a constant, not a variable. Press F1 1This is just a semantic difference: a land use has Requirements, whereas a land area has Qualities which match the Requirements. 2The fact that there are four severity levels of erosion hazard is part of the model, not of ALES. 3Again, this is part of the model, not of ALES ALES Version 4.65 Users Manual Page 57 February 1997 …to display a help text explaining how to select one of the branches of the tree. As you can see, the arrow keys can be used to move to the correct branch. When you're done looking at the help, Press Enter …to return to the decision tree display. Suppose that the land we are evaluating for corn production is ‘sloping’ (5-12% slopes), i.e. in slope class C according to the land characteristic. So, Press the up arrow, ‘ ’, three times. ↑ …to move the highlight to branch 3 (‘C’ slopes). Press Enter …to confirm this value, i.e., to tell ALES that the land area we are evaluating has 5-12% slopes.. Now the slope classes disappear, and next to the ‘slope’ name is the class we selected, namely, ‘C’. ALES is now considering a ‘sloping’ land area. Under the header is the name of the next land characteristic to be considered, namely, ‘perm’, the permeability of the upper subsoil, which as you can see is measured in seven classes. That is, the model builder decided that, on sloping lands, the permeability of the upper subsoil should be the second factor to consider when determining the erosion hazard. Permeability of the upper subsoil affects erosion hazard, because it determines how fast water will infiltrate into the profile. If infiltration is slow, water will pond on the surface and run off. In this area of New York State, infiltration rates are usually limited by the subsoil, not the surface infiltration. Suppose that the land area of interest has a moderately permeable subsoil. So, the highlight has to be moved to branch 4, ‘m’. This time we'll use another method of moving the highlight: typing the branch number. So, Type the number 4 The highlight should move to the branch marked ‘m’ (moderate). Press Enter …to confirm this value, i.e., to tell ALES that the land area we are evaluating has moderately permeable subsoil. Now the permeability classes disappear, and next to the ‘perm’ name is the class we selected, namely, ‘m’. ALES is now considering sloping maps units with moderately permeable subsoils. Under the header is the name of the next land characteristic to be considered, namely, ‘text-A’, the USDA texture class of the surface soil, which as you can see is measured in the USDA-standard 12 classes. Texture of the surface soil affects erosion hazard, because certain particle sizes are easier to detach by the impact of rain or runoff and to transport by runoff. In general, silts and very fine sands are the most susceptible. Supposing that in this land area the soils have a silt loam texture, Move the highlight to branch 5 ALES Version 4.65 Users Manual Page 58 February 1997 …corresponding to class ‘sil’. Press Enter …to confirm this value, i.e., to tell ALES that the land area we are evaluating has a silt loam surface soil. Now the texture classes disappear, and next to the ‘text-A’ name is the class we selected, namely, ‘sil’. Under this is the result, in this case the severity level, or Land Quality value, for the Land Quality ‘erosion hazard’. In the situation we have just described to ALES, namely, a silt loam with moderately permeable upper subsoil on a C slope, the erosion hazard is class 3 (of 4), which in this model is a ‘moderate’ erosion hazard. What does it mean for the erosion hazard to be ‘moderate’? To answer this question, the model builder has included an explanation. Notice that the result is marked with the note sign, ‘°’, and the annunciator line indicates that if we press ‘F9’, we can read the note. So, Press F9 …to read the explanation of the Land Use Requirement and its severity levels; when you are done, Press F10 …to remove the note and return to the results screen. We’re done with this Land Quality, so Press Enter …to confirm the result and continue on to the next Land Quality. Land Quality ‘m’: Moisture availability The window for LQ ‘e’ is replaced with a similar one for Land Quality ‘m’ (moisture availability), as you can see from the new title at the top of the window. The first land characteristic to be considered when evaluating for this quality, namely, ‘dbr’ (depth to bedrock or root-impenetrable layer), is displayed, along with its three classes. This land characteristic helps determine the potential rooting volume, which directly affects moisture holding capacity. Suppose the land to be evaluated has a dense fragipan (‘Bx’ horizon) at 40cm. As you can see from the class names, this is considered ‘shallow’. So, Move the highlight to branch 1 …corresponding to class ‘s’ (shallow). Press Enter …to confirm this value, i.e., to tell ALES that the land area we are evaluating is shallow to a root-impenetrable layer. ALES now displays a result value, namely ‘severe stress’, of the Land Quality ‘moisture availability’. After considering only one factor, ALES has concluded that maize will suffer severe moisture stress on these soils. This ALES Version 4.65 Users Manual Page 59 February 1997 illustrates how decision tree paths can be of different lengths, depending on which branch is taken. Here the shallow depth is enough, by itself, to allow the model builder to conclude that moisture stress is severe. Suppose that we made a mistake, and that in fact the fragipan is deeper, at 75 cm. Fortunately we can still revise our original choice. Notice that the annunciator line says that the left arrow, ‘←’, can be used to go ‘back to the last choice’. So, Press ← …to erase the result and re-display the list of choices for ‘dbr’. Move the highlight to branch 2 …corresponding to the ‘correct’ value ‘m’ (moderately deep, 50-100cm). Then Press Enter …to confirm this value, i.e., to tell ALES that the land area we are evaluating is moderately deep to a rootimpenetrable layer. Now we see that ALES can't make a decision yet on moderately deep soils. It is asking for the USDA texture of the subsoils Subsoil texture is an indicator of water-holding capacity because of the correlation between particle size and pore size. Small pores retain water against drainage, but very small pores retain water against the efforts of plant roots to extract it. Medium textures are a good compromise. Note that this correlation must be calibrated in each general kind of soil (structure and clay mineralogy). Supposing that the area to be evaluated has a silty clay loam subsoil., Move the highlight to branch 9 …corresponding to ‘sicl’ (silty clay loam). Then Press Enter …to confirm this value, i.e., to tell ALES that the land area we are evaluating has a silty clay loam subsoil. Now ALES is asking for another land characteristic value, May-to-September (i.e., growing season) precipitation, ‘pptMS’, which is measured in four classes. This land characteristic isn’t a soil characteristic as are texture and permeability., but rather a climatic characteristic. Rainfall affects moisture supply in the obvious way. These classes were the ones delineated on climate maps for the survey area in central New York state. Suppose that the area receives between 450 and 500mm rainfall in the growing season. Move the highlight to branch 3 …corresponding to ‘450-500mm’. Then ALES Version 4.65 Users Manual Page 60 February 1997 Press Enter …to confirm the selection. ALES now displays the final result: ‘moderate’ moisture stress, class 2 on a scale of 1 to 3. There is a note for this Land Quality; read it if you wish. Press Enter …to confirm the result for moisture availability and continue on to the next Land Quality. Land Quality ‘me’: Conditions for mechanization The window is replaced with a similar one for the Land Quality ‘me’, conditions for mechanization. The first land characteristic to be considered when evaluating for this quality, namely, ‘cfv-A’ (volume of coarse fragments in the surface soil), is displayed, along with its four classes. If coarse fragments are too numerous or too large, they interfere with mechanical land preparation. Supposing that there are no significant coarse fragments in the land area being evaluated,. Move the highlight to branch 1 …corresponding to class 1 ‘n’ (not enough to be named), and Press Enter …to confirm the selection. The next land characteristic to be considered when determining the conditions for mechanization, ‘slope’, is displayed. If slopes are too steep, farm equipment can not safely be operated. Notice that the highlight is already on branch 3, ‘C’ (sloping). Recall that this is the value of this land characteristic that we entered in the first Land Quality box (‘e’, erosion hazard). Also notice that the annunciator line is different: the arrow keys are no longer active. Since you have already entered a value for this land characteristic, you can’t change it now; to do so would be inconsistent. ALES still shows you this step in the decision tree, however. You can only confirm this value, or back up to the previous land characteristic. Press Enter …to confirm the selection. ALES now displays the final result: no limitation to mechanization, class 1 on a scale of 1 to 3. There is a note for this Land Quality; read it if you wish. Press Enter …to confirm the result for ‘conditions for mechanization’ and continue on to the next Land Quality. Land Quality ‘pl’: Planting conditions The window is replaced with one for the Land Quality ‘pl’, planting conditions. ALES Version 4.65 Users Manual Page 61 February 1997 The earliness of spring planting greatly affects maize yields in this region, because the yields are generally limited by the available heat units. If plants develop by early summer, they can capture more of the intense solar radiation of the long summer days. The first land characteristic to be considered when evaluating for this quality, namely, ‘dc’ (soil drainage class), is displayed, along with its six classes. Wet areas can not be prepared or planted by machine until they dry out, thus planting is considerably delayed. Note that the soil even in well-drained areas is usually saturated at the end of winter in central New York. Supposing that the land area to be evaluated is well drained, Move the highlight to branch 2 …corresponding to class 2 ‘wd’ (well-drained), and Press Enter …to confirm the selection. Now the drainage classes disappear, and next to the ‘dc’ name is the class we selected, namely, ‘wd’. Under this is the name of the next land characteristic to be considered on well-drained soils, namely, ‘fpsc’, the family particle size class (from USDA Soil Taxonomy), which as you can see is measured in eleven classes. There are more classes in Soil Taxonomy, but only these eleven occur in the evaluation area. The family particle size class is used here as an indication of the moisture retention of the entire soil profile. We have already told ALES that this land has a silt loam topsoil over a silty clay loam subsoil, so it most probably has a fine-loamy particle size class.1 So, Move the highlight to branch 7 …corresponding to class 7 ‘fil’ (fine-loamy), and Press Enter …to confirm the selection. The result for this Land Quality, namely ‘early’ planting class 1 on a scale of 1 to 4, should be displayed. There is a note for this Land Quality; read it if you wish. Press Enter …to confirm the result for ‘planting conditions’. 1ALES isn’t able to detect contradictions between different land characteristics, for example, if you stated that the soil was very fine, which would be impossible, given the textures, ALES wouldn’t detect the error. ALES Version 4.65 Users Manual Page 62 February 1997 Viewing the results of the consultation on the screen This was the last Land Quality in the model, so no more LQ boxes will be displayed. Instead, the central part of the screen is cleared, and a ‘Working...’ message flashes while ALES computes overall physical and economic suitabilities. When the ‘Working...’ message disappears, the screen is filled with the results of the consultation. At the top of the list are the four Land Qualities in the model, corresponding to the four decision tree boxes we just completed. The land area being evaluated has no planting condition or mechanization limitations, but is moderately limiting for both erosion hazard (class 3 out of 4) and moisture availability (class 2 out of 3). Suitability Below the Land Quality ratings are the final physical and economic suitabilities: 1. The physical suitability subclass (here, ‘3e’) 2. The economic suitability based on the present value (per unit land area)of the cash flow 3. The economic suitability based on the benefit-cost ratio of the cash flow 4. The economic suitability based on the internal rate of return of the cash flow 5. The economic suitability based on the gross margin (per unit land area & year), For all four kinds of economic analysis, ALES computes an economic suitability class using the FAO system of three suitable classes (S1: very suitable, S2: suitable, and S3: marginally suitable), and two unsuitable (N1: economically unsuited, and N2: physically unsuited)1 As you can see, this land area is suitable for the proposed land use. Although it is in physical suitability class 3, due to erosion hazard, the economic value is sufficient to place it in economic suitability class S1 (by IRR), S2 (by NPV and gross margin) or S3 (by benefit/cost ratio).2 At this point, we could follow the ‘Why?’ screens with ‘F2’ to see how the composite suitability values were obtained (this is explained in the next tutorial), or re-consult the same model, with different land data, with ‘F3’. To keep this tutorial short, however, we’ll just end the consultation. So, when you are all done looking at the results, Press F10 …to finish the consultation. You will now be asked if you wish to save the land data from this consultation. During the consultation, ALES made a temporary list of the data values you entered. These could be saved for starting another consultation with pre-defined data values, or for use in a more comprehensive evaluation. In the present case, the data we entered were hypothetical and not from a real map unit, so there is no point in saving them. Notice that the highlight is already on the default answer, ‘No’, so, 1The terminology and methods of economic suitability analysis are explained in the Chapter ‘Building ALES models’. 2The question of which economic metric to use, and how to assign economic suitability classes, is also explained in the Chapter ‘Building ALES models’. ALES Version 4.65 Users Manual Page 63 February 1997 Press Enter …to pass by this question and return to the list of evaluation models. Ending the consultation ALES now displays to the list of evaluation models, with the one we've just consulted, namely ‘Tutor1’, highlighted. If you wanted to re-consult the same model, you would press ‘Return’ to select the model. However, at this point we'll leave ALES. Press F10 …to leave ALES. The screen should clear and you will be looking at the DOS prompt again. Congratulations, you’ve finished the first tutorial! With this practice in interacting with ALES, and with some idea of how ALES models can be used to evaluate a land areas, it’s time to move on to a more comprehensive example. ALES Version 4.65 Users Manual Page 64 February 1997 Tutorial 2 : entering data and running an evaluation The objective of this tutorial is to teach you to define map units and their data and compute evaluation results for these land units, using an existing ALES model. It is intended for the model user, as well as the model builder.1 In this tutorial you will learn to: √ Start ALES in evaluation mode √ Enter and edit land unit descriptions from the keyboard √ Enter and edit land unit data from the keyboard √ Have ALES compute evaluation results for the land units √ View evaluation results as a matrix on the screen √ Use the ‘Why?’ screens to understand how results were computed √ Edit economic parameters and ask ALES to re-compute an evaluation √ Print evaluation results √ Delete map units from the database Before working on this tutorial, you should know the basics of interacting with ALES, such as moving the highlight in selection boxes, making selections, using function keys, and getting on-line help. These were all explained in Tutorial 1. This tutorial should take about three hours to complete. Starting ALES in ‘evaluation’ mode If your ALES syste m i s not i nstal l e d on dr i ve ‘C:’ i n di r e c tor y ‘\ DTM ’, c hange the fol l owi ng two DO S c ommands ac c or di ngl y To start ALES in evaluation mode from DOS: 1. Change to the disk where ALES is installed. Typically this will be disk drive ‘c:’. Supposing this to be the case, at the DOS prompt: Type c: and Press the Enter key.2 If you are already working on disk ‘c:’, you can omit this command. 2. Change to the directory where ALES is installed. Typically this will be directory ‘\dtm’. Supposing this to be the case, at the DOS prompt: Type cd \dtm and Press Enter. 1You will build your own evaluation model in the following tutorial. 2This key is variously called Return or Enter. It may be marked with a square arrow, ↵ ALES Version 4.65 Users Manual Page 65 February 1997 If you are already connected to directory ‘\dtm’, you can omit this command. 3. Then start ALES in ‘evaluation’ mode: At the DOS prompt: Type evaluate and Press Enter . 1 When you start ALES with the ‘evaluate’ command, you will be able to enter and edit land unit descriptions and data, but you won’t be able to alter the models, except for economic parameters such as prices and discount rates. At this point you should see the initial (“welcome”) screen, which includes the program name, your organization’s name, and the serial number. Press any key …for example, Enter, to continue beyond this screen. An initial menu will now appear: 1 2 3 ALES [Evaluate Only] Evaluate System Options About ALES In this tutorial we will only explore option 1, ‘Evaluate’. You use Option 2 ‘System Options’ to change system characteristics, such as screen colors, the human language (English, Spanish, French or Indonesian), and default directories. You use Option 3 ‘About ALES’ to obtain license, version and maintenance information. The highlight should be on Option 1, ‘Evaluate’. Press Enter …to select menu Option 1 ‘Evaluate’. You should now be looking at a list of evaluation models in the center of the screen and an annunciator line at the bottom of the screen. For this exercise we will use the model named ‘Tutor2’, which is a simplification of an evaluation for common field cropping systems in Cayuga County, New York State, USA. If ‘Tutor2’ does not appear in the list of evaluation models, you must first leave consultation mode (press Esc), and load it into your list of ALES models. The saved model ‘tutor2.als’ is included in the self-extracting archive ‘examples.exe’ on the distribution diskette. Copy this file to any convenient place on your hard disk and then run it to extract its files including ‘tutor2.als’, then start ALES with the DOS command ‘ales’, and then load ‘tutor2.als’ into the list of evaluations by using ‘F8’ when that list is displayed. 1This runs the DOS batch file EVALUATE.BAT, which in turn starts the MUMPS run-time system, which loads ALES in ‘evaluate’ mode, and runs it. ALES Version 4.65 Users Manual Page 66 February 1997 Move the highlight to the line in the choice box for ‘Tutor2’ Press F9 …to view the explanatory note. When you are done reading the note, Press F10 …to go back to the list of evaluation models. Now, Press Enter …to select evaluation model ‘Tutor2’. You will now see the main menu for ‘evaluation’ mode: 1 2 3 4 5 1a Main Options [Evaluate] Economic Parameters Data Evaluations Reports Consult Option 3, ‘Evaluations’ is highlighted, i.e. is the default choice, since the most common use is to compute and view evaluations. We will start out by entering land unit definitions and data, so, Move the highlight to Option 2 ‘Data’ Press Enter …to select it. Menu 1.3, ‘Data’, with ten Options, will now appear.1 Defining a homogeneous land unit Before we can enter land data, we must first define the map units we want to evaluate. We will work from the keyboard, so we’ll use Option 1, to define land units, and then Option 4, to enter data for these land units. Move the highlight to Menu 1.3 Option 1 ‘Definitions, From keyboard, Enter or edit’ Press Enter …to select it. A list of the map units that have been defined for this evaluation will now appear. These map units are all from the Cayuga County (NY) soil survey. We will add four new map units to this list: first, the drainage sequence (topo-sequence) of phases of the Schoharie-Odessa-Lakemont soils, and then an association of these three homogeneous map units. 1You may have noticed that Menu 1.3 appears when you select Option 2. This discrepancy is due to the numbering of menus in model-building mode and evaluate-only mode. ALES Version 4.65 Users Manual Page 67 February 1997 Notice that the list is longer than the screen; the usual cursor motion keys can be used to see the hidden part of the list. Notice that the annunciator line shows that ‘F3’ is to be used for a new map unit; so Press F3 …to begin the entry of a new map unit. An entry box should appear, asking for the code for the map unit. Land Mapping Unit code? _______________________ This is a kind of interaction we haven’t seen before. Occasionally ALES must ask you to type, rather than press function keys. This happens when ALES needs new or revised information. In the present case, we have told ALES (by using the ‘F3’ key) that we want to define a new map unit; therefore, ALES now needs a code for the new unit, so it is asking us for this code. Map unit codes are typically found on the map legend for a natural resource inventory such as a soil survey1, and is a mnemonic for the map unit name. Let’s enter the map unit ‘Schoharie silt loam, 2-6% slopes’. So, in the entry box, Type SeB Press F10 …to confirm this code. Since there isn’t already a map unit with this code, ALES will add it to the list. If you make a mistake while typing the code, erase the incorrect characters from the end of your entry with the ‘Backspace’ key (often marked with a left-pointing arrow, not to be confused with the ‘left arrow’ key). First, however, ALES needs some information about the map unit. ALES now displays a three-item data entry form, asking for (1) the map unit name, (2) whether it is homogeneous or compound, and (3) the number of hectares it occupies in the survey area. ---------- SeB (NEW land mapping unit) ------------1. * Name : 2. * (H)omogeneous or (C)ompound : 3. Area [acre] : •••••••••••••••••••••••••••••••••••••••••••• 1. * Name : The first question in the form is the descriptive name of the map unit. Notice that this question is marked with an asterisk ‘*’, which means that it is mandatory, i.e., you must answer it and can not leave it blank. 1But ALES map units can represent individual delineations, either of natural resources or of management units. See the Chapter ‘Building ALES models’ for details. ALES Version 4.65 Users Manual Page 68 February 1997 Type Schoharie Press ↓ loam, 2-6% 1 ……to confirm this answer and move to the next question. ALES is now asking for the type of map unit, homogeneous or compound. Homogeneous map unit This soil map unit is homogeneous, i.e., ALES will assume that it has the same values of all Land Characteristics over all its extent. Land characteristic values are typically measured in ranges, and in a homogeneous map units, these ranges cover all the variability in the map unit. Type h Press ↓ …to confirm this answer and move to the next question. ALES is now asking for the land area of this map unit. Notice that this question is not marked with an asterisk ‘*’, which means that it is not mandatory. We will enter a value nonetheless. In the study area, map unit ‘SeB’ occupied 550 acres2. So, Type 550 Press ↓ …to confirm this answer and move to the next question. Since there are no questions below this one, the highlight moves back to the top of the form and the first question. If you make typing mistakes while entering items in the form, you can move between questions with the up- and down-arrow keys. Within a question, the left- and right- arrow keys can be used to move around, and the ‘Backspace’ and ‘Del’ keys can be used to erase mistakes. You can always press ‘F1’ to see a list of available keys. Now you’ve filled in all three questions of the form, so Press F10 …to confirm all the answers in the form at once. ALES now records the new map unit in the database. Notice that the list of map units now includes the map unit we just defined, ‘SeB’, and in fact the highlight is on it. 1As you can see from the annunicator line, you can also use Enter to move down one question. 2Please accept our apologies for the US customary units that are used throughout this tutorial. Unfortunately, the United States of America has not decided to join the rest of the world with respect to the use of SI or even metric units. Since the knowledge sources (maps, production costs, yields etc.) are expressed in US customary units, we were forced to use these for our tutorial. ALES Version 4.65 Users Manual Page 69 February 1997 Once you’ve created the map unit definition, you can’t change the code, or whether the map unit is homogeneous or compound, but you can change the descriptive name or area. To practice editing in a data entry from, we’ll change the descriptive name of map unit ‘SeB’. Notice that the annunciator line shows that ‘F5’ or ‘Return’ may be used to edit the definition. So, with the highlight on map unit ‘SeB’, Press F5 …to begin editing this map unit definition. The data entry form for the definition of map unit ‘SeB’ appears, but because this is an existing (as opposed to new) map unit, the form has only two items, and your original answers appear as defaults, i.e., if you don’t change them, ALES will keep their existing values. Press ↓ …to move to the last question (the land area). We will change the answer from ‘550’ to ‘650’. The easiest way to edit answers in a data entry form is to clear the current answer, and then type the new answer. Notice in the annunciator line that ‘F4’ is marked ‘Clear’. So, Press F4 …to clear the existing answer, and then Type 650 …which is the correct number of acres. We’re done with this form, so, Press F10 …to confirm all the answers in the form at once and return to the list of map units. We’re done adding map unit definitions for now, so, Press F10 …to return to Menu 1.3 ‘Data’. Entering and editing land unit data from the keyboard Before ALES can evaluate a map unit, it must know the data values for each land characteristic that the model builder has included in the evaluation. In other words, we must fill in the data base for this map unit. Move the highlight to Menu 1.3 Option 4 ‘Data, From keyboard, Enter or edit’ Press Enter …to select it. ALES will now ask which data entry template should be used to enter the data. There are two choices in this model: template ‘cl’ (climatological LC’s) and template ‘ss’ (Cayuga County soil survey data), as you can see from the choice box. Data entry template Data values are entered using one or more data entry templates. These are lists of the Land Characteristics which are included in the database. Model builders usually group related data items (e.g. that appear on the same paper ALES Version 4.65 Users Manual Page 70 February 1997 form or in the same survey report) into templates, so that the model user (you) can enter data separately for each group. In the present case, there are two sources of data: (1) climate maps (Cornell University 1987) and (2) the soil survey report (Hutton 1971). The model builder created two templates (‘cl’ and ‘ss’), one for each data source. The model builder can leave notes explaining how data items in the template can be obtained, or other information about the template. Notice that both templates in this list have associated notes, as indicated by the degree signs, ‘°’, to the right of each code. If you wish, you can Press F9 to read the note for ‘cl’ (this is the highlighted code), and then Press F10 when you’re done reading the note. Let’s tart by entering the climate data. The highlight should already be on the correct template, ‘cl’ (if not, move the highlight until it is on template ‘cl’), and Press Enter …to select template ‘cl’. ALES now displays a selection list of homogeneous map units. This is a good opportunity to learn the ‘unique prefix’ method of moving the highlight in selection boxes. This method is especially useful in long lists such as the one that is now displayed. In this method, you use the typing keys to make a choice by typing a unique prefix of your answer. A prefix of a string of characters is a group of characters that begin the string, and a unique prefix of one string in a set of strings is a prefix that distinguishes the string from all the others. For example, in the set of strings: ‘Example’, ‘Exercise’, ‘Explanation’, the unique prefixes would be ‘Exa’, ‘Exe’, and ‘Exp’, respectively. Of course there may be strings with no unique prefix. For example, if ‘Ex’ were added to the set, it wouldn’t have one. Now you can see the most efficient way to move the highlight to the map unit we just defined: type the shortest unique prefix of the code ‘SeB’. Begin with the first letter of the code; Type S (remember to use the ‘Shift’ key, since the case must match) You will see the highlight move to ‘SeB’. In this list, there are no other map unit codes that begin with ‘S’, so just the one letter ‘S’ was a unique prefix. We’ve successfully moved the highlight to the correct map unit, so Press Enter …to select this map unit. You will now see a data entry form with three items, one for each land characteristic in template ‘cl’. The highlight is on the first question, ‘ffs’: -------- Data for land mapping unit ‘SeB’ ----------------1. ffs (frost-free season) : 2. gdd50 (growing degree days, base 50F)°: 3. pptMS (May-September precipitation) : ••••••••••••••••••••••••••••••••••••••••••••••• 1. ffs (frost-free season) : Each question must be answered with one of the class codes for the LC. The highlight is on the first data item, which is repeated at the bottom of the form. ALES Version 4.65 Users Manual Page 71 February 1997 Pop-up list The easiest and most reliable way to enter data is to use ‘F3’ to pop up1 a list of the possible choices (i.e. the class codes), and then use pick the correct choice out of the pop-up list. So, Press F3 … to pop up a list of choices. A new window appears, with the five choices for the first data item, ‘ffs’, which stands for ‘frost-free season’. The highlight is on the first choice: Choices for ‘ffs (frost-free season)’ ------------------------110-130 [110-130 days] 130-150 [130-150 days] 150-170 [150-170 days] <110 [0-110 days] >170 [170-190 days] ------------------------Schoharie soils occur in an area with 150 to 170 frost-free days, so Move the highlight to ‘150-170’ Press Enter …to select this data value. You will see ‘150-170’ appear in the answer space in the form. The highlight and answer box move to the next question, ‘gdd50’, which stands for ‘Growing degree days, base 50°F’. For practice, we will answer this question using another method, namely, typing the answer in the answer box. The correct answer here is ‘2.4-6k’, but we will make a mistake on purpose and see what ALES does. So, Type 2.4-6 …making sure not to type the ‘k’ at the end of the class name, and then Press ↓ …to confirm this entry and attempt to move to the next question. An error message now appears in the middle of the screen, telling you that the data value just entered is not one of the correct values, and recommending the ‘F3’ method of data entry. So, Press any key …to remove the error message and return to the data entry form, still showing the incorrect answer. The cursor is already at the end of the entry, so to correct the entry, 1The term ‘pop-up’ comes from the fact that this list just appears ‘out of nowhere’, at the position of the highlight. ALES Version 4.65 Users Manual Page 72 February 1997 Type k …that is, the missing letter at the end of the answer, and Press ↓ …to confirm this entry and move to the next question. Now you can see why the ‘F3’ method of data entry is preferable; you only need to type a unique prefix of the answer, not the entire answer, and it’s impossible to make a typing mistake. Also, you don’t have to remember the class codes. Now the highlight and answer box are on the last question, ‘pptMS’, which stands for ‘May-September precipitation’. Answer <400 …using either method (‘F3’ or typing the answer), as you wish. Press F10 …to confirm all the answers in the form, and return to the list of map units. This completes data entry for the climate data for this map unit. Now we will enter the soil survey data. These data are entered with a different template. To change templates, first Press F10 …to leave the map unit list and return to the template list. Move the highlight to template ‘ss’ (‘Cayuga County soil survey’) Press Enter …to select template ‘ss’. Now ALES displays the list of map units again. Move the highlight to map unit ‘SeB’ Press Enter …to select this map unit. ALES now displays a data entry form with fifteen items, one for each land characteristic in the template. Fill in the data entry form ALES Version 4.65 Users Manual Page 73 February 1997 …according to the following table. 1. 2. 3. 4. 5. 6. 7. 8. 9. 10. 11. 12. 13. 14. 15. parent material limestone slope previous erosion depth to bedrock drainage class flooding reaction family particle size class texture of surface soil sand modifier, surface soil type of coarse fragments volume of coarse fragments texture of subsoil sand modifier, subsoil : : : : : : : : : : : : : : : lac d B m d mwd n mial f sil (lacustrine) (dominant) (gently sloping) (moderate) (deep) (moderately well drained) (never) (mildly alkaline) (fine) (silt loam) n sicl (not enough to be named) (silty clay loam) Press F10 …to file your answers and return to the list of map units. Press F10 …to return to the list of templates, and again Press F10 …to return to Menu 1.3 ‘Data’. Copying land units and editing land unit data Now we want to define and enter data for the two other members of the Schoharie-Odessa-Lakemont drainage sequence. Odessa and Lakemont soils resemble Schoharie for the most part, and only differ with respect to their drainage class, previous erosion, and surface texture. The climate is the same. So, we can save a lot of work by taking advantage of the ability of ALES to copy entities in almost any list of definitions. Move the highlight to Menu 1.3 Option 1 ‘Definitions, From keyboard, Enter or edit’ Press Enter …to select this option. A list of the map units that have been defined for this evaluation will now appear, including map unit ‘SeB’ which we just defined, and for which we entered data. This is the map unit we are going to copy, so, Move the highlight to map unit ‘SeB’ Notice that the annunciator (bottom line of the screen) shows that the ‘F6’ key is to be used to copy land unit definitions; so Press F6. ALES Version 4.65 Users Manual Page 74 February 1997 …to begin the copy. An entry box should appear, asking for the code for the map unit: Land Mapping Unit code (copy from ‘SeB’)? ___________ This is similar to the entry box we saw when we pressed ‘F3’ to define a new map unit, except that the box shows that the new map unit will be copied from ‘SeB’. Type OdA Press F10 …to confirm this code. Now ALES copies all information from ‘SeB’ to ‘OdA’, including data values. Once the data has been copied, a two-item data entry form as for a new map unit will be displayed: ---------- OdA (Schoharie loam, 2-6%) --------------1. * Name : Schoharie loam, 2-6% 2. Area [acre] : 650 •••••••••••••••••••••••••••••••••••••••••••• 1. * Name : Schoharie loam, 2-6% Since this map unit was copied from another, the answers are filled in with the values of the original map unit, namely, ‘SeB’. The first question, the descriptive name, is of course incorrect. So, Press F4. …to clear the answer for the first question, and then Type Odessa Press ↓ silt loam, 0-2%. …to confirm this answer and move to the next question. For the second question, Enter 250 …i.e., the map unit ‘OdA’ has an extent of 250 acres for the area Press F10 …to confirm all the answers in the form and return to the list of map units, with the highlight on the newly-defined map unit, ‘Oda’. Using the same techniques as explained in the previous paragraphs, Make a copy of map unit ‘OdA’ as new map unit ‘Lc’, Change its descriptive name to ‘Lakemont silty clay loam’ Change its area to ‘400’ acres ALES Version 4.65 Users Manual Page 75 February 1997 Return to the list of map units. We’ve added two copies of ‘SeB’ to the list and renamed them. Now we have to change a few soil-related Land Characteristics for these two new map units ‘Lc’ and ‘OdA’. Press F10 …to return to the ‘Data’ menu Select Menu 1.3 Option 4 ‘Data, From keyboard, Enter or edit’ In the list of data entry templates, Select template ‘ss’ (Cayuga County soil survey) In the list of homogeneous map units, Select map unit ‘OdA’ (Odessa silt loam, 0-2%) The 15-item data entry form should now be displayed, and the data values we entered for ‘SeB’, from which map unit ‘OdA’ was copied, should be displayed in the form. Map unit ‘OdA’ differs from ‘SeB’ only in 3 respects: slope, previous erosion, and drainage class, so you need only change the answers to questions 3, 4, and 6. The Odessa soils occupy slightly lower and flatter landscape positions than Schoharie soils. They are not eroded and are somewhat poorly drained because of their low landscape position. When the data entry form first appears, question 1 is the active question. Move to question 3 ‘slope (slope of land)’ The answer box contains the value ‘B’ copied from map unit ‘SeB’; this must be changed to the correct value for this map unit ‘OdA’. Change the answer for question 3 to ‘A’ Move to question 4 ‘erode (previous erosion)’ Change the answer for question 4 to ‘n’ Move to question 6 ‘dc (drainage class)’ Change the answer for question 6 to ‘spd’ The rest of the data values copied from ‘SeB’ are correct, so Press F10 …to confirm the entire form and return to the list of map units. Now we have to edit some data values for the second copied map unit, ‘Lc’. Select map unit ‘Lc’ (Lakemont silty clay loam) ALES Version 4.65 Users Manual Page 76 February 1997 Using the same techniques as explained in the previous paragraphs, Edit the data values for map unit ‘Lc’ (Lakemont silty clay loam): A 3. slope 4. previous erosion n pd 6. drainage class Lakemont soils have a slightly heavier topsoil than the better-drained members of the drainage sequence, so we must change the answer to question 10 (texture of surface soil) from silt loam to silty clay loam. Let’s practice another way of moving among questions in a data entry form. You could press ‘Enter’ or ‘↓’ enough times to arrive at question 10, but a quicker way is to jump directly to another question. Notice in the annunciator line that ‘F5’ is marked ‘jump’. So, Press F5 …to start the jump. A small answer box will appear, asking which question to which to jump. Type 10 Press F10 …to confirm the question number. The answer box will disappear and the highlight will move to question 10. Change the answer for question 10 to ‘sicl’ Press F10 …to confirm the entire form. You have now entered correct data for all three members of the drainage sequence. Press F10 …to return to the list of templates, and again Press F10 …to return to Menu 1.3 ‘Data’. Defining a compound land unit Now we will practice entering another kind map unit: a compound map unit. This kind of map unit is made up of two or more homogeneous constituents. You will define an association of soil units that has as constituents the three homogeneous map units (‘Lc’, ‘OdA’, and ‘SeB’) you just defined. ALES will evaluate each constituent separately, and then combine the results. Compound map unit Compound map units are commonly used for smaller-scale maps (usually at 1:50 000 and smaller scale ratios), such as a general soils map of a county or region. At these scales, the individual constituents can’t be mapped separately, but since they are present in regular and predictable patterns on the landscape, a compound unit which contains the homogeneous soils ALES Version 4.65 Users Manual Page 77 February 1997 can be defined and mapped. They can also be used to evaluate an economic unit, such as farm, that consists of several land types. In this case, you will define a drainage association of heavy-textured soils on recent lacustrine sediments: the imperfectly-drained Schoharie silt loam, the somewhat poorly drained Odessa silt loam, and the poorly drained Lakemont silty clay loam. Also included in this association are some topographically-higher areas of fine-textured glacial till that were not covered by lacustrine sediments; these are the Cazenovia silt loams. To define this compound map unit, Select Menu 1.3 Option 1 ‘Definitions, From keyboard, Enter or edit’ ALES will display the list of map units. To define the new map unit, Press F3 …to begin the entry of a new map unit. An entry box should appear, asking for the code for the map unit. Enter and confirm the new map unit code A13 ‘A13’ stands for ‘association number 13’; this is the number used in the Cayuga County soil survey ALES now displays a data entry form for the map unit definition. Fill in the form as follows 1. Schoharie-Odessa association 2. c 3. 45000 Make sure to answer the second question with ‘c’; this tells ALES that ‘A13’ is a compound map unit.. Press F10 …to confirm the form. Homogeneous constituents of a compound map unit Now you will see, at the upper right of the screen, a window for the list of the constituents of this compound map unit. We told ALES that ‘A13’ was compound, so now ALES needs to know which homogeneous map units are included in the compound unit. At first, the list is empty, containing only the dummy item ‘Add a new item’. Looking at the annunciator, you can see that ‘F3’ is again used to enter a new item, in this case, to add a homogeneous map unit to the list of constituents. So, Press F3 …to add the first constituent. A selection list will now appear on the right of the screen, showing all the homogeneous map units. Notice that this list is not the same as the choice box in which we added the ‘A13’ map unit. That choice box is still visible in the middle of the screen (although it is partially covered by ALES Version 4.65 Users Manual Page 78 February 1997 the more recently-active windows), and you can see that it includes both compound and homogeneous map units. That choice box was used to define the compound map unit, whereas the currently-active selection list is used to define the homogeneous constituents of the compound unit. You must pick the first homogeneous constituent out of the selection list. Select map unit ‘SeB’(Schoharie loam, 2-6%) You will see ‘SeB’ added to the list of constituents; in fact it is the only item so far. Now repeat the selection process to add three more constituents: Press F3 Select map unit ‘OdA’(Odessa silt loam, 0-2%) Press F3 Select map unit ‘Lc’(Lakemont silty clay loam) Press F3 Select map unit ‘CeB’(Cazenovia silt loam, 2-8%) Notice how items that you select as constituents are removed as choices for further selections. Once you added these four items to the list Press F10 …to confirm the list of constituents. Now ALES knows what constituents are included in the ‘A13’ association, but it also needs to know their proportions within the compound map unit. These proportions are used to compute weighted averages for crop yields, costs, and economic suitability. You will now see another data entry form, of four items, namely, the proportion of each of the four homogeneous map units. The default values of 25% are shown for each one. The default of 25% in this case is because there are four units and ALES assumes, in the absence of more specific information, that they occupy equal proportions of the association. In fact, according to the soil survey, the true proportions are: 40% Schoharie, 30% Odessa, 15% Lakemont, and 15% Cazenovia. Let’s change the form accordingly: Fill in the form as follows Percent ‘CeB’: Percent ‘Lc’: Percent ‘OdA’: Percent ‘SeB’: 15 15 30 40 Press F10 ALES Version 4.65 Users Manual Page 79 February 1997 …to confirm the form. ALES now saves the information for the new map unit, and you will see the new map unit ‘A13’ in the list of map units. Now we’re done entering map unit definitions, so Press F10 …again to remove the list of map units and return to Menu 1.3 ‘Data’. Press F10 …again to return to the Menu 1a ‘Main options’. Note that we can’t enter data for a compound map unit; this is because the data is associated with each of the homogeneous constituents. The only information that ALES has for a compound map unit is the list of its constituents and their proportions. Getting ALES to compute evaluation results for the land units Now we’ve defined some map units and entered data values for these map units. Let’s see how well-suited are the various map units for the Land Utilization Types defined by the model builder. In other words, it’s time to compute an evaluation. To begin this process, Select Menu 1a Option 3 ‘Evaluations’ ALES now displays Menu 1.4 ‘Evaluations’1, which contains the actions that you will take to compute an evaluation, view the results on the screen, and print the results or write them to disk file. The first thing, of course, is to compute. Select Menu 1.4 Option 1 ‘Compute an evaluation’ ALES now displays a ‘set’ box. In this interaction, you can select as many items out of this list as you wish, and the action to be performed will be done on all the selected items, and on no others. Here, as you can see, the list is of the Land Utilization Types, that is, the land uses for which we are evaluating the land. The list has three land uses, with codes ‘ccc’, ‘ccc-d’, and ‘ttpp’; these are the LUTs defined by the model builder. We are being asked to specify which LUTs ALES should evaluate; let’s compare all three land uses. Notice in the annunciator line that ‘F6’ is marked ‘All’. So, to select all items in this set, Press F6 Notice that all the items in the list are now marked with the diamond symbol, ‘♦’. We’re done selecting the set, so Press F10 …to complete the selection. 1You may have noticed that Menu 1.4 appears when you select Option 3. Again, this discrepancy is due to the numbering of menus in model-building mode and evaluation-only mode. ALES Version 4.65 Users Manual Page 80 February 1997 Now ALES displays another set box, namely, a list of the map units that can be evaluated. Let’s select only the association we just defined, namely ‘A13’. Since ‘A13’ is the first item in the list, the highlight should already be on ‘A13’ (if not, move the highlight there). Notice in the annunciator line that ‘F3’ is marked ‘Select’. So, to select the highlighted item ‘A13’ for the set, Press F3 Notice that this item, and only this item, is now marked with the diamond symbol, ‘♦’, and that the highlight has moved down to the next item, so that it could be selected next if we wished. In this example we only want to evaluate map unit ‘A13’, so Press F10 …to complete the selection. Now ALES begins to compute. The annunciator (25th) line is replaced with a progress report, showing the Land Utilization Type and map unit code that ALES is currently evaluating. A message at the lower right informs us that we can press the ‘Esc’ key during the computation to interrupt it. This is in case we asked for a large evaluation and decide that it’s taking too long. The computation takes from 5 seconds to 3 minutes, depending on your computer1. The amount of time that ALES requires to compute an evaluation depends on the product of the number of Land Utilization Types and map units selected. In the present case, we selected three Land Utilization Types and five map units (the association and, implicitly, its four constituents), so ALES must compute 15 pairs. The computation time also depends on the complexity of the model (especially the number of decision trees, the path length in each tree, and the length of the LUT’s planning horizon), and, of course, the processor speed. Disk speed is only a minor factor, due to the fact that MUMPS saves copies of recently-used disk blocks in primary memory. As a rough estimate, an average-sized physical and economic model on a 25Mhz 386SL takes about 4 seconds per LMU/LUT combination, on a 12MHz IBM PC/AT about 6 seconds, and on an IBM PC/XT about 15 seconds. So this computation, which has 3 LUT × 5 LMU = 15 combinations should take about one minute on a medium-speed 386. You will notice the progress report changing as the evaluation proceeds. When ALES finishes computing, the annunciator line reappears and we return to Menu 1.4. Now we can view the evaluation results. Viewing evaluation results as a matrix on the screen To view the evaluation results, Select Menu 1.4 Option 2 ‘View evaluation results’ ALES now asks which kind of report you would like to see. Let’s start by looking at the predicted net present value (‘NPV’), which considers the time value of money and the sequence of costs and benefits across the entire planning horizon of a LUT. 1If you get bored waiting for the computation to finish, you might try to compute the physical and economic suitability of five map units times three Land Utilization Types (15 combinations) by hand. ALES Version 4.65 Users Manual Page 81 February 1997 Select Report type ‘N’ (Net Present Value…) ALES now asks which kind of NPV report you would like to see; the default is Net Present Value. Again, Select NPV Report type ‘N’ (Net Present Value) ALES now asks you if you want the results to be normalized (i.e., expressed on a per-area basis) or not (i.e., summed over all the area of the map unit.). The default is to normalize (‘Yes’); this answer should already be highlighted, so Select ‘Yes’ (report results on a per-area basis) ALES clears the screen and displays a ‘Working...’ message appears while it formats the results for display. Then it clears the message and displays the evaluation results matrix. Notice in the upper-right-hand corner of the matrix the title and units for this display, in the present case, ‘Net Present Value [$/acre]’1. The evaluation results matrix is a two-dimensional array with the rows being the map units that were evaluated (here, ‘A13’, ‘CeB’, ‘Lc’, ‘OdA’, and ‘SeB’), and the columns being the Land Utilization Types for which an evaluation was computed (here, ‘ccc’, ‘ccc-d’, and ‘ttpp’). Since map unit ‘A13’ is compound, ALES automatically evaluated its (homogeneous) constituents in order to be able to evaluate the compound map unit, hence there is one row in the matrix for each of its constituents as well as for the compound map unit itself. The cells of the matrix show results. Each cell is located at the intersection of a single row (map unit) and column (Land Utilization Type), and shows the result for that map unit and Land Utilization Type. Evaluation results matrix Here is the format of an evaluation matrix: [Units] LUT1 LUT2 … LUTN LMU1 Value1,1 Value1,2 … Value1,M LMU2 Value2,1 Value2,2 … Value2,N … … … … … LMUM ValueM,1 ValueM,2 … ValueM,N The highlight is initially on the upper left hand corner of the matrix; this cell shows the results for the first row, ‘A13’, and the first column, ’ccc’. In the present case, the cell contents are predicted net present values. So, looking at the highlighted cell, we see that if we implemented Land Utilization Type (column) ‘ccc’ on map unit (row) ‘A13’, according to the ALES model and the data we entered, we would expect a net present value of $101.13 per acre. 1 Each evaluation can have a different currency symbol and unit of areal measure, so the choice of dollars and acres for this example is because the available data was expressed in these units. ALES Version 4.65 Users Manual Page 82 February 1997 The matrix provides us with useful comparisons among and within land units and Land Utilization Types. First, we can look in a given column (representing a LUT) to see which land area is most remunerative for that LUT. For example, looking in the first column (representing ‘ccc’), we see that map unit ‘CeB’ is far superior to the other map units as a land area on which to implement continuous corn with no land improvements. This answers the question: ‘What is the best land for this land use?’. Next, we can look in a given row (representing a map unit) to see which LUT’s are most remunerative on that map unit. For example, looking in the first row (representing the compound map unit ‘A13’), we see that LUT ‘ttpp’ has a far-higher present value than the others. This answers the question: ‘What is the best use for this land unit?’. We can compare entire columns to see the overall relation among Land Utilization Types. For example, comparing the two leftmost columns, for ‘ccc’ (continuous corn) and ‘ccc-d’ (continuous corn with land drainage), we can see that land drainage increases the NPV (i.e. is cost-effective according to this economic metric) for map units ‘Lc’ and ‘OdA’ (i.e., the somewhat poorly, and poorly drained members of the drainage sequence), but not for map units ‘SeB’ and ‘CeB’ (i.e., the well- drained and moderately well drained members of the drainage sequence). If a farm was on a typical association of these (i.e., association ‘A13’), draining the entire farm would not be cost-effective. Another comparison we can make is between corn (in the leftmost two columns) and pasture (LUT ‘ttpp’, in the rightmost column). This model indicates that pasture is always much more profitable than corn. Of course, a farm must usually be made up of a balance of enterprises, so this result does not mean that no corn should be grown. We can compare entire rows to see the overall relative ‘value’ of map units. For example, it is clear that ‘CeB’ is superior to the other map units for all three LUTs. The comparisons of Net Present Values presented in the previous paragraphs are only valid because we have specified equal-length planning horizons for all three LUT’s in the model. Using the ‘Why?’ screens to understand how results were computed The matrix now on the screen gives results, but it is natural to wonder, what is the basis for these? How were they computed? What data were used? What assumptions were made by the model builder? Which factors were considered, and which were omitted? The model user, i.e. the ‘consumer’ of the land evaluation, has a right and a duty to be suspicious! One of the outstanding features of ALES is that it allows you to review the logic and data that it used to reach its conclusions. Although computation proceeds in a forward direction, from basic data to final suitability, the logic is most conveniently reviewed using a backward chain, beginning with the results and proceeding backwards through intermediate calculations to the land data. In this ‘top-down’ approach, the most important points are seen first, and only as much complexity as necessary to understand the results needs be reviewed. To examine the reasoning for a particular map unit – Land Utilization Type pair, we must first move the highlight so that the matrix cell containing that pair’s result is highlighted. We can move among columns (i.e. left and right) by using the left and right arrow keys ‘←’ and ‘→’. We can move among rows (i.e. up and down) by using the up and down arrow keys ‘↑’ and ‘↓’, and the ‘PgUp’, ‘PgDn’, ‘Home’, and ‘End’ keys (see the ‘F1’ help for a complete description). An easy way to move among rows is the prefix method, i.e. by typing a unique prefix of the map unit name. Let’s see why the Cazenovia map unit (‘CeB’) has a predicted NPV of $239.45 per acre for continuous corn with land improvement (‘ccc-d’). Press → …to move the highlight to the column corresponding to ‘ccc-d’. ALES Version 4.65 Users Manual Page 83 February 1997 Press ↓ …to move the highlight to the row corresponding to ‘CeB’. Now the highlight is on the cell which we want to query. Notice in the annunciator line that the ‘F2’ key is marked ‘Why?’. So, Press F2 …to initiate the ‘Why?’ screens. ‘Why?’ screens ALES now replaces the rightmost two-thirds of the screen with a ‘Why?’ box (notice the box title). In the box are the full names of the land unit and Land Utilization Type, followed by the discount rate, i.e. rate of interest at which cash flows are discounted. Below this is a table showing the cash flows and their present value for each year in the planning horizon. The screen is only big enough to show the first 12 years. Notice that the last line in the box says ‘...<more>...’; this indicates that there are more lines below. To see these lines, Press PgDn …and ALES will scroll the screen until the final years of the planning horizon are visible. The key number here is the very last one on the lower right: $239.45 per acre is the NPV. This was obtained by summing the column above it, each entry in this column representing the NPV for that year. For example, year 1 has an NPV of $-393.16 (i.e. a net negative cash flow), year 2 has an NPV of $79.14, etc., this column summing to $239.45. All of the ‘Why?’ screens are explained by a ‘help’ screen Press F1 …to view the help screen. You will see an explanation of ‘present value’, namely, that a cash amount (in or out) is discounted as follows: Present Value 100 PresentValue := CashAmount ∗ 100 + DiscountRate YearsFromPresent Discount rate where the DiscountRate is the rate at which money may be borrowed, expressed as a percent (remember, this was shown on the third line of this ‘why?’ screen, and in the present case is 10%), and YearsFromPresent is the number of years from the present when the CashAmount will be spent or received. Note that cash in is considered to be received at the end of a year; this is why the year-1 cash in of $280.00 is only worth $254.54 when discounted; by contrast, cash out is considered to be spent at the beginning of the year, so that the year-1 cash out of $647.70 is worth the same amount when discounted. Thus the effective years of discounting for cash out always lag those for cash in. When you are done reading the ‘help’ screen Press F10 ALES Version 4.65 Users Manual Page 84 February 1997 …to return to the ‘Why?’ screen. Notice that the annunciator line at the bottom of the screen shows how to find out more details about the calculation: ‘F2’ is marked ‘Why Cash In?’ and ‘F3’ is marked ‘Why Cash Out?’. Let’s first determine how the figure of $280.00 cash in was determined, so Press F2 …to display the second ‘Why?’ screen in the backward chain. ALES displays a selection box, asking which year’s cash flow should be explained. In this case, all the years have the same cash in, so Press Enter …to accept the default choice of year 1. ALES now displays a new ‘Why?’ box (the previous one is hidden behind), explaining the cash flow in: it is based on one harvest this year of one crop, namely grain maize, with a return of $280.00 per crop. If this Land Utilization Type included more crops or harvests in year 1, this box would be more important, showing all the outputs harvested this year. Notice in the annunciator line that the ‘F2’ key is now marked ‘Why an output return?’. So, Press F2 …to display the third ‘Why?’ screen in the backward chain. ALES displays a new ‘Why?’ box, showing why each crop of maize is predicted to return $280.00 per acre. Optimum (S1) yield Proportional yield The computation of the return for one crop is the optimum yield (here, 140 bushels of grain per acre), multiplied by the proportional yield predicted for this particular map unit (here, 0.8, or 80% of optimum), resulting in a predicted yield (here, 112 bushels of grain per acre); this in turn is multiplied by the selling price of the crop per unit yield (here, $2.50 per bushel), resulting in the predicted return (here, $280.00 per acre). The ‘optimum’ or S1 yield was set by the model builder, and can not be edited in ‘evaluation’ mode. The selling price was also set by the model builder, but you can edit it to reflect changing conditions. We’ll do that in the next section. Right now, we will continue the backward chain some more, because one part of the computation is not yet explained, namely, how the proportional yield was obtained. This is really the heart of an ALES economic evaluation: determining how a particular land unit will perform, relative to the optimum in the evaluation context. To examine this, Press PgDn …to move to the bottom of the current ‘Why?’ box. ALES will scroll until the last line is visible. You will notice three groups of lines in the display relating to proportional yield: (1) the proportional yield decision tree, (2) multiplicative yield factors, and (3) limiting yield factors. We’ll discuss these in order. In the present case, we can see that the proportional yield decision tree wasn’t defined by the model builder; because in this case there were no interactions between Land Qualities that couldn’t be accounted for by one of the other two methods. There are two kinds of independent effects that can be accounted for in ALES: limiting and multiplicative. ALES Version 4.65 Users Manual Page 85 February 1997 Limiting yield factors Limiting yield factors are used by the model builder to represent limiting effects of a Land Quality. The proportional yield predicted by the proportional yield decision tree (if any) is absolutely limited by any limiting yield factors for Land Qualities that were not encountered on the decision tree path. In other words, the yield can not be any greater than the most limiting of the limiting yield factors for the set of Land Qualities in the evaluation, not including those qualities that the model builder already included in the proportional yield decision tree. In the present example, there was one limiting yield factor defined by the model builder, namely, ‘c’ (temperature regime), and this Land Quality did not appear in the decision tree path (since there wasn’t a decision tree). However, this map unit has no temperature regime limitation, since it was determined to have a full season (class 1). So, this factor did not affect the yield. Multiplicative yield factors Multiplicative yield factors are used by the model builder to represent multiplicative effects of a Land Quality. The proportional yield predicted by the proportional yield decision tree and the limiting yield factors (if any) is multiplied by any multiplicative yield factors for the Land Qualities that were not encountered on the decision tree path. In the present example, there were two multiplicative yield factors defined by the model builder, namely, ‘e’ (erosion hazard) and ‘m’ (moisture availability). Since the severity level of ‘e’ (erosion hazard) was determined to be 1 (none) during the computation, and this Land Quality did not appear in the decision tree path (since there wasn’t a decision tree), the yield factor is 1, i.e. no reduction from the optimum. Similarly, the severity level of ‘m’ (moisture availability) was determined to be 2 (moderate stress), and the corresponding yield factor is 0.8, i.e. a reduction to 80% of the optimum. Now we know how the proportional yield was determined, but this leads to another question: how were the severity levels of the three Land Qualities which figured in the proportional yield determined? Notice that ‘F2’ in the annunciator line is marked ‘Why a severity level?’. So, Press F2 …to display the fourth ‘Why?’ screen in the backward chain. ALES displays a selection box , asking which Land Quality, of the three, you want to examine. Let’s find out why there was moderate moisture stress. So, Select Land Quality ‘m’ (moisture availability) ALES now displays a ‘Why?’ box, explaining why land unit ‘CeB’ has the severity level 2 of Land Quality ‘m’ of Land Utilization Type ‘ccc-d’. The explanation consists of displaying the path taken in the severity level decision tree. This is our first encounter with a decision tree, so let’s take some time to understand it. Severity level decision tree In ALES, the model builder expresses inferences by constructing decision trees. At each level in the decision tree a different factor (in the present case, Land Characteristics) which is necessary to reach a final decision is considered. Each factor divides the tree in branches, depending on how many classes there are for the factor. At the lowest level of the tree (the leaves) is a decision, i.e. the result (in the present case, a severity level of Land Quality). A severity level decision tree is constructed by the model builder so that ALES may determine the severity level of a Land Quality from one or more values of Land Characteristics . ALES Version 4.65 Users Manual Page 86 February 1997 In the present example, since map unit ‘CeB’ was deep to bedrock (first level of the tree), had no previous erosion (second level of the tree), has a silty clay loam subsoil (third level of the tree), and has less than 400mm summer precipitation (fourth level of the tree), it is predicted to have a moderate moisture stress in the context of this LUT. Notice that two lines begin with the degree sign, ‘°’, indicating that there are notes that apply to these lines Let’s look at the one for the decision tree; this is where the model builder has explained the structure of the tree. Press F9 …to read a note. Since there are two notes, ALES asks you which one you want to read. Select note 2 (‘Severity Level decision tree…’) ALES now displays the explanatory note for the severity level decision tree. When you are done reading the note Press F10 …to return to the selection box for notes. Press F10 …to return to the fourth ‘Why?’ box. We are almost at the end of the ‘Why?’ chain, but there is one more level, namely, the actual values of the Land Characteristics that determined the path through the severity level decision tree. Notice that ‘F2’ in the annunciator line is marked ‘Why a land characteristic value?’. Press F2 …to display the fifth ‘Why?’ screen in the backward chain. ALES displays a selection box appears, asking which land characteristic, of the four, you want to examine. Let’s find out why the depth to bedrock was deep. So, Select Land Characteristic ‘dbr’ (depth to bedrock…) This final explanation is quite simple: the value of the land characteristic was entered from the keyboard (remember that we entered it earlier in this exercise). Suppose it is wrong? During the display of the ‘Why?’ screens, you can correct information at the time you notice it’s wrong. Notice that ‘F4’ in the annunciator line is marked ‘Edit land characteristic value’. So, Press F4 …to edit the data value for this Land Characteristic for this map unit. ALES now displays the current value, ‘d’, is the default answer, and allows you to edit it if you wish. The value is in fact correct, so Press Esc …to cancel the data entry form and return to the ‘Why?’ screen. Now we will go back through the chain of ‘Why?’ boxes, removing them one at a time, until we reach a point at which we want to follow another chain. ALES Version 4.65 Users Manual Page 87 February 1997 Press F10 …to return to the explanation of the severity level for ‘m’. At this point we could go backwards again to another land characteristic. Press F10 …to return to the explanation of the proportional yield. At this point we could go backwards again to another Land Quality. Press F10 …to return to the explanation of the year’s output returns. Press F10 …to return to the explanation of the cash flows and net present value. We have followed the explanation of the cash in to the Land Utilization Type; now it is time to follow the ‘Why?’ chain for the other side of the NPV equation, namely, the costs or cash out of the LUT. Notice that ‘F3’ in the annunciator line is marked ‘Why cash out?’. Press F3 …to begin exploring the costs. ALES displays a selection list, asking for which year we want to see the costs. Select Year 1 ALES displays the second ‘Why?’ screen in the backward chain (on the ‘cash out’ branch), showing the first (highest-level) step in the calculation of costs for this map unit for year 1 in the LUT. This screen shows the map unit, LUT, and year in the plan. The cost per area-year of implementing a particular LUT on a given LMU is the sum of three factors: Costs 1. The S1 cost, i.e. those costs that are incurred in every map unit, regardless of their specific Land Quality values1; 2. The additional cost of implementing the Land Utilization Type on this particular map unit, with its own specific set of Land Quality values (severity levels)2; and 3. The production-related costs, i.e. those that depend on the level of production of the various outputs that are produced this year in this LUT1. These may differ among map units, because production levels usually differ. 1These were entered with ALES Menu 1.2 ‘Land Utilization Type’ Options ‘4 : Inputs - annual’ and ‘5 : Inputs - by year’ 2These were entered with ALES Menu 1.2 ‘Land Utilization Type’ Option 7 ‘Land Use Requirements’, sub-options ‘2: additional Annual inputs’ and ‘3’: additional By-year inputs’. ALES Version 4.65 Users Manual Page 88 February 1997 Let’s look at these three types of cost in detail. Notice in the annunciator line that ‘F2’ is marked ‘Why S1 cost?’, ‘F3’ is marked ‘Why additional cost?’, and ‘F4’ is marked ‘Why Production cost?’. Press F2 …to find out why the S1 cost. ALES displays the third ‘Why?’ screen in the chain, explaining the year-1 S1 costs as a sum of two lists of inputs: the annual (recurrent) inputs and the by-year inputs for year 1. Here, the annual inputs are various agricultural chemicals such as herbicides and pesticides, as well as labor, fuel, and other machine charges. These are the costs of planting, growing, and harvesting corn on optimum land. You may notice there is no fertilizer listed here; in this LUT these vary according to a Land Quality, and so are included in the ‘additional’ costs, which we’ll see a bit later. Press PgDn …to scroll the ‘Why?’ screen down and see the by-year inputs that are specific to year 1, in this LUT, those due to the installation of a drainage system. Again, only those costs of installing the drainage system that do not vary among land units are included here; the others are included in the ‘additional’ costs. Costs are the sum of individual inputs, each of which requires a certain number of units, and each of which has a certain purchase price. For example, looking at this display we see that 23 feet of 8” drainage tile (for main drains) are required per acre, and that each foot of tile costs $2.35 installed, resulting in this one-time expenditure of $54.05 per acre. Press F10 …to return to the explanation of overall costs. Now that we’ve seen the S1 costs for the Land Utilization Type, let’s see the additional costs for this Land Utilization Type & land unit combination. Notice that ‘F3’ in the annunciator line is marked ‘Why additional cost?’; so Press F3 …to find out why the additional costs. ALES displays the third ‘Why?’ screen in the chain, consisting of a list of all nine Land Use Requirements defined for this Land Utilization Type, along with the severity levels of the corresponding Land Quality, each with a list of additional annual and by-year (for year 1) inputs. The sum of all these is the additional cost for the land unit as a whole The first LQ listed is ‘c’ (temperature regime); there are no additional inputs associated with this LQ, both because the LQ is not limiting, and because in this LUT we don’t add more inputs to correct for a limiting climate. The next LQ listed is ‘dr’ (suitability for subsurface drainage), and here we see that this particular map unit is rated as severity level 4 (‘90-foot spacing’) out of 6 possible severity levels of the LQ, and that there is an additional year1 one-time input of 484 feet of 4” drainage tile (for lateral drains), each foot costing $0.85 installed, for a total additional cost of $411.40. Note that the costs for lateral drains are included as an additional charge, because the spacing of the drains, and hence the number of linear feet needed, depends on the Land Quality ‘dr’ (which is mainly determined from the subsoil permeability); by contrast, the costs for the main drains were included as an S1 cost, since their spacing does not vary on different kinds of land. 1These were entered with ALES Menu 1.2 ‘Land Utilization Type’ Option ‘6 :Outputs’, sub-option ‘5 : Productiondependent inputs’ ALES Version 4.65 Users Manual Page 89 February 1997 Press PgDn …to scroll the ‘Why?’ screen down. The last LQ listed is ‘nr’ (nutrient requirement), and here we see that map unit ‘CeB’ is rated in severity level 2 (‘Honeoye group’) out of 6 possible severity levels, and that this LQ has an associated list of annual additional inputs, namely, the major fertilizer nutrients (N, P, and K). These are additional inputs because the amount of fertilizer needed depends on the nutrient requirements of the map unit. In the present case, i.e. on map unit ‘CeB’, these are 120lb N, 40lb P2O5, and 40lb K2O. Let’s see why this map unit was rated in severity level for the ‘nutrient requirement’ LQ. Notice that in the annunciator line, ‘F2’ is marked ‘Why severity level?’, so Press F2 …to find out why the severity level. ALES displays a selection list, asking which LQ to display. Select Land Quality ‘nr’ (nutrient requirement) ALES displays the fourth ‘Why?’ screen in the chain, showing the map unit, LUT, LUR, computed severity level (here, 2), and the decision tree path. Here the decision is very simple: the nutrient requirement is directly related to the New York State ‘soil management subgroup’, which is a grouping of New York soils for purposes of fertilizer recommendations. Notice that in the annunciator line, ‘F2’ is marked ‘Why Land Characteristic value?’, so Press F2 …to find out why this map unit is in soil management subgroup 2A. ALES displays the fifth ‘Why?’ screen in the chain, showing a land characteristic - to - land characteristic decision tree, which the model builder constructed to allow inference from the basic map unit properties (here type of parent material, amount of limestone in the parent material, and Soil Taxonomy family particle size class) to the higher-level LC (here the management group). When you are done looking at the tree, Press F10 …to return to the explanation of Land Quality ‘nr’. Then, Press F10 …to return to the breakdown of additional costs by Land Use Requirement. Editing economic parameters and re-computing an evaluation Since, in this exercise, we started ALES with the ‘evaluate’ command, although you can’t change most aspects of the models (e.g., such as decision trees), you are able to edit some economic parameters, namely: input purchase prices, output selling prices, and discount rates. In this section you’ll learn how to edit economic parameters, and then re-compute an evaluation. Input prices Notice that in annunciator line in the present explanation of the additional costs, ‘F5’ is marked ‘Edit prices’. This is the editable economic parameter that affects the calculation that is shown on the current ‘Why?’ screen. Let’s suppose that the cost of nitrogen fertilizer has increased from $0.20 to $0.25 per pound since the time the model was built. We want to edit the input price, so ALES Version 4.65 Users Manual Page 90 February 1997 Press F5 A list of all the inputs in the evaluation is presented; Select input ‘N’ (nitrogen fertilizer) A one-item data entry form now appears, for the price of nitrogen, with the current value, $0.20 per pound, as the default. The cursor is at the end of the answer, so just Type 5 …to specify the new value, 0.25. Press F10 …to confirm the form, and again Press F10 …to return to the breakdown of additional costs by Land Use Requirement. Notice that the new value has not been reflected in either the ‘Why?’ screen or the evaluation matrix. ALES does not recalculate until told to do so. This allows you to make several changes in the model before recalculating. We want to recalculate now, based on this one price change, so we want to return to the evaluation matrix. We could press ‘F10’ enough times to return to the matrix, but there is a shortcut: from any ‘Why?’ screen, Press Esc This will remove all the stacked ‘Why?’ screens at once, and ALES will display the evaluation results matrix. Check that the highlight is still on map unit ‘CeB’ and LUT ‘ccc-d’. Now that we’re back on the matrix, notice that ‘F3’ is marked ‘Compute’ in the annunciator line. So, Press F3 …to initiate the recomputation. ALES will ask you if you really want to recompute the evaluation; this is to guard against accidentally pressing ‘F3’ instead of ‘F2’. Select ‘Yes’ (really recompute the evaluation) ALES now recomputes all the cells in the matrix. As it works, you can see the progress in the annunciator line, exactly as when we originally computed the evaluation results. After the recalculation is complete, the annunciator line reappears, and the matrix is updated with changed values. Any values which have changed during the computation are highlighted. In the current case, the two LUTs with corn as their output have been changed as the result of the recomputation, but the pasture LUT hasn’t been, since N is only specified as an input for corn. Notice that the NPVs were reduced, e.g. for ‘CeB’ by $51.63, to $187.82, by the price increase. Let’s change this economic parameter back to its original value, to leave the tutorial in the same condition as we found it for the next user. We can do that right from the evaluation matrix, without going into the ‘Why?’ screens again. Notice that ‘F5’ on the annunciator line is marked ‘Edit Econ’, i.e. edit the economic parameters. So, Press F5 ALES Version 4.65 Users Manual Page 91 February 1997 …to edit the economic parameters. ALES displays Menu 1a.1 ‘Economic parameters “ccc-d”, consisting of three Options. We want to edit an input price; this is Option 1. Select Menu 1a.1 Option 1 ‘Input prices’ ALES displays the selection list of the inputs. Select input ‘N’ (nitrogen fertilizer) A one-item data entry form now appears, for the price of nitrogen, with the value we edited, $0.25 per pound, as the default. The cursor is at the end of the answer, so Press BkSp (backspace) …to remove the final ‘5’ from the answer, and then Press F10 …to confirm the form, and again Press F10 …to return to economic parameters menu. Discount rate Let’s get a feel for just how important the discount rate can be in determining the cost-effectiveness of a LUT over time. The LUT ‘ccc-d’ has the major capital improvement of land drainage; we would expect that any measure of economic suitability, such as the NPV, which is based on discounted cash flow analysis would be sensitive to discount rates. Select Menu 1a.1 Option 3 ‘Discount rates’ Select Land Utilization Type ‘ccc-d’ Change the discount rate to 2% Press F10 …to confirm the new discount rate. This very low discount rate might represent a government-backed low interest loan to encourage land improvement). Press F10 …to return to the list of LUTs, and again Press F10 …to return to the economic parameters menu, and finally, Press F10 ALES Version 4.65 Users Manual Page 92 February 1997 …to return to the evaluation matrix. Now we want to re-compute, so, Press F3 …to initiate the recomputation. Select ‘Yes’ (really recompute the evaluation) ALES now re-computes and re-displays the matrix with the changed results. When ALES finishes re-computing, you will see that the NPV’s of LUT ‘ccc-d’ have greatly improved, and in fact are now all cost-effective (some were negative at 10% interest). Check that the highlight is still on map unit ‘CeB’ and LUT ‘ccc-d’, and then Press F2 …to see the cash flows; you will see that the cash flows for the later years in the plan are worth much more as present value than they were with the higher discount rate. Since the cash flows for all years past the first are positive, the lower discount rate results in increasing present value. Let’s change the discount rate back to its original value, to leave the tutorial in good condition for the next person. Note that the annunciator line shows that ‘F4’ may be used to edit the discount rate directly from this ‘Why?’ screen (since it is relevant to the displayed calculation); so Press F4 …to display the data entry form for discount rate Change the discount rate to 10% Press F10 …to confirm the original discount rate. Press F10 …to return to the evaluation matrix. Now to return to the original evaluation results, follow the procedures of this section to Recompute the evaluation results We’re done looking at the results for Net Present Value, so Press F10 …to return from the evaluation matrix to the selection list of report types. ALES Version 4.65 Users Manual Page 93 February 1997 If you wish, you can follow the ‘Why?’ screens for the other economic metrics (internal rate of return, benefit/cost ratio, and gross margin), for physical suitability, for crop yields, or for single Land Quality values. Remember, the annunciator line always shows the active function keys, and ‘F1’ always brings up a ‘Help’ screen to explain the current ‘Why?’. Also remember that ‘F10’ always move back one screen in the chain of ‘Why?’ screens. When you are all done exploring the ‘Why?’ screens, return to the selection list of report types. Press F10 …to return to Menu 1.4 ‘Evaluations’. Printing evaluation results The results of an ALES evaluation can be printed in a format that is useful to land use planners and others who need to know about the suitability of land for land uses. The same sort of conclusions that we drew while viewing the matrix can be presented in this form to planners. Select Menu 1.4 Option 3 ‘Print evaluation results’ 1 Now ALES asks where you want the results printed: either on the ‘V’ideo screen, on a ‘P’rinter, to a disk ‘F’ile, or through a ‘C’ommunications port. This may sound a bit redundant, after all, don’t you want them to print on the printer? Not necessarily! √ The option to view the results on the video screen allows you to preview the results before printing. √ The option to write to a disk file allows you to edit the results with a word processor prior to printing them. For example, you might want to add explanatory notes, or change the formatting. √ The option to write through a communications port (e.g. ‘COM1:’) allows you to send the output to a printer that was not configured in the MUMPS system, or to another computer system connected through the port. And of course, √ The option to print allows you to get a printed report, on paper. If you have a printer connected and want to see a printed report: Select ‘P’ (Printer) If you have more than one printer configured in your MUMPS system, you will now have to choose one of them. Otherwise ALES will assume you want to use the parallel printer. You will now be presented with a data entry form, with the form parameters, i.e. options for the placement of the report on the page, the width (in characters) and length (in lines) of the printed form, etc. These will be 1The same reports can be requested with Menu ‘1.5 Reports’ Option ‘1 Evaluation Results’ ALES Version 4.65 Users Manual Page 94 February 1997 probably be correct as they stand. If not, edit the form as appropriate (remember, ‘F2’ at any question will give you more information about the required answers). When the form is correct Press F10 …to confirm the form parameters. If you don’t have a printer, or the printer is not connected, or if you don’t want to waste paper on this exercise: Select ‘V’ (Video screen) With or without a printer, ALES now asks which kind of report you would like to print or view. Since we’ve been reviewing present values in the ‘Why?’ screens, let’s print or view these. As when we viewed the evaluation results in matrix form, Select Report type ‘N’ (Net Present Value…) Select NPV Report type ‘N’ (Net Present Value) Select ‘Yes’ (report results on a per-area basis) Now ALES needs to know whether it should organize the report by rows (land units) or columns (Land Utilization Types). In the first case (by row), each map unit will start on its own page, and each page will show the rating of a single map unit for each Land Utilization Type. This shows what the best uses are for each map unit. In the second case (by column), each Land Utilization Type will start on its own page, and each page will show the rating of all the map units for that LUT. This shows the best map units for each land use. Select ‘Rows’ (land units) The ‘Working...’ message will appear on the screen, and the report should appear on the printer or screen, depending on your choice of ‘P’rinter or ‘V’ideo, above. The report has one page (or screen) for each map unit. On each page, the Land Utilization Types are ranked according to predicted NPV. So for example on the first page, for map unit ‘A13’, we see that the LUT’s are ranked (1) ‘ttpp’, (2) ‘ccc’, and (3) ‘ccc-d’. This tells us what the best uses are for this land, using NPV as the economic metric. Notice at the bottom of the first page is the notation ‘[ VI = $187.50 ]’. ‘VI’ is an abbreviation for versatility index, i.e. a composite measure of ‘goodness’ of the map unit as a whole. In the case of economic metrics, it is just the average of the metric over the Land Utilization Types. (If you are displaying the report on the video screen, you will have to Press any key to move from page to page.) After the report has finished printing, the ‘Working...’ message will disappear from the screen, and you will again be asked for the kind of information to be printed. This is so you can select another report to go to the same output device, without having to set it up again. Notice that the highlight is on the type of report we just printed, namely ‘N’et Present Value. Let’s print this report again, but this time by columns. So, Select Report type ‘N’ (Net Present Value…) Select NPV Report type ‘N’ (Net Present Value) ALES Version 4.65 Users Manual Page 95 February 1997 Select ‘Yes’ (report results on a per-area basis) Select ‘Columns’ (land utilization types) Again the ‘Working...’ message will appear on the screen, and the report should appear on the printer or screen. This report has one page for each Land Utilization Type. For each of these, it shows the map units, ranked in order of their predicted NPV for the LUT. For example, on the first page (for LUT ‘ccc’) we see that ‘CeB’ is the most profitable type of land, with ‘SeB’, ‘A13’, ‘Lc’ and ‘OdA’ following. The latter two have an identical NPV when used for this LUT. The sum of the areas with each predicted NPV is printed below the group; this gives the planner a measure of how much land of each type is available. Notice at the bottom of the first page is the notation ‘[ VI = $162.69 ]’. The by-column (LUT) report also has a versatility index, in this case, a composite measure of ‘goodness’ of the LUT as a whole. In the case of economic metrics, it is just the weighted (by land area) average of the metric over the map units. After the report has finished printing, the ‘Working...’ message will disappear from the screen, and you will again be asked for the kind of information to be printed. Press F10 Press F10 …to return to Menu 1.4 ‘Evaluations’ Press F10 …to return to Menu 1a ‘Main options’ Deleting land units (optional) Note: This section is optional; you should follow it only if you want to return the ALES database for this model to its status before we started, i.e., before we defined map units ‘Lc’, ‘OdA’, ‘SeB’, and ‘A13’. Now that you’re all done with this tutorial, you may want to return the ALES database for this model to its status before we started. In order to do this we’ll have to delete the map units we added. This will give you practice deleting entities, which works similarly in all kinds of lists within ALES. To do this, we first need to display the list of map units. So, from the main menu Select Menu 1a Option 2 ‘Data’ Select Menu 1.3 Option 1 ‘Definitions, from keyboard, enter or edit’ ALES displays the list of the map units defined in this model. Notice in the annunciator line that ‘F4’ is the ‘delete’ key in this context. Let’s try to delete one of the homogeneous map units we defined in this exercise. Move the highlight to ‘Lc’ (Lakemont silty clay loam) Press F4 ALES Version 4.65 Users Manual Page 96 February 1997 …to attempt to delete it. ALES displays an error message: you can’t delete this map unit, since it is a constituent of compound map unit ‘A13’. If we deleted ‘Lc’, there would be no way to know what the correct proportions of homogeneous constituents were in the compound unit ‘A13’. We must either remove this constituent from the compound map unit, or delete the entire compound unit. We were going to delete ‘A13’ anyway, since it was one of the units we added earlier in the tutorial. So, Press any key …to remove the error message, and then Move the highlight to ‘A13’ (Schoarie-Odessa association) Press F4 …to attempt to delete it. ALES now asks you if you really want to delete this map unit. Note that deleting the map unit definition also deletes any data values stored for the map unit, and its evaluation results. Select ‘Yes’ (really delete the map unit) ALES deletes the map unit and re-displays the list of map units; notice that ‘A13’ is no longer in the list. Now let’s delete its constituents. Move the highlight to ‘Lc’ (Lakemont silty clay loam) Press F4 Select ‘Yes’ (really delete the map unit) In the same way Delete map unit ‘OdA’ Delete map unit ‘SeB’ Now the list of map units is the way it was before we started this tutorial. We’re done with the tutorial, so Press F10 …to return to Menu 1.3. Press F10 …to return to Menu 1a. Press F10 …to return to the list of evaluation models. Press F10 ALES Version 4.65 Users Manual Page 97 February 1997 …to return to the opening menu of ‘evaluate mode’. Finally, Press F10 …to leave ALES and return to the operating system. Congratulations, you’ve finished Tutorial 2! Review the objectives at the beginning of the tutorial to make sure that you have mastered them. ALES Version 4.65 Users Manual Page 98 February 1997 Tutorial 3 : Building a Model The objective of this tutorial is to teach you how to build a simple ALES model for physical and economic land evaluation. In this tutorial you will learn to: √ start ALES in model building mode √ create a new evaluation model √ back up a model to a DOS file √ define reference lists of Land Use Requirements, inputs, and outputs √ define land characteristics √ define a Land Utilization Type √ build decision trees √ define data entry templates √ refine and adjust models from the evaluation matrix and ‘Why?’ screens This tutorial is only an introduction to model building; many of the more sophisticated capabilities of ALES are presented in Tutorial 4. Before working on this tutorial, you should have completed Tutorials 1 and 2. We will assume you are able to navigate within ALES, and are familiar with all interaction techniques. In this tutorial we won’t spell out every keystroke. This tutorial should take about 6 hours to complete. Take your time! and make sure to understand what is going on. Don’t rush! The emphasis in this tutorial is on the mechanical aspects of model building, i.e. how to build models using the ALES program. To make the presentation go smoothly, many important logical aspects of model building, i.e., why models are built with a certain structure, are not explained in detail. The Chapter ‘Building ALES models’ presents the logical aspects of ALES model building in more detail; you may wish to consult it as you work through this tutorial. This exercise is too long to be completed in one session. Whenever you want to stop, press ‘F10’ enough times to leave the program. Then when you restart ALES, select your copy of the tutorial and follow the menu structure to return to the point where you left off. We all make mistakes sometimes; ALES makes it fairly painless to correct them. For any answer, whether in data entry forms, single-answer entry forms, or choice boxes, you have to press ‘F10’ to confirm your entry. If you catch your mistake before you confirm the entry, you can correct it by various methods. For example, in a data entry form, you can use the ‘backspace’ key or ‘F4’ to erase some or all of a typed-in answer, and then you can just type the correct answer. Another way is to start the interaction all over: instead of pressing ‘F10’, you can cancel any interaction in ALES by pressing the ‘Esc’ key. Finally, if you have already confirmed an incorrect entry, you can almost always edit data in a similar manner to entering new data. In almost every situation where the ‘F3’ key means ‘add a new item’, the ‘F5’ key means ‘edit the existing item’. ALES Version 4.65 Users Manual Page 99 February 1997 Starting ALES in ‘model building’ mode If your ALES syste m i s not i nstal l e d on dr i ve ‘C:’ i n di r e c tor y ‘\ DTM ’, c hange the fol l owi ng two DO S c ommands ac c or di ngl y To start ALES in model-building mode from DOS: 1. Change to the disk where ALES is installed. Typically this will be disk drive ‘c:’. Supposing this to be the case, at the DOS prompt: Type c: and Press the Enter key.1 If you are already working on disk ‘c:’, you can omit this command. 2. Change to the directory where ALES is installed. Typically this will be directory ‘\dtm’. Supposing this to be the case, at the DOS prompt: Type cd \dtm and Press Enter. If you are already connected to directory ‘\dtm’, you can omit this command. 3. Then start ALES in ‘model-building’ mode: At the DOS prompt: Type ales and Press Enter2. At this point you should see the initial (“welcome”) screen, which includes the program name, your organization’s name, and the serial number. Press any key …for example, Enter, to continue beyond this screen. An initial menu will now appear, with Option 1 already highlighted: 1 2 3 ALES [Build Models] Build Models and Evaluate System Options About ALES Select Option 1 The list of evaluation models will now appear. Notice that the annunciator (bottom line) now includes several new options, including ‘F7’ to save (make a backup copy) of an evaluation to a disk file, ‘F8’ to restore a saved evaluation, ‘F3’ to create a new evaluation model, ‘F4’ to delete an evaluation model, ‘F5’ to edit basic information 1This key is variously called Return or Enter. It may be marked with a square arrow, ↵ 2This runs the DOS batch file ALES.BAT, which in turn starts the MUMPS run-time system, which loads ALES in ‘model building’ mode, and runs it. ALES Version 4.65 Users Manual Page 100 February 1997 for the evaluation, and ‘F6’ to copy a model. All this power means you are in model building mode: ‘with ALES you are always in control’1. Creating a new evaluation model For this tutorial we will create a completely new model. The model will be a simple physical and economic evaluation for fish production in Central America. In the interest of simplicity, we will only define one Land Utilization Type: ‘Tilapia in diversion ponds’, to be implemented by small farmers with no mechanization, but with access to adequate credit and inputs2. In a real evaluation we of course would compare alternatives. In order to keep the tutorial to a workable size, we will simplify it by only including a few of the most important Land Use Requirements and inputs, and by keeping the decision procedures simple. The model will be complex enough to be realistic, but not comprehensive. We are sure you can think of many refinements, especially if you have experience with fish farming. When you are done with the tutorial, you’re welcome to experiment with it and enhance it as you see fit. Fish farming may seem like an unlikely choice for an ALES model, but actually it is a good example of land evaluation: we have land, and fish farms are land use alternatives to arable and perennial crops. Press F3 … to define a new model. You will be asked to enter a code by which this evaluation will be identified in the list of evaluations. A good choice would be your initials (to keep it separate from the tutorials that other users may be working on), and some indication that it’s a tutorial. So if your name is ‘Ralph Stanley’, you might use the code ‘rs-Tut3’. Or, you could use a phrase that summarizes the model, e.g. ‘fishfarm’. Note that codes are short, no more than 8 characters. Enter the code rs-Tut3 (or another code that you choose) and Confirm it. Now ALES will ask you for the basic information that applies to the entire evaluation: (1) a descriptive name, (2) a currency symbol, and (3) the areal unit in which land is measured. The descriptive name should be a short phrase that explains the evaluation code, e.g. ‘Tutorial 3 - R. Stanley’s exercise’. The currency symbol defaults to ‘$’ (dollars) and the areal unit to ‘ha’ (hectares); for this exercise leave the currency symbol as is, but since the size of a typical group of fish ponds is considerably less than a hectare, and 1 Apologies to Pirelli of Venezuela S.A. 2Thanks to Ms. Christine DeRoller for the original version of the model on which this tutorial is based. ALES Version 4.65 Users Manual Page 101 February 1997 cost figures are only available at the smaller scale, change the unit area to ‘are’ (1ha = 100 ares, so 1 are = 0.01ha = 10m x 10m)1. Or, you could convert existing cost figures to hectares, if you wanted the evaluation results reported on a per-hectare basis. Fill in the data entry form: 1. 2. 3. Tutorial 3 - R. Stanley exercise $ are Confirm the form. ALES returns to the list of evaluations. Notice that your newly-defined evaluation is in the list, and in fact the highlight is on it. Now we will practice entering an annotation. It is very important for the model builder to explain the reasoning behind the design choices to the model user, and annotations are useful for this purpose. You know from the previous tutorial that ‘F9’ is used to read notes. Pressing ‘F9’ while holding down the ‘Alt’ key (usually located to the left of the space bar) is how you enter the note editor to enter or edit notes. The way to remember this is that the ‘usual’ thing to do is view the note, whereas the ‘alternate’ things to do is edit it. √ ‘Al t+F9’ i s use d to c r e ate and e di t annotati ons. Press Alt+F9. A large window appears in the leftmost two-thirds of the screen. The title of the window gives the name of the entity for which you are entering a note, in this case the evaluation code. Notice that the cursor is blinking in the upper left hand corner of the window. You are being invited to type your note. This is a simple word processor; you can press ‘F1’ to see a list of the editing keys. In general you just type your note, and the text automatically wraps to the next line as you reach the right margin. You can use the ‘Return’ key to force a new line. The ‘Ins’ key toggles between ‘insert’ and ‘type-over’ modes. Type ALES Tutorial 3: Fish farming in Central America … or some other explanatory text of your choosing. When you are done entering your note Press F10 … to confirm your entry.2 Now you should be looking at the list of evaluations again, and the highlight should still be on the new evaluation code. Notice that there is now a degree sign, ‘°’, next to the code, indicating that there is now a note for your 1This is a bona-fide metric unit of measure. In fact the name ‘hectare’ is derived from the prefix ‘hect’ = 100 and the root ‘are’, which is defined as 10m x 10m. 2This note editor sometimes gets confused during text editing; if the text becomes garbled, leave the editor with ‘F10’ and enter it again. ALES Version 4.65 Users Manual Page 102 February 1997 evaluation. Also notice that ‘F9’ in the function key strip is marked with the same degree sign ‘°’, showing that the ‘F9’ key can be used to read notes. To read the note you just entered, Press F9 Notice that the note window is only as large as is necessary to show the note. When you are done looking at your note: Press F10 … to return to the list of evaluation models. The highlight should be on your newly-created model. Backing up a model to a DOS file As you work in ALES defining models and entering data, ALES automatically saves all your work. Every time you confirm an action, ALES changes the knowledge base or database. You don’t have to ‘save’ the model, as you would a word processing document or a spreadsheet. As long as the ALES system doesn’t crash, your work is safe. However… Don’t risk wasting all your hard work in model building due to disasters, natural or otherwise, such as (1) disk crashes, (2) someone reformatting the disk, (3) someone erasing ALES or one of its datasets, (4) someone erasing or altering your model within ALES, (5) ... (other horrors too many to enumerate). Make a backup copy of your model to diskette on a regular basis. Even though your test model is very small right now, let’s practice making a backup. Note that the ‘F7’ key is marked ‘Save’. The highlight should already be on the model you’ve just created. √ ‘F7’ i s use d to save e val uati on mode l s to DO S fi l e s. Press F7 …to initiate the save. An entry box appears, asking for the DOS file specification to which the backup copy should be written. The default file specification consists of (1) an optional path1 (2) the evaluation code as the file name2, and (3) a file extension of ‘.ALS’, which stands for ‘ALES Save’. If the path is omitted, the backup is written to the same directory as the ALES program. This provides a backup copy in case the model is deleted or altered within ALES, however, it does not protect you significantly against problems with the hard disk, such as a head crash. A better strategy is to back up your models to a diskette. Assuming you will back up to a diskette: Insert a formatted diskette in drive ‘A’. To specify that the backup should be made to diskette, you have to add a drive letter and colon in front of the file name and extension.. First, make sure there is no path specified: 1You can set the default path with Menu 2 ‘System Options’ Item 8 ‘Set default path for saved evaluations’ 2 ALES automatically removes characters that aren’t legal in DOS file names, and truncates the suggested file name to eight characters, as required by DOS. For example, the model named [t]h;i\s is suggested to be saved as this.als. ALES Version 4.65 Users Manual Page 103 February 1997 Erase any default path, i.e., the part of the entry before the file name. Move the cursor to the beginning (left) of the entry box. You will see the cursor blinking under the first character of the file name. . Then type the drive letter, followed by a colon, in front of the file name. For example, if you are backing up to drive ‘A’ Type A:. Press Enter …to confirm your answer. If you already have a file of the same name on the diskette (e.g. if you have done a previous backup to the same diskette), you will be told this, and asked what to do (‘O’verwrite, ‘A’ppend, ‘B’ackup, or ‘Cancel’). You will usually select ‘B’ to back up the file already on disk (with the extension ‘.BAK’). It is good practice to keep at least two previous backups, so that if you are inadvertently saving a model that has been corrupted or altered for the worse, you have a few days to discover this, and go back to a previous backup. To do this, prepare two backup diskettes and alternate them. You will see a ‘Working...’ message while the model is being saved. When the save is complete, the list of evaluations will be re-displayed. The highlight should still be on the model you just saved. Press Enter …to select your model and move to Menu 1 ‘Main Options’. As you wor k i n ALES, you shoul d bac k up your mode l s whe ne ve r you have made a si gni fi c ant numbe r of c hange s. For e xampl e , i f you have to i nte r r upt thi s tutor i al , i t woul d be a good i de a to bac k up your mode l be for e tak i ng a br e ak . Re me mbe r , you bac k up your mode l fr om the l i st of e val uati on mode l s. Defining reference lists of Land Use Requirements, inputs, and outputs The main menu is organized in the order in which we might perform a land evaluation: (1) define reference lists to be used in all LUTs; (2) define Land Utilization Types; (3) enter the data; (4) evaluate; (5) print reports of evaluation results or model contents. You can also access the ‘consultation’ mode (covered in the first tutorial) from this menu, with Option 6, create maps in the IDRISI Geographic Information System, with Option 7, and exchange data with xBase-formatted databases with Option 8. ALES Version 4.65 Users Manual Page 104 February 1997 The first order of business is to define the reference lists, so Select Option 1 ‘Reference Lists’. Now you will see Menu 1.1, ‘Reference lists’, with four options: (1) Land Use Requirement codes (2) Outputs (products) (3) Inputs (4) Land characteristics A reference list is a list of entities that can be used when defining the various Land Utilization Types of the evaluation. The se ar e data tabl e s that ar e i nde pe nde nt of a par ti c ul ar LUT, i . e . , the y appl y e qual l y to al l LUTs. The first reference list is for Land Use Requirements (LUR) In this list we define LUR codes, a short descriptive phrase, a default number of severity levels, and default severity level names. The rest of the definition of a Land Use Requirement depends on the context of the Land Utilization Type. For example, what constitutes a ‘severe’ erosion hazard on inter-tilled row crops is quite different than in tea plantations. Even the number of severity levels may be different. The reference list provides a basis to be used in any of the LUT's. Select Menu 1.1 Option 1 ‘Land Use Requirements’. You will now see a choice box, headed ‘Land Use Requirement code’. There are no entities yet, only a dummy item ‘? <add a new item>’. Let’s define the LURs now. Notice in the annunciator line that ‘F3’ is to be used to add a new item; that is what we want to do, so Press F3 …to begin defining a new LUR. Now you’re being asked to enter a code for the new entity. The Land Utilization Type that we intend to define requires the construction of the fish-holding structures: i.e. earth ponds fed by diversion ditches from streams or springs. Hence an important Land Use Requirement is the ‘potential for construction’, i.e., how easy it is to build the ponds. A good code for this might be the abbreviation ‘pfc’. Type pfc Press F10. …to confirm the code. A two-item data entry form now appears, asking for (1) a descriptive name and (2) the default number of severity levels. The descriptive name appears next to the LUR code in many contexts. The default number of severity levels is the number of different degrees of limitation that can be distinguished for the LUR; in the FAO Framework this is 4. ALES Version 4.65 Users Manual Page 105 February 1997 Fill in the data entry form: 1. 2. potential for construction, 4 Confirm the form. A four-item data entry form now appears, asking for the descriptive names for the four default severity levels. These names appear along with the severity level. In the present case, we’ll enter these when we define the LUT, below, so for now leave them blank. Press F10 …to confirm the (empty) form. The reference list of LUR’s should now reappear. Notice that the ‘?’ item in the choice box is replaced by the new code ‘pfc’. Using the same technique as the previous paragraphs, Add the following codes to the list of Land Use Requirement codes: code name levels level names wq wa water quality water availability 4 4 (none) (none) You should now have a list of three LUR codes. These are now available for use in all Land Utilization Types, and in fact we will add them to the LUT later. When you are done entering this list, Press F10 … to return to Menu 1.1 ‘Reference Lists’. Now we will enter information on the possible outputs (products) to be considered in this model. Select Menu 1.1 Option 2 ‘Outputs (products)’ … to enter information on outputs. You will see an empty list. Only one thing will be produced by our only Land Utilization Type: fresh Tilapia fish. Press F3 …to begin the definition of a new output. When asked for the code, Enter ti … which is an abbreviation for Tilapia, and then Press F10 ALES Version 4.65 Users Manual Page 106 February 1997 … to confirm your entry. A three-item data entry form now appears. For each output we must specify (1) a descriptive name, (2) the units in which the output is measured, and (3) a selling price per unit. For this output, Fill in the data entry form: 1. 2. 3. Tilapia - whole fish, kg 4 Confirm the form. In other words, the output is fresh fish, and 1 kg of fresh fish sells for $4. Notice that the list now has one item. Press F10 … to return to Menu 1.1 ‘Reference Lists’. Select Menu 1.1 Option 3 ‘Inputs’ …to enter information on inputs. These are the things that are needed to implement one or more of the Land Utilization Types. In the present model, we will have inputs associated with construction and with annual maintenance of the ponds, as well as items that are directly related to the crop, such as baby fish, nutrients and other chemicals, and water. Press F3 …to define a new code, and when asked for the code, Enter labor Press F10 … to confirm your entry. You will see a three-item entry form for the new input. You are being asked to specify (1) a descriptive name, (2) the units in which the input is measured, and (3) a purchase price per unit. Fill in the data entry form: 1. 2. 3. manual labor day 2 Confirm the form. ALES Version 4.65 Users Manual Page 107 February 1997 In other words, in this model, manual labor is valued at $2/day.1 Notice that the list now has one item, ‘labor’. Using the same technique as the previous paragraphs, Add the following four codes to the list of inputs: code name units price lime fish manure tile fine limestone baby fish farm manure for fertilizer plastic drainage tile ton each ton meter 20 .05 10 9 You should now have a list of five inputs. Press F10 … to return to Menu 1.1 ‘Reference Lists’. Defining land characteristics Land characteristics (LC) are the measured or estimated properties of the land which form the data items in the ALES data base. In models, they are used in the decision trees that determine the severity level of each land quality, and, ultimately, the final suitability ratings of the various LUT’s. Characteristics are included in the reference list either because they are useful for determining suitability levels (the top-down approach) or because they are available in a resource inventory (the bottom-up approach). In this evaluation we’ll take the first approach: pick the characteristics we want, and then assume that they can be obtained by field survey, interviews with the land owner, or simple lab test.2 Until we define the severity level decision trees, it won’t be clear why we defined this particular set of land characteristics. For now, we will concentrate on the mechanics of entering the chosen LC's into ALES. From Menu 1.1 ‘Reference Lists’, Select Menu 1.1 Option 4 ‘Land Characteristics’ …to enter information on land characteristics. A choice box, similar to those that we saw for inputs and outputs, will appear, with a single dummy entry, ‘add a new item’. Press F3 …to begin defining the first land characteristic. 1In this model we are not distinguishing the farmer’s own labor from hired labor. If we were, we could define two inputs and given them different prices. 2This comes from the original application of the model in Guatemala, where Peace Corps volunteers are expected to determine the values of the land characteristics from interviews and simple field tests. ALES Version 4.65 Users Manual Page 108 February 1997 Defining a discrete land characteristic with units The first land characteristic we’ll enter will be water temperature1. So, when asked for the code, Enter wt Press F10 … to confirm your entry. You will see a three-item data entry form, titled ‘wt (NEW land characteristic)’. The first question is straightforward: a descriptive name for the characteristic. So, Type water temperature Move to the next question in the form. Discrete (classified) Land Characteristics, with units Now comes a crucial question, namely, the number of classes for the land characteristic. Land characteristics can have zero classes, i.e. be measured on a continuous scale. These are not directly usable, however, in decision trees2; which require discrete LC’s, i.e. those measured in two or more classes. Although the current LC, water temperature, certainly has an underlying continuous scale (i.e., if we put a thermometer in the water at a given time, we get a single value, e.g. 18.4°C), this scale can be divided into classes. The number of classes to use for a land characteristic, and the class limits (dividing points) depend on (1) the accuracy desired in the decision procedure, and (2) the accuracy obtainable in the field. In this model, we will distinguish water temperature ranges that are important for Tilapia production. According to the experts, four classes will be sufficient: cold (<16°C), temperate (16-23°C), warm (23-35°C), and hot (>35°C). So at the second question, Type 4 Move to the next question in the form. The number of classes of Land Characteristics with units can be edited at a later time, using Menu 1.1.4a, Options 7 (Add a class) and 8 (Delete a class). At the last question (units of measurement), Type °C 1Water temperature is critical in fish farming; each species of fish has a well-defined and usually narrow range of temperatures at which they can grow. 2In tutorial 4 we’ll see why and how to use continuous LC’s ALES Version 4.65 Users Manual Page 109 February 1997 To enter the degree sign ‘°’ on most PC keyboards, hold down the ‘Alt’ key while pressing the numbers ‘2’, then ‘4’, and then ‘8’ on the numeric keypad (the number keys on the main keyboard won’t work), then release the ‘Alt’ key (note: this is a feature of MS-DOS, not MUMPS or ALES). If for some reason you can’t enter the degree sign from your keyboard, answer this question with deg C. Press F10 … to confirm the form. √ A c l assi fi e d Land Char ac te r i sti c wi t h uni t s of m e asure m e nt i s c al l e d ‘di sc r e te , wi th uni ts’. It i s an ordi nal l and c har ac te r i sti c . Menu ‘1.1.4a Specification options for discrete LC (with units)’, appears, containing eight options. The first option, name and units, can be used to edit the descriptive names and the units of measurement we just entered. The fifth through eighth options will not be covered in this introductory tutorial. We will, however, work through options 2, 3, and 4. We have already told ALES that this LC is to have four classes; now, however, we have to give it some information about each class. Select Menu 1.1.4a Option 2 ‘class abbreviations’ A data entry form appears, with four items, one for each of the four classes of this LC. You are being asked to enter short (8 character or less) abbreviations for each class. These are codes which are used in data entry. They should be short and mnemonic (i.e., the abbreviation should remind you of what the class signifies). They need not contain any numeric limits, as these limits will always be displayed to the user during data entry after they are entered at menu Option 4 (below). Let’s use abbreviations for the descriptive words ‘cold’, ‘temperate’, ‘warm’ and ‘hot’: Fill in the data entry form: 1. 2. 3. 4. c t w h Confirm the form. Now we will specify class names. So, Select Menu 1.1.4a Option 3 ‘class names’ You are being asked to enter descriptive names for the LCs, to be used in printed reports, data entry screens etc. So, ALES Version 4.65 Users Manual Page 110 February 1997 Fill in the data entry form: 1. 2. 3. 4. cold temperate warm hot Confirm the form. Now we will specify the numeric limits, in °C, of the four classes. Select Menu 1.1.4a Option 4 ‘class limits’ The first question of the form ‘class limits’ asks for the lowest possible value, in the units of measurement (which are °C), for any value of the LC; the other questions ask for the upper limits for the four classes. The default lower limit is always zero, but it can be reset to any value. In the present case, we know that flowing water will always be above freezing, so the default value of 0°C is OK. Moving on to the next question, recall that for this LC, that cold water is by definition 16°C or below. So enter 16 as the upper limit for class 1, and move to the next question. Similarly, classes 2 and 3 have upper limits of 23°C and 35°C, respectively; enter these. Class 4, ‘hot’ water, was defined as any water above 35°C; certainly it can not be more than 100°C and still be flowing, so enter an upper limit of 100 for the final class. With these considerations in mind, Fill in the data entry form: 1. 2. 3. 4. 5. 0 16 23 35 100 Confirm the form. We’re all done this menu, so, Press F10 …to leave Menu 1.1.4a. You have now completed the entry of information for this LC. Notice that the choice box now has one land characteristic listed, namely, ‘wt’, which we just defined. Defining a discrete land characteristic without units The next land characteristic we’ll enter will be source of water1. Press F3 …to begin defining this land characteristic. When asked for the code, 1Obviously, a reliable source of water is necessary to keep the fishponds filled with clean water. ALES Version 4.65 Users Manual Page 111 February 1997 Enter ws Press F10 … to confirm it. Now you will see the three-item data entry form. For the descriptive name, Type water source Move to the next question in the form. You are now being asked to specify the number of classes for this land characteristic. Discrete (classified) Land Characteristics, without units Not all land characteristics have underlying continuous scales of measurement. In fact, the LC we are defining now is a good example. Water to be used in the fish ponds can come from three sources: rain, river, or springs. So there are three classes, but no underlying scale or intrinsic ordering: there is no way to order them, other than arbitrarily1. So, at the second question Type 3 Leave the last question blank, i.e., don’t answer it. This tells ALES that there are no units of measurement associated with this LC. Press F10 … to confirm the form. √ A c l assi fi e d Land Char ac te r i sti c wi t hout any uni t s of m e asure m e nt i s c al l e d ‘di sc r e te , wi thout uni ts’. It i s a nom i nal l and c har ac te r i sti c . Menu ‘1.1.4b Specification options for discrete LC (no units)’, appears, containing only six options. Since there are no units of measurement, it doesn’t make sense to enter any class limits; also there are no commensurate LC’s (this will be explained in the fourth tutorial). Select Menu 1.1.4b Option 2 ‘class abbreviations’ Fill in the data entry form: 1. 2. 3. rain river spring Confirm the form. 1We can’t say that rain is ‘greater than’ a spring, for example. ALES Version 4.65 Users Manual Page 112 February 1997 √ The or de r of the c l asse s of a nomi nal LC i s ar bi tr ar y. There really isn’t anything to add in the way of descriptive names, since the codes are sufficiently descriptive. So, Press F10 …to return to the choice box; notice that ‘ws’ is now in the list. Defining the rest of the land characteristics In the previous two sections you have learned how to define discrete land characteristics, both with and without units. Without further instruction, Add the following eight land characteristics to the list of LCs: LC code class # rs 1 2 3 descriptive name class abbreviation length of rainy season short medium long # of classes class name 3 units cfc 1 2 3 4 5 coarse fragment content 1 2 3 4 5 5 few some many excessive extreme % volume cfs 1 2 3 4 coarse fragment size fg cg r b 4 cm (diameter) fine gravel coarse gravel rocks boulders 0 2.5 7.5 25 1000 sd 1 2 3 soil depth s m d 3 cm shallow moderately deep deep 0 75 200 1000 sl 1 2 3 4 slope A B C D 4 nearly level sloping steep very steep 0 3 10 30 200 text 1 2 3 4 soil texture c m f p 4 coarse medium fine peat ALES Version 4.65 Users Manual months % Page 113 LC lower limit class limit 0 6 10 12 0 3 14 35 55 100 February 1997 pH 1 2 3 4 pH of the water vacid acid n valk 4 pH very acid acid neutral to alkaline very alkaline pe 1 2 3 subsoil permeability s m r 3 slow moderate rapid 1 4 6 9 14 You should now have a list of ten land characteristics: ‘cfc‘, ‘cfs’, ‘pH’, ‘pe’, ‘rs’, ‘sd’, ‘sl’, ‘text’, ‘ws’, and ‘wt’. Press F10 …to return to Menu 1.1 ‘Reference Lists’. Again, Press F10 …to return to Menu ‘1 Main Options [Build models]’. If you are familiar with standardized descriptions of map units or soil profiles, you may notice that several of the characteristics do not have the same number of classes, class abbreviations, or class limits, as you may expect. For example, soil texture is measured here in only four classes here, instead of the standard 12 USDA classes. This illustrates an advantage of ALES compared to a land evaluation system with a pre-defined list of characteristics: in ALES, the LCs can be defined according to local needs. In the present case, we feel that knowing whether the texture of the fine earth is coarse, medium, fine, or peat is sufficient to determine the severity levels of the land qualities that we would like to use for our Land Utilization Type. This simplifies both the model and the data collection process. Defining a Land Utilization Type Now that you’ve completed the preliminaries, it’s time to get to the heart of the model: the Land Utilization Types (LUT). These are the land use options to be considered in the model. From Menu 1 ‘Main options [Build models]’, Select Option 2 ‘Land Utilization Types’. A choice box appears; since there aren’t any LUT’s defined yet, it is empty. Press F3 …to begin the definition of a new LUT. ALES will then ask for the LUT code. Enter tdp …which is a mnemonic for ‘Tilapia in diversion ponds’; then Press F10 ALES Version 4.65 Users Manual Page 114 February 1997 … to confirm your entry. A data entry form appears, entitled ‘tdp (NEW Land Utilization Type)’, in which you are to enter basic information about the LUT Entering Information about the LUT as a whole The first item, ‘descriptive name’, is the text that is displayed along with the LUT code. Type Tilapia in diversion ponds Move to the next question in the form, ‘planning horizon’. The second item is the length of the ‘planning horizon’, which is the time over which the model builder can enter by-year inputs and outputs. ALES also uses the length of the planning horizon to normalize all cost and return figures to a per-year basis in gross-margin analysis, and to compute the Net Present Value and Internal Rate of Return of a LUT. The planning horizon takes into account both the recurrence time of the rotation or other management cycle, and the length of time over which any capital improvements are effective. This is discussed fully in the next Chapter. In fish culture, management is based on a one-year cycle; however we have a significant capital investment in pond construction. The Net Present Value depends on the returns over the lifetime of a project, so that the longer the project life, the higher the NPV. For the purposes of this tutorial, let’s assume that the ponds have an expected life of five years. Erase the default answer of ‘1’ year Type 5 Move to the next question in the form, ‘discount rate’. The third item is the ‘discount rate’. The meaning of this was covered in Tutorial 2 and is discussed fully in the next Chapter. For this exercise, assume the discount rate is 5% (probably meaning that the government has subsidized the rate at which farmers can borrow money to build the ponds). Erase the default answer of ‘0’ % Type 5 Move to the next question in the form, ‘# of physical classes’. The final question, ‘# of physical classes’, is asking for the number of levels of physical suitability that the model will determine. The default is ‘4’, which is recommended by the FAO framework, corresponding to FAO suitability classes ‘s1’, ‘s2’, ‘s3/n1’, and ‘n2’. For this tutorial, we’ll accept the FAO suggestion, so we can leave the default 4 classes. Press F10 … to confirm the form. ALES Version 4.65 Users Manual Page 115 February 1997 Note: The number of physical suitability can be changed with Options 4 and 5 of Menu 1.2.8 ‘Physical Suitability options’. See the next Chapter for a discussion of how to decide on the number of physical suitability classes Menu 1.2, ‘Specification options for LUT: ‘tdp’’, with nine options, will now appear. We will spend a lot of time in this menu. The first option is the descriptive name of the LUT, which we just entered. The second option is the length of the planning horizon, which we also just entered. The third option includes the discount rate, which we just entered. These are included in the menu so that they may be edited at a later time. Specifying Annual and by-year inputs The fourth and fifth menu options allow the model builder to enter or edit the inputs to the Land Utilization Type, irrespective of the land it is implemented on. (Land-dependent costs will be addressed under menu option 7, ‘Land Use Requirements’.) First let’s define the annual inputs to this LUT, using menu option 4. Annual i nputs ar e those whi c h must be suppl i e d to the LUT e ac h ye ar dur i ng the pl an, i . e . the y ar e re c urre nt i nputs. Select Option 4 ‘Inputs - annual’. You will see a choice box, titled ‘Annual Inputs for LUT “tdp”’, with only the dummy item in the list. Press F3 … to enter the first item. Now you can see a difference between this choice box and the ones we’ve seen before. We are not being asked to type in a new code; instead, we are being asked to select a code out of a pre-defined lists. In this case, the codes we can choose are those that were defined in the reference list of inputs (see above). There are five possible annual inputs; we are going to use two of them at this time: labor and manure. Select item ‘labor’ A one-item data entry form appears, asking how many units (in this case, days per are) per year will be required to implement the fish farm. Labor is required for fertilizing, maintaining the pond banks, harvesting each crop of fish, and replenishing the water after each harvest. None of these is very labor-intensive; a reasonable estimate of the total time required is six days per 10x10m area (are) per year. Enter 6 Press F10 … to confirm the form. Now we are back on the choice box, with one item, ‘labor’, in the list. Using the same technique that you just used to add the first input, Add a second input, ‘manure’, using 0.2 tons per are. Manure is required to promote algal growth in the ponds (the fish then eat the algae). Press F10 ALES Version 4.65 Users Manual Page 116 February 1997 … to confirm the list of annual inputs and return to Menu 1.2. Now we will enter the by-year inputs, i.e., those inputs that are supplied at some specific time during the LUT, and are not repeated each year. Like the annual inputs that we just defined, the by-year inputs here are not dependent on the specific land, only on the Land Utilization Type. Select Option 5 ‘Inputs - by year’. You will see a choice box, titled ‘Years with by-year inputs for LUT “tdp”’. This is a list of the years in which any by-year inputs have been defined. At this point there aren’t any yet, so the list consists of only the dummy item. Press F3 … to add a year to this list. A selection list of the years which can be added (i.e. 1, 2, 3, 4 and 5) appears. The highlight is already on year 1. Select year 1. Now you will see a choice box titled ‘By-year Inputs for LUT “tdp” [Year 1]’, with only the dummy item in the list. This is the list of by-year inputs for the first year in the plan. In this LUT, the ponds must be built at the beginning of the LUT, i.e., in the first year; in later years they do not need to be re-built, only maintained. Capital improvements such as this are typical of by-year inputs in the first year of a multi-year LUT. Add the following 3 inputs to this list …exactly as you did for the annual inputs: input code number of units per are (how used) fish 200 each (to stock the pond); labor 50 days (to build the ponds) tile 4 meters (to make a drainage system for the pond). After you enter these three inputs, Press F10 … to confirm the list of by-year inputs for year 1 and return to the list of years with by-year inputs. At this point we could add by-year inputs for later years in the plan (e.g. for pond maintenance), but in this model we don’t have any, so Press F10 … to confirm the list of years with by-year inputs and return to Menu 1.2. Defining a Land Use Requirement The seventh option of menu 1.2 is used to specify the Land Use Requirements for this Land Utilization Type, i.e., the conditions of the land that are necessary for successful implementation of the LUT. This is the ‘heart’ of the model. ALES Version 4.65 Users Manual Page 117 February 1997 Select Option 7 ‘Land Use Requirements’. You will see a choice box, titled ‘Land Use Requirements for LUT: ‘tdp’’, with only the dummy item in the list. Press F3 … to define the first LUR. The choice box that appears on the screen is the same kind that we saw when entering inputs in the previous section, i.e. we are not being asked to type in a new code; instead, we are being asked to select a new code out of a pre-defined list. In this case, the codes we can choose are those that were defined in the reference list of Land Use Requirements. We will use all three of the available LUR codes in this LUT. Let’s start with the potential for construction. The highlight should already be on the code for this LUR, namely, ‘pfc’. Select Land Use Requirement code ‘pfc’. Specifying Severity levels You are now being asked for the number of severity levels of the corresponding land quality for the Land Use Requirement ‘potential for construction’, i.e. the number of classes of this land quality that will be distinguished in the context of the current LUT. The default value of 4 is displayed; recall that we specified this default when we defined LUR ‘pfc’ in the reference list of LUR codes. For this Land Use Requirement, the default of four severity levels is correct. Level 1 will correspond to no problems with construction, level 2 to additional costs for drainage, level 3 to additional costs for earth moving, and level 4 to extreme conditions that make construction impractical. In this example level 3 is not necessarily ‘worse’ than level 2; they just represent different types of additional costs, which are not necessarily increasing as the severity level increases. To accept the displayed value of 4 severity levels, Press F10 … to confirm the form. Note: The number of severity levels can be changed with Options 8 and 9 of Menu 1.2.7 ‘Specification options for Land Use Requirement’. Now you will see menu 1.2.7, ‘Specification options for LUT, LUR “tdp, pfc”’. The first menu option is used to give descriptive names to the four severity levels; these will appear along with the severity level in reports, explanations, consultation mode etc., and are a great help to the model user. Select Menu 1.2.7 Option 1 ‘severity level names’ Fill in the data entry form: 1. 2. 3. 4. no limitation needs drainage extra earthmoving impossible ALES Version 4.65 Users Manual Page 118 February 1997 Confirm the form. Specifying Additional inputs Severity levels 2 and 3 of land quality ‘pfc’ are associated with additional costs, i.e., the LUT costs more to implement on land with severity levels 2 and 3 of LUR ‘pfc’. Both costs are incurred in the first year when the ponds are built; there are no annual recurring costs associated with the LUR ‘pfc’, because the ponds are not built every year, but only in the first year. Select Menu 1.2.7 Option 3 ‘additional By-year inputs’ A choice box appears, titled ‘Years with by-year inputs for LUT, LUR “tdp”, “pfc”’. This is a list of the years in which any by-year inputs associated with LUR ‘pfc’ have been defined. There aren’t any yet, so the list consists of only the dummy item. Press F3 …to add a year to this list; a selection list of the years which can be added (i.e. 1, 2, 3, 4 and 5) appears. The highlight is already on year 1, which is when the extra work will be needed. Select year 1. Now you will see a choice box titled ‘Additional by-year Inputs for LUT, LUR “tdp”, “pfc” [Year 1]’, with only the dummy item in the list. This is the list of by-year additional inputs associated with pond construction for the first year in the plan. Press F3 …to add an input to this list; you will see the five inputs we defined in the reference list of inputs. Select input ‘tile’. A form appears, asking for the number of units, in units of measurement per unit area (in this case, linear meters per are), for each severity level of the ‘potential for construction’ Land Use Requirement. Recall that severity level 2 is to be associated with additional costs for drainage construction, so this is the only one of the four levels with an additional by-year cost for drainage tile. Move to question 2 in the form, Enter 10 With this entry, we are saying that land that has land quality rating ‘2’ for ‘potential for construction’ will require 10 additional linear meters of plastic tile per are (10x10 meter area) in order to make it fit for Tilapia production in diversion ponds. in addition to the 4 linear meters that were specified for the LUT as a whole. Press F10 … to confirm the form and return to the list of additional by-year inputs for year 1, which now has one item, ‘tile’. Press F3 ALES Version 4.65 Users Manual Page 119 February 1997 …again to add another input; you will see a list of four inputs to choose from. The list doesn’t include ‘tile’, since we have already entered added by-year costs for this input. Select input ‘labor’. A form appears, asking for the number of units, in units of measurement per unit area (in this case, days per are), for each severity level of the ‘potential for construction’ Land Use Requirement. Recall that severity level 3 is to be associated with additional costs for earth moving, so this is the only one of the four levels with an additional by-year cost for labor. Move to question 3 in the form, Enter 5 With this entry, we are saying that land that has land quality rating ‘3’ for ‘potential for construction’ will require 5 additional days of labor per are, for earthmoving, in order to construct the diversion ponds. Press F10 … to confirm the form and return to the list of additional by-year inputs for year 1, which now has two items, ‘labor’ and ‘tile’. That’s all the additional by-year inputs associated with this Land Use Requirement, for any year in the plan (in this case only year 1), so Press F10 … to confirm the list of additional by-year inputs for year 1 and return to the list of years with additional by-year inputs. There are no other years with additional by-year inputs, so Press F10 … to confirm the list of years with additional by-year inputs and return to Menu 1.2.7. Entering a Severity level decision trees Now we are really going to have some fun! It’s time to build a decision tree that will allow ALES to infer the severity level of the land quality corresponding to LUR ‘potential for construction’ from some set of land characteristics. During the computation of an evaluation, ALES attempts to place each map unit into one of the four severity levels. In other words, it determines whether the map unit (1) has no limitations for pond construction, (2) will require extra tile drainage, (3) will require extra earth moving, or (4) has so many problems that construction is impractical. To do this, ALES follows decision trees, built by the model builder, which relate land characteristics to land qualities. The tree used in this example has purposely been kept small by only considering a few factors. Select Menu 1.2.7 Option 4 ‘severity level Decision Tree’ The main screen we have been looking at for quite a while now, with its overlapping windows, disappears, and is temporarily replaced with the decision tree editor. This is a completely different interaction. As you build models, you will spend much of your time building and altering trees with this editor. At first it looks a bit mysterious, but ALES Version 4.65 Users Manual Page 120 February 1997 you will soon become used to it. It follows the structure of the decision trees, so that editing the trees is as efficient as possible. As always, on-screen help is available. If you wish, press F1 now and take a moment to skim the help screen. We will cover most of this information in the exercise, but now you know how to find it on-line. Return to the editor now. As you can see on the screen, at present there is no decision tree. The annunciator line shows what keys are active; what we want to do now is insert the first level. Notice that ‘F4’, as well as ‘↵’, is marked ‘ins >’, which stands for ‘insert subtree’. √ ‘>’ i s a shor thand for ‘subtr e e ’. √ ‘F4’ i s use d to e nte r a subtr e e . Press F4 … to insert the top-level subtree. A selection list of the discrete (classified) land characteristics will appear. You are being asked to pick out of this list the land characteristic that you want to consider first when determining the severity level of the land quality ‘potential for construction’. Looking at the list, we see some land characteristics that are irrelevant for pond construction, such as the pH of water, but several that are relevant. The idea is to build the simplest model possible, so we pick the land characteristic that will most quickly narrow the choices and reach a decision as to whether a given area of land is suitable for construction of diversion ponds. Assuming that the most important factor is soil depth (we will see why in a moment), Select land characteristic ‘sd’ (soil depth). The selection list will disappear, and the editor now shows the first level of the decision tree. At the top is the first decision entity, i.e. ‘sd’, and below it are four branches, one for each land characteristic class (shallow, moderately deep, and deep), and one marked ‘?’. For the remainder of this Tutorial 3 we will ignore this final ‘unknown’ branch; its use will be covered in Tutorial 4. To the right of each branch is a single ‘?’, signifying that no decision has yet been made with regard to that branch. √ ‘?’ i s a shor thand for ‘no de c i si on’ or ‘unk nown’ Now we must imagine land with each of the three possible depths. Can we determine its potential for construction just based on soil depth? In the case of shallow soils, we can (at least in this model): it is too difficult to excavate into underlying rock, or to transport large amounts of earth from another site to build raised ponds, so we can say that shallow soils are impossible to construct ponds on.1 1You may disagree with this assessment; remember that each model builder makes his or her own decisions based on local conditions and assumptions. It is certainly conceivable that it would be considered economic or otherwise worthwhile to construct ponds on shallow soils despite the difficulties; for the sake of this model we will assume that it isn’t. ALES Version 4.65 Users Manual Page 121 February 1997 So, we want to associate severity level 4 (impossible) with shallow soils, i.e. those with land characteristic class ‘s’ for soil depth. Notice that the highlight is already on branch 1, the one for class ‘s’. Also notice in the annunciator line that ‘F3’ is marked ‘ins *’, which is short for ‘insert a final decision’. √ ‘*’ i s a shor thand for ‘fi nal de c i si on’. √ ‘F3’ i s use d to e nte r a fi nal de c i si on. In other words, by pressing a ‘F3’ we will be able to tell ALES the final decision for this branch. Press F3 … and you will see a selection box with the four possible choices, i.e. the severity levels. Select severity level ‘4’ (impossible). Notice now that the ‘?’ to the right of the first branch has been replaced with the decision, i.e. severity level 4. The asterisk, ‘*’ to the left of the decision is the editor’s notation that this is a final decision. Notice also that the highlight has moved down to the second branch. Now we must make a statement about the severity level, for construction, of moderately deep soils. We can’t reject them out-of-hand, and neither can we say without qualification that they have no limitations. We must consider other factors. Notice that ‘F4’ in the annunciator is marked ‘ins >’, short for insert subtree. Press F4 … to insert a subtree rooted at branch 2. Again we see the list of land characteristics, but this time it does not include soil depth, ‘sd’, since that characteristic has already been used on the current path. Suppose that slope is the next most important factor in determining suitability for construction. Select land characteristic ‘sl’ (slope). Now things change quite a bit in the display. The first characteristic, soil depth, is fixed at branch 2, moderately deep; this is displayed to the right of the LC name. The other branches of soil depth have been temporarily removed from the display, and the next LC to be considered, ‘slope’, is displayed as a secondary heading, indented by one space. The four possible values of slope (along with ‘?’) are the new branch headings. The highlight is on branch 1, which corresponds to nearly level slopes. Don’t worry, the hidden parts of the decision tree are still there, they are just hidden ‘behind’ the currently-visible parts of the tree. The PC display screen is too small to show the entire decision tree, so we can only show the active branch. If you are ever confused about where you are in the tree, you can navigate up and down levels with the arrow keys. Also, you can print the entire tree using Menu 1.5 ‘Reports’, Option 9 ‘Decision Trees’. Suppose that on moderately deep soils, any slope over 30% is impractical for constructing fish ponds, because there is just too much earthmoving, it is very hard to stabilize the pond banks on such steep slopes, etc.. Let’s record that fact now. Move the highlight to branch 4, ‘D’ (very steep). Press F3 ALES Version 4.65 Users Manual Page 122 February 1997 …to enter a decision. A pop-up list appears, asking you which severity level should be assigned to this combination of land characteristic values, namely, very steep slopes with moderately deep soils. Select severity level ‘4’ (impossible). Now the ‘?’ at branch 4 is replaced with an asterisk (signifying a decision), and the decision itself. The cursor has moved to branch 1; notice how it rotates around the branches. Make sure that the cursor is on branch 1; move it there if necessary We are now being asked to give a suitability rating for moderately deep soils on nearly level slopes. A problem with building fish ponds on nearly level sites is that extra drainage must be provided to allow the ponds to be drained and refilled with fresh water every four months or so. Let’s enter this decision now. With the highlight is on the first branch, Press F3 …to enter a decision, then Select severity level ‘2’ (needs drainage) …out of the pop-up list. This result is displayed and the highlight moves to the second branch, representing sloping lands. Sloping land is ideal for fish pond construction, because simple outlets from each pond can be used to move water to ponds further down the hillside (so, no extra drainage is needed), and earth dug from the pond can be used for the immediately adjacent down slope dike (so, no extra earthmoving is needed). Press F3 Select severity level ‘1’ (no limitation) This result is displayed and the highlight moves to the third branch, representing steep lands. Steep land will have no drainage problem, but will require extra earthmoving. Ponds are smaller and dikes are higher, resulting in more work for the same area of ponds. To enter this decision, Press F3 Select severity level ‘3’ (extra earthmoving) This result is displayed and the highlight moves to the fourth branch, representing very steep lands; we’ve already entered a result here. You have now completed the first paths in this decision tree. The tree should look like this on your screen: ALES Version 4.65 Users Manual Page 123 February 1997 sd soil depth 2 m (moderately deep) [75-200 cm] sl slope 1 A (nearly level) [0-3 %] * 2 (needs drainage) 2 B (sloping) [3-10 %] * 1 (no limitation) 3 C (steep) [10-30 %] * 3 (extra earthmoving) 4 D (very steep) [30-200 %] * 4 (impossible) ? [???] ? Now we’ve told ALES how to evaluate land areas with ‘shallow’ and ‘moderately deep’ soils. But what about deep lands? We have to backtrack in the tree and enter decisions for them. √ use the ‘l e ft ar r ow’ k e y ‘←’ to move up one l e ve l √ use the ‘r i ght ar r ow’ k e y ‘→’ to move down one l e ve l Press ← …to go up a level in the tree. The last LC in the path, slope, disappears, and the branches for the first LC, soil depth, are redisplayed. Notice that to the right of the second branch (the one we just completed), is a ‘> sl’; ‘>’ indicates a complete subtree, i.e. a subtree where all the leaves have been filled with decisions, is attached at that branch, and ‘sl’ is the land characteristic that begins the subtree. Move the highlight to branch 3, ‘d’ (deep). Now we will make decisions for ‘deep’ soils. Recall that as we made decisions for moderately deep soils, the depth never was a factor in our decision making. Thus there is no difference, from the point of view of construction potential, between moderately deep (branch 2) and deep (branch 3) soils. We could re-enter the same subtree as is presently rooted at branch 2, but we can also take advantage of another feature of the editor, equating or joining branches. Notice in the annunciator line that ‘=’ and ‘F7’ are both marked ‘join’. √ ‘=’ i s a shor thand for ‘joi ne d’ or ‘e quate d’ √ ‘F7’ or ‘=’ may be use d to joi n br anc he s. Press = … to join this branch to another one. A selection box will pop up, asking to which other branch we want to join branch 3. The highlight is on branch 2, i.e., the one immediately above it. In this case, that’s what we want, so Press Enter … to select this answer. Now the ‘?’ at branch 3 is replaced with an ‘=2’, signifying a join, and the branch number to which it is joined, i.e. a ‘2’. We have saved some work using the join, since otherwise the subtree would have had to be duplicated. Furthermore, there is a logical difference between a join and a separate decision or subtree: in the former case we are stating that from the point of view of the current decision tree, there is no difference between the two branches. In the present case, we are saying that moderately deep and deep soils are the same from the point of view of this Land Use Requirement, and so the additional critical limit of 200 cm between the moderately deep and deep soils is irrelevant (of course this limit may prove important for other land qualities). You have now completed the tree. The first level is displayed: ALES Version 4.65 Users Manual Page 124 February 1997 sd soil depth 1 s (shallow) [0-75 cm] 2 m (moderately deep) [75-200 cm] 3 d (deep) [200-1000 cm] ? [???] * 4 (impossible) > sl =2 ? Decision trees can be annotated, exactly in the same manner as was done for the evaluation. It is a good idea to make a note that explains your reasoning to anyone who uses the model. Important things to explain are: (1) why you chose the decision factors, (2) assumptions about factors not in the tree, (3) an outline of the decision procedure in words. √ ‘Al t+F9’ i s use d to e nte r or e di t an annotati on Let’s enter a note now. Press Alt+F9 … to begin editing a note. An editing box appears, titled ‘Note Editor DT #1’. Enter a note … similar to the following, or, if you wish, you can add some comments of your own. Potential for construction is based on: (1) soil depth -- can’t excavate into bedrock by hand (2) slope --- excessive slopes can’t be stabilized -- steep slopes require more earthmoving -- nearly level slopes require extra drainage When you’re done entering the note, Press F10 …to file the note and return to the decision tree editor. We’ll see this note again when we compute an evaluation. We’re all done with this decision tree, so, Press F10 … to leave the decision tree editor. The tree disappears, and the overlapping windows reappear. We’re all done editing this Land Use Requirement, so, Press F10 …to return to the choice box for the Land Use Requirements. Note that ‘pfc’ has been added to the list of LUR's for this LUT, and the highlight is on it. Also note that the LUR is marked with an asterisk ‘*’, indicating that it has a decision tree, so that ALES can determine the value of the corresponding land quality. You may want to see the whole decision tree at once, to more easily check its structure. The way to do this is to print or view the tree, using Menu 1.5 ‘Reports’, Option 9 ‘Decision Trees’. If you choose this option, you will see a list the trees in the model, along with a brief ALES Version 4.65 Users Manual Page 125 February 1997 description. Select the ones you want to print or view with ‘F6’ and then select an output device. Defining the other Land Use Requirements Now that we’ve completely specified the Land Use Requirement ‘pfc’ (potential for construction) within the context of the current Land Utilization Type ‘tdp’ (Tilapia in diversion ponds), we must specify the remaining two Land Use Requirements for this LUT: water availability and water quality. By this point in the Tutorials, you should be familiar enough with ALES to complete actions on your own, so we won’t give key-by-key instructions. If you get confused, you can refer to the previous three sections, or just use the help screens. Remember that the annunciator line always shows which keys are active. The following two sections, on LURs ‘wq’ and ‘wa’, are parallel to section immediately above, where we specified LUR ‘pfc’ in detail. You should now looking at the choice box for the Land Use Requirements, exactly as at the start of that section, except at this point you have already added one LUR, namely ‘pfc’, to this LUT. Water quality The second Land Use Requirement for this LUT will be water quality, i.e., how favorable is the water for Tilapia. As you will see when we enter the Decision Tree, in this model water quality is determined by water temperature and pH. The temperature can’t be altered, and neither can excessive alkalinity be neutralized. However, excess acidity can be corrected by additional lime added to the water each year (a recurrent expense). So, Land Quality ‘wq’ will have four severity levels: (1) no limitation, (2) needs extra lime, (3) needs even more lime, and (4) impossible. There will be one additional annual input, ‘lime’. Severity levels 2 and 3 will require 0.25 and 0.5 extra tons of lime per are per year, respectively. To tell ALES all this, Add LUR ‘wq’ (water quality) to the list of LURs for LUT ‘tdp’: ♦ Number of severity levels: 4 ♦ Severity level names: 1 2 3 4 no limitation + lime ++ lime impossible ♦ Additional annual inputs: ‘lime:’ level 2: 0.25 tons; level 3: 0.5 tons Enter the following Decision Tree for water quality: wt water temperature 1 c (cold) [0-16 _C]..........................* 4 (impossible) 2 t (temperate) [16-23 _C]................> pH (pH of water) 1 vacid (very acid) [0-4 pH].............* 4 (impossible) 2 acid (acid) [4-6 pH] ......................> pe (permeability) 1 s (slow) ...................................... ...... * 2 (+ lime) 2 m (moderate) ............................. ...... =1 3 r (rapid) ..................................... ...... * 3 (++ lime) 3 n (neutral to alkaline) [6-9 pH].* 1 (no limitation) 4 valk (very alkaline) [9-14 pH] ..* 4 (impossible) 3 (warm) [23-35 _C] ........................=2 4 (hot) [35-100 _C] ..........................* 4 (impossible) ALES Version 4.65 Users Manual Page 126 February 1997 Of course as you enter the tree, you will not be able to see it all at once on the screen; only the current path will be visible. If you wish, enter a note for the decision tree, explaining that excessively acid, alkaline, warm, or hot waters are unsuitable for Tilapia, and that acid water can be corrected with lime; more lime is needed if water leaks out of the pond due to rapid subsoil permeability. Water availability The third Land Use Requirement will be water availability, i.e., how easy it is to obtain fresh water to fill the fish ponds. As you will see when we enter the Decision Tree, in this model water availability is determined by water source (rain, river, or springs), months of rainfall, and subsoil permeability. None of these can be altered, so that there will not be any additional costs. Lower water availability will be reflected in lower yields (see below), i.e., there will be periods when there is not enough water to fill the ponds, hence no fish can be raised. This land quality will have four severity levels: (1) ‘high’, (2) ‘moderate’, (3) ‘low’, and (4) ‘very low’1. There are no additional annual or by-year costs. Add LUR ‘wa’ (water availability) to the list of LURs for LUT ‘tdp’: ♦ Number of severity levels: 4 ♦ Severity level names: 1 high 2 moderate 3 low 4 very low Enter the following Decision Tree for water availability: ws source of water 1 rain > rs (length of rainy season) 1 short [0-6 months] ........ > pe (permeability) 1 s (slow) .................... .... * 2 (moderate) 2 m (moderate) ........... .... * 3 (low) 3 r (rapid) ................... .... * 4 (very low) 2 medium [6-10 months].. > pe (permeability) 1 s (slow) .................... .... * 1 (high) 2 m (moderate) ........... .... * 2 (moderate) 3 r (rapid) ................... .... * 4 (very low) 3 long [10-12 months] ..... > pe (permeability) 1 s (slow) .................... .... * 1 (high) 2 m (moderate) ........... .... * 1 (high) 3 r (rapid) ................... .... * 3 (low) 2 river .... = 1 3 spring.... * 4 (very low) 1Note that all these adjectives modify the noun ‘water quality’, which is the LQ name, for example, severity level 4 is ‘very low water quality’. ALES Version 4.65 Users Manual Page 127 February 1997 If you wish, enter a note for the decision tree, explaining that springs are not a reliable water source, that both rainwater and river water depend on the length of the rainy season, and that the permeability of the subsoil determines how well the pond retains water. Now you should have a list of three Land Use Requirements for LUT ‘tdp’. There are no more LURs for this LUT. Go back to Menu 1.2 ‘Specification options for LUT ‘tdp’’. Specifying Outputs Now we will enter information about the outputs, i.e. the products of this Land Utilization Type. This is one side of the economic evaluation1: the LUT produces outputs which have a cash value. Notice that menu choice 6 is for ‘Outputs’; select it now. Select Menu 1.2 Option 6, ‘Outputs’. A list box should now appear, showing the outputs of Land Utilization Type ‘tdp’; of course at present there are none, so the list has only the dummy item. Press F3 …to add a new output to the list. You will see a selection list of all the outputs that were defined in the reference list of outputs (Menu 1.1 Option 2), in this case, only one (Tilapia). This Land Utilization Type will only have the one output. Select output ‘ti’ …to select new output ‘ti’. Menu 1.2.6, ‘Specification options for LUT, Output “tdp, ti”’, will appear. Optimum yield, number of crops per rotation The first thing to do is tell ALES how much yield we expect under ‘optimum’ conditions, within the context of the LUT and evaluation area. This establishes a baseline for proportional yields which will be defined later. Select Menu 1.2.6 ‘Specification options for LUT, Output: “tdp, ti”’ Option 1, ‘Optimum yield, years when produced, how yield is affected’. A data entry form will appear, asking for four items: (1) the ‘Optimum’ yield, in kg per are; (2) the years in the plan when the crop is harvested; (3) whether yield can be reduced in this LUT; and (4) whether yield can be delayed in this LUT. 1Inputs are the other side. ALES Version 4.65 Users Manual Page 128 February 1997 The terminology ‘optimum’ yield is a bit misleading. Really we are talking about the ‘expected’ yield under optimum conditions. See the next Chapter for a fuller discussion. Answer question 1 ‘Optimum yield’ with 35 I.e., under optimum conditions we expect 35 kg of fresh Tilapia per are (10 meter–by–10 meter pond) per crop. The level at which this figure is set is determined by (1) the ecological context of the model’s area of applicability, (2) the socio-economic context, (3) the management level we assume, and (4) whether we deal with uncertainties as optimists, pessimists (risk-averse), or by considering the average. This issue is covered fully in the next Chapter. Recall that we defined a five-year planning horizon in the basic information for the Land Utilization Type. Under optimum conditions, there are three crops of fish per year. However, if there is a water shortage1, there may be two, one, or even no crops of fish per year. We will take this into account when we enter multiplicative yield factors. For now, we will enter each year number three times, to indicate the three harvests of fish in each year. Notice that the default answer for question 2 is ‘1, 2, 3, 4, 5’, i.e. in the absence of more specific information, ALES assumes that there is one harvest of each output each year; we must correct this answer: Answer question 2, ‘years output is produced’, with 1,1,1,2,2,2,3,3,3,4,4,4,5,5,5 Questions 3 and 4 are pre-answered with the defaults ‘Yes’ and ‘No’, respectively, meaning that adverse conditions reduce the optimum yield but do not delay them. This is the usual situation and applies to the present case. Confirm the form to return to menu 1.2.6 ‘Specification options for LUT, Output: “tdp, ti”’. Determining proportional yield We have just told ALES that each crop of fish on optimum land will yield 35 kg per are. Now it we must to differentiate the lands, based on the severity levels of their land qualities. We must tell ALES how much of the optimum yield we can expect under various combinations of less-than-ideal conditions. In the present simple example, only one of the three land qualities that we have defined for this Land Utilization Type affects yields: ‘wa’ (water availability). Certainly the other two qualities can make Tilapia production impossible: if we can’t construct the ponds, or can’t obtain good-quality water, we can’t grow fish. However, these two will be handled in the physical suitability (below), since either they make production impossible, or they allow full production. This simplifies the proportional yield calculation considerably. Recall that we entered additional inputs of lime for the two intermediate severity levels of the land quality ‘wq’ (water quality). The additional lime completely corrected the limitation due to low pH, so that the growth of the fish will not be lowered in these situations. Therefore, ‘wa’ does not appear in the proportional yield decision tree. If we had elected not to correct this limitation, we would not have entered additional inputs. This would result in lower costs of production on map units with the two intermediate severity levels of ‘wq’; however there would also be a lower yield (due to the slower growth rate of the fish), so that we would have had to include ‘wq’ in the proportional yield calculation. In other words, a limitation can affect costs, or returns, or both, depending on the definition of the LUT. 1We defined a land quality ‘wa’ for water availability to represent this factor ALES Version 4.65 Users Manual Page 129 February 1997 You will notice that Menu 1.2.6 Options 2, 3 & 4 all have to do with proportional yield. Since in this LUT only one LQ affects yield, and its effect is to multiply predicted yield by a proportion that represents the number of crops of fish (3/3, 2/3, 1/3, or 0/3 per year, i.e., 1.0, 0.67, 0.33, or 0 times full production), it is most appropriate to use multiplicative yield factors Select Menu 1.2.6 ‘Specification options for LUT, Output: “tdp, ti”’ Option 3, ‘Multiplicative yield factors’. You will see a list of the three LURs defined for this LUT. As explained above, only water availability affects yield. Select Land Use Requirement ‘wa’ (water availability). Now you will see a data entry form, asking for the multiplicative yield factors for each severity level. Yield factors are decimal fractions on the interval [0..1], with ‘0’ representing complete lack of production (e.g., crop failure), and ‘1’ representing the optimum. Fill in the data entry form: 1. 2. 3. 4. 1 0.67 0.33 0 Confirm the form. Notice the ‘*’ that appears beside the LUR ‘wa’; this shows that there are already yield factors for the LUR (i.e., the ones we just entered). As explained above, the other two LURs won’t affect yield in this model (except to make it impossible). Press F10 …to return to menu 1.2.6 ‘Specification options for LUT, Output: “tdp, ti”’. Specifying Production-dependent inputs ALES allows the model builder to specify that certain costs are only incurred when a crop is harvested, and are incurred in proportion to the amount harvest, i.e. the yield. These are called production-dependent inputs. Select Menu 1.2.6 Option 5 ‘Production-dependent inputs’. You will see a choice box, titled ‘Production-dependent inputs for LUT “tdp”, Output “ti”’, with only the dummy item. Manual labor is needed when harvesting the Tilapia fish to process and package them. Naturally, the more fish, the more work. So, Press F3 …to add a new input to the list. You will see a selection list of all the inputs that were defined in the reference list of inputs (Menu 1.1 Option 3). Select input ‘labor’ ALES Version 4.65 Users Manual Page 130 February 1997 Now you are being asked how many days of labor per kg of fish is required. The key point is that the amount of work depends on how much fish was produced, which you can see by the units of measure. Enter .002 That is, one person can process 500 kg in one full day (note that 1/500 = 0.002). Confirm the data entry form There are no more production-dependent inputs, so… Press F10 …to return to Menu 1.2.6. We don’t need to say anything more about output ‘Tilapia’, so… Press F10 …to return to the list of outputs. There are no more outputs for this Land Utilization Type, so… Press F10 …to return to menu 1.2 ‘Specification options for LUT “tdp”’ Determining physical suitability subclasses We now must tell ALES how to determine the physical suitability of each land area from its set of severity levels of the land qualities. A physical suitability assessment is always necessary to exclude areas that are physically unsuitable. Such areas must be placed in the highest-numbered physical suitability class, since this is the class that corresponds to FAO suitability subclass ‘n2’, i.e. ‘physically unsuitable’. In this evaluation, that is class 4, corresponding to FAO suitability subclass ‘N2, physically unsuitable’. ALES doe s not c ar r y out an e c onomi c e val uati on of l and that i s r ate d as ‘physi c al l y unsui te d’ for a Land Uti l i z ati on Type . The other reason for doing a physical suitability assessment is to indicate the degree and nature of physical limitations to management. The various physical suitability subclasses can be expected to have different management requirements. To specify how ALES should determine overall physical suitability… Select Menu 1.2 Option 8, ‘Physical Suitability Subclasses’. Menu 1.2.8 ‘Physical suitability options for LUT: ‘tdp’’, with three options, should now appear. The simplest method by which ALES determines the physical suitability of each land unit from the set of Land Use Requirements is the maximum limitation method. This is very easy for the model builder to specify, and is appropriate if the severity levels of each Land Quality represent the same degree of physical limitation to the Land Utilization Type. In the present example, this is true; each LUR was defined with four severity levels, and the meanings of the levels are roughly comparable, as we can see from the following table: ALES Version 4.65 Users Manual Page 131 February 1997 Land Use Requirement Level 1 Level 2 Level 3 Level 4 pfc (potential for construction) no limitation needs drainage extra earthmoving impossible wa (water availability) high moderate low very low wq (water quality) no limitation + lime ++ lime impossible In all cases, level 4 means that the land use is impractical, and level 1 means that there is no limitation. Levels 2 and 3 are increasingly-severe limitations, assuming that extra earthmoving is more difficult that extra drainage. So, the maximum limitation method is appropriate in this case. The more general method of determining physical suitability is with a physical suitability subclass decision tree; this can account for interactions between Land Qualities. This method is presented in Tutorial 4. Select Menu 1.2.8 Option 2, ‘Choose factors for Maximum Limitation’. A set box will appear, with the title ‘Consider which LUR's in the Maximum Limitation?’, showing the three LURs defined for this LUT. In a set box, we can pick any number of items. In the present case, all three LURs should be used in the maximum limitation method of determining physical suitability. So… Press F6 …to select all the LURs. You will see a diamond ‘♦‘ next to all three LUR codes. Press F10 …to confirm this set and return to menu 1.2.8. Press F10 …to return to menu 1.2 ‘Specification options for LUT “tdp”’. Now ALES knows how to evaluate the overall physical suitability of each map unit, from the individual Land Quality severity levels. Determining economic suitability classes Economic suitability classes are divisions of the whole range of economic metrics, such as Net Present Values or Gross Margins, to allow ALES to assign land to one of the four FAO economic suitability classes: S1 = ‘highly suitable’, S2 = ‘suitable’, S3 = ‘marginally suitable’, N1 = ‘economically unsuitable’. Note that FAO class N2 = ‘physically unsuitable’; we took care of this case in the previous section You can not change the number or names of the FAO classes, but you can determine which land falls in each class, by entering economic class limits, as explained in this section. If the FAO economic suitability classes are not required as outputs of the evaluation, this step can be omitted. ALES Version 4.65 Users Manual Page 132 February 1997 Economic class limits can be set for all four kinds of analysis: NPV, IRR, Benefit/Cost ratio, and Gross Margin. The Gross Margin is the best measure of year-to-year farm income, without taking into account the time value of money. Select Menu 1.2 Option 3, ‘Economic parameters’ Select Menu 1.2.3 Option 2, ‘Economic class limits - Gross Margin’. A data entry form appears, asking for the lower limits of classes S1, S2, and S3, expressed as $ are-1 yr-1. There is no lower limit of class N1; class N2 is reserved for land that is physically unsuitable. The economic class limits are based on the objectives of the evaluation. The lower limit of S3 is the level at which the farmer would elect not to carry out the enterprise; typically this is zero (assuming that labor has been included in the costs). The lower limits of S1 and S2 correspond roughly to the Gross Margin one would consider ‘excellent’ and ‘good’, respectively. This depends completely on the socio-economic setting. In particular, the per-unit area return that is considered adequate may depend on the typical holding size, to ensure an adequate per-farm income. See the next Chapter for details. Fill in the data entry form: 1. 2. 3. 100 50 0 Confirm the form. …to return to Menu 1.2.8. At this point we could, if we wished, specify class limits for the other economic metrics. Instead, Press F10 …to return to Menu 1.2. We’re all done specifying this LUT, so… Press F10 …to return to the list of LUT’s. In a real evaluation we would certainly define more than one land use alternative (i.e. LUT); in the interests of keeping the tutorial to a manageable length we won’t do this. Press F10 to return to menu 1.2 Press F10 again to return to Menu 1, ‘Main Options’. Congratulations, you have defined a simple evaluation model! Defining data entry templates Before we can compute and view evaluation results (Menu 1 Option 4), we must define map units and enter data (Menu 1 Option 3). Both of these main menu options were presented in Tutorial 2. However, there is one aspect of data entry that was not explained in that tutorial, namely, defining data entry templates. ALES Version 4.65 Users Manual Page 133 February 1997 Data entry templates are used to specify the land characteristics for which data is to be entered, and their order in the data entry form that will be filled in by the model user. The model builder often defines different templates for different sorts of data (e.g. climatic variables in one template, soils variables in another). Or, the model builder can choose to put all data fields in one template; in the present example that’s what we’ll do, because there are only a few land characteristics. Another purpose for templates is to specify the order in which data will be read from an external data base1. To define a template now… Select Menu 1 ‘Main options’ Option 3, ‘Data’ Select Menu 1.3 ‘Data’ Option 7, ‘Templates (data entry formats)’ An empty list of template codes should now appear. Press F3 …to add a new template, and when asked for its code, Type All …because all the land characteristics will be fields in this template. Press F10 …to confirm this code. ALES now ask for the descriptive name of the template Type all Press F10 land characteristics …to confirm this form. Menu 1.3.7, ‘Specification options for Data Entry Template’, with two menu options, now appears. We’ve already entered a descriptive name (Option 1), so… Select menu Option 2, ‘List of data fields (land characteristics)’. Now an empty list box appear at the upper right of the screen, with the dummy item 1 ‘< add to end of list >’ . The list will contain the codes of the land characteristics to be included in the template. This is a bit different from other list boxes we’ve seen, since the list is not ordered by the entity code, but rather the numeric position in the list. This is because the order of fields is important both for the data entry form to be presented to the model user, and for matching the order of fields in any automatic input. Press F3 1See the Chapter ‘ALES and other computer systems’ for more on reading data from an external database. ALES Version 4.65 Users Manual Page 134 February 1997 …to insert the first field. A list of all ten land characteristics that are defined in the reference lists should now appear. All of these must be added to the template. Let’s group them according to the kind of characteristic: water characteristics first, climate second, and soil third. Select ‘pH’ (pH of the water) Notice that it is now the first item in the list, meaning that the first field in the data entry form will be land characteristic ‘pH’ of the water. The highlight should be on the dummy item, now field 2, named ‘< add to end of list >’. Press F3 …again to insert the next field. Notice that the characteristic that we’ve already used for the first field, i.e. ‘pH’, is no longer in the selection list. Select ‘ws’ (water source) Notice that ‘ws’ is now field 2 in the list. The highlight should be on the dummy item, now field 3, named ‘< add to end of list >’. Suppose that we intended that a different characteristic, water temperature, be the first field, instead of pH. We can insert this land characteristic before the fields we’ve already defined. Move the highlight to field 1 Press F3 …to insert a new field before field 1. Select ‘wt’ (water temperature) Notice that ‘wt’ is the first field, and ‘pH’ and ‘ws’ have been pushed down to fields 2 and 3, respectively. The highlight is on field 2 ‘pH’. We will enter the rest of the characteristics at the end of the list. So, Move the highlight to the end of the list Insert the remaining Land Characteristics in the list… …in the order: ‘rs’, ‘sl’, ‘sd’, ‘text’, ‘cfc’, ‘cfs’, and ‘pe’. The list of fields should now look like this: ALES Version 4.65 Users Manual Page 135 February 1997 -– Data Fields for ‘All’ (all land characteristics) –1 2 3 4 5 6 7 8 9 10 11 wt (water temperature) pH (pH of water) ws (source of water) rs (length of rainy season) sl (slope) sd (soil depth) text (texture of fine earth) cfc (coarse fragment content) cfs (coarse fragment size) pe (subsoil permeability) <> add to end of list > We’ve now added all the Land Characteristics to this template, so… Press F10 …to return to Menu 1.3.7; Press F10 …to return to the list of data entry template codes; Press F10 …to return to Menu 1.3 ‘Data’. Entering map unit definitions and data Now that the model is complete, and a data entry template has been defined, we can define land units, enter land data, and compute evaluation results exactly as in Tutorial 2. Rather than go through the mechanics of all that, we’ll just present a table of hypothetical land units and their data1. We’ve designed these so that they will have different physical and economic suitabilities. So, Select Menu 1.3 ‘Data’ Option 1 ‘Definitions, From keyboard, Enter or edit’ Define the following list of (‘h’omogeneous) Land Mapping Units LMU code A B C D E LMU name alpha beta gamma delta epsilon ares 10 20 30 40 50 Return to Menu 1.3 ‘Data’ 1These are not real land units from Guatemala. ALES Version 4.65 Users Manual Page 136 February 1997 Now we will enter data for the homogeneous map units that you just defined, using the convenient format of the Data Entry Matrix. Select Menu 1.3 ‘Data’ Option A ‘Edit Data in a Matrix’ A set box appears, asking which map units you want to edit. Press F6 …to select all the Land Mapping Units. You will see a diamond ‘♦‘ next to all five map unit codes. Press F10 …to confirm this set and display the data entry matrix. Fill in the matrix… …according to the following table, using the arrow keys to move around the matrix, the Enter key to edit a highlighted cell, and the F3 key in the entry box to pop up a list of the choices. Map Unit LMU code A B C D E Land Characteristics wt c t w w t pH n n acid acid acid ws rain river spring rain rain rs long medium short medium short sl A B C A C sd d m s d m text c m m f m cfc 1 2 4 2 1 cfs b fg b fg ? pe m s r s s Return to Menu 1.3 ‘Data’ Return to Menu 1 ‘Main options’ Computing evaluation results Now that the model is complete, all the map units have been defined, and all the data has been entered, ALES can compute physical and economic land suitability. Select Menu 1 ‘Main options’ Option 4, ‘Evaluations’ Select Menu 1.4 ‘Evaluations’ Option 1, ‘Compute an evaluation’ Press F6 …to select all the Land Mapping Units. You will see a diamond ‘♦‘ next to all five map unit codes. Press F10 …to confirm this set and compute the evaluation. ALES will show its progress in the lower-left corner of the screen. The computation should be very fast, since the model is so simple and there are only five map units. When the computation finishes, ALES returns to Menu 1.4. ALES Version 4.65 Users Manual Page 137 February 1997 Select Menu 1.4 ‘Evaluations’ Option 2, ‘View evaluation results’ ALES asks which kind of evaluation results you want to view. Select ‘Physical suitability subclass’ ALES displays the evaluation matrix for physical suitability subclasses. These results should look like the following table: A B C D E tdp 4wq 1 4pfc/wa 2pfc/wq 3pfc Note that two of the units, ‘A’ and ‘C’, are physically unsuitable (i.e., are in physical suitability class 4 = FAO class ‘N2’), but for different reasons: ‘A’ has poor water quality, and ‘C’ has both excessively low water availability, and the ponds can’t be constructed in the first place. Map units ‘B’, ‘D’, and ‘E’ are physically suitable, according to our model. Map unit ‘B’ is the only one without any physical limitations. Map unit ‘D’ has minor water quality limitations, and some extra drainage is needed to build the ponds. Map unit ‘E’ needs extra earthmoving to build the ponds. Calibrating an evaluation from the ‘Why?’ screens and evaluation matrix In Tutorial 2 we took a brief tour of the ‘Why?’ screens, including editing economic parameters and re-computing evaluations. In model building mode we can do more than examine why and alter economic parameters: we can alter any relevant part of the model, including decision trees, from the ‘Why?’ screens. In this section we’ll practice editing the model and re-computing the result. At this point you should be looking at the evaluation results matrix which shows the physical suitability subclasses of the five test map units for the one Land Utilization Type that we’ve defined, namely, Tilapia in diversion ponds. The model builder should look at the evaluation results matrix for anomalies between map units, or inconsistencies with what is known from experience. Let’s suppose that we know from experience that map unit ‘E’ is in fact not suitable for fish ponds; construction was attempted at a test site, but abandoned because it proved too difficult to dig the ponds; bedrock was exposed on these steep slopes. However, we can see that the ALES model evaluates map unit ‘E’ as suitable, with extra earthmoving (i.e., it is rated in physical suitability subclass ‘3pfc’). Let’s see where the model went wrong and adjust it. Move the highlight to map unit ‘E’ Press F2 …to initiate the series of ‘Why?’ screens. The first ‘Why?’ screen looks like this: ALES Version 4.65 Users Manual Page 138 February 1997 LMU: E (epsilon) (50.00 are) LUT: tdp (Tilapia in diversion ponds) Physical Suitability Subclass: 3pfc [1-4] Land Use Requirements and their severity levels : (LURs used by the maximum limitation method are marked with a ♦) ♦pfc (potential for construction) = 3 (extra earthmoving) [1-4] ♦wa (water availability) = 2 (moderate) [1-4] ♦wq (water quality) = 2 (+ lime) [1-4] No Physical Suitability Subclass decision tree Land Use Requirements that were maximally limiting: pfc (potential for construction) Take the time to read this screen; it clearly explains how the physical suitability subclass was determined, i.e., by the maximum limitation method applied to the severity levels of the three land qualities. You can see that land quality ‘pfc’ has severity level 3, i.e. earthmoving is required, but construction is possible. Since we know from (supposed) experience that construction is too difficult, this severity rating must be wrong. Let’s find out why. Notice in the annunciator (25th) line of the screen, ‘F2’ is marked ‘Why sever. level?’ That’s exactly what we want to know, Why LQ ‘pfc’ is rated ‘3’ (extra earthmoving) instead of ‘4’ (impossible). So, Press F2 ALES is now asking ‘“Why” for which Land Use Requirement?’; Select ‘pfc’ …out of the list. The second ‘Why?’ screen appears: LMU: E (epsilon) (50.00 are) LUT: tdp (Tilapia in diversion ponds) LQ: pfc (potential for construction) Severity level = 3 (extra earthmoving) [1-4] Severity Level decision tree (# 1): sd (soil depth) = m (moderately deep) [75-200 cm] >sl (slope) = C (steep) [10-30 %] --> 3 (extra earthmoving) In this screen, we can see the decision tree path actually taken for this land unit. Let’s assume that the relevant data values are correct, i.e. moderately deep soils and steep slopes. The problem is that we incorrectly combined the two land characteristic values in the decision tree: on steep slopes with only moderately deep soils, excavating for ponds will expose the bedrock, which we can’t dig into with hand tools. So we must edit the decision tree to correct our mistake. Notice that in the annunciator line, ‘F3’ is marked ‘Edit sever. level DT’. In the ‘Why?’ sc r e e ns, al l mode l fac tor s and/ or data val ue s that ar e r e l e vant to that sc r e e n c an be e di t e d; the annunc i ator l i ne shows whi c h k e ys ar e ac ti ve , and ‘F1’ he l p e xpl ai ns the opti ons. Press F3 ALES Version 4.65 Users Manual Page 139 February 1997 …to edit the decision tree. The decision tree editor now appears, with the top level displayed. Recall that we are going to alter the decision for moderately deep soils on steep slopes. You can see from the editor that deep soils are equated to moderately deep soils; that will have to be changed, since the potential for pond construction on deep soils will now be different from moderately deep soils. Cutting and pasting in decision trees Now we must apply another decision tree technique: cutting and pasting. This is useful whenever one subtree shares much of its information with another, but is not exactly the same (in this case we join the two subtrees with ‘=‘). The basic idea is as follows: √ A subtree is cut out to the paste buffer √ It is immediately pasted back in the same place, since it is still valid there. √ We then move the highlight to another branch... √ ...and paste the same tree in this new location √ We edit either or both the pasted subtree or the original subtree, making appropriate changes. This process is very similar to the ‘cut-and-paste’ capability of a word processor. The cut subtree remains in a special buffer, called the paste buffer, until a different subtree is cut, and can be pasted as many times as desired (even into a different tree); i.e. the paste key functions like a ‘rubber stamp’. Only one subtree at a time can be in the paste buffer. In summary, √ ‘F5’ i s use d to c ut a subtr e e to the past e buffe r (r epl a ci n g a n y subt r ee t h a t wa s a l r ea dy i n t h e buffer ) √ ‘F6’ i s use d to past e a subtr e e fr om the past e buffe r. Let’s see how this works. The strategy here will be to (1) cut out the subtree now rooted at branch 2 ‘m’ (moderately deep), (2) paste it at branch 3 ‘d’ (deep) (replacing the ‘=‘), and then (3) edit the subtree at branch 2 ‘m’ (moderately deep) so that it gives correct severity levels. Let’s go though this step-by-step. Move the highlight to branch 2 ‘> m (moderately deep)’ Press F5 …to cut this subtree from the decision tree. Notice that the ‘> m’ is replaced with a ‘?’. The subtree is in the paste buffer and the highlight is still on branch 2. Press F6 …to paste the cut subtree back at the same place (branch 2 ‘> m (moderately deep)’). Now we ant to paste the same subtree at branch 3, so, Move the highlight to branch 3 ‘> d (deep)’ Press F6 …to paste the cut subtree at this branch also. Now we have copies of the same subtree at both branch 2 ‘> m (moderately deep)’ and branch 3 ‘> d (deep)’. ALES Version 4.65 Users Manual Page 140 February 1997 The pasted subtree at branch 3 ‘> d (deep)’ is correct. It is the moderately deep soils where we in fact have problems with pond construction. So, Move the highlight to branch 2 ‘> m (moderately deep)’ Press → …to expand the subtree at this branch. The decision tree editor display should look like this: Severity Level decision tree for LUT,LUR ‘tdp,pfc’ sd soil depth 2 m (moderately deep) [75-200cm] sl slope 1 A (nearly level) [0-3 %] * 2 (needs drainage) 2 B (sloping) [3-10 %] * 1 (no limitation) 3 C (steep) [10-30 %] * 3 (extra earthmoving) 4 D (very steep) [30-200 %] * 4 (impossible) ? [???] ? Now you can see the incorrect combination at branch 3 ‘C (steep slopes)’: the decision tree says that ‘extra earthmoving’ is required, but we know from experience that pond construction is ‘impossible’. So, Move the highlight to branch 3 ‘> C (steep)’ Press F3 …to edit the decision. A pop-up box appears, asking ‘Which severity level is the result?’ Select choice ‘4’ (‘impossible’) This now replaces the previous choice ‘3’ (‘more earthmoving’). We’re done editing this tree, so, Press F10 …to return to the last ‘Why?’ screen. Now let’s see how this change affects the evaluation results. Press Esc …to remove the stacked ‘Why?’ screens and return to the evaluation matrix. Notice in the annunciator (25th) line of the screen, ‘F3’ is marked ‘Compute’ Press F3 …to ask ALES to recompute the results. ALES will first ask ‘Really re-compute this evaluation matrix?’, because in large matrices the re-computation might take a long time, and F3 could have been pressed by mistake. Select ‘Yes’ ALES Version 4.65 Users Manual Page 141 February 1997 ALES will show its progress in the lower-left corner of the screen as it re-computes with the changed model. After a few seconds the matrix is updated with new results are displayed. Any changes to the suitability are highlighted in the matrix cells There is one change: map unit ‘E’ is now in physical suitability subclass ‘4pfc’, i.e. unsuitable because construction is impossible. Thus the change to the decision tree had the desired effect, at least for map unit ‘E’1. Press F10 …to remove the matrix and return to the list of report types. At this point you should experiment with several of the report types, such as Physical suitability subclass, Net Present Value, Benefit/Cost ratio, Internal Rate of Return, Gross margin, Land quality values, and Yield. Find out what kind of information is presented in each one, and follow the chains of ‘Why?’ screens, noting on each one how the information was derived, and which parameters or data can be edited at that point. Remember that help is always available, and the annunciator line shows which keys are active. When you are done experimenting, Press F10 three times …to display the list of evaluation models. Make a backup of your model to a DOS file …as described near the beginning of this tutorial. Press F10 twice …to exit from ALES. Congratulations! You’ve finished a complete exercise as an ALES model builder. Although the model you built is fairly simple, it illustrated much of the expressive powers of ALES. In the following tutorial, you’ll experiment with some advanced model-building techniques. 1You should always check to see if all the changes are as expected; sometimes fixing one rating causes others to change unexpectedly. ALES Version 4.65 Users Manual Page 142 February 1997 Tutorial 4 : Refining a model The objective of this tutorial is to teach you advanced techniques for building ALES land evaluation models. In this tutorial you will learn to: √ copy evaluation models √ set up related land utilization types √ use advanced features of the decision tree editor √ define continuous land characteristics √ infer land characteristic values from other data √ enter multi-valued land data √ enter multiplicative and limiting yield factors √ use a proportional yield decision tree to determine yield √ use a physical suitability decision tree to define physical suitability √ delete evaluation models Before working on this tutorial, you should have completed Tutorials 1, 2, and 3. This tutorial is fast-paced, as we expect you to be comfortable with ALES by now. This tutorial should take between three and six hours to complete. You should read the relevant sections of the next Chapter as you work on the tutorial. Copying an evaluation model The model to be used in this tutorial will be a refinement the model used in Tutorial 2. We don’t want to edit model ‘Tutor2’, since others may want to use it in its original state for their own tutorial exercise. Instead, we’ll make a copy of it, and work on the copy. This is a very useful procedure for experimenting with someone else’s model or basing one evaluation model on another. ALES keeps all evaluation models completely separate, so if you work on the copy of a model, you can’t inadvertently delete or modify the original. √ ALES k e e ps al l e val uati on mode l s (r efer en ce l i st s, da t a ba ses, l a n d ut i l i z a t i on t ypes) c ompl e te l y se parat e. Start ALES in model-building mode with DOS command ALES. Select Main Menu Option 1 ‘Build Models and evaluate’ Move the highlight to evaluation model ‘Tutor2’. If ‘Tutor2’ does not appear in the list of evaluation models, you must first load it into your list of ALES models, as explained at the beginning of Tutorial 2. ALES Version 4.65 Users Manual Page 143 February 1997 Notice that ‘F6’ in the annunciator line is marked ‘Copy’1. So, Press F6 …to start the copy. ALES asks for a new code for the copied model. Enter Tutor4 After you confirm your entry, the ‘Working...’ message appears on the screen while ALES copies the entire model and data base for ‘Tutor2’ to the new model and data base ‘Tutor4’. Since there is a lot of information to copy, this will take a while (from 2 seconds on a P100 to about one minute on a 12MHz PC/AT). When the message disappears, the copy is complete, and ALES presents the basic information for this new model. Notice that this 3item data entry form is exactly the same form you had to fill in when defining a new model (as oppose to a copy), but in the case of a copy, the answers are already filled in based on the evaluation you copied from. Clearly, the answer to the first question, ‘Description’, is wrong. Answer Question 1 with Tutorial Confirm the form 4 - Advanced ALES techniques …and return to the list of evaluations. The newly-copied model appears in the list, and the highlight is on it. Notice that it is marked with a ‘°’, indicating that there is already a note for this new model. This is because the note was copied along with the rest of the model. Let’s see if the note is still accurate. Press Alt+F9 …to bring up the note editor. The first two lines are now incorrect: we need to change the references to tutorial ‘2’ to number ‘4’. The cursor is now on the first character of the note. Press Ctrl+→ three times …to move the cursor over the first three words, to the first ‘2’. Another way to type in the note editor is typeover mode, in which characters typed replace existing characters. Press Ins (this key is usually located on the numeric keypad), and notice that the bottom right of the screen now shows the letter ‘T’ (which stands for ‘typeover’), indicating that any characters we type now will replace existing ones, not push them to the right as in the default ‘insert’ mode. So, Type 4 1 You could also use Alt+F6 to rename the model, without copying it. ALES Version 4.65 Users Manual Page 144 February 1997 Notice how the ‘2’ has been replaced by the ‘4’. Press Home …to move the cursor back to the beginning of the line. Press ↓ …to move down one line. Press → three times …to move three characters right; the cursor should now be on the ‘2’ in the number ‘7.2’. Type 4 …to change this to a ‘4’. Press Ins …to return to ‘insert’ mode. Notice how the ‘T’ disappears from the lower right of the screen. Now you can edit the note some more if you want. You might want to add your name as a co-author. Remember that ‘F1’ will give you a complete description of the editing commands. When you’re done editing the note Press F10 …to confirm your changes to the note. ALES displays the list of evaluations, with the highlight on the evaluation model ‘Tutor4’. Setting up related land utilization types Now we want to expand the model. ALES makes it easy to define related land utilization types, i.e. LUTs that are similar, but which differ enough so that they represent different land use alternatives. The easiest way to build a set of related LUTs is to first build the base LUTs, get these models just as you want them, then copy them to related LUTs, and edit the newly-copied LUTs to reflect the differences. Examples of differences between related LUTs are: (1) different discount rates, e.g., market vs. subsidized; (2) different optimum (S1) yields, e.g., optimistic vs. pessimistic, or risk averse yield levels, or referred to a national vs. local context; (3) different decision procedures for the same land qualities; (4) different levels of added inputs, e.g., in one LUT you may elect to correct a limitation rather than take the yield loss; (5) different sets of Land Use Requirements. ALES Version 4.65 Users Manual Page 145 February 1997 Clearly, there are many permutations of these reasons. With ALES you can compare any number of related LUTs side-by-side in the evaluation matrix. This allows ‘what-if?’ analysis based on differences in models. In this tutorial, we want to experiment with different decision procedures for the ‘continuous corn’ LUT. This will allow us to compare two different models for the same LUT. This is appropriate if there is a difference of opinion between model builders, or if we would like to incorporate some more factors in the evaluation model, but aren’t sure of their effect. In this example, the LUT does not change, only our way of modeling it. Let’s create the related LUT now. Select evaluation model ‘Tutor2’ Select Menu 1 ‘Main options’ Option 2 ‘Land Utilization Types’ ALES displays a list of the three LUTs already defined: ‘ccc’. ‘ccc-d’, and ‘ttpp’.1 We want to copy the ‘continuous corn’ LUT to another LUT. So, Move the highlight to Land Utilization Type ‘ccc’ Press F6 …to start the copy. ALES now asks for a new LUT code for the copied LUT Enter ccc-m (the ‘m’ stands for ‘modified model’). After you confirm your entry, the ‘Working…’ message appears on the screen while ALES copies the entire LUT, including all the decision trees. This will take about 15 seconds on a PC/AT. When the message disappears, the copy is complete, and Menu 1.2, ‘Specification options for LUT: “cccm”’, appears. Now we can edit any information for the LUT. The first thing to change about this LUT is its descriptive name, so Select Menu 1.2 Option 1 ‘descriptive Name’ Answer Question 1 with corn grain - modified Confirm the data entry form decision procedures …and return to Menu 1.2. 1In fact, ‘ccc’ and ‘ccc-d’ were set up as related LUTs when the original Tutorial 2 was built. ALES Version 4.65 Users Manual Page 146 February 1997 More on decision trees One of the purposes of this exercise is to teach you advanced techniques for editing decision trees. We’ll alter the decision tree for one of the land use requirements, and then see how these changes affect the suitability ratings. Select Menu 1.2 Option 7 ‘Land Use Requirements’ Select Land Use Requirement ‘m’ (moisture availability) Select Menu 1.2.7 Option 4 ‘severity level Decision Tree’ ALES displays the decision tree editor with the top level LC, ‘dbr’ (depth to bedrock) expanded. Cutting and pasting It is sometimes necessary to restructure a decision tree. Imagine that we were writing the tree out as a large, treeshaped, diagram on a piece of paper. We could cut whole subtrees, and then either discard them, or paste them back at some other point. We could add a new top-level decision entity above all the ones we’d already considered; conversely, we could discard the present top-level entity. All these things can also be accomplished in the ALES decision tree editor. In this section you’ll learn these techniques. The decision tree for moisture availability, as it stands, takes into account four land characteristics: ‘depth to bedrock’, ‘previous erosion’, ‘USDA texture of the subsoil’, and ‘May-to-September precipitation’1. There are certainly many other factors that can affect moisture availability. For example, the tree as it is now makes no allowance for rooting volume, other than the depth dimension. In particular, if there is a significant volume of coarse fragments in the rooting zone, the effecting rooting volume will be reduced, and moisture stress will be increased. Let’s modify this tree now to take coarse fragment content into account. The volume of coarse fragments could be incorporated at several levels in the tree, but it makes the most sense to consider it as the top-level land characteristic. Then the first two levels, i.e. coarse fragments and depth to bedrock, will together define the potential rooting volume, and the lower levels of the tree, i.e. texture of the fines, previous erosion, and summer precipitation, will determine how much water this volume will hold. So we want to add a new top-level characteristic. To do this, we will have to: (1) cut the entire tree to the paste buffer; (2) add the new LC at the top level (3) paste the cut tree back as a subtree of the new top-level LC. Notice in the annunciator line that ‘F8’ is marked ‘cutT’, which is a shorthand for ‘Cut the entire Tree’. This key is only active at the top level of the editor. √ ‘F8’ i s use d fr om the t op l e v e l of the de c i si on tr e e e di tor to c ut the e nt i re t re e Press F8 1You can’t see all four LCs right now, because the editor is on the top level. ALES Version 4.65 Users Manual Page 147 February 1997 …to cut the entire tree into the paste buffer. The ‘Working...’ message appears for a few seconds, and then the entire tree is removed; the editor now shows an empty tree! Don’t worry, the cut tree is now in the paste buffer. Notice that ‘F6’ appeared on the annunciator line after the cut, indicating that there is a cut subtree that can be pasted. Now we want to add the new top-level LC. Press F4 …to insert a tree. ALES asks which LC to use to make the decision at this level. From the list, Select Land Characteristic ‘cfv-A’ (volume of coarse fragments - surface soil) The empty tree is replaced with a new one-level tree, showing the branches for this LC, none of which have a decision associated with them yet. The cursor is now on branch 1, ‘n’ (not enough coarse fragments to be named). This situation is exactly like the one assumed for the original tree (i.e. the one we just cut): no coarse fragments, so we consider the other factors exactly as before. Notice in the annunciator line that ‘F6’ is marked ‘paste’. So, Press F6 …to paste the cut tree under branch 1. After a few seconds the ‘?’ for this branch is replaced with a ‘> dbr’, indicating a complete subtree whose first entity is ‘depth to bedrock’. Now we are back where we were before the old tree was cut, at least for soils with no significant coarse fragments. We now must consider the case where there are enough coarse fragments to reduce the rooting volume. We still must consider all the factors that were used in the cut tree, but we will want to edit some decisions. However, the structure of the cut tree is still correct. Move the cursor to the second branch ‘s’ (significant enough to be named) Remember that the cut tree is still in the paste buffer, so we can paste it in here (as well as at the first branch). So, Press F6 …to paste the cut tree under branch 2. After a few seconds the ‘?’ for this branch is replaced with a ‘> dbr’; this is exactly the same subtree that we pasted in for the first branch. Now we must edit some decisions for this branch, so Press → …to expand the subtree rooted at branch 2 ‘s’ to the second level. Notice in the first line that the value of ‘cfv-A’ is fixed at ‘s’ (significant enough to be named); we are now describing land that has 15-50% coarse fragments. The next factor to be considered, namely, depth to bedrock, is now expanded. Assume for the sake of simplicity that in deep soils (branch 3 at this level) there is no change in moisture supply even with significant coarse fragments, because corn, being a deep-rooted crop, can extend its roots downward to ALES Version 4.65 Users Manual Page 148 February 1997 exploit the same effective volume, compensating for the coarse fragments (this certainly would not be true for shallow-rooted crops). So the subtree at the third branch need not be changed. Also, the decision of ‘severe stress’ for shallow soils (the first branch) is still correct. So, we only have to edit the second branch, ‘moderately deep’. Move the cursor to the second branch ‘m’ (moderately deep) Press → …to expand the subtree rooted at branch 2 ‘m’ to the third level. Now we are considering previous erosion, on moderately deep soils with significant coarse fragments. Suppose that classes 3 and 4 (moderately severe and severe erosion) are now completely limiting, because not enough water can be stored in the reduced rooting volume. Right now branch 3 has a subtree, marked ‘> text-B’; we want to remove this and replace it with a final decision. However, if we use ‘F5’ to cut it, this subtree will replace the present contents of the paste buffer. Suppose we don’t want to erase the contents of the paste buffer, but we do want to remove this subtree. In this case we use an ‘alternative’ to the ‘F5’ key, namely ‘Alt+F5’, to clear the subtree without replacing the contents of the paste buffer. √ ‘Al t+F5’ i s use d to c l e ar a subtr e e wi thout r e pl ac i ng the c onte nts of the paste buffe r Let’s do this now. Move the cursor to the third branch ‘ms’ (moderately severely eroded) Press Alt+F5 ALES will ask if you really want to erase the subtree without saving it in the paste buffer. Answer ‘Yes’ (really delete this branch) Now the ‘> text-B’ subtree at branch 3 is cleared, and replaced with a ‘?’. The cursor is still on this same branch 3. Press F3 …to enter a decision for branch 3, and Select severity level ‘3’ (severe stress) Now branch 3 is marked ‘* 3 (severe stress)’. Note that branch 4 (severely eroded) is already equated with branch 3, so that changing the decision for branch 3 also changes it for branch 4. We must now consider the non-eroded soils at branch 1. Move the cursor to the first branch ‘n’ (not eroded) Press → …to expand the subtree rooted at branch 1 ‘n’ to the fourth level. We see that the fourth level in this decision tree path is the USDA texture of the subsoil. Let’s suppose that some of the textures with less water-holding capacity now become severely limiting without even considering the summer ALES Version 4.65 Users Manual Page 149 February 1997 precipitation. So, we will clear (but not save in the paste buffer) the ‘> pptMS’ subtrees for branches 3 (sandy loam), 6 (silt), 8 (clay loam), and 12 (clay), and equate them with the decision for branch 1 (sand), i.e. ‘* 3 (severe stress)’: Move the cursor to the third branch ‘sl’ (sandy loam) Press Alt+F5 and then answer ‘Yes’ Press = and then select branch ‘1’ Move the cursor to the sixth branch ‘si’ (silt) Press Alt+F5 and then answer ‘Yes’ Press = and then select branch ‘1’ Move the cursor to the eighth branch ‘cl’ (clay loam) Press Alt+F5 and then answer ‘Yes’ Press = and then select branch ‘1’ Move the cursor to the twelfth branch ‘c’ (clay) Press Alt+F5 and then answer ‘Yes’ Press = and then select branch ‘1’ Also, we will equate the decision for branch 9 (silty clay loam) with branch 4 (loam): Move the cursor to the ninth branch ‘sicl’ (silty clay loam) Press = and then select branch ‘4’ When you are all done, this level of the tree should look like this: ALES Version 4.65 Users Manual Page 150 February 1997 cfv-a volume of coarse fragments 2 s (enough to be named) [15-50%] dbr depth to bedrock or root-impenetrable layer 2 m (moderately deep) [50-100 cm] erode previous erosion 1 n (not eroded) text-B USDA texture of subsoil 1 s (sand) ..................................* 3 (severe stress) 2 ls (loamy sand).......................=1 3 sl (sandy loam).......................=1 4 l (loam)..................................> pptMS 5 sil (silt loam) .........................=4 6 si (silt) =1 7 scl (sandy clay loam) ..............=6 8 cl (clay loam) .........................=1 9 sicl (silty clay loam) ...............=4 10 sc (sandy clay)......................=8 10 sic (silty clay).......................=8 12 c (clay).................................=1 ? [???] ? Notice in this example how branches can be joined into groups. In this example, the loamy textures ‘l‘, ‘sil’, and ‘sicl’ form one group, with the highest water-holding capacity, and the other textures form another group. Only one representative of each group needs to be specified; in this example they are ‘l’ (loam) and ‘s’ (sand). Because of the structure of the previous tree, more than one ‘join’ may have to be followed to determine a branch’s grouping. For example, for ‘sic’ (silty clay), first the ‘=8’ is followed to reach ‘cl’ (clay loam), and at this branch we see ‘=1’, which is followed to reach ‘s’ (sand). Now we have to alter the final decisions for the remaining subtree at this level, to reflect the increased moisture stress. Move the cursor to the fourth branch ‘l’ (loam) Press → …to expand the subtree rooted at branch 4 ‘l ’ to the fifth level. As you can see, as the summer rainfall increases, the moisture stress decreases. But since we’re now considering soils with lower water-holding capacity (due to the coarse fragments), the final decisions must be ‘downgraded’ one class. Branch 1 (‘<400’) is already in the worst class, so it can’t be downgraded further. Move the cursor to the second branch ‘400-450’ Press F3 and then select severity level ‘3’ (severe stress) Move the cursor to the third branch ‘450-500’ Press F3 and then select severity level ‘2’ (moderate stress) Move the cursor to the fourth branch ‘>500’ Press F3 and then select severity level ‘1’ (adequate) The entire group of decisions has been ‘downgraded’ by one class. ALES Version 4.65 Users Manual Page 151 February 1997 This is a typical use of cutting-and-pasting. The pasted tree now is placed under a more limiting value of a LC, so that some of the final decisions in the pasted tree must be downgraded. This completes the editing of the subtree for ‘cfv-A’ = 15-50% coarse fragments. So, Press ← four times …to go back four levels and return to the top level of the decision tree, ‘cfv-A’. We’ve completed the decision procedures for branches 1 and 2. Suppose that the very and extremely stony or rocky soils have too little moisture holding capacity without considering any other factors. Move the cursor to the third branch ‘v’ Press F3 and then select severity level ‘3’ (severe stress) Move the cursor to the fourth branch ‘e’ Press = and then select branch ‘3’ Alternate criteria and the ‘Unknown’ branch Up to now we have ignored the branch marked ‘?’ which appears below the list of numbered branches at every level of every decision tree. This branch is considered by ALES as it follows the tree while computing the suitability of a particular map unit, if the value of the land characteristic at a level is missing from the data base for that map unit. √ ALES fol l ows the ‘?’ br anc h i f the r e i s no data val ue for the Land Char ac te r i sti c Consider the decision tree we’ve just been editing. At the first level (which should still be on the screen), ALES will require the value of the LC ‘cfv-A’ (volume of coarse fragments) from the database when it tries to determine the land quality ‘moisture availability’ for a map unit. Suppose that there is no value of that LC for a particular map unit. As the tree stands now, ALES will not be able to compute the value of this LQ, and, since this LQ is used to determine proportional yield, ALES will not be able to compute economic suitability for this map unit. Using the ‘?’ branch, the model builder can specify an alternate decision entity to be used if there is no value of the main decision entity at this level. In the present example, we can specify an alternate LC to be used if no value is found for ‘cfv-A’. Of course, this depends on there being a useful surrogate in the list of land characteristics. In the present evaluation model, there is: LC ‘fpsc’, the ‘family particle-size class’ of USDA Soil Taxonomy. This is a composite of the fine-earth and coarse fragments, used in the USDA “Soil Taxonomy” soil classification system at the family level of soil classification. The ‘fragmental’ class is roughly equivalent to ‘very’ (stony, rocky, etc.) textures, the ‘skeletal’ classes are roughly equivalent to stony, rocky, etc. (but not ‘very’) textures, and the other classes have no significant volume of coarse fragments. The correspondence is by no means exact; in addition the family particle size class refers to a particular control section of the soil profile, not the ‘subsoil’ as such. However, this is still a useful alternative criterion to the volume of coarse fragments, if that data item is not known. Let’s add a subtree at the ‘?’ now. Press ? ALES Version 4.65 Users Manual Page 152 February 1997 …to move the cursor to the ‘?’ branch. Then Press F4 …to insert a subtree. ALES displays the list of available discrete LCs, not including ‘cfv-A’, which is already on the path. Select ‘fpsc’ (family particle size class) ALES expands the tree at the ‘?’ branch. Now we have to complete the decision procedure for this branch. The cursor should already be on the first branch ‘frag’ (fragmental). Fragmental soils have very low water holding capacity, so Press F3 and then select severity level ‘3’ (severe stress) The cursor should move to the second branch ‘s-sk’ (sandy skeletal). This class, along with ‘c-sk’ and ‘s’, are similar to fragmental soils with respect to their moisture stress for maize. So, Press = and then select branch ‘1’ Move the cursor to the fourth branch ‘c-sk’ (clayey-skeletal) Press = and then select branch ‘1’ The cursor should move to the fifth branch ‘s’ (sandy). Press = and then select branch ‘1’ Loamy-skeletal soils (branch 3) are roughly similar to the situation we encountered before with significant coarse fragments and loamy textures; recall that an additional criterion of summer precipitation was then needed. So, Move the cursor to the third branch ‘l-sk’ (loamy-skeletal) Press F4 …to insert a subtree. ALES displays the list of available discrete LCs, not including ‘cfv-A’ and fpsc’, which are already on the path. Select ‘pptMS’ (May-September precipitation) ALES expands the tree at the ‘l-sk’ branch. The cursor should be on the first branch, ‘<400’. Press F3 and then select severity level ‘3’ (severe stress) The cursor should move to the second branch ‘400-450’. Press F3 and then select severity level ‘3’ (moderate stress) The cursor should move to the third branch ‘450-500’. Press F3 and then select severity level ‘2’ (moderate stress) ALES Version 4.65 Users Manual Page 153 February 1997 The cursor should move to the fourth branch ‘>500’. Press F3 and then select severity level ‘1’ (adequate) Now this subtree is complete, so Press ← …to go back to the next-highest level, ‘fpsc’. The subtree we just entered applies to soils with moderate water-holding capacities, either because of reduced rooting volume or because of unfavorable textures. The following family particle size classes can reasonably be equated with this subtree: ‘col’ (branch 6), ‘cosi’ (branch 8), ‘fisi’ (branch 9), ‘f’ (branch 10), and ‘vf’ (branch 11). So, Move the cursor to the sixth branch ‘col’ (coarse loamy) Press = and then select branch ‘3’ Move the cursor to the eighth branch ‘cosi’ (coarse silty) Press = and then select branch ‘3’ The cursor should move to the ninth branch ‘fisi’ (fine silty). Press = and then select branch ‘3’ The cursor should move to the tenth branch ‘f’ (fine). Press = and then select branch ‘3’ The cursor should move to the eleventh branch ‘vf’ (very fine). Press = and then select branch ‘3’ The remaining branch, number 7 (for fine loamy soils) represents the highest water-holding capacities. We will insert a subtree here, based on summer precipitation, as for the loamy soils. So, Move the cursor to the seventh branch ‘fil’ (fine loamy) Press F4 …to insert a subtree. ALES displays the list of available discrete LCs, not including ‘cfv-A’ and fpsc’, which are already on the path. Select ‘pptMS’ (May-September precipitation) ALES expands the tree at the ‘fil’ branch. The cursor should be on the first branch, ‘<400’. Press F3 and then select severity level ‘3’ (severe stress) ALES Version 4.65 Users Manual Page 154 February 1997 The cursor should move to the second branch ‘400-450’. Press F3 and then select severity level ‘2’ (moderate stress) The cursor should move to the third branch ‘450-500’. Press F3 and then select severity level ‘1’ (adequate) The cursor should move to the fourth branch ‘>500’. Press F3 and then select severity level ‘1’ (adequate) Note that these are ‘upgraded’ one class from the subtree rooted at ‘fpsc’ = ‘l’, because these fine-loamy soils have the best water-holding capacity. Now this subtree is complete, so Press ← twice …to go back two levels to the top level, ‘cfv-A’. Notice how the ‘?’ branch is now marked with a complete subtree, ‘> fpsc’. This completes the editing of this tree, so Press F10 …to leave the editor and return to Menu 1.2.7. Comparing related Land Utilization Types Let’s see if the modified decision procedure changes the evaluation results. To do this, we will compute an evaluation for all the map units in the survey area, for both the original and modified LUTs. Press F10 four times …to return to Menu 1 ‘Main options’. Select Menu ‘Main options’1 Option 4, ‘Evaluations’ Select Menu 1.4 ‘Evaluations’ Option 1 ‘Compute an evaluation’. ALES now asks for the LUTs to compute. Since we only want to compare the effect of the changes to the decision procedure, we need only select ‘ccc’ and ‘ccc-m’. The cursor should already be on evaluation ‘ccc’, which we want to evaluate, so Press F3 …to included it in the set of LUTs to be evaluated. The cursor should move to the second LUT in the list, ‘ccc-d’. We don’t want to include this, so Move the cursor to evaluation ‘ccc-m’ Press F3 ALES Version 4.65 Users Manual Page 155 February 1997 …to included it in the set of LUTs to be evaluated. Notice the ‘♦’ next to the selected items. We only want to evaluate these two LUTs, so Press F10 …to confirm the LUT set box. ALES now asks for the map units for which the evaluation should be computed. We only need to compute a few map units to see the effects of our changed model. Use F3 to select map units ‘AvE’, ‘CeB’, ‘ErA’, and ‘HnB’ Press F10 …to confirm the map unit set box. ALES now computes the evaluation for the two LUTs and 25 map units you selected. When the computation is complete, Select Menu 1.4 ‘Evaluations’ Option 2 ‘View evaluation results’. Instead of looking first at the overall suitability, let’s see if the decision procedure affected the single-factor rating for the land quality of moisture availability, i.e., the land use requirement which we just edited. So, when ALES asks for the type of report, Select ‘L’and Quality values ALES asks which LQ to display. Select ‘m’ (moisture availability) ALES now displays an evaluation results matrix of single-factor ratings for the LQ ‘moisture availability’. The map units are the rows of the matrix, and the two LUTs we want to compare are the columns. You can see that the modification to the decision procedure did have an effect. Look at the row for the ‘ErA’ map unit: it has a severity level of ‘2’ in column ‘ccc’ (the original decision procedure) and ‘3’ in column ‘ccc-m’ (the modified decision procedure). Display the first ‘Why?’ screen for LMU ‘ErA’ and the original LUT ‘ccc’ Notice that the decision tree path includes four LCs, ‘dbr’, ‘erode’, ‘text-B’ and ‘ppt-MS’. Display the first ‘Why?’ screen for LMU ‘ErA’ and the modified LUT ‘ccc-m’ Notice that the decision tree path also includes ‘cfv-A’, and that there were some coarse fragments in this soil, enough to downgrade the LQ rating. Why are some of the ratings the same for the two decision procedures? Display the first ‘Why?’ screen for LMU ‘CeB’ and the modified LUT ‘ccc-m’ You can see that the added LC ‘cfv-A’ has a value of ‘n’, i.e. not enough coarse fragments to be named. Recall that we pasted the entire original decision tree below this new top-level branch in the new tree, so, the inferred LQ value remains the same, even though another LC is considered in the decision tree path. Let’s see now how the new decision procedure propagates from single LQs to yields. ALES Version 4.65 Users Manual Page 156 February 1997 Press F10 …to leave the matrix display and return to the ‘Report Type?’ question. Select ‘Y’ (Yields) ALES asks which output to display. There is only one output of both LUTs, so, Select ‘cg’ (corn grain) Select ‘Yes’ (display yields on a per-area basis) ALES now displays an evaluation results matrix of yields of corn grain, in bushels per acre, for each map unit for the two related LUTs. Notice that one of the yields in the ‘ccc-m’ column are lower, namely for the ‘ErA’ map unit. This map unit has a yield of 81 bushels in column ‘ccc’ (the original decision procedure) but only 60.75 bushels in column ‘ccc-m’ (the modified decision procedure). Let’s find out why. Display the first ‘Why?’ screen for LMU ‘ErA’ and the original LUT ‘ccc’ Notice in the proportional yield decision tree at the bottom of the screen predicts 60% of optimum yield, based on LQ ‘pl’ (planting conditions) = 3 (late) and LQ ‘m’ (moisture availability) = 2 (moderate stress). Display the first ‘Why?’ screen for LMU ‘ErA’ and the modified LUT ‘ccc-m’ Notice in the proportional yield decision tree at the bottom of the screen predicts 45% of optimum yield, based on LQ ‘pl’ (planting conditions) = 3 (late) and LQ ‘m’ (moisture availability) = 3 (severe stress). So we see that the increasing severity level affected crop yield. If you wish, you can examine the reports for the Gross Margin and economic suitability class based on the Gross Margin, to see how the difference in LQ value propagated to the overall economic suitability. For example, map unit ‘ErA’ dropped from marginal economic suitability (‘s3’) to economically unsuitable (‘n1’), due to the lower yield of corn, due to the lower predicted moisture availability. When you are done with the evaluation matrices, Return to Menu 1 ‘Main options’ More on land characteristics So far in these tutorials we have considered only discrete land characteristics, i.e., those which are measured in classes. However, in some situations you may want to allow the model user to enter values on a continuous scale. Or, there may be an existing database with some or all data values reported on a continuous scale, which you want to use as the basis of the ALES database. In this section we’ll see how a continuous LC can be used within ALES. Continuous Land Characteristics As an example, we’ll suppose that single values, on a continuous scale, of ‘May-to-September precipitation’ are available for the land units to be evaluated. We will see how to define these in ALES, and use them in an evaluation. ALES Version 4.65 Users Manual Page 157 February 1997 Setting up a continuous land characteristic The first step is to define the continuous LC: Select Menu 1 ‘Main options’ Option 1, ‘Reference Lists’ Select Menu 1.1 ‘Reference lists’ Option 4, ‘Land Characteristic descriptions’. Press F3 …to define a new LC. ALES now asks for the LC code. We want to enter something that reminds us of its connection to the existing discrete LC ‘pptMS’; so Enter and confirm the code pptMS-c the ‘c’ standing for ‘continuous’. ALES displays the information form for this new LC. For the first question (‘Name’), Enter May-September precipitation (continuous) The second question, ‘Number of classes’, is critical. Here is where we tell ALES that the LC is continuous: Enter 0 (the number zero). √ A Land Char ac te r i sti c wi th ‘0’ (z e r o) c l asse s i s c onti nuous The final question, ‘Units of measurement’, is also critical. The units must exactly match those of the commensurate LC ‘ppt-MS’ (you’ll see why in the next subsection), so to this question Enter mm Confirm the form ALES displays Menu 1.1.4c ‘Specification options for Continuous LC’, with three Options. The first menu Option allows us to edit the basic information we just entered, except of course for the number of classes (since the LC is continuous, that number must remain 0). Select Menu 1.1.4c ‘Specification options for Continuous LC’ Option 2 ‘Data validation limits’ ALES displays data entry form, in which you can enter the lowest and highest allowable values for the LC. These values are used as validity checks during data entry. In this region, the summer precipitation is never less than 100mm and never more than 1000mm, so, for the ‘lowest allowable value’, Enter 100 Then, for the ‘highest allowable value’, Enter 1000 Confirm the form ALES Version 4.65 Users Manual Page 158 February 1997 ALES re-displays Menu 1.1.4c. We’re done defining this LC, so Press F10 …to leave return to the list of LCs. The newly-defined LC, ‘pptMS-c’, now appears in the list. Inferring a discrete LC from a commensurate continuous LC Commensurate Land Characteristics To be able to use values of a continuous LC in ALES decision procedures (i.e., decision trees), they must be classified into values (classes) of a so-called commensurate discrete LC. √ Two ALES Land Char ac te r i sti c s ar e c om m e nsurat e i f the y have the same uni t s of m e asure m e nt Recall that we set up ‘pptMS-c’ so it would have the same units (‘mm’) as the discrete LC ‘pptMS’; now we have to tell ALES that these two are linked. We do this by adding an inference link to the discrete commensurate LC, so that when ALES looks for a value of the discrete LC and can’t find one, it infers the value from the continuous commensurate LC by classification. Inference link To add the inference link, in the list of LCs Move the highlight to LC ‘pptMS’ Press F5 …to edit its definition. ALES displays Menu 1.1.4a ‘Specification options for discrete LC (with units). Notice that this menu is different from the one for the continuous LC: there are no data validation limits, but there are options that makes sense for a discrete LC. For example, notice that menu Option 6 is titled ‘infer from commensurate LC’. Select Menu 1.1.4a Option 6 ‘infer from commensurate LC’ Select this option now. ALES now displays a selection list of all the LCs (discrete and continuous) in the evaluation model with the same unit of measurement as ‘pptMS’, i.e. ‘mm’. In the present model, there is only the one other LC in this set. Also, there is an extra item in the list is marked ‘** don’t infer this LC’, which you select if you want to remove an inference. Select ‘pptMS-c’ You have now set up the inference link; Menu 1.1.4a is again active. Notice that Option 5 in Menu 1.1.4a is titled ‘Lc -> Lc decision tree’. If you should choose this, you would invoke the decision tree editor to build a decision tree that ALES would use to determine values of this LC (here, ‘ppt-MS’) from any number of other LCs. The tree looks like a severity level decision tree, except that the decision values are LC classes instead of severity levels of a LQ. This is explained in more detail in Chapter 8; we won’t go through an example in this tutorial. ALES Version 4.65 Users Manual Page 159 February 1997 We’re done editing LC ‘ppt-MS’, so Press F10 …to return to the list of Land Characteristics. Press F10 …again to return to Menu 1.1. Press F10 …yet again to return to Menu 1 ‘Main Options’. Now we must provide a way to enter data for the newly-defined LC into ALES. Recall that data can only be entered for LCs that appear in one or more data entry templates. To add this LC to a template, Select Menu 1 ‘Main options’ Option 3, ‘Data’ Select Menu 1.3 ‘Data’ Option 7, ‘Templates’. Move the highlight to template ‘cl’ (climatological LCs) Press F5 …to edit this template. Select Menu 1.3.7 Option 2, ‘List of data fields’. …to add another field to this template. ALES now displays the ordered list of data fields for this template. We can put the new LC anywhere in the field list. Let’s put it between the existing second and third fields. Move the highlight to item 3 ‘ppt-MS’ Press F3 …to insert another field above this item. Now we want to add the new LC, so Select ‘pptMS-c’ ALES inserts this LC as field 3 in the ordered list, and pushes down the previous item 3, ‘pptMS’ to the fourth position in the list. Press F10 …to confirm the list of fields and return to Menu 1.3.7; then Press F10 ALES Version 4.65 Users Manual Page 160 February 1997 …to return to the list of templates; then Press F10 …to return to Menu 1.3 ‘Data’. Let’s now define some new map units for our experiment, so we don’t affect the existing database. Select Menu 1.3 Option 1 ‘Definitions, From keyboard, Enter or edit’ Move the highlight to map unit ‘HnB’ Press F6 …to initiate a copy. When ALES asks for the new map unit code, Enter and confirm code ‘test1’ ALES will now ask for a descriptive name for the new map unit; Enter the name Testing One ALES will now ask for the number of acres in the new map unit; Press F4 …to delete the area. Confirm the form …and return to the list of map units. Using the same techniques, Copy ‘test1’ to ‘test2’, with name ‘Testing Two’ Copy ‘test2’ to ‘test3’, with name ‘Testing Three’. Now we have three test map units; at present they are all exact copies of map unit ‘HnB’. Press F10 …to return to Menu 1.3 ‘Data’. Let’s enter data for LC ‘pptMS-c’ for these three test map units. Select Menu 1.3 Option A ‘Edit data in a matrix’ Select template ‘cl’ (climatological LCs) Use F3 to select map units ‘test1’, ‘test2’, and ‘test3’ ALES Version 4.65 Users Manual Page 161 February 1997 Press F10 …to confirm the map unit set box. ALES now displays the data entry matrix for the three map units selected and the four LCs in the template ‘cl’. Notice that there is no data for LC ‘pptMS-c’ for any map unit. Move the highlight to map unit ‘test1’, LC ‘pptMS-c’ Press Enter …to enter a data value. ALES asks how many mm of May-September precipitation; Enter and confirm 500 If you are adventurous, try to enter a value outside this range and see what happens. Also, note that the pop-up (‘F3’) method of data entry doesn’t work for continuous LCs, because there is no finite list of choices from which to choose. Move the highlight to map unit ‘test1’, LC ‘pptMS’ Press Enter …to enter a data value. ALES asks which class of May-September precipitation; the current value ‘400-450’ is displayed. We want to delete this value, to force ALES to infer ‘pptMS’ from the commensurate LC ‘pptMS-c’, following the inference link we defined above. As it computes evaluations, ALES always uses a directly-entered (i.e. non-inferred) data value as-entered, and does not infer it, even if there is an inference link set up for the derived characteristic1. The idea here is that the model user must have had more specific information about a map unit if a value was entered. √ ALES wi l l not i nfe r a LC val ue i f the r e i s a di re c t l y -e nt e re d val ue i n the database . Press F4 …to delete the data value. Confirm the form …and return to the data entry matrix. Using the same techniques, For LC ‘pptMS-c’ and map unit ‘test2’, Enter and confirm 200 1However, if ALES is asked to infer a data value, with Option 9 ‘Infer Land Characteristic values’ of Menu 1.3 ‘Data’, it will infer all values, and over-write any directly-entered values. The idea here is that the model user is directly asking ALES to infer values. See the next Chapter for details. ALES Version 4.65 Users Manual Page 162 February 1997 Erase the data value for LC ‘pptMS’ and map unit ‘test2’ For LC ‘pptMS-c’ and map unit ‘test3’, Enter and confirm 425 Erase the data value for LC ‘pptMS’ and map unit ‘test3’ Return to Menu 1.3 ‘Data’ Return to Menu 1 ‘Main options’ Now we will compute an evaluation for the test map units. Select Menu 1 ‘Main options’ Option 4, ‘Evaluate’ Select Menu 1.4 ‘Evaluations’ Option 1, ‘Compute an evaluation’. Select all four Land Utilization Types Select the three test map units ‘test1’, ‘test2’, and ‘test3’ ALES will compute the evaluation for the four LUTs and three map units. When the computation is complete, Select Menu 1.4 ‘Evaluations’ Option 2, ‘View evaluation results’. Select ‘L’and Quality values Select ‘m’ (moisture availability) ALES now displays an evaluation results matrix of single-factor ratings for the LQ ‘moisture availability’. The cursor should be on the upper left cell, namely for map unit ‘test1’, LUT ‘ccc’. Press F2 …to see the first ‘Why?’ screen. ALES displays the decision tree; we can see that LC ‘pptMS’ is on the decision tree path, with value ‘450-500’. Let’s see why; Press F2 …to see ‘Why?’ a particular LC value; a selection list appears with the LCs that were encountered in the LQ decision tree path for this map unit. Select LC ‘pptMS’ This ‘Why?’ screen shows that the value of ‘pptMS’, i.e. the 400-450mm class, was inferred from the commensurate continuous LC, namely ‘pptMS-c’ which we just defined, using the data value of 425mm which we just entered. In other words, ALES classified the single value on a continuous scale into one of the discrete classes of the commensurate LC. Press F2 ALES Version 4.65 Users Manual Page 163 February 1997 …again to see ‘Why?’ for the continuous LC; as you can see from the screen, this value was entered from the keyboard. Multi-valued land data At this point we’ll edit this data value in order to illustrate another feature of ALES, namely, its ability to process multi-valued land data. This is data which has more than one value, each of which has an associated linear probability. This mechanism provides an elementary way of handling probabilistic or time series data. Notice in the annunciator line for this ‘Why?’ box that ‘F4’ is marked ‘Edit LC’. We can edit the LC value without leaving the evaluation matrix/‘Why?’ screen section of the program. So, Press F4 …to bring up a data entry form for this LC value; with the current value ‘500’ as the default. In the present example, let’s suppose that we have climate records for map unit ‘test1’, giving the May-toSeptember precipitation for each of the last 5 years, as follows: 650mm, 325mm, 500mm, 650mm, 375mm. These average to 500mm, the value we entered previously for ‘pptMS-c’, and which is now displayed as the default answer in the one-item data entry form. To erase this answer, Press F4 and then enter the multi-valued answer as follows: Enter 325=.2,500=.2,650=.4,375=.3 The format of a multi-valued data item is straightforward: a series of pairs of ‘data_value = proportion’, separated by commas. So the previous entry can be read as: ‘20% of the time rainfall is 325mm, 20% of the time it is 500mm, 40% of the time it is 650mm, and 30% of the time it is 375mm’. The proportions are typically derived by dividing the frequency of a data value in the series by the total length of the series. In the present example, we have one of five years with 325mm, so its frequency is 1/5 = 0.2. Two years have 650mm, so its frequency is 2/5 = 0.4. Notice that we deliberately made a mistake: the proportions don’t sum to unity. Press F4 …to confirm the entry. ALES notices the error, and displays an error alert, informing you of the error. Press any key …to remove the alert, and then Enter and confirm the correct value 325=.2,500=.2,650=.4,375=.2 Let’s see how this multi-value propagates during the computation. Press Esc …to remove all the ‘Why?’ screens at once and return to the evaluation matrix. ALES Version 4.65 Users Manual Page 164 February 1997 Press F3 and then select ‘Yes’ (really recompute) …to ask ALES to recompute the evaluation. After the recomputation is complete, the matrix is re-drawn with any changed values highlighted. Notice that all the values of LQ ‘m’ for map unit ‘test1’ have changed: instead of being class 2, they now say ‘1=.6,2=.4’. This is the same syntax that we used to enter the multi-value, and means that there is a 60% chance that map unit ‘test1’ has LQ rating 1 for LQ ‘m’, and 40% chance that the rating is 2. The meaning of the proportions is not based on a rigorous definition of probability. We can look at these linear proportions two ways: either that, say, 60% of the land area has rating 1, or that it is 60% certain that all the land has rating 1. For soil or other space-series characteristics, the first interpretation is usually preferable. For climate or other time-series characteristics, the second interpretation is usually correct. Let’s see how the multi-valued LQ was derived. The cursor should already be on LUT ‘ccc’, map unit ‘test1’, so Press F2 …to display the first ‘Why?’ screen. You can see that three paths were taken in the severity level decision tree at the lowest level: one for May-September precipitation ‘<400’ (p=.4), one for ‘450-500’ (p=.2), and one for ‘>500’ (p=.4). ALES has three possible values for the discrete LC ‘pptMS’, and so carries out the computation for each of these. Let’s see how these classes were derived. Press F2 and then select LC ‘pptMS’ Now we see that ‘pptMS’ was inferred from the commensurate continuous LC ‘pptMS-c’ (remember, we set up the inference link) by classification. In the present case, two continuous values (625 and 650 mm) classified to the same value (>500mm), so their probabilities were summed. Similarly, the continuous values 350 and 375 both classified to <400mm. Now let’s see how this multi-valued LQ propagates to final suitability. Press Esc …to remove all the ‘Why?’ screens at once and return to the evaluation matrix. Press F10 …to remove the matrix and return to the selection list of report types. Select report type ‘Gross margin’ Select Gross Margin report type ‘Gross margin’ Select ‘Yes’ (display the gross margin on a per-area basis) ALES now displays the evaluation results matrix for Gross Margin ($/acre-year). Notice that the predicted gross margins for ‘test1’ are not multi-valued. What happened to the two values for LQ ‘m’? The cursor should already be on LUT ‘ccc’, map unit ‘test1’, so Press F2 three times ALES Version 4.65 Users Manual Page 165 February 1997 …to arrive at the ‘Why?’ screen for the predicted return for corn grain. Notice in the display of the proportional yield decision tree that both LQ values (adequate and moderate stress) were taken into account: both paths were taken in the decision tree, to arrive at a predicted yield of 100% assuming adequate moisture (severity level 1, p=.6) and 80% assuming moderate stress (severity level 2, p=.4). ALES multiplied the proportions of yield and land in each LQ class to arrive at a predicted proportional yield of 92%. The calculation is: (100% * 0.6) + (80% * 0.4) = 60% + 32% = 92% yield. This method of linear proportions assumes that: (1) there is a proportionate amount of land with each of the LC values, and (2) that the land use is applied to all the land. Or, looking at this from the point of view of time series data (such as the rainfall data), this method assumes that: (1) there are a proportionate number of years with each of the LC values, and (2) the land use is carried out every year. Under these assumptions, ALES can combine the individual values of yield to obtain a weighted average. Now we’re done exploring multi-valued land data and continuous-to-discrete inferences. Press F10 six times …to return to Menu 1 ‘Main options’. More about proportional yield In Tutorial 3, we used a simple multiplicative yield factor to compute proportional yields. This method has the major drawback that it assumes that several yield-limiting factors multiply to predict final yield; usually this prediction is too pessimistic1. The most general method of computing proportional yields is the proportional yield decision tree. This method can account for any kind of interaction between land qualities. Select Menu 1 ‘Main options’ Option 2, ‘Land Utilization Types’ Select LUT ‘ccc-m’ …i.e., the LUT we’ve been modifying. Select Menu 1.2 ‘Specification options for LUT: “ccc-m”’ Option 6 ‘Outputs’ Select output ‘cg’. 1See the next Chapter for more on this ALES Version 4.65 Users Manual Page 166 February 1997 Now ALES displays Menu 1.2.6 ‘Specification options for LUT, Output: “ccc-m, cg”’. Notice that Options 2, 3 and 4 can all be used to specify how ALES should compute proportional yield. First we’ll examine proportional yield decision tree, and then limiting yield factors. Proportional yield decision tree Select Menu 1.2.6 Option 2 ‘proportional yield decision tree’ ALES displays the top level of a decision tree. This tree is at a higher level of abstraction than the Severity Level decision trees we constructed in Tutorial 3. In fact, this tree uses as its decision entities the severity levels that are the result of the Severity Level decision trees. The result of this decision tree is the proportional yield, i.e., a fraction on the interval [0,1], by which the ‘optimum’ yield should be multiplied to calculate the predicted yield. As you can see, the first LQ is ‘pl’ (planting conditions), and at each branch there is a subtree based on the LQ ‘m’ (moisture availability). The highlight should be on branch 1 ‘early’. Press → …to expand branch 1. Now you can see the proportional yields with no limitations to planting, but with increasing moisture limitations: 100%, 80%, and 60%. Press ← …to collapse branch 1 and return to the top level. Move the cursor to branch 2, ‘medium’ planting date. Press → …to expand branch 2. Now you can see the proportional yields with medium planting date, and with increasing moisture limitations: 85%, 70%, and 60%. Notice that the predicted yield with medium planting date but no moisture limitations is 85%; as we saw just above, the predicted yield with no planting limitations but severe moisture limitations is 60%. If these two factors had no interaction (e.g., were entered as limiting yield factors), the predicted yield would be min(0.85, 0.60) = 60%. If these two factors were both multiplicative, the predicted yield would be (0.85) ×(0.60) = 51%. The proportional yield tree allows us to assign any yield to this combination, from 0% (extremely synergistic effects of the two factors) through 51% (multiplicative), through 60 % (no interaction), to 100% (positive interaction, i.e., one factor compensates for the other). In fact, the evaluator decided that this combination of severity levels would result in 60% yield, i.e., corresponding to the maximum limitation. What is the correct value? This depends on experience with the specific combination of factors. The ideal is to find a set of farmer’s fields with each combination and measure the yield as a proportion of the optimum farmer’s yield with the same technology and management level. Or, a factorial experiment (e.g. nutrients × water) can be used. For the purposes of this exercise, let’s suppose that we have specific information that the proportional yield with medium planting dates and severe moisture stress is 40%, that is, there is a synergistic effect of the two factors. So, Move the cursor to branch 3, ‘severe stress’. Press F3 …to enter a value. ALES asks for the proportional yield, with the current value 0.60 as the default answer. ALES Version 4.65 Users Manual Page 167 February 1997 Enter and confirm the value 0.4 Notice that the value in the tree changes to ‘.4’. In the same manner, Change the proportional yield for branch 2 ‘moderate stress’ to ‘0.6’ Press ← …to collapse branch 1 and return to the top level. We’re done editing the tree, so Press F10 …to return to Menu 1.2.6. Limiting yield factors There are situations where a simpler approach to predicting proportional yield may be appropriate. There are two methods, besides the decision tree, to predict proportional yields, namely, multiplicative yield factors (which we’ve already seen in Tutorial 3) and limiting yield factors. In this section we’ll see how to enter limiting yield factors, and how they affect the computation. Select Menu 1.2.6 Option 4 ‘Limiting yield factors’ …to bring up a list of all the LURs defined for this LUT. Notice that LUR ‘c’ (temperature regime) is marked with an asterisk ‘*’; this indicates that there are already limiting yield factors associated with it. These were entered by the builder of the model ‘Tutor2’, which model we copied at the beginning of the present tutorial. Select ‘c’ (climate) ALES displays data entry form appears, with the limiting yield factors for each of the four severity levels (i.e. LQ values) for this LUR. The current values are: 100% (full season), 95% (medium season), 80% (short season), and 0% (won’t make grain). These factors correspond to the biological fact that the maximum attainable yield for corn depends on the temperature regime1. According to this form, a short-season hybrid in the context of central New York state has an 80% yield potential, relative to a full-season hybrid. Also implicit in this form is that there is no interaction between temperature regime and any other factor that may limit yield. If there is an interaction, the LQ would have been included in a proportional yield tree by the builder of ‘Tutor2’. We won’t change these factors; so Press F10 twice …to return to Menu 1.2.6. Let’s see how these changes affect predicted yields for our set of map units. 1Because as the number of heat units increases, a longer-season corn hybrid can be grown, and the longer-season hybrids have higher yield potentials ALES Version 4.65 Users Manual Page 168 February 1997 Press F10 four times …to return to Menu 1, ‘Main options’. To see the effect of yield factors, we’ll change the data for two of the test map units. Select Menu 1 Option 3, ‘Data’ Select Menu 1.3 Option A, ‘Edit Data in a matrix’ Select data entry template ‘cl’ Select the set of map units ‘test1’, ‘test2’, and ‘test3’. In the data entry form matrix, Make the following changes to the displayed values: LMU ‘test3’, LC ‘gdd50’ = ‘1.8-2k’ LMU ‘test1’, LC ‘pptMS’ = ‘<400’ The low value for heat units for LMU ‘test3’will result in a shorter season for corn, which will be reflected as a limiting yield factor. The low moisture in the growing season for LMU ‘test1’, when combined with a stony soil, will result in severe moisture stress. Press F10 …to confirm the matrix and return to Menu 1.3. Select Menu 1.3 Option A, ‘Edit Data in a matrix’ Select data entry template ‘ss’ (Cayuga County soil survey) Select the set of map units ‘test1’, ‘test2’, and ‘test3’. In the data entry form matrix, Make the following changes to the displayed values: LMU ‘test2’, LC ‘slope’ = ‘C’ (sloping) LMU ‘test1’, LC ‘dc’ = ‘mwd’ (moderately well drained) LMU ‘test1’, LC ‘cfv-A’ = ‘v’ (‘very’ adjective is used) LMU ‘test1’, LC ‘cft-A’ = ‘gr’ (gravelly) The steeper slope for LMU ‘test2’, when combined with the other LCs such as silt loam surface soil, will result in a moderately severe erosion hazard, which will be reflected as a multiplicative yield factor. The stony soil for LMU ‘test1’, when combined with the low moisture in the growing season, will result in severe moisture stress. The moderately well-drained LMU ‘test1’ will result in medium late planting. Press F10 …to confirm the matrix and return to Menu 1.3. ALES Version 4.65 Users Manual Page 169 February 1997 Press F10 …to return to Menu 1, ‘Main options’. Compute evaluation results for LUT ‘ccc-m’ for map units ‘test1’, ‘test2’, and ‘test3’ View evaluation results for Yield of ‘cg’ (corn grain), normalized First, let’s see how a multiplicative yield factor works. Display the first ‘Why?’ screen for map unit ‘test2’. As you can see, the predicted yield is 97.2 bushels per acre, because the proportional yield is 72%. Notice that the proportional yield tree predicts 80%, based on planting date and moisture availability. However, there is one multiplicative yield factor, namely, 90% because of a moderate erosion hazard on this land. This means that the farmer will have to set aside 10% of the land for fallow strips. Hence the predicted proportion of 80% must be multiplied by 90% (i.e. the amount of land that will actually produce a crop), resulting in a 72% proportional yield. Return to the evaluation results matrix Now let’s see how a limiting yield factor works. Display the first ‘Why?’ screen for map unit ‘test3’. As you can see, the predicted yield is 108 bushels per acre, because the proportional yield is 80%. Notice, however, that the proportional yield tree predicts 100%, based on planting date and moisture availability, neither of which are limiting. However, there is one limiting yield factor, namely, 80% because of a short season on this land. (You will have to scroll down to see this line in the ‘Why?’ screen.) This means that the farmer will have to use a shortseason corn hybrid with a yield potential of 80% of a full-season hybrid. Hence the predicted proportion of 100% must be limited to 80% proportional yield. Return to the evaluation results matrix Now let’s see the synergistic interaction we defined in the proportional yield decision tree. Display the first ‘Why?’ screen for map unit ‘test1’. As you can see, the predicted yield is 54 bushels per acre, because the proportional yield is 40%. This 40% comes from the decision tree, because of the medium planting date and severe moisture stress. There is one limiting yield factor, namely, 95% because of a medium season on this land. (You will have to scroll down to see this line in the ‘Why?’ screen.) However, this does not further reduce yield, since it is a limiting yield factor, and the proportional yield predicted by the decision tree is already lower than 95%. Return to the evaluation results matrix Press F10 three times …to return to Menu 1, ‘Main options’. ALES Version 4.65 Users Manual Page 170 February 1997 More about physical suitability In this section we’ll explore several advanced features of ALES for evaluating the physical suitability of land. Physical suitability subclass decision tree. In Tutorial 3 we used the maximum limitation method to determine physical suitability. This is a simple method but it has the disadvantages that (1) the severity levels of all the LURs used in this method must be commensurate, i.e., represent the same degree of limitation, and (2) there is no way to account for interactions between Land Qualities. A more flexible way to assign physical suitability subclasses is by means of a physical suitability subclass decision tree. Let’s examine how LUT ‘ccc-m’ uses this method. Select Menu 1 Option 2, ‘Land Utilization Types’ Select LUT ‘ccc-m’ …i.e., the LUT we’ve been modifying. Select Menu 1.2 Option 8 ‘Physical suitability subclasses’ Select Menu 1.2.8 Option 1 ‘Enter/edit Physical suitability decision tree’ ALES displays the top level of a decision tree. This tree is at a higher level of abstraction than the Severity Level decision trees we constructed in Tutorial 3. In fact, this tree uses as its decision entities the severity levels that are the result of the Severity Level decision trees. The result of this decision tree is the physical suitability subclass code, which consists of a class number and optional modifiers that indicate the kind of limitation. As you can see, the first LQ is ‘f’ (flood hazard). This LQ is measured in two classes only, no risk and risk. This is appropriate for maize because any flooding after planting kills the plant, so there is no need to make finer distinctions of risk levels in this case. You can see that if there is any risk of flooding, the land is already classified as physically unsuitable due to flood hazard, i.e., is in physical suitability subclass ‘4f’. If there is no flood risk (branch 1), there are more factors to consider. The highlight should be on branch 1 ‘early’. So, Press → …to expand the tree at branch 1. ALES displays the second level of the tree, ‘me’ (conditions for mechanization). For all values of this LQ, another factor must be accounted for. Move the cursor to branch 3 (can’t mechanize) Press → …to expand the tree at branch 3. ALES displays the third level of the tree, ‘e’ (erosion hazard), and the decisions, i.e., physical suitability subclasses. At branch 1 the subclass is ‘4e’, i.e., unsuitable due to erosion hazard. At branch 4 the subclass is ‘4e/me’, i.e., unsuitable due to erosion hazard and limitations to mechanization. ALES Version 4.65 Users Manual Page 171 February 1997 Notice that branches 2 and 3 are equated to branch 1. This is because the model builder did not want to differentiate these; once the class is ‘4e’ there is no reason to state that there is a mechanization problem, until it becomes of equal importance. Let’s see how the flexibility of the decision tree allows us to account for interactions between LQs. Press ← …to collapse the tree to the second level. Notice that severity level 2 (‘limiting’) is equated to severity level 1. As the tree now stands, land with limitations to mechanization and moderate erosion hazard is in physical suitability class 1, because there is no single limitation that prohibits the use. Suppose, however, that this combination of two moderate limitations is in fact severe enough to prohibit the use. Let’s change the tree accordingly. Move the cursor to branch 2 (limiting) Press → …to expand the tree at branch 2. Select Land Use Requirement ‘e’ (erosion hazard) Fill in this level as follows: f flood hazard 1 me conditions for mechanization 2 (limiting) e erosion hazard 1 1 (none) ....................*2me 2 2 (slight)...................*3me/e 3 3 (moderate) .............*4me/e 4 4 (severe) ..................*4e ? [???]..........................? Notice that the combination of ‘limiting’ mechanization and ‘moderate’ erosion hazard makes a land area unsuited for this LUT ‘ccc-m’. Press F10 …to return to Menu 1.2.8. To see the effects of this change, we’ll have to recompute the evaluation with this new decision procedure. Press F10 three times …to return to Menu 1, ‘Main options’. Compute evaluation results for LUTs ‘ccc’ and ‘ccc-m’ for map unit ‘test1’ View evaluation results for Physical Suitability Subclass You can see a difference between the two methods. LUT ‘ccc’ is rated in physical suitability class 1, whereas LUT ‘ccc-m’ is in physical suitability subclass ‘3me/e’, even though both have the same severity levels of all LQs. This ALES Version 4.65 Users Manual Page 172 February 1997 is because of the decision tree we constructed for LUT ‘ccc-m’. If you wish, you can use the ‘Why?’ screens to confirm this. Subclass names and annotations So far we have only used physical suitability subclass codes like ‘4e’. These probably are meaningful to the model builder, but you may want to give descriptive names to subclasses, to make them more comprehensible to model users. Also, you may want to add notes to certain subclasses, for example to give management recommendations. In this section, you will learn how to do this. ALES should be displaying the matrix. Let’s see a convenient way to edit the LUT without leaving the matrix. Move the highlight to the column for LUT ‘ccc-m’ Press F5 …to edit LUT ‘ccc-m’. ALES displays Menu 1.2, exactly as if we had selected it from the main menu, and then had selected LUT ‘ccc-m’. Select Menu 1.2 Option 8 ‘Physical suitability subclasses’ Select Menu 1.2.8 Option 3 ‘Enter/edit names or notes for physical suitability subclasses’ ALES displays a list of the current physical suitability subclass names, with the dummy item ‘<add a new item>‘. Press F3 …to add a new subclass to the list. ALES displays an entry box will, asking for the physical suitability subclass code for which you want to enter a name and/or a note. Enter and confirm subclass code 4e ALES displays a one-item data entry form, asking for the descriptive name for class ‘4e’. The name you type here will be displayed in ‘Why?’ screens and reports whenever the ‘4e’ class is displayed. Enter and confirm subclass name non-arable Now the list of subclasses has one item, namely ‘4e’, with the descriptive name ‘non-arable’. At this point we can add a note to this subclass, since it has an entry in the list. The cursor is already on this item in the list, so Press Alt+F9 to start the note editor. Enter and confirm an appropriate note (You might say something about there being too severe an erosion hazard for row crops.) Note in the list of subclasses that code ‘4e’ has the ‘°’ symbol to its left, indicating that there is a note for this item. Press F10 ALES Version 4.65 Users Manual Page 173 February 1997 …to return to the evaluation matrix. Press F10 four times …to return to the list of evaluation models. You might want to save your model to diskette (with ‘F7’). Congratulations, you’ve finished Tutorial 4! You should now be able to use a wide variety of techniques to build ALES models. Refer to Chapter 8 for a full discussion of the various model-building concepts. Press F10 twice …to leave ALES and return to the operating system How to delete evaluation models In Tutorial 3 you learned how to make a backup copy of an evaluation model (knowledge base and database). Eventually you will want to delete evaluation models. For example, once you are done with the tutorials, there is no need to keep them on-line, taking up space on the hard disk1. Evaluation models can be deleted like any other entity: in the choice box where they were defined, i.e., by moving the cursor to the code for the evaluation model and pressing ‘F4’. If you do this, you will be asked if you really want to delete the evaluation; the default answer is ‘No’. If you want to delete it, press ‘y’ to move the highlight to ‘Yes’ and then confirm your choice. The model and all its data will be irrevocably deleted from the knowledge and data bases, i.e. there is no way you can get the model and data back after you delete it! So be sure: you should make a backup copy on diskette (using the ‘F7’ method presented in Tutorial 3) prior to deleting a model. A final word Even with the four tutorials, we haven’t been able to cover every detail of the ALES program. Now it is up to you to experiment as much as you want with ALES. Remember that you can always get on-screen help by pressing the ‘F1’ or ‘F2’ key. Also remember that ALES always asks you for confirmation when you are about to perform major surgery on your model or database. Finally, remember that ALES keeps all models (i.e. entities on the opening list of evaluation models) completely separate, so that if you create or copy a model for experimentation, you can’t inadvertently delete or modify someone else’s work. Experiment, build some models, and we sincerely hope that you will find ALES to be a useful tool in your land evaluation activities. 1Actually, just deleting a model from the list does not free up any DOS disk space, it only frees space in the MUMPS dataset. You can recover the space for DOS using the dataset compression procedure explained in the Chapter ‘Maintaining an ALES system’. ALES Version 4.65 Users Manual Page 174 February 1997 Tutorial 5 : ALIDRIS The objective of this tutorial is to teach to you use the ALIDRIS interface between the ALES database and evaluation results, and the IDRISI Geographic Information System (GIS). For more information on ALIDRIS and IDRISI, see section ‘ALIDRIS’ in the Chapter ‘ALES and other computer systems’. In this tutorial you will learn to: √ reclassify IDRISI base maps with ALES database values √ reclassify IDRISI base maps with ALES evaluation results We built an interface to IDRISI in response to the needs of our users. IDRISI is not the only suitable GIS for use with ALES. Using the techniques explained in the Chapter ‘ALES and other computer systems’, ALES can be interfaced to any GIS that can read relational database tables in ASCII format or xBase-format database files. Before working on this tutorial, you must have installed the IDRISI V4 for DOS, or IDRISI for Windows GIS on your computer; and you must be familiar with the basic operations such as displaying classified images (COLOR), adding a legend (DOCUMENT), changing the IDRISI environment (ENVIRON), and listing the IDRISI images (LIST). If you are not so familiar with IDRISI, you should follow at least the first four IDRISI tutorials before continuing. Thi s tutor i al fol l ows the c ommand str uc tur e of IDRISI V4 for DO S. In IDRISI for Wi ndows, you must fi nd the e qui val e nt c ommand on the me nus, or you c an use the Command box to type the c ommand di r e c tl y. The basic idea of ALIDRIS is that the ALES database or evaluation results are used to reclassify an existing IDRISI raster image that represents the map units in the ALES database. From one IDRISI base map which shows the ALES map units, ALIDRIS can make single-factor maps of any land characteristic in the ALES database, any Land Quality of any Land Utilization Type (LUT), or the final evaluation results (physical or economic) for any LUT, without the need for any further work in IDRISI. Then IDRISI can be used to display the derived maps, or apply any GIS operations on them (distances, adjacency operators, cross-tabulation etc.). ALIDRIS can also be applied to IDRISI values files, commonly used to give legends to vector maps. The base map Before you can use ALIDRIS, you must already have a base map of the land mapping units that you are using in the ALES evaluation. In this tutorial we will not create this map, but rather use one that has already been created for the tutorial. Normally, you would create a base map by digitizing an existing paper map of the map units (with the TOSCA digitizing package supplied with IDRISI, or with a specialized digitizing package such as ROOTS1 or with a drafting package such as AUTOCAD or MicroStation2). The resulting vector map would be rasterized with the POLYRAS command to a blank image 1Decision Images, 196 Tamarack Circle, Skillman, NJ 08558 USA; FAX +1(609) 683-4068 2Intergraph Corporation, Huntsville AL 35894 USA, Phone +1(800) 345-4856 ALES Version 4.65 Users Manual Page 175 February 1997 created with INITIAL, and you would add a legend with the DOCUMENT command or with COLOR, interactive option ‘L’. First, change the IDRISI environment (command ENVIRON) so that IDRISI is looking for images in directory ‘C:\DTM’, or wherever you unpacked the ALIDRIS examples. Run LIST to make sure that IDRISI can find the image TUTOR5. If image TUTOR5 does not appear in the list, it must be loaded from the distribution diskettes, as explained in the section ‘Installing the ALIDRIS samples’ of the Chapter ‘Installing, Configuring and Running ALES’. Use IDRISI command COLOR to display TUTOR5. This is a map of hypothetical soil mapping units in southeastern Cayuga County, NY. Notice that the legend consists of map unit codes just as they were used in the second tutorial, e.g. ‘ErA’. K e y poi nt: The l e ge nd of the IDRISI map i s i ts l i nk to the ALES database or e val uati on r e sul ts. Move around the map and find an area of ‘ErA’; note its coordinates or row/column position. We will see how ALIDRIS reclassifies this cell. [For example, use option ‘C’ of COLOR at Column=56, Row=112, or use option ‘X’ of COLOR at X=393,620 East Y=4,708,240 North. This is in a large map unit near the center bottom of the image.] IDRISI Exercise 1: Use IDRISI command RECLASS to make a map of the areas of map unit ‘ErA’ only, as class 1, and the rest of the area as class 0. How many delineations of ‘ErA’ are there (Hint: use command GROUP on the 0/1 image)?1 IDRISI Exercise 2: Use command AREA to make a table of the acres covered by each map unit in the study area.. How much area does map unit ‘ErA’ cover?2 Creating a thematic map of a land characteristic value The simplest use of ALIDRIS is to make a single-factor map of a land characteristic value in the study area. For example, given a base soils map, you can make a map of surface texture, depth, reaction etc., assuming of course that these land characteristics are contained in the ALES database. In this exercise we will use the ‘Tutor2’ database to make a thematic map of the soil drainage class. Start ALES, select Option 1 ‘Build models & evaluate’, and select evaluation ‘Tutor2’ from the list of evaluation models. If ‘Tutor2’ does not appear in the list of evaluation models, see the note at the beginning of Tutorial 2 which explains how to load ‘Tutor2’ from the distribution disk. 1[Answer: 15] 2[Answer: 56ha] ALES Version 4.65 Users Manual Page 176 February 1997 Select item ‘7 ALIDRIS’ from the main menu. An entry box should appear, asking for the location of the IDRISI program on your system: Where is the IDRISI environment file? _________________________ ALES needs to know where the IDRISI environment is located, so that it can determine where IDRISI stores its images and what file extensions IDRISI uses for these images1. Answer with the path to the IDRISI program, for example C:\IDRISI or wherever you have IDRISI installed on your system. If ALES can’t find the IDRISI environment file in the directory that you specify, you will see the error message such as “Couldn’t open file ‘c:\idrisi\idrisi.env’”. Check the path and try again. When ALES finds the IDRISI environment, a new menu appears: 1 2 3 4 1.7 ALES --> IDRISI interface [V4] Reclassify an IDRISI raster image with LC values Reclassify an IDRISI raster image with evaluation results Reclassify an IDRISI values file with LC values Reclassify an IDRISI values file with evaluation results The first two options are used to make new raster images, the last two to make new values files that are then usually used to make legends for vector maps. In this tutorial, we will only experiment with the first two options. Select item ‘1 Reclassify an IDRISI raster image with LC values’. An entry box should appear, asking for the name of the IDRISI image to reclassify: What is the file name of the source image? c:\dtm\_______________ The answer will be partly filled in with the path to the IDRISI images. ALES determines this from the IDRISI environment file. Complete the answer by typing the name of the image ‘Tutor5’ without the extension (remember, ALES already determined the extension for images and their documentation from the IDRISI environment). If ALES can’t find the image, you will see the error message “Couldn’t open file ‘c:\dtm\tutor5.img’”. Check the path and try again. If you see the message ‘ALIDRIS can't read packed or real-valued images; CONVERT the image first’, you will have to convert the image, with IDRISI command ‘CONVERT’, to an integer, non-compressed format. If ALIDRIS finds the image, and if it is in the correct format, a selection box will appear, asking you to select the land characteristic for which ALIDRIS should make a thematic map. We want to map a map of the soil drainage class, so move the highlight to LC ‘dc’ (drainage class) and press Return to select it. An entry box will appear, asking for the name of the output image: What is the file name of the new raster image? dc______________ 1This is the same way that the other IDRISI modules use the environment file. ALES Version 4.65 Users Manual Page 177 February 1997 The suggested name is the LC code, in this case, ‘dc’. You could change the suggested name, but for now, just press Return to confirm it. The message ‘Working...’ will appear in the center of the screen, as ALIDRIS reclassifies the base map of soil map units ‘Tutor5’ to the thematic map of drainage class ‘dc’. This process takes a bit of time, because each cell in the source map (in this case, 125×125 = 62,500 cells) must be reclassified. When ALIDRIS is done, the ‘Working...’ message disappears, and in its place is an information box which reports on the new map. This box looks like: Done creating file title : data type : file type : columns : rows : ref. system : ref. units : unit dist. : min. X : max. X : min. Y : max. Y : pos'n error : resolution : min. value : max. value : new IDRISI raster image 'dc' ALES Tutorial 5 - drainage class integer ascii 125 125 plane m 1.0000000 392500.0000000 395000.0000000 4708000.0000000 4710500.0000000 unknown unknown 1 6 This information is taken directly from the new documentation file ‘dc.doc’. Let’s check that ALIDRIS correctly classified one of the map units. Go back to the main ALES menu (by pressing F10 twice), select item ‘3 Data’, then ‘4 Data, from keyboard, enter or edit’. Select template ‘ss: Cayuga County soil survey’, and then select map unit ‘ErA’. The data entry form for this map unit should appear. What is the drainage class (data item 6 in this form) for this map unit?1 Now let’s see what the new map looks like. Exit from ALES by pressing F10 seven times. Run IDRISI command LIST: notice that the image ‘dc’ is now in the list, with a descriptive title that was written by ALIDRIS. Run IDRISI command COLOR to display image ‘dc’. The map should show the same area as the base map ‘Tutor5’, but instead of a legend of soil map units, the new map has a legend of drainage classes (1 = ‘ewd excessively well drained’, 2 = ‘wd - well drained’), etc.). Find the location in this image of the delineation of an ‘ErA’ map unit that you investigated at the beginning of this tutorial. [Using the example above, use option ‘C’ of COLOR at Column=56, Row=112, or use option ‘X’ of COLOR at X=393,620 East Y=4,708,240 North. This is in a large map unit near the center bottom of the image.] 1[Answer: ‘spd: somewhat poorly drained’] ALES Version 4.65 Users Manual Page 178 February 1997 What is its legend category and drainage class?1. This agrees with what we know: the soils in map unit ‘ErA’ are somewhat poorly drained, according to the ALES database; ALIDRIS merely made a map of this characteristic. Creating a thematic map of evaluation results Once ALES has computed an evaluation for a set of land uses, ALIDRIS can be used to make a thematic map of the physical or economic suitability of the study area for each land use. In this exercise we will use the ‘Tutor2’ model to make a thematic map of the economic suitability class for maize, both with and without land improvement. The procedure is very similar to that for producing thematic maps of land characteristics, with the additional step that suitability rating must have been computed for a LUT prior to a thematic map for that LUT being produced. First, let’s ensure that an evaluation has been computed. Run ALES, select the evaluation model ‘Tutor2’, select main menu item ‘4 Evaluations’, in menu 1.4 select menu item ‘1 Compute an evaluation’, mark (with ‘F3’) LUTs ‘ccc’ and ‘ccc-d’ to be evaluated, select all the map units (with ‘F6’), finally press F10 so that ALES will compute the evaluation. When ALES finishes computing the evaluation, display the evaluation results matrix by selecting menu item ‘2 View’, then selecting the report for ‘Gross margin - economic class’ (the last item on the list of report types). What are the economic suitability classes for map unit ‘ErA’ for the two LUTs?2. Return to the main menu by pressing F10 three times, and select item ‘7 ALIDRIS’. If you left ALES to view the IDRISI map of drainage classes, you will have to enter the path to IDRISI again, otherwise this question is skipped. In the ALIDRIS menu, select item ‘2 Reclassify an IDRISI raster image with evaluation results’. Enter the name of the source image, namely ‘Tutor5’, exactly as in the previous section. ALIDRIS will now ask which LUT should be used to make the thematic map. Select LUT ‘ccc: corn grain, continuous, conventional tillage’. ALDRIS then asks for the type of map; select ‘Gross margin - economic class’ (the last item on the list of report types), the same report that we just saw in the evaluation results matrix. An entry box will appear, asking for the name of the output image: What is the file name of the new raster image? cccGMe____________ The suggested name is the LUT code, in this case, ‘ccc’, followed by a standard abbreviation for the report type, in this case ‘Gross Margin, economic class’. You could change the suggested name, but for now, just press Return to confirm it. The message ‘Working...’ will appear in the center of the screen, as ALIDRIS reclassifies the base map of soil map units ‘Tutor5’ to the thematic map of economic suitability class, based on the gross margin, for LUT ‘ccc’. When ALIDRIS is done, the ‘Working...’ message disappears, and in its place is an information box which reports on the new map. This box looks like: 1[Answer: category 4: ‘spd : somewhat poorly drained’] 2[Answer: both are in class ‘s3 : marginally suitable’] ALES Version 4.65 Users Manual Page 179 February 1997 Done creating file title : data type : file type : columns : rows : ref. system : ref. units : min. X : max. X : min. Y : max. Y : pos'n error : resolution : min. value : max. value : new IDRISI raster image 'cccGMe' ALES Tutorial 5 - 'ccc' : Gross Margin: Economic class integer ascii 125 125 plane m unit dist. : 1.0000000 392500.0000000 395000.0000000 4708000.0000000 4710500.0000000 unknown unknown 0 6 This information is taken directly from the new documentation file ‘cccgme.doc’. Now let’s see what the new map looks like. Exit from ALES by pressing F10 seven times. Run IDRISI command LIST: notice that the image ‘cccgme’ is now in the list, with a descriptive title that was written by ALIDRIS. Run IDRISI command COLOR to display image ‘cccgme’. The map should show the same area as the base map ‘Tutor5’, but instead of a legend of soil map units, the new map has a legend of drainage classes (1 = ‘ewd excessively well drained’, 2 = ‘wd - well drained’), etc.). Find the location in this image of the delineation of an ‘ErA’ map unit that you investigated at the beginning of this tutorial. [Using the example above, use option ‘C’ of COLOR at Column=56, Row=112, or use option ‘X’ of COLOR at X=393,620 East Y=4,708,240 North. This is in a large map unit near the center bottom of the image.] What is its legend category and economic suitability class?1. This agrees with what we saw in the evaluation results matrix: map unit ‘ErA’ is rated ‘s3: marginally suitable’ for LUT ‘ccc’; ALIDRIS merely made a map which shows the spatial distribution of the economic suitability class. IDRISI exercise: What proportion of the total study area is highly suitable for conventional maize production (Hint: Use HISTO with a class width of 1, tabular output, and note the proportion in legend category 1, which corresponds to ‘s1’.)?2 This completes the basic tutorial on the use of ALIDRIS. More fun with ALIDRIS and IDRISI If you want to see a bit of the power of IDRISI combined with ALIDRIS, continue with this section. No explicit ‘how to’ instructions will be given, instead you will be told what to do, not how to do it. 1[Answer: category 3 ‘s3’] 2[Answer: 27.8%] ALES Version 4.65 Users Manual Page 180 February 1997 1. Use ALIDRIS to make thematic map of the economic suitability class, based on gross margin analysis, for LUT ‘ccc-d’, i.e. the related LUT to ‘ccc’ but with artificial drainage. The name of this map should be ‘ccc-dgme’ (the default suggested by ALIDRIS). 2. In IDRISI, use OVERLAY to subtract the thematic map for ‘ccc-d’ (with drainage) from the map for ‘ccc’ (without drainage), calling the result ‘dif’. This map shows the areas which changed their suitability when drained. It has values which could range from -6 to +6. In order to use COLOR, add 6 to the map with SCALAR; call the result ‘dif1’. Display this map with COLOR. Question: A large part of this map has value 6, i.e., had value 0 before SCALAR was used. What can you say about these areas?1 Question: How much did the suitability change in all map units?2 Question: What map units benefit most from drainage?3 3. Maybe a better way to examine the effect of drainage on the economic suitability is to run CROSSTAB on ‘cccd’ and ‘ccc’. Do this and assign a legend with COLOR ‘l’. This completes Tutorial 5. If you want to clean up the effects of this tutorial, erase images ‘dc’ and ‘cccgme’ using IDRISI command ‘MAINT’, option 1 (‘delete’) and sub-option 1 (‘image’). 1[Answer: their suitability is the same for corn with and without drainage]. 2[Answer: at most one class better or worse] 3[Answer: Map unit 1, ‘Ad’. You can see this directly in the ALES evaluation matrix (the map unit goes from ‘n1’ to ‘s3’), or by comparing ‘Tutor5’ with the areas with class 5, in ‘dif1’, i.e. where ‘ccc-d’ was better than ‘ccc’.] ALES Version 4.65 Users Manual Page 181 February 1997 Building ALES models In this Chapter we present design strategies for the model builder. By far the most difficult aspect of using ALES is building good models. There are several reasons for this: (1) nature is complex, (2) data sources are limited, and (3) the FAO framework, as implemented within and extended in ALES, imposes a certain structure on the model builder. Tutorials 3 and 4 of the previous Chapter are an introduction to the model building process. However it was not possible in the context of a tutorial to completely describe all the decisions and judgments that go into successful model building. In the present Chapter, we present the outline of the model building process, stressing the design decisions that the model builder must make. The term model as used in ALES refers to a set of decision procedures, not to a process model (e.g. of plant growth as related to soil conditions) or a empirical model (e.g. regression equations relating land use to Land Characteristics). The term ‘model’ still is appropriate, however. The ALES model is a representation of the judgment of the land use expert, which in turn is a mental model of reality. Indeed, process or empirical models can be used to help build ALES decision procedures. Outline of the model building process ALES models are built incrementally and interactively. It is important to have a sound design; however, it is not necessary that all particulars of an ALES model be determined before beginning to build it. In particular, verification should take place on a preliminary model before too much effort is expended on extensive data entry and evaluation. Computer programmers have a well-known folk expression: “Build one (program) to throw it away”. While a bit of an exaggeration, it is certainly true that the exercise of building the first model will reveal many pitfalls which can be avoided in a second try. This section describes a typical sequence of actions. First, the model builder should build a preliminary version of a land evaluation model. This involves the following steps: (1) selecting a few representative Land Utilization Types (2) expressing these in terms of their most important Land Use Requirements (3) determining which Land Characteristics are available to form the basis of evaluation (4) constructing decision trees to relate Land Characteristics to Land Use Requirements (5) collecting economic parameters, such as prices (6) selecting some representative or well understood map units (7) collecting and entering Land Characteristic data for these map units. Design of the preliminary model requires close cooperation with the many specialists whose knowledge is necessary for successful land evaluation. The model builder will serve as the collator and arbitrator of contributions from agronomists, soils specialists, hydrologists, climatologists, economists, etc. The design must be based on the project objectives and available data sources. Once a preliminary model is built, and data entered on a representative set of map units, an evaluation matrix may be computed. This matrix shows the rating of each map unit for each Land Utilization Type, either as (1) physical suitability subclasses, (2) predicted present value of cash flows in, out, and net, (3) benefit/cost ratio of the discounted cash flows, (4) Internal Rate of Return of the discounted cash flows; (5) predicted cash flows in, out, and net (i.e. the gross margin), (6) economic suitability classes based either on discounted cash flows or gross ALES Version 4.65 Users Manual Page 182 February 1997 margin,(7) expected yields of crops or other outputs, (8) ratings for single Land Qualities, or (9) the amount of an input needed to implement the LUT. The predicted ratings should be compared against values computed by other methods, and rankings of map units may be reviewed. If there are actual yield data, they may be compared with expected yields. Viewing this matrix should cause the evaluator to ask many questions. Some ratings will appear unreasonable, either in absolute terms (e.g. the model predicts total crop failure, but the map unit in question does provide a reliable, low yield), or in relative terms (e.g. two map units are predicted to have very different gross margins for a particular LUT, but farms on the two areas are not noticeably different in their economic status). ALES provides a way to query the model and data to determine the source of any discrepancies and correct them, thus allowing for iterative model building. While viewing the matrix, the evaluator may repeatedly press a function key (called the ‘Why?’ key) to follow a backward chain showing every step of the reasoning by which a particular map unit was assigned a particular suitability. In this way, the model builder will be able to identify those components of the model that are responsible for unexpected or incorrect results. At each ‘Why?’ screen, all data, economic parameters, and decision trees that entered into the current step of the computation are available to be edited. Thus the model builder can correct any problems immediately upon discovering them. The evaluation matrix may be recomputed directly from the matrix display; any changed results will be highlighted, so that the model builder can see which results were affected by the changes to the model. Typically, this step will be repeated many times, until the model builder is satisfied that the model successfully predicts suitabilities, to the desired accuracy. If the results of an ALES evaluation are to be sent to a GIS or an economic optimization procedure for further analysis, these step should also be part of the iterative analysis of the results. Often looking at a map of suitability or a Land Quality will help the experts visualize the results of the preliminary evaluation. For example, if a preliminary suitability map for an existing LUT shows that an area where the use is known to be successful is not included in the ‘suitable’ zone, the expert can easily see that something is wrong. Once a satisfactory preliminary model is completed, the evaluator can then extend it to a wider set of Land Utilization Types. The program allows the copying of entire Land Utilization Type definitions. The copies can be modified to reflect differences in, for example, management method, or economic assumptions, resulting in side-byside comparisons of related alternatives in the evaluation matrix. Then the model will typically be turned over to model users, who will enter descriptions and data for all the map units in the survey area, and compute evaluations for use by the output consumers. Physical and economic evaluations A major choice which must be made by the model builder is whether to evaluate the land in physical terms only, or in both physical and economic terms. A physical evaluation results in relative suitabilities of each land area for the set of Land Utilization Types in the evaluation, based on the evaluator’s judgment. Within a single Land Utilization Type, this may be very useful. However, when comparing Land Utilization Types, a physical evaluation has no common basis. If we are trying to determine the best use for a land area, we need some way to compare suitabilities of different uses. It may well be that land that is rated ‘highly suitable’ in physical terms for a given Land Utilization Type, but only ‘marginally ALES Version 4.65 Users Manual Page 183 February 1997 suitable’ for another, may preferentially be used for the second LUT by farmers. This is because the farmer is in some sense trying to optimize land use according to some criterion other than crop suitability. Typically, the optimization criterion is largely based on economics, although social and cultural factors may certainly play a large role. As in many other decision making processes, money , or something of value that could in principle be converted to money, is the common denominator. The common saying that one cannot “compare apples and oranges” is not true; they can be compared on the basis of what people are willing to pay for them. While it is true that at times this simplistic view of the common basis of currency can be carried too far, it has a certain validity. Several objections may be raised to economic evaluations: (1) “Economic evaluations are unstable over time”. This is certainly true. However, ALES makes it extremely easy to recompute an entire evaluation with changed economic parameters, such as prices of inputs and outputs, and interest rates. An economic evaluation implemented in ALES can be completely revised, in response to changed economics, in a matter of minutes. (2) “Economic parameters are difficult to obtain”. This is true in general. However, decision makers, including individual farmers and planners, base much of their decision on economics, and they must obtain best estimates of things like expected prices. So it does not seem unreasonable to ask the evaluator to determine these. In also seems quite desirable to force natural resource specialists to work with agricultural economists. (3) “People don’t base their decisions on economics alone”. Again this is very true. However, without adequate economic return, a land use is patently impossible. There are two kinds of distortions to pure economic decisions: cultural and societal. A cultural bias is best handled by omitting the Land Utilization Type in question from consideration. For example, if in a certain area it is considered beneath the dignity of the population to engage in a certain activity, no (??) amount of projected cash return will induce them to do so; therefore the activity should not be considered as an alternative. A societal bias will typically be reflected in economics: the society as a whole (via the government) will subsidize selling prices or input prices, or give tax breaks to encourage an activity. Thus societal imperatives can be incorporated into an economic analysis. (4) “Economic analysis requires predicting yields, and we’re not good at that”. True again, yet if we cannot predict yields in some useful form (e.g. average, worst case, 1 year in 5 worst case...), the concept even of physical suitability classes is in question. A difficult problem must be attacked for natural resources information to be useful. In some situations, a strictly physical evaluation may be sufficient. An example is if land is to be rated for several uses, but the uses are not to be compared with each other. For example, the interpretive tables in a soil survey report for non-farm uses, such as buildings, pipelines, sewage disposal, etc. could be constructed as physical evaluations, with each use represented as a completely independent Land Utilization Type. Physical evaluations In a physical evaluation, map units are assigned physical suitability classes, which indicate a relative suitability, from 1 (best) to some maximum number specified by the model builder. For example, in the FAO framework, there are four physical suitability classes: ‘s1’, ‘s2’, ‘s3/n1’, and ‘n2’. The boundary between ‘s3’ and ‘n1’ is defined only in economic terms, hence in a physical evaluation, these two are grouped. The default of four classes is not arbitrary. It seems to correspond well to our psychological tendency to value things in everyday life as ‘excellent’, ‘good’, ‘fair to poor’ and ‘terrible’, or, in land evaluation terms ‘highly suitable’, ‘suitable’, ‘marginal’, and ‘not suitable’. With fewer classes we are not satisfied and always seem to want to split a class; with more classes we have trouble deciding between classes. ALES Version 4.65 Users Manual Page 184 February 1997 ALES allows the evaluator more flexibility: the FAO-recommended four classes can be used, but if a lower or higher number seems appropriate, the model builder can define the LUT with that number. For example, if it is only necessary to separate unsuitable and suitable (i.e. FAO orders ‘s‘ and ‘n’), a two-class LUT may be defined. This is especially recommended if an economic analysis is to be performed. On the other hand, if the evaluator feels that more classes can be reliably distinguished, more than four classes may be specified. A physical evaluation is often used for risk assessment (e.g. of environmental degradation), even if an economic evaluation is also to be performed to determine optimum land use. It can also be useful to group map units according to their limitations and other Land Qualities that determine management strategies. Economic evaluations ALES always attempts to compute an economic evaluation following the computation of a physical evaluation. If components of the economic model (e.g. prices, optimum yields, proportional yield information) are missing, ALES will not be able to complete the computation. Computation of the physical suitability precedes computation of the economic suitability, so that land that is rated as physically unsuitable will not be considered for the land use, no matter what the economics. ALES will not perform an economic analysis on land in the highest-numbered physical suitability class, which is always assumed to correspond to the FAO class ‘n2’, i.e. physically unsuitable for the use. If an economic model is constructed, degrees of suitability will be revealed in the economic analysis. It then may suffice to define two physical suitability classes (ALES classes 1 and 2), corresponding to FAO orders ‘s’ and ‘n’, and build a simple physical model whose only purpose is to place physically unsuitable land in order ‘n’, i.e. ALES physical suitability class 2. ALES performs two kinds of economic evaluations:(1) gross margin analysis and (2) discounted cash flow analysis The gross margin is defined as variable costs and returns, in units of currency per hectare-year, over the lifetime of the project, without considering the time value of money, and without considering fixed costs of the economic unit (e.g., the farm). Gross margin analysis is satisfactory for analyzing LUTs with no capital improvements and only recurring costs and outputs. ALES economic analysis generally does not include fixed costs of the economic unit (e.g., the farm), because these do not depend on the land area the farm, except indirectly. However, if a LUT is assumed to have a typical size, the fixed costs can be divided by this size and then included as a per-ha S1 cost for the LUT. In this case, ALES’ ‘gross margin’ is really a ‘net (of fixed costs) margin’. Discounted cash flow analysis considers the time value of money, and is appropriate for any plan in which cash flows in and out are spread out over a number of years. It is especially necessary if one-time costs, e.g. capital works such as permanent land improvements, are incurred, and the benefits of the one-time cost are then received over a number of following years. The measures of economic suitability in discounted cash flow analysis are (1) the predicted net present value (NPV), (2) the benefit/cost ratio of the present value of cash in vs. cash out, and (3) the Internal Rate of Return for each Land Utilization Type – land unit pair. The NPV is measured on a continuous scale, as currency per unit area – plan, where ‘plan’ refers to the planning horizon, i.e. length of the project. The benefit/cost ratio is dimensionless, and reflects the leverage of investing a unit sum of money into the project. The measure of economic suitability in gross margin analysis is the predicted gross margin for each Land Utilization Type – land unit pair. This is measured on a continuous scale, as currency per unit area – year, i.e. the cash flows over the length of the project are annualized to a per-year basis. ALES Version 4.65 Users Manual Page 185 February 1997 Normalized vs. non-normalized economic results The usual way to express the economic measures of land suitability ‘Gross Margin’ and ‘Net Present Value’, as well as the actual yield of products, is on a per-land-area or normalized basis. For example, the gross margin can be expressed as ‘currency area-1 yr-1’, and yield as ‘tons area-1’. This is the correct way to compare the intrinsic value of land, i.e., per unit land area. Another way to evaluate land is on a per-map unit basis. This is the per-land-area result, multiplied by the area of the map unit, and gives the economic value of the map unit as a whole, not normalized to a per-land-area basis. For example, the gross margin of a map unit is expressed as currency yr-1; note that the factor ‘area-1’ has been removed by multiplying by the area of the map unit. Yield can be expressed as ‘tons’ produced in the entire map unit, i.e. the total production. This is the correct way to compare actual parcels of land that have both intrinsic value and a specific size. For example, if map unit ‘Alpha’ has a predicted NPV of $100 ha-1 for LUT ‘LandUse1’, and map unit ‘Alpha’ represents a parcel of 40ha, the per-map unit NPV is $100 x 40 = $4,000. In ALES, you have the option to view, print, export to a spreadsheet or export to an IDRISI map evaluation results either on a per-area or a per-map-unit basis, for Gross Margin, NPV and yield. You will be asked which on basis to report just before the evaluation results are output. The default is to report on a per-area or normalized basis, as in ALES V4.0 and earlier. For the per-map unit basis to be valid, the land area of each map unit must have been entered into the map unit data base (Menu 1.2 ‘Data’ Option 1 ‘Definitions, from keyboard, enter or edit’) or read from a disk file along with the map unit codes and names (Menu 1.2 ‘Data’ Option 1 ‘Definitions, from disk file, read’). Economic suitability classes The NPV and gross margin are expressed on a continuous scale, i.e. as currency. For compatibility with the FAO framework, ALES is able to group these continuous values into four discrete suitability classes, corresponding to FAO classes ‘s1’, ‘s2’, ‘s3’, and ‘n1’. (Class ‘n2’ is reserved for land that was previously rated as physically unsuitable.) To allow ALES to perform this grouping, the evaluator must assign three economic suitability class limits, i.e. values of currency per unit area – plan (for discounted cash flow analysis) or currency per unit area – year (for gross margin analysis) which divide ‘s1’ from ‘s2’, ‘s2’ from ‘s3’, and ‘s3’ from ‘n1’. If economic class limits for a kind of economic analysis are not specified by the model builder, ALES will not be able to display or print FAO economic suitability classes for that kind of analysis. The economic class limits are assigned separately for each Land Utilization Type, and need not be the same. This is because the economic suitabilities are expressed per unit area, and some land uses may be much more extensive than others, and thus require less present value or gross margin, per area, to be equally desirable. An example is small-scale vegetable gardening vs. pasture: the pastoralist is satisfied with a much lower return per unit area than the gardener. The model builder must consider these factors when setting economic class limits. The limit between ‘s3’ and ‘n1’ should be set at the gross margin below which the land user will elect not to implement the Land Utilization Type. This limit should be non-negative (i.e. any positive margin should motivate the farmer), however, if the farmer’s labor has not been considered as an input to the LUT, this limit should be some positive amount that takes into account the value of labor, since the farmer requires a certain income to be able to live. The limit between ‘s1’ and ‘s2’ and that between ‘s2’ and ‘s3’ should be set to differentiate the best land from moderately good land, and moderately good land from marginal land. Social factors can dictate these limits: it may be considered that good land must return a certain amount to allow for a acceptable level of prosperity. A rural survey of incomes levels for ‘prosperous’, ‘normal’, and ‘poor’ farmers in an area, divided by typical farm sizes for ALES Version 4.65 Users Manual Page 186 February 1997 these categories of farmers, could be a starting point for determining the per-area returns which would be necessary for the several economic suitability classes. The Versatility Index In the printed reports of evaluation results, the final line of each page is a ‘Versatility Index’ (abbreviation ‘[VI=...]’). The versatility index is a composite measure of ‘goodness’ of the map unit or Land Utilization Type taken as a whole. Versatility of Land Mapping Units The ‘Versatility Index’ for a Land Mapping Unit is defined as follows: VI LMU = ∑R LMU , LUT LUT / ∑1 LUT where RLMU,LUT is the evaluation result for the matrix cell. As you can see, the VI is weighted by the number of LUTs with each result. For example, consider the following results matrix: IRR (%) LUT ‘A’ LUT ‘B’ LMU α 20 20 LMU β 0 30 LMU γ 12 -10 We compute the VI (here, for the Internal Rate of Return) as: LMU α: (20+20)/2 = 20% LMU β: (0+30)/2 = 15% LMU γ: (12+(-10))/2 = 1% This is to be interpreted as saying that ‘on average’ the IRR for LMU α is 20%, etc. The higher the VI of a map unit, the more versatile it is considered to be, i.e., there are more land use options on this land. Versatility of Land Utilization Types For a Land Utilization Type, the Versatility Index is a measure of the ‘goodness’ of the LUT as a whole. Here it makes sense to weight the index by the land area of each LMU, rather than just counting map units. With this modification, the formula for the VI becomes: VI LUT = ∑R LMU , LUT * areaLMU / LMU ∑ area LMU LMU where RLMU,LUT is the evaluation result for the matrix cell, areaLMU is the number of hectares (or other measure of land area) for the map unit. ALES gets the areas from the map unit database; you must enter the areas with Menu 1.3 ‘Data’, Option 1 ‘Definitions, From keyboard, enter or edit’, or if you read the map unit definitions into ALES from a disk file (Option 2), you must have specified an area for each map unit. Im port ant not e : the Ve r sati l i ty Inde x for a LUT de pe nds c ompl e te l y on the l and uni ts i n the study ar e as and the i r ar e as. If the r e ar e no ar e as l i ste d for a map uni t, i t wi l l not be i nc l ude d i n the Ve r sati l i ty Inde x c al c ul ati on. ALES Version 4.65 Users Manual Page 187 February 1997 Let’s see this with an example. Continuing with the hypothetical evaluation matrix presented above, suppose furthermore that the areas of the three map units are: LMU α: LMU β: LMU γ: 3000 ha 2000 ha 5000 ha Then the VI’s are calculated as follows: LUT A: (20*3000+0*2000+12*5000)/(3000+2000+5000) = 12.0% LUT B: (20*3000+30*2000+(-10)*5000)/(3000+2000+5000) = 7.0% So LUT A is more versatile, on average, than LUT B, i.e., averaged over the entire study area, LUT A would give a better IRR. Now, let’s see what happens if we change the proportions of the map units in the study area: LMU α: LMU β: LMU γ: 5000 ha 3000 ha 2000 ha Then the VI’s are calculated as follows: LUT A: (20*5000+0*3000+12*2000)/(3000+2000+5000) = 12.4% LUT B: (20*5000+30*3000+(-10)*2000)/(3000+2000+5000) = 17.0% Now LUT B is more versatile, furthermore, all the VI’s have changed. This illustrates that it is impossible to evaluate the overall suitability of a LUT without reference to a specific study area, with specific proportions of land mapping units.. The Versatility Index for physical suitability (sub)classes In this case, the subclass number is used in the calculation, therefore the lower VI is better (the ideal would be 1.0, which would indicate that this LMU has no limitation for any of the LUTs evaluated). The Versatility Index for ‘severity levels’ of Land Qualities Again, the lower VI is better, assuming that the corresponding Land Use Requirement was set up with increasing class numbers representing increasing limitations. The Versatility Index for economic suitability classes Here the numeric equivalents s1=1, s2=2, s3=3, n1=4, n2=5 are used, so again the lower VI is best. Defining Land Utilization Types By far the most significant decision in constructing a model is the selection and definition of Land Utilization Types, i.e. the land use alternatives. This is covered in detail in FAO Soils Bulletins 52,55 and 58 and in Forestry Paper 48 (see the References). Suffice it here to say that all aspects of the Land Utilization Type, especially including the socio-economic and technical context, must be completely specified. Level of mechanization, access to credit, tenancy system, and many more factors greatly influence the variables that must be considered when constructing ALES models. ALES Version 4.65 Users Manual Page 188 February 1997 The following sections explain design considerations for each aspect of the Land Utilization Type specification. Number of physical suitability classes See above for a discussion of the meaning of physical suitability. In practical terms: 1. Use the default 4 classes (S1, S2, S3/N1, and N2) if you want to conform to the FAO Framework. 2. Use 2 classes (S/N) if you only need to distinguish physically suitable from physically unsuitable, and are going to distinguish various degrees of suitability in economic terms. 3. Use any number of classes (2 to 9) if you can determine that number of physical classes or if you wish to follow an existing system1. Remember that the highest-numbered physical suitability class is always reserved for physically-unsuited land; an economic evaluation will not be carried out for any land areas rated in this class. Discount rate Each Land Utilization Type has a separate discount rate, i.e., the rate at which future cash flows are discounted in order to determine present value. This rate is used to discount a cash amount as follows: 100 PresentValue := CashAmount ∗ 100 + DiscountRate YearsFromPresent where the DiscountRate is the rate at which money may be borrowed, expressed as a percent, and YearsFromPresent is the number of years from the present when the CashAmount will be spent or received. Example: The present value of $1,000 to be received ten years hence, at various discount rates is: 0.0% 3.0% 6.0% 9.0% 12.0% 15.0% 18.0% 21.0% 24.0% 27.0% $1,000.00 $744.09 $558.39 $422.41 $321.97 $247.18 $191.06 $148.64 $116.35 $91.61 Note that at 27% discount, the present value is less than 10% of the actual cash amount. From this we can see that the discount rate can have a very large effect on the present value of a project, especially if a significant portion of the benefits of the LUT are incurred or received in the future. For example, a forestry project may incur many of its costs in the first year, but not receive any benefits for 30 years. The discount rate can be set to reflect current or anticipated future market rates, or a subsidized (‘social’) rate, depending on the purposes of the evaluation. If you want to compare two rates for the same LUT, you can copy the 1E.g. the USDA Land Capability Classification has 8 classes. ALES Version 4.65 Users Manual Page 189 February 1997 LUT to another, alter the discount rate, compute an evaluation with the two LUTs, and see the comparison side-byside in the evaluation matrix. In general, expected inflation should not be included in the discount rate. So, a market rate should be adjusted for inflation. For example, if the market rate is 22% and inflation is expected to be 8%, the discount rate in ALES should be set at 14%. Then the entire analysis is in constant (usually present) currency. This assumes that all prices move equally with inflation. Length of Planning Horizon Each Land Utilization Type has a separate length of planning horizon, i.e., the number of years over which costs are incurred and/or outputs are produced. In discounted cash flow analysis, the planning horizon sets a limit on how far in the future cash flows can be specified. Depending on the discount rate, the present value of future cash flows become insignificant at some point in the future, so that there is no point in a planning horizon beyond this point. Note also that two net present values (NPV) can only be compared for equal planning horizons. In gross margin analysis, the length of the planning horizon is used to annualize expected yields, so that different LUT’s can be compared on a common scale. For annual cropping systems with only recurrent costs, the planning horizon is one year. For a rotational cropping system with only recurrent costs, the planning horizon is the length of the rotation. This is also appropriate for a crop-fallow system. For perennial crops, the planning horizon should be set to the expected life of the perennial. For example, a banana plantation may have an expected life of 10 years, after which it will have to be renovated or abandoned. For any LUT with significant capital improvements either at the beginning of the plan or at some specific time within it, the planning horizon should be set long enough to include the years with improvements, and also the years over which the benefits of the improvement will be reaped, i.e. the so-called ‘useful lifetime’ of the improvement. As a practical matter, depending on the discount rate, 10 (high discount rate) to 30 (low discount rate) years is usually the maximum planning horizon, because cash flows that occur after a time so far in the future have very little effect on the net present value of the plan. Once the present value of a cash flow drops below about 10% of the cash amount, it can usually be disregarded, since the present value of earlier cash flows overwhelm it in the calculation of NPV. You can do some calculations with the discounting formula in the previous section, to get some feel for how far in the future it is worthwhile to plan. ‘S1’ Inputs to a Land Utilization Type (annual and one-time) The S1 inputs to a Land Utilization Type are the things that are required to implement it, regardless of the land on which it is implemented. If different levels of inputs are required, depending on conditions of the land, they are included as additional costs tied to a severity level of a specific Land Use Requirement. Inputs are of two kinds: annual, i.e. needed each year, and one-time (also called by-year), i.e. needed only once, at some specific year during the length of the LUT. The same input can of course be included in both lists; for example, an initial liming may be required to bring land into production, with a supplemental application each year. The same ‘one-time’ inputs may be specified at more than one specific year. ALES numbe r s ye ar s i n the pl an star ti ng wi th ye ar 1, the r e for e , any i nputs spe c i fi e d for ye ar 1 ar e not di sc ounte d. ALES Version 4.65 Users Manual Page 190 February 1997 Examples of inputs are labor, seed or plants, fertilizers, fuel, equipment and tools, and construction materials. Inputs are first defined in the reference list of inputs for the entire evaluation. Then they are available for inclusion as inputs of any or all Land Utilization Types in the evaluation. Each LUT can have any number of annual and one-time inputs. Each input in the reference list must be assigned a unit of measure and a monetary value. The unit of measure for an input must be expressible in a per-unit area basis. Some units of measure are: kilograms, liters, days, or units. Units of concentration, e.g. parts per million, are not usable since they already include the area as part of their denominator. Outputs The outputs of a Land Utilization Type are the things of value that are produced by it. Commonly, these are the usable parts of crops, e.g. grain, straw, tubers, etc. However, there are other kinds of ‘outputs’, such as pollutants, soil that is lost to erosion, recreational value, and so forth. As long as a unit of measures can be devised for an output, and a monetary value (positive or negative) can be assigned to each unit of measure, ALES can include the output in its analyses. Output values can also be negative; this is appropriate for pollutants. The unit of measure for yields must be expressible in a per-unit area basis. Some units of measure are: kilograms, quintals, pasture days, total digestible nutrients, tons of soil, liters of pollutant. Units of concentration are not usable, e.g. parts per million, since they already have the area as part of their denominator. Outputs, along with their units of measure, are first defined in the reference list of outputs for the entire evaluation. Then they are available for inclusion as outputs of any or all Land Utilization Types in the evaluation. Each LUT can have any number of outputs. Harvest years For each output of a Land Utilization Type, the years in the plan when the output is harvested must be specified. An output may be harvested not at all, once, or several times within any given year. From this information ALES is able to determine the present value of the output over the extent of the plan. Thus ALES can evaluate multiple crops, intercrops, perennial crops etc. ALES c onsi de r s that har ve sts ar e e ffe c te d at the e nd of the ye ar , the r e for e , any outputs spe c i fi e d to be har ve ste d i n ye ar 1 are di sc ounte d. For example, consider a six-year planning horizon, corresponding to the following rotation,: first year: establish alfalfa with an oat nurse crop, harvest the oat grain and straw, and take one cutting of alfalfa; second and third years: take three cuttings of alfalfa; fourth year: take three cuttings of alfalfa and then plow it down with a cover crop of winter rye; fifth year: harvest the rye as green chop, plow it down, and plant corn, harvest corn grain; sixth year: plant and harvest corn grain. In this situation we have the following outputs and years when harvested: oat grain (1), oat straw (1), alfalfa (1, 2, 2, 2, 3, 3, 3, 4, 4, 4), rye green chop (5), corn grain (5, 6). For perennial crops there are typically fewer harvests than the plan length. For example, a forest stand that is expected to last 30 years (i.e. this is the length of planning horizon) may have a thinning crop at 5, 10, and 15 years, and a timber crop at 30 years, so that we have the following outputs and years when harvested: thinnings for wood chips (5, 10, 15), trees for lumber (30). Perennials and annuals can be mixed in a LUT (e.g. for agroforestry); the length of the planning horizon should be set by the life of the perennial stand. ALES Version 4.65 Users Manual Page 191 February 1997 ‘S1’ or Optimum yield For each output of a Land Utilization Type, the ‘S1’ or optimum yield must be specified. This is the yield, per unit area per crop (as defined in the previous section), that would be expected in the context of the Land Utilization Type (which includes management, input levels, socio-economic conditions, etc.) assuming no limitations, i.e. all Land Qualities that affect yield with the lowest level of limitation, so that the land area would be rated in physical suitability class S1. The optimum yield is not meant to be a biological maximum, but rather a realistically attainable yield in the context of the LUT. The lowest level of limitation of each Land Quality, and hence the optimum yield, depends on the context of the evaluation. For example, if an evaluation model has a ‘radiation regime’ Land Use Requirement, the lowest level of limitation for this is generally set to correspond with the optimum radiation regime expected within the area of applicability of the evaluation. This is reflected in the severity level decision tree for this Land Quality: severity level 1 is obtained with a certain combination of values of Land Characteristics (e.g. cloud cover, latitude, elevation, ...) which defines ‘optimum’. This illustrates the importance of knowing, and stating in the model, the area of applicability of a model. Depending on the purpose of the evaluation exercise, the ‘area of applicability’ may be larger than the area to be evaluated. For example, to compare yields on a national or continental scale, the ‘optimum’ yield could be set to the expected optimum in the country as a whole, even though only a section of the country is being evaluated. The level at which the optimum yield is set has a great impact on economic evaluations. It should be set according to the purposes of the evaluation. For example, if the Land Utilization Type is to be implemented by risk-averse farmers, it should be set conservatively, e.g., the lowest expected yield over a ten-year period, or an average yield less 20%. In this way the optimum yield will be attained on the best land in the evaluation area except in unusually bad years. On the other hand, if the farmers have sufficient reserves to withstand unfavorable years, an average yield would be an appropriate level for the optimum yield. In some situations the same crop may have different yields at different harvests within a rotation. An example would be early, midsummer, and late summer cuttings of a forage. It would not be correct to specify three crops per year, each with the same optimum yield. To solve this problem, the same crop should be listed several times in the reference list of outputs, and each of these included in the LUT specification. Then each can get a separate number of crops and optimum yield. In the forage example, we could define three outputs: ‘alfalfa-e’, ‘alfalfa-m’, and ‘alfalfa-l’; there would be one crop per year of each, having a different optimum yield depending on the time of cutting. Another application of this same technique can be used for increasing or decreasing yields of a crop during the course of the plan. For example, a conservation farming technique might provide yield increases only after it has been applied for two or three years. In this case, the same crop is listed several times in the reference list of outputs, and each of these included in the LUT specification. Then each can get a separate list of harvests and optimum yields. In the conservation farming example, we might have two outputs ‘maize’ (years 1 and 2) and ‘maize-i’ (years 3 and following); the yield of ‘maize-i’ might be 30% higher than ‘maize’ due to the accumulation of organic matter, establishment of leguminous trees in alleys etc. This same technique can be used for increasing or decreasing series of yields due to effects of the LUT on the physical resource base; in this case you must define the output in the reference list as many times as you can distinguish yield levels. Production-dependent inputs Some production costs are directly related to the level of production of an output. For example, a portion of harvesting costs depends on how much must be harvested. ALES allows the model builder to specify (using Menu 1.2.6, Option 5) these production-related costs, by means of a list of inputs, with each the amount of each input ALES Version 4.65 Users Manual Page 192 February 1997 specified per unit of output, not per unit area of land The inputs are selected from the same reference list of inputs mentioned above. Proportional yield as a production delay In some Land Utilization Types, increasing limitations delay production (e.g., harvest) rather than (or in addition to) lowering the yield of each production event (e.g., harvest). A typical example is forestry: the trees may eventually grow to the same marketable size, but may take longer to do so in unfavorable circumstances such as cool climates, soils with limited rooting volume etc. In discounted cash flow analysis, the year when a harvest is realized can greatly affect the analysis, because of the time value of money. ALES now allows the model builder to specify that yields be deferred, instead of, or in addition to, being lowered, due to increasing limitations. How to specify that production is to be delayed There are two relevant questions in the form from Menu 1.2.6 ‘Specification options for LUT, Output’, Option 1 ‘Optimum yield, years when produced, how yield is affected’: the model builder must specify if the proportional yield will be applied to each harvest, will delay each harvest, or both. The default is to reduce each harvest but not delay, i.e., to duplicate the ALES V4 and earlier behavior. (This same form is available from the relevant ‘Why?’ screens.) Here is a sample form: +------------- 'forest' -- tree1 (tree species 1 - fast growing) --------------+ ¦ ¦ ¦ 1. Optimum yield [ m3/ha ] : 5000 ¦ ¦ 2. Years output is produced : 15 ¦ | 3. Reduce yield? : No | | 4. Delay production? : Yes | ¦ ¦ ¦------------------------------------------------------------------------------¦ ¦ 1. Optimum yield [ m3/ha ] : 5000 ¦ +------------------------------------------------------------------------------+ How ALES computes the harvest delay If the ‘delay’ option is selected, ALES will delay each harvest listed in ‘Years crop is harvested’ by the reciprocal (inverse) of the proportional yield, as determined from the proportional yield decision tree, multiplicative yield factors, and limiting yield factors. For example, if the final proportional yield is 0.75, each harvest will be delayed by (4/3) = 1.33... time periods (e.g., years). Consider a tree species with the year when harvested of ‘15’ and a map unit with a proportional yield of ‘0.75’; the actual harvest year would be 15 ∗ (4/3) = year 20. If the result of the multiplication is not a whole number, it is rounded to the nearest year. For example, suppose the yield factor is 0.8 = 4/5, i.e. the delay factors is 1/(4/5) → 5/4 → 1.25. Then the ‘optimum’ harvest year 15 would be delayed to: year 15 ∗ (5/4) = 18.75 → year 19, and the ‘optimum’ harvest year 17 would be delayed to: year 17 ∗ (5/4) = 20.25 → year 20. Note that year x.5 is rounded to year x+1. Notes 1. The model builder specifies whether the proportional yield is to delay the harvest for each output separately (see the above example form). Thus if final tree harvest can be delayed but thinnings are not, you can set up two outputs: lumber and thinnings, and specify how their yields are affected independently. 2. If a harvest is delayed past the end of the planning horizon (‘useful life’), it will not be included in the outputs, under the assumption that a harvest too late is not worth the trouble. Therefore the model builder must make ALES Version 4.65 Users Manual Page 193 February 1997 sure that the planning horizon (Menu 1.2 ‘Specification options for LUT’, Option 2 ‘Length’) is long enough to include all harvests of interest. Defining Land Use Requirements for a LUT The set of Land Use Requirements (LUR) are the main defining factors of Land Utilization Types. They are of critical importance in ALES because they are used to (1) define physical suitability; (2) increase costs of production; and (3) reduce yields of outputs. In the FAO framework, Land Utilization Types have one or more Land Use Requirements, which are matched with corresponding Land Qualities (LQ). These are just two sides of the same coin: the requirements correspond to the demand of a land use, whereas the qualities correspond to the supply by the land of that factor. When you are building models of land uses in ALES, you specify the requirements. When ALES computes suitabilities for each land use it will compute the corresponding qualities. Land Utilization Types have Land Use Requirements; Land Mapping Units have Land Qualities. The ALES model builder specifies the Land Use Requirements; ALES computes the values of the corresponding Land Qualities. The FAO has published lists of suggested Land Use Requirements for rainfed agriculture (FAO 1983), for irrigated agriculture (FAO 1985) and for forestry (FAO 1984), along with suggestions on how they might be evaluated, e.g., which Land Characteristics are important for these requirements. A worksheet (below) lists the suggested LURs. These suggested LURs can be grouped into categories: (1) Agro-ecological: These affect the growth of the crop or animal. For example, temperature, radiation, water, oxygen, nutrients (2) Management: These affect how the land user must manage the land. For example, conditions for land preparation and harvest, irrigation frequency. (3) Land Improvements: These are requirements that must be met in order to bring the LUT into production. For example, land clearing, irrigation and drainage, requirement for leaching of salts. (4) Environmental risks: These are requirements that the land not degrade. For example, erosion hazard, risk of salinization, chemical contamination in runoff or drainage water. (5) Geographical: These are requirements of location. For example, accessibility to or within the farm, distance from protected areas or to markets. (6) Socio-economic: These are requirements that the land user must meet. For example, attitudes towards a certain type of land use. Although these lists are useful starting points, they are not exhaustive nor exclusive. In fact, a more direct way of deciding on a set of LUR’s is often quite successful: soliciting answers from the land use experts to the question: “What qualities of the land are important for the successful implementation of this LUT?” A related question is: “What qualities of the land differentiate lands that are very suitable, suitable, marginal or not suitable for this land use?” ALES Version 4.65 Users Manual Page 194 February 1997 It is not expected that every evaluation will use every requirement, in fact, in order to keep models to a reasonable size, it is important to limit the set of Land Use Requirements. A Land Use Requirement should be included in the model if: (1) it is important for the land use; (2) there exist critical values of the corresponding Land Quality in the study area, i.e., values which cause differences in the performance of the set of land units being considered; Even factors that are very important to a land use should be omitted from a model’s set of Land Use Requirements, if they do not vary over the set of land units under consideration. In other words, Land Use Requirements whose corresponding qualities are constant, within the context of the survey area, should be left out of the model. (3) it is possible to predict values of the Land Quality, i.e., there is sufficient expert knowledge about the relationship between this Land Quality and a set of Land Characteristics; In ALES terms, this means that enough is known about the requirement so that it is possible to construct a decision tree for it. (4) it is possible to obtain data values for the Land Characteristics that are used in the prediction. Here are some hypothetical examples of Land Use Requirements that would not be included in a LUT, for each of the above reasons: (1) The LUR ‘Erosion hazard’ is not relevant for aquaculture LUT’s; (2) There are no critical values for the LUR ‘Erosion hazard’ in a flat alluvial landscape; A good example of important Land Use Requirements that may often be left out of models of limited geographical applicability are those LURs dealing with climatic adaptation of a crop, such as daylength and radiation. However, if it is expected that a model will be used over a wider area, where these factors are not constant, these LURs would be included. (3) Although soil compaction is a serious problem in a LUT of mechanized grain production in a certain zone, the soil scientists in the area are unable to predict what conditions of the land make it more or less susceptible to compaction, so that the LUR ‘risk of compaction’ can not be included in the set of LUR’s; (4) Suppose the local soil scientists are able to predict compaction based on an expensive and time-consuming field test. If this test has not been performed on the map units in the study area and it is not feasible to do so because of limited time and money, the LUR can not be determined and so must be omitted from the model. Land use requirements can be defined for one of three purposes, which are of course not mutually exclusive: to differentiate the physical suitability of land units, to differentiate the yield potential of land units, or to differentiate the costs of implementing the Land Utilization Type on the different land units. The next three subsections give examples of each of these. LURs related to physical suitability This kind of LUR is typically a ‘hazard’, and influences the land use in a negative manner. Examples are: erosion hazard, flood hazard, drought hazard. The idea here is that excessive severity levels of the corresponding Land Qualities makes the land unfit for the land use. These LURs can also be used to classify land into management groups. ALES Version 4.65 Users Manual Page 195 February 1997 Given an unlimited amount of resources, any limitation could be overcome. This is fairly obvious for limitations of nutrients or water. Even limitations due to daylength could be corrected by putting supplemental lighting in the field! So, strictly speaking, there are no completely limiting Land Use Requirements. In practical terms, however, there certainly are. The model builder determines the concept of impracticality in the context of the Land Utilization Type. LURs which reduce yields These LURs typically have to do with intrinsic factors of plant growth, such as water, light, temperature, and nutrients. Some limitations to culture can also be included here: e.g. planting conditions or harvesting conditions. The model builder must determine which Land Qualities can reduce yield. LURs which increase costs Limitations can result in reduced yields; however, in the context of a Land Utilization Type we may choose to correct (completely or partially) a limitation by increasing inputs. Any yield-reducing Land Use Requirement can be included here as well. If certain severity levels of a Land Quality increase costs, the model builder expresses this by listing the additional inputs, which can be either annual (recurring) or one-time, at one or more specific years within the plan. The inputs are selected from the same reference list of inputs mentioned above. Each severity level may have a different amount of the input needed to correct the limitation. Although the application of an input to correct a limitation may be attractive to the extensionist, it may not be so to the land user, who may prefer to accept a yield reduction, even if the extra input appears cost-effective in the economic analysis. This may be due to the opportunity cost for the same input (or the money needed to purchase it) in the land user’s total system, or to the effective non-availability of the input (e.g. more family labor at laborintensive seasons). The assumption that the extra input will be applied thus must be verified and forms part of the LUT definition, under the headings of ‘level of inputs’, ‘access to working capital’, and even ‘social attitudes’. A related problem is that the land user must be made aware that a particular land unit requires the additional input. For example, if a land unit has low soil fertility which can be corrected by extra fertilizer, the soil test results must be made available (and possibly explained) to the user. Again, this assumption forms part of the LUT definition, under the heading of ‘technical assistance’ or ‘social infrastructure’. Deciding on the number of severity levels A major decision when defining Land Use Requirements within a Land Utilization Type is how many severity levels (also called degrees of limitation or Land Quality classes) are to be distinguished for the corresponding Land Quality. ALES allows Land Qualities to have from two to nine severity levels. In general, and following the FAO, severity levels should be numbered so that increasing limitations have increasing numbers1. For example, class 1 is no limitation, class 2 slight limitation etc. However, there are LURs with no concept of limitation, only of management or economic differences, in which case the order is arbitrary. In the original FAO method, the levels of the various LUR’s must be commensurate, e.g., level 3 ‘marginal’ of one LUR must be in some sense equivalent to level 3 of all other LUR’s. This is required in ALES for those LUR’s which are to be used in the maximum limitation method of computing the physical suitability subclass. There is no requirement that the number of severity levels be the same; for example, some LUR’s may never be absolutely limiting, so that they would not have the highest-numbered (worst) level ‘not suitable’. 1Historically, this goes back to the USDA Land Capability Classification, where class ‘1’ land is the best, and class ‘8’ land is the worst. ALES Version 4.65 Users Manual Page 196 February 1997 An example of this, thinking of a LUT which includes sorghum, might be the LUR ‘plant nutrition’. In a certain study area it might be the case that there is never a complete crop failure due to soil fertility problems, in which case this LUR would not need the highestnumbered class. In contrast, for the LUR ‘oxygen supply to the roots’ there might be some land areas where there is a persistent high water table or ponding, which would kill the sorghum plant. In this case there would be a highest-numbered class. The term ‘severity level’ as used in ALES is a bit misleading, because the level numbers from 1 to some maximum number do not necessarily correspond to increasing levels of physical limitation, or to increasing additional costs, or to decreasing yields. It is certainly common that increasing severity levels do correspond with one of these, but this is not required. In some cases it is not appropriate. For example, a Land Use Requirement of ‘nutrient requirement’ may have a number of severity levels corresponding to soil fertility groupings, each requiring a different combination of additional inputs; the ordering of the classes may be arbitrary. Recall that the Land Use Requirements will be used to determine overall physical suitability, proportional yields, and added costs of production. Therefore each severity level must differ from the others with respect to one of these. This is the top-down approach to determining the number of severity levels. For example, for the Land Quality ‘lime requirement’, we could define a number of severity levels, each requiring a specific one-time quantity of added limestone. In the top-down approach, the number of levels would correspond to the possible application levels. Since the amount of limestone to be applied is a continuous quantity, there are an infinite number of application levels; however, in common agricultural practice only a discrete number of levels are specified, e.g. in 1-ton increments. So the number of classes would be the total range of possible levels, e.g. maximum 12 tons, minimum 0 tons, divided into 1-ton increments, e.g. 0, 1, 2, …, 12 tons. However, the number of classes in ALES is limited to nine, in order to keep the size of decision procedures manageable, so in this example the range 0-12 tons would have to be divided into 0-1.5, 1.5-3, etc. Furthermore, it makes no sense to define more severity levels than can be distinguished on the basis of the available Land Characteristics. Put another way, the precision of the Land Quality cannot be higher than the precision of at least one of the Land Characteristics that will be used in the severity level decision tree. This is the bottom-up approach to determining the number of severity levels. Returning to the example of ‘lime requirement’, if this is determined from topsoil pH, there is an inherent uncertainty in the measurement, as well as considerable variability within each map unit, both of which are reflected by the fact that pH is typically reported in ranges in soil surveys. Suppose that in a certain area pH is reported six classes, e.g. <4, 4-5, 5-6, 6-7, 7-8, >8; it would not be possible to specify more than six severity levels of lime requirement. Worksheet for selecting LURs The following worksheet may be useful for helping you select LURs and decide on the number of severity levels. ALES Version 4.65 Users Manual Page 197 February 1997 Selection of Land Use Requirements Possible Requirements FAO number LQi LQr LQf How significant? suggested FAO code i r Existence Availability Availability for the of critical of of Physical Lowering Raising use values data knowledge Suitability yields costs 1/2/3 1/2/3 1/2/3 1/2/3 #. # # 1/2/3 1/2/3 1/2/3 1/2/3 #. # # Group A: Agro-ecological (growth requirements) 1 2 3 4 5 1 2 9 8 7 10 4 3 A1.1 A1.2 A1.5 A1.4 A1.3 6 8 5 6 7 11a 9 10 11b 12 13a 14 15 11 13b 12 A1.6a A1.6b A1.7 A1.11 A1.10.1 A1.10.2 A1.9.1 A1.9.2 A1.9.3 growing period radiation regime temperature regime air humidity for growth establishment conditions rooting conditions maturity conditions oxygen availability (drainage) moisture availability for growth water availability for irrigation water quality (short-term) fertility: availability fertility: leaching macronutrients NPK micronutrients salinity sodicity toxicities, direct effects of pH diseases, pests, weeds flood hazard physiographic hazards - landslide climatic risks (general) climatic hazards - fire climatic hazards - frosts climatic hazards - wind b j c r d How many levels? Importance Affecting u c h g r i w m m q n n' n zc x y z' p u x p f u' c Group A2: Estimates of forest volume, growth and yield A2.1 A2.2 A2.3 A2.4 present forest stands estimated growth rates estimated survival rates estimated yield of non-timber products Group B: Management 15 16 16 17a 17b 18 19 17 20 water management tillage pre-harvest management B2 harvest management post-harvest management storage and processing B1 mechanization seasonality (opportunity) w k v h h' k j q y Group C: Geography 14 23 21 22 B8 B5 B4 B7 location (transportation costs) adjacency to other uses distance from other uses accessibility proximity to nursery sites access within the production unit shape and size of the parcel l a b Group D: Land improvement 19 20 21 22 23 24 25 26 18a 18b clearing c' land shaping flood protection f' drainage d' levelling (topography) t' physical, chemical & organic ammendma' leaching x' recuperation period r' irrigation works (construction) i' 18c v v' v'' Group E: Conservation and environmental risks 27 28 29 24 25 C1 C2 C3 C4 30 prevention of salinity and sodicity long-term water quality and control erosion hazard land degradation hazard streamflow response vegetation degradation hazard preservation of species (biodiversity) environmental risks xy w e e d v Group F: Sociological and political aspects 31 political entity land tenure farmer attitudes ALES Version 4.65 Users Manual f Page 198 February 1997 Use of this worksheet: Enter 1, 2 or 3 in each of the four columns under 'How significant?', according to the following key For each LUR selected, enter the number of levels that can be distinguished for each of the three reasons under 'How many levels?' Key Importance 1 Large effect on the use 2 Affects the use 3 Little or no effect on the use Existence of critical values 1 frequent (>5% of the area) 2 infrequent (<5% of the area) 3 rarely or never Availability of data with which to evaluate the LQ 1 available 2 obtainable by survey 3 not available Availability of knowledge with which to evaluate the LQ 1 available 2 obtainable by research 3 not available For further information on the Land Qualities... LQi LQr LQf for Irrigated agriculture (Soils Bulletin 55) for Rainfed agriculture (Soils Bulletin 52) for Forestry (Forestry Paper 48) Land characteristics There are three approaches to defining a set of Land Characteristics to serve as the basis for an evaluation: topdown, bottom-up, and middle-out. In the top-down approach, those Land Characteristics are selected which most easily determine the severity levels of the Land Qualities, which have been previously listed as Land Use Requirements for the LUT. In this approach, decision trees to determine Land Qualities from Land Characteristics are usually simple, because of the close correspondence between the qualities and characteristics. There is little or no concern with existing sources of data; it is assumed that values of the Land Characteristics can be obtained as needed, typically by commissioning a new survey. This approach is appropriate, and indeed preferable, if there are no good data sources, and if a new resource inventory can be carried out. Usually, however, there is already a source of resource data available. In the bottom-up approach, the existing data are used to define the set of Land Characteristics. Then, the decision trees to determine severity levels of the Land Qualities from Land Characteristics must use this set. This will usually result in a less than ideal fit, but it has the advantage of using existing data. Different data sets may be used in the same evaluation model. Section 8.4.4 discusses how to reconcile differences between data sets. A combination of the two approaches is the middle-out approach. This begins by applying the top-down approach in its entirety. Now, however, rather than go to the field to determine values for the set of Land Characteristics that was defined by the top-down approach, we instead define another set of Land Characteristics, namely, those that would have been defined in the bottom-up approach. Then we link the two, by using several Land Characteristicto-Land Characteristic inference methods to allow ALES to determine the (unknown) values of the top-down set from the (known) values of the bottom-up set. These methods are: (1) Land Characteristic-to-Land Characteristic decision trees, and (2) inferring from a commensurate Land Characteristic. Land characteristics in ALES can be of three types: (1) discrete and ordered (i.e., ordinal), (2) discrete and unordered (i.e. nominal), and (3) continuous. The following subsections explain each of these in detail. ALES Version 4.65 Users Manual Page 199 February 1997 Discrete, ordered Land Characteristics (with class limits) These Land Characteristics have an underlying continuous scale, for example, °C, % slope, pH, gm cm-3, and so forth. However, ALES decision procedures require that the scale be divided into (two to sixteen) classes that can be used in decision trees. Each class then has a range of values. This is in accordance with the concept that ALES evaluates map units, and there is always variability within map units. For example, a single value of % slope is very rarely applicable to a whole map unit, and that is why most map units are described in terms of a range of slopes, e.g. ‘0-3% slopes’. The number of classes, and the class limits (dividing points) depends on (1) the precision desired in the decision procedure, and (2) the precision obtainable in the field. The second criterion is fairly obvious: we cannot get more precision than can be mapped. With existing inventories, this decision has already been made for us; for example, slopes may have been measured in five classes. So we cannot define more classes than what was measured. The first criterion is more subtle. We are only defining Land Characteristics in order to arrive at severity levels of Land Qualities. The number of these severity levels must correspond to perceptible differences in physical suitability, yields, or levels of inputs. Once this decision is made, it is only necessary to define as many classes of each Land Characteristic as will enable us to place land in one of the severity classes. In general, the number of LC classes is roughly equal to the number of LQ classes. Often a Land Characteristic is used in determining the severity level of more than one Land Quality. For example, slope may be used in decision trees for both erosion hazard and limits to mechanization. In this case, the LC must have enough classes to allow all the relevant LQ’s to be determined. So, for example, if a critical limit for erosion hazard is 12% slope, and a critical limit for mechanization is 15% slope, both these limits must be used as LC class limits. Similarly, a LC is very often used to determine the severity level of a Land Quality in different LUTs. Here again the critical limits may be different, even for the same Land Quality. Again using the example of erosion hazard, in clean-cultivated crops there may be critical limits of 2%, 8%, and 15%, whereas in pasture there may be critical limits of 12% and 25%; all five of these limits should be LC class limits. Discrete, unordered Land Characteristics (without class limits) These Land Characteristics are measured in classes, but have no underlying continuous scale. An example, which might be used in evaluations involving supplemental irrigation, is ‘source of water for irrigation’, with three classes: ‘rainfall’, ‘rivers’, and ‘springs’. These have no natural ordering, they are just three different sources of water. The number of classes of unordered Land Characteristics is determined by the different possibilities; there is usually no problem in determining these. However, if several possibilities always behave the same for the land uses in the evaluation, they can be grouped. For example, a Land Characteristic of ‘parent material’ may have a single class for ‘till, residuum, and colluvium’, rather than have three classes, i.e. ‘till’, ‘residuum’, and ‘colluvium’, if these three parent materials act the same with respect to the proposed land uses. Continuous Land Characteristics These LCs are measured on a continuous scale, for example, pH or % slope. Each homogeneous map unit is described by a single value. The only reason to use this kind of LC is if an existing database only gives single values on a continuous scale. ALES Version 4.65 Users Manual Page 200 February 1997 A continuous LC value can not be used in ALES decision trees. The model builder must set up commensurate discrete LC, and then a continuous-to-discrete inference link as explained below. Then the value of the commensurate discrete LC can be used in decision procedures. Inferring a Land Characteristic from other Land Characteristics ALES provides several methods of inferring the value of a Land Characteristic from one or more other Land Characteristics. This is required in the middle-out approach to defining characteristics explained above. The following subsections explain these methods. Note that in all these methods ALES only performs the inference if it does not already have a (non-inferred) value for the target LC in its database. If a value is directly placed in the database, either from the keyboard or read in from a data file, it over-rides any inferred value. If you want to force the inference, you must delete the value of the target LC from the database first. Continuous to discrete (pigeonholing) Values of continuous LCs are transformed into values of a commensurate (i.e., having the same units of measurement) discrete LC automatically, if an inference link is set up by the model builder. You specify this link in the definition of the discrete LC, by choosing item 5 of menu 1.1.4a (specification options for discrete LCs with units). Tutorial 4 has an example of this procedure. So the LCs are paired: the discrete one, used in the decision trees, and the continuous one, for which data is entered. These must both have the same units of measurement, and the inference link must be set up between them. Discrete to discrete with a decision tree ALES allows you to set up a decision tree for any discrete LC (either ordinal or nominal), by which the values of the LC are determined from any combination of other discrete LCs. This tree looks exactly like a severity level tree, in that the decision entities are LCs, but the decision values are LC classes of the target LC, i.e. the one for which the tree is defined. This kind of tree is appropriate when a more abstract LC, i.e. one that is closer to a Land Quality or is difficult to determine during routine survey, is to be used in severity level decision trees. There may be no data values for this LC. However, data values may be available for a set of simpler LCs, from which the value of the abstract LC can be inferred. For example, consider the LC ‘subsoil permeability’. In some cases this is measured or estimated in the course of routine survey, but some surveyors may not have enough experience to do this reliably, so some published surveys may not include values for this LC. However, soil physicists can infer approximate permeabilities, certainly close enough to place a soil into one of a few classes, using simpler LCs that are routinely measured, such as soil texture, structure type and grade, type of clay, flocculation of the clay, dry and wet consistence, etc. The expertise of this soil physicist can be codified in the LC-to-LC decision tree, so that data values of the ‘higher-level’ LC, permeability, can be inferred by ALES from data values of the ‘lower-level’ LCs just mentioned. The advantage of using this sort of tree is that the model builder can use higher-level, more abstract LCs in the severity level decision trees, thereby making them easier to build (fewer factors need be considered) and more accurate (the LCs are closer to LQs), while still being able to use low-level soil survey data that have already been collected. ALES Version 4.65 Users Manual Page 201 February 1997 Discrete to discrete by linear interpolation ALES allows you to set up an inference link between two discrete LCs that share the same unit of measurement (i.e. are commensurate), in exactly the same manner as an inference link is set up between a continuous and a discrete LC. A typical use of this feature would be to go from a Land Characteristic for which data is available, to a similar Land Characteristic used in a severity level decision tree. The LC used in the severity level tree is typically selected in a top-down manner, i.e. according to the severity levels that were to be determined. The LC for which data is available is typically found in an existing resource inventory, such as a soil survey. For example, if a soil survey is available with slopes reported in classes 0-3%, 3-8%, 8-15%, 15-30%, and >30%, but the ALES model was set up to use a ‘slope’ LC with different classes, e.g. 0-5%, 5-12%, 12-25%, and >25%, the model builder would set up a second slope LC, called, for example, ‘slope-ss’ (meaning slope, from the soil survey), and then set up the link in the definition of the LC to be inferred, i.e. the one that is to be used in the severity level decision trees. An obvious problem with this sort of inference is that the class limits may not match, so that a value of the base LC may be assigned to more than one value of the inferred LC. In the example above, what value of ‘slope’ should be assigned to a map unit with a ‘slope-ss’ value of ‘5-12%’? This range overlaps two classes of ‘slope’, namely 3-8% and 8-15%. The land unit could in fact all be in the first class (if the slopes are all less than 8%), all in the second (if the slopes are all greater than 8%), or some land could be in each class. ALES assumes that the land is uniformly distributed among the inferred classes, according to the proportion of the range of each class. In the current example, ALES would assume that (8-5)/(12-5) or 43% is in the 3-8% class, and that (12-8)/(12-5) or 57% is in the 8-15% class. Similar calculations can be carried out for any two sets of ranges. In the situation where a range of an inferred class is wider than the range of a base class, all the values of that base class will end up in the same inferred class. But in general, the inference procedure will result in a multi-valued Land Characteristic value. In the current example, it would be: 3-8% (p = .43), 8-15% (p = .57). Note that ‘p’ in this syntax is a proportion, not a probability. The multi-value is propagated as described in the section on multi-values, below. Continuous to continuous by formulas ALES allows the model builder to enter mathematical formulas with which to calculate the value of a continuous Land Characteristic (LC) from a set of other continuous LC’s. Typically the derived LC is more complex and less easily measured than the base LC’s. For example, the predicted soil loss by water erosion, in units of T ha-1, could be computed from the silt content, very fine sand content, proportion of the soil surface covered by stones, and slope, all measured in percent. A formula is not appropriate for discrete (classified) data. In this case you should use a LC-to-LC decision tree. An example would be inferring hydraulic conductivity (fast, medium, slow) from particle size class (sand, sandy loam, ...), structure (granular, blocky, prismatic...), vertic characteristics (none, weak, strong) etc. In this example, all the base LC’s are discrete; there is no valid way to combine them with a formula. Instead, a decision tree can be used to combine their classes. As with any continuous LC, those that are determined by formulas must be related to a commensurate discrete LC to be useful in ALES evaluations. This is explained above. Formulas are evaluated when ALES needs the value of the continuous LC for which the formula is defined. These in turn are evaluated when ALES needs the value of the discrete LC which is inferred from the continuous LC. These in turn are evaluated when ALES is traversing a severity level decision tree which uses the discrete LC. ALES Version 4.65 Users Manual Page 202 February 1997 Note that formulas can refer to continuous LCs that themselves are computed by formulas.1 If you would like to compute values of inferred LCs that are not yet used in the evaluation, or if you want to force them to be evaluated for all map units, select option 9 ‘Infer Land Characteristic values’ of menu ‘1.3 Data’. Formulas are entered for continuous LC’s, with option ‘3 Infer by a formula’ of menu ‘1.1.4c Specification options for continuous LC’. They can have the following components: 1. Constants, i.e. numbers (integer or decimal), e.g. ‘13.4’ 2. Variables, i.e. the Land Characteristics whose values should be substituted into the formula. If the LC code contains punctuation that could be confused with mathematical operators, you must write the code between quotes, e.g. LC code ‘c-N’ could be confused with LC code ‘c’ minus LC code ‘N’; LC code ‘abs’ could be confused with the function for absolute value. 3. Arithmetic binary operators: +, -, *, /, \ (integer division), # (modulus) ** (exponentiation) 4. Logical binary operators: = (EQ), '= (NEQ), > (GT), >= (GE), < (LT), <= (LE), & (AND), '& (NAND), ^ (OR), '^ (NOR). The prefix ' means NOT, e.g. '& stands for NAND. The written forms, e.g. AND, are alternate ways to enter the operator, e.g. ‘&’. 5. Unary mathematical functions: ABS, LN, LOG, EXP, SQR (square root), SIN, COS, TAN, CSC, SEC, COT (argument in radians) 6. The ternary conditional operator IF: syntax: IF(truth_condition, value_if_true, value_if_false), where ‘truth_condition’ uses logical operators (AND, OR etc.) and ‘value_if_...’ is any legal formula Formulas are entered with standard algebraic notation; operators have the usual precedence: exponentiation, multiplication and division, addition and subtraction. Examples of valid formulas: 1a. SQR(dbr)/clay**1.5 In standard math notation this is: dbr / clay3 . Note that this is different from: 1b. SQR(dbr/clay**1.5) or, equivalently, SQR(dbr/(clay**1.5)) Both of which are, in standard math notation: dbr clay3 2. IF(dbr>1.5,cfsub/2,cfsup*0.35) In standard math notation this is: if (dbr > 15 . ) then cfsub else cfsup∗0.35 2 1That is, the formula evaluation is recursive. ALES Version 4.65 Users Manual Page 203 February 1997 Computing Land Characteristic inferences directly In normal use, ALES automatically uses inferences only when necessary to determine Land Quality values, i.e., when it computes the evaluation matrix. Thus a Land Characteristic must be used either in (1) a severity level decision tree or (2) as the inference basis of another LC that is so used. In other words, if ALES doesn’t encounter a LC during its traversal of the decision trees, it will not infer its value. In addition, if the model user has directly entered a value for a Land Characteristic, ALES will not infer it during the computation of Land Qualities, even if there is an inference link set up for the derived characteristic. The idea here is that the model user must have had more specific information about a map unit if a value was entered. Both of these problems can be overcome with the use of Option 9 ‘Infer Land Characteristic values’ of Menu 1.3 ‘Data’, or with the ‘Alt+F3’ key from the data entry matrix (reached with Option A ‘Edit data in a matrix’ of Menu 1.3). If either of these are selected by the model user, ALES will infer values of the set of derived LC’s specified by the user, thus over-writing any directly-entered values. The idea here is that the model user is directly asking ALES to infer values. To see the values of derived LC’s not used to determine LQ’s, the model builder must set up a data entry template which includes these LC’s, and then display the data entry form or matrix using this template.. Modifying Land Characteristic definitions ALES is designed for incremental model-building, and so allows you to change everything about the model. In particular: Land Characteristic classes can be added or deleted from both LCs with units (Menu 1.1.4a, Options 7 & 8) and without (Menu 1.1.4b, Options 5 & 6) Land Characteristic codes can be changed (Menu 1.1, Option 4, select the LC to recode, then Alt+F6) All decision trees and LUTs will be adjusted accordingly. Decision procedures The heart of an ALES model is the set of decision procedures by which land suitability may be assessed. There are several steps to this, as explained in the computation diagram of Appendix 3. The following sections explain the different decision procedures used in ALES models. Determining physical suitability subclasses The FAO method differentiates between physical suitability classes and subclasses. Classes are used to express the overall physical suitability rating on a scale of 1 (completely suitable) to some maximum (physically unsuitable); the FAO framework suggests that four classes be used, corresponding to (1) complete suitable (‘S1’), (2) suitable (‘S2’), (3) marginally suitable (‘S3/N1’), and (4) physically unsuitable (‘N2’). Within each class, subclasses are used to designate the kind of limitations or other qualities that result in the placement of a map unit in the class. Subclasses can be used as management groupings. For example, subclass ‘4e/me’ might indicate land that is unsuitable because of high risk of erosion (‘e’) and difficulties for mechanization (‘me’). The FAO provides suggested lists of LQ codes in its various ‘Guidelines’. In ALES, the model builder can use either classes or subclasses as the result of a physical evaluation; it is suggested that subclasses be used, as they are more informative, providing as they do a list of the kind of limitations present, hence the management problems. ALES Version 4.65 Users Manual Page 204 February 1997 ALES has two ways to determine the physical suitability subclass of a land unit for a Land Utilization Type from the severity levels of Land Qualities. 1. In the most general case, the model builder may construct a physical suitability subclass decision tree, which ALES follows during computation of physical suitability, to combine severity levels of LQs into a composite physical suitability. 2. A more restricted case is the maximum limitation method, in which the model builder specifies that the maximum value of one or more LQs shall determine the composite physical suitability. As explained below, these two can be used together. Physical suitability subclass decision trees These trees (Menu 1.2.8, Option 1) allow the model builder to assign specific physical suitability classes or subclasses to any combination of severity levels of Land Qualities. The evaluator can omit some Land Use Requirements from the tree (e.g. because they do no affect physical suitability, only yields or inputs), and can weight some requirements more than others. The result class numbers do not have to correspond to the severity level class numbers. For example, if it has been decided to only use two physical suitability classes, (1) suitable, (2) unsuitable, but you have also decided to rate Land Qualities in four severity levels, then you would probably want to associate severity level 4 with physical suitability class 2. With the decision tree, you can do this by entering ‘2’ at the appropriate leaves of the tree. When entering a subclass designation, ALES allows the evaluator to append to the class number as many limiting qualities as are on the current path. The suffixes can be in any order. In this manner, the evaluator can (1) omit some qualities, thereby emphasizing the others, and (2) order the suffixes to indicate the most important ones first. The maximum limitation method In this method, the model builder specifies (Menu 1.2.8, Option 2) the set of Land Use Requirements whose corresponding LQs are to be considered limiting. During computation of physical suitability, ALES examines the severity levels of the specified LQs, and assigns the physical suitability class from the highest-numbered severity level. It then appends to the suitability class the Land Use Requirement codes for the Land Qualities that were most limiting, resulting in a subclass. For example, consider a map unit with the following ratings: LQ ‘a’: 1/3 (i.e. 1 on a scale of 1 to 3), LQ ‘b’: 3/5, LQ ‘c’: 3/3, LQ ‘d’: 2/2. Suppose in addition that physical suitability is measured in four classes. Then the physical suitability subclass, by the maximum limitation method, would be ‘3b/c’. For this method to be meaningful, the degree of limitation of a particular severity level number must be equivalent or commensurate over all the Land Qualities, and the number of physical suitability classes must be the same as the maximum number of severity levels. For example, severity level 3 for erosion hazard must be, in some sense, equally ‘as bad as’ severity level 3 for nutrient availability, and severity level 3 for flood hazard. It is not required that the highest severity level be the same, since some Land Qualities may never be as limiting as others. Combining the two methods If the evaluator defines both a physical suitability subclass decision tree and a set of maximally limiting Land Use Requirements, ALES will first use the tree to determine a provisional physical suitability subclass. It will then examine the severity levels of the maximally limiting LQs, not including any that were already taken into consideration by virtue of having been included in the decision tree, and modify the provisional subclass if necessary to append any equally-limiting LQs, or replace the subclass with more limiting LQs. ALES Version 4.65 Users Manual Page 205 February 1997 Determining proportional yield Predicting the proportional yield, i.e. the percentage of the optimum, for an output of a Land Utilization Type, involves three model components, all of which are based on the actual severity levels of Land Qualities: a proportional yield decision tree, a set of multiplicative yield factors, and a set of limiting yield factors. Any combination of these three components can be used. (If none are defined in the model, the proportional yield is assume to be 100%.) As a general rule, (1) as a first approximation, specify limiting yield factors for all LQs that can affect yield for a simple no-interactions model; (2) specify multiplicative yield factors for LQs that reduce land area or number of harvest independently of any other factors; (3) use a proportional yield decision tree to specify known interactions between LQs. Proportional yield decision trees The most general way to assign proportional yields is to use severity levels of Land Qualities as decision entities in a decision tree (Menu 1.2.6, Option 2). The advantage of this method is that it allows all interactions to be taken into account. The model builder can specify a proportional yield, on the interval 0 to 1, for each combination of severity levels of the Land Qualities that are in this proportional yield decision tree. The disadvantage of this method is that , if many factors are to be considered, the tree may become excessively large and unwieldy. If some Land Qualities affect yield in essentially a strictly multiplicative or limiting manner, the model builder can leave them out of the proportional yield decision tree, and account for them in one of the following two methods. Multiplicative yield factors Some Land Qualities affect yield in a multiplicative fashion. More precisely, we may say that if a land unit has a certain severity level assigned to one of these Land Qualities, the optimum yield must be multiplied by a factor between 0 and 1 to arrive at the predicted yield. If there is more than one of these qualities in an evaluation, all such factors are multiplied together. For these Land Qualities, there is a shortcut to using them in proportional yield decision trees, i.e., assigning multiplicative yield factors. The disadvantage of this method is that it assumes that several yield-limiting factors multiply to predict final yield; usually this prediction is too pessimistic. As a simple example, suppose that all the n LQs in a model have the same number of severity levels m, each with the same multiplicative yield factors (f1, f2, …, fm ). For a map unit with all LQs rated in level l, the predicted yield is (fl)n, i.e., the factor raised to a power. Since f ≤ 1, in general this product will be small. For example, with l = 2, fl = .9, n = 6, the predicted yield is (.9)6 = 0.53. In words, six factors, each reducing yield by 10%, when multiplied, predict a 53% yield. This may or may not be realistic. The model builder may use multiplicative yield factors (Menu 1.2.6, Option 3) to partially or completely replace proportional yield decision trees. In preliminary stages of model building, it may be useful to define only yield factors, and no tree. The model builder can then examine the predicted yields to see which interactions need to be taken into account by means of a proportional yield decision tree. In the actual calculation, if a particular Land Quality has been encountered in the decision tree path, any proportional yield factor that it may have is ignored. Since the tree has precedence over the yield factors, there is no harm in leaving the factors in the model, even for LQs which are included in the tree. Limiting yield factors Some Land Qualities affect yield according to the agricultural law of the minimum, namely, that the most limiting factor determines yield. More precisely, we may say that if a land unit has a certain severity level assigned to one ALES Version 4.65 Users Manual Page 206 February 1997 of these Land Qualities, the yield can be no higher than this minimum. For these Land Qualities, there is a shortcut to using it in proportional yield decision trees, i.e., assigning limiting yield factors. The disadvantage of this method is that it assumes that several yield-limiting factors do not interact to predict final yield; usually this prediction is too optimistic. For example, in the example of the previous section, the six LQs all rated at 90% of optimum yield would predict 90% yield; it doesn’t matter if there are one or a hundred limitations. The model builder may use multiplicative yield factors (Menu 1.2.6, Option 4) to partially or completely replace proportional yield decision trees. In the actual calculation, if a particular Land Quality has been encountered in the decision tree path, any limiting yield factor that it may have is ignored. Land Quality severity-level decision trees The severity levels of a Land Quality, corresponding to a Land Use Requirement, can only be determined in one way: from a set of discrete Land Characteristics (either ordinal or nominal), by using a decision tree. Thus the model builder must build one severity level decision tree for each Land Use Requirement in the LUT specification. Otherwise, an LUR can not be used in the decision procedures for physical suitability. Missing data: using alternate data sources in decision trees ALES provided several ways to deal with missing data. First, if a particular data value is not required during the computation, the evaluation can proceed without problems. For example, on land that is very rocky, we may not have chemical analyses. If the rockiness is used to place the land in the ‘unsuitable’ physical suitability class (i.e. the rockiness is a criterion in the physical suitability class decision tree), ALES will never need to determine the fertility, so will never need the missing chemical analyses. Sometimes a value of one data item can be inferred from another; this is covered above, under ‘Land Characteristics’. The model builder can specify alternate criteria to be used in a decision tree, when a data value is missing. This is the purpose of the ‘unknown’ branch, marked with a ‘?’, in each decision tree. A subtree can be placed at this branch, which will be followed in the case of missing data for the entity at the current level. This allows the model builder to express the idea of using one type of data ‘or’ another. For example, in the Fertility Capability Classification (Sánchez et al. 1982), most fertility limitations, which in ALES correspond to Land Qualities, can be determined by several methods, which are ranked in order of preference. Section 3.2.3 of this User’s Manual gives an example, for the LQ ‘high P-fixation by iron’. The preferred diagnostic criterion is the LC ‘ratio of free Fe2O3 to clay in the topsoil’; however, if this is not available, the LCs ‘hue of the topsoil matrix’ and ‘topsoil structure’ may be used instead. This is expressed in the ALES decision tree by rooting a subtree, containing the decision criteria ‘hue of the topsoil matrix’ and ‘topsoil structure’, at the ‘Unknown’ branch for the LC ‘high P-fixation by iron’. Controlling complexity in decision trees A problem with decision trees is that their size, measured as the number of leaves, grows exponentially with the number of factors considered. A practical limit is about six factors; beyond this the size of a complete tree is prohibitive. As a rule of thumb, branches should have four or fewer factors should A detailed mathematical analysis of this process may be found in Rossiter (1988a); a summary is presented in this and subsequent sections. There are two appropriate measures of size for a set of decision trees, namely: (1) the number of leaves, designated by N, and (2) the number of trees, designated by T, in the set. The size of a complete decision tree is inherently exponential in the number of discriminant entities considered (e.g. LCs in a severity level decision tree). ALES Version 4.65 Users Manual Page 207 February 1997 Consider a complete decision tree of n entities, each with m branches or choices (this m is also called the branching factor). Such a tree will have N = mn leaves, so that as each new decision entity is added to the tree, the number of leaves is multiplied by the branching factor of the new entity. Trees can get very large very quickly. In ALES the decision entities have branching factors (number of classes) of at most 9 (LURs) or 16 (LCs), with 4 being a typical value. So if we consider only six entities, we would already expect a complete tree of 46 = 4096 leaves. Fortunately, there are ways to control this inherent complexity; the following sections explain these methods. Constants vs. variables As in mathematics, also in land evaluation we can talk about constants, i.e. data values that do not vary over the entire area to be evaluated, and variables, which do vary. A model that incorporates only a narrow range of Land Utilization Types, and is meant for application in a small area, will not need to consider many variables, because over the range of applicability of the model, they are constants. Conversely, a wide-ranging model will have many variables. A good example of the effect of the number of variables on model size is erosion hazard (see, for example, Hudson 1981 or 1995). The Universal Soil Loss Equation considers rainfall erosivity, soil erodibility, crop management, and conservation practices. So it would seem that all these would have to be considered when constructing a severity level decision tree for erosion hazard. However, within the context of a single LUT, the crop management and conservation practices are constant, since they are part of the LUT definition. Hence the decision tree need only consider the first two factors, with the others held constant and used in determining the final values. Continuing with the same example, in a limited geographical area with a single rainfall regime (e.g. intensity of severe storms, total rainfall, average rainfall intensities), the rainfall erosivity could be considered a constant, and hence omitted from the decision tree. There is a trade-off here: if your model is only of limited applicability, you can treat many things as constants, so that your decision trees are small. On the other hand, if you want your model to be of wide applicability, you must consider more variables, resulting in larger decision trees. Make decisions early The easiest way to control complexity is to first consider the factors that will allow you to reach a decision as early as possible. In this way, the tree need not have the same path length to all decisions. For example, if flooding absolutely prohibits a certain use, it would make sense to put a Land Quality of ‘flood hazard’ first in a physical suitability decision tree, with the decision for the classes other than ‘no flood hazard’ being already the highest class (i.e. not suitable). Include only the most significant factors In general, the severity levels of Land Qualities depend on many Land Characteristics. The model builder’s first instinct is to try to include all of these in the decision tree. In most cases, however, a subset of all the relevant LCs can be used, with very little loss of precision in the final decision. A smaller tree is a better tree, for two reasons: (1) it is easier to build and modify, and (2) it is easier for the model user to understand. The smallest tree that can correctly assign severity levels for almost all cases is the best tree to build. A similar situation occurs when building proportional yield decision trees. Some Land Qualities have only a small influence on yield, either always or given some combination of severity levels of other Land Qualities. These can safely be omitted from the yield trees, since their inclusion will not significantly affect the predicted yield. Given that the precision of the input data is not great (e.g. most class ranges are at least 10% of the total range for a Land Characteristic), it is not realistic to predict yield more precisely. Hence if you are about to add a Land Quality to a decision tree, and the different severity levels of that LQ would only affect yield by 10%, it is probably a correct decision to leave the Land Quality out of the tree. ALES Version 4.65 Users Manual Page 208 February 1997 Introduce intermediate Land Characteristics The ability to create LC-to-LC decision trees allows the model builder to break a large severity level decision tree into several smaller components: a severity level decision tree whose decision entities are abstract or ‘high-level’ LCs, and a set of LC-to-LC decision trees to infer values of the high-level LCs from other LCs. In fact, ‘intermediate’ LCs can be set up by the model builder specifically to group sets of related low-level LCs to reduce the size of severity level decision trees. If the original set of LCs in a decision tree is combined pairwise into intermediate LCs, the total number of leaves needed to express the same inference that required mn leaves in the original tree is m(n/2) + (n/2)m2. The branching factor m is raised to a lower power, in fact half of the original. However, the number of trees T has increased from 1 to (1 + n/2). As a simple example of the savings which may be obtained by such a pairing, consider a realistic problem in land evaluation: the determination of the severity level of the ‘climate’ Land Quality for tea in Sys (1985, p. 316) from eight Land Characteristics, each with four classes (possible values). Here n = 8, m = 4, so that the size of the complete tree would be 48 = 65536, which is prohibitively large. Introducing four intermediate Land Characteristics, each pairing two of the original eight Land Characteristics, would result in five trees with a total of 44 + 4*42 = 320 leaves, a realistic number. This divide-and-conquer strategy can be continued by combining the intermediate LCs pairwise into another level of intermediate LCs. Theoretically this results in greater savings, but in the size of problems likely to be encountered in ALES, the benefits are not great. LCs can be combined in any number, not just in pairs. Grouping more LCs into each intermediate LC results in more total leaves, but fewer trees. For example, in a set of trees with n = 16 decision entities, each with m = 4 classes, dividing into groups of 4 entities as opposed to pairwise would result in a third as many trees, and about 16 times the number of leaves. This is a substantial difference, but not as dramatic as the difference from introducing intermediate LCs in the first place. This abstract discussion has up to now avoided the most important point to be considered by the model builder: for this divide-and-conquer strategy to be valid, Land Characteristics to be combined into intermediate LCs must not interact differently from each other with the remaining entities in reaching the final decision. The combinations to use, as well as the degree of splitting, should be suggested by the nature of the entities. In practical terms, each tree should not have a path length greater than four, and a length of three is more easily manageable. Also for the understanding of the model user, a series of smaller trees breaks down the reasoning into more easilycomprehended steps. Continuing with the previous example from Sys (1985), a model builder might decide to combine the two characteristics ‘length of dry season’ and ‘length of dormancy’ into a derived characteristic named ‘lengths’, combine the two characteristics ‘mean annual temperature’ and ‘mean minimum temperate’ into a derived characteristic named ‘mean temperatures’, combine the two characteristics ‘average minimum temperature of coldest month’ and ‘average maximum temperature of warmest month’ into a derived characteristic named ‘average max/min’, and combine the two characteristics ‘annual rainfall’ and ‘relative humidity’ into a derived characteristic named ‘moisture’. Each tree will have 42 = 16 leaves, and four possible results, corresponding to the original m. These four derived characteristics can be combined into a single tree, having 44 = 256 leaves. The total number of leaves will be 320, and there will be five trees. These are certainly manageable and understandable numbers. This example is typical of the size of decision tree sets found in land evaluation problems. ALES Version 4.65 Users Manual Page 209 February 1997 Multi-valued land data Usually, each map unit in an ALES database has a single data value for each Land Characteristic used in the evaluation model. Occasionally, however, it may be necessary to describe a map unit with more than one data value. For example, within a single map unit there may be lands of several slope classes. The best way to handle this sort of situation is to define compound map units, and enter single-valued data on their homogeneous constituents. However, it is possible in ALES to enter a multi-value in place of a single data value for a Land Characteristic. The data entry syntax to enter a multi-value is as follows: val=prob,val=prob,...,val=prob where ‘val’ represents a permissible data value, and ‘prob’ represents a linear probability, in the interval (0,1). The probabilities in the entire multi-value must sum to 1.0. A multi-value may be entered for any data item in a data entry form.1 For example, if a map unit is described as being composed of 60% somewhat poorly and 40% poorly drained soils, in close proximity and inseparable on a map, when asked for the drainage class in a data entry form, we would enter: spd=.6,pd=.4 Note that 0.6+0.4 = 1.0, as required. This is an example of a spatial series of related data. Another example is a time series of climate data. In this case, the proportions are typically derived by dividing the frequency of a data value in the series by the total length of the series. When ALES encounters a multi-value in its evaluation, it evaluates each case in the multi-value separately, and combines the individual results. It is not necessarily true that the evaluation results will be multi-valued, since there might be no difference from the point of view of a land use between the values. In the previous example, if a Land Utilization Type is not appropriate on any but well-drained soils, the multi-valued drainage class would reduce to a single result. The meaning of the proportions is not based on a rigorous definition of probability. We can look at these linear proportions two ways: either that, say, 60% of the land area has rating 1, or that it is 60% certain that all the land has rating 1. For soil or other space-series characteristics, the first interpretation is usually preferable. For climate or other time-series characteristics, the second interpretation is usually correct. Working with multiple datasets Option 8 ‘Erase the Database’ of Menu 1.3 ‘Data’ allows the evaluator to delete all map unit definitions and data, leaving an empty ALES data base (you will be asked for confirmation before ALES actually deletes the data). The effect is the same as if you deleted each map unit in turn with the F4 key when viewing the list of map units when selecting a map unit description for editing (Menu 1.3, choice 1). 1 The ‘pop-up’ feature of selecting among a set of classified data values can’t be used when entering a multi-value, as this method can only select a single data value. ALES Version 4.65 Users Manual Page 210 February 1997 Why would anyone want to erase the database? Mainly to allow the testing or use of a model (knowledge base) with more than one dataset. Along with several other options in Menu 1.3 ‘Data’, multiple datasets can easily be evaluated with the same model. The basic idea is that you maintain datasets in relational tables (i.e. disk files with one line per map unit), for example, by writing first the definitions, and then the data, to disk with ‘Data’ menu options 3 and 6, respectively. When using option 6, you can save all the Land Characteristics in one relational table by defining a template that contains fields for every Land Characteristic. Or, you can split the database into multiple files, each with its own template. For example, you might decide to put soils data in one relational table, and climate data in another. In any case it is important to make a note of which template you used to write the data, as you will have to tell ALES which template to use when you reload the same data. The Chapter ‘Maintaining an ALES system’ gives additional information about these disk files. Once you have saved a dataset (both the map unit definitions and their data) outside of ALES, you can select Option 8 of Menu 1.3 ‘Data’ to erase the entire dataset from ALES. Now you can create a new dataset for analysis. You can do this from the keyboard within ALES (using Options 1 and 4 for the map unit definitions and data respectively) or you can read a prepared dataset in from a relational table (using Options 2 and 5 for the map unit definitions and data respectively). If you read from a file, you will have to specify the template that lists the Land Characteristics for each field. The prepared dataset may have been created by some other program (e.g. a database manager) or it could be the result of saving an ALES dataset as described above. ALES Version 4.65 Users Manual Page 211 February 1997 ALES and other computer systems ALES can exchange information with other computer systems, including: √ Relational Data Bases that use or can read the xBase file format (e.g., dBase III+, dBase IV); √ The IDRISI Geographical Information Systems (GIS), as well as any GIS that store their attributes in xBase-format files, including PC-ARC/INFO and PC-ArcView. √ Word processors (e.g., Microsoft Word) and text editors (e.g., Epsilon, DOS Edit, Notepad); and √ Spreadsheets (e.g., Quattro Pro, Microsoft Excel, Lotus 1-2-3). This Chapter explains what options are provided and in what circumstances they would be used. The final section gives the details of the file formats used for data exchange, in case you have to read or write these files directly. ALES as part of an Integrated Land Evaluation System ALES can be part of an integrated land evaluation system, with other programs serving both preprocessing (i.e., before ALES) and post-processing (i.e., after ALES) functions. This section contains a diagram of a typical land evaluation system, and also some examples of why and how you would use other systems with ALES. There are four kinds of information that can be exchanged between ALES and other computer systems [the ALES Menu and Option for each exchange are listed in brackets]: (1) Land Mapping Unit definitions (1.1) from a delimited ASCII file to ALES [Menu 1.3 Option 2] (1.2) from an xBase-format database to ALES [Menu 1.8 Option 1] (1.3) from ALES to a delimited ASCII file [Menu 1.3 Option 3] (1.4) from ALES to an ASCII text file [Menu 1.5 Option 4] (2) Land Mapping Unit data (Land Characteristic values) (2.1) from a delimited ASCII file to ALES [Menu 1.3 Option 5] (2.2) from ALES to a delimited ASCII file [Menu 1.3 Option 6] (2.3) from ALES to a delimited ASCII file, in spreadsheet format [Menu 1.3 Option A, F7] (2.4) from a delimited ASCII file in spreadsheet format to ALES [Menu 1.3 Option A, F8] (2.5) from ALES to an ASCII text file [Menu 1.5 Option 5] (2.6) from an xBase-format database to ALES [Menu 1.8 Option 3] (2.7) from ALES to an xBase-format database [Menu 1.8 Option 4] (2.8) from ALES to an IDRISI raster image [Menu 1.7 Option 1] (2.9) from ALES to an IDRISI values file [Menu 1.7 Option 3] (3) Evaluation results [Physical & economic suitability classes, financial indicators, yields, Land Qualities, input amounts] (3.1) from ALES to an ASCII text file [Menu 1.5 Option 1, Menu 1.4 Option 3] (3.2) from ALES to a delimited ASCII file, in database format [Menu 1.4.4 Options 1 - 4] (3.3) from ALES to a delimited ASCII file, in spreadsheet format [Menu 1.4.4 Option 5] (3.4) from ALES to an xBase-format database [Menu 1.8 Option 5] (3.5) from ALES to an IDRISI raster image [Menu 1.7 Option 2] (3.6) from ALES to an IDRISI values file [Menu 1.7 Option 4] ALES Version 4.65 Users Manual Page 212 February 1997 (4) Model components [LUTs, LCs, LURs, Inputs, Outputs, Decision Trees, Notes, I/O templates] (4.1) from ALES to an ASCII text file [Menu 1.5 Options 2, 3, and 6 through B] (4.2) from ALES to a delimited ASCII file [Menu 1.5 Options C through F] Before ALES (Pre-processing) A common reason for reading map unit definitions and data into ALES is that there is an existing database with the appropriate information, and reading it directly into ALES not only saves typing, but ensures consistency between the two databases. This situation might arise if there is a national soils database which contains land unit definitions or data. Although ALES provides a way for continuous Land Characteristic values to be combined according to formulas, you might find it easier to perform simple manipulations, e.g. of laboratory data, in a spreadsheet or database, and then import the calculated data values to ALES. A typical example is if lab data must be weighted by horizon thickness in order to compute available water capacity to some depth, or if the horizon including a particular depth must be identified. Another pre-processing operation is the definition of Land Mapping Units by GIS overlay of several source maps (soil types, climate zones, political divisions, etc.). If the GIS uses xBase-format tables to store map unit definitions (e.g., as in PC-Arc/Info) you can use the ALES ⇔ xBase interface; otherwise you must use intermediate ASCII files. In IDRISI you would use the CROSSTAB command to define homogeneous zones, assign them map unit names with DOCUMENT, and then format the documentation file in a spreadsheet to create the ASCII file. After ALES (Post-processing) A common reason for writing land unit definitions or data from ALES is to make these available to a another database program, for example, a natural resources database. This would be useful if the data was originally prepared within the ALES environment. ALES can be used as a data collection system, either in data entry or consultation mode, which may be easier to use than commercial database systems. Evaluation results are written from ALES in order to further process them with GIS, spreadsheets, linear programs, and other programs that perform analysis that is beyond the scope of ALES. ALES predicts the performance of each land mapping unit in isolation. However, a land user typically needs a mix of different enterprises (LUTs) in an integrated operation. For example, dairy farm needs a certain proportion of grain crops, forage, and pasture. A planning unit, such as a municipal council, has similar constraints with respect to kinds of land use. Allocation of land in the correct proportion can be done with an optimization program, with the input data to the program being the results of the ALES evaluation, including economic metrics such as gross margin, and amounts of inputs needed on each land mapping unit.. ALES evaluates map units or delineations. In many applications the geographic location, with respect to roads, other map units, villages etc. is important. Although the geographic characteristics of each individual delineation can be input into the ALES database, it is usually more convenient to conduct the geographical analysis in a GIS. The ALES evaluation results, predicted yields, and individual Land Quality ratings can be used as data overlays in the GIS. ALES Version 4.65 Users Manual Page 213 February 1997 Diagrams The following diagrams show ALES as part of an integrated land evaluation system that also includes a soils and laboratory database programs, and vector- and raster-based GIS1. In this example, a special interface program is included to extract information from the soil survey and soil laboratory databases, and compute Land Characteristics2 that will be used in ALES decision trees. 1 These are modified from the integrated land evaluation system of the Second Land Resource Evaluation and Planning Project, Part C. Strengthening Soil Resources Mapping, Centre for Soil and Agroclimate Research, Bogor, W. Java, Indonesia. 2 For example, available water capacity to a specified depth. ALES Version 4.65 Users Manual Page 214 February 1997 ALES as part of an Integrated Land Evaluation System (1) Soil Laboratory Analysis DataBase Field Observation & Sampling Soil Sample s Laboratory Analysis Data Entry Laboratory results Data Entry Comput e LCs Data transfer Sites, Series, & Mapping Units DataBases Site & Horizon (S&H) DataBase Define Series & Select Representative Profiles Reference Soil Series (RSS) DataBase ALES Interface Define Mapping Units Mapping Unit (MU) DataBase LMUs LCs ALES Land Characteeristics B Export to ArcView or IDRISI Map Units, Series, & Land Data for ALES Build ALES Models ALES Knowledge Base ALES DataBase Compute Evaluatio n A Export to ArcView or IDRISI ALES Version 4.65 Users Manual ALES Evaluation Results Matrix ALES V4.6 Automated Land Evaluation System Page 215 Expert Knowledge of Land vs. Land Use February 1997 ALES as part of an Integrated Land Evaluation System (2) B Land Characteristics A Evaluation Results Digitize & Attribute Land Map Units ALESxBase Interface ArcEdit, Tables ALIDRIS ArcEdit GRID, then ERDIDRIS IDRISI Base Map SPT.01 Polygon Attribute Table SPT.05 SPT.05 SPT.06 SPT.07 ArcPlot ArcView 1 ArcView 2 SPT.01 Vector Base Map IDRISI Suitability, LC, & LQ Maps mwd N2 vpd N2 vpd wd S1 S3eh mwd LUT 1 LUT 2 LUT 3 Land Characteristics & Land Qualities Land Suitability Maps ALES Version 4.65 Users Manual mwd Page 216 February 1997 Interfaces with relational databases: the ALES ⇔ xBase interface ALES V4.6 and later includes an interface with xBase-format database files. This popular database format is used by the PC-Arc/Info and ArcView GIS programs, as well as by dBase III+, dBase IV, Clipper, and FoxPro. Some other databases, e.g. Paradox, can work directly with xBase tables, even though they have another, native, database format. How to use the ALES ⇔ xBase interface The following discussion assumes that the reader is familiar with both ALES and some database program which uses the xBase file format. Terms such as field, data type, table, etc. are used as they are defined in the respective programs. The interface appears as item 8 in the main menu of ALES. When this option is selected, you are presented with the ALES ⇔ xBase Menu [1.8]: 1.8 ALES <--> xBase Transfer 1. Edit import/export templates 2. Import Land Mapping Unit definitions from xBase to ALES 3. Import LC values from xBase to ALES 4. Export LC values from ALES to xBase 5. Export evaluation results from ALES to xBase To transfer information between ALES and xBase tables, you must first define an interface template (Option 1) which specifies the file name of the xBase table, the key field, and the list of fields in the xBase table to transfer, along with their correspondence to ALES tables. Then you can select one of the other Options, each of which uses a specific type of template. Defining ALES-xBase import/export templates You will first be asked for the type of transfer which the template describes: (1) import LMU definitions, (2) import constituent of compound LMUs, (3) import or export LC values (the same template serves for both directions in this case), (4) export evaluation results. For all types of templates, you must always enter the DOS file name of the xBase table which will be the source or destination of the transfer. You must also enter the xBase key field, which must contain the ALES Land Mapping Unit (LMU) code: ALES LMU ≡ xBase key field It is easiest to use the F3 ‘popup’ menu to select the xBase key field. The further correspondence between ALES and xBase fields depends on the type of transfer: (1) Import Land Mapping Unit definitions To import LMU definitions (Menu 1.8.2 Options 1 & 2), you may also specify a xBase field for the map unit descriptive name and for the area it covers; both of these are optional. (2) Import constituents of compound Land Mapping Unit In addition, if the LMU is compound (Menu 1.8.2 Option 3), there is a relation between a secondary key field and the homogeneous LMU (constituent): ALES Version 4.65 Users Manual Page 217 February 1997 ALES homogeneous constituent LMU ≡ xBase secondary key field so that in fact the two xBase fields together form the key into the xBase table, which will have several records corresponding to the primary key (but only one record for the combined key). There also must be a field in the xBase table which defines the proportion of each constituent. (3) Import or Export LC values To Import or Export LC values (Menu 1.8 Options 3 & 4), the correspondence is with an ALES Land Characteristic (LC) code in a one-to-one relation: ALES LC ≡ xBase field (4) Export Evaluation Results To Export evaluation results (Menu 1.8 Option 5), the correspondence is with a Land Utilization Type (LUT) and the type of evaluation results (physical suitability subclass, economic value, economic suitability class, yield, Land Quality, input amount), in a (potentially) many-to-one relation. The results type is exactly the same as for screen displays of evaluation results (Menu 1.4 ‘Evaluations’ Option 2 ‘View Evaluation Results’). xBase field ≡ ALES LUT + Evaluation Results Type We now consider these types of transfers in more detail. Import Land Mapping Unit definitions This is a shortcut to what can also be done using Menu 1.3 ‘Data’ Option 2 (‘Definitions, from a disk file, read’). It avoids the use of an intermediate comma-and-quotes delimited ASCII file, and provides a more logical way of organizing compound map units. There are three options in a sub-menu: 1.8.2 Import Land Mapping Unit definitions 1. Import definitions of homogeneous map units 2. Import definitions of compound map units 3. Import lists of constituents of compound map units There are two kinds of ALES map units that may be transferred: (1) homogeneous and (2) compound, with different methods of importing. (1) Importing homogeneous map units Homogeneous map units, for ALES, are LMU codes which can have associated data, i.e. values of Land Characteristics. They may be mapped themselves and/or they may be constituents of compound map units, see section (2). The import of homogeneous map units to ALES is a one-step process since only one xBase table is involved: 1. Import the map unit definitions from a single xBase table (Menu 1.8.2 Option 1). This table should contain the Land Characteristics for each constituent. At this point, the land data can be imported, with Menu 1.8 Option 3, from the same table. For transfers of homogeneous map units, you only need to specify which xBase fields contains the descriptive name and the area; and both of these are optional. The key field must contain the ALES (homogeneous) LMU identifier (code). ALES Version 4.65 Users Manual Page 218 February 1997 Here is a sample xBase file of homogeneous map units with one sample Land Characteristic (‘dc’ = USDA soil drainage class): $RECNO LMU_ID LMU_NAME AREA DC 1 Ad Alden mucky silt loam 12300 vpd 2 AvE Arnot soils, 25-45% 250 mwd 3 CeB Cazenovia silt loam, 3-8% 9400 mwd 4 HsD Honeoye & Lima gravely silt loam, 14-20% 1220 wd Note that this can be from a PAT with non-unique records, but it is preferable to have a normalized database design, see below. In this example you would specify: ALES LMU ≡ field ‘LMU_ID’, ALES descriptive name ≡ field ‘LMU_NAME’, ALES map unit area ≡ field ‘AREA’. Then you can later transfer the data itself. (2) Importing compound map units Compound map units, for ALES, are LMU codes don’t themselves have data, but which are defined by a list of homogeneous constituents and the percentage of each constituent in the map unit. For example, Map unit ‘A3’ = 60% ‘CeB’ + 40% ‘OvA’. To evaluate the compound map unit, ALES evaluates each constituent separately, then combines the suitability according to the percent composition. Compound map units are frequently used at mapping scales smaller than 1:20 000 and are of various types, e.g. associations or complexes (ALES doesn’t make any distinction between these). The import of compound map units is a three-step process since three xBase tables are involved. 1. Import all homogeneous constituents as in section (1), above (Menu 1.8.2 Option 1). It does not make sense to include an area for the constituents, unless they are also mapped themselves. This table should contain the Land Characteristics for each constituent. ALES knows these are homogeneous units from the menu option you selected. 2. Import all compound map unit definitions from a primary table, including the map unit symbol, name, and area (Menu 1.8.2 Option 2), also as in section (1). ALES knows these are compound units from the menu option you selected. 3. Import information on the homogeneous constituents of the compound map units from a secondary table (Menu 1.8.2 Option 3). This table only gives the compound & homogeneous map unit codes and the proportion of each homogeneous map unit in the compound unit. At this point, the land data can be imported, with Menu 1.8 Option 3, probably from the first table (the homogeneous constituents). For transfers of compound map units, the key field must contain the ALES (compound) LMU identifier, and the descriptive name field and area field are optional as before. In addition you must specify a secondary table, with its own primary key field that contains the ALES (compound) LMU code, a secondary key field that contain the ALES (homogeneous) LMU identifier of a (homogeneous) constituent, as well as a required percentage field that contains the percentage of the constituent in the map unit. ALES Version 4.65 Users Manual Page 219 February 1997 Here is a sample xBase database for compound map units. It consists of three tables. The first table is the table of the homogeneous constituents and their data, see section (1) above. The second table contains the definitions of the compound map units, but not their composition: $RECNO LMU_ID LMU_NAME AREA 1 A3 Cazenovia-Ovid association 25000 2 A5 Palmyra-Cazenovia association 1250 3 A19 Honeoye complex 12400 4 A33 Ovid consociation 1000 Note that this table has a similar structure to that for the homogeneous map units, but doesn’t have any land data, because the land data is all defined for the homogeneous constituents. In this example you would specify: ALES LMU ≡ field ‘LMU_ID’ and ALES descriptive name ≡ field ‘LMU_NAME’. The third table lists the constituents and their percentages. Field ‘CLMU_ID’ in this table may be related to ‘LMU_ID’ of the compound map unit table, whereas field ‘HLMU_ID’ in this table may be related to ‘LMU_ID’ of the homogeneous map unit table. These two fields together make up a compound key. $RECNO CLMU_ID HLMU_ID PCT 1 A3 CeB 60 2 A3 OvA 40 3 A5 PgB 65 4 A5 CeB 35 5 A19 HnC3 70 6 A19 HnB 30 7 A33 OvA 100 Notice that this table can not be understood without the first two tables, because it has no map unit names or areas, nor any land data. In this example you would specify: ALES LMU ≡ field ‘CLMU_ID’, ALES secondary key (homogeneous constituent) ≡ field ‘HLMU_ID’, and ALES percentage ≡ field ‘PCT’. xBase field definitions for map unit transfers • The field containing map unit codes is usually type ‘C’. However, ALES will read from field type ‘N’ and store the number as the map unit identifier. • The field containing the map unit descriptive name is always type ‘C’. • The field containing the map unit area is usually type ‘N’, but may be of type ‘C’ in which case ALES will attempt to interpret the character string as a number. ALES Version 4.65 Users Manual Page 220 February 1997 • The field containing the percentage or proportion of a constituent is usually type ‘N’, but may be of type ‘C’ in which case ALES will attempt to interpret the character string as a number. If the number is less than one, ALES assumes it is a proportion on [0…1] and automatically multiples the value by 100 to obtain the percentage. If the number is greater than one, ALES assumes it is a percentage on [1…100]. Some other facts about map unit input • If the LMU is already defined and its type (homogeneous or compound) is the same as the transfer option you selected, the interface will update its descriptive name and area. If the types do not match, the LMU will be ignored. • If a compound LMU is not already defined, any constituents for it will be ignored. • If the sum of the percentages of the constituents of a compound LMU do not sum to 100% (±0.01%), all the constituents will be ignored. • If any of the constituents of a compound LMU are not already defined as homogeneous map units in ALES, all the constituents will be ignored. • If the constituents are ignored, any existing list of constituents in ALES will not be changed. Important and exporting Land Characteristics This is a shortcut to what can also be done using Menu 1.3 ‘Data’ Option 5 (‘Data, from a disk file, read’) and Option 6 (‘Data, to a disk file, write’). It avoids the use of an intermediate comma-and-quotes delimited ASCII file. Here, you must set up a one-to-one correspondence between a set of fields in the xBase table and a set of ALES LCs. You must ensure that the field types match: • Numeric (data type ‘N’) xBase fields usually correspond to continuous ALES LCs. On import, ALES will check whether a number is within the data validation limits for the ALES LC (entered with Menu 1.14c Option 2); if not, it will be discarded. • However, numeric (data type ‘N’) xBase fields may correspond to discrete (classified) ALES LCs, if the ALES LC class abbreviations are numeric, or if there are no class abbreviations (in which case, the ALES class number is used as its abbreviation). • Character (data type ‘C’) xBase fields must correspond to discrete (classified) ALES LCs. The contents of the xBase field must be the ALES LC class abbreviations (entered with Menu 1.1.4a or 1.1.4b Option 2). On import, ALES will check whether a code is one of the permitted class abbreviations; if not, it will be discarded. On export, ALES will refuse to write a code that is wider than the xBase field. For example, the code ‘sicl’ would not be written to the xBase field with type ‘C3’. Multi-values will not be written if their total length, including codes and proportions, is wider than the field. Some other facts about LC import from xBase to ALES • If the xBase field for a record is null (blank), any value in the ALES database for the LMU corresponding to that record will be deleted, presuming that a null value, representing ‘unknown’, is correct. The idea is that the two databases should be consistent, and the one from which you are transferring should be the most current. • If the value in the xBase field for a record is not valid according to the ALES database’s verification rules (set for each Land Characteristic in Menu 1.1.4), the value will not be stored in the ALES database, and any existing value in the ALES database will remain. • If the xBase key field is not unique (i.e., there are more than one record with the same value of the key field), the last valid value (i.e., from the highest-numbered record with a valid value) will be saved in the ALES database. ALES Version 4.65 Users Manual Page 221 February 1997 • On import from a logical xBase field, the legal values ‘T’ and ‘F’ will be used as ALES class codes. If there are no such codes, the values will be ignored. • On import from a character xBase field, all trailing spaces will be removed from the string prior to attempting to match the ALES class code. This is because the xBase field is always padded with spaces. This implies that the interface will not work for ALES Land Characteristic codes that contain trailing spaces, e.g. ‘mwd ’ (it will, however, work for codes with embedded spaces, e.g. ‘m w d’). Some other facts about LC export from ALES to xBase • If the ALES data value for a LMU is null (blank), any value in the xBase field for the record corresponding to that LMU will be deleted, presuming that a null value, representing ‘unknown’, is correct. The idea is that the two databases should be consistent, and the one from which you are transferring should be the most current. • If the ALES LC value or code is too wide to fit in the corresponding xBase field, it will be ignored, and any value that was already in the xBase field will be left unchanged. • If the xBase key field is not unique (i.e., there are more than one record with the same value of the key field), the same ALES LC value will be written to every record with the same LMU code. • On export to numeric xBase fields, non-numeric ALES fields will be ignored. If the length of the integer part of a continuous ALES value is wider than the xBase field, the value will be ignored. If the combined width of the integer and decimal parts of a continuous ALES value is wider than the xBase field, the decimals will be truncated as necessary to fit. • On export to logical xBase fields, any numeric value other than zero will be written as True. Numeric zero and any character value other than ‘T’ or ‘t’ will be written as False. Exporting evaluation results from ALES The most important use of this option is to augment PC-Arc/Info polygon coverages of Land Mapping Units with land evaluation results. These ‘Polygon Attribute Tables’ (PAT) are named ‘PAT.DBF’ and are located in the coverage directory. For example, for coverage ‘soils’, the PAT is file ‘soils\pat.dbf’ in the workspace. You can also export to other tables that are linked to the PAT by a relational join within the TABLES command of PC-Arc/Info. Step 1: Create xBase fields in the PAT to receive the results (Arc/Info Tables command: ADDITEM, or you can use the database structure editor of your database program to create new fields) Step 2: Determine the names of the key field and the other attribute fields (from step 1). The key field is the field that will be related to the map unit (LMU) code in the ALES database. Note that a key field, in the sense of this transfer, is usually not a key field in the PAT. The PAT key field is usually the polygon ID, and the field which contains the ALES LMU code is one of the attributes of the polygon. This is why this transfer is usually one (ALES LMU) to many (PAT polygons). Step 3: Create the import/export template in ALES (Menu 1.8 Option 1). Specify the key field which corresponds to the ALES LMU code and the attribute fields, and for each attribute field, the type of evaluation results to transfer. Step 4: Compute the evaluation results as usual in ALES (Menu 1.4 ‘Evaluations’ Option 1 ‘Compute evaluation results’). Compute results for all the LUTs that you want to export, and all the LMU in your target map, i.e., all LMUs that correspond to any polygons. Evaluation results are exported from the same evaluation results matrix that you view on-screen with Menu 1.4 Option 2 ‘View evaluation results’. Step 5: Export the evaluation results (Menu 1.8 Option 5). ALES Version 4.65 Users Manual Page 222 February 1997 Some facts about evaluation results export: • If the xBase key field is not unique (i.e., there are more than one record with the same value of the key field), the same ALES evaluation results values will be written to every record with the same LMU code. This is the usual situation when writing to a PAT. • It is possible to ask for the same evaluation results to be written to multiple fields; just specify the same evaluation results as the source for several fields when you specify the template. • When exporting to numeric xBase fields, non-numeric ALES evaluation results will be ignored. If the length of a continuous numeric ALES value (e.g., gross margin), formatted according to the xBase field specification, is wider than the xBase field, the value will be ignored. For example, if the gross margin is $1,234.56, it will just fit into a xBase field of type N7.2, and also into N6.1 or N4.0 (because the decimals will be removed), but not in N6.2, N5.1, or N3.0. • When exporting to logical xBase fields, any numeric evaluation result other than zero will be written as True. Numeric zero and any character value other than ‘T’ or ‘t’ will be written as False. • When exporting numeric results (e.g., Internal Rate of Return) to character xBase fields, these results will be written as character strings, with all decimal values as displayed in the ALES evaluation results matrix. If the complete string will not fit in the character field, it will be ignored. For example if the gross margin is $1,234.56, it will just fit into a xBase field of type C7 (the currency unit and comma are not transferred), but not in C6. Recommended field types for evaluation results When you set up fields in a xBase-format file to receive ALES evaluation results, follow these guidelines. Use the ‘single values’ column if your evaluation (1) has no compound map units and (2) has no multi-valued land data, otherwise use the ‘multiple values’ column. In the cases where no width is given in the table (indicated with a ‘*’), see the notes following. Report Type xBase field type for single values xBase field type for multiple values Physical Suitability Subclass C* C* Physical Suitability Class N1.0 or C1 C* Economic Suitability Class C2 C2 Land Quality values N1.0 or C1 C* Yields N*.0 N*.0 Net Present Value N*.0 N*.0 Internal Rate of Return N3.0 N3.0 Benefit/Cost Ratio N4.2 N4.2 Gross Margin N*.0 N*.0 Input amounts N*.* N*.* Notes: • The maximum widths of xBase-format fields are C254 and N20. In numeric fields, any number of decimal places, up to the width of the field less 2 (e.g., N20.18), may be used. ALES Version 4.65 Users Manual Page 223 February 1997 • To determine the width of numeric (N) fields where none are given in the table, you must examine your evaluation results matrix or printed report to see how wide a field you will need. This depends on (1) the normalized value (per unit land area), expressed in the monetary unit of the evaluation, and (2) if a nonnormalized result, the maximum land unit area which will multiply the normalized value. For example, a normalized Gross Margin in the USA might be on the order of US$100 to US$1000, and a field type of N4.0 might be adequate. But, a non-normalized Gross Margin on a 1000ha parcel in Indonesia (US$1. ≈ Rp.2300) might be on the order of (100 × 2300 × 1000) = Rp.230,000,000 or ten times more, in which case a field type of N10.0 would be necessary. • Almost always there is no justification in specifying decimal places except for Benefit/Cost Ratio, because the precision of the input economic data, combined with the uncertainty of the yields and input amounts, is far too low. However, if something is measured in very small units (e.g., yields measured in Megatons) some decimal places may be significant (e.g., a yield on the order of 1000 kg ha-1 , which would require field type N4.0, is the same as a yield of 0.000 001 MT ha-1, which would require field type N10.8). • To determine the width of character (C) fields where none are given in the table, you must examine your evaluation results matrix or printed report to see how wide a field you will need. This depends on (1) the length of results for homogeneous map units, and (2), for compound map units, the maximum number of homogeneous constituents in the compound map unit. For example, if one-character LUR codes are used for physical suitability and there are never more than 3 limitations indicated, the longest code looks like ‘3a/b/c’, so a C6 field would be adequate. On the other hand, it is easy in ALES to end up with codes like ‘3LQ_A3/LQ_F22/LQ_I10/LQ_A12’ etc. so you really have to look at the evaluation results matrix. Troubleshooting Most of the error messages are self-explanatory. This section discusses the case when the transfer appears to go well, but results are not as expected. Problem: No data are exported to a xBase record There was probably no match between the ALES LMU codes and the values in the xBase field you specified as the key field. The key field must contain the exact same codes, including upper & lower case. (However, the xBase field will be padded with trailing spaces, which will be removed by ALES before matching with the ALES LMU code). In the extreme case, you specified the wrong xBase field as the key field, and it doesn’t contain any LMU codes at all! Or, you specified a xBase field with LMU codes as the key field, but the codes are for a different ALES evaluation model. Problem: No data are imported to an ALES Land Mapping Unit Same as previous comment. Problem: Only some data are exported to a xBase-format record Some of the ALES LC or evaluation results may be too wide for the xBase field, in which case they are ignored. Check the data or evaluation results with the on-screen matrices and compare the width of the ALES value with the definition of the xBase field. ALES Version 4.65 Users Manual Page 224 February 1997 Problem: Only some data are imported to an ALES Land Mapping Unit Some of the data in the xBase file may be invalid. In particular, for classified Land Characteristics, the equivalent field of the xBase file must contain valid class codes; any invalid codes will be ignored. Similarly, for discrete Land Characteristics, the equivalent field of the xBase file must contain valid numeric values that fall within the data validation range; any out-of-range values will be ignored. Also, ALES can not match any LMU codes with trailing spaces, e.g. ‘CeB ’. (Embedded spaces will work, however; e.g. ‘Ce B’). Problem: Evaluation results appear for only some polygons in a PAT (So the resulting ArcView map has ‘holes’.) The most likely causes are (1) some polygons have a null ‘key field’; or (2) the ‘key field’ for some polygons contains a LMU code that is not in the ALES database, or (3) the ‘key field’ for some polygons contains a LMU code that is in the ALES database, but you didn’t ask ALES to compute results for that LMU. Problem: some of my compound map unit constituents are not being imported Most likely you did not first define or import all the homogeneous constituents. Another possibility is that the percentages of the constituents for a compound map unit do not sum to 100%. Do a summary report on your xBase table, grouping by compound map unit and summing the field with the percentages, to see if the sums are in fact 100%. Problem: My xBase-format file was trashed by ALES Although we have tested the interface thoroughly, it is certainly possible that we have overlooked some unusual circumstance in which ALES may trash (corrupt) your xBase-format file. Therefore, ALES always makes a backup of the xBase-format file, with extension ‘.bak’ in place of ‘.dbf’, prior to modifying it. So, you can recover your file by deleting the ‘.dbf’ and renaming the ‘.bak’ to ‘.dbf’. Interfaces with GIS ALES provides three ways to interface with GIS: 1. Import LMU definitions and export Land Characteristic values or evaluation results via the ALES ⇔ xBase interface, for GIS which store their attribute information in xBase-format tables (including PC-Arc/Info and ArcView) 2. Export Land Characteristic values or evaluation results to the IDRISI GIS via the ALIDRIS interface. 3. Import and export LMU definitions and LC values, and export evaluation results, via ASCII tables in relational database format Arc/Info and ArcView PC-Arc/Info coverages store the attributes of polygons (e.g., soil map unit delineations) in a Polygon Attribute Table (PAT), which is an xBase-format database file named PAT.DBF, in the coverage directory. This table must contain the polygon identifier, the area, and the perimeter. It can also contain other attributes (added with TABLES), but these can also be stored in independent tables that are later joined with the PAT to produce interpretive maps. In either case, the ALES ⇔ xBase interface can be used to modify the PAT, or an associated table. See the previous section for the mechanics of using this interface. ALES Version 4.65 Users Manual Page 225 February 1997 This section presents some sample GIS database structures (mainly thinking of PC-Arc/Info, which uses xBaseformat files to store all attributes) and shows how they can be interfaced to ALES via the ALES ⇔ xBase interface. For a thorough treatment of relational database theory, see the classic textbook by Date (1990). Homogeneous map units, flat-file database The simplest case is when a single PAT (polygon attribute table) contains all the information for a map unit. This is a common structure, which we will show is not the most desirable. In the case of PC-Arc/Info, this table will be file PAT.DBF in directory %workspace%\cover, where %workspace% is the current workspace, which here is represented as a DOS environment variable. The polygon label is the key field for transfer with ALES. Consider the following table from a PAT.DBF : $RECNO AREA PERIMETER LMU_ LMU_ID TEXT_A PS_LUT3 1 -767554100 110823 1 0 2 12361530 40560 2 7 sicl 3x 3 194138 2113 3 9 lfs 2n/me 4 4049013 12998 4 85 sicl 1 5 154044 1834 5 7 sicl 3x 6 3024318 10505 6 9 lfs 2n/me 7 2735989 11608 7 133 sil 4fl The field names ‘AREA’, ‘PERIMETER’, and ‘LMU_’ are assigned by Arc/Info during topology creation (BUILD or CLEAN) and can not be changed. The ‘LMU_ID’ field is the polygon label, which is assigned by the map creator during digitizing, and is the key field in the terminology of the ALES ⇔ xBase interface. In other words, it is the link to the attributes of the polygon which ALES will either use to evaluate (if these are LCs) or to which ALES will write evaluation results. The other field names are assigned by the map creator using the TABLES command. (The leftmost field, ‘$RECNO’, is the record number in the table, and is used internally by Arc/Info.) The ‘AREA’ and ‘PERIMETER’ fields measure the polygon numbered by ‘LMU_’, which is the unique polygon ID as seen by the Arc/Info user. (Notice that the first polygon in the table is always the ‘outside’ polygon, whose area is the negation of the sum of the areas of the other polygons in the map.) In this sample table, there are two attribute fields, to represent the two kinds of transfers. Field ‘TEXT_A’ is a typical land data variable (here, meant to represent the field texture of the topsoil), and field ‘PS_LUT3’ is a typical evaluation result (here, meant to represent ‘physical suitability for Land Utilization Type number 3). The relation between ‘LMU_’ (the unique polygon ID) and ‘LMU_ID’ (the key field) is one-to-one, i.e., each polygon belongs to exactly one map unit, and the structure of the table ensures this, because each polygon is a single record, with only one value then in each field including the key field. However, there are in general many polygons of a single map unit, so that the reverse relation, between the map unit and the polygon, is one-to-many. In the table, notice that polygons 2 and 5 (‘LMU_’ = 2 and ‘LMU_’ = 5) both are part of map unit 7 (‘LMU_ID’ = 7). This is because the map unit is distributed over space, for example, a map unit associated with alluvial soils will occur in many of the floodplains in the mapped area, and these generally are not connected, so that there are many polygons (i.e., many different values of field ‘LMU_’) for a single map unit (i.e., one value of field ‘LMU_ID’). O ne Pol ygon ⇒ O ne M ap Uni t M any Pol ygons ⇐ O ne M ap Uni t ALES Version 4.65 Users Manual Page 226 February 1997 The relation between the map unit, field ‘LMU_ID’ (the key field), and the attribute fields such as ‘TEXT_A’ and ‘PS_LUT3’ is one-to-one, i.e., for each map unit there is exactly one value of each attribute. This is logical, because if the land unit is the same, its properties, and hence its suitability, should be the same. For example, in the sample table, both polygons of ‘LMU_ID’ = 7 have surface soil field textures of silty clay loam (‘TEXT_A’ = “sicl”). But, considering the other direction, the relation between the attribute values and the key field is one-to-many, i.e. one attribute value can be shared by many map units. In the example table, both map units 7 and 85 have silty clay loam topsoils. O ne M ap Uni t ⇒ O ne attr i bute val ue M any M ap Uni ts ⇐ O ne attr i bute val ue There is a problem with the structure presented here. Unlike the many-to-one relation between polygons and map units, which is enforced by the table structure, the one-to-one relation between map units and attribute value is not an automatic result of the table structure. For example, the sample table could be edited (using TABLES) so that one polygon of map unit 7 was silty clay loam and another was silt loam, leading to a logical inconsistency: the map unit is the same, so the texture should be the same, but the table shows otherwise. This is also known as an ‘update anomaly’. A related problem is redundancy in the table, e.g., the fact that map unit 7 has silty clay loam topsoil is repeated many times. In database terms, both these problems (risk of inconsistency and redundancy) arise because the single-table database presented above is not fully relational.. This leads to a more consistent table structure, a fully relational database, which we now discuss. Homogeneous map units, fully relational database We remove the redundancies, and possible inconsistencies, by normalizing the table into two tables which are related on a common field, which in this case is the key field of the first example, i.e. the map unit ID. Here are two tables equivalent to the first example. First, the PAT itself: $RECNO AREA PERIMETER LMU_ LMU_ID 1 -767554100 110823 1 0 2 12361530 40560 2 7 3 194138 2113 3 9 4 4049013 12998 4 85 5 154044 1834 5 7 6 3024318 10505 6 9 7 2735989 11608 7 133 ALES Version 4.65 Users Manual Page 227 February 1997 Second, the map unit table: $RECNO LMU_ID TEXT_A PS_LUT3 1 7 sicl 3x 2 9 lfs 2n/me 3 85 sicl 1 4 133 sil 4fl Because these are normalized, it is impossible to have an inconsistent result, where two polygons of the same map unit have different attribute values. Also, all redundancy has been removed. We can recover the original flat-file table structure by means of a relational join on the common field, which in this case is ‘LMU_ID’. PC-Arc/Info and all relational database managers provide commands to do this; e.g. the JOIN command for a temporary join, or JOINITEM for a permanent join. To export or import between ALES and xBase, the xBase file to specify is the one which contains the attributes for the map units. In the fully relational structure, this would be the map unit table just presented. Compound map units, flat-file database A common method for representing compound map units is to have several columns in the PAT, each representing a constituent, with another column showing its proportion: $RECNO AREA PERIMETER CLMU_ CLMU_ID COMP_1 PCT_1 COMP_2 PCT_2 1 -767554100 110823 1 0 2 12361530 40560 2 A3 CeB 60 OvA 40 3 194138 2113 3 A19 HnC3 70 HnB 30 4 4049013 12998 4 A5 PgB 65 CeB 35 5 154044 1834 5 A3 CeB 60 OvA 40 6 3024318 10505 6 A19 HnC3 70 HnB 30 7 2735989 11608 7 A33 OvA 100 0 This is not a good idea. Clearly, this is a non-normalized database, with the same problems as detailed above. For this reason, ALES can not import from this kind of table; you need to set up a relational database as now explained. Note: It is possible to get this structure directly into ALES, by writing the relevant fields out to a flat ASCII file, along with another column that indicates that the map units are compound. This ASCII file can be read using ALES Menu 1.2 ‘Data’ Option 2 ‘Map Unit definitions, from a disk file, read’. Compound map units, fully relational database A better idea for representing compound map units is to have two related tables, one for the polygons and one giving the composition of the map units. First, the PAT itself, with the same structure as in the fully-relational example for homogeneous units: ALES Version 4.65 Users Manual Page 228 February 1997 $RECNO AREA PERIMETER CLMU_ CLMU_ID 1 -767554100 110823 1 0 2 12361530 40560 2 A3 3 194138 2113 3 A19 4 4049013 12998 4 A5 5 154044 1834 5 A3 6 3024318 10505 6 A19 7 2735989 11608 7 A33 Second, the compound map unit composition table, which gives composition of the map units: $RECNO CLMU_ID HLMU_ID PCT 1 A3 CeB 60 2 A3 OvA 40 3 A5 PgB 65 4 A5 CeB 35 5 A19 HnC3 70 6 A19 HnB 30 7 A33 OvA 100 Notice that this tables has a two-field key, i.e., both fields ‘CLMU_ID’ and ‘HLMU_ID’ are necessary to specify a unique record. This design places no limits on the number of homogeneous components of a compound map unit, unlike the flat-file design which requires that we pre-define a number of fields to contain the homogeneous map unit names and their percentages. Then we add a third table, i.e., the homogeneous map unit table, which gives the attributes of each homogeneous map unit: $RECNO HLMU_ID TEXT_A PS_LUT3 1 CeB sicl 3x 2 HnB lfs 1 3 HnC3 sicl 2n/me 4 OvA sil 2dr 5 PgB sil 4fl Notice that this table has a suitability rating (presumably exported from ALES) for the homogeneous constituent of the map unit. The three tables can be related, then you can select the suitability of the dominant component (or maybe the most limiting suitability, depending on the task), and display a map of these. ALES Version 4.65 Users Manual Page 229 February 1997 Fourth and finally, we need a compound map unit attributes table, which is where ALES can write the suitability of these map units. This may be joined with the PAT for map display. $RECNO CLMU_ID PS_LUT3 IRR_LUT3 1 A3 3x & 2dr 15 2 A5 4fl & 3x 30 3 A19 1 & 2n/me 25 4 A33 2dr 5 ALIDRIS The interface between the ALES land evaluation program and the IDRISI Geographical Information System is referred to as ALIDRIS1. ALIDRIS is an interface from ALES to the IDRISI GIS, Versions 3 and 4, and also to IDRISI for Windows. ALIDRIS automatically detects which version of IDRISI is installed on your system when it reads the IDRISI environment file IDRISI.ENV. ALIDRIS is an integral part of the ALES program, and appears as item 7 ‘ALIDRIS’ on the Menu 1 ‘Main Options [Build Models]’2. For more information on IDRISI, please contact: The IDRISI Project Graduate School of Geography Clark University 950 Main Street Worcester, MA 01610-1477 USA Phone: USA (508) 793-7526 FAX: USA (508) 793-8842 Internet: [email protected] WWW: http://www.idrisi.clarku.edu/ Cornell University does not endorse the IDRISI software instead of similar programs. The ALIDRIS interface is offered in response to requests by ALES users who also use IDRISI as their GIS. The two programs are similar in philosophy (i.e., computing power is to be placed in the hands of the analyst at the local level), hardware requirements, and price. The basic idea of ALIDRIS is that the ALES database or evaluation results are used to reclassify an existing IDRISI grid image that represents the map units in the ALES database. From one IDRISI base map which shows the ALES map units, ALIDRIS can make single-factor maps of any Land Characteristic in the ALES database, any Land Quality of any Land Utilization Type (LUT), or the final evaluation results (physical or economic) for any LUT, without the need for any further work in IDRISI. Then IDRISI can be used to display the derived maps, or apply any GIS operations on them (distances, adjacency operators, cross-tabulation etc.). 1 This is by analogy to the names of other IDRISI interface modules such as ERDIDRIS and TIFIDRIS. 2 So, there is no ‘ALIDRIS’ command in IDRISI itself. ALES Version 4.65 Users Manual Page 230 February 1997 ALIDRIS can also reclassify IDRISI values files, commonly used to give legends to vector maps. See the section ‘Installing the ALIDRIS examples’ in the Chapter ‘Installing, Configuring and Running ALES’ for instructions on how to unpack some samples; see Tutorial 5 for some practice using ALIDRIS with one of these samples. How to use ALIDRIS The following discussion assumes that the reader is familiar with both ALES and IDRISI, both of which come with extensive documentation. Terms such as raster, documentation file, environment file, Land Characteristic, etc. are used as they are defined in the respective programs. ALIDRIS appears as Option 7 in ALES Menu 1 ‘Main Options [build models]’. The first time you select this menu item in an ALES session, you will be asked to specify the location of the IDRISI environment file IDRISI.ENV on your computer. The environment file is used to locate the source and destination maps, exactly as in IDRISI. So before using ALIDRIS, make sure that the IDRISI environment is set to point to the images or value files you want to reclassify. For example, suppose the IDRISI images you want to re-classify are located in D:\DATA\MAPS\. First, using the IDRISI ‘environ’ command, you should specify this data path. This ensures that the environment file IDRISI.ENV points to the correct images. Find this file IDRISI.ENV on your system; it is almost always located in the IDRISI home directory (where IDRISI is installed), for example C:\IDRISI\. Then, answer the ALES question as follows: Where is the IDRISI environment file? c:\idrisi______________ Once the environment file is located, ALIDRIS determines the IDRISI version number, and displays this at the top of its menu. This menu has four options: 1.7 ALES --> IDRISI Interface [V4] 1. 2. 3. 4. Reclassify Reclassify Reclassify Reclassify an an an an IDRISI IDRISI IDRISI IDRISI raster raster values values image with LC values image with evaluation results file with LC values file with evaluation results Options 1 & 2 are discussed in the next section, and 3 & 4 in the following. ALIDRIS applied to raster images The existing image must be of data type integer or byte, and file format binary or ASCII, with the integer codes representing the ALES map units1. This image must have a documentation file with a legend giving the correspondence between the IDRISI integer codes and the ALES alphanumeric map unit codes (i.e., the ALES map unit codes can include letters and numbers, and even punctuation). If you decide to use the IDRISI codes as the ALES codes, the legend is not necessary, but the documentation file is. Before using ALIDRIS, you must prepare a source raster image (the base map), along with a documentation file, showing the area of interest. The legend, which can be added with DOCUMENT (in V4, also with COLOR Option 1If you attempt to use ALIDRIS on an image in a different format, you will see a note asking you to convert the file first. ALES Version 4.65 Users Manual Page 231 February 1997 legend), must give the correspondence between the IDRISI codes and the ALES map unit identifiers. This map may then be used to produce many interpretive maps, both of Land Characteristics (from the ALES database) and land evaluation results (from the ALES evaluation results matrix). Here is a typical V3 documentation file, with a legend giving the correspondence between IDRISI and ALES codes: image title data type file type rows columns minimum maximum cell x cell y legend category 1 category 2 category 3 : : : : : : : : : : : : : Cayuga County Soil Map Units integer ascii 50 80 1.0000000000E+00 2.2000000000E+01 5.0000000000E+01 5.0000000000E+01 3 Ad AvE CeB The V4 documentation file is more complex, but the information that ALIDRIS uses is the same, namely, the legend categories. Here is an example: file title data type file type columns rows ref. system ref. units unit dist. min. X max. X min. Y max. Y pos'n error resolution min. value max. value value units value error flag value flag def'n legend cats category 0 category 1 category 2 category 3 : : : : : : : : : : : : : : : : : : : : : : : : : Cayuga County Soil Map Units integer binary 80 50 plane m 1.0000000 0.0000000 4000.0000000 0.0000000 2500.0000000 unknown 50.0000000 1 3 classes unknown none none 4 Ad AvE CeB ALIDRIS reclassifies the image with either (1) Land Characteristic values from the database, or (2) evaluation results. In the latter case, the evaluation must already have been computed for the land utilization types and map units of interest (ALES Menu 1.4 Option 1). ALIDRIS writes a new, recoded map, and a documentation file, and, if the reclassification is to classified values, a legend. Integer-valued results, i.e. maps of LC values and of ALES Version 4.65 Users Manual Page 232 February 1997 classified evaluation results such as suitability classes, are written as integer, binary images. Real-valued results, including output yields, predicted monetary values, the internal rate of return, input amounts, and the benefit/cost ratio, have no legend and are written as real, ascii images. Reclassification with ALIDRIS produces raster maps that can be directly displayed with COLOR or used as a drape image in ORTHO without the need to manually enter a legend. Thus IDRISI acts as a graphics back end to ALES. Also, the full power of IDRISI is also available to, for example, calculate areas or overlay with other coverages. So in this sense ALES acts as a front end, providing new coverages (showing, for example, values of Land Characteristics, or suitability for a given Land Utilization Type). ALIDRIS applied to attribute value files ALIDRIS can also reclassify V3 or V4 attribute values files. The attribute values file to be reclassified must contain the integer polygon identifiers (IDRISI 'feature identifiers') in the first column, and the ALES map unit ID codes (alphanumeric strings) in the second column. Any V3 documentation file for the values file is ignored, since such files are optional in IDIRISI V3. In IDRISI V4, a documentation file (‘.dvl’) is required. It must specify that there are two free-format (format 0) fields, the first one (field 0) integer and the second (field 1) string, and in addition that the values file is ascii. Here is a typical values file, giving the correspondence between IDRISI feature identifiers (e.g. vector polygons) and ALES codes: 1 2 3 Ad AvE CeB ALIDRIS reclassifies this file as explained above, and writes a documentation file, with a legend if possible. Attribute files are most commonly used to display vector maps using the PLOT command, taking the graphic treatment from the new attributes file. The legend can be drawn directly from the attributes documentation file. Attribute values files can also be used with the ASSIGN command to reclassify a raster image, although this is a round-about way to create a map based on ALES map units (it’s easier to reclassify the raster image directly with ALIDRIS). Interfaces with word processors Menu 1.5 ‘Reports’ of ALES allows you to print evaluation results, as well as components of the model such as decision trees. Instead of sending these reports to the printer, you can send them to a DOS text file, which can be imported to any word processor for alteration, formatting, and printing. The procedure to do this is straightforward. After you request a particular report, you will be asked where you want the report sent. Selecting ‘V’ will ‘print’ the report on the video screen, allowing you to preview it. Selecting ‘P’ will, of course, send the report to the printer. Selecting ‘C’ will send the file out a communications port (e.g., a modem connection or serial transfer cable to another computer). Selecting ‘F’ will send the report to a DOS text file. If you select ‘F’, you will be asked to enter a file name for the text file. You may encounter problems when you read the text file into your favorite word processor. ALES writes the file in a straightforward manner, namely, each line is terminated by a ‘Return’ character, ASCII code 13. There are no other formatting characters. However, if you have included characters whose codes are not in the ‘7-bit ASCII’ range 33.-126. (decimal) in class names, Land Characteristic names or values, etc. the word processor may interpret these as its own ‘hidden’ codes, and the text may appear garbled. Some word processors from the ‘dark ages’ of the PC only work with 7-bit characters and use overstrike and backspace for extended characters. ALES Version 4.65 Users Manual Page 233 February 1997 Good examples of this kind of ‘problem’ character are non-English characters, such as accented vowels. For example, ‘í’ has extended ASCII code 161 (decimal). On an English keyboard, you would have entered it as Alt 1 6 1, typing the numbers on the numeric keypad, but on a French or Spanish keyboard you could have typed it directly. You will probably not encounter problems with a non-English DOS word processor. A similar problem arises if you export to a Microsoft Windows-based word processor. These use the so-called ‘ANSI’ character set, versus the so-called ‘OEM’ character set used by MS-DOS. Many of these word processors (e.g., Microsoft Word) recognize DOS text and automatically convert it to ANSI characters. Interfaces with spreadsheets Spreadsheets (e.g., Quattro Pro, Microsoft Excel, Lotus 1-2-3) are probably the most important personal-computer applications programs. In land evaluation, the spreadsheet can be used in pre-processing to calculate Land Characteristics (e.g. minimum, maximum, median etc. weather data; depth-weighted averages of soil characteristics). It can be used in post-processing for farm budget calculations and optimization, where the technical coefficients of the constrained optimization model are obtained from the ALES economic evaluation of each LUT for each evaluation unit. ALES has three interfaces specifically for spreadsheets: √ From ALES evaluation results to a delimited ASCII file, in spreadsheet format [Menu 1.4.4 Option 5]. This duplicates the structure of the ALES evaluation results matrix in the spreadsheet. √ From the ALES database (LMUs and their Land Characteristic values) to a delimited ASCII file, in spreadsheet format [Menu 1.3 Option A, then F7]. This duplicates the structure of the ALES data entry matrix in the spreadsheet. √ From a delimited ASCII file in spreadsheet format, to the ALES database (LMUs and their Land Characteristic values) [Menu 1.3 Option A, then F8]. This allows you to prepare data in a spreadsheet. Interfaces between ALES systems We certainly hope that ALES users will exchange models and data. Also, within one organization there may be several ALES systems. This section explains how to exchange models and data among ALES systems. Transferring models between ALES systems Models, including both the knowledge base and data base, can easily be exchanged between ALES systems. √ First, on the source system, the model is saved to disk file (‘F7’) as described under ‘user-by-user backup’ in the Chapter ‘Maintaining an ALES system’. √ If this file is on diskette, the diskette is mailed or taken to the target ALES system. The file may also be transferred electronically by FTP or as an e-mail attachment. √ Finally, the model is restored from disk file (‘F8’) to the target system. A model of the same name can’t already exist on the other system; if necessary, such a model can be renamed (‘Alt+F6’) before the model is loaded. ALES Version 4.65 Users Manual Page 234 February 1997 Transferring data between ALES evaluation models In ALES there is no shared database between evaluation models; each model has its own separate database as well as knowledge base. You may want to transfer land unit data and definitions between ALES evaluation models. The way to do this is: √ Write the definitions and data from the source evaluation to separate temporary DOS files (Menu 1.3, Options 3 and 6); √ Read the definitions from the first temporary file into the target evaluation (Menu 1.3, Option 2); √ Set up a data entry template in the target evaluation that matches the template with which the data was written (Menu 1.3, Option 7); and √ Read the data into from the second temporary file into the target evaluation (Menu 1.3, Option 5). Transferring LUTs between ALES evaluation models As explained in Tutorial 3 and the Chapter ‘Maintaining an ALES system’, entire ALES evaluation models can be transferred between computer systems by making a backup of the model to a diskette with ‘F7’ on the source system, then loading the diskette into the target system and using ‘F8’ to load the model. However, you may wish to incorporate another ALES user’s LUT into your own evaluation model (as opposed to simply loading their entire model into your system). Or, an organization may decide to share the work of developing models, so that one person works on forestry models, another on animal production etc., and at the end it is desired that these LUTs all be loaded into a common system so that they can be compared side-by-side. To support this kind of information exchange, ALES V4 allows you to save a set of LUTs to a disk file by selecting them out of the LUT list in model-building mode on the source model, and pressing ‘F7’. Then they can be loaded into another evaluation model (the target), either on the same or another system, by pressing ‘F8’ from this same list. You can write several LUTs to the same file, by specifying the same file name for all and then selecting ‘A’ppend to file when ALES informs you that the file already exists. However, for this to work, the target evaluation must contain all the reference list items used in the source models, including (1) LUR codes, (2) input codes, (3) output codes, and (4) LC codes. Otherwise, the LUTs being loaded would have undefined components and could not be evaluated. In this case, ALES will not load the LUT and will provide an error report showing the missing items. The simplest solution to this problem is to first develop a skeleton evaluation, with only the reference lists, then duplicate this on the various machines where the LUTs will be developed. Then all machines have the same reference lists, and LUTs can freely be passed around among them. The post-hoc solution is to examine the error report and define the missing reference items in the target system. ALES Version 4.65 Users Manual Page 235 February 1997 Here is a sketch of a multi-site model building process: Base Model [LUR codes; LC definitions; I/O codes] Menu 1.1 All Options F7/F8 LUT Group A [Agriculture] LUT Group B [Forestry] Or, export/import base model from Menu 1.2 F7/F8 LUT Group C [Pasture] Menu 1.2 F7/F8 Combined ALES Model Transferring Reference Lists between ALES evaluation models Reference lists of Land Characteristics, LUR codes, input code, and output codes may be shared between ALES models (either on the same or different ALES systems). This is useful for maintaining standard sets of reference lists within an organization. For example, consider a national soil survey organization with several regional centers. It makes sense for each region to develop its own land evaluation models, for the LUTs that are relevant to that region. But, it is also desirable to integrate all the LUTs into one national system. The LUTs can be saved to disk and restored as explained in the previous section, but for this to work, the reference lists must be compatible. So, at all the lists in Menu 1.1 ‘Reference Lists’, you can save reference items to disk file with ‘F7’, and restore them with ‘F8’, just as for LUTs and evaluation models. File Formats The following sections describe the file formats for those who are writing their own programs to exchange data with ALES, or who need to set up data tables in relational databases. File format: Land unit definitions This is information on the map units in the project area: their identification codes, descriptive names, and areal extent. For compound map units, the component homogeneous map units and their proportions within the map ALES Version 4.65 Users Manual Page 236 February 1997 unit must also be given. This information can be read into ALES from a text file that has been output by another program or prepared by a word processor. Alternately, it can be entered as map unit definitions within ALES and later written out to a text file that can be read by another program or a word processor. You request that land unit definitions be written to a DOS file with Option 3 (‘Definitions, To a disk file, Write’) of Menu 1.3 (‘Data’); you request that land unit definitions be read from a DOS file with Option 2 (‘Definitions, From a disk file, Read’) of Menu 1.3 (‘Data’). Information is exchanged as DOS text files, in which each record, or line, of the file is terminated by a line feed character (ASCII 10 decimal), and fields within a record are delimited by almost any ASCII character, selected by the user. On output from ALES, the user specifies the delimiter just before the file is written; on input, it is specified just before the file is read. The following characters are not acceptable delimiters: " (double quote) (ASCII 34.) -- this is already used to enclose text fields ^V (SYN) (ASCII 22.) -- this is used in the ALES data structures ^J (LF, line feed) (ASCII 10.) -- this is already used to delimit records. . (period) (ASCII 46.) -- this can appear in numbers. A file can have any name and extension; the ALES user specifies these when the file is about to be read or written. Files have the following format: LMU 1 LMU 2 ... LMU n where each ‘LMU i’ is one line, or record, with the Land Mapping Unit specification. Each line has the following format: {LmuId} {d} {Name} {d} {Type} {d} {Extent} where {d} is the user-selected delimiter character, {LmuId} is the map unit code, {Name} is the descriptive name, {Type} is either ‘h’ (homogeneous) or ‘c’ (compound), and {Extent} is the extent of this map unit, in terms of the unit of measurement used in the evaluation, in the project area. The fields {LmuId}, {Name}, and {Type} are enclosed in double quotes on output from ALES; on input, the quotes are optional. If {type} is ‘c’, in other words the map unit is compound, these four fields are followed on the same line by a series of fields, two for each constituent, with the format: {d} {LmuId} {d} {Percentage} where {LmuId} is the code of the homogeneous constituent, and {Percentage} is the percentage of the compound map unit, from 0 through 100, made up by this constituent. The field {LmuId} is enclosed in double quotes on output from ALES; on input, the quotes are optional. The percentages on a line must sum to 100. On input, a {LmuId} named as a constituent of a compound map unit must already be known to ALES at the time it is encountered in the input file; this will be the case if it is defined as a homogeneous map unit earlier in the same file. On output, all homogeneous LMUs are written before the compound ones, so that a LMU definition file written by ALES can always be read back. ALES Version 4.65 Users Manual Page 237 February 1997 Here is an example file, showing three map units (the field delimiter in this example is the comma, ASCII 44 decimal): "Aa","Alpha silt loam, 3-8% slopes, shallow phase","h",1000 "Bb","Beta fine sandy loam, 8-15% slopes","h",2000 "AB","Alpha-Beta association","c",1500,"AaA",60,"BbB",40 In this example, the Alpha-Beta association has two components: Alpha, with 60% of the area, and Beta, with 40%. Notice that it must follow the definitions of its constituents. File format: Land unit data This is information on the Land Characteristics for map units in the project area, in other words, all the information about the map unit except its definition. This information can be read into ALES from a text file that has been output by another program or prepared by a word processor. Alternately, it can be entered within ALES and later written out to a text file that can be read by another program or a word processor. You request that land unit data be written to a DOS file with Option 6 (‘Data, To a disk file, Write’) of Menu 1.3 (‘Data’); you request that land unit data be read from a DOS file with Option 5 (‘Data, From a disk file, Read’) of Menu 1.3 (‘Data’). The file format is the same as given above, for Land Map Unit definitions. The restrictions on delimiters given there are also applicable. However, the line format differs: in land data files, each line has the following format: {LmuId} {d} {Laval1} {d} {Laval2} ... {d} {Lavaln} where {d} is the user-selected delimiter character, {LmuId} is the map unit code, and {Lavali} is the value of a Land Characteristic that is listed for field number ‘i’ (out of ‘n’ fields) in the data entry template. Non-numeric fields are enclosed in double quotes on output from ALES; on input, the quotes are optional. Before data on a land unit can be read into ALES, that land unit must already have been defined, either by having been read in from a file (see previous section) or by having been entered using Option 1 (‘Definitions, From keyboard, Enter or edit’) of Menu 1.3 (‘Data’). The number of fields and their order is specified by the evaluator by means of a data entry template, which must be completed prior to input or output of land unit data, using Option 7 (‘Templates’) of Menu 1.3 (‘Data’). The template has an identifying name, and an ordered list of Land Characteristics, each of which corresponds to one field in the record. Before a Land Characteristic can be listed as a field in a template, it must in turn have been defined using Option 4 (‘Land characteristic descriptions’) of Menu 1.1 (‘Reference Lists’). The data fields in the input or output record are the class abbreviations (for discrete Land Characteristics) or the actual numeric value (for continuous Land Characteristics).Here is an example. Suppose we have defined a template named ‘data’, with three fields, corresponding to the three Land Characteristics ‘slope’, ‘texture’, and ‘reaction’. Note that the order of these fields in the template definition is important: ALES expects to find the data fields in the DOS file in this same order. These Land Characteristics, as well as the template, must have been previously defined by the evaluator. Suppose that these characteristics were defined as follows: ‘slope’ ‘texture’ ‘reaction’ : : : discrete, 5 classes, abbreviations ‘A’, ‘B’, ‘C’, ‘D’, and ‘E’ discrete, 12 classes, standard abbreviations, e.g. ‘sicl’ continuous, units of measure is pH scale ALES Version 4.65 Users Manual Page 238 February 1997 Here is a sample file, showing data for three map units (the field delimiter in this example is the semicolon, ASCII 59 decimal). "Aa";"A";"sicl";6.5 "Bb","E","sl";7.4 "Cc";"B";"c";5.7 In this example, map unit ‘AA’ has a slope of class ‘A’, i.e. nearly level, a texture of ‘sicl’, i.e. silty clay loam, and a reaction of pH 6.5. File formats: Land unit data from the data entry matrix ALES V4.5 and later allows data to be entered and edited in matrix form, using Option ‘A’ (‘Edit data in a matrix’) of Menu 1.3 ‘Data’. While viewing the data matrix, the data can be saved to (with the F7 key) or read from (using the F8 key) a disk file. The format of the disk file with the land unit data is as explained in the previous section, except that there is an additional header line with the evaluation code in the leftmost column, followed by the LC codes. This is so that the data can be read into a spreadsheet format, with the header line being the column headers. Here is the example output from the previous section, but using the comma “,” as the delimiter, as required by many spreadsheets. Notice the additional header line: "MyEval","slope","texture","reaction" "Aa","A","sicl",6.5 "Bb","E","sl",7.4 "Cc","B","c",5.7 If read into a spreadsheet starting in cell A1, and after a bit of formatting in the spreadsheet, this data looks something like: A 1 B MyEval D slope texture reaction 2 Aa A sicl 6.5 3 Bb E sl 7.4 4 Cc B c 5.7 This looks very much like the data entry matrix in ALES: the rows are map units and the columns are land uses. Now you can apply the usual spreadsheet manipulations to the data, e.g. calculate averages, sums, differences, or compute new variables. In Quattro Pro for DOS or Windows, use the “Tools | Import | Comma delimited” command. In Microsoft Excel for Windows, Version 5, use the “File | Open” command. Specify file Type = ‘text files (*.prn, * .txt, *.csv)’. The ‘Import Wizard’ automatically detects the data format. The ‘file origin’ is DOS or OS/2 (‘pc-8’ character set). ALES Version 4.65 Users Manual Page 239 February 1997 File formats: Evaluation results The information in the ALES evaluation matrix can be output in a form that can be read into relational database managers. You request that evaluation results be written to a DOS file with Option 4 (‘File evaluation results’) of Menu 1.4 (‘Evaluations’). The map units and LUTs included in the resulting disk files are exactly those that are in the current evaluation matrix. So to write just a subset of the entire evaluation, you first have to re-compute the evaluation, selecting just the subset you want to report. Once you select this option, you then select the kind of file to write by choosing in menu ‘1.4.4 Output to a disk file’. There are five possibilities. (1) the suitabilities of map units for each LUT (2) the Land Quality severity levels of map units for each LUR within each LUT (3) the predicted yields on map units for each output in each LUT (4) the by-year cash flow summary for each map unit in each LUT (5) a spreadsheet of any result type. The following sections explain each format in detail. Suitabilities Suitabilites are written out as one line per land unit/land use pair. The database key is the first two fields: land mapping unit code and land utilization type code. These are followed by 10 fields which give different aspects of the evaluation results. Thus each line gives information on the suitability of one land unit for one land use. The record format is: {LmuId} {d} {LutId} {d} {PSC} {d} {PSSC} {d} {PSSC #} {d} {GM} {d} {ELSCg} {d} … {ELSCg #} {d} {NPV} {d} {ELSCn} {d} {ELSCn #} {d} {BCR} {d} {ELSCb} {d} {ELSCb #} ... {d} {IRR} {d} {ELSCi} {d} {ELSCia #} where: 1. {d} is the field delimiter 2. {LmuId} is the map unit code 3. {LutId} is the land utilization type code 4. {PSC} is the integer physical suitability class 5. {PSSC} is the physical suitability subclass; this may be a multi-value with ‘&’ separating the different subclasses 6. {GM} is the predicted gross margin, in currency per hectare-year 7. {ELSCg} is the economic suitability class based on the gross margin, one of the standard FAO classes: ‘s1’, ‘s2’, ‘s3’, ‘n1’, or ‘n2’ 8. {NPV} is the predicted net present value, in currency per hectare 9. {ELSCn} is the economic suitability class based on the NPV, one of the standard FAO classes: ‘s1’, ‘s2’, ‘s3’, ‘n1’, or ‘n2’ ALES Version 4.65 Users Manual Page 240 February 1997 10. {BCR} is the benefit/cost ratio of the present value of cash in vs. out. 11. {ELSCb} is the economic suitability class based on the B/C Ratio, one of the standard FAO classes: ‘s1’, ‘s2’, ‘s3’, ‘n1’, or ‘n2’ 12. {IRR} is the internal rate of return, in percent. 13. {ELSCi} is the economic suitability class based on the IRR, one of the standard FAO classes: ‘s1’, ‘s2’, ‘s3’, ‘n1’, or ‘n2’ The numeric fields {PSSC #}, {ELSCg #}, {ELSCn #}, {ELSCb #} and {ELSCi #} are integer recodings of the text strings given in the {PSSC}, {ELSCg}, {ELSCn}, {ELSCb}, and {ELSCi} fields, respectively. These are included because some programs or database systems into which this data may be read can’t deal with string information. The integers given in {ELSCx #} are a standard translation: integer 1 2 3 4 5 FAO class & meaning s1 suitable s2 moderately suitable s3 marginally suitable n1 economically unsuitable n2 physically unsuitable However, the integers given in {PSSC #} are not standard. These are different for each evaluation matrix. The correspondence between {PSSC} and {PSSC #} is shown in an alert box on the screen after ALES finishes writing the output file. Also, this correspondence can be determined by inspecting the output file itself. Here is some sample output: "A3","ccc",1,"1 & 4e & 4e/me",1,97.21,"s1",1,637.09,"s1",1,1.46,"?",0,61.24,"?",0 "A3","ttpp",1,"1 & 2me",2,87.83,"s2",2,616.56,"s1",1,3.9,"?",0,84,"?",0 "CeB","ccc",1,"1",3,71.07,"s2",2,427.11,"s1",1,1.3,"?",0,42.83,"?",0 "CeB","ttpp",1,"1",3,93.7,"s1",1,663.77,"s1",1,4.33,"?",0,91.51,"?",0 Severity levels The severity levels output is one line per land unit/land use/land use requirement triple. The database key is the first three fields: land mapping unit code, land utilization type code, and land use requirement code. These are followed by a field which gives the integer value of the severity level. The record format is: {LmuId} {d} {LutId} {d} {LurId} {d} {severity level} where: 1. {d} is the field delimiter 2. {LmuId} is the map unit code 3. {LutId} is the land utilization type code 4. {LurId} is the land use requirement code 5. {severity level} is the severity level of the corresponding Land Quality, which is an integer from 1 to the maximum severity level defined for the land use requirement of the land utilization type. ALES Version 4.65 Users Manual Page 241 February 1997 Here is some sample output: "AaA","wheat","e",3 "AaA","wheat","f",4 "AaA","wheat/soy","e",1 "BbB","wheat","e",4 "BbB","wheat","f",2 "BbB","wheat/soy","e",4 In this example, map unit ‘AaA’ has severity level 3 for land use requirement ‘e’ for land utilization type ‘wheat’, and so forth. Yields The yields output is one line per land unit/land use/output triple. The database key is the first three fields: land mapping unit code, land utilization type code, and output code. These are followed by two data fields, the first giving the proportional yield, from 0.00 to 1.00, and the second the predicted yield per unit area per crop. So the record format is: {LmuId} {d} {LutId} {d} {OutId} {d} {pro yield} {d} {pred yield} where: 1. {d} is the field delimiter 2. {LmuId} is the map unit code 3. {LutId} is the land utilization type code 4. {OutId} is the output code 5. {pro yield} is the proportional yield, as a fraction from 0.00 to 1.00 6. {pred yield} is the predicted yield The predicted yield's unit of measurement (numerator) and unit of area (denominator) are not written in this file; you must determine them from the evaluation model. Example are: kg/ha, cwt/acre, number/m2, etc. Here is an example output: "AaA","agh","alfalfa",.8,8 "AaA","agh","hay",1,2000 "AaA","ww","wheat",.9,4.5 "BbB","agh","alfalfa",0,0 "BbB","agh","hay",.8,1600 "BbB","ww","wheat",.6,3 In this example, map unit ‘AaA’ has a proportional yield of .8 for output ‘alfalfa’, corresponding to a per-unit area, per-crop yield of 8 output units per unit area, for land utilization type ‘agh’, and so forth. Cash flow summary The cash flow output is one line per land unit/land use/year in planning horizon triple. The database key is the first three fields: land mapping unit code, land utilization type code, and year number (1,2,...). These are followed by five data fields, giving the actual and discounted cash flows. The record format is: {LmuId} {d} {LutId} {d} {YrId} {d} {cash in} {d} {cash out} {d} {PV in} {d} {PV out} {d} {NPV} ALES Version 4.65 Users Manual Page 242 February 1997 where: 1. {d} is the field delimiter 2. {LmuId} is the map unit code 3. {LutId} is the land utilization type code 4. {YrId} is the year within the planning horizon 5. {cash in} is the actual cash in to the LUT from sales of outputs, in the local currency 6. {cash out} is the actual cash out from the LUT for purchase of inputs 7. {PV in} and 8. {PV out} are the discounted values of these at the beginning of the planning horizon 9. {NPV} is the net present value, i.e. {PV in} – {PV out}. Here is an example output: "AaA","agh",1,187.17,156.28,183.5,156.28,27.22 "AaA","agh",2,249.99,335.2,240.27,328.61,-88.34 Spreadsheet format of the evaluation matrix The spreadsheet format output resembles the evaluation results matrix: √ The first (top) row contains the LUT codes √ The first (leftmost) columns of each row after the first contain the LMU codes √ The columns and rows after the first contain the results as they are displayed in the evaluation results matrix. Any kind of result (physical or economic suitability classes, yields, Land Qualities, profitability) can be written in this format. Non-numeric results are enclosed in quotation marks. Files written with this option can be read directly by Quattro Pro with the “Tools | Import | Comma delimited” command or by Microsoft Excel with the “File | Open; file Type = text” command. The record format is: Row 1: {EvId} {d} {LutId1} {d} {LutId2} {d} ... {LutIdn} Row 2: {LmuId1} {d} {Result2,1,} {d} {Result2,2,} {d} ... {Result2,n,} ... Row m: {LmuIdm-1} {d} {Resultm,1,} {d} {Resultm,2,} {d} ... {Resultm,n,} where: 1. {d} is the field delimiter 2. {EvId} is the evaluation (model) code 3. {LmuIdi} is the map unit code for row i+1 4. {LutIdj} is the land utilization type code for column j+1 5. {Resulti,j} is the evaluation result for map unit i, land utilization type j. Notice that the first row consists of spreadsheet column headers, and that the first column consists of spreadsheet row headers. ALES Version 4.65 Users Manual Page 243 February 1997 Here is an example output, for the yield of corn grain from model ‘Tutor2’: "Tutor2","ccc","ccc-d" "A3",102.168,114.968 "A8",85.158,99.456 "Ad",59.4,112 If read into a spreadsheet starting in cell A1 and after a bit of formatting in the spreadsheet, this data looks something like: A 1 Tutor2 B C ccc ccc-d 2 A3 102.2 115.0 3 A8 85.2 99.5 4 Ad 59.4 112.0 This looks very much like the evaluation results matrix in ALES: the rows are map units and the columns are land uses. Now you can apply the usual spreadsheet manipulations to the data, e.g. calculate averages, sums, differences. In Quattro Pro for DOS or Windows, use the “Tools | Import | Comma delimited” command. In Microsoft Excel for Windows, Version 5, use the “File | Open” command. Specify file Type = ‘text files (*.prn, * .txt, *.csv)’. The ‘Import Wizard’ automatically detects the data format. The ‘file origin’ is DOS or OS/2 (‘pc-8’ character set). File formats: Evaluation models & data The default file extension is .ALS. These files are created with F7 at the list of evaluation models (Main Menu Option 1). These are not intended to be read by any other programs. The format is a modification of the MUMPS ‘%gsave’ format, used to exchange MUMPS data files. The file contains the entire knowledge base and database for the selected evaluation model. File formats: Land Utilization Types The default file extension is .ALU. These files are created with F7 at the list of LUTs (Menu 1.2). These are not intended to be read by any other programs. The format is a modification of the MUMPS ‘%gsave’ format, used to exchange MUMPS data files. The file contains the Land Utilization Type definition for the selected evaluation LUT. More than one LUT may be written to the same file, using the ‘Append’ option. ALES Version 4.65 Users Manual Page 244 February 1997 File formats: Land Characteristic definitions The default file extension is .ALC. These files are created with F7 at the list of LC definitions (Menu 1.1 Option 4). These are not intended to be read by any other programs. The format is a modification of the MUMPS ‘%gsave’ format, used to exchange MUMPS data files. The file contains the selected LC, and any LCs that are needed to infer the selected LCs (for example, LCs used in its LC-to-LC decision tree). They are saved in reverse order, so that when a LC is restored, all the LCs on which it depends will already be restored. More than one LC definition may be written to the same file, using the ‘Append’ option. File formats: Land Use Requirement codes The default file extension is .ALR. These files are created with F7 at the reference list of LUR codes and default severity level names (Menu 1.1 Option 1) These are not intended to be read by any other programs. The format is a modification of the MUMPS ‘%gsave’ format, used to exchange MUMPS data files. All LURs are saved in one file. File formats: Input codes The default file extension is .ALI. These files are created with F7 at the reference list of Inputs (Menu 1.1 Option 2) These are not intended to be read by any other programs. The format is a modification of the MUMPS ‘%gsave’ format, used to exchange MUMPS data files. All input codes are saved in one file. File formats: Output codes The default file extension is .ALO. These files are created with F7 at the reference list of Outputs (Menu 1.1 Option 3) These are not intended to be read by any other programs. The format is a modification of the MUMPS ‘%gsave’ format, used to exchange MUMPS data files. All output codes are saved in one file. ALES Version 4.65 Users Manual Page 245 February 1997 Maintaining an ALES system This Chapter explains how to maintain your ALES database and make modifications to your ALES environment. It is intended for the person functioning as System Manager for your PC. This is the person who works with the operating system, performs backups, adds new hardware, and so forth. It may in fact be the same person as the land evaluator. Before using this Chapter, you should already be familiar with the Chapter ‘Installing, Configuring and Running ALES’. The topics of this Chapter are (1) program errors, (2) backing up your ALES system and restoring it in case of problems; (3) working with Datasets; (4) managing large ALES models; and (5) the MUMPS programming environment. It is impossible to anticipate every problem that you may encounter. If you have previous experience with computer systems, you know the variety of things that can and do go wrong. Perhaps the best advice we can give is to never compound a problem by making hasty decisions. Once you are aware of a problem, make sure you understand its cause before attempting any corrective action. Then map out a strategy to correct the problem. If you are going to be overwriting any files, it is wise to first make backup copies of them, even if you don’t think you’ll need them. You always want to be able to recover to at least the point you’re at before you start a fix-up process. Y ou shoul d al ways be i n a si tuati on whe r e , i f al l e l se fai l s, you c an re -i nst al l AL ES from sc rat c h, i . e . fr om the or i gi nal di str i buti on di sk e tte s, and the n r e l oad your e val uati ons and data i nto i t. Program errors You may encounter a program error while running ALES. These can be caused by programming errors, by a model which exceeds the capacity of the program (unlikely), or combinations of circumstances unforeseen when the program was designed, as well as by limitations of the computer system, such as a full disk. If an error occurs, an error message will appear in front of the other windows, giving the internal (MUMPS) name of the error and its location in the program. If you wish, you can copy the message and contact the ALES project, along with information about the circumstances in which the error occurred. You can try to avoid the error by making sure your model is reasonably complete and contains reasonable values; often problems occur when unforeseen data values exceed the capacity of the system1. Some kinds of errors call for action on your part. In particular, if you see a ‘Disk Full’ error, this is because ALES has attempted to allocate more disk space for an evaluation model or data, and was not able to because at least 512Kb was not free. You must free up at least this much disk space before restarting ALES. If you see a ‘Dataset Full’ or ‘Index pages full’ message, refer to the section ‘Managing large ALES models and datasets’, below, for instructions, After you are done looking at the error message, press any key and you should return to the opening screen, i.e. the list of evaluation models. 1 Although ideally the program should be able to anticipate these problems. ALES Version 4.65 Users Manual Page 246 February 1997 In ve r y r ar e c i r c umstanc e s M UM PS may se e m to ‘fr e e z e ’ the c ompute r syste m. If the c ompute r doe s not r e spond to any k e ystr ok e s, wai t unt i l al l di sk ac t i v i t y st ops (i . e . the ‘di sk ac ti ve ’ l i ght i s off) for a se ve r al se c onds and tr y agai n. Usually the ‘freeze’ is caused by MUMPS expanding or restructuring its database. This occurs at unpredictable times, when the ALES database becomes too big for the existing MUMPS database. Then MUMPS allocated 512Kb more disk space and restructures its files. This takes up to one minute on a slow computer. However, during this lengthy process, the disk-use light on your computer will be mostly on, and after it is done, the ALES program ‘unfreezes’ and you can continue as normal. If, by contrast, the disk-use light is off for more than five minutes, and the computer still does not respond to any keys including Ctrl+C, reboot and immediately check the dataset integrity, as explained below. In some circumstances MUMPS may not be able to shut down correctly. This may happen in the ‘freeze’ situation, or, more commonly, due to unexpected power failures. In these situations, the next time you start ALES, you will see the following message: ** Warning: MUMPS not shut down correctly ** Verify dataset integrity before proceeding After a few seconds the opening ALES screen will appear. You can try to use ALES, and if no further errors occur, the dataset is most likely intact. If you experience further problems, you should immediately exit from ALES and ask the system manager to verify, and if necessary repair, the datasets as explained in ‘Dataset Verification’, below. Backup The system manager is ultimately responsible for the integrity of the ALES knowledge bases and databases. The only way to ensure that power failures, media problems, or user error does not destroy all or part of an ALES evaluation is to institute a data integrity policy, also known as a backup policy. The most i mpor tant r e sponsi bi l i ty of a syste m manage r i s to de si gn a bac k up pol i c y and e nforc e i t. There are two approaches to backup: user-by-user, or system-wide. These are described in the following two sections. There are two sorts of problems that may affect ALES: (1) those affecting the entire database, and (2) those affecting only one evaluation. The first is caused by hardware problems such as a bad hard disk or disk controller, by software problems such as an error in the MUMPS software (very unlikely), or by a DOS user who deletes or alters one of the dataset files from DOS. The second sort of problem is caused by an ALES user mistakenly altering or deleting an evaluation from within ALES, i.e., performing a legal but undesirable operation. User-by-user backup In the user-by-user approach, each user is responsible for making backup copies of their own evaluations and datasets. A drawback of this approach is that the system manager must rely on the users to act in their own best interests. Although this is clearly desirable from their point of view, experience shows that many computer users don’t think about backup until a disaster strikes. In this case, you, as system manager, might want to have acted to ‘save them from themselves’, and earn their heartfelt thanks for it! This is the motivation behind system-wide backup. ALES Version 4.65 Users Manual Page 247 February 1997 User-by-user backup : models and data Both the model (knowledge base) and data can be backed up to the same DOS file. To do this, the user must be at the ALES screen in ‘model building’ mode (i.e. when ALES is invoked from DOS with the ales command) where the list of evaluations in the system is displayed. The user moves the cursor to highlight the evaluation to be saved, then presses F7. ALES then asks for the name of the DOS file to which to write the evaluation. The default is to a file named ‘{eval}.ALS’ in the same drive and directory as the ALES program, where {eval} is the evaluation code displayed on the left of the screen display1. Typically the user will accept the default file name and extension, but add a drive designation in front of it (like, ‘a:’), so that the backup copy will be written to a diskette. This is preferable to backing up an evaluation on the same hard disk that contains the original ALES database; a hard disk failure or reformatting won’t erase both the ALES and DOS versions of the same evaluation. (The third tutorial presents the same information as in the previous paragraph, in an extended form so that users can learn how to do their own backups.) You can set a default drive and path for saved evaluation models, with Menu 2 ‘System options’, Option 8, ‘Set default path for saved evaluations’. You will need to restore the saved evaluation if the on-line evaluation is accidentally deleted, or if some part of it is badly damaged by editing actions. This kind of backup also will save you if for some reason ALES won’t run at all. In this case, you would re-install ALES from your original distribution diskettes, and then restore all saved evaluations from their individual backups. To restore a saved evaluation (model and data), the user again works from the list of evaluations, but it doesn’t matter where the highlight is. The name of the evaluation to be restored must not be present in the list; if necessary, the incorrect version should be renamed, using Alt-F6, or deleted, using F4, in the list of evaluations. Then the saved evaluation may be restored by pressing F8 and naming the file to be loaded; if necessary the diskette drive containing the saved evaluation is placed in the diskette drive so that the saved evaluation may be found. User-by-user backup : land unit definitions and data only Once an evaluation model, i.e., an ALES knowledge base, is completed, it is not necessary to keep backing it up, as it doesn’t change. However, the ALES data base associated with the model will change if more map units are added to the evaluation or if new data is entered. You can back up just the land unit definitions and data, without the knowledge base, using Options 3 and 6 of the ‘Data’ menu (1.3). Note that this method of backup is also accessible to model users who enter ALES from DOS with the ‘evaluate’ command, as well as to model builders. The output resulting from these two options is described in the Chapter ‘ALES and other computer systems’; here we just describe the backup and restore process. You can set a default drive and path for the saved database, with Menu 2 ‘System options’, Option 9, ‘Set default path for database import/export’. To back up the list of map unit definitions: select Option 3 ‘Definitions, to a disk file, write’ of Menu 1.3 ‘Data’, and specify a field delimiter and file name. The default delimiter of ‘;’ (ASCII 59.) is fine; for the file give the drive name (typically a diskette, like ‘a:’) as well as a file name. When the form is confirmed, the definitions will be written to the selected file, and you will be informed of the number of definitions that were written. 1 ALES automatically removes characters that aren’t legal in DOS file names, and truncates the suggested file name to eight characters, as required by DOS. ALES Version 4.65 Users Manual Page 248 February 1997 To back up the map unit data requires two steps. First you will have to define one or more data entry templates, using Option 7 ‘Templates’ of Menu 1.3 ‘Data’. If you already have all your LCs in one template you do not need to define another; otherwise, define a new template, e.g. with the name ‘backup’, and put all the LCs defined for the evaluation into the field list1. You only need to define this template once, and then it is available for use each time you want to back up the data. Once you have defined a template containing the LCs you want to save, select Option 6 ‘Data, to a disk file, write’ of Menu 1.3 ‘Data’, and when you are asked to select a template, pick the ‘backup’ template. After you’ve selected a template, you will be asked to specify a field delimiter and file name. The default delimiter of ‘;’ (ASCII 59.) is fine; for the file give the drive name (typically a diskette, like ‘a:’) as well as a file name. When the form is confirmed, the data will be written to the selected file according to the backup template, and you will be informed of the number of (homogeneous) map units for which data was written. To restore saved definitions or data, follow the above processes in reverse. Select menu 1.3 ‘Data’ Option 2 ‘Definitions, from a disk file, read’ to restore map unit definitions, and Option 5 to restore map unit data. In the second case you will be asked to select a template; pick the same one you used to back up the data. In both cases you will be asked to specify a delimiter and file name; be sure to specify the same ones you used when you wrote the files. Before ALES reads definitions or data from the file, it shows you the first few lines of the file, and asks if you want to proceed. This allows you to peek at a file to make sure you have the right one. If you confirm, ALES will try to read the file; any errors will be reported at the bottom of the screen and also written to the log file. After the file is completely read, ALES will tell you how many records were read, and how many were in error. The log file will give details of any problem (you can read the log file with any text editor). If the land unit definitions or data are already in the ALES database, they will be overwritten with the values read in from the file. System-wide backup In system-wide backup, the system manager backs up the entire ALES database and knowledge base at once. There are two methods: (1) from within MUMPS (recommended) and (2) from DOS. An advantage to the within-MUMPS system-wide backup is that it is the first step in the database compression and repair procedure explained later. System-wide backup from MUMPS In the system-wide approach, you use the MUMPS ‘%dsbackup’ procedure to save the user datasets, as follows: 1. From DOS, run the ‘util’ batch file, located in the same directory as the ‘ales’ batch file, by typing util at the DOS prompt. The MUMPS system program ‘%utility’ appears, with a menu of system maintenance options. 2. Move the cursor to Option 4, ‘Database maintenance utilities’, and press Enter. A sub-menu of nine options will appear. 3. Move the cursor to Option 4, ‘Backup dataset’, and press Enter. This will invoke ‘%dsbackup’. 1 You don’t have to include any derived LCs (i.e., computed by a formula, by a LC-to-LC decision tree, or inferred from a commensurate LC), because these can always be re-inferred from the primary LCs, using Option 9 ‘Infer Land Characteristic values’ of Menu 1.3 ‘Data’. ALES Version 4.65 Users Manual Page 249 February 1997 4. Select dataset ‘EVAL-GBL’ as the one to be backed up, by typing the number in front of this name in the list of datasets, and pressing Enter. The program will ask for an additional dataset; just press Enter without entering anything. A list of parameters will appear, and the active question will be the name of the archive file. 5. If you have a diskette drive ‘a’, the default archive file name ‘A:DT’ is fine. Otherwise, replace this with the name of the DOS file for the backup, without the extension (‘%dsbackup’ will automatically add the extensions ‘.01’, .’02’ etc. as needed). If at all possible, you should back up to a removable medium such as a diskette. When you have entered a valid name, complete the form by pressing Esc. 6. You will be prompted to insert the first diskette; do so and press P to proceed. 7. The dataset will be backed up to the disk you specified. If the dataset is too big to fit on a single diskette, %dsbackup will prompt for more diskettes as necessary. 8. When the backup is done, you will be returned to the database options menu. Press End to return to DOS. System-wide backup should be every day when there is any use of ALES. You should prepare at least three sets of diskettes for backup: the ‘current’, ‘father’, and ‘grandfather’ sets. These are rotated, so that, for example, one day’s ‘grandfather’ set becomes the next day’s ‘current set’. In this way, you can go two backups before discovering a problem, and still recover from it. Every few months (e.g., quarterly), you should make an archival backup, and store it off-site. If the entire EVAL-GBL dataset becomes corrupted, for example by a hard disk problem, accidentally erasing the dataset file, or a MUMPS-induced database degradation error, you must restore the entire database, using the ‘%dsrestore’ MUMPS procedure. You invoke this from the util batch file in the same manner as ‘%dsbackup’ (see immediately above), except that this is Option 5, ‘restore dataset’, of the ‘database maintenance utilities’ sub-menu. If a user has erased or corrupted an evaluation, but the EVAL-GBL dataset is otherwise intact, the valid evaluations must be saved to diskette using the ‘F7’ method explained in the ‘user-by-user’ backup method (above), next ‘%dsrestore’ is used to recover the dataset as it was last saved, and then the valid evaluations are restored with the ‘F8’ method. If the valid evaluations have not been altered since the most recent backup, it is not necessary to save and restore them with ‘F7/F8’. System-wide backup from DOS Another approach to system-wide backup is to use the DOS ‘backup’ command, or a commercial backup product such as Microsoft Backup, including your MUMPS dataset files in the backup. This may be desirable if you already have a data integrity policy for your PC; then if you include the ALES datasets, they will be similarly protected. The only files that need to be backed up are the datasets containing the user evaluations. As distributed, these files are ‘c:\dtm\eval\eval-gbl.*’. There is no need to back up the MUMPS program, system utilities, or ALES program source and support files, as these do not change, and can be reloaded from the original distribution diskette should anything happen to them. Of course, you may choose to back them up, along with your other application programs, for recovery from a complete hard-disk failure. If you are doing incremental backups of DOS files, the ALES datasets will generally not be backed up. This is because their date of modification is not altered after they are created (because the MUMPS run-time system manages them, without telling DOS they have been modified), so that backup software can’t tell that they’ve changed. You must force the backup software to save ‘eval-gbl.*’ every time, whether or not its DOS time stamp has been updated. ALES Version 4.65 Users Manual Page 250 February 1997 Working with MUMPS datasets MUMPS stores program code, program data (such as text and menu structures), and user data in files called datasets. ALES uses the following datasets (you can see this also in the ‘database description’ file MUMPS.DBD): SYS-BASE SYS-RTN SYS-GBL ALES5-RT ALES5-GB LTX5E-GB LTX5F-GB LTX5S-GB LTX5I-GB EVAL-GBL MUMPS run-time system, supplements MUMPS.EXE MUMPS system programs MUMPS system data structures ALES program code ALES support data structures, except text Also includes temporary storage (data & video screens) English-language ALES texts French-language ALES texts Spanish-language ALES texts Indonesian-language ALES texts ALES models & data Only the last-named dataset, EVAL-GBL, is modified by the ALES program user. Dataset ALES5-GB is heavily modified during ALES program use, since it contains temporary data and video storage; however under normal program exit, it is restored to its previous state. On program startup, any left-over temporary storage is deleted as well. Each dataset is stored in two DOS files: an index (extension ‘.IND’) and the actual data (extension ‘.DAT’). The index is a highly-optimized B-Tree, which is what gives MUMPS its very fast data access. The data does not occupy fixed fields (as in xBase-format data files), but instead all fields are variable-length and in fact may be missing altogether; the index keeps track of this. The only disadvantage to the MUMPS dataset structure is that it may become fragmented or corrupted. The following sections explain how to deal with these problems. Dataset compression After a period of intensive use, MUMPS databases become fragmented in two ways. First, the expansion of the dataset creates DOS fragments on the hard disk. Second, the internal structures used by MUMPS within the dataset become spread out within the disk area available to them. Both of these instances of fragmentation lead to degraded performance and wasted disk space. Periodically, the system manager should compress the MUMPS databases used by ALES. The only dataset that should need compressing is that containing the user evaluations, i.e., ‘EVAL-GBL’1. Compressing a dataset is accomplished by the use of the ‘%dscompress’ MUMPS utility, described in §7.1.8 of the DataTree manual. This is invoked from the util batch file in the same manner as ‘%dsbackup’ (see the previous section ‘Backup’), except that this is database maintenance utility menu Option 7 ‘Compact Dataset in place’ of the sub-menu. You can instead choose Option 6, ‘Compress and Copy Dataset’, which makes a copy of the original dataset and compresses the copy. This avoids any possible problems with the computer while the compression is taking place, and also allows you to repair the dataset as it is 1 The dataset ‘ALES5-GB’, which is used for temporary storage, could be compressed, but will re-expand the next time ALES starts. ALES Version 4.65 Users Manual Page 251 February 1997 compressed. Once the compressed version of the dataset has been made, delete the original version, and then copy the compressed version to the correct location. For example, you could compress dataset ‘EVAL-GBL’ to a temporary location, e.g. another location in the directory hierarchy (not in C:\DTM\EVAL), by specifying a full path when asked for the file specification by the compression utility. Then these compressed files (‘eval-gbl.dat’ and ‘evalgbl.ind’) could be copied to C:\DTM\EVAL\, over-writing the old (uncompressed) versions. Dataset verification In certain circumstances MUMPS may not shut down correctly, or the database may otherwise be corrupted. You can check for this by running the ‘%dsverify’ utility on all datasets (although we have never seen errors except in datasets ‘EVAL-GBL’ and ‘ALES5-GB’, because the others are not modified by ALES). This utility is invoked from the util batch file in the same manner as ‘%dsbackup’ (see the previous section ‘Backup’), except that this is database maintenance utility menu Option 8, ‘Verify Dataset Integrity’, of the sub-menu. If ‘%dsverify’ reports an error (any message other than ‘Dataset is OK’, you will have to fix that dataset. Your first approach to fixing a dataset should be to compress the dataset in question, as explained in the previous section, using database maintenance utility menu Option 6 in ‘repair’ mode (answer ‘Yes’ to the question ‘Repair mode’ in the setup form which appears when you select Option 6). Then run ‘%dsverify’ again on the fresh copy to see if the error has gone away. Do not try to use ‘%dsrepair’ (database maintenance utility sub-menu Option 11), this is only for those familiar with the internal structure of MUMPS databases, and its incorrect use can irretrievably damage a dataset. If the dataset is still corrupt, you will have to reinstall ALES. You can then re-load the evaluation models and data from user-by-user backup (‘F7/F8’), if any. Or, if you have a valid system-wide backup of the ‘EVAL-GBL’ dataset, you can restore it as explained above, over-writing the ‘EVAL-GBL’ installed with the distribution. Managing large ALES models and datasets One of the advantages of the DataTree MUMPS run-time system (DTM-PC) on which ALES is built is that it is quite efficient at handling large databases. Of course, with a large database, performance is slower, but with DTMPC the slowdown is more-or-less linear, not exponential. As you continue to use ALES, you may see one of these MUMPS errors when adding more Land Utilization Types or Land Mapping Units: Dataset Full Index Page Full These simply mean that MUMPS has reached the limit pre-assigned to it for the file ‘EVAL-GBL.DAT’ or ‘EVALGBL.IND’, which are the DOS files which contain the ALES user evaluation data and models. When you see this message, there are three possible actions: First, maybe some of your model is not needed (e.g. LUTs you have replaced with more accurate equivalents). In this case, simply delete part of the model and you will have more space. Second, perhaps you have combined data from several sources but only use some of it at any one time. You can save data with Menu 1.3 Options 3 and 6, and then delete the entire database (Option 8) or just some of the map units. Finally, you can expand the MUMPS dataset, up to the size of your hard disk if you wish. To do this: ALES Version 4.65 Users Manual Page 252 February 1997 1. From DOS, run the ‘util’ batch file, located in the same directory as the ‘ales’ batch file, by typing util at the DOS prompt. The MUMPS system program ‘%utility’ appears, with a menu of system maintenance options. 2. Move the cursor to Option 4, ‘Database maintenance utilities’, and press Enter. A sub-menu of nine options will appear. 3. Move the cursor to Option 9, ‘Modify dataset parameters’, and press Enter. 4. Select dataset ‘EVAL-GBL’ as the one to be modified up, by typing the number in front of this name in the list of datasets and pressing Enter. You will see a form that looks like this: Dataset Name EVAL-GBL Description ALES user evaluation data Maximum Data Page Count 5000 Extension Data Page Count 500 Maximum Index Page Count 240 Extension Index Page Count 24 Read Timeout 10 Write Timeout 10 Security Mask 65535 The fields that are of interest are ‘Maximum Data Page Count’ and ‘Maximum Index Page Count’. Each data page is 1K and each index page is 0.5K, and they generally are required in an approximately 20:1 ratio. As distributed, ALES allows up to 5000 data pages (= 4.88Mb) and 240 index pages (=120Kb), for a total size of almost exactly 5Mb. If you want more space, simply increase these numbers, keeping approximately a 20:1 ratio. When you are done, Press ESC to indicate form is complete, END to cancel form, ESC once more and you are done. The next time ALES tries to expand its dataset, it will be successful. It’s a good idea also to run Option 7 ‘Compact Dataset in place’ on the EVAL-GBL dataset. This will compact the dataset, group related items, and speed up operations. This option is DataTree’s equivalent of a DOS disk defragmenter. The MUMPS1 environment ALES is an application program running under the DataTree MUMPS database language and run-time environment (‘DTM-PC’). In turn, DataTree MUMPS is an application program running under your PC’s operating system, PC-DOS or a functional equivalent. You do not need to know anything about MUMPS to run ALES. This section is included just in case you want to learn a little bit about the MUMPS environment. Along with each ALES license you have purchased from Cornell, you have also purchased a single-user license from the DataTree Division of InterSystems Corp. of Cambridge, Massachusetts, USA to use their MUMPS system. However, you do not have the access to DataTree technical support; all inquiries must be directed to the ALES project. 1In 1993, the ANSI language MUMPS officially changed its name to M, and the trade association changed its name from the MUMPS User’s Group (MUG) to the M Technology Association (MTA). However, the name MUMPS is still more common than M. ALES Version 4.65 Users Manual Page 253 February 1997 Namespaces The MUMPS environment is divided into compartments called namespaces. You can see the namespaces defined for your system in the configuration file ‘MUMPS.DBD’. Each namespace refers to several DOS files: one or more for routines (programs) and one or more for globals (permanent data). ALES stores all your evaluation models in namespace ‘EVAL’, which refers to files ‘EVAL-GBL.IND’ and ‘EVAL-GBL.DAT’. The MUMPS interpreter When you run ALES, MUMPS is started in ‘program execution mode’. You can see the syntax for this in the batch file ‘ales.bat’: the appropriate DOS command is mumps eval L /par=50k,12k,16k The first field (‘mumps’) is the DOS command name, and the second field (‘eval’) is the namespace in which MUMPS will find its programs and data files. The third field (‘L’) is the routine name, in other words the name of the first module of the program to be run, in this case, ‘L’. After these fields is a slash, ‘/’, and then some program options. If there is a third field listed before the slash ‘/’, MUMPS will look for the named program and run it. When the program is completed, MUMPS will halt, and you will again see the DOS prompt. This is the way ALES is set up to run. (The portion of the command line after the forward slash ‘/’ is a list of startup parameters.) The other way, other than program execution mode, to run MUMPS is in direct mode. You will probably never want to do this. In direct mode, you are conversing with an interpretive shell (this is similar to most BASIClanguage environments). You type MUMPS programming language commands to the shell, and it immediately responds by executing these commands. The command for entering direct mode in the System namespace is: mumps sys /par=32k,16k,16k Note there is no third field before the slash ‘/’, so MUMPS doesn’t start a program. Instead it displays the MUMPS shell prompt, a single left carat (‘greater than’ sign, i.e. >). There are many MUMPS commands, but only two that you need to know in order to interact with the MUMPS shell for system maintenance purposes: ‘halt’ and ‘do’; these can be abbreviated to just ‘h’ and ‘d’, respectively. All commands are terminated by pressing the Enter key. The halt command is used to leave the interpretive shell and return to DOS. At the ‘>’ prompt, type: halt and then press Enter. To e xi t fr om the M UM PS i nte r pr e te r , type ‘hal t’ and the n pr e ss ‘Ente r ’ The do command is used to execute programs. For example, to run the dataset compression utility program from the shell, type do ^%dscompress and then press Enter. The MUMPS subroutine name (e.g. ‘%dscompress’ in the previous example) must be preceded by the up-arrow or carat ‘^’. When ALES is finished, the shell will regain control. Remember, exit from the MUMPS interpreter back to DOS with the ‘halt’ command. ALES Version 4.65 Users Manual Page 254 February 1997 You can also calculate at the prompt, using the set command, and display the results with the write command. For example: set f=98.6 set c=f-32/1.8 write c >37 Note that the MUMPS interpreter evaluates from left to right, and does not use conventional algebraic precedence rules. Programming in MUMPS The MUMPS language, which was used to write the ALES software, is a procedural language with a built-in database manager. It was originally developed at the Massachusetts General Hospital in the early 1970s, as a minicomputer language to replace mainframe data processing languages like COBOL. Linguistically, it is a hybrid between LISP and BASIC, with the added feature of sparse, hierarchical, disk-based arrays as the main data structure. The language is used in transaction-oriented data processing applications in medicine, libraries, and business. With the emergence of modern 4th-generation database languages, and linguistically-superior procedural languages, MUMPS will probably never be a major programming language, although the MUMPS Development Committee (affiliation with ANSI and ISO) is working a new version of the standard language, and the M Technology Association is actively promoting M (née MUMPS). If you would like to program in MUMPS, you don’t need any additional software, since you have already purchased the required license from DataTree, and the MUMPS programming language is included with the ALES software. However, you will want the complete DataTree user’s manual. And, if you want technical support from InterSystems, you will have to purchase DTM-PC directly from them. Write to DataTree Division, InterSystems Corp., One Memorial Drive, Cambridge, MA 02142 USA, or phone them at USA (617) 374-9191, FAX (617) 4941631, for prices and terms. Be sure to include a copy of your current paper key in your correspondence. To write programs in the DataTree MUMPS environment, you use the zedit command. When you exit from this editor, the program is automatically compiled. For large projects (like ALES), it is advisable to use a programmer’s editor outside the MUMPS environment. In this case, you load routines from the editor’s text file into MUMPS with the ‘%rload’ routine. David Rossiter highly recommends Epsilon1 for DOS, OS/2 and Windows (3.1x or 95). A very good text on MUMPS is “The Complete MUMPS: An Introduction and Reference Manual for the MUMPS Programming Language”, by John M. Lewkowicz of Cornell University, published by Prentice-Hall, Englewood Cliffs, NJ in 1989. You can also obtain tutorials and general information on the language from the M Technology Association, 4321 Hartwick Road, Suite 510, College Park, MD 20740 USA. We do not recommend attempting to alter the ALES program, although we have included the program source code with the ALES distribution mainly so you will feel secure in your purchase of ALES. You should be able to use the framework provided by the program to build models to suit your needs; in this sense the ALES program provides a high-level “programming language” of its own. Also, you can not modify or extend the ALES program without a Memorandum of Understanding with Cornell (because the program code is copyrighted). 1Lugaru Software, 5824 Forbes Ave., Pittsburgh, PA 15217; +1 (412) 421-5911; FAX x6371, e-mail [email protected], Web: http://www.lugaru.com. ALES Version 4.65 Users Manual Page 255 February 1997 ALES Version 4.65 Users Manual Page 256 February 1997 References (See also the annotated bibliography of land evaluation in the Chapter ‘Introduction to Land Evaluation’.) Beatty, M. T., G. W. Petersen, and L. D. Swindale (eds.). 1979. Planning the uses and management of land. Agronomy Monograph 21, American Society of Agronomy, Madison, WI, USA. Beek, K. J. 1978. Land evaluation for agricultural development. International Inst. for Land Reclamation and Improvement, Wageningen, publication 23. Beek, K. J., P. A. Burrough, D.E. McCormack, Eds. 1987 . “Quantified land evaluation procedures: Proceedings of the international workshop on quantified land evaluation procedures held in Washington, DC 27 April - 2 May 1986”. International Institute for Aerospace Survey and Earth Sciences (ITC) Publication No. 6. Enschede, the Netherlands, ITC. Bouma, J. and A. K. Bregt, Eds. 1989. Land qualities in space and time. Proceedings of a symposium organized by the International Society of Soil Science (ISSS), Wageningen, the Netherlands 22-26 August 1988. Wageningen, Pudoc. Bouma, J. & H. A. J. van Lanen. 1987. Transfer functions and threshold values: from soil characteristics to land qualities. pp. 106-110 in: Beek, K.J., P.A. Burrough, and D.E. McCormack (ed.). 1987. “Quantified land evaluation procedures: proceedings of the international workshop on quantified land evaluation procedures, held in Washington, DC 27 April - 2 May 1986”. International Institute for Aerospace Survey and Earth Sciences (ITC) publication No. 6, Enschede, The Netherlands. Burrough, P.A. 1986. Principles of geographical information systems for land resources assessment. Monographs on Soil and Resources Survey No. 12, Oxford Science Publishers, New York. Cornell University. 1989. 1989 Cornell Recommends for field crops. New York State College of Agriculture and Life Sciences, Cooperative Extension, Ithaca, NY. Cox, W.J. & S.D. Klausner (eds.). 1987. Cornell Field Crops and Soils Handbook, 2nd ed. New York State College of Agriculture and Life Sciences, Cooperative Extension, Ithaca, NY. DataTree, Inc. 1986. DTM-PC reference manual and operations guide. DataTree Inc., Waltham, MA. Date, C.J. 1990. An introduction to data base systems. 5th ed. : Addison-Wesley, Reading, MA Davidson, D. A. 1980. Soils and land use planning. Longman’s, London. Davidson, D. A. 1992. The evaluation of land resources. Longman Scientific, London. Davidson, D. A. (ed.). 1986. Land evaluation. Van Nostrand Reinhold/AVI Dent, D. & A. Young. 1981. Soil survey and land evaluation. George Allen and Unwin, London, England. van Diepen, C. A., Van Keulen, H., Wolf, J., & Berkhout, J. A. A. 1991 Land evaluation: from intuition to quantification. In: B. A. Stewart (Eds.), Advances In Soil Science 15: 139-204. Springer, New York. Dumanski, J. and C. Onofrei. 1989. Techniques of crop yield assessment for agricultural land evaluation. Soil Use & Management 5(1): 9-16. ALES Version 4.65 Users Manual Page 257 February 1997 Food and Agriculture Organization of the United Nations. 1976. A framework for land evaluation. Soils Bulletin 32, FAO, Rome, Italy. Food and Agriculture Organization of the United Nations. 1983. Guidelines: land evaluation for rainfed agriculture. Soils Bulletin 52, FAO, Rome, Italy. Food and Agriculture Organization of the United Nations. 1984. Land evaluation for forestry. Forestry Paper 48, FAO, Rome, Italy. Food and Agriculture Organization of the United Nations. 1985. Guidelines: land evaluation for irrigated agriculture. Soils Bulletin 55, FAO, Rome, Italy. Food and Agriculture Organization of the United Nations. 1991 Guidelines: land evaluation for extensive grazing. Soils Bulletin 58, FAO, Rome, Italy. Forbes, T.R., D. Rossiter, and A. Van Wambeke. 1982. Guidelines for evaluating the adequacy of soil resource inventories. 1987 printing ed. SMSS Technical Monograph #4. Cornell University Department of Agronomy, Ithaca, NY. Hack-ten Broeke, M. J. D., H. A. J. van Lanen, & Bouma, J. 1993. The leaching potential as a land quality of two Dutch soils under current and potential management conditions. Geoderma 60: 73-88. Hudson, N. 1981. Soil conservation, 2nd ed. Cornell University Press, Ithaca, NY. Hudson, N. 1995. Soil conservation, 3rd ed. Iowa State University Press, Ames, IA. Hutton, Frank Z. Jr. 1971. Soil survey of Cayuga County, New York. US Government Printing Office, Washington, DC. Johnson, A. K. L. and R. A. Cramb 1996. Integrated land evaluation to generate risk-efficient land-use options in a coastal environment Agricultural Systems 50(3): 287-305. Johnson, A. K. L., R. A. Cramb, and J.R. McAlpine. 1994. Integration of biophysical and economic data using an expert system: results from a case study in northern Australia. Soil Use & Management 10: 181-188. Keyzer, M. A. 1992. Land evaluation: towards a model representation, Centre for World Food Studies, Stichting Ondersoek Wereldvoedselvoorziening van den Vrije Universiteit Amsterdam. van Lanen, H. A. J., Hack-ten Broeke, M. J. D. , Bouma, J., & de Groot, W.J.M. 1992. A mixed qualitative/quantitative physical land evaluation methodology. Geoderma 55: 37-54. van Lanen, H. A. J. and H. Wopereis. 1992. Computer-captured expert knowledge to evaluate possibilities for injection of slurry from animal manure in the Netherlands. Geoderma 54: 107-124. León Pérez, J. C. 1992. Aplicación del Sistema Automatizado para la Evaluación de Tierras (ALES), en un sector de la cuenca del río Sinú (Córdoba, Colombia). Revista C.I.A.F. 13(1): 19-42. Lewkowicz, J. 1988. The Complete MUMPS. Prentice-Hall, Englewood Cliffs, NJ USA McRae, S.G. & Burnham, C.P. 1981. Land evaluation. Monographs on soil survey, Oxford: Clarendon Press. viii, 239 pp. ALES Version 4.65 Users Manual Page 258 February 1997 MUMPS Users Group. 1985. ANS MUMPS programmers' reference manual. MUMPS Users Group, College Park, MD. Purnell, M. 1987. Quantitative land evaluation in some FAO programs. pp. 7-15 in: Beek, K.J., P.A. Burrough, and D.E. McCormack (ed.). 1987. “Quantified land evaluation procedures: proceedings of the international workshop on quantified land evaluation procedures, held in Washington, DC 27 April - 2 May 1986”. International Institute for Aerospace Survey and Earth Sciences (ITC) publication No. 6, Enschede, The Netherlands. Riquier, J.. 1974. A summary of parametric methods of soil and land evaluation.. p. 47-53. In: Food and Agriculture Organization of the United Nations, Soils Bulletin 22, FAO, Rome, Italy. Rossiter, D.G. 1988a. The Automated Land Evaluation System: a microcomputer program to assist in land evaluation. 1988. Ph.D. dissertation, Cornell University. University Microfilms, Ann Arbor, MI. Rossiter, D.G. 1988b. ALES: a microcomputer program to assist in land evaluation. Proc. International Workshop on Land Qualities in Space and Time, Wageningen, the Netherlands, 22-26 August 1988, Pudoc, Wageningen. Rossiter, DG. 1990. ALES: A framework for land evaluation using a microcomputer. Soil Use & Management 6(1): 7-20. Rossiter, D. G. 1995. Economic land evaluation: why and how Soil Use & Management 11: 132-140. Rossiter, D. G. 1996. A theoretical framework for land evaluation (with Discussion). Geoderma 72: 165-202. Rossiter, D. G., M. Tolomeo, & A. R. Van Wambeke, 1988. Automated Land Evaluation System Version 1.0 User's Manual. Department of Agronomy, Cornell University, Ithaca, NY. Rossiter, D. G. and A. R. Van Wambeke. 1991. Automated Land Evaluation System (ALES) Version 3 User's Manual. SCAS Teaching Series 2. Ithaca, NY, Cornell University, Department of Soil, Crop & Atmospheric Sciences. Sánchez, P.A. , W. Couto, & S.W. Buol. 1982. The fertility capability soil classification system: interpretation, applicability, and modification. Geoderma 27(4): 283-309. Siderius, W. (ed.). 1984. Proceedings of the workshop on land evaluation for extensive grazing (LEEG). International Inst. for Land Reclamation and Improvement Publ. 36, Wageningen, The Netherlands. Siderius, W. (ed.). 1986. Land evaluation for land-use planning and conservation in sloping areas.. International Inst. for Land Reclamation and Improvement Publ. 40, Wageningen, The Netherlands. Snyder, D.P., & W.F. Lazarus. 1987. Field crop enterprise budgets: 1987 projections and grower worksheets. New York State. Mimeo A.E. Res 87-8. Department of Agricultural Economics, Cornell University, Ithaca, NY. Snyder, D.P. 1988. Field crop enterprise budget update: 1988 cost and return projections and grower worksheets. New York State. Mimeo A.E. Res 88-6. Department of Agricultural Economics, Cornell University, Ithaca, NY. Sys, C. 1985. Land evaluation (Parts I, II, III, and Appendices). Publications Agricoles 7, Administration Générale de la Coopération au Développement, Brussels, Belgium. ALES Version 4.65 Users Manual Page 259 February 1997 Wagenet, R. J. and J. Bouma, Eds. 1993. Operational methods to characterize soil behavior in space and time. Geoderma Vol. 60 Nos. 1-4. Amsterdam, Elsevier. Wood, S.R., & F.J. Dent. 1983. LECS: a land evaluation computer system. Ministry of Agriculture, Government of Indonesia, publications AGOF/INS/78/006/Manual 5 (Methodology) and 6 (User's Manual), Bogor, Indonesia. ALES Version 4.65 Users Manual Page 260 February 1997 Appendix 1 - ALES program structure This appendix shows the structure of the ALES program, from the model builder's point of view (DOS command ‘ales.bat’), by means of a nested key. The various types of interactions are: Menu: choose one of the numbered action items Choose: add to, delete from, edit in, or copy in a list; new items typed in List: add to, delete from, edit in a list; new items selected from another list Ordered list: a list where the items are numbered Select: pick exactly one item from a list Set: pick any number of items from a list Form: type in answers to one or more questions all pertaining to the same thing Enter: type in an answer to one question Decision tree editor Opening screen: Copyright, licensee name, and serial number Main Menu - ‘ALES [Build models]’ 1 Build models & evaluate Choose: evaluation model [may also save to (F7), restore from (F8) disk file] F3, F5 Form: Descriptive name, currency symbol, Areal unit1 Menu 1 - ‘Main Options [Build Models]’ 1 Reference Lists: Menu 1.1 ‘Reference Lists’ 1 Land Use Requirement reference list Choose: land use requirement code Form: descriptive name 2 Output reference list Choose: output code Form: descriptive name, units of measurement, price per unit 3 Input reference list Choose: input code Form: descriptive name, units of measurement, cost per unit 4 Land Characteristic descriptions Choose: land characteristic code [If a new LC] Enter: land characteristic code Form: descriptive name, number of classes, units of measurement [Case: LC has classes and units of measurement] Menu 1.1.4a - Specification options for Discrete LC (with units) 1 Name, units Form: descriptive name, units of measurement 2 class Abbreviations Form: abbreviations for each class 3 class Names Form: descriptive names for each class 4 class Limits Form: lower limit of class 1, upper limit of each class ALES Version 4.65 Users Manual Page 261 February 1997 5 Lc -> Lc decision tree Decision Tree Editor 6 Infer from commensurate LC Select: infer from which commensurate LC? 7 Add a class Select: Add before which LC class, or after last class? Form: abbreviation, descriptive name, upper limit for new class Select: Join new LC to which adjacent class? 8 Delete a class Select: Delete which LC class? Select: Join deleted LC to which adjacent class? [Case: LC has classes but no units of measurement] Menu 1.1.4b - Specification options for Discrete LC (no units) 1 Name Form: descriptive name 2 class Abbreviations Form: abbreviations for each class 3 class Names Form: descriptive names for each class 4 Lc -> Lc decision tree Decision Tree Editor 5 Add a class Select: Add before which LC class, or after last class? Form: abbreviation, descriptive name for new class Select: Join new LC to which other class? 6 Delete a class Select: Delete which LC class? Select: Join deleted LC to which other class? [Case: LC has no classes] Menu 1.1.4c - Specification options for Continuous LC 1 Name, units Form: descriptive name, units of measurement 2 Data validation limits Form: lowest, highest values 3 Infer by a formula Enter: formula 2 Land Utilization Types Choose: land utilization type code [may also save to (F7), restore from (F8) disk file] F3 Form: initial values of descriptive name, planning horizon, discount rate, # of physical suitability classes Menu 1.2 : ‘Specification options for LUT’ 1 Name Form: descriptive name 2 Length [Case - planning horizon is >1 year] Menu 1.2.2 - Length of planning horizon for LUT 1. Add a year (lengthen) Select: add a year where? 2. Delete a year (shorten) Enter: delete which year? [Case - planning horizon is exactly 1 year] Select: add a year before which year in the planning horizon, or after the last year? ALES Version 4.65 Users Manual Page 262 February 1997 3. Economic parameters Menu 1.2.3 - Economic parameters for LUT 1 Discount Rate Form: discount rate 2 Economic class limits - Gross Margin Form: lower limits for suitability classes s1, s2, and s3 3 Economic class limits - Net Present Value Form: lower limits for suitability classes s1, s2, and s3 4 Economic class limits - Internal Rate of Return Form: lower limits for suitability classes s1, s2, and s3 5 Economic class limits - Benefit/Cost Ratio Form: lower limits for suitability classes s1, s2, and s3 4 Inputs - annual List: which input? Form: number of units per unit area per year 5 Inputs - by year Choose: which year? List: which input? Form: number of units per unit area this year 6 Outputs List: output Menu 1.2.6 ‘Specification options for LUT, Output’ 1 Optimum yield, years when produced, how yield is affected Form: Optimum yield, years when produced, reduce yield?, delay production? 2 proportional yield decision tree Decision Tree Editor 3 Multiplicative Yield Factors Select: multiplicative yield factors for which LUR? Form: multiplicative yield factors for each severity level of the LQ 4 Limiting Yield Factors Select: limiting yield factors for which LUR? Form: limiting yield factors for each severity level of the LQ 5 Production-dependent inputs List: which input? Form: Number of units of the selected input per unit of production of this output 7 Land Use Requirements List: land use requirements Menu 1.2.7 ‘Specification options for LUT, LUR’ 1 severity level names Form: name for each level 2 additional Annual inputs List: annual inputs Form: number of units of the input for each severity level of the LQ 3 additional by-year inputs List: which year? List: by-year inputs Form: number of units of the input for each severity level of the LQ 4 Severity level decision tree Decision Tree Editor 5 Multiplicative Yield Factors Select: multiplicative yield factors for which output? Form: multiplicative yield factors for each severity level of the LQ ALES Version 4.65 Users Manual Page 263 February 1997 6 Limiting Yield Factors Select: limiting yield factors for which output? Form: limiting yield factors for each severity level of the LQ 7 Maximum limitation Enter: include this LUR in the list of maximally-limiting factors? 8 Add a severity level Select: Add before which severity level of the LUR, or after highest-# level? 9 Delete a severity level Select: Delete which severity level of the LUR? 8 Physical Suitability Subclasses Menu 1.2.8 ‘Physical Suitability options for LUT’ 1 Enter/edit physical suitability subclass decision tree Decision Tree Editor 2 Choose factors for maximum limitation Set: Consider which LURs in the maximum limitation? 3 Enter/edit names or notes for physical suitability subclasses Choose: physical suitability subclass code Form: descriptive name for PSSC 4 Add a physical suitability class Select: Add before which physical suitability class, or after highest-# class? 5 Delete a physical suitability class Select: Delete which physical suitability class (not including the highest- and lowestnumbered classes)? 9 land units Not Rated List: map units not to be rated 3 Data: Menu 1.3 1 Definitions, from keyboard, enter or edit Choose: land mapping unit code Form: name, hectares, homogeneous/compound [If map unit is compound] List: constituent homogeneous map units Form: proportion of each constituent 2 Definitions, from a disk file, Read Form: field delimiter, input file, log file 3 Definitions, to a disk file, Write Form: field delimiter, output file 4 Data, from keyboard, enter or edit Select: data entry template Select: land mapping unit Form: data for land mapping unit 5 Data, from a disk file, Read Form: field delimiter, input file, log file 6 Data, to a disk file, Write Form: field delimiter, output file 7 Templates Choose data entry template Menu 1.3.7 Specification options for data entry template 1 Descriptive name Form: descriptive name 2 List of data fields (land characteristics) Ordered list: data fields 8 Erase the data base 9 Infer land characteristic values ALES Version 4.65 Users Manual Page 264 February 1997 Set: infer values of which LCs? A Edit data in a matrix Select: data entry template Set: edit data values for which homogeneous LMUs? Display evaluation matrix <Enter>: Edit data value for LC in current column & LMU in current row F2: Why data value for LC in current column & LMU in current row? F3: Infer land characteristic (LC) values F4: Edit data for LMU in current row (Option 4 of Menu 1.3) F5: Edit definition of LC in current column (Menu 1.1.4) F6: Edit definition of LMU in current row (Option 1 of Menu 1.3) F7: Write matrix in spreadsheet-readable format F8: Read data from spreadsheet export format 4 Evaluations: Menu 1.4 1 Compute an evaluation Set: Which land utilization types? Set: Which land mapping units? 2 View evaluation results Select: What kind of report? [Case: one Land Quality] Select: Land Quality to report [Case: Yield] Select: output to report Select: normalized (Yes/No)? [Case: NPV; Gross Margin] Select: normalized (Yes/No)? [Case: Input amount] Select: input to report Select: year to report, or sum over all years Select: normalized (Yes/No)? Display evaluation matrix F2: Why evaluation results for LUT in current column & LMU in current row? F3: Recompute F4: Edit data for LMU in current row (Option 4 of Menu 1.3) F5: Edit specification of LUT in current column (Menu 1.1.5) F6: Edit definition of map unit in current row (Option 1 of Menu 1.3) F7: Write matrix in spreadsheet-readable format 3 Print evaluation results Select: Which kind of output device? Select: What kind of report? [Case: summary report] (report is printed with no further questions) [Case: not a summary report] [Case: one Land Quality] Select: Land Quality to report [Case: Yield] Select: output to report Select: normalized (Yes/No)? [Case: NPV; Gross Margin] Select: normalized (Yes/No)? [Case: Input amount] ALES Version 4.65 Users Manual Page 265 February 1997 Select: input to report Select: year to report, or sum over all years Select: normalized (Yes/No)? Select: Sort by Rows (LMU) or Columns (LUT)? 4 File evaluation results Menu 1.4.4 : Output to a disk file 1 Suitability Matrix Form: output file name, field delimiter 2 Severity Levels Form: output file name, field delimiter 3 Output Yields Form: output file name, field delimiter 4 Cash Flow Summary by year Form: output file name, field delimiter 5 Spreadsheet Select: What kind of report? Form: output file name, field delimiter 5 Save current evaluation results Enter: Description for saved matrix 6 Delete evaluation results Set: Delete which saved evaluation matrices? 5 Reports: Menu 1.5 1 Evaluation results (same as 1.4.3, see above) 2 Land Utilization Types Set: Print which land utilization types? 3 Land Characteristics Set: Print which land characteristics? 4 Land Unit Definitions Set: Print definitions of which land units? 5 Land Unit Data Set: Print data for which land units? 6 data entry Templates Set: Print which templates? 7 Inputs and Outputs Set: Print which inputs and outputs? 8 Land Use Requirement codes Set: Print which LUR codes? 9 Decision Trees Set: Print which decision trees? A Notes Set: Print which notes? B ALES<->xBase Templates Set: Print which templates? C List Land Use Requirements by LUT D List Outputs by LUT E List Inputs by LUT F List Land Characteristics by LUT6 6 Consult Select: evaluate for which LUT? Select: start with data from a map unit in the database? Yes ALES Version 4.65 Users Manual Page 266 February 1997 Select: map unit Consultation F2 Why consultation results? F3 Re-consult F10 Done with consultation Select: save the data from this consultation? Yes Enter: map unit code Enter: descriptive name 7 ALIDRIS Enter: path to IDRISI program [first time only] Menu 1.7 ‘ALES --> IDRISI interface [V4]’ 1 Reclassify an IDRISI raster image with LC values Enter: name of the source image Select: land characteristic to map Enter: name for the new IDRISI map 2 Reclassify an IDRISI raster image with evaluation results Enter: name of the source image Select: Land Utilization Type to report Select: Type of evaluation result to report (like Menu 1.4 Option 2) Enter: name for the new IDRISI map 3 Reclassify an IDRISI values file with LC values Enter: name of source values file Select: land characteristic to map Enter: name for the new IDRISI values file 4 Reclassify an IDRISI values file with evaluation results Enter: name of source values file Select: Land Utilization Type to report Select: Type of evaluation result to report (like Menu 1.4 Option 2) Enter: name for the new IDRISI values file 8 ALES ⇔ xBase Menu 1.8 ALES ⇔ xBase transfer 1 Edit Import/Export Templates Choose: ALES ⇔ xBase Import/Export template code Menu 1.8.1 ALES ⇔ xBase Import/Export Templates 1 xBase file information For a New template only Select What kind of ALES <--> xBase transfer? 1 Import LMU definitions from xBase 2 Import constituents of compound LMUs 3 Import or Export LC values to or from xBase 4 Export evaluation results to xBase Form: descriptive name, xBase file name, xBase key field 2 Field list Choose: xBase field name [Case - transfer type 3] Select equivalent LC [Case - transfer type 4] Select LUT for which to export results Select Type of evaluation result to export (same as Menu 1.4 Option 2) 2 Import Land Mapping Unit definitions from xBase to ALES ALES Version 4.65 Users Manual Page 267 February 1997 Menu 1.8.2 Import Land Mapping Unit Definitions to ALES 1 Import definitions of homogeneous map units Select:ALES ⇔ xBase Import/Export template code (Only type 1 templates will be presented for selection) 2 Import definitions of compound map units Select:ALES ⇔ xBase Import/Export template code (Only type 1 templates will be presented for selection) 3 Import lists of constituents of compound map units Select:ALES ⇔ xBase Import/Export template code (Only type 2 templates will be presented for selection) 3 Import LC values from xBase to ALES Select:ALES ⇔ xBase Import/Export template code (Only type 3 templates will be presented for selection) 4 Export LC values from ALES to xBase Select:ALES ⇔ xBase Import/Export template code (Only type 3 templates will be presented for selection) 5 Export evaluation results from ALES to xBase Select:ALES ⇔ xBase Import/Export template code (Only type 4 templates will be presented for selection) 2 System Options: Menu 2 - System Options 1 Change colors for main screen Select: color scheme 2 Change colors for banner, function keys Select: color scheme 3 Change colors for help screens Select: color scheme 4 Change colors for consultation mode Select: color scheme 5 Change colors for annotations Select: color scheme 6 Change display language Select: language 7 Change numeric format Select: American or European? 8 Change default path for saved evaluations Enter: path 9 Change default path for database import & export Enter: path A Change default path for log files Enter: path B Change default path for reports to a disk file Enter: path C Change model group Enter: model group code ALES Version 4.65 Users Manual Page 268 February 1997 3 About ALES: Menu 3- About ALES 1 Author & Copyright 2 How to contact the ALES project 3 License 4 Quick help ALES Version 4.65 Users Manual Page 269 February 1997 Appendix 2: ALES knowledge base schema 1 Evaluations descriptive name, monetary unit, areal unit 2 Land Use Requirements descriptive name; default number of severity levels, severity level names 2 Inputs units of measurement, purchase cost 2 Outputs units of measurement, selling price 2 Land Characteristics Case: discrete land characteristic number of classes, units of measurement, +class limits LC-to-LC decision tree commensurate LC from which to infer Case: continuous land characteristic units of measurement, upper and lower limits formulas (from a group of continuous LCs to this LC) 2 Land Utilization Types length of planning horizon, discount rate number of physical suitability classes; subclass names physical suitability subclass decision tree economic suitability class limits 3 recurrent annual Inputs annual amount of input 3 Year in planning horizon 4 by-year Inputs amount of input this year 3 Land Use Requirements severity level decision tree use this LQ in maximum limitation method? 4 Severity Levels severity level names 5 Inputs additional annual amount 6 Year in planning horizon additional by-year amount 3 Outputs harvest years S1 yield; reduce and/or delay if less than optimum? proportional yield decision tree limiting yield factors: 4 Land Use Requirements 5 Severity Level limiting yield factor multiplicative yield factors: 4 Land Use Requirements 5 Severity Level multiplicative yield factor 4 production-related Inputs units of input per unit of output Underlined entities are their primary definition; Numbered entries may be repeated. ALES Version 4.65 Users Manual Page 270 February 1997 ALES Version 4.65 Users Manual Page 271 February 1997 Appendix 3 - ALES program flow Figure A: Computation of Land Qualities and Land Characteristics 1.1.4c/3 Land Characteristic Values (continuous LCs) 1.1.4a/6 Continuous-todiscrete inferences 1.1.4a/6 classifiy compute formulas Formulas LC LMU,LC LC Discrete-todiscrete inferences re-classify 1.1.4b/4, 1.1.4a/5 LC Land Characteristic Values (discrete LCs) traverse decision tree LC-to-LC decision trees LC LMU,LC 1.2.7/4 Severity Level Decision Trees traverse decision tree Land Quality Values (severity levels) LUT,LUR LMU,LUT,LUR B ALES Version 4.65 Users Manual D Page 272 H February 1997 Figure B: Computation of Predicted Yield A 1.2.6/2 traverse decision tree Proportional Yield Decision Tree Proportional Yield predicted by Decision Tree (% of S1 yield) LUT,Out 1.2.6/4,1.2.7/6 LMU,LUT,Out MIN Limiting Yield Factors Proportional Yield predicted by Decision Tree and Limitin g Yield Factors (% of S1 yield) LUT,LUR,Out LMU,LUT,Out 1.2.6/3,1.2.7/5 Π Multiplicative Yield Factors LUT,LUR,Out Proportional Yield (% of S1 yield) 1.2.6/1 LMU,LUT,Out S1 Yield (units/areaharvest) * LUT,Out Predicted Yield (units/area-harvest) LMU,LUT,Out E ALES Version 4.65 Users Manual F Page 273 K February 1997 Figure C: Computation of S1 Costs 1.2/4 1.2/5 S1 annual amount (units in/area-yr) S1 by-year amount (units in/area-yr) LUT, In LUT, In, Yr + + per-input S1 input amount (units in/area-year) 1.1/3 LUT,In,Yr * Input price ($/unit in) IN per-input S1 input cost (units in/area-year) LUT,In,Yr ΣIN total S1 input cost (units in/area-year) LUT,Yr G ALES Version 4.65 Users Manual Page 274 February 1997 Figure D: Computation of Additional Costs A 1.2.7/2 1.2.7/3 Additional annual amount (units in/area-yr) Additional byyear amount (units in/area-yr) SELECT according to severity level LUT, LUR, In, Sev + + total additional input amount (units in/area-yr) 1.1/3 LUT, LUR, In, Sev, Yr LUT, LUR, In, Yr * Input price ($/unit in) IN additional input cost ($/area-year) LUT, LUR, In,Yr ΣIN 1-LUR additional input cost ($/area-year) LUT, LUR, Yr ΣL U R additional input cost ($/area-year) LUT, Yr G ALES Version 4.65 Users Manual Page 275 February 1997 Figure E: Computation of Cash Flow In to the LUT 1.1/2 B * Output price ($/unit) Per-harvest return ($/area-harvest) Out 1.2.6/1 LMU,LUT,Out * # of harvests this year LUT,Out,Yr Per-output return ($/area-yr) LMU,LUT,Out,Yr ΣO U T Cash flow IN ($/area-yr) LMU,LUT,Yr 1.2.3/1 Discount rate (%) Discount to year Y LUT Present Value IN ($/area-yr) ΣY R/ years Gross Margin IN ($/area) LMU,LUT,Yr Σ YR LMU,LUT G' Present Value IN ($/area) LMU,LUT G ALES Version 4.65 Users Manual Page 276 February 1997 Figure F: Computation of Production-related costs 1.1/3 1.2.6/5 Production-related input amount (units in/units out) Input price ($/unit in) IN Out * Production-related cost ($/unit out) B In, Out ΣIN * Production-related cost ($/unit out) Out Production-related cost ($/harvest) 1.2.6/1 LMU, LUT, Out * # of harvests this year Per-output productionrelated cost ($/area-yr) LUT,Out,Yr LMU,LUT,Out,Yr ΣO U T Production-related cost ($/area-yr) LMU,LUT,Yr G ALES Version 4.65 Users Manual Page 277 February 1997 Figure G: Computation of Cash Flow Out of the LUT D C + F + + Cash flow OUT ($/area-yr) LMU,LUT,Yr 1.2.3/1 Discount rate (%) Discount to year Y-1 LUT ΣY R/ years Present Value OUT ($/area-yr) _ Present Value OUT ($/area) Gross Margin ($/area) LMU,LUT LMU,LUT − / E' LMU,LUT LMU,LUT,Yr Σ YR E Gross Margin OUT ($/area) Net Present Value ($/area) Benefit/Cost Ratio LMU,LUT LMU,LUT H ALES Version 4.65 Users Manual Page 278 February 1997 Figure H: Computation of Physical and Economic Suitability A 1.2.8/1 traverse decision tree Physical Suitability Decision Tree LUT Physical Suitability determined by the Decision Tree 1.2.8/2 decision tree path LURs for the Maximum Limitation LMU,LUT LUT LUR on Decision Tree Path? MAX No Physical Suitability Subclass E LMU,LUT 1.2.3/2 1.2.3/3 1.2.3/4 1.2.3/5 (gross margin) (Net Present Value) (Internal Rate of Return) (Benefit/Cost ratio) Economic Suitability Class Limits No classify Physical Suitability = Highest-numbered class? Yes = N2 LUT Economic Suitability Class (S1, S2, S3, N1, or N2) LMU,LUT ALES Version 4.65 Users Manual Page 279 February 1997 Figure I: Legend for Figures A - H Menu/Option where entered Model parameter (units) From another Figure Scope parameter influencing the computation, its effect data flow Computed value (units) Yes Decision Scope No To another Figure Scope: IN LC LMU LUR LUT OUT SEV YR Input Land Characteristic Land Mapping Unit Land Use Requirement Land Utilization Type Output Severity level Year Units $ Area represents any currency represents any areal unit ALES Version 4.65 Users Manual Page 280 February 1997