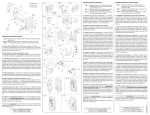
1
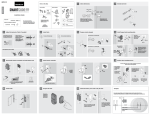
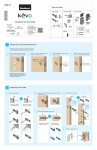
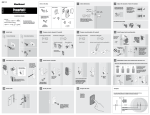
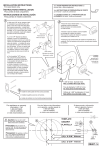
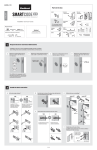
Rockwell Security Inc.
R
MULTIPAD USER MANUAL
www.rockwellsecurityinc.com
Copyright © 2011 Rockwell Security Inc. All rights reserved.
Before you Begin
Remove and discard all packing materials and verify you have all parts shown below.
Follow step by step installation to ensure proper operation of the lock.
You will need 4 AA Alkaline Batteries for installation ( not included )
9
1
2
3
4
QUICK REFERENCE
1. Machine Screws
2. Baseplate
3. Mounting Screws
4. Mounting Plate
5
6
7
8
5. IC Wire
6. Keypad
7. Cylinder
8. Key
9. Wood Screws
DEFAULT PROGRAMMING CODE: 0000
DERAULT USER CODE: 1234
1.
Copyright © 2011 Rockwell Security Inc. All rights reserved.
STEP 1.
Check your Door Handing
STEP 2.
STEP 3.
IC wire
Determine the cylinder tailpiece orientation.
Without the key inserted into the Cylinder,
keep the tailpiece flat.
ENSURE
MULTIPOINT
DEADBOLT IS
RETRACTED
NOTE: Improper orientation of the tailpiece
may cause the lock not to function properly.
STEP 4.
OUTSIDE
Cylinder Tailpiece
Ensure the cylinder is at the
center and not angled
during installation.
IC wire
Carefully insert the
IC wire through the
opening on the
top bore above
the lock casing
Insert Cylinder Tailpiece
into the
of the
Multipoint lock.
STEP 5.
Insert the wire through the
top Slot of mounting plate
Install the mounting Plate
using the two mounting
plate screws. DO NOT OVER
Ensure Mounting Plate is Parallel
to the edge of the Door
IC wire
TIGHTEN THE MOUNTING
PLATE SCREWS.
INSIDE
ENSURE
MULTIPOINT
DEADBOLT IS
RETRACTED
Copyright © 2011 Rockwell Security Inc. All rights reserved.
2.
STEP 7.
STEP 6.
(For Left Handed door)
Using your Key,
test the operation of the lock
by extending
the deadbolt
and retracting
OUTSIDE
it to check the
manual operation of the lock.
Ensure the wire does not interfere
with the manual operation.
Turn Piece
Ensure turnpiece is oriented correctly
prior to installing the interior assembly
onto the door.
STEP 8.
Slide
Up To
Remove
STEP 10.
(For Right Handed door)
Battery
Cover
INSIDE
Optional
Wood screws
Remove the battery cover by Sliding
it up to the top and pulling it then.
Machine screws
STEP 9.
Internal Turnpiece
Machine screws
Ens
Connect
The Wire
ure
STE
P7
Align the
of the internal turnpiece
with the cylinder tailpiece ensure the
turnpiece is oriented correctly based
on your door handing.
Attach the internal assembly to the
mounting plate using the screws.
Ensure the internal assembly is straight
and parallel to the door prior to tightening the screw. DO NOT OVERTIGHTEN
internal assembly screws.
3.
Connect the wire from the external
assembly with the wire in the internal
assembly checking orientation.
Ensure wire is tucked in and does not
interfere with the operation of the
turnpiece, or installation of interior
assembly.
Copyright © 2011 Rockwell Security Inc. All rights reserved.
STEP 11.
Install the batteries.
Ensure proper orientation of polarity
during installation of the batteries.
Alkaline Battery WARNING: Do not dispose of in fire,
recharge, put in backwards, disassemble, mix with used or
other battery types. May explode or leak and cause personal
injurg.
STEP 12.
Upon installing the batteries, the unit should
automatically determine the handing and
direction of the Multipoint Deadbolt to lock
and unlock. Wait 20 SECONDS until you hear
a BEEP and a GREEN light on the exterior
assembly.
STEP 13. - Test with the door in the open position
Test Keypad operation to lock the door by pressing the
button to ensure correct installation. If door
does not operate correctly do as below to rectify issue.
*
Enter Programming Code Default (0000)
0
*
*
Once you have pressed the above buttons the unit will flash and the
Multipoint bolt will determine the direction to lock and unlock..
Wait 20 seconds to complete this process until you hear a beep. Then
repeat step 13.
If the door locks, then proceed to the next step.
If lock does not operate refer to the trouble shooting guide.
STEP 14.
With the door in the open position test the unlocking function by pressing
the user code to unlock.
Default user code is
Press
1
2
3
1
4
2
*
3
4
to unlock the door
You will hear a beep and see a green LED indicator unlocking the door.
If lock does not operate refer to the trouble shooting quide.
Copyright © 2011 Rockwell Security Inc. All rights reserved.
4.
DEFAULT PROGRAMMING CODE: 0000
DEFAULT USER CODE: 1234
6
5
1
Rockwell
7
2
3
8
4
1. One touch button - Used to operate the locking function, clearing codes,
to enter codes, confirming programming codes and clearing errors.
2. Keypad Number Buttons - Used for user codes, programming codes.
There are a maximum of 6 user codes with each user code ranging
from 4 - 8 digits long.
3. Locking Cylinder - Used with a key to manually extend and retract the
multipoint lock bolt from the exterior.
4. Gasket - Used to prevent water infiltration to the unit.
5. Battery Cover - Slide the cover to change batteries or restore default
settings.
6. Battery Holder - AA Alkaline Batteries ( 4 Required )
7. Reset Button - Used to restore default settings.
8. Turnpiece - Used to retract and extend the multipoint bolt from the
interior.
5.
Copyright © 2011 Rockwell Security Inc. All rights reserved.
PROGRAMMING THE KEYPAD
Always ensure the lock is in the unlocked position with the Multipoint
center deadbolt retracted when performing any programming functions.
** PROGRAMMING CAN ONLY BE DONE IN THE UNLOCKED POSITION **
** ALWAYS PROGRAM THE KEYPAD WITH THE DOOR IN THE OPEN POSITION **
Programming Code (P Code)
User Code (U Code)
* Detect Left / Right Hand Door Installation
Enter P Code (0000)
*
0
*
Wait 20 seconds until you hear 3 beeps
Remark : Upon initial installation, in the UNLOCKED POSITION, it is recommended to run the Door handing detection to ensure proper operation.
* Adding A New User Code
Enter P Code (0000)
*
1
Enter
New U code
*
*
Remark :
6 User codes can be programmed with each user code, ranging from 4 - 8 digits.
* Deleting An Existing User Code
Enter P Code (0000)
*
2
Enter the
U Code you want
to delete
*
*
* Deleting All User Codes Simultaneously
Enter P Code (0000)
*
3
*
WARNING: WHEN DELETING ALL USER CODES. THE ONE TOUCH LOCKING BUTTON
AND THE AUTOMATIC RELOCKING FUNCTION WILL NOT OPERATE AND
THE DOOR CAN ONLY BE OPENED WITH A KEY.
* Changing the Programming Code
Enter P Code (0000)
*
4
*
Enter
New P code
*
Remark : It is highly recommended to change the programming code
immediately upon installation retain a copy of the new programming
code and store in a safe place.
* Turning On/Off Automatic Relocking
Enter P Code (0000)
*
5
*
Remarks : The preset time delay for auto relock is 30 seconds, you can
change the time delay by following next set of instructions.
Repeat the autolock steps to cancel the Auto-locking function.
Copyright © 2011 Rockwell Security Inc. All rights reserved.
6.
PROGRAMMING THE KEYPAD
Always ensure the lock is in the unlocked position with the Multipoint
center deadbolt retracted when performing any programming functions.
** PROGRAMMING CAN ONLY BE DONE IN THE UNLOCKED POSITION **
** ALWAYS PROGRAM THE KEYPAD WITH THE DOOR IN THE OPEN POSITION **
Programming Code (P Code)
User Code (U Code)
* Resetting Auto Relock Time Delay
Enter P Code (0000)
*
6
*
Enter
Seconds (10~99)
*
Remarks : Automatic relock time delay can be reset to function between
10-99 seconds.
* Mute On/Off
Enter P Code (0000)
*
7
*
Remark : Repeat same steps to turn on audio indicator. LED illumination
will continue to function even if mute is ON, turning on mute
button will only cancel audible indicator.
* Enabling/Disabling All User Code
Enter P Code (0000)
*
8
*
Remark : Auto-locking and Keypad locking function will not operate
when All User Codes are disabled. The lock can only be
operated by key during this time. Repeat the steps to enable
the User Codes or enter new User Codes.
* Creating a disposable User Code
Enter P Code (0000)
*
9
*
Enter new
disposable U Code
*
Remark : A disposable code can only be used once.
* Restoring Factory Default Setting
Press
R
Remark : Press “R” button for over 5 seconds, to restore factory default
setting. Upon restoring default setting, Please run door handing
detection until you hear 3 long beeps to ensure proper operation.
7.
Copyright © 2011 Rockwell Security Inc. All rights reserved.
Technical Specifications
1.
Programming the Keypad— the Keypad can be programmed to change
the user codes, add new users, activate automatic relocking feature and program timing
of the auto-relock feature. Plus a number of other functions.
The PRESET (DEFAULT) PROGRAMMING CODE IS 0 — 0 — 0 – 0
ANY PROGRAMMING OF THE KEYPAD NEEDS TO BE DONE IN THE UNLOCKED POSITION.
PROGRAMMING THE KEYPAD IN THE LOCKED POSITION WILL RESULT IN PROGRAMMING
ERRORS. IT STRONGLY RECOMMENDED TO CHANGE THE PROGRAMMING CODE IMMEDIATELY. PROGRAMMING CODES CAN BE CHANGED AT ANYTIME.
PLEASE HOWEVER RETAIN A COPY OF THE NEW PROGRAMMING CODE AND STORE IT
IN A SAFE PLACE. SHOULD YOU LOOSE YOUR PROGRAMMING CODE, YOU MAY PRESS
THE RESET BUTTON UNDER THE BATTERY COVER TO RESTORE ALL FACTORY DEFAULT
SETTINGS INCLUDING THE PRESET PROGRAMMING CODE 0000.
Programming codes can be 4– 10 digits in length. It is not used to unlock the door,
only used to set functions and features.
2
LED AND A UDIO Indicator
— the keypad has a built in LED AND AUDIO
INDICATOR
LED FLASHES GREEN
ONCE Plus 1 Audio Beep — indicates SUCCESSFUL
OPERATION
LED FLASHES GREEN
TWICE Plus 2 long Audio Beeps— Indicates SUCCESSFUL PROG-
RAMMING
3 X Plus 3 Audio Beeps — OPERATIONAL ERROR
5 X Plus 5 Audio Beeps — CODE INPUT ERROR.
AFTER 5 UNAUTHORIZED USER CODE ATTEMPTS. KEYPAD WILL SHUT DOWN 45
SECONDS.
FOR SECURITY PURPOSES THE SYSTEM WILL ONLY RESTART AFTER 45 SECONDS.
LED FLASHES ORANGE 3 X plus 3 audio beeps — SYSTEM HAS BEEN RESTORED TO
DEFAULT SETTINGS
LED FLASHES ORANGE IN A SLOW MANNER —DURING PROGRAMMING
LED FLASHES RED PLUS 10 RAPID BEEPS— Low Battery Warning. Please replace batteries.
LED FLASHES RED
LED FLASHES RED
Copyright © 2011 Rockwell Security Inc. All rights reserved.
8.
3.
USER Codes—
The Preset (default ) USER CODE IS 1234
A maximum of 6 user codes can be preset.
User codes are only used to activate and operate the lock and can not be used for
programming features.
User codes can be preset from 4– 10 digits.
User codes can also be changed and deleted at anytime.
4.
Deleting an Individual User Code
User Codes can be deleted individually. To delete an individual user code, you will
need to enter the Programming code to do the same. A deleted user code can be
reset and added even though it has been previously deleted.
5.
Deleting all user codes at once
All user codes can be deleted simultaneously. The programming code is required to do the
same and the same user codes that have been deleted can again be reprogrammed for use.
Warning: Deleting all user codes simultaneously will also delete the automatic relocking
function and the keypad locking function. The lock can only be operated manually with
a key during this time. These functions will only be restored once new user codes are
programmed.
6.
Creating a disposable User Code
A disposable user code can be programmed for single use. Disposable user codes are only
good for one use.
7.
9.
Restore Factory default settings—
Factory default settings can be restored by pressing the Reset button on the interior
receiver module under the battery cover. Restoring the factory default settings, cancels
any user programmed settings and restores original factory settings. Programming code
will be reset to - 0- 0- 0- 0 and user code will be set at -1- 2 -3 -4
Copyright © 2011 Rockwell Security Inc. All rights reserved.
8.
Incomplete Door closing/Opening
The Multipad has a feature that provides warning LED and Audio indicators if the lock is not
fully engaged in the lock or unlock position. If the multipoint deadbolt is not extended or
retracted fully into the closed or open position, you will see 3 red LED warning flashes and
you will hear the 3 audible beeps that the door is not completely locked or unlocked.
This is a warning signal should the multipoint lock be prevented from properly engaging into
the strike or retracting from the same.
9.
Automatic Locking Feature
The Multipad has an automatic relocking feature where the keypad can be programmed to
lock automatically between 10—99 seconds. The keypad is not preset with this feature in the
factory default settings but can be added. Once the automatic relocking feature is programmed, the default setting is 30 seconds. The time delay to automatically relock can be easily
programmed to between 10 –99 seconds. To cancel the automatic relocking feature, repeat
the same programming steps used to activate the feature.
10.
Mute function
Audible signals can be heard when pressing the keypad, programming and during operational
errors. The audible signals can be muted if needed. Note: Muting the audible signals will
prevent warning of incomplete door closing, or low battery warning. LED status indicators
however will continue to operate if the mute function is programmed.
11.
Code Protection
5 unauthorized tries of user codes automatically stops the operation of the keypad for 45
seconds to prevent unauthorized access. System will only restart after 45 seconds after 5
unauthorized used code attempts.
12.
LED indicator
The keypad is built with LED indicator which lights up the keypad for ease of operation in the
dark.
Copyright © 2011 Rockwell Security Inc. All rights reserved.
10.
Trouble Shooting Guide
1.
Upon installation you are unable to lock the door with the keypad but are able
to lock the door manually with a key. When attempting to lock with the keypad you hear
3 beeps.
Possible solutions: The door handing may not have been completed.
Please refer to door handing detection and run the program again.
2.
Upon installation of the keypad and batteries—there is no response when
any button is depressed and no sounds are emitted and LED indicators are not working.
- Please check installation of the batteries making sure they have been installed with the
correct polarity in the battery pack. Or please check the cable connection to ensure it is
properly connected.
3.
Attempted to execute the door handing identification program but it failed
and three red light flashes and 3 audio beeps are heard. Ensure the thumbturn on
the internal receiver was oriented correctly during installation. If so, Check whether
the lock works with a manual key or by operating the thumbturn from the internal
side. - if the lock works manually, Press the reset button and run the door handing
identification program again.
4.
The lock was functioning normally but suddenly the multipoint deadbolt locks up
and the turn piece from the inside can not be rotated, the lock can not be operated with
a key. The Keypad detection may be abnormal.
Please take out one battery first and press any button on the front panel keypad for 15-20
seconds to reset. Reinstall the battery back and the keypad will automatically re-detect its
position.
If this happens repeatedly, please check the opening of the lock strike, whether it is at the
center of the deadbolt or whether it is obstructing the multipoint deadbolt from engaging
into the strike.
5.
When the door is closed, you hear the multipoint deadbolt coming out, when you
press the one touch button to lock the door, however, you hear 3 beeps. However, when
trying the same with the door in the open position, no beeps are heard when locking the
door.
There may be some hindrance in the multipoint deadbolt from engaging into the strike.
Please recheck the depth of the hole in the strike and check whether the strike position is
correct. Check door alignment and repair.
6.
The door can be locked normally, but three short beeps are heard and the door
will not unlock using the keypad.
Cause: Microswitch may not be functioning properly.
Solution: Unlock the door manually with keys, and contact distributor for inspection and
maintenance.
11.