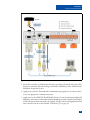
1
. USER MANUAL CWR-40E & CWR-72E EVENT RECORDER -METRA VERSION- Revised: June 9, 2012 M ICRO -A IDE C ORPORATION Tel: 626-915-5502 Fax: 626-331-9484 685 Arrow Grand Circle Covina, CA 91722 E-mail: [email protected] Copyright © 2009 by MICRO-AIDE Corporation All rights reserved. No part of this document may be reproduced or transmitted in any form or by any means without the written permission of MICRO-AIDE Corporation. The information in this document is subject to change without notice. MICRO-AIDE believes the information contained in this document to be accurate. However, MICRO-AIDE assumes no responsibility for any errors or omissions. Windows, Windows XP, Excel, Access, Notepad and Word are registered trademarks of Microsoft Corporation. HyperTerminal is a registered trademark of Hilgraeve Inc. Ethernet is a registered trademark of Xerox Corporation. TABLE OF CONTENTS CHAPTER 1 GENERAL DESCRIPTION Introduction . . . . . . . . . . . . Key Features . . . . . . . . . . . 2-Track and 4-Track Recording Systems CWR-72E Comparisons . . . . . . . Comparing the CWR-40E and CWR-72E About this Manual . . . . . . . . . Firmware Modification History . . . . Setup Database Compatibility . . . . CHAPTER 2 . . . . . . . . . . . . . . . . . . . . . . . . . . . . . . . . . . . . . . . . . . . . . . . . . . . . . . . . . . . . . . . . . . . . . . . . . . . . . . . . . . . . . . . . . . . . . . . . . . . . . . . . . . . . . . . . . . . . . . . . . . . . . . . . . . . . . . . . . . . . . . . . . . . . . . . . . . . . . . . . 1 2 4 5 5 5 6 6 . . . . . . . . . . . . . . . . . . . . . . . . . . . . . . . . . . . . . . . . . . . . . . . . . . . . . . . . . . . . . . . . . . . . . . . . . . . . . . . . . . . . . . . . . . . . . . . . . . . . . . . . . . . . . . . . . . . . . . . . . . . . . . . . . . . . . . . . . . . . . . . . . . . . . . . . . . . . . . . . . . . . . . . . . . . . . . . . . . . . . . . . . . . . . . . . . . . . . . . . . . . . . . . . . . . . . . . . . . . . . . . . . . . . . . . . . . . . . . . . . . . . . . . . . . . . . . . . . . . . . . . . . . . . . . . . . . . . . . . . . . . . . . . . . . . . . . . . . . . . . . . . . . . . . . . . . . . . . . . . . . . . . . . . . . . . . . . . . . . . . . . . . . . . . . . . . . . . . . . . . . . . . . . . . . . . . . . . . . . . . . . . . . . . . . . . . . . . . . . . . . . . . . . . . . . . . . . . . . . . . . . . . . . . . . . . . . . . . . . . . . . . . . . . . . . . . . . . . . . . . . . . . . . . . . . . . . . . . . . . . . . . . . . . . . . . . . . . . . . . . . . . . . . . . . . . . . . . . . . . . . . . . . . . . . . . . . . . . . . . . . . . . . . . . . . . . . . . . . . . . . . . . . . . . . . 7 . 7 . 7 . 11 . 12 . 12 . 12 . 13 . 13 . 13 . 13 . 13 . 13 . 14 . 14 . 14 . 14 . 15 . 15 . 15 . 15 . 16 . 17 . 17 . 18 . 18 . 19 . 22 . 27 . 29 INSTALLATION AND SETUP Introduction . . . . . . . . . . . . Unpacking . . . . . . . . . . . . Initial Check-out Procedure . . . . . Installation Procedure . . . . . . . . Location . . . . . . . . . . . Mounting . . . . . . . . . . . Site Preparation . . . . . . . . Peripheral Equipment . . . . . . USB Device Port . . . . . . Terminal Port . . . . . . . . Ethernet Port (optional) . . . . Internal Modem . . . . . . . GPS Receiver . . . . . . . Cabling . . . . . . . . . . . . Power. . . . . . . . . . . Alarm Relay . . . . . . . . Input Circuits . . . . . . . . Applying Power . . . . . . . . Setup Procedure. . . . . . . . . . User Interface Conventions . . . . Logging On . . . . . . . . Commands and Fields . . . . Data Flow Control . . . . . . Main Menu . . . . . . . . . . Setup (S) . . . . . . . . . . . Time/Date (T). . . . . . . . Reset System (R) . . . . . . System Parameters (S) . . . . Detect Times/Flash Enable (D) . Global Detect Time (G) . . . . iii MICRO-AIDE CWR-40E / 72E USER MANUAL Analog Configuration (A) . . . . Timer Inputs (W) . . . . . . . Event Names (E) . . . . . . . Input Names/Identifiers (I) . . . Virtual Inputs (V) . . . . . . . Measure Speed (M) . . . . . . Network (N) . . . . . . . . . Print Setup Data (P) . . . . . . Transfer Files (T) . . . . . . . . Saving the Setup Database (D) . Restoring the Setup Database (U) Log Off (X) . . . . . . . . . . . CHAPTER 3 . . . . . . . . . . . . . . . . . . . . . . . . . . . . . . . . . . . . . . . . . . . . . . . . . . . . . . . . . . . . . . . . . . . . . . . . . . . . . . . . . . . . . . . . . . . . . . . . . . . . . . . . . . . . . . . . . . . . . . . . . . . . . . . . . . . . . . . . . . . . . . . . . . . . . . . . . . . . . . . . . . . . . . . . . . . . . . . . . . . . . . . . . . . . . . . . . . . . . . . . . . . . . . . . . . . . . . . . . . . . . . . . . . . . 30 32 34 34 36 39 41 43 43 44 45 47 . . . . . . . . . . . . . . . . . . . . . . . . . . . . . . . . . . . . . . . . . . . . . . . . . . . . . . . . . . . . . . . . . . . . . . . . . . . . . . . . . . . . . . . . . . . . . . . . . . . . . . . . . . . . . . . . . . . . . . . . . . . . . . . . . . . . . . . . . . . . . . . . . . . . . . . . . . . . . . . . . . . . . . . . . . . . . . . . . . . . . . . . . . . . . . . . . . . . . . . . . . . . . . . . . . . . . . . . . . . . . . . . . . . . . . . . . . . . . . . . . . . . . . . . . . . . . . . . . . . . . . . . . . . . . . . . . . . . . . . . . . . . . . . . . . . . . . . . . . . . . . . . . . . . . . . . . . . . . . . . . . . . . . . . . . . . . . . . . . . . . . . . . . . . . . . . . . . . . . . . . . . . . . . . . . . . . . . . . . . . . . . . . . . . . . . . . . . . . . . . . . . . . . . . . . . . . . . . . . . . . . . . . . . . . . . . . . . . . . . . . . . . . . . . . . . . . . . . . . . . . . . . . . . . . . . . . . . 49 49 49 49 50 50 51 51 52 52 52 55 55 55 56 57 58 58 59 59 60 60 61 62 63 Introduction . . . . . . . . . . . . . . . . . . . . . Front Panel Description. . . . . . . . . . . . . . . . . USB Host Port . . . . . . . . . . . . . . . . . . Liquid Crystal Display . . . . . . . . . . . . . . . . Keypad . . . . . . . . . . . . . . . . . . . . . How to Use the USB Host Port . . . . . . . . . . . . . . Saving Records to a Flash Drive . . . . . . . . . . . Saving Event Records from a Complete Day . . . . . Saving Event Records from a Range of Times and Dates . . . . . . . . . . . . . . . . . . . . . . . . . . . . . . . . . . . . . . . . . . . . . . . . . . . . . . . . . . . . . . . . . . . . . . . . . . . . . . . . . . . . . . . . . . 65 65 65 65 66 66 66 66 67 OPERATION Introduction . . . . . . . . . . . . Multi-User Operation . . . . . . . . . Remote Operation. . . . . . . . . . Establishing an Ethernet Connection . Establishing a Modem Connection . . Entering the Password . . . . . . How to Operate the CWR-72E . . . . . Query Events (Q) . . . . . . . . Selecting a Single Date . . . . Selecting a Range of Dates . . . Query Report Menu . . . . . . View Events (V) . . . . . . . . . Record Details . . . . . . . . Inputs . . . . . . . . . . . Live Status (L) . . . . . . . . . Measure Flash Rate (M) . . . . . . Event Record Formatting . . . . . . . No Details . . . . . . . . . . . Virtual Details . . . . . . . . . . Digital Details . . . . . . . . . . Analog Details . . . . . . . . . All Details . . . . . . . . . . . CSV . . . . . . . . . . . . . Symbol Legend . . . . . . . . . Capturing Event Records to a PC File . . CHAPTER 4 iv FRONT PANEL OPERATION TABLE OF CONTENTS Files Written to the Flash Drive . . Events Text File . . . . . . . Events Binary File . . . . . . Setup Database Binary File . . How to Use the Keypad . . . . . . . Idle Mode . . . . . . . . . . . Event Record Format. . . . . Browse Mode . . . . . . . . . Event Records . . . . . . . Input Status . . . . . . . . Flash Rate . . . . . . . . . Setup Mode . . . . . . . . . . Alphanumeric Editing Procedure UName . . . . . . . . . . Modem . . . . . . . . . . Baud . . . . . . . . . . . Diag . . . . . . . . . . . Update . . . . . . . . . . CHAPTER 5 . . . . . . . . . . . . . . . . . . . . . . . . . . . . . . . . . . . . . . . . . . . . . . . . . . . . . . . . . . . . . . . . . . . . . . . . . . . . . . . . . . . . . . . . . . . . . . . . . . . . . . . . . . . . . . . . . . . . . . . . . . . . . . . . . . . . . . . . . . . . . . . . . . . . . . . . . . . . . . . . . . . . . . . . . . . . . . . . . . . . . . . . . . . . . . . . . . . . . . . . . . . . . . . . . . . . . . . . . . . . . . . . . . . . . . . . . . . . . . . . . . . . . . . . . . . . . . . . . . . . . . . . . . . . . . . . . . . . . . . . . . . . . . . . . . . . . . . . . . . . . . . . . . . . . . . . . . . . . . . . . . . . . . . . . . . . . . . . . . . . . . . 69 . 69 . 69 . 70 . 70 . 70 . 71 . 72 . 72 . 74 . 75 . 76 . 77 . 78 . 79 . 79 . 80 . 82 Introduction . . . . . . . . . . . . . Adjusting the LCD Contrast . . . . . . Working Inside the Recorder . . . . . . Replacing the Fuses . . . . . . . Installing the Optional GPS Receiver . Installing the Optional Ethernet Port . Installing the Optional Modem . . . . Reconnecting the Internal Cables . . Diagnostic Testing . . . . . . . . . . Checksum Test Program Memory (C) . Flash Memory Test (F). . . . . . . GPS Receiver Test (G) . . . . . . Ethernet Test (E) . . . . . . . . . Modem Test (M) . . . . . . . . . Keypad Test (K) . . . . . . . . . Relay Test (R) . . . . . . . . . . Temperature (T) . . . . . . . . . System Events . . . . . . . . . . . Upgrading the Firmware . . . . . . . . Trouble-shooting Guide . . . . . . . . . . . . . . . . . . . . . . . . . . . . . . . . . . . . . . . . . . . . . . . . . . . . . . . . . . . . . . . . . . . . . . . . . . . . . . . . . . . . . . . . . . . . . . . . . . . . . . . . . . . . . . . . . . . . . . . . . . . . . . . . . . . . . . . . . . . . . . . . . . . . . . . . . . . . . . . . . . . . . . . . . . . . . . . . . . . . . . . . . . . . . . . . . . . . . . . . . . . . . . . . . . . . . . . . . . . . . . . . . . . . . . . . . . . . . . . . . . . . . . . . . . . . . . . . . . . . . . . . . . . . . . . . . . . . . . . . . . . . . . . . . . . . . . . . . . . . . . . . . . . . . . . . . . . . . . . . . . . . . . . . . . . . . . . . . . . . . . . . . . . . . . . . . . . . . . . . . . . . . . . . . 85 . 85 . 85 . 86 . 86 . 87 . 87 . 88 . 88 . 89 . 89 . 90 . 91 . 91 . 91 . 92 . 92 . 93 . 94 . 96 MAINTENANCE APPENDIX A TECHNICAL DATA CWR-40E / 72E Specifications . . . . . . . . . . . . . . . . . . . . . . . 101 Transfer Rates . . . . . . . . . . . . . . . . . . . . . . . . . . . . . 103 Terminal Port Cable . . . . . . . . . . . . . . . . . . . . . . . . . . . 104 APPENDIX B SETUP DATABASES Introduction . . . . . . . . . . . . . . . . . . . . . . . . . . . . . . . 105 Database Alterations . . . . . . . . . . . . . . . . . . . . . . . . . . . 105 BEV and MED Setup Databases . . . . . . . . . . . . . . . . . . . . . . 106 v MICRO-AIDE CWR-40E / 72E USER MANUAL Mainline Setup Database . . . . . . . . . . . . . . . . . . . . . . . . . .110 APPENDIX C OPTIONS AND ACCESSORIES APPENDIX D USB DEVICE PORT Introduction . . . . . . . . . . . Preparation . . . . . . . . . . . Installing the Drivers . . . . . . . . Making a USB Device Port Connection . . . . . . . . . . . . . . . . . . . . . . . . . . . . . . . . . . . . . . . . . . . . . . . . . . . . . . . . . . . . . . . . . . . . . . . . . . . . .121 .121 .121 .124 . . . . . . . . . . . . . . . . . . . . . . . . . . . . . . . . . . . . . . . . . . . . . . . . . . . . . . . . . . . . . . . . . . . . . . . . . . . . . . . . . . . . . . . . . . . . . . . . . . . . . . . . . . . . . . . . . . . . . . . . . . . . . . . . . . .127 .128 .128 .130 .131 .132 .132 .132 .134 .134 APPENDIX E BILLS OF MATERIAL CWR-40E / 72E Bill of Material . . . . . . . . . . CWR-40E / 72E Subassemblies. . . . . . . . PA85-0138/00 Processor PCB. . . . . . . PA85-0139/00 Keypad / Input PCB (CWR-72E) PA85-0139/02 Keypad / Input PCB (CWR-40E) PA85-0134/00 USB Host Port PCB . . . . . CWR-40E / 72E Options. . . . . . . . . . . PA85-0106/01 Modem PCB. . . . . . . . PA85-0135/00 GPS Receiver PCB . . . . . PA85-0136/00 Ethernet Port PCB . . . . . vi CHAPTER 1 GENERAL DESCRIPTION Introduction Since 1988 MICRO-AIDE has provided the rail signal industry with a broad range of Event Recorders that vary in capacity, size and features. As third generation Event Recorders, the CWR-40E and CWR-72E include many new features not previously found in recorders. These features, several of which are unique to MICRO-AIDE, provide the CWR-40E and CWR-72E user with greater ease-of-use and versatility. Both are companion products to the smaller capacity CWR-24E recorder. They are ideally suited for use at crossing, control point and interlocking facilities. Their small physical sizes belie their many capabilities. Of necessity, all Event Recorders utilize an internal real-time clock for date and time stamping events. Historically, these real-time clocks have been susceptible to drift. Over the course of several months the accumulated drift can exceed several minutes. This factor can greatly complicate incident investigation and reporting. However, the CWR-40E and CWR-72E eliminate the problems introduced by clock inaccuracy once and for all. The GPS Receiver option utilizes GPS technology to set the time and date and maintain its accuracy to 0% error. Alternatively, the Ethernet® Port option allows the recorder to be connected to a LAN-based time server. The time server will broadcast time and date information via the SNTP protocol. The CWR-40E and CWR-72E are designed to validate and accept SNTP messages. Either time and date control option features zero-drift, 100% precision without the need for any user intervention. The CWR-40E and CWR-72E can copy Event Records directly to a USB flash drive. The USB Host Port is a standard feature of the recorder. Install the flash drive into the recorder’s front panel socket, press a few keypad buttons and in seconds Event Records from any time span are written as a .txt file. The .txt file can then be read, e-mailed or printed as required. Both recorders are equipped with a built-in keypad and display screen located on the front panel. This allows the user to effectively operate the recorder without additional peripheral devices. However,eachrecorderwillsupportapplicationsthatrequirePC-basedstorageofEventRecords. A USB Device Port and an RS-232 port are provided as standard equipment items. The optional Ethernet Port can also be used to provide an additional local or remote user interface. The USB and Ethernet Ports can provide data transfer rates of 960Kbps and 850Kbps, respectively. Any of the three ports can be connected directly to a personal computer. The PC is then used to retrieve, store and review Event Record data of interest to the user. An optional 33,600 Baud internal modem can also be installed. It too allows the user to remotely access and operate the recorder. A standard phone line connection allows the user to gather crit- 1 MICRO-AIDE CWR-40E / 72E USER MANUAL ical Event Records from any location, however distant. The modem can also be used to provide dial-out alarm reporting to a maintenance facility. Along with either 32 (CWR-40E) or 64 (CWR-72E) optically isolated Digital Inputs, both recorders are equipped with eight general purpose Analog Inputs. Unlike other systems, the use of Analog Inputs does not reduce the number of available Digital Inputs. The Analog Inputs can be used to monitor both DC and AC signals such as battery levels, commercial power voltages or relay coil voltages. Analog DC and AC currents can be monitored by using MICRO-AIDE’s external current sensor. The Failed Lamp Detector (FLD-2) can be used in conjunction with either recorder to detect burned-out bulbs in wayside facilities. Thirty-two Virtual Inputs allow the user to create Event Records based upon a specific logical association of several Digital, Analog, Timer and other Virtual Inputs. The Virtual Input feature can be very useful in analyzing failure conditions or in creating alarm indications. Tedious and confusing site specific profiles are not required when using the Virtual Input feature. Thirty-two Timer Inputs can be used to measure and report the elapsed time between any two events. As an example, the duration of a relay operation, the time between two relay events or the occurrence of an Analog Input event and a relay event can be reported. Additionally, separate Low and High Limit Values can be assigned for each timer. An event occurrence that is too fast or slow when compared to the Limit Values is identified in a Timer Input Event Record. All MICRO-AIDE rail signal products, including the CWR-40E and CWR-72E Event Recorders, are designed to be easy to use and maintain. Each design is based upon the premise that value and reliability start with attentiontodetailandaconcernfor usabilityrather than needlesscomplexity. Our goal in creating these recorders was to provide the rail signal industry with an instrument maintainers and signal technicians will find easy to operate long after the recorder has been installed and set up. Key Features Listed below are some of the features common to every CWR-40E and CWR-72E. • The USB Host Port allows copying of Event Records to a USB flash drive. • The 960Kbps USB Device Port can be used in lieu of the serial Terminal Port. • The optional GPS Receiver allows the recorder’s real-time clock to operate 100% accurately without any user intervention. • The optional, internal Ethernet Port allows for remote LAN-based access via TCP/IP. If the LAN includes a time server, the Ethernet Port also allows the recorder’s real-time clock to be precisely controlled using SNTP. • Automatic adjustment for Daylight Saving Time (DST) can be enabled or disabled. The DST feature is in full compliance with the Energy Policy Act of 2005 which took effect in 2007. • The storage capacity is 111,481 Event Records (expandable to 2,947,289). 2 CHAPTER 1 GENERAL DESCRIPTION • Event Records can be logged for 128 distinct days. • Event Records are stored in flash memory devices that do not require a battery power source. Records are retained even if power is removed. • Setup data and Event Record data can be easily and quickly transferred to a PC file. • Attaching the recorder to an event generating circuit is completely non-intrusive to the circuit. This is ensured by the high impedance nature of the design. • Each Digital Input utilizes opto-isolation technology to provide ground isolation of at least 3800Vdc. • Relay signals in the range from 9 to 36Vdc can be sensed by the Digital Inputs. • Both positive and negative voltages can be sensed. • Every Event Record includes a measurement for each of eight Analog Inputs. • Analog Inputs can range from 51.1V (.1V scale) to 255V (1V scale), DC or AC. • Analog Inputs are tested against separate High and Low Limit Values that are assigned by the user. Crossing either Limit Value will create an Event Record. • Current levels as great as 25.5Adc or Aac can be monitored by using MICRO-AIDE’s external current sensor. • Excessive train speed is reported by four separately programmable Train Speed Monitors. Speed violations are reported in the form of Event Records that are saved to memory. • The FLD-2 Failed Lamp Detector can be used at crossings to detect burned-out bulbs. • Event Detection Times can be set by the user on an input-by-input basis. Default values are provided as an aid to the user. • Event Detection Times can be set to a hundredth of a second (.01 seconds) to capture fast, electronically generated control signals. • Events satisfying the Detection Time criteria are date and time stamped to the nearest hundredth of a second. • The real-time clock used by the recorder can be synchronized to an external signal. • Flashing signal events are detected and can be reported either per flash or per flashing sequence. • Exception Event Records can be created that report out-of-range flashing rates and duty cycles. • The flashing rate of a circuit can be precisely measured. The flash rate in FPM is reported as part of the Event Record for each flash occurrence. 3 MICRO-AIDE CWR-40E / 72E USER MANUAL • Thirty-two Virtual Inputs can be programmed to create Event Records that identify alarm or fault conditions of special interest to the user. • Thirty-two Timer Inputs can be used to measure and report intervals between any pair of events. • Limit Values are used to establish a range of acceptable and unacceptable timed intervals. • Timer Inputs create Event Records that list the timed interval and its relationship to the programmed Limit Values. • Installation is quite simple. Input wires are terminated in detachable, tension clamp terminals. Wire sizes as large as 12AWG can be used. • Maximum power consumption is less than 4W. A 10 to 36Vdc power source can be used to power the recorder. • The user interface provides full cursor control when using a PC. • Three distinct levels of password security provide protection against unauthorized access. • Several diagnostic commands can be executed to verify important system operations. • Firmware updates can be uploaded to the recorder via any port (i.e., Terminal, modem, USB Device or Ethernet). Additionally, new firmware can be uploaded directly via a USB flash drive. • MICRO-AIDE’s GEA (Graphical Event Analyzer) software is fully compatible with the CWR-40E and CWR-72E. GEA can be used to poll, save, review, plot and analyze Event Record data. 2-Track and 4-Track Recording Systems The CWR-40E and CWR-72E Event Recorders are key components in a Recording System. Metra has designated these systems as 2-Track and 4-Track Recording Systems. Each system comprises an Event Recorder (suitably equipped with options) and a light out detector. Table 1 describes the components of each Recording System. Recording System Event Recorder Light Out Detector 2-Track CWR-40E e/w GPS Receiver and Modem options FLD-2 e/w 4 lamp circuit sensors 4-Track CWR-72E e/w GPS Receiver and Modem options FLD-2 e/w 4 lamp circuit sensors Table 1 - Recording Systems The User Manual for the Failed Lamp Detector (FLD-2) is a separate document. A printed copy of it is included with each Recording System. 4 CHAPTER 1 GENERAL DESCRIPTION CWR-72E Comparisons MICRO-AIDE’s standard CWR-72E and Metra Chicago-version (i.e., 64 Digital Input recorder) share identical hardware designs. The two recorders differ only with regard to their installed firmware. The Metra-version includes the following firmware modifications. • The Restricted Access session permits alterations to the Unit Name, Terminal Port Baud Rate, Ring Count and Primary and Secondary Dial Number parameters. • Front panel access to the Setup Database is restricted to the UName, Modem, Baud and Diag commands. Additionally, the Update command can be used to load new firmware. Every recorder shipped to Metra is installed with one of three Metra-defined Setup Databases. The CWR-40E uses either the BEV or MED database. The CWR-72E uses the Mainline database. The contents of each Setup Database are fully detailed in “Appendix B” on page 105. Comparing the CWR-40E and CWR-72E The CWR-40E and CWR-72E share identical firmware. Their hardware designs differ in only one regard. The CWR-40E is equipped with 32 (versus 64) Digital Inputs. The CWR-40E can be thought of as a CWR-72E that has been manufactured with 32 fewer Digital Inputs. Except as regards input capacity, they are indistinguishable from one another. Note Unless otherwise stated, throughout the remainder of this document the term CWR-72E will be used to refer to both Event Recorders. About this Manual This document is intended to provide the user with comprehensive, easy-to-read instructions on how to install, set up, operate and maintain the MICRO-AIDE CWR-72E Event Recorder. This document refers to Version 1.02 of the CWR-72E firmware. Specifically, the sample data and command details depicted were prepared using a Version 1.02 recorder. Wherever possible, step-by-step instructions have been included. In the event the user has questions about any of the described procedures the user should contact MICRO-AIDE for assistance. Additional copies of this manual are available upon request. MICRO-AIDE CORPORATION 685 Arrow Grand Circle Covina, CA 91722 Tel: 626-915-5502 Fax: 626-331-9484 E-mail: [email protected] Note The MICRO-AIDE Material Return and Limited Warranty policies can be found on the inside back cover of this manual. 5 MICRO-AIDE CWR-40E / 72E USER MANUAL Firmware Modification History As previously noted, the Metra versions of the CWR-40E and CWR-72E use identical firmware. It was derived from version 1.03 of the standard CWR-72E design. As such, it includes all of the modifications made through V1.03. If appropriate, and only with the concurrence of the Metra signal staff, future modifications to the standard V1.03 firmware may be adopted by the Metra version. V1.00 Initial release. V1.01 Any time and date interval can now be selected when saving Event Records to a USB flash drive. The modem is now initialized to include an AT \N5 command. This setting improves the modem’s performance when lower quality telephone connections are encountered. V1.02 The USB Host Port can now be used to upload new fimware directly from a flash drive. Setup Database Compatibility Occasionally, modifications to the firmware of the recorder will result in a new memory map of the Setup Database. When this occurs the previously created Setup Database will be incompatible with the new firmware. The following table details the compatibility status of each firmware version. A check mark in any given column indicates compatibility across that collection of firmware versions. Firmware Version Compatibility V1.00 V1.01 V1.02 Table 2 - Setup Database Compatibility Tip When an incompatibility occurs, contact MICRO-AIDE before preparing a new Setup Database. E-mail a copy of the existing Setup Database along with the applicable firmware revision number. MICRO-AIDE will convert the database and return a file that is fully compatible with the latest firmware revision. 6 CHAPTER 2 INSTALLATION AND SETUP Introduction This chapter describes how to properly unpack, install and set up the CWR-72E prior to operation. It is advisable to review the Unpacking, Initial Check-out and Installation sections before actually performing the procedures described in this chapter. Unpacking Each CWR-72E is packed in a shipping carton that is properly sized for the recorder. Abundant packing materials are provided to minimize mechanical shock to the contents. Before opening the carton inspect it for damage. Damage to the carton should be noted. Carefully remove the recorder. It is advisable to save all packing materials in the event the recorder ever needs to be returned to MICRO-AIDE. Inspect the recorder for visual damage. It should not be scratched, dented or deformed in any way. If it appears the recorder was damaged in shipment the responsible carrier should be notified immediately. MICRO-AIDE will assist the user in filing a claim in the event damage was sustained during shipment. Initial Check-out Procedure Before the CWR-72E is installed at a signal facility it is recommended that an operational check of the recorder be performed. The following materials are required as a part of this procedure. • 12Vdc power source. • Common hook-up wire for power and testing inputs (12 to 22AWG). • Wire strippers and small, flat-head screwdriver. • PC equipped with a communications program (e.g., HyperTerminal®) and either a USB port or serial comm port set to operate at 38,400 Baud. • Digital Voltmeter (DVM). Perform each step in the sequence listed below. If a problem arises, refer to the section entitled “Trouble-shooting Guide” on page 96. Figure 1 on page 8 and Figure 2 on page 9 illustrate a typical CWR-72E installation. 7 MICRO-AIDE CWR-40E / 72E USER MANUAL Figure 1 - Typical Installation - Front Panel View 1. With the power off, connect the power source positive and negative conductors to either pair of terminals labeled “B” and “N”, respectively. They are located at the right end of the recorder’s top panel. 2. Connect the PC’s serial comm port to the DE-9 male connector labeled “Terminal”. Use the cable provided by MICRO-AIDE or a DE-9 to DE-9 straight-through cable. Figure 7 on page 104 illustrates the proper wiring of the cable. Alternatively, connect a USB A-B cable between the recorder’s port labeled “USB Device” and any USB port at the PC. 8 Note To use the recorder’s USB Device Port the proper drivers must be installed in the PC. Appendix D describes how to locate and install the correct drivers. Note The factory default setting for the Terminal Port is 38,400 Baud. Refer to the procedure entitled “Terminal Port Baud Rate” on page 23 for details on changing the Baud rate. The CWR-72E requires no parity, 8 data bits and 1 stop bit (i.e., N-8-1). CHAPTER 2 INSTALLATION AND SETUP Figure 2 - Typical Installation - Top Panel View 3. Set the PC to emulate an ANSI terminal. In the case of HyperTerminal, click on the File, Properties command. Select the Settings tab. Enable Terminal keys. Select ANSI from the Emulation drop-down list box. 4. Apply power to the PC. Ensure that the communications program is set for a direct connection to the appropriate communications port. 5. Apply power to the CWR-72E. The LED labeled “Power” located on the front panel should illuminate. After a few seconds the date and time should appear on the Liquid Crystal Display (LCD). The date and time may need to be changed. The procedure for changing the date and time is described in the section entitled “Time/Date (T)” on page 18. 9 MICRO-AIDE CWR-40E / 72E USER MANUAL 6. Shortly after power is applied the PC will display the following message. Micro-Aide CWR-72E Flash Boot Loader 1.01 Press ESC for boot loader Caution The preceding message should be ignored. Do not press the Esc key. The user must wait several seconds for the CWR-72E program to load into executable memory. 7. After the program is loaded the following password challenge will be displayed. Model CWR-72E Metra Event Recorder. Ver 1.02 (C) 2009 MICRO-AIDE INC. CWR-72E Under Test Event storage capacity: 111481 Enter password: Password Request 8. If the recorder fails to display the password request, check the power and peripheral connections and Baud rate and communications settings. If the problem can be isolated to the CWR-72E contact MICRO-AIDE customer service for instructions on how to proceed. Note Repair and return policies are described on the inside back cover of this manual. 9. The remainder of the Initial Check-out Procedure presumes the recorder is configured to operate with one of the Metra-defined Setup Databases. Caution The Mainline database must be installed in the CWR-72E. The BEV or MED database must be installed in the CWR-40E. If this is not the case the user will need to upload the correct database from a PC. Refer to the section entitled “Restoring the Setup Database (U)” on page 45 for details. 10.From the PC’s keyboard type SIGNAL in upper-case letters. This is the Metra-defined Restricted Access password. Complete the entry by pressing the Enter key. The Main Menu, shown below, will be displayed. MICRO-AIDE CWR-72E Event Recorder S L Q V M T D X Setup Live Status Query Events View Events Measure Flash Rate Transfer Files Diagnostics Log Off Main Menu 11.Using a short pair of stripped jumper wires place +12Vdc and negative to Digital Input number 1. Refer to the silkscreened labels located near the input terminals. Positive voltage 10 CHAPTER 2 INSTALLATION AND SETUP should be placed on the terminal to the left and negative voltage on the right. The voltage should be held for at least .5 seconds before proceeding. 12.Use the same procedure described in the previous paragraph to test additional Digital Inputs. 13.Perform a Query of the Event Records by pressing Q at the PC keyboard. Select today’s date and then press Enter. Finally, press the F1 function key. Refer to the section entitled “Query Events (Q)” on page 51 for additional details. 14.Verify that an Event Record is reported for each Digital Input tested. Note any inputs not displayed and test the inputs again, being careful to hold the voltage for at least .5 seconds. A second Query should verify the retested inputs. 15.Press the Esc key once to return to the Main Menu. Press the L key. The CWR-72E will now display the real-time status of Digital and Analog Inputs. 16.Connect the 12Vdc positive and negative test leads to the two inputs of Analog Input A1. 17.Verify the Analog Input reading for A1 is within .1Vdc of the correct reading. The correct polarity of the applied voltage should also be indicated. 18.Repeat the previous two steps for the remaining seven Analog Inputs. 19.Before completing the Initial Check-out Procedure verify the LCD is providing acceptable contrast. If it needs to be improved adjust the potentiometer located at the recorder’s front panel. Refer to the section entitled “Adjusting the LCD Contrast” on page 85. This concludes the Initial Check-out Procedure. This procedure may be used at any time to verify that the CWR-72E is operating properly. Power can now be removed from the recorder. Connections to the PC should also be removed. Note In the event that a failure occurs during any part of this procedure a series of diagnostic tests should be performed. Refer to the section entitled “Diagnostic Testing” on page 88. Alternatively, the user may wish to contact MICRO-AIDE customer service. Instructions on how to proceed will be offered. Material Return and Limited Warranty policies are described on the inside back cover of this manual. Installation Procedure The following sections describe the recommended Installation Procedure. Figure 1 on page 8 and Figure 2 on page 9 illustrate elements that are common to most installations. The illustrations also depict the location of each connector used in the installation. Note The 2-Track and 4-Track Recording Systems include a Failed Lamp Detector unit. The Installation Procedure for the FLD-2 is described in its User Manual. 11 MICRO-AIDE CWR-40E / 72E USER MANUAL Location The location where the CWR-72E is to be installed should comply with a few simple requirements. The ambient temperature near the recorder should be in the range from 40ºC to 72ºC. Mounting The CWR-72E can be mounted on top of a suitable shelf or secured to a back board. Each recorder is equipped with non-slip, rubber feet. Precautions should, however, be taken to prevent the recorder from dropping off the edge of the shelf or desktop. The shelf mounting brackets provided with the recorder can be used for this purpose. To attach the shelf mounting brackets remove the four rubber feet. The provided screws and threaded holes vacated by the rubber feet are used to install the brackets. If a PC is to be used it must be properly secured. Note Contact MICRO-AIDE in the event 19" rack mounting brackets are required. Refer to Appendix C for ordering details. Site Preparation The equipment location must have access to a stable 10 to 36Vdc power source. A pair of wires must be run from the power source to the location where the recorder will be mounted. The CWR-72E wire ends must be stripped approximately 1/4". The stripped ends will be secured by tension clamp terminals located along the top panel of the recorder. One wire must be connected to the positive voltage of the power source and the other wire must be attached to the return of the power source. The tension clamp terminals will accept wire sizes as large as 12AWG. The two wires must be properly secured to prevent damage. It is preferable not to run the wires adjacent to electrical equipment such as motors that may generate large electrical disturbances. The Digital and Analog Inputs use the same tension clamp terminals as those required by the power leads. Each wire should be tagged with its circuit identity. Each input cable or wire bundle should be secured to prevent damage to the connections at either end. The CWR-72E can be programmed to issue an alarm indication signal. A pair of form C relays with normally closed and normally open contacts is available at the connector alongside where power is attached to the recorder. The contacts are rated for 2Adc at 24Vdc and 1Aac at 125Vac. The relays can be used to control an external light or warning device. The GPS Receiver option utilizes an external antenna. The bulkhead-style antenna is designed to be mounted outdoors on any surface less than 3/8" in thickness. It requires a 1/2" diameter hole to be drilled through the mounting surface. The hole should be properly sealed. The antenna assembly also includes a washer, nut and 16' cable. 12 CHAPTER 2 INSTALLATION AND SETUP Peripheral Equipment If a PC is to be co-located with the CWR-72E an appropriate AC power source must be available. Additional connections can be made as described in the following sections. USB Device Port If an on-site PC is to be used MICRO-AIDE recommends that the USB Device Port be connected to a USB port of the PC. The USB Device Port will support data transfer rates of 960Kbps. A standard USB Type A-B cable is used for this purpose. Table 14 on page 104 lists the bit transfer rates of each user accessible port. Note To use the recorder’s USB Device Port the proper drivers must be installed in the PC. Appendix D describes how to locate and install the correct drivers. Terminal Port As an alternative, the PC can be connected to the recorder’s Terminal Port. The Terminal Port cable should be kept to a minimum distance, preferably less than 20'. MICRO-AIDE provides, as a standard feature, an RS-232 DE-9 to DE-9 cable. The cable is suitable for use with any PC comm port or USB-to-serial adapter cable. Caution Each recorder is shipped with a MICRO-AIDE manufactured RS-232 cable. The recommended cable ensures that the connector bodies are not electrically attached. The shield wire is not attached. The cable is constructed in such a way that the recorder chassis and peripheral device are electrically isolated. This further improves the isolation properties of the system. Ethernet Port (optional) The optional Ethernet Port may be used to connect the CWR-72E to a LAN or PC. A standard CAT-5 Ethernet cable is used to connect to the LAN via a hub or switcher. A crossover CAT-5 cable is used to connect the PC directly. The length of either cable must be limited to 50'. Table 14 on page 104 lists the bit transfer rates of each user accessible port. Internal Modem Each recorder is equipped with an internal modem. A standard telephone line can be attached to the recorder. The telephone line must be terminated with an RJ-11 connector like those commonly used in residential telephone service. Test the telephone line first to ensure that a dial tone is available. GPS Receiver The GPS Receiver option is the preferred means of precisely controlling the recorder’s real-time clock. Each recorder is equipped with this feature. It includes a bulkhead-mount antenna designed specifically for use with the receiver module. For improved reception the antenna should be mounted outside of the equipment house or cabinet, as it requires unobstructed skyward access. 13 MICRO-AIDE CWR-40E / 72E USER MANUAL The antenna is designed to be moisture proof and is rated to operate over a broad temperature range. The antenna is equipped with a 16' coaxial cable. The antenna end of the cable is nondetachable. The other end of the cable terminates in an MCX-male connector. The MCX connector must be secured to the recorder’s connector labeled “GPS Antenna” located along the top panel. Note Upon request, an optional magnetic-mount antenna can be supplied. Refer to “GPS Receiver” on page 119 for additional details. Cabling Follow the steps listed below to complete the cabling installation. Tip The power, alarm relay and input wires all terminate in tension clamp connectors that are detachable. The cable installation may be performed more easily if the female connectors are first detached from their male halves that remain secured to the CWR-72E circuit board. Power 1. Ensure that the power is off at the power source. 2. The two wires from the power source must be secured to either pair of tension clamp terminals labeled “B” and “N”, respectively. 3. Connect AC power to the PC (as required). Alarm Relay Wire the alarm indicating device or circuit to the appropriate relay terminals labeled “C”, “NO” or “NC” (i.e., common, normally open, normally closed, respectively). Input Circuits Events will only be recorded if the input circuits are wired properly to the CWR-72E. The correct polarity of Digital and Analog Inputs must be identified. DigitalInputcircuitsaretypicallywiredtoeight-position,detachableconnectors.Individualpairs are wired to horizontally adjacent terminals. The positive lead of the digital circuit to be monitored must be connected to the left-side terminal labeled “+”. The common, or return, lead of the digital circuit must be connected to the right-side terminal labeled “-”. Positive and negative voltages can be monitored by a Digital Input, even if they occur from the same circuit. In such cases the circuit is wired to two inputs of the recorder, one for each polarity. Figure 1 on page 8 illustrates how to connect negative voltage circuits. Analog Inputs are wired somewhat differently thanDigital Inputs. The eight Analog Inputs terminate in a separate connector along the top panel of the recorder. They are labeled as inputs “A1” 14 CHAPTER 2 INSTALLATION AND SETUP through “A8”. The connectors that are used are detachable and also use a tension clamp terminal method for anchoring each wire. Note Event Records will indicate positive and negative polarities for each Analog Input. The user may wish to verify the proper operation of each input. The “Initial Check-out Procedure” on page 7 should be used to identify any faulty input wiring. Applying Power Once the cabling is installed the power can be applied. Shortly after power is applied the PC will display the password request. Refer to the sample data labeled “Password Request” on page 10. After the initialization sequence is completed the front panel LCD will indicate the time and date. This completes the CWR-72E Installation Procedure. The Setup Procedure can now be started. Setup Procedure Before the CWR-72E is ready for use the recorder must be configured to reflect the operation required by the user. The following steps should be performed in the sequence listed. It is assumed that the user is accessing the CWR-72E via a PC which is connected to either the USB Device or Terminal Port. Succeeding chapters describe how to use the front panel display and keypad, as well as access the recorder via the optional Ethernet Port and internal modem. It is further assumed that the user has not previously altered any of the factory default settings. Note The Terminal Port default settings are 38,400 Baud, no parity, 8 data bits, 1 stop bit (i.e., N-8-1). The Setup Procedure involves several steps that permit the user to program a variety of parameters that will best suit the user’s recording requirements. Each step involves the selection and execution of a particular command. Before the actual programming is performed the user should be aware of several conventions employed by the CWR-72E user interface. User Interface Conventions Logging On User sessions are initiated only after the log-on procedure is completed. To log on the user must enter the correct password in response to the password challenge. A typical password challenge message is shown in the sample data labeled “Password Request” on page 10. Note The Metra-defined Restricted Access password is SIGNAL in upper-case letters. Per the requests of Metra management, the Administrative Access password is not reported anywhere in this User Manual. 15 MICRO-AIDE CWR-40E / 72E USER MANUAL Complete the password entry by pressing the Enter key. The Main Menu will be displayed after the correct password has been entered. The user is allowed three password attempts. Commands and Fields The CWR-72E user interface allows commands and parameter fields to be easily and quickly selected. Commands are listed vertically in a menu. Some commands direct the user to sub-menus containing additional commands (e.g., Setup command). Fields allow the user to either select or enter parameter values. A specific field is always uniquely associated with a particular command. To select a command from a menu or a field within a command simply move the rectangular highlight to the location of the desired command or field. Pressing the appropriate arrow keys located on the PC keyboard will move the highlight. The left, right, up and down arrow keys may be used in any sequence to position the highlight. To execute a command that has been previously selected (i.e., highlighted) simply press the Enter key. Alternatively, the command may be executed by pressing the single letter code listed to the left of the command. Upper- and lower-case letters may be used. Every command listed in a menu has a distinct single letter code that permits immediate execution of that command. Working with Fields The CWR-72E utilizes two types of fields. Selection Fields allow the user to select a parameter from a list of predefined values (e.g., Terminal Port Baud rate). Edit Fields can be set to any alphanumeric value desired by the user (e.g., Unit Name). To change the value of a Selection Field simply press the Spacebar on the PC keyboard. The next value from a predefined list of values will be displayed each time the Spacebar is pressed. The first value in the list will automatically follow the last value. Input Names, Detection Times and Limit Values are examples of parameters that are defined by Edit Fields. After the desired Edit Field is highlighted the user may type any combination of alphanumeric characters appropriate to the field. The initial value of the field is completely removed after typing the first character. Consequently, it is not necessary to delete each character that comprises the initial value. Errors in typing can be corrected by using the Backspace key. At any time while editing a field the user may press the Esc key and thereby restore the field to its previous value. Upper- and lower-case letters may be used. Limit values are assigned negative values by preceding the numeric entry with a minus sign. Numeric values that exceed the range of the field are automatically set to the maximum or minimum value (as appropriate) permitted by the range. To accept the new value assigned to an Edit Field the user can either press the Enter key or move the highlight to a new field. The initial value of an Edit Field cannot be restored after the new value has been accepted. When all of the fields contain values suitable to the user the command may be completed. 16 CHAPTER 2 INSTALLATION AND SETUP Note Once a field has been accepted by pressing the Enter key or moving the highlight it may, depending upon the command, be programmed into the recorder as an updated operating parameter. Accordingly, the acceptance may occur before completion of the command. Completing Commands Generally, commands are completed by pressing the Esc key. However, pressing the Esc key will not complete the command if the user is in the process of editing a field. Pressing the Esc key prior to accepting the new value will instead restore the highlighted field to its previous value. To complete a command that requires pressing the Esc key, first accept the contents of the last Edit Field by pressing the Enter key or moving the highlight to another field. Some commands are completed by responding to a choice listed in a Selection Field (e.g., No or Yes). In these cases the command is completed by highlighting the desired choice and then pressing the Enter key. Pressing the Esc key is the equivalent of selecting the default choice (generally the No option). As a rule of thumb, executing the No option will abandon any field changes made prior to the completion. Other commands are completed by pressing the key described in a prompt message displayed with the command. Prompts are frequently listed with commands as an aid to the user. After the command is completed the user will be returned to the menu that was previously displayed. Data Flow Control Several of the setup and operational commands can generate considerable amounts of displayed data. If the user wishes to observe this data on the screen of a PC it may be helpful to temporarily pause the data stream being sent by the recorder. The Pause and Resume commands may be used to provide the required data flow control. To Pause the data being sent press the Ctrl and S keys simultaneously. The data flow will be stopped indefinitely. To Resume data flow press the Ctrl and Q keys simultaneously. This technique can be used to freeze the data at the PC. Another useful command is the Abort command. At any time during a lengthy data dump the remaining data can be ignored or aborted by pressing the Esc key. The user can then issue another command immediately rather than wait until the lengthy data dump is completed. Main Menu The Main Menu of commands will be displayed immediately after logging on. Refer to the sample data labeled “Main Menu” on page 10. The Setup Procedure described in this chapter will familiarize the user with the Setup, Transfer Files and Log Off commands listed in the Main Menu. 17 MICRO-AIDE CWR-40E / 72E USER MANUAL For the remainder of this chapter the Setup, Transfer Files, Log Off commands and their numerous sub-commands will be described in the sequence recommended by MICRO-AIDE for their execution as part of the Setup Procedure. Each command will be identified by its name as listed in the menu where it resides. The single letter code that executes the command will be listed in parenthesis. The procedure starts with the execution of the Main Menu’s Setup command. Note Many of the commands and sub-commands described in the following sections can be accessed, but not executed within a Restricted Access session. The parameters associated with the command can be viewed, but not modified. These commands are labeled Admin Only. Setup (S) The following menu of sub-commands will be displayed after executing the Setup command. Setup Menu T E I D G A V W M N S P R Time/Date Event Names Input Names/Identifiers Detect Times/Flash Enable Global Detect Time Analog Configuration Virtual Inputs Timer Inputs Measure Speed Network System Parameters Print Setup Data Reset System Time/Date (T) Admin Only The CWR-72E time stamps all Event Records. Therefore, the correct time and date must be set. The recorder will automatically account for leap year. The recorder’s clock circuitry will continue to keep time even if power is interrupted for a prolonged period. To change the time or date execute the Time/Date command. The sample data listed below shows a typical response to the Time/Date command. Time/Date HH:MM:SS Time: 13:43:10 MM-DD-YY Date: 09-11-09 Thursday 18 CHAPTER 2 INSTALLATION AND SETUP The highlight may be moved to the hour, minute or second time fields or month, day or year date fields. The CWR-72E utilizes a military-style clock. Accordingly, 12:01:02AM is defined as 00:01:02 and 12:59:58PM is defined as 23:59:58. Leading zeros are not required. The day of week is displayed automatically as determined by the date selected by the user. The clock of the CWR-72E can be sourced or precisely set by three different means. The Clock Sync Mode can be set to GPS, SNTP or Digital Input. Refer to the section entitled “Clock Sync Mode” on page 25. Tip If the clock cannot be synchronized MICRO-AIDE recommends that the clock be manually set once per month. To complete the command press the Esc key. The user can then accept or abandon the changes. Reset System (R) Admin Only The Reset System command can be used at any time to restore the recorder to its factory default settings. The command can also be used to clear previously logged Event Records. This step is listed as part of the Setup Procedure since it can be useful in restoring the recorder to a known state consistent with this documentation. Additionally, any programming or Event Records created as a part of the Initial Check-out Procedure will be erased. The following menu will be displayed after executing the Reset System command. Both command options are described in the sections that follow. Reset System S Reset Setup Data E Reset Event Memory B Reset Both Note The time and date settings are not affected by either option of the Reset System command. Reset Setup Data (S) Admin Only The CWR-72E utilizes two non-volatile memories. The first, referred to as the Setup Database, contains all of the programmed parameters established by the user. Most of these parameters can be restored to their factory default values by executing the Reset Setup Data command. Table 3 lists the values after the reset is performed. Some parameters are unchanged by the reset. Parameter Default or Reset Value Time and Date (as previously assigned) Unit Name ***** NOT SET ***** Table 3 - Factory Default / Reset Parameters 19 MICRO-AIDE CWR-40E / 72E USER MANUAL Terminal Port Baud Rate 38,400 Administrative Password PASSWORD Restricted Password LOOKWORD Passcode 12345678 Ring Count 2 Primary Dial Number (none assigned) Secondary Dial Number (none assigned) Clock Sync Mode (as previously assigned) Clock Sync Input --- (none assigned) Time Zone (as previously assigned) Daylight Saving Time (as previously assigned) High Temp Limit 257ºF Low Temp Limit -67ºF Record Flash Details Disabled Digital Input - Names Digital Input 01, Digital Input 02, etc. Analog Input - Names Analog Input 01, Analog Input 02, etc. Virtual Input - Names Virtual Input 01, Virtual Input 02, etc. Timer Input - Names Timer 01, Timer 02, etc. Flash Input - Names Same as Digital Input Digital Input - Identifiers DInput01, DInput02, etc. Analog Input - Identifiers AInput01, AInput02, etc. Virtual Input - Identifiers VInput01, VInput02, etc. Timer Input - Identifiers Timer01, Timer02, etc. Flash Input - Identifiers Same as Digital Input Event Names - On On (pairs 1-19), Violate (pair 20) Event Names - Off Off (pairs 1-19), Nominal (pair 20) Assigned Event Name Pairs 1, 20 for Timer Inputs Digital Input - Detection Times .30 seconds Digital Input - Flash Status No (disabled) Analog Input - Ranges ±25.5Vdc Analog Input - Filter Setting Slow Analog Input - Low Limits -25.6Vdc Analog Input - High Limits 25.5Vdc Virtual Input - Variables --- (none assigned) Virtual Input - Relay Controls No (disabled) Table 3 - Factory Default / Reset Parameters (Continued) 20 CHAPTER 2 INSTALLATION AND SETUP Virtual Input - Dial Out Controls No (disabled) Timer Input - From and To Triggers --- (none assigned) Timer Input - Low and High Limits 0.0 seconds Train Speed - First Sensor Inputs --- (none assigned) Train Speed - Second Sensor Inputs --- (none assigned) Train Speed - Distance Between Sensors 0 Train Speed - Distance Units Inches Train Speed - Thresholds 0mph Flash Rate Input (as previously assigned) Ethernet settings (as previously assigned) Table 3 - Factory Default / Reset Parameters (Continued) The following precaution will be displayed after selecting the Reset Setup Data command. RESET ALL SETUP DATA TO FACTORY DEFAULTS, ARE YOU SURE? No Yes Select No to abort the reset. Select Yes to proceed. Note The Reset Setup Data command will return the Terminal Port Baud rate to its default setting of 38,400 Baud. The PC Baud rate may have to be adjusted. Tip If the Setup Database is reset to it factory default settings the appropriate Metra-defined database must be reinstalled. The restoration procedure is described in the section entitled “Restoring the Setup Database (U)” on page 45. Reset Event Memory (E) Admin Only The Reset Event Memory command will permanently remove from memory all Event Records that were previously logged. Records from each of 128 possible days will be deleted. The following precaution will be displayed after selecting the Reset Event Memory command. ERASE ALL EVENTS FROM MEMORY, ARE YOU SURE? No Yes Select No to abort the reset or Yes to proceed. If a reset is performed the following precaution will be displayed. 21 MICRO-AIDE CWR-40E / 72E USER MANUAL Erasing memory, do not turn power off for 60 seconds, Press any key to continue Caution It is important that the user not turn off the power while the CWR-72E is clearing the Event Record memory. Reset Both (B) Admin Only The Reset Both command allows the user to clear both databases simultaneously. The precaution noted in the preceding paragraph applies to this command as well. System Parameters (S) System Parameters are those parameters that affect the recorder as a whole. Except for the Clock Sync Input setting, they do not affect individual inputs or their behavior. System Parameters include, but are not limited to, the Unit Name, passwords and modem options. The fourteen System Parameters are defined with a single command containing multiple fields. A typical response to the System Parameters command is shown below. The use of each System Parameter is described in the following sections. System Parameters ----------------- Unit Name DIST_SUBDR_XING-NAME_DOT-NUMBER_MILE-POST-NUMBER Terminal Port Baud Rate 38400 Administrative Password Restricted Password Passcode Ring Count 2 Primary Dial Number Secondary Dial Number Clock Sync Mode GPS Clock Sync Input --Time Zone CST (UTC-6) Daylight Saving Time Enabled High Temp Limit 257 Degrees F Low Temp Limit -67 Degrees F Record Flash Details Disabled System Parameters Unit Name The Unit Name serves as a comprehensive recorder and site ID. It is included at the top of each report. Data from several CWR-72E recorders can be easily distinguished by providing each unit with a unique and descriptive name. A total of eighty alphanumeric characters can be used to define the Unit Name. It is assigned using the standard Edit Field techniques described in “Working with Fields” on page 16. Metra has defined a preferred composition for the Unit Name. The definition is described in the following section. Refer to the sample data labeled “System Parameters” on page 22. 22 CHAPTER 2 INSTALLATION AND SETUP The form of the Unit Name that Metra wishes to use is listed in the Unit Name field. From left to right the Unit Name includes: • District Name: DIST_ • Subdistrict Name: SUBDR_ • Crossing Name: XING-NAME_ • DOT Number: DOT-NUMBER_ • Mile Post Number: MILE-POST-NUMBER The District, Subdistrict and Crossing Names must not exceed 20 characters in total. The space character must not be used for word spacing. The underscore “_” character is used instead for such purposes. Additionally, the following Windows-prohibited characters cannot be used anywhere. They include the following 11 characters / \ ? % * : | ” < >. The front panel LCD has a limited capacity to display information. It is limited to 4 lines of 20 characters. The content of the first 3 lines are fixed by the recorder’s firmware and cannot be changed by the user. The content of the fourth LCD line always reflects the first 20 characters of the Unit Name as depicted below. TIME DATE 16:35:52* 06-01-11 CWR72E EventRecorder DIST_SUBDR_XING-NAME Finally, when Event Records are saved to a USB flash drive the records are contained in a folder. The folder name is created automatically by the Event Recorder. It is a copy of the first 20 characters of the Unit Name just as they appear on the LCD. Folder names cannot include any of the Windows-prohibited characters or the space character in certain positions (specifically, first and last). For this reason it is best to avoid using the space character in any Unit Name. Terminal Port Baud Rate The Terminal Port Baud rate may be assigned one of ten values. Valid settings are: 300, 600, 1200, 2400, 4800, 9600, 19200, 38400, 57600 and 115200bps. Press the Spacebar to select a Baud rate. The following message will be displayed if the Baud rate was changed. Change baud rate now, then Press any key to continue The user must change the Baud rate of the PC to match the new setting assigned to the CWR-72E. 23 MICRO-AIDE CWR-40E / 72E USER MANUAL Administrative and Restricted Passwords Admin Only Access to the CWR-72E via the Terminal, Ethernet USB Device and modem Ports is protected by a dual level password system. Administrative Access permits unrestricted access to all recorder functions. Administrative Access allows the Setup Database to be altered and the Event Record memory to be cleared. The Administrative Password should be known to a limited number of users with a genuine need to know. Restricted Access permits only limited access to the recorder. It allows the user to review the complete Event Record memory, but permits only limited modifications to the Setup Database. The Restricted Password can be shared with users that only need access to Event Record data when investigating an incident or resolving a maintenance issue. The Administrative and Restricted Passwords are defined similarly. Each may be assigned any combination of alphanumeric characters not exceeding eight total. To defeat the password security system assign one of the passwords a null value. This can be done by deleting all of the characters in the password field and then accepting the empty field. When the password challenge is issued the user will be able to access the system by simply pressing the Enter key. Caution Care should be exercised in assigning and saving the Administrative Password. If it is lost or forgotten it will be necessary to contact MICRO-AIDE for assistance. Passcode Admin Only The CWR-72E can be effectively programmed and operated from its front panel. The Passcode is used to protect the recorder from unwanted access via the front panel. It must be entered when the user attempts to alter the Setup Database. The Passcode can be assigned any combination of digits not exceeding eight total. Alphabetic characters cannot be assigned to the Passcode. Ring Count The Ring Count parameter determines the number of ring cycles that must occur before the modem will answer an incoming call. Setting the Ring Count to a sufficiently large value will allow an on-site maintainer to answer a voice call prior to the CWR-72E answering. The Ring Count can be set in the range from 0 to 99. A setting of 0 will disable the modem’s auto-answer feature (i.e., incoming calls will not be answered by the modem). The following message will be displayed below the last field in the Systems Parameter command if the optional modem is not installed. No message will appear if the modem is installed. Modem is NOT installed 24 CHAPTER 2 INSTALLATION AND SETUP Primary and Secondary Dial Numbers The Virtual Input feature of the CWR-72E allows users to program a fault reporting capability into the recorder. If the fault is detected and the recorder is equipped with the optional internal modem, the modem can be enabled to dial out to a maintenance facility and transmit an Event Record that specifies the fault. The telephone number the modem dials is defined by the Primary and Secondary Dial Number parameters. Dial numbers will generally contain numeric values. An exception to this rule is that parentheses, hyphens and space characters can be placed into the number field for clarity. These characters will be ignored by the modem. Additionally, the comma character can be placed anywhere in the field to create an arbitrary two-second delay. A total of twenty alphanumeric characters can be entered for each of the dial numbers. The CWR-72E attempts to establish a connection by dialing the Primary Dial Number first. If the connection fails the next attempt is made to the Secondary Dial Number. Successive failures will force the modem to dial alternately between the two numbers. The modem ceases further attempts after ten failures to each number have occurred. Note The CWR-72E modem is programmed to accept only reliable connections. Consequently, the far end modem must be programmed to establish connections that use error correction protocols such as LAP-M and MNP 2-4. Clock Sync Mode Admin Only The recorder’s real-time clock can be sourced or precisely set to one of three sources. The Clock Sync Mode parameters allow the user to select a setting of GPS, SNTP or Digital Input. Press the Spacebar key to select the desired setting. Tip The GPS setting allows the optional GPS Receiver to operate as the source of the recorder’s real-time clock. MICRO-AIDE recommends the GPS Receiver option as the best method of creating Event Records that include an error-free time and date stamp. To employ the SNTP option three conditions must be satisfied. The conditions are listed below. • The Ethernet Port option must be installed. • The Ethernet Port must be connected to a LAN (or PC) that includes an SNTP time server. • The time server must transmit Universal Time Coordinated (UTC) messages via multicast on IP Address 255.255.255.255, Port 123. The Digital Input setting allows the real-time clock to be controlled by an external source such as a PLC. This setting is described in further detail in the next section. 25 MICRO-AIDE CWR-40E / 72E USER MANUAL Clock Sync Input Admin Only The clock sync feature allows an external signal to set the recorder’s clock to the nearest fifteen minute mark. To synchronize the CWR-72E clock to an external input enter a Digital Input number in the Clock Sync Input field. The input entry must take the form Dn, where n must be in the range of 1 to 64 (32 for CWR-40E). Leading zeros are not required. Additionally, the Detection Time setting for the Clock Sync Input must be less than the duration of the PLC output pulse. Refer to the section entitled “Detection Times” on page 28 for details. The Clock Sync Input is treated like any other Digital Input. Changes in state of the Clock Sync Input will create Event Records. When the input transitions to an active state (i.e., voltage applied) the clock will be rounded to the nearest fifteen minute value. Accordingly, the count of seconds will be cleared to 00.00. As an example, if the time is 12:16:03.95 the clock sync feature will set the clock to 12:15.00.00. If the time is 12:44:20.26 the clock sync feature will set the clock to 12:45:00.00. Caution The Clock Sync Input will normally be connected to the output of a PLC. The time between successive PLC output pulses must be a whole multiple of fifteen minutes. Otherwise the recorder clock will indicate a significant error. Time Zone Admin Only The Time Zone setting is applicable only when either the GPS Receiver or SNTP via Ethernet option is used to set the real-time clock. The setting is otherwise ignored. The GPS and SNTP features indicate time in accordance with the UTC standard. To display the correct local time the Event Recorder must convert the reported UTC time by applying the correct time zone adjustment. The Time Zone setting can be selected from seven different values that are common to North America. Each setting is explained in Table 4. Time Zone Code Description Shift from UTC (hours) AST Atlantic Standard Time -4 EST Eastern Standard Time -5 CST Central Standard Time -6 MST Mountain Standard Time -7 PST Pacific Standard Time -8 AKST Alaska Standard Time -9 HAST Hawaii Standard Time -10 Table 4 - Time Zone Settings 26 CHAPTER 2 INSTALLATION AND SETUP Daylight Saving Time Admin Only The real-time clock of the CWR-72E can be adjusted automatically to compensate for DST. This feature operates independently of the Clock Sync Mode setting. If enabled, the realtime clock will be shifted by one hour on the second Sunday of March and the first Sunday of November. In both cases the clock is adjusted at 2:00AM. Note The DST feature implemented by the CWR-72E is in full compliance with the Energy Policy Act of 2005 which took effect in 2007. High and Low Temp Limits Admin Only The temperature inside the CWR-72E can be measured and reported. If the temperature reaches an extreme value a System Event will be declared and logged to memory. Refer to “System Events” on page 93 for additional information. The High and Low Temp Limits are used to define the range of acceptable operation. The settings must range from -67ºF to 257ºF. Record Flash Details Admin Only The CWR-72E employs a two-tier procedure for the reporting of flashing signals. The Record Flash Details setting controls the second tier. It can be set to Disabled or Enabled. If Enabled, the recorder will report separate On and Off events for each flash pulse. These events are always reported with an Input Number of Fn where n is any value in the range of 1 to 64 (32 for CWR-40E). Additionally, the CWR-72E will test each 30-second interval of flashing pulses to determine if it is in the range of 36 to 64 fpm and 45/55 to 55/45% duty cycle. Exceptions are reported by special System Event Records. Refer to the section entitled “System Events” on page 93 for additional details concerning the flash alarm and how it is assigned as a System Event. Detect Times/Flash Enable (D) Admin Only The Digital Inputs of the CWR-72E will generally be connected to relay-based control circuits. Since relay contacts typically bounce, the recorder must have the ability to debounce these inputs. The Detection Time feature allows the user to establish a validation time for each Digital Input. Each Digital Input can also be set to monitor a flashing circuit. The Detect Time/Flash Enable command allows the user to program each of these features. A typical response to the Detect Time/Flash Enable command is shown below. Only the first several lines of text are shown. 27 MICRO-AIDE CWR-40E / 72E USER MANUAL Detect Input Time Flash ----- ---- ----D01 0.30 No D02 0.30 No Detect Times/Flash Enable Detect Detect Input Time Flash Input Time Flash ----- ---- ----- ----- ---- ----D17 0.30 No D33 0.30 No D18 0.30 No D34 0.30 No Input Time Flash ----- ---- ----D49 0.30 No D50 0.30 No The procedure for programming both parameters is described in the following sections. Detection Times Admin Only In the sample data shown above the Detection Times are set to the factory default value of .30 seconds. The range of valid Detection Times is 0 to 327.67 seconds. A value of zero prevents the Digital Input from logging events. Use the decimal point key to enter fractional values. The Detection Time of inputs assigned as sensors in the Train Speed Monitor feature cannot be altered. They are set to a fixed value of .05 seconds. Tip Set the Detection Times to values slightly greater than the longest expected bounce time of the relay contacts. This will insure that noise or transient induced voltage changes are not recorded and that legitimate short duration events will be logged. The Detection Time assigned to a Digital Input enabled for flashing operation represents a special case requiring additional explanation. The correct programming procedure is described below. Flash Enable Admin Only The first-tier method employed by the CWR-72E to report flashing events is described in this section. A typical flashing event is created by the operation of a crossing light or approach signal. Each time the light flashes a new pulse is seen at the Digital Input. The user may wish to log events only at the start and end of the sequence, not an event for each pulse. To do this, the following setup configuration must be selected. • Assign the proper Detection Time to the Digital Input. • The Flash setting for the Digital Input must be set to Yes. • Set the Record Flash Details setting to Disable. Refer to the section entitled “Record Flash Details” on page 27 for additional information. Figure 3 illustrates the algorithm used by the CWR-72E to detect flashing events. The Detection Time must be set to the nominal duration of a flash pulse. Pulses are expected to be on and off for the same duration. However, the CWR-72E is designed to allow for some variation in the duration of each pulse. Each on and off pulse must have a duration in the range from 75% to 125% of the assigned Detection Time. Use either of the two methods listed below to determine the correct Detection Time for inputs with nonvarying flash rates. 28 CHAPTER 2 INSTALLATION AND SETUP Figure 3 - Typical Flashing Pulse Sequence Tip The Measure Flash Rate command can be used to determine the Detection Time for Flashing Inputs. Refer to the section entitled “Measure Flash Rate (M)” on page 57. Alternatively, the correct Detection Time (in seconds) is equal to 30 divided by the number of flashes per minute (i.e., 30fpm). To enable an input for flashing operation simply highlight the field in the Flash column and press the Spacebar. Note Event Records created by flashing inputs will list the measured flash rate in FPM. Global Detect Time (G) Admin Only The Detect Times command allows each Digital Input to be set individually. Setting all 64 (32 for CWR-40E) inputs to values that differ from the factory default setting can be time consuming. Alternatively, the Global Detect Time command can be used to set all inputs to a single Detection Time value. The following edit field will be displayed in response to the Global Detect Time command. Global Detect Time Detect Time for All Inputs: 0.00 29 MICRO-AIDE CWR-40E / 72E USER MANUAL To set the Detection Time for each Digital Input simply enter a number in the range from .01 to 327.67. To complete the entry press Enter. Note An initial value of 0.00 is always listed in the edit field. The Global Detect Time command will not alter the setting of Digital Inputs assigned as sensors for any of the Train Speed Monitors. Analog Configuration (A) Admin Only The eight Analog Inputs of the CWR-72E can be used in a variety of applications. Battery voltages, AC voltage levels and current flows can be measured and reported by the Analog Inputs. The user can select an entry from a preset menu that best suits the intended application. A typical response to the Analog Configuration command is shown below. Default settings are listed. Input ----A01 A02 A03 A04 A05 A06 A07 A08 Analog Configuration Filter* Low Limit -------------Slow -25.6 Slow -25.6 Slow -25.6 Slow -25.6 Slow -25.6 Slow -25.6 Slow -25.6 Slow -25.6 Range ---------+/-25.5Vdc +/-25.5Vdc +/-25.5Vdc +/-25.5Vdc +/-25.5Vdc +/-25.5Vdc +/-25.5Vdc +/-25.5Vdc High Limit ---------25.5 25.5 25.5 25.5 25.5 25.5 25.5 25.5 *Recommend "Slow" for AC The first column identifies the input. Analog Inputs are consistently labeled by the CWR-72E as “A01”, “A02”, etc. The A-prefix is always used to distinguish Analog from Digital, Virtual and Timer Inputs. This first column of fields is fixed and cannot be altered by the user. Four parameters can be used to characterize an Analog Input. Each parameter is described in the sections that follow. Table 5 lists the Resolution, Filter and Limit Values applicable to each of the seven Ranges. Range Resolution Low Limit High Limit ±25.5Vdc .1Vdc Slow or Fast -25.6 to 25.5Vdc -25.6 to 25.5Vdc +51.1Vdc .1Vdc Slow or Fast 0.0 to 51.1Vdc 0.0 to 51.1Vdc ±255Vdc 1Vdc Slow or Fast -256 to 255Vdc -256 to 255Vdc 25.5Vac .1Vac Slow or Fast 0.0 to 25.5Vac 0.0 to 25.5Vac 255Vac 1Vac Slow or Fast 0 to 255Vac 0 to 255Vac ±25.5Adc .1Adc Slow or Fast -25.6 to 25.5Adc -25.6 to 25.5Adc 25.5Aac .1Aac Slow or Fast -25.6 to 25.5Aac -25.6 to 25.5Aac Table 5 - Analog Input Parameters 30 Filter CHAPTER 2 INSTALLATION AND SETUP Range Admin Only The Range setting allows the user to configure the Analog Input for DC or AC voltage or DC or AC current measurements. The Range setting also selects the span of voltages or currents that will be monitored. Lastly, the Range setting selects the resolution that will be reported by the measurement. The +51.1Vdc range is particularly useful in monitoring batteries that may exceed 24Vdc when charging. The 255Vac range is useful for monitoring the AC power source connected to a battery charger. The DC and AC current ranges are intended to be used with a MICRO-AIDE external current sensor. Tip Each of the Ranges identified as AC utilize a true RMS method of measurement. Consequently, these settings can also be used when monitoring inputs with variable DC or pulse content. Filter Admin Only The Filter parameter can be set to either Fast or Slow. The Fast setting utilizes a time constant of .1 seconds. It is generally used when monitoring DC signals. The Slow setting utilizes a time constant of .64 seconds. It should be used when monitoring AC signals in order to smooth out their ripple content. If the user is unconcerned about the Filter time constant it is best to use the Slow (default) setting. Low and High Limits Admin Only Analog Inputs are constantly compared to two Limit Values. The Low and High Limit Values define regions of acceptable and unacceptable operation. Outside the acceptable region the input is considered to be in an abnormal state. An Event Record will be created when the Analog Input transitions into or out of either region. Figure 4 on page 32 illustrates the relationship of the Low and High Limit Values to the Analog Input state. Each region defines the type of Event Record that is created by transitions of the input. The figure depicts an Analog Input configured to monitor a typical 12Vdc battery source. The figure indicates that the unacceptable region includes all voltages less than 10.2Vdc and all voltages greater than 14.5Vdc. The unacceptable region always consists of two portions separated by the acceptable region. If the input is within the range extending from 10.2 to 14.5Vdc the battery voltage is considered to be acceptable. Note Analog Inputs with levels greater than the Low Limit Value but less than the High Limit Value will create Event Records defined by the inactive or Off Event state. Levels found to be outside these limits will create Event Records defined by the active or On Event state. 31 MICRO-AIDE CWR-40E / 72E USER MANUAL Figure 4 - Analog Input Operating Regions vs. Limit Values Timer Inputs (W) Admin Only The CWR-72E includes 32 general purpose Timer Inputs. Each timer can be programmed individually. A Timer Input can be used to measure the elapsed time between any two events. As an example, the time between two relay events can be measured. The time a single relay is energized or un-energized can be measured. The interval between the loss of adequate BN voltage and a relay operation can be measured. Additionally, the user can assign Limit Values to each Timer Input. In this way, time delays that are unacceptably short or long can be reported. Finally, Timer Inputs will generate distinguishable Event Records like any other input. Included in each record is the measured time value. An array of fields similar to the following will be displayed after selecting the Timer Input command. In the example cited, parameters for the first Timer Input have been entered. The other fields have retained their factory default settings. Only the first three Timer Inputs are listed. 32 CHAPTER 2 INSTALLATION AND SETUP Timer ----T01 T02 T03 From ---D32 ----- Timer Configuration Event To Event LowLimit ----- ---- ----- -------On D33 Off 7.5 Off --Off 0.0 Off --Off 0.0 HighLimit --------12.5 0.0 0.0 [F1]=Next Page [F2]=Prev Page To program a Timer Input follow the steps listed below. 1. Position the highlight anywhere in the row identified by the Timer Input to be programmed (e.g., T01). 2. Move the highlight into the column labeled “From”. The From input is used to trigger the timer. Assign it by entering Dn, An or Vn where n is 1 to 64 (32 for CWR-40E) for Digital Inputs, 1 to 8 for Analog Inputs or 1 to 32 for Virtual Inputs. Leading zeros are not required. 3. Move the highlight to the right into the first column labeled “Event”. Assign the trigger event by pressing the Spacebar as required to select the On or Off setting. 4. Move the highlight to the right into the column labeled “To”. The To input is used to terminate the timer. Assign it by entering Dn, An or Vn where n is 1 to 64 (32 for CWR-40E) for Digital Inputs, 1 to 8 for Analog Inputs or 1 to 32 for Virtual Inputs. Leading zeros are not required. 5. Move the highlight to the right into the second column labeled “Event”. Assign the terminating event by pressing the Spacebar as required to select the On or Off setting. 6. Move the highlight to the right into the column labeled “LowLimit”. Enter a value within the range of 0 to 999.9 seconds. Any measured time interval that is less than this value will generate an Event Record tagged with an Event Name of Violate. 7. Move the highlight to the right into the column labeled “HighLimit”. Enter a value within the range of 0 to 999.9 seconds. Any measured time interval that is greater than this value will also generate an Event Record tagged with an Event Name of Violate. 8. Move the highlight to another row to program an additional Timer Input. 9. After each of the required Timer Inputs are programmed press the Esc key to complete the command. In the example cited above, the time after Digital Input 32 reaches its On state until Digital Input 33 reaches its Off state will be measured. A measured time interval of 7.5 to 12.5 seconds is considered acceptable. Measured time intervals that are within the range established by the Limit Values will generate Event Records tagged with an Event Name of Nominal. Refer to the section entitled “Event Record Formatting” on page 58 for additional information. 33 MICRO-AIDE CWR-40E / 72E USER MANUAL Event Names (E) Admin Only There are two types of Event Records. Active Event Records are created when a Digital Input is found to have sufficient input voltage (greater than 99Vdc) or when an Analog Input transitions into its unacceptable region as defined by its Limit Values. Conversely, inactive Event Records are created when a Digital Input has less than 2Vdc or an Analog Input is within its acceptable region of operation. Event Names allow the user to distinguish Event Records from each other in a quick and unambiguous manner. They should not be confused with Input Names and Input Identifiers (see next section). Event Names always occur in pairs. The On Event and Off Event names form the pair. They in turn distinguish the active and inactive Event Records, respectively. As many as twenty Event Name pairs can be defined. Once the pairs are defined they can be assigned to inputs of the CWR-72E in any manner that helps the user distinguish Event Records precisely and quickly. By way of example, the Event Records for Digital Input 1 could be labeled “XR_On” and “XR_Off”. The Event Records for Analog Input A1 could be labeled “Bat_Norm” and “Bat_Fail”. A typical response to the Event Name command is shown below. In the interest of brevity only four of the twenty pairs are listed (i.e., 1-3 and 20). The factory default Event Names are shown. Event Names Number -----1 2 3 ON Name -------On On On OFF Name -------Off Off Off 20 Violate Nominal To define a new Event Name simply position the highlight to the desired field and type the new name. Event Names are restricted in length to eight characters. They can be formed by any combination of letters, numbers and syntax symbols. Note As an aid to the user Event Name pair 20 is by default labeled “Violate” and “Nominal”. Furthermore, pair 20 is by default assigned as the Event Name Pair to all Timer Inputs. The pair assignment and names can, however, be changed by the user to better suit the intended application. Input Names/Identifiers (I) Admin Only The CWR-72E utilizes two types of inputs. The 64 (32 for CWR-40E) Digital and eight Analog Inputs are referred to as physical inputs because actual circuits are wired to the 34 CHAPTER 2 INSTALLATION AND SETUP recorder’s input connectors. The CWR-72E also includes 32 Virtual and 32 Timer Inputs. Contrary to physical inputs, Virtual and Timer Inputs are defined by the user for the purpose of detecting failure or alarm conditions among the physical inputs. Refer to the section entitled “Virtual Inputs (V)” on page 36. All inputs, regardless of type, share one common programming characteristic. The user can define a unique Input Name, Input Identifier and Event Name pair to each input. The Input Name can be any combination of alphanumeric characters not exceeding twenty total. The Input Name appears in each Event Record created by the input in question. It is the primary means by which inputs are distinguished. The Input Identifier can be thought of as an abbreviated name. It is limited in length to eight alphanumeric characters. It too appears in the Event Record. It is primarily used to distinguish Event Records displayed on the LCD panel of the recorder. Several of the setup commands use the Input Identifier rather than the lengthier Input Name to reference inputs. The Event Name pairs are described in the preceding section. As many as twenty Event Name pairs can be defined by the user. Each pair is identified by a number ranging from one to twenty. After the pairs are defined the Input Names/Identifiers command is used to assign Event Name pairs to inputs. The Event Name pair can be assigned by using either of two methods. The Spacebar can be repeatedly pressed when the highlight is located within the OnEvent/ OffEvent field until the desired pair is listed. Alternatively, the number of the required Event Name pair can be entered in the last column. A typical response to the Input Names/Identifiers command is shown below. Only the first three Digital Inputs and Timer Input T32 have been listed. Analog Inputs follow Digital Inputs. The Virtual Inputs follow the Analog Inputs. They are followed by the Timer Inputs. Input Input Name ----- ------------------D01 Digital Input 01 D02 Digital Input 02 D03 Digital Input 03 T32 Timer 32 Names/Identifiers ID OnEvent/OffEvent Event Pair -------- ----------------- ---------DInput01 On/Off 1 DInput02 On/Off 1 DInput03 On/Off 1 Timer32 Violate/Nominal 20 [F1]=Next Page [F2]=Prev Page Seven data screens are required to list all 136 physical, Virtual and Timer Inputs. To advance to the next screen press the F1 function key. To return to the previous screen press the F2 function key. 35 MICRO-AIDE CWR-40E / 72E USER MANUAL Virtual Inputs (V) Admin Only Virtual Inputs are a unique feature only found in MICRO-AIDE’s family of CWR Event Recorders. The CWR-72E is a powerful, general purpose recording device that can be used to satisfy the data logging demands of a variety of applications. An Event Recorder is frequently used to gather data on a failure condition thought to exist in a relay-based control circuit. The failure condition may occur intermittently. The need to log data over a significant period of time will often impose an additional requirement upon the recorder. The suspected failure can often be defined as the abnormal occurrence of two or more relay states. The normal operation of the circuit predicts that only certain relay states can occur. It follows that any deviation from these normal states suggests a failure that should be flagged and carefully examined. Identifying failures that occur as the result of abnormal relay states is greatly simplified by using the Virtual Input feature. Each CWR-72E allows as many as 32 Virtual Inputs to be defined. Each Virtual Input is defined by specific logical associations among particular physical inputs or other Virtual Inputs. Virtual Inputs are defined by two essential properties. The first property concerns the selection of variables. Variables are merely the inputs (physical, virtual or timer) that will be checked to determine if a Virtual Input event is to be logged. The number of variables that define the Virtual Input can range from one to four. Variables can be Digital Inputs, Analog Inputs, other Virtual Inputs or Timer Inputs. Assigning a Virtual Input as a variable to another Virtual Input is referred to as nesting. Nesting allows the user to create a higher level Virtual Input that evaluates more than four variables. The second property pertains to the state of each assigned variable. A fault condition in a relay-based circuit can only be identified if the state of each variable is properly evaluated. The state of a variable is defined by the CWR-72E as either On or Off. Both states are described below. On: The Digital Input voltage is in the range from 9 to 36Vdc. The Analog Input level is outside the acceptable range as defined by the region between the Limit Values (refer to Figure 4 on page 32). The Virtual Input evaluates to a true logic state. The Timer Input has reported a timed interval that is either too fast or too slow as compared to its assigned Low and High Limit Values, respectively (refer to the section entitled “Timer Inputs (W)” on page 32). Off: The Digital Input voltage is less than 2Vdc. The Analog Input level is within the acceptable range as defined by the region between the Limit Values. The Virtual Input evaluates to a false logic state. The Timer Input has reported a timed interval that is within its range of assigned Low and High Limit Values. The procedure used to define Virtual Inputs is described in the following two sections. 36 CHAPTER 2 INSTALLATION AND SETUP Assigning Variables Admin Only An array of fields similar to the following will be displayed after selecting the Virtual Inputs command. In the example cited, only variables for Virtual Input V3 have been entered. The other fields have retained their factory default settings. Only the first six Virtual Inputs are listed. Input ----V01 V02 V03 V04 V05 V06 Virtual Input Parameters Function of: Relay 1 Relay 2 Dial Out --- --- --- --- ------- ------- ---------- --- --- --No No No --- --- --- --No No No D48 D07 A08 --No Yes Yes --- --- --- --No No No --- --- --- --No No No --- --- --- --No No No [F1]=Next Page [F2]=Prev Page [F3]=edit virtual output function Assigning Variables to Virtual Inputs To assign variables perform the following steps in the order described. 1. Position the highlight anywhere in the row identified by the Virtual Input to be programmed (e.g., V3). Then move the highlight within the row to the extreme leftmost column. 2. Assign the first variable by entering Dn, An, Vn or Tn where n is 1 to 64 (32 for CWR-40E) for Digital Inputs, 1 to 8 for Analog Inputs, 1 to 32 for Virtual Inputs or 1 to 32 for Timer Inputs. Leading zeros are not required. 3. Move the highlight to the right. Assign the remaining variables using the previous step. Not all fields need to be assigned a variable. To remove a variable press the 0 key or simply delete all of the characters in the field. 4. Move the highlight to the field in the column labeled “Relay 1” or “Relay 2”. Press the Spacebar to select the desired setting. The Yes setting will operate the selected internal relay if the Virtual Input definition is satisfied. The internal relays will remain in their energized state for as long as the conditions that define the Virtual Input persist. The No setting leaves the relay unaffected by the Virtual Input. Both relays can be controlled by a single Virtual Input. 5. Move the highlight to the field in the column labeled “Dial Out”. Press the Spacebar to select the desired setting. The Yes setting will allow the internal modem (if installed) to dial the telephone numbers defined by the Primary and Secondary Dial Number parameters. Refer to “Primary and Secondary Dial Numbers” on page 25. If the modem is able to connect with the far end an Event Record for the Virtual Input will be issued. 6. Press the F1 function key to proceed to the next step. 37 MICRO-AIDE CWR-40E / 72E USER MANUAL A sample response listing three variables is shown below. To complete the definition of the Virtual Input the state of each variable must now be assigned. Inputs: D48 POK Rly -------POK Up POK Dwn POK Up POK Dwn POK Up POK Dwn POK Up POK Dwn Virtual Output Function D07 App Lite -------Lite On Lite On Lite Off Lite Off Lite On Lite On Lite Off Lite Off A08 --Battery -------- -------Bat Norm Bat Norm Bat Norm Bat Norm Bat Bad Bat Bad Bat Bad Bat Bad Output: V03 VInput03 -------Alrm Off Alrm Off Alrm Off Alrm Off Alrm Off Alrm Off Alrm Off Alrm On Assigning States to Virtual Inputs Selecting States Admin Only Before proceeding further the table of state selection fields must be understood. Each Virtual Input will have its own data table. However, the basic structure of each table will remain the same. Refer to the sample data labeled “Assigning States to Virtual Inputs” on page 38. Each row lists, from left to right, the Input Numbers that are assigned to each variable (e.g., labeled “D48”, “D07” and “A08”). Unassigned variables are labeled “---”. The last column of the third line lists the Input Number of the Virtual Input being defined (e.g., labeled “V03”). Directly below the Input Numbers on the fourth line of text is listed the Input Identifier for the variable. For the sample data shown the Input Identifiers are labeled “POK Rly”, “App Lite” and “Battery”. The Virtual Input has retained its default Input Identifier, labeled “VInput03”. The remaining lines of text will vary with the number of assigned variables. One variable will list two lines of text. Two variables will list four lines of text. Three variables (example cited) will list eight lines of text. Four variables will list sixteen lines of text. Each line will specify a state for each of the assigned variables (i.e., inputs). Each state is identified by its user-defined Event Name. The states for the variable labeled “POK Rly” are “POK Up” and “POK Dwn”. The sample data includes three variables, so eight lines of text lists all of the possible variable states. The last column of data in each line includes a selection field. The field can be set, line by line, to an active or inactive state. The user decides which state to assign to the Virtual Input for each combination of variable states. For the sample data shown, the Virtual Input is assigned to its active state (labeled “Alrm On”) when the variable’s states are POK Dwn, Lite Off and Bat Bad. Anytime this combination of states is found to exist among inputs D48, D7 and A8, respectively, an active Event Record for Virtual Input V3 will be created and stored in memory. An additional, inactive Event Record will be created when the variable states no longer satisfy these requirements. Perform the following steps to complete the Virtual Input programming procedure. 1. Move the highlight to the first line of text that lists the input states. 38 CHAPTER 2 INSTALLATION AND SETUP 2. Press the Spacebar to select the correct Event Name for that combination of input states. 3. Move the highlight to the next line and repeat the preceding step. 4. When the Virtual Input state is correctly defined for each line press the Esc key and return to the variable assignment table. 5. Press the Esc key to exit the command or reposition the highlight and select the next Virtual Input. Repeat both of the previously described procedures as required. Measure Speed (M) Admin Only The CWR-72E includes a speed measuring feature that can be used to continuously monitor train speeds and log speed violations. The use of this feature is strictly optional. It is referred to as the Train Speed Monitor feature and it is controlled by the Measure Speed command. The recorder must be properly configured before the Train Speed Monitor can be used. Regardless of other variations in the configuration the following list of requirements must be satisfied. • There are a total of four Train Speed Monitors available in each CWR-72E. For each monitor two train sensors must be wired to two spare Digital Inputs of the recorder. • Each train sensor must reliably indicate the presence of a train. • The sensor outputs must be either open (no train) or closed to positive battery (nearby train). • The distance between each sensor must be in the range from 50' to 5280'. An array of fields similar to the following will be displayed after selecting the command. Speed# (Event) ------ ------1 (S08) 2 (S09) 3 (S10) 4 (S11) Measure Speed Parameters Sensor1 Sensor2 Distance Threshold ------- ------- -------- ------------0 Feet 0 MPH ----0 Feet 0 MPH ----0 Feet 0 MPH ----0 Feet 0 MPH To disable measure speed feature: set sensor inputs(s) to none (---), or distance or speed limit to zero The use of each field is described in the following three sections. Note The four Train Speed Monitors are always disabled by their factory default settings. Excessive train speed is reported in a time stamped Event Record. Refer to the section entitled “Event Record Formatting” on page 58. Figure 5 illustrates a typical Train Speed Monitor installation. 39 MICRO-AIDE CWR-40E / 72E USER MANUAL Figure 5 - Typical Installation - Train Speed Monitor First/Second Sensor Input Admin Only The First and Second Sensor Input fields can be assigned any valid Digital Input number. Leading zeros are not required. The values can be non-consecutive or in ascending or descending order. The Train Speed Monitors report motion in either direction with a positive value. The two Digital Inputs assigned to the train sensors are subject to the following treatment. • Previously enabled Clock Sync, Flashing Input and Measure Flash Rate settings will be automatically disabled. • Contact closures from either sensor will not result in Event Records being logged to memory. • The Detection Time for each input will be automatically set to .05 seconds to de-bounce the sensor output signals. • The user will not be able to alter the Clock Sync, Flashing Input, Measure Flash Rate and Detection Time settings. To regain control of these settings the Train Speed Monitor must first be disabled. Note To disable a Train Speed Monitor enter a zero value in any of the four fields. 40 CHAPTER 2 INSTALLATION AND SETUP Distance between Sensors Admin Only The distance between each sensor must be known in order to calculate the speed of the train. The value must be in the range from 50' to 5280'. The value must be entered as a whole number. Tip Greater values of distance (e.g., 500' instead of 50') will result in improved speed accuracy. Threshold Admin Only The Threshold setting establishes a Limit Value which, if exceeded, will result in an Event Record being created. The Threshold setting must be entered as a whole number, in miles per hour. It must be in the range from 5 to 180mph. A train found to be in motion at a rate greater than the Threshold value will have its speed reported as a System Event Record. System Events are also used to log power on and off occurrences. System Events are numbered like other inputs. They are identified with an S-prefix. The System Event number is listed in parenthesis to the right of the Train Speed Monitor number. Refer to the section entitled “System Events” on page 93 for additional information. Network (N) Admin Only The Network command is used to configure the optional Ethernet Port. Provided the Ethernet Port option is installed, a set of six user-assigned fields with data similar to the following will be displayed after the command is selected. Network Setup ------------IP Address 192.168. 0.100 Subnet Mask 255.255.255. 0 Gateway 0. 0. 0. 0 Ethernet MAC Address 00-08-DC-01-23-45 Port 5000 TCP/IP mode Telnet A description of each field follows. IP Address Admin Only The IP Address must be set in accordance with the requirements of the LAN or the same as the address used by the TCP/IP connection of the PC. The initial setting is either 192-1680-100 or 255-255-255-255. 41 MICRO-AIDE CWR-40E / 72E USER MANUAL Subnet Mask Admin Only The Subnet Mask must also be set in accordance with the requirements of the LAN. A value of 255-255-255-0 should be acceptable for a directly connected PC. The initial setting is either 255-255-255-0 or 255-255-255-255. Gateway Admin Only If a Gateway is being used by the LAN it too must be set in accordance with the LAN requirements. A setting of 0-0-0-0 is acceptable for a directly connected PC or a LAN when communications through a Gateway are not required. The initial setting is 0-0-0-0. Ethernet MAC Address Admin Only The first three numbers that comprise the MAC Address must be 00-08-DC. They must not be changed as they are uniquely associated with the Ethernet module used by the CWR-72E. The remaining three numbers must not be shared by any other Ethernet device on the LAN. The initial setting is 00-08-DC-aa-bb-cc (or FF-FF-FF-FF-FF-FF), where aa-bbcc is the serial number assigned by MICRO-AIDE to the recorder. By way of example, a CWR-72E with a serial number of 10142 will have a factory assigned MAC Address of 0008-DC-00-01-01-42. This address is guaranteed to be unique. Port Admin Only The Port assignment must also be selected in accordance with the requirements of the LAN. For a directly connected PC any value greater than 1024 is acceptable. The initial setting is either 5000 or 65535. TCP/IP Mode Admin Only A Selection Field is used to assign the TCP/IP Mode setting. Press the Spacebar to select either Raw TCP/IP or Telnet. Generally, the Raw TCP/IP setting is acceptable. However, the Telnet setting must be used when the Setup Database is being uploaded or downloaded. These data transfers rely upon the Xmodem protocol. Xmodem is data transparent over TCP/IP only when the Telnet setting is selected. Raw TCP/IP is the initial setting. Press the Esc key after all of the fields are properly defined. The following message will be displayed if the MAC Address was altered. CHANGE MAC ADDRESS (normally 00-08-DC-xx-xx-xx), are you SURE? No Yes Select Yes to proceed. Finally, the following message will confirm the change(s) to be made. 42 CHAPTER 2 INSTALLATION AND SETUP Network settings changed, restart network now? No Yes The six fields that comprise the Ethernet Port settings can only be altered by use of the Network command or by uploading a different Setup Database. The Reset System command will not change any of the Network settings. Note If the TCP/IP connection is idle for more than five minutes a time-out condition will occur. The time-out will result in a forced disconnection at the CWR-72E end. The user will then have to initiate a new connection procedure to re-establish communications with the recorder. The time-out duration and forced disconnection is performed so that in the event of a connection failure anywhere in the network the recorder will be prepared to complete a subsequent connection attempt. However, to be successful the subsequent connection attempt must occur no sooner than five minutes after the communications disruption. The recorder will automatically recover from communication failures of less than five minutes duration provided the user end does not perform a disconnect. Print Setup Data (P) The Print Setup Data command can be used to display the setup parameters assigned by the user. The following menu of sub-commands is displayed after selecting the Print Setup Data command. Print Setup Data P E I D A V T M N S Print Print Print Print Print Print Print Print Print Print All Event Names Input Names/Identifiers Detect Times/Flash Enable Analog Configuration Virtual Inputs Timer Configuration Measure Speed Parameters Network Settings System Parameters The Print All command can be used at the end of the Setup Procedure to display the entire Setup Database. The remaining commands are used to display specific portions of the Setup Database. Tip The Print All command will issue a lengthy stream of data that will exceed the viewing capacity of a single terminal screen. The user may wish to temporarily pause the data for better viewing. Refer to the procedure entitled “Data Flow Control” on page 17. Transfer Files (T) A CWR-72E will require a considerable amount of data entry if every input is assigned an Input Name, Detection Time, Event Name pair, etc., that differs from its factory default value. In the event of an accidental loss of data memory (e.g., a reset performed by mistake) 43 MICRO-AIDE CWR-40E / 72E USER MANUAL each Input Name, Detection Time and Event Name pair will need to be re-entered. The Transfer Files command provides the user with a quick and simple data exchange alternative to re-entering the Setup Database by hand. The Download Setup Data command is used to transmit the Setup Database to a data storage system. A PC running a communications program like HyperTerminal makes an ideal storage system. A file containing the setup parameters can be permanently saved on the hard disk or a flash drive for later retrieval via the Upload Setup Data command. To initiate a download or upload of the Setup Database, execute the Transfer Files command. The following sub-menu will be displayed. The transfer Setup Database procedures are described in the two sections that follow. File Transfer D Download Setup Data CWR to PC U Upload Setup Data PC to CWR F Firmware Upload Saving the Setup Database (D) Before the Setup Database can be saved the PC and communications program must be properly configured. The following list describes the correct configuration. • Transfer protocol: Xmodem. • Connection: If the recorder’s Terminal Port is being used select Direct connect-Com1 or Direct connect-Com2 (whichever is available). If the modem is being used the host modem must be logged-on with the recorder. • Baud rate: as required by the Terminal Port and set to N-8-1 (does not apply when connected via the USB Device Port or modem). Note The failure to select the proper transfer protocol (i.e., Xmodem) is the most common mistake made in this procedure. To save the Setup Database to a PC file select the Download Setup Data command. The following message will be displayed. Sending Setup Data via XMODEM... (Ctrl-X to stop) The steps necessary to complete the download depend upon which communications application is being used. The following example describes the HyperTerminal method. Windows XP® was used in the following procedure. Later versions of these programs may be slightly different. However, the fundamental approach will remain valid. 44 CHAPTER 2 INSTALLATION AND SETUP HyperTerminal 1. With the mouse, click on the Transfers command, then the Receive File ... command. The Receive File dialog box will open. Verify that the Xmodem protocol is selected. 2. Select the correct disk drive and folder. Click the Receive button. The Receive Filename dialog box will open. 3. Enter a filename (e.g., 4-trk mainline.bin). The three-character file extension must be defined. If the various settings are correct click on the OK button. 4. An information box will automatically open. It will indicate the progress of the transfer. After a few seconds (depending upon the Baud rate) the information box will close automatically to indicate a successful transfer. After the successful completion of the transfer the CWR-72E will issue the following message. Transfer complete Press any key to continue The following message is issued if the file is not promptly opened after initiating the download. Transfer error Press any key to continue The user can then make a second attempt by selecting the Download Setup Data command again. Restoring the Setup Database (U) Admin Only Before the Setup Database can be restored to the recorder it must have been previously saved. Refer to the procedure entitled “Saving the Setup Database (D)” on page 44. The PC and communications program must be properly configured before the Setup Database can be restored. The following list describes the correct configuration. • Transfer protocol: Xmodem. • Connection: If the recorder’s Terminal Port is being used select Direct connect-Com1 or Direct connect-Com2 (whichever is available). If the modem is being used the host modem must be logged-on with the recorder. • Baud rate: as required by the Terminal Port and set to N-8-1 (does not apply when connected via the USB Device Port or modem). Note The failure to select the proper transfer protocol (i.e., Xmodem) is the most common mistake made in this procedure. 45 MICRO-AIDE CWR-40E / 72E USER MANUAL To restore the Setup Database to the recorder from a PC file select the Upload Setup Data command. The following message will be displayed. Are you SURE you want to upload new Setup Data from PC to CWR? No Yes Select No to abort the upload. Select Yes to proceed. If the user elects to proceed with the upload the following message will be displayed. CCCCC Receiving Setup Data via XMODEM... (Ctrl-X to stop) The sequence of C characters indicates the recorder is awaiting the Xmodem file. The steps necessary to complete the upload depend upon which communications application is being used. The following example describes the HyperTerminal method. Windows XP was used in the following procedure. Later versions of these programs may be slightly different. However, the fundamental approach will remain valid. HyperTerminal 1. With the mouse, click on the Transfers command, then the Send File ... command. The Send File dialog box will open. Verify that the Xmodem protocol is selected. 2. Select the correct disk drive, folder and filename (e.g., 4-trk mainline.bin). If the various settings are correct click the Send button. 3. An information box will automatically open. It will indicate the progress of the transfer. After a few seconds (depending upon the Baud rate) the information box will close automatically to indicate a successful transfer. After the successful completion of the transfer the CWR-72E will issue the following message. Upload completed Press any key to continue The following message will be issued if the file is not promptly sent after initiating the upload. Transfer error Press any key to continue The user can then make a second attempt by selecting the Upload Setup Data command again. 46 CHAPTER 2 INSTALLATION AND SETUP Log Off (X) The Log Off command is used to terminate Administrative and Restricted Access sessions. If the previous user logs off of the recorder, access can be regained only by entering the correct password. If the previous user fails to log off, a second user will be allowed access without entering a correct password. Note All sessions should be terminated by executing the Log Off command. To log off of the recorder press the X key. The following message will be displayed. About to Log Off, are you sure? No Yes If the user proceeds with the log off the current session will be immediately terminated. This completes the Setup Procedure for the CWR-72E Event Recorder. The recorder is now prepared to log events in accordance with the setup performed by the user. Since the installation and setup of the recorder are critical to how the CWR-72E will perform, it is advisable to review the steps taken earlier. The next chapter describes how to operate the CWR-72E. 47 MICRO-AIDE CWR-40E / 72E USER MANUAL User Notes 48 CHAPTER 3 OPERATION Introduction This chapter describes how to operate the CWR-72E from a PC running a suitable communications program. Local (i.e., on-site) as well as remote methods of operating the Event Recorder are described. Before the recorder can be operated it must be properly installed and set up. A PC must be online with the recorder. The use of the LCD panel and keypad are described in the next chapter. Multi-User Operation A unique feature of all MICRO-AIDE recorders is their ability to handle simultaneous operation from multiple users via the Terminal Port, modem, front panel keypad, or in the case of the CWR-72E, via the USB Device or Ethernet Ports. This multi-user capability eliminates the annoying practice in some recorders of one user effectively locking-out a second or third user. Remote Operation The setup procedures and operational capabilities of the CWR-72E can be exercised remotely provided the recorder is equipped with the optional Ethernet Port or internal modem. The Ethernet Port is fully compatible with the TCP/IP protocol. The modem will operate at speeds up to 33,600 Baud. It provides industry standard error correction and data compression features. An Ethernet or modem equipped PC running a communications program (e.g., GEA or HyperTerminal) makes an ideal remote access system. Event Records and other data from several remote CWR-72E recorders can be easily gathered and saved as a file on a hard disk or flash drive. There are a few steps the remote user or host system must perform before remote access is possible. Each of these steps is described in the sections that follow. Establishing an Ethernet Connection An Ethernet connection can only be established if the recorder’s Ethernet Port is properly configured. An IP Address and Port Number must be assigned. The procedure for doing so is described in the section entitled “Network (N)” on page 41. Perform the steps listed below to establish an Ethernet connection. The procedure assumes that the user will access the recorder via a LAN. 49 MICRO-AIDE CWR-40E / 72E USER MANUAL 1. Assign an IP Address and Port Number to the recorder’s Ethernet Port in accordance with the requirements of the LAN. 2. Connect the CWR-72E to either a switcher or hub device using a CAT-5 cable. 3. Configure the communications application (e.g., HyperTerminal) to connect using a TCP/IP port. 4. Within the communications application enter the recorder’s IP Address and Port Number as the target IP Address and associated Port Number. HyperTerminal refers to the target device as a host. 5. Click the icon or execute the command that initiates the connection. The procedure described above is slightly different if the PC is connected directly to the recorder. The Ethernet Ports of the recorder and PC must be interconnected using a CAT-5 crossover cable. A successful connection is indicated by a log-on password request regardless of the interconnection method employed. Establishing a Modem Connection A standard telephone line must be attached to the modem of the CWR-72E. To access the recorder the host system must dial the telephone number of the CWR-72E and wait for an answer. The recorder’s modem will answer after a predetermined number of rings. Refer to the section entitled “Ring Count” on page 24. The modems will then handshake. The handshake ensures that the modems can communicate with each other at an appropriate speed. A connection is established upon the successful completion of the handshake. Note The CWR-72E will only permit reliable connections to be established. The host modem should be programmed for MNP 2-4 or LAP-M operation. Entering the Password Immediately after a connection is established the CWR-72E will issue a password request similar to the following. Model CWR-72E Metra Event Recorder. Ver 1.02 (C) 2009 MICRO-AIDE INC. ***** NOT SET ***** Event storage capacity: 111481 Enter password: The host system must issue the correct password followed by an Enter. Passwords are defined in accordance with the procedure entitled “Administrative and Restricted Passwords” on page 24. 50 CHAPTER 3 OPERATION Note The Mainline, BEV and MED Setup Databases, defined by Metra, use a Restricted Access passwords of SIGNAL. Passwords are case sensitive. The host system is given three attempts to enter the correct password. A third error will result in a disconnect by the recorder. This procedure prevents unwanted users from accessing the recorder. After the password is entered the user will be able to operate the recorder in a manner identical to that specified by local operation. Accordingly, the CWR-72E will display the Main Menu of commands. Refer to the sample data entitled “Main Menu” on page 10. How to Operate the CWR-72E An explanation of each operational command is included in the remaining sections of this chapter. Operational commands may be executed in any sequence. The user may wish to perform operations in one sequence and then, depending upon the observed data, perform a different sequence of commands. Each command is listed by its name (as it appears in the Main Menu) followed by its command code contained within parenthesis. Query Events (Q) The Query Events command provides the principal means by which Event Records are inspected. It allows the user to inspect events for a particular time frame and/or specific set of inputs. Additionally, the Query Events command includes several data output options that can be selectively employed depending upon the user’s data display requirements. A typical response to the Query Events command is shown below. 08-25-09 09-02-09 09-10-09 09-19-09 08-26-09 09-03-09 09-11-09 09-20-09 Select Range of Dates 08-27-09 08-28-09 08-29-09 08-30-09 08-31-09 09-01-09 09-04-09 09-05-09 09-06-09 09-07-09 09-09-09 09-09-09 09-13-09 09-14-09 09-15-09 09-16-09 09-17-09 09-18-09 09-21-09 Use arrow keys to move, Space=start selection, Enter=accept, ESC=cancel The data array forms a table of dates in MM-DD-YY format. The table indicates that at least one Event Record was logged in memory for each day listed. Days where no records were logged will not be included in the table (e.g., 09-12-09 in the above). The CWR-72E can store Event Records for 128 different dates provided the event storage capacity is not exceeded. 51 MICRO-AIDE CWR-40E / 72E USER MANUAL Note The CWR-72E utilizes a rotating memory. Records from the 129th day will automatically overwrite records from the first day regardless of how many records are stored in memory. The first step in using the Query Events command is to select the date or range of dates that the user wishes to inspect. Slightly different procedures are used to select a single date or range of dates. Both procedures are described below. Selecting a Single Date 1. Using the appropriate arrow keys highlight the single date of interest. 2. Press the Enter key. Selecting a Range of Dates 1. Using the appropriate arrow keys highlight the first date in the range. 2. Press the Spacebar to anchor one end of the range to be highlighted. 3. Press the appropriate arrow keys until each date in the desired range is highlighted. 4. Press the Enter key to accept the highlighted range of dates. The Esc key can be pressed at any time to cancel the selection. The user will then be returned to the Main Menu. Query Report Menu After the date(s) is selected an array of Selection and Edit Fields entitled “Query Report” will be displayed. A sample Query Report is shown below. Query Report Start Date: Start Time: 09-11-09 00:00:00 End Date: End Time: 09-11-09 23:59:59 Record Details: No Details (1) Reverse order: Report Type: No Dump Inputs: (blank=all) [F1]=Execute Report, ESC=cancel The Event Records of interest to the user can be further qualified by the six fields listed in the Query Report menu. The use of each field is described in the sections that follow. 52 CHAPTER 3 OPERATION Start Time Event Records that are time stamped after the assigned Start Time (for the day selected as the Start Date) will be issued by the Query Command. The Start Time can be assigned any value from 00:00:00 to 23:59:59. The default setting is always 00:00:00. The Start Time must be entered in military format. End Time Event Records that are time stamped before the assigned End Time (for the day selected as the End Date) will be issued by the Query Command. The End Time can be assigned any value from 00:00:00 to 23:59:59. The default setting is always 23:59:59. The End Time must be entered in military format. Include Details The CWR-72E can format Event Records in five different ways. Press the Spacebar to select one of the five formatting options. As a convenience to the user the last option selected is automatically pre-selected the next time the command is used. A complete explanation of Event Record formats is included at the end of this chapter. Refer to the section entitled “Event Record Formatting” on page 58. The numbers included in each of the headings listed below specify the number of lines of text each formatting option will create. Reverse Order The Reverse Order option can be set to either No (default setting) or Yes. The default setting will result in the oldest records being issued first. If enabled, the Reverse Order option will issue the most recent records first. They will be followed by older records. In either case, Event Records are always issued in chronological sequence. Report Type The Report Type field can be set to Dump (default setting), Browse or Comma. The proper selection depends upon the user’s requirement. Each option is described in the following sections. Dump: The Dump option is used if a large number of records are to be inspected or captured to a PC file. Refer to the section entitled “Capturing Event Records to a PC File” on page 63. The Dump option will issue Event Records in a continuous stream. The streaming of records will only cease when the last record is issued or the user executes a Pause or Abort command. Refer to the section entitled “Data Flow Control” on page 17. Browse: The Browse option allows the user to inspect a set of records one screen at a time. It will typically display eleven one-line records, seven two-line records or four four-line records per screen. The same set of records will be displayed indefinitely until the user presses an arrow key to review additional records. The Browse option is most useful when a limited number of records in a narrow time frame need to be reviewed. 53 MICRO-AIDE CWR-40E / 72E USER MANUAL A completely new screen of records can be displayed by pressing the up and down arrow keys. A single new record can be displayed by pressing the left and right arrow keys. The last line of text in each screen explains the use of the arrow keys. Comma: The Comma option formats the Event Record data so that it can be easily imported to a spreadsheet or database application such as Excel® or Access®, respectively. However, the records in question must first be written to a PC file. Refer to the section entitled “Capturing Event Records to a PC File” on page 63. This option takes the various data fields that comprise a record and separates them with a comma. Intervening spaces are eliminated. The processing application will place the record fields into cells or fields that satisfy its own processing requirements. This formatting technique is frequently referred to as Comma Separated Values (CSV). The section entitled “CSV” on page 61 describes in detail a sample CSV report. Note When the Record Type is set to Comma the Include Details setting is ignored. All Event Records for the selected time period will be issued and similarly formatted. Inputs The Inputs field allows the user to inspect Event Records from specific inputs. The default setting (Inputs field is blank) will issue records from all inputs. To select specific inputs a valid Input Number must be entered. Digital Inputs are entered as Dn where n is a number between 1 and 64 (32 for CWR-40E). Analog Inputs are entered as An where n is a number between 1 and 8. Virtual Inputs are entered as Vn where n is a number between 1 and 32. Timer Inputs are entered as Tn where n is a number between 1 and 32. Flashing Inputs are entered as Fn where n is a number between 1 and 64 (32 for CWR-40E). Leading zeros are not required. Multiple inputs can be selected by using the following methods. Separate two Input Numbers by a single space character. Select a contiguous range of inputs by including a - (hyphen) between two n numbers. The contiguous range option can be applied to all input types. The set of Input Numbers must be terminated by pressing the Enter key. The following example illustrates a typical Inputs field entry. Inputs: d2 D5-8 a3 d64 v16 A6-8 (blank=all) As the example indicates, the input type designator can be entered as an upper- or lower-case letter. Input Numbers can be entered without regard to sequence. Event Records for Digital Inputs 2, 5, 6, 7, 8, 64, Analog Inputs A3, A6, A7, A8 and Virtual Input V16 will be issued. After the inputs are selected the user must press the F1 function key to complete the command. Event Records will then be issued in accordance with all of the settings selected by the user. Event Records will automatically cease being issued when the Report Type is set to Dump or Comma. After the last Event Record a message similar to the following will be displayed. 54 CHAPTER 3 OPERATION Number of records = 126 End of report Hit any key to continue Checksum = F515 Record Count and Checksum The exact number of records included in the report is always specified. A checksum is also included. The checksum is calculated from the first character of the first record through the last character of the last record. Any report that issues the same set of records will always list the same checksum value regardless of when the report was generated. Accordingly, alteration of the record data can be detected provided the original data and checksum are known. View Events (V) The View Events command allows the user to display Event Records in real-time. Immediately after an event is detected its corresponding Event Record will be issued to the active user port (i.e., Terminal, Ethernet, Host Device or modem). This command can be very useful in tracking events that are occurring while the user is online with the recorder. It can also be used effectively during the Initial Check-out Procedure to verify that each input is properly cabled. The records can simultaneously be written to a text file. Refer to the section entitled “Capturing Event Records to a PC File” on page 63. The following message will be issued after the command has been selected. View Events Report Include Details: All Details (4) Inputs: (blank=all) [F1]=Execute Report, ESC=cancel The Event Records of interest to the user can be qualified by the two fields listed in the View Events Report. The use of each of these fields is described in the following sections. Record Details This setting allows the user to select the level of detail to be included in each Event Record. Refer to the section entitled “Event Record Formatting” on page 58 for additional information regarding the use of this field. Inputs The use of the Inputs field allows the user to review records from specific inputs. The use of this field is described in “Inputs” on page 54. After the selection fields are assigned press the F1 function key to start the report. The recorder will continue to print records as they occur in real-time. Press the Esc key to stop the report. 55 MICRO-AIDE CWR-40E / 72E USER MANUAL Live Status (L) The Live Status command provides a single-screen snapshot of the present state of every recorder input (i.e., Digital, Analog and Virtual Inputs). The state or measured value of each input will be continuously and automatically updated. The Live Status report indicates the state of each input by the use of a symbol or its user-assigned Input Identifier and Event Names. Input Identifiers and Event Names are described in “Input Names/Identifiers (I)” on page 34 and “Event Names (E)” on page 34, respectively. Note To properly view the Live Status report the PC must be configured to emulate an ANSI terminal. An example of the Live Status report is shown below. [ESC]=exit 90 Degrees F Live Status 10:50:20 09-11-09 D01-D32 X . . . . . . . . . . . . . . . . . . . . . . . . . . . . . . . D33-D64 . . . . . . . . . . . . . . . . . . . . . . . . . . . . . . . . Alarm_1: VInput05: VInput09: VInput13: VInput17: VInput21: VInput25: VInput29: Active Off Off Off Off Off Off Off VInput02: VInput06: VInput10: VInput14: VInput18: VInput22: VInput26: VInput30: Off Off Off Off Off Off Off Off VInput03: VInput07: VInput11: VInput15: VInput19: VInput23: VInput27: VInput31: Off Off Off Off Off Off Off Off VInput04: VInput08: VInput12: VInput16: VInput20: VInput24: VInput28: VInput32: AInput01 24.3Vdc Good AInput02 0.0Vdc Off AInput03 0.0Vdc Off AInput04 0.0Vdc Off AInput05 0.0Vdc Off AInput06 0.0Vdc Off AInput07 0.0Vdc Off Off Off Off Off Off Off Off Off Battery 13.4Vdc Normal The Live Status report includes a header that lists the present time and date. The state of each Digital Input is listed in the two lines of text that follow the header. An X or . (period) character is used to indicate the state as either active or idle, respectively. The next eight lines of text list the state of each of the 32 Virtual Inputs. Inputs Identifiers and Event Names are used to identify the input and its current state, respectively. Similarly in the last three lines of the report, Input Identifiers and Event Names indicate the state of the eight Analog Inputs. The measured value of the Analog Input is also listed in this group. The sample data indicates that Digital Input 1 is active. The other Digital Inputs are idle. The DC voltage source connected to Analog Input A1 is acceptable at 24.3Vdc and is therefore reported as being in a Good state. The Battery potential at Analog Input A8 is 13.4Vdc, which is considered to be Normal. Finally, there is an active alarm condition reported by Virtual Input V1. The Live Status command can be very useful in verifying that inputs are wired and labeled correctly. Additionally, it can be used to determine if the inputs are operating properly and if the assigned Detection Times are set in accordance with the characteristics of the monitored circuits. 56 CHAPTER 3 OPERATION Measure Flash Rate (M) Typical railroad operating procedures require that the flashing rate of crossing signals be periodically measured and reported. The Measure Flash Rate command allows the CWR-72E user to precisely determine the flashing rate of a circuit. Enabling the Measure Flash Rate feature imposes several temporary pre-conditions upon the Setup Database of the recorder. The circuit to be measured must be connected to a Digital Input. The selected Digital Input will be assigned a Detection Time of .1 seconds. This will insure that the flashing pulses will not be filtered out by the de-bounce properties of the Detection Time feature. Refer to “Detection Times” on page 28. Finally, the selected Digital Input cannot be enabled as the Clock Sync Input. Refer to “Clock Sync Input” on page 26 for additional information. Note The CWR-72E will automatically adjust the Digital Input’s Detection Time setting to .1 seconds and disable its Clock Sync setting when the Measure Flash Rate command is executed. These settings will be automatically restored to their prior values when the measurement is concluded. The following Edit Fields will be displayed after the Measure Flash Rate command is selected. Measure Flash Rate Input to Measure: D01 [F1] to measure, [ESC] to quit The user must enter a valid Digital Input number in the Input to Measure field. The entry must take the form Dn, where n must be in the range from 1 to 64 (32 for CWR-40E). Leading zeros are not required. Press the Enter key to accept the Input Number. Finally, press the F1 function key to initiate the measuring process. A data screen similar to the following will be displayed. Measure Flash Rate Input to Measure: D01 Measuring..., [ESC] to quit Flashes/Minute: On Time: Off Time: Cycle Time: 40.5 0.74 Sec 0.74 Sec 1.48 Sec Detect Time: 0.74 Sec The lower five lines of text reflect the Measure Flash Rate data. The first line indicates the number of flashes per minute (e.g., 40.5). The second and third lines report the On Time and Off Time durations, respectively. The data listed in the fourth line (referred to as Cycle Time) is the duration of one on/off sequence. It is the sum of the On Time and Off Time durations. Finally, the fifth line specifies the optimum Detection Time to be assigned to inputs using the reported flash rate. 57 MICRO-AIDE CWR-40E / 72E USER MANUAL The data listed in the Measure Flash Rate report is updated continuously and automatically. For typical flash rates the data will be updated every several seconds. To stop the measuring process simply press the Esc key. The Digital Input can then be connected to another circuit. The original Detection Time and Clock Sync settings will be automatically restored. Event Record Formatting Event Records provide the user with information about the status of each input at a specified moment in time. Event Records consist of printable ASCII characters. Six different formatting methods are employed by the CWR-72E. The first five formatting options create one-, two- and four-line records. These five formatting options are available in the Query Events and View Events commands. In the sections that follow, each of these formatting options are described in order of increasing detail. The sixth option applies only to the Query command. It formats the records into multi-field, single lines of text containing Comma Separated Values (CSV). A separate section is devoted to its description. No Details The one-line form is used to provide event information from a single input. Analog Input levels are not listed in this format. Seven sample records are shown below. 14:57:54.69 14:58:03.33 15:01:17.74 15:58:32.23 16:02:20.84 16:02:52.94 16:14:59.22 09/11/09 09/11/09 09/11/09 09/11/09 09/11/09 09/11/09 09/11/09 NS_Gate_Down_Relay AC_Power_120V Switch_Delay_R127 Timer 01 Digital Input 64 Digital Input 64 Digital Input 63 GateDwn AC_Power R127-3 Timer01 DInput64 DInput64 DInput63 Up AC_Fail Violate Nominal On Off ON D01 A01 T16 T01 D64 D64 F63 15.9s 18.3s 45.5FPM • Time: The time the event was detected is indicated in military-style HH:MM:SS format. The time is identified to the nearest hundredth of a second. • Date: The date the event was detected is indicated in MM/DD/YY format. • Input Name: The twenty-character Input Name identifies the input. The names NS_Gate_Down_Relay, AC_Power_120V and Switch_Delay_R127 are listed in the first three sample records. The remaining records list factory default Input Names. • Input Identifier: The eight-character Input Identifier further identifies the input. The identifiers GateDwn, AC_Power and R127-3 are listed in the first three sample records. The remaining records list factory default Input Identifiers. • Event Name: The Event Name identifies the type of event detected at the input. The Event Name listed will always be a member of the Event Name Pair assigned to the input. The Event Names Up, AC_Fail and Violate indicate clearly to the user the type of event that was recorded. 58 CHAPTER 3 OPERATION • Input Number: For non-Timer Input records the Input Number is the last data field listed. The record may be from a Digital (D01 to D64, D32 for CWR-40E), Analog (A01 to A08), Virtual (V01 to V32), Timer (T01 to T32) or Flashing Input (F01 to F64, F32 for CWR-40E). In the case of individual Flashing Inputs the Input Number is taken from the Digital Input associated with the flashing circuit. The last sample record is from Flashing Input F63, but the source of the signal was connected to D63. • Measured Time, Flash Rate or Speed: The Measured Time field only appears at the end of a Timer Input Event Record (refer to third sample record listed above). The Measured Time will be reported as a value in the range of 0.0 to 999.9 seconds. A value is listed regardless of the Event Name that identifies the record type (e.g., Violate or Nominal). The CWR-72E can measure and report the rate of flashing associated with a flashing input. The fifth Event Record listed above was created when a flashing sequence of on/off pulses was validated at Digital Input D64. Approximately 32 seconds later the flashing sequence terminated. During the 32-second-long interval a flashing rate of 45.5 flashes per minute (FPM) was measured and hence reported. Refer to the sixth record listed above. Finally, if the Event Record is from one of the Train Speed Monitors the measured speed in mph will be reported. Virtual Details The Virtual Details format uses two lines of text. The first line is formatted identically to that used by the No Details option. See the previous section for additional information. The three sample records listed earlier are shown below using the Virtual Details format. The second line of text includes a sequence of 32 characters that indicate the state of each Virtual Input at the time the event was logged to memory. A pattern of x and . (period) characters are shown in the sample records below. The left-most character indicates the state of Virtual Input V1. The right-most character indicates the state of Virtual Input V32. There are four symbols used to indicate the state of Digital and Virtual Inputs. They are described in the section entitled “Symbol Legend” on page 62. 14:57:54.69 09/11/09 NS_Gate_Down_Relay x......... x......... .......... .. GateDwn Up D01 14:58:03.33 09/11/09 AC_Power_120V x......... x......... .......... .. AC_Power AC_Fail A01 15:01:17.74 09/11/09 Switch_Delay_R127 x......... x......... .......... .. R127-3 Violate T16 15.9s Digital Details The Digital Details format also requires two lines of text. The first line is formatted identically to that used by the No Details option. The three sample records listed earlier are shown below using the Digital Details format. 59 MICRO-AIDE CWR-40E / 72E USER MANUAL 14:57:54.69 09/11/09 NS_Gate_Down_Relay GateDwn Up D01 X........x x......... .......... ........x. .......... .......... ...x 14:58:03.33 09/11/09 AC_Power_120V AC_Power AC_Fail A01 x........x x......... .......... ........x. .......... .......... ...x 15:01:17.74 09/11/09 Switch_Delay_R127 R127-3 Violate T16 15.9s x........x x......... .......... ........x. .......... .......... ...x The second line of text is used to indicate the state of each Digital Input at the time the event was recorded. A pattern of x and . (period) characters are shown in the sample records. The left-most character indicates the state of Digital Input 1. The right-most character indicates the state of Digital Input 64. There are four symbols used to indicate the state of Digital and Virtual Inputs. They are described in the section entitled “Symbol Legend” on page 62. Analog Details The Analog Details format also requires two lines of text. The first line is formatted identically to that used by the No Details option. The three sample records listed earlier are shown below using the Analog Details format. 14:57:54.69 09/11/09 NS_Gate_Down_Relay GateDwn 101Vac 0.0Vdc 0.0Vdc 0.0Vdc 0.0Vdc 0.0Vdc Up 0.0Vdc D01 13.6Vdc 14:58:03.33 09/11/09 AC_Power_120V 89Vac* 0.0Vdc 0.0Vdc 0.0Vdc AC_Power 0.0Vdc AC_Fail 0.0Vdc A01 12.9Vdc 15:01:17.74 09/11/09 Switch_Delay_R127 R127-3 87Vac! 0.0Vdc 0.0Vdc 0.0Vdc 0.0Vdc 0.0Vdc Violate 0.0Vdc T16 15.9s 12.8Vdc 0.0Vdc The second line of text lists the measured levels of each Analog Input. From left to right A1 through A8 are reported. The units of measurement are always displayed to the right of the measured level (e.g., Vdc and Vac). To the right of the units of measurement data is a single character indicator. It is used to indicate the state of the Analog Input relative to the userdefined Limit Values. There are four symbols used to indicate the state of Analog Inputs. They are described in the section entitled “Symbol Legend” on page 62. All Details The All Details format incorporates all of the detail content defined in the Virtual, Digital and Analog Details options. It requires four lines of text. From top to bottom the details include Virtual Input states, Digital Input states and Analog Input measured levels. The sample records from the previous sections are shown below using the All Details format. 60 CHAPTER 3 OPERATION 14:57:54.69 09/11/09 NS_Gate_Down_Relay GateDwn Up D01 x......... x......... .......... .. X........x x......... .......... ........x. .......... .......... ...x 101Vac 0.0Vdc 0.0Vdc 0.0Vdc 0.0Vdc 0.0Vdc 0.0Vdc 13.6Vdc 14:58:03.33 09/11/09 AC_Power_120V AC_Power AC_Fail A01 x......... x......... .......... .. x........x x......... .......... ........x. .......... .......... ...x 89Vac* 0.0Vdc 0.0Vdc 0.0Vdc 0.0Vdc 0.0Vdc 0.0Vdc 12.9Vdc 15:01:17.74 09/11/09 Switch_Delay_R127 R127-3 Violate T16 15.9s x......... x......... .......... .. x........x x......... .......... ........x. .......... .......... ...x 87Vac! 0.0Vdc 0.0Vdc 0.0Vdc 0.0Vdc 0.0Vdc 0.0Vdc 12.8Vdc CSV Listed below is a typical response to the Query Events command when the Record Type is set to Comma. In the interest of brevity only four Event Records are listed. 11:47:16,09/11/09 "***** NOT SET *****" 0,0,0,0,0,0,0,0,0,0,0,0,0,0,0,0,0,0,0,0,0,0,0,0,0,0,0,0,0,0,0,1 1,0,0,0,0,0,0,0,0,0,0,0,0,0,0,0,0,0,0,0,0,0,0,0,0,0,0,0,0,0,0,1 0,1,0,0,0,0,0,1,1,0,0,0,0,0,0,0,0,0,0,0,0,0,0,0,0,0,0,0,0,0,0,0 0,0,0,0,0,0,0,0,0,0,0,0,0,0,0,0,0,0,0,0,0,0,0,0,0,0,0,0,0,0,0,1 11:48:04.50,09/11/09,"Digital Input 01","ON",1 11:48:23.01,09/11/09,"Analog Input 04","ON",24 11:49:12.91,09/11/09,"Timer 16","ON",48,20.8 11:50:21.02,09/11/09,"Digital Input 19","OFF",19,43.9 Each report includes a six-line header. The content of the header is fully described in the following. • Line 1 lists the time and date the report was generated. • Line 2 lists the user-assigned Unit Name. The default name is shown above. • Lines 3 and 4 contain a bit map that indicates the state of each Digital Input at the moment just prior to the first Event Record listed. From left to right, top to bottom, Digital Inputs 1 through 64 are represented. In the sample data cited above Digital Inputs 32, 33 and 64 are reported as active. The other Digital Inputs are idle. • Lines 5 and 6 specify the state of each Analog and Virtual Input at the moment just prior to the first Event Record listed. Analog Inputs are represented by the first eight positions in line 5. Virtual Inputs are represented by the remaining 32 positions. In the sample data cited above Analog Inputs A2 and A8 are active. Virtual Inputs V1 and V32 are also active. Event Records that satisfy the user selected date and time criteria are listed after the header. Records include five or six data fields separated by a single comma. From left to right the fields always include the time, date, Input Name, status and Input Number. The input status is always listed as either ON or OFF. The assigned Event Name is not used. If the 61 MICRO-AIDE CWR-40E / 72E USER MANUAL record is from a Timer Input, flashing input or one of the Train Speed Monitors a sixth field that lists the Measured Time, flash rate or train speed value is included, respectively. Note By convention, CSVs that may contain a comma character must be enclosed by a pair of quotation marks. Refer to the Unit Name, Input Names and status labels shown above. A name that contains a quotation mark will be indicated by an additional quotation mark. The Input Number listed in a CSV record is altered to exclude letter prefixes (e.g., D, A, V, T, F and S). Table 6 on page 62 lists the translation method employed. The S-prefix is used to refer to system events. System events are described in the section entitled “System Events” on page 93. Input Source CSV Input Number D1 to D64 (Digital) 1 to 64 A1 to A8 (Analog) 65 to 72 V1 to V32 (Virtual) 73 to 104 T1 to T32 (Timer) 105 to 136 F1 to F64 (Flashing) 137 to 200 S1 (System Power) 201 S2 (High Temperature) 202 S3 (Low Temperature) 203 S4 (Clock Sync via SNTP) 204 S5 (GPS - 5 Second Error) 205 S6 (GPS - 1hr Record)) 206 S7 Flash Alarm 207 S8 to S11 (Train Speed Monitors) 208 to 211 Table 6 - CSV Input Numbers Symbol Legend The four symbols used to indicate the state of Digital and Virtual Inputs are described in the following table. 62 CHAPTER 3 OPERATION Symbol Definition X Upper-case X The input has transitioned into its On state. The referenced input is the source of the Event Record. The assigned On Event Name is listed as the Event Name. x Lower-case x The input remains in its On state. The referenced input is not the source of the Event Record. : Colon The input has transitioned into its Off state. The referenced input is the source of the Event Record. The assigned Off Event Name is listed as the Event Name. . Period The input remains in its Off state. The referenced input is not the source of the Event Record. Table 7 - Symbol Legend - Digital and Virtual Inputs The four symbols used to indicate the state of an Analog Input are described in the following table. Symbol Definition * Asterisk The input has transitioned into its unacceptable region of operation. The referenced input is the source of the Event Record. The assigned On Event Name is listed as the Event Name. ! Exclamation mark The input remains in its unacceptable region of operation. The referenced input is not the source of the Event Record. = Equal sign The input has transitioned into its acceptable region of operation. The referenced input is the source of the Event Record. The assigned Off Event Name is listed as the Event Name. (blank) The input remains in its acceptable region of operation. The referenced input is not the source of the Event Record. Table 8 - Symbol Legend - Analog Inputs Event Names and Limit Values are described in “Event Names (E)” on page 34 and “Low and High Limits” on page 31, respectively. Capturing Event Records to a PC File The Query (with the Report Type set to Dump or Comma) and View commands will automatically stream Event Records to the active user port. A PC running HyperTerminal can be used to capture these records as a text file. The .txt file that is created can then be read using any commonly available word processing application (e.g., Notepad® or Word®). The steps necessary to capture the Event Records as a .txt file are listed below. HyperTerminal and Windows XP were used in the following procedure. Later versions of these programs may be slightly different. However, the fundamental approach will remain valid. 63 MICRO-AIDE CWR-40E / 72E USER MANUAL 1. Configure the various fields of the Query or View command as desired. Perform step 2 IMMEDIATELY BEFORE pressing the F1 function key. 2. With the mouse, click on the Transfers command, then the Capture Text ... command. The Capture Text dialog box will open. 3. Click the Browse button. The Select Capture File dialog box will be displayed. 4. Navigate to or create the desired folder that will contain the .txt file. Enter a filename (e.g., 09-11-09 0915AM). The three-character .txt file extension will be appended automatically. Click the OK button. The user will be returned to the Capture Text dialog box. 5. Verify that the file specification box lists the correct folder and filename. Click the Start button to open the .txt file. 6. Press the F1 function key to initiate the data transfer. The recorder will proceed to stream Event Records to the newly created .txt file. 7. In the case of the Query command the record stream will cease automatically when the last record is displayed. A record count and checksum will note the end of the data. Refer to the sample data labeled “Record Count and Checksum” on page 55. In the case of the View command the record stream will cease only when the user presses the Esc key. 8. With the mouse, click on the Transfers command, then the Capture Text ... command. Click the Stop option that is displayed. The .txt file is now closed and available for review. To read the file, navigate to the folder. With the mouse, double-click the filename (e.g., 09-11-09 0915AM.txt). The file will open in the default word processing application. This concludes the chapter on how to operate the CWR-72E from the four peripheral ports. The user should remember to use the Log Off command to end the current session. Refer to “Log Off (X)” on page 47. The next chapter describes the use of the USB Host Port, front panel keypad and LCD. 64 CHAPTER 4 FRONT PANEL OPERATION Introduction The CWR-72E is designed to provide its user with the greatest degree of versatility and functionality. All MICRO-AIDE Event Recorders come equipped with a front panel mounted Liquid Crystal Display (LCD) and keypad. Together these features allow the user to perform various setup and operational procedures required to effectively use the recorder. The advantage to the user is that a PC, although helpful, is not always required to operate the recorder. Setup and operation of the CWR-72E from the front panel is somewhat different than operation via a PC. The tasks to be performed and the end results are identical but the methods employed are different. This chapter describes the methods that are unique to front panel operation. Figure 1 on page 8 provides an illustration of the LCD panel and keypad. Front Panel Description USB Host Port The front panel of the CWR-72E includes a USB Type A female connector. The connector is labeled “Save - USB Flash Drive”. It is illustrated in Figure 1 on page 8. Any USB flash drive that is formatted as FAT-32 can be connected to the port. Once connected, the flash drive can be used to save copies of selected Event Records. The procedure for doing so is described in “How to Use the USB Host Port” on page 66. The saved record files can then be read using any word processing application. Table 14 on page 104 lists the bit transfer rates of each user-accessible port including the USB Host Port. Liquid Crystal Display The LCD panel consists of a display approximately 3" by 1" in size. It is configured to present four lines of data. Each line can contain twenty alphanumeric characters and symbols. The LCD characters are large and can be viewed easily from several feet away. The super-twist design of the LCD panel provides a viewing angle of ±20 º from the level of the display. The contrast level of the display may be adjusted. This can be helpful when the recorder is exposed to very hot or cold temperatures. The single-turn potentiometer that controls the contrast level is accessible through a small hole in the front panel of the recorder. It is labeled “Adj”. Use a small flat-head screwdriver to adjust the setting. 65 MICRO-AIDE CWR-40E / 72E USER MANUAL Keypad The keypad contains twenty individual keys. Each key consists of a pushbutton switch. They are clearly labeled as to their various functions. The keys are spaced .65" apart to minimize double hits. A special editing technique allows alphabetic characters to be entered via the keypad. The left () and right () arrow and Enter keys also provide for quick menu item selection. Except while selecting a command or performing the special editing procedure, the left arrow key may be used to backspace over characters when an incorrect number has been entered. Note Unless otherwise stated, characters shown in italics are used to refer to specific keys on the keypad (e.g., Browse). This convention is used throughout the remainder of this chapter. How to Use the USB Host Port Every CWR-72E is equipped with a USB Host Port designed for use with a USB flash drive. The port can be used to save copies of selected Event Records to a compact, portable memory. Once saved, the resultant text records can be read and reviewed on any PC. They can also be copied or moved to a PC file on a hard drive. As a further convenience, MICRO-AIDE’s GEA software can be used to view or plot the records. Note Saving records to a flash drive is completely non-destructive to the original records. Records can be saved as many times as desired by the user. Saving Records to a Flash Drive Either of two simple procedures can be used to save Event Records to a flash drive. Typically only a few front panel keystrokes are required. A PC is not required. Both procedures are described below. Saving Event Records from a Complete Day 1. Insert the USB flash drive into the connector of the USB Host Port. 2. Press the Save key. The following message will be displayed. Save to flash drive: Records for one day Records for a range 3. Press the Enter key after highlighting the “Records for one day” option. 4. A table of dates similar to the following will be displayed. 66 CHAPTER 4 FRONT PANEL OPERATION 091009 091109 091209 091309 091409 091509 091609 091709 At least one Event Record will be logged for each date listed. Dates are listed in the MMDDYY format. The Event Records option may list as many as 128 dates. Only eight dates are listed in the example cited above. The up and down arrow keys can be used to scroll quickly through a large collection of dates. 5. Press the Enter key after highlighting a date. The following message will be displayed briefly after the delay required to create the text file. Writing events.txt Writing events.bin Writing setupdata Success! 6. Records from additional complete days can be saved by repeating this procedure starting at step 2. 7. Remove the flash drive from the USB Host Port after all the required records have been saved. Saving Event Records from a Range of Times and Dates 1. Insert the USB flash drive into the connector of the USB Host Port. 2. Press the Save key. The following message will be displayed. Save to flash drive: Records for one day Records for a range 3. Press the Enter key after highlighting the “Records for a range” option. 4. A table of dates similar to the following will be displayed. The dates represent the available start date of the range. 091009 091109 091209 091309 091409 091509 091609 091709 67 MICRO-AIDE CWR-40E / 72E USER MANUAL At least one Event Record will be logged for each date listed. Dates are listed in the MMDDYY format. The Event Records option may list as many as 128 dates. Only eight dates are listed in the example cited above. The up and down arrow keys can be used to scroll quickly through a large collection of dates. 5. Press the Enter key after highlighting a date. The following message will be displayed. Start time: Enter=edit, Esc=OK 00:00:00 6. To accept the 00:00:00 midnight setting as the start time, press the Esc key. To modify the start time move the highlight to the hours, minutes or seconds position. Press the Enter key. Press the number keys as required to create a new value. The CWR-72E utilizes a military-style clock. Accordingly, 12:01:02AM is defined as 00:01:02 and 12:59:58PM is defined as 23:59:58. Leading zeros are not required. To accept the new value, press the Esc key. Using the same technique, adjust the other values as required. When the start time is correct, press the Esc key. 7. A table of dates similar to the following will be displayed. The dates represent the available end date of the range. 091009 091109 091209 091309 091409 091509 091609 091709 8. Press the Enter key after highlighting a date. The following message will be displayed. End time: Enter=edit, Esc=OK 23:59:59 9. To accept the 23:59:59 setting as the end time, press the Esc key. To modify the end time use the procedure described in step 6 above. When the end time is correct, press the Esc key. 10.The following message will be displayed briefly after the delay required to create the text file. 68 CHAPTER 4 FRONT PANEL OPERATION Writing events.txt Writing events.bin Writing setupdata Success! 11.Records from other times and dates can be saved by repeating this procedure starting at step 2. 12.Remove the flash drive from the USB Host Port after all the required records have been saved. Files Written to the Flash Drive The first time Event Records are saved via the USB Host Port a folder is automatically written to the flash drive. The name of the folder is taken from the first twenty characters of the Unit Name. Certain restrictions apply to the creation of the Unit Name. Refer to the sections entitled “Unit Name” on page 22 for additional details. After the folder is created, three files are written within the folder. A description of each file is listed in the following sections. All of the record files from a specific recorder will be written to the same folder. Provided the first twenty characters of the assigned Unit Name are not changed, a new folder is never created regardless of how many record files are saved from the recorder. Events Text File The first file written is the text version of the Event Records. The file is assigned a filename formatted as follows: [email protected]. As a text file, this file can be read by any word processing application (e.g., Notepad or Word). Table 9 on page 69 provides a complete description and example of the filename format. MM-DD-YY The date of the first record saved to the flash drive. hhmmss The time the records were saved to the flash drive. mmddyy The date the records were saved to the flash drive. .txt Denotes the file as a text file readable by any word processor. .bin Denotes the file as a binary file readable only by GEA. Example: [email protected] The first record is from 09-11-09. They were saved to the flash drive at 12:01:27pm on 09-30-09. Table 9 - Flash Drive Filenames Events Binary File The selected Event Records are also written to the flash drive as a highly compressed binary file. The filename is formatted similarly to the text file; however, the file extension is 69 MICRO-AIDE CWR-40E / 72E USER MANUAL changed to .bin. The binary version of the record file is used exclusively by GEA for viewing and plotting of the Event Records. Setup Database Binary File In order for GEA to view and plot the saved records a copy of the recorder’s Setup Database must be available. The recorder’s database file is always named setupdata.bin. This file is automatically overwritten each time a record file is written to the flash drive. How to Use the Keypad After power is applied, the CWR-72E will perform a firmware boot-up procedure. The LCD will remain blank for 10 to 15 seconds while the recorder is booting. The following message will be briefly displayed at the completion of the boot-up procedure. MICRO-AIDE Model CWR-72E Metra Event Recorder Version 1.02 The reference to firmware version 1.02 may vary. The firmware version number should be recorded and saved in the event service ever needs to be performed on the unit. After the boot-up procedure is completed the recorder will automatically enter Idle Mode. There are three operational modes, each is described in the following sections. Idle Mode Except as noted below, the real-time clock and Unit Name are displayed during Idle Mode. It is the at rest condition of the recorder. An example of the real-time clock display is shown below. The first twenty characters of the Unit Name are listed in the third row. Refer to the section entitled “Unit Name” on page 22 for additional information. TIME DATE 16:35:52* 06-01-11 CWR72E EventRecorder DIST_SUBDR_XING-NAME The CWR-72E utilizes the 24-hour, military time convention (e.g., 7:00PM is shown as 19:00:00). The date and time display is altered once every minute for five seconds. Alternating messages referring to the Setup and Browse Modes are displayed during this period. Note An asterisk (*) to the right of the displayed time indicates that the optional GPS receiver is locked onto a verified GPS signal. 70 CHAPTER 4 FRONT PANEL OPERATION The real-time clock display is also interrupted in Idle Mode when new Event Records are logged. Each new event will be displayed only briefly. This process is useful in verifying that the recorder is continuing to detect events. The Event Record format used by the LCD is described in the following section. Event Record Format Event Records consist of four lines of text. Sample records for several input types are shown below. 14:57:54.69 09-11-09 D01 1xx.......x NS-Gate-Down-Relay GateDwn Up LCD Event Record - Digital Input 14:58:03.33 09-11-09 A01 89Vacx....... AC_Power_120V AC_Power AC_Fail LCD Event Record - Analog Input 21:03:15.82 09-11-09 V03 1..x....... Lamp_Fail_Test VInput03 Test:Bad LCD Event Record - Virtual Input 15:01:17.74 09-11-09 T16 15.9s Switch_Delay_R127 R127-3 Violate LCD Event Record - Timer Input The first line of text always specifies the time and date the event was logged to memory. The date is listed in MM-DD-YY format. The second line of text lists the Input Number. It is generally followed by a sequence of x and . (period) characters. An x indicates an input with an active or On Event state. A . (period) indicates an input with an inactive or Off Event state. In the case of Analog Inputs the state indicators are preceded by the measured Analog Input level (e.g., 89Vac in the second sample record). In the case of Digital and Virtual Input records all 64 (32 for CWR-40E) Digital and 32 Virtual Input states cannot be depicted in the second line of text. 71 MICRO-AIDE CWR-40E / 72E USER MANUAL Only a group of ten are shown. The one- or two-digit number that precedes the state field is the Input Number of the first state indicator. For Analog Inputs the state indicators, from left to right, pertain to A1 through A8. The Measured Time value is listed in the case of Timer Input records. The third line always lists the twenty characters of the assigned Input Name (e.g., Lamp_Fail_Test in the third sample record). Finally, the eight characters of the assigned Input Identifier and Event Name are listed in the fourth line from left to right, respectively. Input Identifiers and Event Names are described in “Input Names/Identifiers (I)” on page 34 and “Event Names (E)” on page 34, respectively. Browse Mode Browse Mode is most commonly used to view Event Records via the LCD panel. Event Records may be viewed in either forward or reverse chronological order. Events are selected by date and time and optionally by Input Number. However, two additional features allow the user to inspect the current status of an input or to measure the flash rate of a flashing circuit. To access any of the Browse options press the Browse key. The following message will appear. Browse: Event Records Input Status Flash Rate Each of the three options are described in the sections that follow. Event Records After selecting the Event Records option a table of dates similar to the following will be displayed. 091009 091109 091209 091309 091409 091509 091609 091709 At least one Event Record will be logged for each date listed. Dates are listed in the MMDDYY format. The Event Records option may list as many as 128 dates. Only eight dates are listed in the example cited above. The up and down arrow keys can be used to 72 CHAPTER 4 FRONT PANEL OPERATION scroll quickly through a large collection of dates. Press the Enter key after highlighting a date. The display will then specify a start time as shown below. Browse Event Records Start Time: 00:00:00 Press the Esc key if records starting from midnight are to be inspected. To inspect records starting later in the day perform the following steps. 1. Using the left and right arrow keys position the highlight in the hour, minute or second field. 2. Press the Enter key to select the highlighted field. 3. Enter the required hours, minutes or seconds by pressing the appropriate numeric keys. Leading zeros are not required. 4. Press the Enter key to complete the entry. 5. Repeat the previous steps to adjust the remaining fields. After the correct starting time is specified the Esc key should be pressed. The following message describing the use of the arrow keys will be briefly displayed. Use to scroll, Browse to select input to query Provided the Browse key has not been pressed, the first Event Record meeting the specified date and time criteria will be displayed. Refer to “Event Record Format” on page 71. The left and right arrow keys can be used to review Event Records in forward or reverse chronological order. Tip Holding down an arrow key allows the user to search through the record set very quickly. The limits of the record set will be indicated by a message stating either “Start of Data” or “End of Data”. To exit Browse Mode and return to Idle Mode press the Esc key. Press the Browse key any time after the start time is specified to inspect records for a particular input. This procedure is referred to as Query by Input Number. Query by Input Number To inspect Event Records for a specific input press the Browse key after the starting time is specified. The following message will be displayed. 73 MICRO-AIDE CWR-40E / 72E USER MANUAL Input to query, (--- selects all) --A flashing highlight will be positioned in the Input Number field located in the third row of text. To specify an input follow the steps listed below. 1. Press the Alpha key repeatedly until the desired input type (i.e., D, A, V, T, F or S) is displayed. 2. Press the appropriate number keys to enter the Input Number. Leading zeros are not required. 3. Press the Enter key to display the first Event Record satisfying the date, time and Input Number criteria. Several seconds may be required to locate the first record. 4. Use the arrow keys to inspect additional records for the specified input. The Browse key can be pressed again at any time if a different input is to be inspected. Press the Esc key to exit the Query by Input Number procedure and return to Idle Mode. Note The CWR-72E will log an Event Record to memory when the power is turned off as well as on. Additionally, a record will be logged if the measured temperature is outside the Temp Limits assigned by the user. These records are referred to as System Records and are associated with S-type inputs. Refer to the section entitled “System Events” on page 93 for additional details. Input Status The Input Status option allows the user to inspect the current state of each input. The status of Digital, Analog and Virtual Inputs is indicated by their assigned Event Names. Voltage and current measurements are reported for Analog Inputs. The Input Status feature can be of great use when setting up the recorder. Without a peripheral device the user can verify that inputs are assigned proper Input Identifiers and Event Names. Each input can be checked to verify that it will report a change of state. Additionally, the command provides a DVM-like function for each Analog Input. After selecting the Input Status option the following message will be displayed briefly. Use to scroll, Browse=select input The arrow keys can be used to scroll from one input to the next. Digital Inputs are followed by Analog Inputs. They are followed by Virtual Inputs. Rather than use the arrow keys to 74 CHAPTER 4 FRONT PANEL OPERATION scroll sequentially through each input the user can jump to a specific input by pressing the Browse key. Select the input using the procedure described in “Query by Input Number” on page 73. Sample status data for each input type is listed below. D01 NS_Gate_Down_Relay GateDwn Down LCD Input Status - Digital Input A01 AC_Power_120V AC_Power AC_Fail 89Vac LCD Input Status - Analog Input V03 Lamp_Fail_Test VInput03 Test:OK LCD Input Status - Virtual Input The Input Number and Input Name are listed in the first and second rows, respectively. The Input Identifier and Event Name are listed in the third row. The fourth row is used to report analog levels. The data listed is updated automatically and in real-time. Without the aid of a PC the user can check the sequence of events at a crossing or while a control function is being exercised. Press the Esc key to exit the Input Status feature and return to Idle Mode. Flash Rate The third option included with the Browse command allows the user to measure the flash rate of a circuit. The following request for a Digital Input number will be displayed after selecting the Flash Rate option. Measure Input:D01 75 MICRO-AIDE CWR-40E / 72E USER MANUAL The user must enter the number of the flashing input (1-64, 32 for CWR-40E). Leading zeros are not required. Press the Enter key to complete the entry. Flash rate data similar to the following will be displayed. Measure Input:D01 Flashes/Min: 42.8 On/Off: 0.70/ 0.70 Cycle Time: 1.40 The Input Number and flash rate, measured in flashes per minute, are listed in the first two rows. The average on and off intervals of each flash pulse, measured in seconds, are listed in the third row. The lesser value is the optimum value to be assigned as the Detection Time for inputs using the reported flash rate. The sum of the average on and off intervals is reported as the cycle time in the fourth row. Press the Esc key to exit the Flash Rate command and return to Idle Mode. Setup Mode Setup Mode allows the user a to set up a limited number of Setup Database parameters. The four commands accessible via the keypad are the same as those available to the user during a Restricted Access session. The results from any keypad-performed command are indistinguishable from those performed from a peripheral device. Accordingly, the setup descriptions that are a part of Chapter 2 may be used to provide a more detailed explanation of the keypad commands. To enter Setup Mode from Idle Mode press the Setup key. The following message will be displayed. The user must enter the correct Passcode before any setup command can be executed. Enter the passcode: Passcodes are assigned numeric values only. Press the Enter key to complete the entry. If the user fails to enter the correct Passcode an error message will be displayed. Tip The Metra-defined Passcode is 547. Assuming the correct Passcode is entered the following message will be briefly displayed. 76 CHAPTER 4 FRONT PANEL OPERATION Use to select items and then ENTER The Setup Menu of front-panel-accessible commands will then be displayed as shown below. UName Diag Modem Baud Update Main Menu - LCD The Setup Menu includes five commands. Table 10 provides a brief explanation of each command. To select a command advance the highlight to the desired command and press the Enter key. The use of each command is explained in the final sections of this chapter. Name Description UName Create Unit Name Modem Assign Dial Numbers and Ring Count Baud Select Terminal Port Baud rate Diag Perform system diagnostics Update Update firmware from USB Host Port Table 10 - Front Panel Setup Commands Before proceeding the user should note that the UName command requires alphabetic characters to be used to create the Unit Name parameter. The keypad, however, contains only numeric and function keys. A special Alphanumeric Editing Procedure which is a feature of all MICRO-AIDE Event Recorders allows the user to create the name from an extensive set of characters. This procedure is described below. Alphanumeric Editing Procedure The first step in the Alphanumeric Editing Procedure is to select the parameter that is to be edited (e.g., Unit Name). A flashing highlight is used to indicate a specific parameter. To select the highlighted parameter press the Enter key. A blank field of characters will be displayed. An underscore (i.e., _) will be positioned in the first character location. The underscore character is used as a cursor in the Alphanumeric Editing Procedure. The left and right arrow keys can be used at any time to position the cursor as required. To create an alphanumeric name perform the following steps. 1. Press the Alpha key. The following list of characters will be displayed. 77 MICRO-AIDE CWR-40E / 72E USER MANUAL ABCDEFGHIJKLMNOPQRST UVWXYZ !"#$%&'()*+,/ abcdefghijklmnopqrst uvwxyz:;<=>?@[]^_{|} 2. Using the arrow keys reposition the highlight until the desired character is highlighted. A total of eighty characters plus ten numbers are available for selection. 3. Press the Enter key to select the highlighted character. The selected character is placed into the name at the present location of the cursor. The cursor is then automatically moved one position to the right. 4. To enter a number into the name press the appropriate number key. To correct an error reposition the cursor under the character in error and overwrite it with a new character. To insert a space, assuming no characters have been inserted to the right, simply move the cursor to the right. The space character follows the upper-case Z in the character set. 5. Repeat the previous steps until the name is completed. 6. Press the Enter key to accept the newly defined name. Alternatively, press the Esc key to retain the previously assigned name or to start again by ignoring all of the character entries. UName The UName command is used to assign a unique name to each CWR-72E recorder. Metra has defined a preferred format for the Unit Name. A detailed description of the format is included in the section entitled “Unit Name” on page 22. A message similar to the following will be displayed after selecting the UName command. Unit name: ***** NOT SET ***** The first twenty characters of the existing Unit Name are displayed in the second line of text. The default Unit Name is displayed in the sample data cited above. To change the name press the Enter key. Assign a new name or modify the existing name by using the “Alphanumeric Editing Procedure” on page 77. Press the Esc key to complete the command. Note Due to restrictions in the size of the LCD panel the UName command can be used to assign a Unit Name limited in length to twenty characters. Lengthier Unit Names (up to eighty characters) must be assigned by using the System Parameters command. 78 CHAPTER 4 FRONT PANEL OPERATION Modem The CWR-72E can be equipped with an optional, internal 33,600 Baud modem. The modem option allows remote users to access the recorder. Additionally, the modem’s dialout feature allows Event Records from Virtual Inputs to be transmitted to a remote maintenance center. There are three parameters that control the operation of the modem. The Ring Count determines the number of rings that must occur prior to the modem answering an incoming call. The Primary and Secondary Dial Numbers identify the number to dial when attempting to transmit a Virtual Input record. Refer to “Primary and Secondary Dial Numbers” on page 25 for additional information regarding these parameters. Data similar to the following will be displayed after selecting the Modem command. Modem ring count: 2 Prim/Sec Dial Number 626-915-5502 626-331-9484 To change the Ring Count setting move the highlight to the appropriate field and press the Enter key. Enter a number in the range from 0 to 99. Accept the new value by pressing the Enter key. Tip A Ring Count setting of zero will prevent the modem from answering incoming calls. To assign a Primary or Secondary Dial Number move the highlight to the third or fourth row, respectively. The existing assignment will be highlighted. Press the Enter key. A blank field with the cursor in the left-most position will be displayed. Enter a valid dial number by pressing the appropriate number keys. The “Alphanumeric Editing Procedure” on page 77 can be used to insert non-numeric characters such as a comma to insert a twosecond pause. Press the Enter key to accept the new assignment. Complete the command by pressing the Esc key. Baud The Baud command allows the user to change the Baud rate of the Terminal Port. The following array of Baud rates will be displayed after the Baud command is selected. Term baud rate: 300 600 1200 2400 4800 9600 19200 38400 57600 115200 It is likely that the 38,400 setting will be highlighted. It is the default setting used by the recorder. To assign a new Baud rate move the highlight to the desired setting by pressing 79 MICRO-AIDE CWR-40E / 72E USER MANUAL the arrow keys. Press the Enter key to accept the new selection. The Baud rate of the peripheral device attached to the Terminal Port must be changed to match the new setting. Diag The Diag command is used to test as many as six critical recorder elements. Included are tests of the program memory, Event Record memory, internal relay, internal temperature and optional GPS Receiver, Ethernet Port and internal modem. Each test can be performed at any time and is completely non-destructive. The contents of the Setup Database and Event Record memories will remain unmodified. The following data will be displayed after selecting the Diag command. Select test: ProgMem FlashMem GPS Rcvr Ethernet Modem Temperature The highlight will initially be positioned over the ProgMem field. To select a different test, position the highlight in the desired field. Press the Enter key to perform the test. Each test is described in the sections that follow. ProgMem A checksum of the entire program memory will be calculated and displayed after a few seconds. The results of a typical ProgMem test are listed below. Program Memory Checksum=68d6 (Good) Hit any key... The labels “Good” or “Bad” will indicate the success of the test. Note The reported checksum value will vary depending upon the version of the installed firmware. FlashMem The results of a typical FlashMem test are listed below. Flash Mem #1:2048K #2:0K #3:0K Hit and key.. 80 CHAPTER 4 FRONT PANEL OPERATION The test verifies that the microprocessor can properly access the Event Record memory. The reference to 2048K, 4096K, 8192K or 16384K indicates the size in bytes of the memory device. A value of 0K indicates a that a memory chip is not installed in the identified position or a failure has been detected. GPS Rcvr The GPS Rcvr test will check for the presence and operability of the optional GPS Receiver. A typical test result is displayed below. GPS Rcvr Test: Okay 16:45:40.258 Valid 34.1046,-117.8783 Hit any key... At the end of the first line either “Okay” or “NONE” will be reported. “Okay” indicates that the GPS Receiver is installed and the microprocessor is receiving data packets. “NONE” indicates that the receiver is either not installed or has experienced a severe failure. At the end of the second line either “Valid” or “Invalid” will be reported. “Valid” indicates that the GPS Receiver has achieved a signal lock with at least one satellite and that an accurate UTC time is being reported. “Invalid” indicates that a satellite lock has not been achieved. A time of “00:00:00.000” will be listed under this condition. The third line will list the latitude and longitude coordinates if they are available. In order to report latitude and longitude the GPS Receiver must achieve a signal lock with a minimum of four satellites. Depending upon the location of the GPS antenna this may not be possible. In such cases coordinates of “0.0000,0.0000” will be listed. Note Irrespective of the reported latitude and longitude coordinates, if the test reports “Valid” the GPS Receiver option is reporting accurate UTC data. Ethernet The Ethernet test will verify that the microprocessor is able to communicate with the optional Ethernet Port. A typical test result is displayed below. Ethernet Test: Okay Hit any key... If the Ethernet option is installed and found to be operational, “Okay” will be reported. If the Ethernet Port is not installed or it has failed, “NONE” will be reported. 81 MICRO-AIDE CWR-40E / 72E USER MANUAL Modem Either of two results should normally be expected from the Modem test. The following response verifies that the optional modem is installed and that the microprocessor is able to communicate with the modem. A typical test takes a few seconds for the microprocessor to complete. Modem Test... Modem found:H Hit any key... The “H” reference listed above indicates that the CWR-72E is equipped with a Silicon Labs modem. A “NONE” reference indicates that a modem is not installed or it has failed. Temperature The Temperature test reports the temperature inside the recorder. A typical response follows. Temp 89 Degrees F Hit any key... The temperature is always reported in degrees Fahrenheit. Caution The temperature reading should never exceed 180ºF. The temperature inside the CWR-72E will generally be about 5ºF to 10ºF warmer than the surrounding ambient temperature. Update The USB Host Port can be used to save a copy of selected Event Records in an easy to read text format. Refer to the section entitled “Saving Records to a Flash Drive” on page 66. The port can also be used to update the firmware used by the CWR-72E. MICRO-AIDE will periodically make available to its customers new firmware that either expands or improves upon the capabilities of its products. The new firmware will be available for downloading from our website. Visit: http://micro-aide.com/support/downloads.htm. Once the appropriate firmware file is downloaded and unzipped it will yield a .hex file. This file can be saved to a flash drive and then later used to update the recorder’s firmware. Caution The USB Host Port operates in strict accordance with various Microsoft standards that apply to filenames and folders. Accordingly, the .hex file name must not be altered to include several illegal characters. All .hex files downloaded from the MICRO-AIDE website are, after they are unzipped, guaranteed to be compliant with applicable Microsoft and USB Host Port standards. 82 CHAPTER 4 FRONT PANEL OPERATION Note Occasionally a new firmware release will be incompatible with the recorder’s existing Setup Database. When this happens the existing database will have to be erased and a new one created. Incompatibilities, if any, are listed in Table 2 on page 6. It should always be reviewed before proceeding with an update. To update the firmware follow the steps listed below. 1. Insert the flash drive into the USB Host Port. 2. Select the Update command. The following message will be displayed. Update Firmware From USB Flash Drive Yes No 3. Select the Yes option to proceed. The following message will be displayed. Insert flash drive with HEX file and select OK CANCEL OK 4. Select the OK option to proceed. Information similar to the following will be displayed. Select hex file: CWR-72E Met V101.hex CWR-72E Met V102.hex CWR-24E V108.hex 5. The Update command allows the user to select a file from a list of nine. The first group of three are depicted above. To navigate to the second or third group press the up and down arrow keys. 6. Once the correct file is highlighted, select it by pressing the Enter key. 7. The LCD will indicate that the new firmware file is being transferred. A single-line progress bar is used to indicate transfer activity. After approximately 30 seconds the transfer will automatically terminate and the following message will be displayed. Updating Firmware... Success! Press any key... 83 MICRO-AIDE CWR-40E / 72E USER MANUAL 8. Press the Esc key to proceed. Finally, the following message allows the user to run or ignore (refer to closing note) the new firmware. Select the Yes option to execute the new firmware by restarting the recorder. The Update procedure has been completed. Restart Recorder? Yes No Note At the completion of the transfer, the new firmware is saved in the non-volatile memory of the recorder. However, the new firmware is not executed until such time as a restart is performed. A restart can also be performed by simply cycling power to the recorder. Note The user may wish to contact MICRO-AIDE customer service if a failure occurs as the result of any diagnostic testing. Instructions on how to proceed will be offered. Material Return and Limited Warranty policies are described on the inside back cover of this manual. This concludes the chapter on how to operate the recorder from the front panel. Since the setup of the recorder is critical to how the CWR-72E will perform, it is advisable to review any changes that may have been made to the Setup Database. The next chapter describes general maintenance techniques that may benefit the user in case a problem symptom is ever encountered. 84 CHAPTER 5 MAINTENANCE Introduction The primary purpose of this chapter is to describe the recommended trouble-shooting methods to be used with the CWR-72E. It should be referred to if ever a questionable symptom arises during the operation of the recorder. The CWR-72E is designed to provide its user with many years of trouble-free operation. There are no user serviceable parts inside the unit. There are no consumable items or supplies that need to be replaced or replenished. The user may occasionally need to wipe dust away from the external surfaces of the unit. This should be done with a clean, dry cloth. The mechanical design of the chassis provides the internal electronic assemblies with a nearly sealed environment. Due to the low power consumption of the unit ventilation holes are not required. The inside of the recorder should remain clean indefinitely. Additionally, MICRO-AIDE printed circuit boards (PCBs) are sealed with a moisture and fungus resistant conformal coating. Adjusting the LCD Contrast The contrast level of the LCD panel may occasionally need to be adjusted to compensate for extreme variations in ambient temperature. To adjust the contrast level simply adjust the potentiometer labeled “Adj”. It is accessible through a small hole in the front panel. Working Inside the Recorder The user may have occasion to work inside the unit to add an optional equipment item. The following sections describe tasks involving work that may be performed inside the recorder. Observe the steps listed below before attempting any task. Refer to Figure 1 on page 8 and Figure 2 on page 9. They illustrate the front and top sides of the recorder, respectively. 1. Remove power from the recorder by detaching the connector labeled “Pwr” located along the top side of the recorder. 2. Remove all of the Analog and Digital Input connectors and peripheral cables. 3. Remove the recorder from the equipment shelf or backboard. 4. Remove the four 6-32 1/4" screws from the top and bottom sides of the front assembly. The front and back portions of the recorder can then be completely separated. 85 MICRO-AIDE CWR-40E / 72E USER MANUAL The task can now be performed safely. After the work is completed reassemble the recorder by reversing the steps listed above. Caution The Processor PCB is equipped with two potentiometers that are set and sealed at the factory. Do not attempt to alter these settings. Caution Electrostatic discharges can cause serious damage to electronic components. When handling circuitry inside the recorder it is recommended that the user wear a wrist grounding strap. Replacing the Fuses There are three fuses mounted on the Processor PCB. The fuses are designed to protect the input power source and the contacts of the two output relays. Each are rated at 1A and conform to the 2AG size standard. Before replacing a fuse the cause of the blown fuse should be ascertained and cleared if possible. Installing the Optional GPS Receiver The CWR-72E can be equipped with a GPS Receiver that is used to provide a 100% accurate, drift-free clock. Once installed the operation of the receiver is completely automatic. Generally, the GPS Receiver is ordered at the time the recorder is purchased and is pre-installed at the factory. If the receiver was not previously ordered the user may wish to install it after delivery of the recorder. To install the receiver follow the steps listed below. 1. Completelyremovetherecorder’sfrontpanelassemblyinaccordancewiththeprocedureentitled “Working Inside the Recorder” on page 85. 2. Locate the 6-pin female socket labeled “J8” located towards the right edge of the Processor PCB. The socket is illustrated in Figure 6 on page 88. 3. Carefully align the MCX connector with the top panel hole and the six pins on the GPS Receiver PCB with their socket counterparts. Press firmly on the module to insure it is seated properly and fully into the socket. The PCB should snap into place as it is secured by a pair of plastic stand-offs. 4. Reassemble the recorder. 5. The GPS Receiver option includes a bulkhead-mount antenna. The antenna is housed inside a water tight enclosure at the end of a 16' long coax cable. Snap the cable end into the mating MCX connector located at the recorder’s top panel. 6. The antenna can be secured to any surface less than 3/8" in thickness. For best reception it is best to locate the antenna outdoors. After power is reapplied to the recorder and the firmware is initialized, the Clock Sync Mode must be set to GPS. Refer to the section entitled “Clock Sync Mode” on page 25. 86 CHAPTER 5 MAINTENANCE Installing the Optional Ethernet Port The CWR-72E can be equipped with a 10/100 Base-T Ethernet Port. The optional Ethernet Port allows high speed local or remote access to the recorder via a TCP/IP-based Local Area Network (LAN) connection. It uses the internal power of the CWR-72E rather than commercial AC power. Table 14 on page 104 lists the bit transfer rates of each user accessible port. Generally, the Ethernet Port is ordered at the time the recorder is purchased and is pre-installed at the factory. If the port was not previously ordered the user may wish to install it after delivery of the recorder. To install the Ethernet Port follow the steps listed below. 1. Completelyremovetherecorder’sfrontpanelassemblyinaccordancewiththeprocedureentitled “Working Inside the Recorder” on page 85. 2. Remove and discard the protective plate that covers the Ethernet Port opening located at the top panel. A 6-32 1/4" nut secures the protective plate. 3. Locate the 56-pin female socket labeled “U7” along the upper edge of the Processor PCB. The socket is illustrated in Figure 6 on page 88. 4. Carefully align all of the pins on the Ethernet Port module with their socket counterparts. Press firmly on the module to insure it is seated properly and fully into the socket. 5. Reassemble the recorder. After power is reapplied to the recorder and the firmware is initialized, the Ethernet Port must be properly configured. Refer to the procedure entitled “Network (N)” on page 41. Installing the Optional Modem The CWR-72E can be equipped with a 33,600 Baud internal modem. The optional modem provides accessibility to remote users of the recorder. Unlike commercially available external modems, the CWR-72E modem will operate over the entire temperature range applicable to the recorder. It uses the internal power of the CWR-72E rather than commercial AC power. Generally, the Modem PCB is ordered at the time the recorder is purchased and is pre-installed at the factory. If the modem was not previously ordered the user may wish to install the modem after delivery of the recorder. To install the modem follow the steps listed below. 1. Completelyremovetherecorder’sfrontpanelassemblyinaccordancewiththeprocedureentitled “Working Inside the Recorder” on page 85. 2. Locate the sixteen-pin male header connector located near the center of the Processor PCB. The modem connector is illustrated in Figure 6 on page 88. 3. Temporarily remove the 6-32 1/4" screw and lock washer secured to the hex stand-off located to the right of the modem connector. 87 MICRO-AIDE CWR-40E / 72E USER MANUAL 4. Install the Modem PCB, component side up, by mating its sixteen-pin female connector with the Processor PCB connector. Use the 6-32 screw and lock washer to secure the modem to the hex stand-off. 5. Reassemble the recorder. When the CWR-72E is reinitialized the firmware will automatically detect the modem’s presence and configure it for auto-answer and originate operation. Reconnecting the Internal Cables There are two ribbon cables inside the CWR-72E. The first ribbon cable connects the Processor PCB to the Keypad/Input PCB. The second ribbon cable connects the Keypad/Input PCB to the LCD panel. These cables have fourteen and sixteen conductors, respectively. Unless instructed to do so by MICRO-AIDE service personnel, neither cable should ever need to be disconnected. To reconnect the cables simply seat them into their respective connectors. The connector end of each cable is keyed. Do not force the connector end into place. It should fit snugly but easily. Figure 6 - CWR-72E Processor PCB Diagnostic Testing The Main Menu of commands for the CWR-72E includes the Diagnostics command. Refer to the sample data labeled “Main Menu” on page 10. The Diagnostics command can be used to 88 CHAPTER 5 MAINTENANCE quickly verify the operational integrity of several hardware elements of the CWR-72E. Each of the eight tests can be performed at any time. They are non-destructive and therefore will not alter the Setup Database or Event Record memories. The following menu of commands will be displayed in response to selecting the Diagnostics command. System Diagnostics C F G E M K R T Checksum Test Program Memory Flash Memory Test GPS Receiver Test Ethernet Test Modem Test Keypad Test Relay Test Temperature Each command performs a specific test. The tests are described in the following sections. Checksum Test Program Memory (C) The Checksum Test reads every memory address location used to store the program code. As part of the reading process a checksum is calculated and displayed at the completion of the test. The same checksum must be calculated each time the test is performed. Either “Good” or “Bad” will be reported at the completion of the test. A typical response to the Checksum Test Program Memory command is listed below. Program Memory Checksum=68d6 GOOD Test Complete Press any key to continue The checksum takes only a few seconds to be calculated. The checksum value of “68d6” in the above example will vary with the version of the firmware installed in the recorder. Flash Memory Test (F) The Flash Memory Test is performed on the memory chip used to store Event Records. The test verifies that the microprocessor can access the Event Record memory. A typical response to the Flash Memory Test command is listed below. 89 MICRO-AIDE CWR-40E / 72E USER MANUAL Flash Memory #1: 2048K Flash Memory #2: 0K Flash Memory #3: 0K Test Complete Press any key to continue If the recorder has been equipped with larger amounts of Flash Memory the single reference of “2048K” will be replaced by one or more references of “2048K”, “4096K”, “8192K” or “16384K”. A failure has been detected if “0K” is reported in a Flash Memory position that should have memory installed. The readings should be compared to the known memory capacity of the recorder. GPS Receiver Test (G) The GPS Receiver Test will check for the presence and operability of the optional GPS Receiver. The test will report several different messages depending upon the state of the receiver. If the GPS Receiver has achieved a signal lock with at least four satellites, valid UTC time and latitude and longitude coordinates similar to the following will be reported. GPS Time: 16:57:11.093 is Valid Location: 34.1043ø, -117.8783ø Test Complete Press any key to continue Note A signal lock with one to three satellites allows the GPS Receiver to report a valid UTC time. In such cases latitude and longitude coordinates of 0.0000º will be reported. Irrespective of the reported latitude and longitude coordinates, if the test reports “Valid” the GPS Receiver option is reporting an accurate UTC time. If the GPS Receiver is installed but has not as yet achieved, or is unable to achieve, a signal lock with any satellite, the following will be reported. GPS Time: 00:00:00.000 is Not Valid Location: 0.0000ø, 0.0000ø Test Complete Press any key to continue If the GPS Receiver has failed completely or is not installed the following message will be reported. 90 CHAPTER 5 MAINTENANCE GPS Receiver not installed Test Complete Press any key to continue Ethernet Test (E) The Ethernet Test can be performed at any time to verify that the microprocessor can communicate properly with the Ethernet Port. The test can be performed while the port is active or idle. Assuming that an Ethernet Port is installed and it is operating properly the following message should be reported. Ethernet Okay Test Complete Press any key to continue An “Okay” result indicates a successful test. If “not Installed” is reported either the test has failed or the Ethernet option has not been installed. Modem Test (M) The Modem Test can be performed at any time to verify that the microprocessor can communicate properly with the internal modem. The test can be performed while the modem is idle or while a call is active. Assuming that a modem is installed and it is operating properly the following message should be reported. Modem Test in progress... Modem found: C Test Complete Press any key to continue The “C” reference indicates that a Silicon Labs modem is installed. If a modem is installed but “NONE” is indicated, a problem has occurred and must be corrected. Keypad Test (K) Each of the twenty keys that comprise the front panel keypad can be checked by using the Keypad test. The following instructions are displayed after selecting the command. 91 MICRO-AIDE CWR-40E / 72E USER MANUAL Keypad test, press ESC to cancel A single unique character is displayed in response to pressing a key. The correspondence between non-numeric keys and displayed characters is listed in Table 11, below. Key Browse Alpha Setup Esc Enter Save/. /- B A S E N . ^ v < > Displayed Table 11 - Keypad Test Characters To exit the test press the Esc key located at the keyboard of the peripheral device that is communicating with the CWR-72E. Relay Test (R) Admin Only The Relay Test allows the user to verify the operation of the internal relay and any alarm or indication circuitry connected to the contacts of the relay. The following message will be displayed in response to the Relay Test command. To energize the relay select the “Relay ON” option. To un-energize the relay select the “Relay OFF” option. Relay Test 1 2 4 5 Relay Relay Relay Relay 1 1 2 2 ON OFF ON OFF To exit the test press the Esc key. The relay will automatically assume an un-energized state. Temperature (T) The Temperature command simply reports the temperature inside the recorder. A typical response is shown below. The temperature is always reported in degrees Fahrenheit. Unit Temperature 86 Degrees F Test Complete Press any key to continue Note The measured temperature inside the CWR-72E will generally be 5ºF to 10ºF warmer than the surrounding ambient temperature. Temperature readings should never exceed 180ºF. 92 CHAPTER 5 MAINTENANCE Note The user may wish to contact MICRO-AIDE customer service if a failure occurs as the result of any diagnostic testing. Instructions on how to proceed will be offered. Material Return and Limited Warranty policies are described on the inside back cover of this manual. System Events Event Records are normally created by a change in state of an input. Exceptions to this rule concern the cycling of power to the recorder, variations in the measured temperature and events related to the Train Speed Monitor feature. The latter feature is described in the section entitled “Measure Speed (M)” on page 39. Each time power to the CWR-72E is turned on or off an event will be logged into memory. If the temperature transitions into or out of the acceptable range of operation or the speed of a train is reported, an event will also be logged. Additionally, each time the SNTP Clock Sync feature sets the recorder’s real-time clock an Event Record is logged. These events are classified as System Events. To distinguish them the Input Number always includes an S-prefix (e.g., S01). Additionally, the Input Name, Identifier and Event Name fields within the record are uniquely labeled. They cannot be changed by the user. Table 12 lists the various fields used by each System Event Record. Input Number Input Name Identifier Event Name Pair S01 System Power Power ON / OFF S02 High Temperature HighTemp ON / OFF S03 Low Temperature LowTemp ON / OFF S04 SNTP Clock Sync SntpSync OFF / OFF S05 GPS 5 Sec Correction GPS 5Sec OFF / OFF S06 GPS Clock Record GPS Rec OFF / OFF S07 Flash Rate Alarm FlashAlm ON / OFF S08 Speed Monitor 1 SpeedLim ON / OFF S09 Speed Monitor 2 SpeedLim ON / OFF S10 Speed Monitor 3 SpeedLim ON / OFF S11 Speed Monitor 4 SpeedLim ON / OFF Table 12 - System Event Records - Field Labels System Events can be reviewed using either of the two formatting options. Record formats are described in the section entitled “Event Record Formatting” on page 58. Listed below 93 MICRO-AIDE CWR-40E / 72E USER MANUAL are six sample Event Records as they would appear at the PC. In the interest of simplicity only the No Details, single-line form is shown. 05:18:27.00 09/11/09 System Power Power OFF S01 05:18:59.24 09/11/09 System Power Power ON S01 14:11:51.00 09/11/09 High Temperature HighTemp ON S02 15:00:09.00 09/11/09 High Temperature HighTemp OFF S02 15:31:04.37 09/11/09 Speed Monitor 1 SpeedLim ON S08 16:00:00.64 09/11/09 Sntp Clock Sync SntpSync OFF S04 16:13:53.27 09/11/09 Flash Rate Alarm FlashAlm ON S07 D01 16MPH The first two records indicate that power was off to the recorder for approximately 32 seconds. Later in the same day the measured temperature was found to be excessive for approximately 48 minutes. A train speed violation of 16mph occurred at 15:31:04. At 16:00:00 the SNTP source performed a clock sync. The first record listed above is also shown below as it would appear at the front panel LCD. 05:18:27.00 09-11-09 S01 System Power Power OFF System Events can be Queried and Browsed just like other Event Records. Instead of selecting a D, A, V or T input type designator, select the S-type. Note System Events are always logged to memory in chronological sequence. The power on event will immediately follow the power off event. The time between the two Event Records indicates the period during which no logging was possible. All of the Analog Input measurements for S1 records will be reported with a zero value. This is done to eliminate erroneous readings. Upgrading the Firmware Admin Only Like any microprocessor-based product the CWR-72E executes a stored memory program. The program, referred to as firmware, is saved in a Flash Memory chip. Flash Memory chips are uniquely characterized by their permanent storage and multiple write properties. Their use allows the CWR-72E firmware to be upgraded to a newer version by simply uploading a new program file. The more common practice of shipping and replacing a Programmable Read Only Memory (PROM) chip does not apply to the CWR-72E. Consequently, there is no need to open the unit to gain access to the Processor PCB. 94 CHAPTER 5 MAINTENANCE The firmware update procedure, described in this section, must be performed via a PC connected to the Terminal Port, USB Device Port, Ethernet Port or internal modem (provided the latter is installed). At the request of the user, MICRO-AIDE support personnel can perform the update via the modem. A firmware update can also be performed very easily by using the USB Host Port. The instructions for doing so are described in the section entitled “Update” on page 82. Note Occasionally a new firmware release will be incompatible with the recorder’s existing Setup Database. When this happens the existing database will have to be erased and a new one created. Incompatibilities, if any, are listed in Table 2 on page 6. It should always be reviewed before proceeding with an update. The steps necessary to complete the firmware update depend upon which communications application is being used. The following example describes the HyperTerminal method. HyperTerminal 7.0 was used in the following procedure. Other versions of this program may be slightly different. However, the fundamental approach will remain valid. Note The CWR-40E and CWR-72E always use the same firmware. The steps listed in the following procedure apply to both Event Recorders. 1. The user must be online with the recorder and the Main Menu should be displayed. Refer to the sample data on page 10. 2. Select the Transfer Files command. The following sub-menu of commands will be displayed. File Transfer D Download Setup Data CWR to PC U Upload Setup Data PC to CWR F Firmware Upload 3. Select the Firmware Upload command. The following warning will be displayed. Are you SURE you want to upload new Firmware? No Yes 4. To proceed select Yes. The following additional warning will be displayed. OK to erase Firmware and upload new Firmware in Intel HEX format? No Yes 5. To proceed select Yes. A final precaution will be displayed as follows. Do you want to ABORT this operation No Yes 95 MICRO-AIDE CWR-40E / 72E USER MANUAL 6. To proceed select No. After a short delay the following message will be displayed. Erasing old Firmware... Firmware has been erased, please send Intel HEX file now. Note The following steps assume that the user is accessing the recorder via Windows XP and HyperTerminal. 7. With the mouse, click on the Transfers command, then the Send Text File ... command. The Send Text File dialog box will open. 8. In the drop down list box labeled “File of type:” select “All files (*.*)”. 9. Select the correct disk drive, folder and filename (e.g., CWR-72E V103.hex). If the various settings are correct click on the Open button. 10.The progress of the upload will be indicated by a sequence of period (.) characters. 11.The upload will terminate automatically after about 80 seconds (at 38,400Baud). The following message will indicate a successful file transfer. Done! Press ESC to continue 12.Press the Esc key as instructed. The following message will be displayed. Do you want to restart the CWR-72E event recorder now? No Yes 13.Select Yes to initialize the new firmware. At the conclusion of the initialization the user will be asked to log on. Note After completing the firmware upgrade procedure it may be necessary to execute the Reset System command. A reset should be performed only if recommended by MICRO-AIDE customer service technicians. Refer to “Reset System (R)” on page 19. Trouble-shooting Guide The following guide is provided to assist the user in resolving problems that may occur with the operation of the CWR-72E. It can be especially helpful when attempting to operate the recorder for the first time. Procedures for resolving both local and remote problems are listed. Where multiple steps are indicated it is recommended that they be performed in the order listed. Corrective actions to be performed inside the CWR-72E must be carried out in accordance with the procedure entitled “Working Inside the Recorder” on page 85. 96 CHAPTER 5 MAINTENANCE If the user is unable to resolve the problem, MICRO-AIDE customer service technicians should be contacted. The user will be asked to state the problem, related symptoms, and indicate any operations or conditions that have a bearing on the problem. If available, the results of any diagnostic tests should be reported. If the recorder has an installed modem it may prove to be helpful in diagnosing the problem from the MICRO-AIDE factory. The user will be asked to provide the appropriate telephone number and correct password. Symptom or Problem Resolution No indication of power Verify 10 to 36Vdc at B and N power terminals Inspect fuse on Processor PCB PC will not connect via USB Device Port Verify USB Type A-B cable is being used Verify correct USB device driver is installed (refer to Appendix D) PC does not display data when connected to Terminal Port Check cable connection to Terminal Port Verify cable is assembled per Figure 7 on page 104 Check Baud rate setting Check if Terminal LED on front panel illuminates Terminal Port data at PC is garbled Check Baud rate setting Verify following setting: 8 data bits, 1 start bit, 1 stop bit Highlight cannot be moved at PC Set the PC for ANSI emulation PC does not communicate via the Ethernet Port when directly connected Verify the recorder’s IP Address and Port Number are correctly assigned Verify the Ethernet Port in the PC is configured properly Verify PC’s communications application is set up for TCP/IP protocol Verify Ethernet cable is a CAT-5 crossover type Setup Database transfer fails via Ethernet Port connection Use Network command to change TCP/IP Mode setting to Telnet GPS Rcvr fails to provide accurate clock control Verify GPS antenna is plugged in Verify location of GPS antenna provides good skyward access Verify GPS Rcvr diagnostic test reports “Valid” Verify Clock Sync Mode is set to GPS GPS Rcvr diagnostic test reports “Invalid” time and/or 0.0000º coordinates Wait several minutes while GPS Rcvr attempts to achieve signal lock with satellite Relocate GPS antenna for improved reception SNTP fails to provide accurate clock control Verify time server is transmitting SNTP multi-cast Verify Clock Sync Mode is set to SNTP Real-time clock is incorrect by one or more hours even with GPS Rcvr and/or SNTP control Verify correct Daylight Saving Time and Time Zone settings Table 13 - Guide to Trouble-shooting Techniques 97 MICRO-AIDE CWR-40E / 72E USER MANUAL Cannot save Event Record files to flash drive Verify flash drive is fully seated into USB Host Port LED on flash drive should flash as files are being saved Test integrity of flash drive by plugging it directly into a PC and copying files from the PC Try another flash drive Initial Check-out Procedure fails on all inputs Verify polarity of test voltage is applied correctly Verify Detection Times are not set to zero Check inputs using View Events command Event Records are not being created on some inputs Check wiring, especially polarity Set Detection Time to shorter value Verify Detection Times are not set to zero Flashing Inputs create multiple Event Records Disable Record Flash Details setting Enable flashing status for inputs (Detection Time setting) Set Detection Time to a longer value Analog Input AC source measures 0 Analog Input is configured for DC, change to AC Analog Input DC source measures correctly but reports AC units Analog Input is configured for AC, change to DC Negative Analog Input voltage is not reported, measures 0 Analog Input Range is set to +51.1Vdc, change to ± setting AC analog readings are not stable Reassign the analog Filter setting to Slow DC analog readings are not tracking voltage changes Reassign the analog Filter setting to Fast Timer Input is not reporting an Event Record Verify valid inputs are assigned in the From and To fields Verify the assigned inputs are each generating state changes Upload/Download of Setup Database fails Verify XMODEM protocol is being used Modem does not answer Check phone line connection Verify Modem Ring Count is not set to zero Modem answers but fails to connect Check modem Baud rate at host end Verify host modem is compatible with recorder modem Test host modem with another auto-answer system Modem will not dial out alarms Test phone line for dial tone Perform Modem Test command Verify modem is enabled by Virtual Input Check Primary and Secondary Dial Numbers Internal relay will not operate Perform Relay Test command Verify relay is enabled by Virtual Input Disconnect the external circuit attached to the relay contacts, test again Visibility of LCD characters is poor Adjust LCD contrast Table 13 - Guide to Trouble-shooting Techniques (Continued) 98 CHAPTER 5 MAINTENANCE This completes the User Manual for the CWR-72E Event Recorder. As an aid to the user five appendices have been provided. They include detailed specifications, descriptions of the Metra-defined Setup Databases and options applicable to the CWR-72E. Appendix E includes a complete Bill of Materials for each sub-assembly. Any comments the reader may have on how to improve this manual are welcomed. Comments should be forwarded to the Director of Marketing, MICRO-AIDE Corporation. 99 MICRO-AIDE CWR-40E / 72E USER MANUAL User Notes 100 APPENDIX A TECHNICAL DATA CWR-40E / 72E Specifications Physical Size Length: 10.4" Height: 3.1" Depth: 7.6" Weight 3.0lb. Environmental Storage Temperature: -50ºC to 85ºC Humidity: 0 to 95%, noncondensing Operating Temperature: -40ºC to 72ºC Humidity: 0 to 95%, noncondensing Mounting Standard: shelf or back board mounting (includes brackets) Optional: 19" rack mounting brackets available Construction Chassis Fully enclosed, anodized aluminum Externally accessible keypad, LEDs and connectors Electrical All components mounted on conformal coated, internal PCBs Power Voltage Range: 10 to 36Vdc Consumption Typical: 2W Maximum: 4W (with GPS Receiver, Ethernet and Modem options) Isolation Power Minimum: 3800Vdc from B and N terminals to chassis and inputs Digital Inputs Minimum: 3800Vdc to any terminal Analog Inputs Minimum: 3800Vdc to any terminal Input to Adjacent Input Digital: minimum 3800Vdc Analog: minimum 3200Vdc USB Host and Device Ports Minimum: 3800Vdc to any terminal GPS Receiver and Ethernet Port (optional) Minimum: 3800Vdc to any terminal Capacities (continued) Liquid Crystal Display Characters: 80 total on 4 lines Character Set: A-Z upper- and lower-case, 0-9, various symbols Viewing Area: 2.8" by .8" Front Panel Keypad Quantity: 20 keys Keys: 0-9, Browse, Alpha, Setup, Esc, Enter, Save/., left, right, up, down/- Inputs Input Impedance Digital: minimum 10KOhms, opto-isolated Analog: minimum 10MOhms Range Digital Input - On: 9 to 36Vdc Digital Input - Off: 0 to 2Vdc Internal Modem (optional) Analog DC Voltage: 3 scales, ±25.5, +51.1, ±255 Designed to meet FCC part 68 standards Analog AC Voltage: 2 scales, 25.5, 255 Capacities Inputs Digital: 32 / 64, all opto-isolated Analog: 8 total, voltage or current (optional) Virtual: 32, user assigned Timer: 32, user assigned Outputs Relay: 2, form C, rated for 2A at 24Vdc or 1A at 125Vac, maximum switching capacity of 125VA or 60W, service life 1 million electrical (typical) Event Storage 111,481 records, expandable to 2,947,289 records Analog Current: 2 scales (optional), ±25.5Adc, 25.5Aac Event Validation Times Digital: .01 to 327.67 seconds, compatible with fixed rate flashing circuits Analog: fast and slow filter settings Analog Limit Values Voltage Separate high and low limits, in multiples of .1V or 1V Current (optional) Separate high and low limits, in multiples of .1A Internal Temperature Separate low and high limits, -67ºF to 257ºF 101 MICRO-AIDE CWR-40E / 72E USER MANUAL Analog Input Accuracy Memory Typical Vdc: ±1% full scale Typical Vac: ±1.5% full scale Typical Current: ±2% full scale Virtual Inputs Quantity 32, user assigned Definitions Any logical association shared by 1 to 4 variables (i.e., Digital, Analog, Timer or Virtual Inputs) Assigned by defining the state of the Virtual Input for each combination of variable states Reporting Non-volatile, Event Records and Setup Database are stored in flash memory chip 129th day over-writes first day, newest data over-writes oldest data Storage Longevity Infinite with power off Rated for 1 million write operations Ports RS-232 Quantity: 1, for use with a PC Creates standard Event Record Emulation: ANSI Relay can be controlled by each Virtual Input Baud Rates: 300, 600, 1200, 2400, 4800, 9600, 19,200, 38,400, 57,600, 115,200 Modem (optional) can be set up to dial-out Event Record Timer Inputs Quantity 32, user assigned Programming Any input can be assigned as the trigger or terminating source On or Off events can be assigned as the trigger or terminating source Limit Values Separate high and low limits per assigned Timer Input, in multiples of .1 seconds Range: 0.0 to 999.9 seconds Reporting Measured Time is reported in each Timer Input Event Record Violation of Limit Values are also reported Train Speed Monitor Quantity 4, separately programmable Operation Reports excessive train speed Logs standard Event Record Sensors are wired to 2 spare Digital Inputs Limit Values 5 to 180mph Sensor Distance 50' to 5280' 102 Type Bit Format: N-8-1 USB Host Compatible with any USB Flash Drive Can create a text file of Event Record data from any time span Can be used to update firmware USB Device Eliminates need for serial comm port Provides local access via a PC Data transfer rates of 960Kbps GPS Receiver (optional) Used to provide precise, real-time clock control Provides latitude and longitude coordinates Ethernet (optional) Type: 10/100 Base-T Speed: 100Mbps Protocol: TCP/IP, Telnet, SNTP LED Indicators: Green - link established; Yellow - data activity Provides remote or local access via TCP/IP Data transfer rates of 850Kbps User assignable IP Address, user port, sub-net mask Supports Telnet and SNTP Modem (optional) Provides remote access, autoanswer Connectors Digital and Analog Inputs Detachable, tension clamp, 8 terminals each, 12 to 22AWG Power Detachable, tension clamp, 4-position, 12 to 22AWG Dual B and N terminals Alarm Relay Detachable, tension clamp, 6-position, 12 to 22AWG N.O., N.C. and common Terminal Port DE-9 male, configured as DCE USB Host Port USB Type A female USB Device Port USB Type B female Telephone Line RJ-11 female GPS Receiver (optional) MCX female Ethernet Port (optional) RJ-45 female Controls Keypad 20 keys, located on front panel LCD Contrast Adjust Single-turn potentiometer, accessible from front panel Indicators LCD Panel Includes LED back lighting for enhanced visibility Displays numerous command menus for configuring the recorder and retrieving data LEDs (3) Power: green Terminal: green, flashes with send/rcv data Modem: green, flashes with send/rcv data and ring-in Internal Clock Accuracy Typical: ±8 seconds per month (3ppm) Resolution Event Records are time stamped to nearest .01 seconds APPENDIX A TECHNICAL DATA Internal Clock (continued) GPS Receiver (optional) Sync Via GPS (requires GPS Receiver option) Via SNTP (requires Ethernet option) Via spare Digital Input, once every 15 minutes Operation Includes PCB and external antenna Module Plugs into mating connector inside recorder Antenna Size: Dia 1.8” H .6” (not including mounting screw) Full calendar, auto-adjusted for leap year Weight: 2oz. (less cable) Enable or disable of automatic Daylight Saving Time adjustment Mounting: bulkhead mountable to surface less than 3/8” thick Non-drift, precise control with GPS Receiver option Location: unobstructed skyward orientation, for use outdoors Non-drift, precise control via SNTP (requires Ethernet option) Non-volatile with power off Y2K compliant Operating Temp: -40ºC to 85ºC Password Protection Administrative Level Access to all functions, limit 8 characters Restricted Level Internal Modem (optional) Type V.34, 33,600 Baud, data compression and error correction Usage Remote access via auto-answer operation Allows dial-out alarm reporting of Virtual Input records Compliance Designed to meet FCC part 68 standards Dial-out Alarms (optional) Calling Method Primary and secondary dial numbers, multiple attempts Tone or pulse dialing Data Issues Event Record for enabled Virtual Inputs Access to Event Record and Setup Database viewing, limited access to Setup Database functions, limit 8 characters Passcode Provides limited alterations to Setup Database via front panel, limit 8 digits MICRO-AIDE reserves the right to make changes, at its sole discretion, to any specifications listed herein. Transfer Rates The following table lists measured bit transfer rates for each of the CWR-72E’s user accessible ports. In each case the same 20,000 Event Records with no-detail formatting were either dumped to a PC file or saved directly to a flash drive. The times listed are normalized relative to 1,000 Event Records. If speed is a concern, using the USB Device Port is highly recommended. 103 MICRO-AIDE CWR-40E / 72E USER MANUAL Port Time to transfer 1,000 Event Records (sec) Actual transfer rate (bps) Terminal Port (38,400) 18.78 38,352 Used as reference Internal modem 14.48 50,638 1.3 times faster Terminal Port (115,200) 6.28 114,569 3.0 times faster USB Host 5.83 123,607 3.2 times faster Ethernet Port .84 853,851 22.3 times faster USB Device Port .75 960,103 25.0 times faster Table 14 - Bit Transfer Rates by Port Terminal Port Cable The following cable is included with every CWR-72E. Figure 7 - Terminal Port Cable - Wiring Diagram 104 Relative speed compared to 38,400 APPENDIX B SETUP DATABASES Introduction The CWR-40E and CWR-72E Event Recorders designed for Metra utilize three very specific Setup Databases. The content of each database was defined by the Metra signal staff. The 2-Track Recording System (CWR-40E based) utilizes two different databases. They are referred to as BEV and MED. The Setup Database used by the 4-Track Recording System (CWR-72E based) is referred to as Mainline. As an aid to the user, this appendix provides a detailed listing of all three databases. Database Alterations The various parameters defined by each Setup Database are listed in the sections that follow. However, it is important to note that the parameters listed in Table 15 are not defined by any of the Metra-created Setup Databases. These parameters are defined by the specific requirements of the site and/or user. A Restricted Access session allows this limited group of parameters to be set and altered as needed. The initial or factory default settings for each parameter are also listed. Parameter Initial Value Unit Name ***** NOT SET ***** Terminal Port Baud Rate 38,400 Ring Count 2 Primary Dial Number (none assigned) Secondary Dial Number (none assigned) Table 15 - Database Exceptions Caution Every Event Recorder will include one of the Metra-defined Setup Databases. Except for the parameters noted above, the user should not have to alter any of the settings referenced herein. 105 MICRO-AIDE CWR-40E / 72E USER MANUAL BEV and MED Setup Databases These databases are only used by the CWR-40E Event Recorders. Parameters related to features not used by Metra (e.g., Virtual and Timer Inputs) are not defined within the Setup Database and are therefore not listed in the following table. Parameter Restricted Password Passcode Clock Sync Mode Clock Sync Input Time Zone Daylight Saving Time High Temp Limit Low Temp Limit Record Flash Details Digital Input 1 - Name Digital Input 2 - Name Digital Input 3 - Name Digital Input 4 - Name Digital Input 5 - Name Digital Input 6 - Name Digital Input 7 - Name Digital Input 8 - Name Digital Input 9 - Name Digital Input 10 - Name Digital Input 11 - Name Digital Input 12 - Name Digital Input 13 - Name Digital Input 14 - Name Digital Input 15 - Name Digital Input 16 - Name Digital Input 17 - Name Digital Input 18 - Name Digital Input 19 - Name Digital Input 20 - Name Digital Input 21 - Name Digital Input 22 - Name Digital Input 23 - Name Digital Input 24 - Name Digital Input 25 - Name Digital Input 26 - Name Digital Input 27 - Name Digital Input 28 - Name Digital Input 29 - Name Digital Input 30 - Name Digital Input 31 - Name Digital Input 32 - Name Analog Input 1 - Name Analog Input 2 - Name Analog Input 3 - Name Analog Input 4 - Name BEV SIGNAL 547 GPS --- (none assigned) CST Enabled 257 -67 Disabled 3RD NORTH-APP-1T 2ND NORTH-APP-1T 1ST NORTH-APP-1T SOUTH DIR STICK-1T ISLAND CIRCUIT-1T NORTH DIR STICK-1T 1ST SOUTH-APP-1T 2ND SOUTH-APP-1T 3RD SOUTH-APP-1T 3RD NORTH-APP-2T 2ND NORTH-APP-2T 1ST NORTH-APP-2T SOUTH DIR STICK-2T ISLAND CIRCUIT-2T NORTH DIR STICK-2T 1ST SOUTH-APP-2T 2ND SOUTH-APP-2T 3RD SOUTH-APP-2T GC&XR-F GC&XR-B LIGHT OUT 1 FLASH RATE 1 LIGHT OUT 2 FLASH RATE 2 ALL GATES UP EAST GATE WEST GATE EAST PED GATE WEST PED GATE EAST MEDIAN GATE WEST MEDIAN GATE ELECTRONIC BATTERY CROSSING BATTERY LINE BATTERY BATTERY EAST ELECTRONIC BATTERY CROSSING BATTERY LINE BATTERY BATTERY EAST Table 16 - BEV and MED Setup Databases 106 MED SIGNAL 547 GPS --- (none assigned) CST Enabled 257 -67 Disabled 3RD WEST-APP-1T 2ND WEST-APP-1T 1ST WEST-APP-1T EAST DIR STICK-1T ISLAND CIRCUIT-1T WEST DIR STICK-1T 1ST EAST-APP-1T 2ND EAST-APP-1T 3RD EAST-APP-1T 3RD WEST-APP-2T 2ND WEST-APP-2T 1ST WEST-APP-2T EAST DIR STICK-2T ISLAND CIRCUIT-2T WEST DIR STICK-2T 1ST EAST-APP-2T 2ND EAST-APP-2T 3RD EAST-APP-2T GC&XR-F GC&XR-B LIGHT OUT 1 FLASH RATE 1 LIGHT OUT 2 FLASH RATE 2 ALL GATES UP NORTH GATE SOUTH GATE NORTH PED GATE SOUTH PED GATE NORTH MEDIAN GATE SOUTH MEDIAN GATE APPENDIX B SETUP DATABASES Analog Input 5 - Name Analog Input 6 - Name Analog Input 7 - Name Analog Input 8 - Name Digital Input 1 - Identifier Digital Input 2 - Identifier Digital Input 3 - Identifier Digital Input 4 - Identifier Digital Input 5 - Identifier Digital Input 6 - Identifier Digital Input 7 - Identifier Digital Input 8 - Identifier Digital Input 9 - Identifier Digital Input 10 - Identifier Digital Input 11 - Identifier Digital Input 12 - Identifier Digital Input 13 - Identifier Digital Input 14 - Identifier Digital Input 15 - Identifier Digital Input 16 - Identifier Digital Input 17 - Identifier Digital Input 18 - Identifier Digital Input 19 - Identifier Digital Input 20 - Identifier Digital Input 21 - Identifier Digital Input 22 - Identifier Digital Input 23 - Identifier Digital Input 24 - Identifier Digital Input 25 - Identifier Digital Input 26 - Identifier Digital Input 27 - Identifier Digital Input 28 - Identifier Digital Input 29 - Identifier Digital Input 30 - Identifier Digital Input 31 - Identifier Digital Input 32- Identifier Analog Input 1 - Identifier Analog Input 2 - Identifier Analog Input 3 - Identifier Analog Input 4 - Identifier Analog Input 5 - Identifier Analog Input 6 - Identifier Analog Input 7 - Identifier Analog Input 8 - Identifier Event Name - Pair 1 (On / Off) Event Name - Pair 2 (On / Off) Event Name - Pair 3(On / Off) Event Name - Pair 4 (On / Off) Event Name - Pair 5 (On / Off) Event Name - Pair 6 (On / Off) Event Name - Pair 7 (On / Off) Event Name - Pair 8 (On / Off) Event Name - Pair 9 (On / Off) Event Name - Pair 10 (On / Off) BATTERY WEST BATTERY NORTH BATTERY SOUTH 120/240 VAC POWER WWWAP-1T WWAP-1T WAP-1T DESR-1T ISLD-1T DWSR-1T EAP-1T EEAP-1T EEEAP-1T WWWAP-2T WWAP-2T WAP-2T DESR-2T ISLD-2T DWSR-2T EAP-2T EEAP-2T EEEAP-2T GC&XR-F GC&XR-B L OUT 1 FLASH 1 L OUT 2 FLASH 2 GATEUP NG DWN SG DWN NPG DWN SPG DWG NMG DWN SMG DWN BATTERY WEST BATTERY NORTH BATTERY SOUTH 120/240 VAC POWER NNNAP-1T NNAP-1T NAP-1T DSSR-1T ISLD-1T DNSR-1T SAP-1T SSAP-1T SSSAP-1T NNNAP-2T NNAP-2T NAP-2T DSSR-2T ISLD-2T DNSR-2T SAP-2T SSAP-2T SSSAP-2T GC&XR-F GC&XR-B L OUT 1 FLASH 1 L OUT 2 FLASH 2 GATEUP EG DWN WG DWN EPG DWN WPG DWG EMG DWN WMG DWN B12-N12 B14-N14 B-N BL-NL/E BL-NL/W BL-NL/N BL-NL/S AC PWR WARN OFF / WARN ON WARN ON / WARN OFF FLASHON / FLASHOFF GATES UP / NOT UP GATE DWN / NOT DWN PWR OFF / PWR ON BATT LOW / BATT OK LAMPFAIL / LAMPOFF TK UP / TK DWN STIK UP / STIK DWN B12-N12 B14-N14 B-N BL-NL/E BL-NL/W BL-NL/N BL-NL/S AC PWR WARN OFF / WARN ON WARN ON / WARN OFF FLASHON / FLASHOFF GATES UP / NOT UP GATE DWN / NOT DWN PWR OFF / PWR ON BATT LOW / BATT OK LAMPFAIL / LAMPOFF TK UP / TK DWN STIK UP / STIK DWN Table 16 - BEV and MED Setup Databases (Continued) 107 MICRO-AIDE CWR-40E / 72E USER MANUAL Event Name - Pair 11 (On / Off) Event Name - Pair 12 (On / Off) Event Name - Pair 13(On / Off) Event Name - Pair 14 (On / Off) Event Name - Pair 15 (On / Off) Event Name - Pair 16 (On / Off) Event Name - Pair 17 (On / Off) Event Name - Pair 18 (On / Off) Event Name - Pair 19 (On / Off) Event Name - Pair 20 (On / Off) Digital Input 1 - Assigned Event Name Pair Digital Input 2 - Assigned Event Name Pair Digital Input 3 - Assigned Event Name Pair Digital Input 4 - Assigned Event Name Pair Digital Input 5 - Assigned Event Name Pair Digital Input 6 - Assigned Event Name Pair Digital Input 7 - Assigned Event Name Pair Digital Input 8 - Assigned Event Name Pair Digital Input 9 - Assigned Event Name Pair Digital Input 10 - Assigned Event Name Pair Digital Input 11 - Assigned Event Name Pair Digital Input 12 - Assigned Event Name Pair Digital Input 13 - Assigned Event Name Pair Digital Input 14 - Assigned Event Name Pair Digital Input 15 - Assigned Event Name Pair Digital Input 16 - Assigned Event Name Pair Digital Input 17 - Assigned Event Name Pair Digital Input 18 - Assigned Event Name Pair Digital Input 19 - Assigned Event Name Pair Digital Input 20 - Assigned Event Name Pair Digital Input 21 - Assigned Event Name Pair Digital Input 22 - Assigned Event Name Pair Digital Input 23 - Assigned Event Name Pair Digital Input 24 - Assigned Event Name Pair Digital Input 25 - Assigned Event Name Pair Digital Input 26 - Assigned Event Name Pair Digital Input 27 - Assigned Event Name Pair Digital Input 28 - Assigned Event Name Pair Digital Input 29 - Assigned Event Name Pair Digital Input 30 - Assigned Event Name Pair Digital Input 31 - Assigned Event Name Pair Digital Input 32 - Assigned Event Name Pair Analog Input 1 - Assigned Event Name Pair Analog Input 2 - Assigned Event Name Pair Analog Input 3 - Assigned Event Name Pair Analog Input 4 - Assigned Event Name Pair Analog Input 5 - Assigned Event Name Pair Analog Input 6 - Assigned Event Name Pair Analog Input 7 - Assigned Event Name Pair Analog Input 8 - Assigned Event Name Pair Digital Input 1 - Detection Time Digital Input 2 - Detection Time Digital Input 3 - Detection Time Digital Input 4 - Detection Time (/) (/) (/) (/) (/) (/) (/) (/) (/) (/) 9 (TK UP / TK DWN) 9 (TK UP / TK DWN) 9 (TK UP / TK DWN) 10 (STIK UP /STIK DWN) 9 (TK UP / TK DWN) 10 (STIK UP /STIK DWN) 9 (TK UP / TK DWN) 9 (TK UP / TK DWN) 9 (TK UP / TK DWN) 9 (TK UP / TK DWN) 9 (TK UP / TK DWN) 9 (TK UP / TK DWN) 10 (STIK UP /STIK DWN) 9 (TK UP / TK DWN) 10 (STIK UP /STIK DWN) 9 (TK UP / TK DWN) 9 (TK UP / TK DWN) 9 (TK UP / TK DWN) 1 (WARN OFF / WARN ON) 2 (WARN ON / WARN OFF) 8 (LAMPFAIL / LAMPOFF) 3 (FLASHON / FLASHOFF) 8 (LAMPFAIL / LAMPOFF) 3 (FLASHON / FLASHOFF) 4 (GATES UP / NOT UP) 5 (GATE DWN / NOT DWN) 5 (GATE DWN / NOT DWN) 5 (GATE DWN / NOT DWN) 5 (GATE DWN / NOT DWN) 5 (GATE DWN / NOT DWN) 5 (GATE DWN / NOT DWN) 20 ( / ) 7 (BATT LOW / BATT OK) 7 (BATT LOW / BATT OK) 7 (BATT LOW / BATT OK) 7 (BATT LOW / BATT OK) 7 (BATT LOW / BATT OK) 7 (BATT LOW / BATT OK) 7 (BATT LOW / BATT OK) 6 (PWR OFF / PWR ON) .30 .30 .30 .30 Table 16 - BEV and MED Setup Databases (Continued) 108 (/) (/) (/) (/) (/) (/) (/) (/) (/) (/) 9 (TK UP / TK DWN) 9 (TK UP / TK DWN) 9 (TK UP / TK DWN) 10 (STIK UP /STIK DWN) 9 (TK UP / TK DWN) 10 (STIK UP /STIK DWN) 9 (TK UP / TK DWN) 9 (TK UP / TK DWN) 9 (TK UP / TK DWN) 9 (TK UP / TK DWN) 9 (TK UP / TK DWN) 9 (TK UP / TK DWN) 10 (STIK UP /STIK DWN) 9 (TK UP / TK DWN) 10 (STIK UP /STIK DWN) 9 (TK UP / TK DWN) 9 (TK UP / TK DWN) 9 (TK UP / TK DWN) 1 (WARN OFF / WARN ON) 2 (WARN ON / WARN OFF) 8 (LAMPFAIL / LAMPOFF) 3 (FLASHON / FLASHOFF) 8 (LAMPFAIL / LAMPOFF) 3 (FLASHON / FLASHOFF) 4 (GATES UP / NOT UP) 5 (GATE DWN / NOT DWN) 5 (GATE DWN / NOT DWN) 5 (GATE DWN / NOT DWN) 5 (GATE DWN / NOT DWN) 5 (GATE DWN / NOT DWN) 5 (GATE DWN / NOT DWN) 20 ( / ) 7 (BATT LOW / BATT OK) 7 (BATT LOW / BATT OK) 7 (BATT LOW / BATT OK) 7 (BATT LOW / BATT OK) 7 (BATT LOW / BATT OK) 7 (BATT LOW / BATT OK) 7 (BATT LOW / BATT OK) 6 (PWR OFF/ PWR ON) .30 .30 .30 .30 APPENDIX B SETUP DATABASES Digital Input 5 - Detection Time Digital Input 6 - Detection Time Digital Input 7 - Detection Time Digital Input 8 - Detection Time Digital Input 9 - Detection Time Digital Input 10 - Detection Time Digital Input 11 - Detection Time Digital Input 12 - Detection Time Digital Input 13 - Detection Time Digital Input 14 - Detection Time Digital Input 15 - Detection Time Digital Input 16 - Detection Time Digital Input 17 - Detection Time Digital Input 18 - Detection Time Digital Input 19 - Detection Time Digital Input 20 - Detection Time Digital Input 21 - Detection Time Digital Input 22 - Detection Time Digital Input 23 - Detection Time Digital Input 24 - Detection Time Digital Input 25 - Detection Time Digital Input 26 - Detection Time Digital Input 27 - Detection Time Digital Input 28 - Detection Time Digital Input 29 - Detection Time Digital Input 30 - Detection Time Digital Input 31 - Detection Time Digital Input 32 - Detection Time Digital Input 1 - Flash Status Digital Input 2 - Flash Status Digital Input 3 - Flash Status Digital Input 4 - Flash Status Digital Input 5 - Flash Status Digital Input 6 - Flash Status Digital Input 7 - Flash Status Digital Input 8 - Flash Status Digital Input 9 - Flash Status Digital Input 10 - Flash Status Digital Input 11 - Flash Status Digital Input 12 - Flash Status Digital Input 13 - Flash Status Digital Input 14 - Flash Status Digital Input 15 - Flash Status Digital Input 16 - Flash Status Digital Input 17 - Flash Status Digital Input 18 - Flash Status Digital Input 19 - Flash Status Digital Input 20 - Flash Status Digital Input 21 - Flash Status Digital Input 22 - Flash Status Digital Input 23 - Flash Status Digital Input 24 - Flash Status Digital Input 25 - Flash Status Digital Input 26 - Flash Status .30 .30 .30 .30 .30 .30 .30 .30 .30 .30 .30 .30 .30 .30 .30 .30 .30 .67 .30 .67 .30 .30 .30 .30 .30 .30 .30 .30 No (disabled) No (disabled) No (disabled) No (disabled) No (disabled) No (disabled) No (disabled) No (disabled) No (disabled) No (disabled) No (disabled) No (disabled) No (disabled) No (disabled) No (disabled) No (disabled) No (disabled) No (disabled) No (disabled) No (disabled) No (disabled) Yes (disabled) No (disabled) Yes (disabled) No (disabled) No (disabled) .30 .30 .30 .30 .30 .30 .30 .30 .30 .30 .30 .30 .30 .30 .30 .30 .30 .67 .30 .67 .30 .30 .30 .30 .30 .30 .30 .30 No (disabled) No (disabled) No (disabled) No (disabled) No (disabled) No (disabled) No (disabled) No (disabled) No (disabled) No (disabled) No (disabled) No (disabled) No (disabled) No (disabled) No (disabled) No (disabled) No (disabled) No (disabled) No (disabled) No (disabled) No (disabled) Yes (disabled) No (disabled) Yes (disabled) No (disabled) No (disabled) Table 16 - BEV and MED Setup Databases (Continued) 109 MICRO-AIDE CWR-40E / 72E USER MANUAL Digital Input 27 - Flash Status Digital Input 28 - Flash Status Digital Input 29 - Flash Status Digital Input 30 - Flash Status Digital Input 31 - Flash Status Digital Input 32 - Flash Status Analog Input 1 - Range Analog Input 2 - Range Analog Input 3 - Range Analog Input 4 - Range Analog Input 5 - Range Analog Input 6 - Range Analog Input 7 - Range Analog Input 8 - Range Analog Input 1 - Filter Analog Input 2 - Filter Analog Input 3 - Filter Analog Input 4 - Filter Analog Input 5 - Filter Analog Input 6 - Filter Analog Input 7 - Filter Analog Input 8 - Filter Analog Input 1 - Low Limit Analog Input 2 - Low Limit Analog Input 3 - Low Limit Analog Input 4 - Low Limit Analog Input 5 - Low Limit Analog Input 6 - Low Limit Analog Input 7 - Low Limit Analog Input 8 - Low Limit Analog Input 1 - High Limit Analog Input 2 - High Limit Analog Input 3 - High Limit Analog Input 4 - High Limit Analog Input 5 - High Limit Analog Input 6 - High Limit Analog Input 7 - High Limit Analog Input 8 - High Limit No (disabled) No (disabled) No (disabled) No (disabled) No (disabled) No (disabled) +51.1Vdc +51.1Vdc +51.1Vdc +51.1Vdc +51.1Vdc +51.1Vdc +51.1Vdc 255Vac Fast Fast Fast Fast Fast Fast Fast Slow 9.0 9.0 9.0 9.0 9.0 9.0 9.0 90 18.0 18.0 18.0 18.0 18.0 18.0 18.0 255 No (disabled) No (disabled) No (disabled) No (disabled) No (disabled) No (disabled) +51.1Vdc +51.1Vdc +51.1Vdc +51.1Vdc +51.1Vdc +51.1Vdc +51.1Vdc 255Vac Fast Fast Fast Fast Fast Fast Fast Slow 9.0 9.0 9.0 9.0 9.0 9.0 9.0 90 18.0 18.0 18.0 18.0 18.0 18.0 18.0 255 Table 16 - BEV and MED Setup Databases (Continued) Mainline Setup Database This database is only used by the CWR-72E Event Recorders. Parameters related to features not used by Metra (e.g., Virtual and Timer Inputs) are not defined within the Setup Database and are therefore not listed in the following table. Parameter Restricted Password Passcode Clock Sync Mode Clock Sync Input Table 17 - Mainline Database 110 Mainline SIGNAL 547 GPS --- (none assigned) APPENDIX B SETUP DATABASES Time Zone Daylight Saving Time High Temp Limit Low Temp Limit Record Flash Details Digital Input 1 - Name Digital Input 2 - Name Digital Input 3 - Name Digital Input 4 - Name Digital Input 5 - Name Digital Input 6 - Name Digital Input 7 - Name Digital Input 8 - Name Digital Input 9 - Name Digital Input 10 - Name Digital Input 11 - Name Digital Input 12 - Name Digital Input 13 - Name Digital Input 14 - Name Digital Input 15 - Name Digital Input 16 - Name Digital Input 17 - Name Digital Input 18 - Name Digital Input 19 - Name Digital Input 20 - Name Digital Input 21 - Name Digital Input 22 - Name Digital Input 23 - Name Digital Input 24 - Name Digital Input 25 - Name Digital Input 26 - Name Digital Input 27 - Name Digital Input 28 - Name Digital Input 29 - Name Digital Input 30 - Name Digital Input 31 - Name Digital Input 32 - Name Digital Input 33 - Name Digital Input 34 - Name Digital Input 35 - Name Digital Input 36 - Name Digital Input 37 - Name Digital Input 38 - Name Digital Input 39 - Name Digital Input 40 - Name Digital Input 41 - Name Digital Input 42 - Name Digital Input 43 - Name Digital Input 44 - Name Digital Input 45 - Name Digital Input 46 - Name Digital Input 47 - Name Digital Input 48 - Name Digital Input 49 - Name CST Enabled 257 -67 Disabled W ADJACENT XING-1T WEST WRAP-1T W CONST WARNING-1T ISLAND CIRCUIT-1T E CONST WARNING-1T EAST WRAP-1T E ADJACENT XING-1T DIRECTIONAL STICK-1T HOLDDOWN CIRCUIT-1T W ADJACENT XING-2T WEST WRAP-2T W CONST WARNING-2T ISLAND CIRCUIT-2T E CONST WARNING-2T EAST WRAP-2T E ADJACENT XING-2T DIRECTIONAL STICK-2T HOLDDOWN CIRCUIT-2T GC&XR-F GC&XR-B LIGHT OUT 1 FLASH RATE 1 LIGHT OUT 2 FLASH RATE 2 ALL GATES UP NORTH GATE SOUTH GATE NORTHWEST PED GATE SOUTHWEST PED GATE NORTHEAST PED GATE SOUTHEAST PED GATE W ADJACENT XING-3T WEST WRAP-3T W CONST WARNING-3T ISLAND CIRCUIT-3T E CONST WARNING-3T EAST WRAP-3T E ADJACENT XING-3T DIRECTIONAL STICK-3T HOLDDOWN CIRCUIT-3T W ADJACENT XING-4T WEST WRAP-4T W CONST WARNING-4T ISLAND CIRCUIT-4T E CONST WARNING-4T EAST WRAP-4T Table 17 - Mainline Database (Continued) 111 MICRO-AIDE CWR-40E / 72E USER MANUAL Digital Input 50 - Name Digital Input 51 - Name Digital Input 52 - Name Digital Input 53 - Name Digital Input 54 - Name Digital Input 55 - Name Digital Input 56 - Name Digital Input 57 - Name Digital Input 58 - Name Digital Input 59 - Name Digital Input 60 - Name Digital Input 61 - Name Digital Input 62 - Name Digital Input 63 - Name Digital Input 64 - Name Analog Input 1 - Name Analog Input 2 - Name Analog Input 3 - Name Analog Input 4 - Name Analog Input 5 - Name Analog Input 6 - Name Analog Input 7 - Name Analog Input 8 - Name Digital Input 1 - Identifier Digital Input 2 - Identifier Digital Input 3 - Identifier Digital Input 4 - Identifier Digital Input 5 - Identifier Digital Input 6 - Identifier Digital Input 7 - Identifier Digital Input 8 - Identifier Digital Input 9 - Identifier Digital Input 10 - Identifier Digital Input 11 - Identifier Digital Input 12 - Identifier Digital Input 13 - Identifier Digital Input 14 - Identifier Digital Input 15 - Identifier Digital Input 16 - Identifier Digital Input 17 - Identifier Digital Input 18 - Identifier Digital Input 19 - Identifier Digital Input 20 - Identifier Digital Input 21 - Identifier Digital Input 22 - Identifier Digital Input 23 - Identifier Digital Input 24 - Identifier Digital Input 25 - Identifier Digital Input 26 - Identifier Digital Input 27 - Identifier Digital Input 28 - Identifier Digital Input 29 - Identifier Digital Input 30 - Identifier Digital Input 31 - Identifier E ADJACENT XING-4T DIRECTIONAL STICK-4T HOLDDOWN CIRCUIT-4T LIGHT OUT 3 FLASH RATE 3 LIGHT OUT 4 FLASH RATE 4 NORTH MEDIAN GATE SOUTH MEDIAN GATE ELECTRONIC BATTERY CROSSING BATTERY LINE BATTERY BATTERY EAST BATTERY WEST 120/240 VAC POWER WAX-1T WWRAP-1T WCWTD-1T ISLD-1T ECWTD-1T EWRAP-1T EAX-1T DSR-1T HLDDN-1T WAX-2T WWRAP-2T WCWTD-2T ISLD-2T ECWTD-2T EWRAP-2T EAX-2T DSR-2T HLDDN-2T GC&XR-F GC&XR-B L OUT 1 FLASH 1 L OUT 2 FLASH 2 GATEUP NG DWN SG DWN NWPG DWN SWPG DWG NEPG DWN Table 17 - Mainline Database (Continued) 112 APPENDIX B SETUP DATABASES Digital Input 32- Identifier Digital Input 33 - Identifier Digital Input 34 - Identifier Digital Input 35 - Identifier Digital Input 36 - Identifier Digital Input 37 - Identifier Digital Input 38 - Identifier Digital Input 39 - Identifier Digital Input 40 - Identifier Digital Input 41 - Identifier Digital Input 42 - Identifier Digital Input 43 - Identifier Digital Input 44 - Identifier Digital Input 45 - Identifier Digital Input 46 - Identifier Digital Input 47 - Identifier Digital Input 48 - Identifier Digital Input 49 - Identifier Digital Input 50 - Identifier Digital Input 51 - Identifier Digital Input 52 - Identifier Digital Input 53 - Identifier Digital Input 54 - Identifier Digital Input 55 - Identifier Digital Input 56 - Identifier Digital Input 57 - Identifier Digital Input 58 - Identifier Digital Input 59 - Identifier Digital Input 60 - Identifier Digital Input 61 - Identifier Digital Input 62 - Identifier Digital Input 63 - Identifier Digital Input 64 - Identifier Analog Input 1 - Identifier Analog Input 2 - Identifier Analog Input 3 - Identifier Analog Input 4 - Identifier Analog Input 5 - Identifier Analog Input 6 - Identifier Analog Input 7 - Identifier Analog Input 8 - Identifier Event Name - Pair 1 (On / Off) Event Name - Pair 2 (On / Off) Event Name - Pair 3(On / Off) Event Name - Pair 4 (On / Off) Event Name - Pair 5 (On / Off) Event Name - Pair 6 (On / Off) Event Name - Pair 7 (On / Off) Event Name - Pair 8 (On / Off) Event Name - Pair 9 (On / Off) Event Name - Pair 10 (On / Off) Event Name - Pair 11 (On / Off) Event Name - Pair 12 (On / Off) Event Name - Pair 13(On / Off) SEPG DWN WAX-3T WWRAP-3T WCWTD-3T ISLD-3T ECWTD-3T EWRAP-3T EAX-3T DSR-3T HLDDN-3T WAX-4T WWRAP-4T WCWTD-4T ISLD-4T ECWTD-4T EWRAP-4T EAX-4T DSR-4T HLDDN-4T L OUT 3 FLASH 3 L OUT 4 FLASH 4 NMG DWN SMG DWN B12-N12 B14-N14 B-N BL-NL/E BL-NL/W AC PWR WARN OFF / WARN ON WARN ON / WARN OFF FLASHON / FLASHOFF GATES UP / NOT UP GATE DWN / NOT DWN PWR OFF / PWR ON BATT LOW / BATT OK LAMPFAIL / LAMPOFF TK UP / TK DWN STIK UP / STIK DWN (/) (/) (/) Table 17 - Mainline Database (Continued) 113 MICRO-AIDE CWR-40E / 72E USER MANUAL Event Name - Pair 14 (On / Off) Event Name - Pair 15 (On / Off) Event Name - Pair 16 (On / Off) Event Name - Pair 17 (On / Off) Event Name - Pair 18 (On / Off) Event Name - Pair 19 (On / Off) Event Name - Pair 20 (On / Off) Digital Input 1 - Assigned Event Name Pair Digital Input 2 - Assigned Event Name Pair Digital Input 3 - Assigned Event Name Pair Digital Input 4 - Assigned Event Name Pair Digital Input 5 - Assigned Event Name Pair Digital Input 6 - Assigned Event Name Pair Digital Input 7 - Assigned Event Name Pair Digital Input 8 - Assigned Event Name Pair Digital Input 9 - Assigned Event Name Pair Digital Input 10 - Assigned Event Name Pair Digital Input 11 - Assigned Event Name Pair Digital Input 12 - Assigned Event Name Pair Digital Input 13 - Assigned Event Name Pair Digital Input 14 - Assigned Event Name Pair Digital Input 15 - Assigned Event Name Pair Digital Input 16 - Assigned Event Name Pair Digital Input 17 - Assigned Event Name Pair Digital Input 18 - Assigned Event Name Pair Digital Input 19 - Assigned Event Name Pair Digital Input 20 - Assigned Event Name Pair Digital Input 21 - Assigned Event Name Pair Digital Input 22 - Assigned Event Name Pair Digital Input 23 - Assigned Event Name Pair Digital Input 24 - Assigned Event Name Pair Digital Input 25 - Assigned Event Name Pair Digital Input 26 - Assigned Event Name Pair Digital Input 27 - Assigned Event Name Pair Digital Input 28 - Assigned Event Name Pair Digital Input 29 - Assigned Event Name Pair Digital Input 30 - Assigned Event Name Pair Digital Input 31 - Assigned Event Name Pair Digital Input 32 - Assigned Event Name Pair Digital Input 33 - Assigned Event Name Pair Digital Input 34 - Assigned Event Name Pair Digital Input 35 - Assigned Event Name Pair Digital Input 36 - Assigned Event Name Pair Digital Input 37 - Assigned Event Name Pair Digital Input 38 - Assigned Event Name Pair Digital Input 39 - Assigned Event Name Pair Digital Input 40 - Assigned Event Name Pair Digital Input 41 - Assigned Event Name Pair Digital Input 42 - Assigned Event Name Pair Digital Input 43 - Assigned Event Name Pair Digital Input 44 - Assigned Event Name Pair Digital Input 45 - Assigned Event Name Pair Digital Input 46 - Assigned Event Name Pair Digital Input 47 - Assigned Event Name Pair (/) (/) (/) (/) (/) (/) (/) 9 (TK UP / TK DWN) 9 (TK UP / TK DWN) 9 (TK UP / TK DWN) 9 (TK UP / TK DWN) 9 (TK UP / TK DWN) 9 (TK UP / TK DWN) 9 (TK UP / TK DWN) 10 (STIK UP / STIK DWN) 9 (TK UP / TK DWN) 9 (TK UP / TK DWN) 9 (TK UP / TK DWN) 9 (TK UP / TK DWN) 9 (TK UP / TK DWN) 9 (TK UP / TK DWN) 9 (TK UP / TK DWN) 9 (TK UP / TK DWN) 10 (STIK UP / STIK DWN) 9 (TK UP / TK DWN) 1 (WARN OFF / WARN ON) 2 (WARN ON / WARN OFF) 8 (LAMPFAIL / LAMPOFF) 3 (FLASHON / FLASHOFF) 8 (LAMPFAIL / LAMPOFF) 3 (FLASHON / FLASHOFF) 20 ( / ) 4 (GATES UP / NOT UP) 5 (GATE DWN / NOT DWN) 5 (GATE DWN / NOT DWN) 5 (GATE DWN / NOT DWN) 5 (GATE DWN / NOT DWN) 5 (GATE DWN / NOT DWN) 5 (GATE DWN / NOT DWN) 20 ( / ) 20 ( / ) 9 (TK UP / TK DWN) 9 (TK UP / TK DWN) 9 (TK UP / TK DWN) 9 (TK UP / TK DWN) 9 (TK UP / TK DWN) 9 (TK UP / TK DWN) 9 (TK UP / TK DWN) 10 (STIK UP / STIK DWN) 9 (TK UP / TK DWN) 9 (TK UP / TK DWN) 9 (TK UP / TK DWN) 9 (TK UP / TK DWN) 9 (TK UP / TK DWN) Table 17 - Mainline Database (Continued) 114 APPENDIX B SETUP DATABASES Digital Input 48 - Assigned Event Name Pair Digital Input 49 - Assigned Event Name Pair Digital Input 50 - Assigned Event Name Pair Digital Input 51 - Assigned Event Name Pair Digital Input 52 - Assigned Event Name Pair Digital Input 53 - Assigned Event Name Pair Digital Input 54 - Assigned Event Name Pair Digital Input 55 - Assigned Event Name Pair Digital Input 56 - Assigned Event Name Pair Digital Input 57 - Assigned Event Name Pair Digital Input 58 - Assigned Event Name Pair Digital Input 59 - Assigned Event Name Pair Digital Input 60 - Assigned Event Name Pair Digital Input 61 - Assigned Event Name Pair Digital Input 62 - Assigned Event Name Pair Digital Input 63 - Assigned Event Name Pair Digital Input 64 - Assigned Event Name Pair Analog Input 1 - Assigned Event Name Pair Analog Input 2 - Assigned Event Name Pair Analog Input 3 - Assigned Event Name Pair Analog Input 4 - Assigned Event Name Pair Analog Input 5 - Assigned Event Name Pair Analog Input 6 - Assigned Event Name Pair Analog Input 7 - Assigned Event Name Pair Analog Input 8 - Assigned Event Name Pair Digital Input 1 - Detection Time Digital Input 2 - Detection Time Digital Input 3 - Detection Time Digital Input 4 - Detection Time Digital Input 5 - Detection Time Digital Input 6 - Detection Time Digital Input 7 - Detection Time Digital Input 8 - Detection Time Digital Input 9 - Detection Time Digital Input 10 - Detection Time Digital Input 11 - Detection Time Digital Input 12 - Detection Time Digital Input 13 - Detection Time Digital Input 14 - Detection Time Digital Input 15 - Detection Time Digital Input 16 - Detection Time Digital Input 17 - Detection Time Digital Input 18 - Detection Time Digital Input 19 - Detection Time Digital Input 20 - Detection Time Digital Input 21 - Detection Time Digital Input 22 - Detection Time Digital Input 23 - Detection Time Digital Input 24 - Detection Time Digital Input 25 - Detection Time Digital Input 26 - Detection Time Digital Input 27 - Detection Time Digital Input 28 - Detection Time Digital Input 29 - Detection Time 9 (TK UP / TK DWN) 9 (TK UP / TK DWN) 9 (TK UP / TK DWN) 10 (STIK UP / STIK DWN) 9 (TK UP / TK DWN) 8 (LAMPFAIL / LAMPOFF) 3 (FLASHON / FLASHOFF) 8 (LAMPFAIL / LAMPOFF) 3 (FLASHON / FLASHOFF) 20 ( / ) 20 ( / ) 5 (GATE DWN / NOT DWN) 5 (GATE DWN / NOT DWN) 20 ( / ) 20 ( / ) 20 ( / ) 20 ( / ) 7 (BATT LOW / BATT OK) 7 (BATT LOW / BATT OK) 7 (BATT LOW / BATT OK) 7 (BATT LOW / BATT OK) 7 (BATT LOW / BATT OK) 20 ( / ) 20 ( / ) 6 (PWR OFF / PWR ON) .30 .30 .30 .30 .30 .30 .30 .30 .30 .30 .30 .30 .30 .30 .30 .30 .30 .30 .30 .30 .30 .55 .30 .55 .30 .30 .30 .30 .30 Table 17 - Mainline Database (Continued) 115 MICRO-AIDE CWR-40E / 72E USER MANUAL Digital Input 30 - Detection Time Digital Input 31 - Detection Time Digital Input 32 - Detection Time Digital Input 33 - Detection Time Digital Input 34 - Detection Time Digital Input 35 - Detection Time Digital Input 36 - Detection Time Digital Input 37 - Detection Time Digital Input 38 - Detection Time Digital Input 39 - Detection Time Digital Input 40 - Detection Time Digital Input 41 - Detection Time Digital Input 42 - Detection Time Digital Input 43 - Detection Time Digital Input 44 - Detection Time Digital Input 45 - Detection Time Digital Input 46 - Detection Time Digital Input 47 - Detection Time Digital Input 48 - Detection Time Digital Input 49 - Detection Time Digital Input 50 - Detection Time Digital Input 51 - Detection Time Digital Input 52 - Detection Time Digital Input 53 - Detection Time Digital Input 54 - Detection Time Digital Input 55 - Detection Time Digital Input 56 - Detection Time Digital Input 57 - Detection Time Digital Input 58 - Detection Time Digital Input 59 - Detection Time Digital Input 60 - Detection Time Digital Input 61 - Detection Time Digital Input 62 - Detection Time Digital Input 63 - Detection Time Digital Input 64 - Detection Time Digital Input 1 - Flash Status Digital Input 2 - Flash Status Digital Input 3 - Flash Status Digital Input 4 - Flash Status Digital Input 5 - Flash Status Digital Input 6 - Flash Status Digital Input 7 - Flash Status Digital Input 8 - Flash Status Digital Input 9 - Flash Status Digital Input 10 - Flash Status Digital Input 11 - Flash Status Digital Input 12 - Flash Status Digital Input 13 - Flash Status Digital Input 14 - Flash Status Digital Input 15 - Flash Status Digital Input 16 - Flash Status Digital Input 17 - Flash Status Digital Input 18 - Flash Status Digital Input 19 - Flash Status .30 .30 .30 .30 .30 .30 .30 .30 .30 .30 .30 .30 .30 .30 .30 .30 .30 .30 .30 .30 .30 .30 .30 .30 .55 .30 .55 .30 .30 .30 .30 .30 .30 .30 .30 No (disabled) No (disabled) No (disabled) No (disabled) No (disabled) No (disabled) No (disabled) No (disabled) No (disabled) No (disabled) No (disabled) No (disabled) No (disabled) No (disabled) No (disabled) No (disabled) No (disabled) No (disabled) No (disabled) Table 17 - Mainline Database (Continued) 116 APPENDIX B SETUP DATABASES Digital Input 20 - Flash Status Digital Input 21 - Flash Status Digital Input 22 - Flash Status Digital Input 23 - Flash Status Digital Input 24 - Flash Status Digital Input 25 - Flash Status Digital Input 26 - Flash Status Digital Input 27 - Flash Status Digital Input 28 - Flash Status Digital Input 29 - Flash Status Digital Input 30 - Flash Status Digital Input 31 - Flash Status Digital Input 32 - Flash Status Digital Input 33 - Flash Status Digital Input 34 - Flash Status Digital Input 35 - Flash Status Digital Input 36 - Flash Status Digital Input 37 - Flash Status Digital Input 38 - Flash Status Digital Input 39 - Flash Status Digital Input 40 - Flash Status Digital Input 41 - Flash Status Digital Input 42 - Flash Status Digital Input 43 - Flash Status Digital Input 44 - Flash Status Digital Input 45 - Flash Status Digital Input 46 - Flash Status Digital Input 47 - Flash Status Digital Input 48 - Flash Status Digital Input 49 - Flash Status Digital Input 50 - Flash Status Digital Input 51 - Flash Status Digital Input 52 - Flash Status Digital Input 53 - Flash Status Digital Input 54 - Flash Status Digital Input 55 - Flash Status Digital Input 56 - Flash Status Digital Input 57 - Flash Status Digital Input 58 - Flash Status Digital Input 59 - Flash Status Digital Input 60 - Flash Status Digital Input 61 - Flash Status Digital Input 62 - Flash Status Digital Input 63 - Flash Status Digital Input 64 - Flash Status Analog Input 1 - Range Analog Input 2 - Range Analog Input 3 - Range Analog Input 4 - Range Analog Input 5 - Range Analog Input 6 - Range Analog Input 7 - Range Analog Input 8 - Range Analog Input 1 - Filter No (disabled) No (disabled) Yes (disabled) No (disabled) Yes (disabled) No (disabled) No (disabled) No (disabled) No (disabled) No (disabled) No (disabled) No (disabled) No (disabled) No (disabled) No (disabled) No (disabled) No (disabled) No (disabled) No (disabled) No (disabled) No (disabled) No (disabled) No (disabled) No (disabled) No (disabled) No (disabled) No (disabled) No (disabled) No (disabled) No (disabled) No (disabled) No (disabled) No (disabled) No (disabled) Yes (disabled) No (disabled) Yes (disabled) No (disabled) No (disabled) No (disabled) No (disabled) No (disabled) No (disabled) No (disabled) No (disabled) +51.1Vdc +51.1Vdc +51.1Vdc +51.1Vdc +51.1Vdc +51.1Vdc +51.1Vdc 255Vac Fast Table 17 - Mainline Database (Continued) 117 MICRO-AIDE CWR-40E / 72E USER MANUAL Analog Input 2 - Filter Analog Input 3 - Filter Analog Input 4 - Filter Analog Input 5 - Filter Analog Input 6 - Filter Analog Input 7 - Filter Analog Input 8 - Filter Analog Input 1 - Low Limit Analog Input 2 - Low Limit Analog Input 3 - Low Limit Analog Input 4 - Low Limit Analog Input 5 - Low Limit Analog Input 6 - Low Limit Analog Input 7 - Low Limit Analog Input 8 - Low Limit Analog Input 1 - High Limit Analog Input 2 - High Limit Analog Input 3 - High Limit Analog Input 4 - High Limit Analog Input 5 - High Limit Analog Input 6 - High Limit Analog Input 7 - High Limit Analog Input 8 - High Limit Fast Fast Fast Fast Fast Fast Slow 9.0 9.0 9.0 9.0 9.0 9.0 9.0 90 18.0 18.0 18.0 18.0 18.0 18.0 18.0 255 Table 17 - Mainline Database (Continued) 118 APPENDIX C OPTIONS AND ACCESSORIES Options GPS Receiver 85-0135: Provides precise, non-drift control of recorder’s real-time clock, includes bulkhead-mount antenna with 16ft. of cable L 56237-5/00: Replaces bulkhead-mount antenna with magnetic-mount antenna Ethernet Port 85-0136: 10/100 Base-T, 100Mbps; TCP/IP, Telnet and SNTP compatible Memory Expansion 40-0216: 234,777 Event Records 40-0416: 481,369 Event Records 40-0616: 727,961 Event Records 40-0816: 974,553 Event Records Accessories Current Sensors HCS-4: High Current Sensor, 4 inputs, 1 to 20Adc or Aac Battery Charger Monitors CSI-1: Charge Status Indicator, single input, monitors voltage and current Voltage Detectors FVD-2: Failed Voltage Detector, 2 inputs, .5 to 48Vdc, .5 to 36Vac, high and low limit values Light Out Detectors FLD-2: Failed Lamp Detector, 2 inputs, 3 to 11 lamps each input, DC or AC lamp current, compatible with all recorders Mounting 40-1016: 1,221,145 Event Records 31-0001: 19" rack mounting brackets 40-1216: 1,467,737 Event Records 31-0002: 23" rack mounting brackets 40-1416: 1,714,329 Event Records 31-0003: Wall mounting brackets (included) 40-1616: 1,960,921 Event Records Cables 40-1816: 2,207,513 Event Records DE-9 to DE-9 (included) 40-2016: 2,454,105 Event Records USB A-B cable (for use with USB Device Port) 40-2416: 2,947,289 Event Records Internal Modem 85-0145: 33,600 Baud, V.34, V.32bis, V.32, V.22bis, V.22 and V.21, V.42bis and MNP 5 data compression, MNP 2-4 and LAP-M error correction Contact MICRO-AIDE when ordering any options or accessories. Purchase Order may list requested items as described in the above. 119 MICRO-AIDE CWR-40E / 72E USER MANUAL User Notes 120 APPENDIX D USB DEVICE PORT Introduction Every CWR-72E is equipped with a USB Device Port. The device port can be used to directly connect the recorder to a PC that does not include a serial comm port. The port also provides a substantially higher speed connection. Bit transfer rates of 960Kbps can be achieved. Table 14 on page 104 lists the bit transfer rates of each user-accessible port. This appendix provides a detailed description of how to select and install the proper drivers for the USB Device Port. Windows XP was used in the procedure that follows. Note The following procedure requires access to several files. The correct files are included in the CD that accompanies this User Manual. The CD can be found inside the back cover. The files are also available for downloading from the MICRO-AIDE website. They can be found on the support/downloads page at micro-aide.com. Caution Do not attempt to install driver files from any source other than the enclosed CD or MICRO-AIDE website. Preparation The following pre-installation steps must be completed before the driver installation procedure can be started. • Locate the CD that is inserted inside the back cover of this User Manual. • A USB Type A-B cable is required. • Apply power to the recorder and insure that it has completed its initialization cycle. Installing the Drivers To install the proper USB Device Port drivers, complete the following steps in the order listed. 1. Connect the USB Type A-B cable to the recorder’s USB Device Port and an available USB port at the PC. 2. After a brief delay the Found New Hardware Wizard screen shown below will be displayed. 121 MICRO-AIDE CWR-40E / 72E USER MANUAL 3. Enable the radio Button labeled “No, not this time”. This will prevent Windows from attempting to access the appropriate drivers via the Internet. The correct setting is shown above. Click the button labeled “Next>”. 4. The second screen of the Found New Hardware Wizard shown below will be displayed. 5. Enable the radio button labeled “Install from a list or specific location (Advanced)”. The correct setting is shown above. Click the button labeled “Next>”. 6. Insert the CD that is included with this User Manual into an available CD drive. 7. The third screen of the Found New Hardware Wizard shown below will be displayed. 122 APPENDIX D USB DEVICE PORT 8. Enable the radio button labeled “Search for the best driver in these locations”. Clear the check box labeled “Search removable media (floppy, CD-ROM...)”. Check the check box labeled “Include this location in the search:”. 9. Click the button labeled “Browse” to open the dialog box named “Browse For Folder”. Navigate to the folder named “Software and Firmware\USB Device Drivers”. Click the button labeled “OK” to accept the specified folder location and close the dialog box. Verify the settings as shown above. Click the button labeled “Next>”. 10.After a brief delay while the driver is being copied and installed, the fourth screen of the Found New Hardware Wizard shown below will be displayed. 11.Click the button labeled “Finish” to complete the installation of the first of two drivers. 123 MICRO-AIDE CWR-40E / 72E USER MANUAL 12.After a brief delay the first Found New Hardware Wizard screen will reappear. The second driver can now be installed. It is installed by repeating steps 2 through 11 as listed above. The screens and required settings will be identical. 13.Disconnect the USB cable immediately after the button labeled “Finish” is clicked. Restart the PC as instructed. Restarting Windows is a common practice after new software is installed. Making a USB Device Port Connection After the PC has restarted per the preceding instructions, the user should test the USB device connection by performing the following steps. 1. Connect the USB Type A-B cable to the recorder’s USB Device Port and an available USB port at the PC. 2. Launch HyperTerminal. A dialog box named “Connection Description” will be displayed. Assign the new connection a descriptive name like “USB Device Port” as shown below. Click the button labeled “OK”. 3. A dialog box named “Connect To” will be displayed. Click the down arrow to the right of the drop down list box named “Connect using:”. Select the virtual comm port that was recently created (e.g., Com 10). Click the button labeled “OK”. 124 APPENDIX D USB DEVICE PORT 4. A dialog box named “Com x” will be displayed, where the letter x is replaced by the number of the virtual comm port selected in step 3. Close the dialog box by clicking the button labeled “Cancel”. 5. A blank HyperTerminal Window will be displayed. In the lower left-hand corner of the screen, “Connected” should appear. 6. Finally, verify that the connection is active by pressing the Enter key. The password challenge will be displayed. The user is now able to access the recorder in accordance with the password that is entered. Refer to the section entitled “Administrative and Restricted Passwords” on page 24 for details regarding the use of passwords. 125 MICRO-AIDE CWR-40E / 72E USER MANUAL User Notes 126 APPENDIX E BILLS OF MATERIAL CWR-40E / 72E Bill of Material M-A Part No. Description / MFG Part No. . . . . . . . . . . Qty. PA85-0138/00 PCB ASSEMBLY, PROCESSOR . . . . . . . . . . 1 PA85-0139/00 PCB ASSEMBLY, KEYPAD / INPUT, CWR-72E . . . . . . . . 1 PA85-0139/02 PCB ASSEMBLY, KEYPAD / INPUT, CWR-40E . . . . . . . . 1 PA85-0134/00 PCB ASSEMBLY, USB HOST PORT . . . . . . . . . . 1 PA85-0106/01 PCB ASSEMBLY, MODEM . . . . . . . . . (OPT.) 1 PA85-0135/00 PCB ASSEMBLY, GPS RECEIVER . . . . . . . . . (OPT.) 1 PA85-0136/00 PCB ASSEMBLY, ETHERNET PORT . . . . . . . . . (OPT.) 1 HB2136/00 BUMPER HH SMITH: 2136 . . . . . . . . . . 4 HC2402T6/01 CABLE, DE9 TO DE9, FEMALE TO FEMALE CABLE DEPOT: 2402-T-6 FF (MODIFIED) . . . . . . . . 1 HRLMSP-4/00 MOUNTING STANDOFF, NYLON, 1/4” RICHCO: LMSP-4-01 . . . . . . . . . . . . . 2 HRPGM-8/00 PLUG, NYLON, BLACK, 5/16” DIA. RICHCO: PGM-8 . . . . . . . . . . . . . . 1 I ACM2004/00 LCD, YELLOW-GREEN, 20 X 4, BACKLIT AMERICAN ZETTLER: ACM2004D-FL-GBS . . . . . . . . 1 J IDS-16T/00 CONNECTOR, 16-PIN, FEMALE, STRAIGHT SAMTEC: IDS-16-T . . . . . . . . . . . . . 2 JH231-131/00 LEVER, CONNECTOR, TENSION CLAMP WAGO: 231-131 . . . . . . . . . . . . . . 4 JPTSW-116/00 WIREWRAP PINS, 16 BY 1, RIGHT ANGLE SAMTEC: TSW11608GSRA . . . . . . . . . . . . 1 JRIDS-C14/00 CONNECTOR, 14-PIN, FEMALE F/W AMP: 746285-2 . . . . . . . . . . . . . . 2 JRSR-14K/00 STRAIN RELIEF, RIBBON, 14-CONDUCTOR AMP: 499252-9 . . . . . . . . . . . . . . 2 JW170747/00 CONNECTOR, TENSION CLAMP, FEMALE, 3-POSITION WEIDMULLER: 1707470000 . . . . . . . . . . . 2 JW170748/00 CONNECTOR, TENSION CLAMP, FEMALE, 4-POSITION WEIDMULLER: 1707480000 . . . . . . . . . . . 1 JW170752/00 CONNECTOR, TENSION CLAMP, FEMALE, 8-POSITION WEIDMULLER: 1707520000 . . . . . . . . . . 10 / 18 M 220283/00 SHEETMETAL, MOUNTING BRACKET . . . . . . . . . . 2 M 220436/00 SHEETMETAL, COVER, CWR-72E . . . . . . . . . . 1 M 220436/01 SHEETMETAL, COVER, CWR-40E . . . . . . . . . . 1 M 220437/00 SHEETMETAL, BASE . . . . . . . . . . . . . 1 ZMCWR-72E USER MANUAL . . . . . . . . . . . . . 1 . . . . . . . 127 MICRO-AIDE CWR-40E / 72E USER MANUAL CWR-40E / 72E Subassemblies PA85-0138/00 Processor PCB 128 M-A Part No. Description / MFG Part No. P 85-0138/00 PCB, PROCESSOR, CWR-40E, CWR-72E . . . . . . . . . Qty. . . . . . . . . . 1 C 18PF/00 CAPACITOR, 18PF, 5%, 50V, CERAMIC BC COMPONENTS: K180J15C0GF5TL2 . . . . . . . . . 2 C 33PF/00 CAPACITOR, 33PF, 5%, 100V, CERAMIC EPCOS: B37979N1330J000 . . . . . . . . . . . 2 C 39PF/00 CAPACITOR, 39PF, 5%, 50V, CERAMIC BC COMPONENTS: K390J15C0GF5TL2 . . . . . . . . . 2 C 470PF/00 CAPACITOR, 470PF, 10%, 6KV XICON: CDR602P9-471K . . . . . . . . . . . . 1 C .1MF/00 CAPACITOR, .1MF, 50V, CERAMIC . . . . . . . . . . 50 C .47F/00 CAPACITOR, .47F, 5.5V, SUPER CAP ELNA: DH-5R5D474 . . . . . . . . . . . . . 1 CE220MF/00 CAPACITOR, 220MF, 50V, AXIAL, ELECTROLYTIC NICHICON: TVX1H221MCA . . . . . . . . . . . . 1 CE220MF/01 CAPACITOR, 220MF, 16V, RADIAL, ELECTROLYTIC ELNA: RJ3-16V221MBX . . . . . . . . . . . . 2 CE2200MF/00 CAPACITOR, 2200MF, 6.3V, RADIAL, ELECTROLYTIC ELNA: RJ3-6V222MBX . . . . . . . . . . . . 1 CT4.7MF/00 CAPACITOR, 4.7MF, 25V, RADIAL, TANTALUM . . . . . . . 9 CT10MF/00 CAPACITOR, 10MF, 16V, RADIAL, TANTALUM . . . . . . . 1 CT33MF/00 CAPACITOR, 33MF, 16V, RADIAL, TANTALUM . . . . . . . 4 D 1N4004/00 DIODE, 400V 1N4004 . . . . . . . . . . . . . . . 1 D 1N5822/00 DIODE 1N5822 . . . . . . . . . . . . . . . 1 D 1N914/00 DIODE 1N914 . . . . . . . . . . . . . . . . 7 D MBR160/00 DIODE, SCHOTTKY, 60V MOTOROLA: MBR160 . . . . . . . . . . . . . 1 DZ1N5359B/00 ZENER DIODE, 24V, 5W 1N5359B . . . . . . . . . . . . . . . 1 F 225001/00 FUSE, 1 AMP LITTELFUSE: 225001 . . . . . . . . . . . . 3 FH111501/00 FUSE CLIP LITTELFUSE: 111501 . . . . . . . . . . . . 6 H TP-101/00 TEST POINT COMPONENTS CORP.: TP-101-10 . . . . . . . . . . 5 J 833-93/00 CONNECTOR, SOCKET STRIP, 2 BY 50 MILMAX: 833-93-100-10-001000 . . . . . . . . . . 28 J PPPN032/00 CONNECTOR, SOCKET STRIP, 2 BY 3 SULLINS: PPPN032AFCN-RC . . . . . . . . . . . 1 J USB-B/00 CONNECTOR, USB TYPE B FCI: 61729-0010BLF . . . . . . . . . . . 1 JA555165/00 JACK, PHONE, RJ-11, RIGHT ANGLE AMP: 555165-1 . . . . . . . . . . . . . . 1 . . APPENDIX E BILLS OF MATERIAL M-A Part No. Description / MFG Part No. . . . . . . . . . Qty. JMDE09PL/00 CONNECTOR, MALE, DB9, RIGHT ANGLE ADAM TECH: DE09PL23 . . . . . . . . . . . . 1 JPWW18-2R/00 WIREWRAP PINS, 18 BY 2 SAMTEC: TSW11807LD . . . . . . . . . 1 JRIDH14LP/00 CONNECTOR, HEADER, 14-PIN, RIGHT ANGLE OUPIIN: 3012-14GRB . . . . . . . . . . . . 1 JRIDH16LP/01 CONNECTOR, HEADER, 16-PIN, STRAIGHT ANGLE OUPIIN: 3012-16GSB . . . . . . . . . . . . 1 JW151326/00 CONNECTOR, MALE, 8-POSITION, RIGHT ANGLE WEIDMULLER: 1513260000 . . . . . . . . . . . 2 JW151346/00 CONNECTOR, MALE, 10-POSITION, RIGHT ANGLE WEIDMULLER: 1513460000 . . . . . . . . . . . 1 K G5V-2/01 RELAY, 12V, DIP OMRON: G5V-2-H1-DC12 . . . . . . . . . . . 2 L WFB-3.0/00 CHOKE, WOUND FERRITE BEAD FAIR-RITE: 2943666631 . . . . . . . . . . . . 2 LXFB470/00 CHOKE, 470 OHM, FERRITE BEAD, SMT MURATA: BLM21AG471SN1D . . . . . . . . . . . 2 Q PN2222A/00 TRANSISTOR, TO-92 PN2222 . . . . . . . . . . . . . 2 QRX76318DB/00 VOLTAGE REGULATOR, 1.8V, SMT TI: TPS76318DBVT . . . . . . . . . . . . . 1 QRX76325DB/00 VOLTAGE REGULATOR, 2.5V, SMT TI: TPS76325DBVT . . . . . . . . . . . . . 1 QR79L05/00 VOLTAGE REGULATOR, -5V, TO-92 NATIONAL: 79L05 . . . . . . . . . . . . . 1 QRLT1171/00 VOLTAGE REGULATOR, SWITCHING, TO-220 LINEAR TECHNOLOGIES: LT1171CT . . . . . . . . . . 1 R 18 OHM/00 RESISTOR, 18 OHM, 5%, .25W . . . . . . . . 2 . . . . . . . . . R 33 OHM/01 RESISTOR, 33 OHM, 5%, .25W . . . . . . . . . . 2 R 100 OHM/00 RESISTOR, 100 OHM, 5%, .25W . . . . . . . . . . 1 R 470 OHM/00 RESISTOR, 470 OHM, 5%, .25W . . . . . . . . . . 2 R 1K/00 RESISTOR, 1K, 5%, .25W . . . . . . . . . . . 5 R 4.7K/01 RESISTOR, 4.7K, 5%, .25W . . . . . . . . . . . 2 R 10K/00 RESISTOR, 10K, 5%, .25W . . . . . . . . . . . 5 R 10K/02 RESISTOR, 10.0K, 1%, .25W . . . . . . . . . . . 2 R 36.5K/00 RESISTOR, 36.5K, 1%, .25W . . . . . . . . . . . 1 R 47.5K/00 RESISTOR, 47.5K, 1%, .25W . . . . . . . . . . . 1 R 100K/01 RESISTOR, 100K, 1%, .25W . . . . . . . . . . . 1 R 221K/00 RESISTOR, 221K, 1%, .25W . . . . . . . . . . . 16 R 332K/01 RESISTOR, 332K, 1%, .25W . . . . . . . . . . . 1 R 1.0M/00 RESISTOR, 1.0M, 5%, .25W . . . . . . . . . . . 1 R 10M/01 RESISTOR, 10M, 1%, .25W . . . . . . . . . . . 16 RA25010/00 ARRESTOR, GAS, 3-TERMINAL CP CLARE: PMT 3(310)25010 . . . . . . . . . . . 1 RN6S10K/00 RESISTOR NETWORK, 6-PIN, SIP, 10K, 2% BI TECHNOLOGIES: L061C103 . . . . . . . . . . . 1 RN8S10K/01 RESISTOR NETWORK, 8-PIN, SIP, 10K, 2% BI TECHNOLOGIES: L081C103 . . . . . . . . . . . 1 129 MICRO-AIDE CWR-40E / 72E USER MANUAL M-A Part No. Description / MFG Part No. . . . . . . . . Qty. RP5K/00 POTENTIOMETER, 5K, 1-TURN, TOP ADJUST BI TECHNOLOGIES: 72PR5K . . . . . . . . . . . 2 TFBRM-8/01 TRANSFORMER BOBBIN, 12-PIN, RM8 SCHWARTZPUNKT: BRM-8-9112AS-5.5PS . . . . . . . . . 1 TFCLIP-8/00 TRANSFORMER CLIP, RM8 TDK: FRM-8-A . . . . . . . . . . . . . 2 TFPC40RM8/00 TRANSFORMER CORE, FLYBACK, RM8 TDK: PC40RM8A250-22 . . . . . . . . . . . . 1 U 67Q5002/00 IC, ARM PROCESSOR, SMT OKI: ML67Q5002TC . . . . . . . . . . . . 1 U ADG408/00 IC, MULTIPLEXER, 8 TO 1, DIP SILICONIX: DG408DJ . . . . . . . . . . . . 2 U ADG409/00 IC, MULTIPLEXER, QUAD 2 TO 1, DIP SILICONIX: DG409DJ . . . . . . . . . . . . 1 U ALFAT/00 IC, USB HOST CONTROLLER, SMT GHI ELECTRONICS: UALFAT . . . . . . . . . . 1 U DS3234S/00 IC, CLOCK, 3PPM, INDUSTRIAL, SMT DALLAS SEMICONDUCTOR: DS3234SN . . . . . . . . . 1 U FT245RL/00 IC, USB SERIAL CONVERTER FTDI: FT245RL . . . . . . . . . . . . . . 1 U MAX3243/00 IC, RS-232 TRANSCEIVER, SMT MAXIM: MAX3243IDWR . . . . . . . . . . . . 1 U MAX3421/00 IC, USB HOST INTERFACE, SMT MAXIM: MAX3421EEHJ+ . . . . . . . . . . . . 1 U REF3025/00 IC, VOLTAGE REFERENCE, SMT TI: REF3025AIDBZT . . . . . . . . . . . . . 1 UA16IS752/00 IC, DUAL UART, SPI, SMT NXP: SC16IS752IPW . . . . . . . . . . . . 1 UF25P16/00 IC, FLASH MEMORY, 16MBIT, SPI ST MICRO: M25P16-VMF6P . . . . . . . . . . . 1 ULLMV710/00 IC, OP AMP, SMT TI: LMV710IDBVR ULOP27GP/00 . . . . . . . . . . . . . . . . 1 IC, OP-AMP, DIP ANALOG DEVICES: OP27GP . . . . . . . . . . . 1 ULOP490GP/00 IC, OP-AMP, QUAD, DIP ANALOG DEVICES: OP490GP . . . . . . . . . . . 2 UR25616AL/00 IC, SRAM, 256K X 16, 10NS, SMT ISSI: IS61LV25616AL-10TLI . . . . . . . . . . . 1 USLVC02S/00 IC, QUAD NOR GATE, SMT TI: SN74LVC02AD . . . . . . . . . . . . . 1 X 7.3728/00 CRYSTAL, 7.3728MHZ ECS: ECS-73-20-1X . . . . . . . . . . . . . 1 X 10.0/00 CRYSTAL, 10.0MHZ ECS: ECS-100-S-1X . . . . . . . . . . . . . 1 X 12.0/00 CRYSTAL, 12.0MHZ ECS: ECS-120-1X . . . . . . . . . . . . 1 . . . . PA85-0139/00 Keypad / Input PCB (CWR-72E) 130 M-A Part No. Description / MFG Part No. . . . . . . . . Qty. P 85-0139/00 PCB, KEYPAD / INPUT, CWR-40E, CWR-72E . . . . . . . . . . 1 C .1MF/00 CAPACITOR, .1MF, 50V, CERAMIC . . . . . . . . 7 . . APPENDIX E BILLS OF MATERIAL M-A Part No. Description / MFG Part No. . . . . . . . . Qty. CT4.7MF/00 CAPACITOR, 4.7MF, 25V, RADIAL, TANTALUM . . . . . . . 2 D 1N4004/00 DIODE, 400V 1N4004 . . . . . . . . . . . . . . . 64 D 1N914/00 DIODE 1N914 . . . . . . . . . . . . . . . 5 DL3962/00 LED, GREEN, SINGLE HP: HLMP-3962 . . . . . . . . . . . . . . 3 JPWW36-1R/00 WIREWRAP PINS, 36 BY 1, STRAIGHT SAMTEC: TSW13607LS . . . . . . . . . . . . 16 JRICO-143/00 SOCKET, IC, 14-PIN OUPIIN: 8003-14T3U-SN . . . . . . . . . . 2 JRIDH14LP/00 CONNECTOR, HEADER, 14-PIN, RIGHT ANGLE OUPIIN: 3012-14GRB . . . . . . . . . . . . 1 JW152246/00 CONNECTOR, 8-POSITION, STRAIGHT, OPEN WEIDMULLER: 1522460000 . . . . . . . . . . . 16 R 4.7 OHM/00 RESISTOR, 4.7 OHM, 5%, .25W . . . . . . . . . . 1 R 220 OHM/00 RESISTOR, 220 OHM, 5%, .25W . . . . . . . . . . 3 R 4.7K/01 RESISTOR, 4.7K, 5%, .25W . . . . . . . . . . . 1 R 10K/01 RESISTOR, 10K, 5%, .125W . . . . . . . . . . . 64 RP10K/00 POTENTIOMETER, 10K, 1-TURN, TOP ADJUST BI TECHNOLOGIES: 72PR10K . . . . . . . . . . . 1 RN5S4.7K/00 RESISTOR NETWORK, 5-PIN, SIP, 4.7K, 2% BI TECHNOLOGIES: L051C472 . . . . . . . . . . . 4 RN9S4.7K/00 RESISTOR NETWORK, 9-PIN, SIP, 4.7K, 2% BI TECHNOLOGIES: L091C472 . . . . . . . . . . . 6 SHB32-121/00 SWITCH, CAP, BLACK OMRON: B32-1210 . . . . . . . . . . . 20 SPB3F4050/00 SWITCH, PUSHBUTTON,.LOW FORCE OMRON: B3F-4050 . . . . . . . . . . . . . 20 U 16F737/00 IC, PIC PROCESSOR, DIP MICROCHIP: PIC16F737-I/SP . . . . . . . . . . . 1 UOPC845/00 IC, OPTO-COUPLER, QUAD, DIP ISOCOM: PS2502-4 . . . . . . . . . . . . . 16 USHC165S/00 IC, 8-BIT P-S CONVERTER, SMT FAIRCHILD: MM74HC165M . . . . . . . . . . . . 8 . . . . . . . PA85-0139/02 Keypad / Input PCB (CWR-40E) M-A Part No. Description / MFG Part No. . . . . . . . . Qty. P 85-0139/00 PCB, KEYPAD / INPUT, CWR-40E, CWR-72E . . . . . . . . 1 C .1MF/00 CAPACITOR, .1MF, 50V, CERAMIC . . . . . . . . . 7 CT4.7MF/00 CAPACITOR, 4.7MF, 25V, RADIAL, TANTALUM . . . . . . . 2 D 1N4004/00 DIODE, 400V 1N4004 . . . . . . . . . . . . . . . 32 D 1N914/00 DIODE 1N914 . . . . . . . . . . . . . . . 5 DL3962/00 LED, GREEN, SINGLE HP: HLMP-3962 . . . . . . . . . . . . . . 3 JPWW36-1R/00 WIREWRAP PINS, 36 BY 1, STRAIGHT SAMTEC: TSW13607LS . . . . . . . . . . . . 16 . . . . 131 MICRO-AIDE CWR-40E / 72E USER MANUAL M-A Part No. Description / MFG Part No. . . . . . . . . . . Qty. JRICO-143/00 SOCKET, IC, 14-PIN OUPIIN: 8003-14T3U-SN . . . . . . . . . . . 2 JRIDH14LP/00 CONNECTOR, HEADER, 14-PIN, RIGHT ANGLE OUPIIN: 3012-14GRB . . . . . . . . . . . . 1 JW152246/00 CONNECTOR, 8-POSITION, STRAIGHT, OPEN WEIDMULLER: 1522460000 . . . . . . . . . . . 8 R 4.7 OHM/00 RESISTOR, 4.7 OHM, 5%, .25W . . . . . . . . . . 1 R 220 OHM/00 RESISTOR, 220 OHM, 5%, .25W . . . . . . . . . . 3 R 4.7K/01 RESISTOR, 4.7K, 5%, .25W . . . . . . . . . . . 1 R 10K/01 RESISTOR, 10K, 5%, .125W . . . . . . . . . . . 32 RP10K/00 POTENTIOMETER, 10K, 1-TURN, TOP ADJUST BI TECHNOLOGIES: 72PR10K . . . . . . . . . . . 1 RN5S4.7K/00 RESISTOR NETWORK, 5-PIN, SIP, 4.7K, 2% BI TECHNOLOGIES: L051C472 . . . . . . . . . . . 4 RN9S4.7K/00 RESISTOR NETWORK, 9-PIN, SIP, 4.7K, 2% BI TECHNOLOGIES: L091C472 . . . . . . . . . . . 3 SHB32-121/00 SWITCH, CAP, BLACK OMRON: B32-1210 . . . . . . . . . . . 20 SPB3F4050/00 SWITCH, PUSHBUTTON,.LOW FORCE OMRON: B3F-4050 . . . . . . . . . . . . . 20 U 16F737/00 IC, PIC PROCESSOR, DIP MICROCHIP: PIC16F737-I/SP . . . . . . . . . . . 1 UOPC845/00 IC, OPTO-COUPLER, QUAD, DIP ISOCOM: PS2502-4 . . . . . . . . . . . . . 8 USHC165S/00 IC, 8-BIT P-S CONVERTER, SMT FAIRCHILD: MM74HC165M . . . . . . . . . . . . 4 . . . . . . . . . Qty. . . . . 1 . . . . . 2 . . . . . 1 . . . . . Qty. . . . PA85-0134/00 USB Host Port PCB M-A Part No. Description / MFG Part No. P 85-0134/00 PCB, USB HOST PORT, CWR-24E, CWR-40E, CWR-72E, VDL J PEC36DB/00 CONNECTOR, HEADER, MALE, RIGHT ANGLE, 36 BY 2 SULLINS: PEC36DBAN . . . . . . . CONNECTOR, USB TYPE A, RIGHT ANGLE FCI: 87520-0010BLF1 . . . . . . . J USB-A/00 . CWR-40E / 72E Options PA85-0106/01 Modem PCB 132 M-A Part No. Description / MFG Part No. . . . P 85-0106/00 PCB, MODEM, SILICON LABS, ALL CWR EVENT RECORDERS, VDL . . . 1 C 560PF/00 CAPACITOR, 560PF, 1KV, CERAMIC, DIP XICON: 140-102P6-561K . . . . . . . . . . . 2 C .001MF/04 CAPACITOR, .001MF, 10%, 3KV, X7R, CERAMIC VISHAY: 30TSD10 . . . . . . . . . . . . . 2 C .1MF/00 CAPACITOR, .1MF, 50V, CERAMIC . . . . . . . . . . 2 CT10MF/00 CAPACITOR, 10MF, 16V, TANTALUM . . . . . . . . . 2 CX10PF/00 CAPACITOR, 10PF, 10%, 50V, NPO, CERAMIC, 0805 XICON: 140-CC501N100D . . . . . . . . . . . . 1 . . . APPENDIX E BILLS OF MATERIAL M-A Part No. Description / MFG Part No. . . . . . . . Qty. CX150PF/00 CAPACITOR, 150PF, 3KV, X7R, CERAMIC, 1808 JOHANSON: 302R29W151MV4 . . . . . . . . . . . 2 CX1800PF/00 CAPACITOR, 1800PF, 50V, X7R, CERAMIC, 0805 XICON: 140-CC501B182K . . . . . . . . . . . . 1 CX.0039MF/00 CAPACITOR, .0039MF, 50V, X7R, CERAMIC, 0805 XICON: 140-CC501B392K . . . . . . . . . . . . 2 CX.01MF/00 CAPACITOR, .01MF, 50V, X7R, CERAMIC, 0805 XICON: 140-CC501B103K . . . . . . . . . . . . 1 CX.022MF/00 CAPACITOR, .022MF, 630V, X7R, CERAMIC, 1206 PANASONIC: ECJ-3FB2J222K . . . . . . . . . . . 1 CX.1MF/00 CAPACITOR, .1MF, 50V, X7R, CERAMIC, 0805 XICON: 140-CC501B104K . . . . . . . . . . . . 4 CX.22MF/00 CAPACITOR, .22MF, 50V, X7R, CERAMIC, 1206 KEMET: C1206C224K5RACTU . . . . . . . . . . . 4 CXT.1MF/00 CAPACITOR, .1MF, 35V, TANTALUM, 3.2X1.6 KEMET: T491A104K035AS . . . . . . . . . . . . 1 CXT1MF/00 CAPACITOR, 1MF, 16V, TANTALUM, 3.2X1.6 KEMET: T491A105K016AS . . . . . . . . . . . . 1 D DB105/00 DIODE, BRIDGE, 600V, .8A MICRO SEMI: DB105 . . . . . . . . . . . . . 1 DXBAV99/00 DIODE, DUAL, SOT-23 FAIRCHILD: BAV99 . . . . . . . . . . . . 2 DXZ5232B/00 DIODE, ZENER, 5.6V, SOD-123 FAIRCHILD: MMSZ5232B . . . . . . . . . . . . 2 DXZ5248B/00 DIODE, ZENER, 18V, SOD-123 FAIRCHILD: MMSZ5248B . . . . . . . . . . . . 1 JFBCS-108/00 CONNECTOR, HEADER, FEMALE, 16-PIN SAMTEC: BCS-108-L-D-TE . . . . . . . . . . . 1 QXBCP56/00 TRANSISTOR, NPN, SOT-223 ON SEMI: BCP56 . . . . . . . . . . . . . 1 QXMMBTA42/00 TRANSISTOR, NPN, SOT-23 FAIRCHILD: MMBTA42 . . . . . . . . . . . . 2 QXMMBTA92/00 TRANSISTOR, PNP, SOT-23 FAIRCHILD: MMBTA92 . . . . . . . . . . . . 1 RVERZV07D/00 VARISTOR, 175V, 1200A PANASONIC: ERZV07D241 . . . . . . . . . . . . 2 RX10 OHM/00 RESISTOR, 10 OHM, 5%, .1W, 0805 XICON: 260-10 . . . . . . . . . . . . . . 2 RX150 OHM/00 RESISTOR, 150 OHM, 5%, .1W, 0805 XICON: 260-150 . . . . . . . . . . . . . 1 RX402 OHM/00 RESISTOR, 402 OHM, 1%, .1W, 0805 XICON: 292-402 . . . . . . . . . . . . . 1 RX1.78K/00 RESISTOR, 1.78K, 1%, .1W, 0805 XICON: 292-1.78K . . . . . . . . . . . . . 2 RX2.2K/00 RESISTOR, 2.2K, 5%, .1W, 0805 XICON: 260-2.2K . . . . . . . . . . . . . 1 RX9.31K/00 RESISTOR, 9.31K, 1%, .1W, 0805 XICON: 292-9.31K . . . . . . . . . . . . . 1 RX10K/00 RESISTOR, 10K, 5%, .1W, 0805 XICON: 260-10K . . . . . . . . . . . . . 2 RX56K/00 RESISTOR, 56K, 5%, .1W, 0805 XICON: 260-56K . . . . . . . . . . . . . 2 . . . . 133 MICRO-AIDE CWR-40E / 72E USER MANUAL M-A Part No. Description / MFG Part No. . . . . . . . . . . Qty. RX100K/01 RESISTOR, 100K, 1%, .1W, 0805 XICON: 292-100K . . . . . . . . . . . . . 1 RX120K/00 RESISTOR, 120K, 5%, .1W, 0805 XICON: 260-120K . . . . . . . . . . . . . 1 UXMAT2508/00 IC, EEPROM, 2.7V, SOIC-8 ATMEL: AT2508AN-10SI-2.7 . . . . . . . . . . . 1 UXSI2433/00 IC, MODEM, TSSOP-24 SILICON LABS: SI2433-BT . . . . . . . . . . . 1 UXSI3015/00 IC, MODEM DAA, SOIC-16 SILICON LABS: SI3015-BS . . . . . . . . . . . 1 XXO4.9152/00 OSCILLATOR, 4.9152MHZ, SMT EPSON: SG-8002JF-4.9152M-PCMB . . . . . . . . . . 1 . . . . PA85-0135/00 GPS Receiver PCB M-A Part No. Description / MFG Part No. . . . . . Qty. P 85-0135/00 PCB, GPS RECEIVER, CWR-24E, CWR-40E, CWR-72E, VDL . . . . . . 1 CX1PF/00 CAPACITOR, 1PF, COG, 0402 PANASONIC: ECJ-0EC1H010C . . . . . . . . . . . 1 CX18PF/00 CAPACITOR, 18PF, COG, 0402 PANASONIC: ECJ-0EC1H180J . . . . . . . . . . . 2 CX.1MF/00 CAPACITOR, .1MF, 50V, X7R, CERAMIC, 0805 XICON: 140-CC501B104K . . . . . . . . . . . . 2 J MCX002/00 CONNECTOR, FEMALE, RIGHT ANGLE, MCX LINX: CONMCX002 . . . . . . . . . . . . . 1 J PRPN402 CONNECTOR, HEADER, MALE, 40 BY 2 SULLINS: PRPN402PAEN-RC . . . . . . . . . . 3 L MGGPS06/00 INDUCTOR, GPS ANTENNA, BULKHEAD MOUNT, 5M, MCX CONNECTOR MIGHTY GPS: MGL1RP . . . . . . . . . . . . 1 LX100NH/00 INDUCTOR, 100NH, 5%, 0603 EPCOS: B82496C3101J . . . . . . . . . . . . 1 RX10 OHM/00 RESISTOR, 10 OHM, 5%, .1W, 0805 XICON: 260-10 . . . . . . . . . . . . . . 1 U 58048-0/00 IC, GPS RECEIVER, COPERNICUS TRIMBLE: 58048-00 . . . . . . . . . . . . 1 . . . . . . . . . Qty. . . . . . PA85-0136/00 Ethernet Port PCB 134 M-A Part No. Description / MFG Part No. . U NM7010B/00 IC, ETHERNET PORT MODULE, CWR-24E, CWR-40E, CWR-72E, VDL IINCHIP: NM7010B+ . . . . . . . . . . 1 Material Return Policy In the event the customer identifies a malfunction in any product, call or write MICRO-AIDE and obtain a Return Material Authorization (RMA) number from the customer service department. Return the product to MICRO-AIDE, freight prepaid, with a note (in-warranty repair) or a purchase order (out-of-warranty) for the repair listing the following information: • RMA number from MICRO-AIDE • Return shipment address • Name and telephone number of person familiar with the problem • Brief description of the problem (include any printouts that may have a bearing on the problem) • Method of payment for repair costs (out-of-warranty) • Send product to the following address: MICRO-AIDE CORPORATION 685 Arrow Grand Circle Covina, CA 91722 Tel: 626-915-5502 Fax: 626-331-9484 E-mail: [email protected] Limited Warranty MICRO-AIDE warrants its products to be free from defects in material and workmanship for a period of five (5) years from the date of shipment. This warranty is in lieu of any other warranty, expressed or implied. In no event shall MICRO-AIDE be held liable for incidental or consequential damage resulting from (1) the use of any of its products, or (2) any alleged breach of this warranty provision. MICRO-AIDE’s liability shall be limited to repairing or replacing, at its sole discretion, any defective product which is returned in accordance with the MICRO-AIDE Material Return Policy. Product that has been subjected to abuse, misuse, alteration, accident, lightning damage, neglect or unauthorized installation or repair shall not be covered by this warranty. MICRO-AIDE reserves the right to make a final decision as to the existence of any failures and the cause of such failures. No warranty is made with respect to custom equipment or products produced to buyer’s specifications except as mutually agreed upon in writing. MICRO-AIDE CORPORATION 685 Arrow Grand Circle Covina, CA 91722 Tel: 626-915-5502 Fax: 626-331-9484 E-mail: [email protected]