1
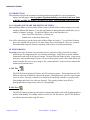
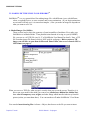
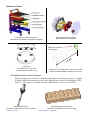
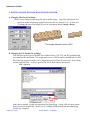
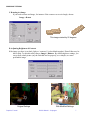
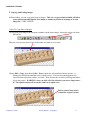
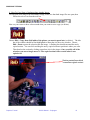
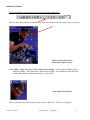
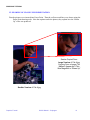
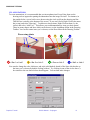
GRAPHICS TUTORIAL
Creating and Editing Graphics Presentations, Web Pages, and Reports
By Martin L. Culpepper
Wooden Board Game
Solid Model Rendered in PhotoWorks to Look Like Wood
CONTENTS:
I. Introduction………………………………………………………………...………… 2
II. Available Software For Editing/Making Pictures……………..………….………… 2
III. File Formats…………………………………………………………………….…… 2
A. GIF Files…………………………………………………………………..…. 2
B. JPG Files………………………………………………………………..……. 2
C. Example of Images Best Saves As GIF Files (Images with few colors)….…. 3
D. Example of Images Best Saves As JPG Files (Photos, images with shading) 3
IV. Making Image Files In SolidWorks………………………………………………….. 4
A. Shaded Images (Not Life Like)………………………………………...……. 4
B. Using PhotoWorksTM (Life Like Images)……………………………...……. 5
V. Editing Images With Microsoft Photo Editor………………………………………. 6
A. Changing The Size Of An Image……………………………………………. 6
B. Changing the File Format Of An Image…………………………………….. 6
C. Rotating An Image………………………………………………………….. 7
D. Adjusting Brightness & Contrast……………………………………….…… 7
E. Sharpening Images…………………………………………………….……. 8
F. Copy And Pasting Images & Parts of Images …………………………..…… 9
i. How To Copy Parts of Images…………………………………….…...… 9
ii. How To Copy Parts of An Image Into Another Image………….……..… 10
iii. How To Make A New Image File From Part of Another Image File……. 11
VI. Example Of Detail Blow Up Made Using Photo Editor…………………….….…. 12
VII. Adding Annotations & Notes ……………………………………….…….……. 13
Graphics Tutorial
© 2001 Martin L. Culpepper
1
GRAPHICS TUTORIAL
I. INTRODUCTION:
This document will provide assistance in making professional graphics for your presentations,
reports, and web pages. Due to graphics degradation during conversion from Power Point
to HTML and PDF file formats, the images are BEST viewed/printed from PowerPoint.
II. AVAILABLE SOFTWARE FOR EDITING PICTURES:
Microsoft Photo Editor is a basic picture editor (comes with MS Office) which can open, save, and
translate different file formats. It can also perform basic editing functions which allow you to
modify or enhance an image. To run Photo Editor, look in the Start Menu, or:
- Start > Find Files Or Folders > Photoed.exe
- Double click on the Photo Editor Icon
You will be shown how to use the basic tools in Photo Editor in section V. You will also be shown
how to use SolidWorks (section IV) to make image files of solid models. However, you must
first understand image file formats commonly used on the web and in presentations.
III. FILE FORMATS:
Depending on the type of picture, one can reduce the size (in bytes) of the picture file by using a
different type of compression (file size reducing technology). Sadly there is not one uniform
format that works well for all types of images. As larger files take longer to load, require more
disk space, and can take longer to print, it is in your best interest to use a file format which will
result in smaller file sizes for your images. The “goods and bads” of the two most common file
formats are discussed below.
A. GIF Files
The GIF file format (picture.gif) allows only 256 colors per picture. This means that only 256
different colors are available to represent the picture. Though this may seem like a great many
colors, it is not. This type of format is excellent for line drawings, sketches, or pictures with
little shading and where few colors are required. They usually produce large files for
photographs which require many colors (I.e. photographs).
B. JPG Files
The JPG file format (picture.jpg) has built in compression which works well for photographs or
pictures with shading. For images with few colors (see GIF files above), the JPG file format is
not efficient and can lead to large file sizes.
Graphics Tutorial
© 2001 Martin L. Culpepper
2
GRAPHICS TUTORIAL
C. Example of Images Best Saved As GIF Files (Images with few colors):
D. Example of Images Best Saved As JPG Files (Photos, images with shading):
JPG
GIF (limit = 256 colors)
Notice difference on ears/arm
JPG
Shading requires many colors
GIF (limit = 256 colors)
256 colors = low shading quality
Has shading around the edges, so would
want to save as JPG file
Graphics Tutorial
© 2001 Martin L. Culpepper
3
GRAPHICS TUTORIAL
IV. MAKING PICTURE FILES IN SOLIDWORKSTM
SolidWorksTM is a very powerful tool for making image file: with different views, with different
colors, as exploded views, as cross sections, and even as animations. (If you desire animations,
see me and I will help you, it is somewhat complex.) How you make an image file depends on
what you want to use it for.
A. Shaded Images (Not lifelike)
These are best used to show the geometry of parts/assemblies of machines. First, make sure
SolidWorks is in Shaded Mode. Then position/orient Instead of saving as a part (SLDPRT)
file, you save as a tif (TIF) file (see 14-17 of SolidWorks User Manual for detail). Note, a TIF
file is another image file format, which is NOT used for web pages. Before you use a TIF
image, you will have to open them in Microsoft Photo Editor, then re-save them in JPG or
GIF format (see page 6).
When you save as a TIFF file, what you get is exactly what you see on the screen. Therefore, it is
best to put your model in the mode you want to see (shaded, now hidden line, hidden line),
then turn off temporary axes, origins, and other things which interfere/take away from the
picture (unless you want them there). You can turn these off under SolidWorks’ View Menu.
You can also insert drawing files via Insert > Object, then browse to the file you want to insert.
Graphics Tutorial
© 2001 Martin L. Culpepper
4
GRAPHICS TUTORIAL
Cut-Away View Of Prototype Cart
Annotations were added in image editing program
Exploded View Of Gear Pump
Note endplates are transparent
Origin was not turned
off on purpose
.0
15
Test Fixture
“No Hidden Line” mode used
so small details are easier to see
0
Illustration From Design Intent Lecture From 2.000
Enhancements/annotations added in Power Point
B. Using PhotoWorks (Life Like Images)
These are best used to convey how a machine/part/product would look to a consumer. Chapter
14 of the SolidWorks tutorial covers how to use PhotoWorks to make life like images (VERY
EASY!!!). After you have rendered an image in PhotoWorks, you save it as a TIF file.
Metal Machining Tool
Rendered in PhotoWorks to Look Like Metal
Graphics Tutorial
Mancala (Wooden Board Game)
Rendered in PhotoWorks to Look Like Wood
© 2001 Martin L. Culpepper
5
GRAPHICS TUTORIAL
V. EDITING IMAGES WITH MICROSOFT PHOTO EDITOR
A. Changing The Size Of An Image
Allows you to change a large image file into a smaller image. Typically, reducing the size
(pixels or inches) of an image by half reduces the file size (in bytes) by ~ a factor of 4.
To change the size of the image file you are working on choose: Image > Resize
This image reduced in size by 50%
B. Changing the File Format Of An Image
You can open various types of graphic files in Photo Editor (GIF, TIF, and JPG included) then
save them in different formats. You might need to save a TIF file made in SolidWorks to a JPG
file so that you can post it on the web or import it into Power Point (In some cases, Power Point
will not read TIF files). To do so, open the TIF file in Photo Editor, then choose:
File > Save As
In the above example, I could save mancala.gif to mancala.jpg. Saving a file as a new format,
does not erase the original file. In this case, I would have both mancala.gif and mancala.jpg
saved to my computer.
Graphics Tutorial
© 2001 Martin L. Culpepper
6
GRAPHICS TUTORIAL
C. Rotating An Image
If you need to rotate and image, for instance if the camera was at weird angle, choose:
Image > Rotate
This image rotated by 25 degrees
D. Adjusting Brightness & Contrast
If the image you have is too dark, light, or “contrasty” (colors blend together), Photo Editor may be
able to help. To edit this utility choose: Image > Balance. By modifying these settings, you
can go from a dark picture (say the flash did not fire properly, see example) to a more
presentable image.
Original Settings
Graphics Tutorial
With Modified Settings
© 2001 Martin L. Culpepper
7
GRAPHICS TUTORIAL
E. Sharpening Images
If you have an image which appears to be “fuzzy”, you can use the sharpen tool to make the image
look crisp. There are other similar tools you can try under the Effects menu (trying them out is
the best way to learn).
Softer Image
Sharper Image
Graphics Tutorial
© 2001 Martin L. Culpepper
8
GRAPHICS TUTORIAL
F. Copying And Pasting Images
In Photo Editor, you can copy/paste parts of images. This is a very powerful tool which will allow
you to edit out unwanted parts of an image or transfer a portion of an image to its own
image file. VERY USEFUL!
i. How To Copy Parts of Images:
To copy part of an image from one spot to another (in the same image), choose the select icon from
the tool bar.
Then use your cursor to draw a box around what you want to cut or copy.
Choose Edit > Copy, then choose Edit > Paste to paste the selection back into the picture. A
flashing box should surround the newly copied section. You can click and drag the newly
copied section to position it where you want. Then deselect the section by clicking somewhere
else in the picture. WARNING: once you click off of the selection, you can no longer move
it! The copied sections will overwrite what it was copied over!
Section pasted here which
overwrites original content
Graphics Tutorial
© 2001 Martin L. Culpepper
9
GRAPHICS TUTORIAL
ii. How To Copy Parts of An Image Into Another Image:
To copy part of an image from into another image, make sure that both image files are open, then
choose the select icon from the tool bar.
Now use your cursor to draw a box around what you want to cut or copy (see below).
Choose Edit > Copy, then click inside of the picture you want to paste into (see below). The title
bar of the window should be blue/highlighted to show that it is the active window. Choose
Edit > Paste to paste the selection into the image. A flashing box should surround the newly
copied section. You can click and drag the newly copied section to position it where you want.
Then deselect the section by clicking somewhere else in the picture. Once you click off of the
selection, you can no longer move it! The copied sections will overwrite what it was
copied over!
Section pasted here which
overwrites original content
Graphics Tutorial
© 2001 Martin L. Culpepper
10
GRAPHICS TUTORIAL
iii. How To Make A New Image File From Part of Another Image File:
Now use your cursor and the selection tool to draw a box around what you want to copy (see below).
Section pasted here which
overwrites original content
Choose Edit > Copy, then choose Edit > Paste As New Image. A new image will show up in a
different window. This means a new file has been created. You can then save this file with
another name and/or in a different format, I.e.: Head.JPG.
New Image File Created
This is a good way to extract parts of images to show “Blow Up” details (see next page).
Graphics Tutorial
© 2001 Martin L. Culpepper
11
GRAPHICS TUTORIAL
VI. EXAMPLE OF CLOSE UP IN PRESENTATION:
First the pictures were inserted into Power Point. Then the red boxes and lines were drawn using the
Power Point drawing tools. Note the captions under the photos, they explain how the “Blown
Up” effect was produced.
Section Copied From
Large Version of File A.jpg
Copying From a Larger File
Makes It Appear As If This
Was Magnified or “Blown Up”
Smaller Version of File A.jpg
Graphics Tutorial
© 2001 Martin L. Culpepper
12
GRAPHICS TUTORIAL
VII. ANNOTATIONS:
To create annotations, it is recommended that you insert photos into Power Point, then use the
drawing tools as opposed to putting the annotations into the image file itself. For instance, in
the graphic below, several circles were drawn using the circle tool from the drawing tool bar.
This tool bar is usually at the bottom of the screen. If you can’t find it, Right Click in the menu
bar (at top) and select “Drawing”. To add text to drawn items, Right Click on them (I.e. the
circles) and select “Add Text”. This allows you to add annotations to items you have drawn!
There are many shapes and lines which can be drawn, see the AutoShape Menu in the Drawing
Toolbar. You can also rotate items you’ve drawn, see the Draw Menu in the Drawing Toolbar.
Pin or rotary joints
1 = Bar 1 or Link 1
1
2 = Bar 2 or Link 2
2
3
3 = Door or Link 3
4
4 = Wall or Link 4
You can also change the color, thickness, and style (solid,dashed, dotted) of the lines which make up
the items you’ve drawn by double clicking on them. Try clicking on one of the circles above, a
box similar to the one shown below should appear. You can then make changes.
Graphics Tutorial
© 2001 Martin L. Culpepper
13