1
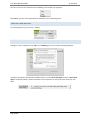
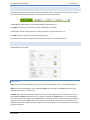
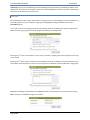
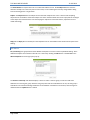
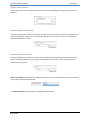
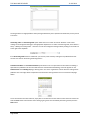
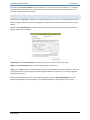
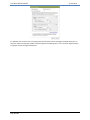
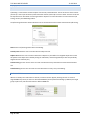
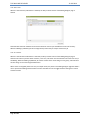
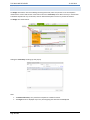
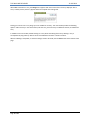
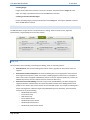
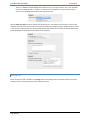
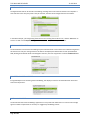
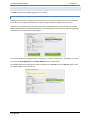
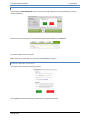
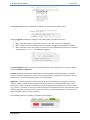
THE MAILING DESIGNER 12-06-2014 The Mailing Designer is the gateway for creating and publishing content in Informz. Previously, several types of mailings were available under different names. Now all of the features for those types of mailings have been wrapped into a single mailing-creation process. The Mailing Designer utilizes the Informz editor, which works more like a word processor and less like an HTML editor. BROWSER REQUIREMENTS To use the Java Editor, there are some minimal web browser requirements: Internet Explorer 7+, Firefox 3.0+, or Safari 3.0+. It is recommended that the latest version of any web browser be used for the best experience. Informz is optimized for use with the latest version of the Firefox browser. Other browsers can be used, but Firefox will provide the best experience. CONVERTING EXISTING MAILINGS TO THE NEW FORMAT To use the new Mailing Designer to modify existing Quickmails or Newsletters, first convert the mailing to the new format. Converting an existing mailing creates a copy in the new format while preserving the existing version. Place your cursor on the Envelope icon for the mailing to view this pop-up menu: Click the Convert option, and this pop-up appears: Click the OK button. A new mailing appears at the top of the list. Its name is the same as the original with words “New Format” preceding it. Page 1 of 23 THE MAILING DESIGNER 12-06-2014 Place your cursor over the envelope of the new Mailing, and a simpler pop-up appears: Select Edit to open the converted Quickmail or Newsletter in the new Mailing format. CREATING A NEW MAILING From the Mailings menu, go to Create -> Mailing. STARTING THE MAILING PAGE FOR THE FIRST TIME Clicking the Create -> Mailing menu or Edit from the Mailing pop-up menu launches the Mailing Designer. This Help screen appears automatically. Click OK to dismiss it or click Don’t Show Again to skip it. If Don’t Show Again is accidentally clicked, it can be turned back on from Preferences on the top line menu under your user name: Page 2 of 23 THE MAILING DESIGNER 12-06-2014 THE TABS The Mailing Designer has four tabs plus a context-sensitive Help button. The tab that is currently active is colored green. Some tabs have additional options on the green bar directly below the tabs. The Set-Up tab contains options for controlling templates, Target Groups, etc. The Design tab is where the layout and content of the Mailings are managed. The Test tab is used for sending email tests, checking hyperlinks, using the virtual inbox, etc. The Send tab sets the options for when the Mailing will be sent. An information icon exists on the right side for each tab to provide an overview about the tab. THE SET-UP TAB The Set-up tab appears below: PROPERTIES Name: This is the name of the Mailing. This name is never seen by recipients, and it is only used within Informz. Folder: This is where the Mailing is stored. Clicking the Folder icon to the right of the Folder drop-down menu allows the quick creation of a new folder. Template: Either Standard or Advanced templates can be used with a Mailing. Once the template is chosen, the default From and Reply-To information for this template is added to the Envelope section. These default values can be overwritten for this Mailing using the Edit button. If a template is initially selected and then later a different template is chosen for that Mailing, these values change to the default for the newly selected template. Once a template is selected for a Mailing, a small icon appears next to the template name, which allows the user to click it and edit the template. Page 3 of 23 THE MAILING DESIGNER 12-06-2014 A/B Testing: The user can test different parts of the Mailing by sending variations of the Mailing to subsets of the target group. The results can be analyzed to see which content brought better subscriber responses. A/B Testing is discussed in more detail later in this document. ENVELOPE To: The Mailing must have a target: either choose a target group for the entire Mailing, a list of email addresses, or separately target each story to a different target group. Clicking Edit or clicking the To box shows the To Information pop-up. st The 1 option calls for one target group for the entire Mailing; however, the Mailing can contain multiple stories. With this choice, target groups need not be assigned individually when adding stories. nd Selecting the 2 option sets the To box as “Story Level.” Thereafter, a target group must be assigned to each story as it is created. rd Selecting the 3 option requires a short list of email addresses to which the Mailing is sent when published. Each email address must be listed on its own line. Lists of more than 15 addresses must be handled with a target group. From: After selecting the To information, the From information is also specified from a pop-up window. Clicking Edit or clicking on the From box brings up this window: Page 4 of 23 THE MAILING DESIGNER 12-06-2014 The Email Address is required and must use a valid email address format. The Friendly From is the name the subscriber initially sees in the From portion of the email, so use something that is clearly recognizable as being from the sending person or organization. Subject: The Subject Line sets the subject line that the email recipient sees. Enter a relevant and compelling subject line for the audience. Note that a Subject Line Tester has been added. The tester simply looks at the length of the subject line and reminds the user that keeping the subject line short works better, especial for users of mobile technology. Reply To: The Reply To is set initially from the Template. Enter an email address that should receive replies to the Mailing. ADVANCED CC: (Test Group): Test group feature allows additional recipients to receive a tested or published Mailing. These additional recipients are sometimes referred to as a Test Group. Clicking the Edit button or the CC: box on the Advanced Options screen brings up this pop-up: The Create a Test Group radio button displays a means to create a new test group, as well as to add email addresses to an existing test group. Once the test group name and the email addresses are set, this test group is available for use with future Mailings. Addresses can be added or removed from the list here; those changes are reflected when the Update button is clicked. Page 5 of 23 THE MAILING DESIGNER 12-06-2014 Select the Choose a Test Group radio button to see a list of currently available test groups. The email addresses for each test group are displayed when the test group is selected. Addresses can be added, deleted, or edited here as well. After finishing updating the Set-up tab, click the Save button and then proceed to the Design tab. Do Not Send: Just as a user can specify additional recipients for a Mailing, recipients can be excluded using the window. OPTION 1: THOSE WHO HAVE BEEN SENT THIS MAILING BEFORE Selecting this option excludes from the recipient list anyone who has previously received this Mailing. (Note: this does not work for copies of already published Mailings. It only works for subsequent publishing of a single Mailing.) OPTION 2: THOSE IN THE FOLLOWING TARGET GROUP(S) This option enables target groups to be used as filters against receiving the Mailing. This is very useful for clients who wish to use Opt-Outs: an Opt-Out interest can be created as a filter for each target group, and all subscribers who wish to opt-out would be added to that Opt-Out interest. Page 6 of 23 THE MAILING DESIGNER 12-06-2014 OPTION 3: THOSE IN THIS LIST This provides a way to remove individuals who should not receive the Mailing by manually entering their email addresses. OPTION 4: FREQUENCY RESTRICTIONS This option displays only if at least one Frequency rule exists. Select the Frequency Rule from the dropdown menu to apply to this Mailing. Click the icon to the right of the dropdown menu to create or edit current Frequencies rules associated with the account. OPTION 5: RECENCY RESTRICTIONS This option displays only if at least one Recency rule exists. Select the Recency Rule from the dropdown menu to apply to this Mailing. Click the icon to the right of the dropdown menu to create or edit current Recency rules associated with the account. Content Entry Method: The Content Entry Method allows content to be created either by using the Informz editor or by pasting in previously created HTML. If the Paste HTML Code method is selected, the Story area looks like this: Page 7 of 23 THE MAILING DESIGNER 12-06-2014 The images above are slightly different when pasting HTML directly into a Quickmail or Newsletter, but the process is the same. Accounting Code: The Accounting Code option allows the user to select an internal “bill-back” code so that mailings can be charged accordingly to the appropriate department. To create an Accounting Code, select Admin -> Setup -> Mailing Accounting Codes -> View All. You can also manage Accounting Codes by clicking on the small icon to the right of the dropdown. If the Accounting Code feature is enabled for your account, each and every mailing that is published from that account must have an Accounting Code assigned to it. Tentative Send Date: The Tentative Send Date option allows a user to input a date and time when the mailing is expected to be published. This time and date becomes associated with the Mailing, and it also appears on the Calendar View of the Mailing List page, allowing other users in the organization to know when the mailing will be published. This encourages better cooperation and information-sharing between users to coordinate campaign efforts. To set the tentative send date and time, simply click on the date and use the sliders to select the hour and minute. Click the Done button when finished. If the mailing is going to be sent immediately after being created, click the Now button. Page 8 of 23 THE MAILING DESIGNER 12-06-2014 By default, the Tentative Send Date function is available in an account but not required. However, it is possible to make the Tentative Send Date a required field when creating a Mailing. Contact your eMarketing Advisor if this should be a required field in your account. TARGETED SUBJECT LINES All Mailings have subject lines. In addition to the standard subject lines, a user can set up targeted subject lines for Mailings. Targeted subject lines involve sending different subject lines to a subset of the subscribers receiving the Mailing. When the Use Targeted Subjects checkbox is checked, the window opens to reveal the functionality that allows targeted subject lines to be added. Default Subject: In the Default Subject area, input the subject line to be used for the main target. Subject: In the Default Subject area, input the targeted subject line to be used. Target: In the Target drop-downs, select the target group to be used to target the alternate subject line. Note that only subscribers in the original target group will the targeted subject line, even if they are in the target group for the targeted subject line. More than one targeted subject line can be added for a Mailing. Click the + Add Targeted Subject link to add additional targeted subject lines to a Mailing. Those additional subject lines appear further down in the list. Page 9 of 23 THE MAILING DESIGNER 12-06-2014 If a subscriber fits into more than one target group, that subscriber receives the highest targeted subject line on the list for which the subscriber qualifies. Anyone targeted in the Mailing who is not in any of the targeted subject line groups receives the original subject line. Page 10 of 23 THE MAILING DESIGNER 12-06-2014 A/B TESTING A/B Testing is a tool used to test the reception of content by a subscriber base. The normal version of the content (Version A) is sent to part of the base, while alternative content (Version B) is sent to a subset. Then the results can be compared to see what kinds of content get a better response. For more information on how to best use A/B Testing, contact your eMarketing Advisor. The A/B Testing Information window allows the user to choose which content will be tested with the A/B Testing: None means no A/B testing will be done in the Mailing. Friendly From allows the user to set alternative Friendly From text. Subject Line allows the user to create an alternative subject line. (This differs from targeted subject lines in that this splits the two subject lines randomly among the subscribers, whereas targeted subject lines are specifically targeted and not randomly set.) Test One Story gives the user the means to create one alternative story that will be inserted instead of another one. Test All Stories gives the user the means to create alternatives to every story in the Mailing. FRIENDLY FROM When the Friendly From radio button is selected, a second From line appears, allowing the user to create an original From line (From A) as well as an alternative From line (From B). When the Mailing is published, the target group is split in half, and each half receives a different From line. Page 11 of 23 THE MAILING DESIGNER 12-06-2014 SUBJECT LINE When the Subject Line radio button is selected, a second Subject Line input box appears, allowing the user to create an original subject line (Subject Line A) as well as an alternative subject line (Subject Line B). When the Mailing is published, the target group is split in half, and each half receives a different subject line. TEST ONE STORY/TEST ALL STORIES A/B Testing is a tool used to test the reception of content by a subscriber base. The normal version of the content (Version A) is sent to part of the base, while alternative content (Version B) is sent to a subset. Then the results can be compared to see what kinds of content get a better response. For more information on how to best use A/B Testing, contact your eMarketing Advisor. The A/B Testing Information window allows the user to choose which content will be tested with the A/B Testing: Page 12 of 23 THE MAILING DESIGNER 12-06-2014 TEST ONE STORY When the Test One Story radio button is selected, the Story Creation section of the Mailing Designer page is altered: Note that tabs have been added to the screen that allow the user to input the different versions of the story. When the Mailing is published, part of the Target Group receive Story A and part receive Story B. TEST ALL STORIES When the Test All Stories radio button is selected, the Story Creation section of the Mailing Designer page is altered in the same way shown above. However, in this case, a B version can be created for more than one story in the Mailing. When the Mailing is published, all of the A versions of the stories will go to one group, and all of the B versions will go to rest of the targeted subscribers. When stories are targeted (either one story or multiple stories, the places in the Mailing Designer page that allow a user to preview the Mailing will have buttons or links that allow the user to toggle between viewing the A version and the B version. Page 13 of 23 THE MAILING DESIGNER 12-06-2014 DESIGN TAB The Design tab holds the area where Mailings are designed visually. Each story location set in the template is noted with the name of that location. Each location also has a Create Story link to add a new story in that location. A Standard template has only one location, while an Advanced template can have any number of locations. The Design tab is shown below. Clicking the Create Story link brings up this pop-up: Note: The Name of the Story is only used if the Template has a table of contents. The Target section is displayed only if story-level targeting was selected in the Set-up tab. Page 14 of 23 THE MAILING DESIGNER 12-06-2014 When Save is clicked for a story, the Design tab re-appears with the content of the new story displayed. After a story is initially created, the story appears within the template in the Design tab. Putting your mouse over a story brings up a mini-toolbar for the story. This mini-toolbar provides the following options: add a new story in the same location, edit the story, move the story to a different location, and delete the story. In addition to the mini toolbar, double-clicking on a story allows the editing of that story. Moving a story is accomplished by drag and drop. Stories can be moved between locations or within a location. When the Mailing is completed, or whenever changes need to be saved, click the Save button at the bottom of the page. Page 15 of 23 THE MAILING DESIGNER 12-06-2014 THE EDITOR A specialized toolbar has been implemented for use with stories in a Mailing. This toolbar contains all of the functionality of the simpler toolbar, plus extra features. A few of the buttons on the Informz Editor Toolbar contain special functionality specific to Informz: Insert Hyperlink: This allows the user to insert hyperlinks into the content, including password-protected links or specials links to Informz specific features like ballots, surveys, or events. Insert Social Media Links: Links to social media sites like Twitter, Facebook, and Linked-In can be added to content. Insert Personalization: Information about subscribers that is held in the database or collected based on subscriber interaction can be seeded into content. Insert Content Code: Special codes can be inserted into Informz content to note dynamic time/date stamps, specially formatted areas, or other features. Content Manager: The content held in an account's Content Manager section can be accessed and utilized via this button. RSS Feed: The content from an RSS feed can be added to the content of a story. Text Version: The text version of a piece of content can be created automatically and then edited via this button. The editor also has a number of extra features: 1. Inline spell checking A misspelled word appears with a red underline. Right-clicking on it shows a list of possible correct spellings. Select the correct spelling from the list to replace the misspelled word. 2. Inline image editing Clicking on an image brings up the image mini-toolbar. Images can be edited in a variety of ways: crop the image, add rounded corners, add a shadow, add a mirror image or flip the image. Note that after editing an image, upon saving the story, the edited image is uploaded to Informz under a new name, preserving your original image. The image size can be increased beyond Informz’s acceptable limits, so the image might need to be altered. Page 16 of 23 THE MAILING DESIGNER 12-06-2014 3. Pasting images Images can be copied from a web site or from your computer and pasted into the Design tab of the editor. The image is uploaded to Informz when the Save button is clicked. 4. Pasting content that includes images Content (including images) can be pasted directly into the Design tab. The image is uploaded to Informz when the Save button is clicked. TEST TAB The Test tab allows six types of tests to be performed on a mailing. These are Send, Preview, Hyperlink, Personalization, Targeted Subject Lines and Virtual Inbox. SEND TEST Send yourself or others (including a Test Group) the Mailing. These are the testing choices: Email All Stories: This sends the Mailing with all of the stories, regardless of where those stories are targeted. Email Based on Profile of Recipient: This sends the Mailing with only the appropriate stories based on their target and each person’s profile. For example, a Mailing might have two stories: one targeted to News interest and one targeted to Membership interest. If the test recipient’s profile only contains the Membership interest, then the recipient would not receive the News story. Email all Versions of the Mailing: This sends a copy of each possible Mailing. This looks through your targeted subscribers and determines the number of possible variations of the Mailing based on their profiles. It then sends a copy of each variation in Text and HTML formats. For example, if a Mailing has 3 stories each targeted to a different Target Group (Membership, Events and News), some subscribers could receive any of the following: o Membership Stories Only o Events Stories Only o News Stories Only o Events & News Stories o Membership & Events Stories o Membership & News Stories o Membership, News & Events Stories Page 17 of 23 THE MAILING DESIGNER 12-06-2014 There are 7 different possible Mailings that could be sent. So, one copy of each is sent in Text and HTML format (or 14 Mailings total). If, however, no subscribers were signed up to receive all three types of stories, only 12 Mailings total would be sent as part of the test. After the Email Test Type is selected, specify who should receive it. This could be a Test Group, or a list of email addresses with each on its own line. Text can be input and added to the beginning of the subject line when the test is sent. This lets recipients know it is not the published email, but instead is a test. Notes can also be added to the top of the Mailing to include special instructions for the recipients. PREVIEW TEST This is the same test that’s available on the Design tab. This test displays either the HTML or Text version of the mailing on-screen and then allows that to be emailed to the user. Page 18 of 23 THE MAILING DESIGNER 12-06-2014 HYPERLINK TEST The Hyperlink test looks at all the links in the Mailing, including those in the stories and those in the Template. It tests each of them to verify they work. If they do not work, the links can be changed from the test window. In the above example, just change http://www.infromz.com to http://www.informz.com , click the Test button to ensure it is valid. Click the Replace Changed Links button that have passed to update content. PERSONALIZATION TEST The Personalization test examines the Mailing for personalization fields. It also searches the subscribers targeted in this email to see if any are missing values for this field. It also displays the default value for each personalization field, allowing those default values to be changed if necessary. This test only pertains to Informz Profile Info fields. TARGETED SUBJECT LINE TEST If Targeted Subjects Lines are being used in the Mailing, this displays a count for the subscribers that will receive each of the subject lines. VIRTUAL INBOX TEST The Virtual Inbox test shows the Mailing’s appearance in many email and mobile clients. It also tests the message against a number of spam filters to see if any are triggered by the Mailing content. Page 19 of 23 THE MAILING DESIGNER 12-06-2014 SEND TAB The Send tab provides the publishing options for the Mailing. PREREQUISITES A Mailing needs a template, a target group, and at least one story. If these prerequisites are not met, the Mailing cannot be sent. The image below shows how a properly configured Mailing is displayed on the Send tab. Hyperlinks are provided to easily jump back to the Set-Up and Design tabs from this page. Additionally, the Get Count hyperlink displays the number of subscribers when a target group is used. (This is not applicable if individual email addresses are used instead of a target group.) The example below shows a Mailing without a target group. In addition to the message “This Mailing is not ready to be sent,” the Send Mailing Now and Schedule Mailing buttons are both hidden. The example below shows a Mailing that’s using a template with an Opt-Out link, but the Opt-Out settings under the Advanced Options have not been set. Page 20 of 23 THE MAILING DESIGNER 12-06-2014 SEND MAILING NOW Upon clicking the Send Mailing Now button, a confirmation page is displayed, ensuring the Mailing is currently ready for publication. If Yes is selected, the Mailing is sent and the following confirmation displays on the Send tab. This notice collapses after five seconds. If No is selected, the confirmation screen closes and the Send tab re-appears. SCHEDULE MAILING TO BE SENT This option presents Schedule and Delivery options. Choosing Once schedules the Mailing for publication one a single date and time. Page 21 of 23 THE MAILING DESIGNER 12-06-2014 Choosing Recurring schedules the Mailing for publication at the same time on different days. Choosing Triggered establishes the settings to send a Mailing after a particular event occurs: 1. 2. 3. When a subscriber registers using a Data Input Form. This is also referred to as “subscribing.” When an admin sends a text message with a special keyword, triggering the publication of a Mailing. When a subscriber sends a text message to Informz with a keyword defined in the brand. For example, a subscriber texts XYZSignup , and a Mailing is triggered. The Delivery Method options control the way the sent email flows to the subscribers. There are two available methods: Standard and Optimized. Standard initiates the sending at the scheduled time, sending the Mailing to all the subscribers in the Target Group. This method is appropriate when the content is time-sensitive, e.g. a legislative “call to action” alert, or when there isn’t an extensive publishing history for these subscribers. Optimized analyzes the open history of each individual subscriber and calculates an average open time. Each subscriber’s Mailing is scheduled for that appropriate hourly time slot. For subscribers without history, other calculations are used to determine an appropriate time. Email addresses without history from a country domain (e.g. .ja (Japan), .ca (Canada), .fr (France)) will take an average from all addresses from that particular country. This method is appropriate when the content is not time-sensitive, e.g. a quarterly eNewsletter, or when there is an extensive publishing history to these subscribers. Once the Mailing has been scheduled, a confirmation screen displays: Page 22 of 23 THE MAILING DESIGNER 12-06-2014 To put the Mailing on hold, click the Stop! button. This prevents the Mailing from being sent. To simply alter the date, time or delivery option, use the Change the Send Options button. If no changes are needed to the Set Date and Time to Send pop-up, simply click the “X” in the upper right corner to close the pop-up and no change is recorded. Note: Once a Mailing is scheduled, the Set-Up and Design tabs are no longer available. This prevents an inadvertent change to the Mailing just prior to publication. If a change to the content is required, use the Stop! button to put the Mailing on hold, and then proceed with the edits. The Test tab is available to review the content, even while the Mailing is scheduled to be sent. Page 23 of 23