1
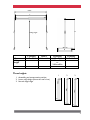
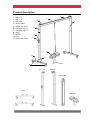
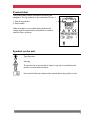
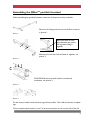
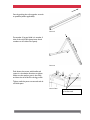
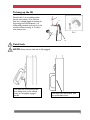
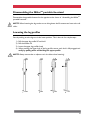
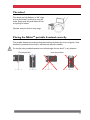
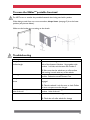
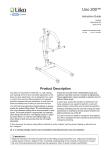
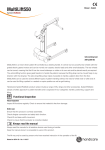
USER`S MANUAL NiklasTM portable freestand The NiklasTM portable freestand offers you the unique possibility to lift and move a patient easily and safely without straining the patient or the caregiver. The portable freestand can be used for lifting and moving patients from a bed, wheelchair, bath/shower or from the floor. Weight capacity is 220 kg / 480 lbs. “Caution!” triangles are used to warn of situations that demand extra care and attention Important! Lifting and transporting a person always involves risk. It is important to read the instructions for both the lifting equipment and the lift. Always ensure that the equipment to be used is compatible with Human Care products. As career you are responsible for the safety of the patient and need to be aware of the patient´s ability to manage the lifting procedure. The NiklasTM portable freestand is designed to lift and lower patients strictly in a vertical plane, never at a diagonal or angle. When lifting a patient, the lift motor should be positioned directly above the patient. When lowering a patient, the lift motor should be positioned directly above the surface onto which the patient is being lowered. LIFTING OR LOWERING A PATIENT AT A DIAGONAL OR ANGLE CAN RESULT IN SERIOUS INJURY TO THE PATIENT OR CAREGIVER. NEVER DO A ROOM-TO-ROOM TRANSFER USING THE PORTABLE FREESTAND If using the portable freestand NiklasTM in a way that is not recommended by Human Care Lifts, Human Care Lifts will not take any responsibility for injuries or other accidents that may occur. If in doubt, please contact the supplier. Human Care Lifts’ products are constantly updated and refined. Therefore we reserve the right to change aspects without prior notice. Table of contents Safety instructions ........................................................................................................... 2 Technical specification .................................................................................................... 2 Product description ......................................................................................................... 4 Product label................................................................................................................... 5 Symbols on the unit ......................................................................................................... 5 Assembling the NiklasTM portable freestand ....................................................................... 6 To hang up the lift ........................................................................................................... 9 Disassembling the NiklasTM portable freestand ................................................................. 10 Lowering the leg profiles ................................................................................................ 10 The wheel..................................................................................................................... 11 Placing the NiklasTM portable freestand correctly .............................................................. 11 To move the NiklasTM portable freestand......................................................................... 12 Troubleshooting ............................................................................................................ 12 Inspection, care and maintenance .................................................................................... 13 Accessories................................................................................................................... 14 1 Safety instructions Before use, ensure that: you have read and understood the instruction guides for the lift cassette and lifting accessories personnel using the equipment have received appropriate instruction and training the lift cassette is connected according to the instructions the portable freestand is adjusted to correct working height the lifting accessories are not damaged lifting accessories are correctly applied to the lift cassette you have selected the correct type, size, material, and design of slings and accessories to safely meet the patient’s needs the lifting accessory is correctly and securely applied to the patient, so that no personal injury can occur. Check list before usage (see label on leg) 1) Foot and leg profiles are assembled correctly 2) Leg and rail profiles are assembled on the correct side. Number 1 leg connected with number 1 rail, and the same with number 2 leg and rail 3) The rail roller is in place and rolls freely in the rails 4) All screws are tightened and the washers are in correct position 5) The handles are correctly connected in the complete leg holes (secure by pulling the handle out while still holding the upper leg profile) 6) Ensure track profile is level See www.humancare.se for more information on slings, rail systems and other accessories. Warning! Product modifications is strictly forbidden without approval from manufacturer Technical specification Maximum load: Dimension: Weight: Materials: 220kg / 480lbs 2450 x 2388 x 1145mm / 105 x 94 x 45in (LxHxD) 30kg / 66lbs Aluminium Plastic - PTFE - PA - TPA Stainless steel Galvanized steel The product is designed for multiple use. 2 total L L H Lifting height D L (length) 1445mm/56in total L 1615mm/64in 2450mm/105in 2620mm/103in Min Lifting height Max Three heights H (height) 1579mm/62in 2080mm/86in to 2180mm/82in 2388mm/94in 1 D (depth) 1145mm/45in 1145mm/45in 2 3 1. Assembling and transportation position 2. Lower usage height (where the roof is low) 3. Normal usage height 3 Product description 2 1. Rail no. 1 2. Rail no. 2 3. Rail roller 4. Anchor point 5. Wheel with brake 6. Complete leg no. 1 7. Complete leg no. 2 8. Hinge 9. Handle 10. Foot 11. Screw with handle 1 11 7 6 8 9 3 10 11 4 5 No. 1 leg No. 2 leg Track profile Foot Rail roller 4 Product label The product label contains information concerning the equipment. The sign is placed on the underside of rail no. 1. 1. Date of manufacture 2. Serial number 1 2 Niklas is tested by an accredited testing institute and comply with the requirements of directives for medicaltechnical Class I products. Symbols on the unit Type B product Warning The product has to be recycled as electric scrap and is not allowed to be thrown in normal waste container. User manual: Read and understand the manual before the product is used. 5 Assembling the NiklasTM portable freestand When assembling the portable freestand, make sure all six parts are easy accessible. Place one of the legs and one foot on the floor as shown in picture 1. Picture 1 Make sure there is some space between the washer and leg when sliding it together. Slide the foot into the track and fasten it together, see picture 2. Picture 2 PUSH DOWN the screw with handle to activate the mechanism, see picture 3. Picture 3 Picture 4 Do the same procedure with the other leg and foot profiles. There will now be two complete legs. They are marked with numbers 1 and 2 to ensure connection to the correct side of the rail. 6 Start by pushing the rails together as much as possible (where applicable). Picture 5 Put number 1 leg and slide it in number 1 side of the rail profile (see picture 6 and numbers on the side of the parts). Picture 6 Push down the screws with handle and rotate in a clockwise direction to tighten. Make sure the washer goes in the track and that the rail is flush to the leg profile. Tighten until the parts are secured and do not slide apart. Picture 7 & 8 Make sure the washers go in the track 7 Pull out the rail as much as possible (where applicable). Lean it against the floor (where applicable). Picture 9 Place number 2 leg and the rail roller in an easily accessible position. In a single motion put the rail roller in the rail and grip the handle on the leg. Then slide it into the slot in the rail (shown in picture 10 and 11). Picture 10 Tighten until the parts are secured and do not slide apart. Picture 11 8 To hang up the lift Place the lift (1) on a suitable surface. Set the main switch (13) to ON and feed out a suitable length of the belt (6) by pressing the DOWN-button (11) while pulling the belt, and hook it on the hook from above, see fig. A. The lift is now ready to use. 6 11 1 13 Catch lock NOTE! Always ensure catch lock is fully engaged The catch lock secures the profile from falling down in the unlikely event of a wrongfully engaged handle The catch lock shall be flush with the profile before use! 9 Disassembling the NiklasTM portable freestand Disassemble the portable freestand in the opposite order shown in “Assembling the NiklasTM portable freestand”. NOTE! When lowering the legs make sure to bring down the lift cassette and secure the rail roller. Lowering the leg profiles Start by making sure the legs are in the lower position. This is done in four simple steps: 1) 2) 3) 4) Pull the upper leg profile UP and hold Pull the handle out Lower the upper leg profile slowly When reaching the upper hole in the leg profile, ensure catch lock is fully engaged and verify by pulling while still holding the upper profile. NOTE! Always ensure that no objects are in the holes when lowering! 1 2 3 4 10 The wheel The wheels are fully flexible in a 360° angle and can be locked in position by using the brake. Simply push the pedal down to lock, and pull up to release. Operate with your foot for easy usage. Placing the NiklasTM portable freestand correctly The portable freestand must always be positioned directly below the centre of gravity. If the freestand is positioned incorrectly, it will adversely affect the stability. Do not place the portable freestand at an inclined angle of more than 5° in any direction. Correct position Incorrect position 11 To move the NiklasTM portable freestand Do NOT move or transfer the portable freestand when being used with a patient. When being moved from one room to another, always lower (see page 3) it to the lower position (see pictures below). Make sure the brakes are not acting on the wheels. Troubleshooting Description The portable freestand is at an inclined angle The leg is difficult to raise or lower The portable freestand is difficult to move Action 1) Check that the legs are assembled on the correct side of the freestand. Number 1 leg together with number 1 rail side, and the same with number 2 2) Make sure that the wheels are on a flat surface and nothing is stuck under any of the wheels Check if there is something jammed between the profiles. Otherwise contact Human Care 1) Check to see if the brakes on the wheels are engaged 2) Clean the wheels. Look for wear or slack. Defect or worn out parts must be changed The rail roller always rolls to one Check that the number 1 leg is connected to side of the rail number 1 side of the rail The rail roller does not run smoothly 1) Check if there is something jammed in the rail 2) Check the rail roller wheels for damage 12 Inspection, care and maintenance Care of the portable freestand When necessary the freestand can be cleaned with a damp cloth and dishwashing liquid. Do NOT use strong detergents. Dry with a dry cloth after. Never flush the portable freestand with water or other liquids. Service agreements Human Care Lifts invites you to sign a service agreement for regular maintenance and testing. Transportation and storage During transport, always lower it to the transportation height which is the lower hole in the leg. The height of the NiklasTM portable freestand is 1579 mm / 69 inches in this position. It is recommended to disassemble the NiklasTM (see page 7) when storing. The climatic conditions should be as follows, an ambient temperature from 0 °C to 50 °C, relative humidity from 30 % to 80 % and air pressure from 790 hPa to 1060 hPa. Recycling Rejected portable freestands can be returned to Human Care for recycling. For information concerning accessories and technical documentation, see our homepage (www.humancare.se). Annual inspection The NiklasTM portable freestand must be inspected at least once a year by Human Care authorized personnel. Pay particular attention to parts that show wear. Service and maintenance are to be performed by Human Care authorized personnel using original spare parts. Daily inspections Check the freestand for loose screws and other signs of wear Monthly inspections Use all positions of the freestand and check for any signs of wear or damage. If the freestand does not run smoothly and is not easy to assemble, contact Human Care. 13 Accessories 50268 four point suspension bar Can be used together with all Human Care lifts 50348 Scale Patient scale that can be used together with all Human Care lifts. Max load 320 Kg / 700 Ibs. 50700 Stretcher This the most lightweight and portable stretcher, with 200 kg/440 lbs capacity, in the hospital- and homecare market. The Stretcher can be assembled by one person and without using any tools 20124 Distance strap Several different lengths to adjust the lifting height to a comfortable height 14 99506-ENG-REVC (2010-03-15) • Fabriksvägen 2, SE-245 34 Staffanstorp, Sweden • • Tel. +46(0)8 - 665 35 00 • Fax +46(0)8 - 665 35 10 • • www.humancare.se • 15