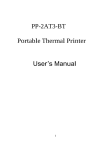
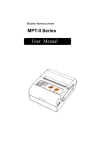
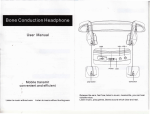
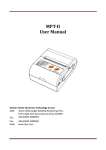
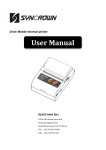
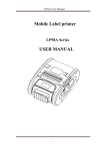
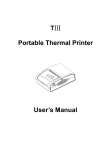
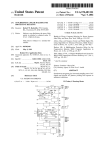
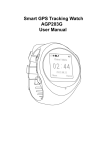
1
Mini Portable Thermal Printer-MP300
-1-
1
Contents
NOTES..............................................................................................................
DESCRIPTION .......................................................................................................................... 5
1.1APPEARANCE .............................................................................................................................. 5
1.3ACCESSORY ................................................................................................................................ 6
FEATURES ................................................................................................................................. 7
2.1 PRINT FEATURES......................................................................................................................... 7
2.2 PHYSICAL PARAMETERS ............................................................................................................. 7
2.3 ENVIROMENT PARAMETERS ........................................................................................................ 7
2.3 OTHER PARAMETERS .................................................................................................................. 7
USE METHODS ......................................................................................................................... 8
3.1 PREPARING FOR USE ................................................................................................................... 8
3.1.1 battery installation ............................................................................................................. 8
3.1.2 installation of the print paper roll ....................................................................................... 8
3.2 BASIC FUNCTIONS ...................................................................................................................... 9
3.2.1 power on ............................................................................................................................ 9
3.2.2 power off............................................................................................................................ 9
3.2.3 self test .............................................................................................................................. 9
3.2.4 feeding
manual feed ..................................................................................................... 9
3.2.5 charge................................................................................................................................ 9
3.3 PRINT CONNECTION AND PRINT ................................................................................................. 10
3.3.1 serial port ........................................................................................................................ 10
3.3.2 the original IR and IrDA connection ................................................................................. 10
3.3.3bluetooth pairing and print................................................................................................ 11
3. 4 LIGHT AND BUZZER SIGNAL DESCRIPTION ................................................................... 11
OTHER INFORMATION ........................................................................................................ 12
4.1 PRINTER DEVELOPMENT GUIDE ................................................................................................. 12
4.2 PRE-PRINTED BLACK MARK INSTRUCTION.................................................................................. 12
-2-
2
Attentions
Please read this document before using the printer !
Safety attention
This printer can use special charger and power adapter only provided by the company.
Or there will cause product damage, battery leakage, fire even explosion.
Don’t put the battery to fire. Don’t make the battery short circuit, demolition
heating or it maybe battery leakage, fire even explosion.
Fluid in battery has causticity. If operate inadvertently causing battery leaks and
the liquid stick to skin or clothes, please use water to wash immediately. If entering
eye accidently, please use plenty of water to wash eyes and go to see a doctor.
Don’t open the paper cover, touch printer-core when printing or just printed. In
order to avoid burns cased by high temperature.
Don’t use the printer when malfunctioning. It may cause fire or electric shock.
Switch off and unplug the printer then call your dealer.
Attentions in using
Neither immersed the printer in water nor prolonged exposure to rain, or it may cause
damage to the printer.
Don’t open the paper cover when printing, or it may cause the printer work not
properly.
Can’t unplug the serial cable when printing in serial port. Or printed data will
not be complete.
Please align the master’s IR window to the printer’s IR window when printing in IR
mode. Distance can’t exceed 50cm, angle can’t exceed 30 degrees, or may cause garbled
or can’t print.
Although printer can work stable with -10
to 50 ,but too high environment
temperature or low temperature may reduce print quality.
Too high humidity(>85%) or too low humidity (<20%) will reduce print quality.
Using poor quality printing paper or store paper too long time may reduce printing
quality even damage the printer.
When printer working in black mark detection method ,requiring black label that
pre-printed in printing paper conform black label printing specifications. Or it
may cause printer can’t detect the black label accurately.
Attentions in storage
Store temperature: -20
to 70 . Humidity temperature: 5 to 95 .
Please remove the battery in a separate storage if store the printer for long time.
Or it may lead to battery failure even leaking then damage the printer.
General thermal paper storage time is short. If you want to print document to save
for long time ,please use the long-term thermal paper. Don’t store paper in direct
sunlight or heat. Please save in a cool dark place if you have opened.
-3-
3
Attention in battery safety
Please read this user manual before use product
May cause battery to overheat, fire, explosion, damage, performance or reduce
product’s life if ignore these instructions.
danger
1.Don’t let water enter in battery. If burn security device inside the battery,
battery charging may cause exception current or voltage, chemical reaction. Then
even cause battery to overheat, ignite or explosion.
2.Don’t use or store battery near high-temperature place. Excessive heat may damage
resin enclosure and/or insulation materials, then short-circuit inside battery.
Even lead battery overheat, fire and/or explosion.
3.Please use the special charger when charging. Charging in high temperature, high
pressure/high current, using modified charger ,etc. may cause over battery charging
and abnormal current/voltage, chemical reaction. Then may cause battery overheat,
fire and/or explosion.
4. Battery have marked positive and negative clearly. Please sure that battery
orientation is correct when putting battery into the charger and/or product. Insert
reversed will cause charge reversed, chemical reaction. Then may cause battery
overheat, fire and/or explosion.
5. Don’t contact battery and power outlet with cigarette lighter socket. It may cause
hypertension, excessive current ,battery to overheat, fire and/or explosion.
6.Don’t heat battery or put battery in fire. This may melt insulation material,
damage security device, ignite electrolytic solution, causing battery overheat,
fire and/or explosion.
7. Don’t use battery in opposite (+) and (-) orientation. In the charging process,
this will cause reverse charge, abnormal chemical reaction. In the using process,
may appear abnormal current that can’t be predicted. Causing battery overheat, fire
and/or explosion.
8. Don’t let battery’s positive and negative touch any metal. Don’t carry or store
battery with metal objects such as necklaces, hair clips ,ext. Internal
short-circuit may cause excessive current, cause battery overheat, fire and/or
explosion and the adjacent metal objects may be overheating.
9. Don’t throw or hit battery. If burned security device inside the battery, the
battery charging may cause abnormal current and/or voltage, cause abnormal chemical
reaction then may cause battery overheat, fire and/or explosion.
-4-
4
Introduction
Part
1.1 printer appearance
10
6
7
2
11
9
5
1
8
4
3
1. feed button
2. low paper indicator
3. RS232 serial communication socket
4. IR interface
5. printer cover
6. power button
7. system light
8. power interface
9. battery cover
10. charge indicator
11. Bluetooth connection indicator
-5-
5
1.3 Accessory
Standard accessories
battery
power charge
serial data line
options
leather
-6-
paper roll
6
Part
Features
2.1 printing performance
Print method: thermal printing
Paper width : 57mm;
Effective print width 48mm
Resolution 8 /mm 203dpi
`
Dots per line 384 dots
Print speed 50~80mm/s
Paper thickness 60 80 m
Printable content
English ,members ,symbols, characters, graphics, curve,
pre-stored icons
Barcode(CODE39 EAN13 EAN8 CODABAR CODE128 CODE93 ITF)
2.2 Physical parameters
Size
114 * 85 * 38 mm
Weight :205g without paper roll
Roll diameter
30mm
Interface method original IR RAW_IR VIR IrDA Ir COMM RS232 serial Bluetooth
Interfaces are different by specific models. Look at model description.
2.3 Environment parameters
Work temperature -10
50
Work humidity : 20% 85%
Store temperature -20
70
Store humidity 5% 95%
2.3 other performance
Paper loading method clamshell paper loading
Black label position: look at 4.2 pre-print black label instruction
Paper detection: power button and function keys will flash and buzzer prompts when
the printer runs out of paper.
Printing control commands: ECS/POS compatible instruction set.
Power supply method: 1600mAH lithium ion power.
Battery warning: when battery will consume, the charge indicator flashes and emit
two short ringing. If user haven’t charge, there will utter a ringing interval to
prompt user to charge.
Charging : full charged within 2~4 hours.
Time of a single charge can be use: on 12.5 print density 100~200m on 25
print
density 80~100m.This parameter is only for reference. After using the battery for
long time, may lead to decline capacity so that can’t sure the print time.
-7-
7
Using method
3.1 prepare before use
3.1.1 Battery installation
1
2
the
3
Open the battery cover then open the battery compartment cover
As shown, put battery into the battery cover. Notice that don’t upside down
positive and negative.
Then close the battery cover.
3.1.2 Install the print paper roll
Sticky stick
cover
Using method
Press here to
open cover
1
2
Hold down the lid button, a little forced to open the cover
As shown put paper roll into the warehouse. Pay attention to the direction
of paper. Upside will lead can’t to print
3 As picture shown pull part of the paper. Notice to pull paper out of warehouse
4 Straighten the paper roll then close the cover.
-8-
8
3.2 Basic functions of using
3.2.1 Power on
When turn off, press power button POWER for 2 seconds the printer turned
on and entering working state. The power indicator (red light) flash.
Notice: If there isn’t out of paper but feed light flashes that mean the
printer is running out of power. Please replace the battery or charge to
continue to use. Charging method is in 3.2.5(charge).
3.2.2 Power off
When power on, press power button
off . All lights extinguish.
POWER
for 2 seconds, the printer turned
3.2.3 Self detection
User can detect printer any time to detect the printer current settings and
status.
Self detection method Power off if the printer is turned on
then press
FEED
then press POWER to turn on. Printer will print self-test page
with current status of the printer and printer setting and print example.
3.2.4 Feeding
manual feed
In normal operation, press FEED to start feeding. Feeding 250mm if there
have print black label in printing paper that printer recognized. Printer
will stop feeding automatically when printer feed to black label. Printer
feed will not affect by black label if set feeding length to 0.
3.2.5 Charger
The printer’s battery will be consumed after using for a time. When battery
power is going to run out, feed light will blink and issue a warning sound.
It means it’s time to charge. User have to charge when printer turned off
automatically in printing process such as to continue to use.
Charge as follow: Insert the charger’s mains plug to electrical outlet of
220V 50HZ. Then insert charge plug into the charging socket begin to charge.
In charging, feed light will flash and charge indicator always flash until
the battery is full charged in power on status.
You can use the printer normally in charging process.
-9-
9
3.3
Print connection and print
3.3.1 Serial port connection
Optional accessories of printer contain DB-9 serial cable(other end MINI
DIN plug connect the printer).
3.3.2 Original infrared and IrDA connectivity
IR data communication technology can be used to data communicate with your
equipment.
IR data communication technology is a kind of wireless data communication
technology which is use IR as a communication carrier that develop and
developed by IR Data Association (IrDA).
Using method
IR port, wireless data transmission interface, now has been the main means
of data communication for most of portable devices because of its low power
consumption, mature technology, easy to use and exp. Most of portable devices
have IR port such as all of the WINCE Pocket PC, PALM PDA, notebook computers,
some mobile phones, most of portable data collector and a small part of
measuring instruments that used in field operations.
The printer’s hardware compatible IrDA1.1 specifications. IrCOMM protocol
is a sub-agreement of IrDA protocol. It has used in many portable devices.
Original IR data communication method can connect device that has original
IR interface to print. IrCOMM ways can connect IrCOMM protocol device to print.
More knowledge about IrDA please visit http://www.irda.org.
Printer can’t work at original IR state at the same time work at VIR and/or
IrCOMM state. You can use the printer only after reset if the printer isn’t
work in the state you need to be. Method of setting IR model please look at
3.3 printer setting.
Original IR can work at Baud Rate of 9600bps 19200bps 38400bps 57600bps
115200bps.
When printing in original IR
RAW-IR and IrDA IrCOMM mode, please align
master’s infrared line to printer’s infrared windows in printing process.
The distance can’t exceed 50 cm(may be different by the master device). The
angle can’t exceed 30 degrees.
Details of original IR and IrCOMM develop please refer to <development manual
of portable mini-printer>.Demand the manual from your supplier.
- 10 -
10
3.3.3 Bluetooth pairing and print
P200 portable mini-printer pair with master of driver before work .Pair process
initiate by master.
Usual pairing as follow:
1
Turn on the printer
2
Master search external Bluetooth
3 Select the SPB printer if there has several external Bluetooth device.
4 Bring in password“0000”
5 Finished pairing.
Please look at the master Bluetooth function description about specific pairing
method.
The printer must be power on in pairing.
Notice: Don’t turn on many printers at the same time when pairing. Or can’t
determine which printer has paired success.
After pairing successful, other PC can still be paired with the printer. Each
printer can pair with 8 PC machine. If pairing more PC, the PC paired with printer
earliest will be delete automatically. At the same time, if PC need drive printer
to print, need to re-pair.
Using Bluetooth interface to print
For PC with a virtual Bluetooth serial port(such as mobile phone of SMARTPHONE,
POCKET PC, PALM, notebook computers),can send print data to P200 printer to print
through virtual Bluetooth serial port after pairing successful. If the PC don’t
have virtual Bluetooth serial port or need drive P200 mini-printer to print,
please contact the PC supplier.
3. 4
Light and buzzer signal instruction
Printer has one buzzer and four indicator lights to prompts user of printer’s status. Indicator
lights are used to represent the current status of printer. Buzzer used to indicate changes of
printer’s status. Four indicator lights are low paper indicator, system light, charge
indicator and Bluetooth connection indicator.
Feed indicator
Power indicator
Printer status
Quick flashing
extinguish
charging
Slow flashing
Extinguish
Low battery
Long bright
Extinguish
Charging end
None
Long bright
Power on status
Slow flashing
Slow flashing
Out of paper
none
Slow flashing
Dormancy status
- 11 -
Buzzer
Chirping sound
11
Other information
4.1 Printer development manual
development manual of portable mini-printer is a technical manual for
developer to develop printer application, which can be obtained from your
supplier. This manual contains technical description of hardware
interface(serial communication interface, IR interface) of printer,
technical document of print control instruction set and others such as how
to print black label, how to use black label to locate.
4.2 Pre-printed black mark instruction
Please comply with the following when user use pre-printed black label to
locate notes or print black label. Or it may lead printer can’t recognize
the black label.
Pre-printed black mark specifications:
Printing position: Black mark should be printed on the left edge of text face.
Width range width 7mm
Height range 4mm height 6mm
Reflectivity of IR light <10%
other parts of paper width of the black mark
for reflectivity of IR light>65%
Hps Hps is distance between black mark’s lower edge of printer with starting
edge of the print.
0mm Hps 1mm
- 12 -
12