1
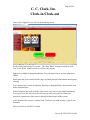
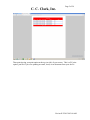
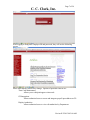
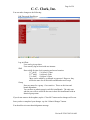
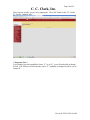
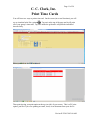
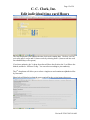
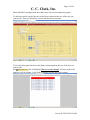
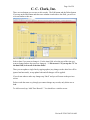
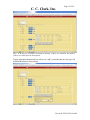
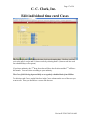
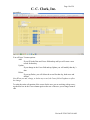
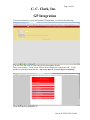
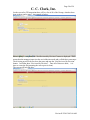
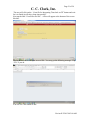
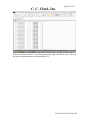
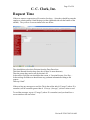
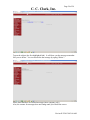
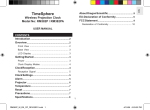
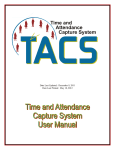
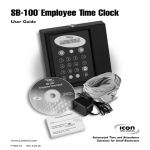
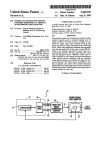
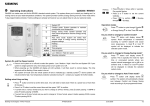
Page 1 of 24
C. C. Clark, Inc.
Timeclock User manual
Timeclock User manual ..................................................................................................... 1
Sign-on ............................................................................................................................... 2
Clock-in/Clock-out ............................................................................................................ 4
Edit Authority ................................................................................................................... 6
Print Time Cards ............................................................................................................ 11
Edit individual time card Hours .................................................................................... 12
Edit individual time card Cases ..................................................................................... 17
GP Integration ................................................................................................................. 19
Request Time ................................................................................................................... 23
Revised1/2/2015 9:03:00 AM
Page 2 of 24
C. C. Clark, Inc.
Sign-on
Go to the internet on your device.
Enter link www.ccclark.com
Tap on “Time Clock” (at the top, 5th from the left)
Revised1/2/2015 9:03:00 AM
Page 3 of 24
C. C. Clark, Inc.
You will use your Employee Id number as your username and whatever your assigned
password is.
If you do not remember your password please email [email protected],
[email protected], [email protected], or [email protected] and we will get it
changed for you. If you need us to change your password, also include your personnel
email to put in your employee profile. We cannot change your password unless there is
an email address in your employee profile.
Revised1/2/2015 9:03:00 AM
Page 4 of 24
C. C. Clark, Inc.
Clock-in/Clock-out
Once you are logged in, you will see the following screen:
It will remain onscreen for 30 seconds. Tap “Start Work” to begin or return to work.
Tap “Leave Work” to take a break or end your day at work.
Support is available for program problems. See your supervisor to get time adjusted or
added.
Please note that your vacation and free days are listed just below the buttons ansd support
message.
Your current week of work (Friday thru Thursday) is displayed below the timeclock with
hours calculated on it.
In the Navigation bar on the left side of the screen, you can view personnel information.
If you go to view this data, the scrren will stay up until you log out or return to the
timeclock screen(use the back arrow at the top left hand corner of the screen.).
At the bottom of the screen is a printer icon. Use this if you want to print a copy of your
timesheet.
When you click on it a PDF is created.
Revised1/2/2015 9:03:00 AM
Page 5 of 24
C. C. Clark, Inc.
Then print it using your print option at the top (or side) of your screen. This is a PC print
option, just like if you were printing an email, word, or txt document from your device.
Revised1/2/2015 9:03:00 AM
Page 6 of 24
C. C. Clark, Inc.
Edit Authority
If this is your first time using the time clock in your Division/Branch, please
contact IT to set up you initial user security before continuing.
There are 3 types of edit authority that can currently be assigned. They are listed
below:
TC_Edit=Y
This user can edit any user in their Division/Branch and assign any available
authorities to them and can edit any time card within their Division/Branch.
This user can add records to any timesheet in their Division/Branch.
This user can assign groups to any user in their Division/Branch.
This user can clock-in/out.
This user can print all or single timecards in their Division/Branch.
TC_Edit=E
This user can edit any time card within their Division/Branch/Group but their own.
This user can add records to any timesheet in their Division/Branch/ Group but their
own.
If this user does not have a group assigned, they can edit any timecard in their
Division/Branch but their own.
This user can print all or single timecards in their Division/Branch/Group but their
own.
This user can clock-in/out.
Blank
This user can clock-in/out.
This user can print their own timecard.
If a user has TC_Edit= Y or TC_Edit=E, they can sign in to the web site using Login
(not TimeClock) from the www.ccclark.com website.
They will see the following screen:
Revised1/2/2015 9:03:00 AM
Page 7 of 24
C. C. Clark, Inc.
After logging in using their employee ID and password, they will see the following
screen:
Please note that the Articles may change. Options of particular interest are:
Time Card MaintenanceAllows you to edit/print/approve timecards.
GP IntegrationAllows authorized users to create and integrate payroll spreadsheets to GP.
Display AuthoritiesAllows authorized users to view edit authorities by Department.
Revised1/2/2015 9:03:00 AM
Page 8 of 24
C. C. Clark, Inc.
To Edit timecards select “Time Card Maintenance”. You will see the following screen:
Please note:
The drop down list will vary based on the security assigned. If the user has
TC_Edit=Y they will have similar to the above options. If they have TC_Edit=E,
they will similar to the screen below:
They do not have the pencil icon
for editing the profile attributes for their own
profile. Also that they can not edit their own timecard.
To Edit Authority you tap the pencil icon
. You will see a screen similar to this:
Revised1/2/2015 9:03:00 AM
Page 9 of 24
C. C. Clark, Inc.
You can make changes to the following:
Edit Timecards DropDown:
Log in Offsite
User can log in anywhere
User can only log in from inside our intranet
Shift
Enter a shift for time clock reporting and record creation.
1-1st shift*
12:01am-11:59pm
2-2nd shift* 10:00am-9:59am
3-3rd shift*
03:00pm-2:59pm
*these can be added to or changed as requested. However, they
will be the same for all Divisions and Branches and Groups
Group
Enter any name for a group. Case sensitive. These are division and
branch dependent.
You can have an admin group in each Division/Branch. The only ones
who the user will see would be the ones in their Division/Branch with an
identical group name.
If you do not want to do the update, tap the “Close Me” button and no changes will occur.
Once you have completed your changes tap the “Submit Changes” button.
You should receive an acknowledgement message.
Revised1/2/2015 9:03:00 AM
Page 10 of 24
C. C. Clark, Inc.
Then close the window you are on by tapping the “Close Me” button or the “X” beside
TC_Profile_Updated_Msg” .
**Important Note**
If you change your edit capabilities from a “Y” to an “E”, you will not be able to change
it back. You will have to find someone with a “Y” capability to change it back for you or
contact IT.
Revised1/2/2015 9:03:00 AM
Page 11 of 24
C. C. Clark, Inc.
Print Time Cards
You will have two ways to print a timecard. On the screen (in several locations) you will
see an icon that looks like a printer
. Tap on it at the top of the page and it will print
all of your group’s timecards. Tap on it inside the grid and it will print the individual
timecard only.
When you click on it a PDF is created.
Then print it using your print option at the top (or side) of your screen. This is a PC print
option, just like if you were printing an email, word, or txt document from your device.
Revised1/2/2015 9:03:00 AM
Page 12 of 24
C. C. Clark, Inc.
Edit individual time card Hours
The first drop down field contains the time clock week starting date. I believe you can
review the past 9 weeks and 11 future weeks by selecting them. (future weeks are used
for scheduled days off requests)
If you have authority, the 2nd drop down box will have the division, the 3rd will have the
branch, and the 4th will have Group. You can select according to your authority.
The 5th drop down will allow you to select a single user and contains an alphabetical list
by first name.
Show help will display/explain the steps required for the review/approval process:
Revised1/2/2015 9:03:00 AM
Page 13 of 24
C. C. Clark, Inc.
Show and Hide Unassigned with show/hide users who are not assigned to groups.
To edit time records, tap the blue box in the Hours column on the row of the user you
want to edit. Then you should see a screen like the next screen shot:
To Exit the edit tap the blue box in the Hours column again on the row of the user you
want to edit.
The Print Edit Trail. Link will display if there were any changes you have made to the
employee you are editing. It will look something like this and can be printed:
Revised1/2/2015 9:03:00 AM
Page 14 of 24
C. C. Clark, Inc.
There are two buttons you can use to edit records. The Edit button and the Delete button.
If you tap on the Edit button and then on a calendar icon beside a date field, you will see
a screen similar to this one:
Select a date if you want to change it. For the time field, select the part of the time you
want to change and use the arrows to change it. ***Please note***If you tap the “X” in
the date field, it clears all of the time fields!
Then you can update a single line by tapping update (any changes to the other line will be
ignored and not made), or tap update both and all changes will be applied.
If you do not what to make any changes tap “Back” and you will return to the previous
screen.
Delete works the same way, though you cannot change any records, only delete one or
both.
To Add a record, tap “Add Time Records”. You should see a similar screen:
Revised1/2/2015 9:03:00 AM
Page 15 of 24
C. C. Clark, Inc.
Note: If no days are available, the button is missing. If days are available, the number
of days are listed after the description.
Tap the appropriate button and you will see an “Add” screen like this one (the type will
be different based on what you tap):
Revised1/2/2015 9:03:00 AM
Page 16 of 24
C. C. Clark, Inc.
You can only specify a date here (use the date selector as explained above). You can also
enter the number of consecutive days you want to add in the “Days” field (default is 1).
To add the day(s) tap the “Add Record” button. To disregard tap the “Back” button.
If your days you are adding are not in this “Week” selected, you must change to the
proper week to view or change the records. You do not have to be on that week to add
records, only to view or change them. If you do not change the date, the days will be
added starting the beginning day of the pay period!
To make the entire edit portion of the screen for the user you are working with go away,
tap the blue box in the Hours column again on the row of the user you no longer want to
edit.
Revised1/2/2015 9:03:00 AM
Page 17 of 24
C. C. Clark, Inc.
Edit individual time card Cases
The first drop down field contains the time clock week starting date. I believe you can
review the past 9 weeks and 11 future weeks by selecting them. (future weeks are used
for scheduled days off requests)
If you have authority, the 2nd drop down box will have the division and the 3rd will have
the branch. You can select according to your authority.
The Cases field is being imported daily on a regularly scheduled basis from EOStar
To edit time card Cases, tap the blue box in the Cases column on the row of the user you
want to edit. Then you should see a screen like the next
Revised1/2/2015 9:03:00 AM
Page 18 of 24
C. C. Clark, Inc.
screenshot:
You will have 3 button options:
Add:
If you fill in the Date and Cases field and tap add you will create a new
record for that day.
Update:
If you change in the Cases field and tap Update you will modify that day’s
data
Delete:
If you tap Delete, you will delete the record for that day, both cases and
dollars!
Note-When you add, change, or delete any record, the Cases field will update to reflect
the change.
To make the entire edit portion of the screen for the user you are working with go away,
tap the blue box in the Cases column again on the row of the user you no longer want to
edit.
Revised1/2/2015 9:03:00 AM
Page 19 of 24
C. C. Clark, Inc.
GP Integration
If you have authority to run it and click on GP Integration, you will see the following:
You can select the week to work with, the division and the branch.
There is an option to “Create a List of Know Errors/Employees with no records”. It will
produce a report that looks like this. Any errors must be corrected before continuing!:
Close this report by taping the “X”.
Revised1/2/2015 9:03:00 AM
Page 20 of 24
C. C. Clark, Inc.
On the screen for GP Integration there will be a list of all of the Groups, what has been
done to them, and a status. An example is below:
When a group is completed, the “Not Reviewed by Division” button is displayed. This
means that the manager/supervisor has revied the timecards and verified their correctness.
The division payroll clerk now does the same and taps the “Not Reviewed by Division”
button. I will then show “Reviewed by Division” . Once all of those are done, it is
time to create the file(assuming the error report is clean).
The screen will look like this:
Revised1/2/2015 9:03:00 AM
Page 21 of 24
C. C. Clark, Inc.
The user will click on the “Creat file for Integrating Timeclock to GP” button and wait
for it to finish (it will take a long time usually).
Next tap the link “View/Edit excel file”. A box will appear at the bottom of the screen
like this:
Tap on the box and it will open an excel file. You may get the following message. Tap
“Yes” if you do.
You will see a file similar to this:
Revised1/2/2015 9:03:00 AM
Page 22 of 24
C. C. Clark, Inc.
Tap the triangle next to column A and double click the bar to the right of column A to
format the colums to autofit. Verify that you have the right week and division. Then run
the payroll integration process as instructed by GP.
Revised1/2/2015 9:03:00 AM
Page 23 of 24
C. C. Clark, Inc.
Request Time
If the user wants to request time off (vacation, free days…) then they should log onto the
employee website and tap “Send Message (on the right hand side near the bottom of the
sidebar). They will see a screen similar to the one below:
They should then select their Division from the Drop Down box.
Then their Branch from the drop down box (if there is more than one)
Then the person they need to ask for the time off.
In the subject field, the user should but the reason, ie Vacation Request, Free Day…
In the message field the user should enter any pertinent information relating to the
request.
Then tap “Send”.
If the user has any messages to read, the Tab in the red bar titled “(X msgs)” (where X is
a number) will be a number greater than 0. If it says “(0 msgs)” you have none to read.
To read the messages, tap on “(X msgs)” (where X is a number) and you should see a
screen similar to the one below:
Revised1/2/2015 9:03:00 AM
Page 24 of 24
C. C. Clark, Inc.
Tap on the subject (the first highlighted link) It will show you the message somewhat
like you see below. You can also delete the message by taping “Delete”.:
Please note that these are internal messages (inter-company only)
Also, the counter for messages does not change until you refresh the screen.
Revised1/2/2015 9:03:00 AM