1
College of Lake County
Professional Development Center y September 2008
PeopleSoft 9.0 Basics
CLC Student Administration System
PeopleSoft 9.0 Basic Users Manual
TABLE OF CONTENTS
1. INTRODUCTION ............................................................................................................................ 1-1 2. GETTING STARTED ..................................................................................................................... 2-1 LOGGING INTO THE NETWORK ...................................................................................................... 2-1 ACCESSING PEOPLESOFT ................................................................................................................ 2-1 GUIDELINES FOR CREATING PASSWORDS ................................................................................ 2-2 SETTING UP THE CLC INTRANET AS YOUR HOME PAGE ........................................................ 2-5 TIMING OUT IN THE SYSTEM .......................................................................................................... 2-6 LOGGING OFF OF PEOPLESOFT ...................................................................................................... 2-7 3. USING THE MENUS ...................................................................................................................... 3-1 MENUS .................................................................................................................................................. 3-1 USING MENUS..................................................................................................................................... 3-2 DISPLAYING AND HIDING THE MENU PAGELET ...................................................................... 3-3 USING THE MENU PAGELET ............................................................................................................ 3-3 OPENING A PAGE FROM THE NAVIGATION MENU .................................................................. 3-4 USING THE MENU SEARCH FUNCTION ...................................................................................... 3-6 PRIMARY ELEMENTS OF WINDOWS ............................................................................................. 3-9 NAVIGATION HEADER ..................................................................................................................... 3-9 TOOLBAR BUTTONS........................................................................................................................ 3-10 WORKING WITH COMPONENTS AND PAGES ............................................................................ 3-11 MOVING BETWEEN PAGES OF A COMPONENT......................................................................... 3-13 SAVING DATA IN A COMPONENT ................................................................................................ 3-14 COMPONENTS WITH RELATED LINKS ........................................................................................ 3-15 4. GETTING HELP ............................................................................................................................. 4-1 FERPA (FAMILY EDUCATIONAL RIGHTS AND PRIVACY ACT) ............................................... 4-3 5. OPENING A NEW WINDOW ....................................................................................................... 5-1 NEW WINDOW FUNCTION ............................................................................................................... 5-1 TIPS FOR USING THE NEW WINDOW FUNCTION ........................................................................ 5-2 6. IDENTIFYING TYPES OF DATA ENTRY ELEMENTS.......................................................... 6-1 TYPES OF DATA ENTRY FIELDS ..................................................................................................... 6-1 REQUIRED DATA ENTRY FIELDS ................................................................................................... 6-2
College of Lake County
Professional Development Center y September 2008
PeopleSoft 9.0 Basics
7. NEWER FEATURES ...................................................................................................................... 7-1 USING SPELL CHECKING ................................................................................................................. 7-1 USING THE DOWNLOAD TO EXCEL FUNCTION .......................................................................... 7-2 USING GRID TABS .............................................................................................................................. 7-3 USING NOTIFY BUTTON ................................................................................................................... 7-5 8. USING PAGE ACTIONS TO VIEW DATA ................................................................................ 8-1 PAGE ACTION BUTTONS .................................................................................................................. 8-1 EFFECTIVE DATES ............................................................................................................................. 8-2 9. USING THE SEARCH FUNCTION.............................................................................................. 9-1 USING SEARCH CRITERIA................................................................................................................ 9-1 BASIC SEARCH PAGE ...................................................................................................................... 9-1 USING SEARCH OPERATORS ........................................................................................................... 9-5 SAVING SEARCH CRITERIA ............................................................................................................. 9-8 INCLUDE HISTORY AND CORRECT HISTORY FUNCTIONS .................................................... 9-10 SEARCH PAGE BUTTONS ............................................................................................................... 9-10 SEARCH RESULTS ............................................................................................................................ 9-11 SINGLE COLUMN SEARCH RESULT LIST................................................................................... 9-11 SUBDIVIDED SEARCH RESULT LIST .......................................................................................... 9-11 LIST WITH MESSAGE TO NARROW SEARCH ............................................................................. 9-12 MOVING BETWEEN RECORDS IN A SEARCH LIST ................................................................... 9-13 10. PRINTING ...................................................................................................................................... 10-1 PRINTING OPTION #1 – FILE > PRINT ........................................................................................... 10-2 PRINTING OPTION #2 – PRINTER FRIENDLY VERSION ............................................................ 10-3 PRINTING OPTION #3 – RIGHT-CLICK.......................................................................................... 10-4 PRINTING OPTION #4 – RIGHT-CLICK FOR INFORMATION THAT IS LARGER THAN A
SCREEN .............................................................................................................................................. 10-4 11. USING 19TH 41ST HOUR ........................................................................................................... 11-1 12. DATA NAVIGATION ................................................................................................................... 12-1 TABBING BETWEEN FIELDS.......................................................................................................... 12-1 SCROLL AREAS ................................................................................................................................ 12-1 COLLAPSIBLE AREAS ..................................................................................................................... 12-2 SEARCHING FOR BIO/DEMO DATA IN THE SYSTEM................................................................ 12-2
College of Lake County
Professional Development Center y September 2008
PeopleSoft 9.0 Basics
13. SETTING USER DEFAULTS ...................................................................................................... 13-1 FIELDS WITH DEFAULTS VALUE OPTIONS................................................................................ 13-6 USER DEFAULTS 1 ........................................................................................................................ 13-6 USER DEFAULTS 2 ........................................................................................................................ 13-6 USER DEFAULTS 3 ........................................................................................................................ 13-7 USER DEFAULTS 4 ........................................................................................................................ 13-7 ENROLLMENT OVERRIDE DEFAULTS ....................................................................................... 13-8 COMMUNICATIONS SPEED KEYS DEFAULTS .......................................................................... 13-8 USER 3C GROUPS SUMMARY DEFAULTS ................................................................................. 13-8 14. USING SELF SERVICE ............................................................................................................... 14-1 15. WORKING WITH FAVORITES IN PEOPLESOFT 9.0 ......................................................... 15-1 ADDING FAVORITES ....................................................................................................................... 15-1 SEQUENCING AND EDITING FAVORITES ................................................................................... 15-2 DELETING FAVORITES ................................................................................................................... 15-4 16. PERSONALIZATIONS ................................................................................................................ 16-1 USING MY PERSONALIZATIONS .................................................................................................. 16-1 17. CLEARING YOUR BROWSER’S CACHE ............................................................................... 17-1 College of Lake County
Professional Development Center y September 2008
PeopleSoft 9.0 Basics
1.
INTRODUCTION
The College of Lake County has been using PeopleSoft software to manage the Human
Resources and Student Administration processes of the college. The college has adopted a new
version of the PeopleSoft system, PeopleSoft 9.0.
The new version of PeopleSoft includes all of the functionality of the previous PeopleSoft 8
system. Additionally, the PeopleSoft 9.0 system has some additional functionality, including
bookmarking within the application, downloading data to Excel, and sending e-mails from within
PeopleSoft.
This manual includes step-by-step instructions on how to use the new system and how the
navigation has changed. The table of contents at the beginning of the document outlines each of
the areas covered in this manual.
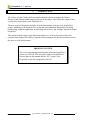
IMPORTANT NOTICE
The screen snaps throughout this manual reflect the PeopleSoft 9
system as of 9/01/08. You may notice slight screen differences,
between those in this manual and the “live” system, if the
PeopleSoft system has changed after 9/01/08.
Introduction y September 2008
1-1
PeopleSoft 9.0 Basics
GETTING STARTED
2.
LOGGING INTO THE NETWORK
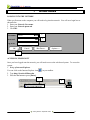
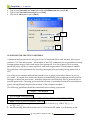
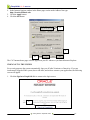
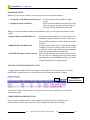
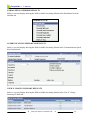
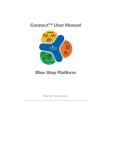
When you first turn on the computer you will need to log into the network. You will see a login box as
shown below.
1. Enter your Network User name.
2. Enter your Network password.
3. Click OK.
User name:
1
Class01
2
Password:
Log on to:
CLCILLINOIS
OK
Cancel
Shut Down...
Options <<
3
ACCESSING PEOPLESOFT
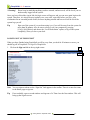
Once you have logged onto the network, you will need to access the web-based system. To access the
system:
1. Bring up Internet Explorer.
, in your taskbar.
You can click on the Internet Explorer icon,
2. Type http://clcweb.clcillinos.edu.
3. Press the Go button or press [Enter].
2
Getting Started y September 2008
3
2-1
PeopleSoft 9.0 Basics
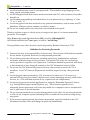
4. Type in your Network User Name followed by @clcillinois.edu and press [Tab].
5. Type in your Network Password and press [Tab].
6. Click on the OK button or press [Enter].
4
5
6
GUIDELINES FOR CREATING PASSWORDS
A compromised password not only puts a user’s E-mail and files at risk, but may also expose
sensitive CLC data and systems. All members of the CLC community are responsible for taking
the appropriate steps to select and secure their passwords. It is also a must to have a strong
password policy in place to meet regulatory and audit requirements. This document outlines
the guidelines and requirements for choosing, managing, and protecting strong passwords at
CLC.
One of the most common methods that attackers use to guess passwords is known as a brute
force attack. In a brute force attack, the attacker systematically tries possible passwords until he
manages to break into an account. Attackers frequently use dictionary files to generate lists of
possible passwords. Choosing passwords that are easy to remember but hard for an attacker to
guess, will significantly improve the security of the computer and data.
The following guidelines should be considered when creating a password:
Steps 1 – 3 are Required
1.
2.
3.
4.
At least eight characters long
The first character MUST BE AN ALPHA CHARACTER AND CAPITALIZED.
Must contain at least one numeric character
May contain at least one punctuation or symbol character (e.g. !@#$%^&*()_+|~=\`{}[]:";'<>?,./ )
5. Are not trivially derived from the user’s CLC Network ID, name, or a dictionary word.
Getting Started y September 2008
2-2
PeopleSoft 9.0 Basics
6. Avoid using dictionary words in your passwords. This includes foreign language words,
slang, jargon, and proper names.
7. Avoid using passwords that contain words associated with CLC, such as lancers, Grayslake,
brandel, etc.
8. Avoid common misspellings and substitutions in your passwords (e.g. replacing “e” with
“3” or “i” with “1”)
9. Avoid using passwords that are based on any personal information, such as name, user ID,
birthdates, addresses, phone numbers, or relatives’ names.
10. Do not use sample passwords, such as the ones included in this guide.
Think up a phrase or part of a book, poem, or song and use part of it to form a memorable
password. For example:
Only 50 more days until I graduate from SFS!, would be O50mduIgfSFS!
All of Gaul is divided into 3 main parts, would be “AoGidi3mp.”
These guidelines were taken from an e-mail composed by Ratnakar Nanavaty 6-27-05.
Guidelines for Protecting Passwords
1. Password security is the responsibility of the end user. The end user will be held accountable
for any misuse of guessed, disclosed, or compromised passwords.
2. Do not share passwords with anyone, including supervisors, administrative assistants,
secretaries, and technology service providers. It is against CLC policy for a technology
service provider to request a user’s passwords. If someone demands a password, refer them
to this document or have them call someone in the CLC Information Security Office.
3. Do not use the CLC Network ID password for any other account or service at CLC or
elsewhere. Your CLC Network ID password should be unique from any other password
used.
4. Avoid using the same passwords for CLC accounts as for other non- CLC access (e.g.,
personal ISP accounts, free online E-mail accounts, instant messaging accounts, other online
services, etc.). This will limit exposure if any of passwords are compromised.
5. Avoid storing passwords within applications or using the "Remember Password" feature
(e.g. Netscape Messenger, Internet Explorer, etc.). These features typically do not
adequately protect passwords, and it may be possible for a computer virus or unauthorized
user to gain access to this information.
6. Do not write passwords down or store them anywhere in the office. Do not store passwords
in a file on any computer system (including PDAs or similar devices) without using strong
encryption.
7. If the account or password may have been compromised, report the incident to the CLC
Information Security Office and change the password immediately.
Getting Started y September 2008
2-3
PeopleSoft 9.0 Basics
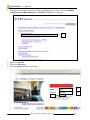
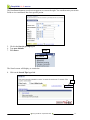
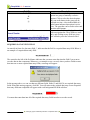
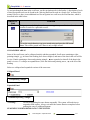
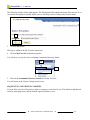
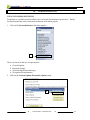
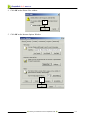
1. Near the top of the page, under the Faculty & Staff Resources section, click on the Student
Administration & Human Resources - PRODUCTION link on the page.
1
2. Enter your User ID.
3. Enter your Password.
4. Click the Sign In button or press Enter.
2
3
4
Getting Started y September 2008
2-4
PeopleSoft 9.0 Basics
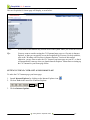
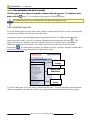
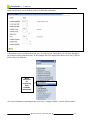
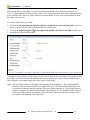
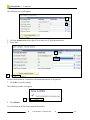
The new PeopleSoft 9.0 home page will display, as seen below:
Note:
Screen shots in this manual may include areas of the system where you do not have access.
Tip:
You may want to consider setting the CLC Intranet home page as a Favorite in Internet
Explorer, so that you can quickly access the PeopleSoft log in screen. For help with this,
refer to the “Working with Favorites in Internet Explorer” section of this manual.
Otherwise, you my want to make the CLC Intranet your home page on your PC, so that it
will automatically come up when you launch Internet Explorer. Instructions on setting up
the CLC Intranet as your home page follow.
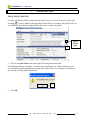
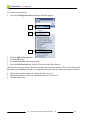
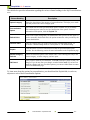
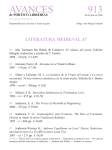
SETTING UP THE CLC INTRANET AS YOUR HOME PAGE
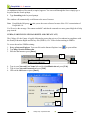
To make the CLC Intranet page your home page:
1. Launch Internet Explorer by clicking on the Internet Explorer icon,
2. Click on Tools in the menu bar of Internet Explorer.
.
2
3. Click on Internet Options.
Getting Started y September 2008
2-5
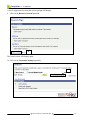
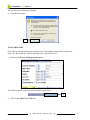
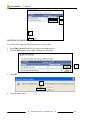
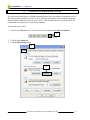
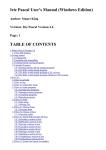
PeopleSoft 9.0 Basics
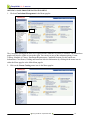
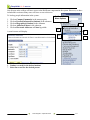
4. In the Internet Options window in the Home page section at the Address line type:
http://clcweb.clcillinois.edu.
5. Click the Apply button.
6. Click the OK button.
4
5
6
The CLC Intranet home page will now appear on your PC whenever you launch Internet Explorer.
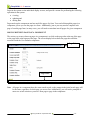
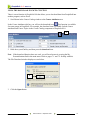
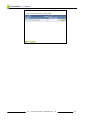
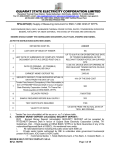
TIMING OUT IN THE SYSTEM
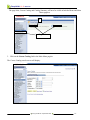
For security purposes the system automatically logs you off after 20 minutes of inactivity. If you are
inadvertently logged off the system, due to idle time, and wish to return to your application, the following
screen will appear.
1. Click the Sign in to PeopleSoft link to return to the login screen.
1
Getting Started y September 2008
2-6
PeopleSoft 9.0 Basics
! Warning !
Please keep in mind that anything you have entered, and not saved, will be lost if you are
inadvertently logged off the system.
Once you have clicked the sign in link, the login screen will appear, and you can once again login to the
system. Therefore, it is always best to regularly save your work, especially before you leave your
workstation for an extended period of time, because anything entered and not saved will be lost if the
system logs you off.
Tip
Sign out of the system if you are done using it, or if you will be away from the system for
more than 20 minutes. Also be sure to always Lock your computer by pressing
[Ctrl]+[Alt]+[Delete] and choose the “Lock Workstation” option, or log off the system
completely, when you leave your desk.
LOGGING OFF OF PEOPLESOFT
When you have finished using PeopleSoft or will be away from you desk for 20 minutes or more, you
should log off of PeopleSoft. To log off of PeopleSoft:
1. Click on the Sign out link in the top right corner.
1
Note
You can sign out whenever the “Sign Out” link appears in the toolbar. There is no need to return
to the Home page to sign out.
Tip
If not available, open a second window and sign out of it. Then close the first window. This will
bring up the Sign In screen.
Getting Started y September 2008
2-7
PeopleSoft 9.0 Basics
3.
USING THE MENUS
MENUS
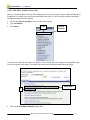
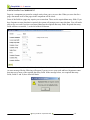
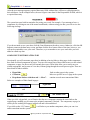
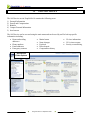
The PeopleSoft 9.0 system uses menus extensively as navigational tools. When you first log into
PeopleSoft 9.0, the homepage will display as seen below. The number of menu items displayed in the
Menu window will depend on the security of each user.
Menu Bar Icons
Menu Pagelet –
Default View
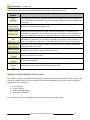
Each window in the PeopleSoft 9.0 system is called a “pagelet”. The Menu pagelet above has three Menu
bar icons in the title bar at the top. The table below describes the function of each of the Menu bar icons.
Icon
Description
Refreshes the window
Minimized the window
Removes the window from the home page.
Refresh
Minimize
Close
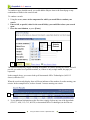
1. Click the Minimize button,
, in the Menu pagelet.
The Menu pagelet is no longer visible. Only the Menu title bar is visible.
2. Click on the Maximize button,
2
, in the Menu title bar.
The full menu screen will display again.
3. Click on the Close button,
, in the Menu pagelet.
Using the Menus y September 2008
3-1
PeopleSoft 9.0 Basics
A Removal Confirmation for the Menu pagelet will display.
4. Click the Yes-Remove button.
4
The Main Menu window will no longer display on the screen.
Note: You should only minimize or close the Main Menu when other menus are visible on the screen.
USING MENUS
On the left side of the PeopleSoft 9.0 home page the Menu pagelet is displayed. It contains a list of
folders, which provide the primary method for moving through the system. This list contains the areas of
the system to which you have access.
Folders
Note: The Menu pagelet displays all folders available to the current user. The folders available will vary
based on the user’s security permissions.
Using the Menus y September 2008
3-2
PeopleSoft 9.0 Basics
DISPLAYING
YING AND HIDING THE MENU PAGELET
The Menu pagelet can be displayed (expanded) or hidden (collapsed) at any time. To collapse the menu
pagelet, click the
button. To re-expand the menu pagelet, click the
button.
The Ctrl (Control) Y hot key combination will also collapse and expand the menu.
USING THE MENU PAGELET
To use the Menu pagelet you may either select a folder (or menu item) in the list or use the search prompt
at the top of the window to search for a particular folder.
Navigation to pages is accomplished through selections in the Menu. If a Menu selection has other
. This
choices associated with it, you will see an arrow pointing sideways towards the selection,
indicates that there are submenus associated with the menu item. If a Menu choice is open and the
additional submenus associated with it are visible, the arrow next to the Menu choice will point
downwards,
. If a Menu choice navigates you directly to a page, it will have a hyphen in front and be
underlined in blue type suggesting that it is a hyperlink to a page.
Search
Prompt
Menus with
Submenus
Links to
Pages
To select a Menu item, click your mouse on the desired selection. This will expand the associated Menu
choice to its submenu. You may also click on any of the page links at the bottom of the Menu pagelet.
Using the Menus y September 2008
3-3
PeopleSoft 9.0 Basics
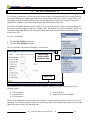
OPENING A PAGE FROM THE NAVIGATION MENU
1. Click on Curriculum Management in the Menu pagelet.
1
The Curriculum Management menu will expand and the submenus will now be available. The Main Menu
pagelet will also be visible as seen to the right. You can access any of the submenu options, Course
Catalog, Schedule of Classes, Enrollment Requirements, Combined Sections, Faculty and Event
Information, Class Roster, Grading and Instructor/Advisor Information by clicking on the menu item in
either the Menu pagelet or the Main Menu pagelet.
2. Click on the Course Catalog menu item in the Menu pagelet.
2
Using the Menus y September 2008
3-4
PeopleSoft 9.0 Basics
The page links, Course Catalog and Catalog Summary will now be visible in both the Menu and Main
Menu pagelets.
3
Page Links
3. Click on the Course Catalog link in the Main Menu pagelet.
The Course Catalog search screen will display.
Using the Menus y September 2008
3-5
PeopleSoft 9.0 Basics
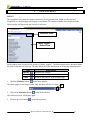
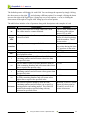
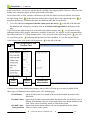
USING THE MENU SEARCH FUNCTION
There is a Search prompt at the top of the menu pagelet. If you are not sure where to find information in
PeopleSoft 9.0, simply type in a keyword and then press Enter. We will search for student enrollment
information using the search prompt.
1. Click in the Search: prompt at the top of the menu pagelet.
2. Type enrollment.
3. Press Enter.
1&2
Search
Prompt
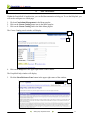
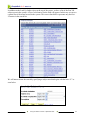
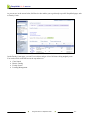
A search screen like the one below will display. A list of each menu item appears as a hyperlink along
with a description of the menu. The path to the menu item also displays under the description.
Menu Path
4
4. Click on the Enrollment Summary hyperlink.
Using the Menus y September 2008
3-6
PeopleSoft 9.0 Basics
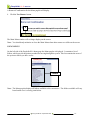
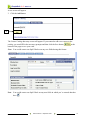
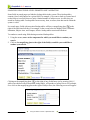
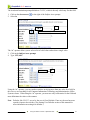
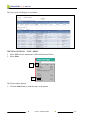
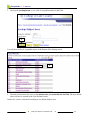
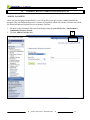
The Enrollment Summary search screen appears, as seen to the right. You can then enter your search
fields to view enrollment data for a specific person.
5. Click in the Search: prompt again.
6. Type user defaults.
7. Press Enter.
5&6
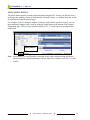
The Search screen will display, as seen below.
8. Click on the Search Tips hyperlink.
8
Using the Menus y September 2008
3-7
PeopleSoft 9.0 Basics
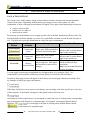
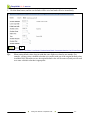
A list of suggestions for using the Search: prompt will display.
9. Click on the Return to Search hyperlink.
9
The Search screen will display again.
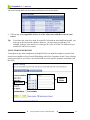
10. Click on the Customize Settings hyperlink.
10
Using the Menus y September 2008
3-8
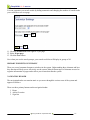
PeopleSoft 9.0 Basics
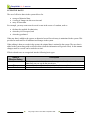
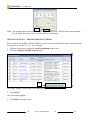
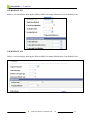
You can customize your search results by hiding summaries and changing the number of search results
you would like to see on a page.
11
13
11. Click the down arrow to the right of 25 per page.
12. Select 10 per page.
13. Click the Save button.
Now when you use the search prompt, your search result lists will display in groups of 10.
PRIMARY ELEMENTS OF WINDOWS
There are several common elements to windows in the system. Understanding these elements and how
they function will help you to effectively use the system. Many different types of elements are used to
organize information on pages and to allow you to enter data into the system.
NAVIGATION HEADER
The navigation header area remains static as you move through the various areas of the system and
appears as follows:
There are three primary buttons on the navigation header:
1. Home
2. Add to Favorites
3. Sign Out
Using the Menus y September 2008
3-9
PeopleSoft 9.0 Basics
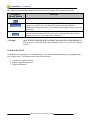
The following table provides information about the buttons contained in the navigation header.
Navigation
Header Button
Function
Takes you back to the Home page in the PeopleSoft 9.0 system.
Home
Save the current page as a favorite in PeopleSoft 9.0. Once the favorite has been
created, you can access it using the My Favorites menu item. Detailed
information on using this feature can be found in the Using Favorites section of
this manual.
Use to sign out of the system, when you would like to leave Internet Explorer
open. Pressing this button will take you back to the PeopleSoft login screen.
Note: Be sure to save your work before signing out.
Add to Favorites
Sign Out
! Warning ! -
ALWAYS USE THE SIGN OUT OPTION TO LOG OFF OF PEOPLESOFT!
Do not use the close button in the Internet Explorer browser to end your Peoplesoft
session.
TOOLBAR BUTTONS
At the bottom of most pages you will find buttons. These buttons change dynamically, depending on the
type of page in use. The buttons come in three different types:
1. search list navigation buttons,
2. page navigation buttons and
3. page action buttons.
Using the Menus y September 2008
3-10
PeopleSoft 9.0 Basics
The table below provides a list of toolbar buttons along with a description of each:
Toolbar
Button
Save
Return to
Search Page
Function
Saves information you have entered into the page. Generally, you will save when you
come to the end of a component. The Save command updates the data for all pages in a
component.
Returns you to the last search page used.
Displays the data for the next record in your search results list. The button will be
unavailable, or grayed out, if you did not select the record from a search results list, if
there was a single row in the list, or if the data displayed is the last record in the list.
Displays the data for the previous record in your search results list. The button will be
Previous in
unavailable, or grayed out, if you did not select the record from a search results list, if
List
there was a single row in the list, or if the data displayed is the first record in the list.
Update/Display Provides access to existing rows of data. If the data is effective-dated, it will display
only current and future rows.
Next In List
Include History
Add
Refresh Page
Go to Page
Button
Displays all rows of data: current, future and history.
Allow you to add a new record.
Reloads the current page to the screen, thereby ensuring that the most current
information is displayed.
Displays when there are several pages that are related to the current page. Clicking this
button opens a new page with a list of related page links.
WORKING WITH COMPONENTS AND PAGES
The system is made up of components and pages. Components are the functional areas in the system, and
consist of multiple pages. There are hundreds of different components in the system. Some examples of
components in the system are:
•
•
•
•
User Defaults
Course Catalog
Student Training History
Biographical (Student)
You will have access to components based on your security level in the system.
Using the Menus y September 2008
3-11
PeopleSoft 9.0 Basics
In the screen below, we are looking at the User Defaults component:
Components are accessed from the menu lists. To reach a given component, you will move through a
succession of menus and sub-menus. In the example above the menu items chosen were Set Up SACR
followed by User Defaults.
Menu
selections
for
accessing
User
Defaults
component
(For more information regarding menus, refer to the “Using the Menus” section of this manual.)
Using the Menus y September 2008
3-12
PeopleSoft 9.0 Basics
Pages in the system are the individual display screens, and provide a means for performing the following
operations in the system:
•
•
•
viewing,
updating and
editing data.
Pages make up the components and are much like pages of a form. You can leaf through the pages in a
component, just as you can the pages in a form. Additionally, just as you may need to complete each
page of a multi-page form, in many cases, you will need to enter data into all pages of a given component.
MOVING BETWEEN PAGES OF A COMPONENT
The easiest way to move between pages in a component is to click on the page tabs at the top of the page
or the page links at the bottom of the page. The screen display below shows the page tabs and links
associated with the User Defaults component:
Page Tabs
Page Links
Note
All pages in a component have the same search record, so the prompt in the initial search page will
be the same, regardless of which page you access first. Additionally, you will not be prompted to
enter new search criteria as you move from page to page in the component.
Using the Menus y September 2008
3-13
PeopleSoft 9.0 Basics
SAVING DATA IN A COMPONENT
Pages in a component are treated as a single entity when you try to save data. When you save data for a
page, data stored on all of the pages in the component will be saved.
Some of the fields in a page may require you to enter data. These are the required data entry fields. If you
have forgotten to enter data that is required, the system will prompt you to enter this data. You will not be
able to save a record if you have not entered data into the required data entry fields. Required data entry
fields will have an asterisk, *, to the left of their field name.
An error message like the following will appear if you try to save your work and have forgotten to enter
data into one or more of the required data entry fields. In the message below, two required data entry
fields, fields 15 and 30, have been left blank:
Using the Menus y September 2008
3-14
PeopleSoft 9.0 Basics
After the error message appears, required data entry fields without data, will have a red background in
their edit boxes. In the example below, the user forgot to enter data for the Responsible ID field, which is
a required data entry.
The system has some built-in reminders for saving your work. For example, if you attempt to leave a
component, by clicking on one of the menu breadcrumbs, without saving you data, you will receive the
following message:
If you do not need to save your data, click the Cancel button on the above screen. Otherwise, click the OK
button to return to the data entry screen, and then click the Save button. Most of the time, however, you
will not be reminded to save your work. Therefore, try to remember to save your work after you have
added or edited any data.
COMPONENTS WITH RELATED LINKS
Occasionally you will encounter pages that, in addition to having links to other pages in the component,
have links to related components or pages. You can click on any one of these links to move to the related
component, or page, for the record you currently have open. These links allow you to easily move to
related components, and to enter or view data, without going through the search process again. There are
three kinds of links available:
•
Hyperlinks –
links to other pages in the system
•
•
Go button,
Drop-down list box with the word “…More” -
links to a specific area of a page in the system
contains several more transactional links
Below are examples of links found in pages:
Hyperlinks
and
“Go” Button Link
When you click a hyperlink, you will notice that the new component contains the same links as the
original page, enabling you to return to the original component, if desired. The component, or page, in
which you are working will appear in black text and is not underlined.
If you click on the “Go” button,
and/or enter data into the system.
, it will take to you another component, where you can view
Using the Menus y September 2008
3-15
PeopleSoft 9.0 Basics
4.
GETTING HELP
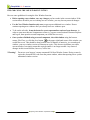
Within the PeopleSoft 9.0 application, you can find documentation to help you. To see the Help link, you
will need to navigate to a search page.
1. Click on Curriculum Management in the Menu pagelet.
2. Click on the Course Catalog menu item in the Menu pagelet.
3. Click on the Course Catalog link in the Main Menu pagelet.
The Course Catalog search window will display.
4
4. Click on the Help link in the upper right corner of the window.
The PeopleSoft help window will display.
5. Click the Show Reference Pane button in the upper right corner of the window.
5
Getting Helpy September 2008
4-1
PeopleSoft 9.0 Basics
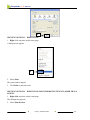
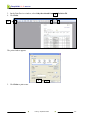
The Reference pane displays. This is a table of contents which can be used to look up specific help topics.
6. Click on Setting User Preferences.
6
The Setting User Preferences folder expands. You could continue drilling down in the table of contents
until you can find a topic of interest.
There are two other ways to search for information in the PeopleSoft help system.
7. Click on the Index tab at the top of the window.
7
Getting Help y September 2008
4-2
PeopleSoft 9.0 Basics
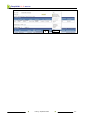
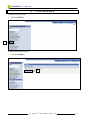
An alphabetical index of keywords (or topics) appears. You can scroll through the list or simply type a
keyword into the Search prompt.
8. Type Searching in the keyword prompt.
The window will automatically scroll down to the area of interest.
Note
PeopleBooks Help may not take you to the exact reference because of the CLC customization of
PeopleSoft 9.0.
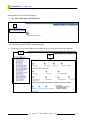
You’ll receive the message “No content available” and then be returned to a more general high-level help
page instead.
FERPA (FAMILY EDUCATIONAL RIGHTS AND PRIVACY ACT)
The College of Lake County is legally obligated to protect the privacy of its students in compliance with
the Family Education Rights and Privacy Act (FERPA). CLC offers on-line training in FERPA.
To access the on-line FERPA training:
1. Bring up Internet Explorer. You can click on the Internet Explorer icon,
2. Type http://clcweb.clcillinos.edu.
3. Press the Go button or press [Enter].
2
, in your taskbar.
3
4. Type in your Network User Name followed by @clcillinois.edu and press [Tab].
5. Type in your Network Password and press [Tab].
6. Click on the OK button or press [Enter].
4
5
6
Getting Help y September 2008
4-3
PeopleSoft 9.0 Basics
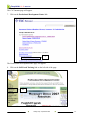
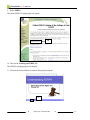
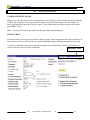
The CLC Intranet page will appear.
7. Click on the Professional Development Center link.
7
The Professional Development home page will appear.
8. Click on the Self-Paced Training link on the left side of the page.
8
Getting Help y September 2008
4-4
PeopleSoft 9.0 Basics
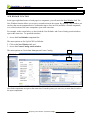
9. Select FERPA.
The online FERPA Training page will appear.
10
10. Click on the Training on FERPA link.
The FERPA training program will display.
11. Click on the forward button to advance through the program.
11
Getting Help y September 2008
4-5
PeopleSoft 9.0 Basics
5.
OPENING A NEW WINDOW
NEW WINDOW FUNCTION
In the upper right-hand corner of each page in a component, you will notice the New Window link. The
New Window function allows you to open a second session in the system. By opening a new window you
can keep the current component active (without having to close out of it) and have a second component,
or a second session of the same component, open at the same time.
For example, in the screen below, we have both the User Defaults and Course Catalog search windows
open at the same time. To open both windows:
1. Access the User Defaults component first.
The menu options are Set Up SACR/User Defaults.
2. Click on the New Window link, and
3. Access the Course Catalog search window.
The menu options are Curriculum Management/Course Catalog.
2
Now both components are open at the same time. From this point, you can view, or enter data, in each of
the open components.
Opening a New Window y September 2008
5-1
PeopleSoft 9.0 Basics
TIPS FOR USING THE NEW WINDOW FUNCTION
Here are some guidelines for using the New Window function:
•
Before opening a new window, save any changes you have made in the current window. If the
session times out while you are working in a new window, you may lose any unsaved changes.
•
Use the New Window function only once to open up one additional new window. Do not
continue opening new windows after you already have two windows open.
•
To be on the safe side, it may be better for you to open another session of your browser, in
order to open more than one component at a time (e.g. open a second session of Internet Explorer
and log on, then open the second component you would like to access).
•
Once you have finished using a second component, close this window using the browser
menus, File/Close, or click the close button, , in the upper right-hand corner of the window you
would like to exit. This should be done because after 30 minutes of inactivity, in a second open
window, your new window session will timeout or expire. This does not invalidate your other,
current window, but simply means this expired window is no longer useable. Any unsaved
changes in this second window, however, will be lost.
! Warning ! Do not use your browser’s menu commands File/New/Window feature. Doing so merely
copies the current HTML code from the parent window, rather than opening a new systemmaintained window session.
Opening a New Window y September 2008
5-2
PeopleSoft 9.0 Basics
IDENTIFYING TYPES OF DATA ENTRY ELEMENTS
6.
On some pages you will see several types of data entry elements. All of the different kinds of data entry
elements serve a common purpose – to provide you with a simple way to enter and update data in the
system. You can type directly into some data entry elements, such as edit boxes. Other data entry
elements, such as radio buttons and drop-down lists, require you to select a value from a list of choices.
Understanding how to use each type of data entry element will help you to use the system more
effectively.
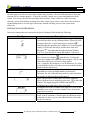
TYPES OF DATA ENTRY FIELDS
Data entry elements that are associated with specific database fields include the following:
Field Type
Check Box
Description
Small, square box that enables or disables an option. Typically,
you select the check box by clicking within it. When you click
an empty check box, a check mark appears in the box, ,
indicating that the option has been enabled. To clear the option,
simply re-click in the check box, and the check mark will
or
Drop-Down List Box
Edit Box
Date Box
Long Edit Box
disappear, , indicating that the option has been disabled.
Note: Use your spacebar to check and uncheck a check box.
Rectangular box, similar to an edit box. However, the box will
have a down arrow button, , within the box. Clicking the
down arrow button will expand the box to display a list of valid
values from which you can select a single option.
Note: Typing the first character, or set of characters, of a value
in a drop-down list box, will take you to an item in the list that
begins with that character(s).
Rectangular box for entering data. Each field in the system is
formatted to accept a maximum number of characters.
Therefore, the size of the edit box provides a visual clue about
the number of characters that can be entered.
Some edit boxes have lookup tables associated with them.
, to the right
These edit boxes have a magnifying glass icon,
of them. The magnifying glass indicates that there is a
predefined list of valid entries for a given field.
Rectangular box with a calendar to the right of it. Click on the
calendar icon to view an on-line calendar. Next, click on the
proper date to select it.
Long rectangular box into which you enter long, free-form text
items, such as comments. Clicking on the up and down arrows
within the box allows you to view additional lines of text that
do not fit in the box.
Identifying Types of Data Entry Elements y September 2008
6-1
PeopleSoft 9.0 Basics
Field Type
Radio Button
or
Search Results Lists
Description
Small round button that represents one
option in a group of mutually exclusive
options. Click to select the desired option;
only one radio button in the group can be
selected at a time. A dot in the middle of a
radio button indicates that option is active.
Note: The spacebar can be used to select and
unselect radio buttons.
An area where fields are displayed in a table,
with a navigation bar. These fields are readonly, and clicking on any field in a given
row will take you to the selected record.
REQUIRED DATA ENTRY FIELDS
An asterisk in front of a data entry field, *, indicates that the field is a required data entry field. Below is
an example of a required data entry field:
The asterisk to the left of the field name indicates that you must enter data into the field if you want to
save the data in that component. Whenever, you attempt to save a record, where you have failed to enter
data into one or more required data entry fields, a message will appear:
In the message above, we can see that two different fields, fields 15 and field 30, are required data entry
fields. When this message appears, click OK. You will return to the original data entry screen. Required
data entry fields not completed will appear with a red background fill in the edit box:
You must then enter data into all of the required data entry fields in order to save the record.
Identifying Types of Data Entry Elements y September 2008
6-2
PeopleSoft 9.0 Basics
7.
NEWER FEATURES
USING SPELL CHECKING
A course will display and the Catalog Data tab will be active. You will see a new icon for spell
checking,
. It can be found on the right side of some fields. For example, the Spell Check icon
is available for the Long Description field in the Course Catalog component.
1
Spell
Check
Icon
1. Click on the Spell Check icon to the right of the Long Description field.
The following window will appear, since there are no spelling errors. If there had been errors,
you would have had the opportunity to change these errors. This is a very handy tool when you
are entering or editing data in PeopleSoft.
2
2. Click OK.
Newer Features y September 2008
7-1
PeopleSoft 9.0 Basics
USING THE DOWNLOAD TO EXCEL FUNCTION
There is a new function in PeopleSoft 9.0 that allows you to download data from PeopleSoft into
another program, such as Excel.
1. Scroll down in the Course Catalog window to the Course Attributes area.
In the Course Attributes title bar, you will see the download icon,
. This function is available
for some groups in PeopleSoft. For example, the download icon is available for both Course
Attributes and Course Topics in the Course Catalog component of PeopleSoft 9.0.
2
2. Hold down your Ctrl key and then press the download icon.
Note If the download function does not work, you will need to turn it on using the My
Personalizations link in the main menu. Refer to pages 7-1 and 7-2 for help with this.
The File Download window displays as seen below.
3
3. Click the Open button.
Newer Features y September 2008
7-2
PeopleSoft 9.0 Basics
The Security Alert window may display.
4. Click the Yes button.
4
USING GRID TABS
Grid Tabs are located at the top of a search screen. The shaded (or darker) tab is always the
active one. By default the “Find an Existing Value” tab will be active.
1. Return to the Course Catalog search screen.
You will see two tabs at the top of the window as seen below.
2
2. Click on the Add a New Value tab.
Newer Features y September 2008
7-3
PeopleSoft 9.0 Basics
A new screen will appear.
3. Click the Add button.
3
The Course Catalog data entry screen will appear. If you wanted to add a new course to the
catalog, you would fill in the necessary prompts and then click the Save button,
bottom of the page to save your work.
, at the
Note: You would want to run Spell Checker on any new fields having this feature.
Note You would want to run Spell Check on any new fields in which you’ve entered data that
have
.
Newer Features y September 2008
7-4
PeopleSoft 9.0 Basics
USING NOTIFY BUTTON
The Notify button appears on many pages throughout PeopleSoft 9. It takes you directly to an email page, thus making it easier to communicate with staff, faculty, or a student about any action
just performed on that PeopleSoft page.
For example, if you’ve changed a student’s primary e-mail address (per their request), you can
then confirm the change in the e-mail by using the Notify button at the bottom of the Contact
Information page. There isn’t any need to transfer to CLC’s e-mail system to accomplish this
notification.
Notify Button
Note PeopleSoft 9,0’s e-mail function is intended for use when communicating specifically
about PeopleSoft–related information / actions. Otherwise, continue to use CLC’s e-mail
system.
Newer Features y September 2008
7-5
PeopleSoft 9.0 Basics
USING PAGE ACTIONS TO VIEW DATA
8.
PAGE ACTION BUTTONS
The system comes with a number of page actions buttons, which are located at the bottom right-hand
corner of some pages. Depending on the function you trying to execute in the system, all, some
combination, or none of the page action buttons will appear. These page action buttons appear when you:
•
•
•
retrieve rows in a table,
modify rows in a table, or
insert rows in a table.
Pressing any one of the buttons serves to apply specific rules to the data, based on the effective date. The
button selected will dictate whether you can access certain fields, and what you can do with each type of
row. The table below provides information on each of the page action buttons.
Page Action
Button
Views
Available
Changes
Update/Display
Current and
Future
Future only. Will not include a
historical record for the data.
Include History
History,
Current and
Future
Future only. Will create a
history for the record.
Correction
History,
Current, Future
All existing rows. Will update
the historical record to reflect
changes.
Insert New Rows
Can use this option when the
effective-date is greater than or
equal to the current row.
Can use this option when the
effective-date is greater than or
equal to the current row.
When using this option, there
will be no effective-date
restrictions.
Note: Access to this function is
security dependent.
You can toggle between page action buttons by clicking on them, or by using the [Alt]+\ key
combination on your keyboard, and then by pressing [Enter] to activate the selected button.
Sometimes, these page actions will appear as check boxes on a search page rather than as buttons. Here
are examples of check box page action options:
When these check boxes are present in a search page, you can simply click in the check box to select one
of these options. A checkmark will appear, if the option has been selected, as in:
Activating one of these check boxes in a search page is exactly the same as clicking on the corresponding
page action button at the bottom of a component page. For example, activating the Include History
checkbox,
, in a search page is the same as clicking on the Include History button,
, at the bottom of a component page.
Using Page Actions to View Data y September 2008
8-1
PeopleSoft 9.0 Basics
EFFECTIVE DATES
The use of effective-dates in the system allows for:
•
•
•
storage of historical data,
viewing of changes in data over time and
entry of future data.
For example, you may want to track several events in the career of a student, such as:
•
•
•
the date they applied for admission,
when they were accepted, and
when they graduated.
When any data is added to the system, an historical record for each entry is maintained in the system. This
provides an audit trail for all additions and changes in the system.
When editing is done to records in the system, the original data is retained in the system. The new data is
added to the system along with an effective date (when the information will go into effect). In this manner
changes made to a record can be tracked over time.
Effective-dated rows are categorized into the following basic types:
Types of
Effective-Dating
Current
History
Future
Description
The data row with the date closest to, but not greater than, the system date.
Note: Only one row can be the current row.
Data rows that have effective dates earlier than the current data row.
Data rows that have effective dates later than the system date.
Using Page Actions to View Data y September 2008
8-2
PeopleSoft 9.0 Basics
USING THE SEARCH FUNCTION
9.
Once you have selected the menu items required to move to the desired area of the system, a
search page will display. You must use search pages in order to locate system data. Therefore,
you must understand how to use the various search functions in the system.
USING SEARCH CRITERIA
Searches can be conducted on a single or multiple database fields. If you would like to use a
single field for your search, you will use a basic search page. If, on the other hand, you would
like to use some combination of fields for your search, you will use an advanced search page.
Each component has a search record, which is a list of defined search fields that can be used to
help you locate data in a given component. We will access the following menus to move to the
Course Catalog component:
•
•
Curriculum Management
Course Catalog
In the basic search page below for courses, only one field in the search record is required,
Academic Institution. The other fields, Subject Area, Catalog Nbr, Campus, Course ID, and
Description are optional.
BASIC SEARCH PAGE
This search will locate all courses offered at the College of Lake County.
Using the Search Function y September 2008
9-1
PeopleSoft 9.0 Basics
To conduct a more detailed search, you could add the Subject Area to the Search page or any
combination of fields in the search record.
To conduct a search:
1. Using the menus, move to the component for which you would like to conduct your
search.
2. Enter a full, or partial, value for the search field(s) you would like to base your search
upon.
3. Press the search button, or press [Enter].
Search
Criteria
Entered
3
The system automatically begins searching the database for entries meeting the criteria, and will
provide you with a list of possible matches; or, if there is only a single match, the page you
requested.
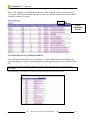
In the example above, we want to look up all Automated Office Technologies (AOS 112
classes) offered at CLC.
When the search results display, there will be an indicator of the number of results meeting your
criteria. In the example below, we have located 2 courses meeting our criteria.
4
.
4. To see additional information on the first class, simply click on any one of the hyperlinks
(CLCCC, AOS, 112, CLC, 004748, or Automated Office Technologies) in the first row.
Using the Search Function y September 2008
9-2
PeopleSoft 9.0 Basics
SEARCHES USING FIELD-LEVEL PROMPTS AND VALIDATION
Some fields in search pages are linked to lookup tables in the system. These lookup tables
contain a list of valid entries for a given field. For example, if we want to look up courses based
on the Subject Area field, there are only a limited number of subject areas. As such, they are
stored in a lookup table. Lookup tables are necessary, then, to ensure, that data stored within the
system is valid.
In a search page, fields with associated lookup tables will have a magnifying glass,
, to the
right of the associated edit box. For example, in the screen below the display fields, Academic
Institution, Subject Area, and Campus, all have lookup tables associated with them.
To conduct a search using fields having associated lookup tables:
1. Using the menus, move to the component for which you would like to conduct your
search.
2. Click on the magnifying glass to the right of the field(s) on which you would like to
conduct your search.
Clicking on the magnifying glass,
, to the right of any of edit boxes (or by pressing [Alt]+5
while in an edit box with an associated lookup table), will produce a lookup screen. For example,
if we click on the magnifying glass to the right of Subject Area, the following screen will appear:
Using the Search Function y September 2008
9-3
PeopleSoft 9.0 Basics
In addition to the Look Up Subject Area at the top of the screen, we have a list of the first 300
subject areas in the system. A list of valid entries for the field will appear. In this case we can see
a partial list of the terms located in the system. This screen shot below represents only the first
24 entries in the search list.
We will narrow down the search by specifying a subject area that begins with the letter “F” as
seen below.
Using the Search Function y September 2008
9-4
PeopleSoft 9.0 Basics
The search results have now been narrowed down to a list of six entries.
3. Click on any of the hyperlinks in the row of the value you would like to use for your
search.
Tip
If you know the value to be used for a specific field with an associated lookup table, you
may type it directly into the edit box. However, you must enter a valid entry. For
example, in the previous search, we could type in a value of “FSM” for Subject Area to
search for Food Service courses.
USING SEARCH OPERATORS
To navigate to any of the components in PeopleSoft 9.0 you must first conduct a search. Each
search screen includes a list of search fields along with a list of operators. In the Course Catalog
search screen below, you will see six search fields as well as specific operators associated with
the fields.
Search
Fields
Operators
Using the Search Function y September 2008
9-5
PeopleSoft 9.0 Basics
The default operator will display for each field. You can change the operator by simply clicking
the down arrow to the right, , and selecting a different option. For example, clicking the down
arrow to the right of the equal sign (=) brings up a set of two options, = or in; or clicking the
down arrow to the right of “begins with” brings up a list of ten options.
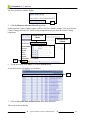
The table below includes a list of operators along with descriptions and examples of each.
Operator
in
begins
with
Description
Allows you to enter two or more values for a field.
The values must be comma-delimited.
Allows you to enter the first one, two, three, etc.
values for a field.
Allows you to enter any part of a field.
contains
=
not=
<
<=
>
>=
between
Must enter an exact match for a field.
Allows you to enter a value to be eliminated from the
list of possible values
The less than operator should be used on fields
containing numbers and will return values less than
the specified value.
The less than or equal to operator should be used on
fields containing numbers and will return values lower
than or equal to the specific value.
The greater than operator should be used on fields
containing numbers and will return values greater than
the specified value.
The greater than or equal to operator should be used
on fields containing numbers and will return values
higher than or equal ot the specified value.
The between operator should be used on fields
containing numbers and will allow you to specify a
starting number and ending number. The result will
include both numbers specified along with any
betweent he specified values.
Using the Search Function y September 2008
Example
in CIT,AOS, would locate
all course with a subject
area or CIT or AOS
begins with 12, would
locate all values beginning
with the numbers 1 and 2
in succession
contains a, would locate
any values having the letter
“a” anywhere in the value
=CIT
Not= CIT
< 345
<= 655
>543
>=321
Between 36 and 45, would
locate all values equal to
36 and 45 as well as all
values in between.
9-6
PeopleSoft 9.0 Basics
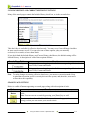
The Academic Institution prompt defaults to CLCCC, which is the only valid entry for this field.
1. Click on the down arrow,
2. Select in.
, to the right of the Subject Area: prompt.
3
1&2
The “in” operator allows you to select a list of valid values rather than a single value.
3. Click in the Subject Area: prompt.
4. Type: CIT,AOS.
4
Using the “in” operator, you can conduct searches involving more than one value for a field. In
this case we are searching for all Conputer Information Technology and Administrative Office
Systems classes. When using the “in” operator, you must use only valid entries for the field and
must deliminate the values with commas.
Note Defaults, like CLCCC, are set by the user in User Defaults. If not set, the user has more
repetitive input to do each day. (See Setting User Defaults section of this manual for
more information on setting user defaults.)
Using the Search Function y September 2008
9-7
PeopleSoft 9.0 Basics
SAVING SEARCH CRITERIA
Once you have conducted a search, you may want to save it for future use.
1. Click the Save Search Criteria hyperlink.
1
The Save Search As window appears as seen below.
2&3
4
2. Click in the Name of Search: prompt.
3. Type Course Catalog AOS and CIT.
4. Click the Save button.
Using the Search Function y September 2008
9-8
PeopleSoft 9.0 Basics
The Save Search As window display.
5
5. Click the Return to Advanced Search hyperlink.
At the top of the Course Catalog window will be a Use Save Search: prompt. Your saved search,
Course Catalog AOS and CIT, will be in the prompt whenever you enter the Course Catalog
component.
Saved Search
Name
Saved Search
Criteria
6
6. To run the search, press Enter or click the Search button.
A search result list will display, as seen below.
7
7. Click on any of the links in the first row in the Search Results.
The course will now display.
Using the Search Function y September 2008
9-9
PeopleSoft 9.0 Basics
INCLUDE HISTORY AND CORRECT HISTORY FUNCTIONS
Many of the search pages contain the Include History check box, as in the screen below:
This check box is available for effective-dated records. You may see a Correct History checkbox
in some search screens as well. You can select one of these options, (they are mutually
exclusive) for a search, or leave them blank.
If you check both the Include History and Correct History checkboxes, the default setting will be
Include History. A description of each of these options follows:
Search Page Options
Include History
Correct History
Function
Brings up the record up along with all of the corresponding effective-dated
rows: Past, Current and Future.
Brings up the record up along with all of the corresponding effective-dated
rows: Past, Current and Future.
Note To make changes to existing, effective dated rows, you must use correction mode. Keep
in mind that correction access is security driven in the system, and, therefore, most users
will not have this capability.
SEARCH PAGE BUTTONS
Below is a table of buttons appearing on search pages along with a description of each:
Button
Search
Button
Clear Button
Function
Processes the search once you have entered search criteria into the search
fields.
Note: You can execute a search by pressing your [Enter] key as well.
Clears entered text from all of the edit boxes on the search page (without
saving), so that you can reenter your search criteria.
Using the Search Function y September 2008
9-10
PeopleSoft 9.0 Basics
SEARCH RESULTS
Whenever you execute a search, you can expect one of two possible outcomes:
1. Go directly to the desired search record – search criterion exactly matches a single
record.
2. Displays a search results list search criterion matches more than one record.
To access any record in the search results list,
click any of the hyperlinks for that record.
When your search criterion matches more than one record, you will return one of three search
results.
• Single Column Search Result List -
for smaller search results lists, you will return a list
containing a single column of records. At the top of
the list will be an indicator of the number of records
in the list.
• Subdivided Search Result List for larger search results lists, you will return multiple
columns of records. At the top of the first list will be
an indicator of how many total records are contained
in the lists, and how they are subdivided.
• List With Message to Narrow Search - if the records matching your search criterion exceed
300, you will see a message at the top of the window
indicating that you should further refine your search
to limit the number of records returned.
SINGLE COLUMN SEARCH RESULT LIST
A single column search result list will appear, if the number of records returned is relatively
small. In the example below we can see that the search results list contains 2 entries.
Number of
Records Indictor
If the list of records is large enough, you may need to use your scroll bar to view all of the
associated records.
SUBDIVIDED SEARCH RESULT LIST
If your search criterion matches a large number of records, they may be displayed in a
subdivided list. In these cases your list will be distributed on more than one page.
Using the Search Function y September 2008
9-11
PeopleSoft 9.0 Basics
Below is an example of a subdivided search result. In this example, we have returned a list of
122 records, which has been subdivided into two lists. The first list contains 100 records and the
second list contains 22 records.
Shows
Subdivision
of Lists
LIST WITH MESSAGE TO NARROW SEARCH
The search function can retrieve up to 300 entries. If your search produces more than the 300
maximum numbers of entries, the following message will appear at the top of your search results
list:
Only the first 300 results can be displayed. Enter more information above and search again to reduce the number of
search results.
The following is an example of a search which produced more than 300 records.
Using the Search Function y September 2008
9-12
PeopleSoft 9.0 Basics
When this kind of search result occurs you should refine your search by adding additional
criteria to get a smaller search result.
MOVING BETWEEN RECORDS IN A SEARCH LIST
When your search produces a large number of records, your search results list will include
navigation functions to allow you so move from record to record in the list. Below is a
navigation header for a search list:
The table that follows provides a list of each navigation tool along with a description:
Button or
Link
Left Arrow
Right Arrow
Function
Allows you to view all records in the search result list on the screen at the same
time.
Note: This will be grayed out if the full search result list is already displayed.
Takes you to the first record in the search results list.
Note: This will be grayed out if you are already on the first record.
In a single column search result list, moves you one record at a time backward
through the search results list. In a subdivided list, moves you backward one list
at a time.
Note: This will be grayed out if you are already on the first record or list.
In a single column search result list, moves you one record at a time forward
through the search results list. In a subdivided list, moves you forward one list
at a time.
Note: This will be grayed out if you are already on the last record or list.
Takes you to the last record in the search results list.
Note: This will be grayed out if you are already on the last record in the list.
Using the Search Function y September 2008
9-13
PeopleSoft 9.0 Basics
10.
PRINTING
Once you have found needed information in PeopleSoft 9.0, you can easily print out the results. We will
search for a specific class roster and print it out.
1. Click on Curriculum Management in the Menu pagelet.
1
2
2. Click on Class Roster.
3. Fill in the search prompts as seen to the right.
4. Click the Search button or press Enter.
4
Printing y September 2008
10-1
PeopleSoft 9.0 Basics
The class roster will display as seen below.
PRINTING OPTION #1 – FILE > PRINT
1. Select File from the main menu in Microsoft Internet Exlorer.
2. Select Print.
1
2
The Print window displays.
3. Click the Print button to send the roster to the printer.
Printing y September 2008
10-2
PeopleSoft 9.0 Basics
3
Note Any printed output from PeopleSoft pages will be displayed as a .pdf file in the reports manager.
It is no longer necessary to go to a ‘Reports Drive’ to get output.
PRINTING OPTION #2 – PRINTER FRIENDLY VERSION
Some windows will include a “Printer Friendly Version” button. This button will allow you to preformat
the screen to fit on an 8-1/2” x 11” piece of paper.
1. While the class roster is displayed, scroll to the bottom of the roster.
2. Click on the Printer Friendly Version button.
2
The printer friendly version of the roster appears on the screen.
3. Click Ctrl+P.
The print window appears.
4. Click Print to print the roster.
Printing y September 2008
10-3
PeopleSoft 9.0 Basics
4
PRINTING OPTION #3 – RIGHT-CLICK
1. Right-click anywhere on the roster page.
A dialogue box appears.
2
2. Select Print.
The print window appears.
3. Click Print to print the roster.
PRINTING OPTION #4 – RIGHT-CLICK FOR INFORMATION THAT IS LARGER THAN A
SCREEN
1. Right-click anywhere on the roster page.
The dialogue box appears
2. Select Print Preview.
Printing y September 2008
10-4
PeopleSoft 9.0 Basics
2
Printing y September 2008
10-5
PeopleSoft 9.0 Basics
3. On the Print Preview window, select Only the selected frame and Shrink to Fit.
3
4. Click Print.
4
The print window appears.
5
5. Click Print to print roster.
Printing y September 2008
10-6
PeopleSoft 9.0 Basics
11.
USING 19th 41st HOUR
To access 19th 41st Hour:
1. Click on Worklist.
1
Worklist Main Menu displays.
2. Click on Navigator.
2
th
st
Using 19 41 Hour y September 2008
11-1
PeopleSoft 9.0 Basics
Advisement for 19th 41st Hour displays.
3. Click CLC Advisement 19th 41st Hour.
3
CLC Advisement 19th 41st Hour footprints display.
4. Choose the one you want from the list on the left (A) OR from the icons on the right (B).
4A
4B
th
st
Using 19 41 Hour y September 2008
11-2
PeopleSoft 9.0 Basics
12.
DATA NAVIGATION
TABBING BETWEEN FIELDS
When you are in a data entry screen, you should press your [Tab] key to move to the next data field in the
window. The [Tab] key moves you one field at a time in a predetermined sequence in the window. To
move to the next field, press the [Tab] key again. To move backward one field at a time in the window,
press [Shift]+[Tab].
Note
You may also click on any edit box in the page rather than tabbing to it.
SCROLL AREAS
Scroll areas allow you to view one record at a time in a page. Each component in the system is made up of
one or more scroll areas. Each scroll area contains information that is randomly arranged on the screen.
A scroll area looks like a data entry page with navigation tools in the header. Below is an example of a
scroll area for the Course Catalog component:
Navigation Tools
Data Navigation y September 2008
12-1
PeopleSoft 9.0 Basics
To navigate though the data in the scroll area, use the navigation tools in the header. A description of each
of these navigation tools can be found in the “Moving Between Records in a Search List” section of this
manual. However, there is one additional tool for navigation in a scroll area, the Find function, which is
described in the table below:
Button or
Link
Find
Function
Brings up a search dialog box, where you can type in any combination of words to
conduct a search for a particular record:
To use the search function, type your search string and press the OK button.
Note: This will be grayed out if there is only a single record.
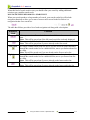
COLLAPSIBLE AREAS
Some of the scroll areas can be collapsed entirely and then expanded. Scroll areas containing a rightpointing triangle, , in front of the heading, have been collapsed, and none of the data in the area will be
in view. Panels containing a downward-pointing triangle, , are expanded, so that all of the data in the
panel is in view. To collapse an expanded area, click the downward-pointing arrow, , to the left of the
heading.
Below are collapsed and expanded versions of the same area:
Collapsed Panel
Left-pointing Triangle
Expanded Panel
Downward-pointing Triangle
! Warning ! –
Do not keep pushing the same button repeatedly. The system will need time to
respond to each request. Always wait until the current function completes before
pushing the same or additional buttons.
SEARCHING FOR BIO/DEMO DATA IN THE SYSTEM
Data Navigation y September 2008
12-2
PeopleSoft 9.0 Basics
Not all users at the college will have access to the Bio/Demo component in the system. However, we have
included this section as many users will have access to this area.
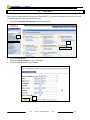
To look up people information in the system:
1.
2.
3.
4.
5.
Click on Campus Community in the menu pagelet.
Click on Personal Information (Student) in the submenu.
Click on Biographical (Student) in the submenu.
Click on Addresses/Phones in the submenu.
Click on Electronic Addresses or Phone hyperlink.
Bio/Demo Data
Menu Options
1
2
A search screen will display.
3
4
5
6. Conduct a search for the desired student.
7. Select the record for the desired person.
Data Navigation y September 2008
12-3
PeopleSoft 9.0 Basics
13.
SETTING USER DEFAULTS
To save time on data entry, you can set up the system so that it will automatically fill in certain fields for
you with default values. Setting up default values eliminates the need to key values for these fields. You
can simply press [Tab], and the default value will automatically be entered. For example, if most CLC
students live in Illinois, you could set the default value for the State field to IL.
Even after establishing default values for fields, you may override default values at any point during the
data entry process by simply typing over existing values. For example, if you have a student who lives in
Wisconsin, rather than Illinois, you can type WI in the state field, and the WI entry will override the
default entry of IL.
To view user defaults:
1. Click Set Up SACR on the menu.
2. Click the User Defaults submenu.
The User Defaults component will display, as seen below.
1
Right-facing
Arrow to View
Additional Tabs
2
Page Links
Notice that there are five different default value categories that appear as tabs across the top of User
Defaults screen:
•
•
•
User Defaults 1
User Defaults 2
User Defaults 3
•
•
User Defaults 4
Enrollment Override Defaults
There are two additional categories that do not display, Communication Speed Keys and User 3C Group
Summary. To access these areas, simply click on the page links at the bottom of the screen or click on the
right-facing arrow to the left of the page tabs.
Setting User Defaults y September 2008
13-1
PeopleSoft 9.0 Basics
In the screen above, you can see only the first five default value category tables. However, all seven of the
default value categories appear as links at the bottom of the page.
Each of these tabs, or links, includes a different set of fields for which you can set defaults. Also notice
the right-facing arrow,
, at the end of the default value category tabs. If the right-facing arrow,
, is
present in the tabs row it indicates that there are additional tabs, that are not shown.
3. To see the additional categories of default values, press this arrow, , at the end of the tabs and
the additional tab will appear, or simply click on the default value hyperlinks at the bottom of the
page.
If you click on the right-facing arrow at the end of the default category tabs,
, you will now see any
additional default value category tabs that are available. In this case, we can now see the Communication
Speed Keys and User 3C Groups Summary tabs. Once you click on the right-facing arrow,
, you will
see a left-facing arrow,
, indicating that the tabs have been expanded. To view the original default
value category tabs, click on the left-facing arrow,
, to the left of the tabs.
Left-Facing Arrow to View
Previous Tabs
Field
Names
Default
Values
Default Value
Interpretations
Clicking on any of the default value category tabs, or links, will bring up a screen of available fields.
Three types of information are available on the User Defaults page:
• Field Names -
appear in bold in the first column of the screen and contain the names of the
data fields.
• Default Values - appear in the second column and contain the default value for the field, if one is
defined. If the default value box is left empty, there is no default defined for the
field. These values are usually stored as codes in the system.
• Default Value - appear in the third column and provide text interpretations for the default
Interpretations values, or codes, in the system.
Setting User Defaults y September 2008
13-2
PeopleSoft 9.0 Basics
For example, in the screen above, you will see that the first default value, Academic Institution, is
CLCCC, which stands for College of Lake County. You will also note that some of the values have been
given a default value. However, other fields have been left blank. You set your system defaults to make
data entry easier for you.
To create a default value for a field:
1. Click on the tab containing the field for which you would like to create a default value. If you are
unsure, you may need to click on different tabs to locate the field.
2. Click on the magnifying glass, , to the right of the default value box for the field for which you
would like to create a default value.
A lookup screen will appear. In this screen you will want to look up the values that are acceptable for this
field. There is security built into the database that ensures that the correct type of data is entered into a
field. Therefore, you cannot simply type in any value of your liking.
Note: The term code is always a four-digit code beginning with the number 1. The second and third
numbers in the term code are the last two digits of the year. The fourth and last digit in the code
represents the semester; the first semester of the year (spring semester) is 1, the second semester
(summer semester) is 2, and the third semester (fall semester) is 3. For example, the fall semester
for the year 2008 would be represented by the code 1083, where 08 is the last two digits of the
year and 3 is the third semester of the years.
Setting User Defaults y September 2008
13-3
PeopleSoft 9.0 Basics
3. Click on the Lookup button, to see a list of acceptable entries for the field.
3
You will now see list of acceptable entries at the bottom of the lookup screen.
4
4. From the search results list, click on the default value you would like for the field. The new default
value will now be entered in the User Defaults screen.
In this case we have selected Accounting as our default Subject Area.
Setting User Defaults y September 2008
13-4
PeopleSoft 9.0 Basics
5. Click the Save button, and the user defaults will be saved and made effective immediately.
4
Tip:
When setting default values keep in mind that some fields are related to one another. For
example, you may select a default value that is in conflict with one of the original default values
in another field. When this occurs, the original default value will be removed; and you will need
to re-enter a default value that is appropriate.
Setting User Defaults y September 2008
13-5
PeopleSoft 9.0 Basics
FIELDS WITH DEFAULTS VALUE OPTIONS
In the following section we will look at the specific fields for which you can set defaults.
Note: Please keep in mind that your default pages may appear different than the images on these pages.
USER DEFAULTS 1
Below is a screen display showing the fields available for setting defaults in the User Defaults 1 tab:
USER DEFAULTS 2
Below is a screen display showing the fields available for setting defaults in the User Defaults 2 tab:
Setting User Defaults y September 2008
13-6
PeopleSoft 9.0 Basics
USER DEFAULTS 3
Below is a screen display showing the fields available for setting defaults in the User Defaults 3 tab:
USER DEFAULTS 4
Below is a screen display showing the fields available for setting defaults in the User Defaults 4 tab:
Setting User Defaults y September 2008
13-7
PeopleSoft 9.0 Basics
ENROLLMENT OVERRIDE DEFAULTS
Below is a screen display showing the fields available for setting defaults in the Enrollment Override
Defaults tab:
COMMUNICATIONS SPEED KEYS DEFAULTS
Below is a screen display showing the fields available for setting defaults in the Communications Speed
Keys Defaults tab:
USER 3C GROUPS SUMMARY DEFAULTS
Below is a screen display showing the fields available for setting defaults in the User 3C Groups
Summary Defaults tab:
Setting User Defaults y September 2008
13-8
PeopleSoft 9.0 Basics
USING SELF SERVICE
14.
The Self Service area in PeopleSoft 9.0 contains the following areas:
1)
2)
3)
4)
5)
Personal Information
Payroll and Compensation
Benefits
Campus Personal Information
Involvement
The Self Service can be accessed using the main menu and can be used by staff to look up specific
information including:
•
•
•
•
Home and mailing
addresses
Phone numbers
Email addresses
Emergency contacts
•
•
•
•
•
Marital status
Name changes
Paycheck
Direct deposit
Compensation history
•
•
•
W-4 tax information
W-2 reissue request
Faculty event tracking
Self Service
Folder Options
Using Self Service y September 2008
14-1
PeopleSoft 9.0 Basics
As you can see, in the screen below, Self Service also enables you to go directly to specific PeopleSoft pages, such
as Faculty Center.
On the Faculty Center page, you can View Advisees and get a list of all classes being taught by term.
You can also click on the tabs across the top and access:
•
•
•
•
Class Search
Browse Catalog
Faculty Search
Learning Management
Using Self Service y September 2008
14-2
PeopleSoft 9.0 Basics
15.
WORKING WITH FAVORITES IN PEOPLESOFT 9.0
ADDING FAVORITES
Once you start working in PeopleSoft 9.0, you will be able to set up Favorites within PeopleSoft the
program. This is different from previous versions of PeopleSoft which relied on the Favorites tool inside
the Microsoft Internet Explorer browser to manage Favorites.
1. Navigate to the Community Directory Search page using the path Self Service > Involvement >
Community Directory Search.
2
2. Click the Add to Favorites link.
Working with Favorites y September 2008
15-1
PeopleSoft 9.0 Basics
The following window on the right appears. The Description field contains the name of the favorite. You
can edit the description as needed. In this case we will keep Course Catalog as the Favorite name.
3
3. Click the OK button.
The Page is added to the My Favorites menu item.
4. Click on My Favorites in the Menu pagelet.
You will now see your Favorites, including Community Directory Search.
4
5
5. Click on the Community Directory Search link in My Favorites.
You will return to the Course Catalog search screen.
SEQUENCING AND EDITING FAVORITES
You can order your list of favorites in whatever sequence works best for you. The default is alphabetical
order by menu page name, and the default sequence number is zero.
Working with Favorites y September 2008
15-2
PeopleSoft 9.0 Basics
Let’s add a second favorite.
1. Click on the Change My Password link in the Menu pagelet.
4
5
1
2.
3.
4.
5.
Click the Add to Favorites link.
Click the OK button.
Select My Favorites in the Menu Pagelet.
Select the Edit Favorites link under My Favorites in the Menu Pagelet.
The Edit Favorites page displays. Each favorite has 0 for a sequence number. This is the default setting
that sorts items in alphabetical order. To change the sort order you must change the sequence numbers.
6. Change the Sequence number for Change My Password to 2.
7. Change the Sequence number for Community Directory Search to 1.
8. Click the Save button.
Working with Favorites y September 2008
15-3
PeopleSoft 9.0 Basics
6
7
8
DELETING FAVORITES
Let’s delete the Change My Password favorite we just created.
1. Select Edit Favorites under My Favorites in the Menu pagelet.
2. Click the Delete button to the right of Change My Password.
2
3. Click OK.
3
4. Click the Save button.
Working with Favorites y September 2008
15-4
PeopleSoft 9.0 Basics
Working with Favorites y September 2008
15-5
PeopleSoft 9.0 Basics
16.
PERSONALIZATIONS
USING MY PERSONALIZATIONS
PeopleSoft 9.0 provides a section where a user can create Personalization preferences. The My
Personalizations link can be found near the bottom of the Menu pagelet.
1. Click on My Personalizations in the Menu pagelet.
1
There are four areas that you can personalize:
•
•
•
•
General Options
Regional Settings
System & Application Messages
Navigation Personalizations
2. Click on the General Options Personalize Option button.
2
Personalizations y September 2008
16-1
PeopleSoft 9.0 Basics
The following screen will appear.
3
3. Click the down arrow to the right of No in the Excel 97 grid download area.
4. Select Yes.
4
5
We have now turned on, or activated, the download function in PeopleSoft.
5. Click OK to save this setting.
The following window will appear.
6
6. Click Return.
You will return to the Personalizations main window.
Personalizations y September 2008
16-2
PeopleSoft 9.0 Basics
The table below provides information regarding the various column headings in the My Personalizations
area.
Column Heading
Description
Option Category
Shows the description of the category of personalizations. This helps you to make
sure that you have the correct category open.
Personalization
Option
This column lists all of the personalization options available for you to modify.
The text that appears in the list is a brief description of the option. For more
information on the option, click the Explain link.
Default Value
Refers to the initial settings that your administrator has specified for the option. If
you do not modify the default value, the option assumes the value provided by the
system administrator.
Override Value
Enter any custom value you want to assign to the personalization option. To
“override” a default setting means to “use in place of ” the default setting.
Explain
Click this link to view more information on what the personalization option
provides. See the following section for more information on the Explanation page.
Restore Category
Defaults
Returns all modified options to the default values. This button applies only to the
current category, as in the category you have open.
OK/Cancel
After you have made any modifications, click OK so that the system records your
changes. If you do not want your changes recorded click Cancel. If you have not
made any changes and just viewed the options, you can use either button to return
to the Personalizations page.
To learn more about the options for personalization, you should read the Explain link, in each row,
adjacent to each of the Personalization Options.
Personalizations y September 2008
16-3
PeopleSoft 9.0 Basics
17.
CLEARING YOUR BROWSER’S CACHE
As you access Internet pages, including PeopleSoft pages, they get stored in a temporary file. As
these files tend to build up over time, every so often you will want to clear out theses temporary
Internet folders, otherwise known as your “cache”. This should be done on a periodic basic. We
recommend clearing out your cache at least monthly.
To clear out your “cache”:
1. Click on the Tools button, on your browser menu and then select Internet Options. . .
1
2. Click on the General tab.
3. Click the Delete Files button.
2
3
Clearing Your Browser’s Cachey September 2008
17-1
PeopleSoft 9.0 Basics
4. Click OK on the Delete Files window.
4
5. Click OK on the Internet Options Window.
5
Clearing Your Browser’s Cachey September 2008
17-2