1
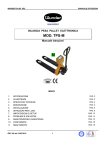
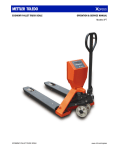
TPSS series Pallet Scales User’s guide UGTPSS-E1.3 5 TPSSS series pallet scale user’s manual Table of Contents SECTION 1 INTRODUCTION……………….……………………………………………1 SECTION 2 SPECIFICATIONS……………………………………………………..……2 SECTION 3 INSTALLATION……………………………………………………………….3 3.1 General installation……………………………………….……………………….3 3.2 Installation of TPSS series…………………………..………………………………..3 3.2.1 Install handle………………………………………………….……………………..3 3.2.2 Adjust release device………………………………………………………………..3 SECTION 4 PALLET TRUCK OPERATE……………………………………………….4 4.1 Control lever……………………….………………………….……………………….4 4.2 Safety note………………………………………..………………………………..4 4.3 Maintenance………………………………………..………………………………..5 4.3.1Oil………..……………………………………..………..……………………………..5 4.3.2 How to expel aire form the pump unit…………….………………………………..5 4.3.3 Daily check and maintenance…………………..………………………………..5 4.3.4 Lubrication……………………….………………..………………………………..5 SECTION 5 KEY DESCRIPTIONS………………………………………………………7 SECTION 6 DISPLAYS…………………………………………………………………….8 SECTION 7 OPERATION…………………….……………………………………….…..9 7.1 Basic operate……………………………………………………………………….9 7.1.1 Zeroing the display………………………………………………………………….9 7.1.2 Taring……………………………………………………………………………..…….9 7.1.3 Weighing operate…….………………………………………………….………….9 7.1.4 Net/gross change…….………………………………………………….………….9 7.1.5 change weighing unit…………………………………………………….………….10 7.2 Accumulated total…………………………………………………………………….10 7.2.1 Accumulated note………………………………………………………………….10 7.2.2 Accumulate operate……………………………………………………………….10 -I- TPSS series Pallet scale User’s Guide 7.2.3 memory recall…………………………………………………………………….10 7.2.4 memory clear…………………………………………………………………….10 SECTION 8 PARAMETERS………………………………………………………………12 SECTION 9 BATTERY OPERATION………………………………………………..…14 SECTION 10 TECHNICAL PARAMETES………………………………………..……..15 10.1 Enter technical parameter setting mode………………………………..……..15 10.2 Function setting table………………………………………………..……..15 10.3 Calibrate………………………………………………………………..……..15 SECTION 11 ERROR CODE……………………………………………………………17 APPENDIX1 FRINT FORMAT……………………………………………………………18 APPENDIX2 DRAWING OF PUMP ASSEMBLY AND HANDLE…………………19 APPENDIX3 DRAWING OF FRAME…………………………………………………21 - II - TPSSS series pallet scale user’s manual SECTION 1 INTRODUCTION The TPSS series of pallet scale provides an accurate, fast weighing solution for pallet truck. There are 4 series scales within the range, with 2 different fork size and optional built-in min printer. All the keypads are mechanical switches and the displays are large easy to read liquid crystal type displays (LCD). The LCD’s are supplied with a backlight. All units include automatic zero tracking, weighing unit change, pretare, gross/net change and an accumulation facility that allows the individual weights to be stored and recalled as an accumulated total. -1- TPSS series Pallet scale User’s Guide SECTION 2 SPECIFICATIONS Model TPSS Max Lifting weight 2000kg Min. Fork Height 85mm Max. fork height 200mm Fork length 1135mm Fork overall width 555mm/688mm Individual fork width 180mm Capacity 1000kg/2000kg division 0.5kg/1kg External resolution 1/2,000 Internal resolution 1/600,000 Stabilisation Time 1 Seconds typical Operating Temperature 0°C - 40°C / 32°F - 104°F Power supply External AC adapter, 9V 800mA, built-in rechargeable battery (lead acid, 6V/10Ah) Calibration Automatic External Display 51/2 digits LCD digital display with 52mm high digits (EL backlight) Interface RS-232 Output Optional Load cells 4 load cells -2- TPSSS series pallet scale user’s manual SECTION 3 INSTALLATION 3. 1 GENERAL INSTALLATION Avoid extremes of temperature. Do not place in direct sunlight or near air conditioning vents. Avoid high humidity that might cause condensation. Avoid direct contact with water. Do not spray or immerse the scales in water. Keep the scales clean. Do not stack material on the scales when they are not in use. Please ascent the pallet before read weight data. Please don’t read data when pallet truck moving. Please charge battery to full before use, see detail in SECTION 9. 3. 2 INSTALLATION OF TPSS SERIES 3.2.1 Install handle The handle is packing separate from pallet truck. 1. Loosen the setting screw (140H) on the crank link (139H). 2. Remove three screws (H109) and three spring washers (H110) from the base (103). 3. Place the handle (H101) on the base (103), please note: Feed the rod and chain (H107) through the centre of the base (103) and axle (109). 4. Insert three screws (H109) with spring washers (H110) into the base (103). Then tighten them securely. 5. Raise the crank link (139H) and put the pin on rod and chain (H107) -3- TPSS series Pallet scale User’s Guide into the groove of crank link (139H). 3.2.2 to adjust release device On the handle of the pallet truck, you will find the control lever (H106) which can be set in three positions 1. First tighten the setting screw (140H) on the crank link (139H) until the LOWER position function works. 2. If the forks elevate while pumping in the NEUTRAL position, turn the setting screw (140H) clockwise until pumping the handle does not raise the forks and the NEUTRAL position functions correctly. 3. If the forks descend while pumping in the NEUTRAL position, turn the setting screw (140H) counter-clockwise until the forks do not lower. 4. If the forks do not descend when the control lever (H106) is in the LOWER position, turn the setting screw (140H) clockwise until raising the control lever (H106) lowers the forks. Then check the NEUTRAL position as per item 2 and 3. 5. If the forks do not lift while pumping in the ASCENT position, turn the setting screw (140H) counter-clockwise until the forks elevate while pumping in the ASCENT position. Then check the NEUTRAL and LOWER position as per item 2, 3 and 4. -4- TPSSS series pallet scale user’s manual SECTION 4 PALLET TRUCK OPERATE 4. 1 CONTROL LEVER the control lever (H106) which can be set in three positions LOWER: to lower the forks NEUTRAL: to move the load ASCENT: to raise the forks. After assembling the handle, you can adjust the three positions. 4.2 SAFETY NOTE For safe operation of the truck, please read all warning signs and instructions here and on the truck before using this truck. 1. Do not operate the pallet truck unless you are familiar with it and have been trained or authorised to do so. 2. Do not operate the truck unless you have checked its condition. Give special attention to the wheels, the handle assembly, the forks, lift and the lower control. 3. Do not use the truck on sloping ground. 4. Never place any part of your body in the lifting mechanism or under the forks or load. Do not carry passengers. 5. The operator had better take on wear gloves and security shoes for labor protecting. 6. Do not handle unstable or loosely stacked loads. 7. Do not overload the truck. 8. Do not subject to unbalanced load, either side to side or along the length of the frame 9. The capacity of the truck assumes an evenly distributed -5- TPSS series Pallet scale User’s Guide load with the centre of the load being at the halfway point of the length of the forks. 10. Make sure that length of the forks matches the length of the pallet. 11. Lower the forks to lowest height when the truck is not being used. 12. At other specific conditions or places, the operator should be carefully to operate the pallet truck. 4. 3 MAINTENANCE 4.3.1 OIL Please check the oil level every six months. The volume of oil is about 0.3lt. Use the hydraulic type oil according to temperature scale below. Temperature Oil L-HM68 Hydraulic oil (equivalent to ISO VG68) -5℃~+45℃ L-HM46 Hydraulic oil (equivalent to ISO VG46) -15℃~-5℃ 4.3.2 HOW TO EXPEL AIR FROM THE PUMP UNIT The air may come into the hydraulic because of transportation or pump in upset position. It can cause that forks do not elevate while pumping in the ASCENT position. The air can be banished in the following way: Let the control lever (H106) to the LOWER position, then move the handle (H1501) up and down for several times. 4.3.3 DAILY CHECK AND MAINTENANCE Daily check of the pallet truck can limit wear as much as possible. Give special attention to the wheels (127, F116 or F117), the axles (F114, F118, F121, F122), the handle (H101), the forks (F110) and lift and lower control. The forks should be unloaded and lowered in the lowest position when the job is over. 4.3.4 LUBRICATION Use motor oil or grease to lubricate all moveable parts. -6- TPSSS series pallet scale user’s manual SECTION 5 KEY DESCRIPTIONS ZERO or Set the zero point for all subsequent weighing. The display shows zero. A secondary function , of "Enter" key when setting parameters or other functions. TARE or Tares the scale. Stores the current weight in memory as a tare value, subtracts the tare value from the weight and shows the results. This is the net weight. A secondary function of incrementing the active digit when setting a value for parameters or other functions. PT Pretare key, press this key to recall pretare, hole this key for 3 seconds for store pretare values. move the active digit right when setting values for other functions. M+ adds the value to the accumulation memory. In zero point, press this key to show current total value, when you select optional mini printer, press key will also print the results to printer. Move the active digit left when setting values for other functions. G/N Gross weight/Net weight display shift, only available after do tare/pretare operate Secondary function ( C ) , is to act as a clear key when setting values for parameters or other functions. UNIT or U Press this key to select the weight unit. It also have secondary function (ESC) , is to return to normal operation when the scale is in a parameter setting mode. ON/ OFF or Turn on or off the power. -7- TPSS series Pallet scale User’s Guide SECTION 6 DISPLAYS The LCD display will show a value and a unit to the right of the digits. In addition there are symbols for TARE, GROSS weight, Zero and for Low battery Low Battery Symbol Net weight mode -8- Weighing Units TPSSS series pallet scale user’s manual SECTION 7 OPERATION 7.1 BASIC OPERATE 7.1.1 Zeroing The Display You can press the ZERO key at any time to set the zero point from which all other weighing and counting is measured, within 2% of power up zero. This will usually only be necessary when the pallet is empty. When the zero point is obtained the display will show the indicator for zero. The scale has an automatic rezeroing function to account for minor drifting or accumulation of material on the pallet. However you may need to press the ZERO key to rezero the scale if small amounts of weight are shown when the pallet is empty. 7.1.2 Taring Zero the scale by pressing the ZERO key if necessary. The zero indicator will be on. Place a container on the pallet, a value for its weight will be displayed. Press the TARE key to tare the scale. The weight that was displayed is stored as the tare value and that value is subtracted from the display, leaving zero on the display. The "GROSS" indicator will be off and “NET” indicator on. As product is added only the weight of the product will be shown. The scale could be tared a second time if another type of product was to be added to the first one. Again only the weight that is added after taring will be displayed. When the container is removed a negative value will be shown. If the scale was tared just before removing the container this value is the gross weight of the container plus all product that was removed. The zero indicator will also be on because the pallet is back to the same condition it was when the ZERO key was last pressed. Press TARE key again to escape “NET” mode. 7.1.3 Weighing operate Put the control lever in the LOWER position and lower the truck to lowest position. Press the ON/OFF key until the backlight on. After the indicator being checked by itself, it display “0kg”. Put the forks under pallet and judge by eyes it will be balanced load. Put the control lever in the ASCENT position, pump the handle to make the fork rise, until you can make sure the pallet leave ground. The stable reading of the indictor is the gross weight of the goods (total weight of the pallet and the goods). 7.1.4 Net/Gross change This function only available after do TARE operate (or pretare, NET indicator ON), press N/G key can shift NET weight display and GROSS weight display (in GROSS -9- TPSS series Pallet scale User’s Guide display mode, GROSS indicator ON, in NET display mode, NET indicator on). 7.1.5 Change weighing unit Press U key to change weighing unit, only weighing unit set as ON can by shown after press U key, see SECTION 8 parameter setting. 7.2 ACCUMULATED TOTAL 7.2.1 accumulate note Every time before do accumulate operate, please empty the fork (ZERO indicator on), and stable (STABLE indicator on). Accumulate operate only available current weight more than 20d (min. capacity) 7.2.2 accumulate operate After weighing a pallet with goods, display show weight data, after STABLE indicator on, press M+ key, the weight displayed will be stored in memory. The display will show "ACC 01" and then the total in memory for 2 seconds before returning to normal. If the optional min printer is installed the weight will be output to a printer. Remove the weight, allowing the scale to return to zero and put a second weight on. Press the M+ key, the display will show "ACC 02" and then the new total. Continue until all weights have been added. The scale can do accumulation operate 99 times at most. 7.2.3 memory recall To view the totals in memory press the M+ key in zero point (ZERO indicator on), display will show "ACC n" (n is current accumulate times) and then the total in memory for 2 seconds, then returning to normal If you install a mini printer, when do memory recall operate, printer will print out accumulate report (total value) 7.2.4 memory clear To clear the accumulate data in memory, just press G/N key during total values display mode. 7. 3 PRETARE 7.3.1 use pretare press PT key, display show “PTL 0”, press TARE key to select Preset item (0~9, total 10 preset item), then press ZERO key to sure, the tare value store in pretare item will used for current weighing, scale enter NET mode. - 10 - TPSSS series pallet scale user’s manual 7.3.2 store pretare value To store tare value to pretare item, just hold PT key for 3 second, display will show current tare value, if you want to modify this data, just use M+/PT key to move active digit, use TARE key to change value, press ZERO key to sure, if you want to use current tare value, just press ZERO, then display will show “PTS 0”, press TARE key to select pretare item (0~9, total 10 preset item), after you select, press ZERO key to sure, pretare value stored in memory. - 11 - TPSS series Pallet scale User’s Guide SECTION 8 PARAMETERS The scale has 4 parameters that can be set by the user plus a method of entering the calibration section. To set parameters press the ZERO key and TARE key at the same time (hit and release at the same time). The display will show the first function, "F1 unit". Pressing the TARE key will cycle through the other functions. Pressing ZERO key will allow you to set the function. It may be necessary to either use TARE key set a value or using the M+ and PT key to move the active digit and then using the TARE key to increment a digit, followed by the ZERO key to enter the value. Use the U key to leave a parameter unchanged. For example when the display shows “F1 unit” press the ZERO key to begin. The display will show “ON lb”, press the TARE key to set the to set weighing unit ON/OFF status. After pressing the ZERO key to sure, scale will show next weighing unit, use TARE key to set, ZERO key sure, after you set, press U key to escape. FUNCTION MENU SETTINGS FUNCTION F1 u nt F2 dati F3 off - 12 - DEFAULT VALUE Sets the displayed unit of weight. Kg/lb Select kg, Lb, ozt(ounce). *If all unit weight set off, the unit key will no function. yy Set year, The display will show current 2000/01/01 year or 00.01.01. Enter new year 00:00 mmdd Set date, the display will show current date or 01.01, enter new date, format mm.dd (month/date) hhmm Set time, The display will show current time or 00.00. Enter new time, format hh.mm (hour/minute) *scale have no built in real time clock, after power off, scale will reset, when turn on the power, the date and time will be 2000/01/01 00:00 C loC K Set clock off or on, CLK off Off: don’t use clock function on: TPSS will turn to clock display after TPSS standby for 5 minutes Bk Set the backlight to be on, automatic or auto off, SUB-FUNCTION DESCRIPTION TPSSS series pallet scale user’s manual on: always on Auto: hit key and weight more than 20d, backlight auto on off: always off off Set the auto power off time. 0/3/5/15/30 minutes. F4 Prt Set the printer format or mode 1 0: no printer, (continuously mode) 1: print format 1 2: print format 2 3: print format 3 4: print format 4 5: print format 5 Prog Pin Enter the programming and calibration menus by entering the correct password. See the section 10. When the scales are set to display in other units of weight the accumulation function is still keeping the weight in kilograms. - 13 - TPSS series Pallet scale User’s Guide SECTION 9 BATTERY OPERATION The weighing indicator is operated from the battery. The battery life is approximately 80 hours. When the battery needs charging a symbol on the weight display will turn on. The battery should be charged when the symbol is on. The scale will still operate for about 30 minutes after which it will automatically switch off to protect the battery. To charge the battery simply plug into the mains power. The scale does not need to be turned on. The battery should be charged for 15 hours for full capacity. Just at the left side of display window, there is an LED to indicate the status of battery charging. When the scale is plugged into the mains power the internal battery will be charged. If the LED is green the battery has a full charge. If it is Red the battery is nearly discharged and yellow indicates the battery is being charged. When you get new scale, please charge battery at first. Even you haven’t use the scale, please also charge battery every 3 month. As the battery is used it may fail to hold a full charge. If the battery life becomes unacceptable then contact your distributor. - 14 - TPSSS series pallet scale user’s manual SECTION 10 TECHNICAL PARAMETERS 10.1 ENTER TECHNICAL PARAMETER SETTING MODE Press ZERO key and TARE key when normal weighing mode to enter setting mode, display shows “F1 UNIT”, press TARE key until display shows “P ROG”, press ZERO key, display shows “PN”, You can press M+, U, TARE key orderly to enter technical setting mode, press TARE key to select parameter, press Zero key to sure, press U key to escape. It may be necessary to either use TARE key set a value or using the M+ and PT key to move the active digit and then using the TARE key to increment a digit. 10.2 FUNCTION SETTING TABLE FUNCTION SUB-FUNCTION DESCRIPTION P1 REF AZ 0 This option is used to select the auto zero maintain Options : 0 (no zero tracking), 0.5d, 1d, 2d, 4d 0AUTO This option is used to select the auto zero range when turn the indicator. Options : 0%, 2%, 5%, 10%, 20% 0 RANGE This option is used to select the manual zero range when press the ZERO key. Options: 2%, 4%, 10%, 20%, 50%, 100% speed Set ADC speed, press U. Wt. Key to select ADC speed, press Tare key to enter 7.5: 7.5 times per second 15: 15 times per second 30: 30 times per second 60: 60 times per second Note: 15 times per second or 30 times per second are recommendatory P 2 CAL DECI This option is used to select the decimal Options : 0, 0.0, 0.00, 0.000 INC This option is used to select the division Options : 1, 2, 5, 10, 20, 50 C AP This display will show xxxxxx for setting the capacity. CAL Calibrate, see detail below COUNT This display will show xxxxxx for indicating the internal counts. grw Set the gravity. Input the local gravity directly. 10. 3 CALIBRATE Enter technical parameter setting mode, press TARE key until display show “P2 CAL”, press ZERO key to enter, press TARE key until display show “CAL”, press ZERO key to enter calibrate. After enter calibrate mode, the display will show "unLd". - 15 - TPSS series Pallet scale User’s Guide Remove any weight from the fork, after STABLE indicator on, press the ZERO key. The display will show calibrate weight value, you can use M+, PT, TARE key to set the weight value (use M+, PT key to move active digit, use TARE key to change value, also you can press G/N key to make value as 0), after you input, press ZERO key to sure, display will show “LOAD”, add calibrate weight on fork, after STABLE indicator on, press ZERO key to sure. If the calibration is acceptable the display will return to normal. If an error message is shown try calibration again as a disturbance may have prevented a successful calibration. If the problem persist then contact your dealer. - 16 - TPSSS series pallet scale user’s manual SECTION 11 ERROR CODES ERROR CODES ----- DESCRIPTION RESOLUTION Over range Remove weight from the scale. If the problem persist contact your dealer for assistance. Enter date using correct format and reasonable values. Format: yy:mm:dd Enter time using correct format and reasonable values. Format: hh:mm:ss The scale was outside the normal zero setting range either when it was turned on or when the ZERO key was pressed. Remove weight from the scale and try again. Use the TARE key to set the display to zero value. If the problem persist contact your dealer for assistance. The values from the A/D converter are outside the normal range. Remove weight from the scale if overloaded, make sure the pan is attached. Indicates the load cell or the electronics may be faulty. If the problem persist contact your dealer Err 1 Date Setting Error Err 2 Time Setting Error Err 4 Zero Setting Error Err 6 A/D out of range - 17 - TPSS series Pallet scale User’s Guide APPENDIX1: PRINT FORMAT Format 1 Without tare weight: DATE: 2005/06/12 TIME: 12:12:30 18.30kg With tare weight: DATE: 2005/06/12 TIME: 12:12:30 G. W. 20.50kg N.W. 18.30kg Format 2 COMPANY NAME --------------------------DATE: 2005/06/12 TIME: 12:12:30 1. 1.36kg 2. 2.54kg 3. 3.06kg -------------------------TOTAL 6.96kg Format 3 NO. 3 G.W. 20.50kg N.W. 18.30kg Format 4 NO. 3 N.W. 18.30kg Format 5 DATE: 2005/06/12 TIME: 12:12:30 NO. 3 N.W. 18.30kg TOTAL 60.40kg Format 6/7/8 DATE/TIME/No/N.W./G.W./T.W./COMPANY NAME/TOTAL/---------------/. All of these above items could be selected, and also the order could be set as you required, you just need to set the item as 1,2,3… - 18 - TPSSS series pallet scale user’s manual APPENDIX2 : DRAWING OF PUMP ASSEMBLY AND HANDLE - 19 - TPSS series Pallet scale User’s Guide Parts List of Pump Assembly Part No. 101 102 103 104 105 106 107 108 109 110 111 112 113 114 115 116 117 118 119 120 121 122H 123 124 125 126 127A 127B 127C 127D 128 129 130 131 132 133 134 135 Description Steel ball Rod Base Steel roller Bushing Pin Shaft Retaining ring Axle Screw Washer Spring Pressure rod Steel ball Pressure valve body Split ring O-ring Washer Steel needle Bushing Pin Pump body Dust cover Bearing Steering wheel axle Bearing Steering wheel, Nylon Steering wheel, Polyurethane Steering wheel, Poly/Nylon Steering wheel, Rubber Retaining ring Steel ball Discharge valve body Spring O-ring Discharge valve shaft Valve taper core Spring Q’ty 1 1 1 1 1 1 2 1 1 1 1 1 1 1 1 1 2 2 1 2 2 1 1 1 1 4 2 2 2 2 2 1 1 1 1 1 1 1 Part No. 136 137 138 139H 140H 141 142 143 144 145 146 147 148 149 150 151 152 153 154 155 156 157 157-1 158H 159H 160H 161H 162H 163H 164H 165H 166 167 168 169 170 171 Description Pressure regulating screw O-ring Screw Crank link Setting screw Nut Parallel pin Retaining cover Spring cover Spring Pump rod Dust proof ring Pump cylinder Seal ring Nylon bushing Red copper washer Retaining ring Rhombus plate Pin Dowel pin Dust proof ring O-ring O-ring O-ring Cylinder Seal ring O-ring Filler plug Reservoir cover Screw Reservoir Retainer Retainer Retainer O-ring Retainer Dust cover Bearing Cover Q’ty 1 1 1 1 1 1 1 1 1 1 1 1 1 1 1 1 1 1 2 2 1 1 1 1 1 1 1 1 1 2 1 3 1 1 1 1 2 Parts List of Handle Part No. H101 H102 H103 H104 H105 H106 - 20 - Description Handle Spring pin Spring leaf Spring pin Spring pin Control lever Q’ty 1 1 1 2 1 1 Part No. H107 H108 H109 H110 H111 H112 Description Rod and chain Rubber cushion Screw Spring washer Nylon roller Spring pin Q’ty 1 1 3 3 1 1 TPSSS series pallet scale user’s manual Appendix3 : Drawing of frame Parts List of Frame Part No. Description Q’ty Part No. F304 Screw 4 F102 F313 Washer 4 F103 F314 Spring washer 3 F104 F316 Bolt 4 F105 F317 Wire clip 2 F112 F318 Screw 4 F113 F319 Fix screw 4 F114 F320S Cover plate assembly 1 F115 F320L (555mm) 1 F116B F321 Cover plate assembly 4 F117B F322 (690mm) 4 F118 F323 Convex spherical washer 4 F119 F324 Concave spherical washer 4 F120 F325 Bolt 8 F121 F326B Load cell 4 F122 F327S Frame (555mm) 1 F123 F327L Frame (690mm) 1 F124 F328 Pull rod 2 F126 F101 Torsion tube assembly 1 Note*: Quantity for tandem roller is 8, for single roller is 4. Description Q’ty Bushing Hexagon socket screw Spring pin Torsion tube shaft Spring pin H-link Load roller axle Bearing Poly load roller, tandem type Poly load roller, single type Axle Roller Wheel frame H-link axle Pull rod axle Nut Spring washer Eccentric pin 4 1 1 1 8/4* 2 4 8/4* 4 2 2 2 2 2 2 2 2 2 - 21 - TPSS series Pallet scale User’s Guide TAIWAN SCALE is a international supplier with more than 30 years experience in the production and sale of electronic weighing equipment. Products are supplied and serviced from our company locations in the CHINA, TAIWAN and distributed through a world wide dealer network, also we make OEM/ODM products for world wide customer. TAIWAN SCALE's products are predominantly designed for the laboratory, medical, business and industrial markets. The product range can be summarised as follows: Counting scales for general industrial and warehouse applications Digital weighing/check-weighing scales High performance platform scales with extensive software facilities including parts counting, percent weighing etc. Digital electronic scales for medical use Retail price computing scales Floor scales Truck scale Crane scales Weighing indicator for platform scales, floor scales and truck scales Hand push and pull gauge Customize auto weighing systems TAIWAN SCALE and their distributors offer a full range of technical services such as on site and workshop repair, preventative maintenance and calibration facilities. TAIWAN SCALE operates an approved quality management system and is certified to ISO9001:2000. Visit our Website at: www.taiwanscale.com Taiwan Scale Mfg. Co., Ltd. 282, Sec.3, Hoping W. Rd. Taipei, Taiwan TEL:886-2-23068203 FAX:886-2-23044354 e-mail: [email protected] W & P Scales Mfg. (Kunshan) Co., Ltd. No. 99 Shunchang Road Zhoushi, Kunshan Jiangsu China TEL:86-512-57669080 FAX:86-512-57669100 e-mail: [email protected] ©Copyright by Taiwan Scale Mfg. Co., Ltd. All rights reserved. No part of this publication may be reprinted or translated in any form or by any means without the prior permission of Taiwan scale. Taiwan Scale reserves the right to make changes to the technology, features, specifications and design of the equipment without notice. All information contained within this publication was to the best of our knowledge timely, complete and accurate when issued. However, we are not responsible for misimpressions which may result form the reading of this material. The latest version of this publication can be found on our Website. - 22 -