1
Masthead
Publisher
Editor-in-Chief
Assistant Editors
MPN, LLC
Robert L. Pritchett
Harry Babad
Michele Patterson
Consultants
Harry {doc} Babad
Ted Bade
Advertising and Marketing Director
Robert L. Pritchett
Web Master
Robert L. Pritchett
Public Relations
Robert L. Pritchett
Contacts
Webmaster at macCompanion dot com
Feedback at macCompanion dot com
Correspondence
1952 Thayer, Drive, Richland, WA 99352
USA
1-509-210-0217
1-888-684-2161
rpritchett at macCompanion dot com
Skype: maccompanion
macCompanion Staff
Harry {doc} Babad
Ted Bade
Matt Brewer (MacFanatic)
Dr. Eric Flescher
Kale Feelhaver (AppleMacPunk)
Jonathan Hoyle III
Eddie Hargreaves
Daphne Kalfon (I Love My Mac)
Wayne Lefevre
Daniel MacKenzie (Tech Fanatic)
Michele Patterson (Dixie Graphics)
Mike Potter (For Mac Eyes Only)
Robert Pritchett
Dennis Sellers (Macsimum News)
Rick Sutcliffe (The Northern Spy)
Mike Swope (Swope Design)
Tim Verpoorten (Surfbits)
Julie M. Willingham
Guest Authors
Tommaso Alvisi http://www.o0o.it/pro/
Kristine LeFevre
Application Service Provider for the macCompanion
website: http://www.stephousehosting.com
Our special thanks to all those who have allowed us to review their products!
In addition, thanks to you, our readers, who make this effort all possible.
MPN, LLC Copyright 2003-2007
Page 2 of 126
Volume 5 Issue 7 July 2007
MPN, LLC Copyright 2003-2007
Page 3 of 126
Volume 5 Issue 7 July 2007
MPN, LLC Copyright 2003-2007
Page 4 of 126
Volume 5 Issue 7 July 2007
______________________________________________ 7
Letter from the CEO __________________________________________________________ 7
Five years of macCompanion! _______________________________________________________ 7
According to Hoyle... __________________________________________________________ 8
WWDC '07 Roundup ______________________________________________________________ 8
Geek Speak: Random Mac Stuff You Need to Know ________________________________ 13
Creating A Dashboard Widget _____________________________________________________ 13
Doc_Babad's Macintosh Tips - A Macintosh Tip or Three… _________________________ 19
The Northern Spy____________________________________________________________ 31
Summer Madness - July 2007 ______________________________________________________ 31
Views from the Ivory Tower - July 2007 __________________________________________ 36
WWDC Announcements __________________________________________________________ 36
Mac Security 101 ____________________________________________________________ 39
For Better or For Worse: Safari For Windows ________________________________________ 39
__________________________________________________ 41
Acrobat 8 in the Office, First Edition ____________________________________________ 41
Adobe Photoshop CS3 One-on-One _____________________________________________ 47
Aperture Training – Real World Aperture and Aperture 1.5__________________________ 49
Canon Rebel XTi (400D) Digital Field Guide and Canon EOS 30 D Digital Field Guide 52
Ebay Business for Dummies ___________________________________________________ 56
MacBook for Dummies _______________________________________________________ 58
_____________________________________________ 60
Ferguson Hill Mini Speaker System _____________________________________________ 60
Mac Pro Upgrade Guide ______________________________________________________ 65
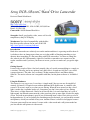
Sony DCR-SR200C Hard Drive Camcorder _______________________________________ 78
Tom Bihn Large Café Bag_____________________________________________________ 80
DragonDrop X 1.3 ___________________________________________________________ 82
HoudahSpot 1.4.11 – A Spotlight front end. To find Mac files. Fast!___________________ 86
InstantShot 2.4 – A souped up menubar located screen shot “grab” tool _______________ 92
MPN, LLC Copyright 2003-2007
Page 5 of 126
Volume 5 Issue 7 July 2007
ITask 1.5 — Another step towards the paperless office ______________________________ 96
____________________________________________ 102
AKVIS Enhancer V.6.0 ______________________________________________________ 102
ConceptDraw 7.0.3 Professional _______________________________________________ 110
Google Sketchup Pro 6 with Layout (beta) _______________________________________ 115
Web Graphics Creator 3.0 ____________________________________________________ 118
Amazon.com ___________________________________________________________________ 124
Apple Store for Individuals _______________________________________________________ 124
Apple Store for Businesses in the USA ______________________________________________ 124
Laughingbird Software __________________________________________________________ 124
TeachMac _____________________________________________________________________ 124
Advertising Information _____________________________________________________ 125
Statistical Analysis _____________________________________________________________________125
Advertising with macCompanion __________________________________________________________126
Site Ad Rate __________________________________________________________________________126
Affiliations ___________________________________________________________________________126
Sponsorships __________________________________________________________________________126
MPN, LLC Copyright 2003-2007
Page 6 of 126
Volume 5 Issue 7 July 2007
Letter from the CEO
Five years of macCompanion!
By Robert Pritchett
Happy Birthday macCompanion! This month is year 5 of monthly distribution of macCompanion
magazine.
While the computer and telephony industries have been working themselves into iPhrenzies and
studying the tea leaves of iPhonomics, we’ve been busy looking at hardware and software
solutions that magnify the Mac with this issue of macCompanion magazine.
As a side note, we have had a few staff changes recently loosing a few to less active roles as they
graze in greener pastures.
If you have not noticed, we changed the gray-scale animated logo using a combination of
Laughingbird Software’s Web Graphics Creator, a bit of Photoshop tweaking and feedback from
staff and others to make it more readable.
We also removed web pages and past PDF issues from 2003 through 2005. If no one really
noticed, then we did the right thing. All articles and reviews have a shelf life and if you want to
find those you can always use the Way Back Engine to pick those up linked in our Index http://www.maccompanion.com/archives/archivesindex.html
And after attending some funerals and noticing that I did not attend my own, I’ve learned it is
more important to have been considered “significant” rather than in just being “good”. Have I
done any good in the world today? Have I accomplished anything of real significance? Have I
made a positive impact in someone else’s life?
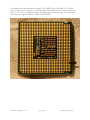
This month our cover has a shutterbug designed by Michele Patterson. The intent is that we
would be covering photography as a theme. So we have some book reviews that go that
direction. If you want to look at camera reviews, then go to Philip and Joanna Askey’s excellent
camera review website at http://www.dpreview.com/
Meanwhile, enjoy the articles researched and posted by our excellent volunteer staff, drop by our
advertisers and affiliates and let the world know about us!
May your birthdays be memorable and your lives significant.
MPN, LLC Copyright 2003-2007
Page 7 of 126
Volume 5 Issue 7 July 2007
According to Hoyle...
WWDC '07 Roundup
by Jonathan Hoyle
[email protected]
macCompanion
July 2007
Despite the fear that a "repeat" topic might dampen interest, this year's Worldwide Developer's
Conference broke its attendance record again, with 5,000 attendees. There were companies
sending people for the first time, and long time Mac development houses sending greater
numbers than ever before. Sending two or more individuals made a great deal of sense, given
that there were 159 sessions, usually running 8 at a time, not including the 94 labs. To get the
most out of this conference, companies ought to send at least two, if not three, to get adequate
coverage of the plethora of information.
The growth of the conference is indicative of the growth of the platform itself. There are now
nearly a million registered Macintosh developers, and an untold number of unregistered ones.
With the recent news that Apple's marketshare has skyrocketed to over 14% for portables and
over 10% for desktops http://www.macworld.com/news/2007/06/22/macshare/index.php, it is no
wonder that attendance is overflowing. And despite the fact that it is named a Developer's
conference, there was an amazing number of upper management, marketing, IT and students
present. Sessions devoted to these other areas were available too, making this more of an all
around Mac conference.
The Steve Show
As usual, WWDC kicked off with a keynote by Apple CEO Steve Jobs. Although Steve's
showmanship remains as strong as ever, one can see that his technological edge is not as sharp as
it used to be. In recent WWDC's, we see how Steve relies more and more on his notes, following
a rigid demonstration, mostly pulling it off as if it were impromptu. Slight hesitations creep in
here and there, such as when he momentarily forgets what a particular icon represents, but all in
all, he still puts on the best show of any conference.
Although most of the material covered in this conference is covered under non-disclosure (and
thus I am unable to disseminate), the keynote address is open to the public and free to discuss.
For those who have not already had the opportunity to see it, I recommend going to Apple's web
site and watching the keynote yourself at: http://www.apple.com/quicktime/qtv/keynote
The topic for this year's WWDC was, of course, Mac OS X 10.5 Leopard. This is an exciting
new update to Mac OS X which most Mac users will be very pleased with. Some of this
information was available last year, and some of it new. Steve listed these Top 10 features of
Leopard.
MPN, LLC Copyright 2003-2007
Page 8 of 126
Volume 5 Issue 7 July 2007
•
•
•
•
•
•
•
•
•
•
New Desktop (new feature this year)
New Finder (new feature this year)
QuickLook (new feature this year)
64-bit
Core Animation
BootCamp
Spaces
improvements in Dashboard
improvements in iChat
Time Machine
These items are described in Ted Bade's column in this month's macCompanion as well.
Reviewing Leopard deserves an article of its own, so we will cover this in its own dedicated
column next month.
One More Thing...
Perhaps second only to Lt. Columbo, Steve Jobs is constantly associated with the phrase "One
more thing...". This year, it was actually two more things. The first was the announcement of the
Safari web browser being porting to Windows XP and Vista. Many developers had mixed
feelings about this, since Safari is one of the things that made Mac OS X superior to Windows.
Worse still, the Jobs presentation suggested that Apple was more interested in capturing the
FireFox market on Windows, not the Internet Explorer market. Perhaps the reasoning is that
those on FireFox are the ones wise enough to look at browser alternatives, whereas IE users are
click-monkeys who would never switch anyway. Still, it's a bit annoying that Apple would
target FireFox (a good browser) rather than Internet Explorer (a poor one). Safari is only
marginally better than FireFox, yet is twice the speed of IE.
Apple has shown some initial success with Safari for Windows, with 1 million downloads in its
first 48 hours. As a comparison, Apple's wildly successful iTunes for Windows has 1 million
downloads every 24 hours, making the Safari download rate already at half the pace of iTunes.
The last item was, to no one's surprise, the iPhone. Unfortunately, this announcement was quite
the disappointment. Raising the crowd's anticipation, Steve Jobs announces that he has a "very
sweet solution" for developers wishing to target the iPhone, one which is "really innovative". A
new iPhone SDK? Perhaps an Xphone development environment? No, instead Steve reminds us
that Safari comes on the iPhone. Thus, developers merely need to write to Web 2.0 + AJAX
standards, and their applications will run on iPhone just as it does on any system running Safari.
Of course, this is not what developers had in mind. Does Steve not know this?
MPN, LLC Copyright 2003-2007
Page 9 of 126
Volume 5 Issue 7 July 2007
Despite the down note Steve left us with, all in all it was a good keynote. Not as good as last
year's, but better than others'. With the conference now under way, Mac developers had a week
of learning and preparing for what is around the corner.
Whither Carbon?
"There will come a time when we will stop investing in Carbon..." - Bertrand Serlet, Senior VP of
Apple Software Engineering, 6/11/07
There was one big bombshell dropped at this year's conference, eclipsing other programming
topics: the announcement that the Carbon API (Application Programming Interface) will not be
ported to 64-bit. This is a major reversal from last year's conference, in which we were told that
Carbon would indeed be 64-bit compatible. Some explanation is in order for those new to the
terminology:
Since the introduction of Mac OS X, there have been a number of APIs by which developers
may create native applications. If you develop in Java, your cross-platform projects can be made
double-clickable applications with little effort. Unix programmers can create console
applications on the Mac by writing to the BSD API. Unix GUI apps can run as well, as long as
the user has installed the optional X11 package. However, the two primary API's by which real
Mac OS X applications are typically develop are these: Carbon and Cocoa.
Carbon is a C-based API, popular with C++ programmers, and is an evolution of the original
Mac Toolbox from 1984. Over the past 20+ years, these API calls have been improved and
modernized, making Carbon a first-class development suite (far superior to the Win32 API on
that other system). In conjunction with Interface Builder, Apple's GUI generator, one can very
easily develop topflight applications with Carbon. The vast majority of applications sold for the
Mac are Carbon-based.
Cocoa has its legacy in the old days of OpenStep and NeXTStep, Steve Jobs' former company.
Whereas Carbon is a procedural API, Cocoa is object oriented, and allows a developer to create
applications even more quickly than Carbon. It even takes greater advantage of Interface
Builder. Unfortunately, Cocoa has two major disadvantages to it: 1) its API is a radical departure
from any previous Mac APIs (so you are relearning from scratch), and 2) it requires developing
in Objective C, a niche language with bizarre syntax, and is virtually unheard of outside of Cocoa
development.
Steve Jobs had maintained the fiction (at least in word) that both Carbon and Cocoa would
remain equally supported. Even as recently as last year's WWDC presentation on Leopard, Apple
confirmed equal support for Carbon moving into the 64-bit world. This year, however, all that
changed. It was announced that the Carbon API will not be ported to 64-bit; 64-bit applications
will have to be rewritten in Cocoa.
I will discuss this greater detail in an upcoming article very soon.
MPN, LLC Copyright 2003-2007
Page 10 of 126
Volume 5 Issue 7 July 2007
Special Events
After hours on most days at the conference, Apple holds various evening events. This is a time
developers can unwind and enjoy these other activities, most of them involving free food and
drink. There were some changes this year, some good, others not so good...
Sunday: In recent years, WWDC Sundays was a time for students. Sunday afternoons often had
workshops for students to learn how to develop Mac software. Sunday evening was typically set
aside as a Student Reception/Career Fair event, in which a number of companies would have
booths accepting resumes and talking with students. Over the years, the Student Reception has
become more diminished, despite its increased attendance. Sushi and exotic appetizers gave way
to pizza and soda to finally this year's cancellation altogether. As a substitute, a separate session
107: Students - Getting the Most Out of WWDC was presented on Monday afternoon.
Unfortunately, even this substitution was mishandled, as the presentation was advertised on the
WWDC Student web page to start at 5:00 PM, but was actually scheduled for 3:30 PM (and in
fact did not begin until 4:00 PM due to the Mac OS X State of the Union session running late).
This was yet another example of the logistical errors that plagued this year's conference.
Monday: Monday evening was the ADC reception, a chance for developers to meet and chat
with Apple engineers. 1,200 Apple engineers made the trip to San Francisco, an amazing figure.
As with last year's conference, the ratio of Apple employees to attendees was 1:4. This is a
significant sign of how serious Apple is about courting its developers. The food at the reception
was mediocre, but the contacts were impressive. This night alone made the conference worth its
price.
Tuesday: This was the night not to miss. Tuesday evening at WWDC has two events: the Apple
Design Awards [ http://developer.apple.com/wwdc/ada/ ] and the awesome Stump the Experts
audience participation game show [ http://en.wikipedia.org/wiki/Stump_the_Experts ]. Pizza is
served in the interim, and it is definitely a geek paradise for the night. Interesting, Apple decided
to double up by moving its Scientific Poster session from Wednesday to Tuesday this year.
Doing so increased the number of attendees viewing the posters, and made for one of the best
WWDC Tuesday evenings in recent memory. The only complaint I had was that by putting all
those things on one night, I did not have as much time to read all the posters I has wanted.
Wednesday: Here Apple dropped the ball.With the Scientific Poster session having moved from
Wednesday to Tuesday, Wednesday evening was left "To be announced" [see:
http://developer.apple.com/wwdc/schedules/wednesday_pm.html ]. Many (including some Apple
employees themselves) suspected a surprise for that evening. In previous years, Wednesday was
movie night, so some had hoped that this would return in 2007. I did not think there was going to
be a surprise, but I had imagined that they might devote the time to rebroadcast some of the more
popular conference sessions, as they had in 2006. But alas, there was nothing. Not even an
announcement of nothing. This appears to be another of the many logistical errors that this year's
WWDC has been suffering.
MPN, LLC Copyright 2003-2007
Page 11 of 126
Volume 5 Issue 7 July 2007
Thursday: With the size of the conference continuing to grow, something had to be done about
the Apple Campus bash. For many years, Apple had held a large party on the campus of Apple in
Cupertino for WWDC attendees on Thursday night. The Apple store would be open for extended
hours, and developers would stand in line to get goodies at a conference discount. Buses would
shuttle the attendees from the convention center to Cupertino and back, and there would be a line
for this as well. When attendance was at a manageable two to three thousand and bus rides took
about 15 minutes, this was not much of a problem. However in 2003, Apple moved the
conference from the nearby San Jose to a more distant San Francisco, making the bus ride a 45+
minute proposition each way. Now double the number of attendees, and you have a nightmare on
your hands.
And a nightmare it was in 2006. Enough was enough. For the 2007 conference, Apple reluctantly
(but wisely) changed the party venue from the company campus to San Francisco's Yerba Buena
Gardens, across the street from the Moscone Center. It was a complete hit. The food was
wonderful, stations of hot dogs, Italian sausage, pasta, sushi, dim sum, tacos, ice cream and
much, much more were scattered all about the garden. Ozomatli played to the delight of all, and
most stayed until past dark.
The smashing success of Thursday night went rather far in compensating for the lackluster
amenities and disappointing food during the week. Hopefully, this will be a sign of future
improvements for upcoming WWDC's.
Coming Up: Next month, a detailed review of Mac OS X Leopard, followed by a review of
Apple's new Xcode 3 development tools. See you in 30!
MPN, LLC Copyright 2003-2007
Page 12 of 126
Volume 5 Issue 7 July 2007
Geek Speak: Random Mac Stuff You Need to
Know
http://www.macfanatic.net/blog/ Copyright © 2007
Creating A Dashboard Widget
By Matt Brewer
Today we’re going to take a dive into a technology that debuted over two years ago with the
release of Tiger: Dashboard. I personally have a love/hate relationship with Dashboard.
Sometimes developers try to make a widget do too much, when it would have been better as an
application. At other times, the widget is just useless. All that aside, Dashboard can be useful for
some simple tasks.
Introduction
If you have any web development experience behind you, then you are well on your way to
becoming an awesome widget developer. A widget is essentially a complete webpage, with
HTML, Javascript, CSS and all that. A widget can take it a few steps farther than just a webpage
however, as Apple has given us developers a “widget” Javascript object that lets us perform
system calls for executing Perl, AppleScript, or even Shell scripts.
Because widgets are essentially webpages, you can develop a widget in a standard text editor and
refer to documentation and go through a whole bunch of work. Or, you can download a beta
copy of Apple’s Dashcode that will make an official appearance in Leopard. Right now the beta
is available for Tiger, you will just need an ADC account to login and download. This download
only requires a basic subscription, so you can sign up for free. Go ahead and download a copy of
dashcode here < http://developer.apple.com/tools/dashcode/ >. This isn’t an introduction to using
Dashcode either, I’ll assume that you can figure out the basic functionality of it on your own.
MPN, LLC Copyright 2003-2007
Page 13 of 126
Volume 5 Issue 7 July 2007
Mission Statement
Now that we have a bit of ideology behind us, let’s talk business. You have just started a job as a
server at a local restaurant and you want to easily be able to calculate how much you made per
hour. The math is fairly simple, you’ll figure up your actual wages for the hours worked, add in
your tips, and then divide by the hours. However, that is a lot of work to do after working a shift
and you want to make it easier, so you decide to make yourself a widget!
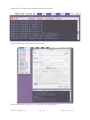
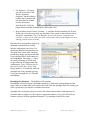
Creating the Front Interface
Fire up Dashcode and choose the “Custom” widget
when creating a new document. Dashcode provides you
with an easy, drag-n-drop way to add objects to your
widget. Take the time now to open up the “Library”
from the toolbar and explore. Notice that there is an
Inspector as well. Take a look through all the options
there. Now, let’s get started.
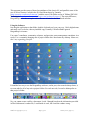
First off, drop a couple basic “Text” objects onto the
front of your widget. As you place objects, they appear
in the source list on the left. If you wish to rename them
(which I highly recommend), you’ll need to open the Inspector and set the “ID” field. Drag two
“Text Fields” onto the face and arrange as shown in the screenshot. Also add a button for
calculating the hourly rate. And, even though you can’t see it, there is one more “Text” object on
the face of the widget. Just drag a regular text object and in the Inspector, delete the text in under
“Localization - Key”. Then your object appears invisible, with no text. We’re going to use this
one as the output area for the user.
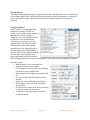
Creating the Back Interface
Now to create the interface for the back of the widget. In the source list on the left, you should
see a black icon that says “back”. This is the other side of your widget. We’re going to be cheap
and just delete the handy “Made with Dashcode” image and add a few things to the back of ours.
Two “Text” objects, used as labels go on the back. You can change the color of the text in the
Inspector. We’ll add a button that will fire up the user’s default web browser and take them to
my website, and also add a quick “Text Field” where the user must enter an hourly wage. Notice
the “Done” button and “i” button were already configured.
MPN, LLC Copyright 2003-2007
Page 14 of 126
Volume 5 Issue 7 July 2007
Adding Code
At this point, I recommend you download the completed project
< http://www.macfanatic.net/downloads/software/samplecode/mcJuly2007-make-a-widget.zip >
and follow along. The main reason is that all those text objects were given specific names and
the code references those names. You might not have changed the IDs (names) via the Inspector
and therefore your source list will have a lot of “Text1” and “Text2” and so forth. If the IDs
don’t match, the code won’t work. Basic HTML element accessing.
First, we’re going to add the main code that crunches the numbers. I have called this function
“calcTips(event)”. The basic design of this function is to grab number values from the three
Text Fields we put on the widget (one is on the back remember), error check those variables, do
the math, and place that number in the output area on the front of the widget. Most of the code is
related to error checking and rounding the number off to two decimal places, since we’re
working with money.
function calcTips(event) {
// Grab the decimal values from the input fields
var hours = parseFloat(document.getElementById("hours").value);
var tips = parseFloat(document.getElementById("tips").value);
var wageRate = parseFloat(document.getElementById("wageRate").value);
// If user hasn't entered any info, just return
// The isNaN(variable) is like checking for NULL
if ( isNaN(tips) || isNaN(hours) ) {
alert("User didn't enter enough info");
return;
}
// If user hasn't filled in the prefs on back, let them know
if ( isNaN(wageRate) || wageRate < 0 ) {
alert("User hasn't entered hourly wage");
document.getElementById("output").innerText = "Set Wage on Back!";
return;
}
// Calculate the actual rate
var out = ((hours * wageRate) + tips) / hours;
// Do the rounding to get to two decimal places
out = Math.round(out*100)/100;
var outString = out+''; // Converts out to a string by adding a empty space
if ( outString.indexOf('.') < 0 ) {
outString = outString + '.00'; // Add the decimal places for money :)
MPN, LLC Copyright 2003-2007
Page 15 of 126
Volume 5 Issue 7 July 2007
}
outString = outString + '/hr'; // Just add this for formality
// Set the result in the field
document.getElementById('output').innerText = outString;
}
A few quick things to note from the code above.
The parseFloat() function is a nice one to use to convert a string to a number. If something goes
wrong, it returns “NaN”, which is why we check for that in the lines following the first couple
statements.
The alert() function is similar to NSLog() or printf(), except you can’t use placeholders as far as I
can tell. You just pass the variable or string in, and it prints it to the console. The user won’t
ever see these when using the widget, but these messages pop up in the Run Log in Dashcode, so
it will help you debug.
Notice when grabbing text from a TextField, you use the “.value” call. However, when grabbing
text from just a regular Text object, you use the “.innerText”. Play around with those until
you’re comfortable. It makes a difference.
Preferences
Now that we have the code in place to crunch the numbers, let’s hook up our preferences.
Preferences for a widget are very similar to the NSUserDefaults and such methods that you use
in Cocoa. Your widget can read from it’s user defaults (most likely at launch) and then write
objects back to the defaults, on a keyed value. You will want to use preferences because this
allows your widget to easily save values across system restarts, logins, etc. If you didn’t use this,
your widget wouldn’t retain values.
function load()
{
setupParts();
// We're going to retrieve our preferences and fill in the textFields on the back now
var wagesFromPref = widget.preferenceForKey("wageRate");
if ( wagesFromPref && wagesFromPref.length > 0 ) {
wageRate.value = wagesFromPref;
}
}
The load() function is in your JS file by default, and the only code in there is setupParts(), to
initialize your widget. However, we need to read our preferences into our widget at startup, so
this is where we’ll do it. Notice the call “widget.preferenceForKey(keyAsString); This returns
your object, or NULL if it doesn’t exist. If we got something other than NULL and the string
wasn’t empty, we set the textField on the back of the widget to that value and move on.
MPN, LLC Copyright 2003-2007
Page 16 of 126
Volume 5 Issue 7 July 2007
function showFront(event) {
// your widget needs to show the front
// The user might have just flipped from the back to the front,
// so we're going to save the preferences they might have set
var wageRate = document.getElementById("wageRate").value;
if ( wageRate && wageRate.length > 0 ) {
widget.setPreferenceForKey(wageRate, "wageRate");
}
more code here....
}
The showFront() widget is called when the user clicks the glassy Done button on the back of the
widget to flip back around to the front. At this point, the user should have entered a value into
the textField on the back, and we want to read that in, quickly error check, and then set the
preference with “widget.setPreferenceForKey(value, keyAsString); That’s all to that. There is
more code below in this function, but it’s stuff setup by Apple.
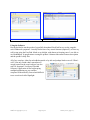
Making the Connections
We have written the code for our widget, but it still doesn’t do anything because we haven’t
hooked up any of the functions to our buttons yet. Select the “Calculate” button on the front of
the widget and pull up the Inspector. Click on the blue object-like tab on the far right and you’ll
see a full list of Javascript handlers that you can assign functions to. For our button, it’s obvious
that we want to assign the “calcTips()” funtion to the “onClick” handler. Just double-click in the
table on the right side and you can either type in the function name, or use the pop up menu to
select a function.
To make the widget a bit more keyboard friendly, we’ll also add two handlers to the “tips”
textField. Assign “calcTips()” to the onBlur and onChange handlers and when the user tabs
through the fields and leaves the last field, it will automatically run. It’s the closest thing I could
come to assigning Return to a button in a Cocoa app.
One last note on the back of the widget, I have assigned a quick function to a button, to pull up
my webpage. The function uses “widget.openURL(urlAsString); to accomplish that. Very
handy.
Conclusion
You’ve used the Play button to preview the widget during development. Be sure to play around
with Pausing it as well and admire the full Javascript debugger that Apple has provided. There is
also a code evaluator that lets you test code in real time on your widget. When you are ready to
share your widget, just go to File -> Deploy Widget. That places a regular widget file wherever
you choose. You can also use File -> Deploy Widget to Dashboard if you want to use it on your
own Mac right away.
MPN, LLC Copyright 2003-2007
Page 17 of 126
Volume 5 Issue 7 July 2007
There are a few more things you can do to the widget, such as set some info in the attributes area,
design a custom widget icon, or make a better background for the front of the widget. All of that
is stuff I worked on, but not very much. As a challenge, I encourage you to add a few more
features to the widget, such as a list view and a way to store data, so that the user can browse
through previous days.
Contact Info
You can always send me an email at [email protected] or visit my website at
http://www.macfanatic.net for more information about me and my ramblings. I also produce a
weekly audio podcast taking an in-depth review of cool and new Mac applications, along with
tips, developer interviews, tutorials, and the occasional tutorial.
MPN, LLC Copyright 2003-2007
Page 18 of 126
Volume 5 Issue 7 July 2007
Doc_Babads Macintosh Tips - A
Macintosh Tip or Three…
July 2007 Edition
By Harry {doc} Babad
© 2007
Product and company names and logos in this review may be registered trademarks of their
respective companies.
The software related tips were tested on a 1 GHz dual processor PowerPC G4 Macintosh with 2
GB DDR SDRAM; running under Macintosh OS X OS X 10.4.9.
This month I continue sharing my occasional tip related finds with you. Most, but not all of the
Tips I share come from — Paul Taylor's Hints & Tips column http://www.mac-hints-tips.com
and are used with his permission. Where I use any one else’s tips for this column, I acknowledge
both their source and their contributors.
Oh, I almost forgot! Unless otherwise noted, all the tips and tidbits I share, where appropriate,
work on my computer. If I don't own the software but if the tip sounds interesting, I'll so note at
the end of that specific write-up.
NEW: Great Stuff – Tips for you to checkout
As I cruise the i8nternet I run across some great tips, that I’m not likely to get permission to
reprints. So I’ve started a new section to this column for do-it yourselfers.
Tips I’ve provided this month include, organized as always in a random order:
•
•
•
•
•
•
•
•
•
Delete Printer Drivers to Reclaim Space
Zapping PRAM in OS X
Deleting Stubborn Files
Use proxy icons to create Mail attachments and more…
What You Don’t Know About Optical Media…Could Kill You (Or Your Drive)
Email Formatting Glitches – Allow all recipients to decode your message (Renamed – the
original title by Ilene Strizver was Email Etiquette]
Mac OS X Keyboard Shortcuts – Compiled by Mike Sivcevic (SilverMac)
Easily Create Lots of New Folders (An untested by me, Terminal based hint)
Great Stuff – Tips for you to checkout
# # # # # # # ## # # #
MPN, LLC Copyright 2003-2007
Page 19 of 126
Volume 5 Issue 7 July 2007
Delete Printer Drivers to Reclaim Space
One way to reclaim some hard drive space is to delete drivers for printers you’ll never use. By
default, OS X installs 2GB of printer drivers in /Library/Printers.
Just open that folder and drag into the Trash the drivers for individual printers, or the folders
containing drivers for an entire brand. It’s not easy to replace these drivers, so be sure to delete
only the brands and models you’re confident you’ll never use.
Design Tools Monthly
April 2007 – Taylor’s Hints and Tips Column
# # # # # # # ## # # #
Deleting Stubborn Files
Occasionally, Mac OS X will refuse to delete a file from your Trash no matter what you try. You
can always use the Terminal application to force empty your Trash, assuming you are
comfortable using the UNIX command line, or you can use one of these applications to do the
dirty work for you.
Mac HelpMate: www.macworkshops.com/machelpmate
Mac HelpMate can force empty your trash, and it does much more. It also manages routine
system maintenance tasks, monitors the health of your hard drive, repairs permissions, remotely
controls other Macs, and more. This utility is free.
Cocktail: www.maintain.se/cocktail/index.html
Similar to Mac HelpMate in some ways, Cocktail can delete those stubborn files and also
performs many system maintenance tasks for you. Cocktail costs $14.95.
Super Empty Trash: www.faqintosh.com/risorse/en/sys/setrash
Super Empty Trash is a one trick pony, but it performs that trick without any hassle. It is an
AppleScript-based application that simply force empties your Trash, and it lets you select which
disk’s Trash files should be deleted. Super Empty Trash is free.
iCan: http://www.kanzu.com/index.html
Can is a $10 shareware trashcan for OS X which sits on the desktop or can be limited to the
menubar, where I prefer it to live. . It's interactive - it appears empty when it's empty, and full
when it's full, just like the one in OS 9. From the menubar you can Empty, Smart Empty, Force
Empty or Secure Empty The trash. And of course there is a warning about how big your trashcan
is, so if there’s more there than you thing ought to be you can check it out and rescue the
accidentally dumped files.
The Mac Observer via Apple Barrel, Ridgecrest, CA
April 2007 – Taylor’s Hints and Tips Column
And Harry (doc) Babad – macC {uses iCan}
# # # # # # # ## # # #
MPN, LLC Copyright 2003-2007
Page 20 of 126
Volume 5 Issue 7 July 2007
Zapping PRAM in OS X
Sometimes you hear Mac technicians say a computer needs its PRAM zapped. For most of us,
this sounds very odd, and maybe even a little obscene. But don’t worry; it’s a standard part of the
Mac troubleshooting routine.
PRAM stands for “parameter random access memory.” A document in Apple’s knowledge base
reads:
“PRAM stores certain system and device settings in a location that Mac OS X can access
quickly. Exactly which settings are stored in the computer’s PRAM varies depending on the type
of computer as well as the types of devices and drives connected to the computer. Parameter
RAM is a small area of non-volatile RAM (NVRAM).”
Because PRAM is “Non-volatile RAM,” it will store data even when the computer is turned off.
It will also typically store data when the computer automatically shuts off due to severe battery
drain.
According to Apple, some of the data stored in PRAM includes:
•
•
•
•
•
•
Display and video settings such as refresh rate, screen resolution, number of colors
Time zone setting
Startup volume choice
Speaker volume
Recent kernel panic information, if any exists
DVD region setting
Many issues can be resolved by “zapping the PRAM.” This includes issues such as Macs that are
flashing a question mark when powered on, to missing pictures on the iMac G5’s display, to
computers that simply won’t power up at all. PRAM can be corrupted by faulty (typically third
party) software, power surges, and electromagnetic interference.
In most Macs you can “zap the pram” by powering the computer on, then immediately holding
down the Command, Option, P, and R keys simultaneously. The Command key is the one with
the cloverleaf or Apple on it.
According to Apple, OS X does not store network settings in PRAM. If you experience a
network issue, resetting PRAM will not help.
If PRAM is reset, you may need to verify your time zone, startup volume, and volume settings
using System Preferences. Certain firmware updates may reset PRAM as a normal part of their
installation process.”
MPN, LLC Copyright 2003-2007
Page 21 of 126
Volume 5 Issue 7 July 2007
Note that zapping PRAM is different than resetting the Power Management Unit (PMU,) which
you might have to do on certain Apple laptops. Apple says “A PMU reset should not be
necessary except as a last resort in cases where a hardware failure of the power management
system is suspected. Performing a PMU reset returns the iBook and PowerBook hardware,
including NVRAM, to default settings and forces the computer to shut down.” ~ Ed
Small Dog Electronics
April 2007 – Taylor’s Hints and Tips Column
# # # # # # # ## # # #
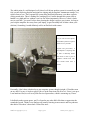
Use Proxy Icons to Create Mail Attachments and to imbed web address into your emails
When checking out, Macworld’s, OS X hints column, I came across Kirk McElhearn hint (blog)
and decided to try whether it worked for Eudora, my favorite email client. Yes, Kurt it does!
According to Kirk, if you're working on a document and you want to send it to someone as an email attachment, you probably know that you can drag the actual file icon to the Mail icon in the
Dock to create a new message containing that file. But to do this, you have to navigate to the
Finder and find the file.
There is another way: Save your
work, click the proxy icon in the
title bar (that's the small icon next
to the file's name) and drag it
onto the Mail icon in the Dock.
This creates a new message with the working document attached to the message. (This method
also works with Microsoft Entourage.
You can do this with Web pages in Safari or Firefox (and perhaps in other browsers) by dragging
the icon to the left of the URL in the address bar; in this case, the current URL is pasted in the
body of the newly created message.
If, however, you are viewing a local file, the file itself will be added to the message.
MPN, LLC Copyright 2003-2007
Page 22 of 126
Volume 5 Issue 7 July 2007
Note that different programs deal with attachments in different ways. With Mail, any changes
you make to your file after adding it to a new message will not be reflected in that attachment;
the file is added to the message in its state at the time you drag it. Entourage, however, only
records a link to the file, so you can keep working on your document and making changes. When
you save or send the message, the latest version of the document will be attached. Other e-mail
programs may have different behavior; so if you use a different program, try it out to see how it
works.
Kirk McElhearn — Macworld, May 31, 2007
http://www.macworld.com/weblogs/macosxhints/2007/05/proxyicon/index.php?lsrc=mwhints
# # # # # # # ## # # #
Email Formatting Glitches – Allow all recipients to decode your message
It’s tempting to format outgoing email with different fonts, point sizes and colors, and to punch
up your text with the use of italics and boldface. Unfortunately, what you send is not necessarily
what your recipient gets.
Some email programs don’t read special formatting, including fonts that your reader’s computer
doesn’t have. And many allow the user to set preferences for plain text instead of rich text, which
includes styling. The result: your carefully formatted email is reduced to plain text, or worse,
littered with ‘alien’ characters (more on that below).
What’s the solution?
First, stick to system fonts, such as Arial, Times, Verdana, Trebuchet or Geneva, which virtually
all users have. And, unless you’re certain that the recipient can read your formatting, keep it
simple and use only keyboard characters and styling that won’t get lost in translation. For
emphasis, try surrounding your important text with *asterisks.* All Caps is another option, but
one to be used sparingly.
Remember that Caps are considered shouting in the cyberworld! For most people who have
access to personal computers, email has rapidly overtaken ‘snail mail’ as the preferred means of
sending written communication, both business and personal. The near-immediate delivery and
low cost of email are hard to beat, but the technology does have limitations when it comes to
typographic finesse. Here are some dos and don’ts to ensure that your electronic communication
is received with its message intact.
MPN, LLC Copyright 2003-2007
Page 23 of 126
Volume 5 Issue 7 July 2007
Safe Characters
One of the most puzzling occurrences in emails is the occasional appearance of strange,
unfamiliar characters in the text, often foreign or mathematical in nature. We can usually read
around them, but even so, what are they and how did they get there? This can occasionally
happen to non-standard keyboard characters when they’re sent from one email program to
another. These characters include such typographic niceties as ‘smart’ quotes and apostrophes,
en and em dashes, and bullets. These characters and others like them are not always encoded or
translated consistently from one email program to another.
The result? Your carefully formatted curly quotes, ligatures and ellipses can turn into something
unrecognizable to your recipient’s inbox. The solution is simple: play it safe and stick to the
standard keyboard characters. While this means using ‘dumb’ straight quotes and double
hyphens instead of correct dashes, at least your message will arrive in a readable form. (But
don’t forget: when copying and pasting text from an email into a designed piece for print,
reformat these ‘dumb’ characters to adhere to the principles of good typography!)
Signatures and Attachments
Other points of good email etiquette include using a signature and being savvy about
attachments. A signature is a short block of copy that identifies you and includes your contact
information.
Most email programs allow you to set up one or more signatures to choose from, or to select a
default signature that will automatically appear at the bottom of every email you send. Usually
used for business, signatures can be a great time-saver if you use them appropriately. Remember
to include your signature in each subsequent email to the same recipient so no one has to search
for the email with your phone number.
Another tip: don’t include images and logos in your signature. These are often filtered out by
spam filters and could result in your addressees not getting your email at all. As for attachments,
keep them to a minimum and keep an eye on their size: between 50K and 2MB is best.
In fact, spam filters often screen out emails with attachments that are 50K or less as a means of
virus control.
For attachments over 2MB, check with the intended recipient before sending and ask for
confirmation afterwards. Sometimes mailboxes have maximums on the size of acceptable
attachments; others are too full to accept them at all.
And, a final tip: proofread your email carefully. Once you hit send, there’s no turning back!
~ Ilene Strizver, founder of The Type Studio, is a typographic consultant, designer, writer and
specializing in all aspects of typographic communication, from the aesthetic to the technical.
Ilene conducts Gourmet Typography Training internationally. For more information visit
www.thetypestudio.com or contact [email protected].
Ilene Strizver, LIMac Forum, Long Island, NY
Paul Taylor’s Hints & Tips March 2007
MPN, LLC Copyright 2003-2007
Page 24 of 126
Volume 5 Issue 7 July 2007
# # # # # # # ## # # #
What You Don’t Know About Optical Media…Could Kill You (Or Your Drive)
If we were a local news show, we’d be running teasers saying things like “Could the blank disc
you put in your disc drive destroy it? We’ll tell you at 11.” But since we’re out here in the wilds
of the blogosphere, we’re just going to go ahead and tell you now. I mean, you’re already here
and everything.
ZDNet’s Jason O’Grady went to burn himself a DVD the other week and ran into a bit of a
problem. A SuperDrive-killing problem. http://blogs.zdnet.com/Apple/?p=441
When the disc came out of my drive the white thermal printing was mostly de-laminated from
the top of the disc surface. About half of the white thermal surface had peeled off inside the
SuperDrive mechanism. Note: that is not a label that I installed or some sort of a sticker, it’s the
white thermal printable topcoat that ships from the manufacturer on the media.
Pieces of the label were trapped throughout the inside of my SuperDrive and it wouldn’t read any
disc, in fact, subsequent discs that were inserted got scratched beyond further use by all the white
shards that were distributed throughout the inside of my machine.
Fortunately, Jason’s MacBook Pro was covered under Apple Care, though the Genius who
handled it informed him that it wouldn’t have been covered by Apple otherwise, a repair that
would have totaled almost $450.
The moral of the story? Stay away from shoddy B-grade media: in this case, Prodisc White
Thermal Hub Printable 8x DVD-R. Remember: sometimes it’s worth it to pay a little more for
something that will not break your optical drive. Jason recommends Verbatim; I’ve had good
luck with Staples’s generic brand. Burn safely, everybody.
Doc Sez – Use the COSTCO TDK medium for all non-essential files but put
archival material on Taiyo Yuden media. I’ve only lost one in about 100 CDs
when using the TDK data CDRs, both for music and data. Oh the material is not
lost since Roxio’s Toast lets me know when I’ve a bum copy and I just burn a
new one. I’ve not done much with DVDs other then large data compilations, and
the TDK DVD-Rs work fine; I’ve not burned 100 disks so have no statistics. In
all cases, I use my internal superdrive as a read source and my LaCie 1394
(Pioneer DVD-RW DVR-107D) or my Sony DRX-820UL-T double density drive
(DVD-RW DRU-820-A) as burners.
http://www.macuser.com/
Posted Feb. 20, ’07, 9:35 AM PT by Dan Moren
http://www.macuser.com/hardware/what_you_dont_know_about_optic.php#more
MPN, LLC Copyright 2003-2007
Page 25 of 126
Volume 5 Issue 7 July 2007
PS: We’ve written about the penny-wise pound foolish attributes of not using
quality media in the 3RS column in the March 2007, Volume 5 Issue 3 of
macCompanion. Doc_Babad
Comment on Dan Moren’s Article by: HawksM
February 21, 2007 10:39 AM
I concur that sticking to quality media is important, I also agree that Verbatim is the way to go. I
have sold all brands of media for years. Among blank DVD-R manufacturers Verbatim by far
has the least amount of complaints. I don't have
experience with Super Drives, but I do know that the
physical specs of the disc are important with Super
Drives. With DVD there are 2 substrates glued
together as opposed to CDR, which is 1 substrate.
I will also say that store bought media is
"outsourced" and branded for companies like
Memorex, HP, Staples etc. They do not manufacture
their own media. Therefore consistency and quality
from batch to batch is a gamble. They will change
manufacturers from batch to batch as they see fit.
For DVD-R stick with Verbatim or Taiyo Yuden. For CDR stick to Taiyo Yuden, MAM-A
(Mitsui) or verbatim.
One more point about quality manufacturers they will be much more likely to play in DVD
players after they are burned. Have you burned a DVD only to have it freeze when you watch it
with friends? Stick to the quality manufacturers. The few pennies that you save by using B-grade
media will not be worth it in the long run. What ever happened to the saying "You get what you
pay for"?
# # # # # # # ## # # #
Mac OS X Keyboard Shortcuts – Compiled by Mike Sivcevic (SilverMac)
I know some of you know many of the shortcuts listed below. So skip the ones you know, and
join the shortcut of the week virtual club. You’ll be surprised by how much better your wrists
feel when doing less mousing around.
Start up hot-keys (press key while booting)
• X = Force Mac OS X startup
• C = Start up from a bootable CD
• N = Attempt to start up from a
compatible network server (NetBoot)
• T = Start up in FireWire Target Disk
mode
• Opt-Cmd-Shift-Delete = Seeks a
different startup volume
• Shift = Start up in Safe Boot mode
MPN, LLC Copyright 2003-2007
Menu Commands
• Shift-Cmd-Q = Log out
• Shift-Opt-Cmd-Q = Log out
immediately
• Shift-Cmd-Delete = Empty Trash
• Opt-Shift-Cmd-Delete = Empty Trash
without dialog
• Cmd-H = Hide window
• Opt-Cmd-H = Hide Others
• Cmd-N = File New window
Page 26 of 126
Volume 5 Issue 7 July 2007
•
•
•
•
•
•
•
•
•
•
•
•
•
•
Cmd-V = Start up in Verbose mode
Cmd-S = Start up in Single-User mode
Cmd-Opt-Esc = Force Quit menu
Cmd-Opt-D = Show/hide the dock
Ctrl-Eject = Bring up Shutdown / Sleep
/ Logout Dialog
• Ctrl-Cmd-Eject = Restart immediately
Clipboard
• Cmd-C = Copy
• Cmd-V = Paste
• Cmd-X = Cut
• Cmd-A = Select All
•
•
•
•
•
•
•
•
•
•
•
•
•
•
Window Management
• Cmd-W = Close window
• Cmd-Opt-W = Close all windows
• Cmd-M = Minimize window
• Cmd-Opt-M = Minimize all windows
• Cmd-H = Hide Application
• Cmd-~ = Cycle through windows for
current application
• Ctrl-F4 = Cycle through every open
window
• Cmd-Tab = Bring up the Application
Switcher.
• Cmd-Tab = Cycle Forwards
• Cmd-~ = Cycle Backwards
• Cmd-Shift-Tab = Cycle Backwards
• Cmd-Q = Quit application
Universal Access
• Opt-Cmd-* (asterisk) = Turn on Zoom
• Opt-Cmd-+ (plus) = Zoom in
• Opt-Cmd– (minus) = Zoom out
• Cmd-Opt-Ctrl-8 = Invert Screen colors
Finder Navigation
• Cmd-N = New Finder window
• Cmd-W = Close Window
• Opt-Cmd-W = Close all Windows
• Cmd-Down = Open File/Folder
• Cmd-Up = Navigate to parent
• Cmd-Right = Expand folder (in list
view)
MPN, LLC Copyright 2003-2007
•
•
•
•
•
•
•
Shift-Cmd-N = New Folder
Cmd-O = Open
Cmd-S = Save
Shift-Cmd-S = Save as
Cmd-P = Print
Cmd-W = Close Window
Opt-Cmd-W = Close all Windows
Cmd-I = Get Info
Opt-Cmd-I = Show Attributes
Inspector
Cmd-D = Duplicate
Cmd-L = Make Alias
Cmd-R = Show original
Cmd-T = Add to Favorites
Cmd-Delete = Move to Trash
Cmd-E = Eject
Cmd-F = Find
Cmd-Z = Undo
Cmd-B = Hide Toolbar
Cmd-J = Show View Opts
Cmd = [ = Go Back
Cmd = ] = Go Forward
Shift-Cmd-C = Go to Computer
Shift-Cmd-H = Go to your Home
folder
Shift-Cmd-I = Go to iDisk
Shift-Cmd-A = Go to Applications
folder
Shift-Cmd-G = Go to Go-To Folder
Cmd-K = Connect to Server
Cmd-M = Minimize Window
Cmd-? = Open Mac Help
Cmd-Space = Open Spotlight (OS X
10.4)
Expose
• F9 = Show all open windows on the
screen at once
• F10 = Show all windows for the current
application.
• F11 = Shows Desktop
• F12 = Activates Dashboard
• F12 (hold) = ejects disk
Page 27 of 126
Volume 5 Issue 7 July 2007
•
•
•
•
•
•
•
•
•
•
•
•
•
•
Cmd-Left = Collapse Folder (in list
Miscellaneous
view)
• Opt-Cmd-D = Show/Hide Dock
Opt-Cmd-Right = Expand folder and its
• Ctrl-Up = Move up one page
subfolders (in list view)
• Ctrl-Down = Move down one page
Opt-Cmd-Up = Open parent folder and
• Opt-Drag = Copy to new location
close current window
• Opt-Cmd-Drag = Make alias in new
Cmd-Shift-H = Jump to your Home
location
folder
• Cmd-Drag = Move to new location
Cmd-Shift-A = Jump to your
without copying
Applications folder
• Opt-Cmd-Eject = Sleep
Cmd-Shift U = Jump to your Utilities
• Cmd-click window toolbar button
folder
(upper right corner) = Cycle through
Cmd-Shift K = Jump to the Network
toolbar views
browser
• Ctrl-Cmd-D and mouse over word in
Cmd-Shift G = Go to Folder…
Cocoa applications = shows Dictionary
Cmd-1 = View as Icons
description for that word
Cmd-2 = View as List
•
Cmd-3 = View as Columns
Screen capture
Cmd-Space = Open Spotlight (OS X
• Cmd-Shift 3 = Capture the screen to a
10.4)
file
Cmd-Delete = Move file/folder to trash
• Cmd Ctrl Shift 3 = Capture the screen
Cmd-Click window title = Display the
to the clipboard
file path
• Cmd-Shift 4 = Select an area to be
captured to a file
• Cmd Ctrl Shift 4 = Select an area to be
captured to the clipboard
• Cmd-Shift 4, then press Space =
Capture entire window
From: Mike Sivcevic’s SilverMac
From: http://www.silvermac.com/mac-os-x-keyboard-shortcuts/
# # # # # # # ## # # #
Easily Create Lots of New Folders (A OS X Terminal Based Hint)
Introduction: I often need almost identical sets of folders for various projects ranging from macC
reviews to various tasks for consulting clients. You may know the routine. [macC Software
Review… Graphics, Background, Drafts, Developer dialogs – with the generic folder name
differing only the product’s name. For example Graphics-MSW ’04.] Therefore when I stumbled
across Rob Griffiths’ hint I was eager to try, but alas not terminally so. But I’m passing it on
anyway for those who are terminally addicted to such tools.
Rob’s Hint: Have you ever had to create a large series of folders, perhaps for a new project,
new client, or just as part of organizing your massively large and massively disorganized hard
drive? In the Finder, it’s trivial to create a new folder—just press Shift-Command-N. But if
you’ve got 10 or 20 or 30 folders to create, the process can get tedious—create the folder,
rename it, create the next, rename it, repeat until done. Ugh. Using Terminal, however, you can
MPN, LLC Copyright 2003-2007
Page 28 of 126
Volume 5 Issue 7 July 2007
greatly simplify this task, as you can easily combine the ‘create’ and ‘rename’ steps into one
action.
In Terminal, you use the command mkdir to create new directories (folders). For instance, mkdir
“My Folder” will create a folder named My Folder in the current directory. But mkdir is actually
more powerful than that, as it will accept multiple new folder names on the input line. For
instance, consider this command:
mkdir "My Folder" "My Other Folder" "Not That Folder"
The above will create three new folders with the ever-so-useful names of My Folder, My Other
Folder, and Not That Folder. Note the quote marks around each name—you’ll need those if your
folder names contain spaces. Alternatively, you can put a backslash before each space and skip
the quotes, but I find it easier (and more visually obvious) to use the quotes. Unless you specify
the full path to each folder, mkdir will create them in the current directory—so remember to use
cd /path/to/destination before creating your new folders.
So what if you have a lot of folders to create? Start by making a text file containing the name of
each folder to be created—one entry per line, and any folder name with spaces must be enclosed
in quotes (or use backslashes, as explained above). Once you have this file created, place it in the
folder where you’d like all the new folders to go, then cd to that same folder in Terminal. Then
type this command (assuming you’ve named your file dirlist.txt):
cat dirlist.txt | xargs mkdir
Each entry in the file will be created as a folder in the current directory. (For the Unix purists,
you can also use <dirlist xargs mkdir instead, but I find the cat version easier to comprehend.)
Finally, what if you’d like to create a selection of folders, all with the same base but a varying
suffix? For example, Project A, Project B, Project C, etc. Try this command:
mkdir "Project "{A,B,C,D,E,F}
You’re not restricted to single letters, of course—anything you want can go within the curly
brackets. Just remember that if you want spaces in the suffixes, you’ll need to enclose them in
quotes, too:
mkdir "Project "{"New Home","Vacation","To Do"
And yes, I know there are a bunch of ways to do this stuff using GUI tools—including
Automator, among others. However, it’s Geeky Friday, and none of those GUI tools will help
you much if you’re trying to do this work over a remote connection.
Mac OS X Hints By Rob Griffiths May 11, 2007
http://www.macworld.com/weblogs/macosxhints/2007/05/foldercreate/index.php?lsrc=mwhints
MPN, LLC Copyright 2003-2007
Page 29 of 126
Volume 5 Issue 7 July 2007
# # # # # # # ## # # #
Great Stuff – Tips for you to checkout
As I cruise the Internet I run across some great tips, that I’m not likely to get permission to
reprint. So I’ve started a new section to this column for do-it yourselfers.
Stem E-mail Overload — Strategies for keeping your inbox under control by Joe Kissell
http://www.macworld.com/2007/02/features/clutter3/index.php?pf=1
# # # # # # # ## # # #
That’s all folks…
Harry {doc} Babad
MPN, LLC Copyright 2003-2007
Page 30 of 126
Volume 5 Issue 7 July 2007
The Northern Spy
Technology News and Views Since 1983
Summer Madness - July 2007
By Rick Sutcliffe
Is it just the Spy's Imagination
or are Apple and Google getting cosier all the time? Of all the possible blockbuster mergers out
there, this one would seem a good fit. Corporate culture, cooperative working record, cutting
edge technology, and marketing savvy all seem to line up.
Perhaps this has something to do with iSteve's foray into the application world with the recent
big hit release of Safari for Windows. Searches from the browser bar pull in a small chunk of
change, but cross platform web applications may be the way of the future, and it would be hard
to imagine a better big mac combo for the role than Apoogle. Question is, would iSteve end up
as the head cheese or a side garnish?
The laugh of the month
comes at the expense of all the W*nd*ws apologists who've seen the handwriting on the wall and
decided to review Leopard, only to sneer at Apple for having copied from Vista. They should
have looked at Apple's OS from a few years ago, the slate from whence creativity-challenged
Vista borrowed its look and feel in the first place. Apple ain't copying Vista, folks. It's being
faithful to itself.
Further thoughts on the Spy's fourth law
in which, for the new readers this month, the Spy opines:
Marketshare lags mindshare by two to five years
include the thought that it applies to more than just the marketing of computers. The economic
boom in Western Canada is now at such peaks that many smaller and especially newer
employers cannot find workers. It's not just about wages. Everybody wants to work for
companies that have already established mindshare with them. The same goes for universities,
which would best market to students in grade ten or eleven, and reap the benefits two years later,
than sell to seniors who've already decided--this in particular if they are small and need to
establish mindshare (big ones already have it)..
MPN, LLC Copyright 2003-2007
Page 31 of 126
Volume 5 Issue 7 July 2007
Ditto churches, where the trend to ever larger megachurches continues unabated, as those who
build a reputation for being the "happening place" end up with all the people. For that matter, in
his own church treasurer role, a version of the Spy's fourth law comes out as: "The last thing the
Lord gets hold of is a person's pocketbook", which is a mere rephrasing of "where the heart goes,
so does the billfold, but not right away". Let's not get into the question of whether any of this is a
good thing; the Spy's Laws aren't moral absolutes, just proverbs on the human condition.
But there's an obvious negative aspect of the fourth law that's had too little attention here. If on
the one hand, a company does not learn for a couple of years or more of bottom lines that it has
successfully generated mindshare by seeing an increased marketshare (and by then it could be a
landslide), it follows that disaster may strike without economic warning on the downside. In
other words, a large commercial operation that loses mindshare becomes a zombie for two to five
years--dead without knowing it. (Small ones get the news faster, but that's another matter.)
Does anyone in Redmond understand this? If so, perhaps it partially explains why MS is busy
using threats and incentives to knuckle under every Linux distributer in sight--handling the
goonery itself this time instead of by proxy. (If you can't re-establish mindshare on your own, go
out and muscle it away from others.) So far Ubuntu and Red Hat haven't passed through the
dealmaking gates to avoid the implicit threat of patent litigation over vague claims of
infringement, but others have. What have we here? Maniacal cleverness, or death spasms? Wait
five years to be sure, but the Spy is already thinking of a subsidiary law that goes something like:
You can't buy or steal others' mindshare; you have to earn your own.
Oh, and by way of an illustration,
that is less obvious than Apple's doubled marketshare in the last three years (double again in the
next three?) Sony appears to be winning the format wars this time around after having lost the
earlier (Beta vs VHS) one. Perhaps it's their turn. Blockbuster Video's recent decision to
concentrate on only Blu-ray video disks and drop retail support for the rival HD DVD format
may turn out to be the market breaker. Of course, the mindshare battle was already won by the
PlayStation 3, which uses Blu-ray, so why be surprised?
This month's upgrades noted in passing include,
- premiere OS X system utility Cocktail, now up to version 3.8 and sporting a new interface on a
boatload of new features. Highly recommended for those nasty cleanup jobs that don't have an
easy interface otherwise. Tweak system settings, manage caches, the Spotlight index, recalcitrant
trashes, and log files, tune network settings, alter interface variables and assorted hidden settings,
and automate system maintenance. Cocktail is $15 to unlock the demo. When you need it, little
else will do.
- the "type what I mean" utility Typinator from Ergonis software is now at version 2.0. When
this puppy is running it will replace an "abbreviation" the user types with a specified text. This
can be used to auto correct common typos on the fly, or to expand things like "dt" into a
correctly formatted current date such as 2007 07 03 or "myrl" into, say
"http://www.webnamehost.net". Of course, case can be preserved. The Spy is just trying this one
out for the first time, and its been many years since he's used such a utility, to the jury's still out.
Seems interesting though. Oh, unlike PopChar, Ergonis' other indispensable utility, it doesn't
work in System 9 apps.
MPN, LLC Copyright 2003-2007
Page 32 of 126
Volume 5 Issue 7 July 2007
- Newsgator's NetNewsWire is now up to Version3.0.1b13. Version 3 brought a much nicer user
interface, higher speed, and better integration with the Newsgator system. One reason the Spy
likes it: If you use this nice little RSS reader on two different machines to the same account, it
will remember what you've read in each newsgroup, as the preferences are stored on their site-another wave of the future, as this makes the product a front end to a web application. Indeed,
you can access the same data via their web site if you wish. The product is $29.95, but upgrades
for recent purchasers are free.
-
And, with the release of the iPhone only two weeks off, Apple announced improvements
(upgrades) to its much-anticipated product. They now tout longer battery life than the
original specs (though all such claims have to be taken with a block of salt) and a touchscreen made of optical glass rather than plastic, for better scratch resistance. If this trend
continues, perhaps corporations will eventually go through the entire product life cycle
from planning through multiple upgrades and on to obsolescence before actually
releasing the product. Come to think of, some already do. Call it the virtual life cycle of
the virtual product--not that this will be Apple's fate. After all, millions are already
waiting in line panting for the chance to give iSteve money for this new toy.
Not in Canada, though, where discussions with Rogers seem to be in limbo. Well, perhaps by the
time it does happen here, the Canuck buck will be at par with the Yank one, and we'll only be
paying a slight premium for the privilege of buying American-made goods instead of double (in
some cases). To be fair, Apple is one of the least predatory pricers in this respect; some are even
worse at applying the RO factor.
And, speaking of passing,
it appears we can RIP Sony's "connect"--the digital music and video service whose one-time
engineers will now be transferred to the Play Station product line-yet another in the long line of
information highway road kills attributable to the iPod/iTunes juggernaut. Just goes to show that
the old Sony is alive and well, still making misteaks, something the Spy never does, of course.
The heroic service award of the month,
goes to Sarah, on the help desk at ConfigServer, a Chirpy little company that specializes in
making, installing, and supporting a set of fabulously useful scripts to enhance the utility of
cPanel servers for web hosts. These include a front end to MailScanner, a mail queue manager, a
firewall installer and front end, and a disk explorer that can be used from the WHM front end--all
such wonderful timesavers you wonder how any server manager could do without them. And,
under his other hat of a web host, the Spy uses these scripts daily. So should ever host.
Back to Sarah. It seems there was some confusion a week ago over a cPanel and MailScanner
upgrade that weren't quite compatible. Moreover, on "Cork" (WebNameHost's main machine)
the /tmp partition filled up in the process, disabling MailScanner and assorted other services
altogether, and cosmetically damaging a third application. The problem wasn't immediately
obvious to the Spy, so enter the data centre technician to provide cPanel support per contract.
The latter reinstalled Exim and MailScanner (without at first saying so, but the Spy watches all),
then pronounced everything good. What he'd actually done was killed off the custom settings in
Exim, disabled the MailScanner front end and turned MailScanner off without fixing anything,
leaving 2500+ messages in the MailScanner queue unprocessed--a not untypical result from a
certain genre of tech who throw "fixes" around like roadkill to crows.
When the Spy finally spotted the full /tmp, and cleaned this up, MailScanner was once again
functional, though the ConfigServer front end to it was not, due to an inappropriate upgrade of
the front end (admittedly the Spy's own fault).
MPN, LLC Copyright 2003-2007
Page 33 of 126
Volume 5 Issue 7 July 2007
Over to Sarah at ConfigServer, who had the fix (how to downgrade the front end appropriately)
and a boatload of other info at her fingertips so the Spy could himself put the now somewhat
messed up box completely back into proper working order.
By further contrast, the tech at the other third party supplier's help desk went in, repaired their
app's problem, and sent a message saying a directory had been out of sync--no real explanation,
and the customer none the wiser if it happens again.
Sarah's approach is how it should always be folks. Don't hand the starving man a fish, teach him
how to fish. A big virtual rose thank you to her and ConfigServer. Now, just wait till cPanel 11
goes release and the machine upgrades big time, we install Apache 2.0, and move to higher
versions of PHP and MySQL. Interesting times are coming. The Spy wishes sometimes that
upgrades were all tested ahead of time and installed just working. Oh wait. That's called a Mac.
In a rather odd move,
the board of CIRA (Canadian Internet Registration Authority) who oversee the .ca TLD, have
decided to expire all domain holders' memberships as of 2007 07 31. Until now, if you had a .ca
domain, you were a member and could vote for the board. Now, everyone who wishes to
remain a member must re-apply per the eMail recently sent out to all registrants, fill in an online
form, then go through a telephone interview to confirm the data. Not sure of the reasons behind
this, but it's going to be a rather massive pain in the neck.
The Spy also wonders if the change will make it easier or harder for the three incumbent board
members who are up or re-election to retain their seats. Indeed, he wonders rather personally, as
he has been selected by the CIRA nominating committee as a candidate to contest the upcoming
election.
So, hey. If you own a .ca domain, make sure you follow the instructions, get your membership
updated, and vote in the upcoming board elections (Sept 6-13), whether you vote for the Spy or
not. The names of the candidates selected to appear on the final Nomination Committee slate
together with their election statement and qualifications will be posted somewhere on CIRA’s
website on or before July 5, 2007.
MPN, LLC Copyright 2003-2007
Page 34 of 126
Volume 5 Issue 7 July 2007
--The Northern Spy
Rick Sutcliffe, (a.k.a. The Northern Spy) is professor of Computing Science and Mathematics at
Trinity Western University. He's written two textbooks and several novels, one named best
ePublished SF novel for 2003. His columns have appeared in numerous magazines and
newspapers, and he's a regular speaker at churches, schools, academic meetings, and
conferences. He and his wife Joyce have lived in the Aldergrove/Bradner area of BC since 1972.
Want to discuss this and other Northern Spy columns? Surf on over to ArjayBB.com. Participate
and you could win free web hosting from the WebNameHost.net subsidiary of Arjay Web
Services. Rick Sutcliffe's fiction can be purchased in various eBook formats from Fictionwise,
and in dead tree form from Bowker's Booksurge.
URLs
The Northern Spy Home Page: http://www.TheNorthernSpy.com
The Spy's Laws collected: http://www.thenorthernspy.com/spyslaws.htm
The Spy's Shareware download site: http://downloads.thenorthernspy.com/
WebNameHost : http://www.WebNameHost.net
WebNameSource : http://www.WebNameSource.net
nameman : http://nameman.net
opundo : http://opundo.com
Sheaves Christian Resources : http://sheaves.org
Arjay Books: http://www.ArjayBooks.com
Booksurge: http://www.booksurge.com
Fictionwise: http://www.fictionwise.com
NetNewsWire: http://www.newsgator.com/Individuals/NetNewsWire/
Cocktail: http://www.maintain.se/cocktail/index.php
Typinator: http://www.ergonis.com/products/typinator/
CIRA: http://cira.ca
MPN, LLC Copyright 2003-2007
Page 35 of 126
Volume 5 Issue 7 July 2007
Views from the Ivory Tower - July 2007
WWDC Announcements
By Ted Bade
As we expected, Apple made a few interesting announcements at the WWDC last month. Mostly it
was about Leopard, which won’t be released until October. I think a lot of people expected more
from Apple this time. But I guess we will take what we can get. I have to admit that it was nice to
see the keynote speech return to Apple’s computer roots. It was about Macs and MacOS X. One
might say that this is to be expected, since the event was a developer’s conference for the
Macintosh. Still, I was happy to hear all the news about MacOS X and what we can look forward
to.
Some interesting news from WWDC07
First of all, game publisher Electronic Arts announced that they will be releasing titles for MacOS
X. They immediately are going to release 4 popular titles, C&C 3, Battlefield 2142, Need for Speed
carbon, Harry Potter and the order of Phoenix game. They also announced simultaneous
(Win/Mac) releases of several sports related games.
While this is good news for Mac gamers, it has a caveat. EA is releasing the games using a system
called Cider developed by a company called Transgaming http://www.transgaming.com/products/cider/ Cider games will only work on Intel Macs. It does
its magic by replacing calls to Window’s OS APIs with ones that work under MacOS X. This
works because the game has already been optimized to work with Intel based CPUs. I had expected
that a company would develop as system like this. It is a great thing for gaming companies that can
now easily offer even their worse titles to the MacOS X community. They don’t have to completely
rewrite the game, but pay a fee for a simple conversion.
Back at the WWDC, game developers id also announced they
planned to release titles for the MacOS X community. There is no
word if they will use something like Cider or write the game directly.
Steve Jobs demonstrated ten important aspects of Leopard. Will ship in October. You can watch the
entire Keynote by visiting the Apple site: [http://events.apple.com.edgesuite.net/d7625zs/event/].
Some of the more interesting aspects of Leopard include:
1. A New Desktop - Dock turns into a reflective table. It actually appears to sit horizontally on
the bottom of the screen. Desktop designed to have a digital image on the desktop rather
then a solid color. So the Menu can become transparent.
2. Stacks - Steve is really annoyed by all your messy desktops with icons strewn everywhere.
With Stacks you can grab a bunch of icons and tie them as one to the Dock. A good
example of this is items downloaded from the Internet. They appear all over your desktop,
With Leopard and Stacks, a “Downloads ” icon will appear on your dock. If you click on
this icon the various items you downloaded fan out from the Dock for easy access. In the
demo we saw a curved row and well as a grid display of these items. The good thing about
this is that there will be less clutter on the desktop but you won’t loose easy access to items
you want to store there! Pretty cool feature.
MPN, LLC Copyright 2003-2007
Page 36 of 126
Volume 5 Issue 7 July 2007
3. A new (updated) Finder - There were a lot of things shown about the new Finder. It is
supposed to be easier to access other Macs on your local network (although it is pretty easy
now). They also added a Cover Flow (as in iTunes) view for the Finder, so you can use the
album case metaphor to sort through files in a folder. It looks interesting but I am not too
sure how practical it will be. I am a list view kind of guy and will probably stay that way.
Perhaps I am “old school ” but I think alphabetically and find things faster that way. Back
to my Mac uses .mac account to keep track of changing IP addresses of the home Mac. So
when you are on the road and need to access your home machine, you can find it via your
.mac account. Obviously this requires one has a .mac account and that you leave your home
machine on all the time. I am sure this will be useful for traveling business people.
4. Updated Dashboard, includes the ability to easily create your own widgets.
5. QuickLook is a feature that allows your to see the contents of a file without running the
application that created it. Aspects of this are already in the current Finder, since you can see
a thumbnail of an image or play a movie directly from the Finder. Wit this feature in
Leopard the document is opened and can be viewed completely. This would be a useful
feature for those people who need to find a particular item among several and have
confusing naming conventions!
6. In iChat there are some new features. iChat theatre lets you share the media from another
program with a friend via ichat. You can do slide shows, Keynote, or show anything that
uses the new Quicklook feature. You can also add a backdrop, that is am image behind you
when you video chat. The image can be still or a motion video. Finally, you can mess up
your image using various PhotoBooth ” effects, this will probably be a big hit with the kids.
7. Spaces - this is a pretty cool effect that lets the user organize the projects they are working
on in separate visual spaces on their Mac. The advantage of this is less screen clutter. A
good example of how this can be used is say you are creating a web page. In one space you
can have the web creation tools and in two other you can have your favorite browsers which
will view your output. At the same time your can have another space with your email client
checking for incoming mail. Since all these applications are in different visual spaces, they
don’t get in each other’s way, which means you don’t have to hide and switch between
applications or move open windows out of the way to see something. All you do is switch
to the space that has the application and its window(s) open exactly the way you like them. I
do this all the time at work (on a Unix box) and I really believe it makes my work a lot
easier.
8. Time machine - You probably heard about this. Automatically back up your drive to another
drive on your hard drive or a network server. Its a good idea, but you need to have a large
capacity drive available all the time. Of course you can then use it to recover lost files or to
even go back to previous versions of a document. Time machine is a great idea, and Apple is
being good to its customers by making it easy to back up their Macs. Let’s get a vote of
hands here, except for your geeks and power Mac users, how many average Mac users do
you think have either an installed internal or an external backup drive? I didn’t see many
hands there . Frankly, I think Time machine will make life easier for those people who
already backup their Mac hard drives. Are iMacs going to come with two drives in the
future? How about Apple laptops? It is an option with MacPros, but its an option. By this I
mean, the user has to buy an extra drive. So Time machine is a good feature, but will the
average user be able to take advantage of it?
9. The Finder is now completely 64 bit, which means it is faster and can make use of larger
memory spaces. (I have to admit, my hopes soared when I say that US road sign icon on
the dock of the demo computer. I was hoping we might hear that someone was releasing a
map software package for MacOS X. Oh well, just a 64 bit Finder .)
MPN, LLC Copyright 2003-2007
Page 37 of 126
Volume 5 Issue 7 July 2007
10. Core animation. What this means is that animation features are build into the core of
MacOS X. This is a techie thing, but it means if someone wants to access animation features
easily, they can. If a program makes use of the core animation features they should be
smooth and slick.
11. BootCamp, the ability to use MS Windows (XP or Vista) will be built into Leopard.
These are some very interesting things. I think they all are terrific and can’t wait to try them out
myself. However, I imagine that most of the glitz and glamour in these features will come with a real
need for a fast processor. Apple has always done a good job of optimizing their OS to work well or
at least okay on their older machines. With all this new glitz, I expect another round of older
machines will be excluded from the fun. Don’t get me wrong, I am not complaining. As machines
get faster and faster programmers work to find ways to use all that speed and so they add cute
animations and features. Just don’t expect to do this on your old Mac!!!
After finishing the top ten list for Leopard,, Steve Jobs got the audience to catch their breath, I know
I did, with a startling announcment. He announced that Leopard would be available in October. He
then said they would sell the basic version for $129. Paused as the audience caught their breath,
(thinking: “was Apple going to use MS’s multiple OS plan to make money????), then announced
the business version for $129, as the audience laughed (realizing the joke and probably in relief!)
Then went on to announce several other versions,, right to the Ultimate version all for $129!
Also announced was a new version of Safari, including a version that works on Windows. We will
have to keep our eye on how well this works and how it is accepted by the Window’s community.
While all this is good news of things to come, it isn’t something that is actually here. This is the
second time Apple has demonstrated features of Leopard. I think people want more then
demonstrations. They want to be able to buy and use it. It appears the market felt that Apple wasn’t
really doing enough as well, since Apple’s stock price went down during this event. It actually
dropped several dollars per share. While it remained above $100/share, the drop shows that people
expected Apple to announce a product, not a future one.
I am also concerned about the computing horsepower needed for all this glitzy stuff. I am sure
Steve Job was demonstrating it using either the current most powerful or the soon to be released
most powerful Mac. How will it fair on my old G5/1.8?
Hidden data in purchased iTunes files - people have discovered some personal information
hidden in DRM free music purchased from the iTunes Music store. Apparently the purchaser's
name and email address are hidden inside. So far I haven’t heard the official reason why this is
done. Is it a means of tracking music that is being shared illegally or is it just an artifact of the song
being sold to a particular user?
Some people are up in arms about this. I can’t see why it is an issue. If the song file is mine and
will stay on my computer, then it is as safe as any other information on my computer. There is more
information about me on every iTunes store receipt I get emailed to me. These emails include my
name, emails address, postal address, and the last four numbers of my charge card. If someone were
to hack into my personal machine, I think they would be able to find a lot more then my name and
email address .
Oh, I forgot, there is that sharing thing. Are people afraid or concerned because they believe this
information can be used to track their illegal sharing of files? Well I guess that is the risk one has to
take when sharing a file. If it wasn’t for those people who go completely overboard sharing music,
we wouldn’t be in this situation of needing DRM in the first place. So if you are concerned and do
indeed share your music, think about all the hassles you have caused every other person who listens
to digital music.
Until next time, keep on enjoying your Mac!
MPN, LLC Copyright 2003-2007
Page 38 of 126
Volume 5 Issue 7 July 2007
Mac Security 101
[email protected]
http://www.applemacpunk.com/
For Better or For Worse: Safari For Windows
By Kale Feelhaver
Apple surprised all of us at WWDC 2007 by releasing a new version of Safari, v3, which will run on both Mac OS
X and Windows. The new version is currently available in beta, and freely downloadable off Apple’s website. A lot
of analysts have called it a good thing, while still others have said this move is destined for failure. Personally, I’m
not concerned with the pass/fail status of Safari for Windows, but I do have some security concerns.
Everyone knows that Microsoft Internet Explorer is the most exploited web browser on the Internet. Luckily for
Mac users, Microsoft discontinued development on the Mac version of Internet Explorer (IE) in June 2003, a few
months after Apple released the original public beta of Safari for Mac OS X. They continued to support the
application until December of 2005, when Microsoft officially declared it discontinued. The lack of IE on the Mac
platform made 100% of IE-based exploits exclusive to Windows. This was good news for Mac users, but it gave all
of us a false sense of security. If 99% of all browser exploits are focused at IE… that made Macs immune to 99% of
the exploits. This makes the Mac more secure based on the odds, but it does not mean that Safari is truly more
secure than IE. Fortunately, many security professionals put Safari through the wringer, and they found that the
browser was truly a secure design, which gave it 2 advantages. However, in 2006, the first Safari-focused exploits
made their debut on the Internet. These were still tame compared to the thousands of exploits focused at IE, but they
did receive a lot of press.
Apple’s release of Safari for Windows brings a stable and fast web browser to PC users and there’s a good chance
that it will have a fast adoption rate. In fact, during its first 2 days, Safari for Windows saw over 1,000,000
downloads. This is good news for Apple, but could prove to be bad news for Mac users. Now that Safari is making
its way into the Windows community, Safari-based exploits may become more common. There is no way to tell if
these exploits will target Safari as an application, or if they’ll target Windows through Safari. Windows-centric
exploits should not affect Mac OS X, but if the exploit is targeted specifically at the application… it may be just as
dangerous to Mac users.
Being an IT professional (and general computer geek), I downloaded and installed Safari on a Windows system to
test it out. My own test results showed that the browser was far faster than any of the other Windows browsers I
have tried, but it was also very buggy. I had random crashes and saw a lot of odd behavior that wasn’t seen in IE or
Mozilla Firefox. I have not yet downloaded Safari v3 for Mac OS X, but I would assume it is nearly as stable as the
current version, which is not the case with the Windows counterpart. At this point it is too early to tell how serious
these bugs are, but time will tell.
MPN, LLC Copyright 2003-2007
Page 39 of 126
Volume 5 Issue 7 July 2007
Now, before you run and change your default browser to Camino, keep in mind that the Firefox browser is
essentially the same scenario. There have been exploits that targeted Firefox on all platforms, but most have still
been Windows specific. Safari is still a great web browser on the Mac and will continue to be, but Mac users should
be aware of the possible exploits that could result from the Windows version. As always, be careful on the Internet,
and watch where you click.
MPN, LLC Copyright 2003-2007
Page 40 of 126
Volume 5 Issue 7 July 2007
Acrobat 8 in the Office, First Edition
Reviewed by Harry {doc} Babad
© 2007
Author: Donna L. Baker
Adobe Press / Peachpit Press
http://www.adobepress.com/
http://www.peachpit.com/bookstore/product.asp?isbn=0321470
80X&rl=1
Released: First Edition. Published December 2006, 2007
Format/Pages: Paperback, 384 pages
Product Dimensions: 8.8 x 6.9 x 1 inches
$40 USD list, $27 Street, $50 CND, £ 29 GBP List, 27.54
Street.
Requirements: Adobe Acrobat 8
ISBN-10: 0-321-47080-X
ISBN-13: 978-0-321-47080-5
Audience: Intermediate/Advanced Acrobat 8 [AA8] users.
Although this is not written for beginners, many of the projects,
for the most part part, can be usefully attempted by novice AA8
users.
Mac Users
PC Users
Strengths: A well-organized and written project oriented book that uses Acrobat 8 to
simplify and perhaps automate a variety of office and small business tasks that range
from organizing comment filled document reviews assembling a document library for the
use of your company’s clients.
Weaknesses: Ms. Baker too often forgets that AA8 is also used by Macintosh users,
providing mostly project backgrounds focused on PC users. At times she fails to identify
the limitations of the Macintosh version of Adobe’s product. Knowledgeable Macintosh
users will be able to follow along the PC focused examples, but newer users of AA8 Pro
may have problems working through the exercises and examples.
MPN, LLC Copyright 2003-2007
Page 41 of 126
Volume 5 Issue 7 July 2007
Introduction
When I saw the release notes for this book I was intrigued. I had just recently finished a joint
review, with Robert Pritchett of the newly released Acrobat 8 and of John Deubert’s AA8 Visual
Quick Start Book published by Peachpit press both in the February 2007 macC. I was ready to
try something more complex than tuning up recipes, and editing PDF formatted documents.
I realize that Adobe Acrobat is one of the most widely recognized tools for document
management, office communications, and improved workflow, and Acrobat 8 is the most
powerful version yet, introducing new tools for shared reviews, creating automated forms,
license management, additional security, and many others. Indeed the basis of my document
filing and retrieval system is AA8/Filemaker Pro combination with the paper to PDF input
provided by a Fugitsu S500M ScanSnap Scanner (Article and review in the May 2007 MacC).
Acknowledging that PDF has become the ubiquitous electronic document format, industries as
diverse as engineering, legal, manufacturing, and government all rely on Acrobat to make their
tasks run smoother and more efficiently.
According to the publisher… “Here to help guide you, Acrobat expert Donna Baker presents
real-life scenarios that you can apply to any situation in which document control and
management is an issue. With practical advice, productivity tips, and step-by-step directions for
using the latest Acrobat features, Acrobat 8 in the Office will help you understand the broad
capabilities of this what-can’t-it-do? Software.”
What You’ll Find in this Book…
First of all the book contains a list of well-focused tutorials (See the TOC), which are mostly
independent of each other. For those that rely on prior described information Ms. Baker does a
great job of cross-referencing. One of the most useful and effective aspects of this book is the
effective combination tutorial, examples and bonus material-additional studies that Canadian
Donna Baker has posted for download on her web site. Although some of the illustrations are
fuzzy and the book is somewhat Mac-o-phobic, it is easy to use. You can use these web-posted
materials to easily follow-along the lessons/projects in the individual chapters.
Alternatively, as I did in one instance (e.g., Chapter 7) use the provided material to create a
template to do my own document library project. The provided PDF files serve to significantly
enhance the content presented in the book. [http://www.donnabaker.ca/downloads.html acro8office/]
Indeed with the additional examples that illustrate and exemplify aspects of a project, a user can
successfully work with the Safari eBook version of Acrobat 8 in the Office. Use an eBook, not I
of course, but then I’m a born and bred bibliophile who never leaves the house without a book or
other reading material.
Among other useful features, this book will:
• Shows you how to use Acrobat in real-life situations to improve you productivity, save
you money by helping to automate or facilitate common document related tasks, and
expedite document related communication, while maintaining your data security.
MPN, LLC Copyright 2003-2007
Page 42 of 126
Volume 5 Issue 7 July 2007
•
•
•
•
Covers the new features in Acrobat 8, including shared reviewing, Acrobat Connect (an
online meeting room), auto-recognition form fields, new merging and document
optimizing tools, redaction tools.
Describes how to best combine new and existing Acrobat tools to accomplish nearly any
office communication task.
As previously mentioned, it focuses on project related and bonus (advanced) lesson
materials found on Donna’s Web site at http://www.donnabaker.ca/downloads.html that
contains source files for examples in the book, plus bonus projects and case study chapters.
The book, in each chapter, provides a what else can you do section, that will allow you to
further enhance the products you created to increase their ease of use or function.
I’ve annotated the books table of contents with my thoughts about the projects, but if you’d like a
complete look at the full table of contents check out O’Reilly’s Safari Books site:
http://safari.oreilly.com/032147080X?tocview=true/
An Annotated Partial Table of Contents… or materials I could readily use.
Introduction
This is a well written introduction to the book its
audience and conventions. Indeed the statement about
the book’s focus “This book isn’t a manual, and while
the scenarios can be amusing at times (they are) it isn’t
meant to be read from cover to cover. Instead it looks at
a range of scenarios you might face in your workplace
and shows you how you can use Acrobat to help solve
many common workflow and document management
problems.”
Chapter 1. Getting Your Bearings
Chapter 2. Building a Cohesive
(presentation) Document
MPN, LLC Copyright 2003-2007
Right on with one proviso-I would have welcomed a list
of introductory Acrobat books recommended by Ms
Baker, for folks when find they’re in too deep.
I’ve now extensively used and read about AA8, but
nevertheless found Chapter 1 and easy to read refresher.
I do forget about feature I don’t use. Ignoring Ms.
Baker’s guidance, this chapter is a must read. As for the
rest of the book, just shop around.
I, as do the heroes of this chapter, too often have to
build a presentation, at times on short notice and from
bits and pieces of data stored on my hard drive. Text
(mostly in MSW format), images; information from
PowerPoint presentations I’ve accumulated; graphics,
and the occasional graph I’ve built in Excel. These are
all grist for my new project. This chapter focuses on
using AA8 as the common vessel for creating a new
presentation, by combining and tuning all my needed
information into a new AA8 document. The good news
is that the lessons are clear and easy to follow. The bad
news is that there is no information on converting the
final AA8 document to PowerPoint, which might
Page 43 of 126
Volume 5 Issue 7 July 2007
Chapter 3. Communicating with
Comments
Chapter 5. Making Accessible
Documents in Acrobat
Chapter 6. Managing and
Organizing E-mail Using Acrobat
Chapter 7. Assembling a (web
accessible document) Library
Chapter 10. Streamlining Form
Development and Data
Management
Index
MPN, LLC Copyright 2003-2007
occasionally be handy.
I routinely do document reviews, my bread and butter as
a consultant, but have never had occasion to either
initiate or participate in an AA8 based review. I found
this chapter both interesting and easy to follow. All of
my reviews were based in filling out MSW review
comments into specified comment forms. The materials
in this chapter should I need it in future review work.
AA8 would certainly make integrating feedback into an
original MSW document easier.
Although this information was fascinating, I had no
immediate use for it although several of my professional
colleagues are either significantly hearing or visually
impaired. I read about Apple’s accessibility features and
was delighted that AA8 also provided such support.
I already have a means for organizing my email by
using Eudora’s extensive folder capability. I’ve modeled
my email organization on my hard drive ‘s folder layout.
I also download and store all key documents I receive in
project folders as text files along with their attachments.
One element of this chapter was interesting was the
premise that you could use AA8 as a storage tool, in a
format that would likely outlast the format of my email
client, but not text of course. If you have the need, by all
means learn to organize email-using AA8.
Although I have no need for creating libraries of
information as records, I found the methods useful.
After all, I do at times have a frequent need to maintain
and store collections of technical and project data
including background documents that are searchable and
as needed made secure from change. Why you ask? I
have come to realize that AA8 allows me to create
complete client project completion reports that are more
professional that creating a CD collection of separate
multiple format assorted documents.
I enjoyed this chapter very much since I’ve been
experimenting with both form creation and hope in the
future to use electronic forms for data gathering. Its
details go far beyond my present needs; no matter its an
interesting and potentially useful subject.
All the terms and subjects I checked were there, what
more can I ask from an index? Well, perhaps a PDF
document of this book with the index terms hyperlinked.
Page 44 of 126
Volume 5 Issue 7 July 2007
Discomforts
Graphics Quality — In too many of the small images, the items selected a simple white on black
bars, making them difficult of interpret. As usual even with a magnifying glass many of the
images are difficult to read. Other images have sections (e.g., 5.1, 7.1, 12.1 that are simply
impossible to read.). I know color printing cost more, but the added legibility would be worth a
few dollars more – after all what we get on our screen is both WYSIWYG and in color.
Treatment of More Advanced Chapter Content — as one reads and works through the various
projects, I found that everything worked fine for me till I hit about the last quarter of the lesson.
Ms Baker then switches into, with out warning, expert mode, and for the most part I get left
completely behind. I get lost, despite working with downloaded examples and not for a lack of
trying. I’m perhaps, despite relying heavily in AA8 in my work, am only an intermediate user.
Some way of warning readers, should this book be updated, that the topics in the later part of the
chapter require more knowledge or experience would be helpful. It would also lower the readers
stress levels.
Customizing Adobe Acrobat’s Toolbars — A number of the projects would have been simpler,
for the user, had Ms. Baker introduced the concept of customizing AA8’s toolbars. There would
be less mousing around
Chapter 9 Omission – Packing and Preparing Legal Documents — Although I had no need for
the chapter’s contents, I was disturbed by a lack of discussion of quality assurance both with
respect to the individual documents included and the package itself. Too often in litigation,
material is disqualified from use purely on the basis of lack of a quality pedigree. I’m not sure
this comment is little off the wall, but I’ll let Ms. Baker determine that.
Conclusion
This is an excellent and well written book that contains a bakers dozen well defined projects that
can be used to enhance your office’s ability to bother create complex useful integrated and
search documents and to use the documents as a powerful communication tool. You can even
learn about communicating by printing your documents in a format beyond that of your laser
printer. Although Macintosh is not the system spoken by Ms Baker, despite occasional
assurances to the contrary, all user of Acrobat 8 professional could benefit from some of its
contents. It will be just a bit harder for those of us who use apple products as our principlecomputing platform.
MPN, LLC Copyright 2003-2007
Page 45 of 126
Volume 5 Issue 7 July 2007
Recommendation
At $40 (list price) this book, although pricy, would make a goof addition to the library of anyone
wanting to use Adobe Acrobat Professional for tasks beyond simple document transfer and the
compilation of groups of documents into packages. Unlike other books I read and review, it
would not be an impulse buy, but would be high on my must have list if any of the AA8 projects
described met my needs. A difficult set of subjects is well treated in a well-focused and relatively
easy to use book, kudo Ms. Baker.
Author Background:
A prolific author and writer of many Acrobat books, as well as books on graphic and Web design
software. Donna lives on a lakeshore in central Canada, where all manner of wildlife from
muskrats to the occasional coyote come to call. She has written the previous edition of this book,
and the popular Adobe Acrobat How-Tos book. As an information development specialist Donna
L. Baker writes extensively about graphics applications and interactive knowledge products. She
also presents at professional development seminars and Acrobat user group meetings, and
consults for a wide range of industries. Her work has appeared on PlanetPDF and Adobe Studio
Web sites.
http://www.donnabaker.ca/book_acro8office/acro8office.html
MPN, LLC Copyright 2003-2007
Page 46 of 126
Volume 5 Issue 7 July 2007
Adobe Photoshop CS3 One-on-One
Reviewed by Robert Pritchett
Author: Deke McClelland
O’Reilly Media
http://www.oreilly.com/catalog/9780596529758
Released: June 2007
Pages: 544
$50 USD, $65 CND, £35.50 GBP
Requirements: Adobe CS3, a DVD player and either a Mac
with Mac OS X 10.4.8 or later, 512 MB RAM, 2 GB hard drive
space, 64 MB video RAM, 1024x768 resolution, Broadband
Internet, QuickTime or a PC-equivalent system.
ISBN 10: 0-596-52975-9
ISBN 13: 978-0-596-52975-8
Strengths: Interactive DVD with Book – whodathot? Full color
and easy on the eyes and mind.
Weaknesses: None. Yes. Really!
Deke McClelland has done such a great job with Adobe products, that he has his own Deke Press
section, like Pogue has Pogue Press at O’Reilly!
This book under-promises and over-delivers with the “Read-awhile, play with Photoshop, sitback-and-watch-the-DVD” approach to educating us about Photoshop CS3.
If you are into learning Photoshop (see Chris Marshall’s review last month), then you will want
to get this well-organized, full-color book.
There are 12 chapters covering pretty much everything that Deke covers in his lynda.com
training packages for Photoshop, only none of this information is regurgitated from his other
excellent training experiences. This is pretty much all new stuff.
He sets us up with his configuration from lessons learned over time, before we can dig into
Photoshop CS3. I recommend following his defaults, because he has “been there, done that”. An
he doesn’t want us tripping over ourselves as we learn all the hidden features in the plethora of
nooks and crannies that Photoshop has become over time.
MPN, LLC Copyright 2003-2007
Page 47 of 126
Volume 5 Issue 7 July 2007
So what’s inside? Quite a bit. Opening and organizing, highlights, midtones and shadows,
correcting color balance, making selections, crop, straighten and size, paint, edit and heal,
creating and applying masks, focus and filters, building layered compositions, text and shapes,
styles and specialty layers and finally, printing and output.
The DVD departs from previous training approaches as Deke asks us to sit back and relax and –
do nothing but listen and watch nearly 3 hours of show&tell. And Lynda.com has done a
marvelous job with their video preparations The price for the book, if it were just the DVD,
would be worth what it costs.
What I enjoyed is that the videos are not designed for TV interlacing, but for computers and
pixel resolution is normally running at 880x660 instead of the usual 720x240. What we get is
truly high-quality legible screen imaging and is superb! Way to go Lynda.com!!
Each chapter in the book is subtly color-coded and tabbed. The layouts are “perfect” in balance
and form based on years of learning how to do presentations.
This book is definitely a coffee-table piece and will make any owner proud to show it off, if it
isn’t bookmarked and dog-eared to death by the time you get done reading it.
If I were teaching a Photoshop course, this is the book and DVD I would use. It’s that good!
MPN, LLC Copyright 2003-2007
Page 48 of 126
Volume 5 Issue 7 July 2007
Aperture Training Real World Aperture and
Aperture 1.5
Reviewed by y Wayne LeFevre
Author: Orlando Luna and Ben Long
Publisher: PeachPit Press
http://www.peachpit.com/title/0321441931
Released: July 11, 2006
Pages: 256
$35 USD, $44 CND, £25 GBP, 27,44 Euro
ISBN-RW: 0-321-44193-1
http://www.peachpit.com/title/0321496620
Released: October 18, 2006
Pages: 552
$50 USD, $62 CND, £36 GBP, 39,20 Euro
ISBN-APT: 0-321-49662-0
Audience: Beginner/Intermediate/Advance
Strengths: Covers, fairly well, the concept and
application of Aperture.
Weaknesses: Not their fault, but pretty much only
game in town.
MPN, LLC Copyright 2003-2007
Page 49 of 126
Volume 5 Issue 7 July 2007
Introduction
It is possible to count on one hand the number of Aperture training and help books available.
After purchasing Aperture, I tried to find training everywhere, from books to videos. It so
happens that there are about… four books on Aperture training out there. Adobe LightRoom,
which I have not used, but I understand is an easier application to grasp the fundamentals, now
has hundreds of titles for it with more growing daily. I jest on the number, of course, but it does
seem that there is no shortage of reading material for LightRoom.
The two other books on Aperture are Apple Aperture 1.5 Photographers' Guide and Aperture
Exposed. I decided to focus on Real World Aperture and Apple Pro Training Series: Aperture
1.5, because they where the easiest to find and flipping through them at the local Borders,
seemed more my learning style.
The description for the Apple Pro Training Series book states:
“Now fully updated for version 1.5, this comprehensive book-DVD combo starts with the
basics of image management and takes you step by step all the way through Aperture's
powerful photo-editing, image-retouching, proofing, publishing, and archiving features.
Version 1.5's new features are completely covered, including the new image editing tools,
expanded search capabilities, new Loupe tool, and support for many more RAW file
formats. It delivers comprehensive training - the equivalent of a two-day course - in one
project-based book. You'll learn time-saving techniques for sorting, ranking, and
organizing images for use in different jobs, and effective ways to display images for
client review, apply metadata, keep your online portfolio up to date automatically, colormanage your workflow from input to final print, and much more. Real-world exercises
feature professional photography from a variety of genres, including fashion, sports,
wedding, commercial, and portraiture. All the files you need to complete the exercises are
included on the DVD.”
The book takes you step by step through Aperture in textbook style, using a hands–on approach.
Included with the DVD are all the images in the chapter lessons. Lessons one through seven
follows a single photo assignment of a typical catalog shoot and provides an introduction to the
Aperture interface, features and workflow. Lessons Eight through Twelve uses several different
assignments for learning Apertures more advanced capabilities, focusing on organizing, using
metadata, editing, output and archiving.
Upon completion of the course material, a student can become an Apple Certified Pro by taking
the certification exam offered only at Apple Authorized Training Centers. Successful
certification as an Apple Certified Pro gives you official recognition of your knowledge of
Apple’s professional applications. The lessons are complete and offer a great approach in
learning the application. In each chapter, you learn by following the lesson and taking a review
followed by learning some keyboard shortcuts all at your own pace.
Note: With this book and the book I talk about next, neither one are intended as a comprehensive
reference manual, nor to replace the documentation that comes with the application. The book
and DVD that comes with the application does a bang–up job in that department though, having
some terrific screencasts on the DVD. So as a disclaimer, at least flip through the manual and
visit the Apple web site every once in awhile.
MPN, LLC Copyright 2003-2007
Page 50 of 126
Volume 5 Issue 7 July 2007
The reason I have included Real World Aperture in this review is that they are very similar. The
two books are written by the same author, and have similar if not at times the same examples and
photographs. Real World Aperture takes less of a clinical, sterile structured approach and
approaches the training in more of a, well, real-world approach. It is set in a much more relaxed
atmosphere, easier to read and follow along without having the computer sitting in front of you.
It is constantly going into side bars about real world stuff, “How does Aperture Compare to
Photoshop?”, “How is Aperture different from iPhoto?” - that sort of thing.
The book basically details all of Apertures capabilities and will help you understand how to
integrate Aperture into your current workflow. You will learn, out of the book:
• Chapter 2, again, fundamentals. You’ll tour the interface and learn the basics of navigating the
program.
• Chapter 3 will guide you through the process of importing images. You also start to organize
your workflow
• Chapter 4, you’ll dive into Aperture in earnest. Here, after a discussion of how to define a
workflow, you’ll learn about all of Aperture’s tools for organizing, comparing, and sorting.
• Chapter 5 moves on to image editing.
• Chapter 6 you’ll learn about Aperture’s raw capabilities and how to use them. It also introduces
raw theory that will help you get more out of Aperture’s editing tools.
• Chapter 7 details how Aperture sends out files to be edited with a third party solution, and how
to bring it back in again.
• Chapter 8 takes you through output options, from print to web to book.
• Chapter 9 finishes you up with archiving and backups. Finally tying it all together for one big
happy workflow.
This is the wordy book, though in size, it’s much slimmer. It digs in depth with each topic,
flushing out the why’s and how’s, the theories as well as the productivities. It doesn’t just set you
out and tell you what to do, as the previous book, but more of a why you are doing it and what
you will want to accomplish with it. It’s a great book that can stand up on it’s own.
So, again, why review them together? Because they make a great match. Either book can do the
job, and do it well. Whether you want to take the classical school classroom way, or just learn
the why and how to develop your own style. When you put them both together, you get the
complete picture, not only will you be able to pass the certs, but you’ll be able to understand the
questions.
With these two books being half of all training books on Aperture ”in the wild”, you really don’t
have much choice, so it’s a great pleasure to find that they both are great tutorials together or
alone.
MPN, LLC Copyright 2003-2007
Page 51 of 126
Volume 5 Issue 7 July 2007
Canon Rebel XTi 400D Digital Field Guide
and Canon EOS 30 D Digital Field Guide
Reviewed by Dr. Eric Flescher
Canon Rebel XTi/400 D Digital Field Guide
Author: Charles K. Lowrie
http://www.wiley.com/WileyCDA/WileyTitle/productCd0470110074.html
Released: February, 2007
Pages: 288
$20 USD, $24 CND, £14 GBP, 15,84 Euro
ISBN: 978-0-470-11007-2
Novice/Intermediate
Strengths: Full color. Includes information about camera and
how to use the camera to make better photographs. Good use of
tables, colors, bold face, photos and more.
Weaknesses: . The first part about the camera is missing some
visual camera photos and additional information. Some pictures
pertaining to the camera are not included ( like where to put the
card). There are a lot of “bells and whistles” to understanding
what controls can do what and how and when. It was most
irritating to have to hunt for the camera’s icons and what they
mean. Instead of saying in text what to do, the visual of the
camera’s icon would have been far better to include.
Canon EOS 30 D Digital Field Guide
Author: Charles K. Lowrie
http://www.wiley.com/WileyCDA/WileyTitle/productCd0470053402.html
Released: October 2006
Pages: 288
$20 USD, $24 CND, £14 GBP, 15,84 Euro
ISBN: 0-470-053-40-2
Novice/Intermediate
MPN, LLC Copyright 2003-2007
Page 52 of 126
Volume 5 Issue 7 July 2007
Strengths: Full color. One section focuses upon camera
information and the second main section using the camera to
make better photographs. Tables used for different information
and making better and different types of photographs are well
done.
Weaknesses: The first part is not as good as the second. The
information about the camera is confusing. Information about
the camera is confusing at many times.
These two books are created by the same author. The " look and the feel" of both books are so
similar, in so many ways, that I thought it would be more instructive to compare and contrast the
two books, the EOS Rebel Xti and the EOS 30D cameras. I am glad I did for several reasons
by for myself and for readers who may use either cameras (or in my case the XT which is very
similar to the XTi).
It is really nice that both books are in full color. The colorful photos and the screenshots make
the instruction and learning an easier one. The white text within the burnt-orange titles on top of
the pages give an easy way to find out the content within the book/chapters. The mini- tutorials
were numbered and the titles were in bold face. Nice but that did not help much with the
understanding of the instructions. I can understand the use of an introduction and quick tour
sections within the first part of the books but these created more headaches then being beneficial.
There are some small side notes (within pink small square), cross- reference (light blue) and tip
(in light bulb icon) that appear next to the text areas. While these are meant for true
informational purposes, some of these helpful-hints take you to other chapters or sections within
the book. While there were only a few of these, especially in the introduction and the first
chapters, I passed over them as I found these annoying. Little visual cues that were missing, I
found were major weaknesses. And I began to see that this very nice looking book had several
other weaknesses.
Having purchased a new Canon Rebel XT, I was looking at using these two books to help me
learn how to use Canon cameras, especially in terms of all the capabilities that can be used to
make better photos. Photographing for many years, including both digital and non-digital
camera use, I am aware of what needs to be accomplished with photos (some published as in
Astronomy magazine). However there is always room for learning and having used digital
cameras for several years, I was looking forward to advancing my skills with the Canon
capabilities. An older photographer that also wanted to use and learn about the newer
technology.
A nice photo of the command dial, used on the Canon camera(s) for making different crucial
settings, showed up (page 2) . But it did not explain, like it should have, what each of the icons
meant. I would have liked to see lines that show what each icon meant instead of “hunting.”
However (page 4) has a list of these. But a list is not a graphic display and this cross-reference
only communicated about one of the dial modes. I won’t go into some of the other wording that
I found confusing. But I found more.
MPN, LLC Copyright 2003-2007
Page 53 of 126
Volume 5 Issue 7 July 2007
Later on with the same page one of the tips (P.4) , has a lengthy set of sentences about changes to
the menus and the ISO settings. The text then said “ for other menus, however, be sure to press
the Set button to confirm changes that you make.” I was so amazed at this - I just wanted to
scream! Looking in the Index, there was no information under “set” or “buttons” for example.
Within the books are 3 parts in 8 chapters. Both books are basically divided into three main
sections with the last being an appendix. One sections has information about the camera. The
second part deals more with how to make your photos better by using the camera. Both have an
introduction which is where some of the problems begin.
Finding the setting that turns off the flash, for example, even if you don’t want the flash to fire,
like during a total solar eclipse (which many people still do!). Neither books, showed visual
information where the icon on the dial would turn off the flash. There were several instance of
the lack of references related to commands, camera functions and more. This non cross
referencing I found confusing and not helpful in my quest.
There were more photos of the camera and its sides and features on the 30D book then the Rebel
book (pages 12-13). The 30D book showed visually where in the camera the Compact Flash
card and eject button can be found. The Rebel book did not show this at all. The view of the
whole camera and its features is more sparse in the 30D while the Rebel photo shows all the
control areas. Both have good visuals of the LCD display screen but cameras have different
panel displays. The viewfinder display photos are a little different according to the camera
differences. These include lines to highlight what the icons mean and where they are situated. I
wondered why the author did not do that with the camera function mode dial settings.
There are some good things. The tables of information for the rest of the book are pretty much
the same in each book. These highlight in specific details how to take better photographs
according to different setting ( Low-light, Night shots , Action and Sports, Environmental
Portrait and more. In many ways, this part of the books, are well done, readable and easy to
understand. The trick is that these tutorials do not integrate how to use the cameras to meet those
specific photographic needs. It is assumed you already know how to use all the “bells and
whistles.” For some of you that might be enough to go on your merry way. For others, you might
have to struggle a bit.
Since I have a XT and not an XTi, I wanted to know more about the dust elimination capability
so hyped with the XTi. The XTi book focuses 3 pages on it and does a good job. I now know the
need for using that function in the Xti to make sure dust not get into your camera or lenses or
eliminate them if they do so you create better pictures. I did not get the XTi mainly because of
this extra device, and bought the XT instead which saved me possibly a couple hundred dollars.
If there was a difference between the Xt and Xti, I did not see it in these books. In fact, the 30D
book, had no information about dust elimination or this Xti device/process. So I am led to
possibly believe that this device is not needed (until I find out further - any I looked in the book
for a Sony digital camera that was not written by the author of these two books).
Finally looking over the Appendix, it was helpful. While the XTi book includes (A) custom
functions and (B) Internet resources, 30D has information about RAW images (in Rebel it is in
four separate sections in the book, which is maddening), conversion RAW programs and creating
an efficient workflow (a recent buzzword for making more efficient use of your photographic
work).
MPN, LLC Copyright 2003-2007
Page 54 of 126
Volume 5 Issue 7 July 2007
A guide should be informational, easy to use and very visual in a way that integrates the helpful
written material. The structure should be a tutorial based one that guides the user to
understanding how to use the device, in this case, the Canon cameras, to take better photos in
whatever settings you wish to photograph. I feel the author had noble intentions but the
integration was lacking. The techniques are there but how they mesh with the use of the
technology could have been much more arrange and displayed in a much more effective means.
If you know how to use the Rebel XT, XTi and/or 30D and want to learn how to take better
pictures you might be okay. That second part of the book is solid. Those of you who are trying
to learn how to use any of these cameras for the first time and want to learn how to become a
better photographer, you might still find the book a good deal. This is true especially if you have
the little Canon tutorial (which is very good I must add) that comes with the camera.
I like the second half of the book but not the first. For these books, the price is right if you want
to find out how to take better photographs. You might have to “hunt” a little. Like myself , its a
matter of time how long it takes for finding the “gizmos” on the camera and then using the skills
you might learn to get the expected outcomes. Any new learning, no matter what, has different
types of “learning curves” that sometimes make learning easier or more difficult. In this case,
these two books, because of the way they are written, make learning about the cameras more
difficult, confounding and irritating. Its up to you and your stage of learning with a Canon
camera and how to photograph with them, whether one of these books can help you. You make
the choice whether you can try this book or another based on this information.
MPN, LLC Copyright 2003-2007
Page 55 of 126
Volume 5 Issue 7 July 2007
Ebay Business for Dummies
Reviewed by Dr. Eric Flescher
Author: Marsha Collier
Wiley Publishing
111 River St., MS 4-01
Hoboken, NJ 07030-5774
201-748-6702
http://www.wiley.com/WileyCDA/WileyTitle/productCd0764584383.html
Released: May 2005
Pages: 864
$30 USD, 39 CND, £19 GBP, 23,77 Euro
ISBN: 0-7645-8438-3
Novice/Intermediate/Advanced
Strengths: Breadth and depth covered by the author is amazing. 9 books in 1 for a great
price that covers all you want to start trying eBay auctions, including trying to sell your
own wares.
Weaknesses: No color pictures and illustrations, which is not a disadvantage for learning
about eBay in many cases.A disadvantage that I have found but is not a real big deal, is
that the parts are number consecutively in number (1,2,3) but each subpart called a chapter
is renumbered (Part 1 Chapter 1; Part 2 Chapter 1). While I understand the logic, it was a
little hard to find the sections I wanted, until I saw that the each edge of the right page has
information that is much more specific, compared to the titles with the page numbers at the
top of the book.
Imagine that you just found out about Ebay. You are interested in finding some items on an
auction or want to sell some of your equipment or some other product. You want to know
everything about the service, how to find items, how to bid, even how to sell your items on
auctions and make some money. Ebay does not have a manuals. The next best thing to a user’s
manual that will give you a solid understanding of this auction site is this great book - Ebay
Business.
I was confounded that it took me so long to find this book. Several years ago, like many others, I
started buying selected items like cameras, meteorites, stamps and more. I learned the “hard
way” how to deal with finding the right items, bidding, trying to outbid others and later selling
items. I did well but I was not efficient. I now have a pretty good knowledge of auctioneering
through my “trials and tribulations.” I could have saved myself time and effort and become a
more effective “auction player” if I had read this book first. And I think you will feel the same
way.
MPN, LLC Copyright 2003-2007
Page 56 of 126
Volume 5 Issue 7 July 2007
This book is nine books in one. In 868 page, it details all that you need to know about Ebay. It’s
not the prettiest looking book (black on white text and non color photos, etc.) but it is “what’s
inside that counts!” The author is an ebay Powerseller, has written two other best-selling Ebay
books already - Ebay for Dummies (4th edition) and Starting an Ebay business for Dummies.
Perhaps this book is an integration of both of these other top selling books into one. She has
carefully and concisely written almost everything you would want to know about eBay. It starts
with the first chapter and just keeps on going.
It’s not overwhelming. Start from the beginning or pick and choose which chapters to read and
learn with.The index is solid and detailed. It is a great reference to find what you want to know
within the massive book.
Part 1 covers the Basics while Part 2’s chapter shows the essential tools that you can use.
Detailed section that eBay users will find very useful are Chapter 3 (Checking things out before
buying ) which includes giving and receiving feedback, scrutinizing a seller’s reputation, getting
protection on Ebay and more); succeeding by sniping (the art of outbidding at the last second
which I have succeeded and lost); Chapter 3 buying and selling like a pro allows you start
selling and your business if that is what you also want to explore as well. Part 4, Sourcing
Merchandise educates you on online retailing, presenting your items, promoting your goods,
power selling,office and legal information and storing and shipping materials. In short, this book
covers all your want to learn about eBay.
Don’t let the title fool you. Most of the dummies books, I have found are done well. This
instructional book is good for Novice eBay users to Advanced. It will grow with you as you learn
so it is a great buy for many reasons. If you want to know all you can find about Ebay, this is a
superior book to start and work with throughout your eBay experience.
It is an all in one desk reference. This book was published in 2005 and I wish I had found it
sooner. In the beginning, I did not think I needed some instruction for starting to buy and later
sell. But there were a lot of “little things” to find out about and educate myself much of it “trial
and error bases.” This book would have saved me a lot of time and would have made me a more
efficient auctioneer. Having said that, I would say get this book if you are serious about selling
some items or gaining some items. Using Ebay is not difficult but working with it on a more
consistent and effective basis would have helped me initially and now. In that case, I would say
check this great book out. You will be educated and learn more at the same time in a direct and
easy manner. The book is easy to read and has a wealth of information that will help you now
and later to do the best on Ebay.
MPN, LLC Copyright 2003-2007
Page 57 of 126
Volume 5 Issue 7 July 2007
MacBook for Dummies
Reviewed by Dr. Eric Flescher
Author: Mark L. Chamber
Wiley
http://www.wiley.com/WileyCDA/WileyTitle/productCd047004859X.html
Released: August 2006
Pages: 384
$22 USD, $26 CND, £15 GBP, 17,43 Euro
ISBN: 0-470-04859-X
Novice/Intermediate
Strengths: The book includes a very good introduction. Good screenshots and illustrations
including the pointers to specific areas within the illustrations. Five icons help pinpoint helpful
information along the way. Chapter 23 “ Top Ten Things to Avoid like the Plague “ is quite good
as well as Chapter 22 “ Top Ten Laptop Rules to Follow (which is insightful and well written).
Good price, well written and readable.
Weaknesses: Chapters like the ones with iDVD and iMovie have minimal amounts of
information. Really these and some of the sections just have the basics. To know and learn more,
books that detail more information regarding specific applications should be found besides these
basics. For iLife applications, you might want to turn elsewhere. Users who read about
“movies,” “projects.” “video clips,” may find the information in this book not well defined,
especially concerning when and how the media can be imported, exported and utilized.
There are several books on the market dealing with MacBook. Several include not only
information about MacBook but MacBook Pro. This is one includes both. I wanted to see what
the author had to offer in this MacDummies series related to these laptops. I found the author of
this book has previously published the Mac OS X All-In-One Desk Reference for Dummies and
completed thirty computer books. My wife bought a MacBook, so I decided to research this
book to see what it could tell me.
MPN, LLC Copyright 2003-2007
Page 58 of 126
Volume 5 Issue 7 July 2007
The book covers 384 pages and spans 23 chapters with seven part/sections. The first part of the
book includes a very nice introduction that gives the reader a nice prelude to learning about the
laptops. As the author says, “ he started with no assumption” regarding knowledge of the laptop.
The book starts “from the ground up” and launches into some interesting ideas that relate to more
than the “hardware.” It is nice that in this beginning section, the author pinpoints information
about “switchers,” those computer users who are moving into the Macintosh realm from the
PC/Windows usage (particularly targeting Windows XP users). He also nicely mentions that if
you are new to Macintosh and the Apple world, most of the software is in the computer and does
not have to be purchased. This is a great tip that probably many PC people still don’t know
about, even though many Apple users already are mindful about.
While many of the Dummies books vary in their versatility, breadth and depth of the
instructional content, this one is solid. While the illustrations are only black and white, the screen
shots are readable. Several include pointers to various sections within the illustrations that zone
in on the information talked about. This takes away the annoying guesswork that I have found in
some books that I have read in which “hunting” within the illustrations was a regular and
recurring point. There are also five icons that are placed throughout the pages. These (Tip;
Mark’s Maxim; Technical stuff; Warning!; Remember) serve to include precise additional
information that assists along the way regarding the instructions.
Part 1 includes information pertaining to Mac laptops, turning on and starting with the system
and computer. Part 2 focuses in on Mac OS X, while Part 3 launches into the world of
connecting and communicating. Part 4 focuses on the iLife applications (introductory
instruction), while the text takes you through each application starting up and using. If you want
more in-depth information other books will be needed. Part 5 is sharing access and information
while Part 6 deals with important troubleshooting, upgrading information and maintaining your
laptop.
Part 7 is called the Parts of Tens. This includes Chapter 22 “Top Ten Laptop Rules to Follow”
(insightful and well written) and Chapter 23 “Top Ten Things to Avoid like the Plague” (useful
for many reasons in your encounter with the internet, applications, hardware and more).
All in all I liked the book and what it had “to say”. Novice and intermediate laptop users might
like it not only for its good price, but also the information it provides. It is readable and you gain
insights throughout the book.
If you already have a Macbook or Pro and have worked with it and want more information
concerning the iLife applications, you might want to turn elsewhere. Users who read about
“movies”, “projects”, “video clips”, may find the information not well defined, especially
concerning when and how the media can be imported, exported and utilized.
MPN, LLC Copyright 2003-2007
Page 59 of 126
Volume 5 Issue 7 July 2007
Ferguson Hill Mini Speaker System
Reviewed by Wayne LeFevre
FH007 & FH008 Speakers
http://www.fergusonhill.co.uk/
FH007 $995 USD, $1195
CND, £500 UK
FH008 SW $595 US, $725
CND
Requirements: Any line level source including computer audio out, iPod, MP3, CD, or DVD
players.
Strengths: Perfect sound for the size. Mac–like quality, finish and design.
Weaknesses: Price for some. Otherwise, absolutely none.
Introduction
First, let me preface this article by saying that I
have never claimed to be an audiophile. I like
music, though, and I know the difference
between what sounds good to the ear and what
sounds “a little off.”
I tell you that to tell you this; these are the best
speakers I have ever heard! They are definitely
the oddest speakers I’ve ever seen, and there
have been many an odd shape being thrown at
the computer/iPod industry of late.
MPN, LLC Copyright 2003-2007
Page 60 of 126
Volume 5 Issue 7 July 2007
There are two horns, two bass spheres, and an optional sub–woofer. The horns and bass sphere
speakers are made from a clear acrylic that makes the whole system see through. This is enough
aesthetically to make them clearly a conversation piece, yet unobtrusive as possible.
Driving all of this is an amplifier box with one simple control on the front. Volume. More on this
later. For the look, nothing could be more Mac-like. They are as artistic as they are fantastic
sounding. The FH007 system is based upon Ferguson Hill’s larger popular system - the
FH001/2/3. This larger system is way over the top, but way cool and affordable only to the more
affluent, unless one wants to take out a second mortgage!
Technical Bits
To get a little more technical into what you receive for your money, the aluminum amplifier is
the heart of the system. The amplifier is a class A/B four channel, each driving a separate
speaker, producing clean, clean sounds. Though they can be cranked quite loud, you will notice
that they aren’t trying to push out (cue tractor pull and monster truck announcer,) “100 Watts
per channel for the ultimate party sound!” Taking the opposite direction, Ferguson Hill has
decided to take the sound–over–volume approach. The frequency response of the Horn/Sphere
speaker system goes from a very low 75 Hz to 20 KHz. With the addition of the FH008
Subwoofer, the bass response of the system extends down to a deep 45 Hz.
MPN, LLC Copyright 2003-2007
Page 61 of 126
Volume 5 Issue 7 July 2007
There are two ways to input music. One is a 3mm plug, the other a standard RCA Red/Black
jack. The inputs from the speakers themselves are 3mm plugs, one from each horn and one from
each bass sphere. If you opt for the sub–woofer, a specially made cord will be included that
basically splice into the bass. The subwoofer, by–the–way, operates with an active cross–over
amplifier that makes the cross at a range from 150 to 45 Hz, adjustable. At 100 Watts, it doesn’t
take but a small move with the volume control on the subwoofer to get an acceptable bass sound.
Much more than what it can take. This isn’t the subwoofer that you get with your all–in–one box
speaker system. This is the real thing weighing in at 25 pounds, 8 inch drive unit, heat fins and
more. It produces clean bass without the brassy rumble that you hear with your average .1
system. With the volume at half you could compete with any custom rolling thumpers next to
you at the stop light. I have found that if you put the volume to about twenty–five percent and the
frequency cross–over to about mid–range you will get the optimal bass quality for the system.
The subwoofer is definitely optional with this system, as the
sound is great even without it. Having had it, though, and
listening so long with it, I don’t think it would sound
complete without it. It gives it an extra oomph, and if you
have it set right, which so many systems I hear do not, it
gives a subtle yet noticeable complement. So often, for
whatever reason, people like to really jack up their bass so
you really hear it even drowning out some of their other
instruments. Ah, kids these days.
FH008 Subwoofer
How it really sounds
I was told, and quite rightfully too, that there is a difference between lossless and the 128 bit
lossy files and how they sound. With this system, you really can tell the difference, and you’ll
soon be re–ripping your CDs, or wondering why iTunes doesn’t do FLAC. The cable I have to
hook up my iPod to the amplifier is a Tara Labs Rectangular Solid Core RSC® Diva Cable. It’s
a premium cable that is made in many complementary colors. Specs on the cable include four
RSC® Super Annealed Oxygen Free Eight Nines Copper conductors, natural fiber spacers, anti–
corrosion coated copper braided shield, nylon mesh sleeve, single 24K gold mini-stereo plug,
and two specially designed petit 24K gold plated RCA plugs that are smaller and lighter than a
standard RCA plugs. So down to brass tacks, the cable should deliver a broader fuller sound.
I think that will be a choice left up to the individual consumer, as the cables start at $129 USD.
It’s not a cable that can be purchased at Best Buy, however. My cable came with the business
card of the person who made it, R. Marino, so that’s got to be saying something. As far as actual
sound difference, I’m sure there is. I’m not sure if I can tell, but I haven’t tried a cheaper cable
either.
As far as the speakers go, they are fantastic! There is a nice fat sound through the entire audio
spectrum. There wasn’t a piece of music that I tried that one range versus another didn’t sound
great. The Beatles “Because” off the Love album was clear all the way through from the birds at
the start to the tonal quality of the mids of the band’s a cappella.
The highs of Tchaikovsky: Serenade For Strings In C, if you like to waltz, are as bright and clear
as if you where in front of the actual performers. My daughter, well, let’s just say I’ve caught her
fiddling with the subwoofer controls and says Mims never sounded so good.
MPN, LLC Copyright 2003-2007
Page 62 of 126
Volume 5 Issue 7 July 2007
The whole point of a well designed, well placed, well driven speaker system is to actually try and
fool you into believing that the musicians are singing and playing their instruments onstage, live,
right in front of you. The Ferguson Hill system does that better than most, even those systems
costing much more. There’s nothing like cranking Elvis Costello through this system, able to
handle every high and low without a crack or flat. More importantly, however, is how it looks
next to your Mac. You won’t believe how pleasing the design is next to your system. As long as
you keep the amplifier box away from your laptop, (it gets incredibly hot! Almost a burn-yourskin hot.) Something I would definitely add is an iPod dock with remote.
As you can see in this photo,
the FH007 system sits right at
home next to your Mac.
Stylish and provocative, it
encompasses everything that
is Mac. It definitely breaks
the mold in what a pair of
speakers should look like,
and sounds better than it
looks!
Personally, I don’t have it hooked up to my computer system, though it might, if I had the room
on my desk. For now, it looks so good, I have it in the front room for all to see. I have it set up so
I can attach an iPod, as well as my Slim Devices Squeezebox, which is streaming my iTunes.
It definitely makes guests pause, and I’ve found no one who didn’t like them or appreciate the
sounds they made. I think I even find myself actually listening to more music and less podcasts
then before. Plus there’s that whole iTunes Plus store…
MPN, LLC Copyright 2003-2007
Page 63 of 126
Volume 5 Issue 7 July 2007
Conclusion
The biggest question of all will come down to whether or not you want to spend a thousand of
your hard-earned dollars on a speaker system that may not even be your main system. For this
system, if you can afford it, yes. If you live around a showroom that displays them, at least take a
listen. Availability of this system is world–wide, but somewhat limited in the USA, there’s only
one distributor at the moment, but if you’re around Deerfield Illinois, just take a listen at
Ultimate Audio Video - http://www.ultimateaudiovideo.citymax.com/page/page/3698484.htm
Several retailers have recently been introduced in the States that you can also find the Ferguson
Hill Speakers, including two in San Francisco, Minnesota and Chicago, IL. Check Ferguson
Hill’s web site - http://fergusonhill.co.uk/distributors.php for all dealer locations around the
world.
Suddenly, those really cool JBL Stormtrooper helmets and Harman Kardon sticks will seem
mighty limiting, and maybe even a little “off”, though you might not even know why. Even
though there may be some limitations to the Ferguson Hills, such as you can’t put an amplified
source through it, so keep it away from your home receiver! (Though feel free to hook it straight
up to your home system’s CD/DVD player.) You may also find it difficult to find the real estate
for all the components. But in pure across the board tonal quality, I challenge you to find a better
system for your iPod or Mac.
White gloves included for handling.
MPN, LLC Copyright 2003-2007
Page 64 of 126
Volume 5 Issue 7 July 2007
Mac Pro Upgrade Guide
By Tommaso Alvisi http://www.o0o.it/pro/
As usual...warranty is void!
Created on 30 May 2007 Last Modified on 26 June 2007
Since i bought almost a year ago my Mac Pro, i dreamed about the upgrade possibilities with
other Woodcrest (x51xx XEON Socket 771) processors or, better (yup!), with Clovertown ones
(x53xx XEON Socket 771). They don't draw much more power (on charts) BUT they give you
plenty of computational power.
HardMac, AnandTech and others tried this way already with positive results but they used two
X5355 ES (Engineering Sample) which aren't production samples readily available and worst of
all, cost more than 1000 Euros EACH!!!!
About 2 months ago, I found the ideal choice: the nice E5320 (SL9MV).
Its power and thermal specs are quite similar to the 5150: 80W instead of 65W!!! Also it's the
best for trying the BSEL mod since it has a default bus of 1066 MHz, so modding it to 1333
MHz we can push it to 2,33 GHz from the stock 1,86 GHz!!!
After following this guide you'll have an 8 cores Mac Pro from a "normal" 4 cores one.
For reference, you'll go from a total of 10,64 GHz to 18,64 GHz!!!
And, best of all they cost about 350Euros each, or only 250 on eBay.
So maybe I should call it the El Cheapo Mac Pro Upgrade!!!!
Test Mac Pro configured as follow:
2x Xeon WoodCrest 5150 Dual Core 2,66 GHz 4GB FB-DIMM (8x512MB) 3x or 4x SerialATA
300 Hard Drives Pioneer DVD Burner "SuperDrive" Genuine Apple nVidia 7300GT 256MB
Hardware Tools:
Screwdrivers for some screws to open the MacPro (about 5, not much!) Torx T15 (at least 20cm
long)
Software Tools
Hardware Monitor smcFanControl MenuMeters FFmpeg (cli) HandBrake PowerFractal
MPN, LLC Copyright 2003-2007
Page 65 of 126
Volume 5 Issue 7 July 2007
NOTE 1: Hardware Monitor's Power Consumption (in watts) estimation is about 40-60W less
than the real one. NOTE 2: Fans speed were configured to 1000rpm and 1500rpm on the eight
cores upgraded system.
Here's how my Mac Pro was before the
upgrade:
Now let's see how good
it is without any
modifications, simply as
Apple sells it, with only
some more RAM and
storage the estimated
power consumption
under idle: 147W (about
200 real watts).
MPN, LLC Copyright 2003-2007
Page 66 of 126
Volume 5 Issue 7 July 2007
a quite effective ffmpeg auto option for threads calculation:
and under full load: 242W (about 300 real watts).
With PowerFractal: average of 30-35GigaFlops, not bad indeed!!!!!!
MPN, LLC Copyright 2003-2007
Page 67 of 126
Volume 5 Issue 7 July 2007
Now let’s upgrade!
Open the MacPro as seen on many sites like HardMac or, if you have it, on the official Apple
Service Manual. When only the CPU heatsinks remain, pay attention to the cpu thermal sensor
headers!!
MPN, LLC Copyright 2003-2007
Page 68 of 126
Volume 5 Issue 7 July 2007
Disconnect the CPU-A
2 pin connector...
..and the CPU-B one.
MPN, LLC Copyright 2003-2007
Page 69 of 126
Volume 5 Issue 7 July 2007
Then unscrew the 8
screws (4 for every
cpu hs) with the long
torx. When you
successfully remove
the heatsinks you'll see
the 5150 xeons! Yup!
Remove the old
CPUs. Here you can
see one of the new
xeon, soon to be
installed! ;) Noticetwice the
cache! From 4MB to a
whopping 8MB per
CPU!!!
MPN, LLC Copyright 2003-2007
Page 70 of 126
Volume 5 Issue 7 July 2007
Clean carefully the new
cpu and the bottom (the
copper plate) of the
heatsinks with
acetone and a CLEAN
cloth (i suggest to clean
the old cpus too right
after removing them,
much better!).
Here it is
a cleaned
(at its
best)
copper
plate.
MPN, LLC Copyright 2003-2007
Page 71 of 126
Volume 5 Issue 7 July 2007
According to the Intel datasheets, to bypass CPU’s BSEL (from 1066 MHz to 1333 MHz
bus) you only have to isolate (i.e. cover) the sixth contact on the last row (look at the picture
below). It is easily accomplished with a VERY thin strip of insulator tape. Pay attention to
cover only the required contacts...TAKE YOUR TIME!!!
MPN, LLC Copyright 2003-2007
Page 72 of 126
Volume 5 Issue 7 July 2007
Ok, now let's put
the processors
inside the MP
mainboard
sockets
(771) and apply
an even amount
of thermal
compound
(paste).
Fire it up! ;-)
This is what "About this Mac" should tell
you if the upgrade is successful! The
CPU is obviously unknown.
MPN, LLC Copyright 2003-2007
Page 73 of 126
Volume 5 Issue 7 July 2007
If you looked closely at the previous screenshot, you should have noticed the CPU speed isn't
correctly detected too! So we have to find the "hard" way! ;-) If you have Hardware Monitor
installed under Window -> Show System Info you'll find what we're waiting for!
Success!!!!
Ok, in idle it draws now about 180-200W
(230-250 real ones, remember!), but have a
look at some benchmarks...
First a full load
test with 8 (E I G
H T !!) ffmpeg
instances...290300W (or 340350 measured at
the power outlet)
MPN, LLC Copyright 2003-2007
Page 74 of 126
Volume 5 Issue 7 July 2007
Notice that with normal MPEG4 avis HandBrake (based on ffmpeg) isn't using the total
computing power... only less than 30% average for a 103fps encoding!!!!!
So I tried with 3
instances!!! (you have
to duplicate and
rename the Handbrake
Application to do
so!) ;-) Look
below!!!!!
UNBELIEVAB
LE!!!
310fps on total
average with less than
80% of load!!!!!! I
think it can do about
400fps!!!!! This is
about 5 minutes for a
90 minute long
feature!!!!!!!!
MPN, LLC Copyright 2003-2007
Page 75 of 126
Volume 5 Issue 7 July 2007
And even at
its stressful
settings
(H264 higher
res, 2x AAC
audio tracks)
HandBrake
remains
under 50%
global CPU
utilization!
When I
added a
second
instance
(each at a
rock steady
50fps) it
barely went
up to
85%!!!! I
presume that
the total maximum would be 110-120fps if a more efficient multi-threaded encoding would have
been implemented!!
And look at the PowerFractals results! Between 64GigaFlops and 66 GigaFlops!!! For your
reference the Mac Pro 3.0 GHz x 8 does 84 GigaFlops...but it COSTS as much as a CAR!!!! ;-)
MPN, LLC Copyright 2003-2007
Page 76 of 126
Volume 5 Issue 7 July 2007
Conclusions
A real full load of 330-350w isn't bad for a such powerful workstation, almost double the
powerfractal results! I found that after upgrade is better to keep system fans AT LEAST at
1000rpm (which produce a very acceptable amount of noise...VERY QUIET!)
FBDIMMs are VERY VERY VERY POWER HUNGRY!!!!!!! About 10-15W each module!!!
Strangely enough the capacity of the modules doesn't matter, so the SWEET SPOT is with four
modules (quad channel)!!!
The full load comes down to 300W if only 4 modules installed.
:: Quick Update ::
Mac Pro it's rock solid, I've used it as my main machine for two weeks now! I've completed
successfully a 2 days and half rendering with 8 threads. During heavy load (I mean HEAVY), I
only raise the fans to 1000-1500rpm when 8 cores crunching! And maybe only because ambient
temps in my house are around 27-32C or about 80-90F ...I don't have air conditioning and here is
a pretty darn hot 'n sunny summer! That's a stress test!
If you liked this guide please consider a small donation for my future projects!!! Considering
time involved, risks, hosting fees, the processors since I had to buy them as soon as possible and
so paid 700Euro on top of what I already spent for the Mac Pro itself!! Thanks anyway for you
visit, even without donations, at least help me with the nice offers on this site!!!!
MPN, LLC Copyright 2003-2007
Page 77 of 126
Volume 5 Issue 7 July 2007
Sony DCR-SR200C Hard Drive Camcorder
Reviewed Daniel MacKenzie
http://www.sony.com/
$850 USD, $906.36 CND, £426.49 GBP, 634,08 Euro
Retail - $1,050 USD.
Comes with: 100GB Internal Hard drive.
Strengths: Small, good quality video, reacts well in cold
temperatures, sharp LCD display
Weaknesses: Not a lot of compatibility with the Mac.
Buy Mac-specific software for an extra $100 USD
http://www.pixela-1.com/sony/hdd/mac/
Introduction
Hard drive camcorders are relatively new on the market and there is a growing need for them. It
is a bother to have to change tapes when you are in the middle of shooting something or just
about to shoot something. It’s the same thing with DVD camcorders. You have to change the
disc when it gets full. Unfortunately, right now, hard drive camcorders are expensive to the
regular consumer and if you have your heart set on one, you have to make sure you get the right
one.
Getting Started
It came with a couple of discs. One had a tutorial video of a weird cartoon talking to a couple on
a vacation. This may just be my opinion, but I didn’t like it. It made me feel like I was a child
(younger than me). The other was a software CD that contained Movie and Photo editing
software. The movie software isn’t compatible with Mac, but the photo software is. It installed
fine.
Using the Hardware
This camera is very easy to use. It even has a “simple mode” that you can use for simplified
controls. It features 10X optical zoom with an additional 80X digital zoom. A rotatable wide
screen LCD screen is used to see what you are filming. When the area around you has a lot of
light, it makes the viewfinder hard to see. Sometimes you don’t know what you are filming.
There also is a Night Shot mode. I had a lot of fun with this. It is used when there isn’t a lot of
light around. An infrared sensor turns the video green but picks up more light. It looks like night
vision. The built-in microphone is good if you are shooting home videos, but it picks up a lot of
background noise. If you are looking for something more professional, you can purchase external
microphones, which you can find at sony.com. Another feature is a built-in 4 megapixel camera
if anyone wants an all-in-one camera. It comes with a video mode and a still picture mode but
you can still take still pictures in video mode.
MPN, LLC Copyright 2003-2007
Page 78 of 126
Volume 5 Issue 7 July 2007
The camera is the perfect size. It fits in the palm of your hand and lets you reach all of the
buttons you need. The LCD screen is a touch screen, which lets you access many of the camera’s
features from one screen. It can rotate over 180 degrees, so you can adjust it to the way you like
it.
Something interesting happened to me while I was reviewing this product; since it is a USB
camcorder, iMovie doesn’t work with it. You can’t import directly into iMovie. So I e-mailed
Sony’s customer support and they said that the camcorder was completely compatible with
iMovie. I’m not sure what he meant by “compatible” but you can’t import directly. Eventually, I
got the video into iMovie using an analog/digital converter and the camera’s preview mode. I
had a lot of trouble. Another way you might be able to get the video on to the computer is having
the Mac think the camera is a regular USB hard drive and extracting your video that way. Either
way, it’s a pain.
Conclusion
Overall, this is a great camcorder if you have Windows. Its ease of use and video quality make it
a good buy, but I would not suggest it to any Mac user. I was disappointed that the compatibility
was so poor. The only major improvement that Sony can make to the product is making it usable
with Apple computers.
Recommendation
A beginner to seasoned user would find this camera useful. But you should have a Windows
computer or a Windows partition on your computer (Boot Camp, Parallels, etc.)
MPN, LLC Copyright 2003-2007
Page 79 of 126
Volume 5 Issue 7 July 2007
Tom Bihn Large Caf Bag
By Guest Contributor, Kristine LeFevre
Large Café Bag
http://www.tombihn.com/
$55 USD, $59 CND, £28 UK
Requirements: None
Strengths: Heavy Duty, many configuration options for wearing.
Weaknesses: None. The perfect run-about.
Introduction
I am an itinerate teacher. I travel from one school to another school every day. I also am a
“soccer mom” and a Junior High and High School Track coach. I also am a quilter in my “spare
time.” What does all this have to do with Tom Bihn’s Large Café bag? Everything. I carry my
world with me everywhere I go, and I couldn’t do it without this bag.
Description
From the website, “The Café Bag is a hip accessory for travel and everyday use. It can be used to
carry smaller laptops when you purchase the optional Size 5 (12" Powerbook or Small PC
Laptops) or Size 6 Vertical Soft Cell (13" MacBook) laptop sleeve. The main, open-top
compartment and front zippered pocket are covered by a flap that closes with the distinctive Tom
Bihn offset buckle. On the back, you'll find a simple open-top pocket; inside, a snap-hook for
your keys and two pockets for your checkbook, cellphone, and other items. The Café Bag rides
on your shoulder with a padded 1-1/2" strap and can also be carried by a webbing handle on the
top/back. You may purchase an optional removable waist strap, so you can wear it bikemessenger style.
It’s available in many colors. Large Size measures 12" x 13" x 3".
MPN, LLC Copyright 2003-2007
Page 80 of 126
Volume 5 Issue 7 July 2007
Exterior of 1000 Denier Cordura®. Lined with 500 denier Dupont Cordura®.”
Using the Bag
I can fit everything into it. From folders, binders, books, quilts, food, water bottles, cameras. It
all goes in.
I use this bag as my purse, though Tom Bihn’s site makes sure that it is not perceived as one. It
does have a male consumer population to appease, and it really works for them. It looks like a
professional bag that would not look out of place on any male shoulder. It is tough, good looking
and user friendly. It has one large pocket on the inside and smaller pockets for pens, phone, iPod,
etc. It has a large open pocket in the back, where I put folders and mail and magazines. It has a
zipper pocket in the front, which is pretty roomy.
Conclusion
I love this bag. I admittedly am a bag person. Some people do shoes, jewelry, and clothes. I do
bags. (Wayne: All true. Trust me on this one. It’s almost silly!) This is the best bag I have ever
had. (Again, that is truly saying something not to be taken lightly.) It has a key strap that I totally
use for my work keys, and I would loose them every time if it didn’t.
The shoulder strap is strong and sturdy, but most of all comfy. It has a gel shoulder piece that
slides up and down the strap so you can adjust it to your body, along with the strap length itself.
It’s perfect for me, and I’m sure if you try it, you’ll find it perfect for you too. With this price,
how could you go wrong?
I just love this bag!
MPN, LLC Copyright 2003-2007
Page 81 of 126
Volume 5 Issue 7 July 2007
DragonDrop X 1.3
Reviewed by Harry {doc} Babad
© 2007
Developer: David Adamson
[email protected]
http://cs.oberlin.edu/~dadamson/DragonDrop/Release
Released: 13 Jul 2006
Happyware: If you use DragonDrop, you must be nice. To put
a concrete mandate behind such a general statement, do
something unexpected and good for someone you don't know.
System Requirements: Mac OS X 10.4 or later Universal
binary 500 KB Hard Drive Space.
Localization: DragonDrop supports internationalization. The
kindness of strangers has produced Japanese and French,
Russian and Dutch and German localizations. DragonDrop can
be localized by anyone who can use a text editor - no
experience with programming is required, nor are any developer
tools. Volunteers are welcome.
Source Code: Available
Strengths: The software does exactly what it says it will. I can use it to easily focus on active
projects, and also cleanup some of my desktop clutter. For me that make it a keeper.
Weaknesses: None beyond those items listed by its developer none of which trouble me.
Copyright Notice: Product and company names and logos in this review may be registered
trademarks of their respective companies.
The software was tested on a 1 GHz dual processor PowerPC G4 Macintosh with 2 GB DDR
SDRAM running under OS X 10.4.9.
Disclaimer: When briefly reviewing share-freeware I will often use the developer’s product,
functions and features descriptions. All other comments are strictly my own and based on testing.
Why need I rewrite the developer’s narratives, if they are clearly written? This review is one such
example.
Introduction in Including Publisher’s Summary
DragonDrop is intended to reintroduce some of the functionality lost with the death of tabbed
windows in Macintosh OS X. Some of us remember tabbed windows, those who trod the classic
OS paths. Drag an open window to the bottom of the screen, and a title-tab peeks up, readily
displaying its contents at a click or a drag. It then collapsed to insignificance (tab size) at a click
of a mouse.
MPN, LLC Copyright 2003-2007
Page 82 of 126
Volume 5 Issue 7 July 2007
This program provides some of those lost attributes of the classic OS, and parallels some of the
ease of access features I relish in the $10 Fruit Menu haxie by Unsanity
[http://unsanity.com/haxies/fruitmenu/] with the ease of file/folder access of XMenu [DEVON
Technologies http://www.devon-technologies.com/products/freeware/]. The major difference,
DragonDrop uses a tabs metaphor rather than one oriented to the Macintosh menubar.
Using the Software
Just drag the application to that folder, double click and you’re on your way. I did a slight detour,
and made sure, see below, that my installed copy Unsanity’s WindowShade ignored
DragonDrop's existence.
I’m a macC contributor, community volunteer, and part time waste management consultant. As a
result, I’ve a constantly changing mix of project folder alias’ that clutter my desktop. Humor me,
that’s my organizing principal.
I found the best way to use the DragonDrop software, and in part, clear some desktop clutter, is
to create tabs for all of my active project folders. For each new tab, I tossed a desktop alias to
that project’s folder.
No, you cannot create a tab for a document, I tried. I thought based on the information provided
in David Adamson’s readme file, I could make it work, but I read the readme wrong.
MPN, LLC Copyright 2003-2007
Page 83 of 126
Volume 5 Issue 7 July 2007
Interestingly, when I dragged an application’s icon onto DragonDrop it created a tabbed window
showing the applications’ contents. Such contents are usually accessible only by using the
contextual menu command “show package contents” That makes sense, if you think about it. An
application is just, as treated by the OS, a constrained type of folder whose contents you
shouldn’t mess with.
However, you can turn either a folder or a folder’s alias into one. These are not static displays
but active Finder-mode functioning windows. I was able to drop and drag new items into the
DragonDrop windows and drag some of a window’s contents to my desktop. Nice feature!
Drag any file or folder over DragonDrop's icon in the Finder or in the Dock, and drop it there. A
window will appear, showing the contents of the folder you dropped, or of the folder containing
the file that you dropped. This file-viewer is a poor cousin to the Finder's list-view, offering
basic file operations by way of menu commands and (of course) drag and drop.
In addition as noted by the developer: The file-icon in the title bar of a window in any
application (including DragonDrop) can be dragged into DragonDrop just like any other file
icon. By default, DragonDrop's tab-windows minimize by collapsing to the bottom of the screen.
By way of the Preferences window (command + semicolon), this behavior can be changed to
echo the WindowShades software of days of yore, or to suck it into the dock in the mandated
Mac OS X manner.
A Purposeful Limitation — According to its developer,
only one DragonDrop window will be revealed at a
time, the others collapse upon losing your attention.
Dragging anything over a collapsed DragonDrop
window causes its contents to be revealed, and will recollapse once the dragged thing has passed by. There's
more, David notes, hopefully self-evident functions.
Glance through the menus; toy with the preferences,
experiment and play. Doc Sez it fun and doesn’t cost
you nothin’.
Discomfort
My only gripe about this otherwise easy to use and helpful product is that I could not get the
contents of a tab that contained sub-folders to work in spring-loaded mode or to open when
selected and double-clicked. Instead I had to right click (control-click on a one button mouse) to
get a contextual menu that contained an open command. Ups, I just checked and despite setting
my Finder preferences appropriately, none of my desktop or deeper level other folders seem to
active the spring folder’s function.
MPN, LLC Copyright 2003-2007
Page 84 of 126
Volume 5 Issue 7 July 2007
What DragonDrop Doesn't Do (Developer’s Note) — This software is very much a work in
progress, with many features missing that I desire. Patience, and possibly volunteer work, should
see the things we wish come to pass.
My bulleted (wish) list:
•
It appears that Unsanity's WindowShade X and DragonDrop do not play well with one
another. It is recommended that you add DragonDrop to the "Exclude List" in
WindowShade's preference pane.
•
There isn't a whole lot to sort by, only name and date. This may change, but DragonDrop
is supposed to be a lean little launcher/drop box, and not the whole of the Finder.
•
Icon View is not yet an option. I've got some ideas, and a few half-made prototypes, but
nothing deliverable. Thoughts, or class donations, or indication of desire would be
appreciated.
•
And probably a few other things. Let me know what keeps you from enjoying my toy,
and I'll try to fix it.
Conclusion
If you liked the ability to clear your screen, as we did in the classic environment, by using tabs,
you’ll like this simple but capable software. For the rest of you who prefer to minimize
temporarily distracting documents to the dock, just continue on your way — this product is not
for you. But it’s free, so you might just try and see if tabs, would once again work for you. After
all your browser, and soon MS Office 2008 (Mac) are full of them. You’re not giving up the
Apple Dock’s functionality, just using an alternative to it.
Recommendation
Hey its free, if you’d like the tab capability try it, you just might like it. If you do, or even if you
don’t, drop David Adamson a line. Silence from readers deadens the spirit and chills the creative
juices.
MPN, LLC Copyright 2003-2007
Page 85 of 126
Volume 5 Issue 7 July 2007
HoudahSpot 1.4.11 A Spotlight front end. To
find Mac files. Fast!
Reviewed by Harry {doc} Babad
© 2007
Houdah Software
support.houdahspot@ houdah.com
http://www.houdah.com/houdahSpot/
Released: 17 May 2007
Shareware: $20 USD
System Requirements: Mac OS X Tiger 10.4.8 or later with
Spotlight enabled; Universal Binary, 2.8 MB Download and at
least 8.4 MB on Hard Disk
Strengths: A simple to use, rational extension of Apple’s Spotlight tool that works, painlessly.
Weaknesses: A user manual, perhaps assembled fro the developer’s web contents, would be
helpful to those wanting to master, not simply use, this program
For a Demo of this Product: I know the product can be downloaded, but I was unable to find
the duration of the demo period.
Copyright Notice: Product and company names and logos in this review may be registered
trademarks of their respective companies. The software was tested on a 1 GHz dual processor
PowerPC G4 Macintosh with 2 GB DDR SDRAM running under OS X 10.4.9.
Disclaimer: When briefly reviewing share-freeware I will often use the developer’s product,
functions and features descriptions. All other comments are strictly my own and based on testing.
Why need I rewrite the developer’s narratives, if they are clearly written?
Introduction in Including Publisher’s Summary
I hate Spotlight! No. I’ve not turned it off. But I never use the Apple tool except when EasyFind
[http://www.macupdate.com/info.php/id/11076/] doesn’t work for me because I’m searching
document contents, a task it’s not designed to do. In that respect it is a more powerful find tool
that we used in the classic Macintosh OS systems. But I really do need to find things, more often
than I’d casually admit, that are buried in documents I’ve written or downloaded as text or PDFs.
Why test HoudahSpot — HoudahSpot is a desktop search tool based on Apple's Spotlight
technology. It enables users to quickly create and store detailed and focused search queries using
an interface simpler that that provided by Apple in either Spotlight or the Apple Find tool.
MPN, LLC Copyright 2003-2007
Page 86 of 126
Volume 5 Issue 7 July 2007
What’s Wrong With Spotlight — Note: HoudahSpot doesn’t fix all the issues that I have with
spotlight such as not searching FileMaker Po databases or my Eudora Mail. As noted later in this
review, it builds on and augments Apple’s spotlight engine. It therefore makes it at a minimum
more user friendly. Actually it makes spotlight’s features useable for routine use, something I’d
never achieved before finding HoudahSpot.
The main problem with Spotlight is that making everything searchable doesn't imply that
everything will be findable. Hits and more @#$%@* hits any resemblance to what I seek is
purely coincidental
Keyword search works only if there aren’t too many words. Sometimes even two words are too
much. In addition, since Spotlight gives equal weight to each word no matter whether it is
buried deeply within a file or is part of a document’s name. So instead of focusing keywords to
search, you must think of a word within the document sufficiently unique to focus your search.
You can’t search: FileMaker Pro databases contents, invisible files, some systems files, or for
the subjects or contents imbedded in Eudora’s email messages. Searching for a specific image,
particularly one with a letter-number as a name can get you reaching for a Prozac.
What is so hard about allowing word completion in a text box? Type in the word, hit return.
(E.g., EasyFind.) Spotlight starts searching with the first letter you type and the interface gets
weirder and more surreal as new results appear with each new letter.
Although detailed, I’ve never been helped much by Apple’s Spotlight tips.
http://www.apple.com/macosx/tips/spotlight.html/
How is HoudahSpot Different from Spotlight — HoudahSpot builds, augments, on the Spotlight
engine. It aims and succeeds in providing a front-end that is more convenient, flexible and
powerful than Apple's offerings, at least for the Tiger OS. The software allows you to specify
where you want to search: your home folder, your documents, ... anywhere. Of cause, search
criteria also allow you to restrict the search to specific file types.
Getting Started
After a traditional transfer of the software to my applications folder, I needed to use a special file
provided by the developer, to complete registration. At that point, after a bit of preferences
tuning (have it open at login), I was ready to start testing the product. Notice the red Spotlightlike icon in my menubar!
Alas the only
disappointment with
the preferences was that I could not make it disappear from the dock, not could I make the
Spotlight icon disappear.
My first reaction on booting the software was to smile broadly! It has a simple to relate to
window that is large, and configured in a way that even a spotlight dum-dum like me can
understand. Perhaps I can use this software to make Spotlight find things I need it to!
MPN, LLC Copyright 2003-2007
Page 87 of 126
Volume 5 Issue 7 July 2007
HoudahSpot
Apple’s Find Tool
Using the Software
Having decided to test the product I regretfully abandoned EasyFind for two weeks; anguishsuch withdrawal symptoms. I actually had to turn of my custom shortcut (Option-F), to force my
self to stop using the EasyFind. Much to my delight, with almost no learning curve I was able to
use HoudahSpot. In preparation to testing the product I skimmed the online features description
and the product’s help files.
All of my searches, either for embedded material or by title and perhaps kind went well. What’s
well? I not only found what I remembered I
owned/created on the search subject, but also
stuff I’d forgotten I’d collected. Houdah
Software’s application is like bright spring
sunlight brightening up you searches,
compared to the narrowly focused and difficult
to use search tool called Spotlight.
MPN, LLC Copyright 2003-2007
Page 88 of 126
Volume 5 Issue 7 July 2007
Features
• Unlimited Flexibility in the Search
Form — You can both do
simultaneous multiple variable
searches (e.g., by or using a
preferred template, you may
configure just about any aspect of
HoudahSpot: default query form,
result list columns.
•
Boolean Type Searches — I’m used
to doing Boolean searches on when googling and when searching with DEVONagent. If
Apple’s Spotlight has that feature, I have not been able to figure it out. With HoudahSpot,
you can use Boolean terms (and, or, not…) to create complex queries by grouping search
criteria.
•
Find by Example — I was surprised at the flexibly of this feature in focusing searches but
again did not find many occasions were my searches were sufficiently narrowly defined
for me to make repeated use of “Finding” by example. The developer notes: It's never
been easier to find similar files. Drag a file to a criteria and it will reflect the file's
property. E.g. to find all files modified the same date as an existing file, just drag it onto
a "Modified" date criteria.
•
Saved searches — These are much like Spotlights smart folders. Since I never save
search results except when googling, I didn’t spend much time on the feature. However,
according to the developer saving a search its run state and result sort order are saved
along with the query. A search saved while running jumps back to life as soon as it is
opened. HoudahSpot comes with 2 such predefined searches: 'Applications' and 'Recent
Documents'.
•
Templates – I did not choose to create any because the work I do is so varied that no
search pattern was worth capturing.
•
File Preview — An excellent feature, more useful then that in Apple’s Get Info.
HoudahSpot provides generously sized file previews. Right from the result list you may
now preview most of your files: text, PDF, images, movies, audio files...
MPN, LLC Copyright 2003-2007
Page 89 of 126
Volume 5 Issue 7 July 2007
•
File Inspector – Not quite
get info on steroids or MS
Words “document
properties” but the software
enables you to perhaps find
out more than you wanted
to know about your
individual files. Well, the
program knows all that Spotlight knows; that's quite a lot!
•
Drag and Drop Search Criteria Creation — I could not find an immediate use for this
feature since over the test period, any similarity of one search to that made previously,
was purely coincidental. You, if so desired, can save your queries (setup) for later
reference. A query set up with a few basic criteria and a search scope might serve as a
starting point for future searches.
But when all is said and done, despite its
unlimited customizability, friendly
interface and general ease of use, I’m
turning my EasyFind software back on.
The good news is that when I need too
search more deeply into documents then
I can with EasyFind, I shall continue to
use HoudahSpot. The image => shows
my results searching my DVD sized
recipe collection for mango-lamb dish
combinations. [Note: Checkout the filepath on the yellow bar? Neat!] Now,
being repetitive, if I could only make the
Spotlight Icon in my menubar go away –
I can’t turn Spotlight off, or I’ll disable
HoudahSpot.
HoudahSpot Limitations – The Publisher’s Description
HoudahSpot is based on Apple's Spotlight technology. It finds only what Spotlight can find.
Apple chose to exclude some select system directories from the Spotlight index. By setting your
privacy preferences you may have excluded some more.
Spotlight relies on importer plug-ins to index file content and metadata. Such importers are
provided either by Apple or by the respective application authors. If you can't find a file by
contents, you may lack the appropriate importer. Try searching for the file by name.
MPN, LLC Copyright 2003-2007
Page 90 of 126
Volume 5 Issue 7 July 2007
Discomforts
No Separate Manual — I created a manual, of sorts, by downloading most of the sections of the
Help function. I then merged the PDF files so I could read through the material prior to jumping
in and trying to use HoudahSpot. Why you ask? I have such a dislike for Spotlight, I thought I’d
better get a bit smarter, before any trial and error of Houdah’s product made me as grumpy as
does Spotlight. I also found the detailed discussion of HoudahSpot’s features, in its website
helpful in orienting to the product.
Conclusion
HoudahSpot makes me grad that Apple invented Spotlight. The product allows me sufficient
control over my searches that I don’t get a case of the spotlight DTs. It is a beautifully laid out
fully functional and easy to use augmentation to spotlight. If able does as well in Leopard,
spotlight might become the reasonable search tool it was meant to be. From my perspective I
have the best of both search world environments —the dynamic duo of HoudahSpot and
EasyFind. Indeed, with HoudahSpot installed, I’m glad I resisted the repeated impulse to trash
Spotlight.
Recommendation
If you use spotlight, get a life. Buy HoudahSpot. Save time and avoid spotlight-ites based
aggravation. Best of all you as a mere mortal now can make Spotlight work, finally work, for
you! Twenty bucks is cheep to relieve the heartburn and raised blood pressure that is the routine
fate of many heavy Spotlight users.
MPN, LLC Copyright 2003-2007
Page 91 of 126
Volume 5 Issue 7 July 2007
InstantShot 2.4 A souped up menubar
located screen shot grab tool
Reviewed by Harry {doc} Babad
© 2007
Digitalwaters Projects
[email protected]
http://projects.digitalwaters.net/index.php?q=instantshot
Released: 12 March 2007 (My birthday)
Freeware — keep the movement going and make a donation. I
know you’ll love this product, so help motivate the developers to
keep on being Mac-creative.
Localization: English, Italian, Traditional Chinese, French,
Japanese and German.
System Requirements: Mac OS X 10.4 or later; Universal binary;
500 KB Hard Drive Space.
Strengths: Instantshot! Does not occupy space on the desktop. It’s accessed fro the
menubar. It is flexible, stable, and intuitive and feature rich. In addition the developers
web site contains both detailed user manual and some trouble shooting information.
Weaknesses: None that I could find during a week of testing in preparing g this month’s
macC reviews.
Copyright Notice: Product and company names and logos in this review may be
registered trademarks of their respective companies.
The software was tested on a 1 GHz dual processor PowerPC G4 Macintosh with 2 GB
DDR SDRAM running under OS X 10.4.9.
Disclaimer: When briefly reviewing share-freeware I will often use the developer’s
product, functions and features descriptions. All other comments are strictly my own and
based on testing. Why need I rewrite the developer’s narratives, if they are clearly
written? This review is such an example.
Introduction in Including Publisher’s Summary
Do you often use screenshot software and feel that something is missing? I do both for my macC
reviews and for other articles I write. Since starting to use Macintosh OS X, I have tested a wide
variety of screen capture utilities. These include Apple OS’ screen capture shortcuts and Apples
Grab application on which I now depend.
MPN, LLC Copyright 2003-2007
Page 92 of 126
Volume 5 Issue 7 July 2007
In addition I’ve tried:
•
•
•
•
Yellow Mug Software’s Freeware SnapNDrag,
piDog Software’s Screenshot Plus,
Ego Systems Screenshots Preference Pane 1.0, and
The commercial strongman of this genre, Ambrosia Software’s Snapz Pro.
I’ve reviewed some of these for macC, but other than the Apple tools, despite their quality, these
3rd party products have not appealed after several months of use. I have modified Apples screen
capture tools to give JPEGs by default, using Screenshots Preference Pane.
Snapz Pro, a highly praised product is just too complex for my needs. The others just weren’t
right — a personal preferences thing, rather than a fault in their operation. Another product that
I’ve noticed by not yet tried is ScreenCaptureX, which I get to in the near future. All of these
products can be downloaded from the MacUpdate site.
Since I prefer to access utilities from the menubar, because I suffer a continual case of dock
bloat. I’ve tested, given good scores to, but have never remained comfortable with dock doubling
software. Therefore I was delighted to read about InstantShot, a menubar accessed screen capture
utility — so read on.
InstantShot! creates an icon in the menu bar. Clicking on the icon, a menu will appear. Select the
capture type from the menu (whole screen, a portion of screen, timed screenshot or multiple
captures) or, if you want to change the save format,
select the desired one from the submenus and then...
capture! It’s the scissors icon.
Getting Started
Installing the product is as simple as dragging it into your applications folder. Its icon appeared
in the menu bar, ready to use. I took a few
seconds to tune the program’s preferences —
Turned off adding the image of the cursor,
default the saved image to my desktop, and
assured that the program would open on startup.
Some of these operations are usually done from
the dock, but this screen capture utility is
dockless. (You can drag its application icon to
the dock, but why bother.)
MPN, LLC Copyright 2003-2007
Page 93 of 126
Volume 5 Issue 7 July 2007
Using the Software
Okay, What Did I Do — hmm? — I pretended that
it was my only screen capture tool for a number of
articles I was writing. It thereby replaced the
Apple screen capture shortcuts I normally use and
the Grab application for timed screenshots. What’s
more to say.
The software worked flawlessly for all of my
image-capture needs; an entire screen, rectangle
enclosed screen portion and timed (menu)
captures. My major use is either in rectangle or
time mode. A bonus, there’s a
rectangle size tool, a part of capturing rectangular areas that does just that.
Rectangle Mode-One Irritation —
When using the rectangle capture
mode, you always get a helpful
instructions window, useful once or
twice, but like the MS Office Wizard, an irritation after a while. I’ve yet to find a way to make it
go away.
Not Tested — I at present, have no use for taking multiple quickly sequenced shots, a feature of
InstantShot, not having any reviews that require capturing a sequence of actions. This might
come in very handy for writers of manuals.
A bit of strange: I use GraphicConverter as my primary graphic manipulation tool. For some
reason, when I capture an image in InstantShot and open it in GraphicConverter my default
application, I gain the ability to instantly edit the image. Wow! That view also lets me shift
between the last group of clips I’ve capture. I wish I could turn this feature off, since I seldom
need it, but alas it has no preference to do so. Of course, when I when drag a captured image into
my article only the image gets imbedded.
MPN, LLC Copyright 2003-2007
Page 94 of 126
Volume 5 Issue 7 July 2007
A few of the products other interesting and easy to access features —
Using the Same Rectangle for More Than One Shot — you
can right click anywhere with the mouse (or Ctrl+click with
one button mice) to use the last rectangle you defined.
User Configured Hot Keys for all Screen Capture Modes —
I’ve too many hot keys already so I am on a campaign to
stamp them out on my computer. The application is available
from the menubar that a hot enough access for me.
Direct Control of File Names — The ability to confirm the filename for each saved image except
in multiple capture mode. This is wonderful in comparison to having to rename each Picture1,
Picture 2… when using the Finder screen capture shortcuts.
Timed Capture — Ability to set the delay for a single timed capture or multiple captures.
Availability to Scale Images and More on Your Saved Images – I’ve not used this feature but it
seems interesting. It’s the only feature I have no idea how or when to use. But it looks easy to do
so I’ll fool with it after I meet my editor’s deadlines. The software also allows controlling the
compression level for the JPEG format. There is a similar feature in GraphicConverter that I’ve
similarly ignored
To Frame or Not to Frame? — Whether to add a fixed border to the chosen rectangles becomes
an option as does, to a limited extent, the style of that border
Conclusion-Recommendation
This is a lovely, easy to use product. It provides all the screen capture features I need directly
from the menubar. No I’m not tossing Apple’s Grab, but have removed it from my dock freeing
up a spot for something new. Try it, you’ll like it.
Then pretend its shareware and send the developers a gift. They actually have a wish list on the
Amazon UK website – access from the bottom of the web site. A nice idea — it beats cash and
gifts are not reportable to Italy’s equivalent to the IRS.
PS
I was pleased to read of another use for the product – one individual noted that the product was
used to take a screen shot every 5 minutes to assist billing his clients. I’m glad my clients, on
occasion, only want me to keep tract of their time on a 15-minute basis. Amazing!
MPN, LLC Copyright 2003-2007
Page 95 of 126
Volume 5 Issue 7 July 2007
ITask 1.5 Another step towards the
paperless office
Reviewed by Harry {doc} Babad
© 2007
Developer: Box & Locks
[email protected]
http://www.boxandlocks.com/
Version Released: 02 Mar 2005
Previous macC Review: Version 1.4 [macCompanion August
2004]
Shareware: $15 USD
System Requirements: Mac OS X 10.2 or later; Not Universal
Binary; 1.8 MB hard drive Space needed.
Strengths: Easy to use means of keeping track of you todo
lists.
Weaknesses: Unlike other similar tools, there is no way I could find to transfer my tasks list to
an iPod, since carrying my desktop Mac around, makes checking on tasks a bit difficult.
For a demo of this product: http://www.macupdate.com/info.php/id/13050
Copyright Notice: Product and company names and logos in this review may be registered
trademarks of their respective companies.
The software was tested on a 1 GHz dual processor PowerPC G4 Macintosh with 2 GB DDR
SDRAM running under OS X 10.4.9.
Introduction Including Publisher’s Summary
iTask is a compact desktop application that should helps you manage the various tasks, promises,
chores and to-dos in your life. With this program you can replace all those refrigerator white
board lists, post-its and to-do notes — use this on-screen scheduler. Like all good “organizer”
software you can choose to categorize your current and future tasks and prioritize their individual
importance, so your reminders evolve with your workload.
Now to be fair, and open about this all, I presently use a combination of Kelvin Delbarre’s ToDo
X $15 shareware program [http://www.nomicro.com/] for to-dos and general promises notes
having no firm due dates; and DEVONnote to handle the other I must remember bits and pieces
of information in my life, but only the ToDo software is relevant to this review. Nevertheless,
iTask or other comparable product, is a great tool to use when life's getting too hectic and you've
just got too much to remember. It feels so good to check off an item or three when it’s done!
MPN, LLC Copyright 2003-2007
Page 96 of 126
Volume 5 Issue 7 July 2007
Getting Started
A standard install, drop and drag to my applications folder, and the product was available to me,
with a simple double click. I had a problem entering the provided serial number, so wrote this
review in the demo-mode. Since the demo mode is full featured, that lack caused me no
problems.
Using the Software
Since I already us a todo application
installed, my testing of iTask was
simple. I just copied over the contents of
that todo list to iTask. My list of
categories covers a reasonable amount
of ground so I am convinced that,
according to its developer, you can
organize your to-do lists for both the
office and your home; and organize
anything from your filing (perhaps) to
remembering to take out the laundry. I
do agree that you can organize anything
you can name, and categorize your
current and future tasks and prioritize
their individual importance, so that your reminders evolve with your ever-changing workload.
General Features:
• Built-in ability to access multiple list
categories from its main window.
• Uses a single data entry window for inputting
to both list category and list files
• Prioritizing an item changes its location in the
list
• It is easy to add a due date in the data entry
window
• Allows the easy establishment of priorities,
from highest to lowest as well as labeling
them as done.
• In list item entry mode, the user has the ability
to add notes to the list item name.
• A simple set of user preferences, keep the
complexity down.
MPN, LLC Copyright 2003-2007
Page 97 of 126
Volume 5 Issue 7 July 2007
There is a unique feature in this product, the ability to tie an attachment to a task. However, in
the absence of a help file, this was a counter intuitive
process. Specifically, I have an item called Index New
Music CDs (Music Video Category) to which I was
going to link to my CD Collection FileMaker Pro
Database. Okay, I did that using the attachments button
on the data entry window. But there seemed to be no
difference in either the item description or its category to
show there was a link defined to an attachment.
Then, I found, a trial and error thing, that I could get to
the attached database by selecting the item in the
software’s main wind (I used the all listing) and clicking
on the attachments icon (a paper clip). Wonderful tool
but strangely hidden for a users sight.
Review Limitation —The software has a feature I did not test including the ability to integrate
with Apples iCal. Why, I don’t use iCal, PandoCalendar works just fine for my needs.
Discomforts
Still No Help Files — My review of version 1.4 noted that the lack of help files it was harder to
work with than the developer's blurb led me to expect. There are still no help files in version
1.5.Yes the program is intuitive, but then I’ve used a Macintosh continuously from my first SE30. But there are both newbies and PC-switchers out there that could benefit from this program
with a little bit of help from its developers. — Hint.
Category Alphabetization — When using a task manager, I create one category for super hot
items. You know, they needed to be done yesterday. Since the Apple Finder allows list
prioritization, by putting a space in front of a document name, I would like to thereby bring that
category to the top of my list. This kind of a feature has worked in other todo list application but
does not work in iTask. Neither could I drag to categories into a different order. List also cannot
be reordered. Why?
Moving Individual to ToDos to a Different Category — After completing my category list, I
decided that some of the items in my “super hot” category could just as well live in a new Crafts
Related category. So I created one. Much to my surprise I could not drag and drop my
individuals tasks to a new category.
Spelling Checker – Where art thou? – Much to my surprise the program ignored my
misspellings, something competitive products did not do. Since I’m an appallingly bad typist, I
always spell check everything with either a build in checker or with Spell Catcher. But really, is
it so hard to hook into Apple’s spell checker. The product after-all is text based.
MPN, LLC Copyright 2003-2007
Page 98 of 126
Volume 5 Issue 7 July 2007
Limited Printing Flexibility — The software is
still limited to printing only the contents of the
selected category but does not include that
category's name. It also does not print the
notes attached to a task, something I would
find useful. The developer could significantly
enhance this product by strengthening the print
options.
Menubar Access Desired — Making the
product accessible on the menubar would de-stress my crowed dock. [No I don’t like dockdoubling software.]
Export Feature — The export feature does not appear to work in the normal manner to allow
creation of text or RTF files. Instead it just creates a backup copy of the iTask List (database).
See the PS to this review for a work-around.
Conclusion
Overall, this product represents a good approach to configuring a checklist software product.
Although it contains a number of features that are missing from its simpler cousins, I found its
implementation awkward to use and incomplete.
Understand, price is not a concern, rather the absence of Macintosh like features such as drop
and drag implementation, and accesses to a spell checker are troublesome. I especially wanted to
be able to use the “attachments” feature since that is missing from other programs I’ve tested. In
the absence of a help file, it took me longer to figure out how to implement this excellent feature
then it should have.
There is much about this product that deserves praise, but it needs attention from its developers
to bring it to the top of the available todo products list. My major overall concern is the fact that
many of the recommendations I suggested in my last review (version 1.4) [macCompanion
August 2004]. It is not clear whether the developers have abandoned the product since the last
update was 02 Mar 2005.
Recommendation
If the features of iTask out weight its limitations, by all means download the product and try it
out. It is easy to use and makes for a capable if inflexible todo list manager.
If you are seeking something a bit more robust I suggest you browse MacUpdate site for other
available products. Should a newer version, say 1.6, be released, one that addresses some of the
weaknesses in the current version, I would strongly recommend your trying it out. I will!
Meanwhile, I shall continue to work on checking out new products as they appear, ever looking
the newest best todo software. For now ToDo X does what I need. But perhaps that will change
after I review What to Do in this issue of macC.
[http://www.macupdate.com/info.php/id/24074/what-todo]
MPN, LLC Copyright 2003-2007
Page 99 of 126
Volume 5 Issue 7 July 2007
PS
I managed to convert the full contents, in text format (including notes) from my task list. But I
did it the hard way. Dropping the database file (.itsk) onto MS Word gave me decipherable
garbage. [See below.] All I needed to do to add a bit of clarity was to replace </t> with a space,
and use a 5 point space after each paragraph.
Index New CDs in FMP</t>1</t>6/13/07</t>Include both Daedalus and 3RFS
finds</t>6/13/07</t>13</t>06</t>2007</t>Music & Video</t>0</t> Harry's
Tiger:Users:harry:Documents:Harry's Documents:DATA BASES &
FILES:Books—Music—Movies:CD MUSIC Babad's List.fp5
macC Devon Pro Office to Review</t>2</t>6/13/07</t>Get
SN?</t>6/13/07</t>13</t>06</t>2007</t>macC & Computer</t>0</t>
PDF2Office - Paul Chanda</t>2</t>6/13/07</t>Need New
SN</t>6/13/07</t>13</t>06</t>2007</t>macC & Computer</t>0</t>
Review the OMNI Products</t>1</t>6/13/07</t>OmniOutliner 3,6,2 _ Organize your
idea, projects, and more. </break>OmniGraffle Pro4.2 beta 5 _Create diagrams flow
charts, and more. </break>OmniPlan 1.1.1 rc 1 _ Project management made painless.
</break>OmniWeb 5.5,4 _ Web browser with Safari engine & many enhanced features.
OmnlGraflle 4.2 beta 5 _ Create diagrams, flow charts and more. </break>OmniOutliner
Pro 3.6.2 _ Pro version of the popular outliner.
</break></t>6/13/07</t>13</t>06</t>2007</t>macC & Computer</t>0</t>
Index New CDs in FMP 1 6/13/07 Include both Daedalus and 3RFS finds 6/13/07 13 06
2007 Music & Video Harry's Tiger:Users:harry:Documents:Harry's Documents:DATA
BASES & FILES:Books—Music—Movies:CD MUSIC Babad's List.fp5
macC Devon Pro Office to Review 2 6/13/07 Get SN? 6/13/07 13 06 2007 macC &
Computer
PDF2Office - Paul Chanda 2 6/13/07 Need New SN 6/13/07 13 06 2007 macC &
Computer
Review the OMNI Products 1 6/13/07 OmniOutliner 3,6,2 _ Organize your idea, projects,
and more. </break>OmniGraffle Pro4.2 beta 5 _Create diagrams flow charts, and more.
</break>OmniPlan 1.1.1 rc 1 _ Project management made painless. </break>OmniWeb
5.5,4 _ Web browser with Safari engine & many enhanced features. OmnlGraflle 4.2 beta
5 _ Create diagrams, flow charts and more. </break>OmniOutliner Pro 3.6.2 _ Pro
version of the popular outliner. </break> 6/13/07 13 06 2007 macC & Computer
MPN, LLC Copyright 2003-2007
Page 100 of 126
Volume 5 Issue 7 July 2007
MPN, LLC Copyright 2003-2007
Page 101 of 126
Volume 5 Issue 7 July 2007
AKVIS Enhancer V.6.0
Reviewed by Michael Potter
Enhancer V.6.0
www.akvis.com
$69 USD, 53 Euro
System Requirements: Mac OS X 10.3.9 or later;
Universal binary; 512 MB RAM; 15 MB Hard Drive
Space; One of: Photoshop 6-CS3, Photoshop Elements or
GraphicConverter X.
Strengths: simple interface, recover lost image details with ease
Weaknesses: limited documentation, minor quirk transferring image to Photoshop
For a demo of this product: http://akvis.com/en/enhancer/index.php
Introduction
It’s not uncommon to compose a shot in your digital camera only to find when you get back to
your computer for “developing”, what you saw in the viewfinder and what the camera captured
are two totally different things. In many cases these problems are caused by the automatic
settings in your camera taking their readings from a different part of the scene than your eye. The
end result can be images that are under or over-exposed, leaving the subject flat and lifeless.
AKVIS Enhancer is a plug-in for Adobe Photoshop that promises to recover some of the lost
detail in areas of uneven exposure and even bring back detail in parts of your photos that are
overexposed.
Being somewhat of an expert at taking underexposed images, I was eager to give AKVIS
Enhancer a try. The Enhancer plug in was tested in Adobe Photoshop CS3 Extended on my
MacBook Pro running OS X 10.4.9. Images were captured with a first generation Canon Digital
Rebel SLR.
MPN, LLC Copyright 2003-2007
Page 102 of 126
Volume 5 Issue 7 July 2007
Getting Started
Installation of Enhancer is straight forward, but there certainly is no hand-holding on the part of
AKVIS. They spend more time in the sparse installation instructions describing their license
agreement and how to get past it than they spend on installing the plug-in for Photoshop CS3.
"Drag the folder into the Plugins folder of your photo editor”
That’s the extent of their instructions. Though I downloaded the Photoshop CS3 version, there's
no indication as to WHERE the plug-ins folder might reside on your Mac. Surprisingly, the
DMG doesn’t include an alias to the proper installation location even though the download was
for CS3 specifically.
So while I’m aware “Plug-Ins” is found in the Photoshop folder within Applications, I have to
wonder how many other people are? Granted, AKVIS’ customer base likely trends toward the
more experienced Photoshop users, but, still, there's a wide range of Photoshop users out there
and many are not aware that plug-ins exist, let alone where the folder might be, so a little help
from AKVIS would be appreciated to ensure everyone has a pleasant experience with their
product.
Once AKVIS Enhancer is installed and Photoshop is restarted, however, it’s very easy to locate
in the Filters menu under the sub-menu AKVIS.
When activated, you’ll see that it’s really quite a simple interface with only four main parameters
to adjust.
MPN, LLC Copyright 2003-2007
Page 103 of 126
Volume 5 Issue 7 July 2007
The Shadows parameter lightens and enhances detail in the underexposed parts of an image
without causing loss of detail in the light areas.
Conversely, Highlights brings out the detail in light areas of an image. As with shadows, the
light areas become darker, but as you move the slider to the right, AKVIS warns that you may
lose middle tones in some images causing the image to flatten a bit.
Level of Detail tells Enhancer how much detail to pick out of the image based on color
transitions. So the higher the value, the more detail is visible. Because it's based on color
transition, you may find more noise in your image if it was underexposed to begin with and you
set this value too high.
And the last adjustment is Lightness. Quite possibly the simplest setting in the toolbox, it
defaults to 50 on a scale of 1 to 100. As you slide toward 100 the image gets lighter and as you
slide toward 1, the image gets darker.
In addition to those parameter adjustments, there are Before and After tabs to keep track of the
progression of changes made to the image and a Presets drop down to save and select some of
your favorite settings.
Using the Software
I set out to enhance a number of different pictures from my library. In the end, I limited my
selection to just two for this review. The first was taken in a dark hallway with little overhead
light and the other snapped outdoors with the subject backlit a bit too much.
Some of the others I messed around with didn’t highlight Enhancer’s core functionality as well
as the photos chosen – namely, bringing the detail out from your muddy images.
Starting with the first image, you can see that although a flash was used, it’s still woefully
underexposed in the left half of the image. Colors are dull and the whites are grey. Also, detail –
what Enhancer is going to help us with – is lost in the texture of the wall as well as the subjects
themselves.
MPN, LLC Copyright 2003-2007
Page 104 of 126
Volume 5 Issue 7 July 2007
The moment I bring it in to Enhancer, however, there’s a dramatic difference seen with no other
tweaks to the parameters made:
That’s the original off to the left with Enhancer’s window floating above it on the right.
Clicking on the Before button in Enhancer reveals one of the issues I have with the program:
What you see in the window is not necessarily what you get.
MPN, LLC Copyright 2003-2007
Page 105 of 126
Volume 5 Issue 7 July 2007
Here is the original on the left and what should be the original within Enhancer on the Before
tab, but you can see that Enhancer’s version is much lighter. And I’ve found that to be the case
in Photoshop as well after the enhancements have been applied.
Below is the original image and on the right is the enhanced image. Though notably improved,
it’s still not as light as the version seen on the After tab in the AKVIS Enhancer dialog box.
MPN, LLC Copyright 2003-2007
Page 106 of 126
Volume 5 Issue 7 July 2007
My initial reaction was that this was due to the image being a JPG and not a RAW image that
would allow for more granular tweaks, so I played around with a few RAW images to see what
would happen.
In the screen shot below you can see the original outdoor image on the left behind the Enhancer
dialog box.
AKVIS Enhancer did a great job of pulling the subject out of the picture and adding a lot of
detail otherwise lost to the shadows, but, once again, when I clicked Apply, the image darkened
considerably when brought into Photoshop.
It’s hard to say what the problem is here. Clearly Enhancer gave me a much different result in its
dialog box than what it gave me in Photoshop. It could be a compatibility issue with Photoshop
CS3 or perhaps a minor flaw in Enhancer that’s not sending the data over properly. In either
case, there aren’t very many places to turn to find out the answer. I clicked through to their FAQ
only to find, once again, multiple questions about licensing and serial numbers, but nothing on
specific issues in any of the photo editing applications they support.
However, Enhancer’s main function is to bring out the detail in an image. So how did it do with
that?
Pretty darn good!
Sticking with our little furry friend, I loaded up the original, the Enhancer retouched version and
a version that I tweaked by hand using the Camera RAW dialog box in Photoshop and, though
not obvious if you look at them individually, the results are quite striking when compared side by
side:
MPN, LLC Copyright 2003-2007
Page 107 of 126
Volume 5 Issue 7 July 2007
On the far left is the original, the AKVIS Enhancer version is in the middle and the hand retouched photo is on the right. What should grab you immediately is the wonderful contrast in
that middle photo. The blacks are black and the fur really looks great. Despite my best 5 minute
effort in Adobe Camera RAW, the meerkat on the right is still a bit washed out and I couldn’t get
much more detail in the fur without the image getting too grainy from the sharpening – though I
think I may have pulled a bit more of the ‘kat’s facial features out.
I’m sure I could have come up with better results if I’d messed around in Camera RAW a bit
longer (especially to get rid of that washed out look), but it would have taken me considerably
longer than the results produced by Enhancer in a mere fraction of the time.
For fine detail work, AKVIS Enhancer could not be beat.
Conclusion
Perhaps one of AKVIS Enhancer’s biggest downfalls on the Mac platform is the limited number
of programs it’s compatible with. Though I’m not familiar with GraphicConverter X, I’m well
aware of the capabilities of Adobe Photoshop and Photoshop Elements. If you only shoot in JPG
or TIFF, the simple controls of AKVIS Enhancer will help you bring out the best in your photos
and do so much more easily than you could using Photoshop’s Shadow/Highlight adjustment or
even Levels and Curves. It’s a shame the plug-in is not available for iPhoto.
Considering the target market is most likely the prosumer photographer who shoots in RAW
100% of the time and can take advantage of the excellent RAW image importers in Photoshop,
Aperture and Lightroom – and has the skills to use them properly – if you’re looking for a
program to offer only tonal enhancement to your images, then AKVIS Enhancer is likely
overkill.
MPN, LLC Copyright 2003-2007
Page 108 of 126
Volume 5 Issue 7 July 2007
What I didn’t “get” about Enhancer when I first sat down with it is what, ultimately, makes it a
great addition to your Photoshop toolbox. That is, the ability to draw out detail in specific parts
of an image – the shadows or the highlights – without affecting the areas you want to leave
alone. For extracting detail thought lost to the shadows, AKVIS Enhancer could save an image
that otherwise would be destined to the trash can.
Recommendation
AKVIS Enhancer is a great product and performs as advertised. I am a little concerned about the
differences between what we see in the Enhancer dialog box and what we get in Photoshop after
applying the filter. For that I marked it down a half a star or so. And if it really is meant for a
broad range of users with varying skill levels, then the lack of proper installation instructions is
unacceptable – a simple one sentence “Please place in the Plug-ins folder of Adobe Photoshop
CS3 which is found...” in the Read Me would be more than they have now.
However, if you came to me tomorrow and said, “I really need an easy way to enhance the detail
in my digital photos. What’s an easy way to do that in Photoshop?” I wouldn’t skip a beat in
recommending AKVIS Enhancer … though I’d be waiting by the phone for your call asking,
“How do I install this thing?”
MPN, LLC Copyright 2003-2007
Page 109 of 126
Volume 5 Issue 7 July 2007
ConceptDraw 7.0.3 Professional
Reviewed by Robert Pritchett
CS Odessa, Ltd.
29 Frantsuzskiy Blvd.
Odessa, 65044 Ukraine
Fax: +38(048)728-6661
CS Odessa LLC 1798 Technology Dr Ste 244
San Jose, CA 95110-1399 USA
Toll free (US/Canada): +1 (877) 441-1150
Main Phone Line:
+1 (408) 441-1150
Fax:
+1 (408) 441-1138
Telephone Support:
+1 (877) 441-1150
+1 (408) 694-3213
http://www.csodessa.com
http://www.conceptdraw.com/en/products/cd5/main.php
Released: May 2007
Free Trial version or $300 USD.
Requirements: Mac OS X 10.4 or later or Win 2000/XP/Vista
Languages: English, French, German, Spanish and I suspect,
Russian or Ukranian.
Strengths: Cross-platform.
Weaknesses: Sorry, I’ve been spoiled by 3D. This is 2D.
Tour:
http://www.conceptdraw.com/en/products/cd5/screenshot_tour.php
30-Day Trial:
http://www.conceptdraw.com/en/resources/suppdownl.shtml
Learning Center:
http://www.conceptdraw.com/en/products/cd5/study/main.php
Other Reviews:
http://www.conceptdraw.com/en/products/cd5/reviews.php
http://www.applelinks.com/index.php/more/conceptdraw_70_busi
ness_technical_diagramming/
Useful Links:
http://www.conceptdraw.com/en/resources/suppflowres.shtml#cd
MPN, LLC Copyright 2003-2007
Page 110 of 126
Volume 5 Issue 7 July 2007
Introduction
ConceptDraw 7 is a powerful diagramming and drawing tool that enables you to effectively
visualize and communicate information and processes. Create professional-looking graphics and
diagrams such as flowcharts, network diagrams, database diagrams, floor plans and much more
in minutes. ConceptDraw 7 provides a comprehensive tool set to easily represent and share any
kind of information.
As we wrote back in 2005, ConceptDraw is Visio for the Mac. And others agree http://www.visioformac.com/ Now we have ConceptDraw 7 Professional.
I requested to review this app, even though I have earlier versions, because I wanted to see how
well it would work on a real project, such as the floor plan layout for the Ever-Green Renewable
Energy Resource Center I’ve been fussing with lately.
To see what has changed, go here - http://www.ski.com.ua/en/products/cd5/whats_new.php
Many of the improvements revolve around reducing the time it takes to get work done.
All the applications for network and system diagramming, software and database design,
business diagramming and charting, website planning as well as home and landscaping can be
found here - http://www.ski.com.ua/en/products/cd5/applications.php
MPN, LLC Copyright 2003-2007
Page 111 of 126
Volume 5 Issue 7 July 2007
The power in the program for me lies in the Template Gallery.
For
example,
Landscape
and Garden
Design
looks like
this –
When
that is
picked
we can
go deeper
and look
at this –
MPN, LLC Copyright 2003-2007
Page 112 of 126
Volume 5 Issue 7 July 2007
The Business Plans Template looks like this –
Once a plan
or drawing
is
completed
– including
layers – the
whole thing
can be
exported to
any number
of formats
–
And then
used on
either a web page, PDF or even in presentations. This is a fairly rich environment for also
scripting, doing scientific illustrations, sentence diagramming, chemical, electrical and
MPN, LLC Copyright 2003-2007
Page 113 of 126
Volume 5 Issue 7 July 2007
mechanical engineering, flow, org and project management charting, timelining and calendaring,
working with sales, marketing and Venn charting, web site hyperlinking, geo-mapping and of
course, software diagramming.
I was interested in how it handled Floor Planning. I'll let you know if I use it for my project or
use one of the other apps instead.
Conclusion
So, what have we got? Lots of templates. Lots of ideas to work with. This is a great app for 2D,
but I want my 3D fix. However, if you need Visio-like functionality on the Mac, this is it.
MPN, LLC Copyright 2003-2007
Page 114 of 126
Volume 5 Issue 7 July 2007
Google Sketchup Pro 6 with Layout beta
Reviewed by Robert Pritchett
1600 Amphitheatre Parkway
Mountain View, CA 94043
650-253-0000
FAX: 650-253-0001
http://www.sketchup.com/
http://www.sketchup.com/?id=106
Sketchup 6 – Free. Sketchup Pro 6 - $495 USD, £370 GBP
(with VAT)
Evaluation (8-hour): http://www.sketchup.com/?id=76
Layout (beta): http://www.sketchup.com/index.php?id=1956
Released: January 2007.
Requirements: Mac OS X 10.4 or later, 128 RAM, 80 MB
diskspace or Windows.
Tutorials: http://sketchup.google.com/vtutorials.html
Forums: http://forum.sketchup.com
Strengths: Cross-platform. Integrated with Google
Weaknesses: Layout is still quite Beta.
Other Reviews:
http://www.aecbytes.com/review/2007/SketchUp6.html
Introduction
BIM me up Scotty! Building Information Modeling
http://en.wikipedia.org/wiki/Building_Information_Modeling is the next generation of Computer
Aided Design that has taken 25 years to mature to this point1. Google has provided a path to get
there with Sketchup Pro 6. I believe that Google has provided this mostly to enhance their
perception of the world through Google Earth and the 3D (3-Dimensional) Warehouse.
Getting Started
Download the 8-hour Demo or go ahead and buy the full version so you can enjoy 3D modeling.
The Pro version comes with a beta copy of LayOut (a 2-dimensional presentation tool) – and it is
still very much a beta app.
1
http://www.nemetschek.net/architect/bimwhitepaper.php
MPN, LLC Copyright 2003-2007
Page 115 of 126
Volume 5 Issue 7 July 2007
Using the Software
After looking at Belight Software Live Interior 3D (which review will be posted by Ted Bade in
August), I needed something more that would fit with the conceptual drawing and design work
for the Ever-Green Renewable Energy Resource Center discussed in the June issue of
macCompanion Magazine. So visualize this, a picture is worth a lot more in proposals than
words.
As like most cross-platform software, this one takes a little getting used to even with the
tutorials, so don’t expect to be an expert producer without taking some time to manipulate the
program.
I really enjoyed going through the 3D design section in the 3D Warehouse to get ideas for the
Conceptual Drawing for my proposal. Once I had it down, I was able to then step through the
“tour” feature by creating clips to rotate around the picture and turn it into a QuickTime movie
located here - http://www.maccompanion.com/RenewableEnergy/RenewableEnergy.html
I can really see the merit of doing a “virtual walkthrough” once I get the interior organized.
One of the sweet deals is PhotoMatch, that matches an image to the modeling environment or
“make the model real” by using a background photo to place it in.
I’m still learning how to get the Layout app tied into Sketchup without getting frustrated in the
process. So much to learn, so little time and I feel I do not have it to play with a beta program
while trying to be productive.
Meanwhile there are the tutorials to play with at http://sketchup.google.com/sptutorials.html
If you really want to get geeky, there is a Ruby hook to do Ruby scripting in Sketchup http://download.sketchup.com/sketchuphelp/gsu6_ruby/Docs/index.html
MPN, LLC Copyright 2003-2007
Page 116 of 126
Volume 5 Issue 7 July 2007
Read Lachmi Khemlani’s excellent review of Sketchup 6 from the PC-perspective at
http://www.aecbytes.com/review/2007/SketchUp6.html
Conclusion
There is not too steep a learning curve in using this app to go “3-D”.
Recommendation
There is low end, middle and high end software available for the Mac for producing 3D apps.
Sketchup Pro 6 one lets us do “walkthroughs” without paying the high price for those high end
apps like VectorWorks and I would place it in the middle. Get the demo and find out if you want
to pay $500 to add in PhotoMatch capability.
There are a lot of great ideas and designs that Google has captured online and I’m awed at the
creativity of the designers who posted their creations for all to see.
This is just plain fun! http://sketchup.google.com/index.html
MPN, LLC Copyright 2003-2007
Page 117 of 126
Volume 5 Issue 7 July 2007
Web Graphics Creator 3.0
Reviewed by Robert Pritchett
Laughingbird Software LLC
2510 Worth Way
Camarillo, CA 93012
(805) 386-1616
http://www.laughingbirdsoftware.com/
http://www.webgraphicscreator.com/
Released: November 2006. Updated June 2007.
$40 USD
Requirements: Mac OS X or Windows.
Forum: http://www.logodesignforum.com/forums
The Manual: http://www.webgraphicscreator.com/the_manual/
Strengths: Cross-platform.
Weaknesses: Tends to want to stay active when attempting to
quit. Still has “eCover Creator” artifacts. “Buttons” need a little
more finessing. It relies heavily on proprietary Flash
technology. The FlipBook feature has issues. Takes a little
getting used to.
Tutorials: http://www.webgraphicscreator.com/tutorials.html
Reviewed using the iMac G5 and Mac OS X 10.4.10.
Disclosure – Laughingbird Software paid for advertising in the
June and July issues of the magazine.
Introduction
Since Laughingbird Software and I go back a ways with troubleshooting other apps and finding
solutions to problems and because we received funds for advertising this app, I figured we
needed to get a copy and kick the tires. This is an example of what I was able to generate using
this app -
MPN, LLC Copyright 2003-2007
Page 118 of 126
Volume 5 Issue 7 July 2007
I did so by pulling in a graphic of the earth (holographic image) and integrating that into the
tweaked text function in the Art Center and using Apple Chancery for the font. It acts quite like
The Logo Creator reviewed previously. However, it takes some getting used to for changing and
editing text.
Getting Started
Previously known as the “eCover Creator”, this program now has more functions.
eCover Creator can generate photorealistic covers – you will need to be able to right-click with
your mouse to use this app. Use this to “flip” or rotate graphics. In this case, a rotating software
app package can be animated.
Flip Book Creator requires lots of graphics for turning pages in a book online and apparently
doesn’t really play nice in a Windows Internet Explorer 7 environment. I was thinking of using it
to flip pages in the macCompanion magazine. After reading some of the comments in the forum,
I have not pursued that. I’m concerned about the overhead.
MPN, LLC Copyright 2003-2007
Page 119 of 126
Volume 5 Issue 7 July 2007
Button Creator animates web buttons and tabs after some tweaking. For website visitors, they
need the proprietary Flash player to view the buttons. The assumption is that everybody already
has Flash installed. That is not a valid assumption.
A clue of what is being used to run this program comes from the “Get Info” in Mac OS X – It
would seem that it is using Macromedia Director MX 2004 as the engine of choice.
“Wicked” wrote –
“I this might be what you are looking for... In the
examples below I am going to be referring to button
#1,#2, and #3. These will represent for example that you
want to use 3 buttons to create a menu on you're site.
So lets say that wanted to have you're website menu like
this:
Button #1
Button #2
Button #3
First create you're swf buttons in the button maker and
make sure to assign them a URL or link when making
them. Then you would upload them to you're web
hosting into a folder. So for this example lets say you
uploaded you're swf buttons to
YourSite.com/buttons/(then swf files here)
So then if you wanted the buttons to appear on you're
home index.html file for example then you would need
to open up that file and look at all the code and figure
out where you want to put them in the body section of
the document. Once you find the place you want to put
them this will be the code to make it happen using the
button 1,2,3 example.
MPN, LLC Copyright 2003-2007
Page 120 of 126
Volume 5 Issue 7 July 2007
Quote:
<object width="100" height="50">
<param name="movie" value="/buttons/Button1.swf">
<embed src="/buttons/Button1.swf" width="100" height="50">
</embed>
</object>
<BR>
<object width="100" height="50">
<param name="movie" value="/buttons/Button2.swf">
<embed src="/buttons/Button2.swf" width="100" height="50">
</embed>
</object>
<BR>
<object width="100" height="50">
<param name="movie" value="/buttons/Button3.swf">
<embed src="/buttons/Button3.swf" width="100" height="50">
</embed>
</object>
The areas you would need to edit are highlighted in red and green. You would need to edit these
areas in green to fit they way you want to buttons to look as far as size. The areas in red would
need edited to reflect where you have uploaded the buttons to you're web hosting or server.
The layout I have shown you above should display you're buttons as
Button1
Button2
Button3
All stacked on top of one another to create a menu.
Make sure you edit the areas highlighted in red and green to reflect what is right for you in the
code. You have to adjust the width and height portions of the code to get the button the size that
you need it to be. The area in red on the code has to be edited to reflect where you have uploaded
the .swf file you created. Perhaps you could leave a link to your site so i can see what is going on
with it.”
This is an example of the Forum feedback Q&A regarding just one piece of the program.
Conclusion
There seems to be more issues on the Windows side than there are on the Mac side of things. It
seems to be an awful lot of work to animate buttons and tabs for Flash-specific websites.
Knowledge of HTML and Macromedia/Adobe apps seem to be required to use this program
intelligently.
MPN, LLC Copyright 2003-2007
Page 121 of 126
Volume 5 Issue 7 July 2007
Recommendation
I strongly suggest going to http://www.webgraphicscreator.com/Art_Center_examples.html and
reading the tutorials so you can get a better idea o f the potential of this program http://www.webgraphicscreator.com/tutorials.html
If you don’t mind the occasional quirks and Macromedia centricity, this might help get the
creative juices flowing.
Interactivity with websites can be a bit tricky. What I found is that even if this app is a little
quirky due to possible Operating System updates and changes and perhaps some Macromedia
artifacts on my system, this is an interesting program for Web developers for $40 USD.
MPN, LLC Copyright 2003-2007
Page 122 of 126
Volume 5 Issue 7 July 2007
MPN, LLC Copyright 2003-2007
Page 123 of 126
Volume 5 Issue 7 July 2007
Advertisers Index
Amazon.com
http://www.amazon.com/gp/homepage.html/002-5842389-7443202
Apple Store for Individuals
http://store.apple.com/AppleStore/WebObjects/BizCustom.woa/wo/StoreReentry.wo?cid=AOSA
10000025758&siteID=%2Foi97eu4uMUAtGr6EOxXtw%2FIzYZGve3Aw&qprm=78313&family=iMac
Apple Store for Businesses in the USA
http://store.apple.com/AppleStore/WebObjects/BizAgent?qprm=126559
Laughingbird Software
http://www.webgraphicscreator.com/
TeachMac
http://www.teachmac.com
MPN, LLC Copyright 2003-2007
Page 124 of 126
Volume 5 Issue 7 July 2007
Advertising Information
Contact Robert Pritchett, our Ad and Marketing Director, for working through the process of
advertising with us.
[email protected]
We are the Macintosh Professional Network (MPN), Limited Liability Corporation (LLC).
MPN, LLC continues to evolve, ever since its creation in 1996 as a way to reach out to those
who use computers for a living in an effort to make their lives easier and their work both
enjoyable and profitable.
We also provide monthly book, hardware and software reviews at macCompanion. We offer
ways and means for folks to get comfortable using the Macintosh created by the Apple
Corporation in the multibillion-dollar computer industry. We know that bad software doesn't live
long in the Mac™ environment. On the other hand, good computer equipment and software
becomes great as the word spreads, and we are very good at helping to spread it. Our suggestions
over the years have also helped improve many successful products in use today. Through kind
and gentle efforts, we have been able to help many people move to better tools-of-the-trade so
they can be more productive in their work.
Besides our website and consulting efforts, we also create macCompanion as a freely available
PDF-based monthly. It averages about 100 pages per month. July 2006 was the 4th-year
anniversary of this labor of love. The macCompanion staff is an all-volunteer team of writers and
reviewers from many parts of the globe, and they also have a great wealth of knowledge and
experience in their backgrounds. That base of talent also continues to keep growing as the
Macintosh Professional Network expands.
Statistical Analysis
We are very excited about our site statistics! The multilingual-capable macCompanion website is
close to 2 million page views a month and readership continues to increase rapidly through our
"whisper campaign".
We continue to get greater visibility every day. Many of the various 35 computer operating
systems (with many moving towards the Mac® OS X™ environment), 115 online search
engines, 269 countries and domains and 319 online robots have discovered us – and continue to
do so. So far, over 201 other websites have also linked to us. Many of our readers have made our
site one of their favorites. While nearly 70% of our readership stops by for a quick visit via RSS
feeds, over 23% spend between 1/2 to 1 hours at a time going through over 250 different pages
on our site (mostly archives). Many of those who quickly drop by, come to get the monthly PDF
issue of macCompanion. Over 35GB of bandwidth was used in December 2005 alone for
download purposes. Previous months have averaged around 20GB. Trend analysis indicates that
will continue to increase as folks decide to “Move to the Mac”.
MPN, LLC Copyright 2003-2007
Page 125 of 126
Volume 5 Issue 7 July 2007
Advertising with macCompanion
We have some advertising options you may choose from, and multiple months receive a 20%
discount for both website and PDF-based ads. All advertising must be paid in advance. We
accept credit card payments via PayPal, checks, money orders, by regular mail and cash in US
currency by hand, if you meet us face-to-face.
Site Ad Rate
We offer website ads for a fixed-budget price of only $100 per month on our site. Following the
KISS principle, we accept banner ads in only one size at this time - 468x60 pixels (per the
Interactive Advertising Bureau standards for a Full Banner Ad Interactive Marketing Unit.) The
ad will be rotated through with other ads, and there is no limit to how many you want to include.
The billing cycle begins based on the first day the ad placed on the site and is renewable on a
monthly basis. This can begin immediately or at any time.
Affiliations
We do affiliations, and work with those who have made arrangements with online affiliate
systems, or we deal directly with you if you have created code, and have a contract we can sign.
Check out the Bazaar on our website at http://www.maccompanion.com/bazaar/bazaarindex.html
Sponsorships
We also accept sponsorships. Please let us know if you would like to sponsor macCompanion!
If you are as excited about our macCompanion readership as we are, please download the
contractual terms and conditions documentation that are online in PDF format, or we can send
them to you as an attachment. We'd enjoy having an ongoing working relationship with you too.
Well that's it for this issue. Please come back again next month!
The macCompanion Staff
MPN, LLC Copyright 2003-2007
Page 126 of 126
Volume 5 Issue 7 July 2007