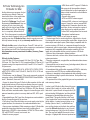
1
MaUsE DoubleClick
February 2010
Just Say NO to Anime
2010 MaUsE Executive
• President: Michael Shaw
[email protected]
• Vice President: Aaron Vegh
[email protected]
• Apple Liaison: Marcel Dufresne
[email protected]
• Treasurer: Stan Wild
[email protected]
• Publicity Director: Jim Danabie
• Photographer: Irma Shaw
• DoubleClick Editor:
Michael Shaw
[email protected]
• Secretary: Jeff Hurd
• Director: Guy Lafontaine
[email protected]
• Director: Ian Winton
• Director: Marcel Dufresne
MaUsE Contact Information:
The MaUsE
c/o Stan Wild
58 Rothean Drive
Whitby, Ontario, Canada
L1P 1L5
w w w. m a u s e . c a
From The Editor
What you are looking at is the February 2010 edition of
the MaUsE DoubleClick, the online publication of the
Macintosh Users East, (MaUsE), a motley collection of
mostly harmless cranks who reside in Southern Ontario
with their motley collection of old and new Macintosh,
Hackentosh & MacClone computers.
The DoubleClick is published using a 2.8 GHz Aluminum
iMac and QuarkXPress 8. An antique Kodak DX7590 is
used for all pictures. Everything not specifically attributed
to someone else can probably be blamed on the Editor.
Back issues can be downloaded from the MaUsE website: < www.mause.ca >. Submissions from MaUsE Club
members are almost always welcome.
Brrrrr....
Yes, it’s cold. Bloody right it’s cold. Brrrrr.
It’s February again in Southern Ontario.
What did you expect ? On the other
hand, there is a good chance that much
of the worst of Winter is behind us now
and there is no doubt that this month will
see us through to the beginning of a
warmer and sunnier March. Maybe the
dreaded Global Warming (that we have
heard so much about before the economy became news) will finally set in and
we can get some sunshine and an early
Spring. The days are already getting
longer and it will soon be time to put the
snow-blower away and tune up the lawn
mower. Don’t you feel better already ?
Send your submissions and articles to me at
< [email protected] >, especially if there are files or
pictures attached. I have never refused a submission yet.
Because we care about the environment, the MaUsE
DoubleClick is created using only recycled electrons:
matter was neither created nor destroyed in the process
of creating this issue. There are no infractions of the law
of matter conservation. There is always room for another
piece on any Mac-related topic and Iʼll make room if there
isnʼt. I would like your submissions. But I wonʼt beg.
Apple, Macintosh, and the Apple logo are trademarks of
Apple Computer, Inc., registered in the U.S. and other
countries. The MaUsE (Macintosh Users East) is an independent Mac user group and has not been authorized,
sponsored, or otherwise approved of by Apple Computer,
Inc. Its very much like they don’t even know we exist.
Michael Shaw, Editor
MaUsE Meetings are held in Room 1 at the new Whitby Public Library
on the south-east corner of Henry and Dundas West in Whitby, Ontario.
Meetings start at 7:00 PM but there is an early session from 6:30 for people who wish to discuss hardware or software issues or problems. Macintosh virus problem discussion from 6:58 to 7:00 PM as and if required.
Meetings are open to the public and admission is free. Raffle tickets at
MaUsE events are free but the free raffle tickets for Macintosh hardware
or software will only be given to paid-up MaUsE Members. Please remember to bring your Membership card to every meeting.
CrossOver Mac Pro from CodeWeavers
How to Run Windows Programs on a Mac
There are many options for running Windows programs on the Mac
because Apple now has the Intel processor. Boot Camp, for instance,
is included with OS X for installing Windows on a separate partition.
The software for running this is found in the Utilities folder of your Applications. With Boot Camp installed, you can startup your computer
in either the Mac OS or the Windows environment. The big problem
here is that you must reboot to switch operating systems. Parallels,
VMware and VirtualBox offer virtualization software that let you run
your Windows programs without logging out of OS X. The thing that
all of these options have in common though is that they legally require you to actually run Windows and therefore own a Windows license.
CrossOver however allows you to run Windows applications without
actually running Windows. With CrossOver installed on your Mac,
you can insert a Windows version installer disc, install the program,
and run it. CrossOver bridges directly between Windows software
and OS X, allowing applications to run at full speed on your Macintosh desktop. CrossOver has been tested for performance with many
common applications such as Microsoft Office, Adobe Photoshop and
Quicken. It also works well with a wide variety of other programs. You
can check for compatibility issues at < www.codeweavers.com/compatibility >. There are thousands of applications that work fine.
I would always opt for a Mac if given the choice, but some things you
want to do with your computer still require Windows. Now, thanks to
the Intel-based Mac, you can get a fast Windows environment without
leaving the comfort of your Mac OS X. Some of the top reasons for
needing to resort to Windows would be for games, interactive DVDs,
some Microsoft or Adobe applications and Quicken.
Installing a Windows program is as straight forward as it would be on
any Windows computer. CrossOver has a list of specific applications
that you can choose to help you install. If you want to install from a
single installer file or install one of CrossOver’s automatic packages,
select “Install Software…” from the Configure menu. Then select the
name of the package from the list provided. If the program you want
to install is not in the list, click “Install Unsupported Software…” and
follow the steps provided by the CrossOver Software Installer. If all
went well, a launcher icon appears for the application you just installed. This icon is in your home directory for later use. If your program did not create any icons, you can still launch it by selecting “Run
Command…” from the Programs menu. This will access your virtual C
drive which is located in Application Support/Crossover of your Library
file. Remember that unsupported software may work poorly or not at
all. In addition, installing unsupported software may prevent already
installed supported Windows applications from working.
It is generally recommended that unsupported applications be installed in a new bottle for testing purposes. The bottle idea was the
most confusing term used by CrossOver. A bottle is a virtual windows
environment. Each bottle contains a unique C drive and all its standard sub directories: Windows, Program Files, etc. A bottle also contains a complete Windows registry, a full set of most CrossOver
settings, and one or more Windows applications.
CrossOver allows you to maintain multiple bottles in one CrossOver
installation. This is like having several different Windows machines
operating together on your single Linux computer. This is useful anytime you want to install multiple applications yet prevent them from interacting or damaging one another. Most CrossOver users will be
happy using a single, default bottle. The CrossOver Software Installer
will automatically create the default bottle and any other bottles which
you may need during normal use. You can choose to install all new
software into an already existing bottle.
There is a very useful help menu that will lead you through your first
few installs, if you need it. In case of a problem, the first place to
check is online at the CodeWeavers tech-support. It is updated regularly to document known issues and their workarounds. With luck the
solution to your problem may already be waiting for you. There are
also some videos that can be watched for the more visual learners.
These can also be found in the support area on CodeWeavers web
site.
The thing I found most impressive about CrossOver was the intuitive way it worked. The minute I start or put in a disc that
has a Windows component to it, the CrossOver application
starts up. I can choose to ignore it, if I can run the application
with Mac. A lot of CDs have Apple and Windows on them. There
is no time lapse. This has to be the quickest way to run Windows applications. The biggest drawback is that it will not run
all Windows applications. If you know specifically which Windows applications you would like to run on your Mac then check out
their compatibility.
CrossOver is easy to install, and requires
very little space on your system. Its minimum requirements are an Intel Macintosh,
Mac OS X 10.4.4 or higher, 512M of RAM,
100MB of available disk space, and whatever space the Windows application would
take up. There is a demo version of
CrossOver that can be downloaded that has
all the functions and features of the full version. Any windows software that works on a
full version will also run in the demo version,
and vice versa. The important limitation of
the demo version is that bottles can only be
used for 31 days. This means that any Windows packages that you install using the
demo version will cease to work no more
than 31 days after their installation. There is
a fairly wide variety of CrossOver applications that you can purchase. These range
from $39.95 to $69.95 for the Pro version.
You can read about these and download a
trial copy from
http://www.codeweavers.com/products. This
is the way to go if you do not have a Windows license. I can now run that old Windows game “Battle for Troy” that I picked up
in the discounted rack.
Article submitted by Marcel Dufresne
Matias Corp.
Tactile Pro 3.0
The best keyboard Apple ever
made rises again... again !
I promised back before
Christmas that I would
write about the new Tactile Pro 3.0 keyboard when it became available. It was
scheduled for release early in January
2010 and here it is January and mine
has arrived. First of all let me just say
that the Tactile Pro 3.0 is radically different from the Tactile Pro 2.0 keyboard it replaced and in many ways
an all-around better product.
On several occasions in the past I have written about keyboards and I can honestly say that
I have probably used some of the best and worst
keyboards ever devised. In the July 2008 issue of the
DoubleClick I wrote about the two best keyboarding experiences Macintosh users were ever likely to have and why. The two
keyboards I wrote about were the famous Apple ADB Extended
Keyboard II M3501 and the Matias USB Tactile Pro 2.0. What made
these two keyboards outstanding was the incredibly high-quality (but
noisy) Alps mechanical keyswitches that were used during their construction. Unlike other keyboards each key on the keyboard was built
on an individual Alps Mechanical Switch. Life expectancy for these
switches was generally estimated at 20 to 25 years of normal use.
There is no argument that Apple computers have gotten better with
every passing year. You get more RAM & storage and faster processor speeds per dollar spent than ever before. The MacOS is better,
the screens are bigger, brighter and cheaper, and the design of the
computers is definitely setting the pace for the entire computer industry. Apple leads where others follow. The only exception to this trend
is the keyboard. Apple keyboards built after 1993 generally suck.
For those of us who write a lot the keyboard is the single most important imput device we interact with every day. Like looking for hours at
a cheap monitor, if the typing interaction is made difficult by poor quality or un-ergonomic design the experience can be awful.
Back in 2008 when I replaced the truly crappy stock flat aluminum
Apple keyboard that shipped with my 2.8 GHz Intel iMac with the seriously superior Matias Tactile Pro 2.0 I found that the Matias keyboard was as close to perfect as any USB keyboard I had ever used
and that it had a much better feel than any of the newer Apple keyboards I had been using. The action was crisper and the annoying
tendency to miss the first letter of many words disappeared. Now I
have upgraded to the new 2010 model and I must say that from first
impressions the Matias Tactile Pro 3.0 keyboard has the same
sturdy feel as the previous model and each keystroke is just as solid
(and just as noisy). But there are some obvious differences, all of
them improvements. One big difference is that the new model has no
software required to enable any of
its special features. The Pro 2.0
model could be optimised for PC
or Mac with various software setup
files that controlled the layout of
special keys. This is neither required nor possible with the new
Pro 3 model. Another new feature
involves how the symbols are
printed onto the keys. Anyone who
types a lot with any keyboard will
eventually notice that the symbols
on the keys tend to wear off. Matias promises that with the Pro 3.0
model, (unlike the Pro 2.0 model),
the symbols won’t ever fade because they are laser etched
(burned into the keys with a laser)
so they'll never fade away. At a
price of $150.00 this keyboard is
intended for many years of use so
this laser etching feature is definitely a plus. If you type a lot, and if
product longevity is important to you, you will appreciate the value.
Requirements for the Matias Tactile Pro 3.0 are any Mac with a USB
port. In order for the USB hub to function in high-speed mode it must
be plugged into a USB 2.0 port. When the keyboard is first connected
Another improvement is the built-in 3-port Hi-Speed USB 2.0 hub. The to your Macintosh computer the Mac OS 10.3 or older (including Mac
previous model had only two USB 2.0 ports and in order to enable the OS8 and OS9) will recognise it immediately. If you are running Mac
OS 10.4 or higher the Keyboard Setup Assistant will launch and rehub it was necessary to connect the keyboard to your computer with
quire a few specific keys be pressed to identify the keyboard to the
two USB connectors, color coded gold and silver. If you did not recomputer.
For Windows users there is a driver download from Matias
quire the use of the USB 2.0 dock, you could leave the gold-colored
plug unconnected.The complete connection and proper functioning of that will change the Apple Option and Command keys into Windows
and Alt keys.
both the Pro 3.0 keyboard and its built-in 3-port USB 2.0 hub is now
achieved with just one USB connector.
The Matias Corporation is located in Newmarket, Ontario. More
information
about the Tactile Pro 3.0 and other specialty keyboards
If you look closely at the picture of the keyboard (above) you will nocan be found on the internet at: < http://www.matias.ca/ >
tice that there are two or three symbols on each key. The Tactile Pro
3.0 makes it easy to find special symbols like ™, €, £, ¥, © and other
Besides a full line of specialty keyhard to remember symbols. Now they are all printed in pairs in very
boards Matias carries a selection of
small script on the upper right corner of the keys. Simply hold down
high-quality
iPod accessories and
the Option key while typing for the bottom-right characters, or Shift“Mobile Office” portable computing acOption for the top-right characters. The F-keys function just as they
do with other Apple keyboards and can be used to control volume and cessories including stands, computer
bags and rigid cases. Matias merbrightness, eject disks, and invoke Dashboard and Expose.
chandise information can be found
and
Matias items can be purchased online from their website at:
Most keyboards allow only a certain number of keys to be pressed at
< http://matias.ca/products/index.php >.
once, and often cannot keep up with very fast typists. The result is
called ghosting — letters missing from what you actually typed, or adArticle submitted by Michael Shaw
ditional letters that you didn't type. Some Apple keyboards, especially
Matias logo courtesy of Matias Corporation.
the previously mentioned aluminum iMac keyboard, are particularly
prone to this fault. The Matias Tactile Pro 3.0 has special Anti-Ghosting Circuitry (also called n-key rollover) to eliminate these problems.
You can type as fast as you're able; the Tactile Pro 3.0 will keep up.
Macintosh Users East
It’s a date! Mark your calendar!
Actually mark a whole bunch of dates, those on which our regular
MaUsE meetings will be held in 2010.
The dates are...
Wednesday, February 24th
Wednesday, March 24th
Wednesday, April 28th
Wednesday, May 26th
Wednesday, June 23rd
Wednesday, September 22nd
Wednesday, October 27th
Wednesday, November 24th
And two bonus ‘Evenings with Mac’
Wednesday, April 7th
Wednesday, October 6th
Mark your calendar now and plan at every opportunity
to be a participant in the Macintosh Users East
computer club’s meetings.
We meet in Whitby Public Library’s meeting room 1A & B
starting at 6.59 p.m. and usually ending around 9.30 p.m
AND...
Remember to check regularly on the web at
www.mause.com
for the latest issue of DoubleClick,
MaUsE’s superb monthly online publication.
This book tells you everything you need to know about your options
for running Windows on a Mac, how to get around common annoyances, and what you should do to protect yourself from the big, bad
world of Windows malware.
Take Control
eBooks
DoubleClick will be featuring an ebook
from Take Control Books every month.
These ebooks have been published in
PDF format and cover issues related to
Mac OS. Because they are in PDF format, these ebooks have a lot of advantages over the traditional paper books.
Electronic books are a new experience
for many people, but they provide you
with a good deal of flexibility that isn't
available with printed books. With your
purchase of the ebook you get expert
advice on various topics but with an
Apple perspective. These are the same
expert authors of some best-selling print
books. The download is immediate and
you don't have to leave your house to
get it. Because it is paperless it can be
purchased for much less than a paper edition. Also, if a new edition of
the book comes out, your original purchase of the book allows you to
easily update your current copy for free. There are clickable links right
in the text so that your book immediately leads to other sources on
the same topic. It is readable onscreen which means you can control
the size of the print. If you use Preview you can even highlight sections without messing up the book (use a copy of the original if you
are worried). You can even print up a paper copy of the book if you
feel the need. The catalog is very extensive and can be accessed
from http://www.takecontrolbooks.com/catalog. They offer free sample
sections of all their ebooks and a money-back guarantee, so try one
out anytime. As readers of the DoubleClick, you also now have access to this coupon (CPN90219MUG) which entitles you to a 30%
discount on the purchase of a book.
The book featured this month is Take Control of Running Windows on
a Mac, 3rd Edition. Using an Intel-based Mac means you can choose
the best of both worlds—running Mac OS X or running Windows, but
what's the optimal way way to go about it? Cross-platform expert Joe
Kissell has distilled untold hours of testing into this ebook to help you
understand the pros and cons of Apple's Boot Camp versus virtualization software and to give advice and step-by-step instructions for installing either Windows XP or Windows Vista in Boot Camp, Parallels
Desktop 4, VMware Fusion 2, and VirtualBox. There is even a chapter
on running Windows without having the license (check out CrossOver
which is also reviewed in this DoubleClick).
"Partly because I understand Windows so well, I’d always opt for a Mac if given the choice. But, like it or not,
some things I want to do with my computer still require
Windows. Even when working on something platformneutral, such as a Web site, I want to be sure things
look and work correctly on Windows. On those occasions when I’ve needed Windows over the past few
years, I’ve tried everything from running Virtual PC to
visiting a library or cybercafé—everything, in other
words, short of buying a Windows PC. That was the
one step I hoped never to take, but other solutions were
frequently awkward, slow, or otherwise annoying. Now,
thanks to my Intel-based Mac, I can get the Mac OS X
environment I love plus a fast, fully featured Windows
installation, all in one box. I can even share files and
network connections seamlessly between operating
systems." Joe Kissel
This 167-page ebook covers how to handle many aspects of using Windows, including:
• How can I get a copy of Windows XP or Vista that will work on a
Mac?
• What are 15 things that you can do in Windows, but not on the Mac?
• How can I set things up so that Windows won't bog down?
• How should I handle partitioning for my Windows installation?
• How do I avoid and handle activation hassles?
• Boot Camp is free with Mac OS X, but what are the pros and cons to
using it?
• How can I best run Windows with Boot Camp and virtualization software?
• Should I run VMware Fusion, Parallels Desktop, or VirtualBox?
• What's the best way to right-click in Windows?
• How do I print from my Windows software?
• How do I make my Bluetooth devices work in Windows?
• What is FAT32, and why might it matter to me?
• What are the coolest new features in Parallels Desktop 4?
• What's interesting about the different views in VMware Fusion?
If you are unsure about running Windows on the Mac or which of the
five choices you have that would be the best for you then this is the
ebook to get. This ebook costs $10.00 normally but using the coupon
will make a difference. Check this ebook out and a lot others at
www.takecontrolbooks.com.
Article Submitted by Marcel Dufresne
Neat Stuff
In Gmail
About a century ago (well it seems that long
ago) at one of the club’s meetings Michael,
our beloved president, announced that
Google was offering ‘Gmail,’ a free email
service, and suggested that we would find it
superior to many of the other free email services then on offer; try it I did, liked it and have been using it ever
since.
For a long time I was more or less satisfied to use the default settings
in Gmail and then I discovered the ‘settings’ button (and that in Gmail
it meant ‘preferences,’ I’m a slow learner). I started to customize
Gmail to better suite my personal preferences. Here are some of the
more obvious settings that I have adopted, and then some of the latest things from Google’s lab, interesting stuff that is currently available. Ready to start customizing your Gmail? OK, go to the settings
button (in the top right hand side of the Gmail page) and start...
• Message translation: If you, like me,
from time to time receive emails in a language other than your own Gmail will display a ‘translate’ button, when you click on it
your incoming message will automatically be translated into the language of your choice; e.g. Spanish to English etc.
• Default font: Change the default font that is used in your emails
from ‘Times’ to one of your choice; you have eleven fonts to choose
from. My own choice is Verdana, a very ‘easy to read’ font
• Date format. One has a choice of formats and my choice, (logical?)
is to have it written the way I would speak it... February First, TwentyTen, (Month - Day - Year) how YOU want it written is up to you...
• Signature: Yes, if you wish it will automatically append your name
to every email you send, but you can do more, (or less) there is sufficient space for you to add other stuff. I vary my signature from time to
time according to what is happening in my life and/or in the world or
how I am feeling. Currently my name is followed by ‘Whitby,’ the town
in which I live, ‘Ontario’ and ‘Canada.’ If I am feeling particularly patriotic I change it to read “Proud to be a Canadian,’ and, at other times
when I am feeling crotchety it simply says ‘The Old Curmudgeon’; I
like that one because some people do not know the meaning of the
word and if they take the time to look it up they have learned something. <Grin> Did you??? Look it up that is.
• Vacation Responder: If you are away from your home or office for
a period of time, it will automatically respond to every incoming email
(except spam) with a message that you have
composed; i.e. “Thanks for your e-mail. Sorry, I
am away from home: I will check for mail from
time to time and get back to you when I am
able to do so. Thank you for understanding.”
You can set the date the responder is to start
responding and the date it will stop doing so. A
most useful option.
OK, those are the some of my choices in the ‘General’ settings category, but there are more ways to tweak your emails if you wish to do
so; at the top of the settings page is a bar with a bunch of other
choices for you to consider; let’s take a quick look at several:
• Themes: At the extreme right on that settings bar you will find
‘Themes’; take a few minutes and see all of the varied and interesting
ways you can change the overall appearance of how the Gmails window will look when you log on; as of the day I am writing this article
there were 35 themes available for you to choose from; currently I
have mine set to ‘Zoozimps’ because it is always fun to see and those
‘imps’ actually react to what is happening in your Gmail.
Gmail Labs is a testing ground for experimental features that aren't
quite ready for prime time; caution, they may change, break or disappear at any time. If you are adventuress go and take a look in this
section, it contains a whole bunch of small applications that the programmers at Google are working on in order to make Gmail even
more useful; here are some that I am currently using...
• Message translation - Vacation time, already mentioned above.
• Undo send: Oops, hit send too soon? You can stop messages from
being sent for a few seconds after you have hit the send button.
Got the wrong Bob? – This one can save you embarrassment. Have
you ever addressed an email too quickly, and included Bob (your
boss) instead of Bob (your friend) by accident? If you're emailing
more than two people at once Gmail will check if you meant to include
Bob Smith rather than Bob Jones based on the groups of people
you email most often. (Thanks to Gmail for the previous two descriptions.)
Final Thought: If you are not already using Gmail,
maybe you should consider doing so. It is a
very good system and you can use all those
neat features that I have written about plus
many more waiting there for you to discover.
Want to find out more? Go to
www.gmail.com and learn all about it; and
Yes! It’s free.
Postscript: HTTPS – Increased security for you.
Today (January 15th) I learned from Michael that Gmail is making information in your emails more secure by changing
from HTTP to HTTPS. Here is what Gmail
has to say on that topic:
“We've recently made the 'Always use
https' setting the default behavior in Gmail
(the default used to be http). Here's some
background: If you sign in to Gmail via a
nonsecure Internet connection, like a public
wireless or non-encrypted network, your Google account may be
more vulnerable to hijacking. Non-secure networks make it easier for
someone to impersonate you and gain full access to your Google account, including any sensitive data it may contain like bank statements or online log-in credentials. Accordingly, we enable the 'Always
use https' option in Gmail by default. HTTPS, or Hypertext Transfer
Protocol Secure, is a secure protocol that provides authenticated and
encrypted communication.” And they add this warning: If you use a
public computer to check your email, it's also important to end each of
your Gmail sessions by clicking Sign out at the top of any Gmail page
and to close all Gmail browser windows. After reading that information
I immediately went to the ‘Browser connection’ section of my Gmail
settings and switched to HTTPS and thus gained more peace of
mind; in my mind another valid reason to choose and use Gmail.
Article submitted by Stan Wild
New !!
Updates From Alien Skin
If you are one of the lucky MaUsE members
who has recently won a copy of Alien Skin Blow
Up 2, Bokeh, Eye Candy 6, or Snap Art 2 in
one of our MaUsE Raffles you
should check on the Alien Skin website for the updater to your software. In fact, if you have won any
of the software titles pictured below you should do
it. Alien Skin is constantly improving their software
in response to users’ requests so make sure you
check to see if there is something for you.
AKVIS
Magnifier
In this world we are constantly being
told that "Bigger is Better". To that
end I just received the latest version
of AKVIS Magnifier. If you are
wondering what that is, I'll tell you: it
is a sophisticated tool to increase
image resolution in digital photos. If
you want a big print then this program is for you.The program allows
printing large images at a higher resolution. This photo enlargement
product allows you to take a photo
and enlarging it to a super-high resolution of up to a maximum of 30,000 x 30,000 pixels, making a 100 x
100 inch (2.5 x 2.5 meter) poster easily printable at typographic quality of 300 dots per inch (dpi). Larger formats are viewed from a distance to suit their size and often don’t require that high a resolution.
For a print that is 8 x10 inches you should view it at about three feet,
arms length away from your eyes. Because you do not need to use
the maximum resolution you can make even larger enlargements of
200 x 200 inches which is a whooping 5 x 5 meter print. So if you
need to print larger then your home printer can handle, you could use
this program to create the image and then have a commercial printer
make your poster for you.
In the days before digital, if you wanted a bigger print of
your photo, you sent your film negative or slide off to a
photo lab where they would proceed to put it in an enlarger and project a bigger picture onto a piece of photographic paper. This process had it's limitations, one of
which was the grain of the film used. To get faster films
the manufactures used bigger pieces of silver iodide. This
was embedded in the film and was known as grain. When
you enlarged the photo the grain enlarged as well and became more apparent. With today’s digital cameras you
would know grain as "Noise". This is most noticeable in
areas where you have one constant colour. You also have
a problem with loss of sharpness at the edges of each
pixel. This is quite apparent when you size your image
above 100%.
AKVIS Magnifier comes as two separate styles, Standalone and Plug-in, for both operating systems, Mac or
Windows. It has a ten day free trial period, after which
time you will need to decide which licence you want to
buy. The functionality of the program depends on the license type. During the ten day test period you can try all
the options so you can choose the license you like.
The four functionality types are: Home Plug-in ($129), Home Standalone ($129), Home Deluxe ($165) or Business ($249). Your choice of
license will affect which features are available in AKVIS Magnifier.
AKVIS Magnifier can work independently as a standalone program as
well as a plug-in to Adobe Photoshop. Both variants support the various colour modes: Red Green Blue (RGB), Grayscale, Cyan Magenta,Yellow and Black (CMYK), Lab; or any of the following bit
channels, 8 or 16 or 32 bits per channel. The standalone program
works with all of the following formats for your photos, JPEG, PNG,
BMP, TIFF formats. It does not do the "Raw" format.
The plug-in version of AKVIS Magnifier is compatible with Adobe Photoshop and Photoshop Elements. In Photoshop the Magnifier plug-in
supports Batch Processing that allows you to automatically convert a
series of images. Just create an Action in Photoshop and apply the
plug-in with the same settings to a folder full of images. The plug-in
works with any one-layered image, which can be opened by Photoshop in supported colour modes: RGB, Grayscale 8 or 16 bit. It is imperative that the layers must be merged before using the plug-in.
The parts of the AKVIS Magnifier workspace are displayed in the picture below. The left part of AKVIS Magnifier’s workspace is taken up
by the Image Window with the tabs Before and After above the photo
you have chosen. The Before tab displays the original image, the
After tab shows the results. You can compare the original and the resulting images by just left-clicking on any point of the image. The right
side holds the Navigation Window and the Settings panel.
In the upper right portion of the Workspace window you will find the Navigator Window, (as
shown at right), where you can see the reduced copy of the image. The red frame shows the
part of the image that is now visible in the Image Window; the areas outside the frame will
be shaded. Drag the frame to make other parts of the image visible. To move the frame,
bring the cursor inside the frame, press the left mouse button, and keeping it pressed, then
move the frame in the Navigation window. Underneath the reduced copy of the image you
have a scale field which has a drop down menu, that show frequently used sizes. The scale
goes from 25% to 400%. You can also type in a scale if you need to. To the right of the scale
field box is a slider for increasing or decreasing the image in the Image Window. You can
also use the + or - buttons for increasing or decreasing the image, or do the "Command" +
and "Command" - from the keyboard.
Under the navigation window is the Settings panel. The setting panel is used for setting parameters for advanced image processing. To avoid distortion of details, it is recommended to
scale the image to its original size (100%) before changing the settings of the program.
There are four groups of settings: New Size, Parameters, Unsharp Mask and Presets. By
using the hot-key combination Option+underlined letter you can quickly move the focus into
the corresponding entry field. You can also use the mouse. The Lower half of the settings
panel is where you set the new Parameters. Here is the explanation of the different parameters:
Sharpen Edges (scale = 0-100). This parameter increases the sharpness and intensity of
an objects’ edges.
Edge Smoothness (scale = 1−8). This parameter smoothes colour gradients on the border
of contrasting colour zones. At high values of this parameters the border looks softer. At low
values of the parameter the border line looks uneven and irregular. Edge Smoothness is
well visible on an image with contrasting colour zones.
Simplicity (scale = 0−400). This parameter sets the level of detail on the final image. The
higher the value of the parameter, the more simplified and artificial the result will look; the
lower the value – the more details will be visible. At the same time sharpness/smoothness of
the image is influenced by the size and the scale of the image. At high values of the
Sharpen Edges parameter, the difference between the original and the simplified image increases.
Microline (scale = 0-400). This parameter singles out thin (1-2 pixels) contrasting lines on
an image with a low resolution. The default value provides a satisfactory result, but it is possible to adjust it. At low values of the parameter the lines are thinner and the edges are
sharper; At higher values, the lines get a bit thicker and this gives you ragged edges.
Grain (scale = 0-25). The parameter adds slight Noise to the image. It is helpful in case of
an over smoothed images, which is an image processed with a high values of the Sharpen
Edges parameter and a high level of Simplicity.
Unsharp Mask. This selection sharpens the image by increasing contrast between the pixels. When the check-box is enabled, the program compares the resulting image with its
blurred copy and if the pixel of the image contrasts with the pixel of the blurred copy, the
contrast is increased; otherwise, the pixel stays unchanged. In this way the program
processes all image pixels.It helps to understand that the level of contrast between the pixels is regulated by the parameter Amount. The values of the parameter range is between 0
and 250%. At 100% the contrast is increased twice, at 200% - the contrast is increased by 4
times, etc.
The Radius shows a number of pixels around a pixel to be affected by blurring. While 1.5
pixels is a recommended blurring radius, the latter can vary between 0 and 50 pixels.
AKVIS Software Inc. (www.akvis.com) specializes in
development of image processing software and scientific research. The company was founded in 2004 by
IT professionals having considerable experience in
programming and software development. Since then
the company has released a number of successful
programs.
The head office of AKVIS Software Inc. is located in
Vancouver, British Columbia.
Picture #1
Picture #2
Picture #1 is like the standard outdoor photo that you
may take of your family or friends. As you can see it
does not show you just the important information.
There is a lot of unwanted information cluttering the
photo. Perhaps what I really want is a head and
shoulders shot...
By using Akvis Magnifier I was able to blow up this
photo to the desired size and still keep the details
sharp. Normal enlarging would blur out or pixelate the
fine detail and make the photo look shabby. As you
can see in Picture #2 the head and shoulder shot extracted with Akvis Magnifier has keep the detail and
you can even read the name of my cousin on her
shirt.
It is possible to save the settings you like as a preset and use them in
the future. To save a preset, enter a name for the preset into the Presets field and press the Save button. The settings of the selected preset will be used as the default settings. If you change the values of
the parameters, you can always come back to the factory default settings of the preset with a click on the Reset button. To process an
image with the settings of a certain preset, you should select it from
the drop down menu and press the button. To delete a preset, select
it from the list and press Delete.
Increasing an image’s size is a resource-intensive process and requires a substantial amount of RAM memory capacity and 2-3 Gigabites (Gb) of free space on your hard drive for swapping-files. When
increasing a 5-10 megapixel image to 400%, the image area increases by 16 times + 200 to 300 Megabites (Mb). in
this case the processing will consume about 1.5 Gb
RAM. This makes for huge files, and does take time to
process. Now that you have enlarged your image, you
are going to want to print it. In the standalone version
you select the button for printing. This will bring up the
Print dialog box seen at right.
one of the corner markers or to a side (the cursor changes in shape to
a double sided arrow) and drag the marker or side. To change the position of the image on the page, bring the cursor over the image,
press the left mouse button, and move the cursor.
Clicking the Page Setup button opens a dialog window in which you
can choose the size of the paper and its orientation, as well as the
print margins.
To print an image with the chosen parameters, press the Print button.
To cancel and close the printing dialog window press the Cancel button.
This program is great for making enlargements and also reductions, if
you have a need to.
The left part of the Print dialog box is the preview area
where the current position of the image on the page is
shown. On the right side of the dialog window the following print settings can be adjusted:
• Printer. If your computer is connected to a local network with many printers or if it is connected to many output devices itself, you will need to choose one of the
available printers to print your image. Choose the desired print resolution from the Print Resolution dropdown list. The available choices will be based on those
available for the printer you have chosen.
• Orientation of the printed image. There are two types of orientation
available - Album and Portrait. Album corresponds to the horizontal
page orientation (Landscape),
while Portrait - corresponds to the
vertical orientation of the paper.
• Print Size. To change the size of the printed image, adjust the parameters Scale, Width, Height and Fit to Page. These parameters
have no effect on the image itself, just on the printed version. You
can change the size of the printed image by entering any value in %
(any value less than 100% will result in a smaller print size, and any
value larger than 100% - will result in a larger print size), or by entering new values in Width and Height. If you want the size of the image
to be adjusted to the paper size, then just select Fit to Page.
• Move To. Choose the position of the image on the page by clicking
on one of the the nine green arrows.
The size of the printed image and its orientation can also be selected
manually. A frame with markers is displayed around the image in the
preview window. To change the size of the image move the cursor to
Submitted by Kevin Livesey <><
Fujitsu
ScanSnap
With the advent of computers, there were hopes
that the use of trees for paper could be decreased. After all, data could be stored on the
computer - no need for all that paper. Change, as
always, is a very slow process. The trees have
not yet been spared. We seem to require a hardcopy of all our data, as well as a digital. It is as though we
do not trust the data to be saved in the digital format. We
do not trust that new fangled machine. We still rely on the
old tried and true hardcopy. This train of thought will eventually change. The younger generation is much more
comfortable with going paperless. Witness the rise of the
Kindle eBook reader and hopefully the Tablet from Apple.
Books may eventually be a thing of the past as literature
makes the switch to digital.
To help us make this big switch to paperless, we need a
reliable means of taking the paper copies that we now
have and changing them to digital. This is the function of
a scanner. There are two major types to be found:
• There is the older flat bed kind where you need to lift
the cover of a large glass top machine. Next you need to place your
page in exactly the right spot to ensure a good 90° straight reproduction. Once the lid was closed, the scanner would then slowly scan
across the bottom of that glass top and send the reproduction to your
computer for saving. The next page would require you to lift up the
cover, replace your first page with the second and repeat the procedure. The last time I used my old flat bed copier, it took over an hour
to get copies of a twenty page booklet into PDF format so that I could
share these with my class.
• The second type of scanner now available is a top loading type. In
this case the pages to be scanned are fed in through the top of the
scanner just as the pages of a printer would be fed in. In fact, there
are many multi-function printers that will also do scans. I have found
that the speed and the quality of the reproductions usually vary directly with the price and indirectly with the number of functions. In
other words, if you want to get good quick scans, then buy a dedicated scanner, not a printer that will also act as a scanner.
The Fujitsu ScanSnap S1500M is
one of the best top loading scanners
out there. It is a compact colour duplex scanner for the Mac. The ‘M’ at
the end of the code denotes its Macintosh use. With one push of a button your document becomes an
easily searchable PDF file. The intelligent paper feed allows you to
accidentally put the page in a bit crooked, but come out perfect.
Few scanners can match its speed; it can duplex
20 colour pages per minute. You can load in a
stack of 50 pages at a time. The task that took
me over an hour now would take less than a
minute. And it looks great, a pearly white colour,
sitting beside any Apple computer. It folds up
into a 28 x 18 x 15 cm compact shape when not
in use. To turn it on, simply open up the top
cover. There are no on/off buttons to search for.
With the top cover open, documents are now
ready to be fed into the top slot. Paper jams, if
they occur, present no problem either. A lever on
the front allows access to the inner workings and
paper can be removed without having to move
the scanner.
The ScanSnap S1500M provides Mac users with an effective way to
greatly reduce paper clutter, storage space, and security risk associated with unmanaged paperwork at home or at the office. There is a
lot more that can be done with documents that have been scanned.
For instance, they can be stored in multiple areas or they can be
found so much faster. How much time have you spent searching for a
specific receipt? This becomes such a simple task with the Mac’s capability to search anywhere on the computer.
The ScanSnap Manager, which can be accessed from the Dock and
has a half dozen choices, allows the scanned documents to be
quickly placed exactly where they belong. Scan to folder, puts the
PDF in the folder that you have predetermined. Scan to email opens
up your Mail program and attaches the document to a new email.
Scan to print immediately sends the scan to the printer, bypassing the
save to folder option. You can scan to Standard which sends the document to Adobe Acrobat or Preview. You can even scan directly to
iPhoto. There are options to scan to Word or Excel. These do not
work since if you don’t have these two applications. I hope in the future that Fujitsu is intending on incorporating Pages and Numbers into
the scan options since these are the Mac equivalents.
The scans are somewhat limited to PDF or jpegs. However, I can’t
think of any other format I would like my scans saved as. I would think
that if you needed them in another format, you could easily take the
jpeg and convert it with other applications. The OCR
(Optical Character Recognition) capabilities of the software means that you can quickly edit parts of a document, even if you only have a hardcopy of it. No need to
retype the whole page. (This does require the use of
Word or Excel for Mac). The only other draw back I could
think of is really a problem with any top loading scanner.
You could not scan a book without tearing it apart, since
only single pages can be fed in through the top. Also,
boxes or other 3d-shapes can’t be scanned.
ScanSnap is smart. It has intelligent paper feed detection. It knows when a document should be scanned in
colour, grayscale or black and white. It knows if it should
increase the resolution on small documents for readability. It has auto page size detection, anything from business cards and up. It has auto crop, de-skew, and
content-based rotation. It can tell if it has to scan both
sides of a document or not. If there is anything on the
back of the document, it will be scanned with no reduction in speed. You direct it to scan only one side if you so
wish. It can detect small documents intermixed in a stack
and scan them appropriately. Smaller documents such
as receipts and business cards are scanned at higher
resolution to make them more discernible.
Remember how much time it took to scan olds photos into your computer. Now you can put a stack of photos in to be scanned. Choose
iPhoto from the ScanSnap Manager and when the blue start button is
pushed the photos are immediately sent to iPhoto where they are
shown as the Last Import. Hours of time saved. My wife could not believe how simple it was when she started scanning in old photos from
an album. She remembered using a flat bed scanner a few years ago
and kept putting off further such projects. Once she saw the speed
and facility of using ScanSnap, she commenced again scanning the
family photos to label and preserve them for future generations.
As a bonus, besides containing a DVD with Adobe Acrobat Pro 8, the
install disc also contains the application Cardiris which recognizes the
print on business cards. You can scan them and have the data sent to
Address Book. No more retyping of your business contacts. The OCR
extracts the data from the image and attempts to place the data in the
correct spots. Think of the time saved. You can set up what is called a
profile, which is a saved set of preferences, that you like to use for
certain documents. For instance, you can have a profile called ‘Pictures’ which will be one sided, jpegs, saved in a a folder of your
choice.
All your profiles are part of the ScanSnap manager options that pop
up from the dock. These are thus right at your fingertips. All of this is
very well explained in the User’s Manual that comes on the install
disc. The ScanSnap manager also has a lot of helpful windows that
explain its choices. I had absolutely no problem scanning documents
and photos without reading the manual.
You can have a look at more of the details for the ScanSnap from
http://www.fujitsu.com/us/services/computing/peripherals/scanners/sc
ansnap/scansnap-s1500.html. The minimum requirement is MAC OS
10.4.3 and it is Snow Leopard ready. It can be bought in Canada for
~$500. This makes it pricey but take note that it does includes Adobe
Acrobat Pro which is an expensive application on its own. In terms of
speed, functions and ease of use you won’t find a better machine. It
has been called by some the most Apple like peripheral not made by
Apple. Whether for home or business use, the ScanSnap is top of the
line.
Article Submitted by Marcel Dufresne
R-Tools Technology Inc.
R-Studio for Mac
Another data recover program. And yet
something very different. Lately we
have looked at two of the easiest data
recovery programs around, SubRosaSoft's FileSalvage 7 and Prosoft
Engineering's Data Rescue 3. Now we
are going to look at one that is definitely not for the faint of heart. R-Studio for Mac from R-Tools Technology
Inc. is a completely different kettle of
fish. This is the program for people who
know more about computers than I do and a lot more than the average Mac user does. R-Studio for Mac is ideal for regular users and
also fully featured enough for all you intensely nerdish Mac users .
R-Studio for Mac comes in three flavours: PowerPC, Intel and Universal. If you want to try out a demo of the program you can download
the software from the R-Tools Technology web-site at:
http://www.data-recovery-macintosh.com/Mac_Recovery_Download.shtml
R-Studio for Mac Features:
• Host OS: Mac OS X Snow Leopard 10.6, Mac OS 10.4 Tiger, Mac
OS Server 10.5 Tiger, Mac OS 10.5 Leopard and Mac OS Server 10.5
Leopard running on a computer with Intel, PowerPC G5 or PowerPC
G4 processors.
• Supported file systems: HFS, HFS+, HFSX, FAT12, FAT16, FAT32,
exFAT, NTFS, NTFS5, Ext2 FS, Ext3 FS, Ext4 FS, UFS1, UFS2 and
UFS BigEndian.
• Data recovery over the Network*. Files can be recovered on network
computers running: Win95/98/ME/NT/2000/XP/2003/Vista/2008/Windows 7, Macintosh, Linux and UNIX.
• Support for known file types. R-Studio for Mac searches for files with
known typical features of their structures allowing the user to search
for files on devices with unknown files systems, including an HD, CD,
DVD, floppy disk, Compact Flash Card, USB drive, ZIP drive, Memory
Sticks, and other removable media. Support for known file types is the
main and mandatory option for recovery data from HFS, HFS+ partitions.
• Expandable Known File Types. New file signatures can be added to
the list of known file types by the end user.
• File Sorting. Found files and folders can now be easily sorted by the
original structure, file extension or file creation/modification time.
• Scan process visualization. While scanning an object, R-Studio Mac
graphically shows items that have been found, including files of
known types, HFS/HFS+ volume headers, HFS/HFS+ BTree+ nodes,
FAT and NTFS MFT records, boot records, etc.
• Mass file recovery support.
• APM, Basic and GPT support. R-Studio for
Mac supports all three partition schemes
used to define the low-level organization of
data on disks formatted for use with Macintosh computers.
• Dynamic disk support.
• HFSJ and HFSX volumes support.
• Software RAID, volume set, and stripe set
support. Support for various unusual RAID
configurations. Parameters like block size
and order, offsets, and even the number of
stripe blocks can be explicitly specified.
Custom RAID configurations can be saved.
• Recognizes localized names.
• Hardware RAID, volume set, and stripe set support.
• Creates image files for an entire hard drive, logical disk, or its part.
Such image files can be processed like regular disks. Images can be
either simple exact object copies (Plain images) compatible with the
previous versions of R-Studio, or compressed images that can be
compressed, split into several parts, and password-protected. Such
images are fully compatible with the images created by R-Drive
Image, but incompatible with the previous versions of R-Studio.
• Recovers files on damaged or deleted partitions.
• Recovers data forks, resource forks, finder information and UNIX file
system permissions.
• Recovers compressed, encrypted files and alternative data streams
from NTFS partitions.
• Recovered files can be saved on any (including network) disks visible by the host operating system.
• A hexadecimal disk and file editor supporting HFS/HFS+ data forks,
resource forks and NTFS file non-resident attribute editing.
• Patterns (or templates) in the hexadecimal editor allowing for parsing the data according to specific data structure. Such patterns may
be custom-created.
• File preview. Most of the graphic file types can be previewed to estimate recovery chances.
In order to put R-Studio for Mac through its paces
I started, (like I usually do), with an empty USB
flash drive. I copied a bunch of images onto it (39
pictures totaling 40 Megabytes) and then deleted
the images by selecting them and using Command-Delete. This moved the files to the Trash.
Then I emptied the Trash to simulate an accidental file deletion. I created an empty folder on my
Desktop (Save to Here!!). I verified that there
were no files showing on the flash drive and then
I used the R-Studio application to see if it could
find and salvage any or all of the the 39 deleted
files. The scan took only 53.3 seconds to churn
through a 1 Gigabyte flash drive and produced an
amazing record that showed the scan results. Everything R-Studio
could find was displayed in a folder called “Extra Found Files”. In all
there were 514 found files totaling 255.6 Megabytes set out in 14
folders. Obviously there was more on the empty drive than just the
39 JPGs I deleted ! I marked the JPEG and Kodak image folders I
was interested in and found that they totaled about 208 Megabytes of pictures. I clicked on the
“Recover Marked” button. R-Studio started processing through the scan information and sending
information to the “Save to Here!!” Desktop folder. By the time it was finished R-Studio had rescued 178 items totaling over 218 megs of image files.
As you can see from a careful examination of these pictures, I began to scan the drive at 5:15 PM,
completed the scan at 5:16 PM, and had all of the rescued files sorted and salvaged to my destination by 5:18 PM. Not only is R-Studio for Mac incredibly thorough, it is also incredibly fast. To
verify that the salvaged files were actually usable I investigated the contents of the saved folders.
I found that the 39 items I
was using as the test files
were all present in the Digital Camera folder. Also included in the same folder
were another 60 older digital photographic images that
had been on the drive and
erased several months ago.
Looking at R-Studio for
Mac so soon after looking at Prosoft and SubRosaSoft data recovery software really brings
out the differences in these programs. For a true
understanding of the powerful advanced features built into R-Studio for Mac it really is necessary to know more than 99% of the
computer-literate population and spend some
serious time, possibly a few months, with the RStudio for Mac user manual, (a truly astoundingly dense 113-page PDF that defies
comprehension unless the user is technical in
the extreme). For what I did with it I had no trouble successfully operating the program within a
half-hour of downloading it but I know that I did
not scratch the surface of what this program can
do.
Conclusion:
R-Studio for Mac found everything I was looking for and a whole lot more. R-Studio for Mac
definitely recovers files. It is the most complex
and powerful software of its type I have ever
encountered and R-Tools claims that it can
work on EVERYTHING. The Macintosh version I downloaded was
for “For Local and Network Recovery” but there are also downloadable “R-Studio Emergency ISO Image” files on the R-Tools Technology website that can be used to create bootable network and local
disks for PowerPC-based New World Macintosh (since 2001) and
compatible UNIX computers/servers or for Intel-based Macintosh,
Windows, Linux and UNIX computers/servers. This really is a complete professional data-recovery system.
In order to use R-Studio for Mac you need to have a Macintosh
computer with an Intel, PowerPC G5 or PowerPC G4 processor and be running Tiger,
Leopard or Snow Leopard. And you need to have some place other than the source
big enough to save files to. Administrative privileges are required to install and run RStudio for Mac. The program only costs US $80.00 and you can try it before you buy
it. The R-Tools website is HUGE with excellent help files and lots of good advice and
information.
Submitted by Michael Shaw
R-Studio for Mac will recover files:
• Removed by virus attack or power failure;
• After the partition with the files was reformatted,
even for different file system;
• Deleted from your computer;
• When the partition structure on a hard disk was
changed or damaged. In this case, R-Studio for
Mac can scan the hard disk trying to find previously existing partitions and recover files from
found partitions.
• From hard disk with bad sectors. R-Studio for
Mac can first copy the entire disk or its part into
an image file and then process the image file.
This is especially useful when new bad sectors
are constantly appearing on the hard disk, and remaining information must be immediately saved.
Prizmo 1.1
From Creaceed
Like the Prizmo 1.1 Welcome screen says, this little application packs
a decent punch for your buck. For US $40.00 this program will appeal
to both the photographers amongst you and those looking for easy to
use OCR capability.
In case you didn’t know, OCR, which stands for ‘Optical Character
Recognition’, refers to the ability to enable your Mac to look at a
scanned image of some text and be able to edit it. In other words, instead of just being a picture of the text, it can actually read it as real
text which you can then cut and paste, etc., as though you’d just
typed it. Which for the slower typists, like me, is a brilliant idea because it saves hours of copying text by typing it word for word.
Prizmo, which is compatible with Leopard and Snow Leopard, has
clever abilities that can be basically divided into two parts.
First, (for everyone) there’s the OCR technology. It has an adjustable
grid for easily selecting the text to be recognized; result preview (interactive text skimming of recognized text areas); several file types for
saving the results (PDF, RTF, TXT); spotlight indexable results... and
it can do all this in 10 languages!
Second, (for the photographers) you can use it to correct perspective
and lens distortions. It’s quick and easy, you just drag your JPG on to
the Welcome Screen and go from there.
But there’s more…
But now for all you shutter-bugs and non-photographers alike, this
software can perform a
really neat trick. It will
Image as imported
accept a JPG photo of
onto my desk top
any text taken by any
camera and be able to
convert it, via OCR, to
editable text. This
means you can take a
snap of a street sign, a
menu, a magazine that
doesn’t fit in your scanner, then drag the JPG
to the Prizmo screen
and produce an editable
text document. So in
fact, (I know you’re
ahead of me), you don’t
need a scanner at all.
For all of you, before buying a scanner or if you’re on the road away
from home (scannerless), this software is worth checking out.
Also, when you take the snap you don’t even have to be exactly
square on to the object. Remember the photographers using it to correct lens distortion and perspective (correcting for the sides of tall
buildings appearing to get closer together at the top), well this is used
to square up any oblique distortion of the text image so the OCR will
be able to recognize the letters and numbers as, well, letters and
numbers.
I have tried Prizmo 1.1 with a basic test, taking a snap of an article in
a magazine resting on my desk, uploading it to my Mac’s desktop and
then dragging the icon to the Prizmo screen. It was very easy. Just
make sure you have things in focus and avoid any reflection sheen
from the flash if it’s used. For videos on using Prizmo go to…
http://www.creaceed.com/prizmo/screencasts.html
When you push the save button it creates an ‘extracted’ file. Opening
the ‘extracted’ file occurs by default into the Text Edit application but
you can, if you prefer, go straight into either Word or Pages (via the
“Open With...” option).
So then I tried it with a photo of a sign I took when we were on holiday
last year. (Tip for Shutter-bugs, take photos of the signs you see so
you can remember where the heck you were and what you were looking at!). This shot was taken with no intention of applying it to some
fancy-dancy OCR software or anything of the kind. It wasn’t even
black on white text. I wondered what Prizmo would be able to do with
this. In fact, admittedly to my surprise, it did a pretty good job. At this
point I decided that this was some really useful software at a decent
price.
Image rotated in Prizmo
and desired section
‘extracted’ as a JPG
Desired section
‘extracted’ as
editable text
Above is the ‘extracted’ JPG image of the desired selection from the
original. I could have tweaked the image within Prizmo if I wanted a
better picture but here I’m trying to show the application can work
quite well even in the face of adversity - (my lousy picture). Below is
the actual editable text I harvested from the original snap shot. The
accuracy becomes less towards the end of the piece as there were
marks on the original sign and as I mentioned the sign was twisted.
Above is the original JPG of the sign as it was imported to my Desktop. Note the object was not flat: it is not only distorted vertically it’s
also twisted slightly especially at the bottom. And it’s not in black and
white. But it is in focus (more or less). I selected the desired text by
clicking roughly at the four corners. Then I tweaked the box that was
created by dragging the corners to try to get as parallel as possible to
the text. Prizmo shows the selection on the left.
The Native Americans have long held the Superstition Mountains to
be sacred. The Apache Indians tell of the Thunder God who lives
within them, and the Pima Indians believe their ancestors are entombed in the mountains waiting for release into the great beyond,
The early settlers began calling the mountains the Superstitious
after hearing the Indian legends. The Superstition's most famous
explorer is Jacob Waltz of the Lost Dutchman Mine legend. A German immigrant, Waltz came west during the gold rush of the 1850s.
Legends about Waltz are many, bu have been proven. One tells of
how he and five others found gold but were attacked by Apache
warriors.
, Only two escaped back to Phoenix with their
lives, never to return. When Jacob Waltz died only a few gold samples and some maps of the Superstition Mountains.
' ' ~ In
the early 1900s, the Superstition Mining District produced 60,000
ounces of gold
valued at nearly'
.. ~- - "'- $3,000,000. It was the only gold ever found here. Creation
of the Superstition wilderfiess Area in 19.64
:
. , left the
area open to prospering until 1984. At that time serious searching
for the Lost Dutchman Mine came to an eno.
~,Today, the Superstition W'flderness area is managed by Tonto National Forest. Lost Dutchman State Park was established in 1977.j
Having optimized the image using the Binarization slider (easy to get
the hang of), I clicked the Recognize Text button and in a few seconds one or more smaller boxes appear (in this case three), that indicate regions of recognized text. You can then run your cursor over
these boxes and the recognized text is shown at the top of the screen
so you can check it out. If it’s not good enough you just tweak either
the original selection box (now shown by a dotted line) and/or the Binarization slider, to get a better ‘read’.
I could have improved the ‘read’ by doing the last couple of paragraphs on their own with a new selection box more aligned to the
lower text. The image I gave Prizmo to interpret was hardly one I’d
have aquired if I had really intended to use it for OCR work later. But
as you can see the little application did a pretty good job and certainly
wouldn’t take much time from here to tidy up if it were needed. So, all
in all, I’ve been most impressed with this software. It is definitely
worth a look - from any perspective.
Submitted by Jeff Hurd
Markzware
ID2Q8 v4
It is important to understand that it is not possible to achieve a
100% conversion due to the fact that QuarkXPress and InDesign
handle text in differing ways.
I want it all. I especially want to be
able to use my InDesign CS templates
and documents with QuarkXPress 8.
When it comes to desktop publishing
QuarkXPress is recognized as the superior of the two programs but Adobe
InDesign, (as the DTP part of the
“Adobe answer-to-everything” suite) is
getting an awful lot of use and exposure.
Heavy emphasis on the “awful”. There are countless new
documents being created with both of these programs every
day to add to the billions already created and stored in archives. Because of this there are a lot of occasions when documents created in
one format have to be ported over to the other format to be updated
or re-used. There are two ways to do this: the bad way is to purchase
both programs, open them up at the same time, and then laboriously
scan or copy-paste each text box and image from one document to
the other. Very time consuming and expensive. The good way is to
use Markzware file conversion software and simply use one program
to open the other program’s documents.
The Markzware utility for magically converting Quark
documents to InDesign documents is called Q2ID. The
Markzware utility for magically converting InDesign
documents to Quark documents is called ID2Q. Since
ID2Q has just been updated to make it compatible with
QuarkXPress 8, which I use, we’ll take a look at it.
ID2Q is an XTension. That is, it is a plug-in written to
enhance and expand the abilities of QuarkXPress in
much the same way that Photoshop plug-ins enhance and expand the
abilities of Photoshop. ID2Q can be purchased and downloaded from
the Markzware website. It costs only US $199.00. ID2Q offers users a
quick and easy way to convert InDesign content into a new QuarkXPress document. This includes the intricate details of all objects of the
document such as exact page positioning, color models, fonts and
styles, images, as well as precise text attributes. Important items are
instantly re-created. Unfortunately there is no demo version of ID2Q
for you to download and try out. If you need it, you know it. Once installed, ID2Q shows up in QuarkXPress in its own Markzware menu.
To use it just open QuarkXPress and click on “Convert InDesign Document...”. A dialog box will appear just like the one you see when you
use the “File => Open...” command.
Then navigate to and select the InDesign document you want
to convert and open with QuarkXPress and wait for ID2Q to
perform its magic. ID2Q can convert InDesign documents created on either the Microsoft Windows or Apple Macintosh OS,
into Macintosh or Windows QuarkXPress.
Nothing else can do what ID2Q does and I have to tell you that
you there is a modest warning that comes with this software:
Markzware acknowledges that Adobe InDesign and QuarkXPress use very different processes for presenting text and this will
likely cause problems in the way that text objects from a document
created in one program will appear when presented in the other.
Markzware warns that anomalies will occur. But they also assure the
user that these anomalies will be easily identified and corrected and
that the overall result will be a document so close to the original in
terms of content that many hours of work will be obviated.
In order to test out this program for this article I tried it with several InDesign CS documents of my own. The results were disappointing
because my documents were just too simple. The QuarkXPress 8
versions of the converted InDesign CS documents were so close
to perfect that there was really no discernable difference between
them. In order to see what the Q2ID was truly capable of I decided
to look further afield and use a ringer - a real stinker. I found in the
Samples folder that came with InDesign CS a 5.2 Meg .indd document that Adobe uses to highlight the abilities of their program.
The document is called Garden Poster.indd and it really has it all.
I have put a shot of it on the next page as it appears in InDesign CS. It has nine layers, uses lots
of different fonts (including some that I don’t have
installed), overlaps transparencies, uses gradients
applied to text, has pictures applied to text, drop
shadows, objects that run off the page, text applied
to a hand-drawn path snaking across it, and more
obscured or hidden features than usually appear in
most reasonable documents of this type.
I would like to apologize for the confusion and clutter that surrounds
the picture of the Garden Poster.indd on the next page. Somebody at
Adobe should be shot for setting up the InDesign interface with all of
those confusing tools and palettes. This picture reminds me why I
want to convert InDesign stuff into Quark in the first place !!
After I took the screenshot of the Garden Poster.indd I closed the document and very happily quit the Adobe InDesign CS application. Then
I launched QuarkXPress 8 and tried to open the same InDesign docu-
ment by accessing it through ID2Q. I navigated to
the Garden Poster.indd using the ID2Q method
as previously described, selected it and clicked
Open. The ID2Q Preference window opened first
and I set my Conversion Option preferences.
Hoping that all of the images used to create the
Garden Poster were embedded in it and recognizing that font substitution was going to occur, I set the simple ID2Q preferences to extract the embedded images and expand the text boxes if required.
See what I mean about the InDesign CS interface above ? Shot and pissed on.
I clicked “OK” and the Markzware magic began. With all of the various elements
used in this large document it took considerably longer for the conversion to
complete than it took for my own much smaller InDesign documents. Even so, it
took less than a minute for the 5.2 meg Garden Poster.indd to turn into the desired 1.6 meg Garden Poster.qxp you can see on the next page. The ID2Q
XTension runs a progress bar on the screen to show that the conversion
process is proceeding normally. Great for really big jobs.
And here, shown above in all its glory, is the end result. As you can
see, the InDesign Garden Poster is now open in QuarkXPress and
the document has a .qxp suffix. It is a bona fide QuarkXPress document and can be used in Quark just as if it had been originally created
in Quark. It has been reduced to 1.6 megs and all of the images used
to create the original are more or less in place. All nine of the original
InDesign layers show up in the Quark Layers palette. All objects with
drop shadows have retained them. All gradients are intact. Some of
the objects will have to have their runaround reset. A few of the images will have to be brought forward and suitable fonts will have to be
chosen in a few places to replace the fonts that were used in the original. These changes will take only a few minutes but recreating
just this one document without Markzware’s ID2Q XTension
would have taken many hours. Just like I said: Markzware magic.
A bonus ability built into ID2Q
is that the InDesign file does
not necessarily need to be
healthy. There is a video on YouTube that shows that many corrupted
InDesign files (.indd files that InDesign cannot open) can be converted with ID2Q and opened in QuarkXPress and then ported back
into InDesign as good Quark files if the Markzware InDesign Q2ID
plug-in is present.
Markzware ID2Q runs on QuarkXPress 7 and 8, can convert Adobe
InDesign 1.5 through CS4 files, and is available for Macintosh OS
10.5 and Windows XP and Vista. See < www.markzware.com > to
learn more.
Submitted by Michael Shaw
Corel is one of the world's top software companies with more than 100
million active users in over 75 countries. Corel products provide consumers and businesses with the easy-to-use and powerful software
tools they need to improve their productivity and enhance their
lifestyles. Corel produces Digital Studio multimedia software, VideoStudio video editing and movie making software, PaintShop photo-editing
program, CorelDRAW Graphics Suite graphic design software, the
WordPerfect Office productivity software line, WinDVD DVD player
software, and the WinZip line of file compression software products.
All Corel products are available for a free trial software download.
New From Corel:
Painter Essentials 4
In much the same way that
Adobe Photoshop has its junior
sibling Photoshop Elements,
(with many of the popular Photoshop features at a vastly diminished price), so, too, does
Corel Painter 11 have its junior
sibling, in this case called
Painter Essentials. Painter Essentials is priced and equipped
to be the popular program of
choice for people who are interested in using many of the most
popular features found in Corel
Painter 11 without shelling out
the $400.00 that Painter 11
commands.
Painter Essentials 4 is two
complete interfaces, each
with its own set of tools and
purposes. The photo-painting
window, shown here at right
with its set of auto-painting and
associated palettes enables the user to take any digital source image
and render it into a simulation of hand-made art. While it is true that
there are many Photoshop plug-ins that promise this ability, in fact
none of them offer the wide range of controls and presets that Painter
Essentials does and most of them cost many times the price of Es-
sentials and require Photoshop in order to run. There are dozens of
presets that can be used as-is or customised by editing the paper,
brush style, edge treatment and colours. As you can see from the application window above the tools are presented very simply and the
program invites exploration and experimentation. What is less apparent is the incredibly powerful rendering engine that drives Painter Es-
sentials 4. Based on the world's most powerful painting and illustration software, Corel Painter 11, but costing about one eighth the price,
Painter Essentials 4 is the ideal way to get started with creating and illustrating with images based on your own digital images. To help the
new user along there is a library of narrated video tutorials that explain and demonstrate how the user can create artistic treatments and
retain control over their use. Unlike plug-ins that merely re-render
complete images, Essentials provides brushes and tools that the user
applies with mouse or pen.
The other aspect of Painter Essentials is the part that is based purely
in the user’s control of the wide array of pens, brushes, and other
colour application tools that can be found in the drawing and painting
window. Switching between the two interfaces is as easy as clicking
the tabs in the upper right corner of the application window. The
Drawing and Painting part of the application, as shown below, gives
immediate access to plenty of resources: the 130-page .PDF users
guide and the library of Photo Painting and Drawing and Painting
videos and tutorials are just one click from the start of every project.
Besides the resources on the disk there are a lot of online helpers for
this program, not that a lot are needed. What is needed is plentifully
provided: direct links to the online community of other Painter Essentials users and links to galleries of their works.
Corel has a huge corral of software products for amatuer and professional photo and video editing, illustration and design, and office productivity. Go to : http://www.corel.com/ to find out more. You can
download fully-featured demo copies
and try out any Corel title (including
Painter Essentials 4) that tickles your
fancy and purchase the code online
when you decide to buy. With Corel
software you can always buy now,
use the product for a full 30 days
and, if you're not 100% satisfied for
any reason, you get your money
back.
Article submitted by Michael Shaw
Eventually you are going to get fed up with your internet service
provider you have now. If your monopoly ISP is one of the reasons
why Canadians pay more for highspeed internet access than anyone
else in the civilised world, then I know whose service you are using.
When it comes time to change your ISP to one that is interested in
you as a client, and not just a phone number, check out the only website that compares and rates all of the internet service provider alternatives.
Canadian ISP.com is :
• The only ISP Finder to allow
consumers a one-stop shop to
find an ISP, rate an ISP, review an ISP, list ISPs, and / or compare any
Internet Service Provider (ISP) and their services anywhere in
Canada. Those services include Dial-up, ISDN, DSL, Dry DSL, Cable,
Satellite, Point to Point, Wireless and Voice Over IP (VoIP).
• A comprehensive listing of small Canadian ISPs serving over 6000
cities across Canada, including: Montréal, Ottawa, Toronto, Vancouver, Halifax, St John's, Charlottetown, Calgary, Regina, Iqaluit, Yellowknife, Whitehorse, Winnipeg and Fredricton, just to name a few.
• An up-to-date website where you can expand your ISP search to include service type (Dial-up, ISDN, DSL, Cable, Satellite, Point to
Point and Wireless), maximum price per month and/or limit to Business or Residential services. The Canadian ISP.com search engine
creates a comparison list of the ISPs, showing their prices, monthly
caps and other service details. Want to know more about the possible
ISPs to choose among? Just click on their names to see a more complete service list, including a view of their ratings as well as a direct
link to their website.
We used to have an unlimited account with our monopoly ISP and
we paid the top rate for it. Then they informed us that we had a contract with them (!) which they were amending to raise our monthly
bill and at the same time reduce our monthly limit to 60
gigabytes combined up and down-loading. This
was their new definition of “unlimited”.
When we got fed up with being ripped
off by our ISP we shopped for a change
and we found TekSavvy. Our service
has been excellent since we changed
and our monthly bill dropped by about ten
dollars. And the amount we can up and
download was tripled, from the 60 gigabytes we
had before to 200 gigabytes with TekSavvy.
ACME
Telephone Company
If you sign up for internet service with one of the big monopolies, you
will find that you will be expected to use their equipment. And you will
pay top dollar for the privilege. Everyone gets supplied with the same
piece of limited hardware and it remains the property of the ISP. That
makes it easier for the ISP to control and diagnose connection problems because the service people only have to know about one piece
of equipment. And then they cripple it and lock the features so that it
will only work with their setup. Because of this many of the modems
you might see for sale at garage sales are useless unless you have
the knowledge and ability to unlock them. Unlocking the modem removes the limits the ISP puts on the modem and is very forbidden. Of
course if you get hooked up with an internet service provider that
does not supply crippled modems you are free to use any of the commercially available modems and have a wider choice of features.
When we signed up with TekSavvy we purchased our own modem, a
Thomson Speedtouch 516v6, from the ACME Telephone Co. It cost
only $44.29, works perfectly with our Asante router, and allows us to
connect our entire network of four computers to each other and to our
highspeed internet service. The Thomson Speedtouch 516v6 is a single ethernet port modem/router that has a state full inspection firewall,
NAT translation, remote access, and a feature set that is unmatched:
Longest reach and sync modem on the market. Backwards compatible to ADSL. It can be bridged or routed on any ISP'S network. There
are three models suggested on the TekSavvy website:
• Speedtouch 516 : $44.29 CDN
•SpeedTouch 546 (4 ports) : $56.99 CDN
•SpeedTouch 585 (Modem/4
ports/Wireless) : $95.00 CDN
The ACME Telephone Co. is in
Kitchener Ontario. They are an
authorised Thomson modem
dealer and have the best prices
and service.
http://www.acmetelephone.com/
January 2010 MaUsE
Draw & Raffle
The first MaUsE Loyalty Draw of 2010
brought good news to the two Mikes one of them won $100.00 in the draw
and the other (c’est moi) won the 8-gigabyte flash drive. There were also
some really nice prizes awarded in the
MaUsE Raffle. We had software, hardware and books. A few of the items
were brought to the meeting and donated by MaUsE Members and that was good to see. We still
have MaUsE members using older systems who would love to
take home your old software so please feel free to bring in donations of used Apple books and programs.
January 2010 MaUsE
Meeting Report
Our first MaUsE gathering of the
year coincided with the January
27th Apple Event. From beginning
to end it was Aaron’t time to show
his enthusiasm and delight with
Apple’s new iPad product line.
Aaron had time to check it all out
and he told us all about the news
from Apple at the evening meeting.
We watched the iPad video that
was on the Apple website and
Aaron talked about where this new
technology was going.
Doug Mirans and Kayhan Boncoglu came to the January meeting to talk to us about the iHelp program
they are piloting at the Pickering Public Library.
iHelp is the Pickering Library's new digital services
and media centre. This new service desk is located at the Central Library,
and is open Monday to Friday 1:00 p.m to 9:00 p.m., Saturday and Sunday 1:00 p.m. to 5:00 p.m.
The iHelp centre will provide access to five Apple iMac computers fully
stocked with state-of-the-art media creation software and two photo printing and scanning kiosks. Specifically, library clients will be able to:
• Print digital photos from many makes of digital cameras as well as from
digital photo media such as CompactFlash and SD cards.
• Scan and convert old print photos to a digital format and archive these
onto a CD/DVD or flash drive.
• Use Adobe PhotoShop to create and edit photos and other pixel-based
digital imagery.
• Use Adobe Illustrator to create and edit vector-based digital imagery
such as logos and other digital art.
• Use Adobe InDesign to create and edit sophisticated print-based page
layouts such as books, pamphlets and flyers.
• Use Apple GarageBand to create that musical masterpiece for your blog
or podcast.
• Use Apple Final Cut Express to create and edit digital video for your
website or create a DVD to display on your television.
• Sign out a Library iPod pre-loaded with audiobooks, or bring in your
own iPod or iPhone. see Do you want an iPod with your audiobook? for
more details.
• Computer and technology advice, operating system questions for Windows, Mac OS X, and Linux, software recommendations including free
and open source alternatives answered by our knowledgeable staff and
much more.
Itʼs About the Money...
Macintosh Users East is a good computer club. It is your club
and we appreciate the support that you the members have
given to it this past year. We trust that your enthusiastic
participation will continue unabated in the coming year.
Macintosh Users East relies on the yearly fees paid by you to
cover all of our MaUsE operating expenses and we are now
coming to that time in the year when we start collecting the
current yearʼs membership dues.
In the coming months I shall be sending each member a
letter advising them when their dues are payable. When you
get your letter you will be helping the club by paying your
dues promptly.
Many members find it convenient to simply bring their annual
dues to the next members meeting and hand their cheque or
cash over to me in return for their new membership card. If
you prefer, you can mail your membership cheque to me. You
will find my address on the dues
letter that I shall send to you.
If you have any questions about your membership please
either call me directly. My telephone number is 905-4304562. Or speak to any of the clubʼs directors - they and I will
be happy to answer your questions.
In advance I thank you for your cooperation.
Stan Wild
MaUsE Treasurer