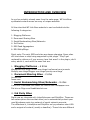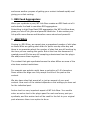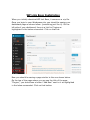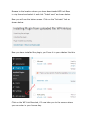
1
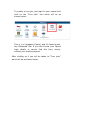
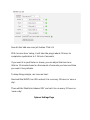
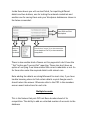
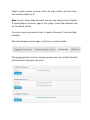
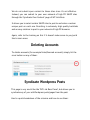
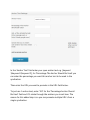
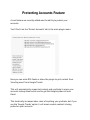
WP LINK BOSS SEO
GUIDE AND USER
MANUAL
Plugin Support/ Issues
Thank you for purchasing WP Link Boss. Now it’s time to get WP Link
Boss working and helping you dominate the search engines. Before
getting into the instructions of how to use the plugin, we want to assure
you that we stand behind all of our products.
So whenever you need some help with installation/usage, you can drop
us an email at [email protected]
INTRODUCTION AND OVERVIEW
As you’ve probably already seen from the sales page, WP Link Boss
syndicates content across an array of unique websites.
All the sites that WP Link Boss submits to can be divided into the
following 6 categories:
1. Blogging Platforms
2. Document Sharing Sites
3. Social Bookmarking Sites/Networks
4. 3rd Parties
5. RSS Feed Aggregators
6. EDU Wikis/Blogs
Quick note: The web, SEO and sites are always changing. Some sites
will shut down or stop being supported by the plugin. They’ll get
replaced by others so if you see any here that aren’t in the plugin; don’t
worry about it, work with the ones that are.
1. Blogging Platforms – 6 Sites
Wordpress.com blogs Tumblr.com blogs LiveJournal.com journals
Multiply.com blogs Blogger.com blogs Ipernity.com blogs
2. Document Sharing Sites – 2 sites
Scribd.com
Issuu.com
3. Social Bookmarking Sites/Networks – 8 sites
Plurk.com Friendfeed.com Identi.ca Zootool.com Instapaper.com
Del.icio.us Diigo.com Readitlaterlist.com
4. 3rd Party Sites
Right now we integrate with LinksAlpha.com and OnlyWire. These are
two subscription services that allow you to automatically submit your
new Wordpress posts to a network of social network accounts.
The difference is, LinksAlpha and OnlyWire only syndicate a short URL
and a snippet of content (usually a headline). These links are different
and serve another purpose of getting your content indexed rapidly and
giving you a fast ranking.
5. RSS Feed Aggregators
When you syndicate a post, WP Link Boss creates an RSS feed out of it
and submits the feed to countless RSS aggregators.
Submitting to high Page Rank RSS aggregators like WP Link Boss does,
gives you lots of link juice and powerful backlinks. It also makes your
link profile more diverse and therefore more natural and powerful.
6. .EDU Wikis
Coming to .EDU Sites, we cannot give a guaranteed number of wiki sites
as these Wikis are getting shut down for public use day after day and
there is no guarantee about the number of sites that are still working by
the time you are reading this guide. But at the time this document is
created around 83 sites are still accepting submissions from the plugin.
We add/remove them regularly.
The content that gets syndicated across the sites differs as some of the
sites have content restrictions.
For example one website might have a restriction of 140 characters.
Some others like diigo.com only accept the title of the post as the
content.
We also have sites that accept all or just an excerpt of your post
content. How much of the content depends on the settings you have set
for the individual post.
Anchor text is a very important aspect of WP Link Boss. You need to
enter an anchor text in the plugin panel for each and every post you
syndicate, and this anchor text will be used for the link to your original
post whenever there is an option to do so.
Example: Let’s say you wanted to rank for “WP Link Boss” and so you
used “WP Link Boss” as anchor text to link to your post. The anchor text
would then look like this:
WP Link Boss
Anchor text is used to tell Google what the page you’re linking to is all
about. So whatever text you use for anchor text, the search engines will
boost you for. Most SEOs use too much of the same anchor text which
leads to a lot of suspicion and sometimes a Google penalty.
Over the top anchor text optimization can get you penalized easier than
anything else. That’s why it’s so important to diversify your anchor text.
In your syndicated content, WP Link Boss will use anchor text wherever
possible. In the WP Link Boss panel you’ll see the anchor text field at
the very top:
An important element with anchor text is spinning. Doing so as shown in
the example above allows you to use a wide variety of anchor text.
Using multiple keywords for anchor text is crucial. We recommend using
the final ‘Anchor Usage Percentage’ option, ‘15% Primary, 45%
Secondary, 20% Brand, 20% URL’.
We want to make our link profile look as natural as possible. Naturally,
people use a big mix of anchor texts when linking out to a site.
The easy to use ‘Anchor Usage Percentage’ option makes this possible.
For primary anchor text, enter the top 1-3 keywords you want your
page/post to rank for. These should be the keywords your page is
optimized to rank for.
For secondary anchor text, enter the next 5-10 or more keywords you can
think of that you’d like your post to rank for. These should all be
relevant anchor texts close to the primaries. For example, if your
keyword is ‘weight loss tips’ you might enter ‘best weight loss tips’,
‘weight loss tips online’, ‘easy weight loss tips’ and so forth as
secondary anchor text.
Brand anchor text is essentially just your domain/brand name. If it’s
‘rapidweightloss.com’, your brand anchor text should be: rapid weight
loss, rapidweightloss.
You add your brand anchor text on the main ‘settings’ page of WP Link
Boss.
For all anchor texts, you must place them in what’s called spintax { | }.
These are like using commas, for example with the brand anchor text
you’d enter: {rapid weight loss|rapidweightloss}. Always opening and
closing with the { & } symbols and using | to separate each keyword.
This is so WP Link Boss can rotate them. With these settings, your link
profiles should appear completely organic. As a result of being very safe,
they will result in slower and more long term rankings for your entire
site.
As Always: It’s Your Decision How You Use The Plugin, but these are
recommended settings for anchor text.
WP Link Boss Installation
When you initially download WP Link Boss, it comes as a .zip file.
Once you login to your Wordpress site, you should be seeing your
dashboard page as shown below. (something just like it). On the
left side of your dashboard, there is a link for Plugins as
highlighted in the below screenshot. Click on that link.
Now you should be seeing a page similar to the one shown below.
On the top of the page where you can see the title of the page
“Plugins”, you should see a button “Add New” next to it as highlighted
in the below screenshot. Click on that button.
Now you should be seeing another page with its heading as “Install
Plugins”. Below that you will have a link “Upload” like shown in the
screenshot below. Click on that link.
Now click on the ‘Browse/Choose File’ button as shown below:
Browse to the location where you have downloaded WP Link Boss
in .zip format and select it and click “Install now” as shown below.
Now you will see the below screen. Click on the “Activate” link as
shown below.
Now you have installed the plugin, you’ll see it in your sidebar like this:
Click on the WP Link Boss tab, it’ll now take you to the screen where
you can enter in your license key.
Enter the license key that was given to you via the members area and
hit validate.
It’ll tell you you’ve validated the plugin successfully. If not, shoot us an
email and we’ll fix it for you.
Now just click on the link in the sidebar again and it’ll bring you to the
default settings page:
There are a lot of settings and we’ll explain them one by one.
Auto Blog/Auto Syndicate? : This setting appears at the end of the
settings panel. I have started off with this setting, as it makes more
sense to explain it before the other settings in the plugin. Check this
option if you are using autoblog software like WP Robot on your blog.
If you are using autoblog software then the posts will be published
automatically by your autoblog software, then the syndication will
happen based on the settings on this page (Which will be explained
later). If you aren’t using an autoblog software, leave this option
unchecked as you’ll want to customize the settings for each
individual post. If you do have it checked, it will automatically run on
every blog post you publish instantly after you’ve published.
Promoting Scheduled Blog Posts (Side note)
One amazing feature that took a long time to develop is using
WP Link Boss to automatically promote scheduled blog posts. So
if you want your scheduled blog posts to be automatically
promoted by the plugin, you just need to follow this simple
process:
First have your blog post written, SEO settings filled out and
everything ready to be published. Then go to the Publish tab
and click the “edit” button next to “Publish immediately”.
Straight after you’ll be able to input the date and time when
you want your post to be published and click ok. After you click
ok, you need to click the “schedule” button which is like the
standard publish button.
After hitting schedule the page should refresh and you’ll get
verification of the schedule.
The last step is to go over to the WP Link Boss panel in the
post and click “done”. As we’ll explain, you must make sure you
have the settings configured before doing so. As soon as you
hit done, WP Link Boss will add the post to the syndication
queue when it gets published at its scheduled time. You’ll see
this after clicking “done”:
That’s it, when the post gets published the plugin will add it to the
syndication queue and build backlinks over the period of time you
set depending on your settings (more on that later).
This feature has a lot of power. In our testing, we simply
outsourced 30-60 articles at a time, configured the plugin,
added 3-10 sets of accounts and scheduled all the articles to be
posted 1-2/day.
So every day a post would be published automatically and the plugin
would promote it. Imagine doing that with 1000 articles! You could
set it all up in a few weeks and have the site grow by itself
expanding every day for years!
Anchor Text: The clickable text that will be added to your
syndicated posts by default if you have the “Auto Blog?” option
checked. The anchor text you add on the main settings page will be
used by default unless altered. We always advise you to change it
for individual posts.
Brand Anchor Text: This is the brand anchor text. This will be used
in all of your syndications when you choose to use brand text
(recommended as explained above). Enter your domain/brand name
here.
Excerpt Length for Blogging sites(Enter 0 if you want to post
everything): This is the excerpt length of the content that will be
posted on the blogging sites by default if you have checked the
“Auto Blog?” option. You can set this value for individual posts if
you are publishing your posts manually (This will be explained
later). If you give this value a ‘0’ (Zero) then your whole post
content will be syndicated onto your connected accounts.
Excerpt Length for Doc Sharing sites(Enter 0 if you want to
post everything): This is the excerpt length of the content that
will be posted on the document sharing sites (scribd, issuu) by
default if you have checked the “Auto Blog?” option. You can
set this value for individual posts if you are publishing your
posts manually (This will be explained later). If you give this
value as ‘0’ (Zero) then your whole post content will be posted.
Excerpt Length for EDU Sites/Wikis(Enter 0 if you want to post
everything): This is the excerpt length of the content that
will be posted on the EDU Wikis/ Sites by default if you have
checked in the “Auto Blog?” option. You can set this value for
individual posts if you are publishing your posts manually (This will
be explained later). If you give this value as ‘0’ (Zero) then your
whole post content will be posted. (Best to use a few paragraphs
with wikis)
Post to EDU Wikis? : If this setting is checked in then your post
content will be syndicated across EDU Wikis/Sites by default if you
have checked the “Auto Blog?” option. You can set this for
individual posts if you are publishing your posts manually.
Number of wikis to post to: The number of wikis onto which the
content will be syndicated onto by default if you have checked the
“Auto Blog?” option. You can set this for individual posts if you are
publishing your posts manually.
Post to Document Sharing Sites? : If this setting is checked then
your post content will be syndicated across Document Sharing Sites
by default if you have checked in the “Auto Blog?” option. You can
set this as well for individual posts.
Number of Document Sharing Accounts to post to: The number of
document sharing accounts onto which the post content needs to be
syndicated onto by default if you have checked in the “Auto Blog?”
option. You can set this for individual posts if you are publishing
your posts manually.
Post to Social Bookmarking Sites? : If this setting is checked in
then your post content will be syndicated across Social
Bookmarking Sites by default if you have checked the “Auto
Blog?”
option without customizing a post. You can set this as well for
individual posts.
Number of Social Accounts to post to: The number of Social
Bookmarking/Network accounts onto which the post content needs
to be syndicated on by default if you have checked in the “Auto
Blog?” option. You can set this for individual posts if you are
publishing your posts manually.
Post to Blogging Sites? : If this setting is checked in then your
post content will be syndicated across Blogging Sites by default if
you have checked in the “Auto Blog?” option. You can set this as
well for individual posts.
Number of Blogging Accounts to post to: The number of
Blogging accounts onto which the post content needs to be
syndicated on by default if you have checked in the “Auto Blog?”
option. You can set this for individual posts if you
are publishing your posts manually – just like with
most of these settings.
Third Party site Settings: These are the 3rd party site
settings that will be used by default if your ‘Auto Blog’
option is checked.
We have LinksAlpha.com, Onlywire.com and RSS
directories. We recommend you post to LinksAlpha &
Onlywire, they are 3rd party sites with monthly
subscription fees.
Lastly you have the ‘Submit feed to RSS directories’
option under third party site settings. If this setting is
checked then a rss feed will be made of the wordpress
post/page and this feed will be submitted to 20+ rss
feed directories for added backlinks.
Again, all of these settings are the settings that will
be used by default unless you customer them.
We recommend you customize them for every
syndication, which is why you may leave every setting
the same as is, just as long as you enter your brand
anchor text here!
If you update these basic settings, make sure you hit
save at the bottom before you close the page.
CRON JOBS
Cron Jobs are an essential part of WP Link Boss. They
are what control the postings to the sites.
The cron jobs can be found at the top of the settings
page:
You need to set them all up on your hosting account.
To set them up, you first need to copy the text/URL and
remove the “0 * * * *” from it. Then it should look something
like this:
/usr/bin/GET http://income-labs.com/wp-content/plugins/WP-link-boss/cron.php.
To copy simply highlight this part and right click and copy it:
This part is CRUCIAL, without it the plugin wouldn’t work.
You need to create a cron job with the text/url as instructed
above. Cron jobs are setup in Cpanel and are used to tell
WP Link Boss when to run.
To create a cron job, just login to your cpanel and
click on the “Cron jobs” icon which will be as
shown below:
This is in a hostgator Cpanel, and it’s found under
the ‘Advanced’ tab. If you don’t know your Cpanel
login details or cannot find this Icon, simply
contact your hosting support.
After clicking on it you will be taken to “Cron jobs”
which will be as shown below.
In the ‘Command’ field, paste the Cron URL/text you
copied from your settings page.
Under ‘Common Settings’, select ‘Once An Hour’ as
shown below:
Now hit the ‘add new cron job’ button. That’s it!
With ‘once an hour’ setup, it will take the plugin about 24 hours to
complete a syndication to 1 full set of accounts.
If you want it to post faster or slower, you can adjust the time to as
little as 15 minutes based on the amount of accounts you have and time
you want it to syndicate.
To keep things simple, use ‘once an hour’.
Next add the SHWP Cron URL and set it to run every 24 hours or ‘once a
day’.
Then add the ‘Backlinks Indexer URL’ and set it to run every 24 hours or
‘once a day’.
Spinner Settings Page
Here you can enter your own custom spinner settings. When Link Boss
posts to sites, it can spin the content creating unique variations making
your backlinks look completely unique.
We built a free synonyms database right into the plugin to give you a
free option. Although it doesn’t produce the best content.
We currently integrate with Spinner Chief, The Best Spinner and Spin
Rewriter.
We recommend you sign up to one of the 3 spinners and enter your login
details on this page and hit save. This will produce higher quality
backlinks.
If you do not have a spinner and do not wish to spend more money,
simply use the free synonyms database built in.
Adding Accounts (Building Your Network)
Coming to the next section, the “Manage Accounts” page of WP Link
Boss, this is really the heart of the plugin where you’ll enter the login
credentials of different sites and save them to the database for
syndication.
This is your network of sites you can post to as much as you’d like!
Once you click on the “Manage Accounts” page of WP Link Boss, you
will be presented with a page where you can add logins for the
different sites. Each of the boxes are used to save login details for
different sites.
Inside these boxes you will see text fields, for inputting different
details and two buttons, one for testing the entered credentials and
another one for saving them onto your Wordpress database as shown in
the below screenshot:
There is also another kind of boxes on this page which don’t have the
“Test” button and “success/fail” reporting. These sites don’t have an
option of verifying if we have entered the correct credentials or not. So
for these sites enter the required details with utmost care.
Note: adding the details are straightforward for most sites, if you have
trouble knowing where to find certain details a quick Google search
should return the answer. Otherwise refer to the PDF in the members
area on exact instructions for each site.
Multiple Accounts
This is the feature that puts WP Link Boss decades ahead of its
competition. The ability to add an unlimited number of accounts to the
database.
Before we started developing WP Link Boss; we took a serious look at
the competition. We realized the problem with all other link building
plugins is that they’re incredibly limited. Near all of them only allow
you to add a single set of accounts.
Obviously, the more accounts you add; the more backlinks you’ll get.
And in order to boost your rankings, you need a wide variety of
backlinks from lots of different sources.
So by having the multiple accounts feature; it allows users to add as
many as they like at each site. If you just want to use the plugin to
“announce” your new blog posts to the world or build links to a site
once; you can just use a single set of accounts.
But if you want to take it to the next level and build 5, 10 or even 20
times as many links as the average user; you can import/add more
accounts. And in the settings panel of WP Link Boss; you can choose
how many accounts you want to “post to” for each syndication.
WP Link Boss will rotate between your accounts. Rotating between
accounts isn’t just recommended; it’s absolutely essential. Even if you
just add 3 sets of accounts; your link building efforts will increase x5.
Here are the basic recommendations:
1. Immediately add 1 set of accounts (1 account at every site) before
syndicating anything.
2. For the basic user, add 3 sets of accounts. Three accounts at each
site.
3. Only submit to a 3rd of your accounts at any given time. So post to 1
full set of account with 3 added, 2 sets with 6 added etc.
That’s a safe practice, you can post to however many you want. By only
posting to a 3rd of your accounts each time, you keep your backlinks
more natural.
In the syndication panel, you’ll see how many accounts you have at
each type of site (like blogging sites), so you can enter a 3rd of the max
# of accounts it displays.
For example with 18 blogging accounts, submit to 6. This will make
your links look more natural and prevent your accounts from being
banned.
Note: Accounts do get banned from time to time depending on how you
treat them. In our testing, we used the general rule of thumb; “submit to
1 batch of accounts per 3 added”.
To add multiple accounts, use the ‘add multiple accounts’ widget in the
top right:
Simply select the site you want to add another account for, hit ‘add
another account’ and another account box will display on the page.
Simply create another account, enter the login details, test and save.
You can then submit to it!
Note: we sell ‘ready made accounts’ that you can import via the ‘Update
& Import/Export Accounts’ page in the plugin. Check the members area
for the details on this.
For serious users, purchase at least a 3 pack of accounts if we have them
available.
Now the manage accounts page is split over a couple of tabs:
The blogging/social and doc sharing accounts are very straight forward.
Let’s talk about 3rd party real quick:
Currently we have LinkLicious.me, Onlywire.com and LinksAlpha.com.
These are all 3rd party services with additional costs and are optional.
LinkLicious.me is a paid service that helps you index your backlinks. It
works well, but our own plugin WP Link Juicer has been proven more
effective. (details in members area).
Onlywire.com and LinksAlpha.com allow you to syndicate to a network
of social networks and blogging sites. Quite similar to link boss, but they
do it in a slightly different way.
They will only syndicate a short snippet (a title) of your content and a
shortened URL like a bit.ly link to the accounts you have added to them.
These syndicated ‘short links’ sent to primarily social networks result in
rapid indexing and social signals. They are worth using for additional
traffic and an SEO boost.
SHWP Sites
Another badass feature, we can automatically submit UNIQUE content
to SHWP sites.
SHWP sites are your own domains built on the Wordpress platform. We
have a training in the members area on this and refer it to when you’re
ready to spend some extra cash to get a massive SEO boost and rank for
competitive keywords.
You simply add your WP username and password in a usual ‘add accounts’
box on this page to add your own SHWP sites.
We do not submit spun content to these sites since it’s not effective.
Instead, you can submit to your own network of high PR SHWP sites
through the ‘Syndicate Own Content’ page of WP Link Boss.
It allows you to select certain SHWP sites to post to and enter a custom
unique post on each one. Resulting in extremely high quality backlinks
and an easy solution to post to your network of high PR domains.
Again, refer to the training on this if it doesn’t make sense to you/you’d
like to learn more.
Deleting Accounts
To delete accounts (for example failed/banned accounts) simply hit the
cross button on any of them:
Syndicate Wordpress Posts
This page is very much like the ‘WP Link Boss Panel’, but allows you to
syndicate any of your old Wordpress posts/pages from the past.
Here’s a quick breakdown of the columns and how to use them:
Title: The title of the post. If you click on the titles, it
will open the posts in a new page. (note: this page will
display drafts too; make sure you do not syndicate drafts)
Anchor Text: This is the anchor text that will be used
during the syndication of the post. Remember to use
multiple anchor texts by
entering spintax i.e. {keyword 1|keyword 2|keyword 3}
Post to Blogs?: If you check this, then the post will be
syndicated across the blogging sites.
Excerpt length for Blogs: This is the excerpt length of
the post content that will be used during the syndication
of the post on the
blogging sites.
Number of Blogging accounts to post to: The number of
blogging accounts onto which the content needs to be
syndicated. Also make
sure that you don’t give this value more than the value given as
maximum. (the maximum value is shown at the top)
Post to Document Sharing sites?: If you check this, then the post
will be syndicated across the document sharing sites.
Excerpt length for Document Sharing Sites: This is the excerpt
length of the post content that will be used during the syndication of
the post on the document sharing sites.
Number of Doc Sharing accounts to post to: The number of
document sharing accounts onto which the content needs to be
syndicated. Also make sure that you don’t enter a number exceeding
the maximum number of accounts displayed as the max value.
Post to Wikis?: If you check this, then the post will be syndicated
across the wiki sites.
Excerpt length for Wikis: This is the excerpt length of the post
content that will be used during the syndication of the post onto the
wiki sites. We recommend half the post content. Customize the values
as you please.
Number of Wikis to post to: The number of wikis onto which the
content needs to be syndicated. Also make sure that you don’t input a
value more than the value given as maximum.
Post to Social sites?: If you check this, then the post will be
syndicated across the social sites.
Number of Social accounts to post to: The number of Social
accounts onto which the content needs to be syndicated. Also make
sure that you don’t give this value more than the value given as
maximum.
Submit RSS Feed to directories?: If you check this, an rss feed will be
created out of the blog post and then submitted to the rss feed
directories. (this feature is extremely powerful and a virtually a plugin
within WP Link Boss)
Spin Post Content?: If you check this, the post content will be spun
during syndication and unique variations will be published on each
account, otherwise the same copy of the content will be syndicated
across all the sites.
Spin Post Title?: If you check this, then the post title will be spun
during syndication, otherwise the same title will be used for all the
submissions.
Protected Keywords: The keywords that you do want to be spun
(replaced with synonyms) during the syndication. It’s a good idea to
protect main keywords that your posts are targeting.
Syndicate Own Content
This is the most powerful feature of the plugin.
It allows you to post any content to your network of sites. As well as
allows you to post unique content to your own SHWP sites.
Here are the steps:
1. Click ‘Select Spinner Algorithm’ to select your desired spinner and click
the ‘cross’ button to close it.
2. Enter in your content title. Then the content body. Ideally write or
paste in over 300 words of content.
3. Click ‘Spin Post’, wait for the spun version to show.
4. Click ‘Spin Preview’.
5. Customize the ‘Article Title’ with your own spun version with the same
spintax ex. The {Great|Best|Honest|Most Awesome} {WP Link Boss|Link
Boss} {Review|Critique}. Always enter your own spintax for the title as its
important to have a well spun title that reads well.
Now we have the posting settings. Anchor text works differently here:
In the ‘Anchor Text’ field enter your spun anchor text e.g. {keyword
1|keyword 2|keyword 3}, for ‘Percentage The Anchor Should Be Used’ you
can enter the percentage you want this anchor text to be used in the
syndication.
Then enter the URL you want to promote in the URL field below.
To just use 1 anchor text, enter ‘100’ for the ‘Percentage Anchor Should
Be Used’ field and it’ll rotate through the anchors you insert here. The
reason for this added step is so you can promote multiple URL’s from a
single syndication.
To promote multiple URLs, click the ‘Add New’ blue button and a second
anchor text box will appear. Again repeat the process,
Enter the anchor text for this second URL, enter the URL and change the
‘percentage’ field accordingly.
For example you could enter ‘50’ for both anchor text settings and each
URL would be promoted evenly. Or you could enter 75/25, just make sure
the number adds up to 100 for this powerful feature to function!
Lastly we have the option to ‘insert own anchor text into article body’. If
you check this, these anchor text settings box/s will be disabled and you
can place your own anchor text in the body.
By clicking ‘Add a sample anchor text’ it will insert a sample anchor text
into the article body like this for you to customize:
Only use this if you know what you’re doing. If you do, you can use this to
insert anchor text anywhere in the article body and even SPIN multiple
HTML anchor texts into the body to rotate its placement. Stick to the
anchor text boxes below if you are not an experienced user.
The posting settings below the anchor text settings are the same as with
the WP Link Boss Panel and the syndicate WP posts methods.
Enter where you’d like to syndicate the content to and the number of
accounts at each type of site.
Lastly at the bottom you’ll find the ‘SHWP Settings’. This is where you
can post unique content to your network of SHWP sites.
If you have SHWP sites added, simply check the ‘Post to SHWP’ option
and select a site from the drop down to syndicate to.
Then click ‘Add’. A box will display below with a custom title and body
field.
Enter in your own unique title and a unique post (300+ words
recommended). For anchor text with these posts, you must enter your
own HTML anchor text in the body where you want it to show. Example
anchor text to use:
<p><a href="http://yourwebsite.com">Anchor Text</a></p>
To submit to more SHWP sites, simply select the others you have from
the drop down and click ‘Add’. More boxes will appear for you to enter
unique posts for each site!
This is extremely powerful when you have your own network of high
Page Rank domains and a great way to manage a private blog network as
well as to post to them.
Refer to the videos for more training on this.
Protecting Accounts Feature
A cool feature we recently added was the ability to protect your
accounts.
You’ll find it on the ‘Protect Accounts’ tab in the main plugin menu:
Here you can enter RSS feeds or allow the plugin to pull content from
‘trending news’ from Google Trends.
This will automatically scrape hot content and syndicate it across your
accounts to keep them active and to get the Google spiders all over
them!
This drastically increases index rates of anything you syndicate, but if you
use the ‘Google Trends’ option it will mean random content is being
posted on your accounts.
For a more effective approach, select the RSS feed option and enter a
list of RSS feeds from popular websites and blogs in your niche.
You can find them by searching Google for blogs/websites in your niche
and adding ‘rss’ to the search.
This is totally optional and if you are going to use it we recommend you
use it wisely by finding high quality RSS feeds in your niche to pull from.
Here’s the breakdown of settings with instructions:
Content Creation Type: Select either the trending news option or the
RSS feeds one.
List of feeds: Enter the list of feeds if you have selected the feeds
option for content creation, one RSS feed per line! [Enter 10+]
Use Full Feeds/Full Trending News?: Check this if you want to post the
full text/content from the links in the RSS feeds or if you want to post
the full news article from Google Trends. [Select YES]
Link Back to Original Source?: If you want to provide a link back to the
original source from where the plugin scrapes the content, then check
this box. [Select Yes]
Spin Title?: If you want to spin the titles of the articles that are used
for the protecting of accounts, then check this box. [Select Yes]
Spin Content?: If you want to spin the content of the articles, then
check this box. [Select Yes]
Blog Updation Cron URL: Copy this text and remove the “0****”
from it.
The text should start with “/usr/bin/get”.
Copy this text/code/url to the end and create a cron job with it using
the previous instructions. Only after you have created a cron job for
this, will your accounts be updated with fresh content daily.
You create this cron job in the exact way you created the cron job that
processes the submissions from the main settings page.
The cron you copy should look like this:
/usr/bin/GET http://YOURWEBSITEHERE.com/wp-content/plugins/WPSocialCrushh/cron_blogupdater.php
Use the first instructions to create a cron job with it.
Set this cron job to run every hour.
Conclusion on the ‘protect accounts page’. If you’re new to SEO and
don’t know what you’re doing. Leave out this page and do not setup
the cron job.
Proxies
On the main settings page, you’ll find the ‘Proxy Settings’ tab.
Here we can add proxies which can be used during the syndication of a
post.
The format of the proxies will be either:
IPAddress:Port or
Username:Password:IP Address:Port
Once you have added the proxies in the text box, click on the “Save
Proxies List” button and then the proxies will be saved and used during
the syndication.
Proxy use should be mandatory. Without proxies, it looks like one
person is logging into all of your accounts and sharing the same
content.
You should add at least 5-10 private proxies for best results. They will
make your submissions look natural and more effective. You can find
cheap proxies on Fiverr.com. Here are some other services:
·
·
Lime Proxies
Proxy Bonanza
·
Squid Proxies
Syndication Status
This page will show you the list of syndications you have in the ‘queue’
and the status of them. They will be processed one by one.
Backlinks Report
This page will report some of the backlinks the plugin builds. Note: many
sites to not support reporting which is why many don’t show up. There is
also a button to download the backlinks to a text file and clear them
from the page.
Importing/Exporting Accounts
Go to the ‘Update & Import/Export Accounts’ page from the main menu.
This is where you can import accounts from a .csv file you have
purchased from us or exported yourself.
You can also export your accounts to a .csv file here and import them to
other installs of WP Link Boss on other domains.
Follow the ‘Step 1’ instructions on the page to export & download your
accounts to a .csv file.
Updating The Plugin
To Update the plugin follow the instructions on the page.
1. Export your accounts to .csv file using instructions on page.
2. Go to the plugin members area to download the latest file (we email
you when we release major updates).
3. Deactivate & Delete The Plugin From Your Site
4. Upload The Newest File
5. Go to the ‘Update & Export/Import Accounts’ Page And Import The
.csv File You Previously Exported
That’s how you can update the plugin and quickly add all of your
accounts back via export/import.
Using The Link Boss Panel To Syndicate
Published Posts & Pages
Now that we’ve gone through all the sections in the plugin we will go
through syndicating a Wordpress post/page, when it is published.
Once you have activated the plugin, you will see a WP Link Boss panel
has been added to the “Add new post page” at the top right.
We went over the basics of using this panel at the start of this manual
in detail about the anchor text settings.
Everything else is the same as on the syndicate own content/wordpress
posts pages.
You choose the sites you want to syndicate to, the number of accounts
and enter protected keywords. Quick work on protected keywords,
always enter your main keywords you are targeting as ‘protected
keywords’ in that field. Separate them with commas: keyword 1,
keyword 2.
After filling out the settings, his ‘Done’ and a ‘Syndicate Now’ link
will appear. Click that and it’ll give you a confirmation of the
syndicating being added to the queue.
That’s it, you’ll be able to see the status in the queue. Congratulations
on making it through this long and sometimes tedious PDF manual.
WP Link Boss is an extremely diverse and powerful one of its kind plugin.
It really is the ‘Se-nuke’ of Wordpress plugins.
While it may sound complex, at its core WP Link Boss is extremely simple.
Add accounts, and use the WP Link Boss panel to syndicate your posts
and pages, use diverse anchor text. Incorporate proxies & 3rd party
services to take it the next level as well as SHWP sites. That’s it!