1
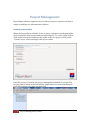
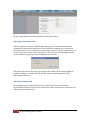
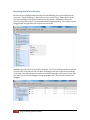
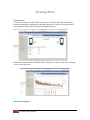
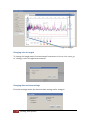
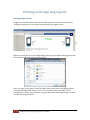
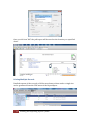
Psiber
ReportXpert
User’s Manual
1 Installation |Psiber
CONTENTS
Table of Contents
Psiber
1
User’s Manual
1
CONTENTS
2
Installation
4
Installation and Setup
4
Installing PDF Writer
4
Upgrade
4
Project Management
6
Creating a new project
6
Importing Test records
7
Closing a project
8
Opening an existing project
8
Exporting to a project pack
9
Opening a project Pack
9
Editing Site Name
10
Organizing results into Hierarchy
11
Viewing Plots
12
Viewing Plots
12
Worst Case Margins
12
Selecting plots
13
Worst Margin display
13
Changing units for length
14
Changing date and time settings
14
Changing plot directions
15
Editing Company details
15
Changing Language settings
16
Printing and exporting reports
17
Printing single records
17
Printing Multiple Records
18
Printing Summary Reports
19
2 Installation |Psiber
Special Operations
20
Upgrading Device Firmware
20
Checking the version number
20
3 Installation |Psiber
Installation
Installation and Setup
ReportXpert software can be installed on any PC running Windows XP, Vista, or
2007 operating system. To install the ReportXpert software you have to execute
the ReportXpertSetup executable available in the USB flash drive shipped with
the WireXpert kit. The installation process will automatically guide you through
the setup process install the ReportXpert software in the PC. The
Installing PDF Writer
PDF writer software is required for generating PDF reports. The installation
process automatically starts the installation process for the PDF writer software.
By default the pdf writer will be installed in c:\program files\pdf. Once the pdf
writer is installed it gets automatically selected during the pdf generation of
reports.
Upgrade
When there is a previously installed software version of the ReportXpert
software running a later version of ReportXpert software will automatically start
upgrading the older software.
4 Installation |Psiber
The setup will automatically guide through the process and upgrade the
software. If the PDFWriter was installed during the previous setup, the
installation process will prompt an informational message.
5 Installation |Psiber
Project Management
ReportXpert software organizes test records as projects. A project can have a
single or multiple site information as desired.
Creating a new project
When the ReportXpert software is run, it opens a splash screen displaying the
most commonly used actions from the reporting tool. To create a new project,
click inside the text box and enter the name of the new project. Click on the
“Create Project” after entering a valid project name.
Once the project is created, the project management window is opened. The
project name is listed in the left window under which records from different
sites will be listed once they are imported.
6 Project Management |Psiber
Importing Test records
Test records from the WireXpert can be exported to the PC software using the
USB flash drive (Refer to the user manual of WireXpert to learn how to export
test records to a flash drive). Once the flash drive with the test records is plugged
into the PC, Test records are imported from the project management window by
clicking on “Import” -> “Test Results” option.
The ReportXpert software will then detect the list of flash drives attached to the
PC and show you a list of Flash drives. Choose the flash drive that has the tests
records that you want to import.
7 Project Management |Psiber
Once the test records are imported, the records are listed by the site under the
project name.
Closing a project
To close a project and go back to the splash screen, click on “File->Close Project”.
Opening an existing project
A list of recently used projects is always listed in the splash screen. The project
can be opened by choosing the project and clicking on the “Open project”.
8 Project Management |Psiber
All the saved projects can be listed from a drop-down box.
Exporting to a project pack
A project pack is used for transferring a selected set of records or site into a
separate file that can be transferred across different computers or stored in a
network location. You can pack a set of selected results or all the results in a site
by selecting “Save Project Pack” from File-> Save Project Pack. Multiple results
can be selected using “Ctrl” and clicking the test records.
The packed project is stored in a prz format file which can be opened again in
another computer or archived. The prz file can be opened again from the
ReportXpert software.
Opening a project Pack
An existing project pack in the form of a prz file can be opened from the
ReportXpert software. The project pack can be either opened as a new project or
edited to an existing project.
9 Project Management |Psiber
Editing Site Name
Sites can be renamed and edited from the ReportXpert software.
The number of test records under each site is indicated in the braces. Note that
even renaming the site retains the number of test record information
automatically.
10 Project Management |Psiber
Organizing results into Hierarchy
Results can be organized into hierarchies like building, floor plan and telecom
room etc. A new building or Floor plan can be created by a “right-click” on the
site and clicking on the appropriate hierarchy. Either a building or Rack etc.
Once the new hierarchy is created and renamed appropriately, the results can be
dragged and dropped into the respective hierarchy.
Multiple records can be selected by using the “Ctrl” and clicking on the respective
records. The selected records can then be dragged into the respective hierarchy
as desired. Once the desired records are selected drag the cursor over to the blue
dot and the cursor will change to drag-drop indicator. The records can then be
dragged.
11 Project Management |Psiber
Viewing Plots
Viewing Plots
To view test results “double-click” on the test record. It will open a summary
window showing the parameters that have passed or failed. It also has a tab of
test parameters that are measured during the autotest.
Different parameters like PSNEXT, NEXT, Return Loss can be viewed by clicking
on the respective tabs.
Worst Case Margins
12 Viewing Plots |Psiber
By clicking on the worst case tab at the top you can view a list of worst case
measurements for the parameter selected, say Return Loss, on each of the pairs
and the corresponding frequency.
Selecting plots
In the plot window individual plots or a group of plots can be selected by clicking
on the check boxes that are listed below.
Worst Margin display
The point which gives the worst margin or the least head-room can be viewed by
clicking on the worst margin
13 Viewing Plots |Psiber
Worst margin
Changing units for length
To change the length units of measurement from meter to feet or vice-versa, go
to “settings->unit of length measurement”.
Changing date and time settings
From the settings menu, the date and time setting can be changed.
14 Viewing Plots |Psiber
Changing plot directions
From settings menu, Y axis direction can be flipped around for users used to
viewing it differently.
Before flipping
After flipping
Editing Company details
If you want to customize the company name that is appearing on the PDF report
instead of Psiber as default, you can edit it from the settings menu and entering
the company name.
The logo that appears in the PDF report can be customized to suit your corporate
identity as well. There are restrictions on the type of image and the size of the
image that can be used.
15
|Psiber
Changing Language settings
The default language of ReportXpert can be changed from English to your
preferred language by going to “Settings ->Language”. The PDF reports will also
reflect this change.
16
|Psiber
Printing and exporting reports
Printing single records
Single test records can be converted to PDF reports from the plot window by
clicking the print icon on the plot window at the top right corner.
When you click the print icon, ReportXpert pops up a window letting you choose
the location and name of the saved the file.
Once you type in the name of the file and click on save button the ReportXpert
selects the default PDF writer in your PC. If you don’t have any PDF writer
installed previously, the pdf writer program that ships with ReportXpert is used
for PDF report generation.
17 Printing and exporting reports |Psiber
Once you click on “OK” the pdf report will be saved at the location you specified
above.
Printing Multiple Records
Detailed reports of the records of all the tests that are done under a single site
can be generated from the PDF menu of the ReportXpert.
18 Printing and exporting reports |Psiber
Note that if there are a large number of records, printing a rich PDF report takes
significant amount of time and resources depending on the configuration of your
PC. ReportXpert software is already largely optimized for such operations.
The report that is generated will have the test records of all the test results
under the selected site.
Printing Summary Reports
Instead of printing detailed reports containing plots, a summary of all the test
records under a site can also be printed from the PDF menu.
The summary report will only contain the pass/fail result for each record under
the site and the total length of the cabling installed.
19 Printing and exporting reports |Psiber
Special Operations
Upgrading Device Firmware
Device firmware is upgraded using a USB flash drive. Before performing a device,
the USB flash-drive needs to be prepared for an upgrade. This can be done using
the ReportXpert software. Insert the USB flash-drive that is used for device
upgrade in the PC. From the ReportXpert menu, select the “Tools-> Update
Device Software”
If the USB drive is detected, the pop up message will prompt asking you to select
the drive.
Once you update the USB drive, the drive should have a folder named RXpert.
Checking the version number
The version number of the ReportXpert software can be found from the “Help>About” menu.
20 Special Operations |Psiber